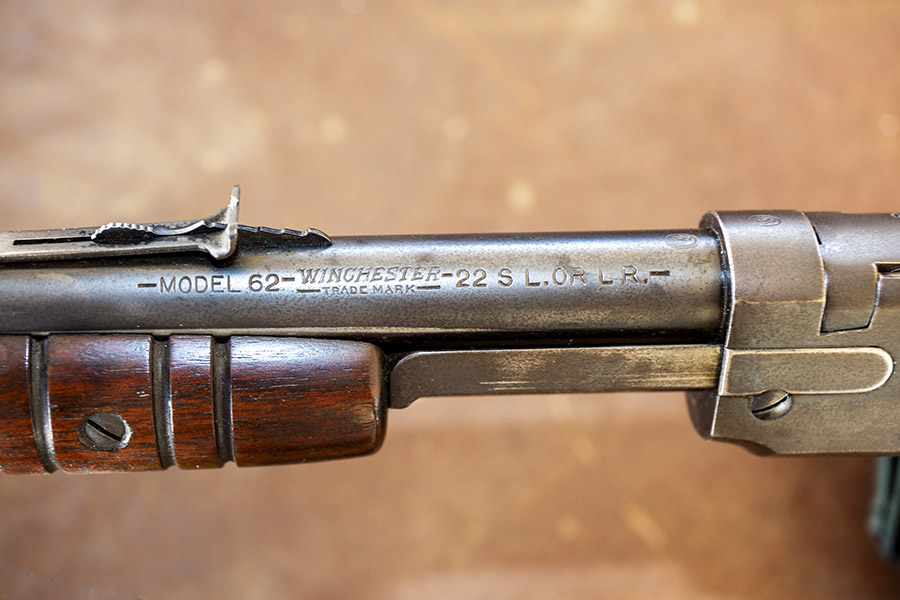
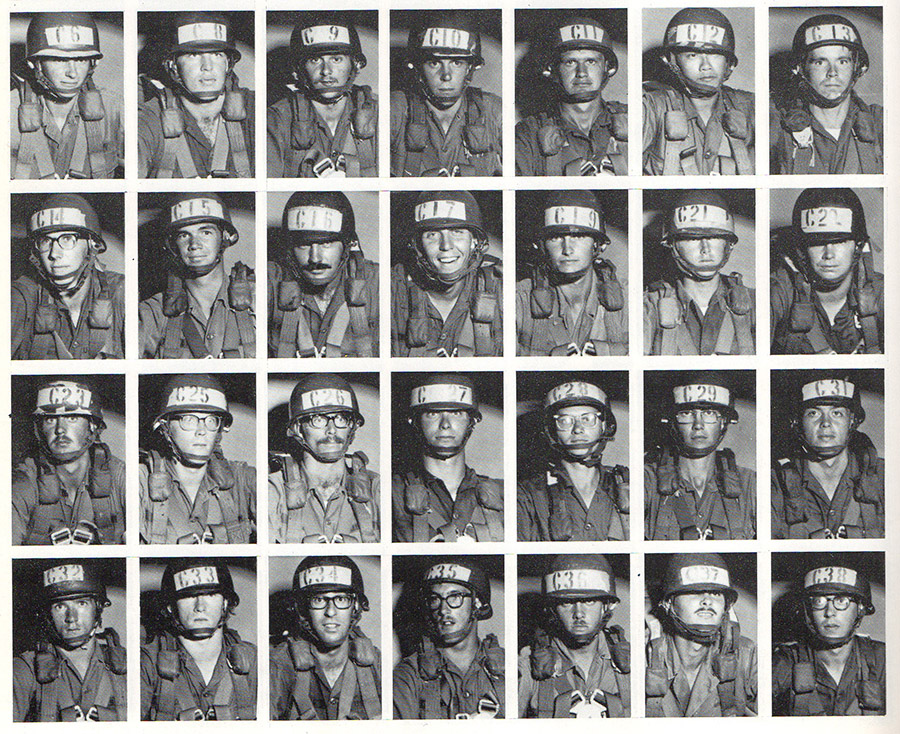
The gun that has been in my family the longest is a Model 62 Winchester chambered in .22 Short, Long, and Long Rifle. I remember it being in the gun cabinet when I was a little boy and being told never to play with it (you can guess how well I listened to that advice).
I could go into a bunch of technical details about the Model 62, and I’ll provide a little bit of that below, but that’s not my intent with this article. I decided to instead focus on the rifle, how it shoots and handles, a little bit of its history, and what it means to me.
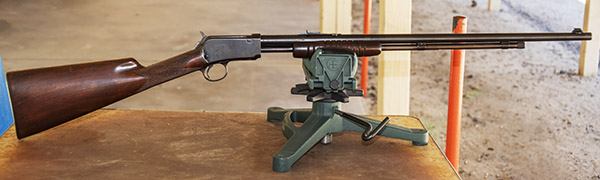
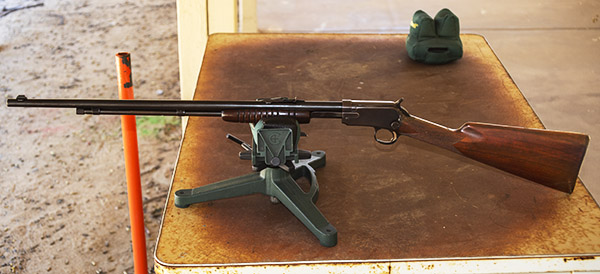
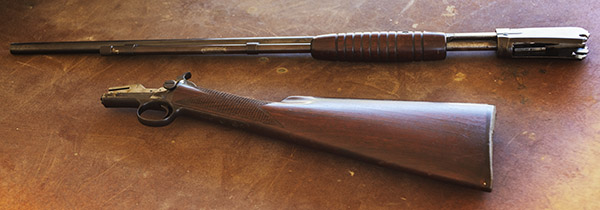
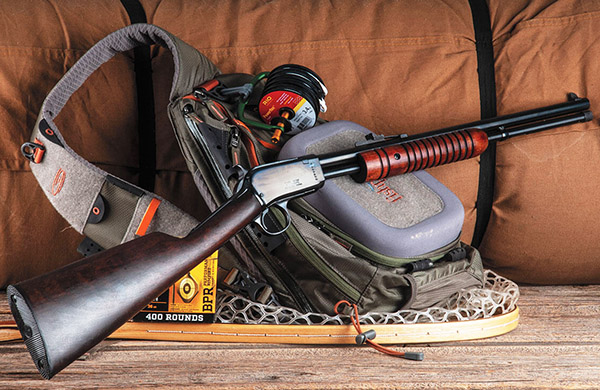
The starboard side of my Winchester Model 62 rifle. It’s a sleek and lightweight .pump-action 22.A port side view of the Model 62 on the range at the West End Gun Club.
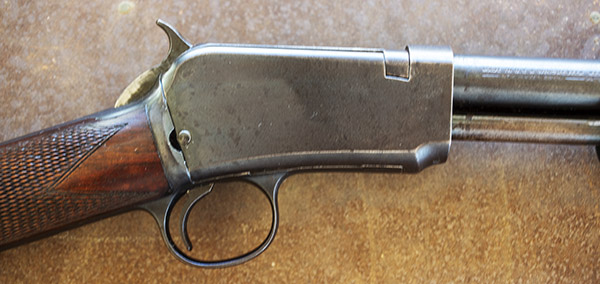
When Dad had the rifle up until the time I went into the Army (and that would be in 1973), the rifle’s metalwork was flawless. Then I disappeared from the scene for about 10 years (the Army, work, and other things). I guess during that time my father stopped paying attention to the rifle. Dad passed in 1982, and when I came home for the funeral, the metal parts had taken on the patina you see here. New Jersey is a unforgiving and humid place; if you don’t keep your toys oiled, they corrode quickly. But the Model 62 still looks good and it shoots well.
Shooting in RAW (the camera, that is), a macro lens, and even lighting bring out the inherent beauty of this fine old rifle.
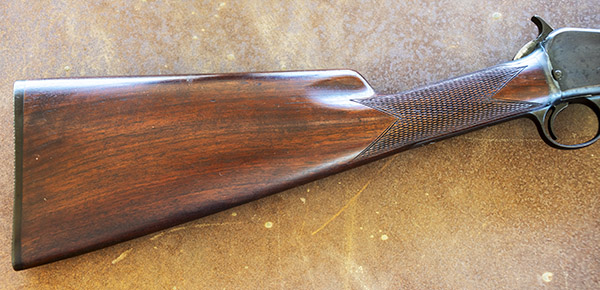
I like the Model 62 Winchester’s straight grip stock. It felt right to me when I was a kid and it influenced my future preferences in firearms. I have more than a few rifles with that same straight grip stock now…a Winchester 1886 .45 70 clone made by Chiappa in Italy, several Ruger No. 3 rifles, and a few Marlin lever guns.
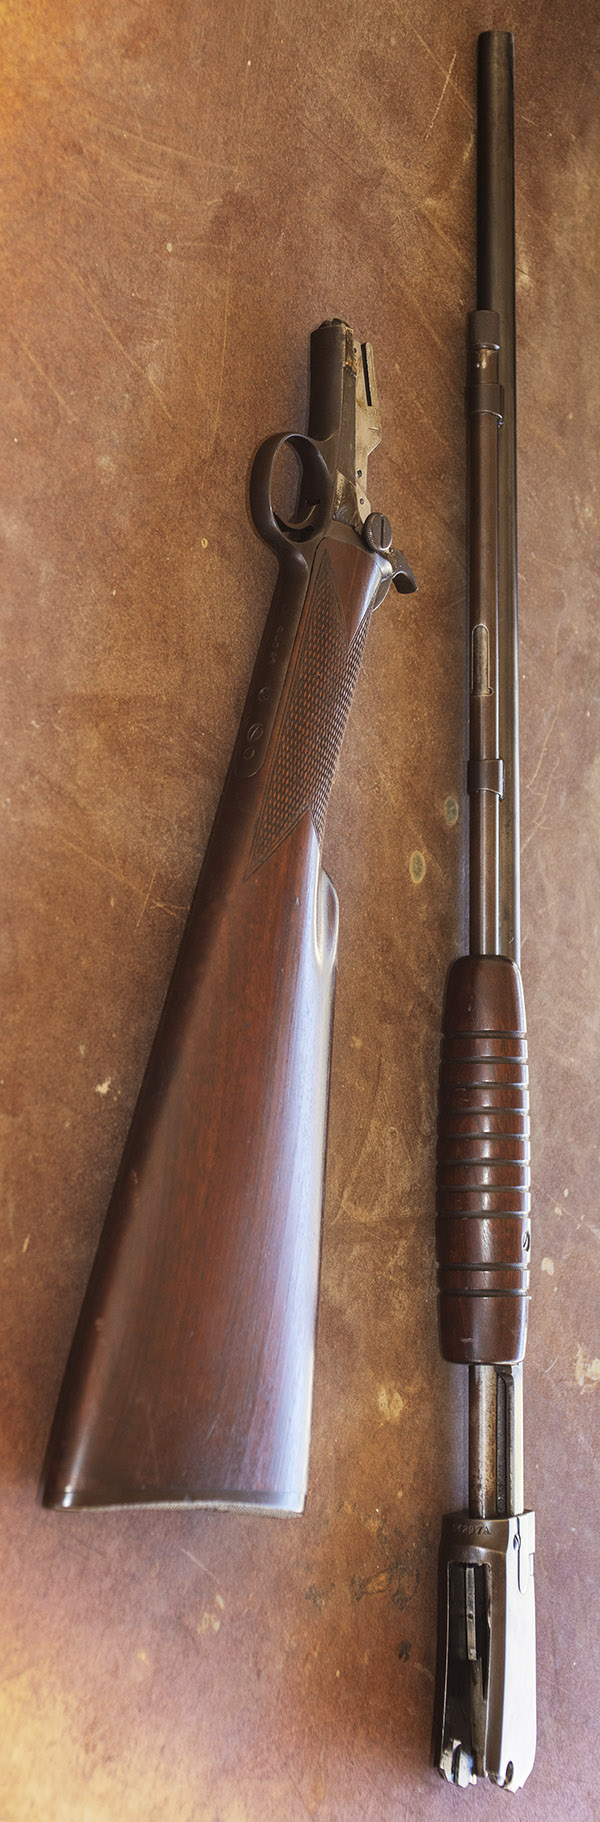
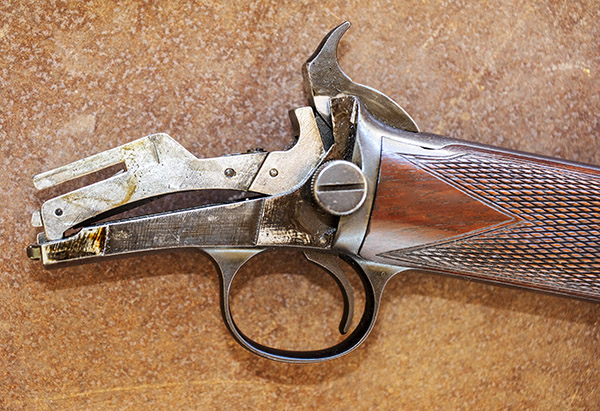
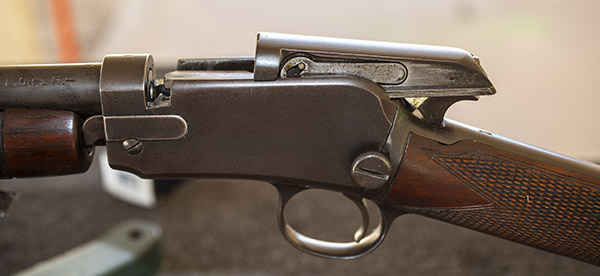
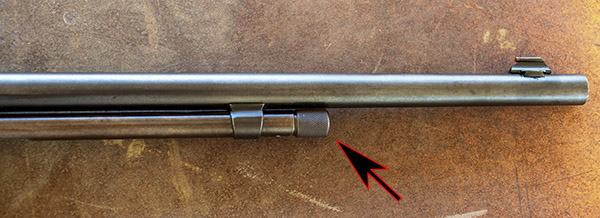
The Model 62 is what we call a “takedown” rifle. A single thumb screw secures the stock and trigger group to the rest of the gun. It’s a cool approach.
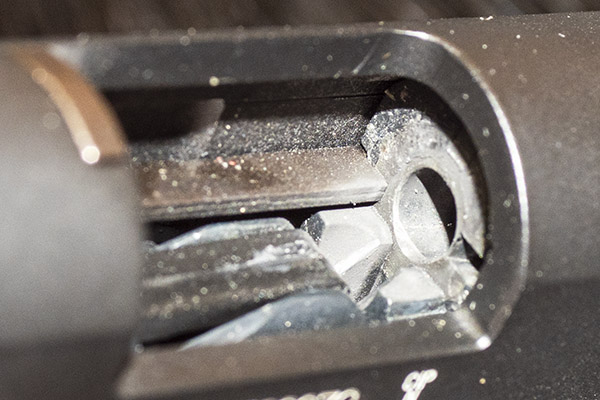
The Model 62 taken down. The stock and the trigger group detach from the barreled action with a single thumbscrew on the left side of the receiver.I rotated the photo 90 degrees clockwise to provide a better look at the rifle after take down.A macro view of the aft portion of the Model 62 after it has been taken down. The large thumbscrew in the center of this photo allows disassembly.The Model 62’s barreled action after take down.
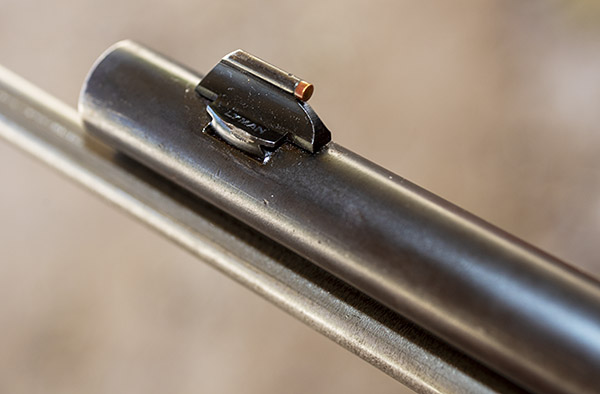
The sights on the Model 62 are old school. They’re Lyman front and rear. Nothing fancy, but they work well. A simple gold bead up front, and a drift adjustable rear with a stepped ramp for adjusting elevation. But I’ve never had to adjust them. Either they came zeroed from the factory, or the guy who owned the rifle before Dad adjusted the sights, or Dad adjusted them.
Winchester used Lyman sights front and rear back in the 1930s. This front sight has a brass bead. It tarnished enough so that it looks black when I align the sights, and that works for me. Bright brass beads reflect light and pull the shots to one side.The Model 62 rear sight. Simple, elegant, and traditional.
I think my Nikon 810 and the Sigma 50mm 2.8 macro lens do a good job in bringing out the rifle’s vintage beauty. You can see it in the next few photos.
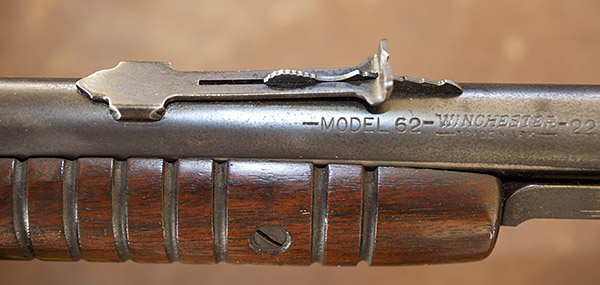
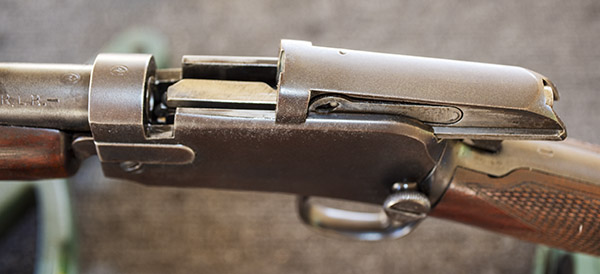
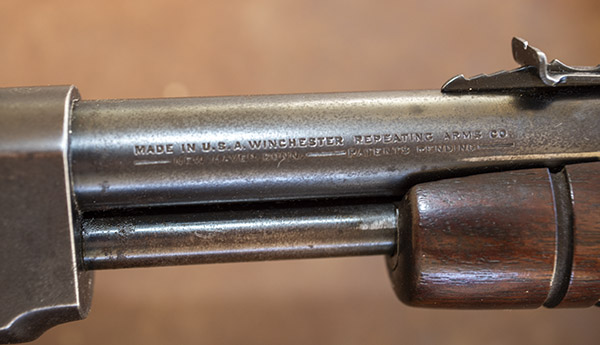
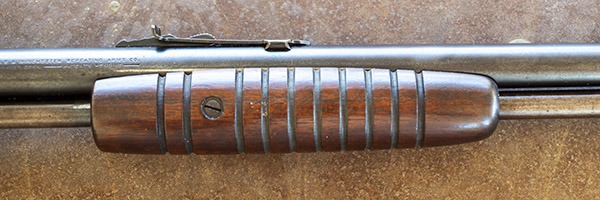
The Model 62’s bolt lifts up and slides to the rear when the pump is actuated. The spent brass ejects upward.Another shot of the retracted bolt, showing the mechanism that ejects the spent brass case.Rollmarks on the right side of the barrel: “Made in U.S.A. Winchester Repeating Arms Co. New Haven, Conn. Patents Pending.” Cool stuff.The receiver from the left side. Patina, they call it. I could have it reblued, but then it wouldn’t be original, and like they say, it’s only original once.The pump action forearm with its distinctive pre-war oval shape. Post-war forearms were straight. This one is much classier.
When I was a kid and my parents weren’t home, I sometimes snuck out of the house with the Model 62 and a box of .22 ammo. We had a couple of acres in New Jersey that ran into the woods with a stream behind the house (the stream fed Farrington Lake, which emptied into Raritan Bay on the Atlantic Ocean). You might think having a couple of acres in central Jersey with property bordered by a stream was a sign of wealth, but it wasn’t. It’s what people did in the 1950s: You bought a couple of acres and built a house, and that’s what my Dad did. He didn’t pay somebody else to build a house; he actually built our house. Today you’d have to be rich to own those two acres. Back then it was the path you took if you didn’t have money.
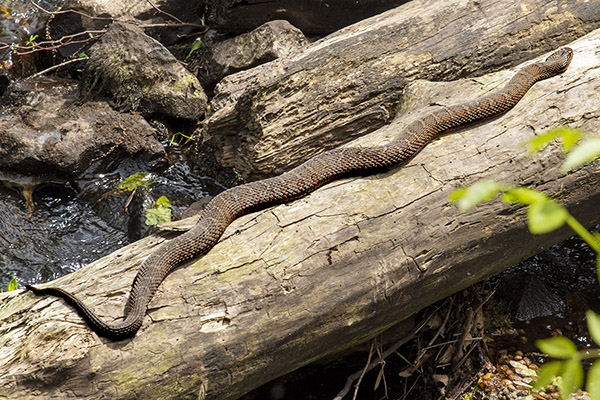
Those were good days and good times. One time a kid from my junior high came home with me (Bob Dixon, if you’re reading this, drop us a line). Mom and Dad weren’t home yet, so Bob and I grabbed the Model 62 and headed into the woods. There was an old cellar door laying in the mud next to the stream and Bob thought it would be a good idea to flip it over. “You know, there might be a snake or something under there…”
A New Jersey water snake. This one was about five feet long. We used to think these were water moccasins.
We did, and what we saw shocked the hell out of both of us: A monstrous, scaly, and scary reptile. Being kids, we were convinced it was a water moccasin. Today, I realize it was probably a water snake. But it was huge and we did the only thing any kid would have done in similar circumstances, and that was to put the Model 62 to good use. Call me Bwana. (On a recent trip back to New Jersey’s Farrington Lake, I saw another one of those frighteningly large snakes and I wrote about it here.)
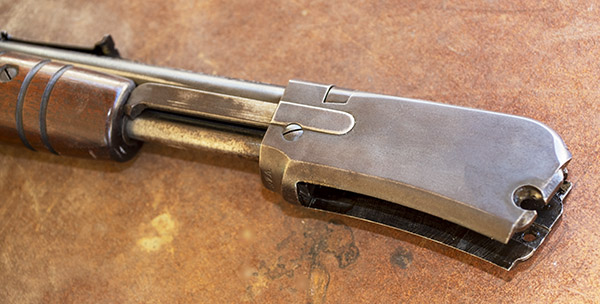
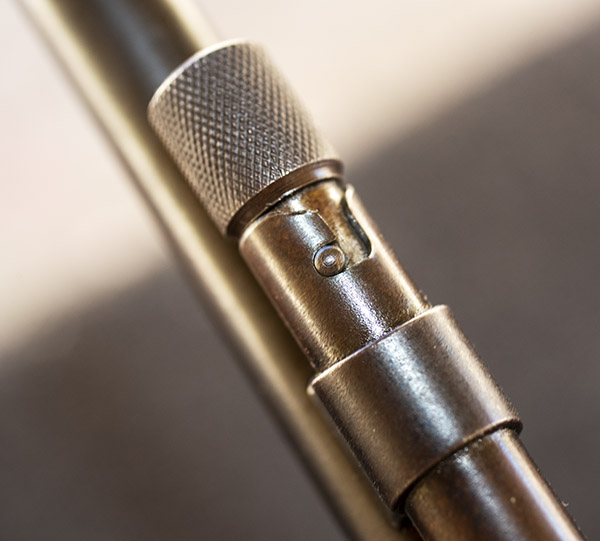
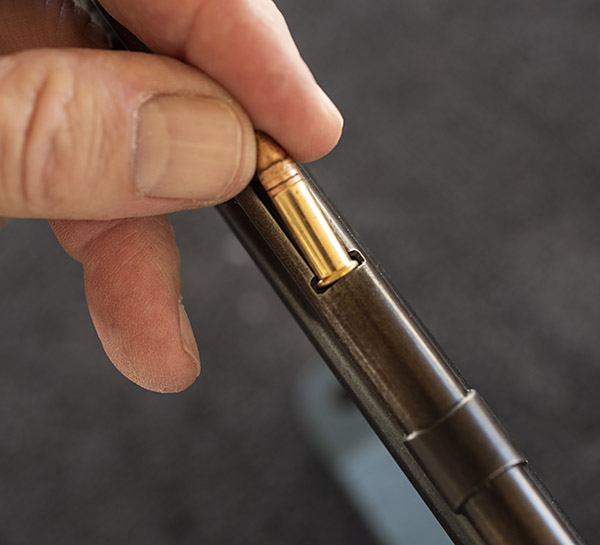
Loading the Model 62 is pretty straightforward. The rifle has a tubular magazine that holds a ton of ammo. As you see from the rollmarks above, it will shoot .22 Long Rifle, .22 Long, and .22 Short. I don’t know how many rounds of each it will hold, but it is a lot. I only load five rounds at a time, so it’s kind of a moot point to me. Come to think of it, I can’t remember the last time I saw .22 Long or .22 Short ammo anywhere. It’s all .22 Long Rifle these days.
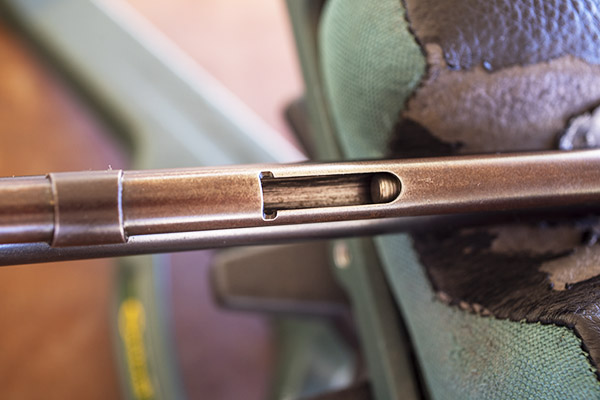
The tubular magazine below the barrel. The arrow points to the knurled knob that opens the magazine.A macro shot of the tubular magazine’s knurled knob and its bayonet lock. Twist the knob and the plunger can be pulled forward for loading.When the magazine’s inner plunger is pulled forward, the loading port can receive ammo.A Federal .22 Long Rifle being loaded into the Model 62.
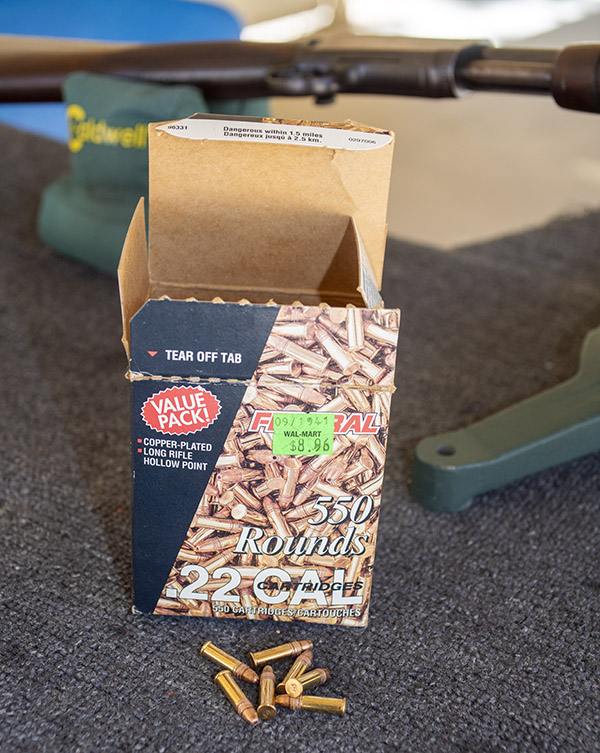
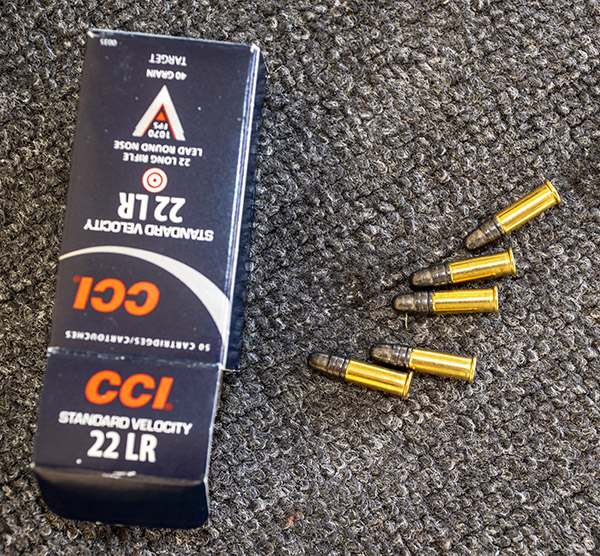
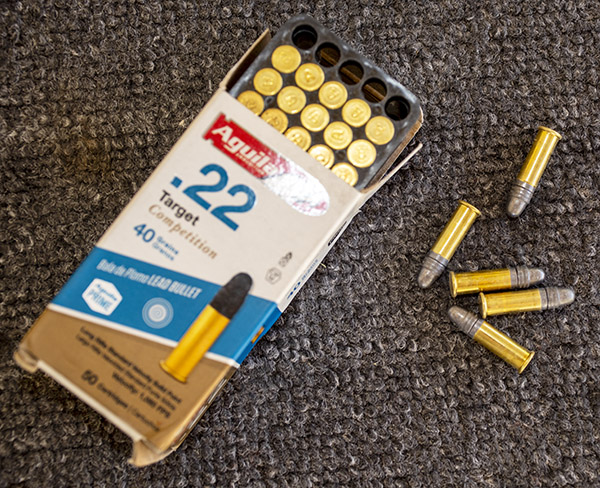
So how accurate is this nearly 80-year-old pump action .22? I’m glad you asked. I had not shot it in three or four years, so I grabbed three different kinds of .22 ammunition I had in my ammo locker: Older Federal copper washed high velocity ammo, CCI standard velocity ammo good buddy Greg gave me a few years ago, and Aguila standard velocity target ammo I bought from a local sporting goods chain when it was on sale.
I’m just about to the end of this box of .22 Long Rifle Federal ammo. Look at the price!The accuracy load: CCI standard velocity .22 Long Rifle ammo. This is good stuff.Aguila .22 Long Rifle target loads. Previous testing at 50 yards showed this worked best in my Ruger 10/22 (a Rimfire Series blog on that rifle will follow in the near future).
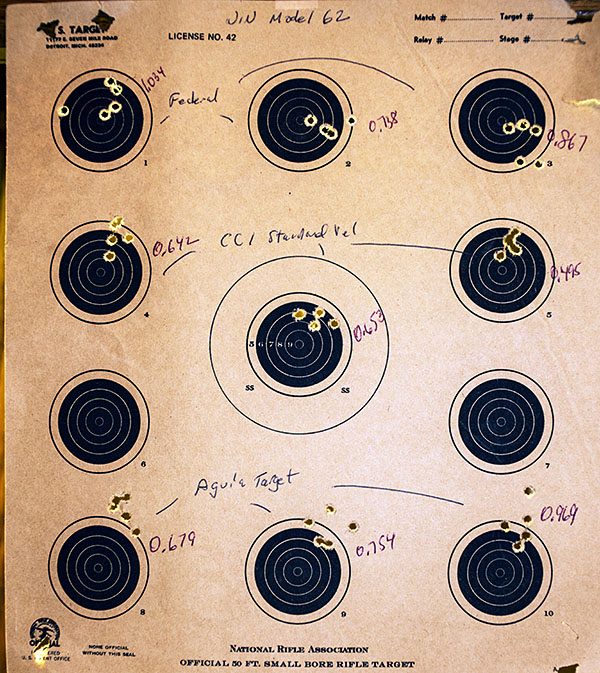
My U-boat Subie and I braved the Meyers Canyon water crossing to get to the West End Gun Club, I went to the .22 range and set up a table, and I tested the Model 62’s accuracy at 50 feet from a bench rest. I fired three 5-shot groups at an old 50-foot rimfire target I found in my stash. Here’s how it went:
Test results at 50 feet. The top right target was the first target of the day, and it was predicably the largest group (the bore was unfouled, and I was not yet in form). The Model 62 did best with CCI standard velocity ammo. This is not too shabby with open sights on an 85-year-old rifle.
A bit more info on the Model 62 Winchester: This Model 62 carries the serial number 94XXX, which puts its date of manufacture at 1939. My father bought the rifle when he was a kid; he would have been 13 years old in 1939. Winchester manufactured 409,000 Model 62 rifles from 1932 to 1958, with a two-year break during World War II. In 1939, production switched over to the Model 62A. The Model 62A incorporated engineering changes to reduce production cost (mine is the original Model 62, not the 62A). When Winchester introduced the Model 62 in 1932, the rifle’s suggested retail price was $17.85. Presumably, the price had climbed a bit by 1939. Family lore has it that Dad paid $8 for the rifle. Sales of recently completed auctions on Gunbroker.com show the price for a Model 62 today ranges from $300 to $3000. That’s quite a spread, but to me it’s irrelevant. This rifle is not for sale at any price; one day it will go to one of my grandsons.
Model 62 Winchesters show up for sale on Gunbroker.com pretty much all the time, so if you want one they are available. More good news is that the Model 62 is legal here in the Peoples Republik of Kalifornia.
The Rossi Model 62.
More good news is that Rossi, a Brazilian firearms manufacturer, offered their Model 62 (a fairly faithful reproduction of the Winchester Model 62) from 1970 to 1998 and the Rossi rifles can still be found. Rossi discontinued the Model 62 when they were acquired by Taurus, but the Rossi rifles still show up on the auction site gunboards. Sometimes you see one in a pawnshop or a gunstore’s used gun rack. I’ve never handled or fired the Rossi so I can’t say anything about them, but if I came across one at a reasonable price I would jump on it. You might consider doing the same.
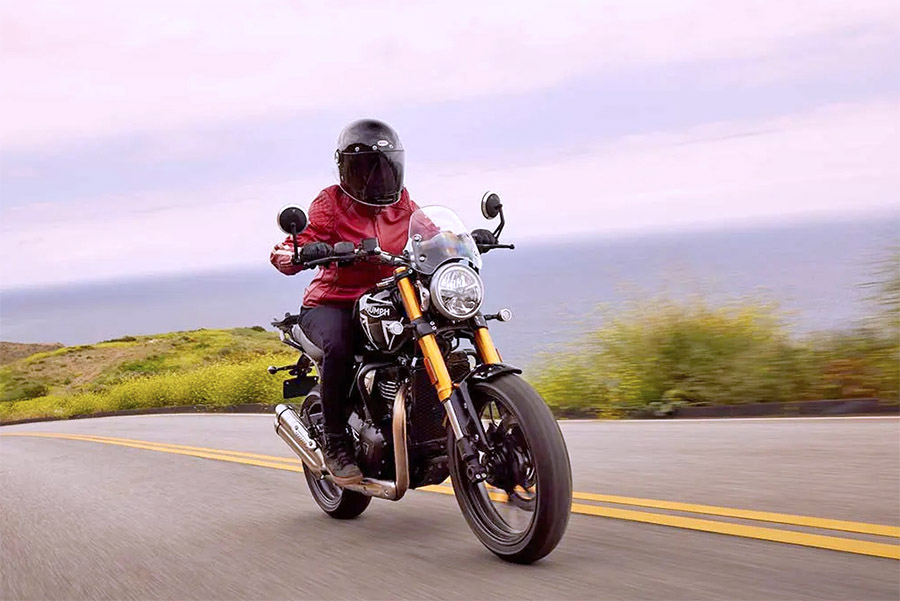
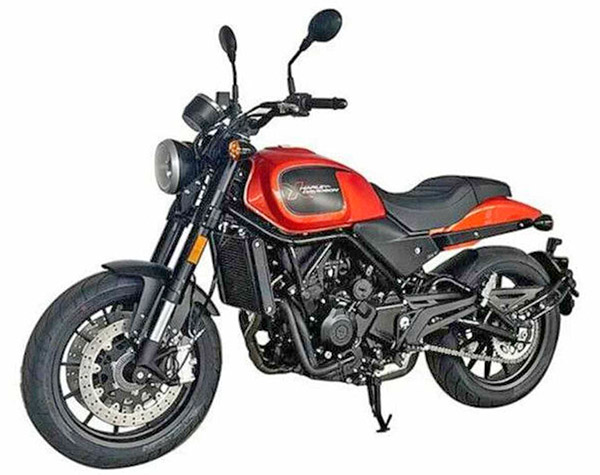
Well, what do you know? Triumph is the latest moto manufacturer to jump on the small bike band wagon with the announcement of their new 400cc single-cylinder motorcycles. Not to be too snarky, but better late than never, I suppose. Harley did the same thing a year or so ago with their 350cc and 500cc motorcycles, but the Harleys were supposed to be manufactured and only available in Asia. More’s the pity, although I get it: A small bike wouldn’t go well with the typical Harley crowd.
Back to today’s topic: The new 400cc Triumphs: I like them.
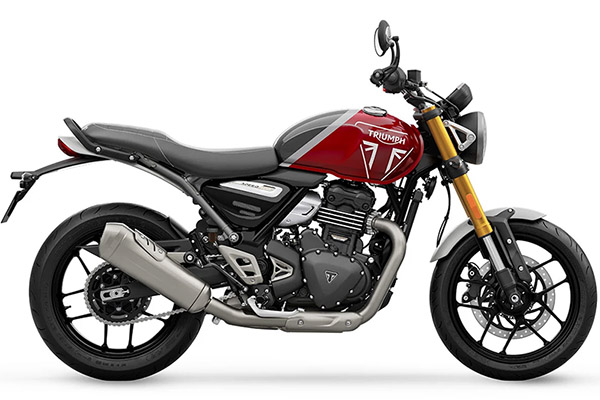
Triumph announced two models: A Speed 400, and a Scrambler 400. They look like Triumphs, which is to say they look fabulous. I like the colors (each will available in three different color themes) and I like the looks.
The Triumph Speed 400.The Triumph Scrambler 400.
With a published 40 horsepower, the bikes will probably be good for 100 mph, and that ought to be enough for any sane rider. I’m guessing the bikes will get something around 70 miles per gallon, and that should be good, too. Triumph turned to Bajaj (in India). There’s nothing wrong with that. Triumph’s Bonneville line is manufactured in Thailand. My Enfield 650 (which I’ve been riding for three years) is manufactured in India, and its quality is magnificent. Prices on the new Triumphs haven’t been announced yet. If the Mothership can keep the dealers from pulling their normal freight and setup chicanery, these bikes should be a good deal (but expecting dealers to abandon their larcenous freight and setup games is, I realize, probably wishful thinking).
On that Harley thing I mentioned above: QianJiang (also known QJ Motor) bought Benelli (an Italian motorcycle company) in 2005. QJ took the name and started offering bikes made in China but labeled as Benellis (I saw them at the Canton Fair a few years ago). The QJ/Benelli bikes are not bad looking, but I’ve never ridden one and I have no idea how good (or bad) they are. It’s that very same Benelli (i.e., the Chinese one) that Harley announced would be making 350cc and 500cc small Harleys. The Harley plan was that their smaller models would only be sold overseas (i.e., not in America). Harley makes and sells more motorcycles than I ever will, so I suppose they know what they are doing. But I think they are making a mistake not bringing their small bikes to America.
Look! Up in the sky! It’s a QJ Motor! No, it’s a Benelli! No, it’s Super Harley!
Let’s not forget the new BSA Gold Star, another made-in-India Britbike reported here on the ExNotes blog about a year ago. That one is still in the works, I guess. For a delivery date, the new BSA website still says “available to order soon,” which is to say we have no idea when the new BSA Goldie will be here.
The revivified Beezer Gold Star. I think it is a better-looking bike than either the new Triumph or the small Chinese Harley.
While all this is going on, my friends in Zongshen (they make the RX3, the RX4, the Zongshen 400cc twins, the TT 250, the San Gabriel, and now the RX6 650cc twin that CSC imports to the US) tell me that the craze in China has gone full tilt toward bigger bikes. That’s why they introduced the RX6. I was the first journalist/blogger/all around good guy in America to ride and report on the RX6. It’s a good bike, but I’m not a fan of the movement toward ever larger motorcycles. I’m convinced that my RX3 was the best all around motorcycle I ever owned (especially for riding in Baja), and I’ve written extensively on that.
I’m looking forward to seeing the new Triumphs. Hell, I’d look forward to seeing the new small Harleys and the BSA, too, but maybe that’s not in the cards. Why the fascination and appreciation for small bikes? Take a read here.
Susie and I were channel surfing on Netflix a few nights ago and a new documentary popped up: Arnold.
Arnold is a three part series (one hour each) documentary on the life and times of our former governor and my all-time favorite actor, Arnold Schwarzenegger. The series was very well done, it is told by Arnold himself (interspersed with comments by folks who figured prominently in his life, including James Cameron, Danny DeVito, and others), and in a word, it was great. The three segments cover the Governator’s early life and body building career, his movie career, and his stint as governor of California. The show doesn’t pull any punches, and the last segment includes the affair with his housekeeper and the son he had with her.
I’d heard of Arnold Schwarzenegger and sort of had a vague idea that he was a movie star/body builder before the movie Terminator was released. When I saw Terminator and Terminator II and I thought he was great in both. Then I saw Predator, and I liked him even more. I watched (or rented the VHS tape back in those days) of just about everything he’s ever done. When Arnold ran for governor of California, he had my vote both times. I’m a fan. I like the guy.
If you are a Netflix subscriber, queue up and watch Arnold. You’ll like it.
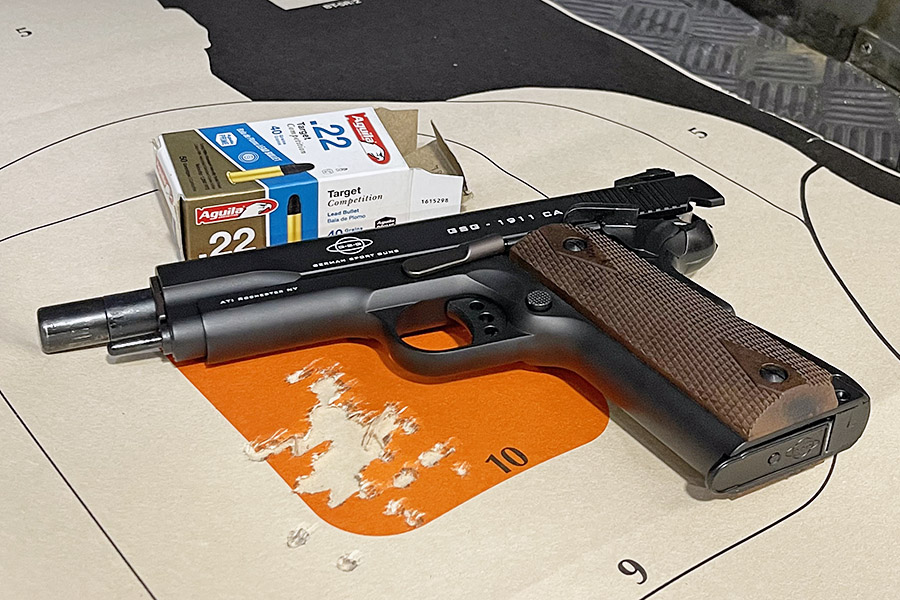
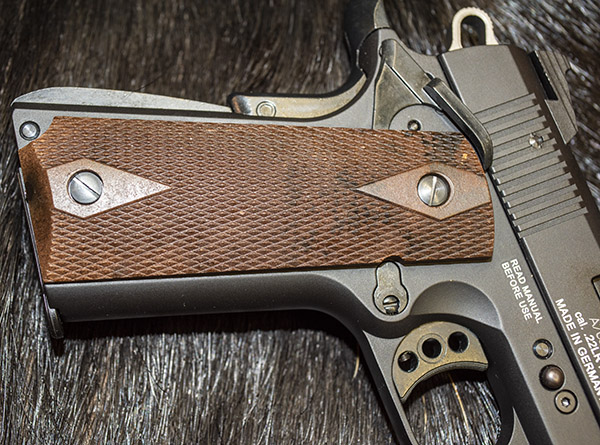
A few years ago I was in a local Turner’s sporting goods store (Turner’s is a big sporting goods chain in the southwestern US) and they had a sale on GSG .22 LR 1911s. I think I paid $229 for it and I’ll admit it: The GSG was an impulse buy. I didn’t need it, but for $229 I thought any kind of 1911 would not be a mistake (I just checked the Turner’s website and they are now $379.99; that’s still not bad). I put the gun in the safe when I bought it and pretty much forgot about it.
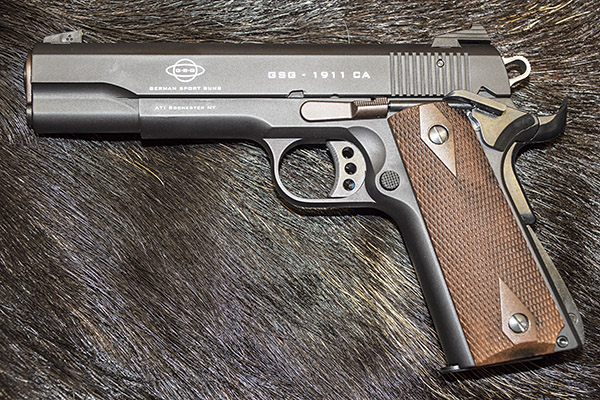
The GSG .22 1911. All the controls are the same as a real 1911. Note the competition/target-style hammer, the extended beavertail grip safety, the target-style trigger, and the Patridge-style front sight.
I had owned the GSG .22 for several years and I hadn’t fired it. Then, one fine recent morning when I was putting my 9mm 1911 in the range bag, I realized it was dumb not to shoot the little .22. It’s not like it’s ever going to be a collectible, so I thought I might have some fun and enjoy it. The GSG went into the bag, too, for its first firing session.
To my surprise, the GSG is surprisingly accurate and it is fun to shoot. The feel is just like a real 1911 except it’s a bit lighter (as near as I can tell, the exterior dimensions are identical to a full-sized 1911). The trigger is a little on the heavy side (especially after shooting my TJ-modified 9mm Springfield Armory 1911 with its 2 1/2-pound trigger), but the GSG trigger is creep free.
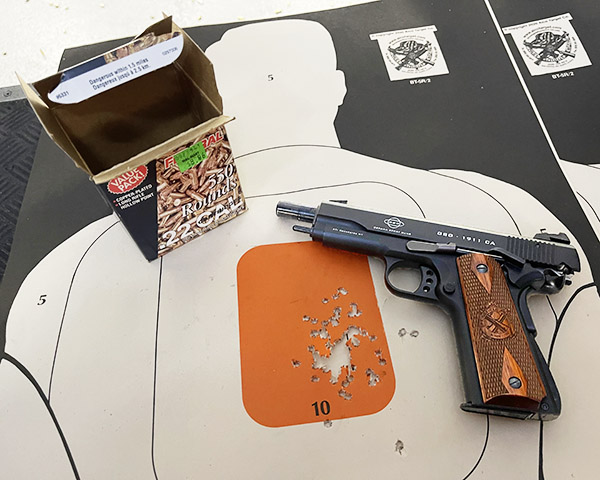
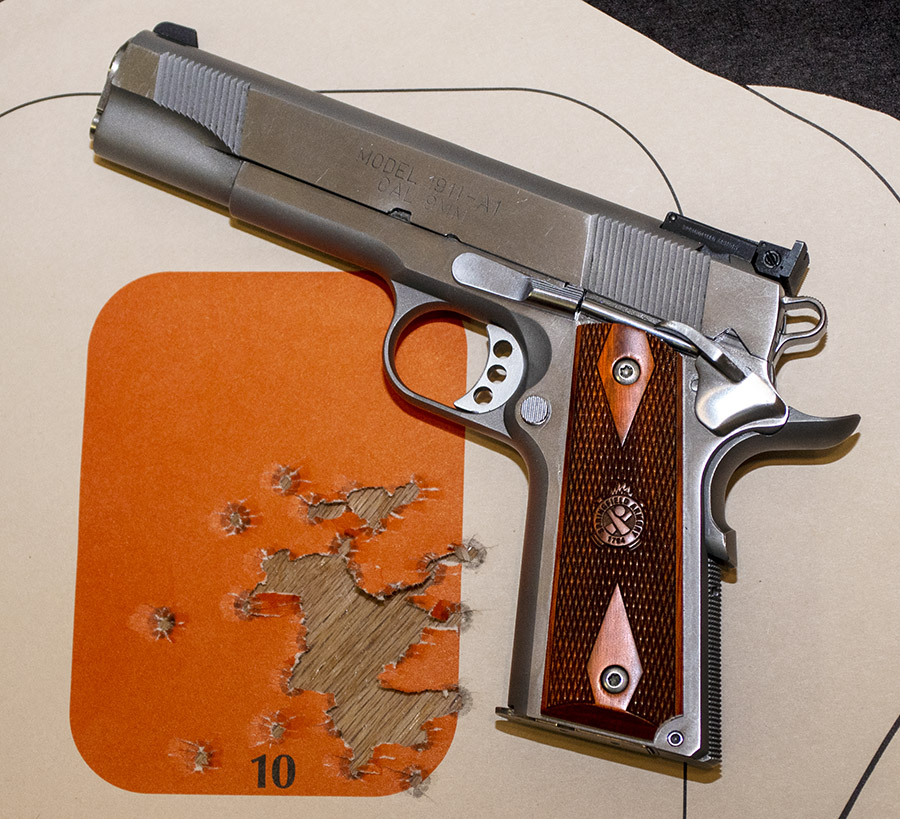
As you can see on the target above (at the top of this blog), the GSG shot slightly to the left. I could see on the slide that the rear sight it was not centered. I fixed that. The rear sight is drift adjustable (it’s held in place with a setscrew), so I moved it a scosh to the right.
The GSG has decent whitish/yellowish (almost aged ivory in color) dot sights front and rear. About that target above: It’s a box of 50 Aguila .22 target loads at 10 yards, with a two-hand hold, firing offhand. I have no excuse for the two outside the 10-ring.
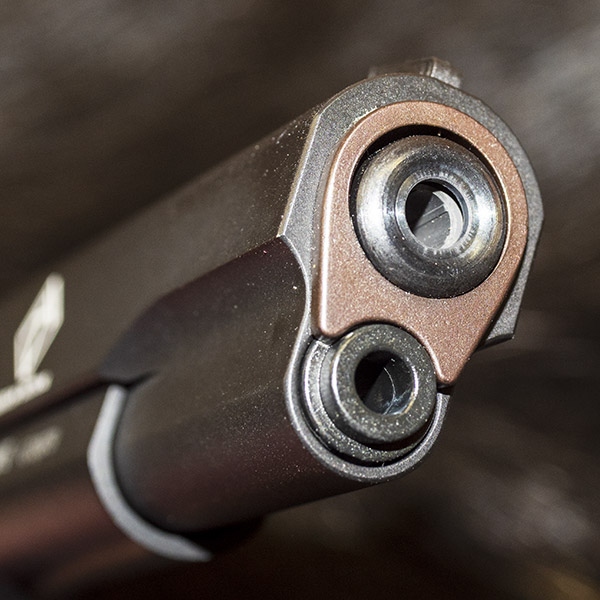
The front sight. I’m sure it’s plastic, but the dot has the appearance of aged ivory. It’s dovetail mounted, and it appears to have a set screw retainer.The rear sight, with the same faux ivory dots. The sights are good. As delivered (and as you can see in this photo) the rear sight is biased slightly to the left. The GSG shot a little to the left for me. I may move the sight over to the right a little bit.The business end. I haven’t taken the gun apart to clean it yet. There appears to be zero bore leading after firing that first box of 50 rounds.The boiler room after 50 rounds. There were no extraction failures. I had one stovepipe, but the gun is brand new. I hadn’t even oiled it before taking the little GSG to the range.The grips appear to be some kind of plastic. That’s okay; I have a brand new set of diamond-checkered Springfield Armory 1911 Cocobolo grips I’ll use as replacements.
There’s a fair amount of plastic on this gun and I think the finish is some kind of paint, but the gun looks and feels good. The GSG is not a Wilson or a Les Baer 1911, but it doesn’t cost $3500, either.
I don’t know how the GSG takes down or what it looks like inside. I suppose it’s time to read the instructions, and I need to do that so I can clean it. Watch for more on this fun little 1911. You’ll see it right here on our Rimfire Series of blogs. Don’t forget to check out our other gun and reloading articles, which are indexed for your convenience on our Tales of the Gun page.
A quick edit: I took the grips that split on my Springfield Armory 9mm 1911, superglued them back together, and installed them on the GSG .22 (I had to relieve the safety cutout on the right grip to get them to fit). The Springfield grips look good, and they feel better than the injection molded plastic grips than came on the GSG. I had the GSG on the range a couple of days ago and I sent a quick 100 rounds downrange.
The GSG now shoots very slightly to the right, but I’m going to leave it alone until I try the next batch of ammo (I ran out of the Federal ammo you see above). The GSG is 100% reliable with high velocity .22 ammo; it experiences an occasional failure to fully cycle with standard velocity ammo.
This is an update on my 9mm 1911 sudden unintended disassembly saga. I will address four topics:
Zeroing in on the cause.
Rework of the ammo I had loaded on my Lee turret press.
My reconstituted 9mm 1911.
Preventing a recurrence.
Let’s get into it.
Zeroing In On The Cause
I’m down to thinking the 1911 event was due to either of two causes: A double propellant charge, or bullet setback (i.e., the bullet slid deeply into the case as the round was being chambered, thereby raising the chamber pressure).
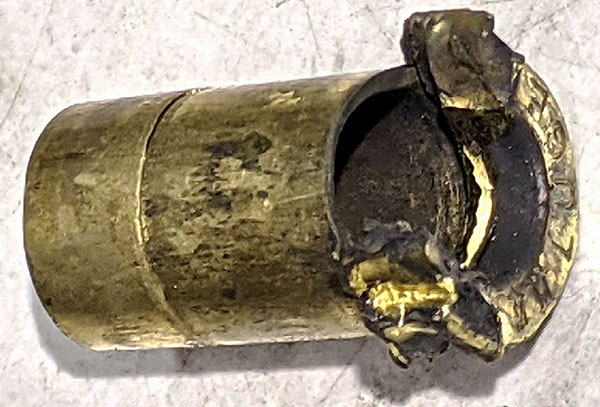
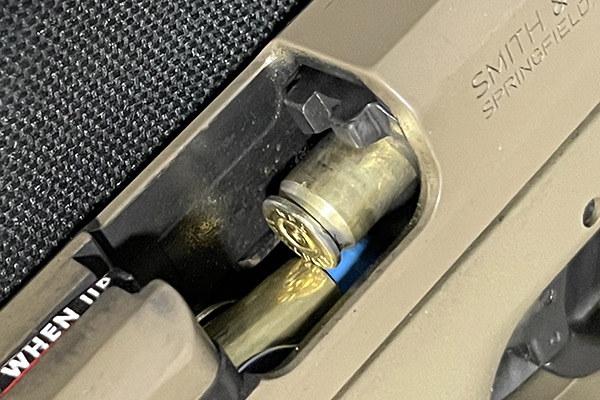
My burst 9mm cartridge case. It was a Remington case, not that it makes any difference. Any case would likely have burst. Photo by TJ of TJ’s Custom Gunworks. Compare this to the photo of the double-charged case at the end of the video below.
A Double Charge
I did a Google search on double-charged cartridges, and what do you know, there’s actually someone out there who did the same thing I did. He caught it on video and posted it with a photo of the case. His burst cartridge case sure looks a lot like mine.
If you compare the photo at the end of the above video to the case stuck in my chamber, they are identical. I’ve convinced myself that this is the most likely of the two scenarios, but I’ll describe the other scenario (bullet setback) as well.
Bullet Setback
What has me thinking deep thoughts about the second failure mode (pushing the bullet deeper into the case during chambering) is that I think it is relatively easy to screw up while reloading and induce this failure, and from what I’ve read, 1911s are more prone to do this than are other semi-autos.
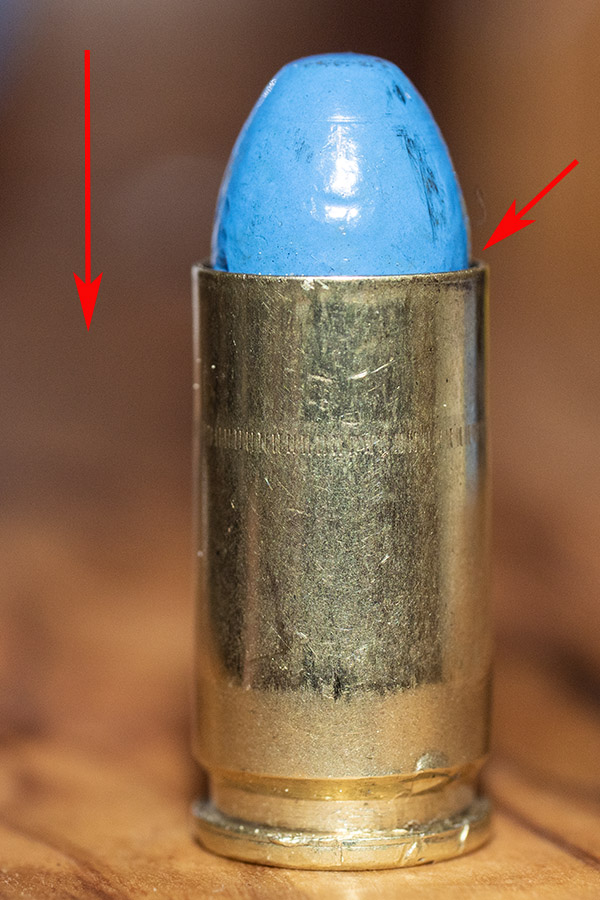
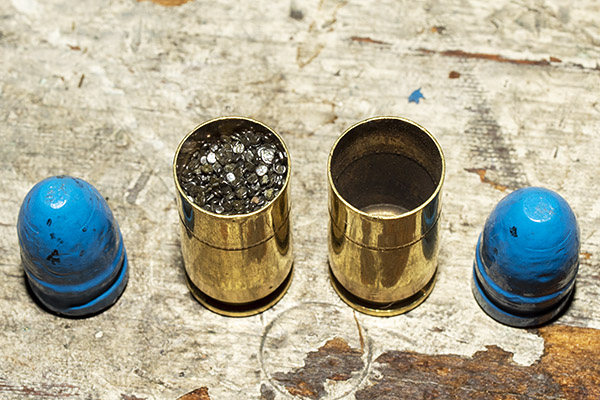
This is what bullet setback would look like. The bullet is seated much deeper in the case than it is supposed to be, which would raise chamber pressure. This example did not occur in the gun; I loaded dummy case and pushed the bullet in much deeper using my reloading press. Theoretically, it can be induced by the gun if the bullet is not crimped sufficiently.
Let’s discuss screwing up the reloading process in a manner that could induce bullet setback. On my Lee Classic turret press, bullet seating and crimping occur in two separate operations (seating refers to pushing the bullet into the case; crimping refers to locking the bullet in place by crimping the cartridge case mouth). The third (of the four) dies seats (but does not crimp) the bullet; the fourth die applies a taper crimp to the bullet. Here’s the screwup: I’ve had at least a couple of instances where I took the cartridge out of the press after seating the bullet (but before crimping it). I know; you’re thinking that’s stupid, and I can’t argue with that conclusion. I don’t know why I did it (too eager to see the completed round, maybe?). I caught myself, returned the cartridge the press, and crimped it. But it’s possible I missed the crimping step on a cartridge.
I think setback is the less likely of the two failure modes discussed here. I tested the crimp by tapping on the bullet with a rubber mallet and it didn’t move. Failure to crimp or a weak crimp may have caused setback, but on properly crimped bullet, I don’t think setback will occur. Also, when I made the cartridge shown in the photo above on my RCBS Rockchucker press, it took more effort than I thought it would to seat the bullet as deeply as you see in the photo (and the case had not been crimped). I doubt that simply chambering the round would drive the bullet in that deeply (even without a crimp). If you think otherwise, please leave a comment below.
Gun Design and Bullet Setback
As mentioned above, bullet setback is more likely to occur on a 1911 than it is on other semi-auto handguns. It has to do with cartridge location in the magazine, and how it feeds into the chamber. On more modern handguns, the top round in the magazine sits higher in the gun than it does on older design guns. When the slide shoves the round forward, cartridges in more modern handguns have a straighter path into the chamber. On a 1911, the top round in the magazine sits lower in the gun. When the slide pushed it forward, the bullet impacts the ramp, it has to stay situated in the cartridge case without experiencing setback, and the cartridge has to rotate up and then into the chamber. Because of this, a 1911 is more likely to experience bullet setback than is, say, a gun like the S&W Shield.
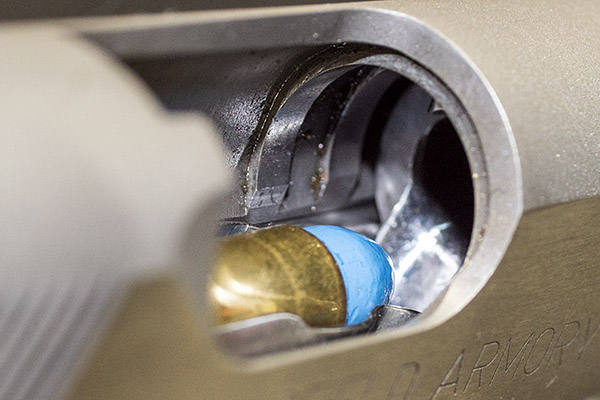
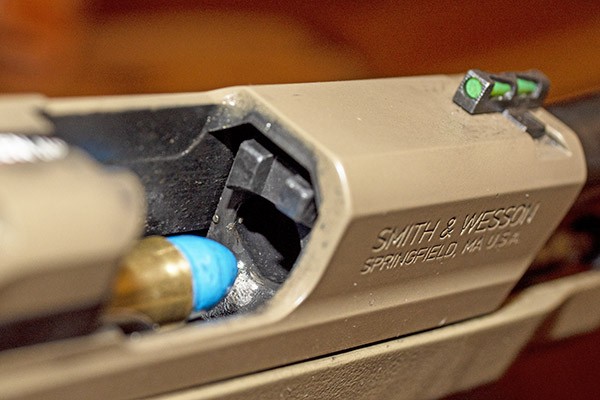
A 9mm cartridge waiting to be chambered in a 1911. It’s a little hard to see in this photo (I did the best I could), but the bullet nose will hit the ramp head on and then slide up the ramp and into the chamber. The potential for bullet setback is a little higher here than on most other modern 9mm semi-auto handguns.A 9mm cartridge waiting to be chambered in the S&W Shield. Notice how the round is nearly aligned with the chamber as it sits in the magazine.
That’s not to say the Smith and Wesson Shield is a better design or that it’s all sunshine and rainbows. There’s a tradeoff the engineers made on the Shield. Yep, the Shield’s higher cartridge position makes for a straighter path into the chamber. It also allows for higher capacity in a smaller gun (my little Shield holds 8 in the magazine and one in the chamber). But the higher cartridge position can induce another issue: Failure to extract and eject.
A cartridge case in the S&W Shield caught during extraction on the mouth of the case immediately below it.
During extraction, the round being extracted has to drive the magazine’s top cartridge down into the magazine as it is being extracted. it does so by using the next cartridge’s bullet as a cam surface. The rear edge of the cartridge being extracted bumps into the mag’s top cartridge, and then it has to drive it down so the case can exit the gun after firing. As it uses the bullet of the mag’s top round for that cam surface, the rear of the cartridge case rim encounters the case mouth of the mag’s top cartridge, and that can cause a failure to extract and eject. It’s happened to me. I’ve found the Shield is sensitive to ammo brand, bullet configuration, and crimp. Too much crimp, and the cartridge goes too deep into the Shield’s chamber and the firing pin won’t light the round off. Too little crimp and it jams in the manner described above. Too little crimp and it might experience bullet setback. Like most things in life, the design is a tradeoff.
Again, I don’t think bullet setback is what happened in my 9mm 1911. I’m including it here simply because it is interesting and relevant to this discussion.
Ammo Rework
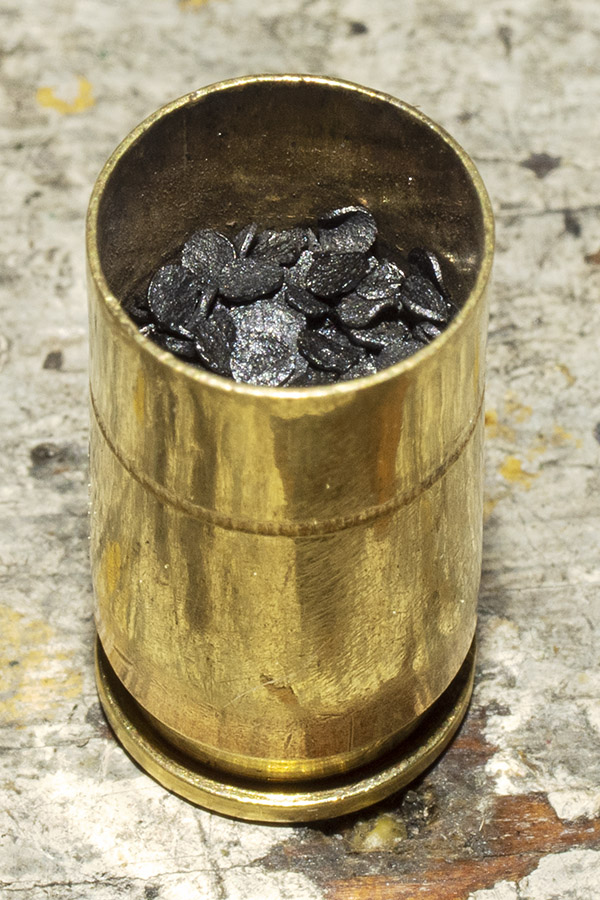
One of the personally dismaying and embarrassing things about blowing up my 9mm 1911 is that it immediately threw into question the approximately 1500 rounds of 9mm and .45 ACP ammo I had reloaded on the Lee turret press.
I thought I could use weighing the rounds as a way to screen for double loads, but on both the 9mm and the .45 cartridges, the weight variation exceeds the weight of the powder charge. That means I could have a double charge and if it was in a lighter round, it would be within the variability for the loaded cartridge. So weight was not a way to screen. I know there will be keyboard commandos with advice to stick to one case manufacturer (or to segregate cases by brand), but the same variability problem exists even when cases are segregated (I’ve checked). I wish the self-styled “experts” on Facebook would slither back under their rocks (or at least refrain from commenting when they just don’t know what they are talking about, which is most of the time).
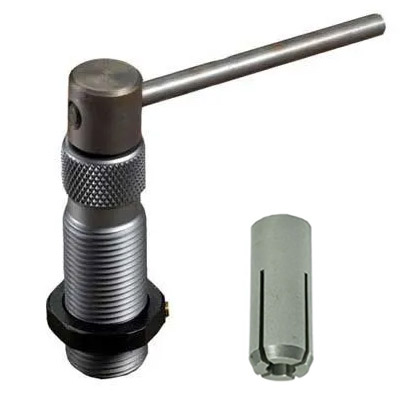
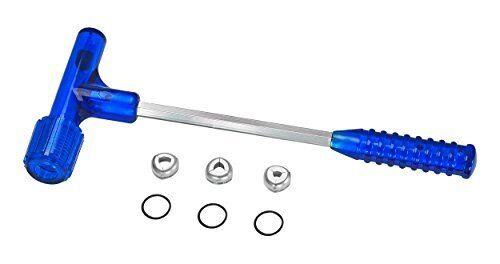
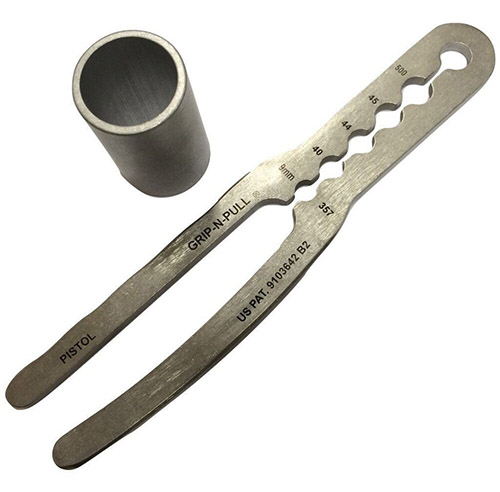
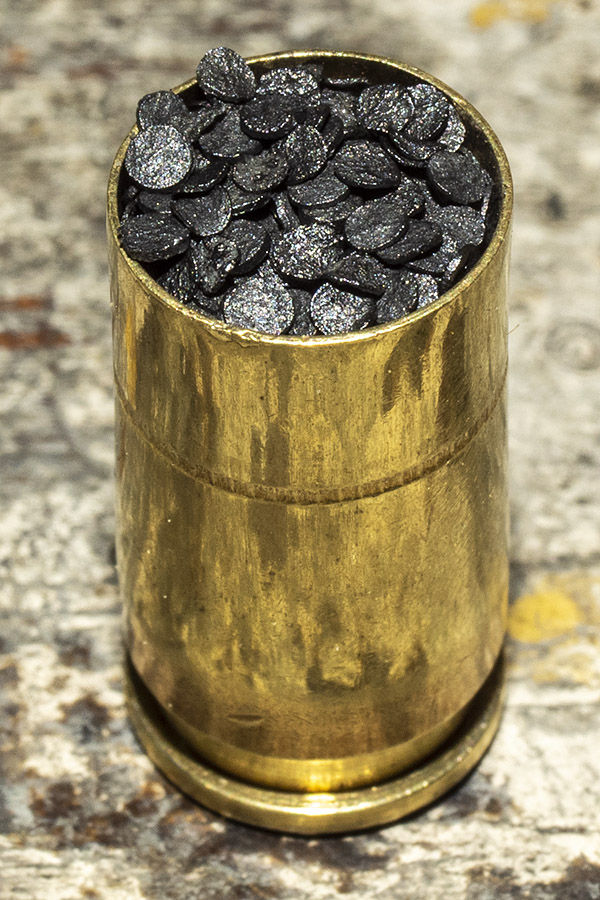
The RCBS collet bullet puller. You put your cartridge into the press shell holder, raise it into the collet (the gizmo on the right, which fits inside the gizmo on the left), tighten the crank, and lower the press ram. Voila, the bullet is pulled. Most of the time. Sometimes it doesn’t work.An impact bullet pullerr. You put a loaded cartridge into the cap on the hammer head, whack the opposite end against a hard surface a few times, and inertia drives the bullet out of the case. It is a lot of work.The Grip-N-Pull. It works occasionally. I tried a few cartridges and gave up on it.
I’ve disassembled and reassembled the 800 9mm rounds I loaded on the Lee turret press. I did not find a single one with a double charge. I used my buddy Greg’s RCBS collet bullet puller for this on my 9mm ammo and it worked like a champ with minimal or no bullet damage. Surprisingly, with all brands of brass, after pulling the 9mm bullets from crimped cartridges I did not have to expand the case mouths again to reseat the bullets. They slid right in. I just seated them to the right depth and crimped them again. Reusing the bullets didn’t seem to affect accuracy, either.
The RCBS collet bullet puller did not work on my .45 ACP ammo. The .45 collet couldn’t get a good enough grip on powder coated 230-grain roundnose bullets or on my 185-grain cast semi wadcutters. I tried one of those Grip-N-Pull devices and that didn’t work, either. The bullets slid right out of it. To disassemble the .45 cartridges, I had to use an impact bullet puller, and that was tough sledding. It takes forever. I don’t like impact bullet pullers, but hey, it is what it is. And what it is, well, is a lot of labor. I’m working it a little at time, at a rate of about a box per week. Three or four months and the rework will be in the rearview mirror.
That double charge sure turned out be one expensive mistake, both in terms of damage to the 1911 and the need to rework a lot of ammo. Live and learn, I guess.
The Reconstituted 1911
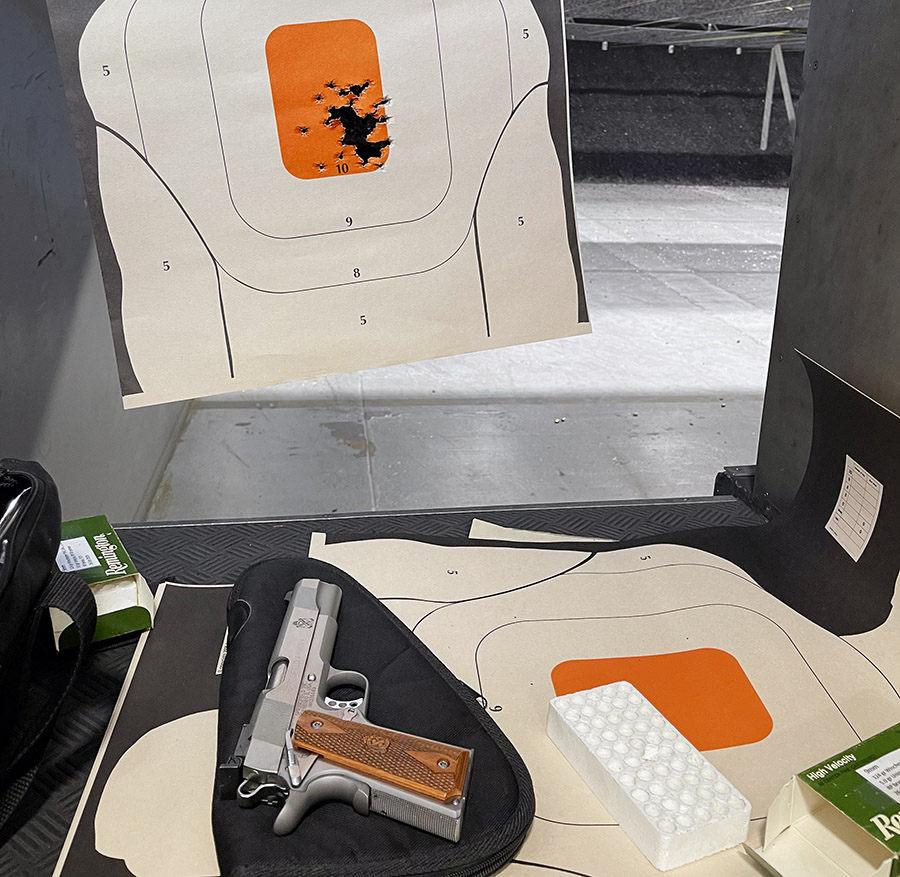
TJ (of TJ’s Custom Gunworks) worked his magic on my 9mm 1911. As mentioned in a previous blog, in addition to addressing the damage from the burst cartridge, he polished the barrel and ramp, refit an extractor that actually works (shame on you, Springfield Armory, for letting this one get out of the factory with an extractor that didn’t even contact the cartridge case), he recontoured the slide release and the slide release pin (shame on you again, Springfield Armory, for a slide release that was extremely difficult to install), he fit a one-piece guide rod (which is what I asked him to do), and he did one of his magnificent trigger jobs (this 1911 has a “breaking glass” 2 1/2 pound trigger now, with zero creep and no discernible takeup). This 1911 is a pure joy to shoot. I loved it before and I love it even more now. That target at the top of this blog? It’s a full box of my reloaded 9mm ammo (50 rounds) fired without resting the gun on anything. No failures to feed, no failures to eject, no misfires, and every bullet hit in the 10 ring.
50 rounds shooting offhand with the 9mm Springfield Armory 1911. Custom work by TJ’s Custom Gunworks.
Preventing a Recurrence
Wow. Where to begin.
I am implementing a number of changes in my reloading to prevent this from occurring again:
I’m slowing down and paying more attention. Duh. I’m no longer complacent. Duh again.
I’m installing better lighting on my press.
I’m standing up so I can see into the cartridge case.
I’m switching to a bulkier powder so that a double charge, if it ever occurs again, will spill over the case mouth and make a big, impossible-to-ignore mess.
I don’t mind sharing with you that when this first occurred, my thought was to abandon the Lee Classic turret press and return to loading on my single stage RCBS Rockchucker press. Double charging a case using a single stage press is (in my opinion) a much less likely thing to happen, and in 50 years of reloading on the Rockchucker, I’ve never had it happen.
When you load on a single stage press, it’s easier to view all of the charged cartridge cases. If any have been double charged, they will stand out.
I have a friend who works for Colt in their customer service department, and he tells me that when he sees a blown up gun sent in, there’s usually a progressive or a turret press somewhere in the story. But good buddy Paul told me to think about it a while longer and I did. I’m back to using the Lee turret press, but I’m a little older and a lot wiser now. The older part wasn’t really necessary, but the wiser part is and hopefully, readers can benefit from my screwup.
Slowing Down and Paying Attention
You know, when I worked in the munitions industry I participated in two fatality investigations where inadvertent detonations were involved. Multiple human errors caused those inadvertent detonations, and one of the key human errors was complacency. That’s what I had become using the Lee Classic turret press: Complacent. I’d been reloading for so long I became entranced with the turret press’s speed, and I started reveling in the thousands of rounds I was cranking out (and it was, literally, thousands of rounds). I always knew that double charges or skipped steps (like crimping) were really, really bad, but I just never thought I’d be the guy making either mistake. I wasn’t taking the time I needed to and I became complacent. That’s changed. I’ve slowed the pace, and you can bet I’m looking into every case immediately before I place a bullet on top to make sure I haven’t double charged it. You can also bet that I’m making sure I hit the crimping step on every round. I’ve actually posted a sign on my reloading bench with the best advice I’ve ever given myself: Slow down.
Better Lighting
Good buddy Duane (who is both smarter and better looking than me) also reloads with the Lee Classic turret press. Duane mounted a light above his press to allow better visibility into the charged case. I’m going to do the same.
Standing Up
I used to sit at the reloading station. My bench, though, is higher than a standard work table (it’s how I had it built 50+ years ago). When I’m seated, it’s not as easy to see into the case. I reload standing up now, and that allows seeing directy into the case.
Bulkier Propellant
My last change concerns the propellant. One of the things I investigated shortly after my 9mm hand grenade episode was if it was possible to get a double charge into a 9mm case. With the load I was using (5.4 grains of Accurate No. 5), the answer was yeah, you could. It even had a little room left over. My thinking at the time was that I needed to go to a propellant that would overflow the case if I double charged it. In the past, I’ve found 4.8 to 5.0 grains of Unique with the 125 grain bullet is a marvelous 9mm load. Doubling that (i.e., 9.6 grains of Unique will overflow a 9mm case) and if that happens when loading, that’s a good visual indicator that something’s wrong. So, from here on out when using the Lee turret press, my load will be 4.8 grains of Unique. That only works for 9mm, though. Other cartridges (the .45 ACP, for example) will handily swallow a double charge. There, it’s back to paying serious attention (which we need to do on everything when we reload; it’s just using a propellant that will spill over with a double charge adds an additional indicator if things aren’t done correctly).
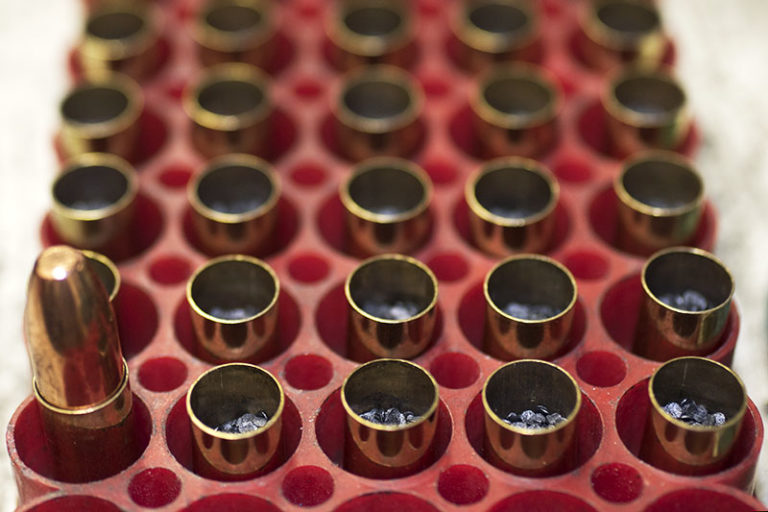
A double charge in the case on the left. My load was 5.4 grains of Accurate No. 5. I loaded both cases with this charge, and then took the propellant from the case on the right and poured it into the case on the left. A 9mm can easily swallow a double charge of Accurate No. 5.A single (correct) charge: 5.0 grains of Unique in a 9mm case.The most Unique I could load into a 9mm case was 7.9 grains. A double charge would spill over the top of the case and be immediately noticeable (at least in 9mm; the .45 ACP case will take a double charge of Unique without a spillover).
Incidentally, when this happened, I wrote to Lee and asked them if they offered any accessories to prevent a double charge (my Star reloader has a mechanical feature that prevents this from occurring). The answer was no, but Lee advised using a propellant that, well, read the above again and you’ll know. I checked the literature that came with the Lee Classic turret press kit, and sure enough, Lee has a recommendation in there to do exactly what I describe here.
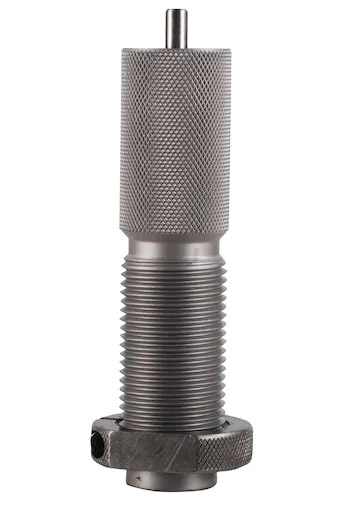
Hornady’s Powder Cop
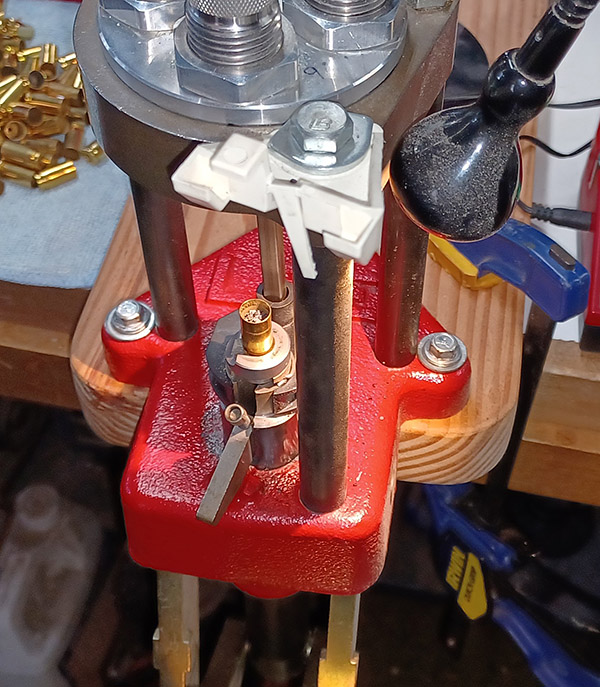
When I posted earlier blogs on Facebook, a few people mentioned a reloading cop. In 50 years of reloading, I’d never heard of such a thing, but I found it on Amazon. Hornady’s Powder Cop die is a die with a pushrod indicator. You add it to a vacant station on the reloading turret after the propellant charging station and when the charged round goes into it, if the case is double charged the rod will go higher than it normally does.
Hornady’s Powder Cop. The idea is that a double-charged case will lift the rod another 3/16 of an inch or so.
I don’t think the Powder Cop is the answer for several reasons. The Lee Classic turret press doesn’t have an empty station in its turret (all four stations are taken by the Lee 4-die set), you would have to notice that the pushrod indicator rose marginally higher than it was supposed to, and I believe that if a double charge was present, the pushrod might just push into the powder and not rise enough to indicate the double-charge condition. The Powder Cop might be right for some people, but my equipment can’t use it and I don’t think it’s an effective check. If you missed the double charge, you would probably miss the rod extending upward a bit further, too.
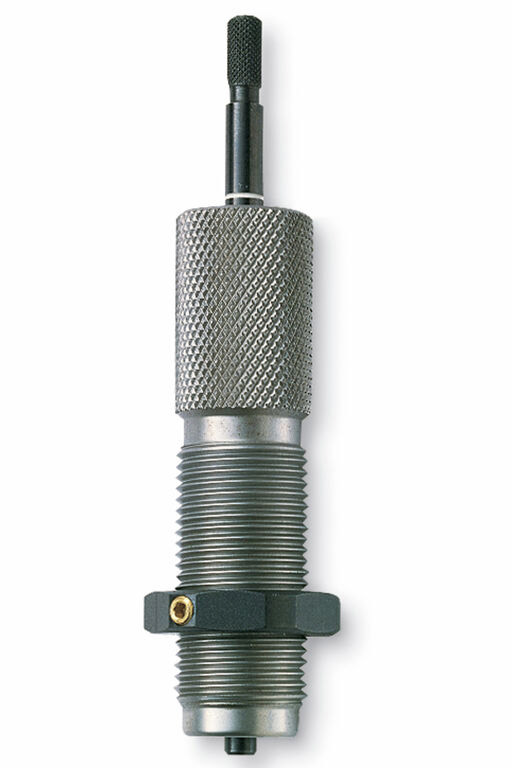
The RCBS Lockout Die
RCBS offers their lockout die which is, in my opinion, the best option for preventing a double charge on a reloading press, if the press that has an open station. If the case has an overcharge or an undercharge (or no charge), the lockout die locks the press, which positively lets you know that something isn’t right. It’s a clever mechanical device that detects either and overcharge or an undercharge and then stops the process.
The RCBS lockout die. If the case has an undercharge or an overcharge, this device stops the reloading process.
Unlike Hornady’s powder cop die, the RCBS lockout die isn’t just a rod moving up and down. The lockout die stops the show and forces you to check the cartridge that has locked up press movement. I think it’s a much better approach. The problem, though, is that you need that extra station on either a turret or a progressive press, and I don’t have that on the Lee Classic turret press (so for me it’s a nonstarter). What it says to me is that if I were to buy a new press, I would want one that has an extra station. I think the lockout die is a stellar idea; I just don’t have the real estate for it on my press.
The Bottom Line
I’m convinced that I had a double charge in the round that burst in my 1911. I’m also convinced that it’s on my to prevent it from happening again. As explained above, here’s what I’m doing:
I’m slowing down and paying attention to what I do. There is no place for complacency in the reloading world.
I will continue to use my Lee Classic turret press, but I’m installing better lighting and standing up so I can see into the cartridge case.
I’m switching to a bulkier powder so that a double charge, if it ever occurs again, will spill over the case mouth and make a big, impossible-to-ignore mess.
So there you have it. If you have any thoughts on any of the above, I’d sure like to hear them.
Never miss an ExNotes blog:
Check out our Tales of the Gun page for more firearms and reloading articles.
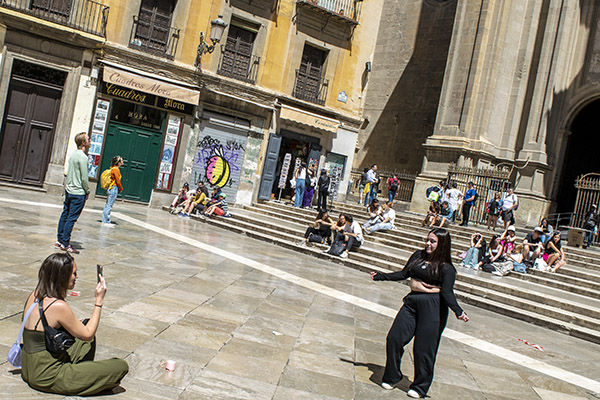
It doesn’t get more Spanish than the Alhambra. Until this visit if anyone had mentioned Alhambra I would have thought of our Alhambra here in California, but this was the real deal: The original Alhambra in Granada, Spain.
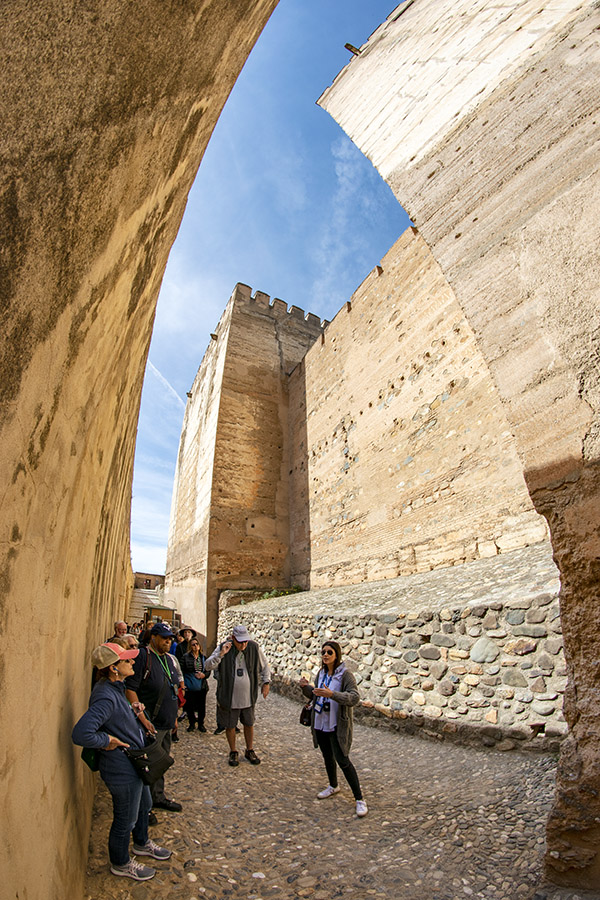
Walking the streets in and around the original Alhambra fortress. The red comes from iron in the clay brick construction. The walls aren’t really curved; the curvature here is from my Rokinon 8mm lens. It’s manual everything (f-stop, shutter speed, and focus) when mounted on my Nikon D3300 digital camera.
Alhambra translates from Arabic as “the red fortress.” The Moors controlled the Iberian peninsula from the early 8th to the 15th centuries, and many Spanish words and names include the syllable “al” (Alava, Alvarez, etc.). “Al” in Arabic means “the.” “Al” became “el” in Spanish; “al” remains the first syllable many Spanish words.
The foundations of an earlier structure show the area was first fortified in the 8th century by Visigoths (Germanic people who were part of the Roman Empire). The Arabs arrived next, and they hung around for 800 years. Our visit to the Iberian peninsula was a bit shorter (we were there for 15 days).
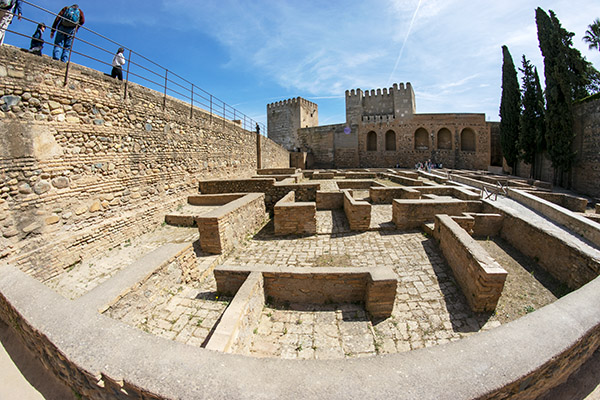
A wide angle photo of the Alcazaba (the Citadel) and its interior. This is the oldest part of the Alhambra.
The Alhambra’s ownership changed many times. Moorish rule ended in 1492 when the Emirate of Granada surrendered to King Ferdinand II and Queen Isabella (she financed Christopher Columbus’s expedition to America). Ferdinand II and Isabella only lived in the Alhambra for a tumultuous few months. While there, old Ferdinand and Isabella expelled Spain’s Jews unless they converted to Christianity, and that started the horror known as the Spanish Inquisition. I didn’t know this when we visited the Alhambra; I learned it while writing this blog. I suppose that’s good; I might not have enjoyed the Alhambra as much if I knew this while I was there.
Inside the Palace of Charles V’s courtyard, an Italian-inspired building commissioned in 1527.
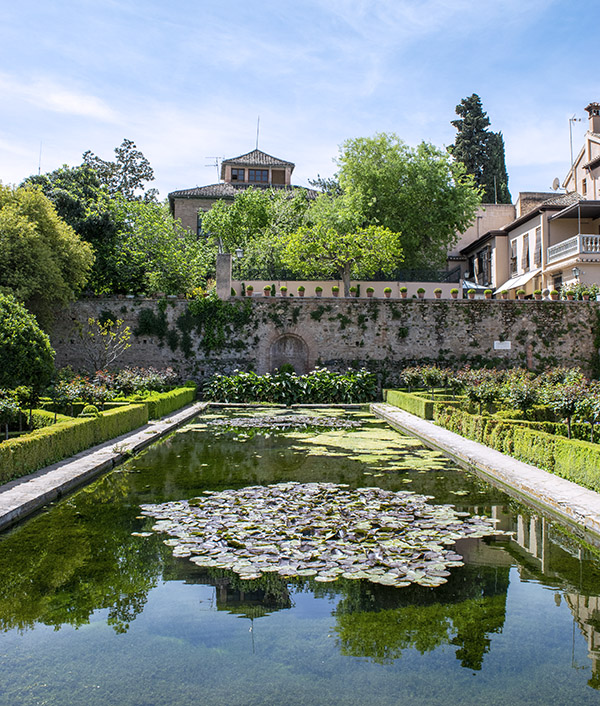
We walked the grounds of the Alhambra most of the morning. There were the fortress and palace buildings described above, the inevitable souvenir and trinket shops, and stunning gardens and courtyards.
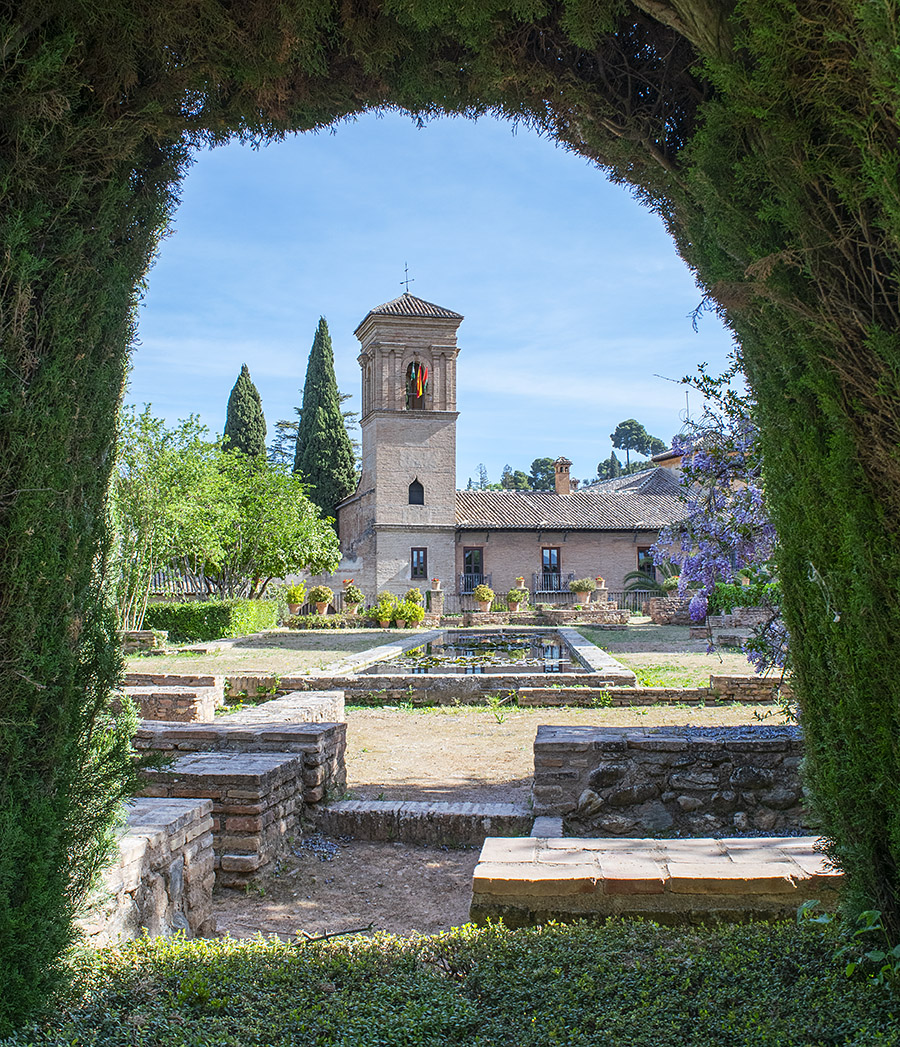
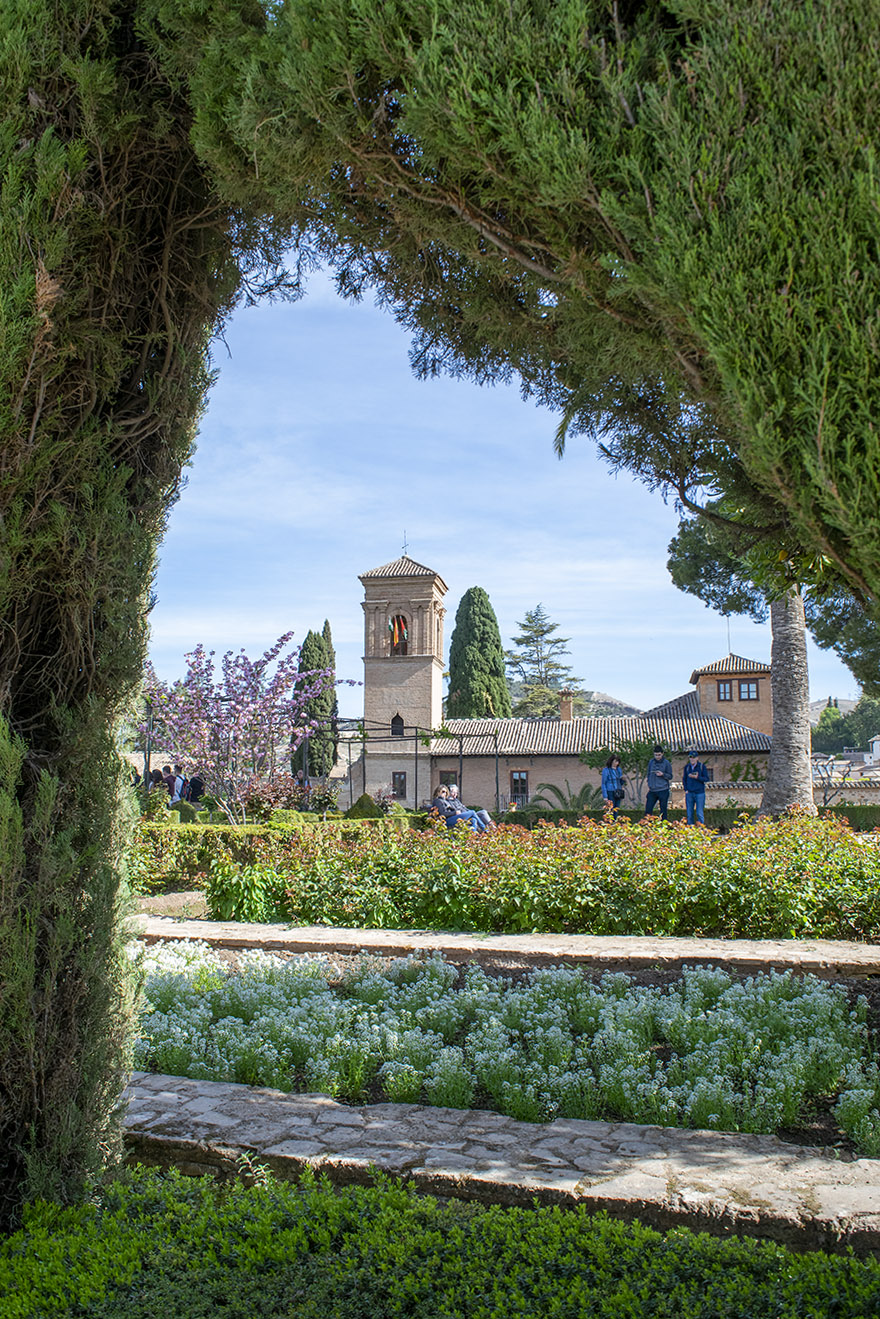
One of several pools and gardens in the Alhambra. It was almost too much to take in on a single visit. I think I just decided a return is necessary.A magnicently-framed photo of the Convent of St. Francis, also known as the Palacio del Convento de San Francisco. It was built over a Moorish building. Today, it is a hotel. I shot this photo with the Nikon kit 15-55mm lens, which is not a high end lens. The original photo doesn’t show the rich greens you see here (they were all very dark), but because I shot in RAW, Photoshop’s auto adjustment really made the picture come alive. The is the same structure and vantage point you see in the photo at the top of this blog.
After taking in the courtyards we entered the fortress area. The photo ops were phenomenal.
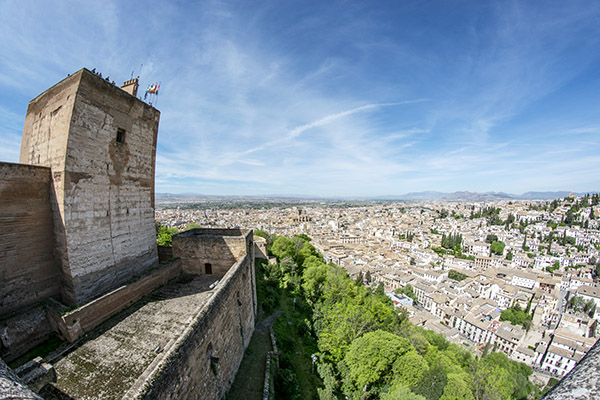
The view from the Alhambra overlooking Granada.Another view of Granada from the Alhambra.
There’s a beautiful pathway that leads from the Alhambra to Granada. It has good shade, it was cool, and the walk was all downhill.
Fellow traveler Ibrahim seizing the moment. Ibrahim showed several of his photos to me from this and previous adventures; he is an exceptionally talented photographer.Walking into Grenada from the Alhambra. The day was magnificent; the weather was perfect.
Granada is located at the base of Spain’s Sierra Nevada Mountains. It’s history and occupations parallel those of the Alhambra. The surrounding area is believed to have been populated since at least 5500 B.C. Nobody is certain what “Granada” means in either Spanish or Arabic. The city is the capital of the Spanish province of Granada.
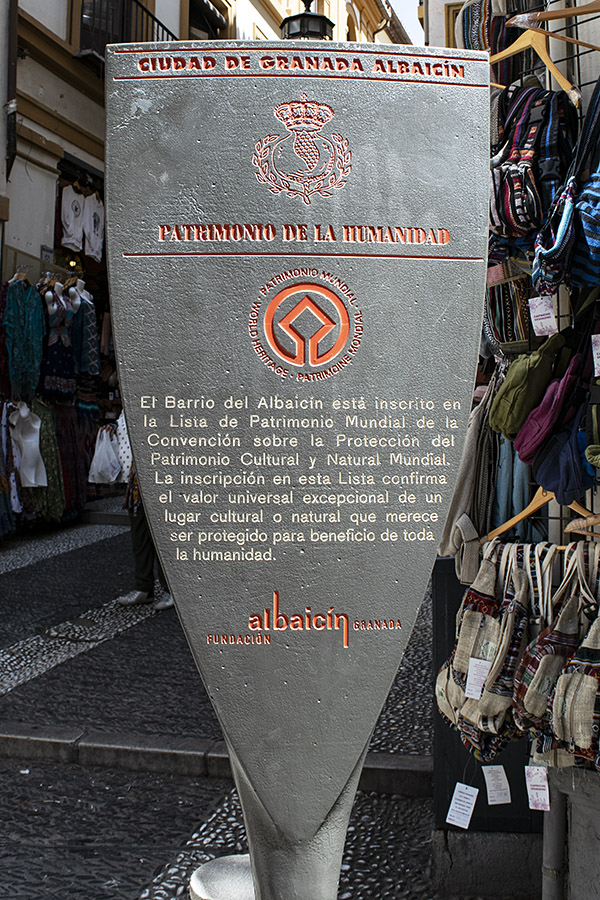
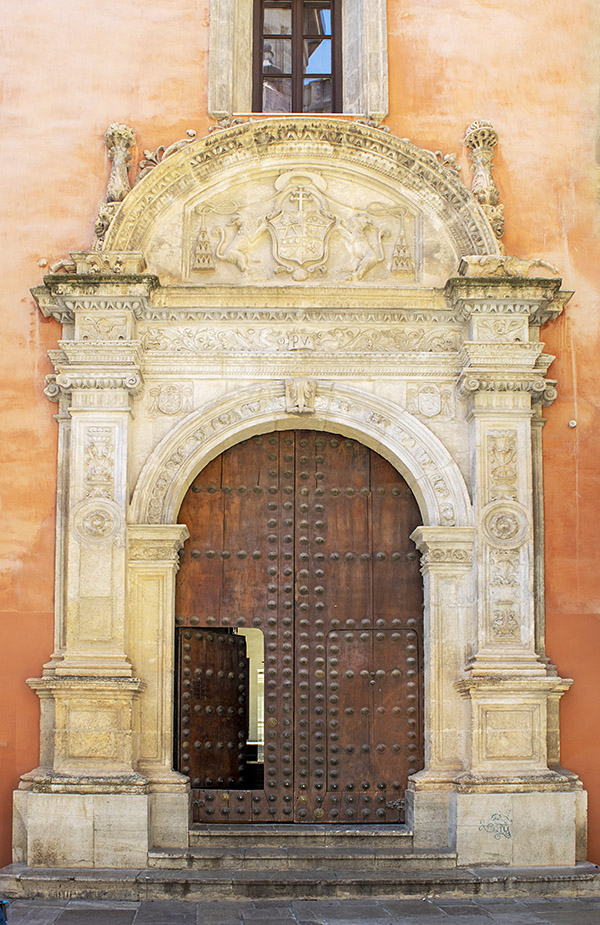
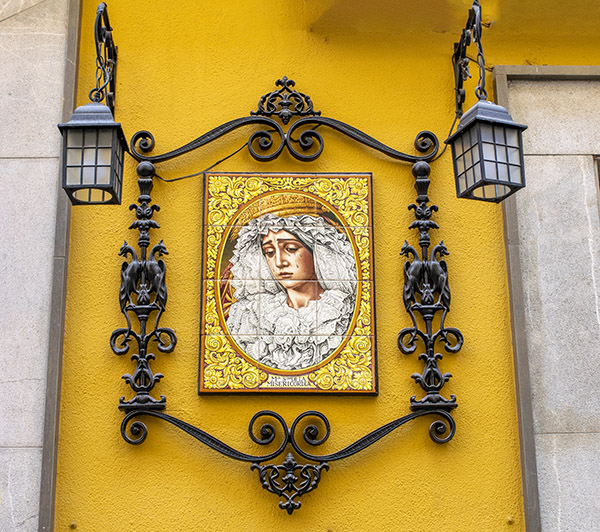
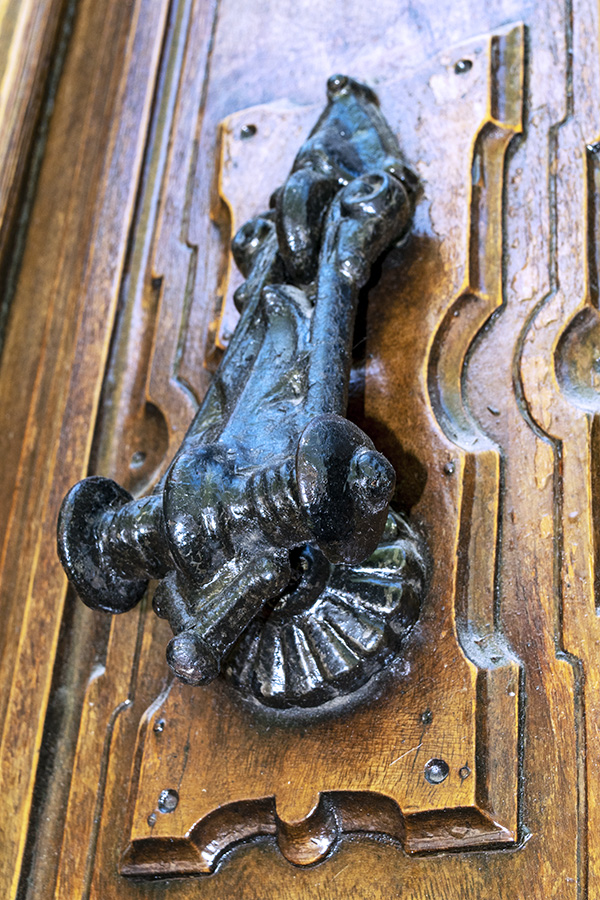
A Granada sign explaining the Albaicin area, an historic area that retains its medieval look and streets.One of many photogenic doorways in Granada.Exterior artwork that demanded a photo.As always, an ornate Spanish knocker.Decorative borders for sale in a Granada shop.
Granada’s city center has a beautiful town square, bordered at one end by the Santa Iglesia Catedral Metropolitana de la Encarnación de Granada. We stopped to take it all in after we enjoyed a lunch in one of Granada’s many sidewalk cafe restaurants. The first hit of empanadas there was free, but our initial empenada serving was a seafood medley with little octopuses (octopi?) we didn’t like. Our waiter picked up on that, took them away, and returned with chicken empanadas. Lunch was great.
Anything for a few likes, I guess. These young gals staged an impromptu belly dance video in front of the Santa Iglesia Catedral Metropolitana de la Encarnación de Granada.
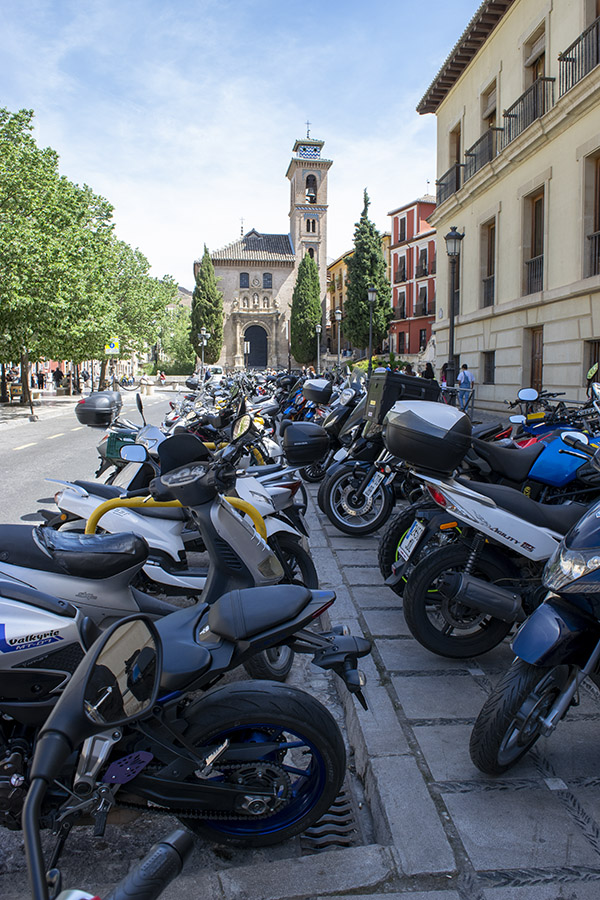
As was the case in every city we visited in Spain and Portugal, two-wheeled transportation is part of the culture. Our tour was by bus and high speed rail and it was great, but I missed being on a motorcycle. The traffic didn’t look too crazy and on previous motoadventures I made it through China and Colombia. I think I could handle Spain and Portugal on a motorcycle. Maybe next time.
A strong motoculture….my kind of place.
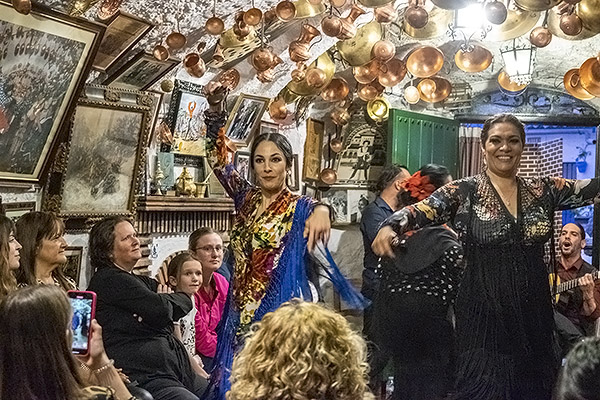
Granada was great. That evening, we had a wild taxi ride to the top of a mountain to watch the Flamenco dancers. That’s coming up next, so stay tuned.
Watch for our next blog on the Iberian adventure!
Here are links to more Spain and Portugal articles:
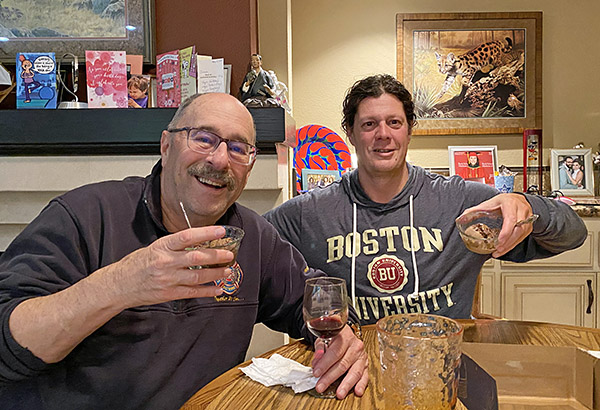
Good buddy Mike Huber rolled through So Cal a few days ago and spent the night at Casa Berkowitz. It was a fun visit.
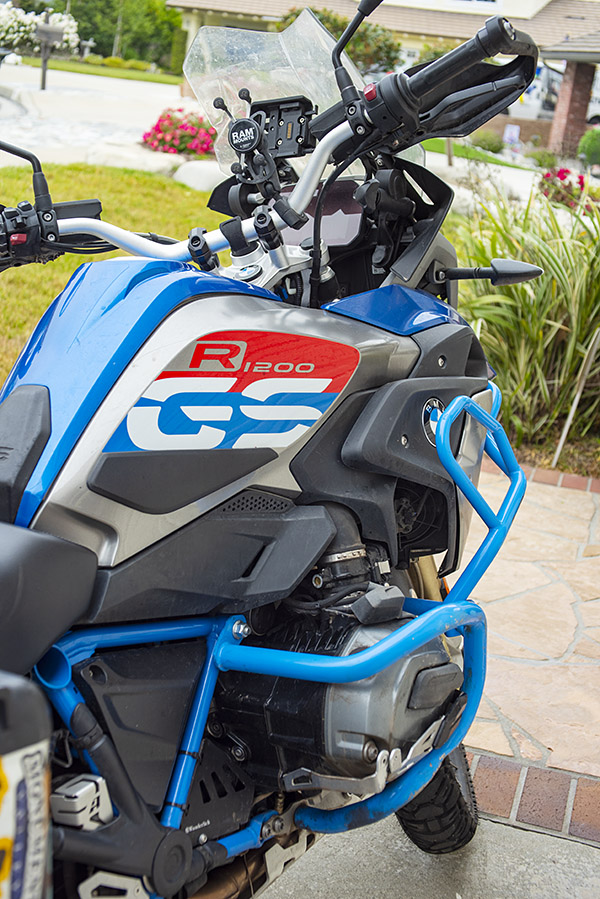
Mike Huber on the UberMoto. Mike’s current GS is his second one.
I first met Mike on one of the CSC Baja expeditions, and the circumstances of our meeting hit on shared interests (motorcycles and Baja) and a shared background (we are both alums of the Benning School for Boys).
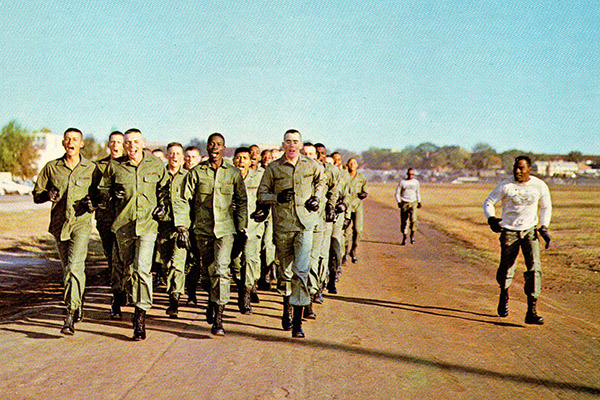
An August 1972 jump school postcard purchased at the Benning School for Boys Post Exchange.
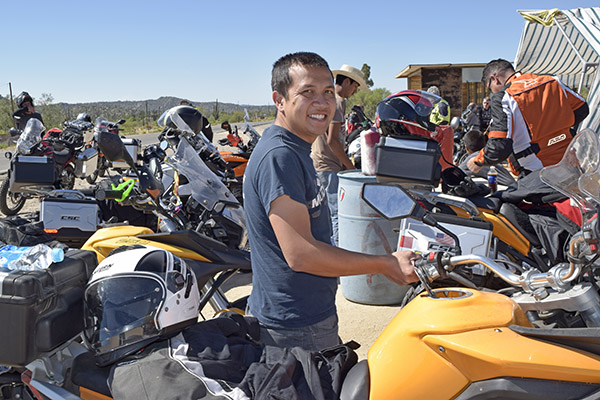
The CSC crew (me and maybe a dozen fellow RX3 riders) had stopped for gasolina on the 200+ mile stretch between Baja’s El Rosario and Guerrero Negro. Cataviña is about 130 miles south of El Rosario, and for a long time it has been the only place to buy fuel on that section of Mexico’s Highway 1. There were no gas stations then; enterprising Mexican capitalists sold it from bottles on the side of the road (capitalism rules, my friends). Today there is a Pemex in Cataviña, but that’s a relatively recent development.
Refueling in Cataviña. That’s good buddy Tuan, an RX3 rider and one of my former students at Cal Poly Pomona.
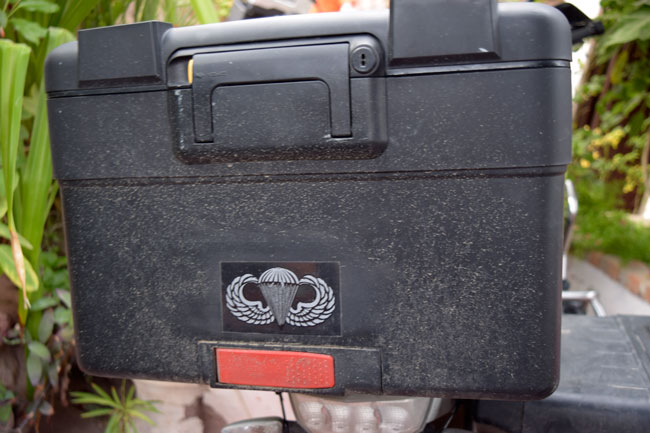
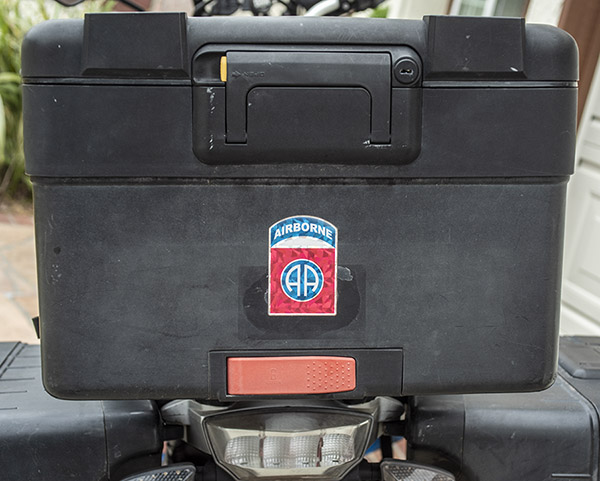
You can imagine the scene…a dozen bikes crowded around a handful of people selling fuel out of jugs. Or maybe you don’t have to imagine it; just take a look at the photo above. It was a hot day, we’d been on the road a while, and we were two days into a seven-day trip. I looked at the other bikes around me and on one of the motorcycle tailpacks I saw a decal that commands instant and profound respect from anyone who’s been there: The winged parachute emblem showing that the bearer graduated from the US Army Airborne School at Fort Benning, Georgia.
Mike’s jump wings on the back of his first GS. It was this emblem that first alerted to Mike and his background. Mike’s done 19 jumps (5 in jump school and another dozen when he served with the US Army’s 82nd Airborne Division).When the jump wings fell off, Mike replaced them with an 82nd Airborne Division decal. The “AA” stands for “All American.” I learned that when I asked one of my jump school instructors; he first told me that for us trainees, it stood for “Almost Airborne.” Then he told me the real story.
That’s weird, I thought. I had only known the guys on this ride for a few days, I’d seen all of their bikes, and if any had been adorned with jump wings I would have picked up on it immediately. I was pondering how I had missed that when I looked at the guy standing next to the bike. It was Mike Huber, whom I had not met yet. My next befuddled thoughts were that I thought I had met everyone. Where did this guy come from? Then I looked at the motorcycle. It wasn’t an RX3. It was a BMW GS 1200. The two machines looked enough alike that I had not noticed the difference when Mike worked his way into our herd of turtles at the gas stop in Cataviña. I looked up at Mike again and he was grinning. He knew I was confused and I think he was enjoying my being perplexed.
Mike’s current GS 1200. It’s a stunning motorcycle.
Mike and I hit it off immediately. He stayed with us a couple of nights later in Mulegé (at good buddy Javier’s magnificent Las Casitas Hotel), and we’ve kept in touch ever since. Mike did a guest blog or two for us here on ExNotes, and he became one of our regular writers last year.
When Mike told me he would pass through our neck of the Peoples Republik, I told him we wanted him to stay the night and enjoy a barbequed salmon dinner with us.
The port saddlebag on Mike’s GS.And the starboard pannier. Mike gets around, as you know from his blogs here on ExNotes.
We had a great visit. The Tecate cerveza (and later, the Spanish wine) flowed freely. Sue crafted a desert we recently learned about on an olive plantation in Spain (see our most recent blog), and it was awesome.
The post-dinner treat: More vino, and chocolate gelato topped with orange-infused olive oil from the Basilippo plantation in Spain. Olive oil on ice cream sounds strange, but take my word on this: It’s wonderful.
As always, it was great to spend time with my good friend and fellow scribe Mike. The next morning after a good breakfast Mike was in the wind again, headed north toward Ojai, the Bay area, and beyond. You will be able to read about those travels right here, on your favorite motorcycle blog.
Good times and good friends, folks. It’s what life is all about. That, and clicking on the popup ads.
I like olive oil and I cook with it a lot, so when I heard we would be visiting the Basilippo olive oil plantation and factory in Spain it sounded like a great plan to me. I knew that extra virgin olive good was the real McCoy (kind of like 100% agave Tequila is the good stuff), but that was the extent of my olive oil knowledge. I learned quite a bit more about olive oil on this visit.
The Basilippo company headquarters.
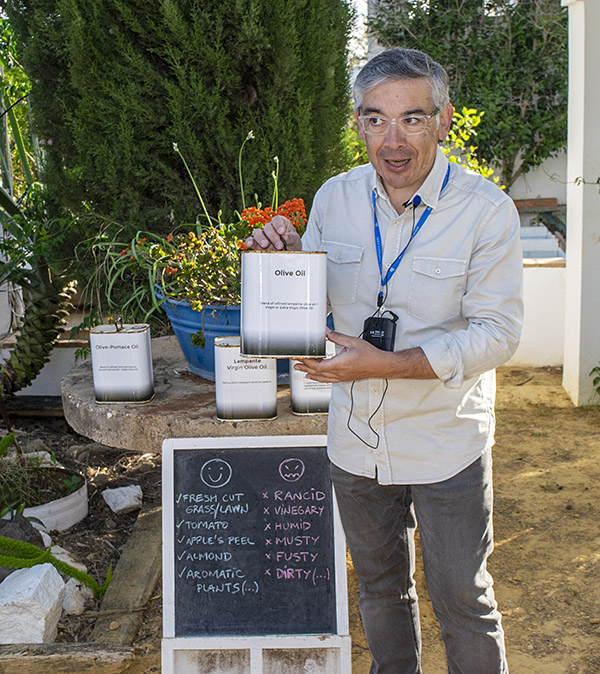
Did you know that there’s no such thing as extra extra virgin olive oil? (extra virgin is as good as it gets.) Did you know that by international agreement every bottle of true extra virgin olive oil has a “use by” label on the back of the bottle? (The “use by” date is two years after the olives were harvested.) If you see a bottle of olive oil that claims to be extra virgin but there’s no date on the back, you might want to take a pass. Did you know that darker bottles are better for preserving olive oil than are lighter bottles? Did you know that for the best olive oil, the olives are pressed within 4 hours of being harvested? All of this was new info to me, and all was delivered by our host, Isaac Martin.
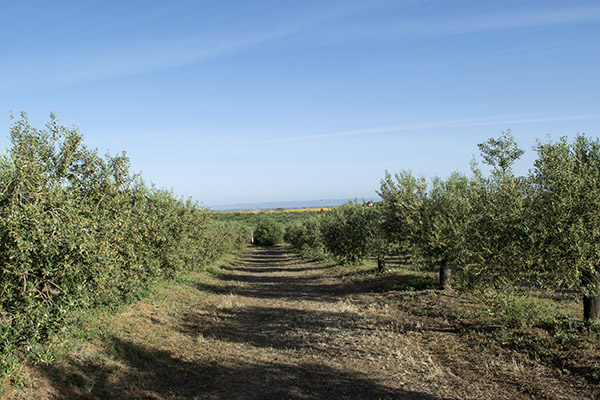
Olive trees on the Basilippo plantation.
Meet Isaac Martin, oil mill master, olive expert extraordinaire, and our presenter at the Basilippo plantation. Mr. Martin was an engaging, entertaining, and informative speaker. Isaac told us that with “only” 14,000 trees, Basilippo was a “boutique” producer. That sounds like a lot of trees to me, but hey, Isaac is the guy would know.
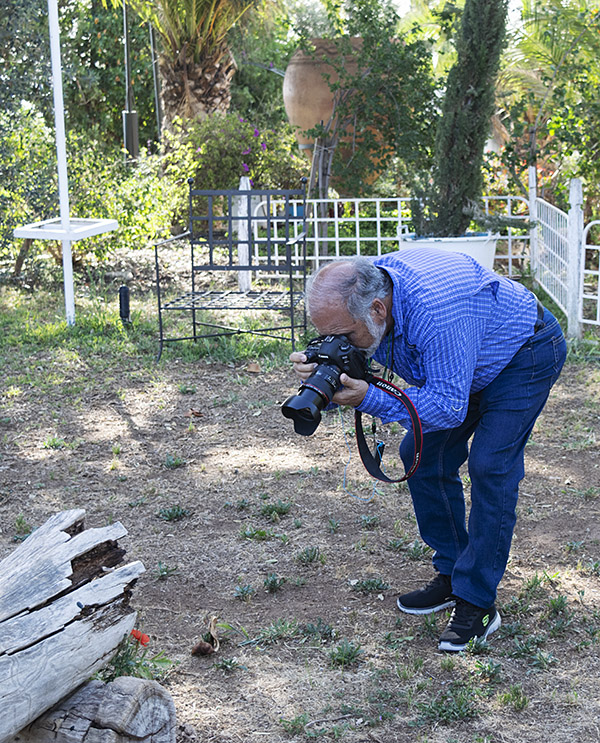
Isaac Martin, who provided us with a marvelous presentation.Good buddy and fellow photography enthusiast Ibrahim photographing a flower. Ibrahim showed me a few of his other photos. He is one of the most talented photographers I’ve ever known.
We entered the factory and tasting area next. Good things were in store for us. The factory was about what I expected. It was not running when we were there, as the harvest had already ended. The tasting was an awesome experience. Isaac told us we would be enjoying olive oil and ice cream. Yep…you read that right. Olive oil and ice cream. I know…it sounds gross. Boy oh boy, were we ever in for a surprise.
A monitor in the Basilippo oilve processing factory.
Let me type those words again. Olive oil and ice cream? Yep, I thought it was crazy, too, until I tried it. At the end of our tour, Isaac took us to a room where two small glasses (with a bit of olive oil in each) were waiting for each of us. That’s the photo at the top of this blog. Isaac showed us how to us to rub the bottom of the glass, remove the paper covering it, and inhale the olive oil aroma. It was wonderful…with just a hint of orange. Then the staff brought in a small plate of chocolate ice cream for each of us, and Isaac asked us to pour the olive oil over the ice cream. I know…it sounds like a screwy combination…but wow…was it ever delicious!
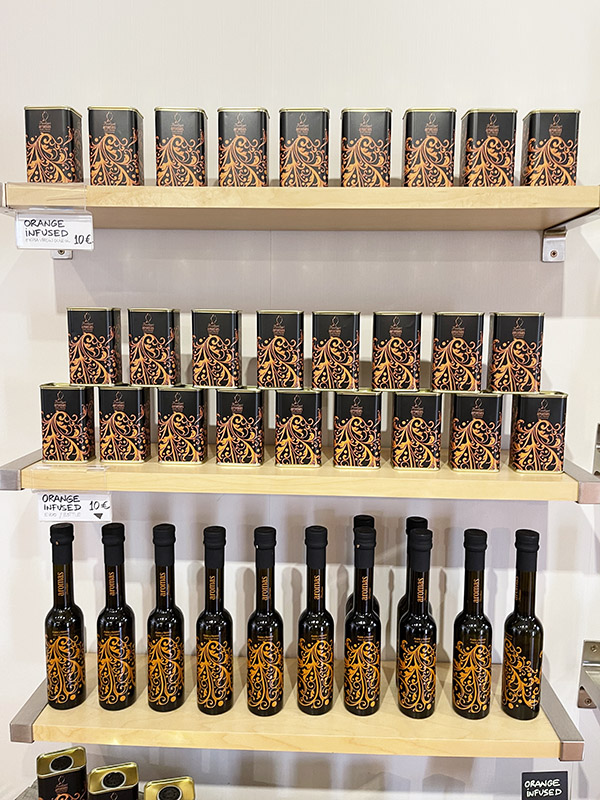
Orange infused olive oil….gift shop offerings at Basilippo’s. Who knew?
Predictably, the path out was through the Basilippo gift shop. Sue bought three containers of the citrus-scented olive oil. I was a bit nervous about that, but all three made it back to California without leaking. Two of the containers were for gifts; the third was for us. When we finish it, you can bet we’ll be ordering more and if you swing by our place for dinner, Basilippo orange-infused olive oil over chocolate ice cream will be on the dessert menu.
Basilippo also sells their olive oils online and they ship to the US. Here’s the link:
It was 50 years ago that I joined the U.S. Army. I went to college on an ROTC scholarship and graduated with a Regular Army commission, the same as the people who graduate from West Point. Three days before graduation, the Army told me my first duty assignment would be staying at Rutgers and getting a master’s degree, all courtesy of Uncle Sugar. Guys I went to high school with were going to Vietnam; the Army sent me to grad school. It didn’t feel right, but it was what it was.
The ROTC scholarship was a sweet ride; grad school was an even better deal. Uncle Sam picked up the entire tab, paid me a housing allowance, and I drew my full pay as a second lieutenant. As I recall, it was something like $436 per month. I couldn’t believe how sweet life was and how I was rolling in dough (grad school was actually easier than undergraduate school). Three of the guys I went to high school with were killed in Vietnam. Several more served over there.
Memorial Day has always been a special day for me, and not just because of what I wrote about above or my time in the Army. I think about the guys I knew and I remember them. You don’t have to have served to do that; all of us should take the day, enjoy it, and think about the people this special day honors: Those who were killed in action fighting America’s wars.
I photographed the Honda VFR you see in the big photo above in Coimbra, Portugal. Bait and switch? Perhaps. We are a motorcycle site, sort of. I’ll try to work in a little moto content when and where I can. For us on this adventure, it was all walking, buses, and high-speed rail transport (and that was really cool). But that’s coming up later.
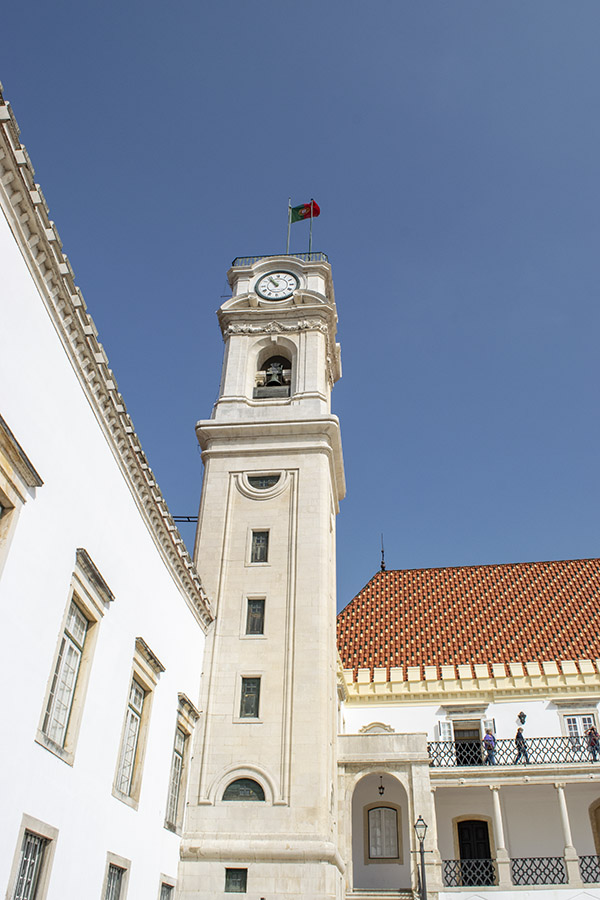
Coimbra was another stop on our recent trip to the Iberian peninsula. Coimbra is a college town on the Rio Mondego. It was Portugal’s medieval capital before the Portuguese government relocated to Lisbon. But this college town was particularly cool. The UNESCO-recognized Universidade de Coimbra is one of the oldest and most prestigious universities in Europe.
On the Universidade square in the medical school area in Coimbra. It was a stunning day.
Like many areas in Portugal, Coimbra also has a rich wine producing heritage. Many of the signs display this heritage.
The shape of signs in Coimbra. Wine was everywhere in Spain and Portugal. We had wine with virtually every meal except breakfast.
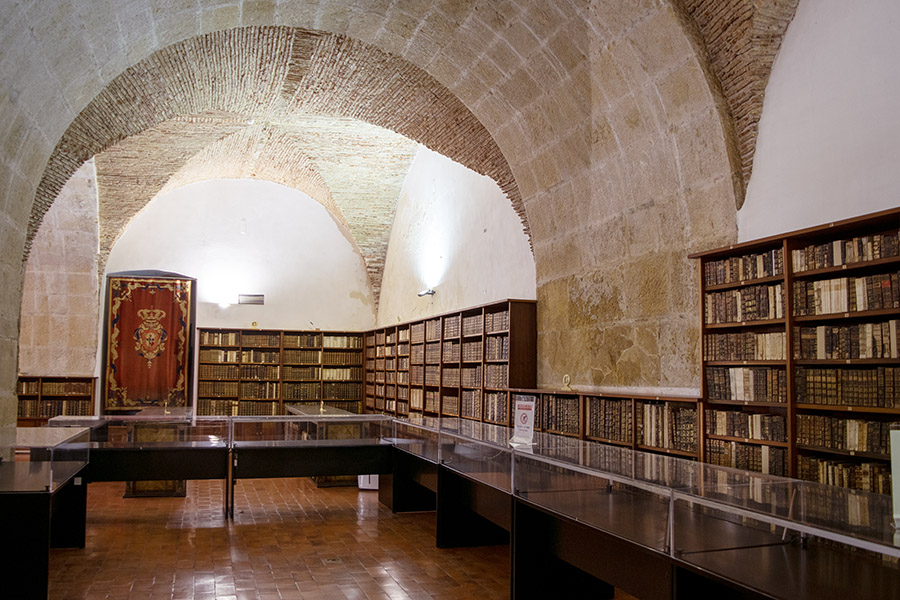
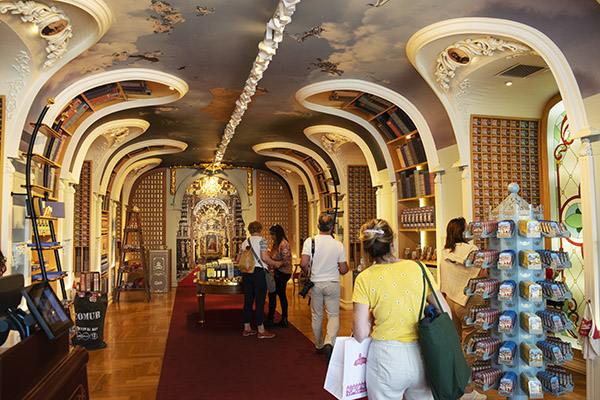
The Biblioteca Joanina is one of the world’s great libraries. One of the things that is particularly interesting is the way the librarians protect the ancient manuscripts from insects (insects are the books’ natural enemies, because they eat the pages). Bats reside in the library. They live behind the books. The bats come out at night and eat the insects in the library. I can’t make this stuff up, folks. This really happens.
In the Joanina Library.Books, books, and more books. The principal threat to these books is insects eating the pages. The University has an app for that.
I grabbed a macro shot or two as we wandered the campus. This sidewalk guardpost was interesting.
Photo ops galore. Nothing fancy with equipment here…all these shots are with a basic Nikon consumer-grade D3300 DSLR and 18-55mm kit lens.
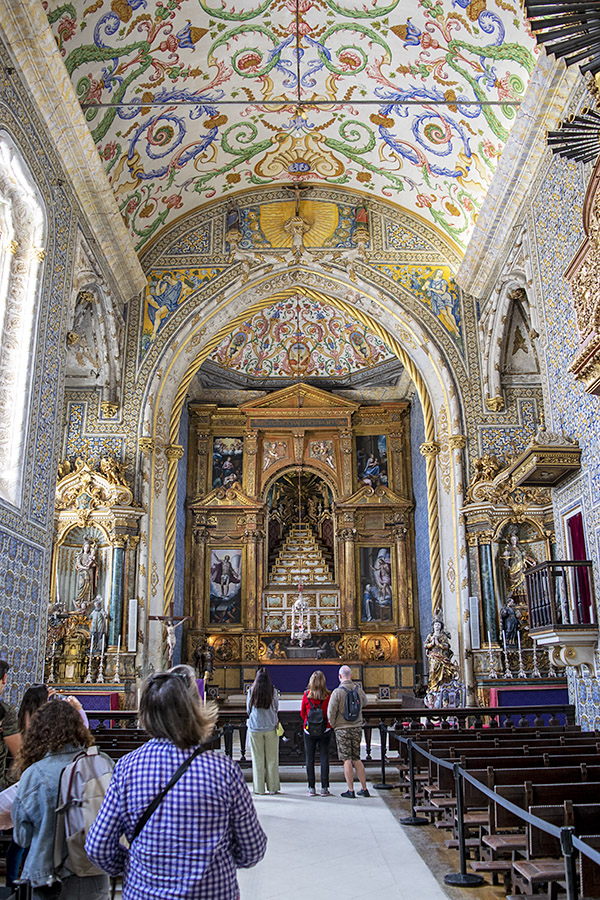
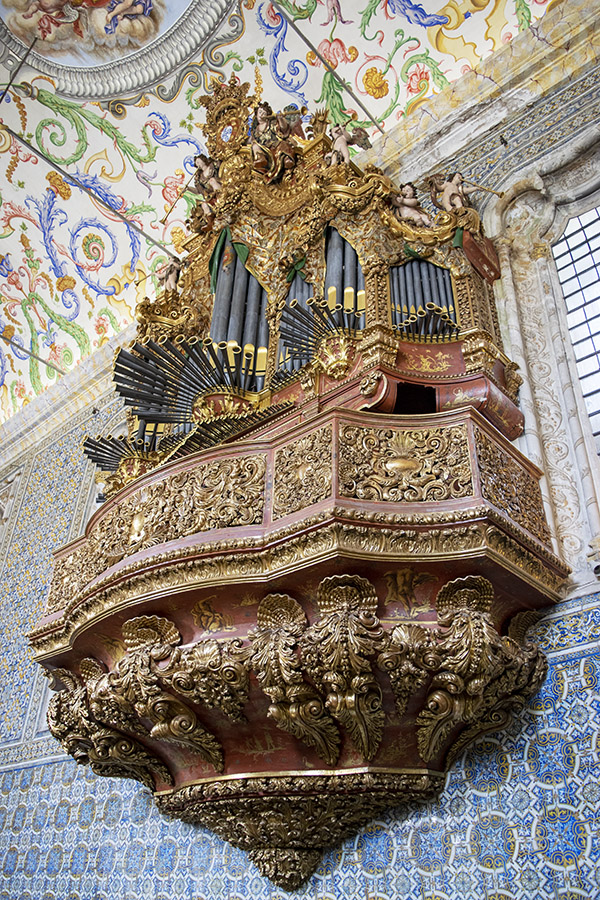
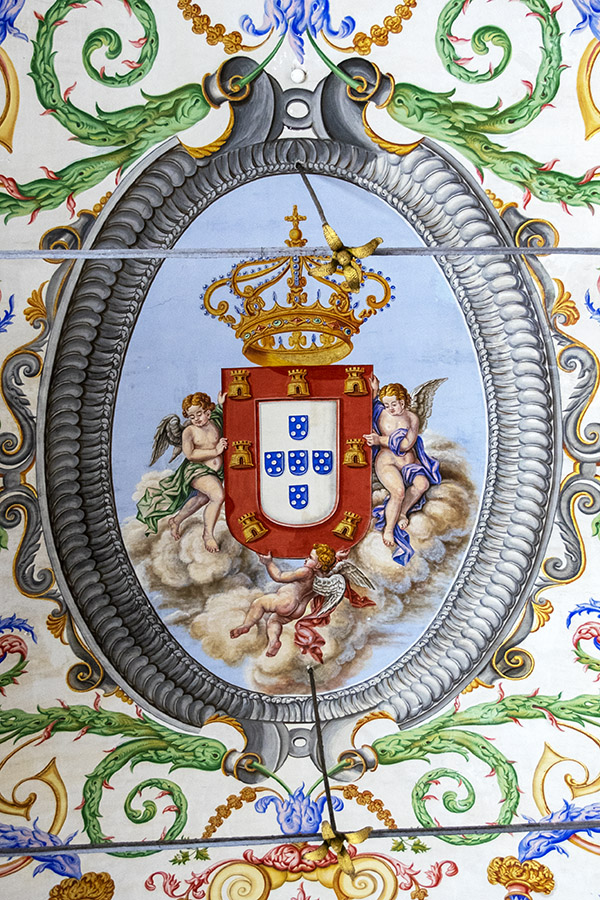
As we would find to be the case in virtually every Portuguese and Spanish town, Coimbra has a cathedral. Actually, it has three. We visited St. Michael’s at the University of Coimbra. That’s where I grabbed the interior photos below.
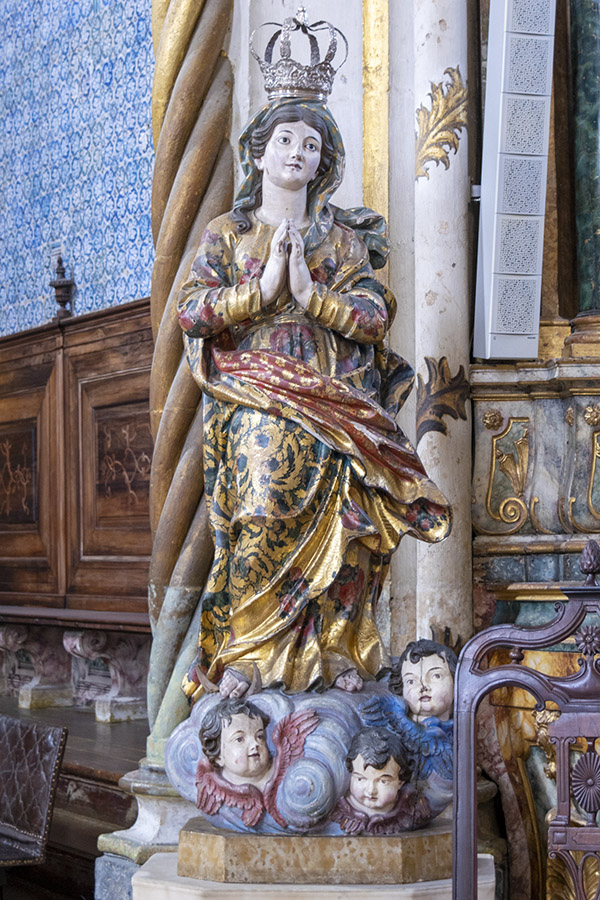
Inside St. Michael’s with our fellow travelers.The tile work, the organ, the roof colors…I had a great time on this trip.A coat of arms, surrounded by scrollwork.A statue in St. Michael’s.
After walking around the University, we walked into the city. It was pleasant. The weather was comfortable, the city was beautiful, and the photo ops continued.
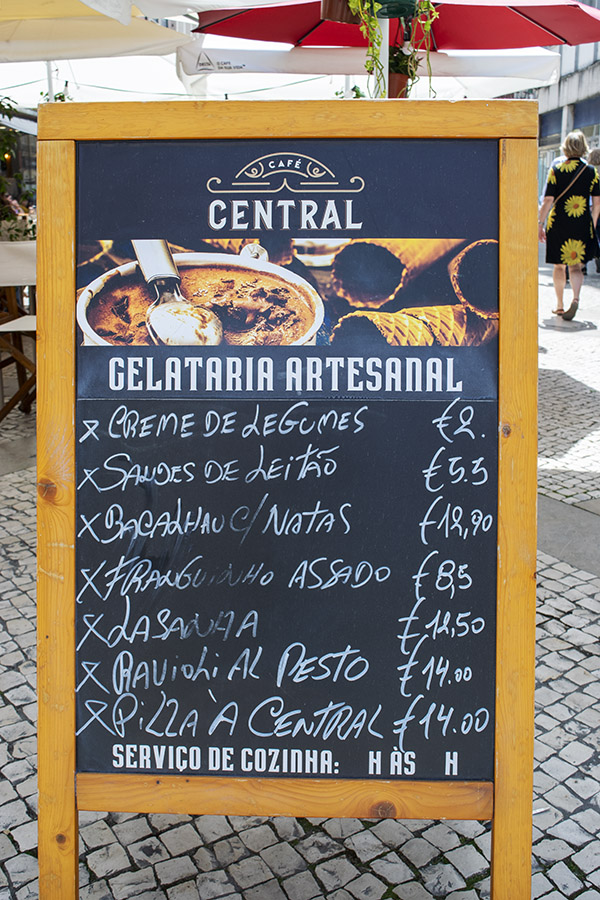
One of many statues in downtown Coimbra.This almost looks like a fancy ancient church or castle. Actually, it was a store catering to tourists with a unique product line: Canned sardines.Another statue in the Coimbra town square.A street menu for one of the many restaurants in downtown Coimbra. The food was excellent; the prices were reasonable.
I enjoyed Coimbra. As a retired college professor, I thought visiting a campus was a cool thing to do. We had a fabulous lunch, and then our journey continued.
Back on the motorcycle thing again…I’ve traveled by motorcycle in some pretty exotic locales. I think bopping around Europe on a motorcycle would be a fun way to see the continent. I wouldn’t want a big bike, and even on the freeways, the speeds are such that a 250 or a 400 would be just fine. Maybe someday. I know my friends in Chongqing read the ExNotes blog. If you need somebody to ride around Europe on your motorcycles to spread the gospel, the ExhaustNotes staff is available. We’re your boys (and one girl). Call us.
Stay tuned. I’ll work in more from Spain and Portugal as time and other blogs permit.
Keep the content flowing…please click on the popup ads!