China’s Shaolin Temple

By Joe Berk

I posted a blog yesterday about Chinese pocketknives and drew a few comments (as I knew I would).  One of them mentioned Shaolin martial arts, and that prompted a response from me about the Shaolin Temple in China.  Not a lot of folks here in the US have been to the Shaolin Temple.  I know of two who rode there on motorcycles (that would be Joe Gresh and yours truly).   I covered that visit in Riding China, and I thought it would be good to share a part of that chapter with you today.  Who knows…I might even sell a few books by doing so.  You know, so you can read the rest of the story about our ride through China.


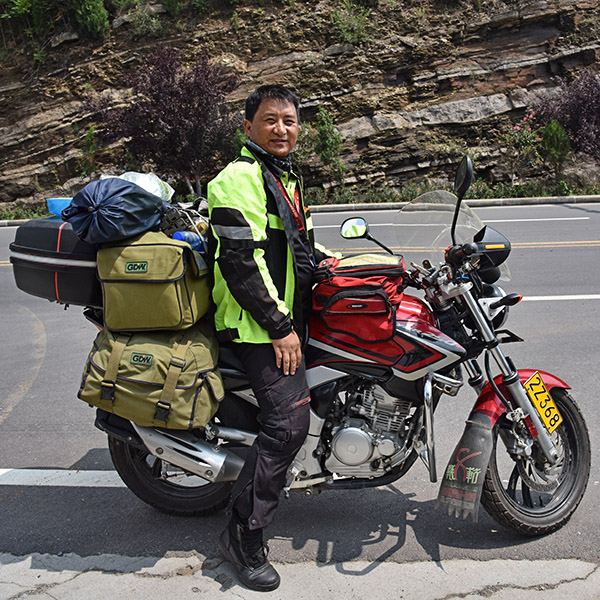
We continued riding and entered a mountainous region. I liked that a lot. The roads were nice, there wasn’t much traffic, and because we were both moving and climbing, the heat abated a bit. We stopped for a break, and a fellow came along on a 250cc Yamaha that was configured for touring. He stopped and chatted with us and we took turns taking pictures of each other. His bike looked good. We only saw a few other Chinese on our trip who were touring on motorcycles.

A Chinese motorcyclist on a 250cc Yamaha. His luggage is from Lester Peng’s motorcycle luggage company. Lester rode with us last year on the 5000-mile Western America Adventure Ride.

I didn’t realize it at the time, but we were very close to the Shaolin Temple when we stopped to talk to the Yamaha rider. That would be our next destination this day. Another fellow then came by and he had an animated conversation with Sean (our guide). It turns out he was selling, Sean was his mark, and the guy was working Sean hard. This guy owned a restaurant and he wanted us to eat there. He was successful; we did.

We didn’t pause for naps after this lunch, but Sean was soon having another excited conversation with folks outside the restaurant. I didn’t know what they were discussing, but I later realized it was about transportation and how we would get into the Shaolin Temple. The bottom line to this conversation was that we all piled into three small gray minivans that took us about two miles down the road, back the way we had ridden to get to the restaurant.

What I learned later was that there were two ways to get into the Shaolin Temple complex. One was through the main gate, and apparently that cost more. The other was a woodsy trail through the mountains that required a climb over two or three mountains on a slippery muddy trail. If you did that, you could sneak into the Shaolin Temple complex for free. That’s what we did, and that climb was rough. The trail was slippery, and by now the temperature and humidity were up again. Had I known what was going on I would have gladly paid to go in through the front door, but I didn’t realize what we were doing until I was doing my best impersonation of a mountain goat in the hills behind Shaolin.

So here’s the deal on the Shaolin Temple: It’s famous as the home of Chinese Kung Fu. No kidding; it’s both a Buddhist Temple and a world-renown Kung Fu school (the original Kung Fu school, actually). It’s where Bruce Lee learned his craft, and if you’ve ever seen a martial arts movie with scenes that have large numbers of young Chinese guys learning the martial arts, it was almost certainly filmed here.

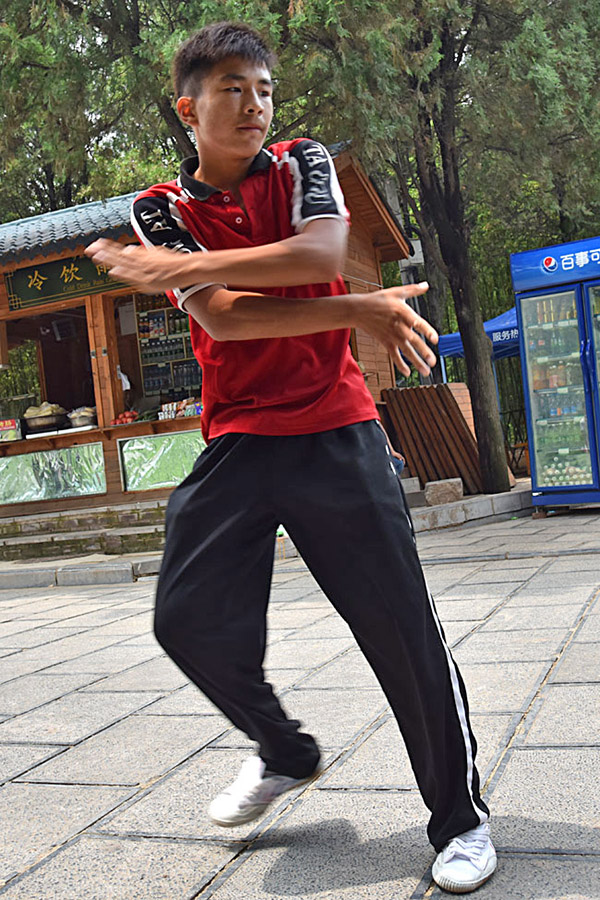
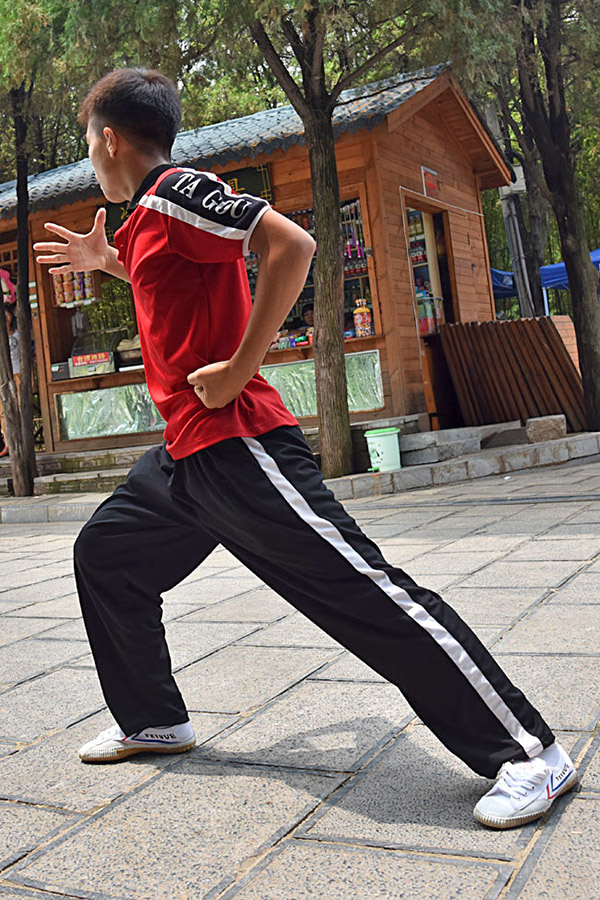
The Shaolin Temple was beautiful. As we walked along its well-manicured paths, a young guy went into a martial arts routine that was mesmerizing. It was something right out of a movie. The guy was executing all of these snappy martial arts stances (one seemed to flow into the next) in a manner that almost made the display a dance routine. It probably only lasted a minute or two, but when it ended, a large crowd had already gathered and everyone applauded. I enjoyed seeing it, even though I know nothing about any of this stuff.

A martial artist demonstrating his moves at the Shaolin Temple.
More moves. I told the guys I could do this, but I don’t think they believed me.

The Buddhist Temple was beautiful, but by then it was so miserably hot and humid we weren’t enjoying anything. We were in a walled courtyard that allowed no airflow, and I couldn’t seem to get my body temperature down. I was still perspiring from climbing over the mountains.

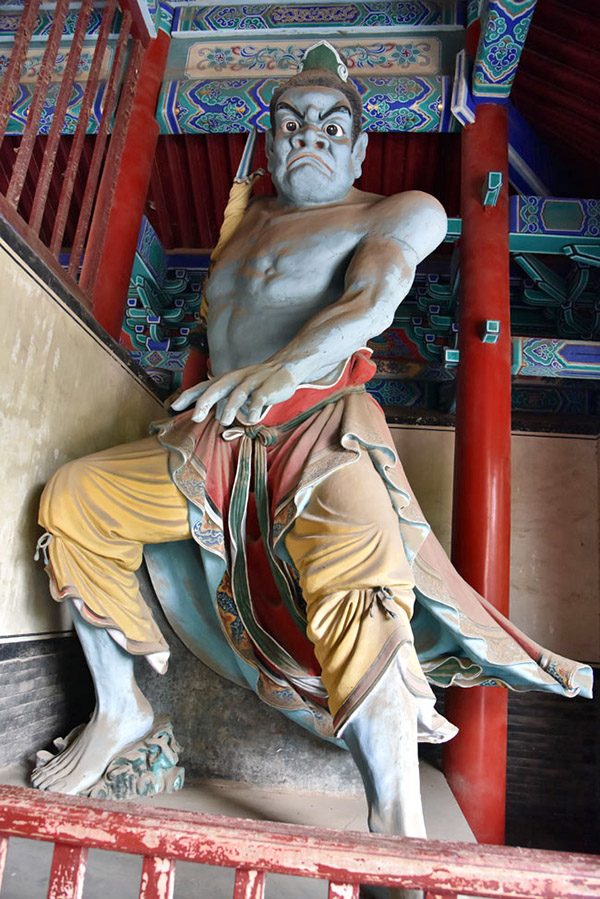
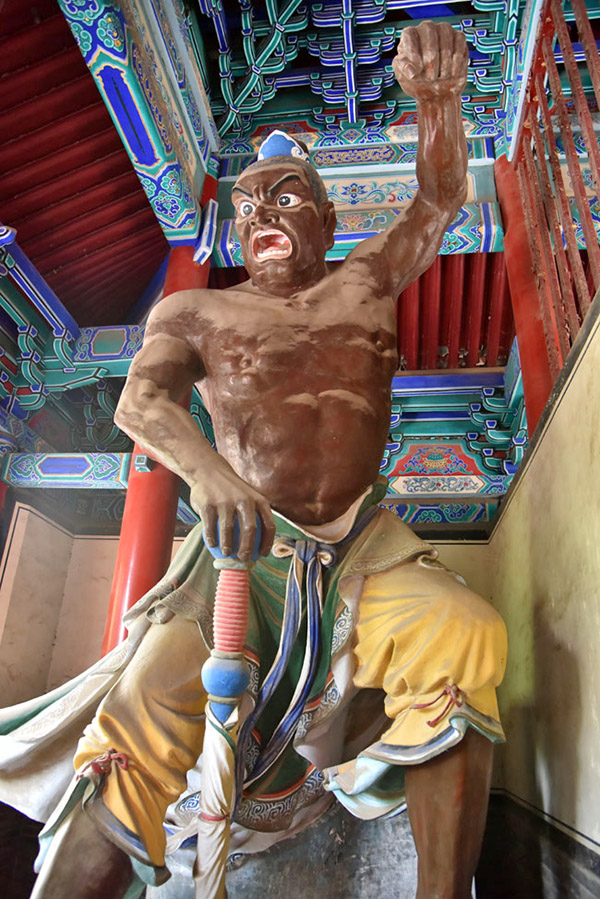
I shot a few photos of some of the figures inside the temple (yet again, the D810 Nikon’s incredible low light level capabilities came through).

A figure inside the Shaolin Temple. It’s likely Bruce Lee saw these things when he studied here.
Another huge and menacing figure inside the Shaolin Temple.  These statues were about 15 feet tall.

On our walk out (we left through the main gate), it mercifully started raining again. The rain finally helped me cool off. So far, this day was the hottest and most humid day of our ride (and I found I was saying that nearly every day for the last several days).

At dinner that night, I thought I would have a little fun with the guys. One of the dishes that evening had black fungus mixed in with the vegetables, and I loved that stuff. As I mentioned earlier, what the Chinese call black fungus is a mushroom of some sort, and I loved the taste of it. A small speck of one of the mushrooms, a black piece about a quarter of an inch long, was on the edge of my dinner bowl. I managed to pick up that tiny piece of mushroom with my chopsticks in preparation for solidifying my reputation as a chopstick martial arts master.

I told Tracy, who was sitting next to me, that I wanted him translate exactly what I was about to tell the Chinese guys in our group. He said okay, but went back to his meal. “No, Tracy,” I said. “I want you to tell the guys to stop eating and listen to what I have to say.”

Tracy looked at me for second, and then he spoke to the group in Chinese. The others stopped eating, looking at Tracy and then at me.

“We all visited the Shaolin Temple today and we saw the birthplace of Kung Fu,” I began. I paused, nodded at Tracy, and he started speaking to the group in Chinese.

“You may not know this, but like Mr. Bruce Lee, I, too, am a martial arts expert,” I said. Tracy looked at me and translated what I just said. The others stared at me, taken in by my serious demeanor.

“You know that I am an expert with chopsticks, as I demonstrated on our second night in the peanut contest,” I said. Tracy diligently continued to translate. “You may not know that I am a master at using chopsticks in the martial arts. In fact, I created a branch of Kung Fu that relies entirely on chopsticks.” As I said that, I motioned with my left hand as if I was shooing a fly away from the food on our table. It was a motion all of us had used across China at all of our dinners to get rid of the flies.

As Tracy continued to translate, and when I saw everybody look at my left hand shooing the imaginary flies away, I lunged out into the space over our table with my right hand, still holding my chopsticks. As I did so, I emitted a piercing “eeeee yah!” (my best rendition of a martial arts cry, worthy of no less a master than Bruce Lee himself). I held up my chopsticks, which still held that small morsel of black mushroom. No one could have confused that speck of mushroom for anything other than a fly captured in mid-air by a martial arts master (with his chopsticks, of course).

A loud gasp of astonishment and admiration went up from all of the Chinese riders. Before they could get a closer look, I plopped the tiny piece of mushroom into my mouth and exaggeratedly swallowed. There was a second of stunned silence at our table, followed by another gasp and heavy applause. Gresh was the only one who rolled his eyes. A legend was born that evening, my friends, and he be me.

We had a great dinner that night (I know, I’ve been saying that about every meal on this trip). Eeeeeeyah! The fly-impersonating black fungus. The chopsticks. The applause. It was wonderful.

After dinner, all I wanted to do was get back to the hotel, take a cool shower, crank the air conditioner all the way down, and get some sleep. I posted a blog that night, I went to bed, and I probably dreamed about being a chopstick martial artist.

They’re still talking about me over there, you know.


The ride across China was amazing, the adventure of a lifetime.  You can read about the adventures of dos Joes on the entire trip here:


Join our Facebook ExNotes page!


Never miss an ExNotes blog:


Help us keep the lights on:


Don’t forget: Visit our advertisers!


A Shift In Battery

By Joe Gresh

I was going to do a bunch of stories on my solar power system that powers my shed. I may still do that but this is more of an update on the batteries I use to store the solar power.

Small footprint means more energy density and hotter, more localized fires…

With solar, unless you plan on only having power in the daytime, you’ll need a way to store energy. The traditional way to accomplish this is with lead-acid batteries. I’m a lead-acid fan boy because they are so much cheaper than lithium batteries or a molten salt battery.

I should say, were cheaper…as of late lithium batteries have been dropping in price so much you can now get a 12-volt 100ah lithium battery for the same price as the cheapest Walmart lead-acid, deep cycle battery.

My solar system has been online since 2018 and in those years I’ve had to replace three Walmart batteries. The others are getting a bit long in the tooth, you know? Six years is a good service life for a lead-acid battery. Walking by the battery bank a few days ago I smelled the telltale odor of sulphur. This meant another battery had given up the ghost. It’s usually easy to find the bad battery in a bank. It will be hot to the touch, or in this case the filler caps had blown off. Kind of obvious.

The lithium batteries seem fairly even voltage wise at 100-amp load.

Looking at the average age of my battery bank I decided to bite the bullet and buy a new lithium set up. Getting in just under the tariff wire, so to speak.

My new bank will be 12, 12-volt, 100ah lithiums. Wired in series/parallel to produce a 24-volt, 600 amp hour storage capacity. That’s theoretically 14,400 watts of storage if you could squeeze every bit of juice out of the batteries.

By contrast, the existing 12, 12-volt 100ah battery bank only has 7200 watts of usable storage capacity due to lead -acid batteries dropping voltage below 50% capacity. The same total amount of juice is in the lead-acids but it’s at a voltage too low to operate equipment.

I use an old, analogue battery load tester to establish baseline numbers for future troubleshooting.

In addition, the lithium batteries have a smaller footprint so I’ll be able to rig the new bank on a single shelf instead of two shelves like the set up is now. This will cut down in battery cable length and by extension, voltage drop. Less cable is always good with electricity.

All in, I’ll nearly double my solar storage capacity in less square footage for less money than the old style lead-acids. This seems like a win-win.

Lots of important information that I will ignore is printed on the battery.

Now for the downside. These generic lithium batteries claim a 10-year life span but since the Chinese manufacturer’s keep changing brand names like I change underwear the likelihood of the same battery company being around a decade is slim. And then there’s that small detail of the fires.

Lithium batteries don’t like cold weather so that could be an issue. We do get some 20-degree nights at the ranch. I run pipe heaters at night so maybe that bit of drain will keep the batteries snug and warm.

Ah well, it’s not like lead-acid batteries don’t catch fire or explode occasionally.

I’ve had good luck with my Walmart lead-acids, no complaints, and I’m hoping these lithium replacements hold up at least 6 years. 10 years will be great and if they last look for an exhaustnotes long term review in 2035.


Join our Facebook ExNotes page!


Never miss an ExNotes blog:


Help us keep the lights on:


Don’t forget: Visit our advertisers!


The Big Dig

By Joe Gresh

One of the reasons we got such a good deal on The Ranch©️ in New Mexico is its location. Perched on the side of the Sacramento Mountains, the land is steep. Any flat areas are man-made so when you want to build a greenhouse, you’ve got to move some earth.

I’m filling the area beyond the wall. It was a steep rocky place and now you can walk around without stumbling like an old man…which I am.

Terracing is much easier than removing the mountain so that’s what we’ve been doing. The little cabin we live in is on a terraced spot down by the arroyo. The shed is higher up on another terraced spot.

There’s a great location for a greenhouse behind our shack and down closer to the arroyo. The spot gets plenty of winter sun and it’s protected in most directions from wind. It’s so low I suspect it may flood in heavy rains.

It’s a little hard to get to but the location will be better when the high winds kick up.

Unfortunately, the location is hard to get to. A while back I made a set of stairs to access the location but there’s no way to get the Kubota tractor down the stairs. I actually could get it in position via another route but it would require cutting a bunch of trees. I don’t want to cut trees.

That leaves hand digging. The ground is not too bad to dig. It’s much easier than the front of the house where I put a driveway. Down in the arroyo the ground is a combination of hard topsoil, mid-sized rocks and some whitish, proto-rock stuff that crumbles with a sharp blow from a 2-pound sledgehammer.

The land tapers from level. At the highest about three feet must be removed.

The process is: I break up the top layer with an electric, 35-pound jackhammer (powered by the Harbor Freight Tailgator generator), then I use a round point shovel to move the loosened soil into a wheel-buggy. A little work with a pick dislodges the larger rocks. Aside from a few tree roots, it’s the best digging I’ve encountered on the property.

Since the area is so steep I’m bulkheading off lower regions with some old roll-up garage doors and using the removed earth to level a larger pad. It’s like getting free land. I plan to fill about two feet deep of as large an area as I have dirt for.

This sounds like a lot of work and it is. I take it slow and steady. It’s really no worse than going to a gym to work out and you get the added benefit of a flat spot on your ranch.

The greenhouse is a cheap Vevor 10-foot x 20-foot hoop style. The hoops are 1-inch tubing that are assembled like tent posts. A through bolt holds the pieces together. The cover is a greenish plastic material reinforced with what looks like thread. I think the cover will last a couple years if we don’t get a hailstorm. It’s not a heavy-duty unit.

It’s a happy worksite. I take frequent breaks and enjoy the smell of freshly turned earth.

The foundation will be heavy duty. I’m building a two-block high pony wall to set the greenhouse on. The blocks are dry stacked, poured solid, and they sit on a 4-inch-thick footer. The footer has rebar to keep it together when it cracks. I’ve set some 1/2-inch j-bolts into the block cavities to secure the wood sill that I will screw the greenhouse tubing into.

The foundation is overkill because I’m assuming the Vevor won’t last long and I’ll be scratch building anothergreen house one day. In the meantime, I’ll practice my green thumb.

As the project progresses, I’ll post updates. There will be solar power and a water catchment system making the greenhouse off-grid. For those of you wanting to build your own greenhouse my advice is to start with level ground.


Join our Facebook ExNotes page!


Never miss an ExNotes blog:


Help us keep the lights on:


Don’t forget: Visit our advertisers!


The Wayback Machine: A Call to Alms

This is a rerun of a blog Gresh wrote a couple of years ago.  Yep, we’ve got our palms out.   Help if you can; we’d sure appreciate it!


By Joe Gresh

Sponsored content is a way for publications to earn money. How it works is companies pay cold hard cash for bloggers to write a story about the products they’re selling.  Most reputable websites and magazines print a notice letting you know the story is paid advertising. We’ll never have to worry about that because we don’t write sponsored content.

Not writing sponsored content is not the same as not having sponsors, though.  Sponsors pay money for advertising on our website but don’t have any say about what we write. Sponsors support the website because they feel the content will attract the sort of people who they want to reach. For ExhaustNotes those people will be motorcyclists, shooters, travelers (especially Baja travelers), and concrete finishers. I know, it’s an odd mix of topics, but Berk, me, Huber, and our other contributors write about what we know.

So here’s the pitch: If you have been reading ExhaustNotes and think the eclectic collection of stories we create might appeal to your customers, by all means become one of our sponsors.

Or, if you just like reading the website and want to help support us, become a site sponsor even if you have nothing to sell. Maybe we’ll make a wall of names for people who sponsor the site. We want sponsors to support ExhaustNotes.us because they think that the writing we are doing is worthwhile.

So dig down into those dusty advertising budgets and drop an email to us  (info@ExhaustNotes.us).   Let us know how we can help you spend your money.


Join our Facebook ExNotes page!


Never miss an ExNotes blog:


Help us keep the lights on:


Don’t forget: Visit our advertisers!


The Norge

By Joe Gresh

Winter has finally arrived here at The Ranch. This year it seems like we got a late start to winter in New Mexico. I was riding my motorcycle in 70-degree weather just a few days ago. The avocado plants have been brought in to protect them from the 20-degree nights and I have installed insulated faucet covers over the outside plumbing fixtures so that we don’t burst a pipe.

Wintertime in New Mexico is beef stew time. The best way to make beef stew is with a crockpot and I couldn’t find our crockpot. Actually that’s not true, I know where the crockpot is: it’s buried under a giant mound of Amazon cardboard boxes I’m saving for my future eBay business.

Having no traditional kitchen stove at the ranch I decided to utilize the Isiler inductive hot plate as a heat source for the stew. The isiler is a sleek looking, single burner, and inductive-heat unit. It only works with magnetic-metal cookware meaning aluminum and stainless steel pots won’t get hot. I bought a whole set of inductive, stainless steel pots to use on the thing. These pots have iron or steel cast into the base so they will work with the Isiler.

The iSiler is only a couple years old. I cooked breakfast with the hot plate two or three times before, a cast iron skillet works great on the thing. The inductive heat is really efficient as no heat is wasted heating the cooktop or surrounding atmosphere. Only the metal pot gets hot and it will boil water in a few seconds on high settings. I like to cook my beef stew slowly. I toss in all the ingredients raw, meat included, and let it stew on low heat for half a day or more.

Apparently the iSiler doesn’t like being left on for long periods of time at a low (180 degrees) setting. The thing kept shutting itself off. I would come in from the Big Dig to check the stew and the iSiler was not heating. A red H was displayed on the digital control panel. Turning the unit off then on restored the iSiler and it would start cooking the stew. The shutdowns were random. If you watched the iSiler it never shut down. It was like trying to cook on Schrodinger’s hot plate: go outside to dig a foundation for a greenhouse and the unit would die but you would never know it until you observed.

Luckily, I was in the house when smoke started pouring out of the ventilation openings of the iSiler. The whole cooktop was hot and I needed a couple paper towels to pick it up without burning my hands. I unplugged the cooktop and took the stinking wreck outside. The house reeked of burnt electrical components.

And this isn’t unusual for modern appliances. In the last few years we’ve burned up three Krieg coffee makers. The fan went out on our refrigerator. Our washing machine started leaking water and then mysteriously stopped leaking. It’s hard to find new stuff that holds up over time.

Which brings us to the Norge. In the 1970’s I bought a little house on Chamoune Avenue in East San Diego. Back then funds were tight and East San Diego was a cheap place to buy a house. The house came with no appliances; I bought a used Norge refrigerator for 50 dollars. In my tatty old neighborhood there were appliance stores that sold nothing but used or repaired equipment. At least three vacuum cleaner repair shops were within walking distance of my house along with mattress rebuilders, typewriter repair shops, TV repair shops, radiator repair shops and at least 10 Chinese restaurants. You could buy cigarettes one at a time. East San Diego in the 1970s was a hive of industry captained by small e entrepreneurs.

The Norge had a thick, heavy, single door opened by a gigantic pull handle with a ruby red emblem that looked like a royal warrant. The handle would not look out of place drawing cold, foamy Bass Ale at your local pub.  Unlike new idiot proof, safety-first refers the Norge door latched closed and if you found yourself stuffed inside of the thing you would surly die because from the inside the door would not open. Even with dynamite. And no one could hear you scream.  It was a solid refrigerator, man.

There was no fan to circulate air inside the Norge. The top freezer section had a small, plastic interior door and uneven distribution was accomplished by cold air falling to the bottom of the fridge. You could turn the entire interior of the Norge into a freezer by cranking the temperature knob down to its lowest setting.

I don’t know the exact year the Norge was constructed but it looked just like the ones built in the 1940’s. The only thing I could complain about is that the Norge needed to be defrosted occasionally, failing to do so would trap frozen items in the freezer compartment like woolly mammoths were trapped in Siberian ice thousands of years ago.

I used the Norge for 10 years or so and it was running fine when I sold the house with the Norge still in it. Still keeping food fresh, still cold, still deadly to small children. It was probably 40 years old last time I saw it. And I can’t get a hot plate to last more than 4 meals.

Maybe I have a skewed view of the situation. Did the Norge represent standard 1940 quality or was it a one-off, Hyperon refrigerator? So much of our industrial energy today is expended on items that are junk. It seems like a waste of resources. Worthless and uneconomically fixable items clog our landfills, where the iSiler hot plate is heading.  You may note we didn’t include the regulation Amazon link to the iSiler. That’s because we don’t want ExhaustNotes readers to buy the thing and set themselves on fire.

I bought a new, analog hot plate from Amazon, the kind with the resistance coil that will heat all types of cookware. Sometimes I can fix things because it’s cheaper than buying new. But that’s almost never the case if you include your time. No, I fix things just to stick a finger in the gears of our throwaway society. Sure, it’s painful.  You rarely come out ahead and you can lose a finger. I won’t be tinkering with the iSiler hot plate, though. I don’t want to know if the cat is dead or alive if it means burning down the house.


Join our Facebook ExNotes page!


Never miss an ExNotes blog:


Help us keep the lights on:


Don’t forget: Visit our advertisers!


ExNotes Product Review: Yonligonju Compression Tester

By Joe Gresh

If you’ve been keeping up with us here at ExhaustNotes you’ll know I had a lot of trouble getting Zed, my 1975 Kawasaki Z1 900, running correctly.

In between rebuilding the carbs and tinkering with most everything I could think of it dawned on me that maybe the engine was just tired. After all, it wouldn’t be unusual for a 50-year-old, air-cooled engine to wear out after 46,000 miles.

I used to have a nice compression tester that was at least 40 years old. In the big move west I can’t seem to find it. Maybe it got tossed after one of the many floods that inundated our house in the Florida Keys. I forget the brand but it had a flex hose and several adaptors for different size spark plugs.

I don’t need a pro-level compression tester as I’m not in the mechanical business anymore. This cheap, cheerful Yonligonju (say it three times fast!) Chinese kit on Amazon looked like the goods for less than 20 dollars.

The Yonligonju comes with a nice, blow molded plastic case that keeps all the little bits in order.

It amazes me how China can build such a nice kit for so little money. Including the quick release flex hose, this kit comes with adaptors to fit 5 different spark plug sizes.

In addition, the set came with two of the rubber bung type connectors. To use these, you just hold the compression tester tightly in the spark plug hole. It speeds things up on a multi cylinder engine. This works well enough if you’ve got enough hands for the job.

My Yonligonju worked well, showing 80-ish psi on all four Kawasaki cylinders. This isn’t great compression but the cylinder pressures were nearly even and Zed might have done better if the engine wasn’t cold. My Kawasaki manual claims 85 psi as the lower limit and Zed may get there warm. What do you want after 46,000 miles?

Besides compression, what you’re looking for with a compression tester is one cylinder being much lower than the others. This indicates a problem in the cylinder. The actual psi number is less important. Unless they are all really low…

Anyway, the Yonligonju gauge proved compression wasn’t the reason my Kawasaki was fouling plugs. See the latest Zed update for the full story.

The compression gauge held the reading without bleeding off for the few minutes it took me to look at it. There’s a pressure release valve on the side of the gauge that also worked as it should.

This isn’t a kit that will see a lot of usage.  If you’re like me, a home-shop tinkerer, the thing will do the job for not much money. Hell, just taking your bike to a motorcycle shop once to test the compression would cost five times what the tool cost.

I think people rebuild old motorcycle engines more than is needed. Two-strokes especially get the piston, ring and bore because it’s so easy to do. Most likely the bike would have run fine the way it was.

For classic bikes that don’t see everyday use it’s enough that the engine runs well. There’s no need for a ton of compression with today’s crappy fuel anyway. I’m guessing the Yonligonju will last a while sitting in my toolbox waiting for another engine to test.


Join our Facebook ExNotes page!


Never miss an ExNotes blog:


Help us keep the lights on:


Don’t forget: Visit our advertisers!


British Motorcycle Gear Exclusive Offers!

By Joe Berk

Good news!  Good buddy Andrew Capone, Isle Of Man empresario and British Motorcycle Gear baron is having an exclusive sale for ExNotes readers.  It’s a whopping 21% off any BMG brand jacket. When you enter your order on the British Motorcycle Gear site, just add the code BMGJOES21 at checkout.  British Motorcycle Gear also has great deals on Belstaff closeouts (as well as nice gifts in the $100 range) for under your Christmas tree.  Andrew tells us that the 21% BMG jacket discount is 1% more off the sale he’s currently running, and that’s because we ExNoters are his kind of 1%-ers.

You read about Andrew here on ExNotes before.  He’s the real deal and he’s a real rider.  The latest issue of Motorcycle Classics magazine (Jan-Feb 25) is about to hit the newsstands, and Andrew’s magnificent Norton P11 is featured in it.  It’s a great read about a great bike (I know because I wrote it).  Pick up a copy when you get a chance.  Or, if you have a subscription, you can read it online.

You’ve also read about BMG gear here on ExNotes.  Joe Gresh tested several of their items, he’s a crusty old fart, and he gave all the British Motorcycle Gear high marks.  You can read Gresh’s BMG reviews here.


Join our Facebook ExNotes page!


Never miss an ExNotes blog:


Help us keep the lights on:


Don’t forget: Visit our advertisers!


Zed’s Not Dead: We Get It Right The Tenth Time

By Joe Gresh

I like to think of myself as handy with a wrench. I try to fix most things even if I have no clue and oftentimes succeed. This Kawasaki 900 though, this Zed has been giving me fits. It almost makes me question my do-it-yourself mantra. Almost…

After initially getting Zed running a few years ago I enjoyed 4000 relatively trouble-ree miles. Zed had a slight hitch in its giddy-up right off idle but otherwise it ran fine.  Then the bike started fouling spark plugs and missing. Occasionally gasoline would pour out the carb overflow tubes and a sharp rap with a screwdriver handle was needed to stop the flow.

So my first line of attack was the float needles because they were original and came out of corroded carbs. I went online and bought some cheap carb kits that included needles and seats.

Setting float height on carbs using plastic hose screwed into float bowl drain.

On a 1975 Z1 Kawasaki the carbs sit up high off the engine block so you can do a lot of tinkering without removing the carb bank. I changed all the needles and set the float height using the clear tube tool that screws into the carb bowl drain.

New fuel tees @ $26 each!

This didn’t really cure anything.  Plugs were still fouling. I started to suspect an ignition problem. After messing with the points and several test runs I was getting nowhere so I purchased a new, aftermarket ignition system. They’re cheap, like $90 or so.

Carbs removed from Zed. A scene I got accustomed to. After the 4th round trip I decided to look elsewhere.

The new system came complete with new coils and wires. This was nice as the old coils were butchered by the previous owner. I installed the new ignition system and the bike still ran terrible and fouled plugs.

I rechecked the aftermarket floats and upon examination I found the needle seats miss-punched with what looked like lettering for the needle size. This caused a wrinkle in the exact spot the needle needed to seat.

.030 tool for setting baseline carb slide height.

Next, I bought new Mikuni needles and seats. I put the Mikuni stuff in and re-set the float levels. The bike ran like crap and foiled the plugs. At least I knew the ignition system was ok.

I was at my limit of understanding, my attention went back to the carburetors. I pulled the carbs, dismantled them and cleaned everything.

Zeds carbs sat like this for 2 years. I was befuddled, vexed, stressed right the “F” out.

I bought another, more expensive carb kit and new Mikuni enrichener plungers. The carbs were in a million pieces on my bench and I lost interest. Other things were happening, concrete need pouring and the carbs gathered dust for two years.

A few months ago I decided to get Zed running for the Motorado vintage motorcycle show up in Santa Fe, New Mexico. Buckling down, I reassembled the carbs and using new rubber manifolds (the others had dry rotted in only a few years!) I slid the carbs back into Zed and the bike ran like crap, still fouling plugs.

I couldn’t get the bike running well enough to sync the carbs. A bad condenser was messing up two cylinders.

I took the carbs off the bike and went through them again making sure everything was spotless. And the bike ran like crap. Again, I took the carbs apart racking my brain over the flooding issue. And the bike ran like crap. I changed jets, I changed float heights, I swapped pilot air jets, I swapped emulsion tubes. The third time I took the carbs apart and triple checked everything the bike still ran terrible.

I was in the weeds bad-like and decided to think hard on the situation. I told myself that carbs aren’t all that complicated and that even if I didn’t get them perfect it should still run. And that the bike ran fine for 4000 miles with those carbs. That was when I decided to go back to the new ignition system.

One of the new points had a whitish coating. I thought maybe the bike sat so long the points corroded. Then inspiration hit me: the condensers! I checked the condensers with an ohm meter and found one of the two condensers bad.

Bad condenser from new kit.

I had started with one problem: fouling plugs and by using aftermarket needles I installed a worse set of needles. By removing the original ignition system I installed an entirely new problem with the bad condenser.

These two errors were compounded by my inability to believe that the new parts were bad out of the box so I kept rebuilding the carbs over and over.

The condensers on the old ignition system tested ok and I swapped them into the new plate. And the bike ran. Not perfectly because I had all the jets wrong in my attempts to make the bike run.

I walked the carbs back to their original settings. First the old slide needles and emulsion tubes went back in. Then the main jets, then the pilot jets until finally everything was back to where I started from two years ago.

Zed was running pretty good so I took a little 300 mile test loop. No fouled plugs. Stupid hurts and I was so damn stupid chasing gremlins that I was creating even as I was installing new gremlins.

Home built replica of the official Kawasaki carb sync tool.
The business end of the carb sync tool.

Next up is a good carb sync and since parts are so crappy now I will try an electronic ignition system just for fun because I haven’t screwed things up enough yet. Stay tuned.

New electronic ignition. Only $68 on Amazon. Cheaper than points! What could go wrong?

Want to follow the initial resurrection of Zed? It’s right here!


Join our Facebook ExNotes page!


Never miss an ExNotes blog:


Help us keep the lights on:


Don’t forget: Visit our advertisers!


ExNotes Review: UABRLA Tire Inflator

By Joe Gresh

There’s a reason we call this pump a tire inflator instead of an air compressor. The thing is pretty small to start with and half of that size is battery to power the thing. Don’t expect to run your 1/2″ air impact wrench with the UABRLA is what I’m trying to say in an original, thought-provoking manner.

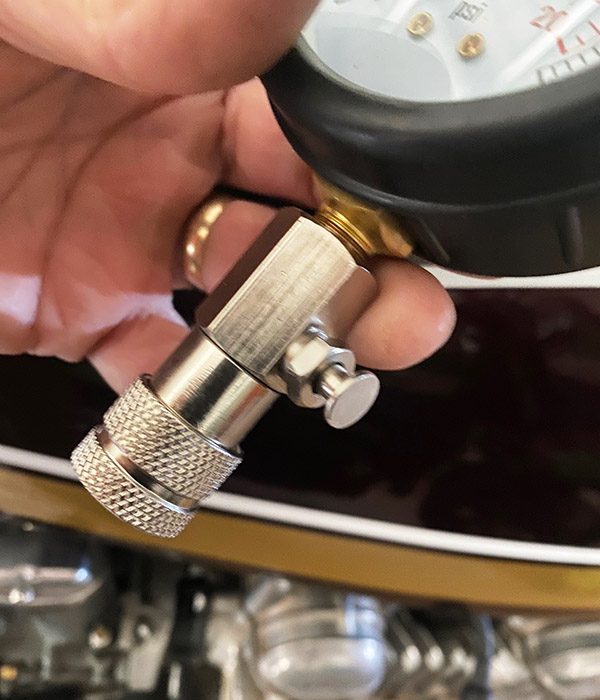
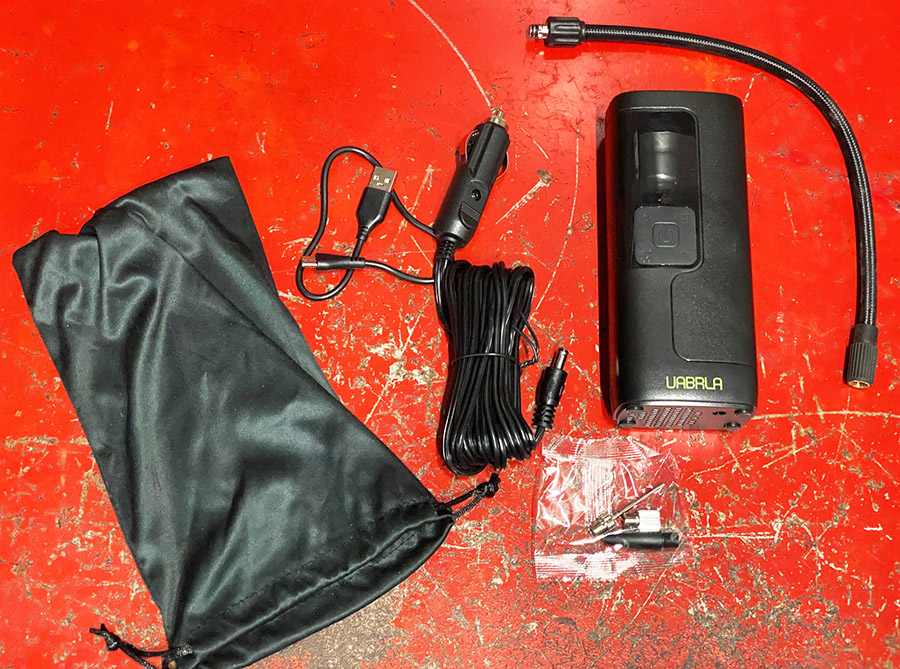
I have a small, 12-volt Slime brand tire inflator that I carry on whichever bike I’m riding. It works well and is like 15 years old now. The main issue (I hate to say problem because it’s more of a design limitation) is that you have to connect it to the motorcycle’s battery. On the RD350 that’s not a big problem but on some bikes, like the ZRX1100, the battery is buried under a bunch of junk I store on the bike. You have to remove the dirty socks, chucks of broken concrete, a dried up Sharpie marker and last year’s Laguna Seca vintage racing schedule. That gains access to the battery door, then you have to slide the battery out to access the terminals.

For airing up bike tires in the shop I use a larger 12-volt compressor (it has some grunt) and a 12-volt car battery.

I bought the UABRLA because I sometimes forget on which bike the Slime pump is stored. I’ve ridden off to the hinterlands thinking I had flat tires covered yet the Slime was packed away on a different motorcycle.

You’re probably wondering if I’ll ever get to the UABRLA review.

The UABRLA was delivered from Amazon in only two days.  That’s pretty fast considering where I live. It came with a hose for connecting to tires, a charging cord, a 12-volt cigarette adaptor so you can keep filling tires even if the built-in battery is dead and a little collection of adapters for beach balls, inflatable mattresses and New England Patriots footballs. A handy tote bag is included. The unit also has a flashlight and a USB port for charging small electronics. The flashlight has three modes: on, on-strobe, on-SOS. Four modes if you count off.

The inflator has presets for car tires, motorcycle tires, bicycles and sports equipment. I can’t see the need as air is air but maybe if you were a complete novice it would help.

A nice touch is the auto-shutoff that kills the inflator when the tire reaches a preset pressure. The setting is pretty accurate being only a pound or two off when checked against a pencil-type gauge. Or maybe the pencil gauge is off. Regardless, I can’t tell a tire is low until the rim scrapes the ground.

The built in battery supposedly has 20,000 mah capacity but I can’t be bothered to test that. I filled up two bicycle tires and topped up 6 motorcycle tires with the little inflator and it was still showing 2 of 4 bars. I’m guessing you could fill one car tire with the built in battery. After that you’ll have to switch to the 12-volt cigarette adaptor.

Anyway, I wouldn’t use this machine for car tires. Maybe adding a few pounds would be ok. My experience with these little inflators is that they get hot if you run them too long so I’d let it cool a few times if you’re filling a 40-inch tall muddier tire.

One thing I would like different is a 90-degree air chuck instead of the straight chuck that comes with the UABRLA. It gets a little tight on some motorcycle wheels.

The UABRLA is a nice-looking bit of consumer glitter. I’ll be tossing this pump into my motorcycle travel kit and hopefully it will last more than one or two uses.


Join our Facebook ExNotes page!


Never miss an ExNotes blog:


Like what you read on ExhaustNotes?  Help us keep the lights on:


Don’t forget: Visit our advertisers!


ExNotes Long Term Test: Oxilam LED Headlight Bulb

By Joe Gresh

As you’ll recall from the Oxilam headlight review we published on ExhaustNotes a while back, I loved the thing. It gave a much brighter view at night and the light source was positioned in the correct spot for the reflector on the ZRX1100 Lawsonsaki. Low beam was wide and had a sharp cutoff so as to not blind oncoming drivers, and high beam lit up the dark New Mexico roads nicely.

Unfortunately. the bulb burned out on my bike after only 3000 miles. Considering the original halogen bulb lasted 35,000 miles, 24 years, and was still going strong, I was disappointed.

Taking the bulb apart revealed a neatly constructed circuit board, a cooling fan, heat transferring grease to the large aluminum heat sink, and broken solder connections at the main board/plug connector junction.

The board connections are tiny and I may try to re-solder the connections (there are four of them broken: two on either side of the circuit board) but I don’t hold out much hope.

The Oxilam kit came with two bulbs, and I’ll pop the other one in to see if my failure was just a fluke. I do like the quantity of light produced and riding with a plain old halogen seems dark now.

My new, revised rating on the Oxilam LED headlights is: Don’t buy them just yet. Wait until the second Oxilam has proved itself for 24 years. I’ll be sure to report back here if I’m still alive.


Join our Facebook ExNotes page!


Never miss an ExNotes blog:


Like ExhaustNotes? Help us keep the lights on:


Don’t forget: Visit our advertisers!