Tools For a Motorcycle Trip Part 2: You’ll Need a Luggage Rack

ExhaustNotes.us contributor Mike Huber recently wrote a story about tools to carry on a motorcycle trip. The story threw me because I was expecting a list of actual tools. Instead, Huber wrote about high tech software and hardware to make a motorcycle trip safer and more enjoyable. He should know as he lives on a motorcycle.

I’m always scratching for something to write about. The Internet consumes content at an incredible pace so I figured I’d steal Huber’s idea and write about the tools I carry on a motorcycle. This tool set may seem like a lot but I bring it along on a 7-mile run to the post office or a cross-country ride. Much like a large, ugly tail rack I won’t leave home on a motorcycle without tools.

If your bike has a kick-starter these little jump starters are not a must-have but with a high-compression 500cc single cylinder and no kick starter the Husqvarna is a bear to push start with a dead battery. Luckily I haven’t needed to jump the Husky yet but I have used the jump starter to start cars, other motorcycles (see Royal Enfield Bullet) and just yesterday I used it to start the back-up generator when the power went out at Tinfiny Ranch.

My nephew, Anthony gave me this one and it’s a pricy unit but you can find them on Amazon for as low as $25. I have a cheapie in every car and they work well. Not only will the tiny, lightweight battery jumpstart a diesel tractor or large cruise ship, it will charge your cell phone many times over. The only flaw with them is that they hold a charge for so long you tend to forget about them. Remember to recharge the thing every 6 months or so.

If you have a 12-volt system, not a given with old motorcycles, a small electric air compressor will save you hours of pumping after fixing a flat tire. This one is Slime brand but any of them will work. For some reason I frequently get flat tires so this pump sees regular action.

Of course a pump is useless without a patch kit. Most of my motorcycles still run inner tubes, which are a PITA, compared to tubeless tires. If you can find access to the hole without further damaging the tube patching is easy and reliable. I also carry a spare tube in case a tube becomes irreparable from my ham-fisted repair attempts.

A Leatherman multi-tool pocketknife covers a lot of bases and takes up little space. There are other brands of multi-tool and they are ok but I still think the Leatherman is the best of the bunch. Leatherman also has a great warranty. If you break a blade just send it back and Leatherman will send you a new knife. I’ve done it twice and had no issues.

An assortment of basic tools will get you out of trouble most times. I carry vise grips, tire irons, a decent multi-tip screwdriver, a few wrenches and ¼-inch sockets with driver, and a little flashlight. Vise grips will most likely damage whatever you use them on but they will get the job done and you can replace the chewed up parts when you get back home. The small aluminum tin case seen in the cover photo contains a universal cable repair kit. This is a neat item with several different cable ends and a length of cable. The various ends screw on so you can make a temporary cable for damn near any motorcycle. I’ve never used this item but I will be well-chuffed (warning: Brit slang!) if I ever do need the thing.

I also carry a spare master link, electric tape for those melt downs, a bit of bailing wire, tie wraps and a length of measuring tape. The measuring tape is super for seal cleaning or shimming or even measuring.

In addition to the basic tool set I add a few motorcycle brand-specific bits as I swap the tool set from bike-to-bike. A tube of Seal All rides with me on the Kawasaki 900 because the gas tank was very rusty and might spring a leak at any time. The Yamaha 360 gets a flywheel puller, a jug of two-stroke oil and a 21-inch front tube that will fit both wheels if it has too. The Husqvarna gets a 17-inch tube to suit its odd-sized wheels.

The tool kit rolls up in a canvas bag along with a few paper towels. No two ways about it, this kit is heavy. I look at it this way: The extra weight of the tools is offset by the lightness of my soul knowing I have the ability to fix most any minor problem on the road.


Hey, check out our ExhaustNotes.us home page, where we now have a quick index to our most recent blogs!

Repairing Blinkers: KLR250 Refresh, Reflash and Rehash Part 2

Blinkers on a dirt bike are kind of silly but lately I’ve been running The Widowmaker, my 2005 KLR 250, on the street more than is right or just. The KLR250 spends most of its time in Florida and the automobile drivers in that state are legendarily bad. With Nearly-Deads behind the wheel and blind rage as their co-pilot any blinking light that may draw attention is a good thing.

The Widowmaker’s blinkers have had a rough go of it. They worked fine when I bought the bike but several thousand miles of the Trans America Trail managed to put a pronounced sag in the rubber stalks holding the lamp fixtures. The rubber soon cracked and the blinkers hung down swinging on their electrical wires.

At first I managed to keep the original stalks in the game using the KLR rider’s best friend, duct tape. Soon the tape was not enough and I progressed to beer can wraps, bailing wire and spit. The rubber stalks crystallized and began to crumble into small, hard black cubes. It was a metamorphosis: soft, pliable rubber became fragile like chalk. The lamps, now free from their moorings swung in a crazy amber half circle pointing towards the ground. As they filled up with water the light fixtures quit blinking and they became memories of directional indicators slapping the side of the motorcycle.

I couldn’t find replacement stalks online. The complete blinker is sold as a unit and when your motorcycle needs as much attention as mine you can’t blow a bunch of money on parts that will break off soon anyway. I dismantled the old blinkers and decided to try to fix them for two reasons: Because I’m cheap like that and KLR riders will always take the hardest path.

Two of the direction lamps weren’t rusty and came apart fairly easy. The rusty ones were more of a challenge. I had to soak them in penetrating oil and break the glass bulbs in order to remove the bulb base from the socket using pliers. After getting them apart I soaked the rusty bits in Evaporust for a few days and then painted the reflector and socket a fetching metallic silver.

Making new stalks was a conundrum: I needed something stiff enough to hold the lamp in position but flexible enough to bend during a crash, preventing destruction of the blinker lens and housing. I toyed with the idea of two thin strips of sheet metal to provide a malleable stem that could be bent back into position. I debated welding a thin tube between the threaded ends but didn’t have any tubing that would serve the purpose.

I settled on ½” Pex plastic plumbing tubing mainly because it comes in a red color than neatly matches The Widowmaker’s faded bodywork. The Pex copper crimp rings would make for a neat finished end to the Frankenstalks. The only problem was the threaded ends salvaged from the old rubber parts were a little too big for the Pex pipe.

I really could have used the South Bend lathe to turn down the ends but that project is not completed yet so I had to chuck the parts into a hand drill and grind them to size. Even cut down they were still too large for the Pex but I didn’t want to grind any more and lose the knurling. It’s amazing how a new tool opens up avenues of creativity. It frees your mind, man. My new tubing expander (bought for an air conditioning job) made short work of the Pex inside diameter and the threaded inserts fit perfectly.

Next I used the tubing expander to resize the copper Pex crimp rings to fit the expanded pipe. Things were going well. After crimping the copper rings with a hydraulic cable crimper the stalks looked like 100 bucks.

The grinding process put a divot in the threaded end so I had to run a 10mm die over the things to straighten out the divots. With 4 new blinker stalks it was only a matter of time before everything was reassembled and back on the motorcycle. I’ll need to put a battery in to see if the blinkers actually work (I’m using the same battery in the Z1, the Husky, and the KLR) but I remain confident they will work at least as good as they used to. Which is not at all.

A few questions remain. Will the crimped ends stay put on a rough trail? I assume they will rip out during a crash and that’s good. My new stalks cost about 67 cents apiece so I can replace them as often as I like. Will the plastic tube droop leaving me with a sad-eyed KLR250? Will the bike require a plumbing inspection now? I don’t know the answers but I’ll report back if these Frankenstalks actually work.


More “Bring ‘Em Back Alive” Gresh Resurrection stories are here!

Stop Me If You’ve Heard This One: KLR250 Refresh, Reflash and Rehash Part 1

I’ve owned a KLR250 for a long time. I bought the thing on highway 40 between Ocala and Ormond Beach from a gator-meat seller named Street. When I bought it the KLR was nearly new and being a 2005 model it is the last in a long line of KLR250 Replicants that started in 1995. In 20 years of building the 250cc enduro-style bike all Kawasaki did was change the paint schemes and the seat colors.

My KLR, named “The Widowmaker” due to its extremely low power output, has done some long distance, cross country traveling but the last 7-8 years it has been stowed at The Love Shack for use in March during Daytona’s bike week. Long periods of inactivity broken up by a week of full throttle action has left The Widowmaker in a sad state so I brought her out to New Mexico for some tender loving care.

In no particular order The Widowmaker needs front brake work, blinker stalk replacement, a new front tire, valves adjusted, carb cleaned, air filter replaced, coolant and coolant hoses replaced (15 years!), back tire replaced, fork seals and a few other things I’m forgetting. It’s not that bad a list for the many years of neglect The Widowmaker has suffered under my care.

Last March The Widowmaker’s front disc brake was giving me trouble. It would not release and the disc got pretty hot from dragging. I could smell brake lining burning as I rode the bike. The Widow maker, never very fast to start with, was pushing the front forks down and struggling to make 40 miles per hour. Cracking open the bleeder on the caliper freed up the front wheel and I managed a few days of riding using only the rear drum brake.

Eventually I had to fix the brake as it was taxing my brain planning stops 300 feet in advance. I took the caliper off and the piston was firmly stuck inside with a crystalline white-ish gunk but I managed to extract the offending part without too much collateral damage. 2005 might as well be 500 years ago when you’re trying to find motorcycle parts. I went to a few brick and mortar motorcycle shops in Daytona but nobody had anything for a 15 year-old KLR. I didn’t have enough time to order online so I cleaned out the bore and stuck the caliper back together.

Bleeding the system was a challenge as the master cylinder seemed to move 2 pico-liters of fluid each stroke. The lever didn’t feel right but I pressed on. The Widowmaker’s brake was better but the caliper was still not releasing well and I determined the master cylinder was the culprit. All around me Florida was closing up due to Covid-19. I had no more time to work on the bike so I loaded The Widow maker into the truck and hauled it out west to New Mexico.

Looking online for a master cylinder rebuild kit I found new, complete, generic master cylinders with lever and all for $20! People complain about the global economy but $20 is $20. My Facebook post about the cheap master cylinder brought mixed reactions. Some said they are garbage and leak others said they use them all the time and that they work great. I went with the generic because I’m old now. If the brakes fail I haven’t lost much time.

When I say complete I mean even down to the brake light switch. I opened up the unbranded box and the new unbranded lever looked great cosmetically. I could see no flaws in the construction and a side-by-side comparison with the original Nissan master showed there was nothing visual to make the OEM seem better than the generic. A few minor differences: the generic has a larger reservoir and includes a threaded hole for a mirror. The mirror mount was an unexpected bonus because I had broken the left side mirror mount in a violent side-trip through some sagebrush out in Utah. I was trying to follow Hunter at the time. The extra mounting hole allowed me to transfer the old, right side, stand alone mirror mount to the left side where I had wanted a mirror ever since the sagebrush incident .

If you Safety Nazis are wondering where the handlebar kill switch is I can tell you that it broke off years ago in a less memorable crash. The key switch is only a foot away. The new master cylinder installed and bled out easily. The front brake has a firm lever, firmer than it ever was. The caliper releases nicely and all seems rosy. Time will tell if the replacement master cylinder lasts as long as the Nissan.

The left side of the handlebar has the (also broken) light/blinker/horn and all that works well. I had to thin down the mirror mount to fit between the clutch lever (not broken!) and the switch cluster.

I don’t want to give you the wrong impression. Realize it has taken many years to break all these parts. I’m not tossing the bike down the road everyday, you know? The Widowmaker’s features, like a boxer fighting past his prime, are becoming smoother and less distinct from the blows. If I don’t turn back the tide of destruction now The Widowmaker will look as bad as a 2021 Goldwing.


Want more of Gresh’s resurrection projects?  Just click here!

Freeze Warning

Summer has clawed its way up from the Tularosa valley and settled in here at 6000 feet. Tinfiny Ranch is hot. I have few real chores at Tinfiny except the ones I create for myself but keeping my wife cool is one of the prime directives. It’s hot enough to fire up the mini-split air conditioner, electric bill be dammed! I installed the mini-split 4 years ago; in fact I ordered it from China, in China, when me and Berk were out scrambling motorcycles in the Gobi desert. That was after we descended from high atop the Tibetan Plateau…for 40 days.

The mini-split installation was fairly easy: a Magic box that sits outside, a wall-mounted unit inside and a couple of copper pipes with a bit of wiring is all there is to the thing. The unit came pre-charged: all the gas was under pressure inside the magic box. I had to buy a vacuum pump to evacuate the line sets and then open the service valves. Presto! Nice cool air.

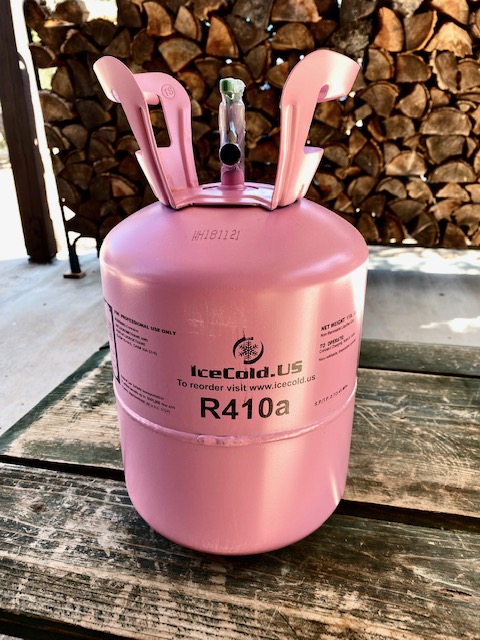
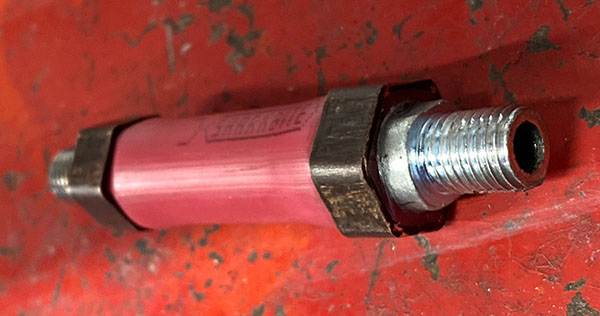
Unfortunately, sometime last winter the system sprung a leak: Tinfiny’s mini-split had lost its ability to keep my wife cool. If you’ve read ExhaustNotes.us before you’ll know that I have an aversion to calling in a repairman. Hiring someone who knows what they are doing clashes with the pioneer spirit here at Tinfiny. I googled the F3 error code and found the gas charge was low so I ordered an 11-pound container of 410A refrigerant. Pretty in pink and $80 with free shipping.

The tools required for the air conditioning trade used to be fairly expensive. A set of gauges and a vacuum pump might set you back $500 in the 1980s. A typical homeowner usually didn’t have that kind of equipment sitting next to the rake and that broken blue plastic kiddie pool. Thanks to the wonders of our modern global economy a middleclass pencil-pusher can set himself up in the air conditioning business for a couple hundred very devalued US dollars. Less if he doesn’t care to know what pressures his system runs.

Mini-split air conditioning systems are pretty simple at the mechanical-cooling level. A compressor squeezes the refrigerant gas into a liquid, increasing its heat. This hot, liquid refrigerant is then run through a condenser, which is nothing more than a radiator like the one in your car. The condenser cools the liquid refrigerant by transferring heat from the liquid to the outside air via the cooling fins of the condenser.

Next the cooled liquid refrigerant goes to the expansion valve. The expansion valve has a tiny hole that causes a pressure differential. The now low-pressure refrigerant travels to the evaporator which is another radiator located inside the room to be cooled. The room air temperature boils or expands the refrigerant, in the process drawing heat out of the room. After absorbing heat from the cooled space the refrigerant travels back to the compressor to start the cycle anew.

As this endless circle of suck, squeeze, condense, evaporate, return continues the room gets cooler and cooler until the thermostat shuts off the compressor or the room gets so cold the refrigerant won’t evaporate. Don’t hold your breath for the room to get that cold. While refrigeration theory is simple, all the extra components, controls and electronics involved with air-conditioning are not simple.

An interesting side note about mini-splits: The expansion valve is located inside the compressor/condenser unit that sits outside. This means that both refrigerant tubes going to the interior-mounted evaporator/fan unit are all part of the expansion cycle so both tubes get cold as opposed to one line hot, one line cold like in a traditional central air system.

Have all the fair-weather readers left the room? Good, because we’ve lost anyone with a functioning life and things are about to get even geekier. On my mini-split the only access for a pressure gauge is on the low-pressure side near the intake of the compressor. Gauge sets are usually the first thing a person buys when working on an air conditioner but to me they are the least important tool. My AC guru, Jerry, from The Florida Keys told me to feed the 410A in slowly until the evaporator gets uniformly cool and you’ve reached the right pressure. Who cares what the pressures are as long as the room gets cool, right?

I put the pressure gauge/manifold on the system anyway and fed a steady diet of 410A into the low-pressure side keeping things around 100-psi and it worked. For about 3 hours we had glorious cool air. My wife was happy. Was it me, or did each pass through the compressor seem like a little less cool air was blowing out? I had a leak. I kind of knew I had a leak before I started the filling process because it’s a sealed system: what else could cause low pressure?

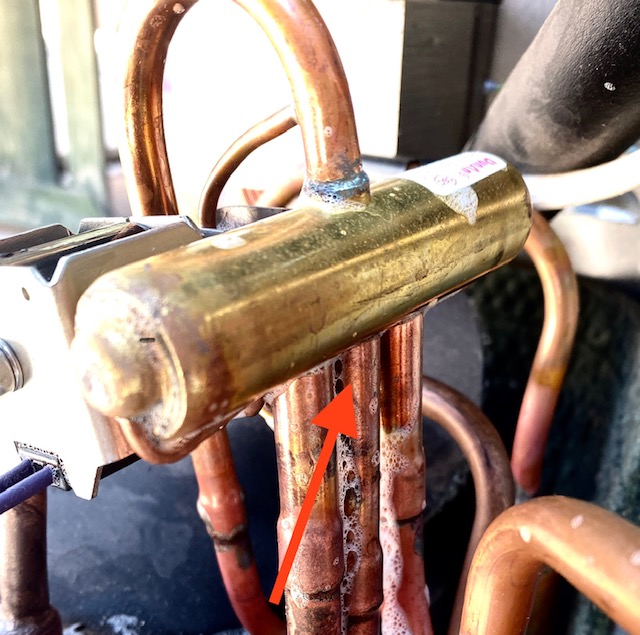
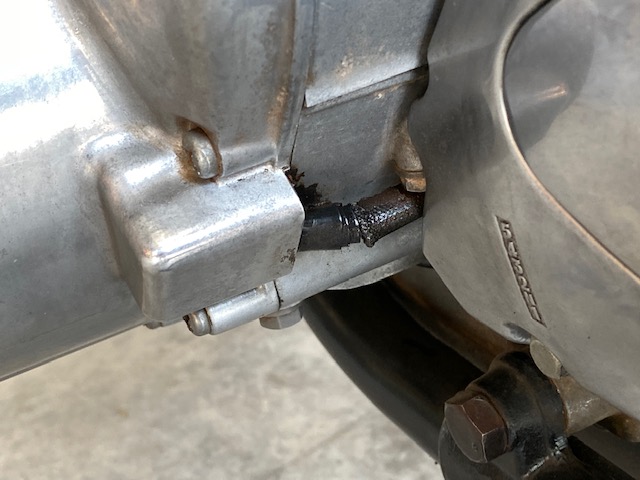
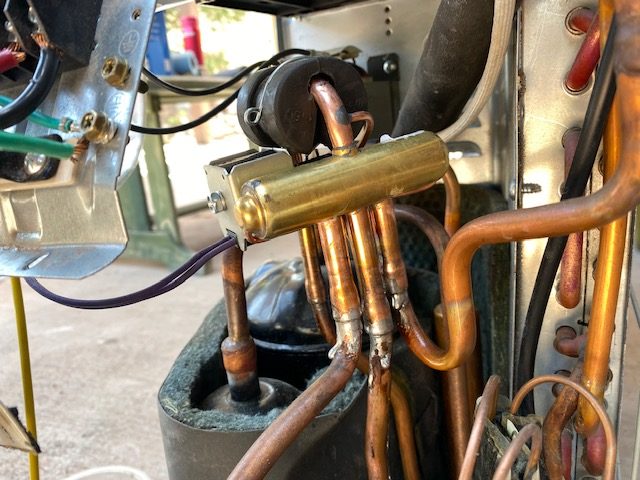
Much like finding a leak on a flat tire, soapy water revealed that the reversing valve was leaking where the tubes were soldered into the spool valve body. A quick note on reversing valves: They do exactly what they say they do. They reverse the direction refrigerant flows in the system making the evaporator the condenser and the condenser the evaporator. In reverse cycle, the unit tries to cool the outdoors and the interior unit warms the house. It makes a fairly efficient heat source as there are no heat strips or high wattage elements to suck up huge quantities of electricity.

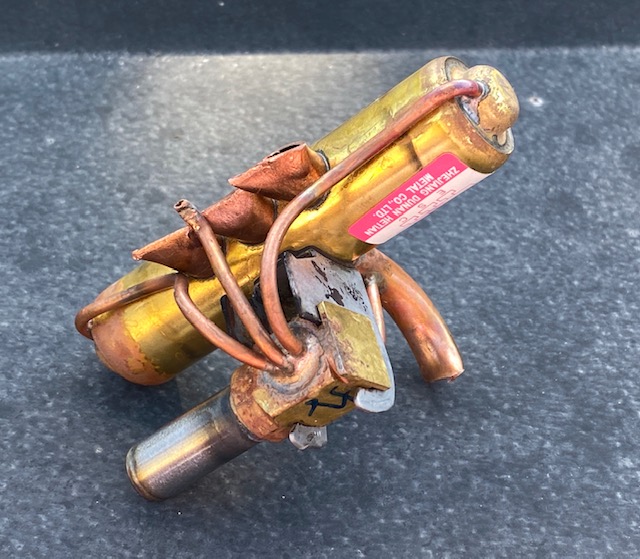
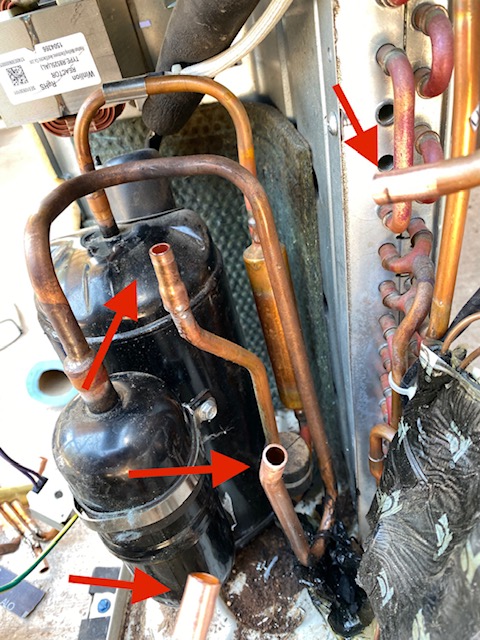
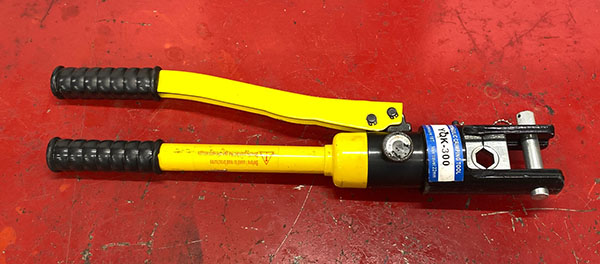
The operative word in mini-split land is “mini.” Everything is crammed together inside a small space making the valve swap more difficult than it needed to be. There are three short pipes almost touching each other and then one more off to the side. To remove the valve gracefully you’d need to heat all 4 joints at once. I don’t have 4 torches or 4 hands so I cut the old valve out. I then tried to de-solder the left over stubs but whatever the manufacturer used to solder their joints had a higher melting point than the copper pipe! The job was turning bad, man. The copper pipe would turn rubbery and that damn solder still would not let go. The wiring and insulation were catching on fire. I had to take a break.

My new plan was to abandon the old joints and cut each tube, lowering the valve a bit but I couldn’t find my small tubing cutter. I had to bend each pipe out of the restricted space to cut them. Of course you know any time you move pipes that have sat in position for years the risk of creating another leak is pretty much 100%. Manhandling the copper pipes back into position was another chore and I began to mentally prepare myself for the cost of a new AC unit ($600).

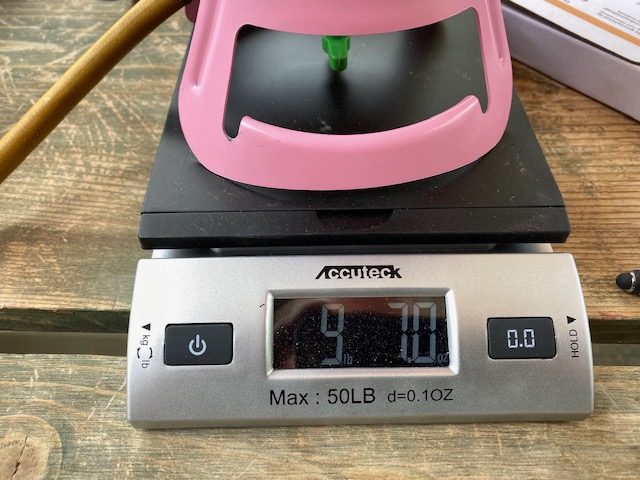
If you’ve lost all the gas out of your mini-split system the best way to charge it is to weigh in the correct amount of refrigerant (32 ounces in this case, plus a few ounces for the tubing runs). I guess now would be a good time to discuss the merits of filling liquid vs gas. Depending on the orientation of the gas bottle you’ll get liquid refrigerant or gas refrigerant out of the bottle. From what I’ve read online liquid charging preserves the ratio of the blended crap they sell us now to close that Ozone hole and save mankind. Sure it worked, the hole closed and all but what about my rights? Gas charging ends up favoring the lighter elements of the blend so each fill alters the ratio of the remaining refrigerant. Worst case it will decrease cooling performance and leave behind a compromised bottle of AC juice. 410A is not as bad as some of the other exotic blends but I liquid charged anyway because I’m a cutting edge, risk taking sort of dude.

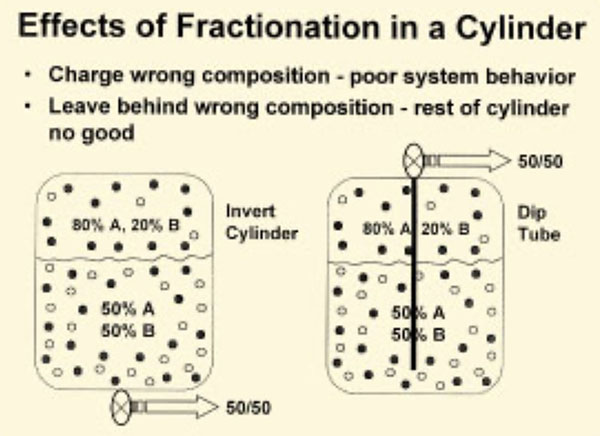
In actual fact as soon as the liquid hits a pressure differential it turns to a gas. Things like your pressure gauge manifold knobs turn into expansion valves. As long as you don’t dump the juice in too fast and lock up the compressor with a slug of liquid 410A. Keep the stuff coming out the bottle liquid and your ratios will remain correct.

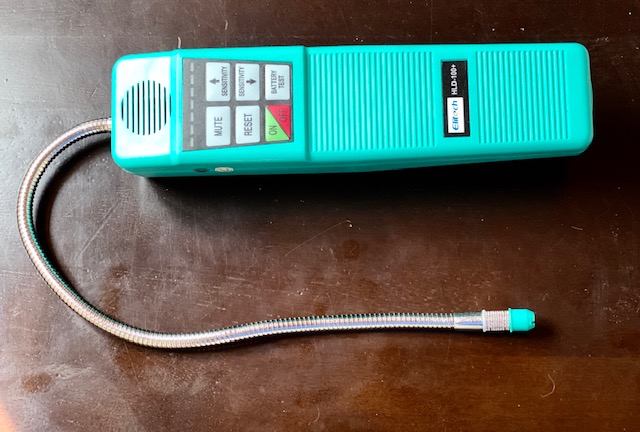
32 ounces of 410A bought us another few hours of nice, cool air before the mini-split began blowing room temperature air into Tinfiny’s living room (if you can call it living). The thing was still leaking. I never let a crisis go by without using it as an excuse to buy more tools. I used my new halogen sniffer on the condensing unit and found the new expansion valve leaking at my solder joints.

In retrospect I was rushing the job, frustrated with the confined space, fires and tired of messing with the stupid thing. I guess I didn’t get the pipes cleaned off enough or there might have been traces of oil that the solder flux didn’t get clean or who knows. The new valve passed the vacuum test but vacuum is nothing compared to the 300+psi high side running pressure.

Luckily a cool spell blew through Tinfiny Ranch, which bought me some time to think. I asked myself what was the main obstacle to success on this job? The main obstacle was the confined area to work on the valve. Then I said to myself, “Why not get rid of the valve?” it was like the blinding light of Jesus struck me! Of course! Make it cool only and I’ll worry about heat next winter!

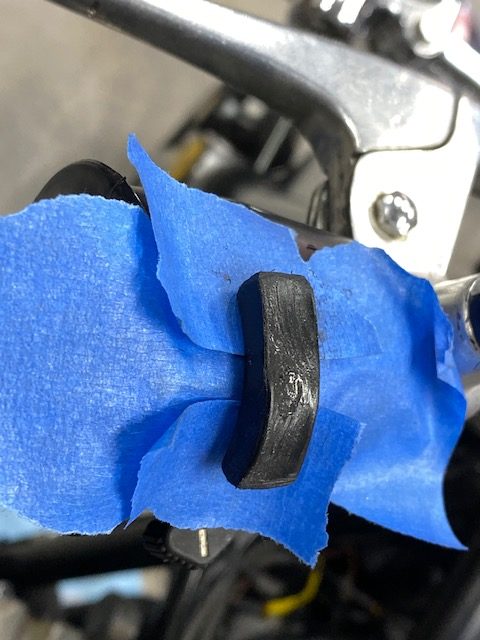
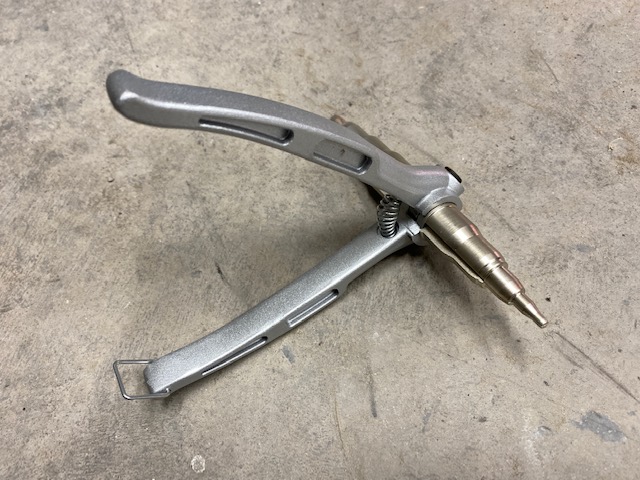
And so on the third day of working on the mini-split I bypassed the reversing valve. Using my new mini tubing cutter I made cuts in the pipe at different levels and wide apart, filling the gaps in the plumbing with new copper pipe. This also allowed me to use my new tubing expander on the jumper pipes. Anytime you can eliminate a solder joint it’s a good thing. The tubing expander gets rid of couplings and saves solder joints.

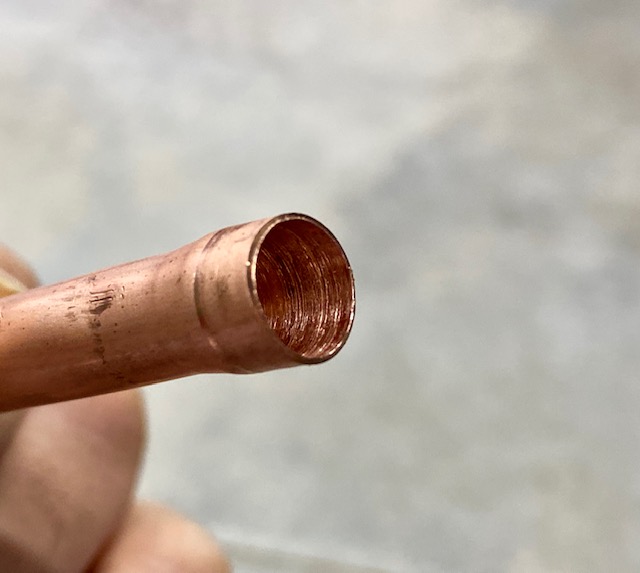
When I bought the pink, 11-pound bottle of 410A I figured it would last the rest of my life. After charging the system twice I was starting to worry I wouldn’t have enough gas to finish the job. I sanded the pipes with crocus cloth and wiped them down with paste flux. I might have gone a bit overboard with the solder as the stuff was running down the pipe. Usually when I solder copper pipe I let the solder wick into the joint then wipe the joints with a rag while the solder is still soft. It makes a clean looking joint. This time I didn’t touch anything for fear of causing a leak.

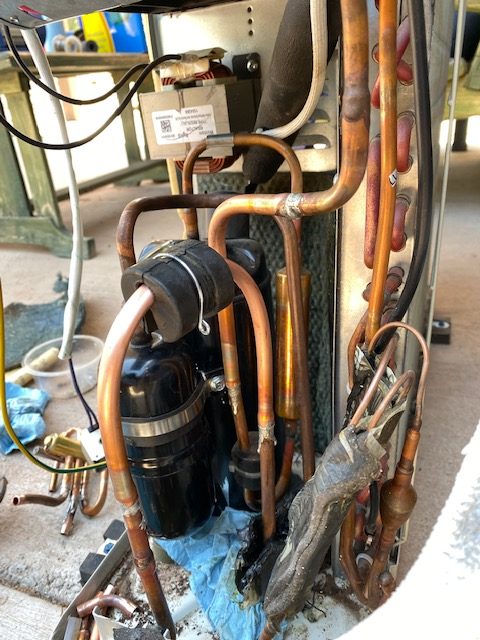
With the bypass pipes in place I charged the system yet again. 34 ounces of 410A put the low-side pressure near enough to 110 psi so I was in the ballpark charge-wise. Daytime temps have been in the mid-90’s and as I type this the mini-split has been cooling Tinfiny down to a crisp 70 degrees inside. And it’s been doing it for almost 5 days. If there’s a leak it’s a slow one.

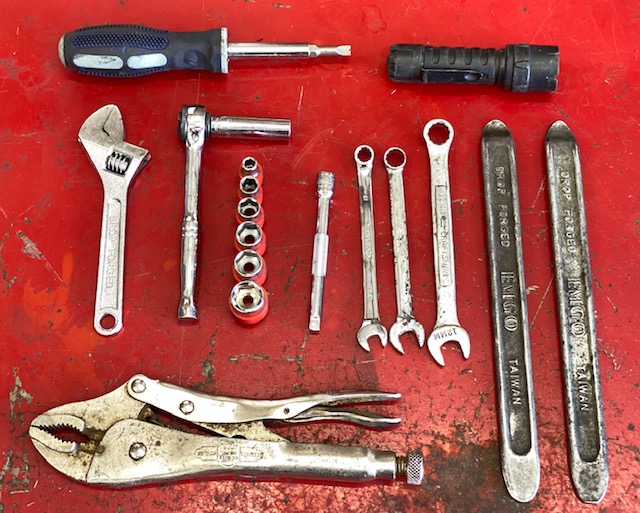
Money-wise I may have to call it a wash. I bought a digital scale, a halogen sniffer, a mini tubing cutter, a bottle of 410A, a tubing expander and the rest of the tools I already owned. Maybe calling a pro would have been the way to go. I spent 3 days learning a lot about HVAC, cussing and thinking hard about the choices I make. And I would do the same thing again. It’s a good thing to peek inside the magic boxes of your life.

Product Test: BMG Adventure Pants

As any loyal reader of ExhaustNotes.us knows, I recently got all new riding gear from British Motorcycle Gear. In this blog we tackle BMG’s Adventure pants, a lighter weight alternative to BMG’s Pioneer pants. When I say lighter weight I don’t want to mislead you; the Adventure pants are still heavier than denim jeans.

The Adventures have two zippered vents on the front side that let in a lot of air when you stand up on the pegs like a real adventure rider is prone to doing whenever there is a camera around. Sitting down like a lazy chopper rider, the vent flow is less powerful but you can still feel it. There is a mesh liner that combined with the 500 denier shell gives a good compromise between protection and sweating.

One feature that stands out for me is the heat resistant, Nomex inner-calf panels. The high-mount, left-side Husqvarna exhaust system has burned a hole through several of my rain pants and street slacks. So far I haven’t been able to melt the Adventure pants.

Another feature I like on the Adventure pants are the three belt loops. I’d like to have a few more loops but three loops beat none because I wear a belt. You’d have to have a misshapen body like mine to appreciate the extra security a belt gives you in big-air situations. There’s nothing more embarrassing than getting pantsed by gravity.

On the sides of the Adventure pants are waist adjusters. These are handy for postprandial riding when your belly is bloated from too many carbohydrates. My odd combination of fat waist and short legs make finding motorcycle pants to fit a real challenge. I’ve been riding motorcycles for 50 years and the BMG Adventure pants come the closest to fitting in all those years. The 29-inch legs could be a 1/2 –inch shorter but as long as I have my belt it’s not a problem.

My Adventure pants came without armor, which is fine with me. I also have the much heavier-duty, armored BMG Pioneer pants to test but that will have to wait for cooler weather. The Adventures have long leg zippers but I didn’t need them to enter or egress the pant. If you are a weirdo who puts their boots on first, then your pants you will find the zippers handy. There is a short piece of zipper on the backside that can connect to BMG’s line of jackets. I never use those back zippers but I bet they stop drafts pretty well. The back zipper will also keep your jacket from riding up in a crash and possibly save a few square feet of road rash. Hmmm…maybe I should start using that zipper!

I’ve worn the Adventure pants down to 40 degrees with only a thin thermal underwear layer and was warm and comfortable. For my personal thermostat 40 to 80 degrees F was right in the Adventure pant wheelhouse. Above 90 and into the 100’s the Adventure pants are a bit too warm for my taste. Really, for motorcycle riding above 100 degrees shorts and flip-flops are the only way to go. Just kidding.

For New Mexico use the BMG Adventure pant is a great 3-season bit of riding kit. If you live where it rarely gets to 90 degrees or above then you can call them 4-season pants. I feel safer wearing them on a motorcycle than I do in plain old dungarees. The retail price of $199 is not out of this world when you consider the price of Levis jeans or cigarettes. Don’t forget to use the exhaustnotes.us discount code (BMGJOES) when you order from BMG to save a few bucks.  Run your order up to over $199 and you’ll get free shipping, too.


Visit our Product Reviews page here!

Mentors: Virgil B. Patterson

Once upon a time I wanted to be a boat mechanic. When I met Virgil B. Patterson I got the chance. Everyone called him Virgil B. The Patterson part rarely came up. I met him at Admiralty Marine down on Shelter Island in San Diego where I had been hired to install bonding systems in boats.

Bonding entails electrically connecting all the underwater metal components of a boat. Stuff like rudders, props and shafts, thru-hull fittings for water intakes or transducers for electronics. These components may be bronze, stainless steel or any amalgam of metals the manufacturer used when they built the part but they are never pure anything. Bonding connects these blended combinations of atoms to a zinc or magnesium sacrificial anode. If you dip the whole mess into salt water you have a nice .75-volt battery. The zinc, being a less noble metal would slowly lose mass as a slight electrical current passed between the zinc and all the rest of the metals. By sacrificing itself the zinc protected any more-noble metals in the circuit .

There’s a lot more to bonding but the rest of it was just as boring as that last paragraph. At first I liked the job. I crawled around boats connecting things with one long, continuous piece of #10 gauge solid copper wire. We used one piece of wire to eliminate the possibility of a bad connection at one fitting causing a disconnect down the line. The wire looped back to the beginning, forming a circle so that if the bonding was cut once everything was still protected. The last thing you want is a bunch of dissimilar metals electrically connected without a chunk of zinc in the circuit. It would be better to leave the boat un-bonded and let each part corrode at its own metallurgical pace.

My initial enthusiasm waned. Bonding became a tedious and thankless task. I could work on a boat for 60 hours and it would look exactly the same as when I started. Nothing on the boat worked better or, for that matter, worse. Unless something goes very wrong electrolysis is a slow process. It took months or even years to see if you actually accomplished anything electrolysis-wise. The worst of it was that it always seemed like the customer didn’t really know why you were there.

When I wasn’t bonding boats Virgil B. would take me along on engine or transmission jobs. Virgil B. was a Marine and tough as nails but he was getting on in years and he needed a young back to help with the heavy stuff. My job was to lift the heavy stuff, carry his toolbox down the docks, run to get parts and drive him home at night after we got hammered on Mickey’s Big Mouth malt liquor. Mickey’s were unique in that they came in little green-glass hand grenades. We loved the things.

Getting hammered on Mickey’s Big Mouth malt liquor was our way of winding down after a hard day’s work. We put in a lot of time at Admiralty Marine. It was a busy shop. 60-hour weeks were normal. One week I clocked 90 hours. I was making $3.25 an hour so I needed all the time I could get. It was 6 or 7 pm when we quit and drove to the store for some Mickey’s. Virgil B. drove a 1973 Ford Ranchero Squire. The one with wood trim. At that time it was a fairly new car.

Some nights, and I never figured out why, Virgil B. wanted me to drive his car home and drop him off, then I would go to my house to sleep and pick him up in the morning. He was no more hammered than I but who knows? I tell you what, that Ranchero hood looked about 70 feet long after 4 malt liquors.

Virgil B. taught me to be the end of the line. The buck stopped with us: If we couldn’t fix the problem then we damn sure figured out how to fix it. There was no quit in Virgil B. and we never failed. The man was relentless. Lowering a 200-pound Paragon transmission (with a reduction gear!) deep into the bowels of a sail boat while Virgil B. held my legs to keep me from sliding into the hole gave me the confidence to complete any task. I was taught that there is no one else coming along and that the job was all on me, on us.

I got real busy with bonding systems so Admiralty Marine hired a full-time helper for Virgil B. He was a young Marine fresh out of the military. I’ll call him Eric because he resembled Eric Estrada. The son-of-a-bitch looked like a movie star. Virgil B. picked Eric from the other applicants because he was big, strong, a Marine and he was beautiful.

Virgil glowed with the pride of ownership. Standing Eric next to me was comical: Eric towered 6-feet 3-inches, I was 5-foot 7-inches. It was like Pee Wee Herman next to Charles Atlas. Eric was well into the lower 200-pound range. I had long, scraggly hair and weighed about 130 pounds.

But the pride of ownership soon faded. Eric and Virgil B. were sent out on jobs and kept coming back with problems. This wouldn’t come loose or that was heavy. Even simple things stalled Eric. He was just lazy, was the problem. Virgil B. took me aside one day and said “I don’t know what happened to the Marine Corps but Eric wouldn’t have been a Marine in my day.”

The final straw was a diesel Ford Lehman cylinder head Eric was to bring in for a valve job. The Lehman is a mid-sized diesel and the head is one big ass chunk of iron covering 6 cylinders. Eric came back to the shop empty handed and told Virgil B. that it was stuck. The frustration welled up and in disgust Virgil B. turned to me and said, “Joe, go get that god-damn cylinder head.”

There was no way in hell I was going to let Virgil B. down. I would have died if that’s what it took. The buck stopped with me. I broke ratchets and sockets. In the cramped engine room I strained lifting the cylinder head off the block and carrying it up from the engine room, down the docks and into the truck. It really should have been a two-man job but I brought Virgil B. that Lehman cylinder head. At the shop I dropped the pickup’s tailgate revealing the cylinder head. The look Virgil B. gave Eric was worth every single BTU of energy I had expended. If couldn’t be pretty or tall at least I could be relentless like Virgil B.

Eric was fired. I overheard Virgil B. telling Admiralty’s owner “He just doesn’t have it.” After the Eric debacle, Virgil B. took me along for all the hard jobs. The jobs that nobody wanted to do. We drank malt liquor and worked late. We rebuilt Perkins and Chevys, Toroflows and Atomic-4s. It was a wonderful time in my life and the methodical trouble-shooting lessons I learned from Virgil B. have served me well. But the most important lessons Virgil B. taught me were that if I never quit I can never fail and that the buck stops here.

Tie Back Action!

Tinfiny Ranch is a steep and rutted place. Located in the foothills of the Sacramento Mountains we get a lot of runoff. When it rains water flows through the joint with alarming speed carrying off soil as fast as I can put it back. After living here only 4 years we lost 18 inches of dirt and the house’s foundation was laid bare. The solution to handling intermittent, mass quantities of water is terracing and concrete. I built a long retaining wall and back filled it with dirt but I wanted a bit more tip resistance than just the extended foundation and concrete slab top would provide. The new grade is much gentler slowing the speed of the water and directing it away from the house.

Enter the tieback. The tieback is a belt and suspenders type of thing. In my case I bent a loop on pieces of 5/8” rebar, ground the ends as round as I could by free hand (If I only had a lathe!) and threaded the bar for 5/8 coupling nuts.

The nuts spin on to the threaded rebar until tight, but seeing as how the threads were kind of ragged on the rebar I decided to give them a lick of weld to ensure the bar won’t pull out of the nut. I used an Oxy-Acetylene welder because it’s the only type of welding I can still see.

After welding the tieback I dug a T-shaped hole for concrete. In this setup the concrete is mostly there to protect the rebar from rusting. Any tipping force on the wall tries to stretch the rebar and pull the cross piece through the dirt.

The rebar connects to a 5/8” threaded rod cast into the poured concrete columns. These poured columns tie each 8-foot section of wall together and have a L-shaped foot protruding on the fill side. The L-foot column is yet another tool to prevent tipping.

Once poured, the tie back is buried and the dirt compacted. About 6-feet long with a 24-inch cross bar, one of these tiebacks anchors each 8-foot section. The idea being the wall would have to move a lot of compacted, dry dirt to fall over.

The wall has 3/8” rebar every few cells of the block sections. This rebar is poured into the foundation of the wall and all the block cells are filled with concrete. The 3/8” rebar stands proud of the final slab elevation.

Capping all this monkey-motion, the protruding 3/8” rebar is bent over below the finished grade of the slab and tied to more steel. Another rebar runs parallel along the wall to emulate a cap. Then the slab is poured making a nice beer drinking or steak grilling patio.

Obviously if you’ve read this far you’ll realize I’m not an engineer so all this may be excessive or futile but to tip the retaining wall you’ll have to lever the foundation L-feet, pull the tie backs through the dirt and drag a 30-foot long by 10-feet wide patio across the ground. It’s not impossible given enough ground saturation but the wall is only 4-feet tall at its highest and I’m hoping the slab keeps the dirt beneath dry.

If this wall fails I’ll just leave it for fill and start another wall a few feet away from the wreckage. It’s been a fun project and I plan to extend the retaining wall another 30 feet after this year’s monsoon season is over.

Zed: Miles of Smiles

During this Covid-19 lockdown I’ve been racking up the miles of Zed. I fill the tank before I leave home and gas up once mid-ride making sure to rinse my hands with gasoline to kill any virus remnants left on the bowser keypad or handle. For those of you who are concerned about my crashing the bike and adding to the overwhelmed medical staff, fear not: I am riding easy like Easy Rider. Also Southern New Mexico is at the very beginning of the infection curve so the hospitals have plenty of room.

Since the last oil leak was stopped Zed has done 650 miles and she’s dry as a bone. I checked the oil level and it has not dropped. I feel confident that zed’s engine will take me anywhere. It feels like the bike is running a wee bit too rich but my riding area goes from 4500 feet elevation to 9000 feet. The jetting is stock in Zed’s carbs so if I chose to ride only in New Mexico I’d re-jet the thing. As it is I get a fairly steady 40 miles per gallon, mostly highway miles @ 70 to 80 miles per hour.

But I’m not going to stay around here. Berk and me are going to ride down to Mexico when this thing is all over. We’re going all the way to the end of the road, man. We’ll pick up Big John on the way. We’ll drink Modelo beer in the evening and eat Mexican food until we burst. Berk has a new 650 Royal Enfield that will get enough miles per gallon for both of us. I’ll bring my syphon hose. Orlando has a Texas Hill Country ride planned and I’d like to get down there. I’ll be interested to see if Zed’s fuel mileage improves at lower levels. I tried the magic gas treatment on Zed but unlike the 10 MPG improvement I see on the fuel-injected Husqvarna the magic sauce doesn’t seem to do anything for the carbureted Z1. Maybe there are just too many carbs.

Riders today think all bikes handled badly before they came on the scene. The Z1 was reputed to be ill handling, not as bad as the two stroke triples but still deadly. I’m not feeling it. At sane speeds the bike is steady and it corners with a delightful, easy steering. The bike does not show its 500 pounds. Winding it up to 110 MPH reveals no wobbles. Hitting a bump mid-corner induces a tiny wiggle but it’s no worse than other bikes I’ve ridden and quite a lot better than some late-model heavy weights. Maybe modern bias-ply tires are better than they were in the early 1970’s.

The front brake squeals at slow speed. The aftermarket pucks did not have the threaded hole to screw the thin, anti-vibration shim to. I thought I could get away with leaving it out. Looks like I’ll have to try some of that disc pad backing goop.  Or, once all other options are exhausted, get the correct pads.

I’ve tried to social distance on my rides but in the Carrizozo Park my perimeter was compromised by a scraggly looking dude walking two scraggly dogs. “Nice day for a ride!’ he exhaled a dense stream of almost pure Covid 19 virus across the picnic table. I staggered to stay upright, it was a water main gusher. My to-go hamburger was glowing with a faint greenish light. Covid dripped through the expanded metal tabletop peeling the paint from the metal as it went. “Yep, It doesn’t get any better” I said scooting farther down the bench. “What ya riding? A 200?” the wind was at a better angle now, the covid pooled by the dog with one front paw in a sling, who sniffed at the greenish mass with nothing like enthusiasm.

“No, it’s a 900cc.” I said. Scraggly squinted at the bike. “That’s a small bike, 900 you say?” He didn’t believe me and I didn’t want to prove it with a tear down and bore inspection. “I’m a Vietnam vet!” He said. “I’m crazy but it’s not my fault.” He had one bad eye and used it to glare at me. “It’s the stuff they made me do, and now the VA won’t help me!” I said I thought the VA was supposed to be getting more money. He laughed; a chunk of grey, spongy lung flew out of his mouth. “That’s all a lie! That money is going in their pockets.” He stuck his right hand in his pocket for emphasis.

“This town sucks, there’s no prostitutes!” he shouted. I looked around and had to agree that this section of town did not have any working the street. “I hate it here. I’d like to go back to Vietnam and kill people!” I was beginning to suspect Scraggly might really be crazy. I quickly ate my burger and stood up. I told Scraggly, “Well, I’ve got to hit the road.”

“Okay, I’m leaving in 28 days, going to Georgia.” We shook hands; at that point I was already covered in Covid. Back at the bike, I stuck a paper towel inside Zed’s gas tank and used the cool gasoline to wash my hands and face. Then I cleaned my arms and then lit a match and set the whole shebang on fire.

The brakes on the Z1 are not awe-inspiring. It takes 4 fingers to get the front tire to break traction. The rear is pretty good but who uses rear brakes? The front suspension clatters as it tops out over bumps but after a few cycles they quiet down. The back shocks are original and I assume 45 years old but they keep the tire from hitting the fender and that’s all I can ask from shock absorbers.

Me and my riding buddy Mike took a long, 280 mile ride. The Z1 ran perfectly. Mike was on his Fatboy Harley. The Zed hits reserve kind of early. Like 100-110 miles. I still have a lot of gas so I may shorten the pick up tube a bit. I don’t like drawing from the bottom of the tank if I don’t have to. The 104 cubic-inch Harley gets 50 miles to a gallon! Zed is a thirsty beast.

Next up is an oil and filter change on Zed as soon as my oil arrives from Amazon. I’ll be checking the spooge closely for any odd bits of metal. That is, assuming I’m not on a ventilator by then.


Read the story of Zed’s resurrection here!

CSC’s new colors and some good adventure video…

I stopped by CSC Motorcycles last week to visit with my friend Steve and see the new TT250, San Gabriel, and RX3 colors.   I and my camera will try to do justice to the new CSC paint themes, and hey, while we here, we’ll share a few videos.

The TT250 line has an entirely new set of colors, and I like the new look.

There’s a cool decal on the TT250 side panel, too, which i like a lot.  It reminds me a bit of what new Triumphs had in the 1960s, when every one of their bikes had a “world’s fastest motorcycle” decal on the tank.

As you know, I have a TT250, and mine is from the very first shipment that came into CSC a few years ago.  Mine is black with bold TT lettering on the tank and side panels.  I like that bike, I’ve ridden it in Baja (the video below is taking it through the Rumarosa Grade in northern Baja), and I’m going to fire it up and ride it around a bit today.

Next up is a photo of the San Gabriels. The new colors on the SG250 work well, too.

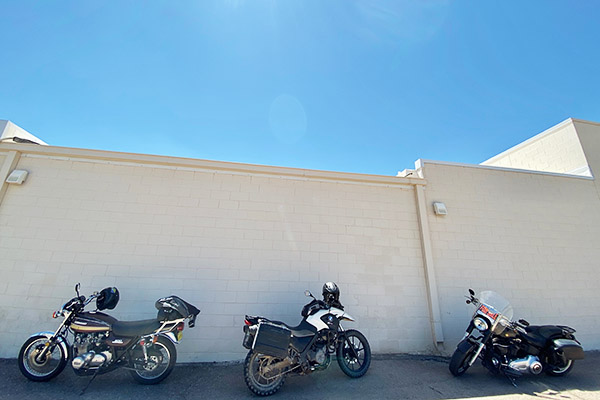
You know, I did one of the very first San Gabriel videos when those bikes first came to America.  It, too, was a hoot.

And here are a few photos of the CSC RX3, a bike that has generated lots of smiles and lots of miles since its introduction to the United States in 2015.  The new colors are much more interesting and maybe a little more subtle than what we’ve seen on RX3 motorcycles in the past.  There’s a gray and turquoise theme, and a silver and red alternative.  They both look good.

I like the new RX3 paint themes, and I like the original ones, too.  I ride an RX3.  Mine’s a 2015 model and, like my TT250, it’s one from the very first shipment to the US.  My RX3 is orange (the fastest color, as good buddy Orlando knows), and it’s one of the early ones that faded to a kind of subdued yellow (that’s before Zongshen started adding color stabilizers to the paint).   I like that look and I’ve had a lot of great rides on RX3 motorcycles, starting with our initial CSC Baja run.  That ride was a hoot and a half.  Imagine that:  A brand new shipment of RX3 motorcycles (the first in the US), and yours truly and 15 other intrepid CSC riders did 1700 miles in Baja on these bikes.   Take a look:

Our next big RX3 ride was the Western America Adventure Ride…5000 miles across the Western US, from So Cal to Sturgis to Portland and then down the Pacific coast to home. I didn’t do a video on that ride, but good buddy Joe Gresh sure did!

We did several more CSC Baja rides, a bunch of rides in the US, and our absolutely amazing 6000-mile ride across the ancient kingdom on RX3 motorcycles:

Not enough?  Hey, how about a ride through magical Colombia on RS3 motorcycles?   The RS3 is the carbureted version of the RX3, and it, too, was an amazing adventure:

If you enjoy watching YouTube videos, we have quite a few more on our YouTubby page.   Grab a cup of coffee, click on the YouTubby link, and have fun.  I sure did.

Zed: Better Living Through Silicone

Every time I tinker with Zed it leaks a little less. This session I tackled the alternator wire oil leak. Zed’s alternator runs wet, a popular thing to do way back when motorcycles were made of steel and riders were flesh and blood. Where the wire harness exits the stator housing a rubber grommet is supposed to keep oil from seeping out. Someone had stuffed electrical tape down in there and Zed’s grommet wasn’t doing its job because the harness dripped oil.

The problem with replacing the grommet is that the stator harness plug needs to be dismantled to get the wire ends through the grommet. Dismantling the 45 year old stator plug is an iffy proposition. You’ll break the brittle plastic for sure. I guess you could eliminate the plug, cut the wire ends off and butt splice the mess back together. It would probably be better from an electrical standpoint.

The job also requires removing the stator housing to gain access to the grommet. That means a new cover gasket and more work. Instead, I took ExhaustNotes.us reader, Honda 919’s advice: After removing the tape and gunk in the grommet area I flushed the void with carb cleaner and mopped it out with a rag. Once I got the void nice and clean I packed in black, RTV silicone until it was flush with the stator housing. Then I let it dry over night. No more stator leak…at least for now.

The black rubber, half-circle cam end plugs were the next problem. Oil seeped out of these with the engine running and at high speeds the oil would blow back onto the plug wire and whatever pants you happened to be wearing that day. The plugs are more than just rubber though, they have an aluminum core to help hold their shape. Zed’s were dry and hard from years of service so I bought new ones.

The old cam plugs were glued in with silicone. I’m not sure it’s a factory process but I used a tiny bit of RTV black on the head semi-circle to help seal the plugs. All went well until I started tightening the valve cover and the rubber plugs started to squirt out the side of the head. Maybe the silicone was making the plugs slippery. I used a rubber mallet to tap the rubber plugs back into the head but when I did that the valve cover gasket pulled in towards the head.

I decided to let the silicone set up and walked away. The next day I loosened the valve cover, set the valve cover gasket back into position and buttoned the thing up. Hopefully for good.

Somewhere in all these road tests the high/low beam knob fell off leaving a broken bit of plastic stalk to control the lights. The parts to fix the high/low switch cost nearly as much as an entire new switch cluster! Having had about enough parts ordering I heated and curved a bit of black plastic, drilled a hole in the thing and RTV silicone glued it onto the protruding bit of the switch stalk. It looks horrible but at least it’s ugly.

I set an ambitious goal for Zed’s 4th test run: 200 miles across the Sacramento Mountains to eastern New Mexico and back. I was only 15 miles into the test run when I smelled oil. The damn valve cover was leaking. Still! The two forward cam ends had a light sheen of oil so I aborted the big ride and took a shorter route. After 36 miles of riding the oil leak seemed to be gone. After 60 miles of riding the cams were nice and dry and there was no oil smell. After 90 miles of riding, not a drop of oil anywhere: the engine was dry. Maybe the earlier oil leak was pre-existing oil blowing around the front of the engine? Back home I checked Zed and could not find any leaks.

I believe the test runs are over for Zed. It runs great and it doesn’t leak. There will be more repairs in Zed’s future but I feel pretty confident in the old motorcycle getting me where I need to go. That is, if the gas tank doesn’t leak.


More Zed’s Not Dead here!