Restoring an Ugly and Broken 1968 Ruger Blackhawk

By  Joe Cota

This is my tale about restoring a very ugly and broken vintage 1968 Ruger Blackhawk that had the safety conversion done by the Ruger factory.  I think Skeeter Skelton would have approved! (Skeeter Skelton was an American lawman and prolific gunwriter well known to firearm enthusiasts.)

First, a little background on the single action revolver, or “sixgun” as they are called. In 1872 the US government was looking for a new service revolver to replace its older Colt and Remington cap-and-ball revolvers used in the Civil War.  Colt developed a sixgun that utilized the then new technology metallic cartridge. Colt was the successful contractor and their cartridge gun was adopted by the government in 1873 as the 1873 Colt Single Action Army. The 1873 Colt SAA was shortly thereafter offered to the civilian market and became very popular with ranchers, lawmen, cowboys and bad guys alike. The “Peacemaker” (as Colt’s SAA became known) was priced around $15, which was most of a drover’s wages for a month.

After WWII a new-fangled gizmo called television started to become affordable. In 1948 about 1% of American households owned a television, and by 1955, 75% of American households owned at least one television set (black and white with “rabbit ears” antenna, of course). The TV set became the center of the living room, and the entire family would gather around the “set” after dinner. Hollywood’s golden age of TV westerns from the mid-1950’s through the 1960’s produced an astounding number of instant hits with shows like Have Gun Will Travel, Rawhide, Wanted Dead or Alive, and The Rifleman. All of them featured the Colt SAA and Winchester repeating rifles, or the “lever gun.” Every red-blooded American boy and his father and his uncles and even some moms wanted to own and shoot their very own Peacemaker.  But there was a problem: The Colt sixguns were expensive and often not available.

My beautiful all original 1969 Ruger Single Six (top), the ugly vent ribbed 1968 Ruger Blackhawk “parts gun” (bottom).  The Single Six is Ruger’s .22 Long Rifle sixgun; the Blackhawk is the larger centerfire cartridge sixgun. Note the three screws on both sixguns and the square-faced, non-notched hammer on the Single Six in the half-cocked position. This Single Six was my first handgun given to me by Mom & Dad brand new for Christmas as a young man 13 years of age. It has a fair amount of holster wear from hunting, backpacking, camping, etc. over many years of honest use. I own up to evey scratch and ding on this well-used sixgun, and I’d never want to refinish or change a thing. When Ruger’s free retrofit advertising campaign first appeared in 1975 issues of Guns & Ammo magazine, I was tempted to send mine in to make it like the New Model but didn’t want to part with the gun for a few weeks. In hindsight, I’m sure glad that I didn’t fall for it.

That’s when Bill Ruger decided to give the public what they wanted. In 1953 Ruger introduced the Single Six revolver chambered in .22 Long Rifle.  It was a sixgun for every boy! Two years later in 1955 Ruger introduced its Blackhawk in .357 Magnum.  This was a sixgun for every man!  They were and still are wildly popular. About 700,000 of the pre-1973 Ruger Single Six .22 revolvers were made, and well over a million New Model Single Six .22 revolvers were made after 1973. I’ll defer the exact number manufactured to the Ruger historians.

Ruger’s Single Six and the original Blackhawk single action revolvers were patterned after Colt’s SAA. The Ruger has a similar shape, size, look and feel as the Colt on the outside. But on the inside Ruger made some improvements. Ruger’s guns used modern high-strength carbon steel. Colt’s action ran on leaf springs prone to breakage. Ruger replaced the brittle leaf springs with much tougher coil springs made from piano wire. The Ruger guns are much tougher than the Colt.

One of the infamous traits both Ruger’s initial guns and the Colts share is the first small hammer cock position called the “safety” is not safe. A gun with all six cylinders loaded, if accidently dropped, is prone to the safety failing (resulting in a negligent discharge). Therefore both the Colt and pre-1973 Rugers should only be carried with five rounds loaded and the hammer down over an empty chamber. These pre-1973 Ruger sixguns are known as the “three-screw” Rugers, as identified by the three plainly visible screws on the left side of the frame, just as the Colts have three screws.   The original Rugers are also called Old Models, for reasons that become clear in a minute.

As the story goes, someone who didn’t follow what is clearly stated in Ruger’s owner manual to carry only with the hammer over an empty chamber, dropped their Old Model Ruger, fully loaded with six rounds, and shot himself in the leg. Apparently, there were other negligent discharges and expensive lawsuits. This prompted Ruger’s engineers to develop a safer design Ruger sixgun.  This newer design is called the New Model Blackhawk.  New Model Rugers can safely be carried with all six chambers loaded. Beginning in 1973 all the New Model Rugers have what’s called the “transfer bar safety.” It basically works by making a mill cut in the front (or face) of the hammer so that in the down position the hammer face can’t possibly touch the frame-mounted firing pin. When cocked back in the shooting position, a steel bar (the transfer bar) attached to the trigger mechanism is raised. When the trigger is depressed, the transfer bar fills the gap between the milled cutout on the hammer face and the firing pin, effectively “transferring” the hammer’s impact to the firing pin.

The 1973 and later New Model Rugers are easily identified because they do not have the three screws.  They have instead two pins. Another difference is that there is no “half cock” position for loading the gun. The cylinder freely rotates for loading simply by opening the loading gate. The New Model Rugers work well enough but do not have the distinctive feel and clicking sound while cocking the hammer as do the Colts and old three screw Rugers. The New Model trigger is not quite as smooth as the older designs because of increased drag and the friction of the transfer bar as it moves into position. Some shooters claim they don’t notice the differences between the two, but I own both and I can feel the difference.

In 1975, Ruger engineers devised a method of retrofitting all of the “unsafe” pre-1973 sixguns with a makeshift transfer bar. They ran a campaign in the gun periodicals that prompted owners to ship their old guns to Ruger and they would “upgrade” the older guns to make them safe to carry with all six chambers loaded.

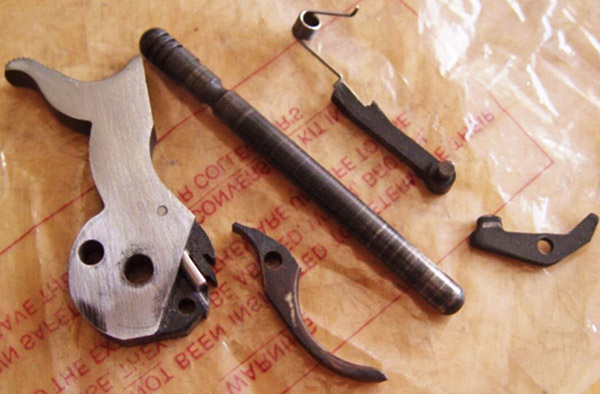
It remains unknown how many owners sent their guns back to Ruger, but apparently there were thousands because we see many of these retrofitted guns on the used gun market today. They are three screw guns that function similar to the New Model two pin guns, but unfortunately the trigger pull on the converted guns is absolutely terrible. The retrofit-style transfer bar scrapes up along the back side of the frame causing an awful, gritty, jerky feel. To make matters worse, the retrofit cylinder base pin is fitted with a small spring-loaded pin that also drags against the transfer bar to push it out and over the firing pin on its upward travel. If the retracting pin gets stuck, the transfer bar pushes into the firing pin, locking up the gun. The retrofitted three screw Rugers are pretty bad, taking all the smoothness from the action.

Ruger reportedly returned the retrofitted guns back to their owners with the original parts sealed a small plastic bag. Many of these plastic parts bags have been separated from the converted guns (they were either lost or thrown away). Ruger doesn’t offer any of these old parts for sale to the public, as they consider them unsafe. If an old unconverted three screw is sent in Ruger for any type of repair, they will return it to its owner with the transfer bar conversion installed, whether the owner asks for it or not. In fact, Ruger will not work on an unconverted old model gun without doing the conversion.

Unconverted three screw models (i.e., unaltered Old Model Rugers) today command premium prices among collectors. Even with the parts bag, the converted Old Models will never realize their true collector value because Ruger has permanently marked the converted guns with an “R” on the frame. The stamp is concealed underneath the grip frame to prove that the factory had done the conversion even if an owner wished to restore it back to its unaltered condition. Ruger will install the Old Model conversions but only if the owner sends the gun to them for installation, and Ruger will stamp the frame showing that they did the conversion.

Converted Old Model Rugers having the afterthought safety conversion are generally not very good shooters. However, restored back to original, these guns make very nice non-collectible shooters for those able to locate the original parts. The Old Model unconverted guns handle much better than the New Model guns, provided a most important safety rule is strictly adhered to.  That rule is to never carry the restored-to-original Old Model Ruger with the hammer over a loaded cylinder. This brings us to the point of this story.

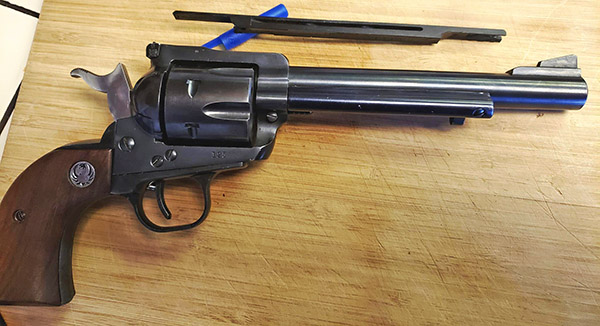
Six years ago I stumbled upon an Old Model 1968 three-screw Blackhawk being sold as a parts gun at the Ventura Crossroads gun show. The cylinder was totally locked up due to the transfer bar conversion (as described above).  However, the asking price was so low that I won’t tell you the cost because you wouldn’t believe me.  Besides being broken it had a ventilated rib that I had never seen before on any Blackhawk. It was truly an ugly duckling Ruger Old Model Blackhawk!  But it had a great finish and the original factory grips, so I went for it without haggling over the price. Man, I’m not kidding.  This gun’s price was so low it was almost free.

The Poly Choke fake ventilated rib glued onto a Blackhawk barrel is just about the ugliest thing somebody could do to a Ruger. Trying to make it look like a Colt Python? Well, you failed!
Close up of the Poly Choke fake rib. It does absolutely NOTHING to improve the gun

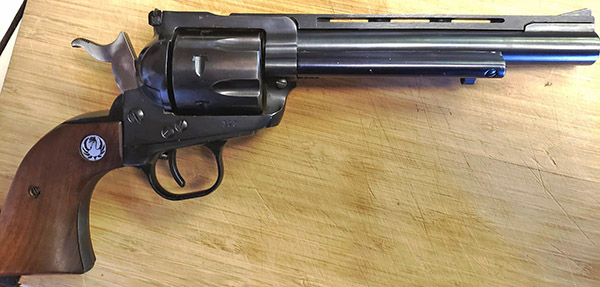
After the 10-day cooling off period, I brought the ugly little Old Model sixgun home, along with a brand-new, high-quality gunsmith screwdriver set. After disassembling the Ruger, I found that the cylinder was frozen because of the factory safety conversion. After cleaning it up and freeing the cylinder, the gun had the absolute worst sandy, gritty, heavy sticky trigger I’ve ever experienced.  It now worked but it had a terrible action, and it was still the ugliest Blackhawk I had ever seen.

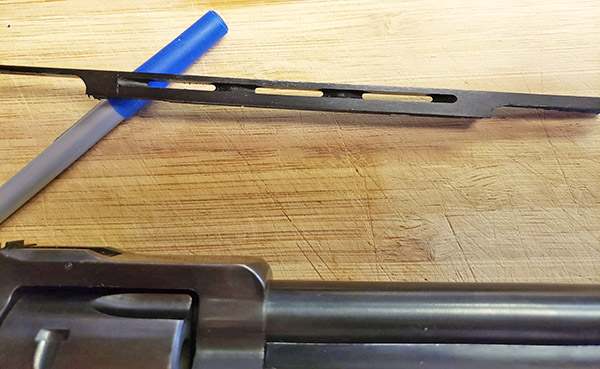
After more research I found that Ruger never made a Blackhawk with a ventilated rib. This gun had a phony aftermarket glued-on rib made by the Poly Choke company. I guess the owner wanted something that looked like a Colt Python and decided to dress up the Ruger for Halloween.  I managed to pull the fake ventilated rib off without causing any damage to the barrel, but it wasn’t easy.  The Poly Choke adhesive was pretty tough. After pulling the rib off, the remaining glue was removed using brake cleaner spray. By now the gun was looking pretty good again, but the action still sucked.

With the Poly Choke rib removed, the “parts gun” is beginning to look like a Blackhawk again. Note the flat hammer face. This photo was taken after the transfer bar conversion had been removed and factory original parts installed.

To smooth up the action, I removed the transfer bar conversion and replaced it with factory original parts to restore it to the original, classic “5-shooter” configuration. Unfortunately, the gun didn’t come with the old parts bag but I was determined to restore it.  Now before any of the do-gooder Ralph Nader safety types out there proclaim “how irresponsible of you,” allow me to ask if you’ve ever seen an original Colt SAA with a safety conversion? Well, no, you have not because Colt had the good sense to not ruin their guns with an ill-designed stopgap transfer bar safety.

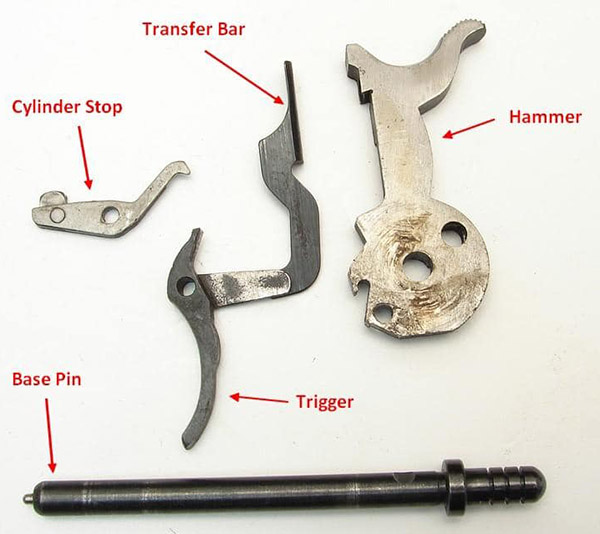
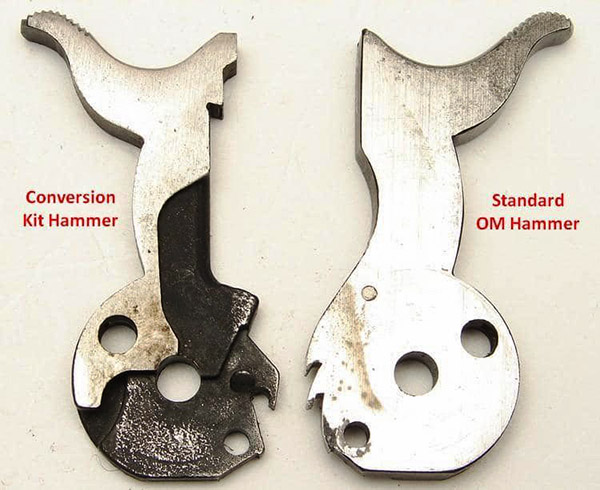
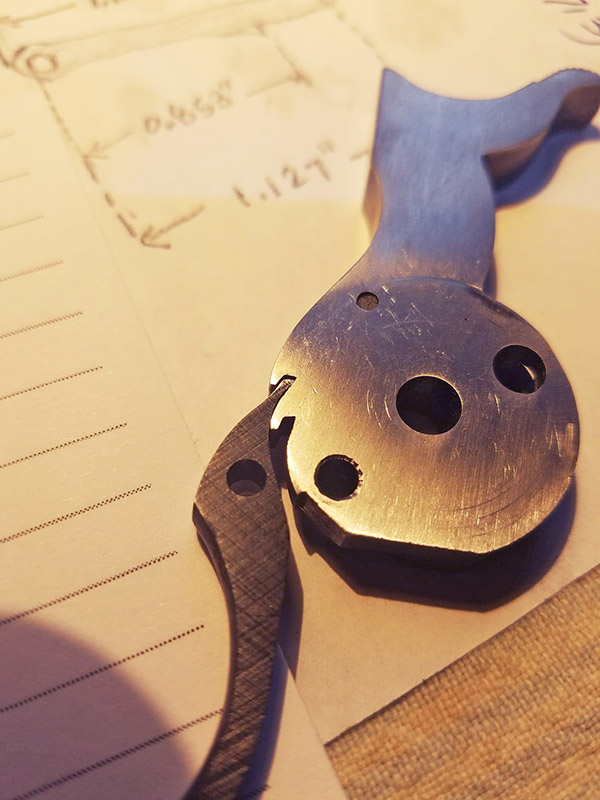
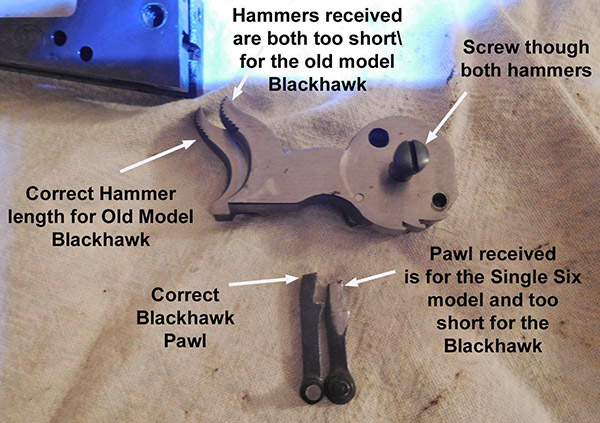
Finding the original parts for an Old Model Ruger is very difficult. Each part had to be purchased separately. It took several months to find all the parts and there were some hiccups along the way. Upon receiving some parts advertised as original Blackhawk parts, such as the hammer, I found that they were original parts for a Single Six model and were not compatible with the Blackhawk. Eventually all the original parts were acquired. The parts included a new hammer, trigger, base pin, cylinder stop, spring, screw, and pawl. The photos and captions tell the story about what it takes to restore converted guns and illustrates the differences between the original and retrofit parts.

Factory transfer bar safety conversion parts. Note that this is not the same parts set as the transfer bar parts that come installed with New Model Blackhawks. These transfer bar safety conversion parts were specially designed to fit on the old three screw models and are not interchangeable with the two pin new models. In this photo the transfer bar appears to be connected to the trigger, but that’s not the case. The transfer bar has a hole that aligns with the trigger pivot bolt.
Original Old Model unconverted parts. This is an image that shows the contents of a returned parts bag that was offered for sale on the internet many years ago. Unfortunately, it was not available when I restored by Blackhawk and I had to locate the parts individually.
Comparison of the original flat-faced hammer (right) and the conversion hammer (left). Note that the conversion hammer has been milled on the face to create a space between the frame-mounted firing pin and hammer while the hammer is down and the transfer bar retracted. The side of the conversion hammer is also recessed for clearance of the long arm of the transfer bar. The transfer bar has friction along this part of the hammer. The front face of the transfer bar also rubs against the back of the frame. All of this creates unwanted friction that gives the converted gun a gritty feel. Also note the three notches on the original hammer for the safe, half-cock, and full-cock trigger positions. The conversion hammer lacks the three clicks that give the Old Model Ruger and Colt SAA their classic feel and sound.
When mixing and matching parts as you can find them, the trigger is not likely to be the same as the one that came with the hammer as a matched set and will likely need minor honing of the sear and hammer notches for proper fit.  This is an opportunity to make the trigger pull better.
One of the pitfalls of buying used gun parts on the internet is that the seller doesn’t always know what he is selling. The Ruger Single Six and Blackhawk trigger groups are not the same. Here’s an example of some of the Single Six parts that were sold to me as Blackhawk parts. The Single Six’s hammer and pawl are both shorter than those of the Blackhawk.

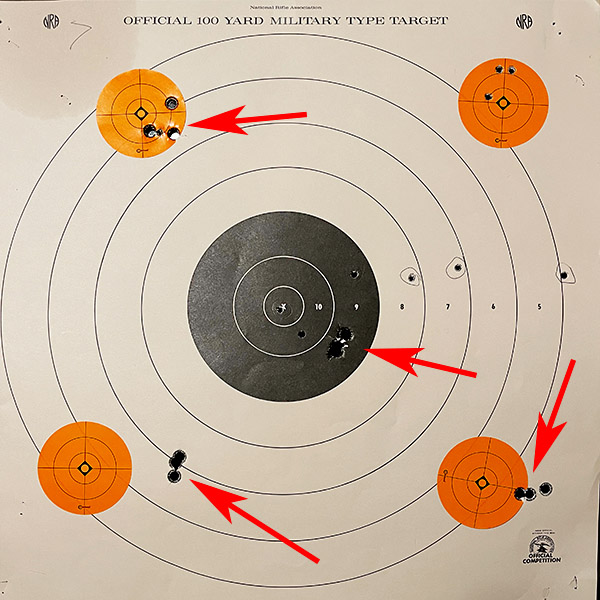
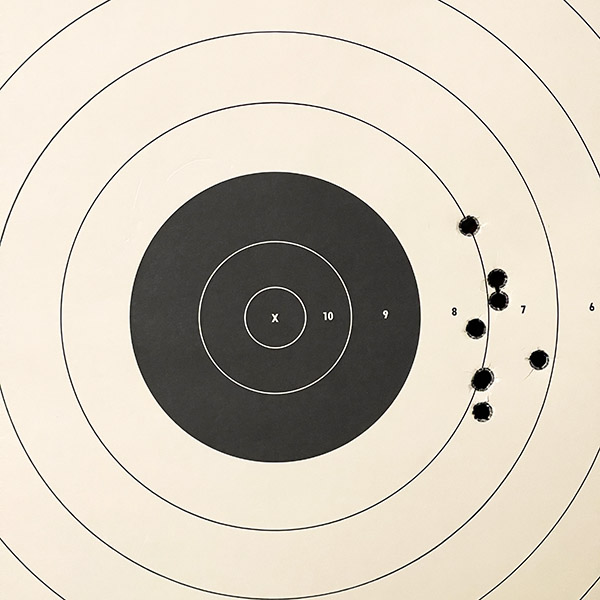
To make a long story short, all the original parts cost more than what I paid for the gun. But it was worth it. This is the smoothest Blackhawk trigger ever, and the accuracy is awesome. Only hand loaded, home cast Elmer Keith style bullets have been fired through it since acquired by me.

This Old Model Ruger has become one of my favorite .357 Magnum sixguns and I think that Skeeter would have approved of how this “parts gun” was salvaged.


Never miss an ExNotes blog:


Don’t forget: Visit our advertisers!


Zooming Through New Zealand: Part I

By Mike Huber

Having both traveling and motorcycling as my two greatest passions in life whenever I have an opportunity to combine them it is always quite magical.  Add on top of that camping, and it’s a trifecta for pure bliss.  Having found myself in New Zealand (and previously hearing tales of the incredibly technical roads and terrain here) was something that I didn’t want to miss, yet I almost did.

One of my strengths as a traveler, which seems counter intuitive, is my lack of planning.  I rarely plan more than a week in advance, and sometimes less than that.  In the past this has been a double-edged sword.  The agility of minimal planning allows me to instantly adjust with few consequences when opportunities arise, but it also has caused me to miss highlights that require more planning.  Still, this is the way I have traveled and for the most part it works.  To be fully transparent, the lack of planning could be due to laziness.  But to be perfectly honest if it hadn’t been at least semi-successful I would absolutely put in the work to lay out a more detailed plan.

This lack of planning almost became a major regret here in New Zealand.  By the time I arrived on the south island to reserve a motorcycle they were booked months in advance.  I was pretty distraught, but I understood the reasoning since it was peak tourism season (and I hadn’t planned).  It didn’t look like riding a motorcycle in New Zealand was in the cards for me.

There was a bright spot as an old friend of mine, Neal from the United States, happened to be on an Air Force duty assignment here. We hadn’t hung out in almost 20 years, so seeing him would be a great way to wash away the disappointment. Neal was in Christchurch and attached to an Air Force unit whose mission was to provide support for Antarctica.  Which I thought was really cool as they were part of the maintenance team for C-130s that delivered supplies to the frozen continent.  I love C-130s as I used to jump out of them when I served with the 82nd Airborne Division. The only difference (from my limited perspective) is the props had eight blades on the propeller instead of four, and these planes had skis attached to the wheels for ice landings. Of course, I thought all this was bad ass.

Leading up to our visit, Neal kept mentioning this Brazilian BBQ place that is an all you can eat meat on a stick fest. When we arrived along with three of his soldiers, the owner came out to greet my friend like he was the mayor of Christchurch.  Instantly I knew Neal frequents this place quite often.

After we ordered Brazil’s National Drink, the Caipirinha, we waited for the feast to begin.  During this time I began chatting up the owner. He was originally from Arizona and had motorcycled quite a bit throughout the United States.  It didn’t take long for the conversation to turn to motorcycling New Zealand and how I couldn’t find a bike.  Within 5 minutes he had texted the owner of a local family-owned rental company, South Pacific Motorcycles.  They had a BMW GS750 available for the exact days I wanted. This was great to hear. I may be able to rebound from my lack of planning after all! If this wasn’t destiny, I don’t know what is.

I had 5 days to kill in Christchurch until I picked up the BMW.  That wasn’t too hard as it’s a fairly large city with some quirky architecture, botanical gardens, museums, and beaches to occupy my time until it was time to pick the bike up.  The downtime also allowed me to research different routes.  This wasn’t done by online forums or social media groups but by just looking at maps and putting a route together (as I would do in the United States).  Again, this could be laziness, but it’s what works for me.  Things were looking bright and the weather was great the day Kim, from South Pacific Motorcycles, picked me up in front of my hostel.  It was time to get this adventure underway.


Read the Mike Huber New Zealand posts here:


Never miss an ExNotes blog:


Don’t forget: Visit our advertisers!


Spiders

By Joe Berk

I’ve always been afraid of (and morbidly curious about) spiders, so when Bobbie Surber posted the photo you see above of a spider in her Ecuadorean hotel room’s bathroom, it had my attention.  I don’t think I could stay in a hotel room where a spider like that put in an appearance.  I know I’m a big tough guy who rides motorcycles and made it through jump school in a prior life, but spiders creep me out.  I’m deathly afraid of the things.

Which doesn’t mean I’m going to pass up an opportunity to get a photo of one.  Baja John and I were rolling through Baja a decade and a half ago on our KLRs (I loved that motorcycle; it was one of the best I ever owned).  We were doing maybe doing 60 mph when I somehow spotted a tarantula creeping along the pavement’s edge.  I had to turn around and get a photo (it’s the one that sometimes graces the scrolling photo collection you see at the top of every ExNotes blog).  Baja John, being a curious sort, did a U-turn and parked his KLR by the side of the road, too. I had my old D200 Nikon with its first-gen 24-120 Nikon lens (not a good choice for a spider macro shot, but it did the job).

The KLRs of Baja John and yours truly stopped along the Transpeninsular Highway for an impromptu tarantula photo shoot.  Those KLRs were great bikes.
A Baja tarantula minding his (or her) own business.
Cover and concealment, tarantula-style.

Before you knew it, I was snapping away while Baja John and I were crouched down in front of the hairy thing.  The tarantula’s ostrich-like behavior was kind of funny.  It hunkered down with a weed over its six or eight (or whatever the number is) eyes, thinking because the weed covered its eyes it was concealed.  At least for a while.  Then it realized we were still there and it charged.  I’m not kidding.  The thing charged at us with startling speed.  Both of us did our best impersonation of Looney Tunes cartoon characters, our feet moving faster than we were, trying to run backwards from the crouched position, screaming like little girls.   We made it, and the spider scurried off to wherever it thought was a better spot.  Baja John and I, thoroughly adrenalized, laughed so hard I thought I was going to pee my pants.

I’m an old fart who really doesn’t give a rat’s ass about what anybody thinks of me anymore, so I’ll tell you that I am scared of spiders on some basic, fundamental, hardwired-into-my-psyche level.  That said, I know that some of you younger guys who read ExNotes probably still worry about being perceived as tough macho men (you guys who haven’t achieved my level of self-awareness and acceptance yet).  Because of that, I’ll share with you a technique I’ve used for decades.   You know the deal…your significant other spots a spider, usually in the bathtub, and the job of sending it to the promised land naturally falls to you, the man.   You’re as scared as she is, but your ego won’t let you admit it.  There’s a spider there, and militant feminism be damned, it’s your job (as the man) to “get it.”

Here’s where the story turns to my other favorite topic:  Guns.  I’m helping you out here, guys.  Here’s an excuse to pick up another firearm.  You can thank me later.

What you need is a pellet pistol.  Preferably a manually-cocked model that doesn’t require a CO2 cartridge.  My weapon of choice is the Daisy 777 air pistol.  It’s a fantastic gun and it is quite accurate (I used to compete with one in bullseye air pistol competition, but I digress…back to the story at hand).

When your lovely significant other comes to you announcing a spider in the bathtub, choke down those feelings of fear, revulsion, and inadequacy. Here’s what you do:  Grab your air pistol.  Cock it, but (and this part is very important) do not put a pellet in the chamber.  While maintaining a firm grip on the weapon, point it at the offending arachnid with the muzzle approximately one inch away from your target.  Do not stand directly under the spider (for reasons that will become clear momentarily, this is also very important).  Take a deep breath, let it halfway out, and while maintaining focus on the front sight and proper sight alignment, gently squeeze (do not jerk) the trigger.  A high-speed jet of compressed air will  exit the muzzle, strike the spider, and break it up into legs, thorax, abdomen, and other body parts.  They will float to the ground and in most cases, the separate parts will continue twitching (adding to the excitement, the thrill of the hunt, and proof of your masculinity).  Mission accomplished, as old George W liked to say.  Your job (which was to “get it”) is done.   You can now turn to your sweetheart, smile, and ask her to clean it up.


Never miss an ExNotes blog:


Don’t forget: Visit our advertisers!


Becoming Vulcan: My Journey Into The Modern Welding Landscape Part 2 (School Is In Session)

By Joe Gresh

You can learn only so much from watching Utube videos. To get proficient at welding you have to actually weld, and weld a lot. This is where New Mexico State University comes in handy. I signed up to be an Aggie for Welding 102 with Mr. Hurt in the hope my shabby attempts at welding could be improved.

Welding 102 is the NMSU starter course, ground zero. For the first few classes we dwelt on safety stuff and spent the time gathering the needed tools of the trade. Steel toe boots were required and I couldn’t find a pair cheaper than $200. I had most of the other stuff: welding helmet, fire resistant shirt, chipping hammer, pliers, safety glasses, welding gloves and a wire brush. It’s a lot of gear and if you’re starting from scratch you’ll be $300 or more into the deal before striking a bead.

Welding 102 is not cheap either. The course runs $500 and is two days a week, 1 1/2 hours each class. I’m not sure how long a semester lasts but I plan on going until they tell me to stop. Most of the cost of welding 102 is materials. NMSU provides all the steel, gas, welding rods and other consumables. It’s fair: I can burn up $20 worth of rod in one sitting.

Arc welding (or MMA, Manual Metal Arc) is the first type of welding we are learning. It requires the least expensive equipment and the fewest bits and pieces. You have a buzz box, the rod, and the material to be welded. The first thing we did was run 6-inch beads on a 3/8-inch plate of mild steel. You started at the top and ran a bead across then started a second bead just below the first bead and overlapping onto the first bead a little. We used 6010 rods, which is a fast freeze metal. The rod makes coarse ripples as you move along, freezing only a fraction of an inch behind the molten puddle.

I had a hard time with 6010. After I finished filling my plate with beads Mr. Hurt said I needed to work on my bead width consistency. So I turned the plate 90 degrees and started again, bead after bead. I still sucked. Turning the plate once again I laid beads over the other two layers of metal. My plate was getting heavy and was warping like a taco.

Mr. Hurt opened the welding shop on a Saturday for us uncoordinated kids who need more practice. I welded on my 6-inch square plate of mild steel from 9:00 a.m. until 1:00 p.m. and the thing was approaching ¾ of an inch thick when Mr. Hurt said that it was enough. I could never weld that many hours with the Vevor 130 welder I bought on Amazon.

Through all the practice I was getting better at seeing the welding process. I still couldn’t see where I was going but I could see the puddle, puddle width and was getting the tiniest bit more consistent.

7018 is the next rod we are tackling. It’s the same process: cover a 6×6 steel plate with beads overlapping beads. The 7018 was easier to control and the beads have a more uniform appearance. 7018 is more liquid (slower cooling?) than 6010 so the ripples between the puddles are less pronounced and not as coarse. 7018 is a low-hydrogen rod, whatever that means.  It is kept in a 250-degree oven so that the flux doesn’t absorb hydrogen from the atmosphere.

Each student has their own welding booth complete with a table, smoke extractor and arc shielding curtains to keep from flashing other kids. A blind welder isn’t much use to anyone.

Our class of 13-ish started out with two women but they both dropped out after the third class. I don’t know why. There is no gender-based physical limitation to be a welder. Eyesight and a steady hand are more important than brute strength. There is one other geezer in our class; the rest is made up of younger guys looking to get into welding as a trade. I just want to know how to use the machines I bought.

The university provides Miller equipment and these things are beasts. They will do arc, wire feed with gas and TIG welding. You can run them 24 hours a day. They don’t overheat or shut down. If you were running a welding shop this is the way to go.

I feel like I’ve made some progress with my welding. That long Saturday session really helped. Welding 4 hours straight will calm your nerves right down. I’m still nowhere close to being Vulcan. There are a many more types of welding to learn. NMSU has three more welding courses, each more advanced than the previous. If you manage to complete them all you will be Vulcan at the end. Live long and prosper, my brothers.


Never miss an ExNotes blog:


Don’t forget: Visit our advertisers!


A Ruger .45 70 Circassian No. 1

By Joe Berk

The .45-70 Government cartridge was destined for obsolescence in the middle of the last century and then a curious thing happened:  Ruger chambered their No. 1 single shot rifle for it and Marlin did the same with an adaptation of their lever action rifle a short while later.

300-grain .45 70 Winchester and .22 LR Federal cartridges.

When Marlin and Ruger came on board with their .45 70 rifles, there was suddenly significant interest in the cartridge.  I fell in love with the .45 70 when I bought a Ruger No. 1 in 1976 (a rifle I still have), and I’ve been reloading the cartridge ever since.  I’ve owned several No. 1 Rugers, a few Ruger No. 3 rifles, a bunch of Marlin .45 70s, and a replica 1886 Winchester (by Chiappa, with wood that is way nicer than anything from Winchester).

Starboard side of the Ruger Circassian .45 70 No. 1 rifle with 26-inch barrel.
Yep. The .45 70 was adopted as the official US Army cartridge in 1873, hence the “Gov’t” designation sometimes seen with the cartridge name.
In addition to its Circassian walnut and 26-inch barrel, these rifles included wrap-around checkering on the forearm. The standard checkering pattern for a Ruger No. 1 is shown on the rifle to the left.

All these manufacturers have offered special editions of their .45 70 rifles. One of the more recent offerings from Ruger was a 26-inch barreled No. 1 with a Circassian walnut stock.  When it was first offered about 7 years ago by Lipsey’s (a Ruger distributor), it was a limited run of only 250 rifles.  They sold out immediately and folks still wanted these, so Lipsey’s and Ruger offered a second run of 250 rifles.  I wanted one with fancy wood, but none of the Circassian Rugers I saw online had wood nice enough to be interesting.  Even though the rifles had Circassian walnut, all the ones I saw were plain and straight grained.  Then one day I wandered into a local gun shop and I saw the rifle you see here.  It caught my eye immediately and at first I couldn’t believe what I was seeing.  These rifles were next to impossible to find and here was one right in front of me.  It was pricey, but I Presbyterianed the guy down to $1050 (you fellow Members of the Tribe will get it) and I pulled the trigger (figuratively speaking).

Ruger’s more recent .45 70 No. 1 rifles have a short leade (the distance between the forward edge of the cartridge case and where the rifling starts).  Mine won’t chamber cartridges with 400-grain and above bullets.  In fact, I had some ammo I had loaded with an old batch of Hornady’s 300-grain jacketed hollow points, and this ammo wouldn’t chamber, either.   I examined the profile of my old 300-grain Hornady bullets and compared it to pictures of the current Hornady 300-grain bullets, and it was obvious the older bullets had a more gradual ogive (the curved portion of the bullet’s profile).  I ordered a box of the current Hornady 300-grain slugs, I loaded them, and the ammo chambered in this rifle easily.  In researching this issue on the Internet, the issue of recent Ruger .45 70 rifles’ shorter leades is a complaint that’s popped up more than once.  One guy even sent his rifle to Ruger, but he said Ruger measured the chamber and returned it to him with no work done (according to him, Ruger said the rifle met SAAMI chamber spec requirements).  It’s not really an issue to me; if I want to shooter the heavier bullets I’ll use a different .45 70 rifle.

I had some Winchester factory .45 70 cartridges in my ammo locker, including the Winchester load with 300-grain hollow point bullets.  I thought I would shoot those to see how they did in the Circassian No. 1.

A big ol’ .45 70 hollow point cartridge.
Spent cases destined for reloading. This is one of my favorite cartridges to reload.

My first shots were at 50 yards, and the Ruger grouped nicely.  The shots were biased very slightly to the right.  That’s okay, because the Ruger rear sight is adjustable for both windage and elevation.   I didn’t bother making the adjustments on the range, as it was a fairly windy day.  I’ll make the adjustments, if necessary, on the next trip.

50-yard groups with the Circassian No. 1. The groups are biased to the right, some more than others (a function of how I held the rifle for each group).  Ignore the upper right target and the circled holes to the right of the bullseye; those were from a .243 I had out on the same day.

I then set up a standard 100-yard target (at 100 yards).  There were 20 rounds in the box of Winchester .45 70 ammo and I had already shot four 3-shot groups at 50 yards.  That left eight rounds to play with at 100 yards, and play around I did.

Eight shots at 100 yards. I need to move the rear sight a bit to the left. The vertical stringing is most likely a function of not allowing the barrel to cool between shots.

The results surprised me.  I was holding on the bullseye at 6:00, and those big 300-grain hollowpoints hit at about the right elevation.  As was the case with the 50-yard targets, the point of impact was biased to the right.  The first three made a tight group and then the shots climbed as I progressed through the eight.  The vertically strung group was only about an inch in width.  The stringing is almost certainly due to barrel heating and the barrel being deflected up by the forearm (it’s not free floated).  I was pleased with the results.  It told me that I could leave the elevation adjusted for 50 yards and it would still be spot on at 100.  On my next range outing with this ammo, I’ll adjust the rear sight to the left a scosh and take my time between shots to preclude the stringing.  Even with the stringing you see in the above target, it’s not too shabby for a 100-yard group with open sights.


More blogs on this and other .45 70 rifles?  You bet!

Buffalo Guns
A Wind  River Marlin .45 70 Rifle
A .45 70 Remlin 1895
The 1886 Winchester
Turnbull Guns
Marlin Cowboy Front Sight Installation
Marlin 1895 Cowboy Revisited
Henry Rifles
The Henry Is In California
Developing a Henry .45 70 Load: Part 1
Developing a Henry .45 70 Load: Part 2
Henry’s Home and an Interview with Dan
Henry Accuracy Loads


Never miss an ExNotes blog:


Don’t forget: Visit our advertisers!