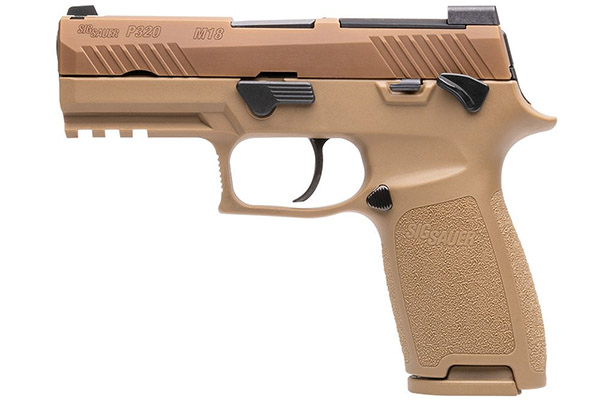
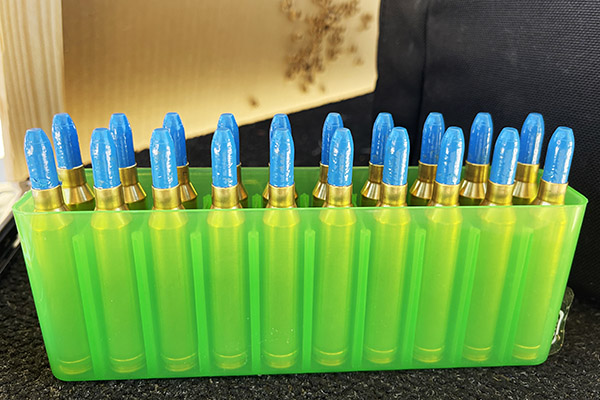
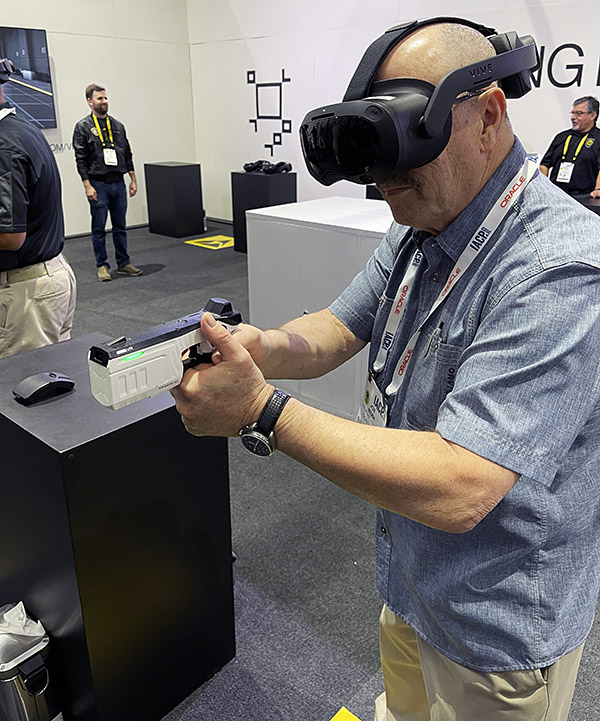
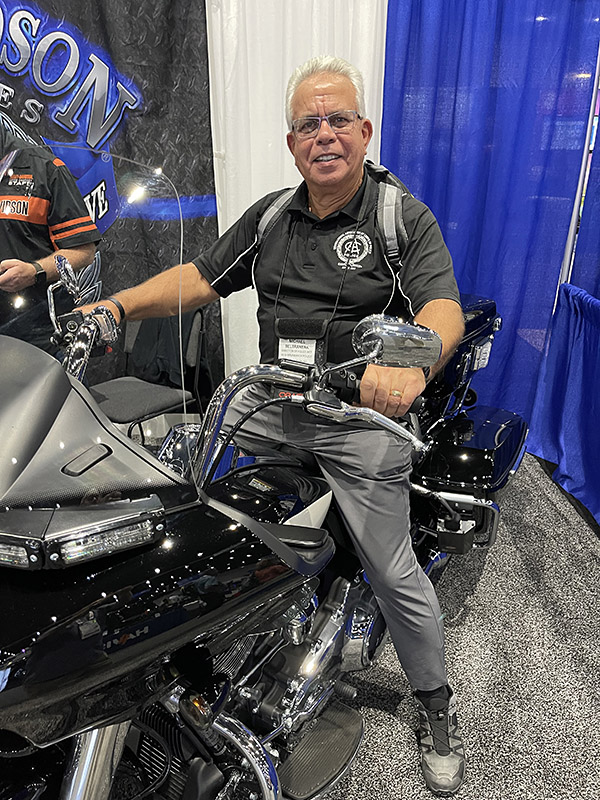
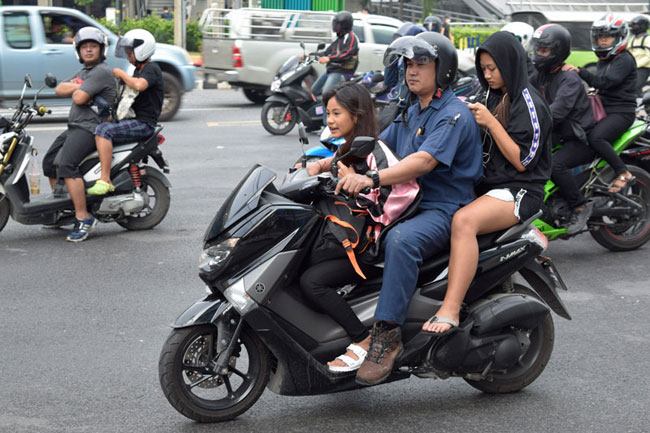
I had a chance to fire the new SIG M18 9mm handgun, which was recently added to the California Department of Justice roster of approved handguns here in the People’s Republik. I was impressed with the M18’s accuracy, grouping, comfort level, feel, and sights. I love the desert tan colors. I was not impressed with the trigger (more on that in a bit).
It was a good day on my local indoor pistol range, and as I was leaving, my good buddy Shannon asked where I’ve been (I hadn’t been there in a few weeks). “Overseas,” I told her. She then pointed to the new M18 SIGs they had in the display case and asked if I’d like to try one. That reminded me of the old joke about the guy with the wooden eye. I responded with an affirmative and rhetorical, “Would I?”
The venerable 1911. It’s chambered in .45 ACP. All steel and with a Parkerized finish, as God intended. In my opinion, you can’t improve on perfection, but the Army had other ideas.
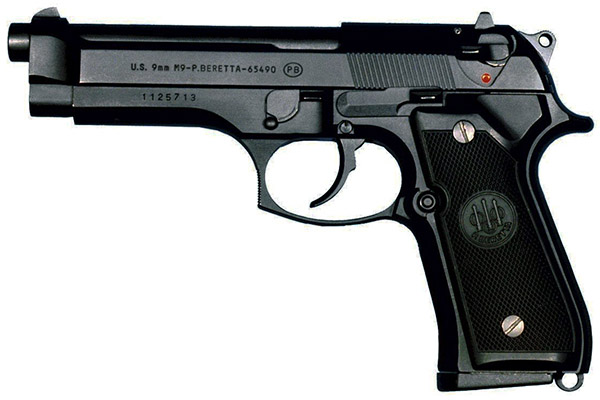
A bit of background: The US Army and I have something in common: We change handguns on a regular basis. The Army had been using the venerable .45 ACP 1911 since about, well, 1911. It served the Army well (and still serves well in certain special ops units), but the Army decided it wanted something better. That led to adoption of the 9mm Beretta 92 (designated as the M9 for the military) in 1985. I never cared for the Beretta, so I’ve never owned one and I can’t tell you anything about how it shoots or feels. The M9 had pushed out my beloved 1911, so I didn’t like it. Period. No handling or testing required.
The Army wanted a smaller pistol cartridge, and it settled on the Beretta M9. The M9 has an aluminum frame. Bob likes it.
The Army quickly decided it didn’t much like the Beretta, either. But the Army is big and it moves slowly when it’s not lobbying for more funding from Congress, and it wasn’t until 2017 that they decided to go with a militarized version of the 9mm SIG P320. There are two versions of the new military handgun: The M17, which has a 4.7-inch barrel, and the M18, with a 3.9-inch barrel. Both are full sized handguns with magazines carrying a gazillion rounds, and until recently, neither was available to lowly and untrustworthy civilians here in the People’s Republik of Kalifornia. Nah, scratch that. Lowly or not, trustworthy or not, no California civilians could purchase either of the new SIGS, although weirdly, we could purchase the civilian gun from which it was derived, the SIG P320. Go figure.
The SIG P320, the gun the M17 and M18 handguns are based on. All three guns (the P320, the M17, and the M18) have a polymer gripframe. You can tell they’re swell (I’m not going to explain that comment; you have to be old enough to get it).The 9mm SIG M17. Note the longer barrel length.The gun I fired: The SIG M18.
The SIG M18 recently appeared on the California Department of Justice approved handguns roster. That’s just a bit on the weird side, too, because the M18 is the version with the shorter (i.e., slightly more concealable) barrel. You’d think in their wholesome attempts to keep us pure our legislators would have approved the longer-barreled M17. Maybe they will in the future.
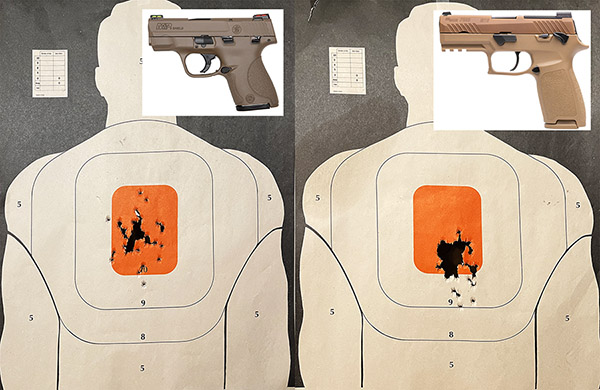
The Rock Island Compact 1911. This is a short barreled, shorter grip frame 1911 chambered in .45 ACP.My Smith and Wesson Shield. It has a very short barrel compared to either the SIG M17 or M18, which makes my shooting with it a bit less accurate.
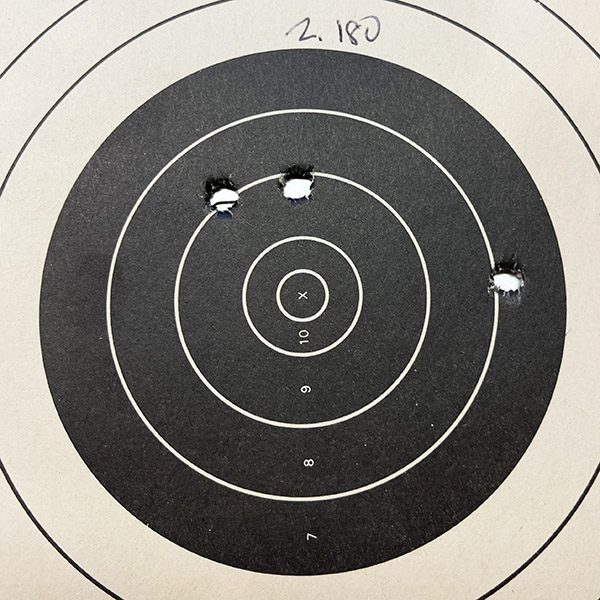
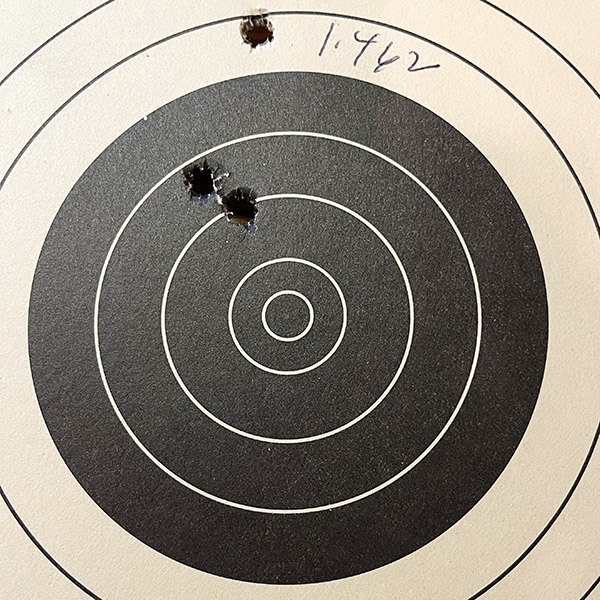
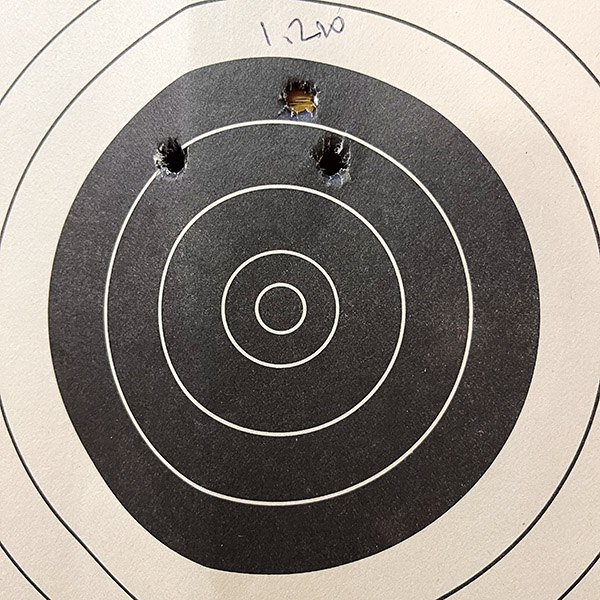
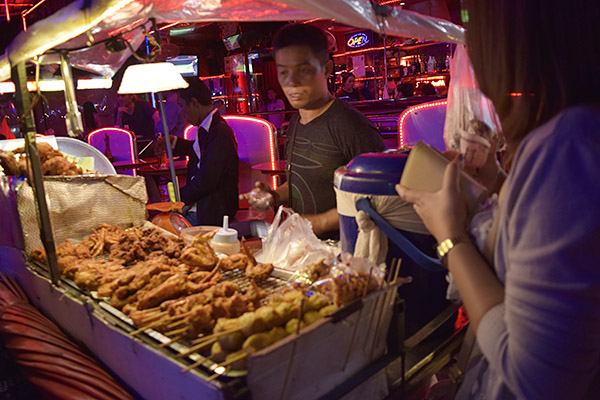
I had fun on the range. I shot a box of .45 ammo in my Compact 1911, and then two boxes of ammo in my Smith and Wesson Shield. I was doing pretty good with both, too. It’s a pleasant way to spend an afternoon. As I was leaving the range, Shannon told me about the new M18s they had in stock and offered a trial run, so I put a box of 50 rounds through one of them.
I used a 6:00 hold on the orange bullseye on both targets, and I fired 50 rounds at each. The Shield target is on the left; the SIG target is on the right. Both guns are good enough; the M18 is surprisingly accurate.
As I said above, I didn’t care for the M18 trigger (the M18 is a striker-fired handgun; give me a hammer-fired gun any day). But the thing was accurate, even with the Joe Biden trigger (it was clumsy and creepy). I put nearly all 50 rounds through a single jagged hole at my point of aim 10 yards downrange, and then I started hitting low with the last few rounds. The few that dropped a bit below the orange bullseye were entirely due to me being tired and shaky (it wasn’t the gun; I was coming up on 200 rounds in that range session and I’m an old man). The bottom line: I like the new M18. A lot. I may buy one somewhere down the road, unless the M17 gets approved in California first.
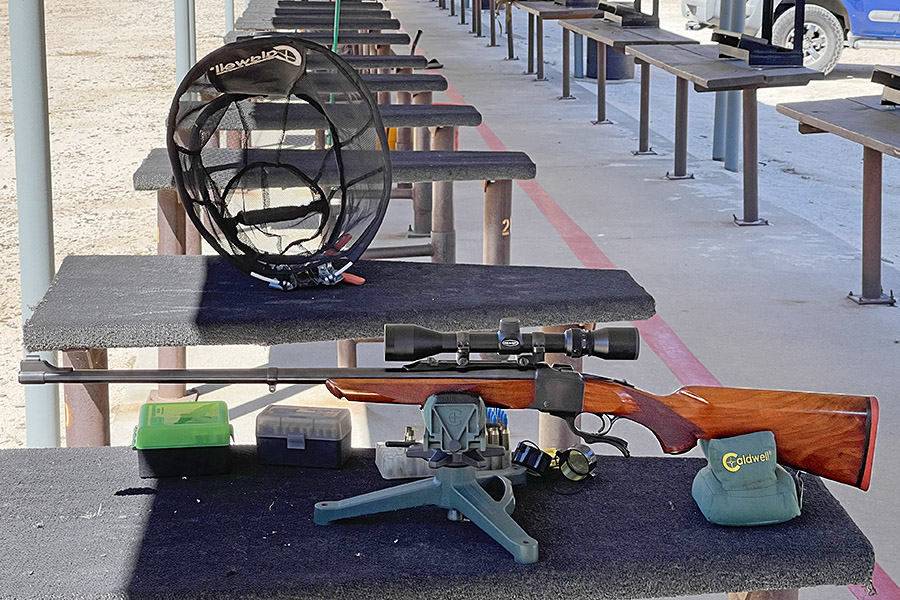
I had a good morning at the West End Gun Club recently. I shot the 6.5 Creedmoor rifles, a .223 Browning Micro Medallion, and Jim Gardner’s powder-coated cast bullets in a 7mm Remington Magnum Ruger No. 1. I might get around to writing about the other rifles, but for today, the focus is on the 7mm Magnum No. 1 and powder-coated cast bullets. I’ve written about shooting 7mm cast bullets in the No. 1 before; those results were mediocre and the barrel leaded enough after five rounds that accuracy went to hell (I had to clean the bore with a bristle brush after ever group). The powder coating Jim applies makes a difference. The Gardner powder-coated bullets did not lead the barrel (at all) and the results were good. I think I’ve finally found a decent cast bullet load for this rifle.
I have had a lot of difficulty making this rifle perform with the powder-coated cast bullets. It was apparent they weren’t leading like my other cast bullets had, but they weren’t very accurate. Neck sizing only, which often improves accuracy, compounded the felony. It didn’t work well at all, mostly because I couldn’t chamber most of the rounds (even though they had been fired in the same 7mm Magnum Ruger No. 1 rifle). I also tried seating the bullets further out, but one got stuck when I chambered a round and when I removed it, the bullet came out of the case and Trail Boss propellant spilled all over the guts of the rifle. That led to it not extracting, so I had to disassemble the action and clean everything. I also tried crimping, but those rounds weren’t any better.
This morning’s batch were full length resized, not trimmed, and not crimped. I flared the case mouth just a tiny bit to let the Gardner powder -coated bullets enter without shaving any of the powder coating or the lead, and I seated them a little deeper so that they did not contact the rifling. When I seated the bullets this time, they expanded the case mouth just enough to eliminate the flare. This batch chambered easily.
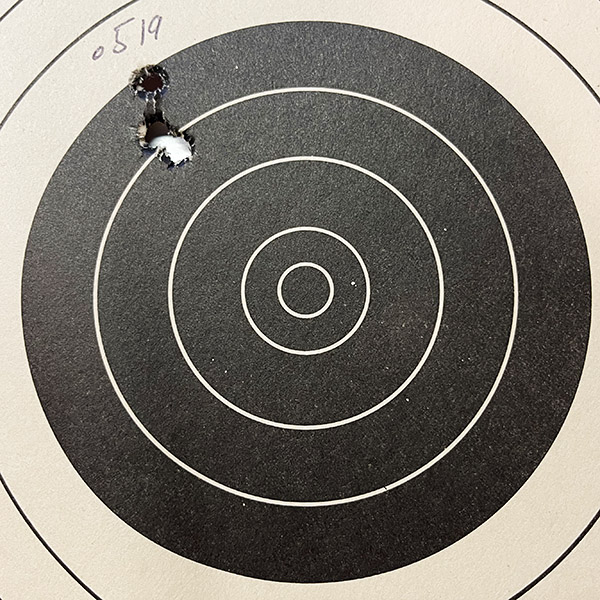
I had one round left over from a previous batch, and I fired it first (all shots are and groups discussed here were 50 yards from a rest). That one round was left over because it wouldn’t chamber the previous time I had the rifle out because the case had deformed slightly when I overcrimped it. I had to run that round through the full length resizer (bullet and all, with the decapping pin removed) so it would chamber. It was my first shot of the day and it shot a little to the right (as you can see above). That first group was the biggest group of the morning.
I then shot four more groups, and all the rest grouped nicely.
At 50 yards, these aren’t what I would call amazing groups, but they are getting better and that one half-inch group shows promise. I bought a thousand of the Gardner powder coated bullets, so it’s nice to know I can get then to work. The powder charge was 18 grains of Trail Boss, dispensed (not individually measured). I may go out to a hundred yards on the next outing to see how they perform. But where they are, I’d feel comfortable chasing rabbits with them.
The tricks to this load were full length resizing, no crimp, very slight case mouth flare, 18.0 grains of Trail Boss, Winchester large rifle primers, Remington brass, and a cartridge overall length of 3.127 inches. I’m going to try this load again. The brass is in the tumbler now.
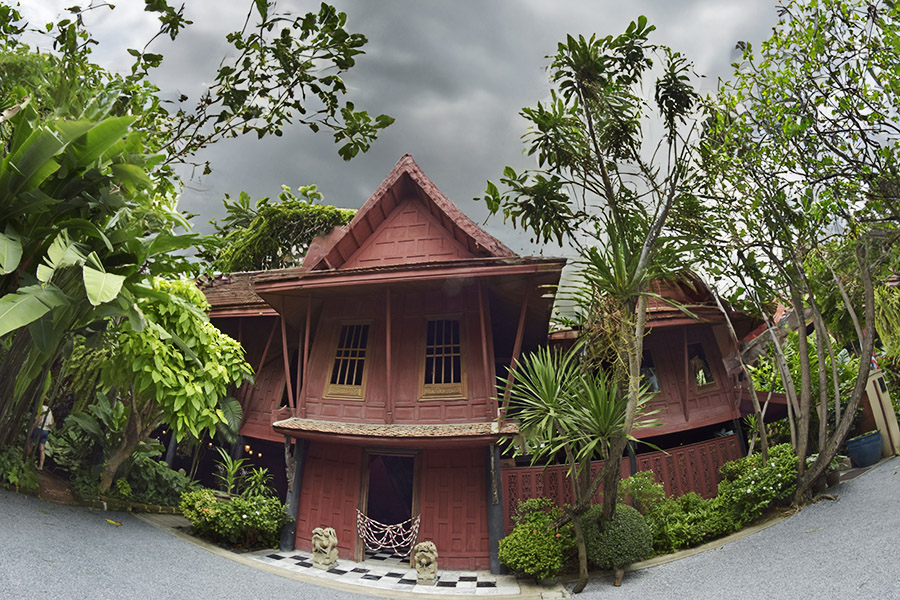
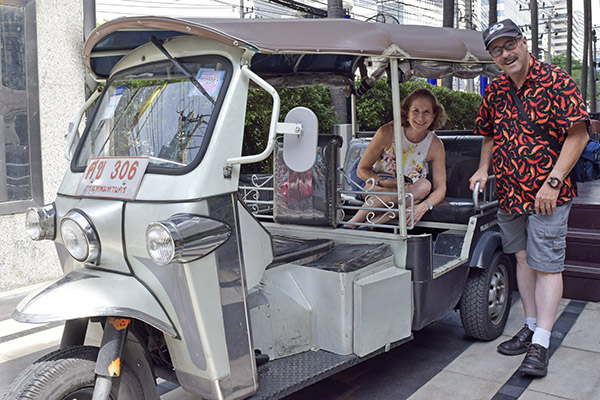
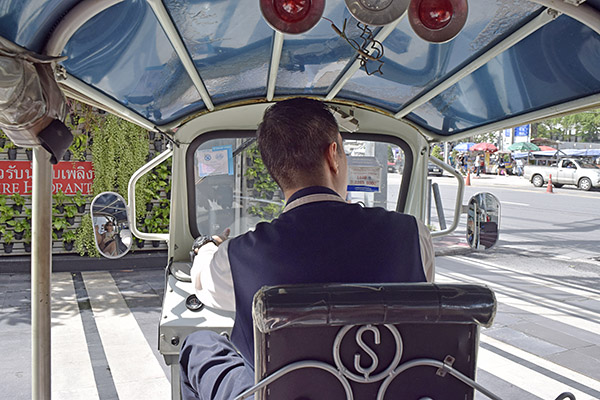
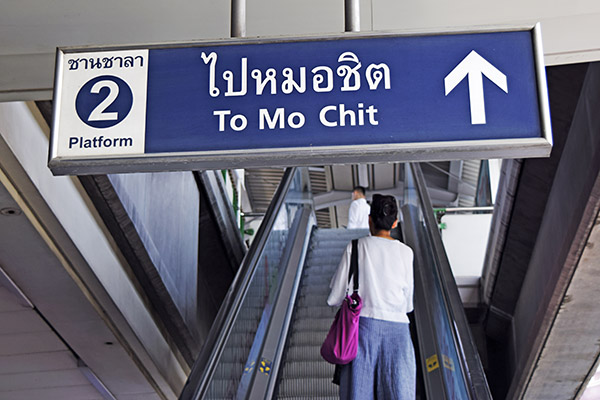
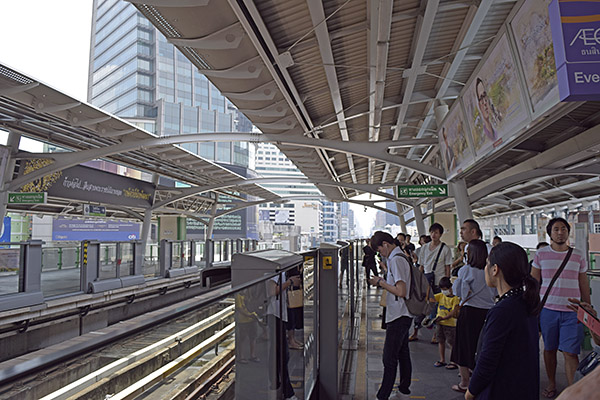
Today was another exciting day, and we visited another one of Bangkok’s best kept secrets. Sue and I took a tuk tuk ride to the train station and we made our way on Bangkok’s elevated inner city railway system to our destination du jour: The Jim Thompson House and Museum, located inside the city along a remote canal. Tucked away, you might say. And that’s entirely appropriate. Read on and you’ll understand why.
Thai transport, tuk tuk style.The view from the passenger compartment.Getting around on Bangkok’s elevated railway was surprisingly easy. And that’s Mo Chit.Waiting for our ride.Inside the train.
The destination of our tuk tuk and train travel was the aforementioned Jim Thompson House and Museum. You might wonder: Who was Jim Thompson?
Jim Thompson, before he disappeared in the jungle forever.
Okay, here goes, and when I’m done giving you the Reader’s Digest version of this amazing tale, you tell me if isn’t something that might be the story line of the next Indiana Jones or James Bond adventure.
Jim Thompson was a young east coast guy born into wealth who went to Princeton University and became an architect. He joined the Army just prior to World War II, he jumped out of airplanes while he was in the Army (I like this guy already), and he ended up in the Office of Strategic Services during the war (the OSS was the forerunner of the CIA). Toward the end of the war, Thompson was stationed in Thailand where he found interesting and previously unknown (unknown outside of Thailand, that is) artisans doing amazing things with silk. To make a long story a little less long, Thompson is the man who made Thai silk famous. Seriously. He designed silk clothing for royalty, elites all over the world, and folks in Hollywood (including the costumes used in the movie, The King and I).
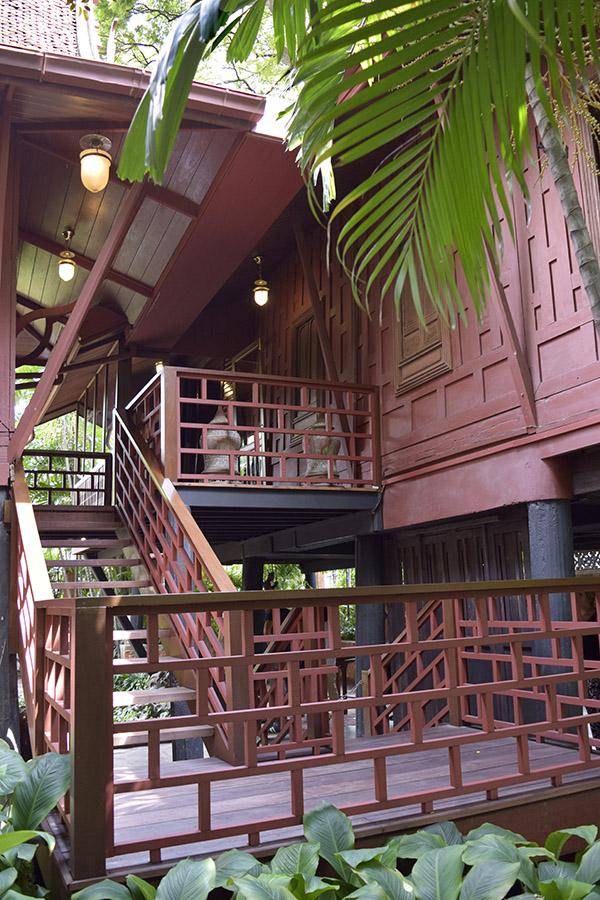
Along the way and with his background as an architect, Mr. Thompson starting collecting classic Thai teak homes and Asian artifacts (like I said above, the guy had money). He built a compound comprised of six teak homes he moved from ancient Thai cities to Bangkok, and there he built a compound that he made his home. The big photo at the top of this blog is part of it. It’s in Bangkok now, but when Thompson built it, it was well outside the city. Bangkok expanded around it.
Then, to make this story even more interesting, in 1967 Jim Thompson disappeared in the Malaysian jungle without a trace. I know, it sounds like a story line from a movie or one of those adventure novels you buy in an airport bookstore, but folks, no one can make up stuff this good. A former US Army paratrooper/OSS officer/CIA agent turned wealthy silk magnate, complete with an ancient Thai compound on a canal in Bangkok who goes missing deep in the jungles of Malaysia. What was it? A tiger attack? An assassination when former enemies finally caught up with him? Or something else? No one knows. At least, no one who’s talking.
With that as the backdrop, here are a few more photos of the Jim Thompson House and Museum.
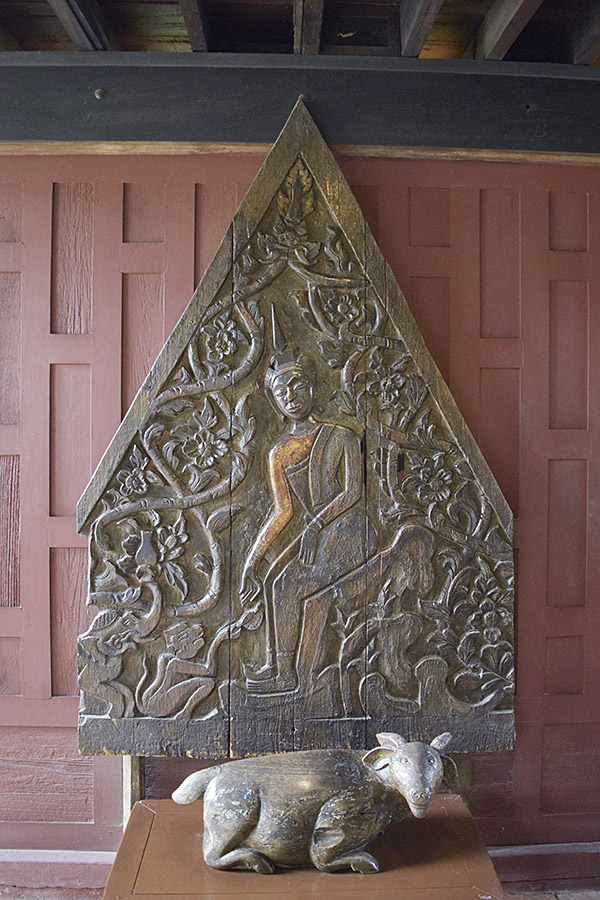
One of the exterior shots. The really good stuff was inside. I thought about trying to sneak a few photos, but then I remembered Thompson’s background and thought better of it.Our guide, in an area where photos were allowed.Hallway artifacts.More stuff outside.One last photo inside the Jim Thompson compound.
This was an amazing visit. I would have liked to have taken more photos of the inside of the home and the amazing ancient Thai artifacts it held, but as I mentioned above, no photography was allowed inside. You’ll just have to take my word for it. This is one amazing place and one amazing story. If you ever find yourself in Bangkok, seek out the Jim Thompson House and Museum. Most people have never heard of it. It’s one of the more fascinating places I’ve ever visited.
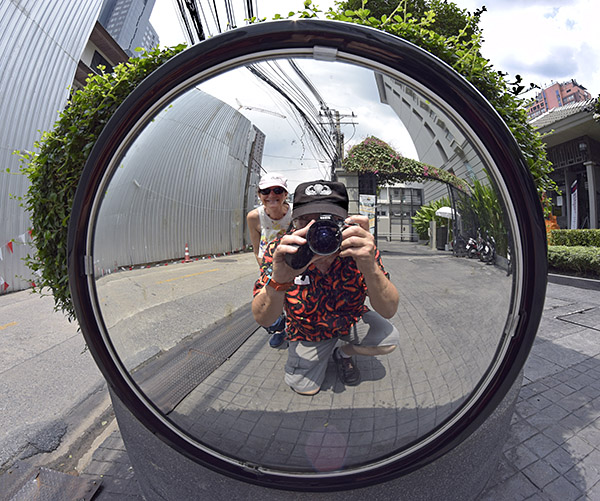
I took one more photo that day as Sue and I walked back to the train station. It was a convex mirror at a tight street intersection, you know, the kind that lets drivers approaching from either way see what’s around the corner. It called out for a selfie, and we answered that call.
Trust me on this: If you ever find yourself in Bangkok, the Jim Thompson House is a place that has to be on your “must see” list.
Never miss an ExNotes blog:
Please click on the popup ads and visit the folks who advertise with us.
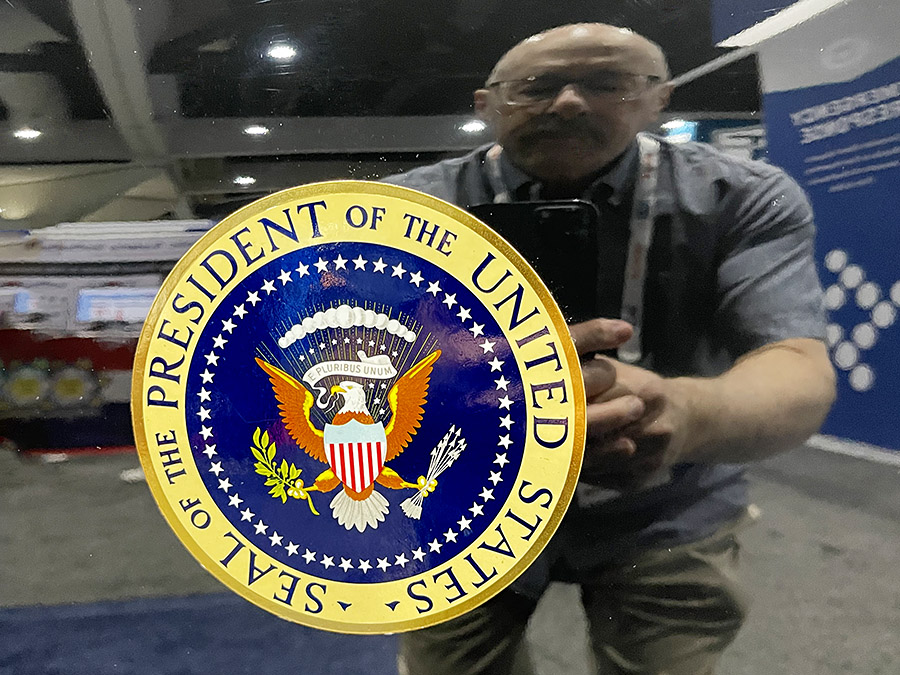
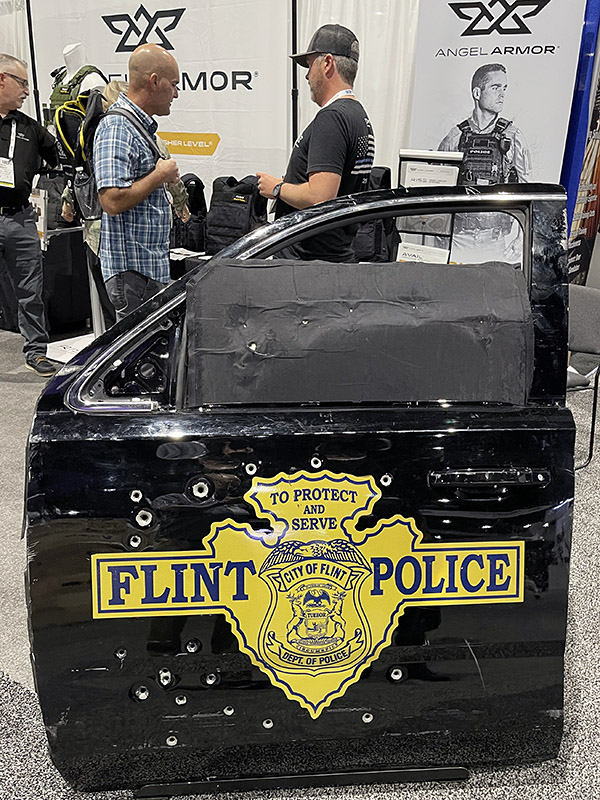
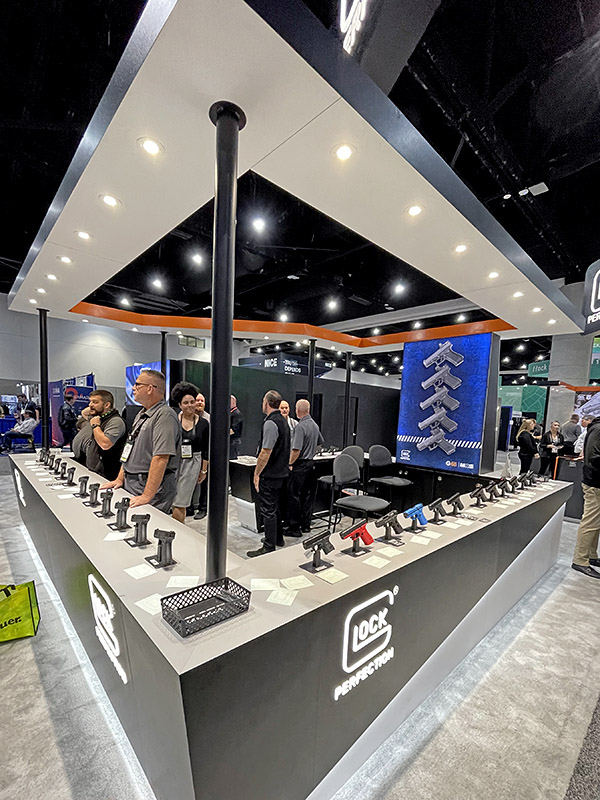
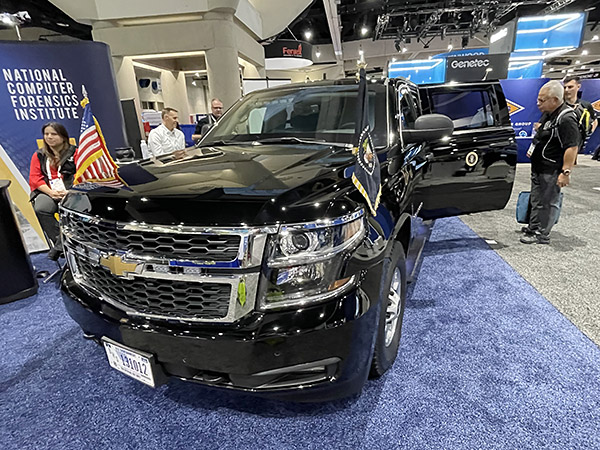
The International Association of Chiefs of Police…it’s an organization most folks have never heard of, but it’s been around for 130 years. My good buddy Mike is a member and he invited me along as his guest to the 2023 IACP convention (Mike and I have known each other since the 7th grade, and that means we’ve been friends for more than 60 years). It’s the third or fourth time I’ve attended the IACP show, and it’s always great. The IACP convention was in San Diego this year, and any time I have an opportunity to visit that beautiful town, I’m in. Susie and I rolled south in the Subie; Mike had already flown in. All kinds of companies have exhibits at the IACP convention, and many federal and state law enforcement agencies have displays. The United States Secret Service was there and they had one of the presidential limos on display. The photo at the top of this blog is yours truly reflected in the presidential limo’s deep black paint.
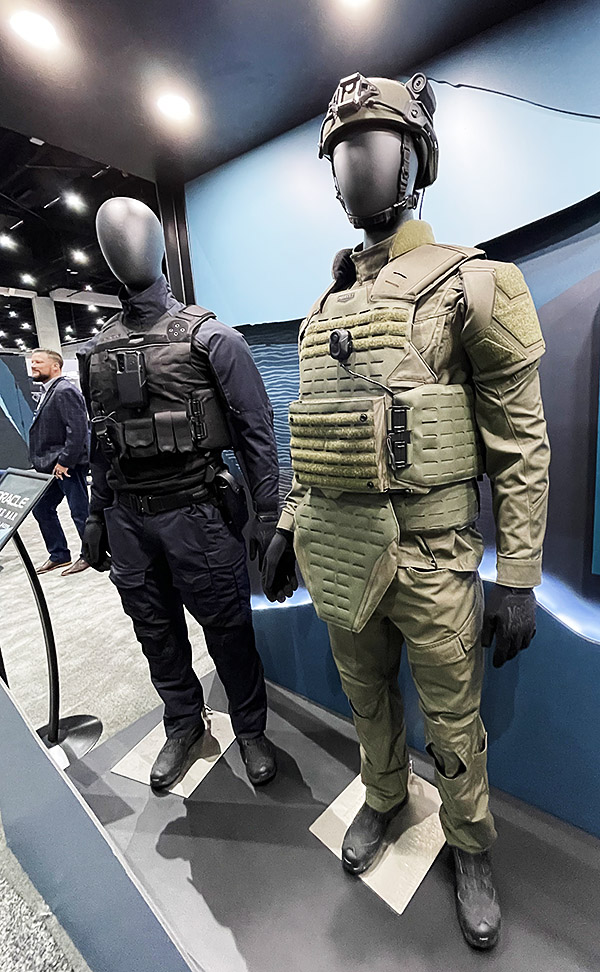
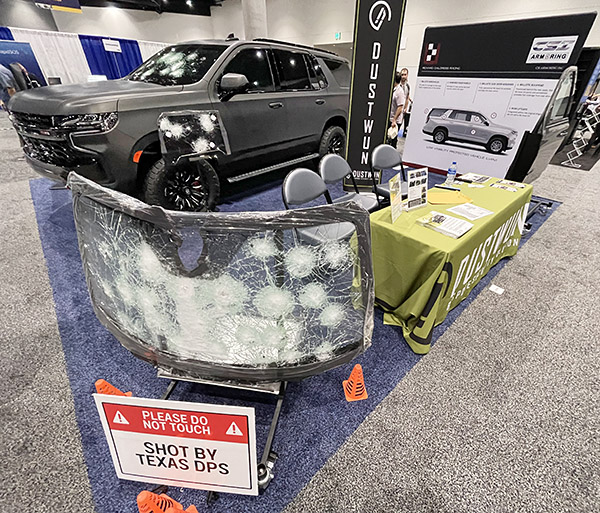
So who exhibits at the IACP? All kinds of government organizations and all kinds of businesses. Many of the exhibitors were software companies (including Microsoft) specializing in data base and other police applications. There were several outfits advertising armor plating for people, automobiles, war wagons, and more.
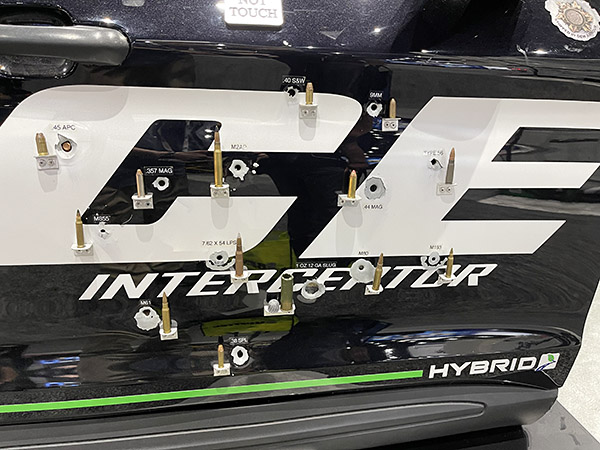
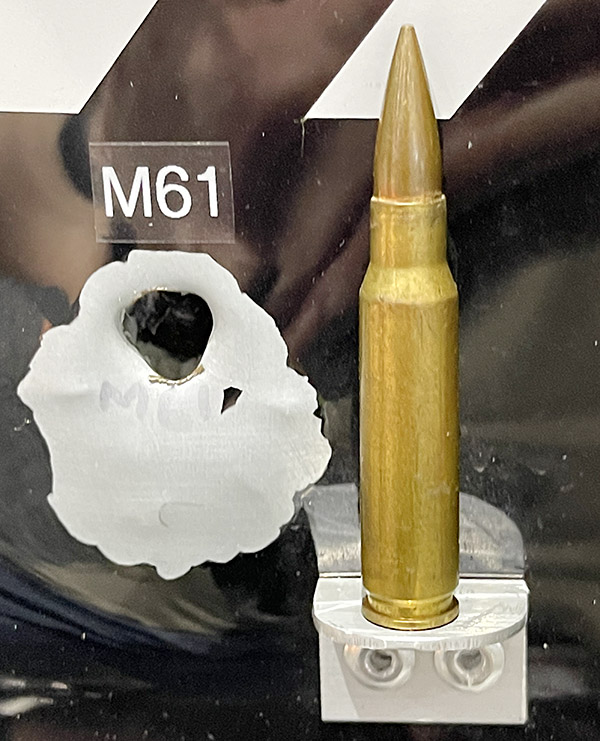
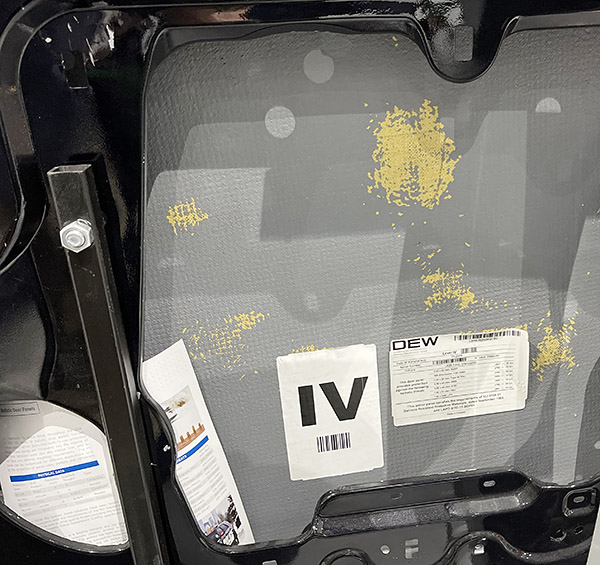
Body armor in your choice of colors. I’d wear it, but it would make me look fat.Impressive. Bullet proof glass may become an optional accessory for civilians here in the Peoples Republik of Kalifornia.Another bullet proof barrier supplier. Check out the photos below.Here’s another bulletproof barrier company, with several of the cartridges its material can stop displayed.A close-up photo of one of the cartridges.The above door interior. None of the bullets made it through.
As you might expect, gun companies also display at the IACP convention. The ones I saw this year included Glock (with the largest display), SIG Sauer, Beretta, and a few different AR manufacturers. Surprisingly, Smith and Wesson wasn’t there (if they were, I missed them), nor was Colt (not many police departments carry Colt handguns these days).
Glock’s booth at the IACP convention. These guys had a lot of visitors. Glocks are popular and they are relatively inexpensive.
The Beretta and SIG booths were quiet. There was a lot of activity at the Glock exhibit. I spent some time at the Glock booth talking to one of their reps, and he was informative when I asked about using cast bullets in a Glock. I’d previously heard that Glock advises against using cast bullets in their pistols, and I asked if that was true. Glocks have barrels with polygonal rifling, and as such, there are no lands and grooves (there are just raised and lowered areas that twist along the barrel’s length). The Glock rep explained to me that they do indeed recommend not using cast bullets, as the lead has nowhere to go when it accumulates in the bore. When the barrels experiencing leading, it constricts the bore, and this raises pressures higher than what would be experienced in a conventionally-rifled pistol barrel. He said if you clean the barrel often enough (so that leading does not accumulate), shooting cast lead bullets would probably be okay, but how many shots can be fired before this becomes a problem is too dicey a proposition for Glock to provide a number. I also asked about copper plated (as opposed to jacketed) bullets, and the Glock rep told me that they advise against using those as well. To me, it’s not a big deal, as I don’t own a Glock, I always clean my guns, and virtually every firearm manufacturer advises against shooting reloaded ammo anyway. Eh, what do they know? The only time I ever shoot factory (i.e., non-reloaded) ammo in my handguns is when I have to requalify for my concealed carry permit.
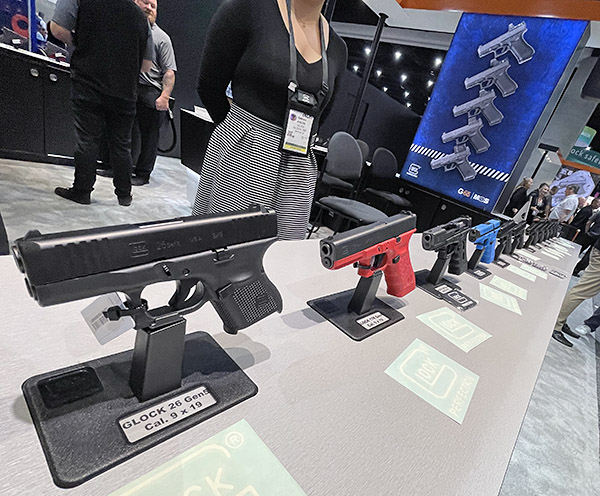
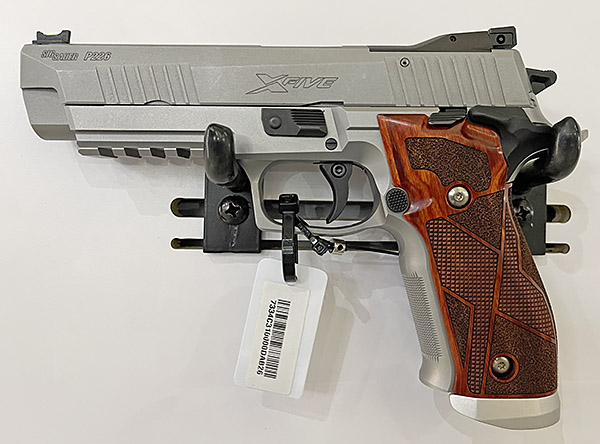
Glock pistols. I don’t follow Glock, so I don’t know what their different models are. The red and the blue guns are training guns.SIG Sauer’s 226 X-5. This is an impressive handgun.
I saw the new SIG target model (the 226 X5) and I fell in love with it. Unfortunately, the X5 is not available to us here in the Peoples Republik of Kalifornia (it’s not on the California Department of Justice roster of approved handguns). The SIG X5 is expensive at $2219, but I’d buy one in a heartbeat if it was sold here. It fits like my hand like a glove and the trigger is superb. The grips are nice, too. The X5 has all steel construction, so it’s heavier than the standard 226 (which has an aluminum frame). I sure wish it was available here. On the plus side, SIG’s M18 is now available in California. It’s the Army’s new sidearm. It has a striker firing mechanism (there’s no hammer), so the trigger pull is not what I would call good (as is the case, in my opinion, with all striker-fired handguns). The M18 is about $700 and I am tempted. I like SIG handguns.
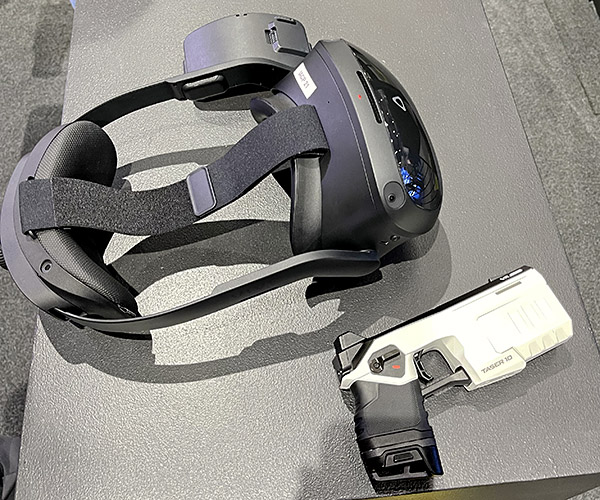
There were taser manufacturers and firearms training simulator manufacturers at IACP, too. The photos below show a taser virtual reality simulator. You wear a headset that covers your eyes and hold a taser gun. I think the company was Axon. They had about 20 stations for people to try it. The rep explained that you have to fire twice…once in a noncritical area and then again in another non-critical area. When you do that on the simulated bad guy in the virtual reality headset, the bad guy goes down. Sometimes you have to fire more than two times because your suspected felon doesn’t cooperate and keel over immediately. You get about 15 runs against assorted bad guys, and I toasted every one of them. Then there’s an officer needs assistance call where you roll up on a police officer having difficulty subduing a bad guy. I fried that bad guy, too. It was fun.
Virtual reality and a taser. It was awesome.Me, in my VR world.
Another company, Sim Lab, had a target gallery with moving silhouette targets and your choice of either a SIG or a Glock (I went with the SIG). I did pretty good on that one, too, and after I had toasted their bad guys the Sim Lab rep said I was a good shot. That made this IACP convention one of the best ever for me.
The Sim Lab setup. I opted for the SIG M18. I may get a real M18 one of these days.
After I shot the Sim Lab course, the rep asked if I wanted a video. Hey, does a man in the desert want water? Does a California resident want gas prices below $5 a gallon. “You bet,” I answered, and I fired the course again. It was fun. (Pro Tip: The video looks better if you expand it to full screen.)
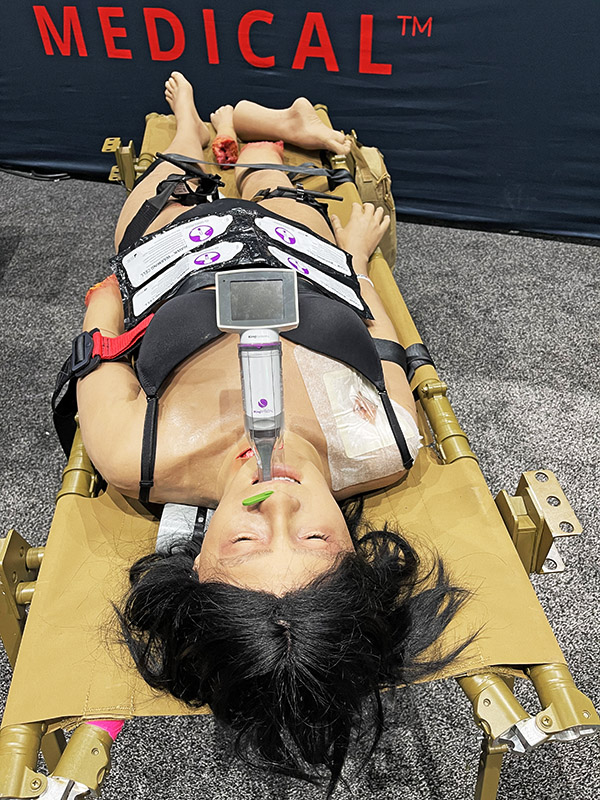
There were a couple of first aid equipment manufacturers at IACP 2023, and the exhibits were surprisingly lifelike. And gruesome. You couldn’t walk by their exhibits without looking (and taking a photo or two).
This young lady is having a bad day. She lost a leg, she lost a hand, and someone slit her throat.
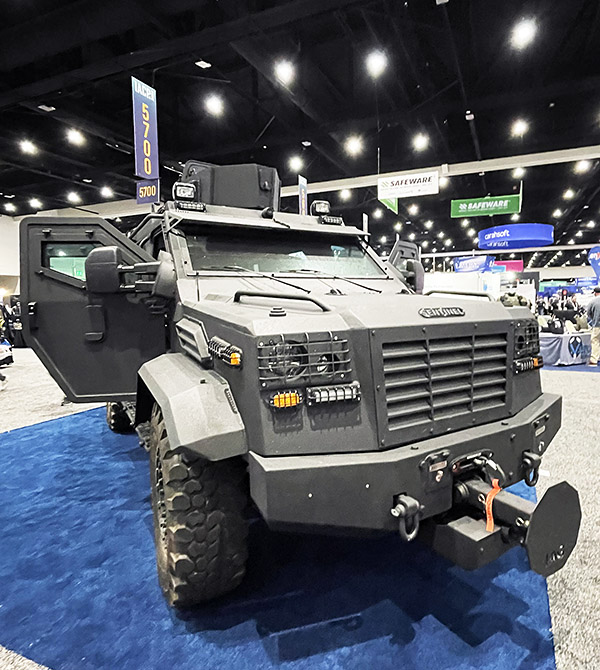
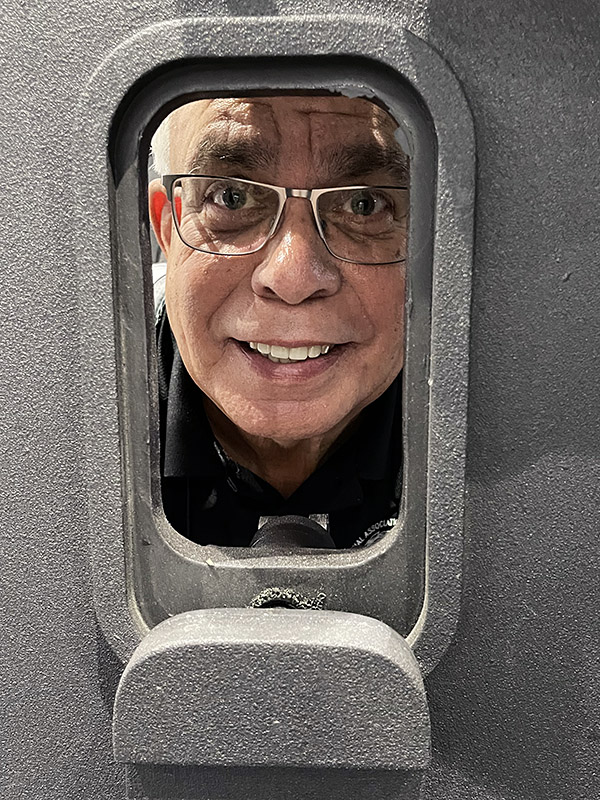
There were several vehicles on display. One was the Riverside County Sheriff’s command center. It was awesome. There were also armored vehicles. They were really cool. And there were police motorcycles.
The Riverside County Sheriff’s Mobile Command Post. It is impressive.An armored vehicle with a battering ram. Check out the gun port on the right door.Good buddy Mike peeking through the gunport.
Harley and BMW were the only two police motorcycle suppliers in attendance (which is probably fitting, as they are the only two gasoline-powered motorcycle manufacturers selling to US police departments). Mike and I both sat on the Harley. Its weight (840 pounds) could only be described as oppressive. I guess I’ve grown weaker in my old age. I could barely get the thing off the side stand. I’ve owned a couple of Harley full dressers. No more, though. For a lot of reasons, my Harley days are in the rearview mirror.
Mike on the police Harley. We both agreed: It’s a porker.
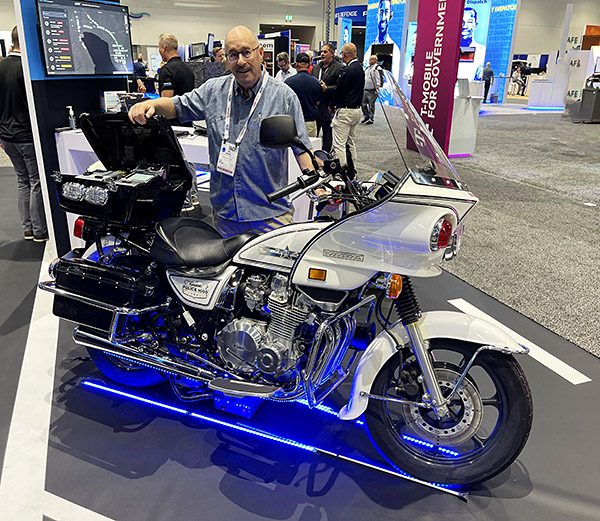
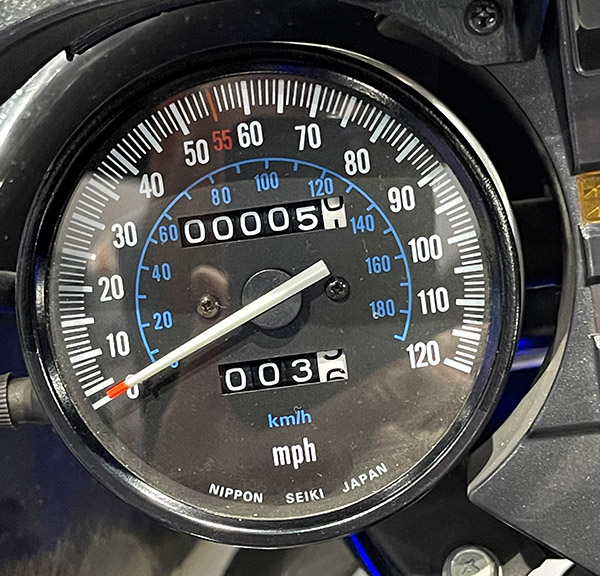
The Kawasaki KZ1000P, an iconic police motor if ever there was one, went out of production at least 20 years ago. But there was a pristine one on display. It was in a booth advertising communications equipment, and that company used it to showcase the early police comm equipment they used to manufacture. The Kawasaki (although it was 20 years old) was immaculate, as it should be. The odometer showed only 5 miles. Mike and I were both impressed. I would like to own this bike.
Yours truly with the no-longer-manufactured KZ1000P Kawasaki.The real deal, with just 5.3 miles on the odometer.
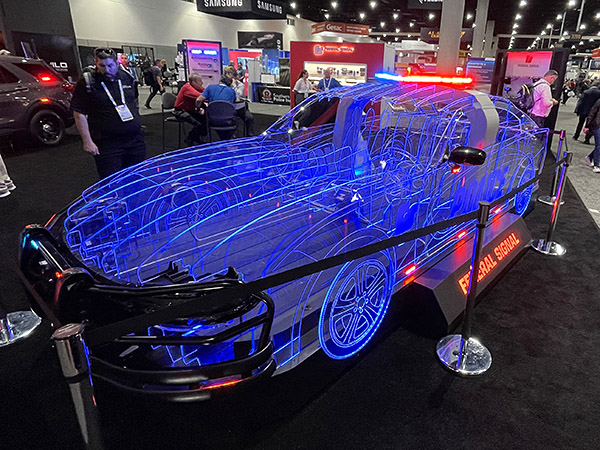
There was a company displaying an artistic Lucite arrangement lit up. It was interesting. I can’t remember who the company was, so I guessed it bombed as an advertisement, but it was cool. In the photo below, it shows Federal Signal. I’m not sure what they do. But if I ever needed a Lucite car bit of artwork, they would be my guys.
A Lucite car.
The United States Secret Service had what was probably the most interesting exhibit. It was one of the President’s Chevy Suburbans, complete with the presidential insignia and flag. I sat in the rear seat. There were real Secret Service agents there and they were nice guys. We joked with them a bit about taking care of Old Joe, because we sure didn’t want Kamala in the White House. They tried not to laugh, but I sensed strong agreement.
Hail to the Chief! The window glass on this SUV is at least an inch thick.
Boston Dynamics was there with a couple of their robotic dogs. You might have heard of Boston Dynamics. They were featured on 60 Minutes (the television show) a couple of years ago. The robotic dogs were cool. There was a real police dog there, too. It was not sure what to make of the robots.
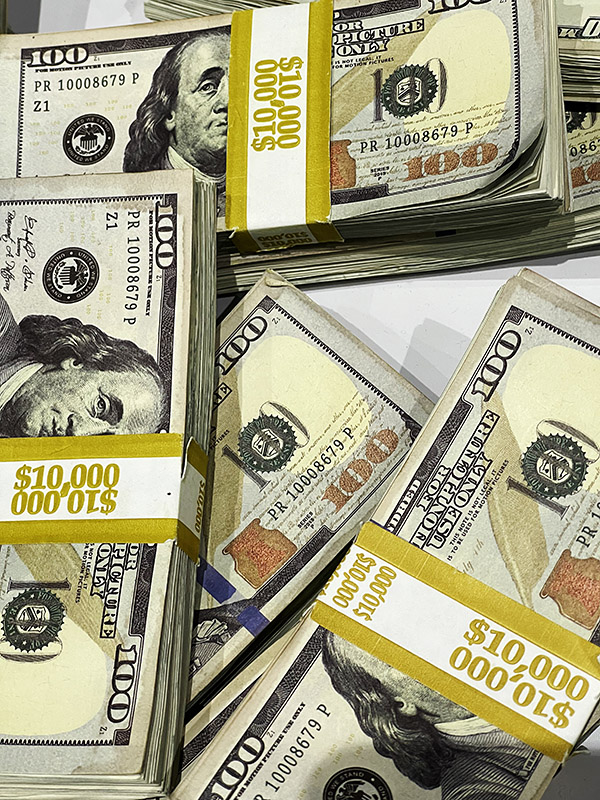
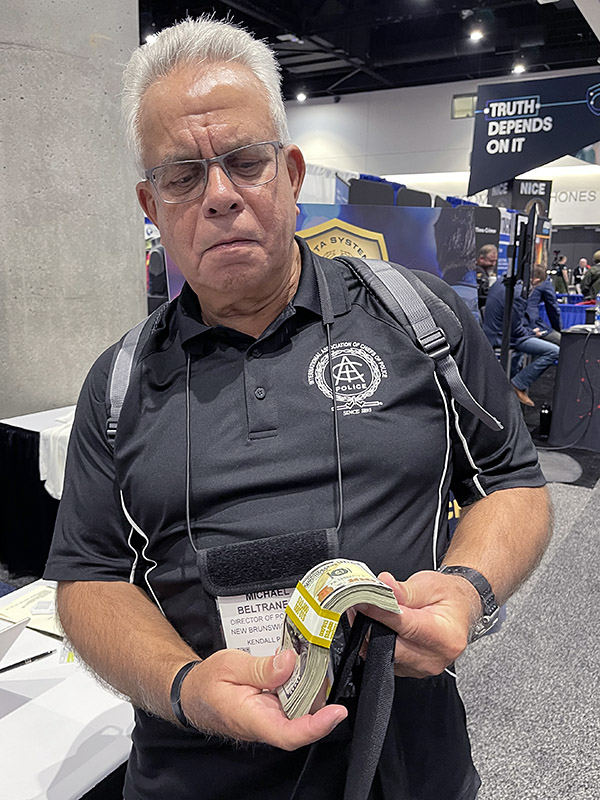
One of the exhibits had a large table full of counterfeit $100 bill bundles. This was another cool exhibit that I have no idea what they were selling. But it was cool and it made for a couple of cool photos.
Money money money. I’m not sure what these guys were selling.Thumbing through a stack of hundred dollar bills.
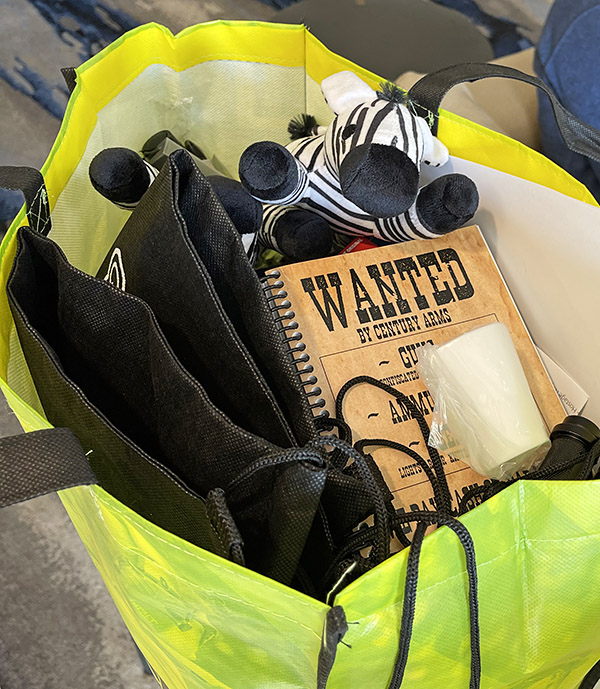
One of the great things about these kinds of conventions are the goodies. Many of the exhibitors had bags (mine was from Blauer), and nearly all the booths had goodies. I was a grownup playing trick or treat, and I didn’t even need to wear a costume. Ordinarily, I don’t pick up much in the way of goodies at trade shows, but I have four grandchildren now and I was scooping it all up for them. At least that’s my story, and I’m sticking with it. I will tell you I won’t need to buy another pen for probably another 50 years.
The goodies bag. It was heavy by the end of the day. The grandkids will be pleased.
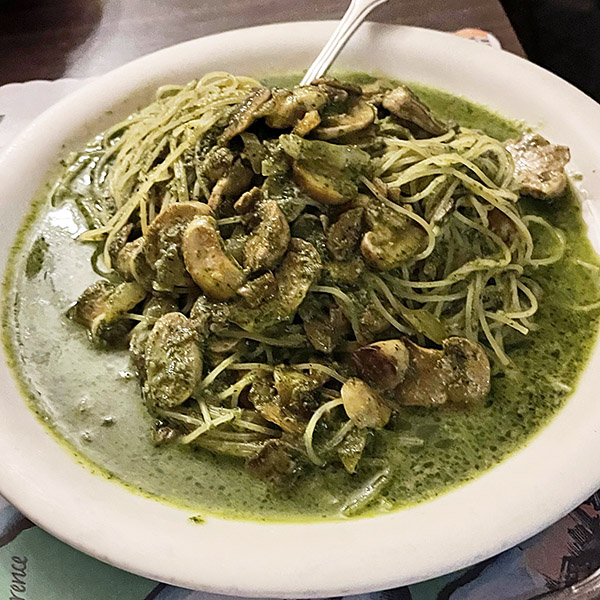
Mike and I had a super time wandering around in the IACP convention. So much so, in fact, that we reached the end of the day without eating lunch (and for me, that’s unusual). That was okay, because it made us look forward to dinner as we left the convention. As always, the dining in San Diego was superior. Whenever Sue and I visit another city, we don’t go to the touristy restaurants; we always search for the local favorites (and Sue does a stellar job in finding these). Valero’s got the nod our first night in town; it’s a small, family run Italian restaurant, and it was excellent. I had eggplant parmigiana, Sue had angel hair pasta with pesto sauce and mushrooms, and Mike had the pasta puttanesco. I’d never heard of that last one and when Mike translated the name to English I didn’t believe him initially, but he was right. I’ll have to try that one on our next visit. And there will be a next visit. Valero’s was outstanding.
Eggplant parmigiana that tasted as good as it looks.Angel hair with pesto sauce and mushrooms. It was awesome, too.Pasta puttanesca. It’s on the list for the next visit. Mike enjoyed it.
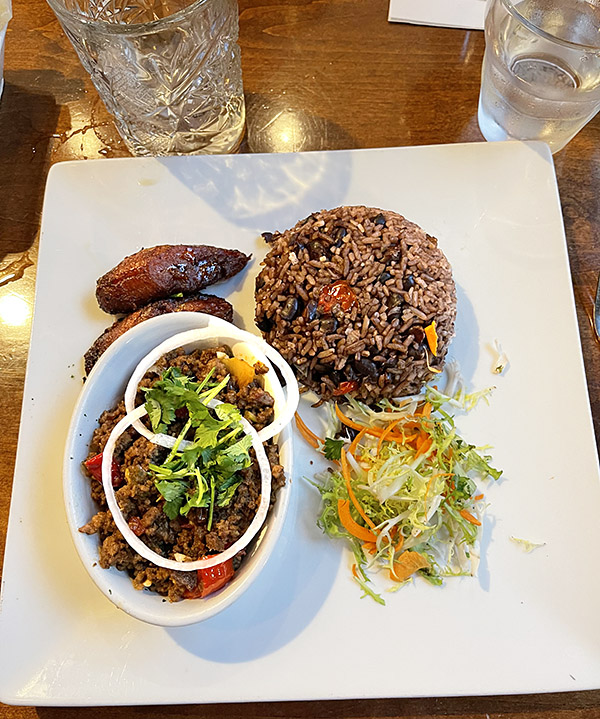
Our second night in town brought us to the Havana Grill, a Cuban restaurant not far from Old Town San Diego. It, too, was a local favorite and it was excellent.
Picadillo, which is beef seasoned with onions, peppers, garlic, olives, and raisins. I had it for dinner and it was fantastic.
So there you have it: A great visit with good buddy Mike, a super time at the International Association of Chiefs of Police Convention, and a great couple of days in San Diego.
It was to be a busy day in Thailand starting with a long ride south out of Bangkok to the famous floating market, an awesome shrimp lunch after that visit, then back to Bangkok, and then dinner at a fabulous Italian restaurant with a couple of good friends (I know people everywhere). Imagine that: Italian food in Bangkok (and it was good, too).
About the floating market near Bangkok: I’d first sort of heard of it way back in the early 1970s when I saw a James Bond movie and its chase scenes with those narrow Thai boats. The Bond flick was The Man With The Golden Gun (if you’re reading this blog, my guess is you’ve seen all the Bond movies). The movie showed the boats in Bangkok, not the floating market, but it planted a seed 50 years ago and I when I heard about the floating market on this visit, I wanted to see it. Here’s that scene I remembered showing James Bond doing his secret agent stuff (with an appearance by Sheriff J.W. Pepper, ably played by the late Clifton James) on Bangkok’s waterways:
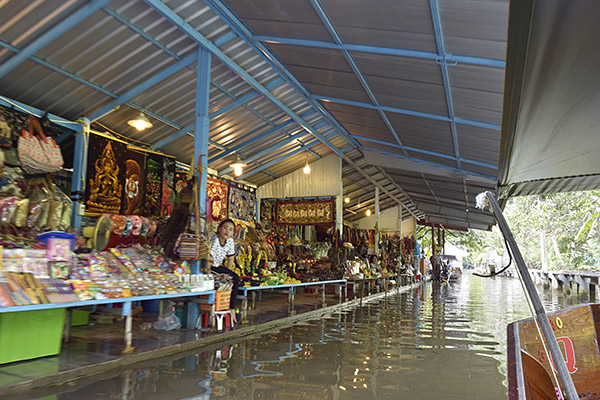
The floating market is about 100 miles south of Bangkok. The concept is that there are shops on the canals in the delta where the Chao Phraya River meets the sea. The idea is you are on these long narrow boats and you float along, visiting shops. In some places the vendors paddle out to visit you. Every turn in the floating market was a photo op, and for me, the photo ops were the best part of our visit. I took close to 400 photos in the space of a couple of hours. All were with my D3300 Nikon and its 18-55mm kit lens. That combo is a stellar travel photography approach. The 18-55mm lens is not as sharp as a good prime lens, but it does a good job and it is versatile.
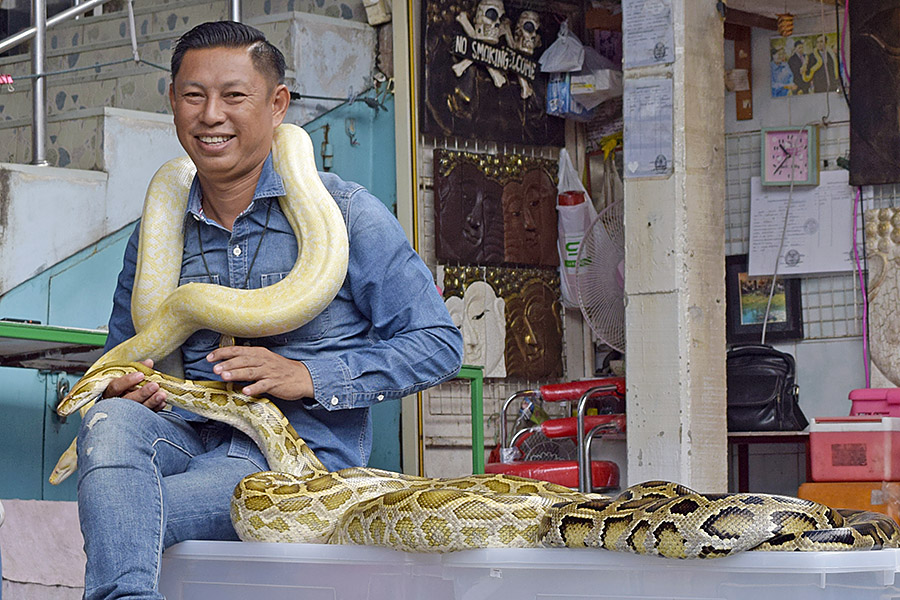
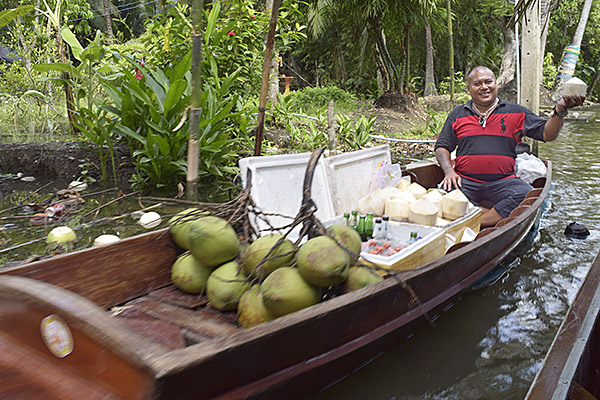
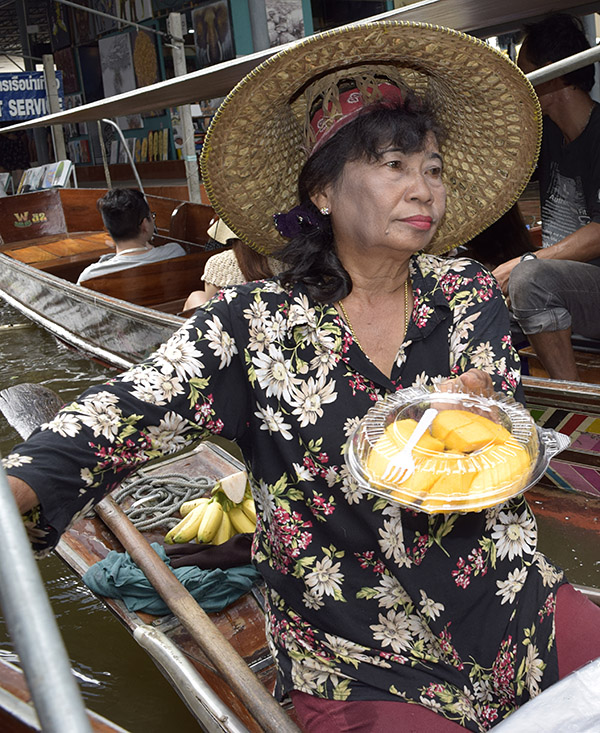
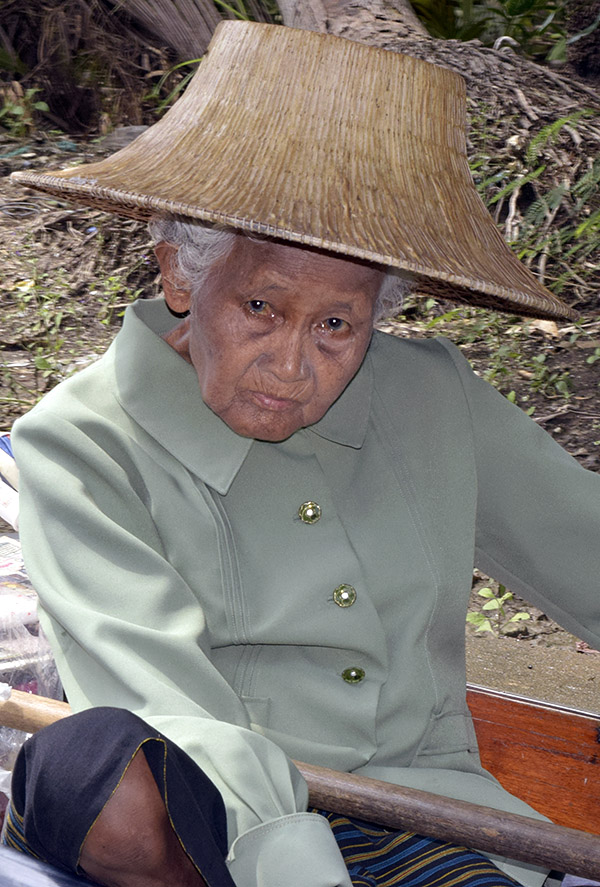
A typical scene in the floating market. It was very tranquil. In some places, it was also very crowded.A happy coconut vendor.Need a python? I have one. You can read about it here.One of the long boat captains.Imitation, the sincerest form of flattery. Here, this young lady is imitating me photographing her.Mango. It looked good.Some folks make amazing photo subjects.Some animals do, too. If you’re wondering what this guy is…it’s a pygmy slow loris, rare primates that live in bamboo forests in Southeast Asia. They look friendly.
On the way back to Bangkok, our driver took us to a nondescript restaurant that didn’t look like much from the outside, but our driver knew where the good spots were. We had shrimp fried rice for lunch, and it was delicious. The freshness, the aroma, the taste…it was marvelous. It was easily the best shrimp plate I’d ever had, and I’ve had some good ones. I’m not supposed to eat rice and I’m not supposed to eat shrimp, but I’m glad I broke the rules for this meal.
A hidden gem…a Thai shrimp plate. I knew when I was enjoying it I’d probably never find this restaurant again. Maybe that added to the experience.
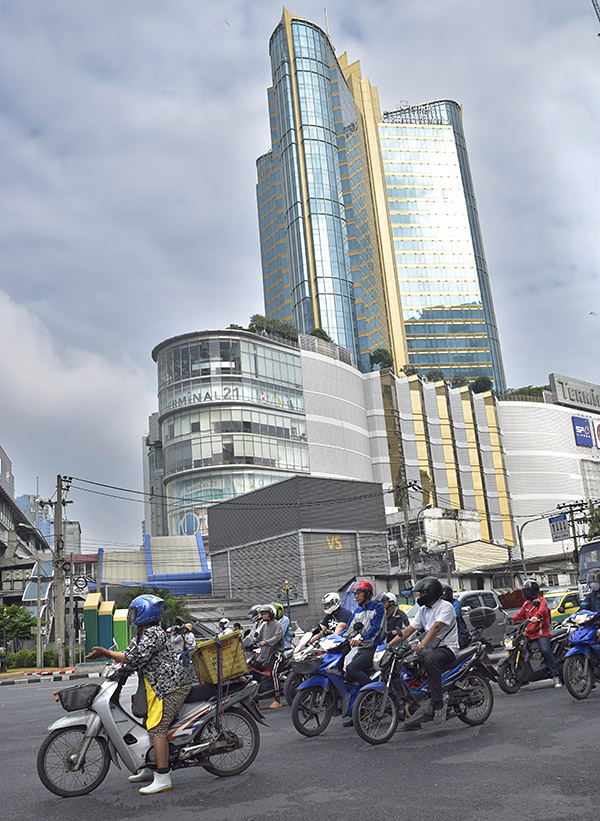
We returned to downtown Bangkok and I wandered around grabbing a few more photos. I promised something related to motorcycles in every Bangkok blog. Promises made; promises kept:
The Bangkok Moto GP. It’s at the head of every traffic line at every traffic stop.
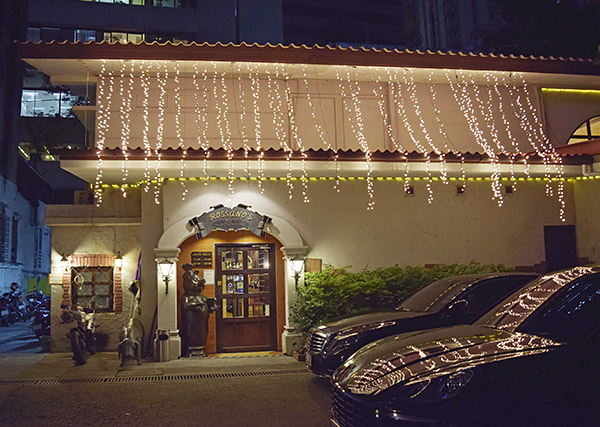
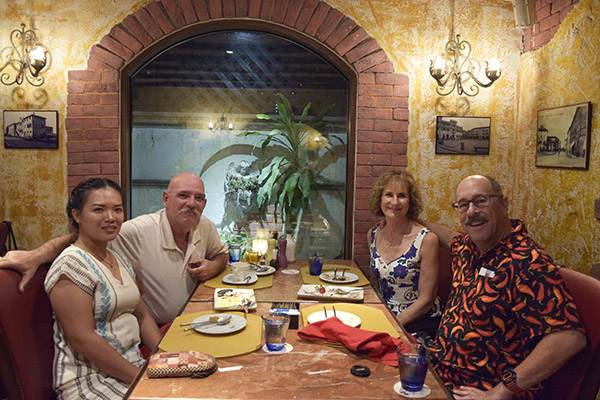
Our plans for that evening included having dinner with our good friends Kevin and Nan at Rosseno’s Italian Cucina. It was another five-star dining experience, a world-class Italian restaurant in the middle of downtown Bangkok. It was only a couple of blocks from our hotel, so Sue and I walked there.
Rosseno’s Italian Cucina. It was superb. I had lasagna.From left to right, it’s Nan, Kevin, Susie, and me.
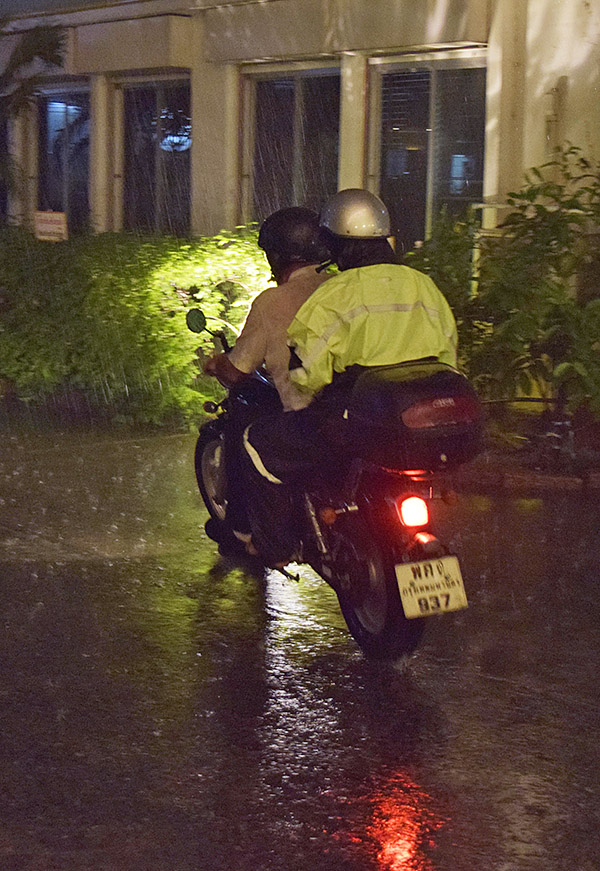
During dinner, it started raining. After dinner it was pouring. It does that a lot in Bangkok. Kevin and Nan had arrived on one of Kevin’s motorcycles. I would have been concerned about the rain, but as folks who live in Bangkok, Kevin and Nan were not. To them it was no big deal.
Nan put on her rain gear (Kevin did not) and they rode off into Bangkok traffic.
Bangkok is one of the world’s great cities. It’s about the size of New York, and like most major cities in the world, it pretty much has everything you can imagine (including great Italian food).
Tomorrow’s adventure is going to be another Bangkok hidden treasure: The Jim Thompson house. Stay tuned. You’ll enjoy it.
Never miss an ExNotes blog:
Help us bring more to you: Please click on the popup ads!
Another day, another Bangkok blog, and another famous Thai locale…Soi Cowboy. Soi means street in Thai, so Soi Cowboy is Cowboy Street. It played a role in the movie Hangover II. It’s amazing how many famous spots there are in this amazing town. The guys in orange vests you see in the big photo above are motorcycle taxi dudes. They take folks (mostly women) around Bangkok on the back of their bikes carving paths through traffic as if it wasn’t there. It’s an amazing thing to see.
Soi Cowboy is a street that is pretty dead during the day. When the sun sets, though, Soi Cowboy comes alive. There are street vendors selling food from their carts. The clubs come to life. And the B-girls start doing their thing. As an older married guy, it all seems pretty silly. Sue was mortified. But it is what it is, and I’m going to show you just a little bit of it here.
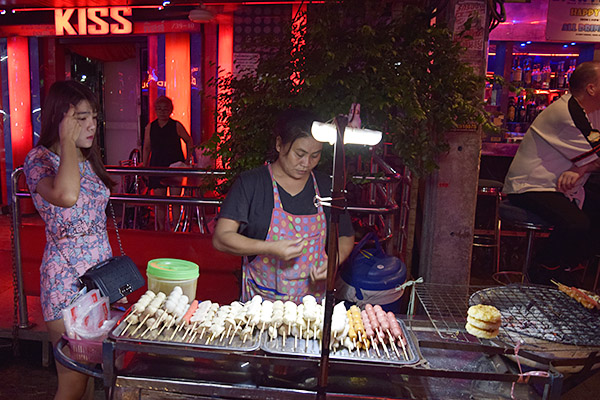
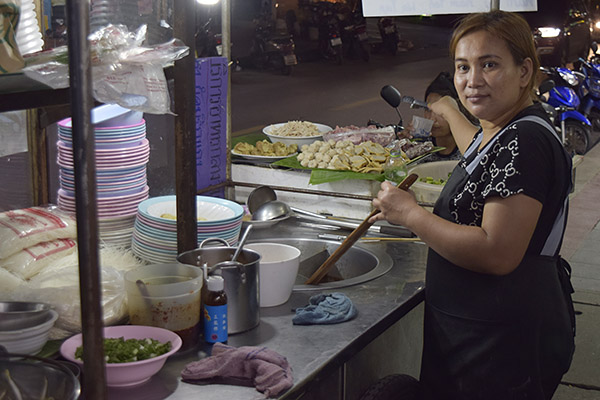
One of the many food carts on the street in front of the clubs on Soi Cowboy.Another food cart. I had the Nikon on its “auto ISO” setting, which basically means it runs the ISO up as high as it thinks it needs to be to get a good shot. Some of these photos were at ISO 12,800.More Thai food. I didn’t work up enough courage to try eating off these street vendors, but I’ll bet the food was good.
The clubs are bars with entertainment. Most of the entertainers are young Thai women. Most of the entertainees are older western guys. It’s pretty sad, actually, and I imagine it’s a pretty rough life for the girls.
A snap shot in front of one of the clubs.Another club shot.
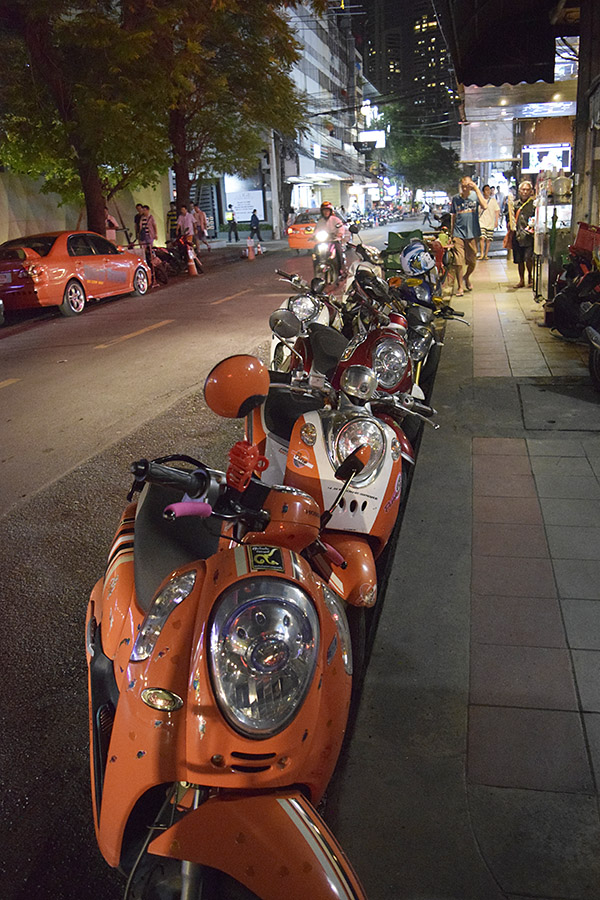
As always, motorcycles and motor scooters were everywhere.
Bikes lined up just off Soi Cowboy last night.And finally, a look down Asoke (that’s the street name) from a pedestrian overpass.
So that’s it for this post from Thailand. Watch for scenes from the floating market tomorrow.
Help us bring more content to you: Please click on the popup ads!
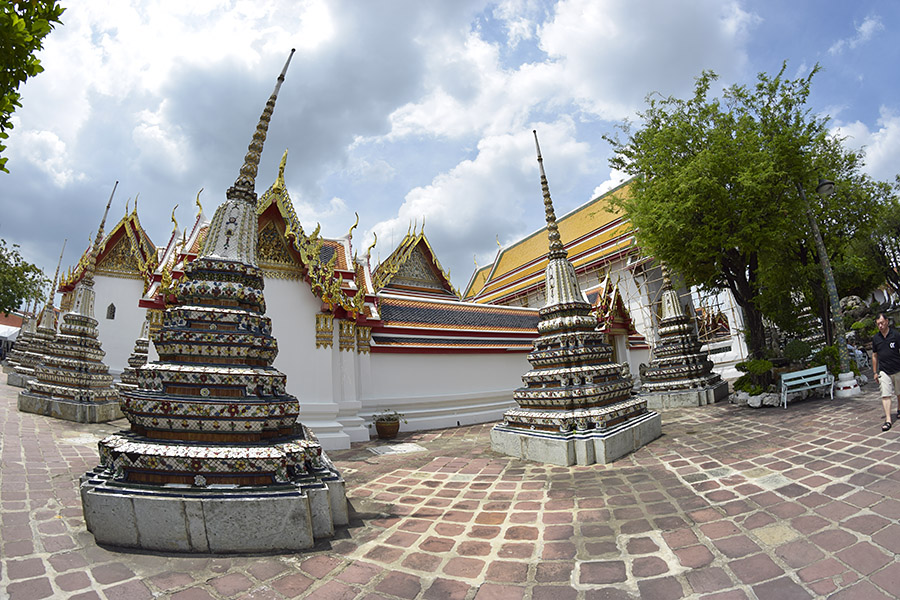
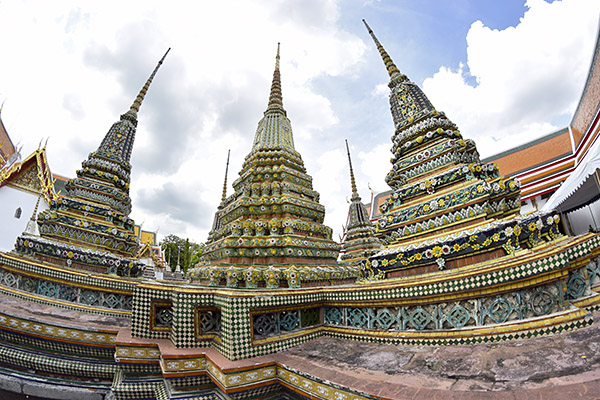
On our next day in Bangkok, Sue and I visited the Wat Pho Buddhist Temple. There are numerous Buddhist temples in this fine city, and on this (my third trip to Bangkok), the nod went to Wat Pho. The colors and the views were stunning, and my 8mm inexpensive Rokinon wide angle manual everything lens earned its pay yet again. I think it would be hard to find a Buddhist temple in Bangkok that was not impressive.
Wat Pho is one of Bangkok’s oldest temples, and it is one of six temples considered to be of the highest grade Buddhist temples in Bangkok. It is a royal temple.
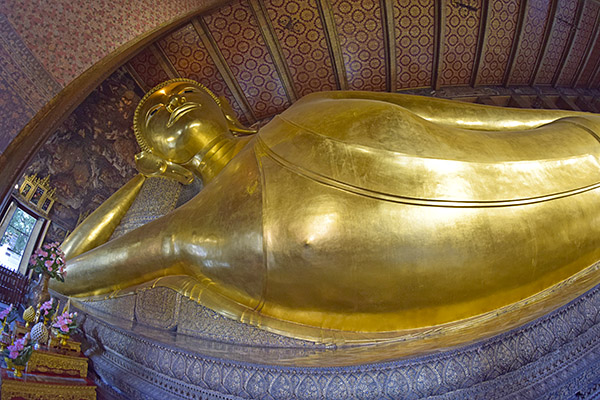
Wat Pho has the famous reclining Buddha, which is 15 meters high and 46 meters long. It is one of the largest statues of Buddha in Thailand.Colors abound at Wat Pho. It is a photographer’s delight.Buddha images inside the temple.A colorful tapestry inside the Wat Pho temple.
We later walked around town a bit, including a visit to the infamous Soi Cowboy area (it’s right around the corner from our hotel). I will post a few evening Soi Cowboy photos in a later blog.
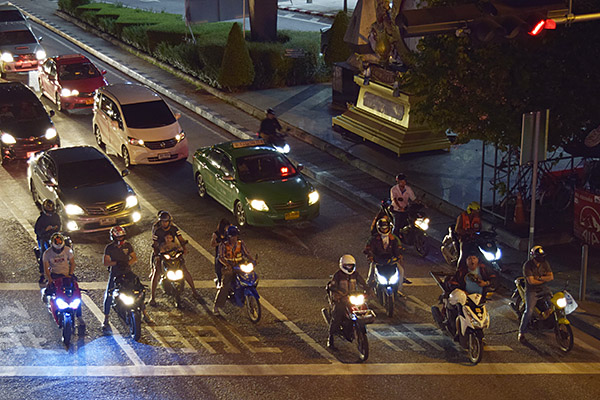
Thailand is two-wheeler territory. Motorcycles and scooters are everywhere. There’s more to come on this topic, so stay tuned.
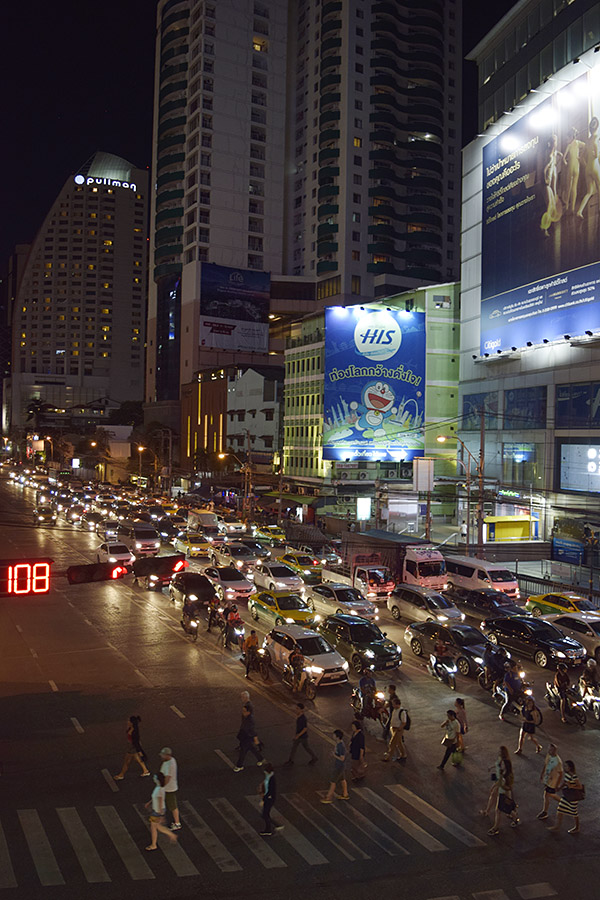
I said I would try to get something motorcycle-related in each of these blogs, and here’s the photo for this one: A Sukhumvit Street stoplight at night, with all the motorcycles and scooters filtered to the head of the line.
In October of 2017, Susie and I visited Bangkok. I had a gig in Singapore and we opted to swing by Thailand on the way home. It was an awesome visit and I had a lot of fun taking pictures of Bangkok motorcycles, Thai women, a few Thai guys, food, and more. I thought I would rerun that series (with a few updates) for you here on the ExNotes blog. In as many of these posts as I can, I’ll tell you about the motorcycling scene in Bangkok, too.
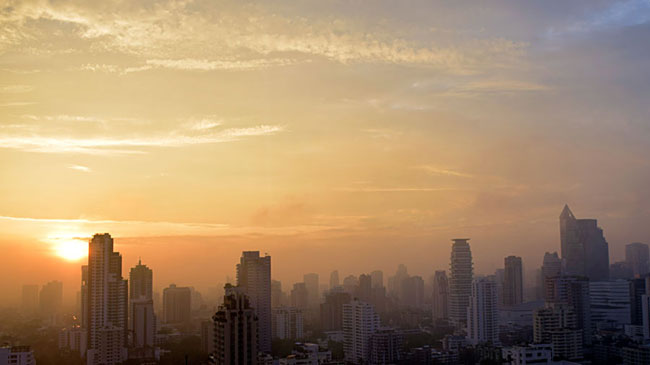
Our first morning in Thailand! Sue and I were up with the sun and we walked around the block to get a few photos after a great breakfast in the Grand Pullman Hotel.
Sunrise in Bangkok. When it comes to smog, Bangkok is what California used to be.
The evening before was fun. We arrived at the hotel late at night, and because we had opted to stay on the executive floor, the hotel staff rolled out the red carpet for us. When we went to the check in counter and told the staff our names, they whisked us up to the top floor, brought us into the executive lounge, poured us each a glass of wine, put several kinds of appetizers in front of us, and seated on us on a comfortable sofa. Two young Thais basically interviewed Sue and me, they disappeared for a moment, and then they reappeared with our room keys. It was a pretty cool experience, and it was unlike any hotel check-in we’ve ever had.
That morning we walked around a bit taking in one of the world’s busiest streets in one of the world’s most exotic cities. The number of motorcycles on every street had our attention immediately. Something we had not seen before anywhere else in the world were the motorcycle and motorscooter taxis. People used motorcycles and scooters for taxi duty, as you will see in a few of the photos below.
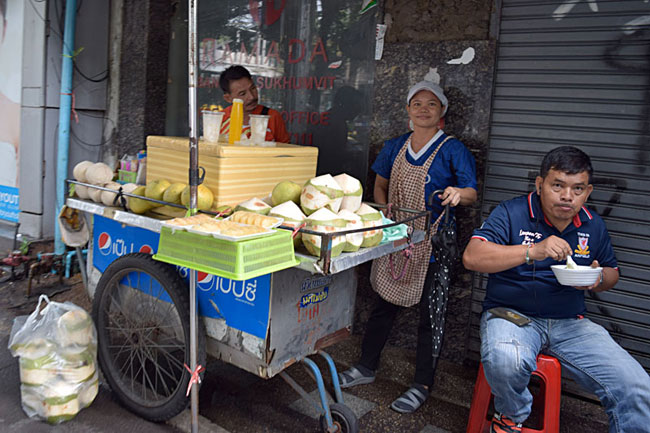
A Thai motorcycle taxi rider waiting for a fare. Motorcycles are commonly used as taxis in Thailand.Another Thai taxi, this time a rider on a scooter. The orange vests signify that these bikes are for hire. You have to be a daring person, I think, to hail a ride on the back of the Thai two-wheeler.A Thai family on a scooter. And a few other scooters, all waiting at a traffic light on Sukhumvit Road, the main road through Bangkok.The ubiquitous Honda CG clone engine. These power motorcycles made all over Asia. They are probably one of the more reliable engines ever made.ATGATT: All the gear, all the time. Well, some of the gear. Maybe some of the time. Can you imagine what the emergency ward in any Bangkok hospital must look like?Street food, Bangkok style. Thai food was surprisingly good. But we weren’t risk takers…we only ate in restaurants.
The fun was just beginning. I’ve been pretty lucky all of my life and my work has carried me to some pretty exotic locales. I’ve seen a lot of the world and most of it has been on someone else’s dime. That’s what this Thailand adventure was. A client brought me to Singapore to teach a failure analysis course to a group of their defense ministry engineers (I wrote a book about failure analysis a couple of decades ago and it’s been providing adventures like this ever since). The heavy lift on this trip was the airfare to Singapore (which the client covered); swinging by Bangkok and stopping off there on the way home only cost a bit more. It’s a great way to travel. I had my trusty Nikon D3300 with me (I love that camera), and I put it to good use on this trip.
I think I’m going to run this Bangkok series every day starting today and for the next six days to maintain the story’s continuity (there will be seven Bangkok posts in total). If it’s too much, hey, just check back in when it’s convenient for you.
I guess a good way to start a blog is to grab the reader’s attention, and I can do that here: How many people do you know who ride a Panther?
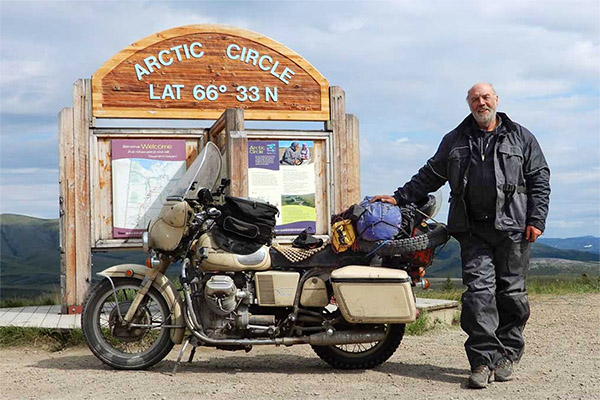
A few weeks ago I wrote a blog about Nick Adams, an interesting man, fellow motojournalist, and author. Nick is about the same age as me and he enjoys exploring the world on his different motorcycles. In other words, he is our kind of guy.
Nick Adams and his trusty Moto Guzzi.
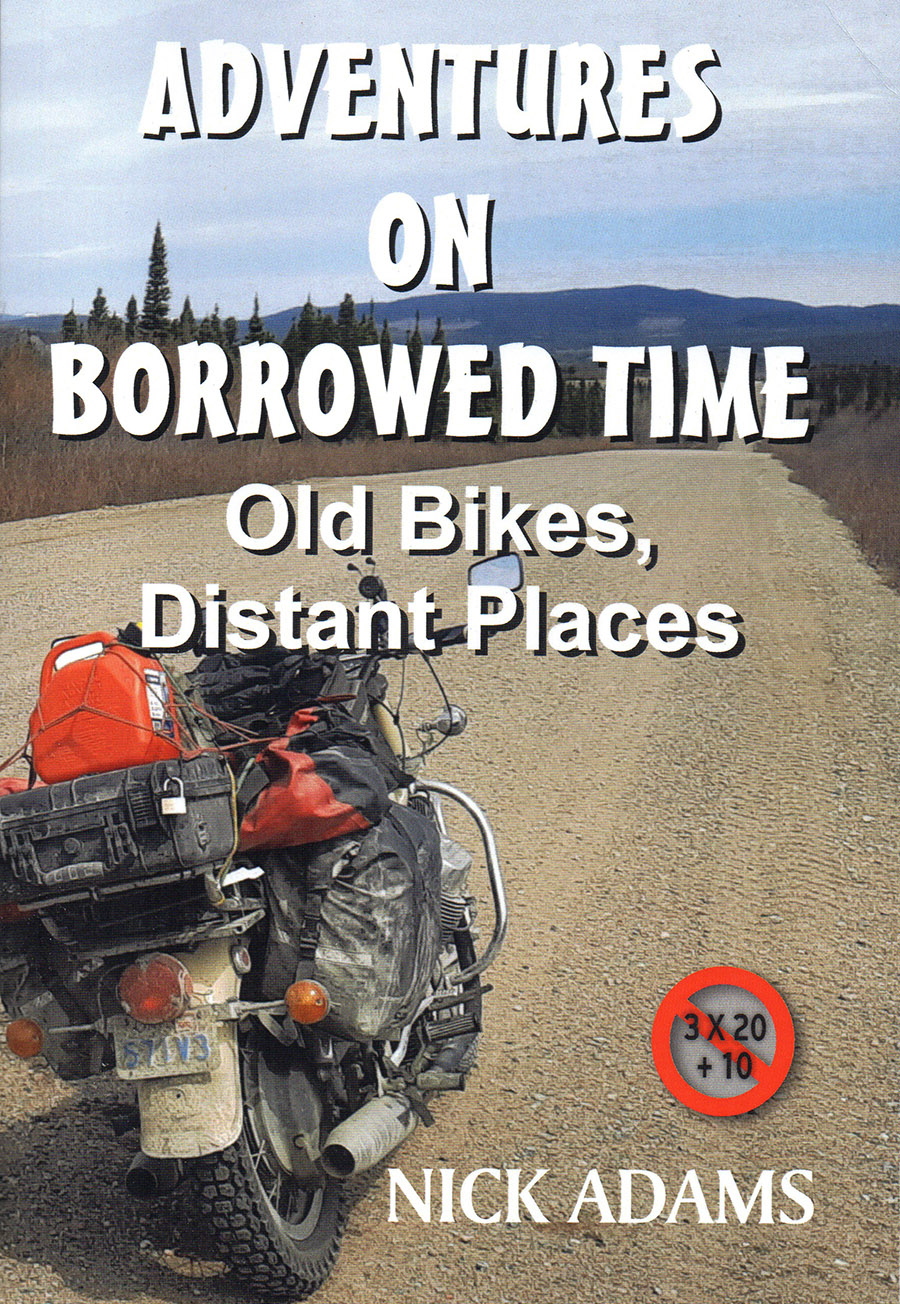
In my prior blog about Mr. Adams, I mentioned that I planned to purchase one of his books. I did, and a few days after ordering Adventures on Borrowed Time, it arrived.
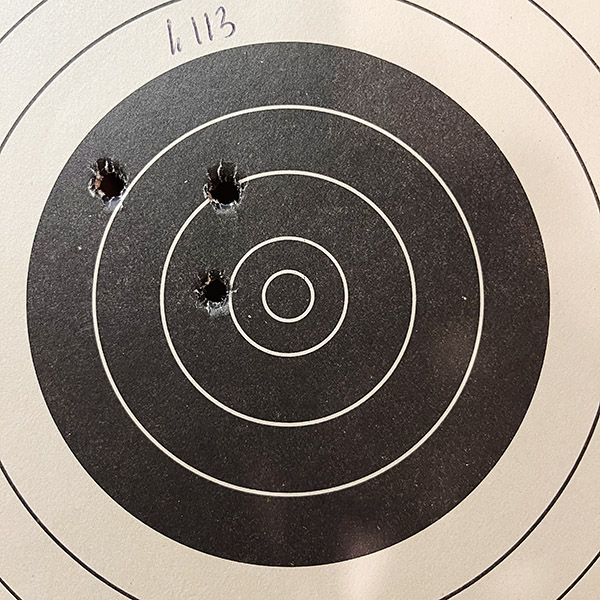
Adventures on Borrowed Timeis well written and well organized. It’s 191 pages long and it has lots of pictures. Nick’s writing style is conversational and easy to follow (it feels more like listening to a good friend’s stories than reading). The first chapter is about Nick’s ’72 Guzzi Eldorado (the one you see in the photos above). The following chapters take you through Canada, mostly on gravel roads, in good weather and bad. There are instances in which Nick’s Guzzi didn’t feel like starting, and Nick takes us through the steps he took to coax the old V-twin back to life. There are parts where Nick switches to his ’86 Suzuki Cavalcade (Suzuki’s attempt to cash in the Gold Wing craze), that monster of a bike’s surprisingly good handling, and the repairs Nick made to it. Parts of Adventures on Borrowed Timedescribe exploring Canada on Nick’s 650cc Suzuki Burgman scooter. And then, returning to my attention grabber at the start of this blog, Adventures on Borrowed Timedescribes Nick riding Canada on his 62-year-old Panther.
Never heard of the Panther? Don’t feel bad. The Panther is a 600cc single English bike made from 1900 to 1968, and most folks have never heard of it. They are fairly primitive, I think. I say “I think” because I’ve never even seen a Panther. And here’s Nick, describing what it’s like to take major trips through Canada on one. A long-distance moto adventure ride through the Canadian wilderness on a 62-year-old British motorcycle…what could go wrong?
The writing is superb, the photos are great, and the character development all make Adventures on Borrowed Timea book you need to read (the characters being Nick, his wife, the people he meets, and the bikes). You can purchase your copy of Adventures on Borrowed Timehere. Trust me on this: You’ll enjoy it. You can thank me later.
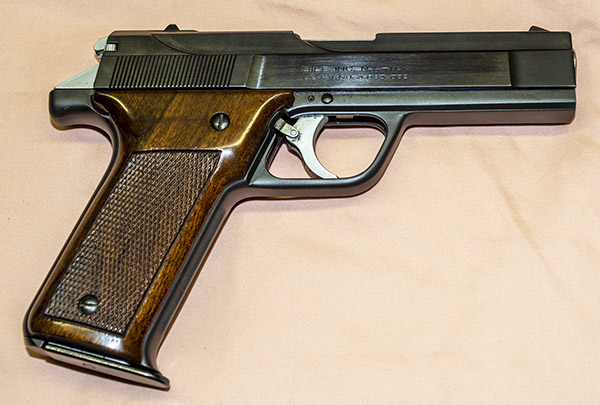
The Benelli B76 is a relatively rare and delightfully different handgun designed and manufactured more than four decades ago. In the 1980s, police departments were making a wholesale switch from .38 Special and .357 Magnum revolvers to 9mm semi-automatic sidearms. Benelli wanted in on this action and they introduced their B76 in an attempt to get on that bandwagon. Commercially, the B76 was a resounding flop. But from quality, technical complexity, and cool factor perspectives, Benelli out-Ducati’d Ducati, and that’s no mean feat. As an engineer, I find my Benelli to be an intriguing firearm. It’s not red and it doesn’t have a clutch that rattles, but it’s still a pretty exciting bit of Italian engineering.
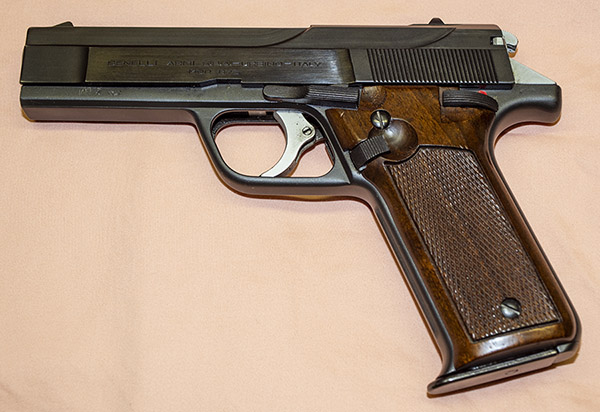
Benelli B76 9mm handgun, viewed from the port side. It is an attractive weapon.
From a collector’s perspective, the B76 was a cool deal. I picked this one up in the 1980s when they were going for cheap and tucked it away in the safe, which is where it sat for the next 40 years. A few weeks ago, I had the urge to shoot it. Benelli only made around 10,000 of the things, and you almost never see them come up for sale anymore (while writing this article, I searched GunBroker.com and GunsAmerica.com and I didn’t find a single one). In the last couple of years, when they came up on the auction sites, well worn examples would sell for around $2K. Three or four years ago, one that was new in the box with all the papers (which is what mine was until a couple of weeks ago) sold for $4K.
The high market value kept me from shooting my unfired B76, and then I realized: I’m not going to sell my Benelli. All I was doing by not shooting it was acting as a warehouse for some guy who would buy it after I’m gone. So I made the only two decisions any responsible gun owner could make: I decided I’m going to live forever, and I’m going to shoot the thing.
Starboard view of the B76. It is an attractive pistol.
The B76 is a very high quality European handgun built like a lot of European weapons were back in the day. It is of all steel construction (except for the walnut grips). The polishing and bluing is deep and exceptional. Like pre-war Mauser rifles, it has matching serial numbers everywhere: The frame, the slide, the barrel, and the receiver (I’m making a distinction between the frame and the receiver, with the receiver being the part into which the fixed barrel is attached). You read the above right: The barrel is fixed (more on that in a second). Because all these parts are serialized, I’m guessing that there was a fair amount of hand fitting at the Benelli factory.
The B76 is both a double action and single action semi-auto, and the innards are complex. The expense associated with the design and the single stack magazine (the B76 holds only 8 rounds; the WonderNines of the 1980s could hold 14 or more cartridges) probably doomed the B76 in the police market.
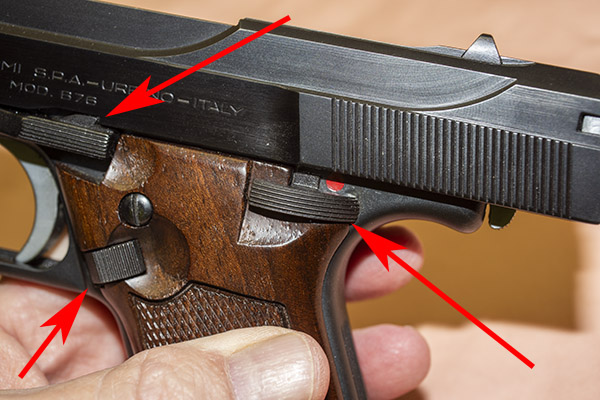
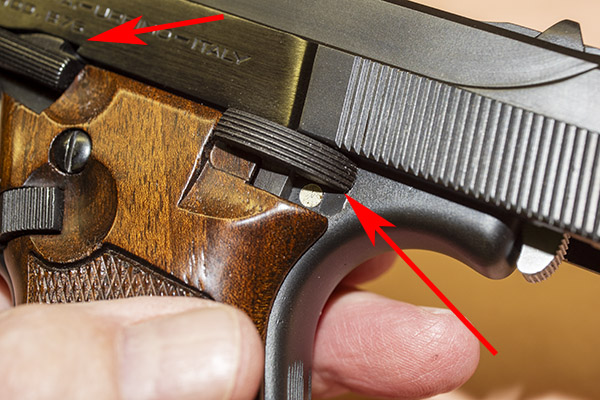
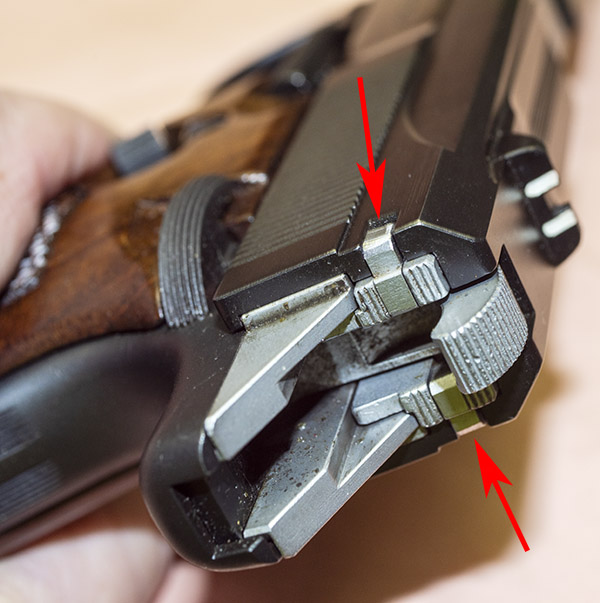
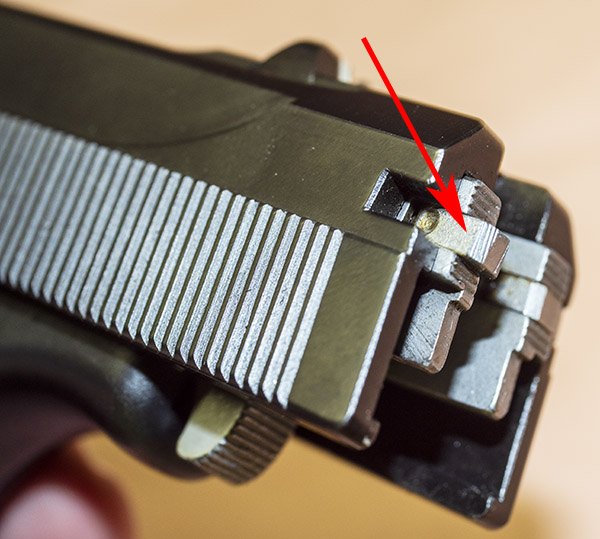
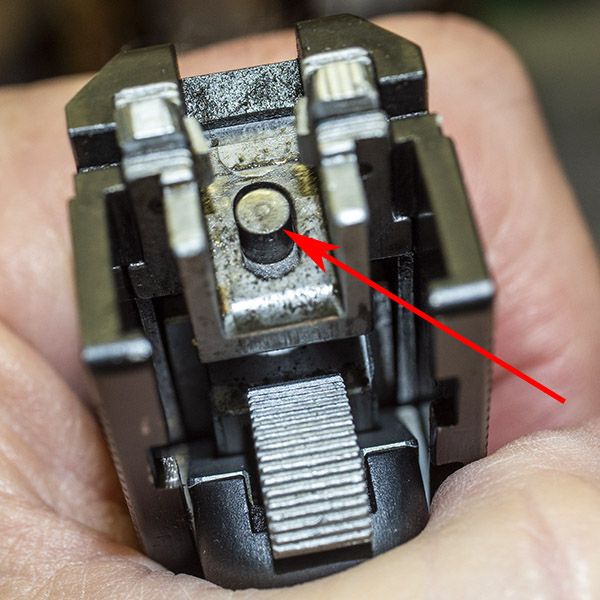
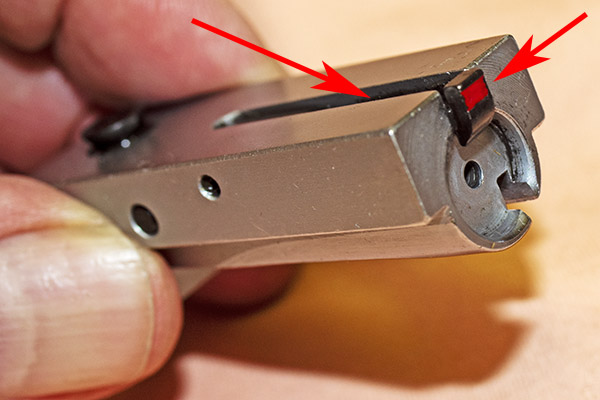
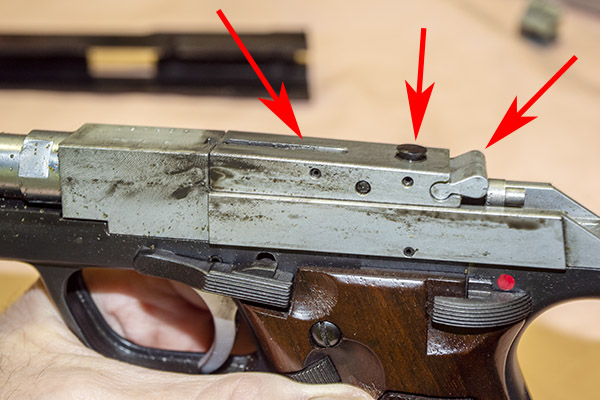
B76 controls. The top arrow points to the slide release, the lower left arrow points to the magazine release, and the lower rear arrow points to the manual thumb safety (a combined safety/slide lock).Disassembly requires pulling the slide all the way to the rear, and raising the manual thumb safety (right arrow). Note that in this position, the slide is further to the rear than it would be when locked open by the slide release.
The B76’s controls are all in the right places, as you can see above. There’s a trigger (as noted above, both single and double action), a slide release, a combined safety and slide lock (more on this in a second), and a magazine release. Unlike the 1911 and most semi-autos, the magazine release is not pushed into the frame to release the magazine. You have to push it forward. When you do so, the magazine flies out of the frame.
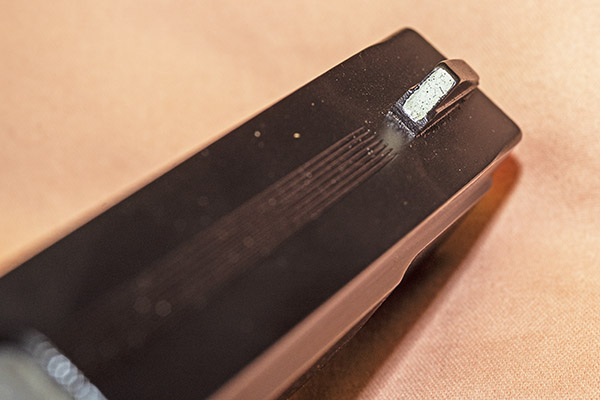
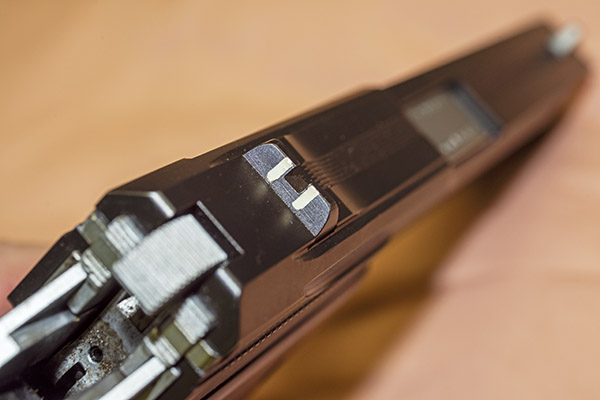
The B76 front sight.The B76 rear sight.
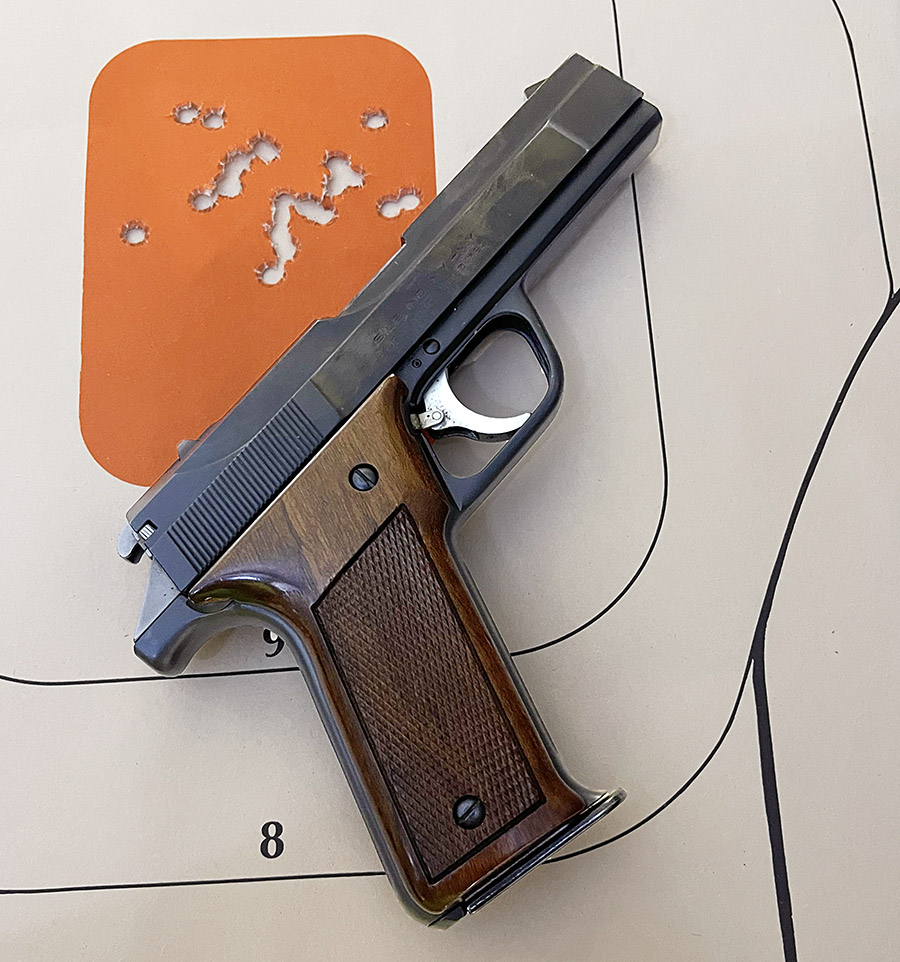
The B76’s fixed sights are a three white posts with no elevation adjustment. The rear sight can be drifted in its dovetail mount to move point of impact left or right. I didn’t need to move the sights on my B76; the windage is perfect (40 years ago, some dude in Italy at the Benelli factory got it right). I held at 6:00 on the orange bullseye on the target at the top of this blog. The B76 shoots a little bit high at 50 feet, but on a man-sized target, it’s close enough for government work.
I don’t really care for the three white posts on the sights, as they make aiming more difficult than it should be. There are two white posts on the rear sight. When aiming, there are gaps between the rear sight’s slot and the front sight (so that’s two more white posts). And then there’s the white post on the front sight. What this means to the shooter is that you have to align five white posts. To my old eyes, that’s way too complicated. I like a simple black post front sight and a simple black slot rear sight on a target gun. On a carry gun, the green and red dots on my Smith and Wesson Shield are about perfect, but in my opinion, that’s about the only thing Smith got right on the Shield.
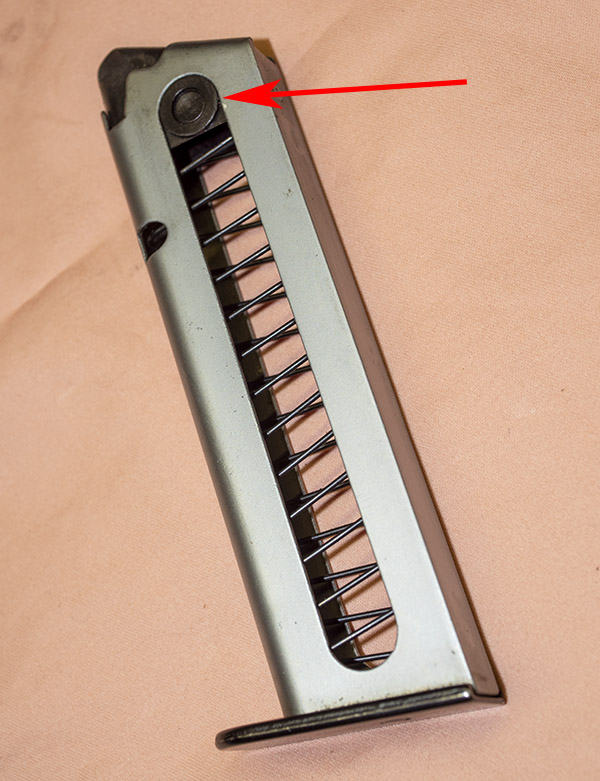
The B76 magazine. The red arrow points to the magazine follower.
As mentioned earlier, the B76 magazine “only” holds 8 rounds. That’s not an issue for me, as I’m a target shooter and I never load more than 5 rounds at a time. An interesting tidbit: The average number of shots fired in a gun fight is less than 2. I’m okay with a magazine holding 8 rounds.
Front to rear, there’s not a lot of real estate there. Overall cartridge length in this photo is 1.065 inches. Those are my reloads.
I found that I had to reload 9mm ammo to a shorter overall cartridge length for the Benelli. My other 9mm autos like the ammo to be loaded to an overall cartridge length of 1.105 inches (or more) for best accuracy. Loaded at that length, the cartridges won’t fit in the B76 magazines. To load ammo from the top by pushing one round in on top of the other, I have to hold overall cartridge length to 1.065 inches. I can go up to 1.080 inches, but to load cartridges of this length I have to pull the follower down and then slide the cartridges into the magazine. I fired cartridges of both lengths and I could see no difference in accuracy.
One last word on the Benelli B76 magazines: They are scarce. When you see them on Gunbroker.com, they go for $250 or more, and even at that price they don’t sit around long.
B76 disassembly for cleaning is different than a 1911, but still relatively simple. It starts by dropping the magazine from the weapon, pulling the slide all the way to the rear (beyond where it normally is restrained by the slide release lever), and then pushing the safety all the way up to hold the slide in this beyond-fully-retracted position.
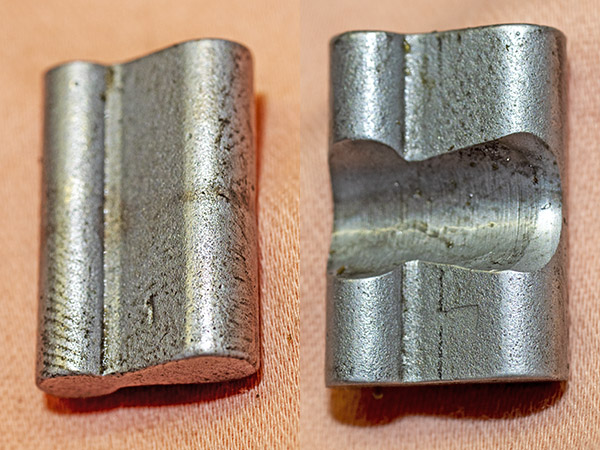
Locking pawls in the firing pin retainer and bolt locking support. The locking pawls are in the closed position.
Disassembly continues with the locking pawls on either side of the hammer. In the photo above, with the slide in battery (all the way forward), the locking pawls are shown in the locked position. In the photo below, the slide has been pulled all the way back and locked, and the left pawl has been unlocked. The pawls unlock by rotating them to the rear.
Locking pawl in the open position. The little levers rotate outward.
The next step requires pushing the firing pin in (I used a brass pin so as to not scratch any surfaces) and pulling the firing pin retainer and bolt locking support downward. It will drop out of the slide.
The firing pin in the firing pin retainer and bolt locking support. When the firing pin is pressed in, the firing pin retainer and bolt locking support can be slid down and out of the slide.
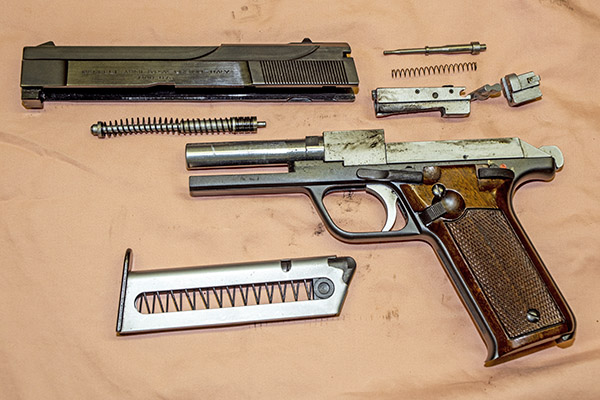
Once the firing pin retainer and bolt locking support has been removed from the slide, the slide can be slid forward off the frame (you have to lower the safety to release the slide). At this point, all of the major components are accessible and easily removed from the gun. I took my B76 apart for cleaning after putting several hundred rounds through it, so in the photos below the gun is kind of funky. Mea culpa.
A very dirty B76 taken apart for cleaning. In this photo, you can see the slide, the firing pin, the firing pin spring, the blot, the firing pin retainer and bolt locking support, the bolt, the recoil spring assembly, the receiver, and the magazine. Note that the barrel is fixed to the frame. Theoretically, this should make the B76 more accurate, but I found its accuracy to be about the same as other 9mm handguns.The bolt, with the firing pin removed. The firing pin spring and the toggle lever lock are still in place. The spring is very light and it wants to stay in the bolt; exercise caution when removing it so as to not cause the spring to stretch too far and yield.The firing pin. It has a flat on the forward collar, which has to face up for assembly,The recoil spring assembly. It’s lighter than other semi-auto springs. That’s because the B76 slide is lighter than other slides.The bolt and its extractor. The extractor is also supposed to serve as a loaded chamber indicator, but in that regard it’s useless. It doesn’t protrude very much above the chamber, the red is covered with soot after the first shot, and the red is only visible when in front of the weapon.
So how does the B76 work? It’s complicated. There are a few YouTube videos that attempt to explain the B76 theory of operation and a few other explanations sprinkled around the Internet, and they are all either so superficial as to be useless or just flat wrong.
Larger caliber semi-auto handguns (9mm and up), other than the B76, rely on a design called locked breech recoil. Locked breech recoil systems keep the breech (the rear end of the chamber) locked against the slide until the bullet exits the muzzle, which allows pressure to drop to a safe level before the cartridge case is extracted and ejected. Larger caliber semi-auto pistols like the 1911 (and others) do this by keeping the barrel and the slide locked together initially. One thing to note at this point is that on these other guns, there is no separate bolt (the piece that fits up against the rear of the chamber). On these other guns the entire slide, in effect, is the bolt. It contains the firing pin and butts up against the chamber when the gun is in battery. When these guns fire, the barrel and the slide initially move together. As they move rearward from recoil and after the bullet has exited the barrel (by which time the pressure has dropped to a safe level), the slide keeps moving to the rear and the barrel is pulled downward. The barrel then unlocks from the slide, the slide continues to the rear, and the cartridge case is ejected as the slide’s extractor pulls the case from the chamber.
Going tangential for a second, you might wonder: Why not just let the recoil push the slide back to pull and eject the case from the chamber? Smaller handguns (e.g., 380 autos, .22 autos, etc.) work this way. But simply allowing the fired cartridge to push the slide rearward and eject (also known as blowback operation) is not feasible on the big dogs. There’s too much energy involved with the larger caliber guns, and too much gas pressure would be released near the shooter.
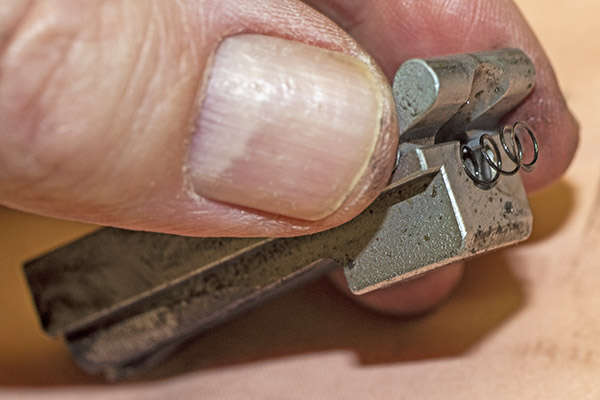
Benelli took a different approach. It’s quite clever and a bit abstract. In the Benelli literature, Benelli calls their system a delayed blowback locking system, but that term can also be applied to the 1911 approach. I’ll call the Benelli approach a lever-locked inertial system. The Benelli, unlike a 1911 or other larger caliber semi-auto handguns, has a separate bolt with a toggle lever lock and a bolt control stud. You can see these parts in the photo below.
The bolt in place in the B76 receiver. The arrow on the left points to the bolt, the center arrow points to the bolt control stud, and the arrow on the right points to the toggle lever lock. It’s dirty, I know. I shot these photos while disassembling the Benelli to clean it.
When the B76 slide is in battery (all the way forward), the firing pin retainer and bolt locking support (that’s a complicated name, but it’s all one part) at the rear of the slide push forward on the toggle lever lock. In this position, the top of the toggle lever lock butts up against the inside of the slide top, which holds the bolt down against the frame. In this position, the chamber is closed and the gun is in battery. When the bolt is in this position, a ramped surface at its rear engages a similar ramp in the frame. Until the hammer drops (and for a brief instant after), everything is locked closed.
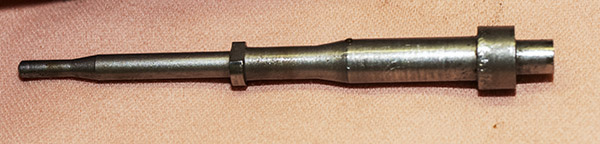
Top and bottom views of the toggle lever lock. I’m guessing this is a hardened machined forging. I sure hope this piece never breaks.
When the B76 fires, the entire gun (the slide, the receiver, the whole gun) recoils and starts moving backward. The toggle lever lock is held down by the slide, and the toggle lever lock pushes down on the rear of the bolt, keeping it locked, too. But then a funny thing happens. The shooter’s hand, holding the receiver, slows the gun’s rearward motion (the motion that was induced by recoil). The slide, however, continues moving to the rear due to its inertia (the inertia it picked up when the gun was in recoil and everything was moving to the rear). As soon as the slide starts moving further to the rear than the receiver, the toggle lever lock drops and it no longer forces the bolt down. The bolt is now driven up by the ramp on its bottom that mates to a corresponding ramp in the receiver, and that drives the bolt control stud on top of the bolt into a slot in the underside of the slide. By this time, chamber pressure has been reduced significantly. And by this time, the bullet has cleared the muzzle and is headed downrange. The bolt and slide continue rearward. The bolt extracts and ejects the spent cartridge case.
After all the stuff I describe above occurs, the slide slows to a stop as it reaches the end of its rearward travel. The recoil spring force drives the slide forward again. The slide is still hanging on to the bolt control stud at this point, so the bolt is driven forward, too. As the bolt moves forward, the bolt picks up the next cartridge in the magazine and drives it into the chamber. And as the slide continues its forward motion it pushes the toggle lever link up, the toggle lever link pushes down against the bolt’s rear, the bolt control stud drops out of its slot inside the slide, and the bolt goes back into battery. Clever people, these Italians are (well, except for that desmo valve thing on their Ducatis). But they sure nailed it with this handgun design. Nobody else does it like this.
I love my B76. It is accurate enough, it is a fine handgun, it is extremely reliable, it is made of blue steel and walnut as God intended guns to be, and it is certainly something different. I have never seen another one on the range or in a gun shop, and that means something to me. It’s unique and it’s cool.