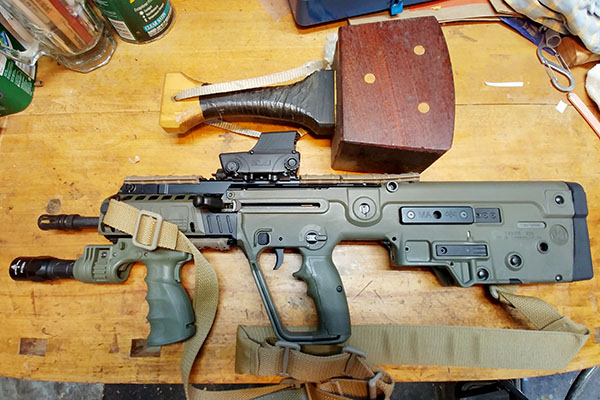
Good buddy Jake Lawson sent us a marvelous guest blog on his new Israeli Weapon Industries Tavor X95 (the one you see in the photo below), and it sure is an interesting story. Folks, this man can write! Enjoy. I sure did.
I wasn’t raised to respect Lego rifles.
There was no implication of egalitarianism in Dad’s gun culture: firearms were reserved for the martial few who took to the hills in Wranglers to provide for family, tribe, and the community of soft-handed city folk who’d never eaten brains for breakfast. We Lawsons, I was given to understand, descended from hunters and warriors and gamekeepers. We were special and worthy. We harbored innate skills.
Those blood-honed instincts were best served by very special rifles, furnished like Victorian houses and smelling, always, faintly of Hoppe’s No. 9 (we pronounced it “hoppies” and you should, too). I was occasionally loosed to wander wide-eyed through legendary temples like Kesselring’s while Dad traded country-boy bons mots with the staff. They’d nod at each other with the unspoken recognition of cowboys, bikers, and Seventh Day Adventists. Through the slanting half-light of well-secured buildings, racks of gleaming fire sticks whispered strong magic from the past, waiting like Excalibur to leap lively under the hand of a righteous knight.
Like classic hardware stores before canvas aprons gave way to the Playskool smocks of “home centers,” bygone gun stores offered only gradual apprenticeships into the mysteries. You started knee-high and – provided you paid respectful attention – you might one day grow into a man worth reckoning with. We had no internet to spawn new lingo by the day. You absorbed the patois the way artists learned line and color, with dawning awareness that most of the wisdom lay between the lines.
In those quieter times you could buy a rifle in most any variety store, but a man went to the altars of the elect to discuss blued, two-piece scope rings, buy a seasonal box of Winchester Silvertips, and run his fingers over the saddle straps of fine, leather scabbards. Those places, mostly killed off by Discount Gun Stores and their ilk, barely exist today. Where you find them, they’re secured by crabby, clannish insiders, guarding their diminishing cache of unique knowledge like tattered dragons squatting on a pile of dimes.
The full flower of our information age democratized knowledge on any number of subjects. This is largely a good thing. Who doesn’t want to download the part number for their dishwasher inlet valve alongside a quick, friendly video reminding you to wrap brass threads in nylon tape?
The internet also gave rise to tens of millions of Shake ‘n Bake™ experts who can quote the ballistics by range of 5.56mm 55-grain FMJ slugs but have never once shot a deer, bedded a walnut forend, or cleaned weapons to an armorer’s satisfaction.
Erupting angora-soft neck beards through scarlet fields of pimples, less good ol’ boys than fresh-faced kids, these are our experts now. Good-humored and alert, they staff brightly lit gun stores where you no longer ballpoint your way through BATF forms while leaning on the glass over surplus police revolvers, joking with someone’s crinkle-eyed uncle about your mental incapacities, but instead enter your digits into a dumb terminal, squatting humorlessly in the corner of a repurposed Blockbuster Video store that still reeks of Citrisolv. Lean hill hunters in woolen plaid are nowhere in sight, replaced by pasty Glock jocks sporting 5.11 Tactical trousers. The gun tech surely is better – so much better that you can build a reliable weapon on your kitchen table with no tooling more exotic than a wobbly drill press – but long glass cases littered with sci-fi props, zombie targets, and pimped-out banger bling make me miss my father’s Oldsmobile.
And there are AR-15s. So many AR-15s, in so many configurations, that kids today don’t say “my rifle” anymore. They call their gun “this build.”
Decades ago, I’d already had enough of M16s and their multifarious cousins: A1s, CAR-15s, A2s, SOPMODs, A4s, et al. Sure, they’re cool in those movies where Arnold gets 160 rounds out of every mag and never has a stoppage, but let’s get real: standing a pre-’64 Winnie up against a tac stack of AR-pattern rifles is like pushing Howie Long, wearing a Saville Row suit, into a police line-up of minor-in-possession suspects. Class or crass: pick one, and move along.
Having toted an M4 carbine across someone else’s desert at taxpayer expense, I conceived no special desire to spend a thousand bucks adopting one of my very own. I’d mistrusted those plasticky things since childhood. What kind of war weapon bitches like a parent when you don’t close the door? M1 Garands and M1911 Colts didn’t jam under fire! Mattel rifles?! I was sick of ‘em: sick of the Chevy 350 ubiquity of “modern sporting rifles,” sick of the little “oh s&!t” springs that zing away any time you don’t pay attention, and sick of dangling one from a single-point bungee sling, tied off to a 40-lb. shirt. I’d gone to work with my M4, slept with it, eaten with it, prayed with it, and I didn’t miss it for one lonely moment after our long-overdue divorce.
At some point, I realized that I’d gone my whole life without buying a rifle.
Now, this isn’t the hardship one might imagine. Most of us don’t need a rifle. I don’t need a rifle – and if I did, I could always peck open the safe and pull out the .30-30 I got as a Christmas present the year I joined up with Boy Scouts of America, or the pre-war .30-06 with its first series Leupold Gold Ring 3-9X scope that came down to me from Grandpa through Dad, or the .22 with the 4X Weaver that – strike that; I actually passed that one along to my mother-in-law to pop rattlers in her Arizona garden.
Or I could pull one of the rifles from the other side of the safe, where Pretty Wife’s inheritance encompasses more firepower than my own.
We’re not wealthy folks. Intrigued though I may be by long-range shooting, a Savage 110 with Accu-Trigger and a big honkin’ optic – let alone something fancy from Accuracy International – is not a hobby within my budget. It’s entirely too easy to shoot through two hundred bucks a day in ought-six or .308 ammunition, just getting the feel of things.
Also, that’s tougher on a rebuilt shoulder than I like to confess.
But still, I’d never bought a rifle. Never shopped for one “with intent,” never spec’ed one out just for me. Every long arm I’d shot was a loaner, a gift, an inheritance, or a duty weapon. That thought came to me from time to time and I pushed it down, and then it came tickling back. Some of those middle-aged tickles grow compelling. Plus I hearken to my sweetie’s frequent admonition to “have your midlife crises early, and often.”
Did I mention I’d never bought a rifle? According to family tradition, I still haven’t.
Oh, I had my aspirations. A bolt-action gun with a stainless, free-floated, heavy match barrel. A McMillen stock adjustable for comb height and length of pull, or maybe a thumbhole stock I carved myself from Circassian walnut, with a shoulder plate of polished ebony. Big scope, adjustable for ranges to infinity and beyond, with the kind of chambering that requires a dope card just to open the cartridge box: .338 Lapua, maybe.
Being more of a dream than a plan, that did not happen. For the record, I do not believe it will. In any event, I have the character more of a hip shooter than a sniper. I perform best when I think less. At least, that’s my excuse for all the busted plans in my life.
Hip shooters favor short rifles. They’re just easier to get through the door, whether that’s a HMMWV door or my bedroom door. Think more along the lines of Steve McQueen’s “mare’s leg” in Wanted Dead or Alive than the .45-110 Shiloh Sharps from Quigley Down Under.
Stubby rifles get a bad rap, though. As alleged “assault rifles,” they’re considered truculent by dint of terminology. The region where I live, always a “shall-issue” state due to our supreme court’s historic interpretations of Article I, Section 24 of the state constitution, swiftly retreats from our Wild West past.
There was an Ernst Home Center just down the road from the house where I lived through high school. It sold potted plants, plywood, drywall anchors, and guns. Nose-printed showcases lining the west wall displayed rows of Dan Wesson Pistol Packs boasting various selections of interchangeably-barreled revolvers, and I can remember wondering whether I’d need to be 18, or 21, to walk in and buy one of those O.G. “Lego guns,” right over the counter. Their big shrouds and barrel nuts made them a little funny-lookin’, but I didn’t mind too much.
There are waiting periods now, of course. Those have been legislatively hip for a while now, but recently my state went all-in on protecting us from the law-abiding. Now that semi-automatic rifles are considered a greater threat to society than pistols (a statistically unsupportable politifact), 18 year-old adults may no longer buy them here. Even those of us well past drinking age face the same ten-day waiting period for semi-auto rifles as for a handgun.
Year before last, possession of a Washington CCW meant that a citizen with such clearly documented legal standing could buy any legal weapon, from a long-mag Glock to a Barrett .50, without a waiting period or additional background check. That privilege recently vanished. Every single gun transfer, of every type, now requires a background check – including selling your old deer rifle to your cousin, or gifting it along to your daughter.
Strange times.
Now, in all honesty, none of that prevented an old cuss like me from buying an “assault rifle” any time I felt enough like it to muster the funds. However, two more laws now grind through our legislature: one to limit magazines to California’s ten-round max capacity, and the other an outright ban on “assault rifles.” Our Attorney General’s legislation request defines assault rifles as having a telescoping stock, pistol grip, detachable high-capacity magazine, forward grip, or a “combination flash suppressor and muzzle brake” (i.e. any M16-style bird cage) that “reduces muzzle climb and preserves shooter’s eyesight.” Black rifles do not matter to Bob Ferguson. Neither, apparently, does a shooter’s eyesight.
Well, now. If there’s one way to make me want a thing, it’s to forbid it. All too human that way, I set about making my pitch to Pretty Wife. In these Trumpian times, a liberal activist like she just might respond perversely to me stocking in a practical little rifle.
Spoiler alert: it worked.
Again, I’ve never been much for customizing guns. That was gunsmith work when I was a tot, and my habits were formed then. No machine shop tools = no bore-sighted scope mounting (I don’t remember us calling them “optics” in the day).
Everything was some level of bespoke, back when. Even the humblest rifles were graced with pretty wooden stocks, inletted by the hands of people who cared. Bluing required preservation, and even when scrupulously cared for would slowly sacrifice itself over time, fading into colors soft and gentle as wisps of your grandmother’s hair.
Bought, issued, or given, the thing came to you as a piece of kinetic, mechanical art; wrought from the disparate elements of tree flesh, steel, bluing, oil, chrome, and smokeless powder. For me, rifles were objects of reverence in the manner of excellent tools: taught to sons as a secret language, and handed forward across generations.
Today’s guns are not that; surely especially not the jangle-parts “black rifles” that have ruthlessly displaced .30-30 Marlins as basic, go-to units for American rifle(wo)men. MSRs seem closer akin to the power tools at your home center: you may notice brand quality differences between Milwaukee (Colt) and Ridgid (KelTec), but you must delve much deeper into specialty retail to find heirloom-quality marques like Mafell (Blaser).
On the plus side, plastic-stocked rifles are utterly modular and have more accessories available than the H.O. train sets of my youth. In the future we now occupy, gun parts rain from the internet sky, fully engaging the tinkering mind.
As mentioned, I’m not sitting on a big go-to-Hell budget. When I shake a few nickels out of the sofa, they normally go toward tools &/or supplies for home improvement.
Yes, we’re still working on our house. We’ll likely be working on it on the day I die. Hopefully, between then and now, I’ll set aside a few hours to knock together a pine box for my carcass.
However, everything is situational. Rahm Emmanuel once exhorted, “Never let a serious crisis go to waste.” So it was when mean bubbas got meaner about Jews at around the same time our state government decided to restrict “assault rifles” that I pled my case for picking up a Hebrew Hammer… y’know, just in case we might need it. Better to have it and not need it than need it and not have it, right?
As mentioned, AR-pattern guns remain the most modular, not to say popular, sporting rifles on the planet. With upgrades and spares available for everything from the flash hider to the buffer spring, they’re the small-block Chevy of rifles. Problem is, I’m “that guy” – the sentimental boob who buys a flathead Ford, just to be different.
Or because he’d already spent so much time behind the wheel of a Chevy that the Corvettes started to feel like Caprice Classics. I’ve shot a few friends’ AR-15s, and (obviously) put in trigger time on Colt’s (and GM Hydramatic Division’s) M16A1 and A2. I’m good enough on a rifle-mounted M203 to bloop a 40mm grenade through a small window a couple hundred yards out; have put in range time (one-way and two-way) on the slightly odd M249 SAW; and I deployed with an ACOG-equipped M4.
So, lots of black rifle exposure.
Enough is enough and I’m sick to death of picking carbon out of the bolt faces and forcing cones of direct-impingement rifles. Filthy buggers, and still – after half a century of development! – stupidly prone to jamming. Jack’s rule for outdoor fun: if you have to keep snapping shut a modesty panel to keep your rifle’s bikini line shaved, someone made a questionable design choice.
I did want to shoot 5.56 NATO, though. It is to me what .30-06 M2 Ball was to WWII vets: familiar and readily available. It’s light to carry. It shoots pretty flat. It’s a ton cheaper than 7.62 NATO if you don’t reload (which I don’t), has low recoil and high velocity, and I know the ballistics by instinct.
After a couple hun’nerd hours of pleasant research, I dropped a notable sum for a chunky bullpup from the Promised Land of Zion, the Israeli Weapon Industries Tavor X95, and it is one cute rig. Despite our possible impending mag ban, I didn’t buy a bunch of bananas. For some reason, I seem to have a dozen or two of them already lying around.
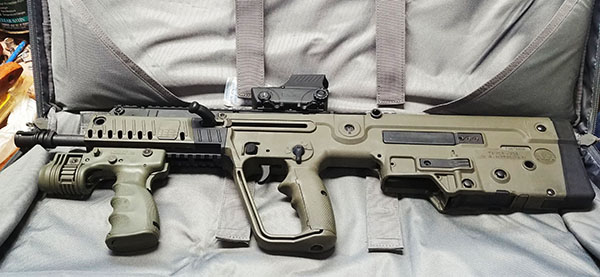
The plastic-chassis X95 ships in IDF black, “Flat Dark Earth” (light brown), or O.D. Green. Mine is the green, since it was available and I wanted not-black. Sue me. I’ve shot enough black rifles for two lifetimes.
I was stoked! When it came in, I trotted straight up to Precise Shooter L.L.C. and keyboarded my way through the computerized interrogation. Forking over the not-inconsiderable cash, I smuggled it home to play with it. First discovery: it comes apart easy as an AK. Punching a single pin flips open the overstuffed, La-Z-Boy butt cap (required to keep it legally lengthy), and you can slide out the gas piston works. Two pins more, and the trigger pack drops into your palm.
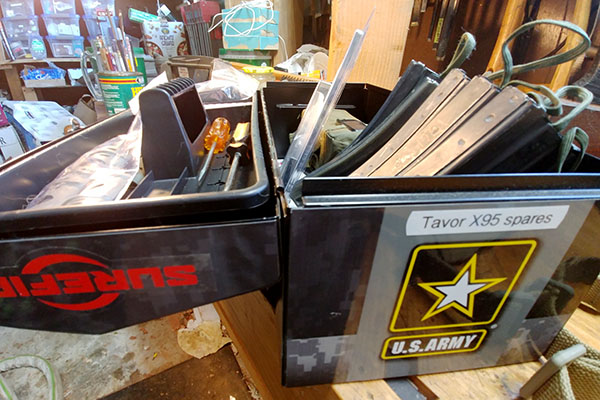
With 500 rounds and a clutch of extremely well-traveled “high capacity magazines” sleeping in an old .50-cal. can, I was all set to go terrorize some paper.
Yet there it sleeps, in our big, speckle-coated Cabela’s box, still waiting for me to go shoot it because I blew my entire budget on the carbine. My X95 bristles with virtues – it’s short and handy; conveniently modular; battle-proven; and reliable as a blacksmith vise – but an economical buy-in price does not number among its pleasures.
And I wanted an optic.
I was still saving up for one on the day we found ourselves smack amidst the next available serious crisis: coronavirus! Plus Australia on fire, locusts straight out of the Book of Revelation swarming over Africa, police riots from sea to shining sea, murder hornets illegally immigrating four towns to the north.
“Basically,” as the good Dr. Venkman said, “the worst parts of the Bible.”
I would fix it with retail!
Pretty Wife was probably told about the pre-battlesight-zeroed, snappy little iron sights that defilade themselves flat into the carbine’s topside Picatinny rail, but I somehow don’t think that information took hold. If it did, she forgot about it somewhere between Initiative 1639 and now.
Once again, we had “the talk.”
This is a different talk than the one your dad had with you before high school. More like a negotiation, really. A sensitive one, at that. Once again, it turned out I’m more charming than I knew.
What? Is it my fault she loves me?
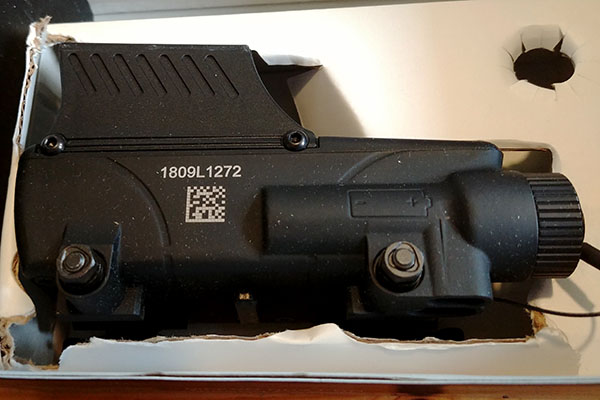
Following even more enjoyable research hours, I settled on a MEPRO Pro V2 from redoubtable IDF supplier Meprolight. It retailed for 600 bones, but Optics Planet had it for $550, with another fifty bucks off for St. Patrick’s Day. It’s well-reviewed on their site, and elsewhere.
One funky thing about a Tavor is that the comb is groundsnake-level to the top rail, forcing the use of a high (read “expen$ive”) mount for AR-optimized optics. And one funky thing about yours truly is that I tend to break stuff.
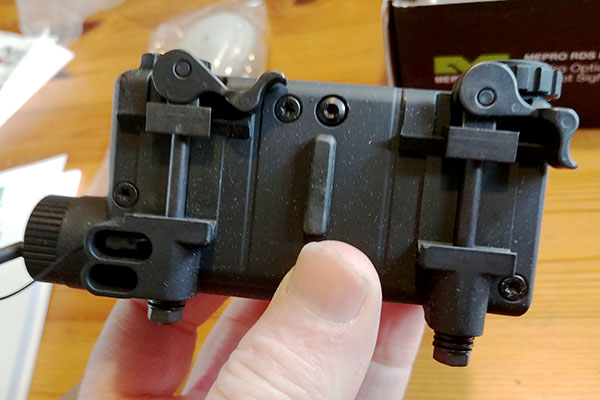
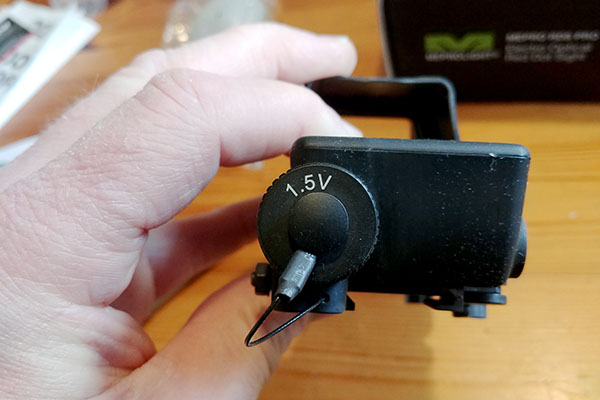
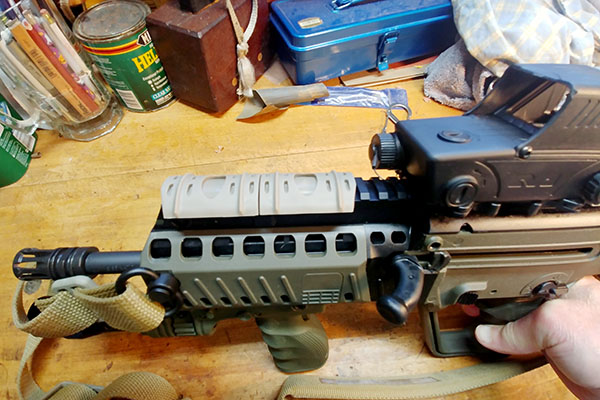
The Mepro has me covered on both fronts: the Israelis GI-proofed it for use by conscripts slogging through an eternal war zone, and they sized it specifically to mount on their front-line service rifle. That’s what the Tavor is (my version is the U.S. model, so no giggle switch but at least it isn’t black). Which is to say that both gun and gunsight were apocalypse-proofed by apocalypse experts.
“Expensive but hard to break” is how I grew to ride BMW motorcycles and to stock my shop with General International and Milwaukee and Record Power trade tools, and when I can pull it off I rarely regret that economic model.
My red-dotter hit the porch a couple of weeks ago. After side-eyeing its package for four days to see if any militant viruses leapt off, I pulled it out and cammed it onto the rail. Just to be sure it was tough enough (okay, actually because my spine’s last will & testament bequeathed me a permanent case of butterfingers), I dropped it onto my bench.
Twice.
Then once onto a concrete floor, just to be sure. Din’t seem to faze ‘er none.
I like the circled, 1.8-mil red dot more than others I’ve sampled, which are EOTech and the M68 (MIL-SPEC version of Aimpoint). It shows up well on every setting (except IR, obviously), and I figure I’ll be able to shoot it pretty well with both eyes open. That’s becoming important with the growth spurt of my bouncing baby cataracts. I also like that its dust- and water-sealed power compartment requires nothing more exotic than a lone, double-A battery.
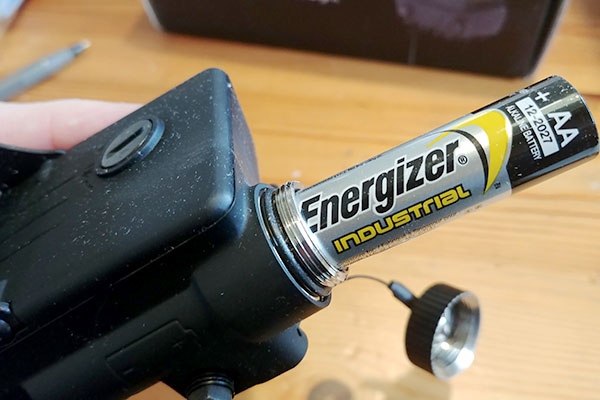
In another life, I ran range strings with an EOTech mounted on an M4. This optic inspires the same effortless targeting (hi, neighbors!), though hopefully without the fragility and short battery life of those earlier “picture window” sights. Reportedly, it runs for a dog’s age on that regular ol’ double-A, has auto-off and motion-restart, and is waterproof to a few meters’ depth. It’s also supposed to be mud- and sand-resistant, which is important given that the rifle it’s mounted on definitely is – there are torture test videos on YouTube showing military Tavors yanked out of sloppy mud holes and saltwater baths, then immediately loaded and fired full-auto without a pause for cleaning.
We’ll see. Again: I am known for breaking stuff.
I tried positioning the MEPRO in a couple different spots along the ridge rail, before I latched its nose into a photo finish with the charging handle’s rest position. Bonus of sticking to factory racing parts: with the backup iron sights erected, the peep and blade line right up spot-on with the orange bullseye. Still no gunsmithing. All I did was to press the mount forward against the rail teeth as I folded in the cam levers (the direction recoil will push it), and peer through it.
Zeroing should be a lolly. Once my submontane range reopens, I plan to adjust fire to an average two and a half inches low at 25 yards, then walk out the strings to 100m and see how my groups hold up. May change POI later, depending on ammo selection (it’s a Boolean for me: XM193 or XM855, with a mild preference for the latter), and on how it prints at 100 meters.
With its 16.5” barrel, my bullpup’s overall ballistics shouldn’t vary much from an AR15, but the ballistic arc will likely be “bloopier” due to a sighting axis about an inch higher over the bore. The V2’s half-mil clicks won’t make a precision rig out of it, but this is a battle rifle. I’ll be content if it shoots into 3 MOA at 100, and can tag a championship Frisbee at 300. If I can squeeze ‘er under 2 MOA with its suspiciously Kalashnikovian guts and my trifocaled eyes, I’ll be ecstatic.
So the sight is all mounted up and there’s ammo on the shelf, but I still can’t shoot it. In our gone-viral age, it seems rifle ranges aren’t yet considered “essential business.” Not that I disagree with that. I just like to fuss.
So I went back to shopping. There are but few American anxieties fully resistant to retail therapy.
One of the spiffy, gunsmith-obviating features of the X95 is that its forend panels literally slide off at the touch of a button. You’ll discover one Picatinny rail under the bottom and another to either side of the front stock, each with its own quick-detach cover. Cool kids these days are all into KEYMOD or Magpul’s M-LOK system, but rails are solid and battle-tested. Grandpa would approve.
I decided I might want a “broomstick,” and would definitely want to mount a flashlight. For home defense, a short rifle beats the ever-lovin’ snot out of a long shotgun (that’s my opinion, worth what you paid). That augured in favor of a forward grip and weapon light.
Here’s the rub, though: the little sumbitch is like Yoda, short and stumpy with the gravitational pull of a black hole. While noticeably smaller than a stubby M4 with its federally controlled 14.5” barrel, the Tavor weighs as much empty (7.9 lbs.) as an M16A1 weighs with 30 rounds in the hopper. Not only do I disdain larding up guns with excess ballast, I also hate hanging snaggy accessories off the nose of a rifle (I’m talkin’ to you, AN/PEQ-2!). When it comes to clearing rooms, the slicker, the better.
While poking around the merch sites and cheerful chat rooms of the gunweb, I found a FAB Defense forward grip on closeout, again from Optics Planet (full disclosure: I also suckered for their doorbuster-priced knife, a meaty and smooth-opening Chinese folder for under eight bucks). The FAB grip is rigged to mount a one-inch, rear-switch flashlight à la Streamlight or Surefire. It has a grip trigger to turn on the lights and (yes, really) a cross-bolt safety to prevent accidental illuminations.
It’s a pretty slick gizmo, plastic but solidly cast. FAB sustains a good rep, and I like the idea of NOT having the flashlight lashed to the side rail like a Fury Road War Boy hanging off an overclocked rat rod. The green is probably not perfectly matched to my rifle’s plastic, but I’m partially RG-colorblind and it looks just fine to me.
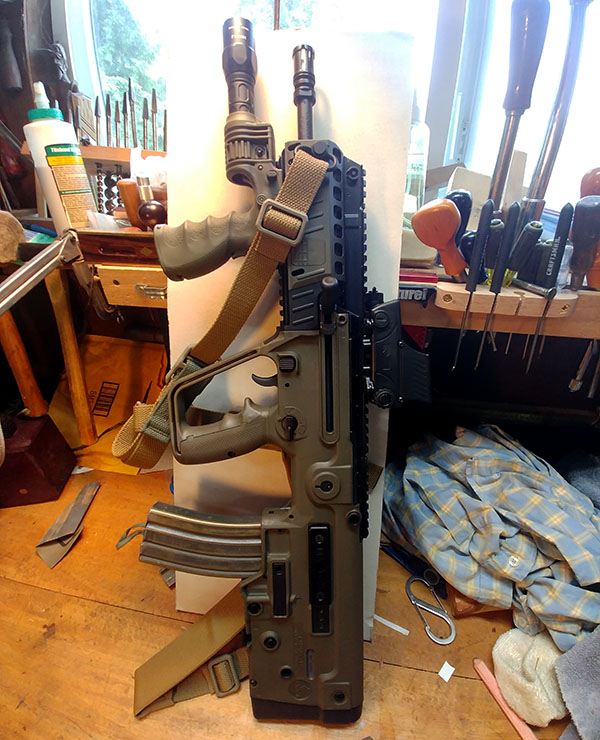
Will I come off like a pimply, overcompensating mall ninja with no real-world experience when I yank out this Ghostbuster wand at the range? Most certainly. I just don’t give a large rodent’s sphincter.
Speaking of pulling it out, I also settled on a case from which to pull it. IWI pushes a stout bag, knotted over with MOLLE gingerbread, for about 150 bucks. For reasons obvious to adults, I wanted something less “gunny” looking, so I ordered up SAVIOR Equipment’s “American Classic Tactical Double Short Rifle Gun Case Firearm Bag” in 28″ length.
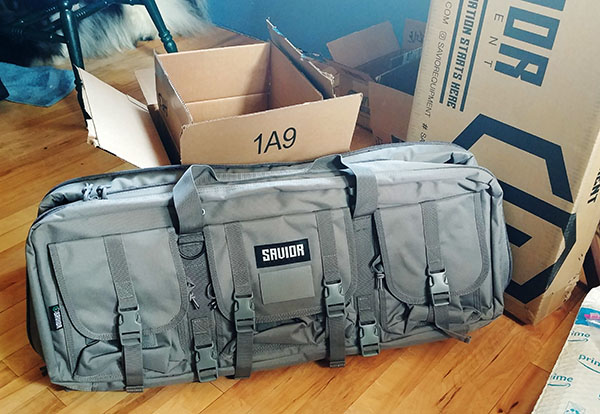
That’s a lot of words to describe a bag that costs less than fifty bucks!
And yes, you read that right: in 28″ length. The overall length of my bullpup is 26.4 inches. The overall length of the “spec ops cool guy” M4 that I toted in Iraq was 29.75 inches with the stock fully collapsed – and it had a 1.8-inch shorter barrel (same 1:7 rifling twist rate, though).
The bag is superb – not “pretty good for a third of the price,” but actually superb. Based on a lot of squinting at marketing pictures, it seems likely that it was stitched up in the same Chinese factory as IWI’s case, with the only noticeable difference being omission of the tacti-kewl MOLLE straps. My case is not green, black, or “flat dark earth,” but a business-like light grey, suitable for office tower or racquet club.
I don’t want to be a mall ninja everywhere.
Inside, it’s festooned with handy pockets, including not one but TWO rifle compartments. There’s additional space for a couple of handguns, cleaning kit, tools, spares, accessories, and fitted pockets for 18 USGI magazines loaded with 5.56 NATO (that’s 540 rounds, or more pork than adding TWO additional carbines to my double-rifle range bag). All this in a case that measures two feet, four inches long.
On the outside, it’s snugly padded with sturdy zippers, tie-down straps over each pocket, and handle straps circumstraddling the belly of the bag. There are metal D-rings for the padded shoulder strap. All told, this bag is ready to carry far more than I’m prepared to stuff it with.
Did I mention it’s 28 inches long? It’s TWENTY-EIGHT INCHES LONG! Looks like a dang tennis bag.
Not long after the bag hit our porch, it was followed by a Surefire G2X Tactical LED flashlight that snugs perfectly into the FAB grip, which itself turns out to have a quick-detach function: punch a button on the left side, and it slides off, with flashlight aboard, to transform into a “light pistol” separate from the weapon. Handy, I suppose, for those times when you want to check what’s happening across the backyard without actually aiming a rifle at your daughter’s fleeing boyfriend.
Or your granddaughter’s.
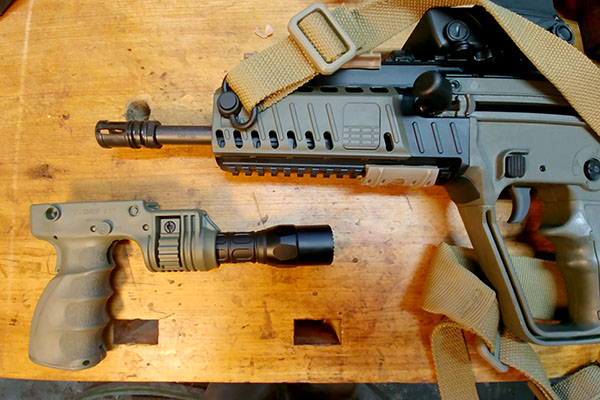
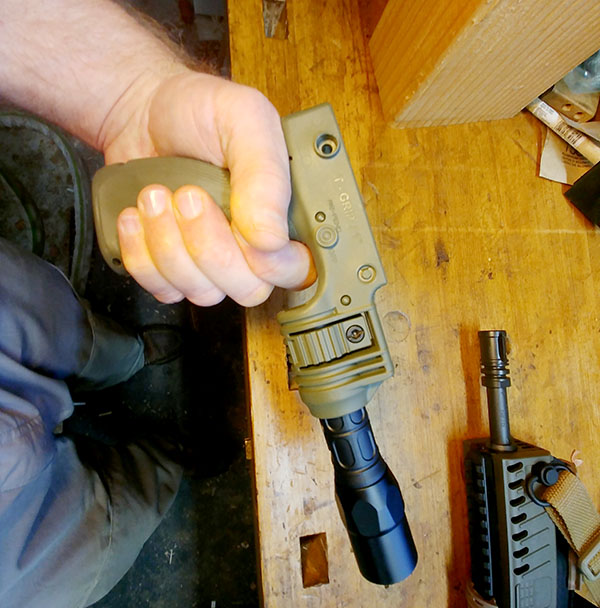
The weapon light, mounted, projects beyond the flash hider of my Tavor. Happily, the whole rig still fits into that cheap, sturdy bag that cost me less than an accessory port cover.
While Tavors may never achieve the teeming fettler’s aftermarket of the AR15, Manticore Arms has invested big design time into engineering tasty treats for it. I whiled a few pleasant hours dreaming my way through their catalog, as well.
One criticism of the X95 relates to modular reversibility. To make it easily switchable from right- to left-handed firers, it’s built with ejection ports on either side. Because it’s a bullpup, the unused ejection port lurks around the corner of your mouth. The factory’s plastic port cover allegedly does a poor job of controlling renegade gas discharge around its edges, resulting in the grey-black cheek bloom known as “Tavor face.” Apparently, that gets worse under suppressed fire.
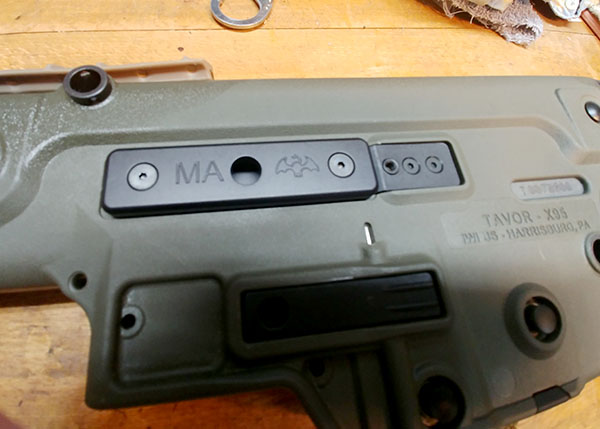
Although I don’t plan to run a suppressor, Manticore’s gasketed port cover is just ded sexy: two meticulously machined, black anodized panels sandwich a rubber gasket that bulges from the edges to seal the port hermetically. As a tidy bonus, Manticore’s port bling adds an extra QD mount for sling attachment, because why not?
Added to the factory-installed tackle, that gives me four (4) QD points on the cheek side (one of which is reversible to the other side), and two on the off side.
Speaking of slings, I went for a quick-adjust, padded Vickers Combat Applications sling from Blue Force Gear (back in the days before our world melted, “blue force” meant the good guys and “red team” was the opposition force, and that’s already more political than gun writing should ever get).
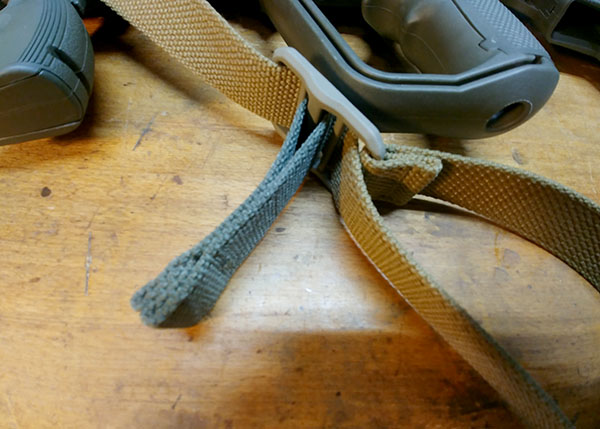
Because IWI thoughtfully included two stout QD swivels in the rifle box, I ordered my sling naked and saved $25.00. With a sale price at Optics Planet, that reduced expenditures for this well-regarded slippy-strap to solidly 30 bucks less than IWI wants for their convertible one- or two-point Savvy Sniper sling (I’m unlikely ever again to have use for a single-point sling).
My sling showed up in dirt-ignoring Coyote Brown. Tropical Camouflage seemed a bit over the top for our Pacific NW rain forests. Also, see under “I’ve had enough of black.”
What to say about a sling I haven’t taken anywhere yet? It’s comfortable; it’s slick to adjust, and I felt pretty silly after about a minute of standing in my office, running the adjustment tab up and down to practice shouldering my bangstick. Zing! Zing! Beware, dust bunnies!
Somewhen during this card-melting retail frenzy, I bought myself a ShootingSight “TAV-TOOL” from Bullpup Armory for about forty clams. This is a jacknife-style gizmo I really wanted to like, particularly since it includes the occasionally important barrel wrench (fifteen bucks OEM, all by itself). Although regrettably floppy and cheaply finished, the TAV-TOOL found a place in my range bag. Between that and a Leatherman Wave, I can cover most any fiddling that I’d take on away from home. Like a bicycle multitool, it may not be much good but its yellow-lettered bulk keeps me from losing whichever slim, black fiddle probe I need. Right. NOW.
More research on the aforementioned port cover revealed that the plastic chassis of my X95 might release gas, not only from the unused ejection port (now sealed up like Grant’s Tomb) but also from under the hind end of the top Picatinny rail. Encasing gas blooms in a plastic chassis results in a farty little beast. It’s probably the single most prevalent criticism of the gun. As a guy still annoyed by all the CLP eyewash I collected while trying to keep old Stoner platforms running I wasn’t overly concerned, but I had time on my hands.
Other owners have published various solutions, including smearing RV sealant all around the stock/rail junction. That sounded… nasty. Obviously, I don’t mind messing with my rifle. In early spring, that was what I set out to do.
I’m just not ready to mess up my rifle. Did I mention I’d never bought a new rifle before? Shoot, pard, it ain’t even been to the range yet!
No schmear here.
Turns out, IWI posted a little video on their site to address this exact issue. They suggest mounting a rail cover right at the back of the rail and shoving an IWI-logo, rubber zipper pull (full disclosure: I have one on my shop vest) under the back edge. Simple, eh? Though it does beg the question: if gas leakage is so easy to fix, why is it still an issue left for owners to solve? Reminds me of the ignition coils on cam belt Ducatis, but I digress…
Shopping for rail covers was a novel experience. Seems most of ‘em are purpose-built to make me walk tall and talk loud, banged out of aluminum and customized with silk-screened patriotism ranging from Punisher skulls to Bible verses – and they’re about 25 bucks a pop, too!
Enter Wal-Mart, carrying a bagful of rail covers from Acid Tactical (a woman-owned company, they proudly announce). Looking like tiny, rubber, desert tortoise shells in Flat Dark Earth, they cost $8.99 a dozen.
Shipping was free.
Since so many of them tumbled out of the cellophane sack, I went ahead and snapped ‘em on anywhere rail teeth might bite: behind the flashlight-enabled ghetto grip, and everywhere along the top rail not already covered by Meprolight’s finest.
Back, ye gases! Avaunt!
All dressed up and no place to go, I was really getting the itch to go shooting, but it still isn’t a thing here. Three more weeks, and my chosen range just might open… meantime, what else could I play with?
SBRs (“short-barreled rifles”) are any kind of rifle that’s cut-down for maneuverability. These are considered double-secret probation-level subversions of federal intent, here in the Land of the Free. They’re the assaultiest of assault rifles. You can order an upper receiver for an AR-15 with a 14-inch, 11.5-inch, 10.5-inch or even 7.5-inch barrel. This will make your black rifle shorter, MUCH louder, faster wearing, less reliable – and instantly felonious without a $200, recorded tax stamp from the Bureau of Alcohol, Tobacco, and Firearms, AKA “the fun police.”
As mentioned early on in this model builder’s manifesto, an X95 doesn’t need its pipe sawn short to be handy in a pinch. Even with its 16.5” barrel, the Tavor is just 26.4” long. Any shorter would require that same SBR signoff from BATF, because there’s a statutory minimum overall length to go with the statutory minimum barrel length.
Of course, people generally rob banks with pistols and a note. Even the shortest SBR is a whole lot harder to conceal than a garden variety SIG, and not a whole lot scarier. A muzzle in your face is a muzzle in your face, right?
Strike that. The Tavor is actually closer to twenty-EIGHT inches with its flash hider screwed in place. Now, like most modern rifles, my carbine has never had its flash hider removed. The thing is gummed on with thread sealant and horsed into place with a wrench, and here’s one of many places where our laws get weird.
To make Tavors ATF-compliant, IWI fits them with a U.S.-only, double-stuffed butt pad that adds an inch-plus to length of pull (i.e. distance from trigger to butt). There are few rifle rounds that recoil more softly than 5.56 NATO fired from a gas piston gun weighing damn near nine pounds, but this callipygous rump is their solution to legality.
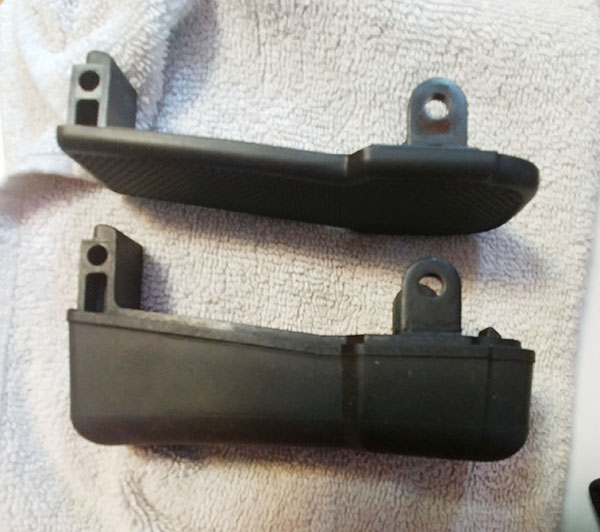
To understand just how silly that is, realize that the butt pad swings open when you drive out one pin, and falls right off if you then back a single screw out of a cross pin. You can change it with a pocketknife much more easily than you can denude the threaded muzzle, but there you have it: the stock is officially permanent, and the birdcage fungible, unless and until I drill a hole through the flash hider, into the barrel, and seize the whole works tight by brazing in a steel pin. I won’t do it. I’m averse to vandalizing new products for superficial security concerns and besides, having more options remains superior to having fewer options.
Manticore Arms produces a curved butt pad that somewhat restores the designed LOP and retains legal length, thanks to its hooked-top profile. It runs close to 70 bucks.
Here’s what I found out, though. One of the parts available for the X95 is the IDF’s flat butt plate. It’s legal in Canada and, presumably, in the U.S.A. if you have an 18.5”-barrel Tavor. Thin plates are made from rubberized plastic and run $14.99 each from IWI (for people hawking enormously expensive bullpups, they’re surprisingly reasonable about spares). My plan is to chop a chunk of aluminum or even rock maple into a length-extending top hook, inset a couple of screw inserts, then run small bolts through the butt plate into my cheater block. I’ll cover the whole thing with black heat shrink to keep a clean look.
If I get around to it, this little project should accomplish three goals. One, it will shrink my rifle for all practical purposes, while technically maintaining legal length. Two, it will give me one more thing to dink around with during this interminable viral lockdown.
Three, and most importantly, it will make me giggle.
Out of deeply felt personal incorrigibility, I might or might not already have installed the feloniously flat plate for a few minutes, just to experience what federal crime feels like. Probably not, though, and don’t tell anyone.
What else might I fiddle with? Well, the $350 Super Sabra trigger pack from Geissele seems as redundant as it is expensive – the X95 Tavor carries a vastly upgraded mechanism, relative to the crushing pull required for its predecessor, the Tavor SAR. I tried that trigger in a gun shop, and it was like trying to prize open a snapping turtle’s beak. Although still more a combat bang switch than a target trigger, X95s measure at around half the weight of a SAR.
Still may pop for Geissele’s “Lightning Bow” trigger, though, just to dial out most of the novella-length takeup.
IWI offers the option of switching out their swashbuckling “cutlass grip” for the pistol grip preferred by Israeli special operators, as well as grip panels that are slotted instead of pebbled to offer security when your palms are sweaty (for instance, if you happened to find yourself operating in a desert near the Mediterranean coastline). I’m not in any great hurry to do this for the same reason I haven’t ordered MagPul’s MBUS flip-up sights: I need to shoot it as-built before I fix what is likely not broken. If I needed it to feel and run just like an AR-15, I could have saved close to four figures by buying an AR in the first place.
Our buddies at Manticore Arms make a charging handle that alertly parks itself out of the way every time the bolt slams home. I’m attracted to it for the same reason people peel the plastic chrome off new cars – it just looks cleaner.
Manticore also makes a nice ambidextrous safety which, like gas sealing, frankly should have come stock from the factory.
The initial excuse for my carbine was quickly freighted with the additional burden of entertaining my adolescent world-building fantasies (and I should really get back to making furniture, which I’m frankly better at than fettling guns). Believe it or not, I aim to keep the overall package reasonably sleek, respecting the Wiley Clapp ethic of “everything you need, and nothing that you don’t.”
But then “need” can sure become a subjective and temporary judgment. Perfection ever flees at her lover’s course approach.
So on it goes, just like with Legos and dirt bikes and shop tools and jeeps. There’s always one more thing to tinker at and if there isn’t, we’ll find one. Ask any man who never outgrew tuning hot rods, creating worlds around Lionel trains, or organizing a warehouse wall lined with color-matched rollaways in a cellar shop two floors beneath the Lego Museum. The male monkey remains an inveterate fiddler. Against all practical sense, men will not be stopped from racing chain saws, stocking bug-out rigs, and re-programming our smart watches to open the garage door.
We control our recreational world – the part of life that matters, where imagination capers carelessly over responsibility’s grindstoned snout – by commissioning, refining, tearing apart, and rebuilding systems in the evanescent image of our dreams.
G-d help me if I ever buy a boat.
A great story, Jake, and thanks very much for sharing it with us. When you get to the range with your new Tavor, we want to hear how it shoots!
Read more gun stuff on the ExhaustNotes Tales of the Gun page!


