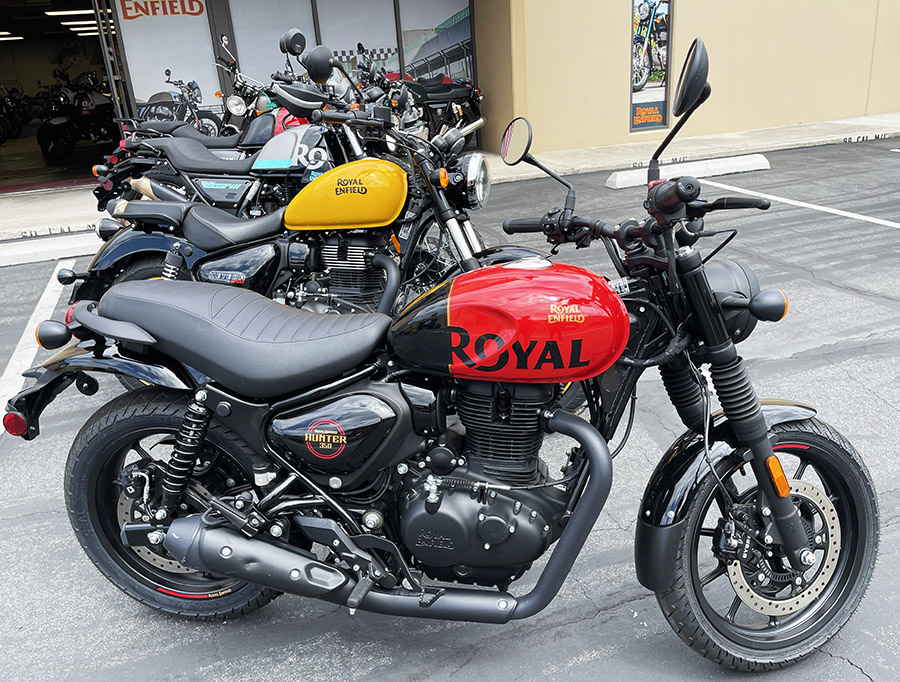
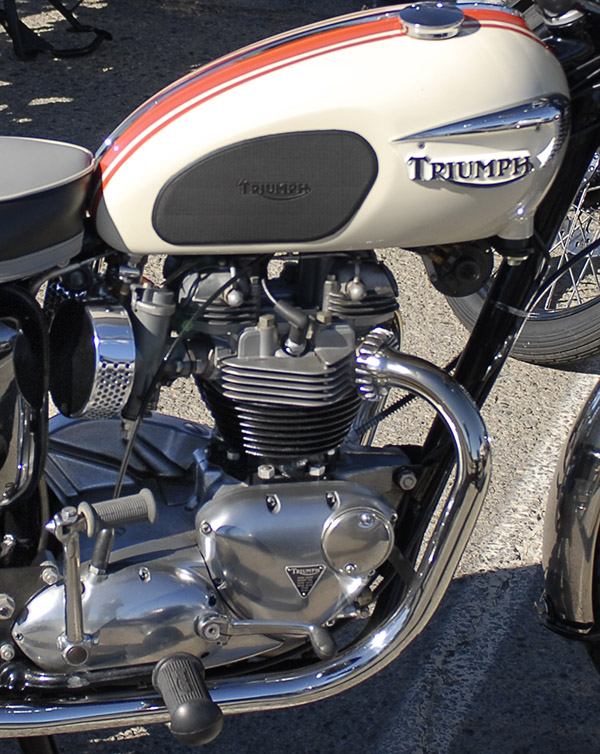
Sue and I visited the Nixon Library in Yorba Linda (one of our favorite So Cal destinations) to hear Fox News’ Jesse Watters speak a couple of days ago. I’ll post a blog about that in a few days. On the way home, we stopped at a motorcycle dealership in Brea, California. Normally, I avoid motorcycle dealerships for a lot of reasons (as outlined in 5000 Miles At 8000 RPM), but I used to have my 1200 Daytona serviced at So Cal Motorcycles and I thought I’d stop in for a visit. So Cal Motorcycles is a multi-brand dealership selling Ducati, Triumph, Royal Enfield, and Suzuki. I stopped with the intention of looking at the Enfields, but I also spent some time in the Triumph showroom. This blog focuses on the Enfields; I’ll post another one on the Triumphs in the near future.
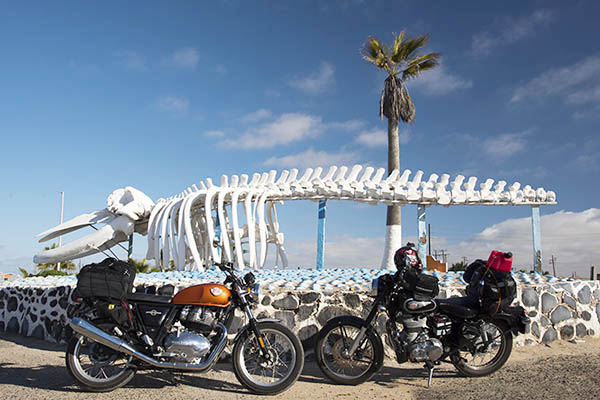
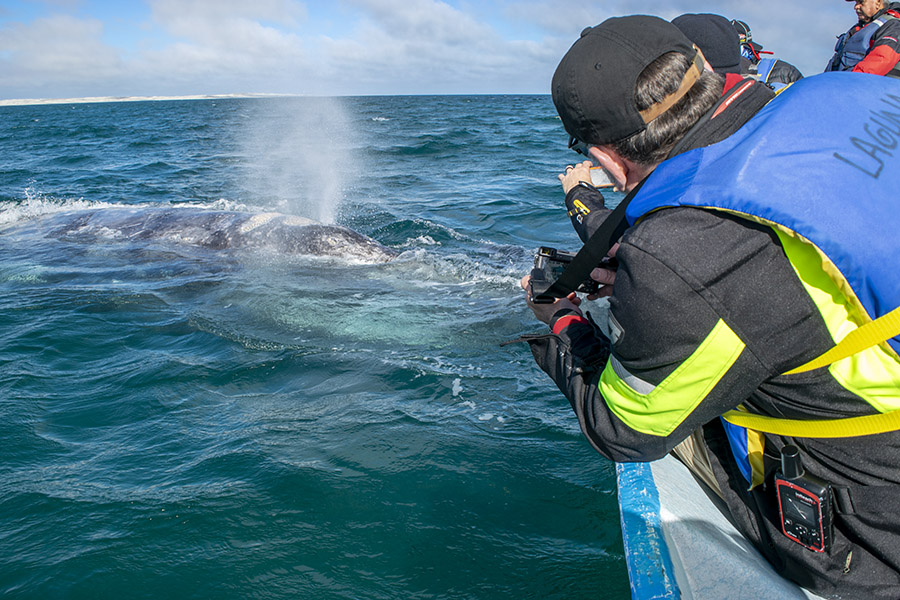
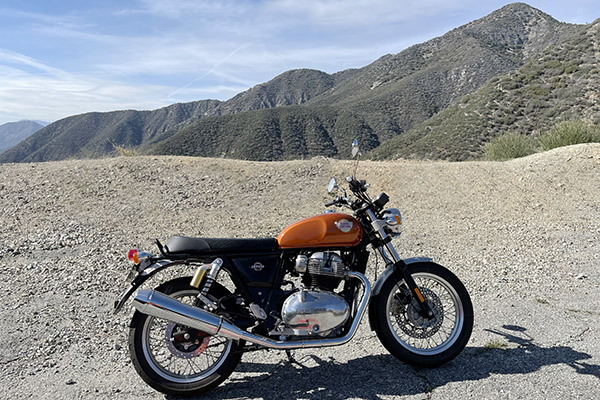
As you probably know, I ride a Royal Enfield 650cc Interceptor. Joe Gresh and I tested two Enfields in Baja a few years ago. You can see those bikes at the Paralelo 28 military post in the photo above (we were about 500 miles south of the border when I took that shot). Our conclusion was that the 650cc Interceptor was a marvelous machine (I liked it so much I bought one), but the 500cc Bullet needed muey attention before it would meet our low bar for approval. That was a few years ago, though, and that’s why we visited So Cal Motorcycles.
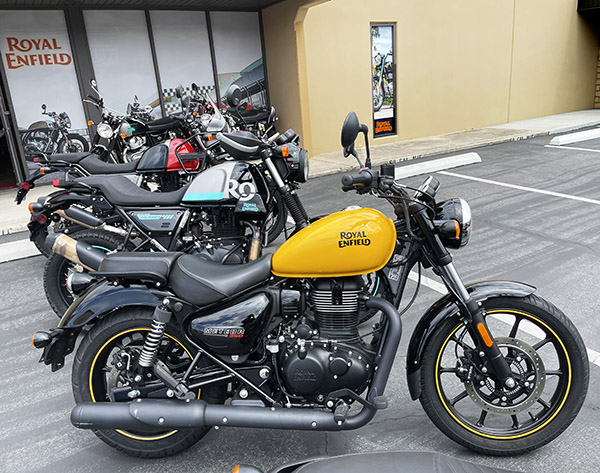
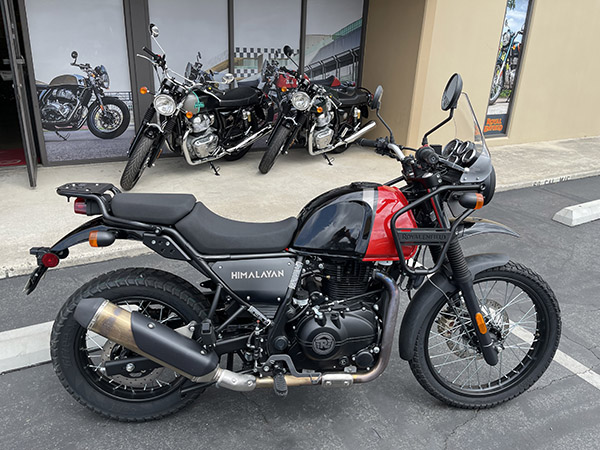
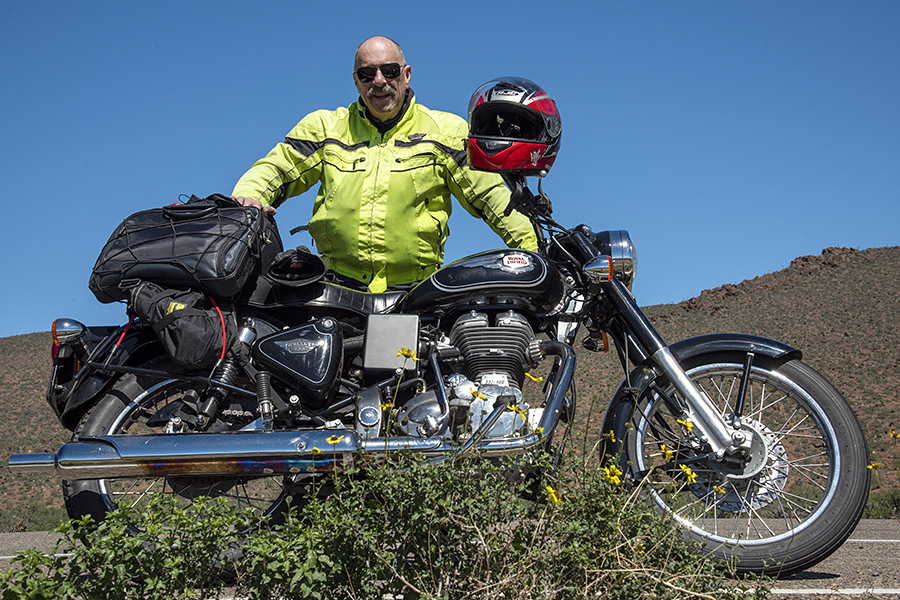
As soon as we parked, I noticed several Enfields parked outside. I had not seen their new singles up close and personal yet. The model line has become a bit confusing for me. It used to just the Bullet (their single), then they added the Interceptor (the 650cc twin), and my 15-kilobyte mind could handle that. Now they have several different versions of the 650 twin and a whole bunch of singles in 350cc, 411cc, and maybe other displacements. I won’t try to explain the entire model line here, mostly because I don’t feel like expending calories trying to wrap my mind around it all. I just wanted to see the bikes and take a few photos. I did that, and I have to tell you: Royal Enfields are still great looking motorcycles. Check out the 350cc Meteor singles below:
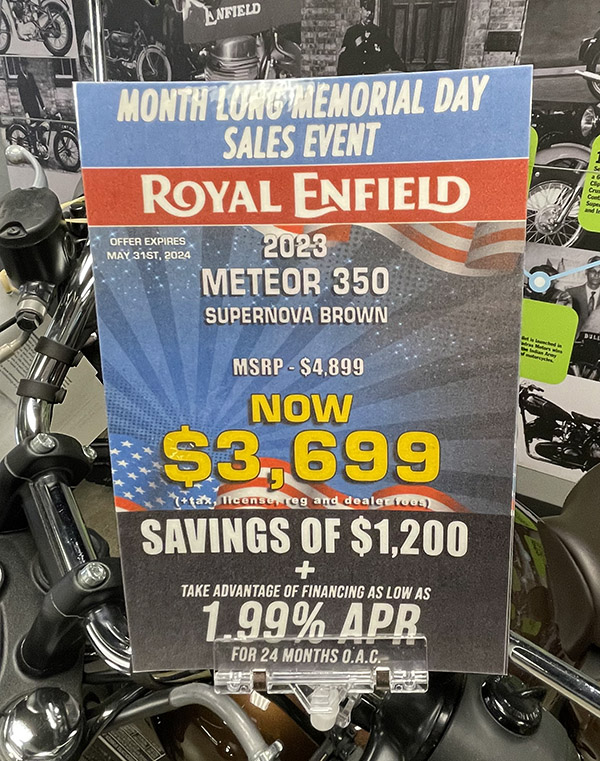
The Meteor 350 is the bike you see at the top of this blog and the two you see immediately above. The price on Enfields has always been attractive; on the Meteor it is even more so. So Cal Enfield had a 2023 leftover Meteor and the price on it was especially attractive.
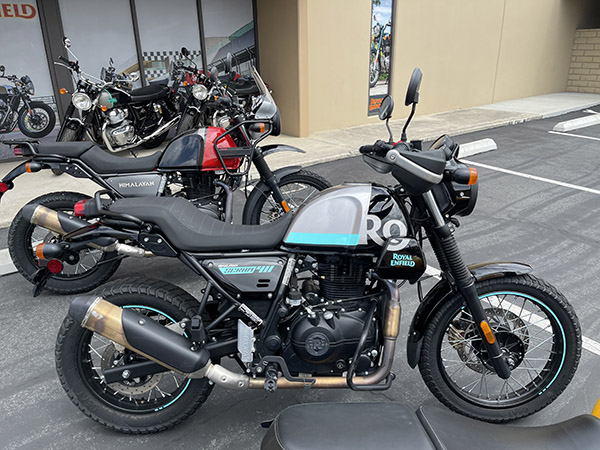
Next up were the Himalayan models, Enfield’s ADV bikes.
The Himalayan has a 411cc single cylinder engine. The colors are attractive. I didn’t see any with luggage, but I know panniers and top case are available. I saw a guy riding one of these one time when I was returning from northern California on Interstate 5. I was cruising along at 77mph; I think the Himalayan was running about 70mph. Enfield’s spec sheets puts the horsepower at 25. I guess that’s enough. My RX3 had 24.8 horsepower, and it took me all over the western US, Mexico, Colombia, and China.
As an aside, a bunch of folks (including Royal Enfield) are offering trips through India (and the Himalayan Mountains) on Royal Enfield motorcycles. I’m tempted. I’ve always wanted to visit that part of the world, and the thought of doing it on a motorcycle is appealing. The photo ops would be amazing, and I’d get another book out of it, I think. Ah, maybe someday. Maybe I should write a letter to Enfield and ask them to sponsor me.
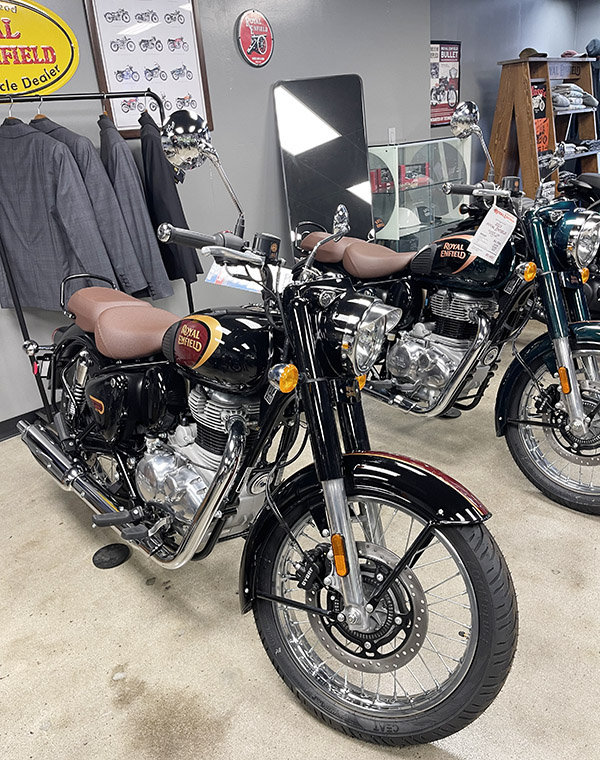
Enfield’s Classic line looked good, too. At just under $800, the freight and setup fees are ridiculous and larcenous (they were lower than what I’ve seen other dealers charging, though). Motorcycle dealers’ posted freight and setup charges are often nothing more than a suggested negotiating starting point, but it’s still annoying to see this kind of imaginative exaggeration. I wrote about this common dealer misrepresentation in 5000 Miles At 8000 RPM.
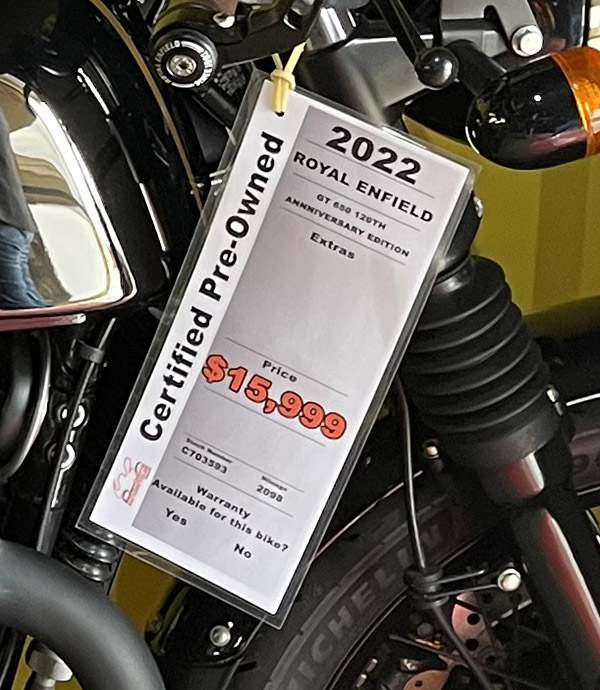
So Cal Enfield had what apparently is a 650 twin anniversary model. It was a used bike with an asking price of $15,999. Hope springs eternal, I suppose.
Like most motorcycle companies, Royal Enfield has a clothing line. I saw a sweatshirt I thought I might want until I looked at the price. It was $88. I put it back on the rack. I don’t think I would ever pay $88 for a sweatshirt.
I enjoyed viewing the Enfield line at So Cal Motorcycles. My negative comments about freight and setup (and $88 sweatshirts) notwithstanding, I believe So Cal Motorcycles is a reputable dealer. When I rode Triumphs, I sometimes had So Cal service my bikes, and they always did a good job. Unlike my experience at other dealers, I never had to bring my bikes back because they botched the job. If I was in the market for another Enfield, this would be the place I would go.
Interestingly, Sue and I were the only people in So Cal’s Enfield room. The Ducati room was similarly empty (other than lots of outrageously expensive red motorcycles). Maybe we just hit a lull when we were there. The Triumph showroom, on the other hand, was hopping. I’ll talk more about that in a near-term future blog. Stay tuned.
For me a motorcycle’s appearance, appeal, and personality are defined by its motor. I’m not a chopper guy, but I like the look of a chopper because the engine absolutely dominates the bike. I suppose to some people fully faired motorcycles are beautiful, but I’m not in that camp. The only somewhat fully faired bike I ever had was my 1995 Triumph Daytona 1200, but you could still see a lot of the engine on that machine. I once wrote a Destinations piece for Motorcycle Classics on the Solvang Vintage Motorcycle Museum and while doing so I called Virgil Elings, the wealthy entrepreneur who owned it. I asked Elings what drove his interest in collecting motorcycles. His answer? The motors. He spoke about the mechanical beauty of a motorcycle’s engine, and that prompted me to ask for his thoughts on fully faired bikes. “I suppose they’re beautiful to some,” he said, “but when you take the fairings off, they look like washing machines.” I had a good laugh. His observation was spot on.
A 1200cc Harley Panhead motor I photographed at the Rock Store in Malibu.
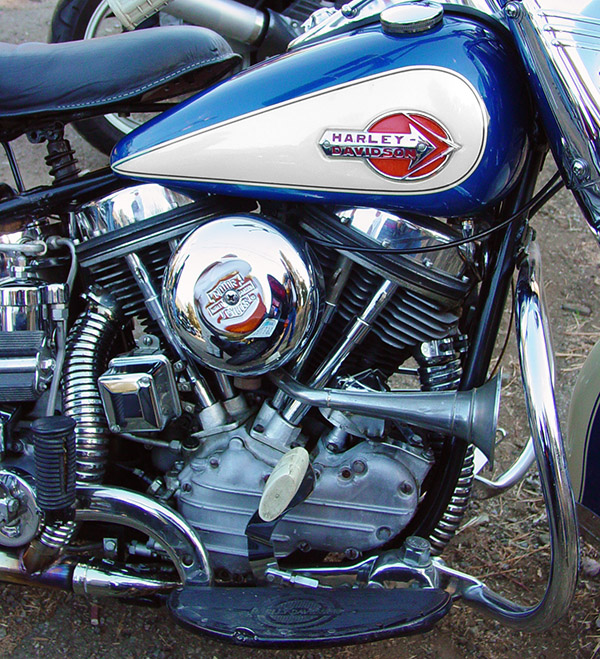
My earliest memory of drooling over a motorcycle occurred sometime in the 1950s when I was a little kid. My Mom was shopping with me somewhere in one of those unenclosed malls on Route 18 in New Jersey, and in those days, it was no big deal to let your kid wander off and explore while you shopped. I think it was some kind of a general store (I have no idea what Mom was looking for), and I wandered outside on the store’s sidewalk. There was a blue Harley Panhead parked out front, and it was the first time I ever had a close look at a motorcycle. It was beautiful, and the motor was especially beautiful. It had those early panhead corrugated exhaust headers, fins, cables, chrome, and more. I’ve always been fascinated by all things mechanical, and you just couldn’t find anything more mechanical than a Big Twin engine.
There have been a few Sportsters that do it for me, too, like Harley’s Cafe Racer from the late 1970s. That was a fine-looking machine dominated by its engine. I liked the Harley XR1000, too.
A 1000cc Harley Cafe Racer photographed at one of the Hansen Dam meets. When these were new, they sold for about $3,000.
I’ve previously mentioned my 7th grade fascination with Walt Skok’s Triumph Tiger. It had the same mesmerizing motorrific effect as the big twin Panhead described above. I could stare at that 500cc Triumph engine for hours (and I did). The 650 Triumphs were somehow even more appealing. The mid-’60s Triumphs are the most beautiful motorcycles in the world (you might think otherwise and that’s okay…you have my permission to be wrong).
A 1966 Triumph Bonneville and it’s 650cc twin-carb engine. My Dad rode a Bonneville just like this one.
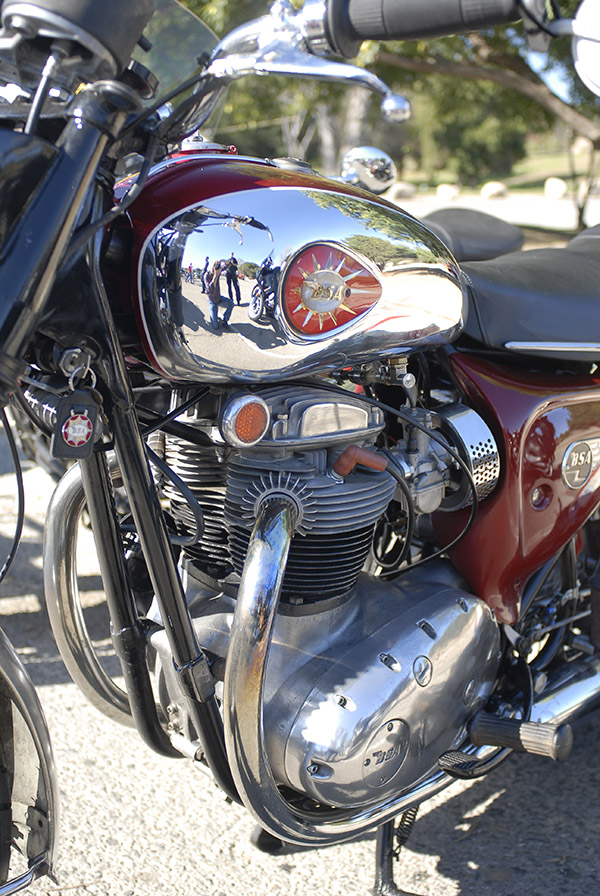
BSA did a nice job with their engine design, too. Their 650 twins in the ’60s looked a lot like Triumph’s, and that’s a good thing. I see these bikes at the Hansen Dam Norton Owners Club meets. They photograph incredibly well, as do nearly all vintage British twins.
A late1960s BSA at Hansen Dam. These are beautiful motorcycles, too.
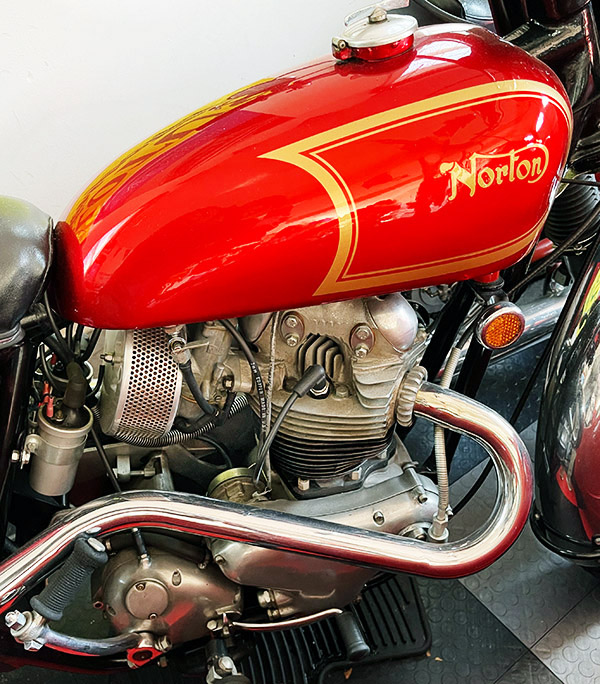
When we visited good buddy Andrew in New Jersey recently, he had several interesting machines, but the one that riveted my attention was his Norton P11. It’s 750cc air cooled engine is, well, just wonderful. If I owned that bike I’d probably stare at it for a few minutes every day. You know, just to keep my batteries charged.
Andrew Capone’s P-11 Norton. You can read about our visit with Andrew here.
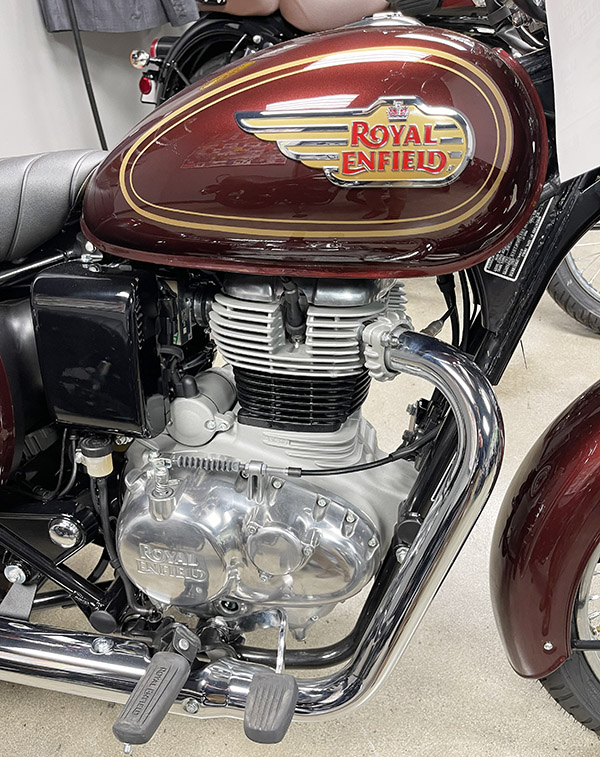
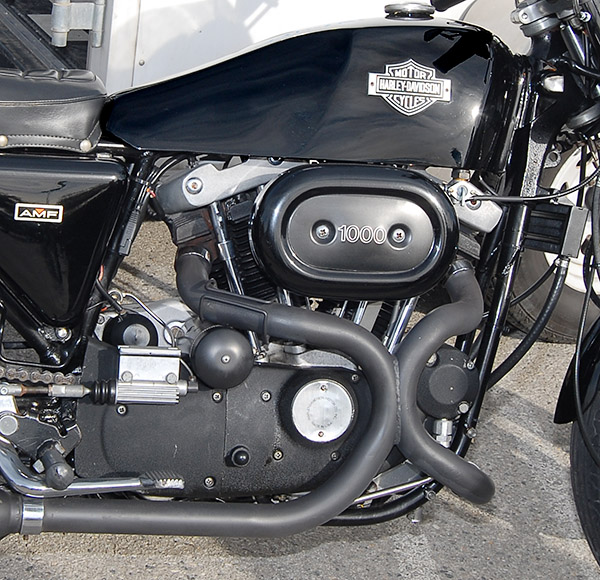
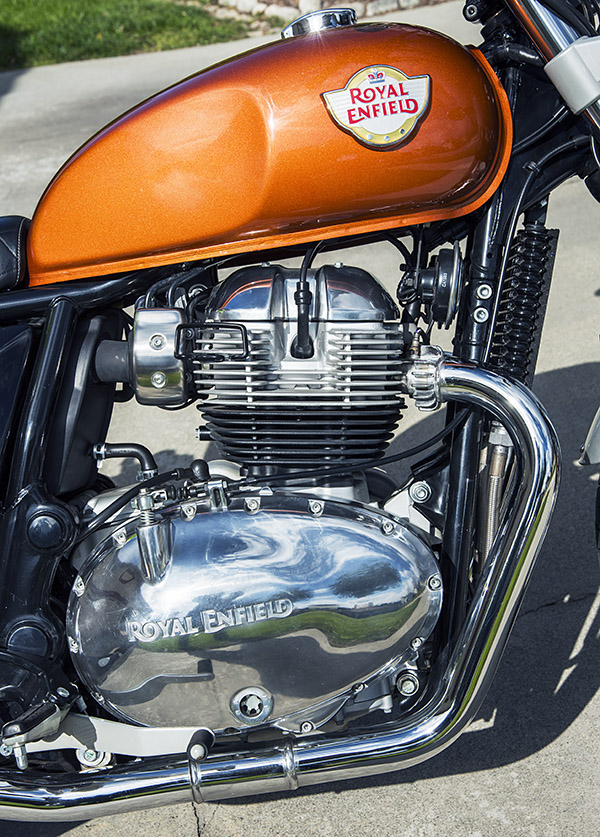
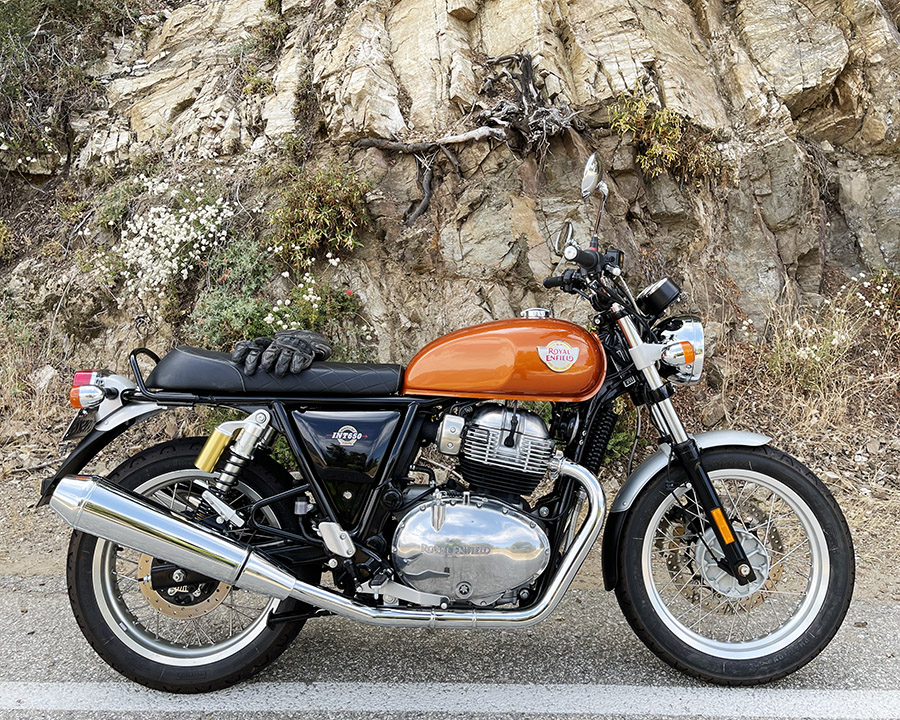
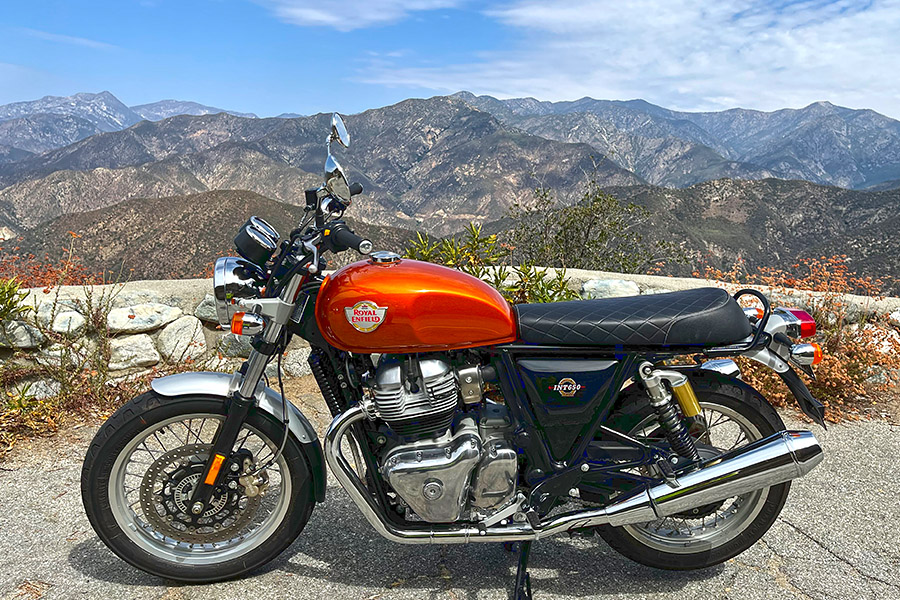
You know, it’s kind of funny…back in the 1960s I thought Royal Enfield’s 750cc big twins were clunky looking. Then the new Royal Enfield 650 INT (aka the Interceptor to those of us unintimidated by liability issues) emerged. Its appearance was loosely based on those clunky old English Enfields, but the new twin’s Indian designers somehow made the engine look way better. It’s not clunky at all, and the boys from Mumbai made their interpretive copy of an old English twin look more British than the original. The new Enfield Interceptor is a unit construction engine, but the way the polished aluminum covers are designed it looks like a pre-unit construction engine. The guys from the subcontinent hit a home run with that one. I ought to know; after Gresh and I road tested one of these for Enfield North America on a Baja ride, I bought one.
The current iteration of Royal Enfield’s 650cc twin. I rode this bike through Baja and liked it so much I bought one when I returned from Mexico. Here’s more (a lot more) about that adventure.
Another motorcycle that let you see its glorious air-cooled magnificence was the CB750 Honda. It was awesome in every regard and presented well from any angle, including the rear (which is how most other riders saw it on the road). The engine was beyond impressive, and when it was introduced, I knew I would have one someday (I made that dream come true in 1971). I still can’t see one without taking my iPhone out to grab a photo.
A 1969 or 1970 Honda CB 750. This is the motorcycle that put the nail in the British motorcycle industry coffin. I had one just like it.
After Honda stunned the world with their 750 Four, the copycats piled on. Not to be outdone, Honda stunned the world again when they introduced their six-cylinder CBX. I had an ’82. It was awesome. It wasn’t the fastest motorcycle I ever owned, but it was one of the coolest (and what drove that coolness was its air-cooled straight six engine).
A Honda CBX engine photographed at the Del Mar fairgrounds near San Diego. The CBX was a motorcycle that added complexity where none was required. It was an impressive machine.
Like they did with the 750 Four, Kawasaki copied the Honda six cylinder, but the Kawasaki engine was water-cooled and from an aesthetics perspective, it was just a big lump. The Honda was a finely-finned work of art. I never wanted a Kawasaki Six; I still regret selling my Honda CBX. The CBX was an extremely good-looking motorcycle. It was all engine. What completed the look for me were the six chrome exhaust headers emerging from in front. I put 20,000 miles on mine and sold it for what it cost me, and now someone else is enjoying it. The CBX was stunning motorcycle, but you don’t need six cylinders to make a motorcycle beautiful. Some companies managed to do it with just two, and some with only one. Consider the engines mentioned at the start of this piece (Harley, Triumph, BSA, and Norton).
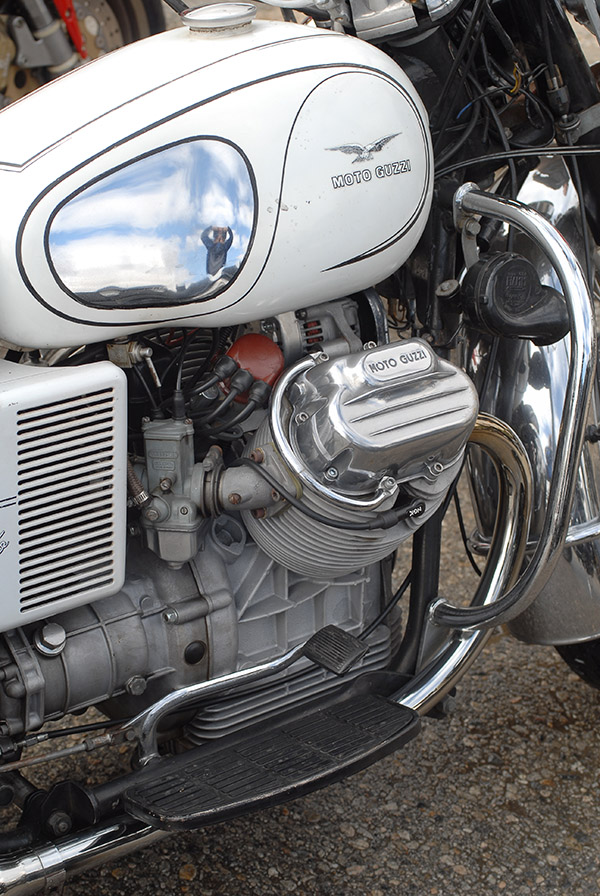
I shot this photo at Hansen Dam, too. I always wanted a mid-’60s Moto Guzzi. Never scratched that itch, though. They sound amazing. Imagine a refined Harley, and you’d have this.
Moto Guzzi’s air-cooled V-twins are in a class by themselves. I love the look and the sound of an air-cooled Guzzi V-twin. It’s classy. I like it.
Some motorcycle manufacturers made machines that were mesmerizing with but a single cylinder, so much so that they inspired modern reproductions, and then copies of those reproductions. Consider Honda’s GB500, and more than a few motorcycles from China and even here in the US that use variants of the GB500 engine.
The Honda GB500, Honda’s nod to earlier British singles. It’s another one I always wanted.
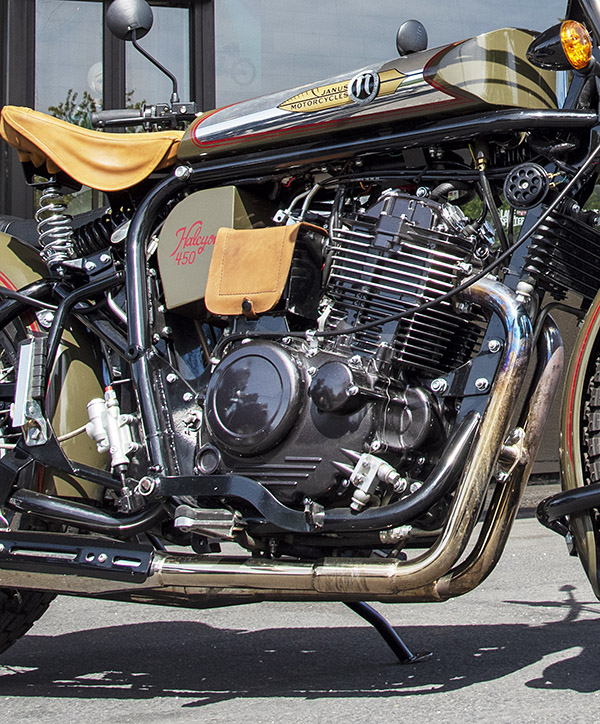
The GB500 is a water cooled bike, but Sochoiro’s boys did it right. The engine is perfect. Like I said above, variants of that engine are still made in China and Italy; one of those engines powers the new Janus 450 Halcyon.
The Janus 450 Halcyon I rode in Goshen. That resulted in a feature story in Motorcycle Classics. It’s engine is by SWM in Italy, which is a variant of the Chinese copy of the GB500 engine. I liked the Janus.
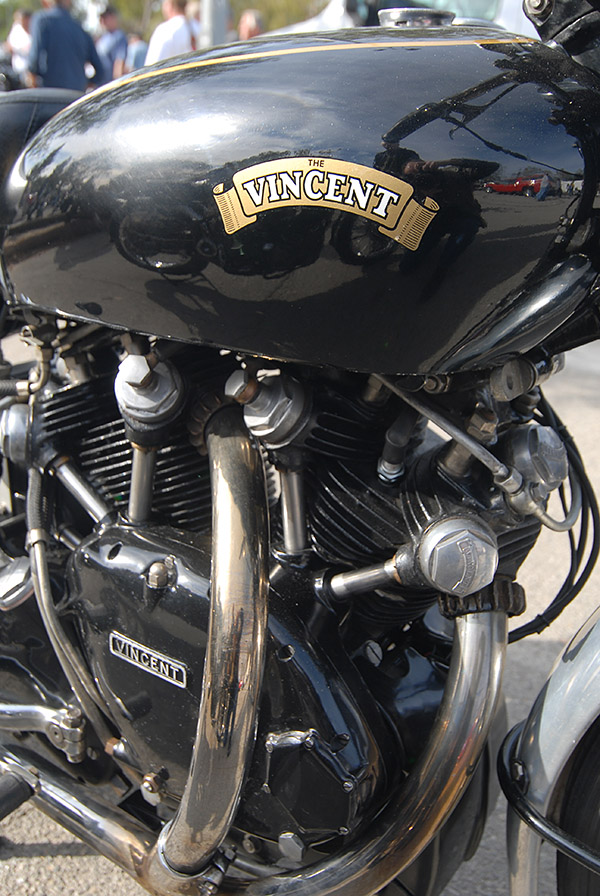
No discussion of mechanical magnificence would be complete without mentioning two of the most beautiful motorcycles ever made: The Brough Superior SS100 and the mighty Vincent. The Brits’ ability to design a visually arresting, aesthetically pleasing motorcycle engine must be a genetic trait. Take a look at these machines.
The Brough Superior SS100. Its engine had a constant loss lubrication system. This is the same motorcycle Lawrence of Arabia rode. One of my grandsons is named T.E. Lawrence.The mighty Vincent. This and the Brough Superior above were both photographed at Hansen Dam.
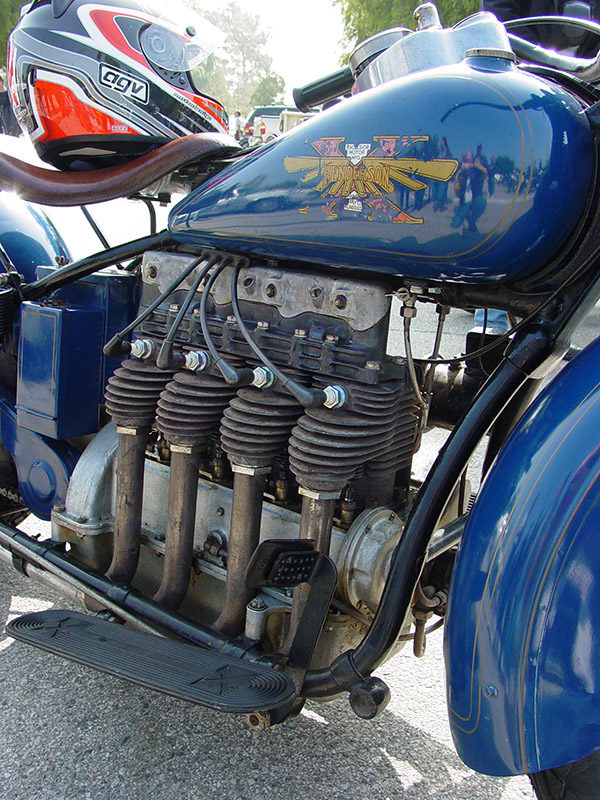
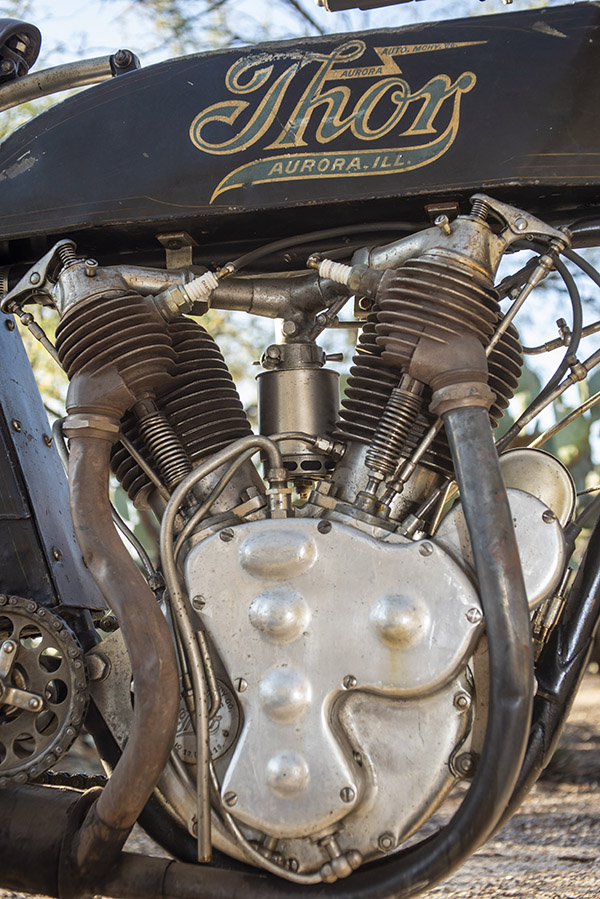
Two additional bits of moto exotica are the early inline and air-cooled four-cylinder Henderson, and the Thor, one of the very first V-twin engine designs. Both of these boast American ancestry.
Jay Leno’s 1931 Henderson. He told me he bought it off a 92-year-old guy in Vegas who was getting a divorce and needed to raise cash, and I fell for it.
The Henderson you see above belongs to Jay Leno, who let me photograph it at one of the Hansen Dam Norton gatherings. Incidentally, if there’s a nicer guy than Jay Leno out there, I haven’t met him. The man is a prince. He’s always gracious, and he’s never too busy to talk motorcycles, sign autographs, or pose for photos. You can read about some of the times I’ve bumped into Jay Leno at the Rock Store or the Hansen Dam event right here on ExNotes.
A Thor V-twin photographed at the Franklin Auto Museum in Tucson, Arizona. You almost need a four-year mechanical engineering degree to start one of these. Thor made the first engines for Indian.
Very early vintage motorcycles’ mechanical complexity is almost puzzle-like…they are the Gordian knots of motorcycle mechanical engineering design. I photographed a 1913 Thor for Motorcycle Classics (that story is here), and as I was optimizing the photos I found myself wondering how guys back in the 1910s started the things. I was able to crack the code, but I had to concentrate so hard it reminded me of dear departed mentor Bob Haskell talking about the Ph.Ds and other wizards in the advanced design group when I worked in the bomb business: “Sometimes those guys think so hard they can’t think for months afterward,” Bob told me (both Bob and I thought the wizards had confused their compensation with their capability).
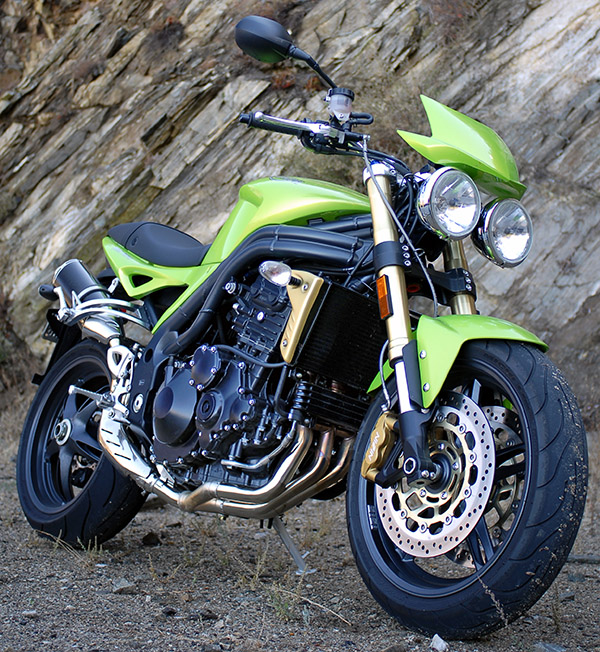
There’s no question in my mind that water cooling a motorcycle engine is a better way to go from an engineering perspective. Water cooling adds weight, cost, and complexity, but the fuel efficiency and power advantages of water cooling just can’t be ignored. I don’t like when manufacturers attempt to make a water-cooled engine look like an air-cooled engine with the addition of fake fins (it somehow conveys design dishonesty). But some marques make water cooled engines look good (Virgil Elings’ comments notwithstanding). My Triumph Speed Triple had a water-cooled engine. I think the Brits got it right on that one.
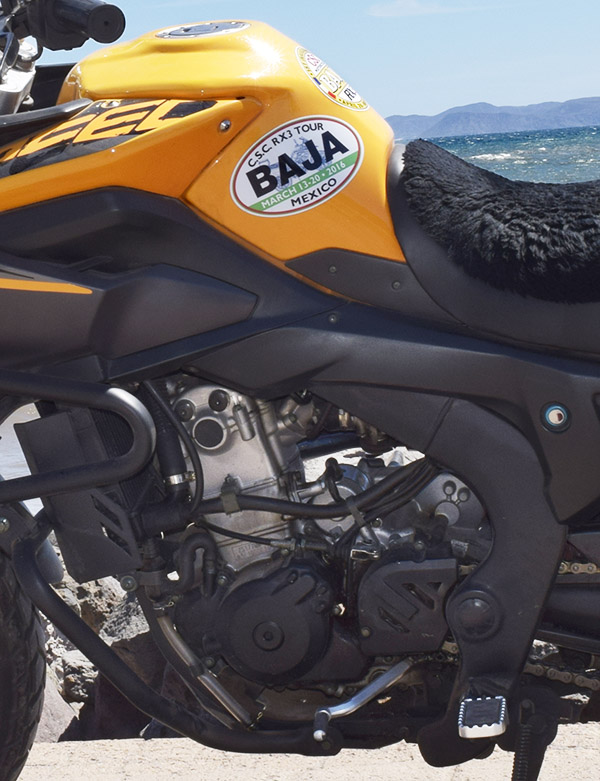
My 2007 Triumph Speed Triple. Good buddy Marty told me some folks called these the Speed Cripple. In my case, that turned out to be true, but that’s another story for another blog.My 2015 CSC RX3. Before you go all nuts on me and start whining about Chinese motorcycle quality, I need to tell you I rode these across China, through the Andes Mountains in Colombia, up and down Baja a bunch of times, and all over the American west (you can read about those adventures here). It was one of the best and most comfortable bikes I ever owned.
Zongshen is another company that makes water-cooled engines look right. I thought my RX3 had a beautiful engine and I really loved that motorcycle. I sold it because I wasn’t riding it too much, but the tiny bump in my bank account that resulted from the sale, in retrospect, wasn’t worth it. I should have kept the RX3. When The Big Book Of Best Motorcycles In The History Of The World is written, I’m convinced there will be a chapter on the RX3.
The future of “motor” cycling? This is the CSC RX1E. I rode it and liked it. The silence takes some getting used to.
With the advent of electric motorcycles, I’ve ridden a few and they are okay, but I can’t see myself ever buying one. That’s because as I said at the beginning of this blog, for me a motorcycle is all about the motor. I realize that’s kind of weird, because on an electric motorcycle the power plant actually is a motor, not an internal combustion engine (like all the machines described above). What you mostly see on an electric motorcycle is the battery, which is the large featureless chingadera beneath the gas tank (which, now that I’m writing about it, isn’t a gas tank at all). I don’t like the silence of an electric motorcycle. They can be fast (the Zero I rode a few years ago accelerated so aggressively it scared the hell out of me), but I need some noise, I need to feel the power pulses and engine vibration, and I want other people to hear me. The other thing I don’t care for is that on an electric motorcycle, the power curve is upside down. They accelerate hardest off a dead stop and fade as the motor’s rpm increases; a motorcycle with an internal combustion engine accelerates harder as the revs come up.
Wow, this blog went on for longer than I thought it would. I had fun writing it and I had fun going through my photo library for the pics you see here. I hope you had fun reading it.
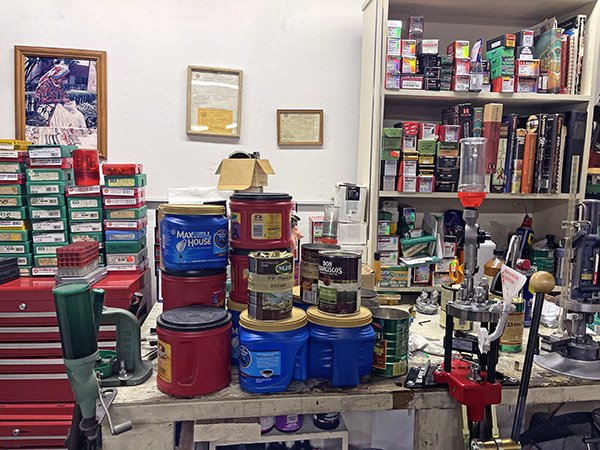
I spent most of the morning in the garage, organizing my reloading bench and the tons of components I have stacked in, on, under, and around it. I rearranged a good chunk of my 9mm brass (I probably have something north of 4,000 empty 9mm cases, enough to keep me in Parabellum paradise for the rest of my natural life). I’m waiting on a part for my Lee turret press (Lee is sending it to me at no charge), and when it gets here I’ll start reloading 9mm again. It’s become a favorite cartridge, but more on that in a future blog.
Busy real estate, my reloading bench is. Those coffee cans are chock full of 9mm brass.
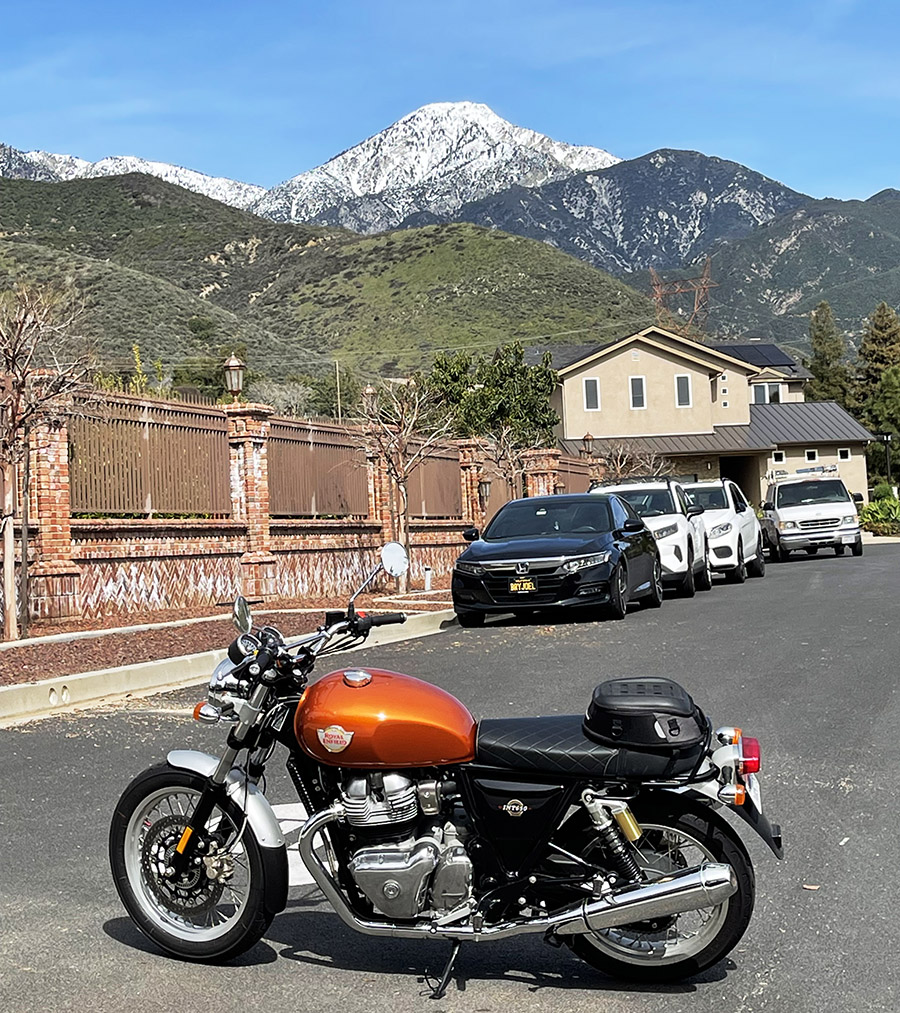
As part of the garage cleanup and reorg effort, I pushed the Royal Enfield out so I could sweep the floor. A young lady who lives in the neighborhood was walking her dog when she spotted the Enfield. “It sure looks like a nice day for a ride,” she said. We chatted for a bit and then I thought about her comment. It really was a nice day for a ride. We’ve had rain big time for the last couple of weeks (don’t believe the lyrics…during the winter it rains a lot in California), and today we finally had a day that was bright and sunny. I did what anybody would do…I closed up shop and fired up the Enfield.
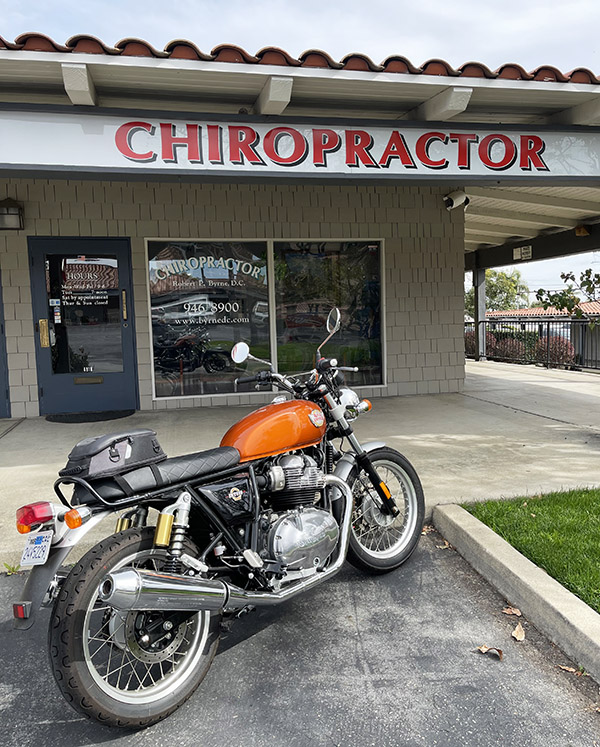
The nice thing about the winter rains here in So Cal is that when the clouds disappear we see the San Gabriel Mountains blanketed in snow. It really is quite beautiful. I started a ride into the mountains to get a good shot of the Enfield with the snow-capped mountains as a backdrop, and then I realized it was already 1:15 p.m. I had a 2:00 appointment with Doc Byrne, my chiropractor. I stopped for the quick shot you see above, and then it was over to the doctor’s office.
People who see a motorcycle parked in front of a chiropractor’s office should probably realize the doctor knows his business. My guy does, and another plus for me is that he is a rider. We’ve had some interesting conversations about motorcycles while he works his magic. I’m a big believer in chiropractic medicine.
A motorcycle parked in front of a chiropractor’s office. What’s wrong with this picture?
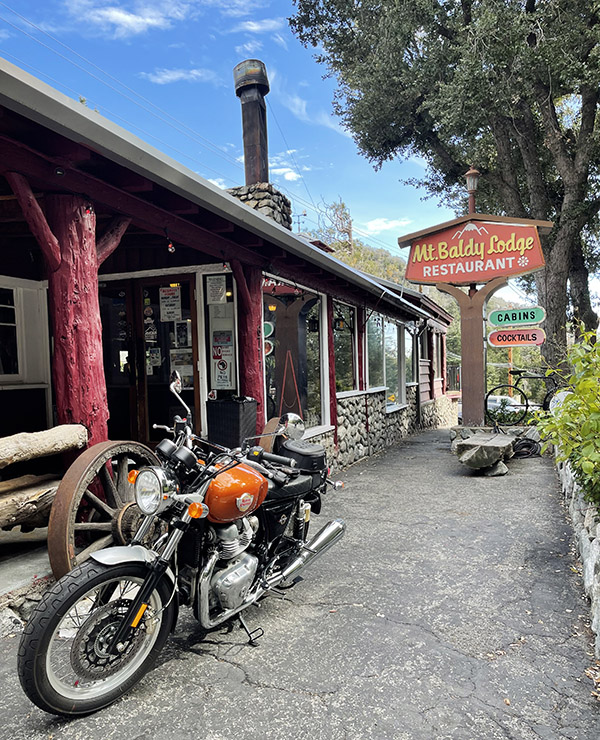
After getting my back straightened, I pointed the Enfield north and wound my way into the San Gabriels. I was looking forward to a late lunch at the Mt. Baldy Lodge, and I was not disappointed.
The Mt. Baldy Lodge, a favored destination in the San Gabriel Mountains.
I like the Mt. Baldy Lodge. It was busy (that was good), although like a lot of places their prices have climbed irrationally (that’s not so good). I ordered a turkey melt sandwich and paid the extra $2.00 for onion rings instead of French fries (not exactly a healthy option, but it was delicious).
As soon as I sat down at the bar, a younger guy (they’re all younger these days) who was shooting pool asked if I came in on the Enfield. “Guilty,” I answered.
“Cool,” he said. “I had an Enfield about 10 years ago, but I crashed and the insurance company totaled it.”
I didn’t have the heart to tell him that the Interceptor was only introduced about four years ago. I had no interest in a conversation with a guy who was obviously making it up as he went along. Better he should find a job with the news media or in politics, or maybe as an Ivy League university president. (Does that count as politics? We don’t do politics here on ExNotes, you know.)
I enjoyed my sandwich and the onion rings. I didn’t eat the whole thing, which somewhat eased my guilt pangs (I’m having a weight loss contest with Baja John, and he’s kicking my ass). I was having a good day. There’s something about a motorcycle ride into the mountains, sitting at the bar in the Mt. Baldy Lodge, having a good lunch, and listening to the pool table balls clicking and clacking that just feels like all is right with the world. I had a great ride and a great lunch, but it was getting late and the outside temperature was starting to drop. I knew I’d better head home. Even though it was cold, I enjoyed the ride down out of mountains as much as the ride up. The next time I see that young lady walking her dog, I’ll thank her for her suggestion. She was right; it was a nice day for a ride.
So, in case you are wondering why you received a notification email about the new Janus 450 Scrambler and the link didn’t work…well, that was a case of operator error. I hit publish before I should have, which triggered the email notification, and then I took the blog down so I could repost it on 23 February. But the email notification had already gone out. I reposted the blog on the 23rd (like I was supposed to do to first time), and you can view it here. My fellow blogistas have warned me that they are going to lop off yet another finger if I screw up again, so I have to be careful. I only have a few fingers left, and it’s getting hard to type. Mea culpa, and all that…
The New Year hits tonight. The years keep rolling by and it’s time for my 2024 resolutions. I’ve made a few, and with your indulgence, I’ll share them here.
I’m going to continue to hold my tongue (and my keyboard) on all things political. I’ve never seen anyone read a social media post or a blog or listen to someone with an opposing viewpoint and suddenly exclaim, “ah, now I understand…of course you’re right, and I was wrong all along…” Nope, the era of intelligent political discourse ended in the 1960s with the Vietnam War protests. Back then, and now, everyone is convinced their opinion is the only true path. I’m never going to call anyone ever again a leftwing idiot or a rightwing idiot, partly because of this resolution and partly because I hate being redundant.
I’m going to stop getting upset with people at the gym tying up machines while screwing around on their cell phones. Nope, you can sit on a machine and text to your heart’s content. I’ll just move on to another piece of equipment. Someday, though, when you’re standing in front of the Pearly Gates, you’ll have to answer. And I’ll be there. Just in case there are any questions.
I’m going to lose weight. The answer is to use that calorie tracker on my cell phone and exercise. Really. This time I mean it. I want to be skinny like Gresh.
I’m going to cook more, but in line with the resolution above I’ll eat less. I do a great barbequed salmon, a marvelous Italian meat sauce, delicious stuffed shells, a wonderful chili, incredible stuffed peppers, a great wild pork sausage and mushrooms casserole, tasty chicken tostadas, and a few others. I want to try making my own chile rellenos this year and find at least three more dishes to add to my repertoire.
I’m going to sell a few guns. I own too many to enjoy and more than a few that I don’t shoot. It’s time to convert these investments into cash and let others have some fun.
I’m going to ride my motorcycle and my bicycle more. I’ve slowed down on my riding quite a bit in the last three years. Part of it is the pandemic…law enforcement on our public roads has dropped to nearly nothing, and there are too many people driving like maniacs out there…speeding, weaving in and out of traffic, and screwing around on their cell phones. I’ve been hit by cars twice in my life while on two wheels (once on a motorcycle and once on a bicycle), and I don’t care to add a third bone-breaking event to my resume. But I haven’t been riding enough and I want to get out and ride. Get my knees in the breeze. You know the feeling.
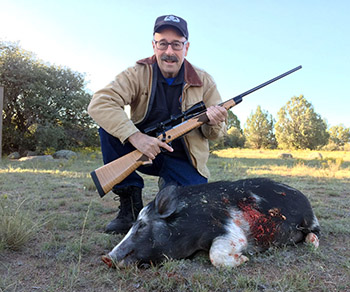
It’s time to put more pork on the table. I’m going to do at least two hunts in 2024. One will be a varmint hunt for coyotes in Arizona with Baja John; the other will be a pig hunt with my 6.5 Creedmoor (location to be determined). If you’re a vegetarian or fundamentally opposed to hunting, you have my permission to skip any blogs I write about these events.
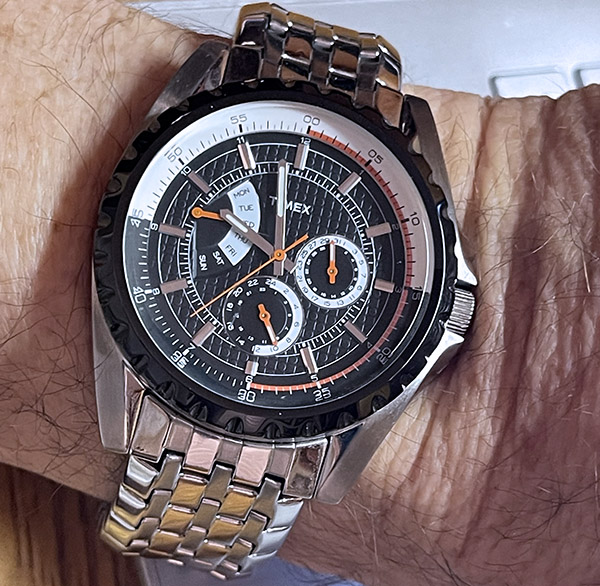
I’m not going to buy any more watches. I came across Segal’s Law last year, which holds that a man with a watch knows what time it is, but a man with many watches is never sure. I’m the guy who’s never sure, raised to an exponent.
I’m going to do Baja again, most likely in March so I can see the whales, eat a chile relleno in San Ignacio, and visit Javier at the La Casitas in Mulegé. I think Gresh wants to go, too. Maybe we’ll get our other ExNotes writers in on the action. You’ll read all about it here on ExNotes.
I’m retiring, for real this time. I’ll still write for the ExNotes blog and Motorcycle Classics magazine (I enjoy writing for both and I never viewed either as work), but I’m done with everything else. It’s time.
There you go…my 2024 resolutions. How about yours?
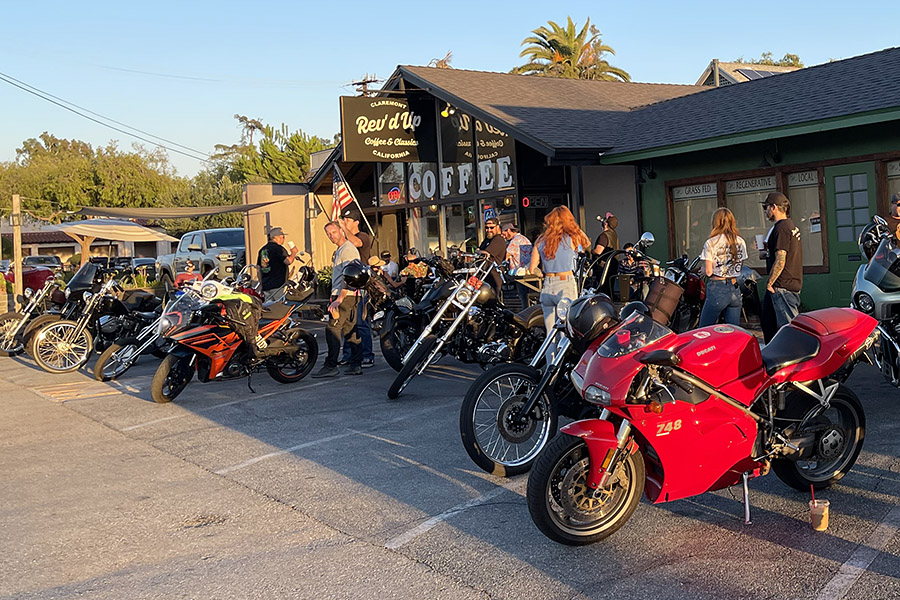
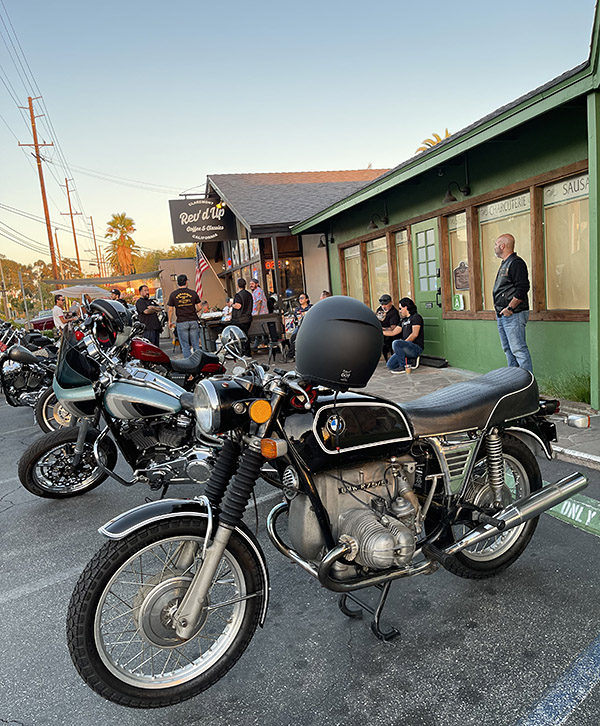
Wow, did I get lucky with this…a coffee and motorcycle spot just a few miles from home. It used to be that I had to ride all the way up Angeles Crest Highway to Newcomb’s so I could hang out at a motorcycle destination where like-minded people stopped for something to eat and to admire other motorcycles. Then Newcomb’s closed, a victim of the down economy and the pandemic. There was another cool spot Gresh and I spent an evening at in Chongqing, but the chances of me riding the Enfield across the Pacific to get there are slim. And then, I noticed Rev’d Up Coffee and Classics in Claremont. Claremont is the next town over from where I live. I’d seen Rev’d Up before, but I figured it was just another Gen X or Millennial (or whatever they’re calling themselves these day) Starbucks refugee trying to cash in on the coffee craze with a little moto mystique thrown in as sort of an artificial sweetener. Boy, was I ever wrong; there’s nothing artificial about Rev’d Up or its owner.
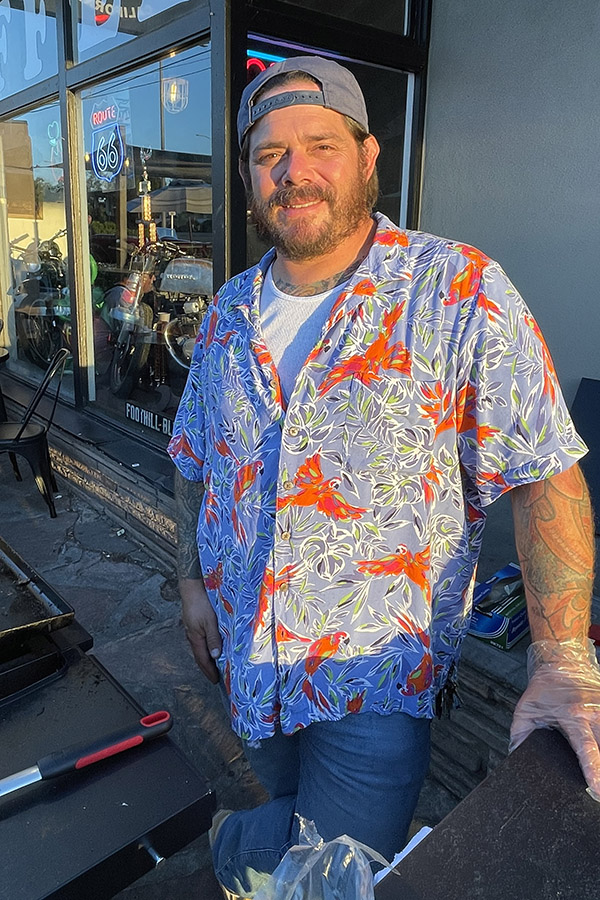
Steve Solis, motorcyclist and Rev’d Up proprietor, taking a break from Bike Night cooking duties.
Steve Solis is the guy who owns and runs Rev’d Up. He’s a good guy, a lifelong area resident, and a rider. Steve’s personal ride, a Sportster, is usually parked inside the restaurant seating area during normal business hours, but he brings it outside during bike night.
Steve’s personal ride – a Harley Sportster with an extended front end and apehangers.
The theme of Rev’d Up is bikes, classic cars, and hot rods. Steve has a couple of vintage bikes on display in the restaurant windows, and there are cool moto things throughout the dining and coffee sipping area.
A Honda Dream on display in one of the Rev’d Up windows.Another vintage Honda on display at Rev’d Up.Older motorcycle helmets. I wore one of the Peter Fonda Captain America helmets in the ’70s.
In keeping with the Rev’d Up theme, the menus are displayed on car hoods suspended from the ceiling. One is from a Camaro, the other is from a Datsun.
The breakfast and lunch menu. On Bike Nights, Steve is out front making Philadelphia cheesesteak sandwiches. They sure smelled good.The coffee and other specialty drink menu. I have to try the Easy Rider.
I asked Steve what the best kept secret was. His answer? The Easy Rider espresso. He said it was his favorite drink. Next time I’ll try it.
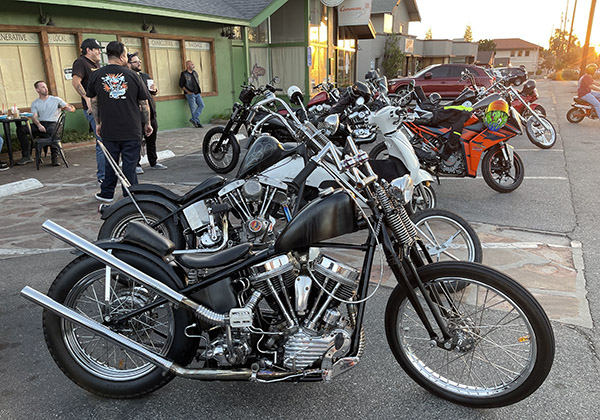
The best part of any of these gatherings is always wandering around in the parking lot, taking in the bikes, and talking to the riders. There’s no set theme regarding the bikes. Harleys, choppers, Ducatis, KTMs, BMWs, Triumphs, and more. They were all there.
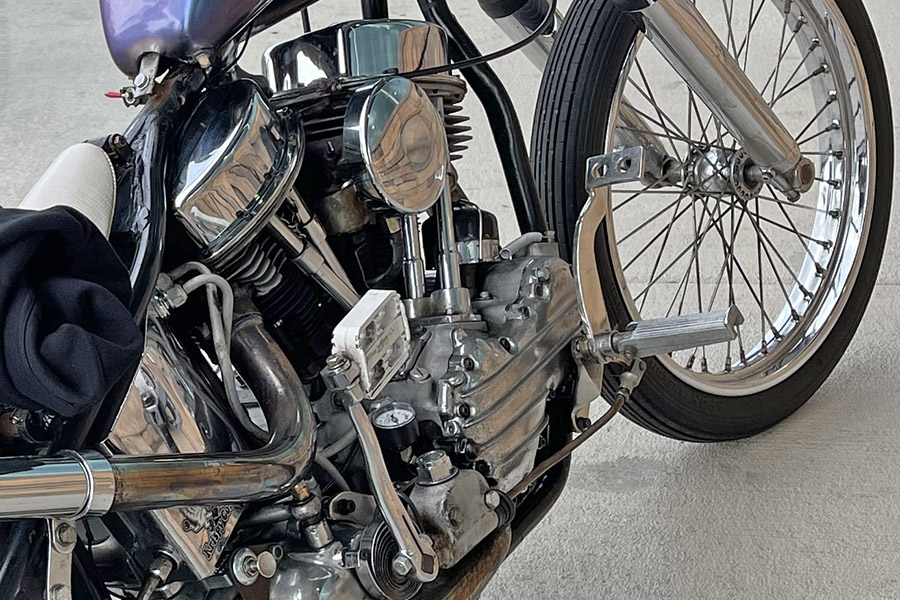
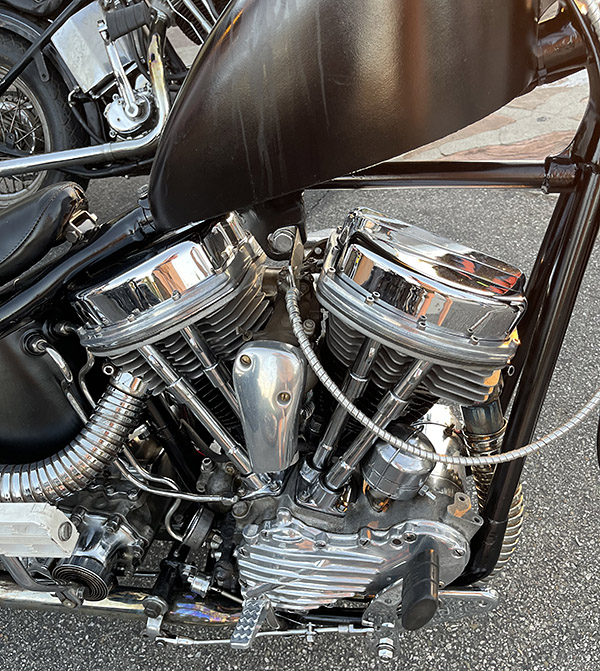
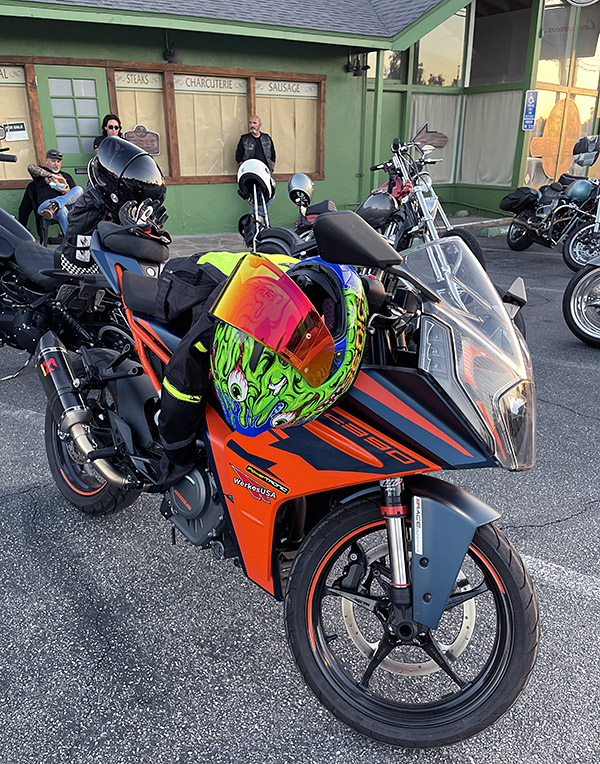
Check out the SU carb and the velocity stack on this Shovelhead chopper. Where does the rider’s leg go?The Harley Panhead engine, one of the two best-looking Harley engines ever made. The other one is the EVO motor. Those Panhead valve covers are impressive.A full view of the Panhead chopper.Bike night is not all about choppers. The colors on this helmet and motorcycle stood out.Another classic and beautiful motorcycle. The 748 was a later version of Ducati’s 916. They look good.There are no better colors for a classic BMW boxer twin than gloss black with white pinstripes.As we were leaving, this Triumph pulled into the parking lot. All marques are welcome at Rev’d Up. It’s a cool place.
Rev’d Up Coffee and Classics is located at 212 West Foothill Boulevard (that’s Route 66) in Claremont, California. It’s definitely worth a stop, and I’d say it’s a worthwhile place to take a ride. Maybe I’ll see you there. Look for the orange Enfield in the parking lot; if it’s there, I will be, too.
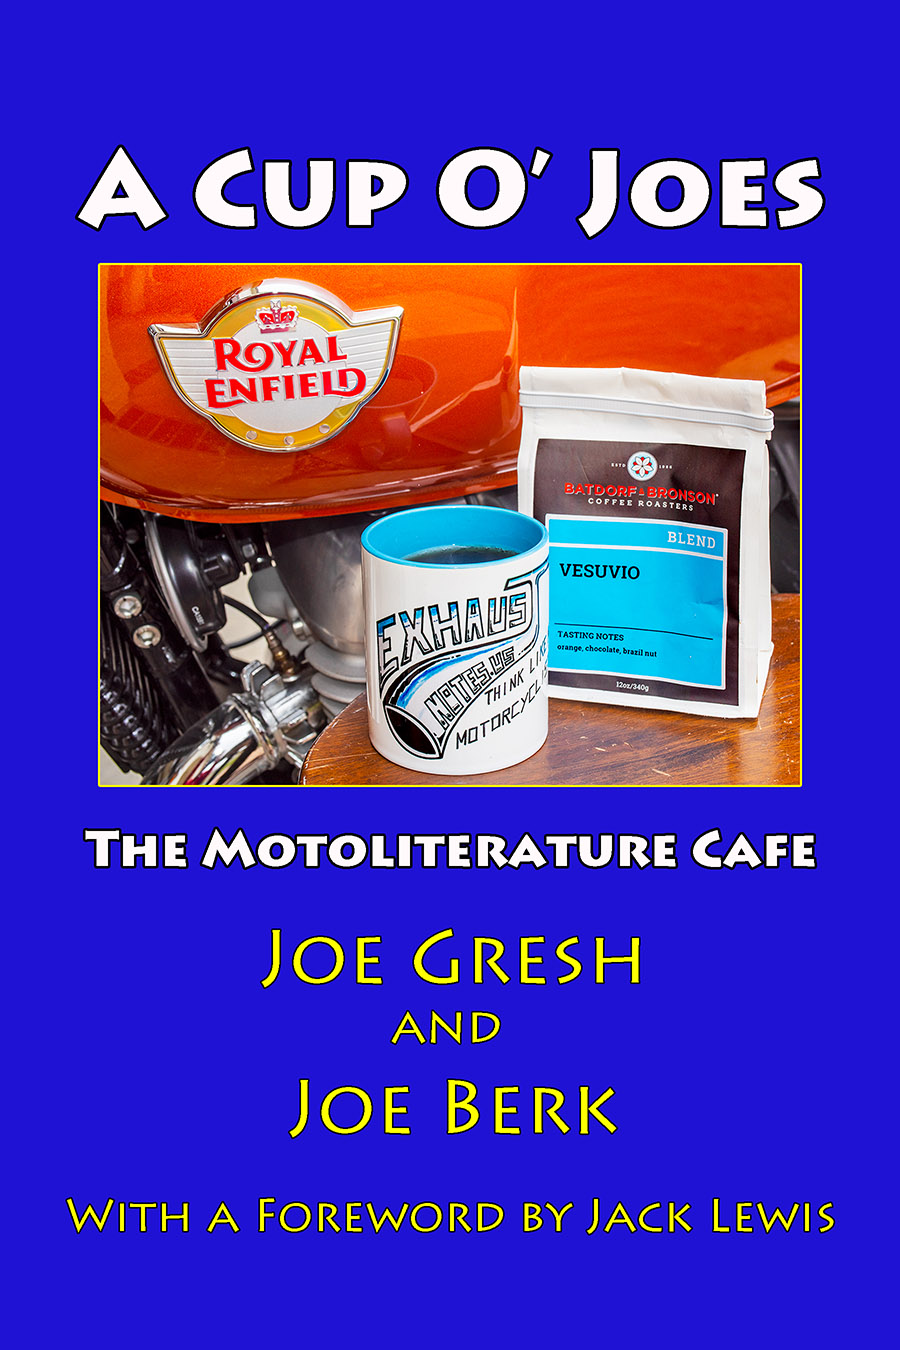
A Cup O’ Joes is available now on Amazon. Every bathroom in every motorcycle shop and every motorcyclist’s home needs this book. They make great gifts. Check out the blurb:
Joe Gresh and Joe Berk bring you a collection of their favorite articles and stories from the ExhaustNotes.us website, Motorcycle Classics magazine, Rider magazine, Motorcyclist magazine, ADVMoto magazine, and other publications. Ride with the Joes in China, Colombia, Mexico, New Zealand, Canada, the former Soviet Union, and the United States. Read their opinions on motorcycles, accessories, and more. Humor, wit, insight, and great reading…this collection of motoliterature belongs in your library. Published in black and white.
You could wait for the movie, but the movie deal fell through. You know the story…I wanted Leonardo di Caprio to play me or Gresh, the studio countered with Danny DeVito, and things fell apart after that.
Seriously, though, you need this book. It will make you taller, skinnier, more attractive, and a faster rider. Trust us on this.
Two or three years ago Joe Gresh and I provided product reviews on our Viking motorcycle jackets. We like them a lot and you may have noticed that Viking advertises on our website. Both jackets have given us good service and I’ll provide links to those reviews at the end of this blog.
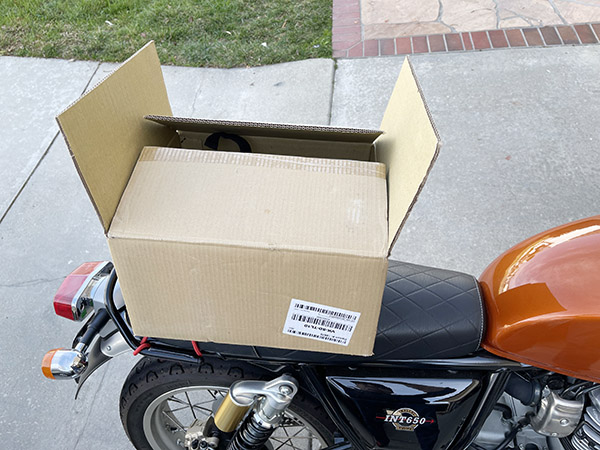
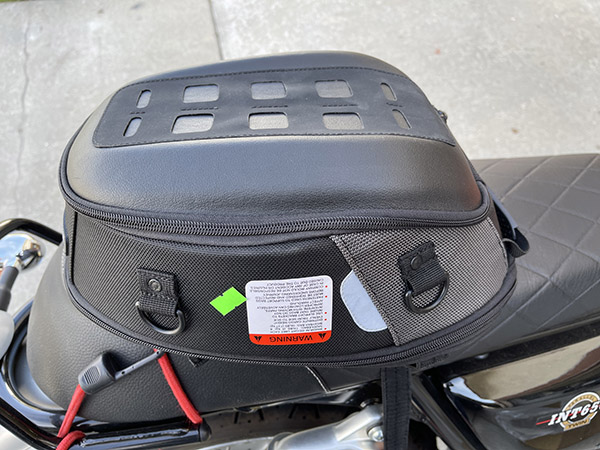
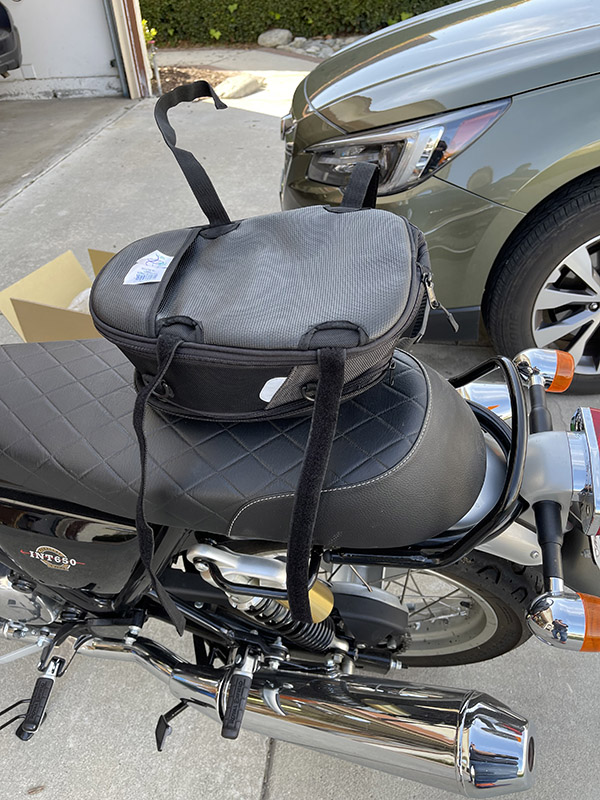
The topic today is the Viking Momentum small street and sportbike tail bag. I’ve found bags like this to be ideal for my travels through Baja and elsewhere. I used similar equipment on my KLR 650 and I found that I could carry more than I needed in Baja and elsewhere. Gresh suggested the Viking bag and I ordered one. It arrived quickly and it was well packaged.
The Viking Momentum bag arrived in a robust cardboard box.
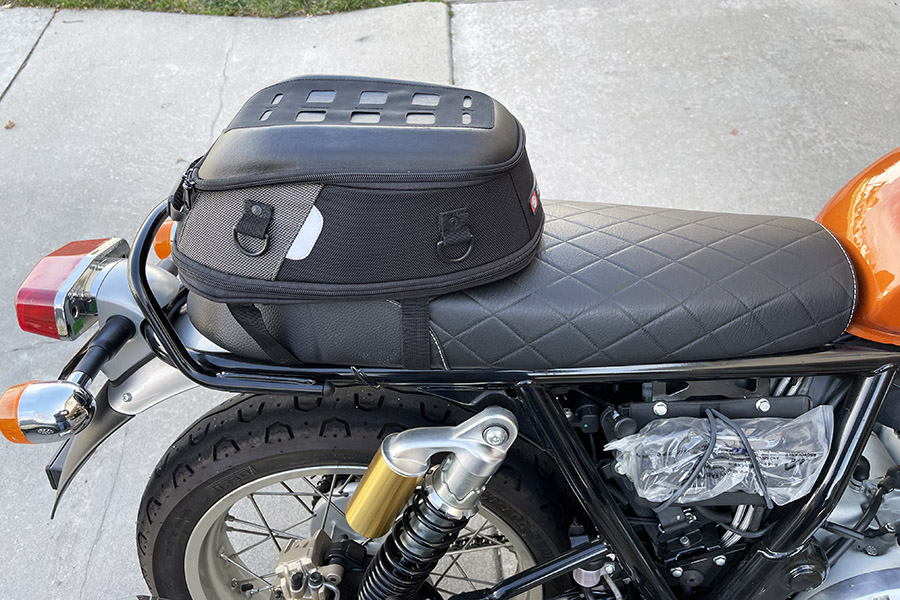
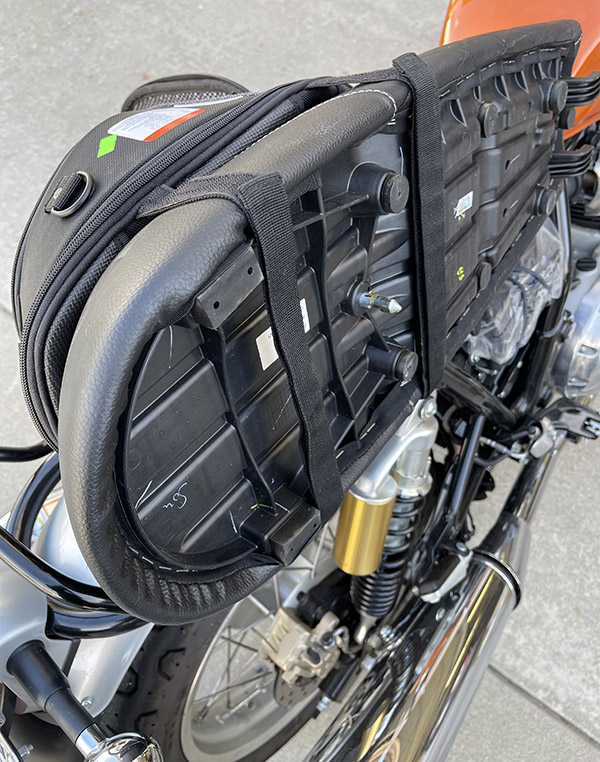
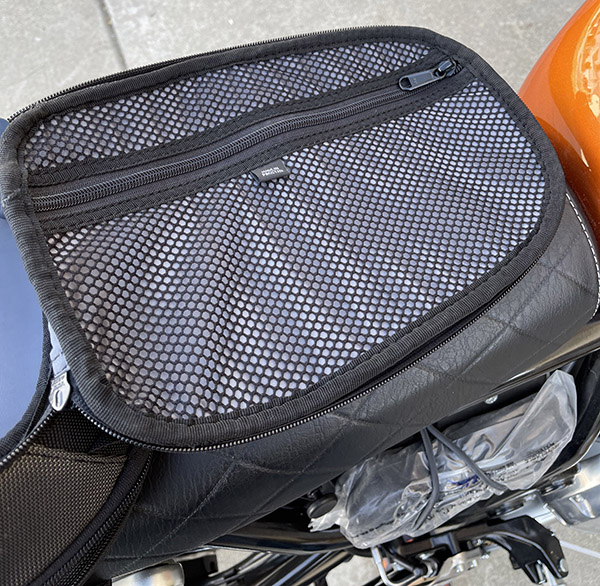
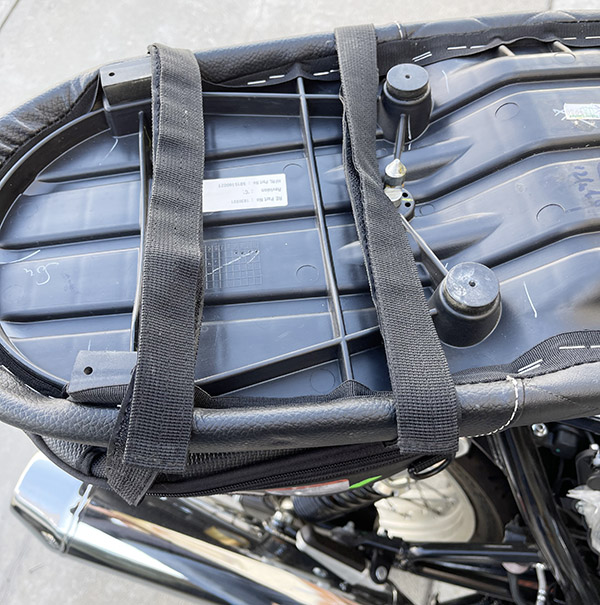
After taking the Viking bag out of the box, I put it on my Royal Enfield. The size was about perfect. What I especially like is that I can swing my left over it when getting on and off the motorcycle. With larger tail bags, getting on and off the motorcycle becomes a problem, but not with the Viking bag.
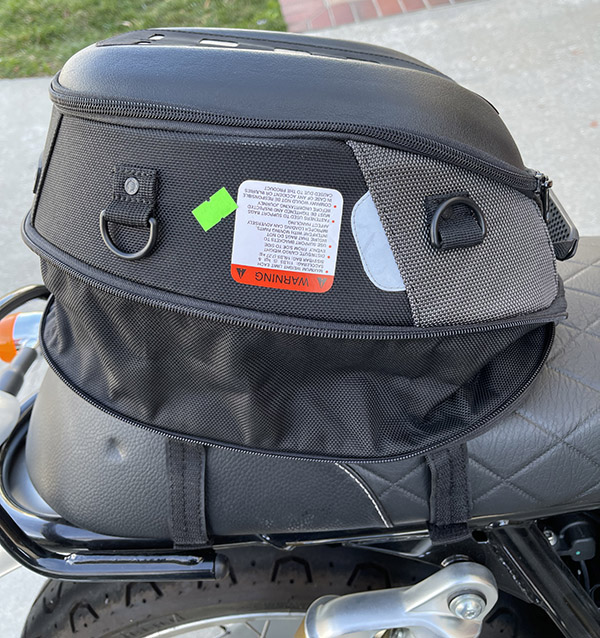
The Viking Momentum tail bag.
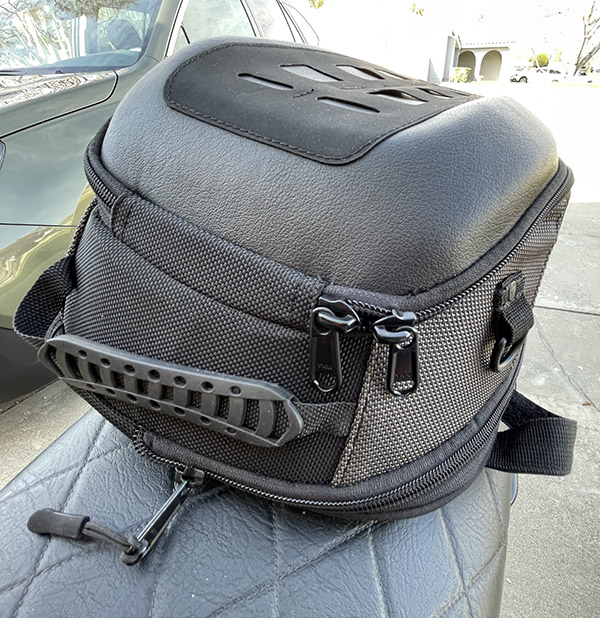
The Viking bag has a hinged lid and lots of mounting points. I’ve not used the slotted deal on top of the lid yet. It looks cool. The bag also has a carrying handle. It’s a well-designed and well-built motorcycle accessory. I examined the bag closely and I am impressed with the build quality. I could not find any defects and no indications of sloppy workmanship.
The Momentum has a carrying handle and two zipper handles for opening an expanding the bag.
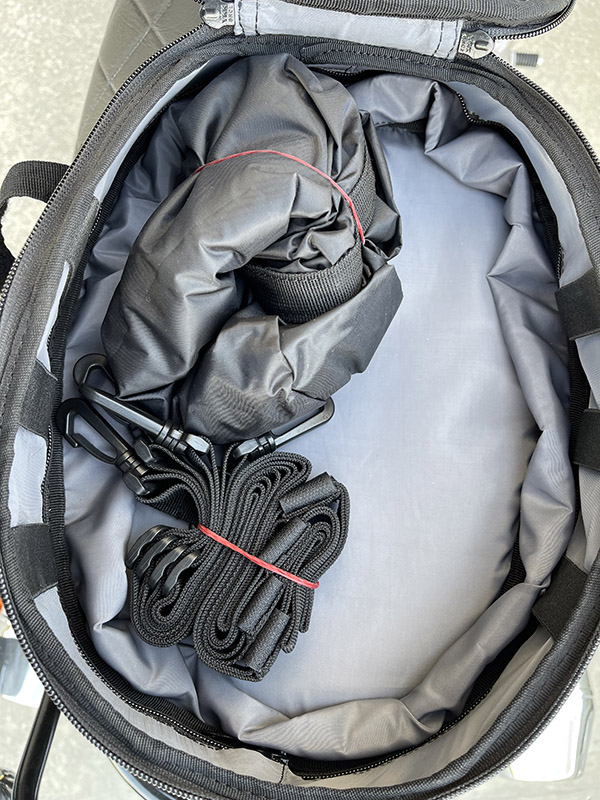
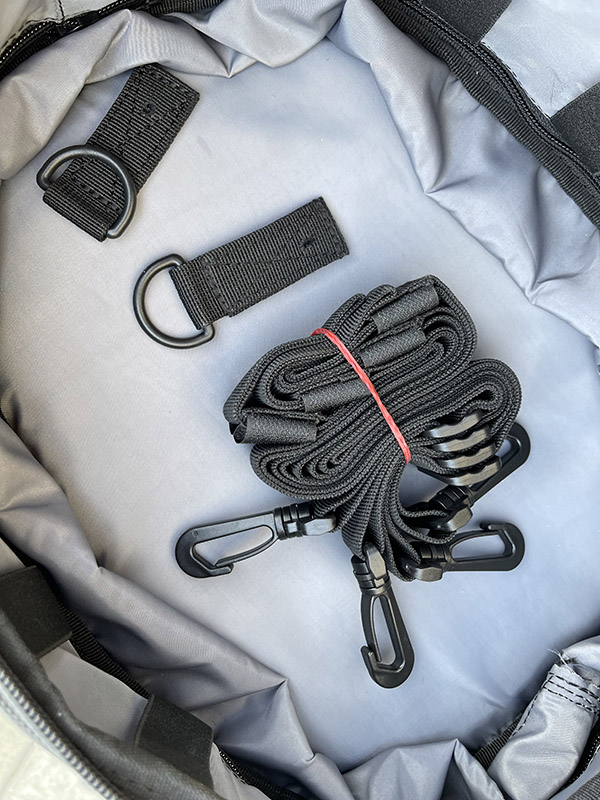
Before I installed the bag on my Royal Enfield, I opened it to see the interior. The Momentum comes with a rain liner, a set of straps, and spare nylon web bungee cord attach points. You can rivet these to the bag (in addition to the four already present) or you can use them as replacements if the ones on the bag detach.
Inside the Momentum I found a rain liner and extra straps. You can use the extra straps for additional tie down points. I think I could use the straps to turn the Momentum bag into a backpack.Extra straps and spare D-ring attachments.
The Viking Momentum bag has four Velcro straps on the bottom. These pass under the seat, stick to each other, and secure the bag to the seat.
The Momentum upside down. The Velcro straps pass under the motorcycle seat and attach to each other.
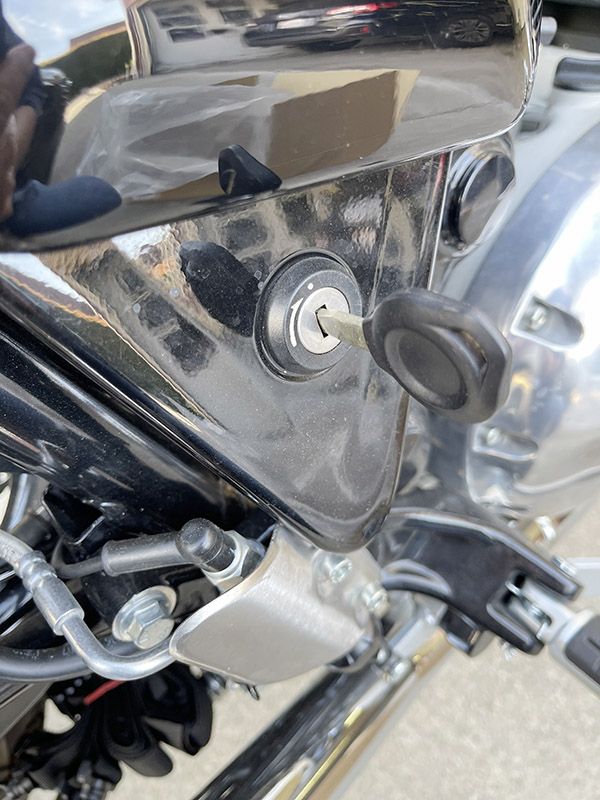
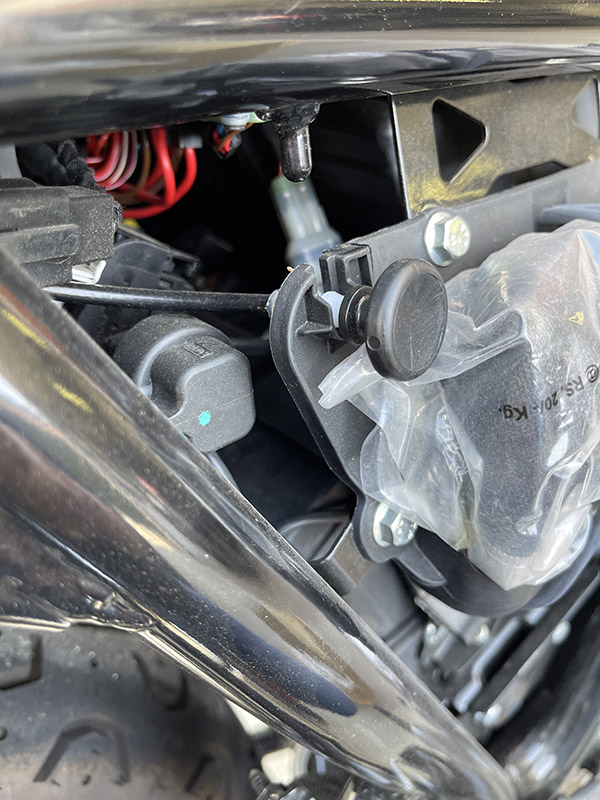
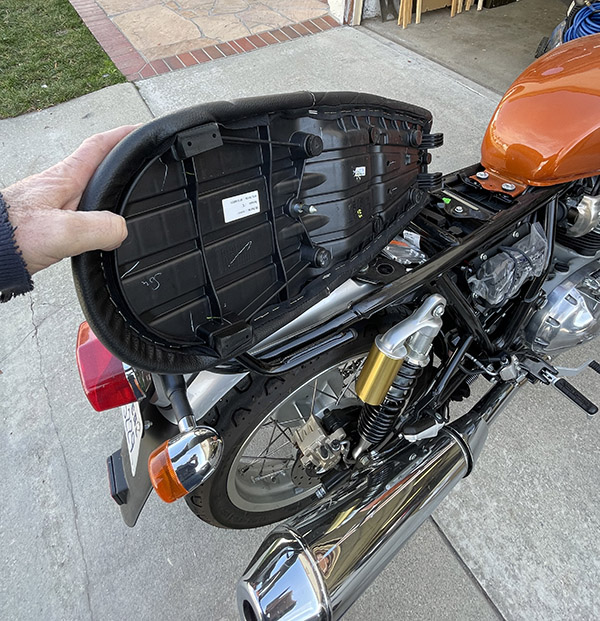
To mount the bag, I took the seat off the Enfield. The Enfield and Viking designs makes this easy. On the Enfield, the ignition key unlocks the right side panel, it comes off, and that reveals a cable pull button that unlocks the seat. Easy peasy.
Unlocking the Enfield side panel to gain access to the seat release.The Enfield’s seat release.The Enfield seat removed from the motorcycle.
Once the seat was off the bike, it was a simple matter to mate the Viking Momentum’s mounting straps underneath.
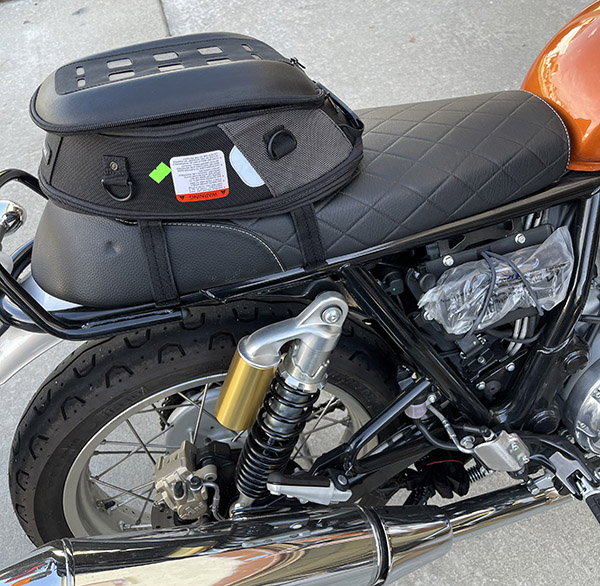
The Momentum tail bag strapped to the Enfield seat.
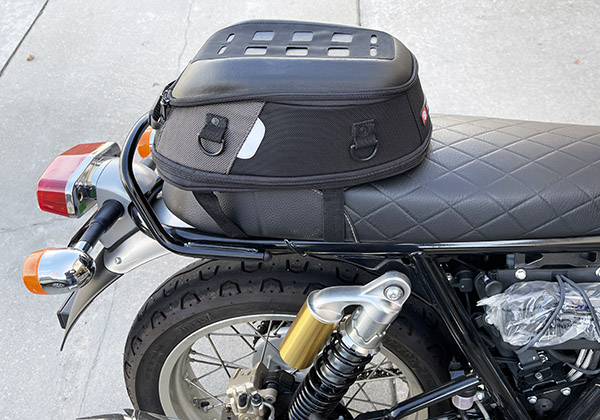
I first mounted the seat so its carrying handle faced forward, as shown below. Then I reversed it. I’ll say more about that in a bit.
The Momentum installed on the Enfield.
The Viking bag has two zippers around the exterior. The upper one is for the lid; it provides access to the bag’s interior. There’s another zipper around the bag’s base; unzipping it allows the bag to expand and approximately doubles its volume.
With the bottom seat unzipped, allowing the Momentum to expand.
I thought it would be cool if the expanded bag would hold a full-face helmet, but it did not. That’s okay. If I put my helmet inside, there wouldn’t be room for anything else.
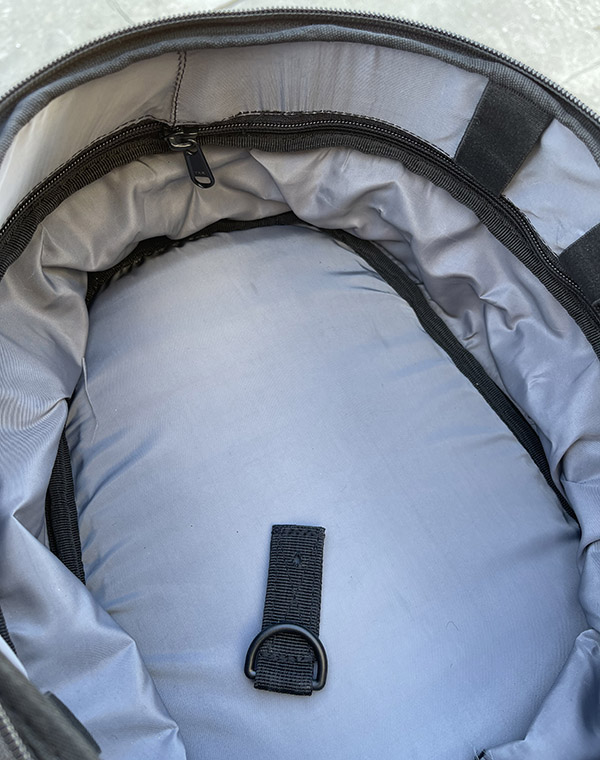
There are a couple of zippers inside the Viking bag. One is on the bag’s inner walls. The other is on the underside of the lid. You can store things in the lid compartment like your phone, a map, a Baja tourist visa, your BajaBound insurance paperwork, and other stuff.
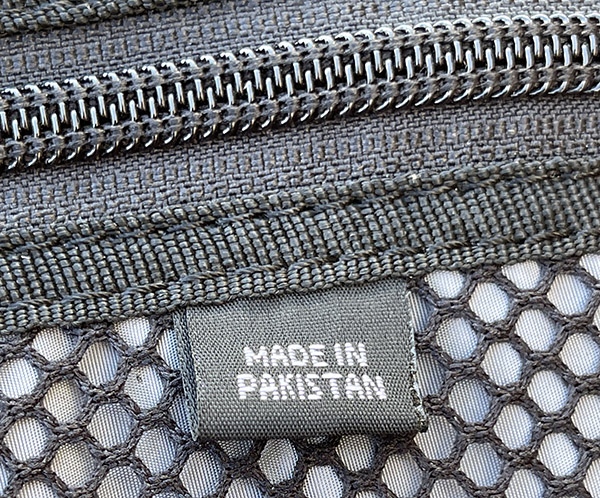
The Momentum interior.The underside of the Momentum lid. You can unzip the zipper and store small items inside the lid’s pocket.Like most motorcycle apparel and many luggage items, the Momentum is manufactured in Pakistan.
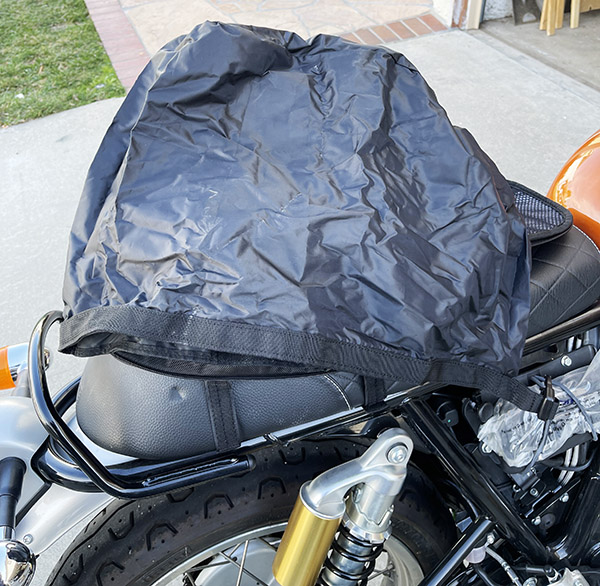
The Viking Momentum includes a rain liner. It packs up compactly. You can keep your stuff dry in the rain liner inside the Momentum bag. It’s a nice touch.
The Momentum rain liner.
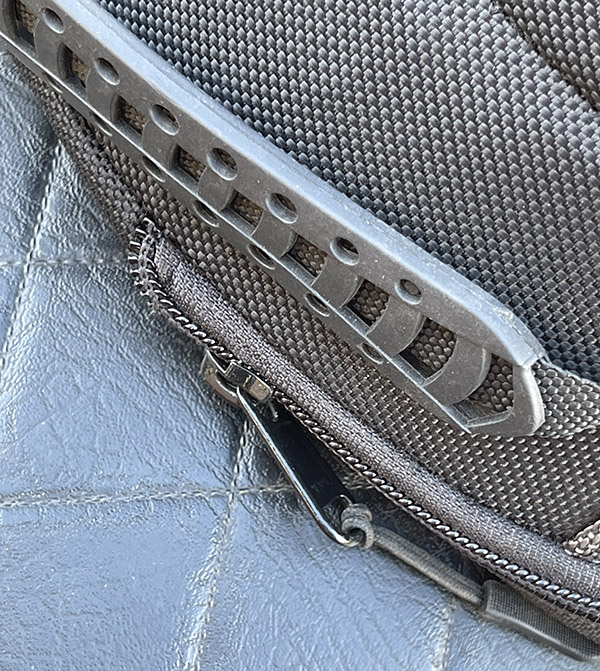
With the Momentum bag’s handle facing forward, I didn’t like how the bag was positioned on the seat. It provided adequate room, but no extra room. The Enfield has a hard seat. I’m getting older and my butt is aging along with the rest of me. I need extra room to move around on a motorcycle seat, and with the bag mounted with the carrying handle forward I didn’t have any extra room. I also noticed that the base zipper (the one you unzip to expand the bag) pull was digging into the Enfield’s Naugahyde surface. I didn’t want to disrespect the Nauga that gave up its hyde for my seat, so I turned the bag around and moved it more toward the rear.
With the Momentum mounted with the handle facing forward, the expansion zipper toggle is against the seat surface. I turned the bag around to eliminate this issue.
When I did that, the Velcro straps are still captured by the seat’s base mounting points (the bag won’t slide off), and I eliminated the zipper-to-Naugahyde interference.
The Velcro straps secured on the motorcycle seat after reversing the bag.
Cosmetically, the seat looks great in either orientation.
The Momentum mounted in the reverse position. The expansion zipper handle is off the seat.
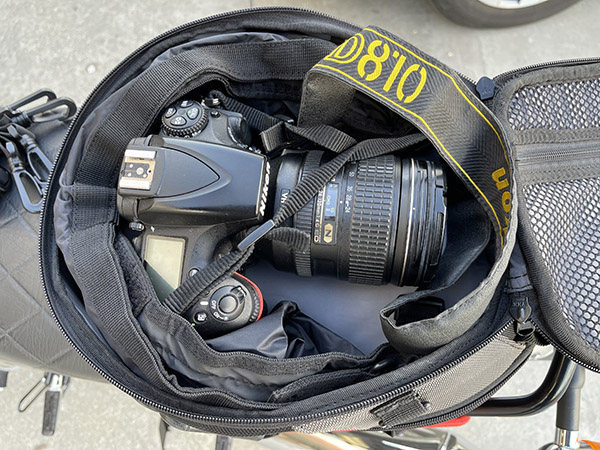
I once led a bunch of guys on a short Baja weekend ride about 15 years ago. One had a Harley, he was new to motorcycling, and he had never done an overnight ride. We met at a Denny’s before heading for Mexico, and when he rolled up on his Electra-Fried, he and that Harley looked like they escaped from the opening scene on the old Beverly Hillbillies show. The only thing missing was Granny in her rocking chair. He told me his saddlebags and his Tour Pak were stuffed, and he also had two or three gym bags bungied to the bike. This was a weekend trip to San Felipe, about 130 south of the border, and we were only staying two nights. My KLR had a medium tank bag and nothing else (and that tank bag also held a camera). “I’m ready for a week down there,” my friend announced from his adventure Glide.
“Well,” I said, “I’ve got my Nikon and a spare set of underwear, so I guess I’m good for a week, too.”
My boat anchor Nikon D810 and a Nikkor 24-120 lens in the Momentum. I really like this. The camera and the lens cost almost as much as the Enfield.
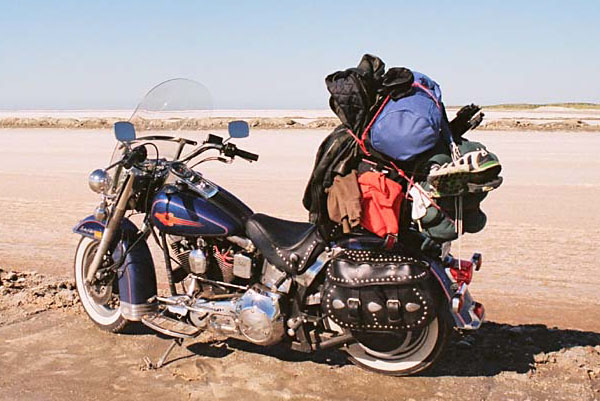
I guess I shouldn’t make fun of that guy. I get it; he was at the front end of the learning curve, and we’ve all been there. I once took an overpacked Harley into Baja, too. We were going to Cabo, taking the ferry to mainland Mexico, heading down to Guadalajara, and coming back through Sinaloa cartel country (you can read about that trip here). I did not yet know about the virtues of traveling light and good ballistic nylon gear like the Viking Momentum bag.
How not to pack a motorcycle. The Momentum tail bag is a much better approach.
The point is this: You don’t need to carry a lot on a motorcycle trip (even if you write a blog), and you can get a lot of stuff in the Viking Momentum. I like it. The Momentum tail bag is a good deal; on the Viking website it retails for $99.99.
So there you go: My take on the Viking Momentum tail bag. It’s a good thing to have for your motorcycle but don’t take my word for it. Listen to what Bernadette has to say.
I mentioned above I would provide links to the Viking motorcycle jacket reviews. Here’s mine, and here’s Joe Gresh’s.
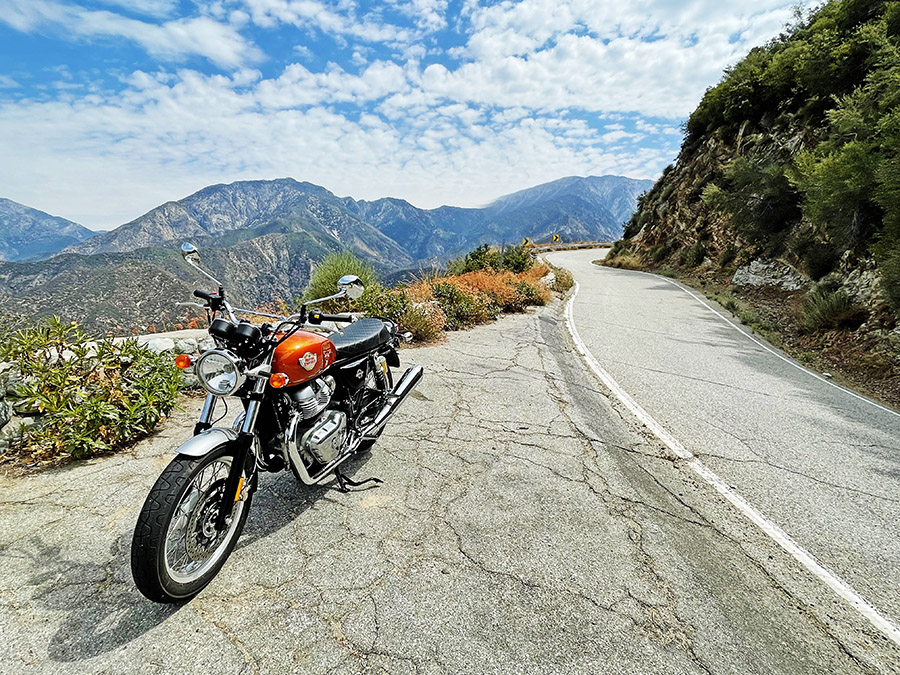
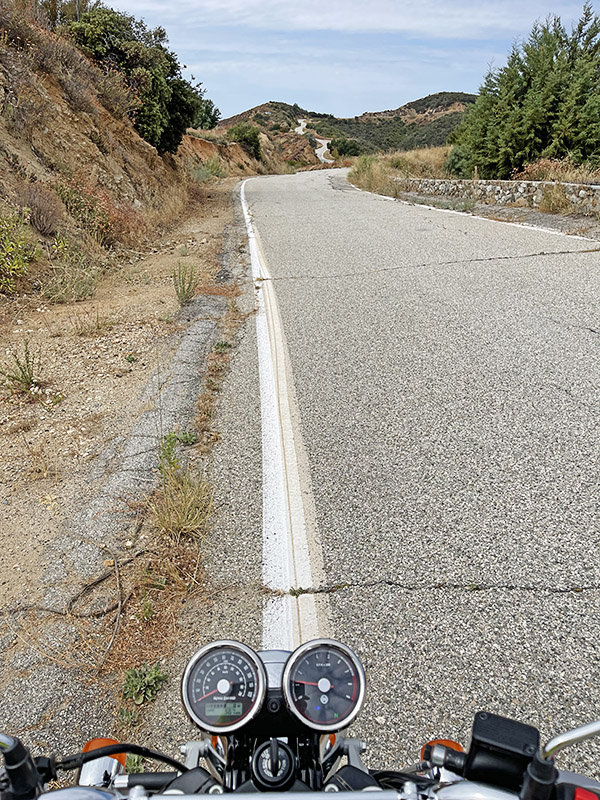
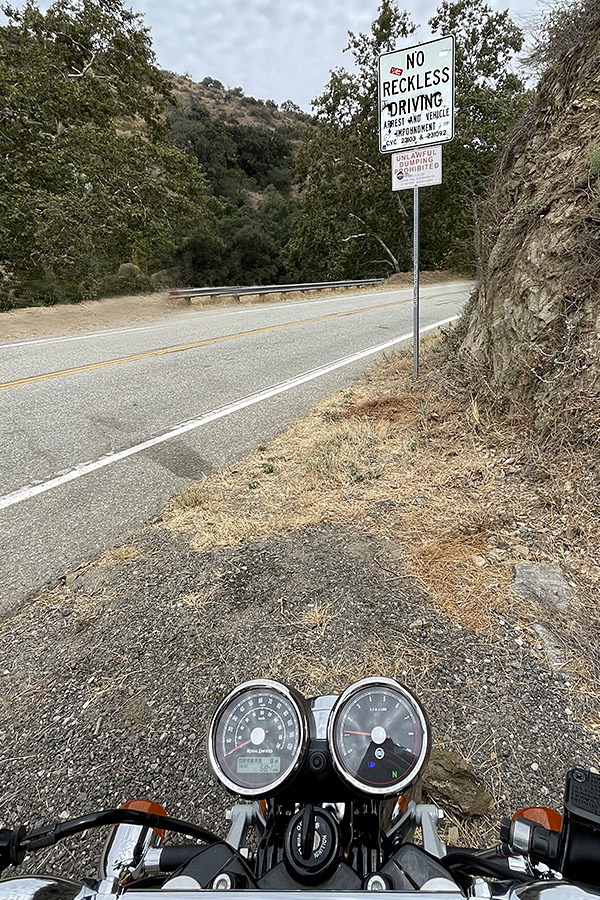
Glendora Ridge Road is one of the best kept secrets in southern California, offering 12 miles of well-maintained, low-traffic twisties nestled in the San Gabriel Mountains. And it’s not just 12 miles…it’s 12 miles with 234 curves (I counted them) through some of the most beautiful country imaginable. The striking thing about this road is its simultaneous desolation and nearness to civilization. Glendora Ridge Road is only 45 minutes from downtown Los Angeles. It’s only 10 minutes from my front door. Given its magnificence and nearby location, you’d think I’d ride it every day. I don’t, but I should.
That’s the ridge Glendora Ridge Road runs along, framed by the Entfield’s instrumentation.
Glendora Ridge Road is a glorious ride, and it’s been a favorite ride for me ever since I arrived in California. It’s hard to believe just how good it is and just how much of a change it offers between what most folks think southern California is and pure wilderness. Like I said above, it starts just 10 minutes away from my home. Ride it and you enter a different world. When I rode it last week, I saw two other vehicles on the entire ride. One was a single-cylinder dual sport; the other was a red Ducati. That’s it: Just two vehicles, and both were motorcycles.
As is the case with many mountain paths, Glendora Ridge Road began life as a dirt road many decades ago. Situated high up in the Angeles National Forest, asphalt came to Glendora Ridge Road in the 1970s. There’s no centerline for most of its length, which requires extra care in navigating its many tight blind corners. Glendora Ridge Road attracts motorcyclists, bicyclists, and the odd sports car or two. We also get some ricky racers in modified Honda Civics and the like up in the San Gabriels, so caution is in order.
Yikes! In the spring, you’ll see these guys looking for lady spiders at dusk. They say they’re harmless. I’ll take their word for it.
Glendora Ridge Road runs directly through one of the premier wildflower spots in America (the colors are surreal during April and May when the flowers are blooming…purples, reds, yellows, oranges, and more). Glendora Ridge Road also borders the San Dimas Experimental Forest, a 32-square mile research area. I’ve seen deer, fox, bobcat, bear, tarantulas, and snakes up there. I grabbed the tarantula shot above one evening in the pre-digital days with a 35mm Minolta and a 28mm lens. I had to get right on top of the spider to get that shot. I held the camera maybe six inches or so above it, only to later learn those things can jump 10 inches straight up!
I’ve ridden Glendora Ridge Road on virtually every motorcycle I’ve owned in the last 40 years. We used to do a lot of company rides with CSC Motorcycles, and everyone loved it. The RX3 is a perfect motorcycle for this ride. We once did a winter ride when the road was iced over. We rode it anyway.
The photo opportunities along Glendora Ridge Road are awesome. These days, I’m down to one motorcycle, and that’s my 650 Enfield. There are a lot of good spots for getting advertising quality photos on Glendora Ridge Road, and I took advantage of a few. Glendora Ridge Road has several areas where the cliffs and overhangs provide shade, so even on a bright day you can get great shots without harsh shadows
I pick a motorcycle based on how I know its colors will photograph. I chose wisely, I think.On Glendora Ridge Road, looking north. It really is this scenic. I had the road and the San Gabriels to myself. The great Mojave Desert lies on the other side of those mountains.
Glendora Ridge Road runs roughly east to west (or west to east, depending on which way you travel). I like riding this road in the early morning or at dusk, as it makes for a more interesting ride (fewer folks, and the wildlife is more active.) In the morning, it’s best to ride in a westerly direction to keep the sun out of your eyes, and vice versa at dusk. The road’s curves make it tempting to go faster than you should, but my advice is to keep a relaxed pace. Many of the corners are blind, and you never know if there’s a squid pushing too hard coming the other way.
Just as you enter Mt. Baldy Village, the sign for Glendora Ridge Road appears on the left (if you’re not looking for it, you may miss it). You’ll only climb about a half-mile before you hit Cow Canyon Saddle. It’s a neat place to get a feel for the length and breadth of the valley skirted by Glendora Ridge Road. There’s a dirt road on the other side of that valley, but it’s not open to the public (the dirt road runs about eight miles to an abandoned tungsten mine). After running west for exactly 12 miles (and as mentioned above, no fewer than 234 curves), you arrive at the intersection of Glendora Ridge Road, Glendora Mountain Road, and East Fork Road. Glendora Mountain Road meanders down into Glendora. If you turn right to take East Fork Road, it continues on to Highway 39 above Azusa. The intersection of these three roads is a popular meeting spot where riders stop to talk and take in the view. On clear days in the winter, you can see the Pacific Ocean and Catalina Island.
Always a good idea. This photo shows Glendora Mountain Road heading up into the San Gabriels.
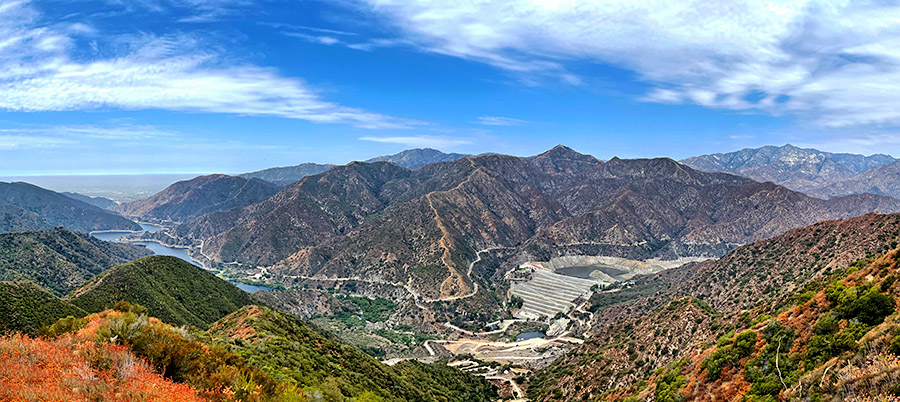
My choice for the return home on this most recent Enfield ride was Glendora Mountain Road. It’s equally scenic and a little shorter ride back. My arthritis was bothering me a bit and even though I was having a great time, my shoulder was reminding me I’m not 17 years old anymore. It was a good ride down out of the mountains. There are places on Glendora Mountain Road where you can see Highway 39 and the reservoir above Azusa, as shown in the photo below.
This is a photo stitched together from four photos in PhotoShop. The road at the base of the mountains on the other side of the reservoir is Highway 39, which runs south to Azusa. CSC Motorcycles is located not too far from the notch in the mountains on the left side of this photo.
So there you have it: Glendora Ridge Road, one of So Cal’s best kept secrets. If you’re looking for a great ride, this is it. If you’re up there and you see an old guy on an Enfield nursing his left shoulder, give a wave.
We’ve got a bunch of cool stuff coming your way in the next few weeks.
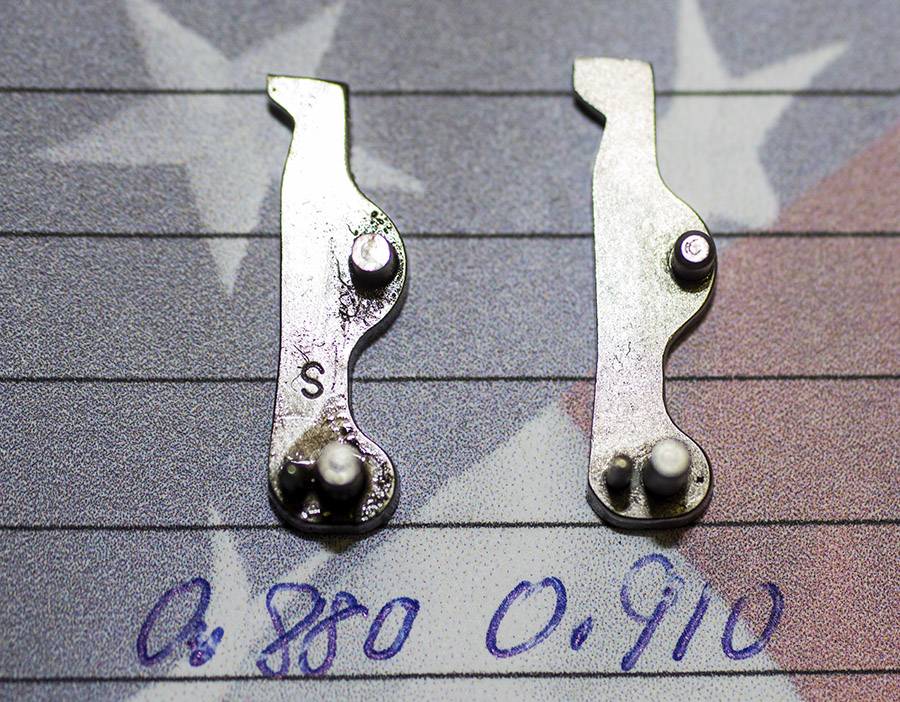
I’m working on a detailed tutorial on how to time a revolver…it’s my beloved Model 60. It seems the more things go south on that old war horse, the more I love it. This time, the revolver went out of time (that means it’s firing with the chambers misaligned with the barrel), and the way to correct that is by fitting a new hand. That’s the piece you see in the big photo above, showing the well-worn 60-year-old original hand on the left and a new one on the right (the hand is the part that advances the cylinder for each shot). Good times. Did I mention I love that gun?
I’ll be on a bunch of secret missions in the next few months. I’m visiting Janus Motorcycles in the next few weeks and I’m going to ride their new Halcyon 450. You may remember I rode with the Janus guys in Baja three years ago (wow, those three years went by quickly). The Janus trip was a hoot and I was blown away by the quality of these small motorcycles.
I’ll be in Gettysburg soon…four score and seven years ago, and you know the rest. Gettysburg was the turning point, and the bloodiest battle of the Civil War. I’m looking forward to the photo ops, and you’ll see the Nikon’s output right here.
And another: Hershey, Pennsylvania…an entire town blanketed in the aroma of good chocolate, streetlights that look like Hershey kisses, calories galore, and tasty treats. That will be a sweet ride!
Folks love listicles. There are a dozen or so reasons why a Timex is as good as a Rolex. That one will generate a few comments, and we’ll be bringing them to you here.
How about the Indianapolis Motor Speedway? You’ll see it right here on ExNotes. Good stuff. Yep, we’ll be there, too.
Bill’s Bike Barn…yet another vintage moto museum. Never heard of it? Well, you will!
More gun stuff? Absolutely. Fine walnut and blue steel. I’ve got a cool story about the most beautiful stock I’ve ever seen on an absolutely incredible .257 Weatherby Magnum Ruger No. 1.
Look for a follow up on the Shoei helmet Gresh wears these days…it’s in the mix, too.
A road trip to New Mexico, and that means a visit with Joe 1 (or is he Joe 2?) and another video or two. Gresh has a bunch of motorcycles. Maybe I’ll borrow one and he and I will go for a ride. Who knows?
And more rides on my effervescent and exciting Enfield, one of the best bargains in biking (we’ll have a listicle coming up bargain bikes, too). Now that the left-leaning evil time suck (i.e., Facebook) is in the rear view mirror, I have lots more time. I’m doing what the Good Lord intended, and that’s riding my motorcycle and writing about it.
Shortly before the pandemic began, Uncle Joe and yours truly borrowed two Royal Enfields from Royal Enfield North America and toured Baja. One was the new 650 Interceptor, and I liked it so much I bought one when I came home. The other was a 500cc Bullet, and, well, you might want to read the blogs to understand how we felt about it. Truth be told, the Bullet was probably better than we perceived it to be (that was because the dealer did a half-assed job prepping it for us). Nah, that’s not fair (it implies the dealer did half of what he should have). But there’s no expression for 10%-assed, and even that might be giving the dealer too much credit. But I don’t want to spoil the story for you. You can get to the Enfield adventures here.
Never miss an ExNotes blog…subscribe here for free!