Anyone who wants to become Vulcan must learn how to cut metal. There are many methods available like bandsaws, oxyacetylene torch, abrasive wheels, hacksaws and the old reliable, bend-it-back-and-forth-until-it-breaks. One of the relatively newer methods (in relation to the age of the Universe) is a machine called the plasma cutter.
Plasma cutters used to be very expensive. The plasma machine we use at school cost around 4000 dollars and is rated at 60 amps. The global economy (AKA China) has driven down the cost of plasma cutters dramatically. The Yeswelder cutter in this story cost me under 200 dollars and is rated 55 amps. Shipping was free.
In use, a plasma cutter works much like an oxyacetylene cutting torch. The big difference is that you don’t need any fuel: no acetylene gas to buy or bottles to rent. The only thing burning in a plasma cutting system is the material you are cutting through.
The plasma cutter uses regular compressed air and a bunch of ions and magical stuff inside the cutting head to create a super-hot, narrow stream of plasma. It’s sort of like having your own pocket-sized northern lights shooting out of the torch to cut material.
Unlike oxyacetylene, there is no waiting for the material to heat up. With a plasma cutter you set the torch near the material and pull the trigger. A jet of plasma shoots out of the torch and you can start cutting immediately. The plasma cutter cuts at about the same speed as an oxy cutter so you can move right along.
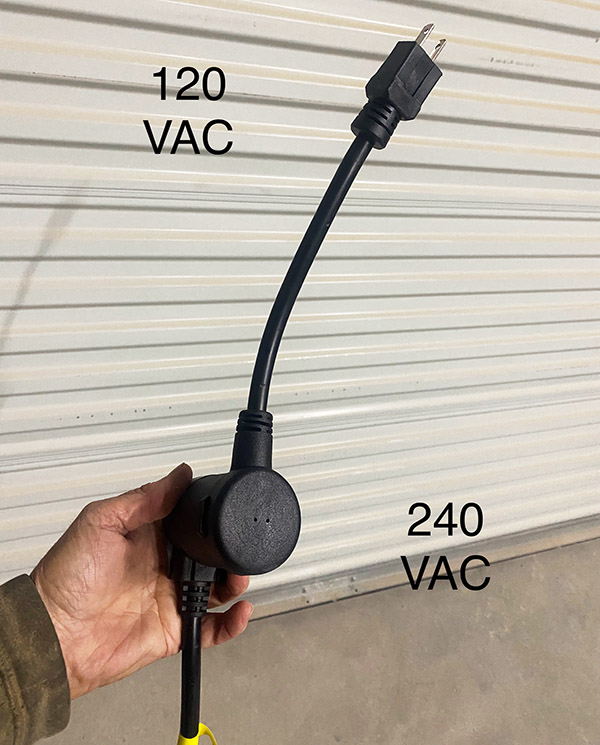
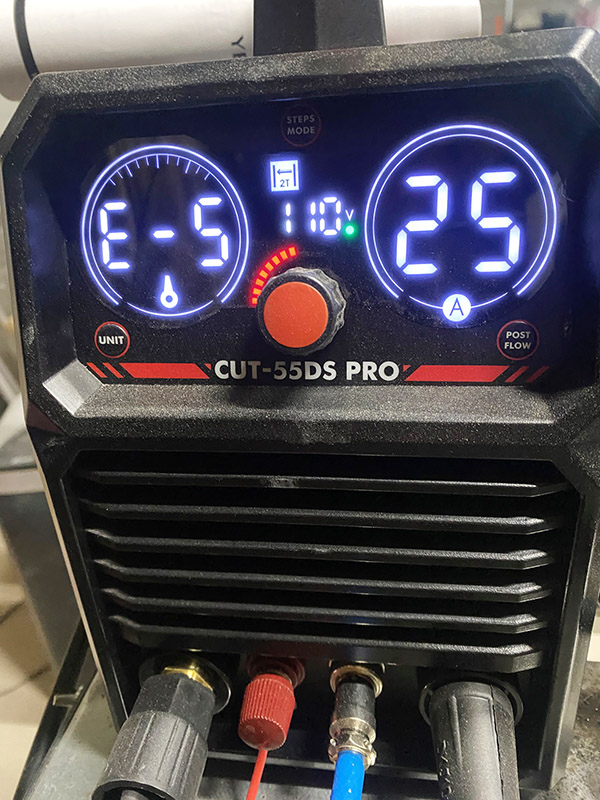
The 55 DS Pro Yeswelder plasma cutter will operate using 120 or 240 volts AC using the included adaptor. The machine auto selects for the voltage you are plugged into. At 120VAC input the machine will only go to 30 amps. You’ll need 240 VAC to access all 55 amps of metal slashing power
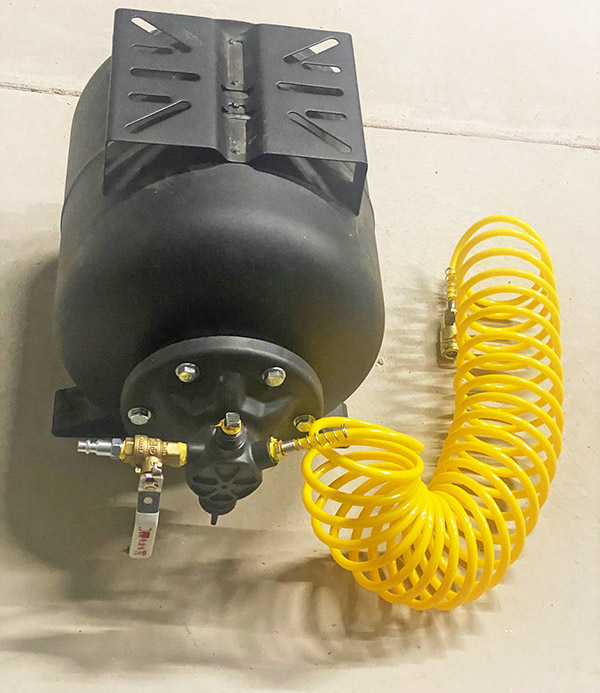
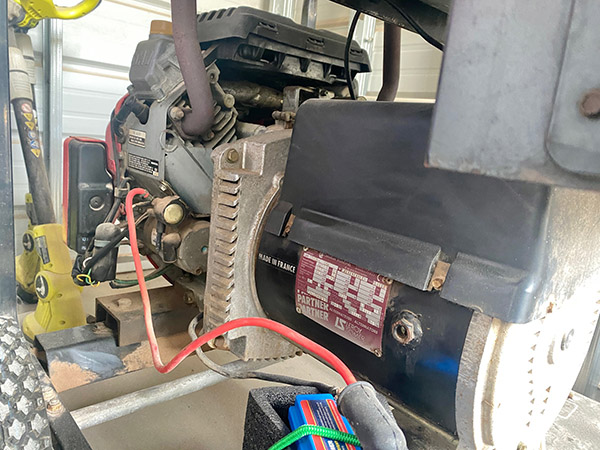
My air compressor is too small for the plasma cutter and is located too far away from where I cut so there’s a long air hose involved; with a long hose line pressure drops fast. I made a remote air tank out of a defunct water pump to give me a little more cut time and eliminate the line drop. I can cut 6 to 10 inches before I have to wait for the compressor to catch up. If you’re going to be doing a lot of continuous cutting with a plasma cutter you’ll need a decent sized air compressor.
With the compressor and the plasma cutter operating simultaneously, my smallish off-grid inverter struggles and spits out a low voltage alarm when the compressor starts. To get around this problem I use a fossil fuel powered 10KW Honda generator. The big V-twin Honda doesn’t even notice when I cut with the plasma torch and the air compressor kicks in.
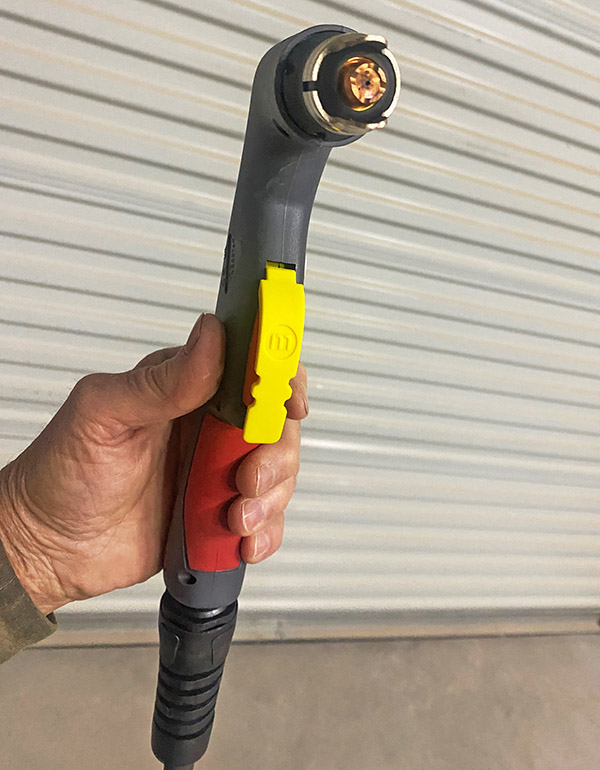
Most everything you need to get started is included with the Yeswelder Cut-55. You’ll need to provide the air compressor and connect an air hose to the built in pressure regulator/filter on the back of the Yeswelder. Unless you cut through the torch hose or spill a Big Gulp container of Pepsi Cola inside the cutter, normal consumables are only the bits inside the torch that churn out ions.
The controls are pretty simple on the Yeswelder Cut-55. There is an amp setting, an air pressure setting, 2T or 4T trigger actuation (on-off with squeeze and release or squeeze on, release, torch stays on, second trigger pull turns off) an indicator for input voltage and not much else. It’s a simple machine to operate.
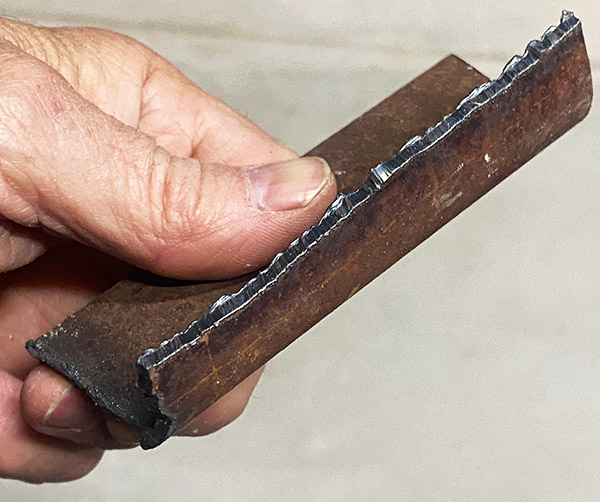
I haven’t used the machine very much; it cut through 1/8-inch steel like a hot jet of plasma through 1/8-inch steel. There’s not as much slag as with oxy cutting so clean up is easier. It should handle ¼-inch steel without a problem and I don’t work with anything thicker.
The prices on these Chinese plasma cutters are so much lower than the old line companies something must be sacrificed. I’m guessing in a full time metal shop the cheapo versions wouldn’t last long but for guys like me or you who just want to cut out a metal silhouette of a buffalo once in a while the Yeswelder looks like the goods. I give it a 5-star rating on the Hacksaw Chi-Com scale. That being said I have only one caveat: The thing may go up in a ball of exploding ions tomorrow. If it does quit I’ll be sure to report it in a follow up story.
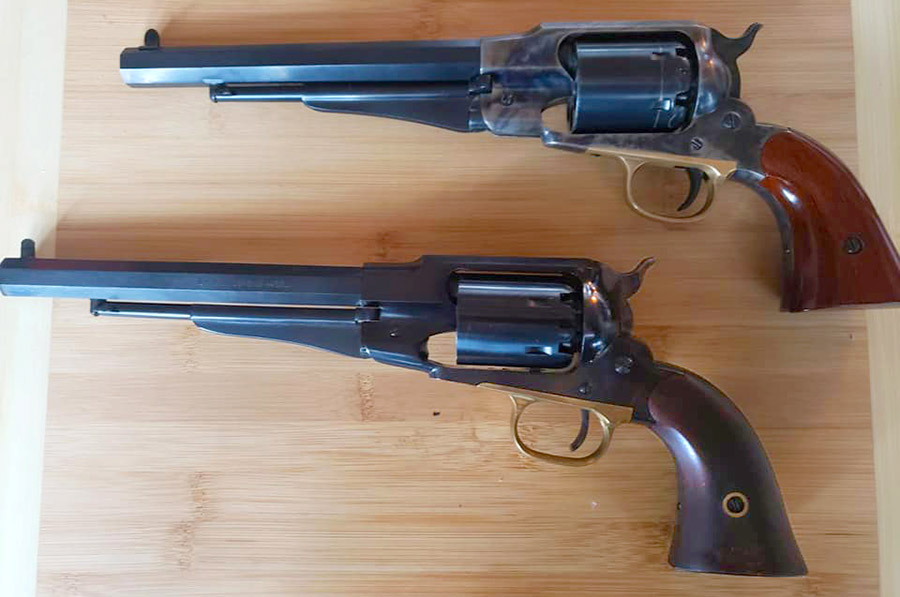
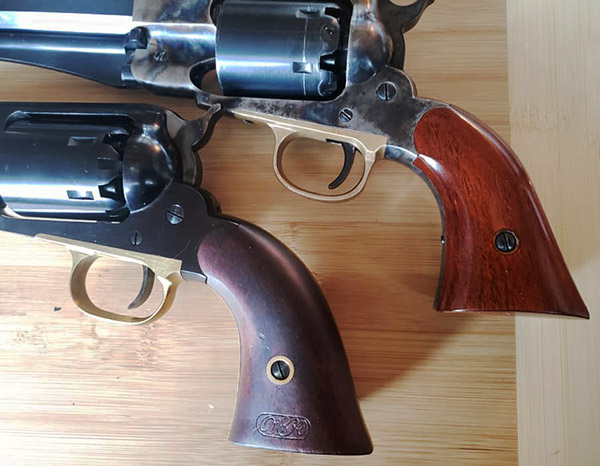
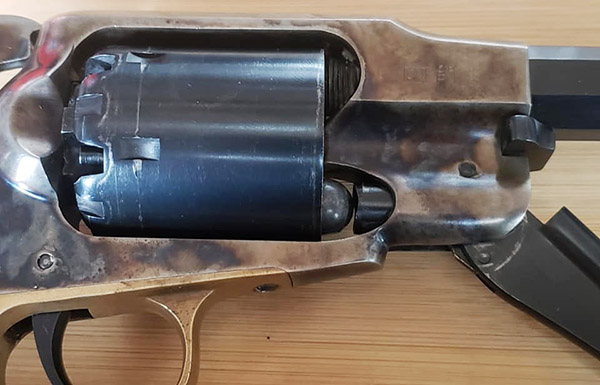
This blog compares two modern Italian reproductions of the famed .44 caliber 1858 Remington New Model Army revolver. One is manufactured by A. Uberti S.p.A. (it’s the one on top in the big photo above); the other is by F.LLI Pietta (the revolver on the bottom). Here’s another shot of the two:
The Uberti in on top right, the Pietta is on lower left.
The 1858 Remington New Model Army was a competitor to Colt’s blackpowder percussion sidearm. The Army went with both versions but primarily bought the Colt (it was 50 cents cheaper than the Remington). Then the Colt factory had a fire in 1864. At that point, the Army starting buying Remingtons in quantity. The Remington was considered to be the stronger revolver because it has a top strap over the cylinder (the Colt does not), and some folks feel the Remington is easier to aim because the rear sight is cut into the frame (instead of the hammer, as on the Colt). And there are other advantages to the Remington, which Jose covers. With that as a background, here’s Jose’s article on the modern Uberti and Pietta reproductions. All photos in this blog are by Jose.
Help us publish: Please click on the popup ads!
If you’ve never fired a percussion revolver you’re really missing out on huge part of firearms history. But maybe you didn’t know that even here in California you can order one of these fine blackpowder revolvers online or over the phone with a credit card and have it shipped to your doorstep without background check or going through an FFL. Your state rules may vary.
Cap and ball packpowder sidearms were a huge part of arms on both sides during the American Civil War. The Union Army had a contract for the Colt 1860 Army, but when Colt could not keep up with demand Remington Model 1858’s were ordered. Many troops preferred the Remington over the Colt for a number of reasons. The Remington has a top strap making it stronger, and the Colt was prone to having loose percussion caps jam the cylinder.
Uberti 1858 Remington Revolver
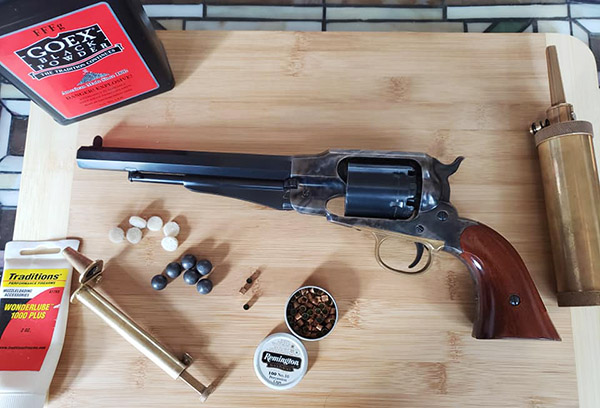
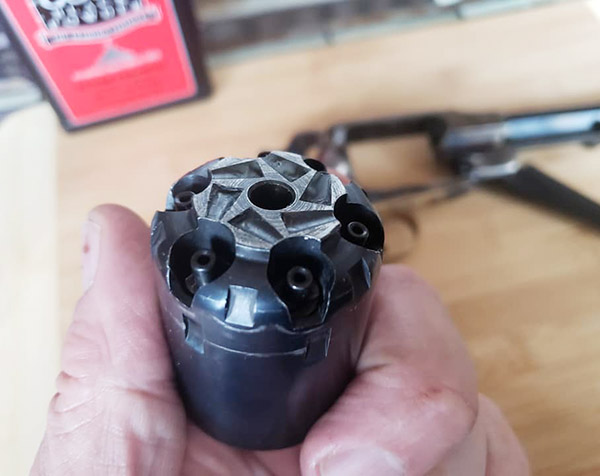
I’ve had the Uberti for about 10 years. It’s an awesome piece of fine craftsmanship. There is nothing cheap about this revolver, the fit and finish are supurb. The cylinder and barrel are a deep blue, the steel frame is color case hardened, and the trigger guard is polished brass, ans walnut stocks, giving it a very classy look. The gun is a six shot .44 cal, rifled 8-inch barrel with 1:18 LH twist, and weighs in at 2.7 pounds.
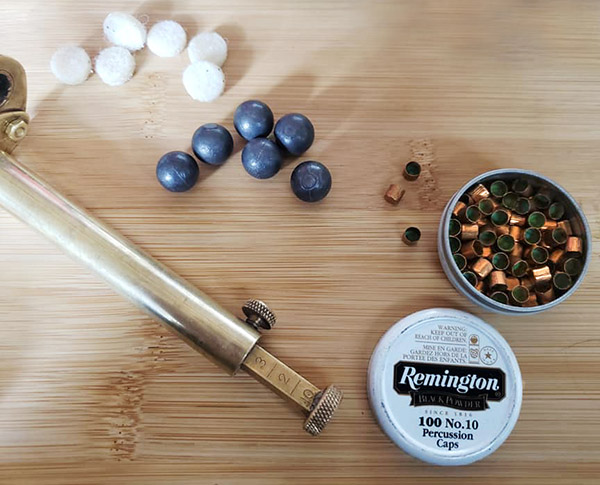
454 cal pure lead balls, Remington #10 percussion caps, waxed felt wads, and the Uberti 1858 New Army.Powder measure, balls, waxed felt wads, and caps.
I use .454-inch diameter balls cast from pure soft lead (stick on wheel weights or plumbers lead, BRN 7) weighing in at 143 grains. It fires best when loaded with 35 grains of FFF blackpowder (I don’t like substitute synthetics), a felt pad soaked in bore butter over the powder, and the ball over the top. The felt over the powder charge prevents a chain fire from jumping between cylinders, and also adds some lube to the barrel between rounds helping prevent a buildup of powder. Either Remington or CCI #10 percussion caps provide the spark.
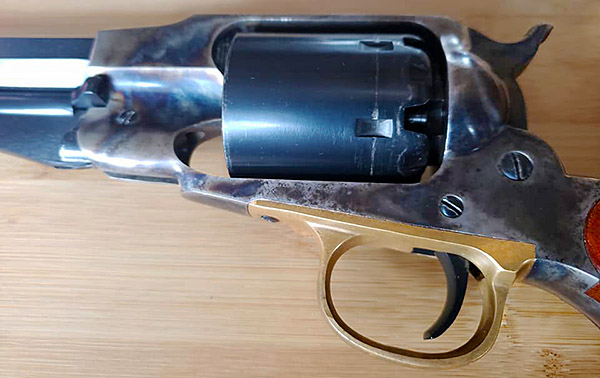
The color case hardened steel frame on this model Uberti is off set nicely by its polished brass trigger guard.The loading lever on the Remington 1858 is used to ram the ball into each cylinder, after loading powder and waxed wad. The percussion caps are placed on the cylinder nipples only after all cylinders have been loaded.The cylinder doesn’t require removal between loadings, only for cleaning.
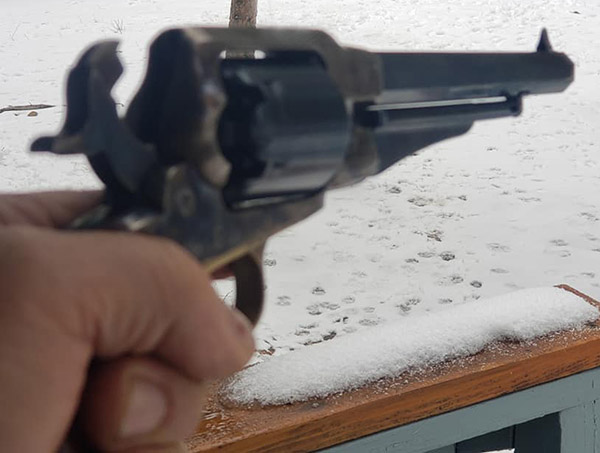
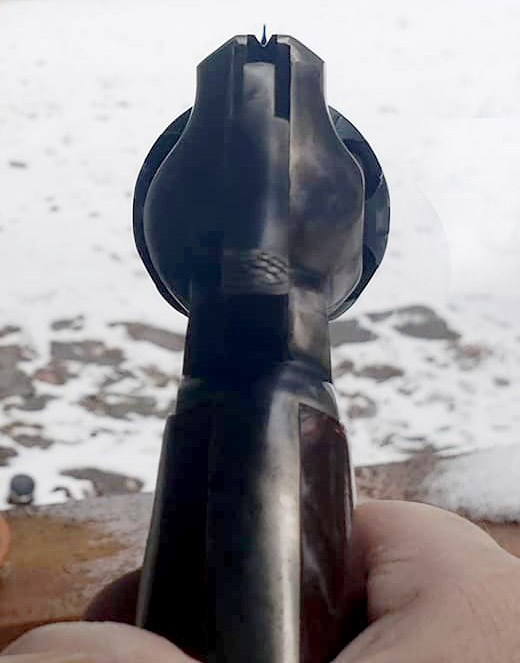
The Uberti is very well balanced and feels good in the hand. The cylinder locks up very tightly. There are noches between the cylinder nipples to rest the hammer on making it safe to carry with all six cylinders loaded. The rear sight is a V-notch on the top strap, unlike the Colt 1860 which has the notch on the hammer because the 1860 lacks a top strap. It’s no exaggeration that out to 40 yards my the Uberti 1858 holds about as tight a group as my Ruger Super Blackhawk .44 mag!
The Remington 1858 has a top strap over the cylinder making it stronger than the Colt 1860 and older firearms. It also allows for placement of a stable V-notch rear sight as opposed to the Colt’s rear site which is a simple notch filed on the back of the hammer.Nice sight picture. This Uberti has a 1:18 barrel groove twist and holds groups as tight as my Ruger Super Blackhawk out to about 40 yards.
Properly cleaning and blackpowder revolver after a day in the field is a good exercise in gunsmithing. The revolver should be entirely disassembled, down to the Springs, removing hammer from the frame, cylinder pin, loading lever, trigger, mainspring, nipples from the cylinder – everything except for removing the barrel from the frame and front sight.
The notchs between the nipples are for the hammer to rest, allowing the six-gun to be safely carried with all cylinders loaded.
A good set of gunsmithing drivers and properly fittjng nipple wrench are mandatory to keep from damaging the screws. Owning a blackpowder revolver will help anyone gain confidence to start Barking simple dunsmithing repairs and parts replacements on other types of firearms. If you don’t already have a blackpowder gun order one today! They are a blast.
Pietta 1858 Remington Revolver
This one was recently purchased because the price was right. It looks like it has never been fired, and I’ve not fired it yet, either. The specs are essentially the same as the Uberti; however, the claimed weight of the Pietta is only 2.4 pounds compared to Uberti’s 2.7 pounds. For whatever reason the Uberti feels much lighter and more well balanced. The Pietta is noticeably front heavy. The Pietta has a little play at cylinder lockup. The hammer pull and trigger feel smooth and crisp, similar to the Uberti.
The Pietta, another quality Italian replica in a slightly lower price range.
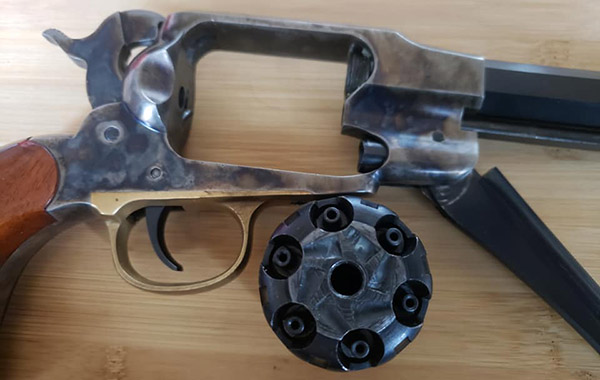
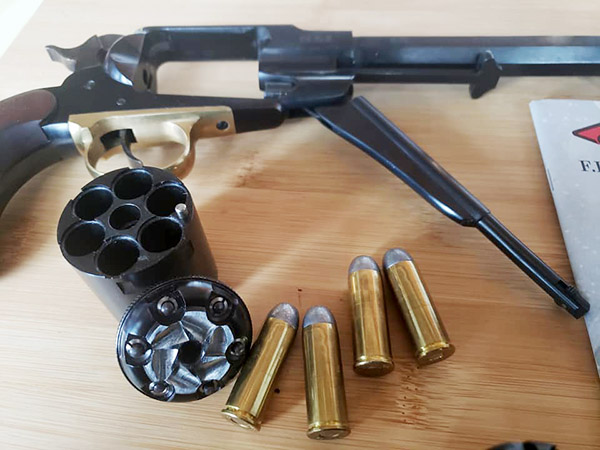
The really nice thing about the Pietta is that it came with an optional .45 Colt conversion cylinder. I’ve always wanted to get a conversion cylinder for my Uberti but they are very expensive, about 2/3 what I paid for the gun, and they always seem to be out of stock.
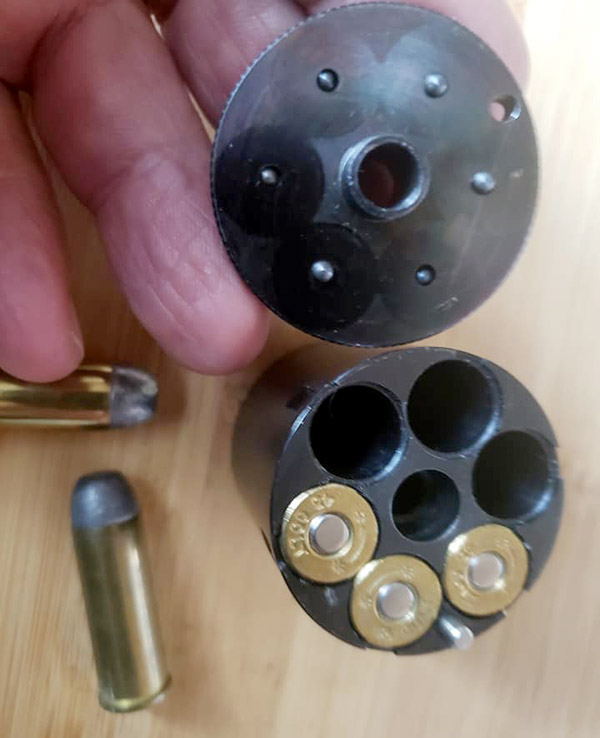
This Pietta came with a .45 Colt conversion cylinder.The conversion cylinder has an upper plate that holds a separate firing pin for each cylinder.
The conversion cylinder for the Pietta fits very nice, locks up tightly, and came with a box and a half of .45 Colt ammo which I have no intentions of using. Remington first started converting Model 1858 revolvers to .46 cal rimfire metallc cartridges in 1868. These were still blackpowder cartridges as smokless powder hadn’t yet been developed. So I will hand load .45 cartridges for the Pietta using blackpowder to stay traditional.
I’m looking forward to shooting these two together on a side-by-side comparison soon. For now, I hope you enjoy the photos.
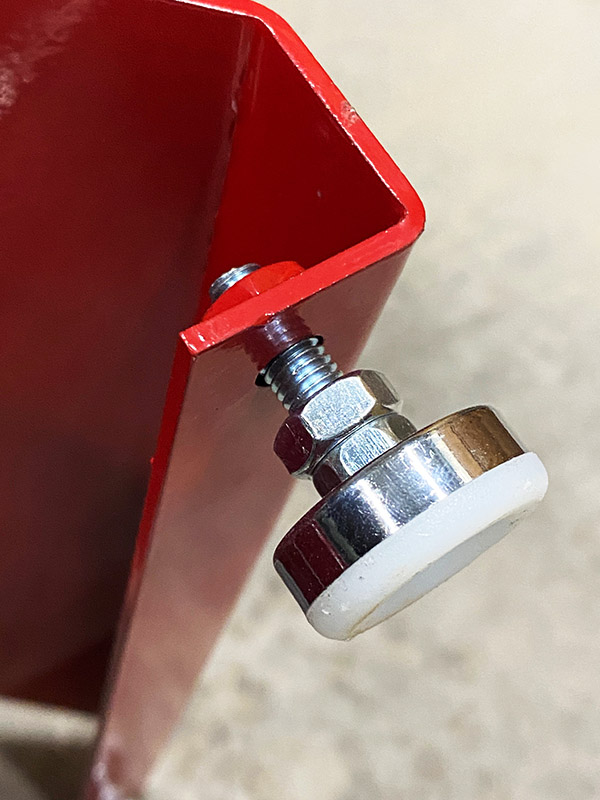
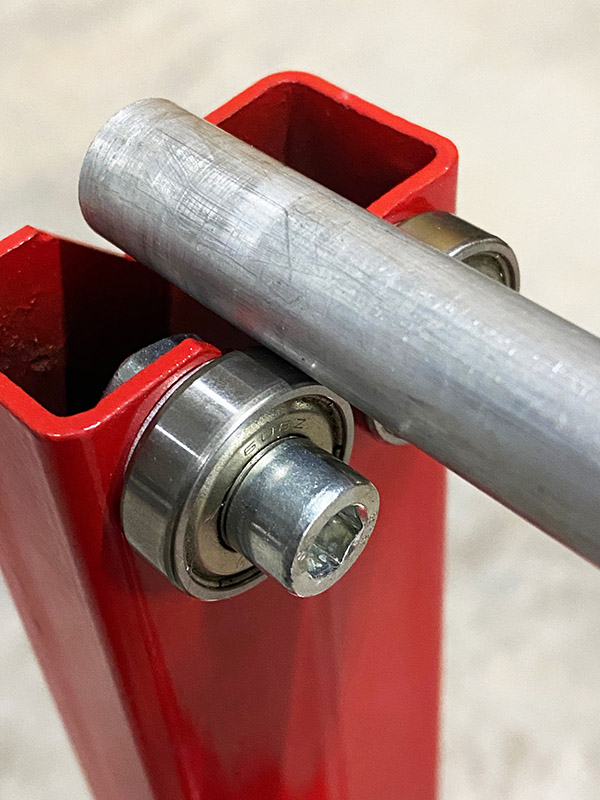
I usually use two jack stands with a long piece of ½” rod through the wheel bearings to balance a motorcycle tire. It works ok but there is a bit of drag on the bearings that makes balancing a sticky affair. You can get the wheel close but minor amounts of weight (like ½ ounce) won’t have much effect.
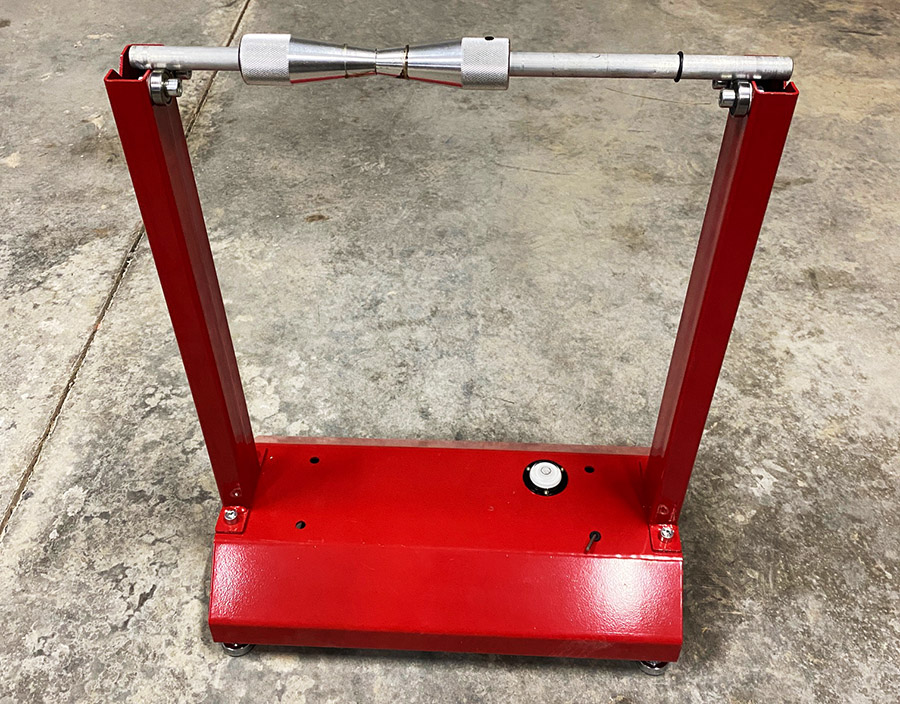
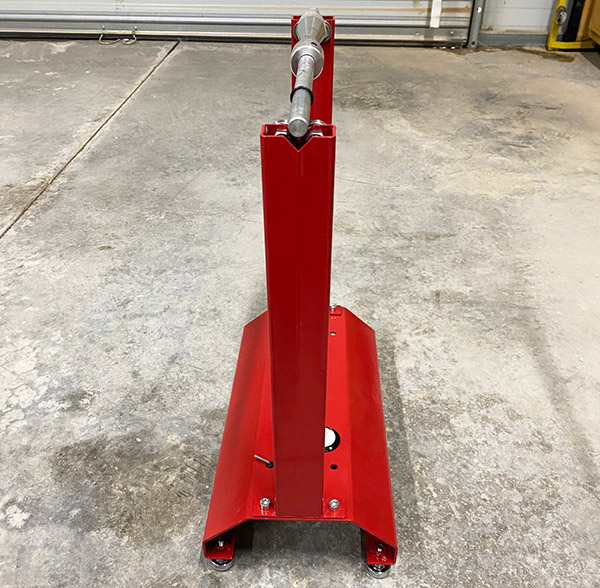
Since I got the Harbor Freight tire machine I’ve been happily changing tires as needed. I’ve done around eight tire changes and I’ve got the system somewhat down. The only thing I was missing was a dedicated tire balance stand. This is where the Easyberg (no relation to Joe Berg) tire balancer comes in.
An Amazon search will return about two dozen motorcycle tire balancers, and most of them look exactly the same. The Easyberg was the cheapest at the time I bought it, but prices sway back and forth depending on which seller is having a sale or coupon deal. I paid $36 for the balancer and there is no way I could build one as nice for that amount of money.
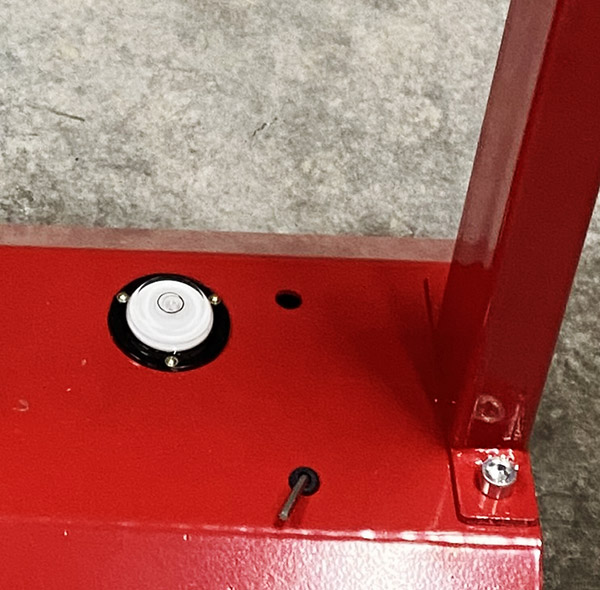
My Easyberg came unassembled. It was Easybarrak to assemble the thing, requiring only an open end wrench and a hex wrench. A tiny screwdriver was needed to tighten the bubble level.
Once assembled, the Easyberg I received was slightly tweaked. The axle did not run parallel to the base making the tire sit crooked in the stand. The Easyfoil material is thin enough that I could tweak it straight. Any warpage of the base due to the tweaking process can be taken out by the four, adjustable feet. I used a four-foot level on top of the axle to check the bubble and it was fairly accurate. I’m not sure being perfectly level is all that critical, but I set it up that way.
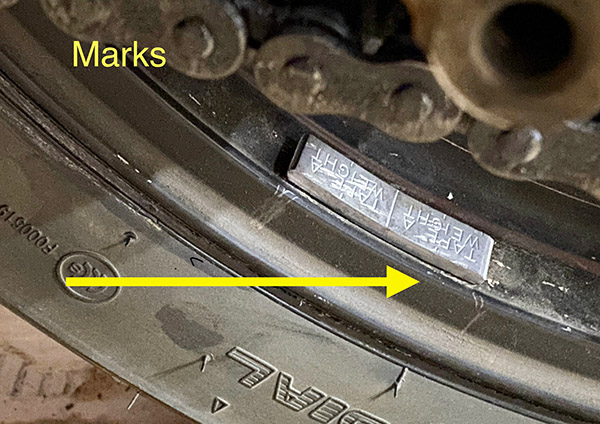
Using the balancer is Easyberg as pie. You slide the axle through the wheel and snug up the centering cones using the supplied Allen wrench to lock the cones into position. This next step is where the Easyberk…I mean berg, is better than jack stands. The four ball bearings supporting the axle spin much Easyburger than the bearings found in your motorcycle wheel; this free movement allows a finer balance. ¼ ounce of weight will cause the wheel to move.
I give the Easyberg four stars (out of five) subtracting one star due to the thing being crooked. Otherwise it’s Easilyberk worth the $36. I’m now fully set up to change motorcycle tires. At the speeds I run, usually less than 100 MPH this balancer does a good enough job and my limited riding skills can’t detect any wheel vibration at highway speeds.
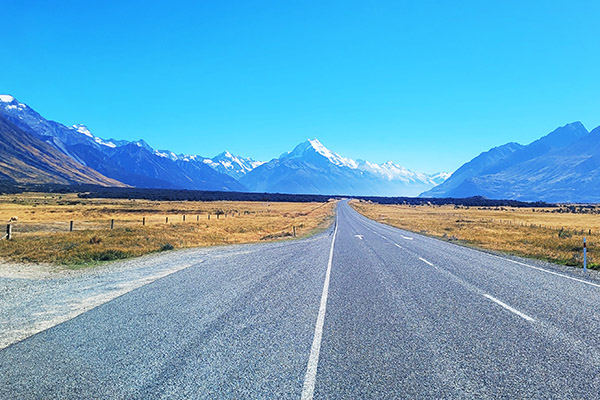
I was in the tiny town of Omarama, New Zealand, having coffee and trying to wake up enough to plan the day. I was under an hour and a half away from the Hooker Trail, which I learned just a day or so ago was not too far off my original route. The Hooker Trail was one of those that I kept seeing and hearing about in any conversation about the North Island. I normally avoid touristy places as much as possible. One of my many travel mantras is “If I run into another American I have failed.” That’s because most Americans stay on the beaten path and rarely venture off. The venturing off seems to be my happy place.
As I finished my coffee and began to put my gear back on for the ride to the Hooker Trail, I fueled up since it New Zealand was pretty devoid of towns for the next couple hundred miles, which is perfect for riding. I was expecting Mount Cook would be similar to the other areas of New Zealand and was preparing to view a miniature copy of say, Mt. Hood. The previous day (although incredible and diverse) was like a 70% replica of the western United States with a sprinkling of British Columbia thrown in. Yes, I am extremely spoiled in my perspectives of motorcycle roads. I understand this.
It didn’t take long after leaving the coffee shop before low level clouds consumed me and the road. I had just gone through a similar area and noticed when I gained some elevation it cleared up. I remained optimistic as I strained to see anything in front of me. The attempt to hike the Hooker Trail surely would be in vain if it continued to stay this way, as I have heard it often does up in the s, outhern Alps of New Zealand.
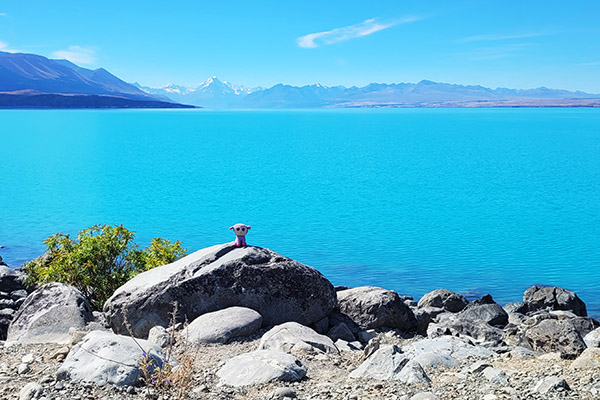
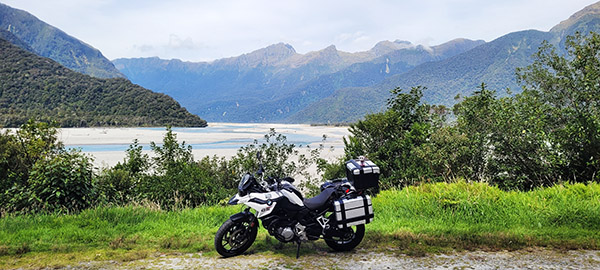
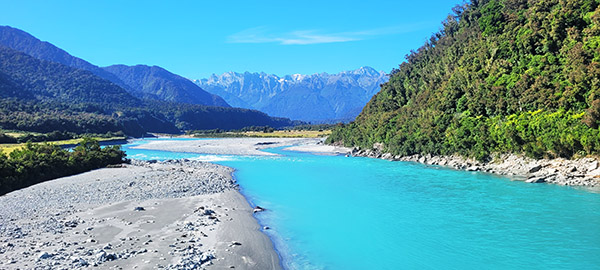
Fortunately, this wasn’t the case. Once I hit Lake Pukaki, I had obtained enough elevation to where the clouds were below me. Lake Pukaki than came into full view and it was stunning. The neon green water contrasted with the brown mountains surrounding the lake, and it became all I could see. The colors were so overwhelmingly bright I had to pull over several times not only to take the views in but allow my eyes to adjust from the drab cloudbank that had me engulfed over the previous hour.
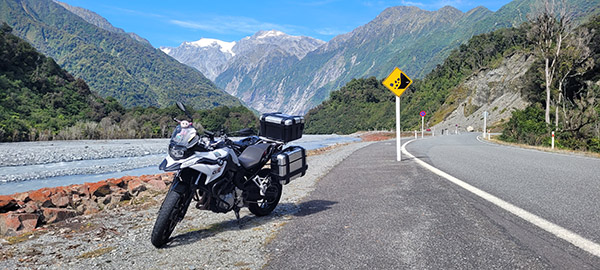
After another 30 minutes of riding along this other-worldly lake I could see Mount Cook was getting close and I was excited to finally hike the Hooker Trail. As I entered the parking lot around noon, I noticed how crowded it was. There was hardly any parking (at least for cars). I found a perfect spot for Massie right up front next to the trail head and swapped out my riding outfit for hiking gear.
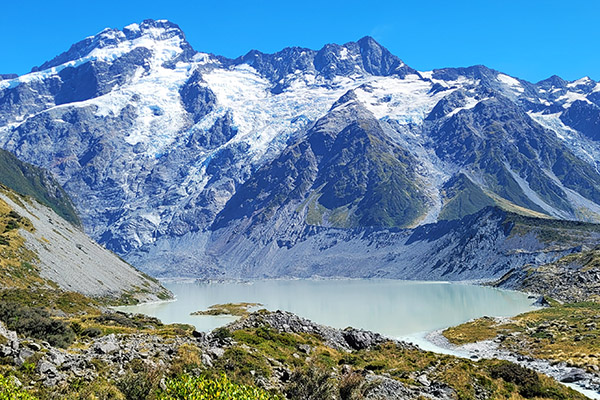
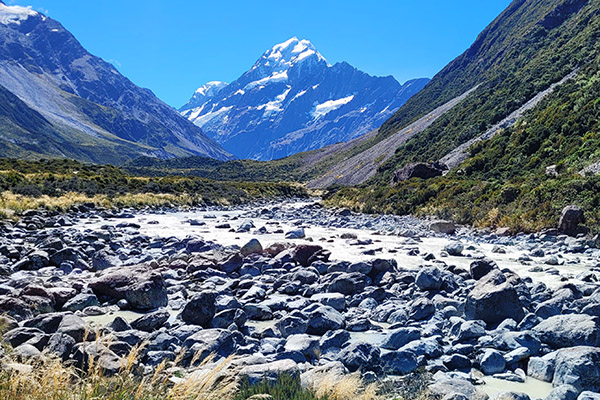
This was it: The Hooker Trail. It wasn’t too long, only around 6 miles round trip. Once I began hiking I understood why I had kept hearing about it in my travels and when reading random blogs and posts. It was super-crowded. The hike was beautiful. Around each corner was a new view of either glacial lakes or views of Mount Cook towering above. The trail ended at a glacial lake with a beach that was perfect for a quick swim. It was mid-afternoon and it was warming up quite nicely.
Massie she was parked right where I had left her and ready to blast out our final few hours to the hostel on the edge of Lake Tekapo. The trip had taken me through what felt like a whirlwind of geographical features. There’s no question that that the roads, people, and environment in New Zealand are a dream for anyone (especially a motorcyclist). As I cracked open a cold Kea IPA on the lakeshore a sense of satisfaction came over me. I could now add New Zealand to the growing list of countries I where have motorcycled. The memories of this trip will help me pass the time while on the long flight to my next destination. Cheers New Zealand!
It was well after 6:00 p.m. and I was starting to hit my wall for riding. My goal was to travel to this campground I stumbled upon on Google which was about 5 miles down a dirt road which had some decent reviews. The rental company mentioned no off-roading as Massie had street tires. I zoomed in on the map and saw “Linda Road,” so I technically was not off-roading. Check!
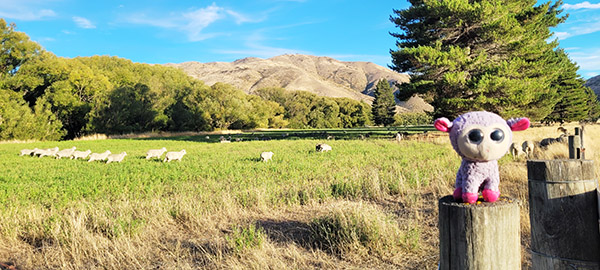
The road was a very tame forest service road with the occasional “Traffic Lamb,” as quite frequently there were herds of sheep and they would part like the Red Sea as they heard Massie’s engine roar grow closer (you can send hate mail for that joke to Joe Berk).
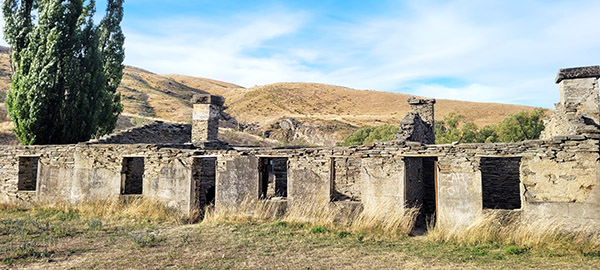
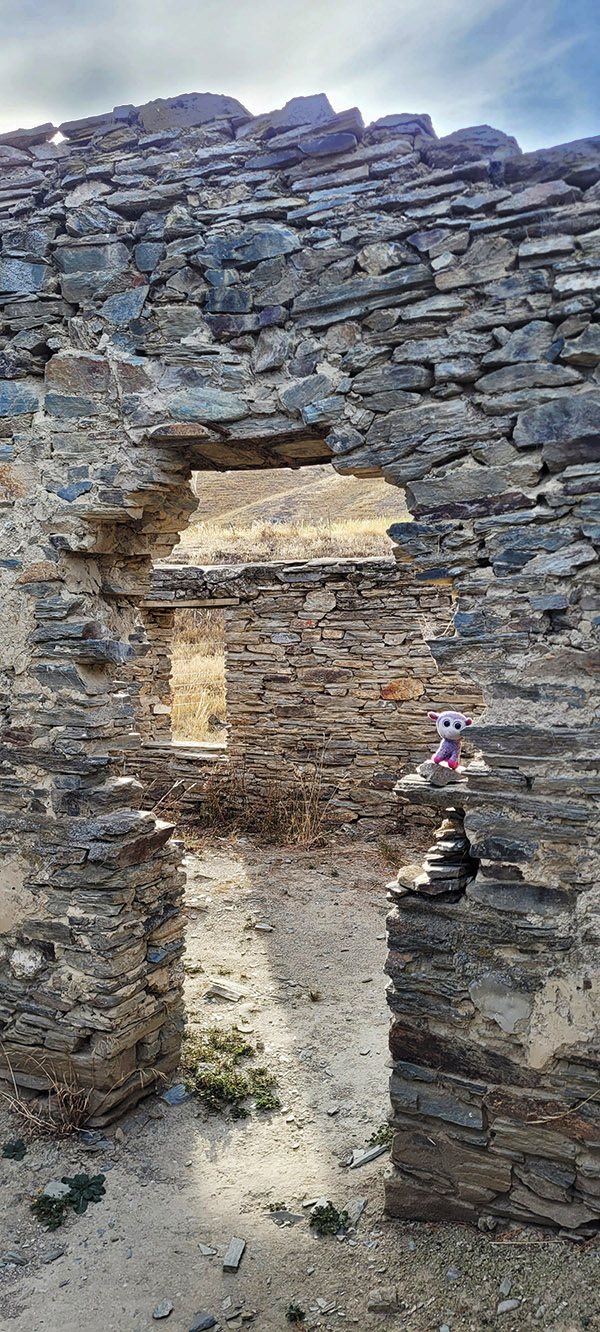
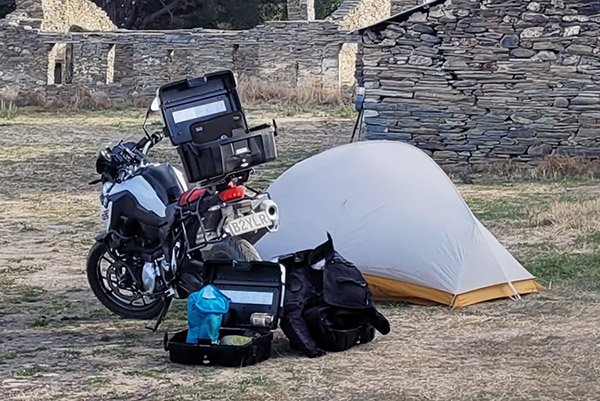
Once I neared the campsite I noticed a couple of old rundown stone buildings (from who knows how long ago) and a few van lifers dispersed around a large field. This was a really cool spot! Not only that, but you had views for miles of the sun beginning to set over the brown grassy mountains that surrounded the location. This was Linda’s Camp. It was an old short term gold mining operation from the 1860s, which switched hands a few times before finally being abandoned in the 1950s. This was an amazing place to camp and it was far off the grid. I didn’t even have cell service.
After setting up my tent I struck up a conversation with an old gold miner. He was living in his van there and spent his days panning for gold off a nearby river with minimal luck. He got a good laugh from my story about getting the boot from the coffee shop earlier that day for drying my gear there. The rest of the evening was spent exploring the hotel ruins and a short hike up the mountain to watch the sunset. It was one of those moments where I really was able to relax, breathe, and just be in the present. It was a long but rewarding day and I thought having an early night was in order. It would be another long day tomorrow to include the Hooker Trail hike, which I was greatly looking forward to.
Waking up in yet another serene location with Massie sitting just outside the tent was another perfect kickoff to this new day. Since it was still pretty early, after packing I thought pushing the bike out of the camping area was the proper thing to do to avoid waking any of the van lifers (or the gold miner).
Once well outside the perimeter I went to start the bike. Nothing happened. Shit. The battery was somehow dead. I took the panniers off and attempted to manually jump start it off a small incline. No good. It wasn’t starting. Well, I thought, it was not so funny breaking that “stay on the road rule” now, was it? I had no cell signal either. As I sat down weighing my options (none of which none were good) I heard a couple of pots banging together. The old gold miner was up. I walked over and asked if he had jumpers, and he did! Sure enough, the bike fired right up with his help. Okay, cool I can still make the Hooker Trail even if I am an hour behind schedule. And, the rental company would never know I was off road.
Once I was back on the main road and well on my way, the need for coffee hit me. I pulled into a rest area to see if there was a cell signal to guide me to a coffee shop. There was a cell signal, and there was a coffee shop not too far away. I pulled out and began racing the Linda Pass switchbacks when suddenly all I saw was a huge yellow Scania 18-wheeler coming head on at me. Why was he in my lane? SHIT! I was on the wrong side of the road! In my morning fog, and my distraction from the battery issue I zoned out and drove on the right side of the road. Even with a giant yellow arrow on Massie’s dash as a constant reminder, I somehow ignored the fact that they drive on the wrong side in New Zealand. I didn’t have much time to react and managed to skirt along not so much of a shoulder, but a strip of grass as the truck blasted by me.
That was close. I really didn’t need any coffee after that wakeup call, but what I did need was a moment to get my head back in the game (especially if I was to complete the Hooker Trail and find a campsite). Due to Massie’s moody electrical system, tonight’s campsite would need to be near a town with a strong cell signal. It was still early and my confidence was high. I knew I would satisfy both objectives.
There are certainly worse places to wake up. I opened my eyes facing a beautiful mountain lake with loud wekas clumsily hunting for food in the brush next to my tent. Without my cooking gear it took me just about 20 minutes to pack up and load Massie, the BMW GS750 for what would be a full day of riding. As I was packing up I was already craving a coffee and a meat pie for breakfast. While stuffing my gear in the panniers I noticed how wet everything was from the dew and being so close to the lake. The sun was out though, so I thought after an hour or so of riding I would dry it out as I ate breakfast.
Riding to breakfast took a bit longer than expected and the one hour turned to three. Not that big of a deal as the sun was fully out now and would allow for my gear to dry while I researched my route and stops for the day. As I pulled into a coffee shop in a small town along my route the waitress stated how it would be a while for my food and coffee. This was my queue to unpack my wet gear and lay it out to dry while I was researching maps and things to do for the day.
During my wait several people introduced themselves and we had some fun conversations about my gear and riding. It was a great environment, or so I thought. After about 20 minutes my coffee and food arrived and I was told that maybe I should take it to go and it was time to pack up my gear. I guess they didn’t like the look of my tent and equipment drying and sprawled out all over their front porch. Which I sort of get, even though many of the clientele had been chatting me up. I apologized and, well, it took me about as long to pack up that gear as it did for them to bring my coffee (it happened to be fully dry by the time it was packed). I found it a bit rude, but I understood that having my gear everywhere could be viewed as a bit of a mess. It was time to get going, anyway, as I had a long day ahead.
During my minimal research and planning at the coffee shop I discovered this one hike that I continually heard about from others. It was the Mount Cook Hooker Trail. The hike wasn’t too long, and it had an incredible view at the end. This was only a couple hours off my planned route. Adding that hike meant I would have to have a long day and miss a lot of stops that tourists hit, such as the Franz and Fox Glaciers and hikes along that area. I decided to prioritize the Hooker Trail and skip the glaciers and other coastal hikes. Having made this decision meant a 350-mile day. Which to me didn’t seem like a lot, but the roads were tight and windy, which I thoroughly enjoyed, probably too much as I used the long day as a reason to really wear the edges of the tires in.
After close to 10 hours of aggressive riding through what I felt was like a mini version of the Western United States and British Columbia, I arrived where I thought would camp for the evening, just outside a city called Wanaka. However, the “campground” resembled something of a tent city I would expect to find under Interstate 5 in Seattle. That made it a hard pass for me. I did have a second option, but it was another 45 minutes north and if it didn’t work out, I would be in a tight position as the day was beginning to wear on me. I decided to shoot for it and hope for the best. What I found was far more than I expected and maybe one of the coolest places I ever moto camped.
Zongshen ended production of its iconic RX3 motorcycle and CSC sold the last of its RX3 inventory. I was tangentially involved in bringing the RX3 to America and I had a ton of fun on that motorcycle. Knowing that the RX3 is no longer in production is like hearing an old friend has passed away. In the end, the S-curve prevails for all of us, I guess. But it still hurts. The RX3 was and still is a great motorcycle.
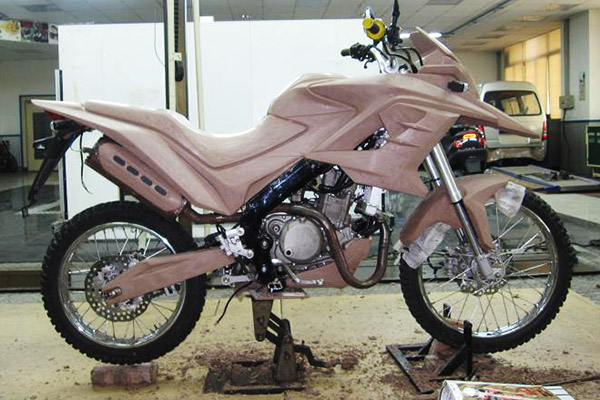
An early clay mockup of what would become the RX3 in Zongshen’s Advanced Design center.
According to my sources in Chongqing, Zongshen first started thinking about a 250cc offroad and adventure touring motorcycle in 2010. Engineering development took about two years (excluding the engine). China’s initial and traditional 250cc was based on a Honda CG125 air-cooled engine, which evolved into 150cc, 200cc, and 250cc variants (the 250cc CG engine was actually 223cc; it is the engine that powers CSC’s current TT 250). The CG-based variants didn’t have the performance Zongshen wanted for its new adventure touring motorcycle, and that led Zongshen to develop a 250cc water-cooled, four-valve engine for Megelli in Italy. It went into the Zongshen NC250 motorcycle. This engine also went into the RX3.
Yours truly with former Sears president and CSC advisor Carl Mungenast on Glendora Ridge Road. I rode the CSC 150 Mustang replica in this photo to Cabo San Lucas and back.
For CSC, the Zongshen connection started with a search for a larger CSC 150 engine. The CSC 150 was the Mustang replica Steve Seidner designed and manufactured in 2009. I was already in China for another client, and it was only an hour flight from Guangzhou to Chonqging for the initial visit to Zongshen. To make a long story slightly less long, CSC started purchasing the Zongshen 250cc engines for the little Mustangs. I think most of the folks who bought those Mustangs really didn’t care if it was a 150 or a 250. Both were capable bikes; my friends and I rode the 150cc version to Cabo and back. It was the 250cc Mustang engine that established the relationship between CSC and Zongshen, though, and that was a good thing.
When CSC’s Steve Seidner noticed an illustration of the RX3 on the Zongshen website, he immediately recognized the RX3 sales potential in the United States. Steve ordered three bikes for evaluation and he started the U.S. certification process. Steve and I did a 350-mile ride on two of those bikes through the southern California desert and we both thought they were great.
Showing the Zongshen execs in Chongqing possibilities for a ride in America. The Chinese sponsored the Western America Adventure Ride as a result of that discussion. It was awesome and the bikes performed magnificently.
Zongshen was not targeting the U.S. market when they developed the RX3; they thought the U.S. market had different requirements and consumer preferences. The initial RX3 design did not meet U.S. Department of Transportation lighting and other requirements. It was back to China for me to help set up the specs for the CSC RX3 and the initial order.
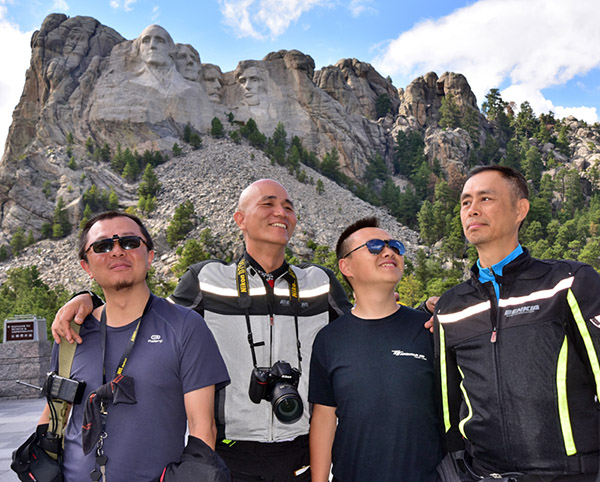
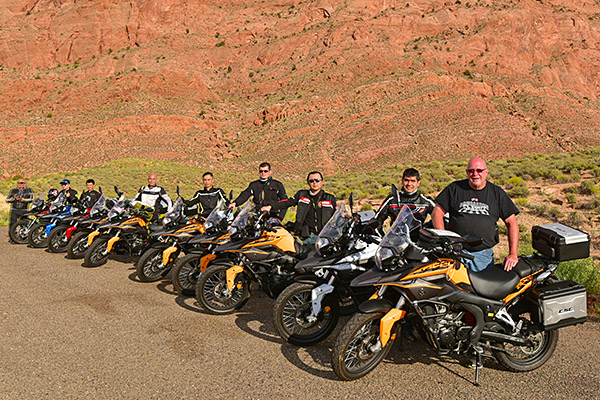
On the Western America Adventure Ride, we rode from southern California to Mt. Rushmore, back to the Pacific across the top of America, and down the Pacific Coast to return to Azusa. Here King Kong, Leonard, Hugo, and Tso emulate the American presidents at Mt. Rushmore.
On that early visit, the Chinese told me they wanted to ride in America. They sent over a dozen bikes and as many riders, and we had an amazing 5,000-mile adventure we called the Western America Adventure Ride. Baja John planned the itinerary and mapped out the entire ride; we even had special decals with our route outlined made up for the bikes. We let the media know about it and it was on this ride that I first met Joe Gresh, who wrote the “Cranked” column for Motorcyclist magazine. I made a lot of good friends on that trip. After the trip through the American Southwest, Zongshen invited Gresh and me on a ride around China, and after that, I was invited by AKT on a ride through the Andes Mountains in Colombia.
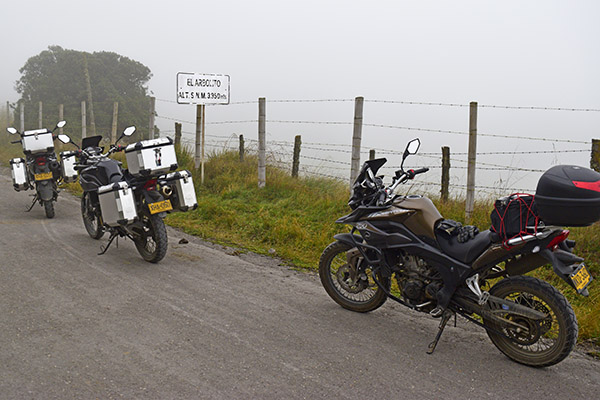
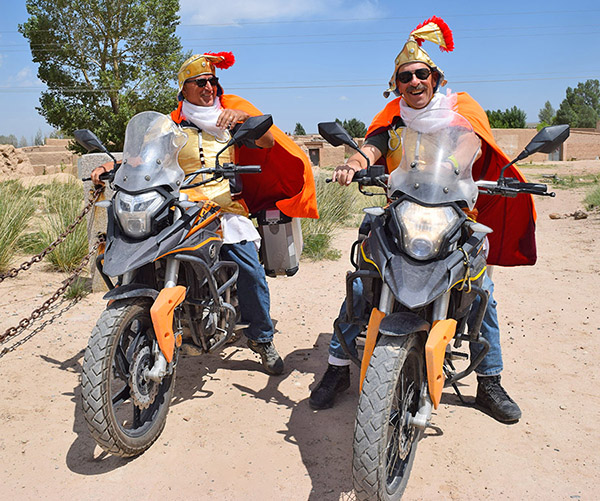
In Medicine Bow, Wyoming, on the Western America Adventure Ride. Two Colombians also participated, which resulted in an invitation to ride in Colombia.On the road in the Andes Mountains. The sign says the elevation is 3950 meters (that’s 13,000 feet above sea level).Joe Gresh and I gladiating near Liqian, China. The China ride was the adventure of a lifetime.
At CSC, we had a lot of discussions on the initial marketing approach. We were looking at a $50,000 to $100,000 hit for an advertising campaign. Maureen Seidner, the chief marketing strategist for CSC and co-owner with Steve, had a better idea: Sell the bikes at a loss initially, get them out in the market, and let the word spread naturally. We knew the price would stabilize somewhere above $4K; Steve’s concept was to sell the bike for $2995. Maureen had an even better idea. $2995 sounded like we were just futzing the number to get it below $3K; Maureen said let’s make it $2895 for the first shipment instead. I wrote a CSC blog about the RX3 and CSC’s plans to import the bike. When I hit the Publish button on WordPress for that blog, the phone rang literally two minutes later and I took the first order from a guy in Alaska. Sales took off with CSC’s introductory “Don’t Miss The Boat” marketing program.
I wrote another CSC blog a week later saying that I was eager to get my RX3 and ride it through Baja. I thought then (and I still think now) that the RX3 is the perfect bike for Baja. The bike does 80mph, it gets 70mpg, it has a 4-gallon gas tank, and everything you needed on an ADV touring machine was already there: A skid plate, good range, good speeds, a six-speed gearbox, a comfortable ride, the ability to ride on dirt roads, panniers, a top case, and more. We started getting calls from folks wanting to ride with me in Baja, and the orders continued to pile in. That resulted in our doing an annual run through Baja for RX3 owners. We didn’t charge anything for the Baja trips. It was a hell of a deal that continued for the next four or five years. I had a lot of fun on those trips and we sold a lot of bikes as a result.
The Western America Adventure Riders in Arizona. This photo is prominently displayed in the Zongshen main office building lobby. That’s Baja John in front; he did nearly all the work organizing the ride.
CSC’s enthusiasm surrounding the RX3, the CSC company rides, and CSC’s online presence did a lot to promote the RX3 worldwide, and I know Zongshen recognized that. I visited the Zongshen campus in Chongqing several times. One of the best parts of any Zongshen visit for me was entering their headquarters, where a 10-foot-wide photo of the Western America Adventure Ride participants in Arizona’s red rock country dominated the lobby.
The RX3 was controversial for some. RX3 owners loved the bike. A few others found reasons to hate it, mostly centering around the engine size and the fact that the bike came from China. I spent a lot of time responding to negative Internet comments until I realized that the haters were broken people, there was no reasoning with them, and none were ever actually going to buy the motorcycle anyway. These were people who got their rocks off by throwing rocks at others.
When RX3 production ended recently, I contacted one of my friends at Zongshen and I thought you might enjoy some of what he told me. Zongshen sold 74,100 RX3 motorcycles (35,000 in China; the rest went to other countries including Mexico, Colombia, other South American countries, Singapore, Turkey, and the United States). Colombia alone purchased 6000 units in kit form and assembled their bikes in Medellin. I watched RX3 motorcycles being built in the Zongshen plant in Chongqing; I was also in the AKT factory in Colombia and I saw the RS3 (the carbureted version of the RX3) being built there. Ultimately, RX3 demand dropped off, but 74,100 motorcycles is not a number to sneeze at. The RX3 greatly exceeded Zongshen’s expectations and their initial marketing forecasts, especially in overseas markets. CSC had a lot to do with that success, and playing a minor role in that endeavor has been one of the high points of my life.
The CSC 650cc RX6 twin cylinder motorcycle. The Chinese motorcycle industry is moving to larger displacement bikes.
Chinese motorcycle companies today are emphasizing larger bikes. We’ve seen that here with the CSC RX4, the 400cc twins, and the 650cc RX6. I’ve ridden all those bikes and they are great. I like larger bikes, but I still think a 250cc motorcycle is the perfect size for real world adventure riding. I think the emphasis on larger bikes and the decision to drop the RX3 is a mistake, but I haven’t sold millions of motorcycles (and Zongshen, with CSC’s help, has).
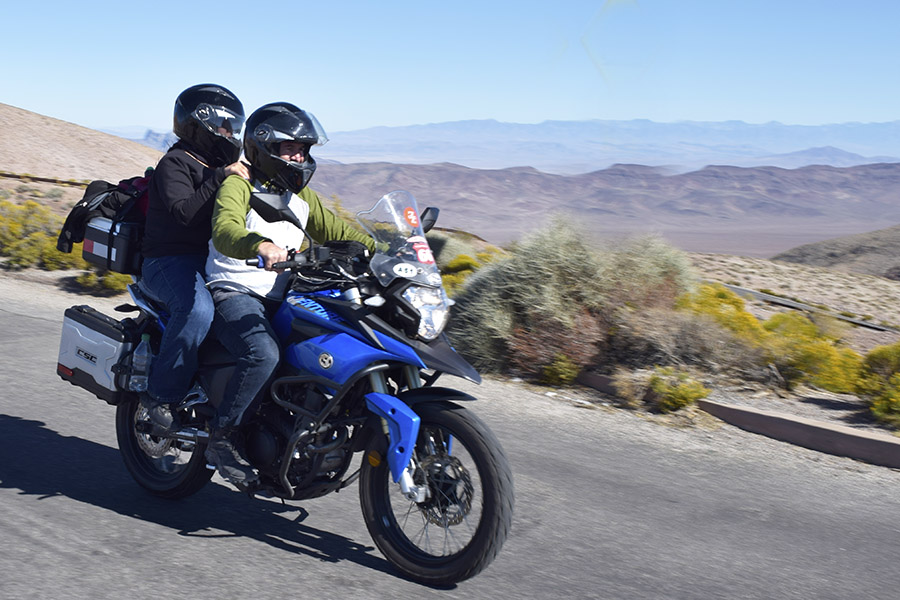
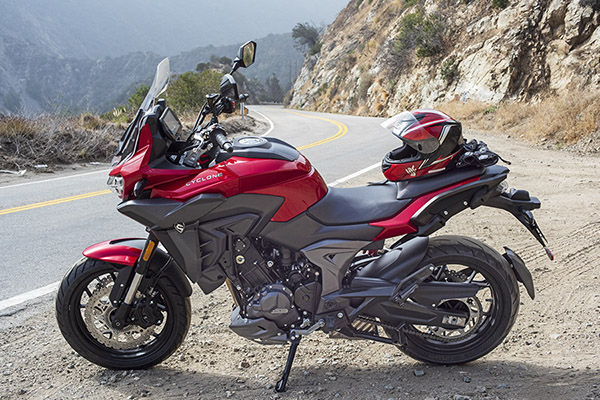
That photo you see above at the top of this blog? It’s good buddy Orlando and his wife Velma riding their RX3 up to Dante’s View in Death Valley National Park. Orlando thinks blue is the fastest color, but I know orange is. Sue and I recently visited Death Valley again; watch for the ride reports here on the ExNotes blog.
We’ve had a string of cool days here in California (cool for us, anyway, with temperatures in the high 40s and low 50s) and when it gets cold, I really enjoy a bowl of chili. I suppose the easy thing to do would be to head over to a restaurant and order up a bowl, but with restaurant prices verging on the ridiculous lately, I only visit restaurants when I’m traveling. Sue and I usually prefer to cook at home. The cost is way less and the food is better.
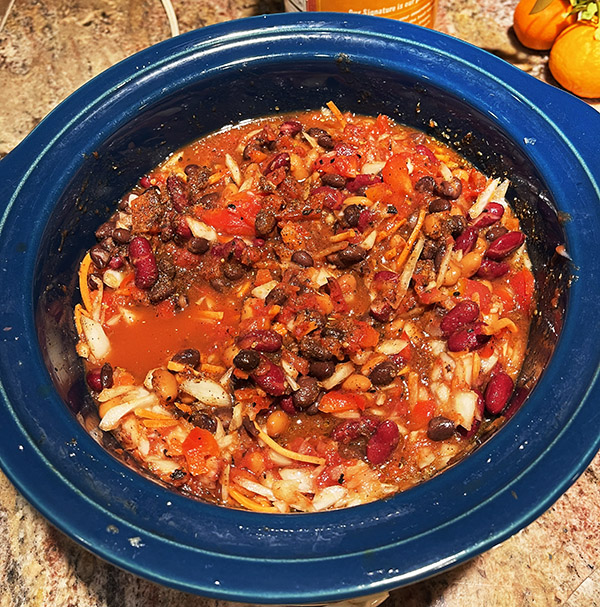
One of my buddies mentioned a good pot of chili he ginned up and I asked for his recipe. A few days later when I was in Trader Joe’s, I saw the shaved beef my friend told me he used in his chili. I was about to put it in my cart when I thought I really didn’t want to put that in my body. Then an idea hit me: Vegetarian chili. I’ve had some good ones but I had never made vegetarian chili before. I quickly Googled vegetarian chili recipes on my cell phone, mentally merged the ingredients that appealed to me, and I picked those up instead.
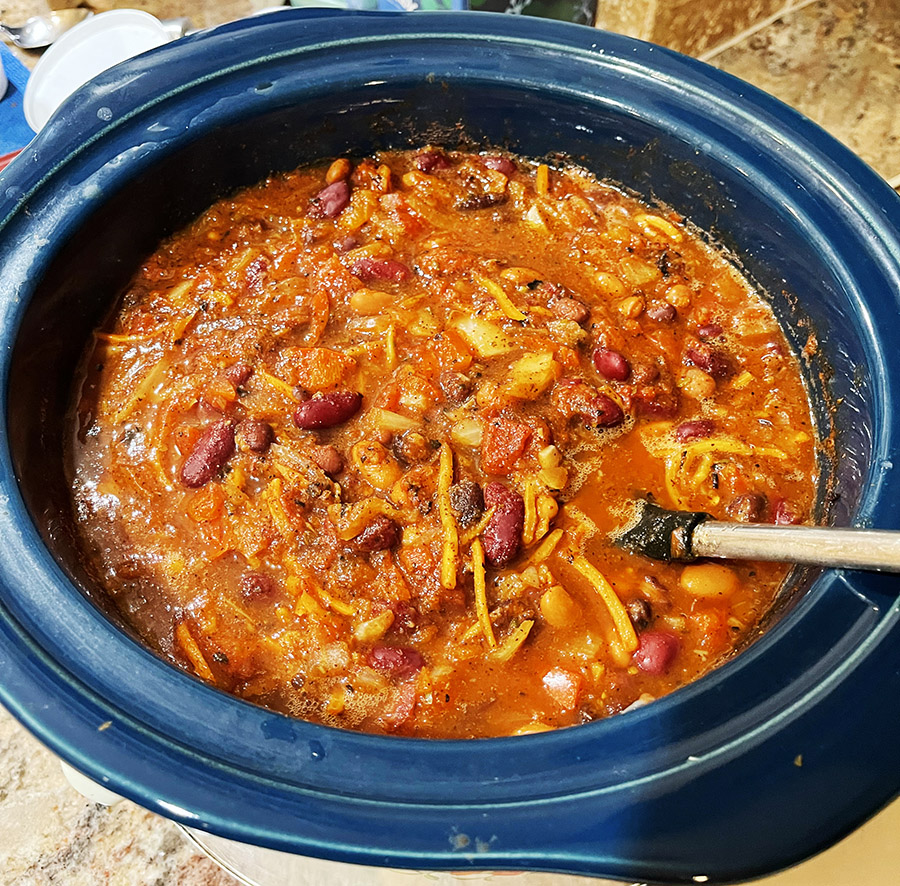
I do a lot of my cooking in a crock pot. I like the idea of getting all the work out of the way in the morning and letting the brew simmer all day long. The aromas are always great, and my vegetarian chili was no exception. crock pots are cheap, too. They are an easy way to prepare a great meal.
Here’s my recipe for what turned out to be a great vegetarian chili:
1 chopped medium yellow onion
1 chopped red bell pepper
1 cup of shredded carrots
3 cloves of minced garlic
1 15.5 ounce can of can pinto beans
1 15.5 ounce can of black beans
1 15.5 ounce can of kidney beans
1 28 ounce can of fire roasted tomatoes
3 cups of low-sodium vegetable broth
2 tablespoons of chili powder
1 tablespoon of ground cumin
2 teaspoons of dried oregano
1 tablespoon of extra-virgin olive oil
I drain and rinse three different kinds of beans before adding them to the pot. After everything is in the pot, I mix it up a bit with a big wooden spoon and then put the pot on the low heat setting. Eight hours later, it’s ready.
The bottom line? It was delicious.
Pro tips:
I always use the San Marzano brand for any recipe calling for canned tomatoes (they have the best flavor).
All the vegetarian chili recipes called for adding salt. I don’t. There’s enough salt in the canned beans and fire roasted tomatoes.
When serving our chili, we add a scoop of sour cream and shredded cheddar cheese.
Most chili recipes call for a jalapeno pepper or red chili flakes. You might want to consider that if you like your chili spicy. The recipe included here makes a tasty dish and the flavors don’t compete with the heat from a jalapeno or red chili. The two tablespoons of chili seasoning alone are just about perfect for a modest amount of spiciness.
What I’ve found with any crock pot recipe is that the time doesn’t have to be exact, and 8 hours is a minimum time. If it goes another couple of hours, it’s no big deal.
The sizes on the ingredients listed above make for a full pot; Sue and I will get four or five meals (each) out of this recipe. I’ve found that chili makes for a good omelet, too.
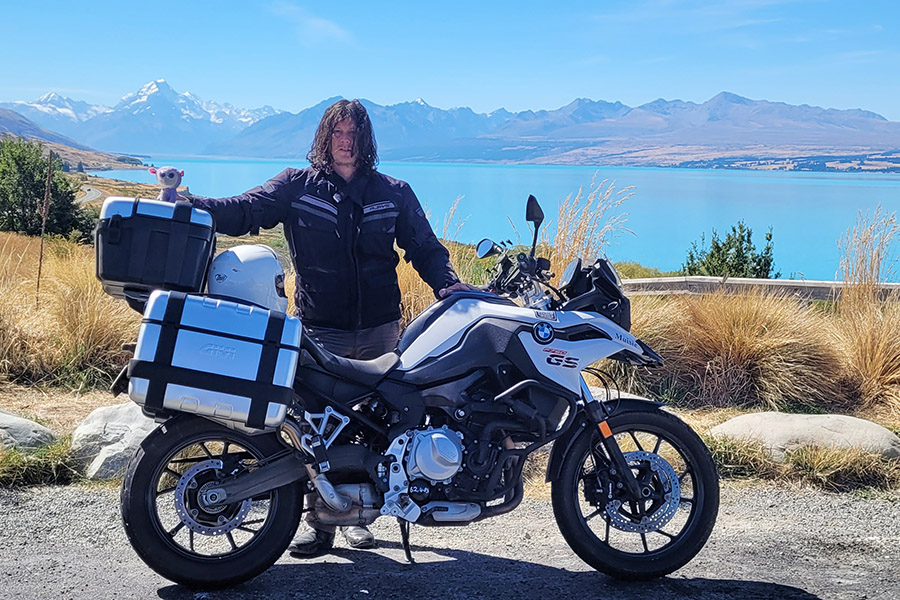
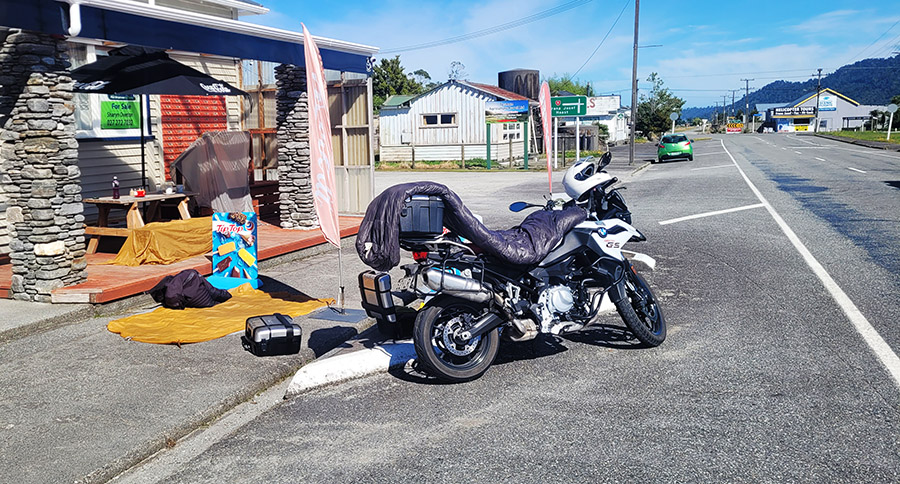
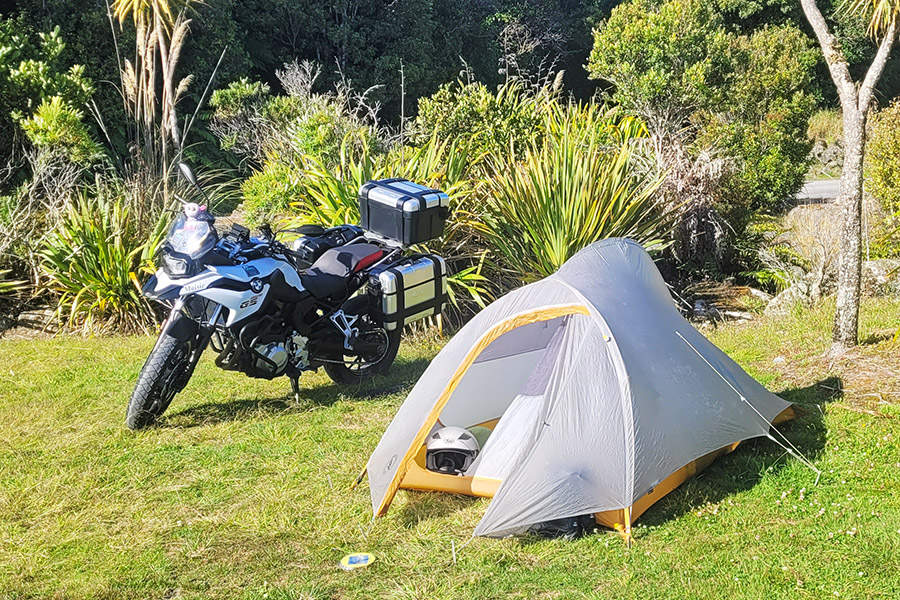
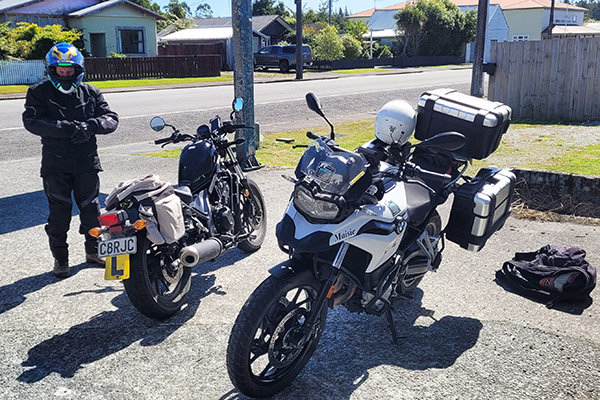
Kim from South Pacific Motorcycles had just picked me up at my hostel in downtown Christchurch, New Zealand and we were off to meet my new steed for the week. It was a BMW GS750 named “Massie.” Even with my lack of planning, somehow the Universe decided I needed to get back on a motorcycle and I was fortunate enough to snag the last one available for the dates I was in town. The stars couldn’t have aligned any better.
Kim and I exchanged ideas on routes and agreed the one I had lazily researched would be a great one, but it might result in some long riding days. I would have to forego some hikes and tourist attractions that were on my list. It was a loop that would take me over three unique mountain passes, and allow me to see two glaciers and cruise along ocean roads. It would be a full riding trip with not much time for hikes and other tourist stops. This was fine with me as I was itching to ride again. Also, I had enough time remaining in country that if anything appealed to me, I could always return via bus or rental car.
The weather was a perfect 70 degrees F and I was ready to hit the switchbacks as I raced towards Arthur’s Pass National Park. The roads were pretty solid going through this area. It was just exhilarating to be riding again (and in another country at that). I was so caught up in the moment that I forgot to top off on fuel prior to heading into the mountains.
Upon hitting the first town after completing Arthur’s Pass, Massie’s fuel level read a mere 18km remaining (a rookie mistake by me). Once the bike was topped off I sat under the gas station’s awning to figure out where I would be staying that evening. The rental company recommended staying in Holiday Parks. These were similar to the KOAs that we have in the United States.
I cannot stand KOAs. Unless I was in a pinch that would not be my plan for the evening. Camping in New Zealand is different from the United States in that many areas are called “freedom camping,” but in order to stay there you had to have a self-contained vehicle sticker. To obtain the sticker the vehicle must undergo a rigorous inspection process to ensure the vehicle has a toilet in it. So Freedom Camping was obviously out of the question.
Hunting down campsites wasn’t anything new for me. It didn’t take me long to remember that on the North Island I had camped in DOC (Department of Conservation) campsites. These campsites could be quite primitive but they have toilets, which meant I didn’t need a sticker. I found them in really beautiful areas and at a cost of just $15 NZD ($10 USD) they met all my requirements for a peaceful night of camping.
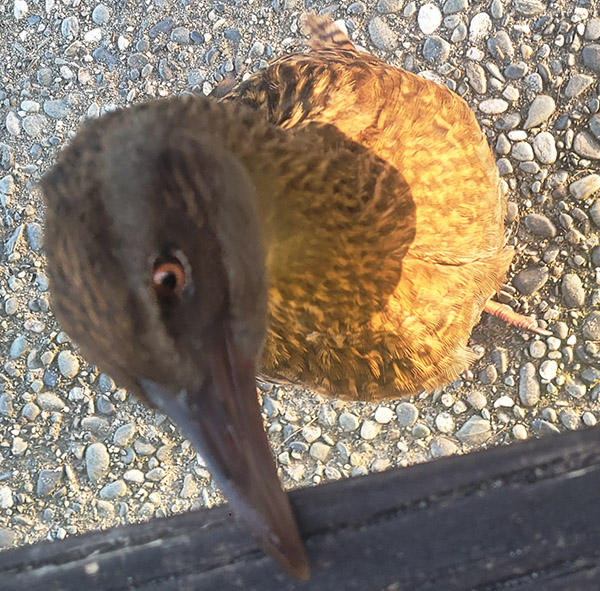
The campsite was perfect. It was next to a beautiful lake with plenty of weka birds that would walk right up to you and hang out for a bit. It had been a short day but it was the perfect length to get used to the bike, chat with a few other riders, and get back into camping off a motorcycle. I was back in my natural environment and decided to call it an early night. I knew the next day I would have to put some serious mileage behind me if I was to complete this loop.
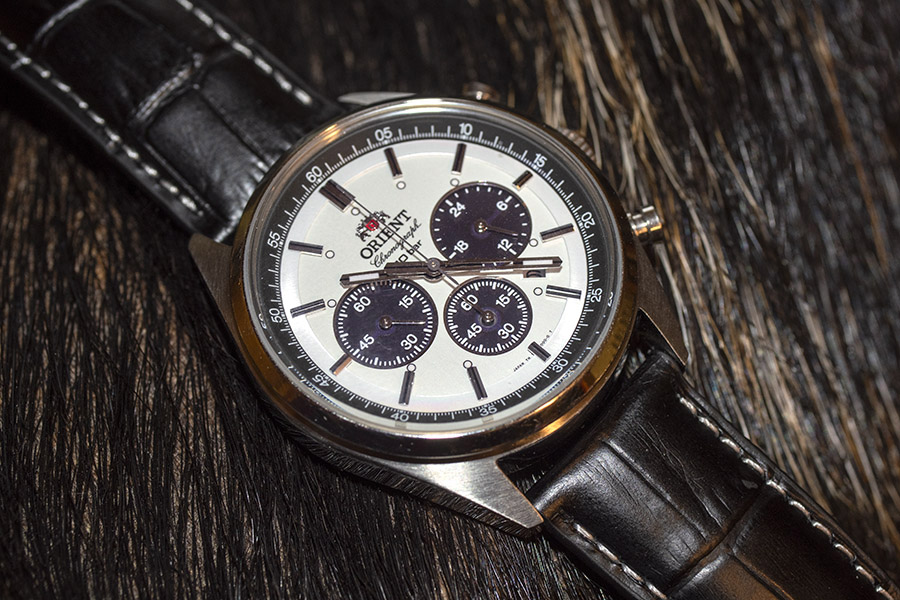
Some time ago, I wrote a blog about panda watches. In it, I mentioned the Orient Panda. I’ve been wearing one for several months now and I thought I’d share my opinions.
From an accuracy perspective, it just doesn’t get much better than what this Orient provides. I set it to the U.S. National Institute of Standards and Technology (NIST) official time site, and it is still spot on after several months (no gain, no loss; it is accurate to the second). The watch has a solar-powered quartz movement; you can’t realize that kind of accuracy with a mechanical watch.
I didn’t care for the Orient Panda’s stainless steel bracelet. The bracelet’s appearance is good and the construction appears to be of high quality, but it was uncomfortable. Maybe that was due to the bracelet’s relatively sharp edges. I played around with the adjustment by removing links and then putting them back in, and also by moving the pin to different positions on the clasp, but I couldn’t get it to fit my wrist comfortably. It was either too tight (which made it even more uncomfortable), or it would swim around on my wrist with the watch going from the top of my wrist to the opposite side (I hate it when a watch does that).
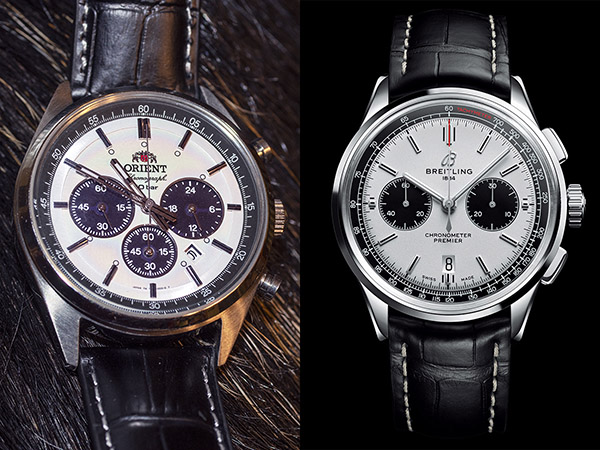
Orient and Breitling Pandas. The Orient is $160; the Breitling sells for $7,300. For me, it was an easy decision.
I addressed the fit and comfort issues by ordering an inexpensive alligator style leather band from Strapsco (it was less than $20). The band is black with white leather stitching, and when I put it on the Orient, the watch’s personality changed completely (and for the better). The band matches the watch perfectly and it is much more comfortable. I think it looks much richer (it’s very similar to the $7,300 Breitling Panda mentioned in my earlier blog). I think Orient may be missing the boat here; the Orient Panda should ship with both bands.
The Orient’s solar power feature doesn’t need the sun; interior lighting is good enough. I’ve left my Orient Panda unworn for weeks on a shelf in my office and my office light kept it going. I like the idea that the watch won’t die in the middle of an overseas adventure because the battery gives out. That’s happened to me before.
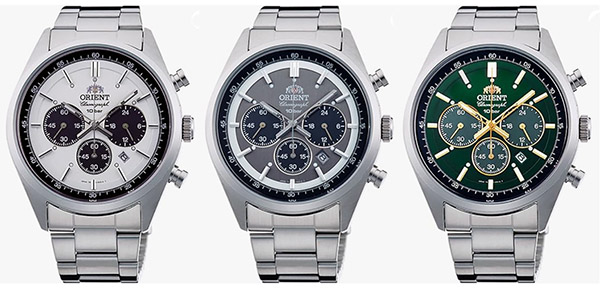
The Orient Panda can be had in three different colors. I like the one on the left best.
Although I love the panda concept and look, on the Orient Panda the contrast between the hands and the watch face doesn’t work for me. The hands should stand out so that the time is apparent at a glance. It is not on this watch. Maybe me being an old fart is aggravating the issue. I have to stare at the watch to see the hands against the watch face. The hands should be black, I think, as was the case on my 1970s-era Seiko Panda. Maybe the Orient colors will work for you. Orient offers this watch in three different colors, but I don’t care for the look of the other two. Interestingly, the Orient Panda with the gray face is only $135 on Amazon, undercutting the price on the other Orient Panda color options by $25.
The Orient Panda has bits of lume on the numbers and the hands. The lume is small, though, and like me, they are not terribly bright. I found the lume tough to see at night. It’s also tough to determine where 12:00 on the watch face is at night.
The Orient Panda has a date feature. I’ll chalk this observation up to being a geezer: I found the date to be so small it was useless. Plus, the date is set back from the watch face, which throws a shadow over the numerals (further obscuring the date).
The Orient Panda has three subdials, which I think is one too many. Like many over-subdialed watches, the 24-hour subdial is a dumb thing. I think I can tell the difference between night and day, I know when it’s a.m. and when it’s p.m., and I can do the mental math instantly to convert 2:00 p.m. is 14:00 hours (I don’t need a subdial for this). If Orient had made the subdial hours settable in hourly increments independent of the main dial’s hourly settings, that would be a cool GMT feature that would allow knowing the time in two different time zones. But like every other watchmaker that includes a 24-hour subdial, you can’t set the subdial separately, so to me all it does is add complexity where none is required.
With regard to the chronograph feature, there is a smaller subdial at the 6:00 position that tracks up to 60 minutes, and seconds are recorded with the watch’s main face second hand. That approach is okay, I suppose, but the second hand really disappears against the watch face due to the aforementioned lack of contrast, and the 0-60 minute subdial is too small. I think Orient would have a better product if they eliminated the 24-hour subdial at the 3:00 position and used that real estate for a larger subdial for the chronograph’s 0-60 minute feature. That would knock the Orient Panda down to two subdials, which I think is just right for a panda watch. It would look more like a panda. But hey, what do I know? Orient sells a lot of watches. I don’t sell any.
At an Amazon price of $160.84, the price on the Orient Panda is impressive, especially when viewed alongside the $7300 Breitling Panda. My complaints notwithstanding, the Orient Panda is a beautiful timepiece at an affordable price. It is both a nice piece of jewelry and a usable everyday watch.


 Kim and I exchanged ideas on routes and agreed the one I had lazily researched would be a great one, but it might result in some long riding days. I would have to forego some hikes and tourist attractions that were on my list. It was a loop that would take me over three unique mountain passes, and allow me to see two glaciers and cruise along ocean roads. It would be a full riding trip with not much time for hikes and other tourist stops. This was fine with me as I was itching to ride again. Also, I had enough time remaining in country that if anything appealed to me, I could always return via bus or rental car.