Black Powder Gatling Guns

By Joe Berk

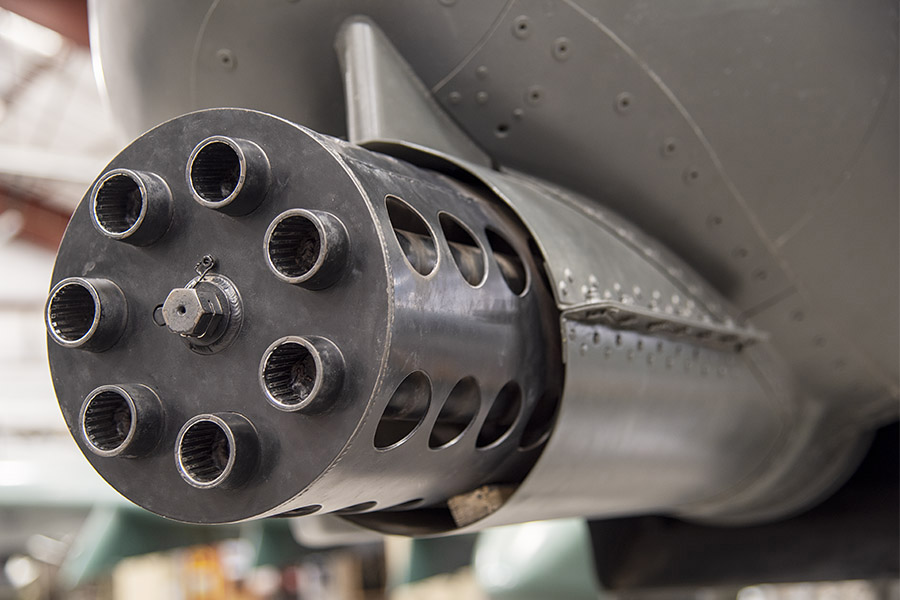
Did you know the original Gatling gun (the Model 1862) used a blackpowder and percussion cap firing system?   And did you know that all modern Gatlings (the guns arming the F-15, the F-16, the A-10, the AC-130, and more) are based on the original Gatling gun design?  This is a chapter from our book, The Gatling Gun, that addresses the first iteration of Dr. Gatling’s famous weapon.  Many of you are blackpowder enthusiasts and I thought you might find the Gatling gun’s blackpowder lineage interesting.  I sure did.

Figure 1.  The Gatling Gun, by yours truly.

The Percussion Firing System

When most people think of loading a gun, they visualize it as a simple operation in which cartridges are inserted into the weapon (or a magazine). Most understand that the cartridges of modern weapons include both the bullet and the gunpowder. This simplicity of operation was not always the case. Earlier shooters had to use a much more complex percussion firing system. Unlike today’s guns (most of which use metallic cartridges), shooters with percussion firing guns could not simply load a cartridge into their guns and fire. Instead, percussion shooters had to load the primer, gun powder, and bullet into their guns separately for each shot.

Figure 2 shows the basic elements of a percussion firing system, which consists of a gun barrel and a nipple (the nipple is an extension with a channel).

Figure 2. Percussion firing system operation.

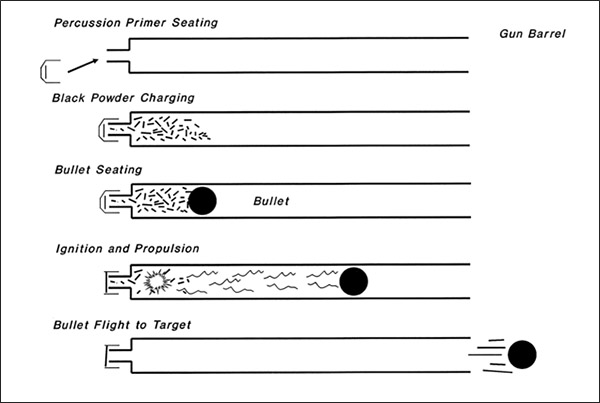
Loading began by placing a percussion primer on the nipple (as shown in the upper left portion of Figure 2). Black powder was then loaded into the barrel from the muzzle and tapped down prior to installing the bullet. The bullet (usually a round lead ball) was pressed into the barrel, again from the muzzle end (for this reason, percussion weapons are often referred to as “muzzleloaders”). Once the bullet was fully seated against the powder, the weapon was ready to fire.

A percussion weapon was fired by cocking the hammer and then releasing it to strike the percussion cap. The percussion cap contained a small quantity of an impact-sensitive material, which detonated when the hammer struck the cap. This detonation sent shock and heat waves through the channel in the nipple to the black powder. When the black powder ignited, it developed high pressure, which drove the bullet through the barrel with enough velocity upon exiting to continue its flight to the target. As the bullet moved down the barrel, it was engaged by spiral grooves machined into the barrel’s inner surface (these grooves are called “rifling”), which imparted a spin to the bullet. The spin stabilized the bullet, making it more accurate. Once the bullet had left the bore, the spent percussion cap could be removed and the loading and firing process could begin again.

Army Weapon Preferences

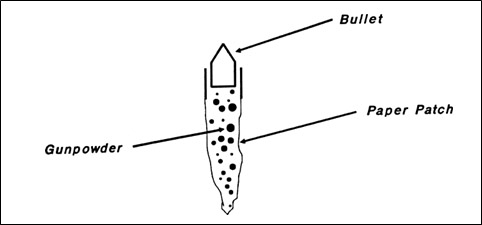
During the Civil War, percussion weapon systems were standard-issue items (even though completely self-contained metallic cartridges had already been invented, the Union army had not yet adopted the concept). A refinement of the percussion priming system that bridged the gap between percussion priming and metallic cartridges had been at least partially accepted by the Union army. It involved the use of integral paper-patched bullets and powder charges. Figure 3 shows the paper-patched bullet and powder concept. Paper-patched bullets and powder charges were loaded as a single unit into the muzzle of the gun (thereby eliminating the need to carry and load bullets and powder separately). When a gun loaded with these cartridges fired, the percussion primer gas jet perforated the paper bag attached to the bullet to ignite the powder. The gun then operated in the same manner described earlier.

Gatling recognized the futility of proposing a gun with metallic cartridges to the Union army and therefore opted to develop his first Gatling gun with paper-patched bullets and powder charges. He developed the first Gatling gun in 1862, accordingly designating it the Model 1862. It was to be the only variant of the Gatling gun that did not use the more modern metallic cartridges, and because of that, certain features of its operational sequence differ from later models. Nonetheless, its operation is worth studying, as it provides insight into the mechanical genius behind the weapon and a fundamental understanding of the operational concepts behind all future Gatling guns (including those used in many of today’s modern weapon systems).

Gatling Gun Operation

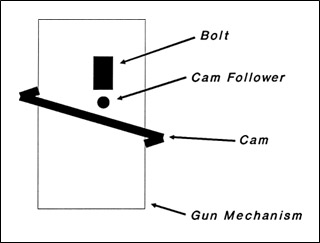
As the above description demonstrates, the loading and firing of percussion weapons was a slow and cumbersome operation that left the gunner essentially defenseless during the reloading operation. This disadvantage was primarily responsible for the advent of metallic cartridges. The complexity of the reloading process was also a major design challenge in developing a high-rate-of-fire weapon, as were the cocking, hammer release, and recocking actions. The elegance of the Gatling gun design is that the steps involved in loading and firing occur automatically. To understand how this occurs, one must first be familiar with another important mechanical concept, the principle of the cam.

Figure 3. Paper-patched bullets. The paper bullet patch engaged the rifling and also contained gunpowder to propel the bullet. When the gun fired, the primer burned through the paper to ignite the powder.

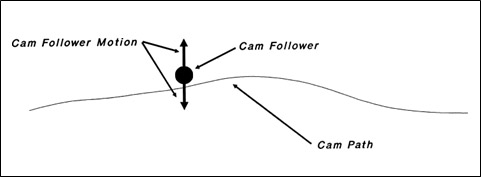
A cam is simply a device that translates motion in one direction into motion in another direction (see Figure 4). It involves the motion of an inclined surface, which is then used to drive a follower. If the inclined surface is wrapped around a rotating surface, the rotating element can be used to create a back-and-forth (or reciprocating) motion in the follower. This is the concept Dr. Gatling used to drive the mechanism of the Gatling gun.

The problem Dr. Gatling solved was generating the reciprocating motion required to step through the actions of firing a gun. This cam-driven concept is shown in Figure 5, wherein the position of the gun mechanism is shown at successive stages of the firing process. In the first position, the gun drive mechanism is near the most narrow portion of the inclined cam surface.

Note that there are two ways a cam can be used to create reciprocating motion: the cam can be driven to actuate the followers, or the followers can be driven while the cam is held stationary. Dr. Gatling chose the latter approach, for reasons that will soon become obvious. As the gun mechanism moves with respect to the cam, the hammer is pushed back, compressing a spring and cocking the gun. When the hammer is fully rearward (and its drive spring fully compressed), it encounters a sharp step on the cam profile. The cam step is a release, and it allows the drive spring to snap the hammer into the percussion cap. This fires the gun.

Figure 4. The concept of a cam. As the cam moves with respect to the cam follower, the cam follower will move in accordance with the profile of the cam.
Figure 5. Gatling firing sequence. As the gun mechanism rotates, the bolts are driven back and forth by the elliptical cam path.
Figure 6. Gatling cam-path-driven operation. As the gun mechanism rotates, the cam follower moves the bolt back and forth, accomplishing the Gatling gun firing sequence.

In our discussion above (and in Figure 5), we depicted a stationary cam surface, as well as a gun barrel and firing mechanism that moved with respect to the stationary cam. It involved a flat cam surface and a lateral motion of the gun along this surface. Let’s take this one step further. Suppose the entire gun mechanism (moving gun barrel and action and cam) is wrapped around a shaft parallel to the gun barrel (as shown in Figure 6). The barrel, hammer, and other elements of the gun’s action would then revolve around this central axis. Suppose further that the cam is wrapped around the interior of a stationary cylindrical housing at the rear of the gun. We’d then have a design in which the gun barrel and action spun around, and the action was driven through the firing steps by the stationary cylindrical cam inside the rear housing. While completing its journey around the inside of the housing, the cam would cock and release the hammer, just as described earlier.

Once the gun operation and rotary gun mechanism/stationary cam concepts are understood, the remaining theory of the operation of the Gatling gun is straightforward. All that’s involved are the additional actions required to load the gun prior to firing and eject the spent cartridge after firing.

The design need not be restricted to only one gun action and barrel. Other actions and barrels can also mount on the central axis, and these can make the circular journey around the stationary cam simultaneously. The number of additional actions and barrels is constrained only by size (how many will fit around the axis and the stationary cam) and weight (if the gun design is limited to a specified weight). The first Gatling gun (the Model 1862) had six barrels, but it could just as easily have had more or fewer.

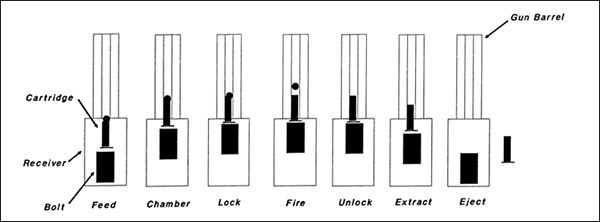
To simplify our discussion, let’s follow the path of one barrel and action around the circular cam. The Model 1862 operated with five basic steps:

• loading
• compression
• locking and firing
• unlocking
• ejecting

Each step occurred as the Gatling gun mechanism revolved inside the stationary, circular cam path. The mechanism was driven by the familiar small hand crank at the rear of the weapon. When the crank was turned, a small pinion gear on the end of it engaged a larger ring gear on the cluster of gun barrels and actions. This large ring gear was fixed to the main shaft of the gun. When the main shaft rotated, the entire barrel assembly and all of the other moving parts (each barrel’s actions, etc.) rotated counterclockwise (as viewed from the muzzle end). As these components moved, followers in each barrel’s action followed the circular cam path in the stationary rear housing.

Loading

At the beginning of this chapter, we described how a basic percussion-fired weapon operates and then progressed into an explanation of paper cartridges. As you will recall, the first steps required placing a percussion cap on the nipple and a paper cartridge and bullet in the barrel. Gatling recognized that these actions could not be easily accomplished while the gun mechanism he envisioned was spinning around a circular cam path. It would be difficult to ram paper cartridges into a spinning barrel and delicately place the percussion caps on moving seats. Gatling solved the problem by preloading steel chambers with paper cartridges, bullets, and percussion caps, and then loading these into the Gatling gun feed mechanism.

These preloaded steel chambers have been described as miniature guns. In a sense they were, but they could perhaps be more accurately described as predecessors to the metallic cartridge. They were self-contained units with a projectile, propellant, and primer, invented solely to simplify loading. Metallic cartridges were smaller and easier to load, but the concept was nearly identical.

The Model 1862 Gatling gun had a small hopper on top of the gun mechanism (near the rear). A quantity of the preloaded steel chambers was placed into the hopper, and as the gun mechanism turned, the chambers fell into grooves in the gun’s rotating mechanism. The gun had a grooved slot for each barrel. When each groove passed approximately through the two o’clock position, one of the preloaded chambers from the hopper dropped into place. The groove aligned the preloaded chamber with the bore of the gun barrel so that when the chamber fired, the bullet had a straight shot into the barrel. As the gun mechanism turned, each preloaded chamber traveled with its barrel, remaining in constant alignment with it.

Compression

As the gun mechanism continued to rotate, a protrusion on the hammer engaged the cam surface. At this point, the lock cylinder actuated. The lock cylinder consisted of a tube containing a hammer and a compression spring. A protrusion on the hammer extended through a groove in the lock cylinder tube to contact the circular cam path. As the gun mechanism continued to rotate, the hammer spring approached full compression (near the twelve o’clock position).

Locking and Firing

Just prior to reaching the twelve o’clock position, the rear of the lock cylinder contacted a small raised surface in the rear of the housing, formed by a hardened steel insert in the plate behind the gun mechanism. The insert was designed to force the lock cylinder forward, which in turn forced the preloaded chamber against the rear of its gun barrel. This caused the forward surface of the preloaded chamber to bear down against the barrel, “locking” it into position and forming a better seal. The concept was to effect a better seal, thereby minimizing the escape of propellant gases and providing for higher bullet velocity.
As soon as locking occurred, the hammer protrusion (in the locking cylinder) reached a sharp forward step on the cam surface, which released the hammer. The hammer spring drove it into the percussion cap, firing the preloaded chamber.

Unlocking

Once the barrel had fired, it had to be unloaded so it could be reloaded and fired again. Before this could be done, though, the locking action had to be unlocked. This was governed by the proper sizing and positioning of the small insert described above. Once the lock cylinder passed the insert (as the gun mechanism continued to turn) another spring on the outside of the cylinder pushed it slightly to the rear. This relieved some of the pressure holding the preloaded (and now fired) chamber against the barrel. The remaining force holding the chamber against the gun barrel came from the hammer spring, which now (in the fired position) held the hammer against the percussion cap and the chamber against the barrel. Dr. Gatling included another small raised surface on the cam path to back the hammer away from the steel chamber just enough to allow the chamber to float freely. This occurred as the gun progressed from the eleven o’clock position to the ten o’clock position.

Ejection

The chamber could be ejected once it had unlocked. This occurred as the rotating cluster of barrels and actions positioned the now-fired chamber near the bottom of the gun. The chamber simply fell free through an opening in the base of the mechanism, where it could be picked up for later cleaning and reloading. To prevent the chambers from getting hung up in the gun mechanism, a guide bar forced them out as the chamber groove passed through the six o’clock position.

Once the five steps described above were complete, the now-empty chamber groove (in the rotating cluster) continued its circular journey up to the hopper, where a new preloaded chamber fell into position and the load, compress, lock, fire, unlock, and eject process began again. As mentioned earlier, the Model 1862 Gatling gun had six sets of barrels, actions, and grooves. These spun as a set, with each of the steps described above occurring sequentially. The gun fired six times with each rotation of the barrel cluster.

The Model 1862 was the only Gatling gun to use the separate preloaded chambers. There were several problems inherent to this approach, which were corrected in subsequent versions of the gun. These problems and others (as well as the solutions and subsequent Gatling guns) are discussed in the next chapter. The use of metallic cartridges in the Model 1865 significantly changed the manner in which the Gatling gun operated. Though many of the detailed mechanical actions changed, all were actuated through the rotating-barrel-cluster and stationary-circular-cam approach. As will be seen in subsequent discussions on contemporary Gatling guns (starting with Chapter 6), all modern variants of the Gatling use this approach.


Want to learn more about the Gatling gun, both the early versions and the ones that arm today’s high performance military systems?  Hey, for just $12.95, we can help you with that!


Never miss an ExNotes blog:


Don’t forget: Visit our advertisers!


Caught in the Snow

By Joe Berk

A few weeks ago I posted a blog about riding in the rain.  With all the snow blanketing parts of the US this winter, I thought it fitting that I post a blog about getting caught in the snow.  I’ve ridden in the snow four times and none of them were fun.

Crater Lake

On this ride, my buddy Marty and I were on our way home from Calgary to California after completing the 2005 Three Flags Classic rally.  Marty was far more worldly than me and he knew all the good spots to stop.  One was Crater Lake in Oregon.  We rode in from the Oregon coast where the temperatures were cool but not unbearably so.  We pointed our front wheels east and rode to Crater Lake.  It was a brutally cold ride, and it grew even colder the further we climbed into the mountains.

We had an interesting encounter with a herd of elk on the way to Crater Lake.  We had been seeing road signs warning of elk, but we hadn’t seen any until that day.  A monstrous bull stepped out in front of my Triumph Daytona from the forest on the right side of the road.  He stood broadside 50 yards in front of me, and he looked directly at me as if to say, “What’s your problem?”  If he was attempting to intimidate me, it worked.

I stopped and Marty stopped on his BMW K1200RS behind me.  My visor started to fog from my breath.  It was just the three of us on that cold, cold morning:  Me, Marty, and the Big Bull Elk.  After what seemed like several minutes (during which I wondered how quickly I could execute a u-turn and accelerate away from those immense antlers), the elk turned his head and lazily sauntered across the road into the forest on the other side.  Yeah, you’re bad, I thought.

I started to let out the clutch and moved forward a tiny bit when two more elk stepped out of the forest onto the highway.  These were female elk following the alpha male who had successfully stared me down.  So I pulled the clutch in again and waited.  The ladies crossed the highway and I started to let the clutch out again.  Then another lady elk appeared from the right.  This went on for the next several minutes.  Maybe as many as another 20 elk, all female, repeated the sequence, two or three at a time.  I remember thinking the first one, that big bull, probably didn’t get much sleep with that harem to take care of.  I wished I had grabbed a photo, but truth be told, I was too scared and shocked to react.  I can still see it vividly in my mind, though.

The Daytona 1200 along Crater Lake in Oregon.  A few miles earlier, we had a magical several minutes with a herd of elk.

After the elk episode, we continued our climb up to Crater Lake.  The sun was getting higher, but we were climbing and instead of warming the temperatures continued to drop.  There were bits of snow on both sides of the road, but the road was dry and we were doing okay.  I used a Gerber electric vest in those days.  It was a godsend.

Another view of Crater Lake. Note the snow in the foreground.

Crater Lake was interesting.  I took a bunch of photos and checked that destination off my bucket list.  Incidentally, on that trip I was still shooting with film.  I had the N70 Nikon I blogged about earlier.

After taking in Crater Lake, Marty and I started our ride down off the mountain.  The ride down was on the western side of the mountain, and the road was in the late morning shade.  That section of the road had not warmed up.  The snow was still there in two different forms…hard pack white snow in some places, and black ice where the snow had melted and frozen over.  It was the first time I had ever ridden in such conditions on a big road bike, and I quickly realized my Daytona 1200 was way different than the Honda Super 90 I rode in the snow when I was a kid in New Jersey.  Piloting that Triumph down off the mountain was an extremely demanding and mentally-draining 15-mph riding experience requiring intense concentration.

Fortunately, I remember thinking, Marty and I were the only two guys out there and I didn’t have to worry about anyone else on the road.  Marty was in front and we both were taking things very easy.  Then in my left peripheral vision I sensed a yellow vehicle starting to pass me.  I was pissed and confused.  Who the hell else is out here, I thought.  Can’t they see I’m on a motorcycle, I’m on ice, and why the hell are they passing me?

Then I realized who it was.  What I saw in my peripheral vision wasn’t another vehicle.  It was my motorcycle in the rear view mirror.  The big Triumph was sliding sideways.  The yellow I had picked up peripherally was my rear tail light cowling.  Damn, that was exciting!  (And terrifying.)

Marty and I made it down off that mountain, but it was a religious experience for both of us.

The Sweetwater Rattlesnake Roundup

This was a ride coming h0me from the Annual Rattlesnake Roundup in Sweetwater, Texas  (I wrote about the Roundup before and you can read that story here).  We spent a half day at the Rattlesnake Roundup, another hour or so at the gun show in the hall next to the Rattlesnake Roundup, and then had a late afternoon departure headed home.  The first portion of that ride was okay, but as the sun set the temperature dropped big time and the wind across Interstate 10 kicked up dramatically.  We crossed into New Mexico and the wind was blowing so hard it felt like the bikes were leaned over 30 degrees just to keep going straight.

Very cool photo ops abounded at the Sweetwater Rattlesnake Roundup. Check out the fangs; this is the stuff of nightmares.

We pulled off the highway in Lordsburg, New Mexico, around 10:00 p.m. and stopped at the first hotel we saw.  It was one of those small old Route 66 type motels (you know the type…a cheap single-story structure still advertising they had color TV).   One of us (I can’t remember if it was Marty or me) decided we wanted to look for something nicer.   We continued on into town and found a nicer hotel, but the desk clerk told us they had no rooms left.   “With this wind, every trucker is off the run and in a hotel,” he said.  The next town was 50 miles further down the road.  I looked at Marty, he looked at me, and I made the case for doubling back to the Route 66 special.

We entered the lobby and two other people looking for a room followed us in.  We were lucky.   We nailed the last room in Lordsburg (which, I know, sounds like the title of a bad country western song).  The folks behind us were out of luck.  I have no idea what they did.

Most of the snow was gone after we returned from breakfast.

When we woke up the next morning, the bikes were covered in snow.   There was no way we were going to ride in that, so we walked across the parking lot to a diner and had a leisurely breakfast.  By 10:00 a.m. there was still snow on the ground, but the roads were slushy (not icy) and we could ride.  When we were back on Interstate 10 the slush had disappeared and the road was dry.  It was cold.  I again enjoyed my Gerber vest.  We made it back to southern California late that night.  It was pouring rain (that’s the bad news), but it wasn’t nearly as cold as it had been and there was no snow (and that’s the good news).

The Angeles Crest Highway

I met my buddy Bryan at a water treatment company.  Someday I’ll write a story about that company and the guy who started it.  He was a crook (the company founder, not Bryan) and I’m not exaggerating just because I didn’t like the guy.  He actually was a crook who was later charged with financial fraud and convicted.  I know, I’m digressing again.  Back to Bryan, me, motorcycles, and riding in the snow.

Good buddy Bryan and his VFR at warmer times in warmer climes.

Bryan was fascinated by my motorcycles (I owned four or five at the time), and within a few weeks he had purchased a Honda VFR.  That VFR was a nice motorcycle (one I never owned but always wanted), and Bryan and I started doing a lot of rides together.  We both live in southern California at an elevation of around 1700 feet above sea level, and it is rare to see snow here.  I think in the 40+ years I’ve been in So Cal I’ve seen snow twice at my home, and it both cases it didn’t stick.

Bryan and I often rode the Angeles Crest Highway.  We would take the 210 freeway to Glendale to pick it up, ride over the mountains on the Crest (the Angeles Crest Highway), stop for gas and sometimes a meal in Wrightwood on the other side of the San Gabriels, and then head home through the Cajon Pass on Interstate 15.  It’s one of the best rides in the country.

A typical weekend parking lot scene at Newcomb’s on the ACH. Those were glorious days.

One day in the winter months, it was comfortable So Cal winter weather when Bryan and I decided to ride the ACH, but in the opposite direction.  We rode up the 15 to the 138, we rolled through Wrightwood, and then we picked up the Crest heading over the mountains to Glendale.  It got cold fast, and by the time we were on the Crest it was brutal.  Then it started to snow.  It didn’t seem that bad at first and we pushed on.  I was on my Daytona 1200 again, and I could feel the bike moving around beneath me. I’d already ridden the Daytona on icy roads in Oregon (see above), so I thought I’d be okay.  But this was worse.  I could feel the big Daytona sashaying around like an exotic dancer in a room full of big tippers.

Bryan and I stopped.  “Think we should turn around?” one or the other of us asked.  “Nah, it probably won’t get worse and it’s shorter to keep going than it would be to turn around,” one or the other of us answered.  We had that same conversation telepathically three or four more times.  The weather was worsening and we hadn’t seen another vehicle on the road since we started.  No motorcycles and no cars.  It was just us.

Finally, we made it to Newcomb’s, a legendary Angeles Crest roadhouse that is no more (a pity, really…you’d see all kinds of moto exotica and sometimes Jay Leno up there on the weekends).  We stopped for a cup of coffee and a bowl of chili.  The parking lot was empty, but the place was open.  The bartender was shocked when we entered.  “How did you get up here?” he asked.

“We rode,” one or the other of us said.

“How did you do that?  The road’s been closed because of the snow and ice.”

Well, what do you know?  We had our coffee and chili and we warmed up.  When it was time to leave, we kept going toward Glendale.  No sense going back, we thought.  We already knew the Crest behind us was bad.  But we soon learned the road ahead wasn’t any better.  It was a white knuckle, 15mph ride all the way down, and man, was it ever cold.  But it made for a hell of story.  I’ve ridden the ACH many, many times…but only once on snow and ice when the road was closed.

The “Build Character” Ride

In my opinion (and I’m the guy writing this blog, so it’s the one that counts) riding in the snow and ice is dumb raised to an exponent.  If you’re already on a trip and you get caught in it, it’s sort of understandable.   Making a decision to intentionally ride into the snow, though (at least to me), is a really dumb move.  But yeah, I did it.  Once.  Peer pressure is a bitch, let me tell you.

The story goes like this:  A bunch of us guys used to meet every Saturday morning at the local BMW dealer to listen to and tell tall tales (said tall tales usually involving motorcycles, women, or both).  We did a lot of rides together, this group did.  Baja.  The American Southwest.  The Three Flags Classic.  Weekend rides up the Pacific Coast Highway to Pismo Beach for a barbeque dinner in nearby Nipomo at Jocko’s.   And more.  We were not spring chickens, either.  I was in my late 50s and I was the youngest guy in the group.  Most of the other guys were real deal geezers in their 70s.  One guy was in his 80s.

Geezer riding buddies in the Jocko’s parking lot after coming down out of the mountains. Trust me on this: None of these guys needed to build any more character.

One day at one of our Saturday gatherings one of the guys had this brilliant idea that instead of simply getting caught in the rain, it would be a grand idea to start a two-or-three day ride in the rain when rain would be forecast for the entire ride.   You know, a tough guy ride into bad weather.  We would do the two-day run up to Pismo, through the mountains and along the coast, and do it on a weekend when it would rain all weekend.  “It will build character,” said the geezer whose idea this was.  Mom had warned me about guys like that.  I should have listened.

Everybody was in.  Like I said, peer pressure is a bitch.  I had ridden plenty in the rain, and if you are properly attired, it’s not that bad.  But snow and ice?  Nope, that’s positively not for me.  That’s what happened on this ride.  Remember I said along the coast and in the mountains?  Well, it was that mountain part that did us in.  It was in the winter, we were at higher elevations, and sonuvabitch, all of a sudden that rain wasn’t rain any more.  It was snow.  The roads never froze over, but it was plenty slushy.

Somewhere along our descent, the snow reverted to plain old rain again, and we made it to Pismo without anyone dropping their bike.  I noticed on the way home, though, we rode the coast (where it was modestly warmer) all the way back.  I guess each of us felt we had built enough character to have banked a sufficient amount.


There you have it…my thoughts on riding in the snow.  The bottom line from my perspective is that motorcycles and snow don’t mix.  Your mileage may vary.  If you think otherwise, let us know.


Never miss an ExNotes blog:


Don’t forget: Visit our advertisers!


Becoming Vulcan Part 3: Yeswelder Cut-55DS Pro Plasma Cutter Review

By Joe Gresh

Anyone who wants to become Vulcan must learn how to cut metal. There are many methods available like bandsaws, oxyacetylene torch, abrasive wheels, hacksaws and the old reliable, bend-it-back-and-forth-until-it-breaks. One of the relatively newer methods (in relation to the age of the Universe) is a machine called the plasma cutter.

Plasma cutters used to be very expensive. The plasma machine we use at school cost around 4000 dollars and is rated at 60 amps. The global economy (AKA China) has driven down the cost of plasma cutters dramatically. The Yeswelder cutter in this story cost me under 200 dollars and is rated 55 amps. Shipping was free.

In use, a plasma cutter works much like an oxyacetylene cutting torch. The big difference is that you don’t need any fuel: no acetylene gas to buy or bottles to rent. The only thing burning in a plasma cutting system is the material you are cutting through.

The plasma cutter uses regular compressed air and a bunch of ions and magical stuff inside the cutting head to create a super-hot, narrow stream of plasma. It’s sort of like having your own pocket-sized northern lights shooting out of the torch to cut material.

Unlike oxyacetylene, there is no waiting for the material to heat up. With a plasma cutter you set the torch near the material and pull the trigger. A jet of plasma shoots out of the torch and you can start cutting immediately. The plasma cutter cuts at about the same speed as an oxy cutter so you can move right along.

The 55 DS Pro Yeswelder plasma cutter will operate using 120 or 240 volts AC using the included adaptor. The machine auto selects for the voltage you are plugged into. At 120VAC input the machine will only go to 30 amps. You’ll need 240 VAC to access all 55 amps of metal slashing power

My air compressor is too small for the plasma cutter and is located too far away from where I cut so there’s a long air hose involved; with a long hose line pressure drops fast. I made a remote air tank out of a defunct water pump to give me a little more cut time and eliminate the line drop. I can cut 6 to 10 inches before I have to wait for the compressor to catch up. If you’re going to be doing a lot of continuous cutting with a plasma cutter you’ll need a decent sized air compressor.

With the compressor and the plasma cutter operating simultaneously, my smallish off-grid inverter struggles and spits out a low voltage alarm when the compressor starts. To get around this problem I use a fossil fuel powered 10KW Honda generator. The big V-twin Honda doesn’t even notice when I cut with the plasma torch and the air compressor kicks in.

Most everything you need to get started is included with the Yeswelder Cut-55. You’ll need to provide the air compressor and connect an air hose to the built in pressure regulator/filter on the back of the Yeswelder. Unless you cut through the torch hose or spill a Big Gulp container of Pepsi Cola inside the cutter, normal consumables are only the bits inside the torch that churn out ions.

The controls are pretty simple on the Yeswelder Cut-55. There is an amp setting, an air pressure setting, 2T or 4T trigger actuation (on-off with squeeze and release or squeeze on, release, torch stays on, second trigger pull turns off) an indicator for input voltage and not much else. It’s a simple machine to operate.

I haven’t used the machine very much; it cut through 1/8-inch steel like a hot jet of plasma through 1/8-inch steel. There’s not as much slag as with oxy cutting so clean up is easier. It should handle ¼-inch steel without a problem and I don’t work with anything thicker.

The prices on these Chinese plasma cutters are so much lower than the old line companies something must be sacrificed. I’m guessing in a full time metal shop the cheapo versions wouldn’t last long but for guys like me or you who just want to cut out a metal silhouette of a buffalo once in a while the Yeswelder looks like the goods. I give it a 5-star rating on the Hacksaw Chi-Com scale. That being said I have only one caveat: The thing may go up in a ball of exploding ions tomorrow. If it does quit I’ll be sure to report it in a follow up story.


Never miss an ExNotes blog:


Don’t forget: Visit our advertisers!


The Wayback Machine: Two 1858 Remington Revolvers

By Joe Cota

This blog compares two modern Italian reproductions of the famed .44 caliber 1858 Remington New Model Army revolver.  One is manufactured by A. Uberti S.p.A. (it’s the one on top in the big photo above); the other is by F.LLI Pietta (the revolver on the bottom). Here’s another shot of the two:

The Uberti in on top right, the Pietta is on lower left.

The 1858 Remington New Model Army was a competitor to Colt’s blackpowder percussion sidearm.  The Army went with both versions but primarily bought the Colt (it was 50 cents cheaper than the Remington).  Then the Colt factory had a fire in 1864.  At that point, the Army starting buying Remingtons in quantity.  The Remington was considered to be the stronger revolver because it has a top strap over the cylinder (the Colt does not), and some folks feel the Remington is easier to aim because the rear sight is cut into the frame (instead of the hammer, as on the Colt).  And there are other advantages to the Remington, which Jose covers.  With that as a background, here’s Jose’s article on the modern Uberti and Pietta reproductions.  All photos in this blog are by Jose.


Help us publish:  Please click on the popup ads!


If you’ve never fired a percussion revolver you’re really missing out on huge part of firearms history. But maybe you didn’t know that even here in California you can order one of these fine blackpowder revolvers online or over the phone with a credit card and have it shipped to your doorstep without background check or going through an FFL. Your state rules may vary.

Cap and ball packpowder sidearms were a huge part of arms on both sides during the American Civil War. The Union Army had a contract for the Colt 1860 Army, but when Colt could not keep up with demand Remington Model 1858’s were ordered. Many troops preferred the Remington over the Colt for a number of reasons. The Remington has a top strap making it stronger, and the Colt was prone to having loose percussion caps jam the cylinder.

Uberti 1858 Remington Revolver

I’ve had the Uberti for about 10 years. It’s an awesome piece of fine craftsmanship. There is nothing cheap about this revolver, the fit and finish are supurb. The cylinder and barrel are a deep blue, the steel frame is color case hardened, and the trigger guard is polished brass, ans walnut stocks, giving it a very classy look. The gun is a six shot .44 cal, rifled 8-inch barrel with 1:18 LH twist, and weighs in at 2.7 pounds.

454 cal pure lead balls, Remington #10 percussion caps, waxed felt wads, and the Uberti 1858 New Army.
Powder measure, balls, waxed felt wads, and caps.

I use .454-inch diameter balls cast from pure soft lead (stick on wheel weights or plumbers lead, BRN 7) weighing in at 143 grains. It fires best when loaded with 35 grains of FFF blackpowder (I don’t like substitute synthetics), a felt pad soaked in bore butter over the powder, and the ball over the top. The felt over the powder charge prevents a chain fire from jumping between cylinders, and also adds some lube to the barrel between rounds helping prevent a buildup of powder. Either Remington or CCI #10 percussion caps provide the spark.

The color case hardened steel frame on this model Uberti is off set nicely by its polished brass trigger guard.
The loading lever on the Remington 1858 is used to ram the ball into each cylinder, after loading powder and waxed wad. The percussion caps are placed on the cylinder nipples only after all cylinders have been loaded.
The cylinder doesn’t require removal between loadings, only for cleaning.

The Uberti is very well balanced and feels good in the hand. The cylinder locks up very tightly. There are noches between the cylinder nipples to rest the hammer on making it safe to carry with all six cylinders loaded. The rear sight is a V-notch on the top strap, unlike the Colt 1860 which has the notch on the hammer because the 1860 lacks a top strap. It’s no exaggeration that out to 40 yards my the Uberti 1858 holds about as tight a group as my Ruger Super Blackhawk .44 mag!

The Remington 1858 has a top strap over the cylinder making it stronger than the Colt 1860 and older firearms. It also allows for placement of a stable V-notch rear sight as opposed to the Colt’s rear site which is a simple notch filed on the back of the hammer.
Nice sight picture. This Uberti has a 1:18 barrel groove twist and holds groups as tight as my Ruger Super Blackhawk out to about 40 yards.

Properly cleaning and blackpowder revolver after a day in the field is a good exercise in gunsmithing. The revolver should be entirely disassembled, down to the Springs, removing hammer from the frame, cylinder pin, loading lever, trigger, mainspring, nipples from the cylinder – everything except for removing the barrel from the frame and front sight.

The notchs between the nipples are for the hammer to rest, allowing the six-gun to be safely carried with all cylinders loaded.

A good set of gunsmithing drivers and properly fittjng nipple wrench are mandatory to keep from damaging the screws. Owning a blackpowder revolver will help anyone gain confidence to start Barking simple dunsmithing repairs and parts replacements on other types of firearms. If you don’t already have a blackpowder gun order one today! They are a blast.

Pietta 1858 Remington Revolver

This one was recently purchased because the price was right. It looks like it has never been fired, and I’ve not fired it yet, either. The specs are essentially the same as the Uberti; however, the claimed weight of the Pietta is only 2.4 pounds compared to Uberti’s 2.7 pounds. For whatever reason the Uberti feels much lighter and more well balanced. The Pietta is noticeably front heavy. The Pietta has a little play at cylinder lockup. The hammer pull and trigger feel smooth and crisp, similar to the Uberti.

The Pietta, another quality Italian replica in a slightly lower price range.

The really nice thing about the Pietta is that it came with an optional .45 Colt conversion cylinder. I’ve always wanted to get a conversion cylinder for my Uberti but they are very expensive, about 2/3 what I paid for the gun, and they always seem to be out of stock.

This Pietta came with a .45 Colt conversion cylinder.
The conversion cylinder has an upper plate that holds a separate firing pin for each cylinder.

The conversion cylinder for the Pietta fits very nice, locks up tightly, and came with a box and a half of .45 Colt ammo which I have no intentions of using. Remington first started converting Model 1858 revolvers to .46 cal rimfire metallc cartridges in 1868. These were still blackpowder cartridges as smokless powder hadn’t yet been developed. So I will hand load .45 cartridges for the Pietta using blackpowder to stay traditional.

I’m looking forward to shooting these two together on a side-by-side comparison soon. For now, I hope you enjoy the photos.


Join our Facebook Uberti group!


Never miss an ExNotes blog:


Don’t forget: Visit our advertisers!


ExNotes Product Test: Easyberg Wheel Balancer

By Joe Gresh

I usually use two jack stands with a long piece of ½” rod through the wheel bearings to balance a motorcycle tire. It works ok but there is a bit of drag on the bearings that makes balancing a sticky affair. You can get the wheel close but minor amounts of weight (like ½ ounce) won’t have much effect.

Since I got the Harbor Freight tire machine I’ve been happily changing tires as needed. I’ve done around eight tire changes and I’ve got the system somewhat down. The only thing I was missing was a dedicated tire balance stand. This is where the Easyberg (no relation to Joe Berg) tire balancer comes in.

An Amazon search will return about two dozen motorcycle tire balancers, and most of them look exactly the same. The Easyberg was the cheapest at the time I bought it, but prices sway back and forth depending on which seller is having a sale or coupon deal. I paid $36 for the balancer and there is no way I could build one as nice for that amount of money.

My Easyberg came unassembled. It was Easybarrak to assemble the thing, requiring only an open end wrench and a hex wrench. A tiny screwdriver was needed to tighten the bubble level.

Once assembled, the Easyberg I received was slightly tweaked. The axle did not run parallel to the base making the tire sit crooked in the stand. The Easyfoil material is thin enough that I could tweak it straight. Any warpage of the base due to the tweaking process can be taken out by the four, adjustable feet. I used a four-foot level on top of the axle to check the bubble and it was fairly accurate. I’m not sure being perfectly level is all that critical, but I set it up that way.

Using the balancer is Easyberg as pie. You slide the axle through the wheel and snug up the centering cones using the supplied Allen wrench to lock the cones into position. This next step is where the Easyberk…I mean berg, is better than jack stands. The four ball bearings supporting the axle spin much Easyburger than the bearings found in your motorcycle wheel; this free movement allows a finer balance. ¼ ounce of weight will cause the wheel to move.

I give the Easyberg four stars (out of five) subtracting one star due to the thing being crooked. Otherwise it’s Easilyberk worth the $36. I’m now fully set up to change motorcycle tires. At the speeds I run, usually less than 100 MPH this balancer does a good enough job and my limited riding skills can’t detect any wheel vibration at highway speeds.


Never miss an ExNotes blog:


Don’t forget: Visit our advertisers!


Zooming Through New Zealand: Part 5

By Mike Huber

I was in the tiny town of Omarama, New Zealand, having coffee and trying to wake up enough to plan the day. I was under an hour and a half away from the Hooker Trail, which I learned just a day or so ago was not too far off my original route. The Hooker Trail was one of those that I kept seeing and hearing about in any conversation about the North Island.  I normally avoid touristy places as much as possible. One of my many travel mantras is “If I run into another American I have failed.”  That’s because most Americans stay on the beaten path and rarely venture off.  The venturing off seems to be my happy place.

As I finished my coffee and began to put my gear back on for the ride to the Hooker Trail, I fueled up since it New Zealand was pretty devoid of towns for the next couple hundred miles, which is perfect for riding.  I was expecting Mount Cook would be similar to the other areas of New Zealand and was preparing to view a miniature copy of say, Mt. Hood.  The previous day (although incredible and diverse) was like a 70% replica of the western United States with a sprinkling of British Columbia thrown in.  Yes, I am extremely spoiled in my perspectives of motorcycle roads.  I understand this.

It didn’t take long after leaving the coffee shop before low level clouds consumed me and the road.  I had just gone through a similar area and noticed when I gained some elevation it cleared up.  I remained optimistic as I strained to see anything in front of me. The attempt to hike the Hooker Trail surely would be in vain if it continued to stay this way, as I have heard it often does up in the s, outhern Alps of New Zealand.

Fortunately, this wasn’t the case. Once I hit Lake Pukaki, I had obtained enough elevation to where the clouds were below me.  Lake Pukaki than came into full view and it was stunning.  The neon green water contrasted with the brown mountains surrounding the lake, and it became all I could see.  The colors were so overwhelmingly bright I had to pull over several times not only to take the views in but allow my eyes to adjust from the drab cloudbank that had me engulfed over the previous hour.

After another 30 minutes of riding along this other-worldly lake I could see Mount Cook was getting close and I was excited to finally hike the Hooker Trail.  As I entered the parking lot around noon, I noticed how crowded it was. There was hardly any parking (at least for cars).  I found a perfect spot for Massie right up front next to the trail head and swapped out my riding outfit for hiking gear.

This was it: The Hooker Trail.  It wasn’t too long, only around 6 miles round trip.  Once I began hiking I understood why I had kept hearing about it in my travels and when reading random blogs and posts. It was super-crowded.  The hike was beautiful.  Around each corner was a new view of either glacial lakes or views of Mount Cook towering above. The trail ended at a glacial lake with a beach that was perfect for a quick swim.  It was mid-afternoon and it was warming up quite nicely.

Massie she was parked right where I had left her and ready to blast out our final few hours to the hostel on the edge of Lake Tekapo. The trip had taken me through what felt like a whirlwind of geographical features. There’s no question that that the roads, people, and environment in New Zealand are a dream for anyone (especially a motorcyclist). As I cracked open a cold Kea IPA on the lakeshore a sense of satisfaction came over me. I could now add New Zealand to the growing list of countries I where have motorcycled. The memories of this trip will help me pass the time while on the long flight to my next destination.  Cheers New Zealand!


Read the Mike Huber New Zealand posts here:


Never miss an ExNotes blog:


Don’t forget: Visit our advertisers!


Zooming Through New Zealand: Part 4

By Mike Huber

It was well after 6:00 p.m. and I was starting to hit my wall for riding.  My goal was to travel to this campground I stumbled upon on Google which was about 5 miles down a dirt road which had some decent reviews.  The rental company mentioned no off-roading as Massie had street tires.  I zoomed in on the map and saw “Linda Road,” so I technically was not off-roading. Check!

The road was a very tame forest service road with the occasional “Traffic Lamb,” as quite frequently there were herds of sheep and they would part like the Red Sea as they heard Massie’s engine roar grow closer (you can send hate mail for that joke to Joe Berk).

Once I neared the campsite I noticed a couple of old rundown stone buildings (from who knows how long ago) and a few van lifers dispersed around a large field.  This was a really cool spot!  Not only that, but you had views for miles of the sun beginning to set over the brown grassy mountains that surrounded the location.  This was Linda’s Camp.  It was an old short term gold mining operation from the 1860s, which switched hands a few times before finally being abandoned in the 1950s.  This was an amazing place to camp and it was far off the grid.  I didn’t even have cell service.

After setting up my tent I struck up a conversation with an old gold miner.  He was living in his van there and spent his days panning for gold off a nearby river with minimal luck.  He got a good laugh from my story about getting the boot from the coffee shop earlier that day for drying my gear there.  The rest of the evening was spent exploring the hotel ruins and a short hike up the mountain to watch the sunset.  It was one of those moments where I really was able to relax, breathe, and just be in the present.  It was a long but rewarding day and I thought having an early night was in order.  It would be another long day tomorrow to include the Hooker Trail hike, which I was greatly looking forward to.

Waking up in yet another serene location with Massie sitting just outside the tent was another perfect kickoff to this new day.  Since it was still pretty early, after packing I thought pushing the bike out of the camping area was the proper thing to do to avoid waking any of the van lifers (or the gold miner).

Once well outside the perimeter I went to start the bike. Nothing happened.  Shit.  The battery was somehow dead. I took the panniers off and attempted to manually jump start it off a small incline.  No good.  It wasn’t starting. Well, I thought, it was not so funny breaking that “stay on the road rule” now, was it? I had no cell signal either.  As I sat down weighing my options (none of which none were good) I heard a couple of pots banging together.  The old gold miner was up.  I walked over and asked if he had jumpers, and he did!  Sure enough, the bike fired right up with his help. Okay, cool I can still make the Hooker Trail even if I am an hour behind schedule.  And, the rental company would never know I was off road.

Once I was back on the main road and well on my way, the need for coffee hit me.  I pulled into a rest area to see if there was a cell signal to guide me to a coffee shop.  There was a cell signal, and there was a coffee shop not too far away.  I pulled out and began racing the Linda Pass switchbacks when suddenly all I saw was a huge yellow Scania 18-wheeler coming head on at me.  Why was he in my lane? SHIT! I was on the wrong side of the road!  In my morning fog, and my distraction from the battery issue I zoned out and drove on the right side of the road.  Even with a giant yellow arrow on Massie’s dash as a constant reminder, I somehow ignored the fact that they drive on the wrong side in New Zealand.  I didn’t have much time to react and managed to skirt along not so much of a shoulder, but a strip of grass as the truck blasted by me.

That was close.   I really didn’t need any coffee after that wakeup call, but what I did need was a moment to get my head back in the game (especially if I was to complete the Hooker Trail and find a campsite).  Due to Massie’s moody electrical system, tonight’s campsite would need to be near a town with a strong cell signal. It was still early and my confidence was high. I knew I would satisfy both objectives.


Read the Mike Huber New Zealand posts here:


Never miss an ExNotes blog:


Don’t forget: Visit our advertisers!


Zooming through New Zealand: Part 3

By Mike Huber

There are certainly worse places to wake up. I opened my eyes facing a beautiful mountain lake with loud wekas clumsily hunting for food in the brush next to my tent. Without my cooking gear it took me just about 20 minutes to pack up and load Massie, the BMW GS750 for what would be a full day of riding.  As I was packing up I was already craving a coffee and a meat pie for breakfast.  While stuffing my gear in the panniers I noticed how wet everything was from the dew and being so close to the lake.  The sun was out though, so I thought after an hour or so of riding I would dry it out as I ate breakfast.

Riding to breakfast took a bit longer than expected and the one hour turned to three.  Not that big of a deal as the sun was fully out now and would allow for my gear to dry while I researched my route and stops for the day. As I pulled into a coffee shop in a small town along my route the waitress stated how it would be a while for my food and coffee.  This was my queue to unpack my wet gear and lay it out to dry while I was researching maps and things to do for the day.

During my wait several people introduced themselves and we had some fun conversations about my gear and riding.  It was a great environment, or so I thought. After about 20 minutes my coffee and food arrived and I was told that maybe I should take it to go and it was time to pack up my gear.  I guess they didn’t like the look of my tent and equipment drying and sprawled out all over their front porch.  Which I sort of get, even though many of the clientele had been chatting me up.  I apologized and, well, it took me about as long to pack up that gear as it did for them to bring my coffee (it happened to be fully dry by the time it was packed).  I found it a bit rude, but I understood that having my gear everywhere could be viewed as a bit of a mess.  It was time to get going, anyway, as I had a long day ahead.

During my minimal research and planning at the coffee shop I discovered this one hike that I continually heard about from others.  It was the Mount Cook Hooker Trail.  The hike wasn’t too long, and it had an incredible view at the end. This was only a couple hours off my planned route.  Adding that hike meant I would have to have a long day and miss a lot of stops that tourists hit, such as the Franz and Fox Glaciers and hikes along that area.  I decided to prioritize the Hooker Trail and skip the glaciers and other coastal hikes. Having made this decision meant a 350-mile day.  Which to me didn’t seem like a lot, but the roads were tight and windy, which I thoroughly enjoyed, probably too much as I used the long day as a reason to really wear the edges of the tires in.

After close to 10 hours of aggressive riding through what I felt was like a mini version of the Western United States and British Columbia, I arrived where I thought would camp for the evening, just outside a city called Wanaka.  However, the “campground” resembled something of a tent city I would expect to find under Interstate 5 in Seattle.  That made it a hard pass for me.  I did have a second option, but it was another 45 minutes north and if it didn’t work out, I would be in a tight position as the day was beginning to wear on me.  I decided to shoot for it and hope for the best.  What I found was far more than I expected and maybe one of the coolest places I ever moto camped.


Read the Mike Huber New Zealand posts here:


Never miss an ExNotes blog:


Don’t forget: Visit our advertisers!


The End Of An Era: RX3 Production Ends

By Joe Berk

Zongshen ended production of its iconic RX3 motorcycle and CSC sold the last of its RX3 inventory. I was tangentially involved in bringing the RX3 to America and I had a ton of fun on that motorcycle.  Knowing that the RX3 is no longer in production is like hearing an old friend has passed away.  In the end, the S-curve prevails for all of us, I guess.  But it still hurts.  The RX3 was and still is a great motorcycle.

An early clay mockup of what would become the RX3 in Zongshen’s Advanced Design center.

According to my sources in Chongqing, Zongshen first started thinking about a 250cc offroad and adventure touring motorcycle in 2010.  Engineering development took about two years (excluding the engine).  China’s initial and traditional 250cc was based on a Honda CG125 air-cooled engine, which evolved into 150cc, 200cc, and 250cc variants (the 250cc CG engine was actually 223cc; it is the engine that powers CSC’s current TT 250). The CG-based variants didn’t have the performance Zongshen wanted for its new adventure touring motorcycle, and that led Zongshen to develop a 250cc water-cooled, four-valve engine for Megelli in Italy.  It went into the Zongshen NC250 motorcycle.  This engine also went into the RX3.

Yours truly with former Sears president and CSC advisor Carl Mungenast on Glendora Ridge Road. I rode the CSC 150 Mustang replica in this photo to Cabo San Lucas and back.

For CSC, the Zongshen connection started with a search for a larger CSC 150 engine.  The CSC 150 was the Mustang replica Steve Seidner designed and manufactured in 2009.  I was already in China for another client, and it was only an hour flight from Guangzhou to Chonqging for the initial visit to Zongshen.  To make a long story slightly less long, CSC started purchasing the Zongshen 250cc engines for the little Mustangs.  I think most of the folks who bought those Mustangs really didn’t care if it was a 150 or a 250.  Both were capable bikes; my friends and I rode the 150cc version to Cabo and back.  It was the 250cc Mustang engine that established the relationship between CSC and Zongshen, though, and that was a good thing.

When CSC’s Steve Seidner noticed an illustration of the RX3 on the Zongshen website, he immediately recognized the RX3 sales potential in the United States.   Steve ordered three bikes for evaluation and he started the U.S. certification process.  Steve and I did a 350-mile ride on two of those bikes through the southern California desert and we both thought they were great.

Showing the Zongshen execs in Chongqing possibilities for a ride in America. The Chinese sponsored the Western America Adventure Ride as a result of that discussion. It was awesome and the bikes performed magnificently.

Zongshen was not targeting the U.S. market when they developed the RX3; they thought the U.S. market had different requirements and consumer preferences.   The initial RX3 design did not meet U.S. Department of Transportation lighting and other requirements. It was back to China for me to help set up the specs for the CSC RX3 and the initial order.

On the Western America Adventure Ride, we rode from southern California to Mt. Rushmore, back to the Pacific across the top of America, and down the Pacific Coast to return to Azusa. Here King Kong, Leonard, Hugo, and Tso emulate the American presidents at Mt. Rushmore.

On that early visit, the Chinese told me they wanted to ride in America.  They sent over a dozen bikes and as many riders, and we had an amazing 5,000-mile adventure we called the Western America Adventure Ride.  Baja John planned the itinerary and mapped out the entire ride; we even had special decals with our route outlined made up for the bikes.  We let the media know about it and it was on this ride that I first met Joe Gresh, who wrote the “Cranked” column for Motorcyclist magazine.  I made a lot of good friends on that trip.  After the trip through the American Southwest, Zongshen invited Gresh and me on a ride around China, and after that, I was invited by AKT on a ride through the Andes Mountains in Colombia.

In Medicine Bow, Wyoming, on the Western America Adventure Ride. Two Colombians also participated, which resulted in an invitation to ride in Colombia.
On the road in the Andes Mountains. The sign says the elevation is 3950 meters (that’s 13,000 feet above sea level).
Joe Gresh and I gladiating near Liqian, China. The China ride was the adventure of a lifetime.

At CSC, we had a lot of discussions on the initial marketing approach.  We were looking at a $50,000 to $100,000 hit for an advertising campaign.  Maureen Seidner, the chief marketing strategist for CSC and co-owner with Steve, had a better idea:  Sell the bikes at a loss initially, get them out in the market, and let the word spread naturally.  We knew the price would stabilize somewhere above $4K; Steve’s concept was to sell the bike for $2995.  Maureen had an even better idea.  $2995 sounded like we were just futzing the number to get it below $3K; Maureen said let’s make it $2895 for the first shipment instead.  I wrote a CSC blog about the RX3 and CSC’s plans to import the bike.  When I hit the Publish button on WordPress for that blog, the phone rang literally two minutes later and I took the first order from a guy in Alaska.  Sales took off with CSC’s introductory “Don’t Miss The Boat” marketing program.

I wrote another CSC blog a week later saying that I was eager to get my RX3 and ride it through Baja.  I thought then (and I still think now) that the RX3 is the perfect bike for Baja.  The bike does 80mph, it gets 70mpg, it has a 4-gallon gas tank, and everything you needed on an ADV touring machine was already there:  A skid plate, good range, good speeds, a six-speed gearbox, a comfortable ride, the ability to ride on dirt roads, panniers, a top case, and more.  We started getting calls from folks wanting to ride with me in Baja, and the orders continued to pile in.   That resulted in our doing an annual run through Baja for RX3 owners.  We didn’t charge anything for the Baja trips.  It was a hell of a deal that continued for the next four or five years.  I had a lot of fun on those trips and we sold a lot of bikes as a result.

The Western America Adventure Riders in Arizona. This photo is prominently displayed in the Zongshen main office building lobby.  That’s Baja John in front; he did nearly all the work organizing the ride.

CSC’s enthusiasm surrounding the RX3, the CSC company rides, and CSC’s online presence did a lot to promote the RX3 worldwide, and I know Zongshen recognized that.  I visited the Zongshen campus in Chongqing several times.  One of the best parts of any Zongshen visit for me was entering their headquarters, where a 10-foot-wide photo of the Western America Adventure Ride participants in Arizona’s red rock country dominated the lobby.

The RX3 was controversial for some.  RX3 owners loved the bike.  A few others found reasons to hate it, mostly centering around the engine size and the fact that the bike came from China.  I spent a lot of time responding to negative Internet comments until I realized that the haters were broken people, there was no reasoning with them, and none were ever actually going to buy the motorcycle anyway.  These were people who got their rocks off by throwing rocks at others.

When RX3 production ended recently, I contacted one of my friends at Zongshen and I thought you might enjoy some of what he told me.  Zongshen sold 74,100 RX3 motorcycles (35,000 in China; the rest went to other countries including Mexico, Colombia, other South American countries, Singapore, Turkey, and the United States).  Colombia alone purchased 6000 units in kit form and assembled their bikes in Medellin.  I watched RX3 motorcycles being built in the Zongshen plant in Chongqing; I was also in the AKT factory in Colombia and I saw the RS3 (the carbureted version of the RX3) being built there.  Ultimately, RX3 demand dropped off, but 74,100 motorcycles is not a number to sneeze at.  The RX3 greatly exceeded Zongshen’s expectations and their initial marketing forecasts, especially in overseas markets.  CSC had a lot to do with that success, and playing a minor role in that endeavor has been one of the high points of my life.

The CSC 650cc RX6 twin cylinder motorcycle. The Chinese motorcycle industry is moving to larger displacement bikes.

Chinese motorcycle companies today are emphasizing larger bikes.  We’ve seen that here with the CSC RX4, the 400cc twins, and the 650cc RX6.  I’ve ridden all those bikes and they are great.  I like larger bikes, but I still think a 250cc motorcycle is the perfect size for real world adventure riding.  I think the emphasis on larger bikes and the decision to drop the RX3 is a mistake, but I haven’t sold millions of motorcycles (and Zongshen, with CSC’s help, has).


That photo you see above at the top of this blog?  It’s good buddy Orlando and his wife Velma riding their RX3 up to Dante’s View in Death Valley National Park.  Orlando thinks blue is the fastest color, but I know orange is.  Sue and I recently visited Death Valley again; watch for the ride reports here on the ExNotes blog.


Visit the CSC website here.


I’ve written several books about the adventures described above.  You can order them here.


Never miss an ExNotes blog:


Don’t forget: Visit our advertisers!


Vegetarian Chili

By Joe Berk

We’ve had a string of cool days here in California (cool for us, anyway, with temperatures in the high 40s and low 50s) and when it gets cold, I really enjoy a bowl of chili.  I suppose the easy thing to do would be to head over to a restaurant and order up a bowl, but with restaurant prices verging on the ridiculous lately, I only visit restaurants when I’m traveling.  Sue and I usually prefer to cook at home.  The cost is way less and the food is better.

One of my buddies mentioned a good pot of chili he ginned up and I asked for his recipe.  A few days later when I was in Trader Joe’s, I saw the shaved beef my friend told me he used in his chili.  I was about to put it in my cart when I thought I really didn’t want to put that in my body.  Then an idea hit me:  Vegetarian chili.  I’ve had some good ones but I had never made vegetarian chili before.   I quickly Googled vegetarian chili recipes on my cell phone, mentally merged the ingredients that appealed to me, and I picked those up instead.

I do a lot of my cooking in a crock pot.  I like the idea of getting all the work out of the way in the morning and letting the brew simmer all day long.  The aromas are always great, and my vegetarian chili was no exception.  crock pots are cheap, too.  They are an easy way to prepare a great meal.

Here’s my recipe for what turned out to be a great vegetarian chili:

    • 1 chopped medium yellow onion
    • 1 chopped red bell pepper
    • 1 cup of shredded carrots
    • 3 cloves of minced garlic
    • 1 15.5 ounce can of can pinto beans
    • 1 15.5 ounce can of black beans
    • 1 15.5 ounce can of kidney beans
    • 1 28 ounce can of fire roasted tomatoes
    • 3 cups of low-sodium vegetable broth
    • 2 tablespoons of chili powder
    • 1 tablespoon of ground cumin
    • 2 teaspoons of dried oregano
    • 1 tablespoon of extra-virgin olive oil

I drain and rinse three different kinds of beans before adding them to the pot.  After everything is in the pot, I mix it up a bit with a big wooden spoon and then put the pot on the low heat setting.   Eight hours later, it’s ready.

The bottom line?  It was delicious.


Pro tips:

    • I always use the San Marzano brand for any recipe calling for canned tomatoes (they have the best flavor).
    • All the vegetarian chili recipes called for adding salt.  I don’t.  There’s enough salt in the canned beans and fire roasted tomatoes.
    • When serving our chili, we add a scoop of sour cream and shredded cheddar cheese.
    • Most chili recipes call for a jalapeno pepper or red chili flakes.  You might want to consider that if you like your chili spicy.  The recipe included here makes a tasty dish and the flavors don’t compete with the heat from a jalapeno or red chili.  The two tablespoons of chili seasoning alone are just about perfect for a modest amount of spiciness.
    • What I’ve found with any crock pot recipe is that the time doesn’t have to be exact, and 8 hours is a minimum time.  If it goes another couple of hours, it’s no big deal.

The sizes on the ingredients listed above make for a full pot; Sue and I will get four or five meals (each) out of this recipe.  I’ve found that chili makes for a good omelet, too.


Our recipe for crock pot Italian meat sauce and lasagne is here.


Never miss an ExNotes blog:


Don’t forget: Visit our advertisers!