The 1886 Winchester

An 1886 rifle chambered in .45 70. Octagonal barrel. Color case hardened receiver and other bits. Finely-figured walnut. It was a good day.

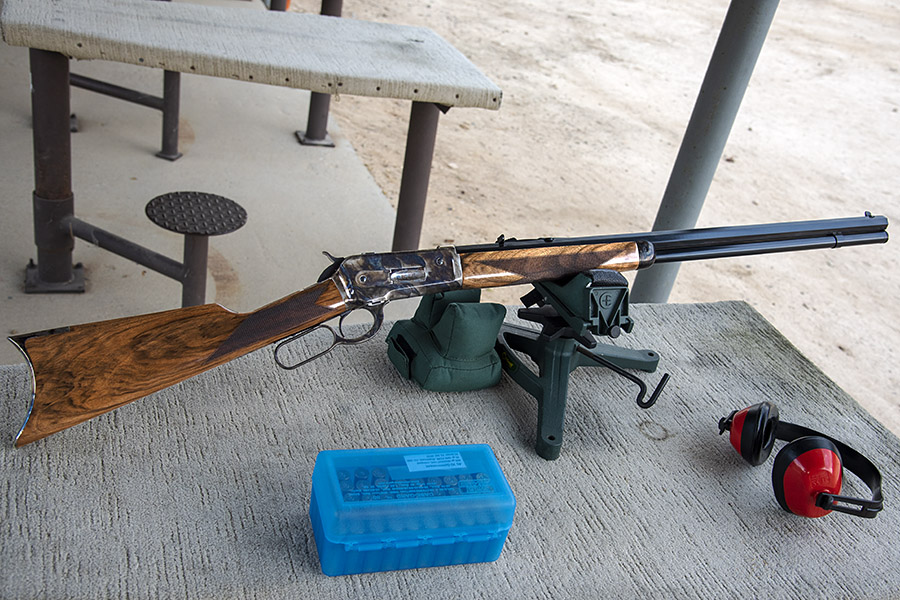
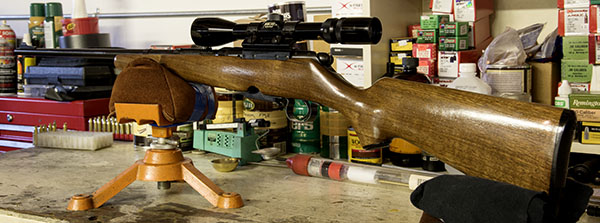
It was one of Theodore Roosevelt’s favorite rifles, and it was a rifle I’ve wanted for a long time:  The 1886 Winchester, except mine isn’t a Winchester.  Mine is a Chiappa, and it’s a faithful reproduction of the original 1886 Winchester.  After a diligent search, I purchased mine through Gunbroker.com from an outfit in Pennsylvania called Elk County Ammo and Arms and I had it shipped to my favorite local gun shop, Bullet Barn Guns here in southern California.

I picked up my 1886 this week and I was on the rifle range with it the day I did so. It wasn’t my brightest move; it was over a hundred degrees on the firing line and the heat made me woozy by the time I got home.  But I wanted to shoot my 1886.  Not surprisingly, I was the only nut on the range that afternoon.  Also not surprisingly, I enjoyed every second of my 1886 range session.  For me, the rifle’s heritage, beauty, performance, accuracy, and general magnificence overcame the heat.   Even though old Davy Crockett did his thing a good half century before the Winchester 1886 came on the scene, I kept hearing the music from that old 1950s TV show while I was on the range. You know.  Davy Crockett, King of the Wild Frontier and all that.  A stunningly-beautiful 1886 and high temperatures will do that do you.  King of the Wild Frontier.  I liked that.  It’s how I felt that afternoon, a feeling fueled by the vintage look and feel of my 1886.

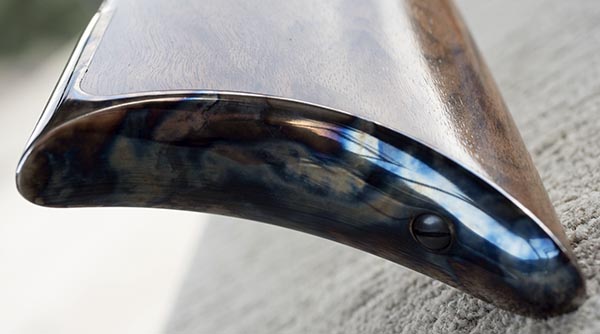
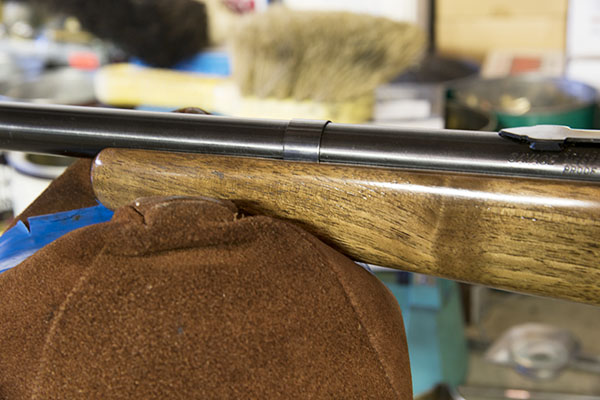
My 1886: Blue Steel and Walnut

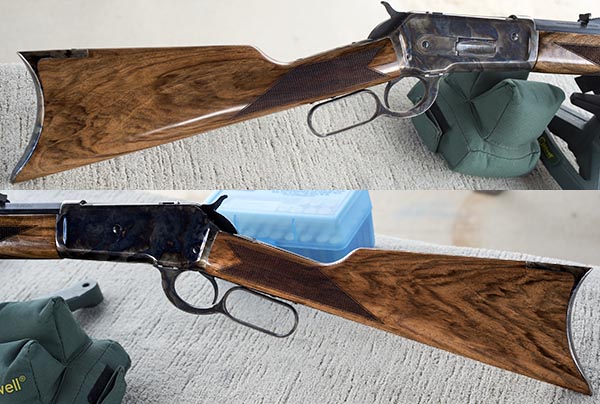
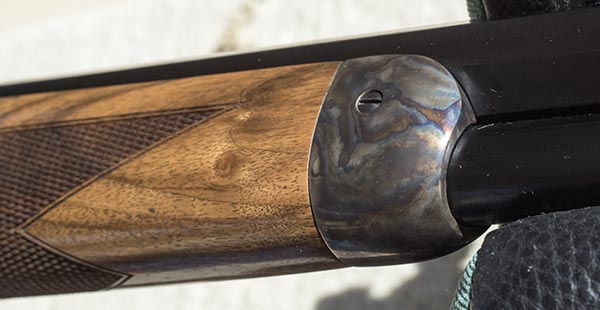
Well, not just blue steel and walnut.   Blue steel, color case hardened steel, a 26-inch octagonal barrel, and extremely well-figured walnut.  It’s a combination that’s tough to beat, especially on a classy lever gun like the 1886.

Left and right views of my 1886. This is a beautiful rifle. But that buttplate!

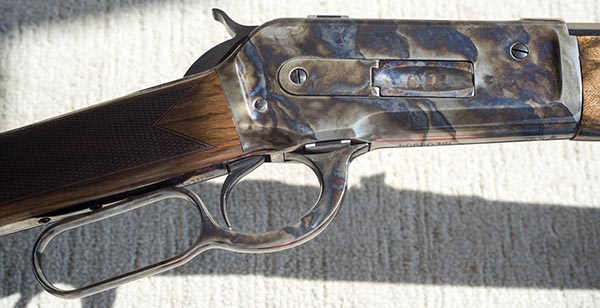
The folks at Chiappa know what they’re doing.  Check out this color case hardening.  It’s stunning.

This is a classy rifle. The color case hardening is magnificent.
The craftsman in Italy who do this kind of work are underpaid. I have no idea how much they earn, but I think they are underpaid.  This kind of work is priceless.
The fore end tip is also color case hardened. The checkering is hand cut and beautifully executed.
Painfully beautiful, this buttplate is.  It captures the era and the feel of an original 1886, but with full power loads, it’s painful.

The 1886 and 45 70 Accuracy

So what’s it like shooting the 1886?   Hey, take a look…

The 1886 Chiappa will shoot.  The heat not withstanding, I was having a good time out there.  The sun was playing hide-and-seek behind the clouds, and when it went behind the clouds, the difference in accuracy was immediately apparent.  I saw firsthand what happens when you have glare on the front sight.  When the sun ducked behind the clouds, the front sight stood out clearly.  When the clouds moved away and the sun bore down on the 1886 directly, the front sight caught a fair bit of glare.  It made getting a clear sight picture difficult, and you can see the results on the target below.

Five 5-shot groups at 50 yards with the Chiappa 1886.  The first three groups were shot with the sun behind the clouds. The Chiappa 1886 is accurate! The sun emerged for the last two groups, and the accuracy difference was startling.  Glare from the front sight made the groups open significantly. My 1886 had not been zeroed yet. The purpose of this range session was just to see how the 1886 would group, and it did not disappoint.

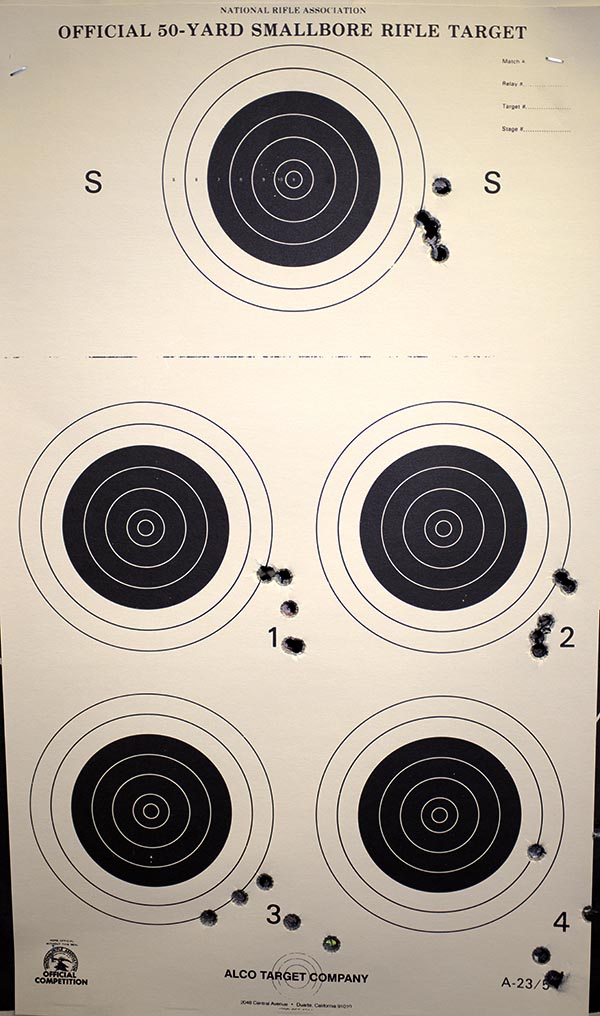
I had my Marlin 45 70 accuracy load (a 405 grain cast bullet with 35.0 grains of IMR 4198 powder) and I used it on the target above.  I fired the first three groups with the sun behind the clouds and no front sight glare.   Then the clouds shifted, the sun was out in the open, and the front sight started winking at me.   Glare kills accuracy when shooting open sights.  I proved it. With no front sight glare, the groups were impressive.

The 1886 was shooting to the right, and when I examined the sights, sure enough, the front sight was slightly biased to the left.   On a rifle or handgun rear sight, you move the sight in the direction you want the bullets to go (if you want your shots to move to the left, you move the rear sight to the left).  On the front sight, it’s just the opposite.  You move the front sight in the opposite direction you want the bullets to move.

Look very closely, and you can see the front sight is a bit to the left.  That octagonal barrel is beautiful.

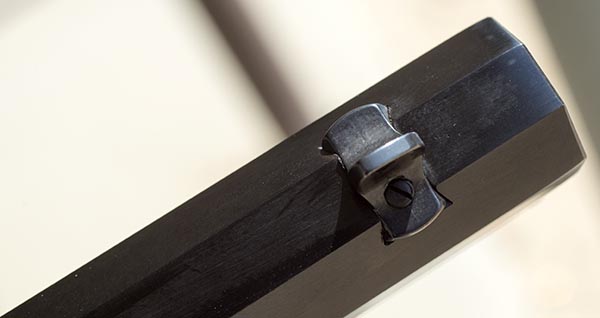
The front sight on my 1886 needed to move to the right because I wanted to move the shots to the left.  I had a gunsmith screwdriver kit with me at the range, but between the heat and my sweating like a stuck pig I didn’t want to fool around trying to move the sights out there.  I thought it would be best to wait until I returned home and do it in my shop.  That’s what I did, and I’m eager to get back out on the range and try it again.

45 70 Recoil

In the video above, the 1886’s recoil looks to be pretty mild, and it was for the three shots you see me firing in the YouTube (I was shooting a light Trail Boss load).  I brought two different loads with me to the range.   One was the aforementioned light Trail Boss load; the other was the more serious IMR 4198 load that I also mentioned earlier.   Trail Boss and IMR 4198 are two different propellants; Trail Boss loads generally give low bullet velocity and low recoil (you know, it’s the old f = ma thing).  IMR 4198 makes the bullet step out more earnestly and that load used a heavier bullet.  Both resulted in a sharp step up in recoil.

With the light Trail Boss load and a 300-grain Hornady jacketed hollow point bullet, the recoil was tolerable (as you can see in the video).  With my accuracy load (the one I developed for my 45 70 Marlin, a 405-grain cast bullet and 35 grains of 4198), the steel 1886 buttplate hurts big time. I had to use a wadded up T-shirt as a half-assed recoil pad for a field expedient.  But the rifle will shoot.   It’s accurate, as the above groups show.

The Gunstores

As I mentioned above, I bought my Chiappa 1886 from Elk County Ammo and Arms in Pennsylvania.  There are a lot of shops selling the 1886 Chiappa, but Elk County Ammo and Arms was the only one willing to take photos of my rifle and email them to me so I could see what I was getting.   That was a big plus for me, and it cinched the deal once I saw the actual rifle. I had Elk County Ammo and Arms ship the rifle to my local gun store, Bullet Barn Guns, here in southern California.  Bullet Barn Guns is a family-run operation and they are absolutely top notch in every regard.  Like me, they appreciate blue steel and fine walnut, and they were blown away by my 1886 when it arrived (so much so that they shot photos of it and emailed them to me, too).  The folks at Bullet Barn are enthusiasts, just like me.

The 1886 Chiappa:  The Bottom Line

I’m a happy camper.  I wanted an 1886 with good wood and this one answered the mail.  The walnut is stunning.  The checkering is hand cut and sharp (it’s not laser cut or pressed, as is the case on many rifles today). The walnut is oil finished, which makes it easily repairable when the inevitable hunting, range, and general use scratches occur.  The metal work is superior (you can see that in the above photos). The trigger is good (there is no creep).   And the rifle is accurate.  It groups well.   After I shot the above target, I used up the remainder of the box of ammo I brought to the range shooting at a rock out at about 150 yards, and I connected every time.  That was cool.

About the only thing I don’t care for is that the lever does not lay flush against the receiver; it’s angled out a degree or two. I don’t think that’s a big deal, but I had to find something to bitch about (I’m told it’s part of my charm).  That’s it.

The bottom line is that the Chiappa 1886 is a beautiful and accurate rifle. I had wanted an 1886 with nice wood and color case hardening for a long time, and now I have one.  Keep an eye on the ExNotes blog, folks.  This is a rifle that will be back on these pages.


Like stuff on blue steel and walnut, or maybe the 45 70 cartridge?  Hey, check out our Tales of the Gun page!

Sweet Home, California and New Mexico!

Wowee, it’s been nonstop travel for Gresh and me these last few weeks.   As you know from reading the ExhaustNotes blog, Gresh rode his Husqvarna to the Bonneville Speed Week in Utah from his home in New Mexico.   He’s a better man than I am.   I don’t think I could handle riding a Naugahyde-covered 2×4 all that distance.  Joe is back on the Tinfiny Ranch in New Mexico now, no doubt thinking about concrete, motorized bicycles, getting his vintage Z1 back on the road, and more.

I’ve been on the road, too.  It was a scouting expedition for an upcoming hunting trip with my good buddy J, back to Soprano-land for my 50th high school reunion, and then up to Seattle for a friend’s wedding.  We’re racking up the miles, but I’m home now, and let me tell you, it’s good to be home! I was supposed to be on the road this past week for the Three Flags Classic (I would have been on the way home from Canada by now), but it was getting to be too much and I bailed out on that one.  Like my good buddy Dirty Harry likes to say, a man’s got to know his limits, and I hit mine.

Scouting for Deer

Out in the boonies with good buddy J, proving that beer doesn’t work well as a mosquito repellant.

Good buddy J and I snuck away to an undisclosed location to scout deer. Where we were and where we’re going is a closely-held military secret, but we saw lots of game, we’re going back heavy, and we’re looking forward to bringing home the bacon (or, I guess I should say, the venison).  We camped on this trip, which is something I hadn’t done in quite a few years.  J makes camping seem like staying at a 5-star hotel.  It was fun.  Except for the mosquitos.  Those little bastards were brutal.  I probably won’t be able to make it up there the same time as J (I’ve got another secret mission to Asia coming up real soon), but if I don’t make it on the trip with J, I’ll be there a few days later.  Venison beckons and all that.  I’ve got a .300 Weatherby load with a deer’s initials on it.

Bonneville Speed Week

Joe’s trek to Wendover for Bonneville’s Speed Week was awesome, and you can get to his posts here…

Salt 1
Salt 2
Salt 3
Salt 4
Salt 5
Salt 6
Salt 7
Salt 8

Reading Joe’s blogs was a real treat; I felt like I was riding along with Uncle Joe.  You will, too…click on the above links if you haven’t seen these great stories and enjoy some of the best motorcycle story telling in the world!

Winging it to Wendover, Gresh was…

Joe has another trip planned in the near term for the Yamaha Endurofest.  I’m looking forward to the photos and the stories on that one.  I love reading Joe’s stories!

The Big 50

Hey, what can I say?   My classmates from our Class of ’69 did one hell of a job putting together an absolutely amazing 50th high school reunion.  Surprisingly, I didn’t get a lot of photos…I was having way too much fun.  I did get a few, though, and here they be!

Just a few of my classmates taking a tour of our old high school.
Good buddy Tad, whom I met in the 7th grade, with his Honda Gold Wing.
Good buddy Mike, reminding us there’s no talking to the driver while the bus is in motion!

At one point, we started grabbing photos of folks from the different elementary schools in our area.  Here’s one of the crew who went to Deans School…my elementary school alma mater.

I’ve known everyone in this photo from kindergarten. I had crushes on every girl in this photo at one time or another.  Don’t tell Sue.

We then thought it would be a good idea to take a group photo of everyone who had detention in high school…you know, where they make you stay late to wash blackboards, clean erasers, and stuff like that for cutting up in class. I’m guessing they can’t do that anymore.

The kids who had detention in high school. I was the king of detention.

I can’t remember ever having as much fun as we did at the reunion.  Everyone looked great. Some of the folks there I first met in kindergarten, and most I had not seen in 50 years.  One of the young ladies you see in the photos above had saved some of our high school newspapers, which had a column titled Exhaust Notes.  And you can guess who wrote it more than half a century ago.  That’s a story for another blog, and it’s coming your way soon.


Don’t miss a single ExhaustNotes blog!  Sign up here for automatic notifications…

Refinishing the Mini 14

A couple of years ago I spotted a beat-up old Mini 14 rifle stock in the used parts junk pile at my favorite local gunstore, and I thought it might be fun to refinish it.  It was for the earlier series Mini 14 and I didn’t own one, but the stock looked like it needed me.  It was dinged up but didn’t have any gouges, and the anodized aluminum buttplate had multiple scratches.  I asked John, the guy behind the counter, what he wanted for the stock, and we were both in a quandary.  John’s brow furrowed.  He was searching for a price that wouldn’t be insulting, but I could see that he was eager to unload something that had all the earmarks of becoming a permanent resident.  There were several old timers in the shop (there always are; it’s that kind of place).  All eyes were on John and me.

“I don’t know…maybe $25?” John said.

I recoiled as if struck by an arrow.  It’s all part of the game, you know.   All the eyeballs were on me now.  It was like being in a tennis match.

“I don’t know, John,” I answered.  “I was going to offer $30, but if you gotta have $25, then $25 it is…”

Everybody laughed and I went home with a Mini 14 stock that looked as if it had been to Afghanistan.  I wished I had the foresight to grab a few “before” photos of it, but I did not.

Like I said, the stock was decrepit, but I wanted a refinishing project and now I had one.  I removed all the metalwork, I stripped the finish (you can see how to do that in our series on the Savage 340 refinish), I steamed out the dents (same story there; it’s covered in the Savage 340 stock refinish series), and then I went to work on it with 200, 320, 400, and 600 grit sandpaper.  The buttplate was hopelessly scratched all to hell, so I did the same thing with the same grades of sandpaper and I decided to leave the aluminum bare.  In one of my prior aerospace lives, I worked at company that made interior doodads for aircraft, and the approach I just described was one we frequently used for doorknobs, latches, and the other metal chotchkas you see in aircraft cabins.  That particular company was not a good place to be (my boss was a butthead), but I liked working with the crew of Armenians who handled all of our finishing work.  Whenever I had an idea about making an improvement, those guys were quick to tell me that wasn’t how they did it in the old country, and I went with their expertise (it was the right thing to do).  But I digress; that’s a story for another time.

Mini 14 stocks are birch, which is a light wood, and the question was do I want to stain the birch for a darker look, or leave it unstained for a lighter look?  I went for Door Number Two, and I think it turned out well.  I used the same approach described in the Savage 340 blog, taking care to use very light coats applied with a fresh bit of T-shirt cloth each time and waiting a day between applications.  This one has 10 coats of TruOilTruOil is good stuff.

I had a beautiful rifle stock, but no rifle to go with it.  One of my good buddies told me his brother had a Mini 14 that was in rough shape, so I gave the refinished Mini 14 stock to him to send to his brother.  It was a fun project and I really liked the way this one turned out.


Check out our other Tales of the Gun stories!

The Three Flags Classic: I dropped out

If you’re waiting for blogs from me on the Three Flags Classic and updates on the RX4, you won’t get them.   I dropped out before I even started.  I don’t like to think of myself as a quitter, but that’s what I did on this one.

It came down to this:   I’ve been on the road for the last two months nearly nonstop and I needed a break.   I am not doing a very good job at being retired, and the travel just got to a point where it was overwhelming.  I had a consulting gig with a large agricultural firm in Colorado, then it was more expert witness work (analysis and a deposition), a trip back east for my 50th high school reunion (that was a lot of fun, but it was another week of travel), a trip to Seattle for a friend’s wedding (lots of fun there, but yet another week of travel), a couple of runs up the coast to be with grandkids (more fun, but again, more travel), and on and on it goes.   I don’t think I’ve been home more than two or three days in a row in the last two months.

Three Flags for me would have involved a full day on the motorcycle in 100-degree weather to get to Mexico today, a 681-mile motorcycle day tomorrow starting at 3:30 a.m. to get from San Luis Rio Colorado (in Mexico) to Cedar City (in Utah) through 110-degree weather on a holiday weekend, and another 1500 miles of riding to get to Canada over the next week.  And then another 2200 miles or so to get back to southern California. It would be two more weeks on the road.

Baja John was going to ride with me, but when he considered the distances and the temperatures and the timing, he decided not to go.  When Joe Gresh heard I wasn’t going, he thought about taking my place, but after an initial burst of wanting to go he came to the same conclusion as John did.  Those two guys are smarter than me.   What was I missing?  At what point in your life do you decide you need to stop and smell the roses for a bit?  At what point do you say:  Hey, I made a decision that was too hasty and I need to reverse it?

For me, that point was yesterday.  There’s nothing wrong with the RX4 motorcycle (in fact, it’s a great bike and the new ones are in port waiting to clear Customs now) and there’s nothing wrong with the 3FC19 ride.   The timing’s just not right for me.   I know I’m disappointing a few people with this decision, but I’m also pleasing a few people, and I’m one of them.

The Indian 741

By Joe Berk

The world was at war, the Army said build motorcycles this way, Indian saluted and executed, and Harley told the Army to go pound sand.   This is the Indian that resulted, it’s running in the current issue of Motorcycle Classics magazine, and you might want to read it.


Join our Facebook ExNotes page!


Never miss an ExNotes blog:


Help us keep the lights on:


Don’t forget: Visit our advertisers!


Gunstock Refinish: Part IV

This blog will wrap up the series on refinishing the Savage 340 rifle.  It’s been quite an adventure and the Savage is quite the rifle.   As you may recall, I found this rifle on the consignment rack at a local gun store, and to my great amazement, my little $180-dollar econo gun turned out to be quite the tack driver.  I purchased the rifle with a refinishing project in mind, and now it’s complete.

The Refinished Savage

I stopped after eight coats of TruOil, as the results were the same after the sixth and seventh coats.  The Savage went back to together in minutes, and it looks like a new rifle.  Actually, that’s not quite right…the 340 Savages that left the factory never looked this good..

Here are a few shots from the right side…

And a few from the left…

Before and After Comparisons

Here are a few before and after shots to allow a more direct comparison…

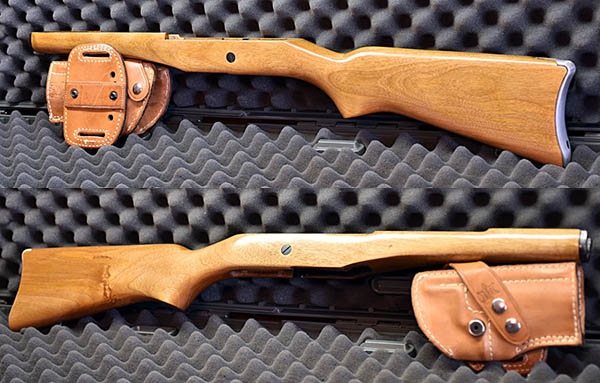
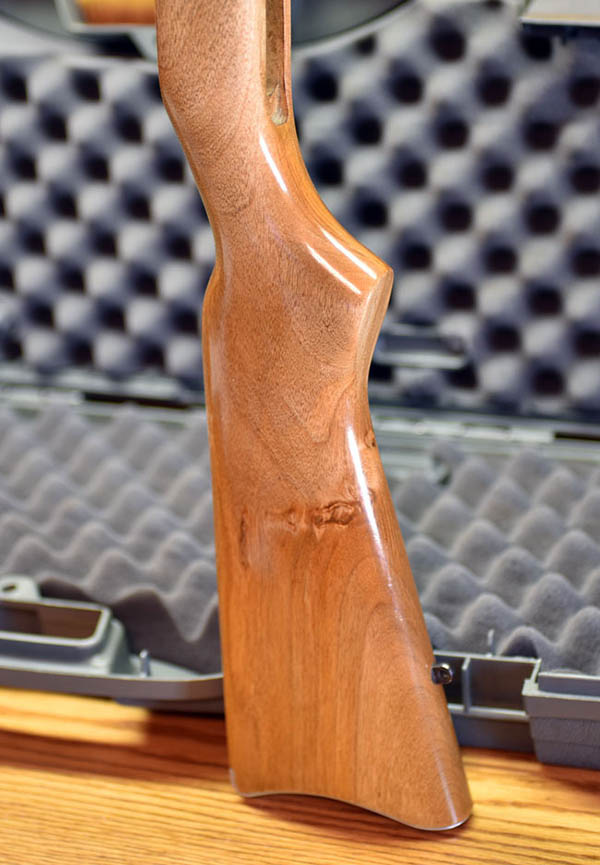
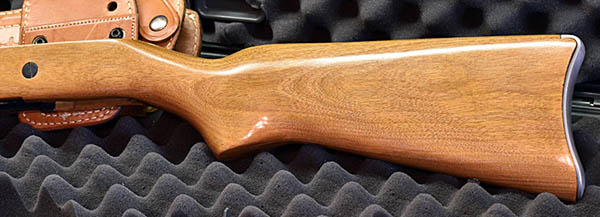
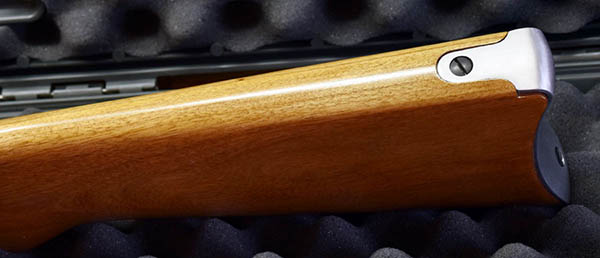
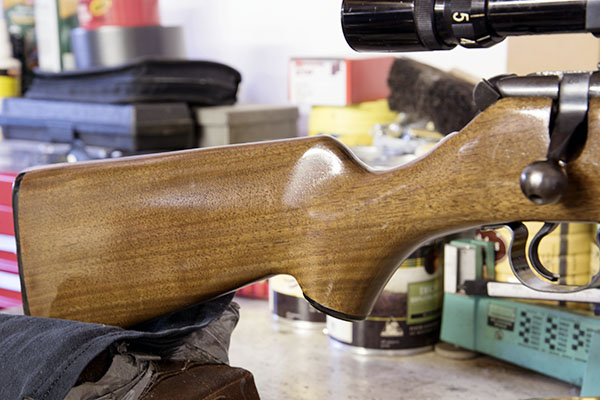
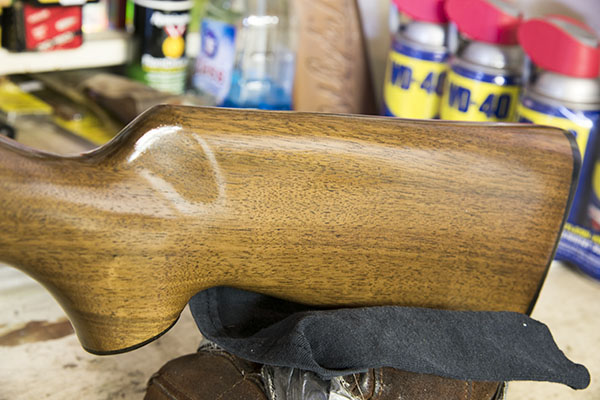
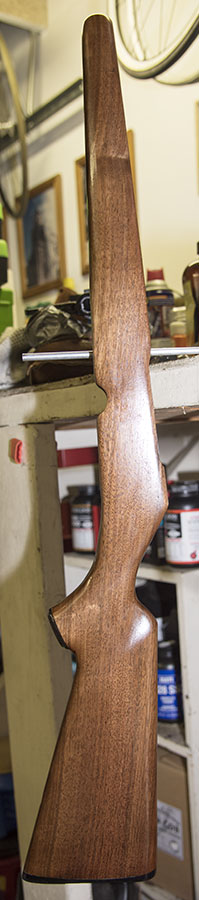
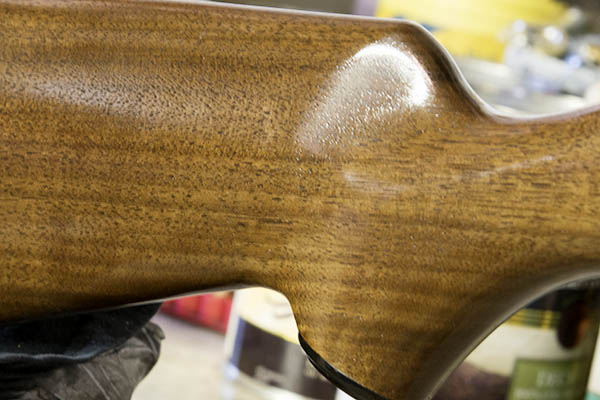
The original finish had a lot of scratches and dings; those are all gone.  The 340 originally had white line spacers between the buttplate and the stock, and between the pistol grip cap and the stock.  I like the “less is more” look (I think it’s more elegant), and I think I achieved it by deleting the spacers.  The rifle’s original finish was some sort of shellac or varnish that gave a reddish hue to the stock; the new TruOil finish allows the natural walnut color to emerge and I like that better.

Oil Finish Advantages

There are other advantages besides just good looks to an oil finish.  When the stock gets scratched or worn (and if it’s used in the field, it will), it’s a simple matter to just reapply the TruOil again.   When you do that, the stock will be like new again.  It’s easy to touch up an oil finish.  Another advantage is that the stock is sealed.  The oil finish is relatively impervious to moisture, and that keeps the stock stable.  It won’t induce a shift in bullet impact as a result of the stock absorbing moisture and distorting.  And of course, there’s that most basic advantage:  It just flat looks good.


If you would like to see how this project began and read a bit about the Savage’s accuracy, you can do so here.

A Savagely Inexpensive Rifle
Savage Refinish Part I
Savage Refinish Part II
Savage Refinish Part III

An International Motorcycle Rally!

It’s weird, I know, but I usually get the pre-ride jitters on every big motorcycle ride I’ve ever done.   This time, I’m going into Mexico, back into the US, across the US from our southern border with Mexico to our northern border with Canada and then on up into Canada, and then back across the US to arrive home after riding roughly 4500 miles on the 2019 Three Flags Classic.  The weird thing this time is I’m not apprehensive at all.  I can’t wait to get started on this ride.

I was able to hook up BajaBound Insurance with the Southern California Motorcycle Association and they are now the recommended insurers for the Mexico leg of this trip (hey, that’s what happens when you advertise with ExhaustNotes), and I’m going to get my insurance as soon as I’m done with this blog.

The CSC RX4 I wrote about earlier is running like a champ, and the guys at CSC Motorcycles have done a super job prepping the bike for me.  There really wasn’t too much to do…I asked for the big Tourfella bags so I can carry my Nikon and my laptop to give you folks all the great photos and blogs you’re used to seeing on any ExNotes ride, a mount for my cellphone, and a set of running lights.  I could have done without the running lights (you know, the spotlights) because the headlight on the RX4 is so good, but don’t tell CSC I told you.  You should buy the spotlights anyway.  They look cool.

Man, I am looking forward to this one.  I’m going to make new friends and see new sights.  I can’t wait to meet the other 249 Three Flags Classic riders. And I’m going to do it all on the first RX4 in North America. It’s going to be great.

My Three Flags Classic RX4

My 3FC19 RX4 motorcycle on the road last night. It’s a great motorcycle.

I’m getting excited about the upcoming Southern California Motorcycle Association’s Three Flags Classic adventure and the CSC RX4 I’ll be riding on this epic rally.  I’ve been putting a few miles on the RX4 CSC graciously provided and I thought I would fill you in on a few of the specifics I’m discovering on this bike.

I have a measured mile by my home and I was happy to see that the RX4 clocked it at exactly 1.0 miles.  I think that’s pretty much what all the motorcycles do these days for obvious reasons.  If the odometer read more miles than you actually covered, the manufacturer would be cheating you out of a portion of the warranty, and if the odometer read fewer miles, they’d be warranting the bike for longer than they intended to.  The point is moot with a CSC motorcycle; their bikes are warranted for unlimited miles.  But it’s nice to know that whatever distance it says you’ve gone is the real distance.

Command central and my high-tech data bank. The ergos on this bike are good.

The next thing I checked was fuel economy, and I did so based on a mix of freeway, city, and mountain road riding.  The bike I rode, with roughly 1200 miles on the clock, returned 66.34 mpg.  I think CSC advertises 60 mpg for the RX4; I did 10% better than that with the one I’m riding.

Next up was motorcycle speed indicated by the speedometer versus GPS indicated speed.  I found that the speedometer was 15% to 8% optimistic, depending on velocity.  At higher speeds, the speedometer error decreased to the 8% range.  It’s pretty common for motorcycle speedometers to be about 10% optimistic.  It’s also very common for the percentage difference between actual speed and speedometer-indicated speed to not be constant (the error percentage changes with speed).

Indicated versus Actual MPH on the RX4 I’m riding in the 2019 Three Flags Classic. Speedometer error, as a percentage, decreased as velocity increased. The bike will do way more than 80 mph; I just didn’t want to go any faster for this test.

Next up was a quick look at engine RPM versus indicated speed.  The RX4 cranks way less RPM at every speed compared to the RX3.   Here’s what it looks like on the RX4…

Velocity versus RPM on the RX4.  The RX4 engine runs at lower rpm for any given speed than does the RX3.

The RX4 has a torquey motor, and I was surprised at how low the RPM is at any given speed compared to the RX3.  I know on my RX3, 80 mph is somewhere near the redline at 9000 RPM.  On the RX4, the engine is just loafing along at a meager 6000 RPM.   The RX4 engine pulls strongly from anything above 3000 RPM.   You can downshift to move away more quickly, but you don’t need to on this bike.

And hey, because I know you’ll ask, here’s what the bike sounds like…

Another area in which the RX4 excels is its lighting.  The headlight does a fantastic job; I was impressed riding it at night.

Up above the Pomona Valley with the sun going down. An orange bike photographs well, don’t you think? And hey, Orlando, what’s the fastest color?

That’s it for now.  I’ll have a lot more info on the RX4 and the 3FC19 ride, and I’ll be posting from the road every day.  Make sure you sign up for our automatic blog updates so you don’t miss anything!


Want to learn more about the RX4 motorcycle?  Take a look at our comparisons of the RX4 to the RX3 and the KLR 650 here.  And don’t forget to visit CSC’s website, too, for more information on the RX4 and CSC’s other motorcycles.

Gunstock Refinish: Part III

In our previous blogs, we removed the Savage 340 barreled action from the stock, we stripped the old finish and made a few minor wood repairs, and we sanded the stock to a smooth finish with successively finer sandpaper.  We’re now ready to get to the fun part, and that’s applying the TruOil for a rich, deep, and elegant finish.

TruOil Application

Applying the TruOil to the stock takes several days because it involves repeated applications and drying cycles.  There are basically two ways to go here.  We can create a deep gloss finish, or we can create a subdued satin finish.  I like both, and as of this writing, I haven’t decided what the final look is going to be.

You’ll recall that I omitted the white line spacers between the stock and the buttplate and between the pistol grip cap and the buttplate because I like the look better without the spacers.

I always c-clamp a rod to my bench because that’s where I’ll hang the stock after each TruOil coat to allow it to dry.   You can see that in the photo to the right.

The way I like to do this is I cut out a small square of old T-shirt for the TruOil applicator.  I’ll put a small bit of TruOil on the cloth and rub that into the stock, and then hang the stock to allow it to dry.

On this particular piece of walnut, I noticed that the walnut pores were large in a few areas, so I put on two coats over the space of a couple of days to see how they filled.  I didn’t like the way the pores looked (they were not filling) after the second coat.  That’s okay; we have an app for that.  It involves applying a thick coat of TruOil and giving it several days to cure.  That worked for me because I was going to be out of town for several days (another secret mission, you could say), and that would give the third coat plenty of time to thoroughly cure.

Some folks like to use a wood filler to fill the pores.  I’m not one of them.  I like to let the TruOil do all the work.  I think it looks better than using a filler.

After the third, thick TruOil coat cured, I then went to work on the stock with 0000 steel wool.  The idea here is remove all of the excess TruOil from that third, thick coat, and get a uniform surface with no open pores.  That worked out well, and I had a nice subdued stock finish that already looked way better than the original finish.  I could have stopped at that point and reassembled the rifle, but I decided to go for a deeper finish.    More TruOil coming up, folks.

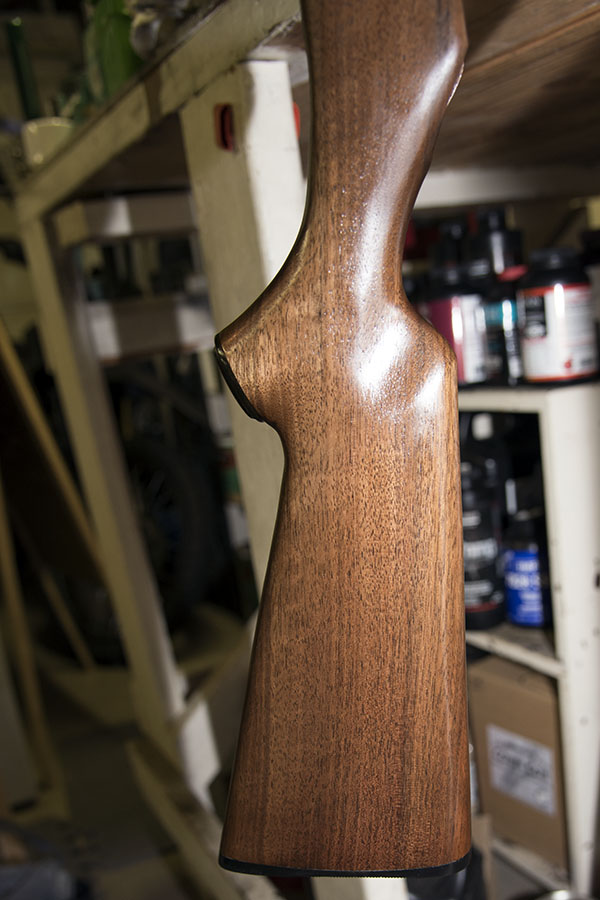
I applied a thin fourth coat of TruOil and allowed it to cure overnight.  The stock started to look very good, and I next applied a fifth thin coat.  It’s what’s curing now, and it’s what you see in these photos.  The drill is to go very, very light with each coat, rubbing it into the walnut with the cloth applicator.  You want to get the wood wet, but just barely.  If you get it too wet, the TruOil will run (and then you have to rub it down with steel wool after it cures and start all over).  I’m going to do this a few more times, and I’ll decide on the total number of TruOil applications based on how the stock looks after I apply each coat.   As I mentioned above, I may leave the high gloss finish as is, or I may opt to break the shine with 0000 steel wool and have a subdued satin finish.   We’ll see.


Read more of our Tales of the Gun stories here, and don’t forget to sign up for our automatic email blog notifications!


Did you miss the earlier blogs on this Savagely inexpensive, tack-driving Savage 340? You can see them here, here, and here.