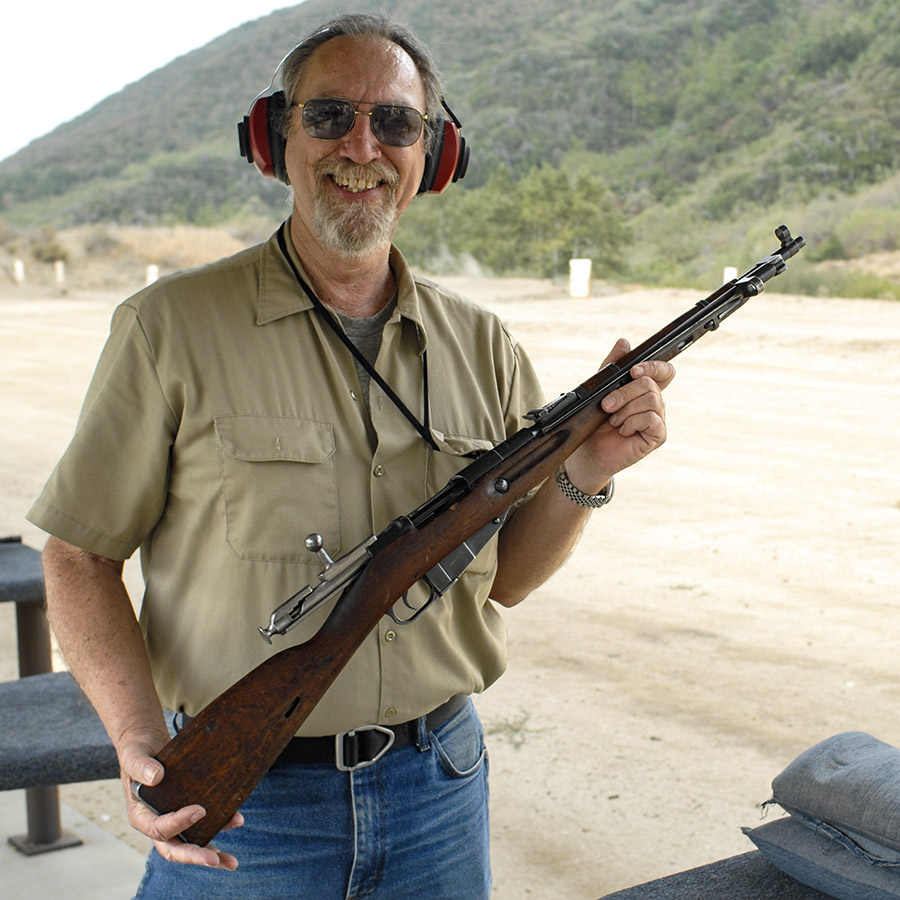
One of the problems with getting old is that you lose friends along the way. I’m not as good as I should be staying in touch with people, and I recently learned that Rick Courtright, one of the guys I’d sent a few emails to without receiving responses passed away a couple of years ago. I was sad when I learned of Rick’s passing.
I first met Rick through the Internet on the Ruger forum. I had posted something (I can’t remember what), Rick responded, and we started sending messages back and forth. I learned that Rick lived only a few towns over, and I invited him to our monthly military surplus rifle matches. We became friends.
Rick impressed me with his complete lack of pretentiousness and his willingness to share whatever he knew about shooting and reloading. I enjoyed his friendship and I can still hear his voice. A rabbi once told me that folks we’ve lost live on in our minds, and I guess that’s true.
I found a few photos of Rick at our informal West End Gun Club milsurp matches, and I thought I’d share them here. Those were fun matches and fun days. The matches were always followed up by lunch at a favorite local Mexican restaurant. Good times, those were. Rest in peace, Rick. You are missed.
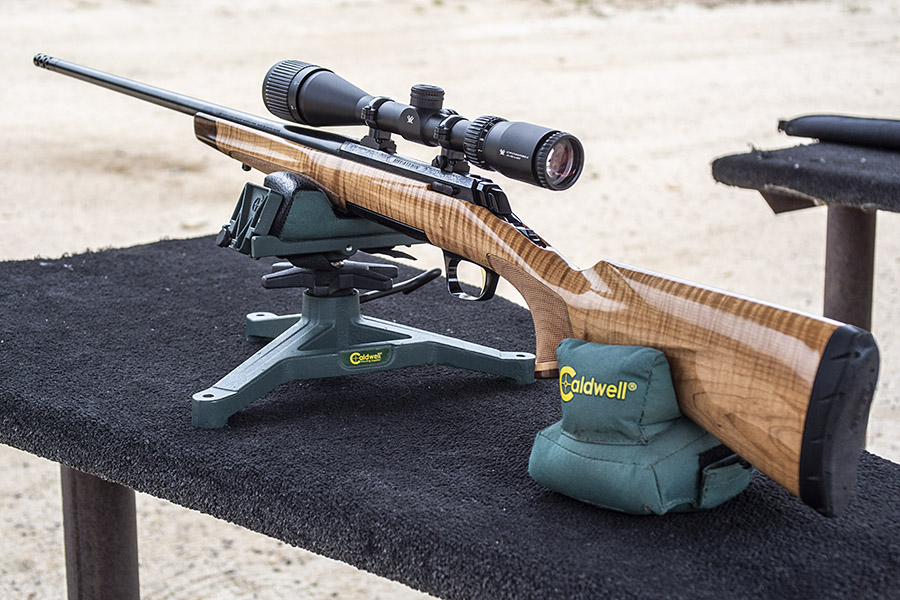
Prior to pointing the Subaru toward Arizona for my recent pig hunting expedition, I briefly thought about taking my 6.5 Creedmoor Browning X-Bolt rifle (it’s the one you see above). Then I realized: All the load development I had done with that rifle had been with target bullets (none had been with hunting bullets). I didn’t have time to buy bullets and develop a hunting load before the trip to the Dunton Ranch, so I defaulted to Old Faithful (my .30 06 Ruger No. 1). That worked out just fine. The .30 06 did what it was designed to do (as it always has), and I got my pig with one clean shot.
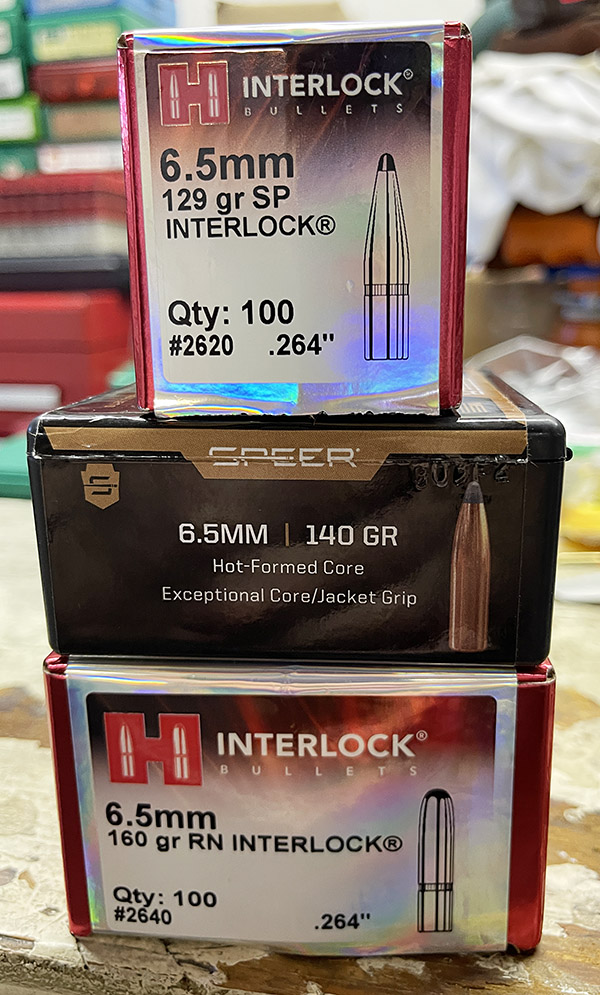
Hunting bullets ordered for a 6.5 Creedmoor hunting load development effort.
But the above adventure got me to thinking about hunting with the Browning 6.5 Creedmoor. I bought that rifle from a shop in Colorado after seeing Baja John’s .25 06 maple Browning several years ago. Browning makes a nice rifle. I knew they could be very accurate.
John wants to do another hunting expedition and so do I. It would be cool to be armed with a Browning rifle like John. So I checked on the hunting bullets available for the 6.5 Creedmoor, and I ordered three different types:
The 129-grain jacketed soft point Hornady.
The 140-grain jacketed soft point Speer.
The 160-grain jacketed roundnose Hornady.
It was that 160-grain Hornady roundnose bullet that made things interesting for me. I checked all the reloading manuals in my library and none of them had loads for the 160-grain Hornady in the 6.5 Creedmoor (or so I thought; more on that in a second). That’s because Hornady originally developed that bullet for use in the 6.5 Swedish Mauser (which has been around forever) and other .264-caliber cartridges. I remember thinking I probably should have checked the reloading manuals before I ordered the bullets.
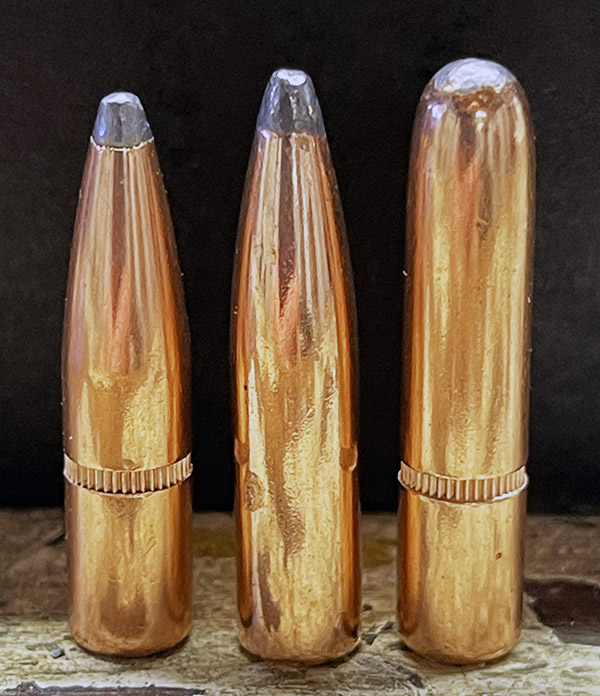
6.5mm hunting bullets (they are 0.264 inch in diameter). From left to right, it’s the Hornady 129-grain jacketed softpoint, the Speer 140-grain jacketed softpoint, and the Hornady 160-grain jacketed roundnose.
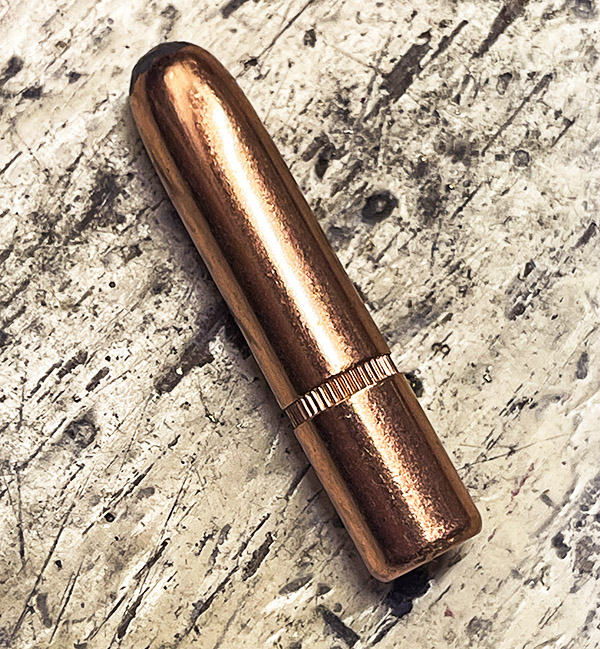
The 160-grain bullet has a radical appearance. It’s not gently ogived like all the other bullets I’ve shot. It looks like a copper billy club: Long, blunt on both ends, and mean. It’s an old-fashioned bullet design, and to me, it looks cool. When I reloaded the ammo, it had a radical appearance, kind of like a syringe with a dull tip. I think it looks awesome. So did my friends when I showed the 6.5 ammo to them at the range.
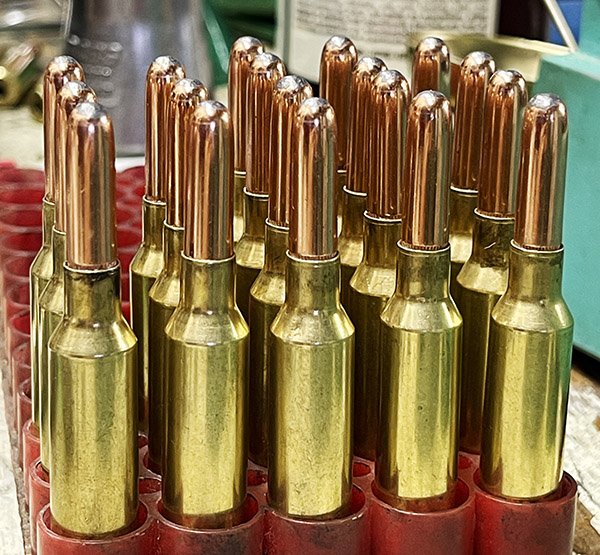
The 160-grain Hornady jacketed roundnose bullet is a long projectile.6.5 Creedmoor loaded ammo with the Hornady 160-grain jacketed roundnose bullet. This is good stuff.
While I was reloading these cartridges, a funny thing happened. When I was adjusting the bullet seating die and measuring the cartridge overall length, I inadvertently pushed the bullet further into the case with just finger pressure. That’s not supposed to happen, I realized. Hmmm.
You know, when you resize a case during the reloading process, there’s a lot of things happening:
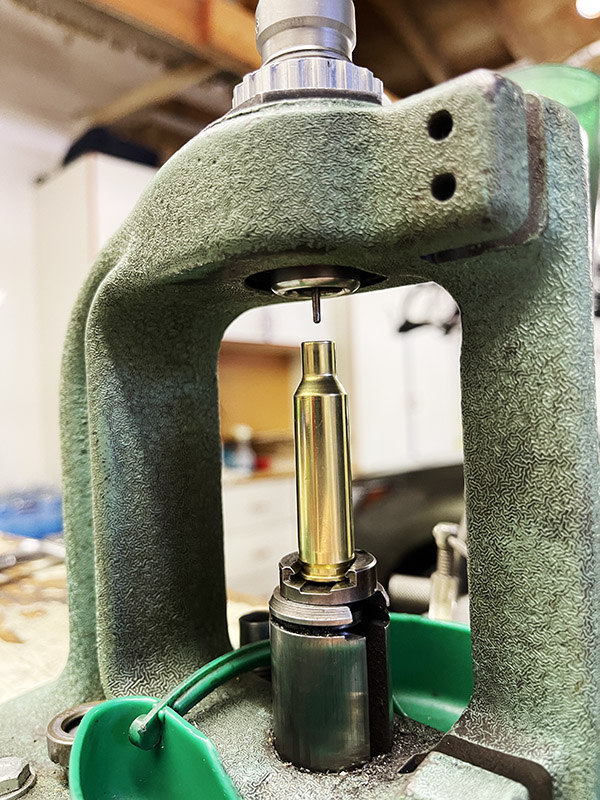
The cartridge case pushed into the die, and the case is resized to its original dimensions (it expanded during the previous firing, when propellant pressure forced it out against the chamber walls).
The old primer is pushed out of the case.
The case is withdrawn from the die, and the expander ball opens the cartridge case mouth to a diameter that should be 0.001 less than the bullet diameter.
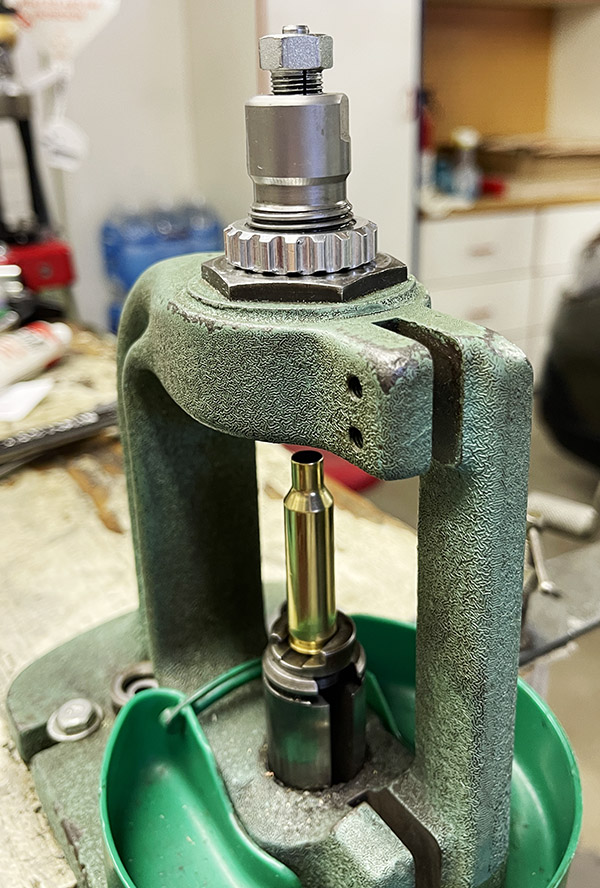
The Lee 6.5 Creedmoor full length resizing die in my RCBS Rockchucker press. This die proved to be problematic. The first one scratched the cases, and Lee replaced it. The replacement had an oversized expander ball.A 65. Creedmoor case going into the full length resizing die. The pin you see beneath the die pushes the old primer out of the cartridge case.
It’s that last action that’s critical (just like all the others, I guess), and it’s that last one that I realized was not right. The expander ball on the decapping pin was too big. I wanted the case mouth to be expanded to 0.263 inches to securely grip the 0.264-inch diameter 6.5 Creedmoor bullet. The reason the case mouth should be smaller than the bullet diameter is the bullet needs an interference fit to give the case mouth the right tension on the bullet. If the case neck tension is too low or if it is inconsistent, the propellant won’t burn consistently from shot to shot and accuracy will suffer. If you don’t believe me, get a little lube on your bullets when you seat them in the cases and you’ll see: Accuracy will be terrible.
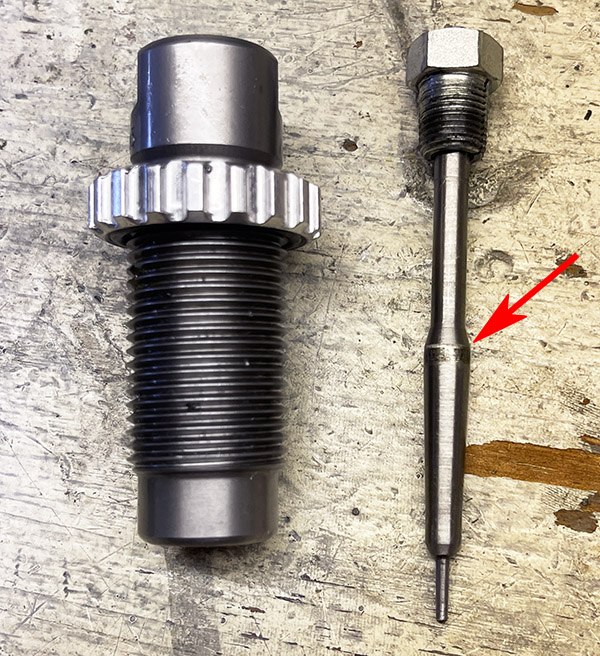
The resizing die’s decapping pin and expander ball removed from the die body. The red arrow points to the area on the decapping pin (the expander ball) that opens the case mouth to its resized dimension. It was this area that was machined from 0.264 inches to 0.263 inches. That little 0.001-inch difference made a huge impact on accuracy.
The fix was easy enough after I finished beating up on myself for not recognizing the problem sooner. I pulled the decapping pin out of the die, chucked it up in my hand drill, and spun the expander ball in a small piece of 220-grit sandpaper. I did this a few seconds at time until the expander ball went from 0.264 inch to 0.263 inch. Then I reinstalled it in the die and loaded more 6.5 Creedmoor ammo.
Somewhere in the middle of all the above, I found another Hornady reloading manual that I already owned. It was a later version than the one I mentioned above. I turned to the 6.5 Creedmoor section, and what do you know, Hornady had loads listed for their 160-grain bullet. I was a kid on Christmas morning. I looked over all of the suggested Hornady recipes, and then checked the propellants I had on hand. IMR 4350 got the nod.
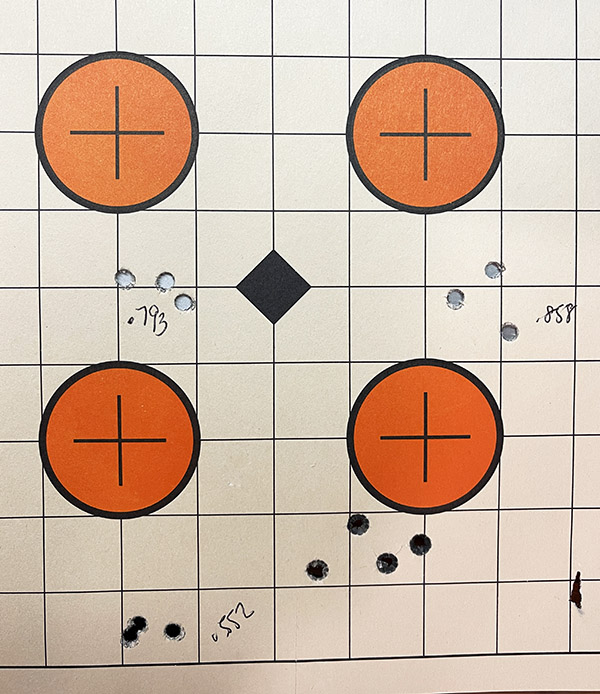
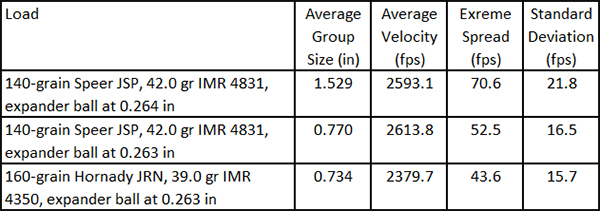
The results downrange told the story better than I ever could for both the 140-grain Speer jacketed softpoint bullets and the 160-grain Hornady jacketed roundnose bullets. Average group sizes immediately tightened up, as did the extreme spreads and the standard deviations. Take a look:
The top and lower left targets show hits with my 6.5 Creedmoor Browning X-Bolt with the 160-grain Hornady jacketed roundnose bullet at 100 yards. The 160-grain load shoots lower than then 140=grain load (I’ll bring the Browning’s Vortex scope up 8 clicks to compensate for that). Ignore the lower right target; I shot it with a .308 rifle that will be the subject of a subsequent blog.
The heavier 160-grain bullets hit the 100-yard target about two inches lower than do the 140-grain bullets. That’s okay; it’s why the scope has an elevation adjustment.
Knocking the expander ball down to 0.263 cut the group size in half with the 140-grain Speer bullet. The 160-grain Hornady grouped even tighter.
I like the 160-grain Hornady jacketed roundnose bullet. It’s way more accurate than it needs to be for hunting pigs. I like the way it looks. The recoil is modest. In fact, I like it so much I ordered another five boxes. How will it perform on pigs? I don’t know the answer to that yet, but I’m going to find out, and you’ll read about right here on ExNotes.
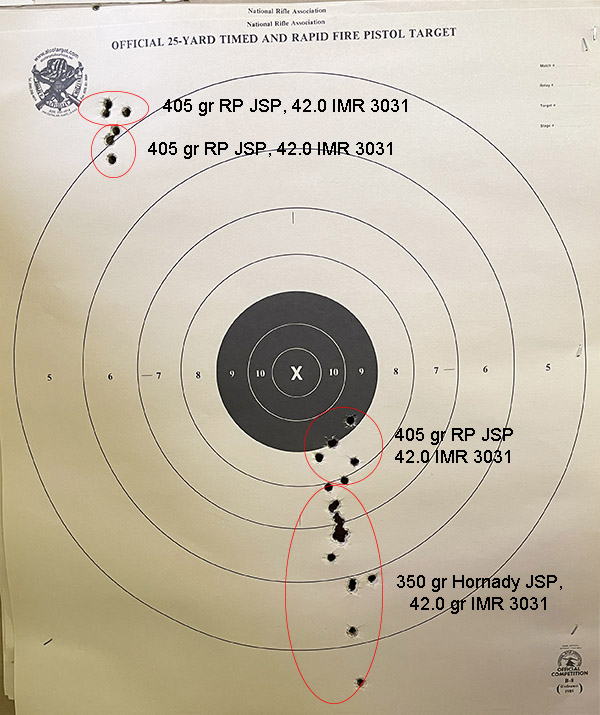
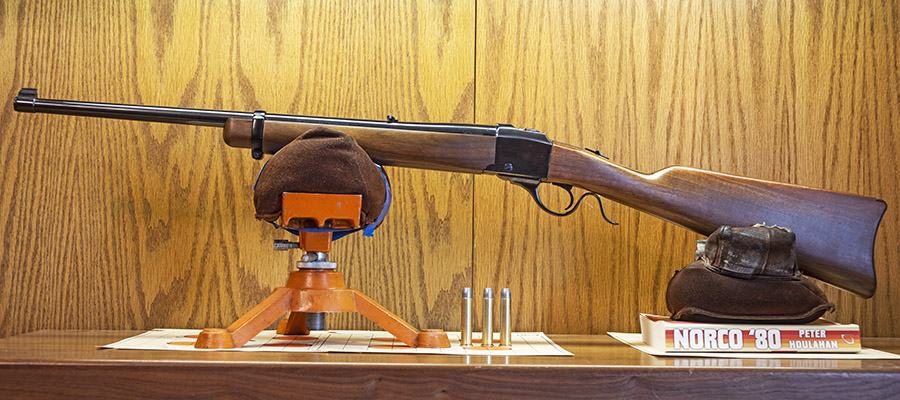
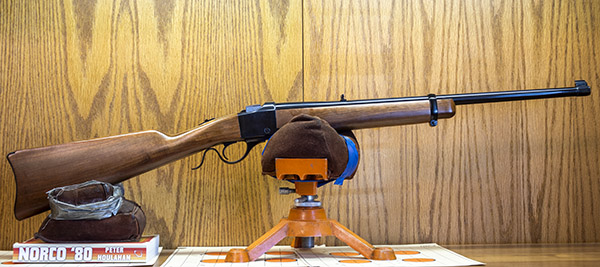
We recently published a blog on my de-Bubba’d .45 70 Ruger No. 3. I wrapped that one up with the promise of a follow-up blog to tell you how the rifle shoots. This is that report. The bottom line up front? The .45 70 No. 3 is a cantankerous beast, but I found loads that it likes. What the No. 3 doesn’t like is the barrel band on the fore end. Leave it on and the rifle strings like a plumb bob. Take it off, and the No. 3’s capabilities emerge.
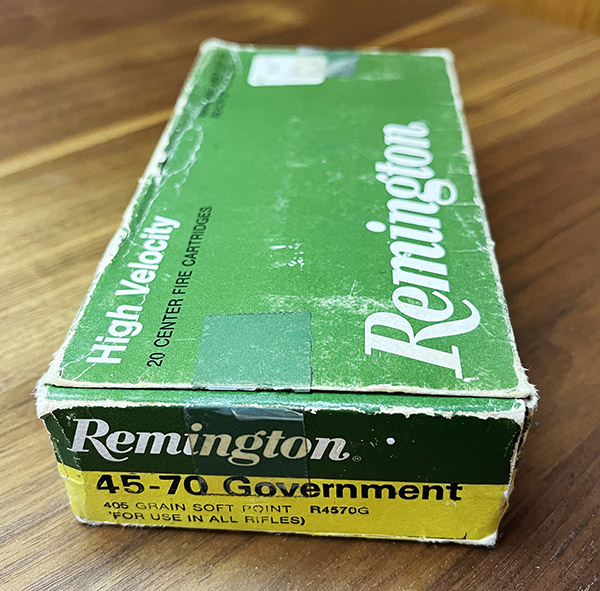
I shoot a fair amount of .45 70 in my Marlin Guide Gun, so I had my loads for it, some additi0nal recipes, and I even had a box of .45 70 factory ammo. Shooting factory ammo was unusual for me. Years ago, one of the guys at the range had a couple of boxes of factory ammo he wanted to unload for cheap, and I was happy to oblige Normally, the only factory stuff I shoot is .22 Long Rifle, but this ammo was cheaper than new unprimed brass, so I pounced.
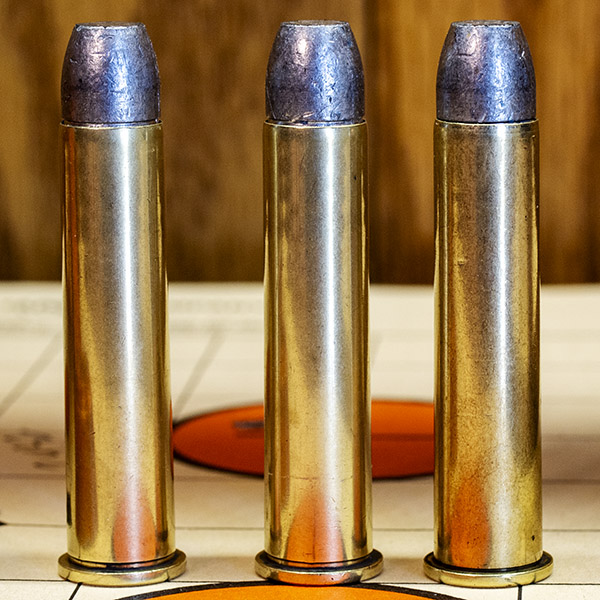
Old ammo: Remington 45 70, loaded with their 405-grain jacketed soft point bullets.If only it was still this inexpensive. Those days are long gone. That same box of ammo today sells for $58.
I had several loads I wanted to try:
The above mentioned Remington 405-grain factory ammo.
A load with the same 405-grain bullet the factory ammo used (I loaded with 42.0 grains and with 38.0 grains of IMR 3031 propellant).
A load with the Hornady 300-grain jacketed hollowpoint bullet and 16.2 grains of Trail Boss.
A load with the Hornady 300-grain jacketed hollowpoint bullet and 54.0 grains of XBR 8208 propellant (this is the accuracy load in my 26-inch barreled Ruger Circassian 45 70 No. 1).
A load with the Hornady 350-grain jacketed softpoint bullet and 42.0 grains of IMR 3031.
A load with the Missouri cast 405 grain bullet and 35.0 grains of IMR 4198 (this is my accuracy load in the Marlin Guide Gun).
I’ll warn you up front that not all of my accuracy testing is what I would call an apples-to-apples comparison. During the course of this testing, I found that the Ruger No. 3’s barrel band had a detrimental accuracy impact (after one or two shots, it induced extreme vertical stringing). I suppose I should do all of this testing again without the barrel band, and I probably will, but not in the near future. This testing was intended to be a quick look and point my loads in the right direction.
Reloads with Remington’s 405-grain jacketed softpoint bullet.
Also, I didn’t fire the same number of shots for each group, and I didn’t measure group size. Others might quibble with this. Measuring group size when shooting with iron sights is kind of silly. The smaller number of shots fired for some of the groups I tested will artificially reduce the extreme spreads and standard deviations. Hey, I’m writing a blog, not a doctoral dissertation.
With the above caveats out of the way, here are my results:
I thought I would share some of the targets with you, along with my comments.
This first target shows the results with the Remington 405 grain bullet and 42.0 grains of IMR 3031, and the Hornady 350-grain bullet and 42.0 grains of IMR 3031.
50-yard results with a couple of my reloads, with the barrel band on. The two groups in the upper left quadrant used the logo as a target. The first three shots formed the group in the upper red circle. The next three grouped well, but the group printed lower, showing the effects of vertical stringing from the barrel band.
On the target above, I shot at the big bullseye in the center for the first bit of shooting (all at 50 yards with iron sights), then I shifted to the logo in the upper left corner. The rifle is shooting a little bit to the right. I tapped the rear sight a little to the left in its dovetail when I got home because I may take the No. 3 with me on an upcoming pig hunt and I’m a perfectionist. That said, I think the slight bias to the right won’t make any difference to the pig.
On this issue of vertical stringing: For the first two and sometimes three shots, the rifle shoots okay. The stringing would not be a problem in the field because I’m pretty sure the pig would either be DRT (dead right there) on the first shot, or if the shot was a miss, the pig would probably initiate aggressive evasive action. In either situation, the vertical stringing is moot.
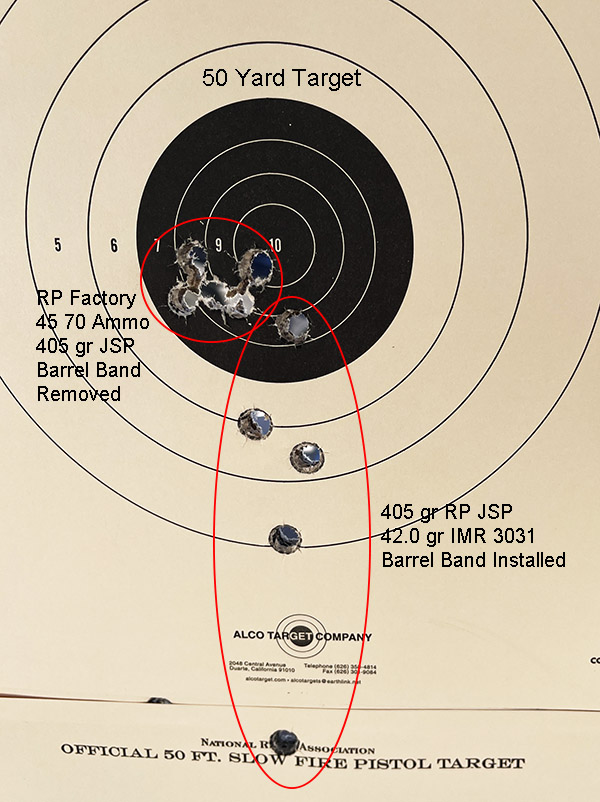
Vertical stringing with a warmer barrel is apparent when shooting my 405-grain jacketed bullet reloads. With the barrel band removed and using factory ammo, the group tightened right up.No barrel band, 16.2 grains of Trail Boss, and the 300-grain Hornady jacketed hollow points grouped well. Windage is close to perfect. This is an easy shooting load.
A few more points:
Once again, the above testing shows there is not perfect correlation between low extreme spreads, low standard deviations, and accuracy. The cast bullet load with IMR 4198 (which is stellar in my Marlin Guide) had the lowest extreme spread and standard deviation I’ve ever recorded (granted, it was only for three shots), but it was not accurate at all. On the other hand, the Trail Boss load showed a similarly tiny extreme spread and standard deviation, and it was very accurate.
Once again, the above testing confirmed that each rifle is an entity unto its own. The 300-grain Hornady jacketed hollowpoint with XBR 8208 (which performed extremely well in my 26-inch Circassian No. 1) returned unacceptable accuracy in the No. 3.
These loads were in the trapdoor Springfield and modern lever gun range (which is to say, they were relatively mild .45 70 loads). The recoil was still attention-getting, but even with the Ruger No. 3’s metal buttplate, the recoil was tolerable.
The rear sight that came with the No. 3 does not offer sufficient elevation adjustment for hotter loads. These all shot several inches lower than the lighter loads at 50 yards. I had the rear sight elevated as high as it would go just to get the rifle to print in the black bullseye with the factory ammo and the Trail Boss loads; with the warmer loads, I couldn’t raise the rear sight leaf any higher. I have a higher rear sight that came off my .458 Win Mag Ruger No. 1, and that sight will replace the one that is currently on the No. 3.
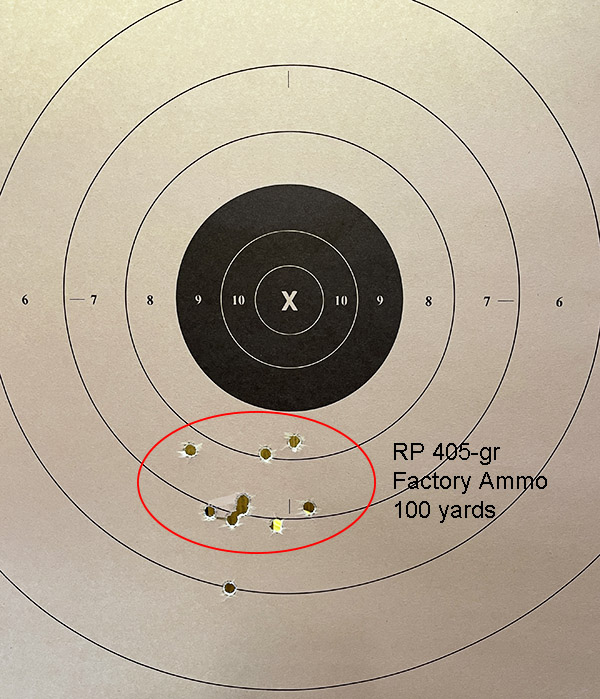
As mentioned above, I did most of my shooting for this series at 50 yards, as I regard the open sights and the No. 3 .45 70 as a 50-yard rifle. That notwithstanding, I tried my luck at 100 yards with a couple of loads. The first was the 405-grain Remington jacketed softpoint with 42.0 grains of IMR 3031. My results with my reloads were embarrassing; I only put one shot on paper. When I tried the Remington factory ammo with the same bullet, though, I was very pleasantly surprised. I put eight shots (the last of my factory ammo) into a 3 1/2-inch circle.
100-yards with Remington .45 70 factory ammo and the Ruger No. 3. That one low shot was the single shot that found its way to the paper with my reloaded ammo. It was a humbling experience.
I like my .45 70 Ruger No. 3. It’s a kicker and it’s accurate.
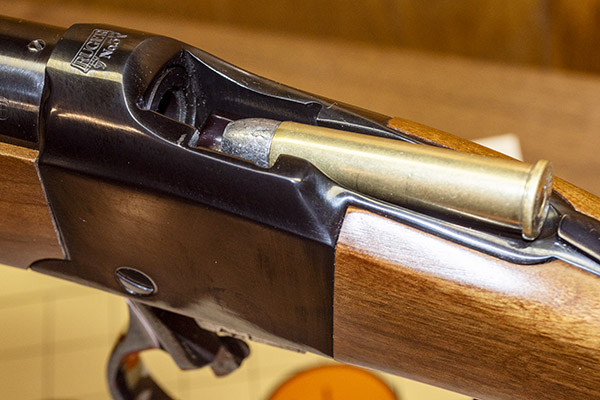
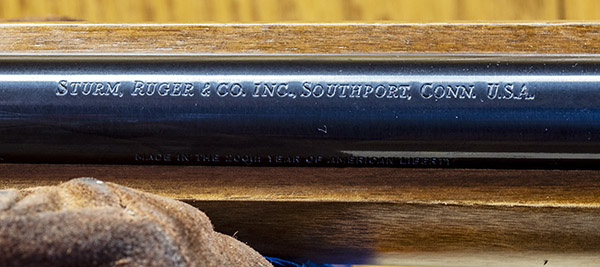
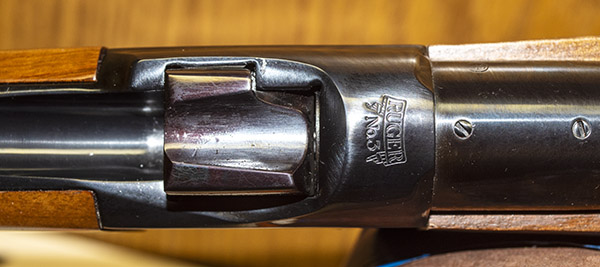
Back in the mid 1970s, I was in the Army at Fort Bliss, Texas, and I was both a pistolero and a rifle shooter. It was a great time and a great place to be a shooter and a gun collector. One of the reasons for that was that Ruger had all their guns manufactured in 1976 stamped with “Made in the 200th Year of American Liberty.” I especially loved Ruger’s single-shot rifles. Ruger had the uber-slick and elegant No. 1, and they also offered an econo-version of it called the No. 3. I guess they skipped No. 2 because they didn’t want anybody calling their guns turds. Trust me on this: They were anything but.
In those days, the No. 3 carried an MSRP of $165, but you could buy them all day long for $139. The No. 3 was offered in three chamberings: .22 Hornet, .30-40 Krag, and 45-70 Government. I bought all three, and then I sold them when I left the service. That decision to sell my No. 3 Rugers bothered me for years. About 15 years ago I acted to correct my No. 3-less status.
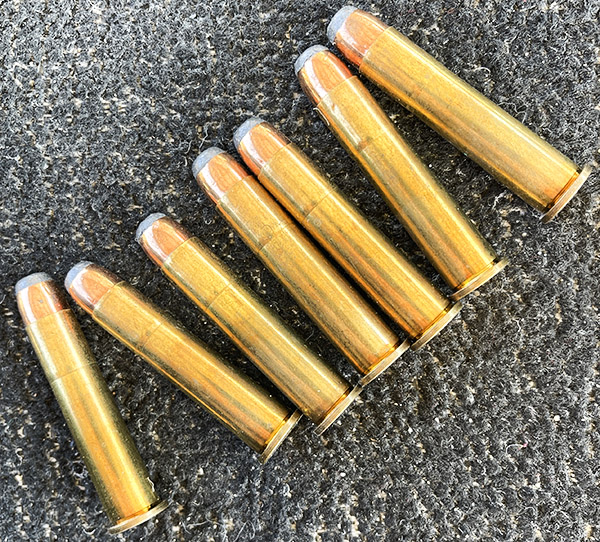
The .45 70 cartridge. It’s one of my favorites to shoot, and it’s one of my favorites to reload. My usual load is 35 grains of IMR 4198 propellant with the Missouri Bullets 405-grain cast bullet.
Like all things, Ruger No. 3 rifles had gone up in value substantially. Used ones were going for around $650 (today, they are going for anywhere between $1000 and $1500). I picked up a .22 Hornet, a .30 40 Krag (I paid a lot for it; they were relatively hard to find), and a .45 70. All were 200th Year Rugers.
The .45 70 No. 3 I bought had been Bubba’d, and the Bubba-ing was done by a clumsy and nearsighted Bubba. The stock and fore end had scratches all over, the black anodizing on the butt plate and the fore end clamp was worn and scratched, the bluing was well worn, and good buddy Bubba ham-fistedly added sling swivel mounts that weren’t quite centered. But, it was a 200th year rifle and it shot well. I know that some folks get off on honestly-acquired patina, and sometimes I’m one of them. But this wasn’t one of those times. I wanted the rifle to make up for me selling my .45-70 No. 3 back in the ’70s. When I was young. And stupid. I liked the used .45 70 No. 3 I bought, but its cosmetic condition kept me up at night.
A view of the No. 3 from the starboard side.
The Ruger No. 3 had been out of production for nearly 30 years when I called Ruger 15 years ago to see if they would reblue it. The guy I spoke to had to check, so I waited on the phone. He was back in minute, the answer was yes, and the price was right: $130. While I had the guy on the phone I described the other cosmetic defects, and asked if they had any higher quality wood laying around. That answer was no. I figured that would be okay; I could refinish the stock and fore end myself.
So I sent the rifle to Ruger and it was back in about 10 days. That was fast. When I took the rifle out of the box, I was blown away at how nice the bluing turned out. All the lines and letters were crisp, nothing was blurred, and the bluing was way nicer than the No. 3 rifles had originally been finished. My No. 3 Ruger’s bluing is like the high-polish bluing that Ruger used to provide on the Super Blackhawk. It’s really nice.
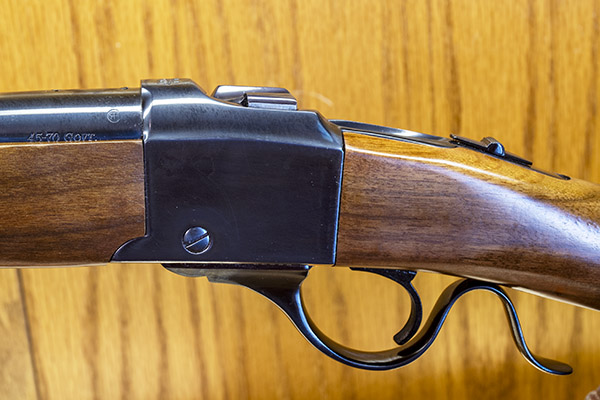
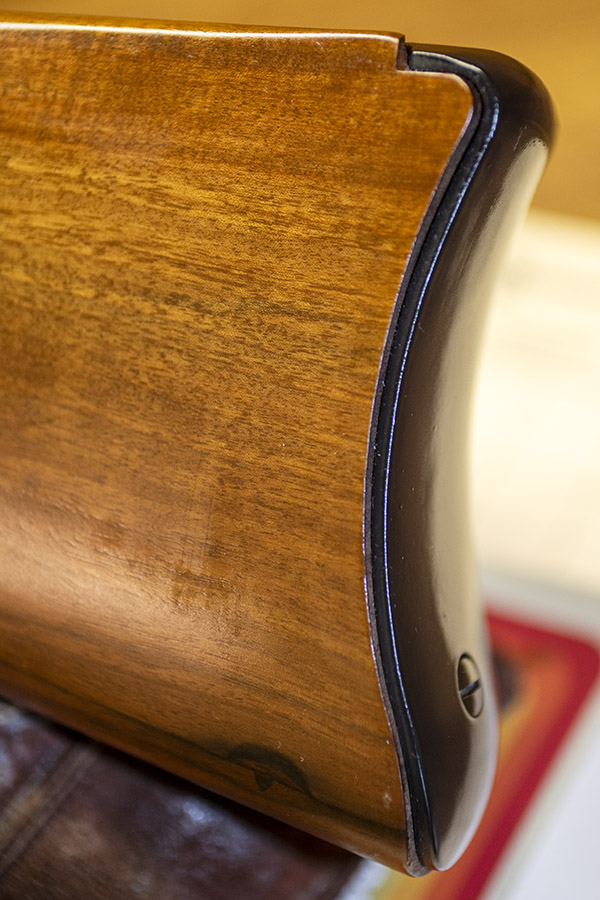
The No. 3 actipn. These are great rifles.A .45 70 cartridge in the trough. You load these one at a time. When the lever below is pulled up, as block behind the cartridge rises and the rifle is ready to fire.The re-anodized metal buttplate. In later production, Ruger started using plastic buttplates. The metal ones are cooler.
As I stared at the rifle, there was something else about it that was different. It took me a few seconds before I realized that contrary to what they said on the phone, they had indeed replaced all the lumber (as well as the black anodized buttplate and fore end clamp). My 1976 No. 3 had become a new rifle. I looked at the invoice, and Ruger hadn’t charged anything for the new wood and metal bits. Somebody back there is an enthusiast, I realized. They did have a stock set laying around, and he (or she; I have no idea) didn’t think it was right for a freshly (and nicely) reblued No. 3 to leave the factory with lumber by Bubba.
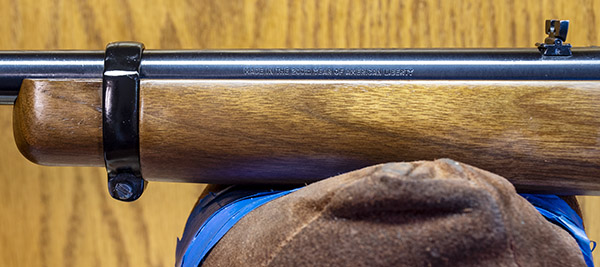
The “Made in the 200th Anniversary of American Liberty” inscription. Note the new fore end and the re-anodized fore end clamp.Back in ’76, there were no warnings on the barrel. I like the simpler labeling you see here much better. It’s classier.
The pictures you see here are what came back from Ruger, all for $130 plus shipping. It was a hell of a deal.
A big hole. The .22 Hornet, .30-40 Krag, and .45 70 No. 3 rifles all have the same external dimensions. The bigger bore of the .45 70 makes it the lightest of the three chamberings.The Ruger No. 3. It is a classy logo. I almost never see another one of these rifles on the range these days.
Okay, that’s enough for now. You’re probably wondering how the rifle shoots. So am I. I’m going to get out to the range soon, and you’ll read about it right here. Stay tuned.
An upfront warning: If you’re squeamish, you should skip this blog.
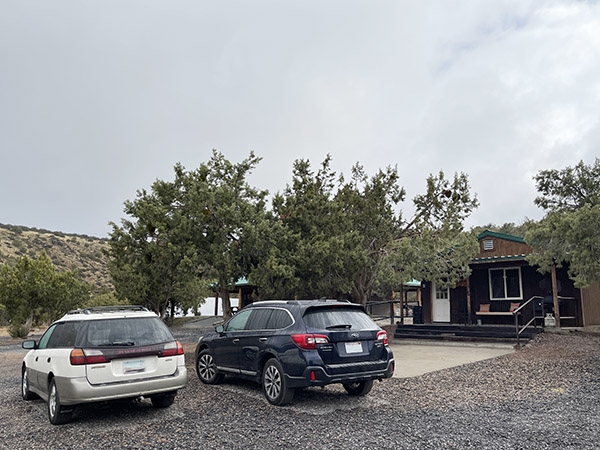
It rained hard after Tom, John, and I returned from our first day’s hunt, but that was okay. The Dunton Ranch has nice accommodations. Heat, hot water, cooking gear, refrigerator, shower, comfortable bunks, and more. Just bring food and ammo. It’s a gentlemanly way to hunt, and if nothing else, John and I are gentlemen. No more pitching tents and sleeping on the ground for us.
Subaru Outbacks, parked in front of our Dunton Ranch cabin. John and I are both Subie fans.
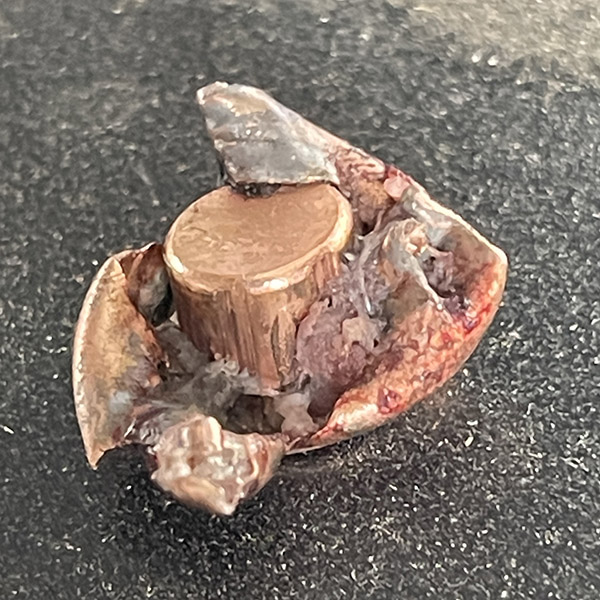
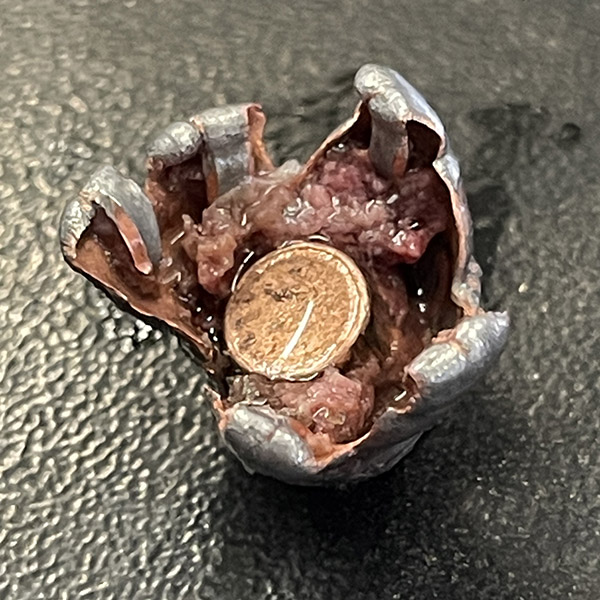
When Tom picked us up the next morning, he told me my hog weighed 219 pounds, and that he recovered the bullet. It had come to rest just inside the hog’s hide on the opposite side of where I shot it. I was very interested in seeing that bullet. Tom had prepped the hog and two sides of pork were hanging in the Ranch’s freezer. Tom told us he had stood outside in the rain the previous night skinning and dressing it. My pig weighed 219 pounds.
Tom showed me the bullet. My hog was a clean kill, but the bullet had failed. Its lead core separated from the cupper cup. Not that it made any difference to the pig.
My bullet, post impact. The copper jacket should the bullet had mushroomed nicely (which is what you want), but when I turned it over, I was disappointed (see below).My bullet’s copper jacket. The jacket peeled back nicely. The lead core was gone. It should have still been in the jacket. John’s bullet would behave the way it was supposed to, but mine had not.
Tom told me the bullet had cleanly impacted the hog’s spine and taken out a fist-sized chunk of it. The hog was dead before it hit the ground, but the bullet had separated. It bothered me enough that I called Hornady when I returned home, and I’ll tell you about that later in this blog.
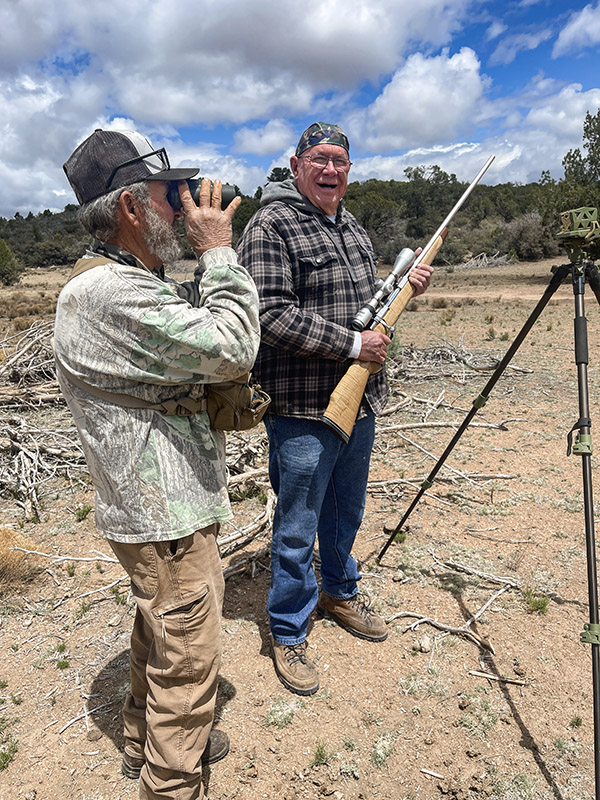
Tom, our guide, and Baja John checking the zero on John’s .25 06 Browning. The zero was exactly where it needed to be. We were good to go.
John’s rifle is a beautiful curly maple Browning A-Bolt chambered in .25 06. That’s a cartridge I had never owned, but not because I didn’t like it. Everything I’ve ever read about the .25 06 has been positive. Flat shooting, accurate, easy to find ammo and brass for…it has all the right things going for it and it rings all the bells. And I love A-Bolt Brownings. John’s rifle is all stainless steel, it has an octagonal barrel, and it wears a Nikon 3×9 telescopic sight finished in silver to match the rest of the rifle. It’s a beautiful firearm.
When John first bought his Browning several years ago, he visited us and we spent some time at the West End Gun Club zeroing it. John hadn’t shot the rifle too much since then, and he wanted to check the rifle’s zero before we hunted. Tom took us to a place where we could do so by firing at a pile of large boulders he knew to be a hundred yards away. John fired two shots and both hit exactly where he intended.
I took my Ruger with me again, but I already had my pig. I didn’t intend to shoot my rifle again unless we encountered a Russian boar.
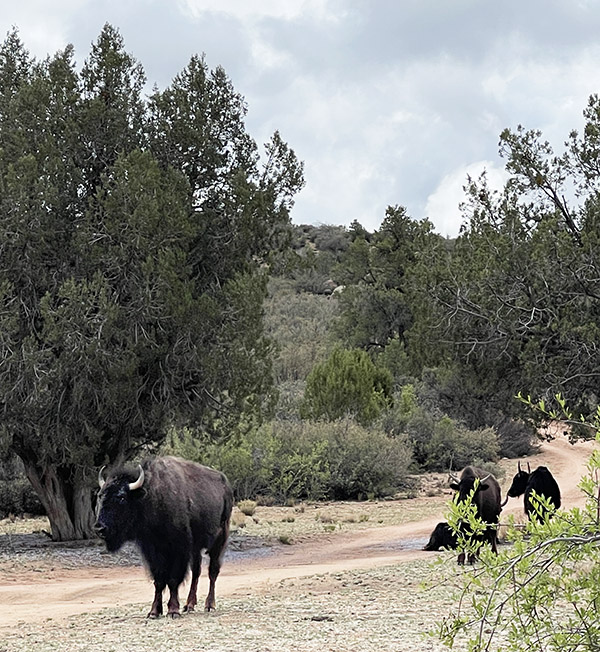
Yakkety Yak! Yaks on the Dunton Ranch. Shooting a yak is not something that’s made my bucket list. Your mileage may vary.
Although we had seen several Ossabaw hogs yesterday, none were around that second morning. Tom said he had been out earlier (before retrieving us) and he hadn’t seen any pigs, either. He said the previous night’s downpour most likely had driven them away. We did see several yaks and a bison. Dunton keeps a lot of game on his ranch. Neither John nor I had any desire to shoot one of these large animals.
A Dunton Ranch bison. These are too cool to shoot, in my opinion. Your opinion may be different. I respect your right to be wrong.
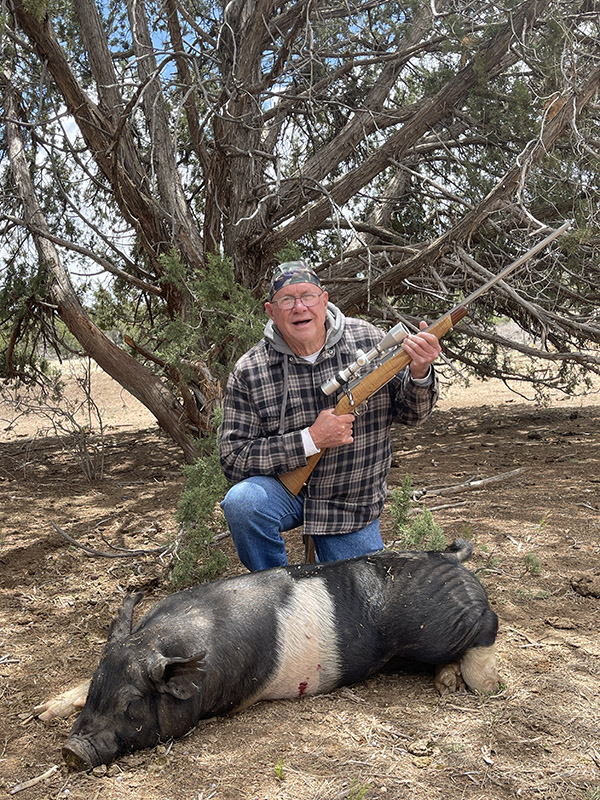
After riding around in the truck and walking most of the morning, we finally spotted several hogs. Tom scoped them and put the distance at 77 yards. It was John’s turn at bat and he took but a single swing. Just as had occurred the day before, all it took was one shot and it was game over. The .25 06 did its job.
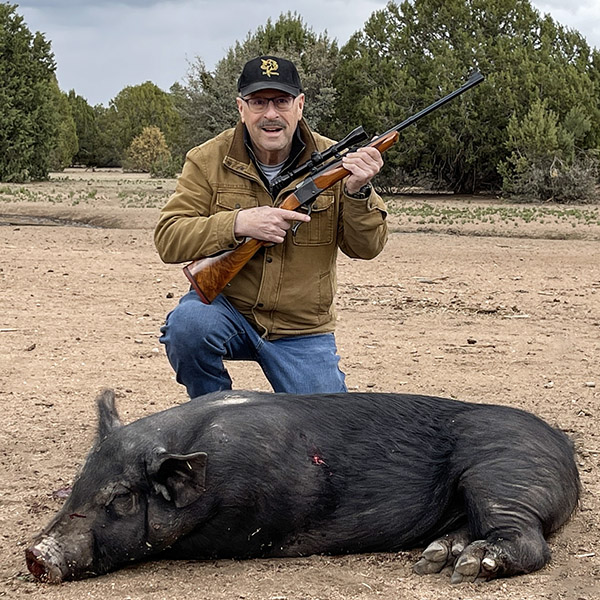
John and his Ossabaw. We both had our pigs for this trip. Our hunt was a success.
When we walked up to the pig, we grabbed a few more photos, including the one of John and I posing behind his pig. It’s the photo you see at the top of this blog.
Tom asked if we’d like to go to one of the blinds and sit around waiting for a Russian to possibly stroll by while he dressed John’s pig. I asked if they would enter this part of the ranch with the Ossabaws present. “Yep, they will,” Tom said. “They’ll mate with the female Ossabaws.”
“I guess they’re not too particular,” I said. John, Tom, and I had a good laugh.
John said he’d like to go back and watch Tom dress his hog. Neither of us had seen that before. I realized I wanted to see it, too. We went back to the ranch proper, and wow, we really had our eyes opened. It’s not like you see meat at the supermarket, all neatly packaged and ready to go.
The first thing Tom showed us was my hog, all dressed out, with both sides hanging in the refrigerator. Tom pointed to where my bullet had hit the hog’s spine. The damage was staggering.
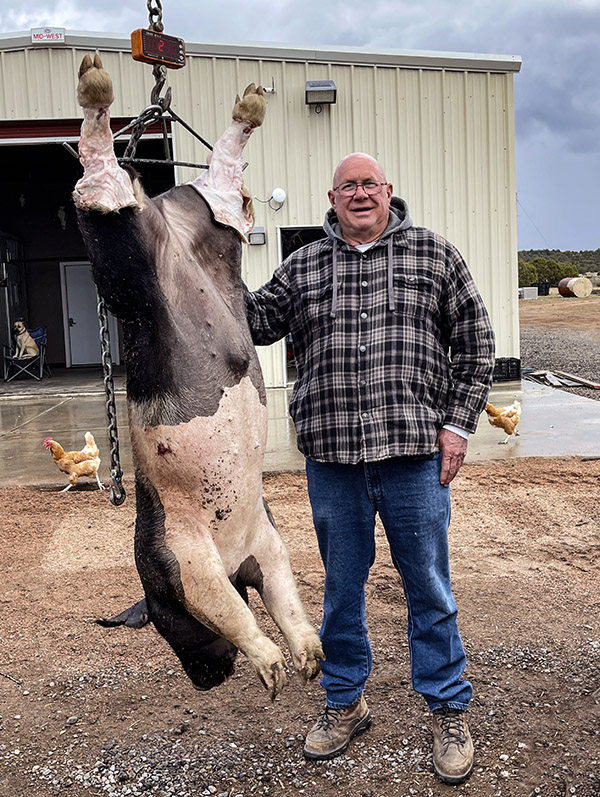
We went back outside and Tom used a Bobcat tractor to lift John’s hog out of the trailer. The hooks had a scale attached, and John’s hog came in at 225 pounds. He outdid me by 6 pounds (not that we were competing).
John and his Ossabaw. The little thing on the chain (it looks like an iPhone) is a digital scale.
Tom went to work on the pig and what followed was amazing. I had no idea dressing out a hog was so labor intensive. It took Tom a good hour and a half, maybe more, to complete the job. It probably would have taken Tom less time if John and I hadn’t asked so many questions and taken so many pictures. All the while, chickens wandered into the area and were eating bits and pieces that fell off the hog as Tom worked on it. They’re carnivores, you know. There were turkeys strutting around, too, but they kept their distance (but not their silence). It was hard not to laugh as the turkeys gobbled up a storm at each other. It reminded me of what passes for political discussion these days.
Carniv0rous chickens. Who knew?
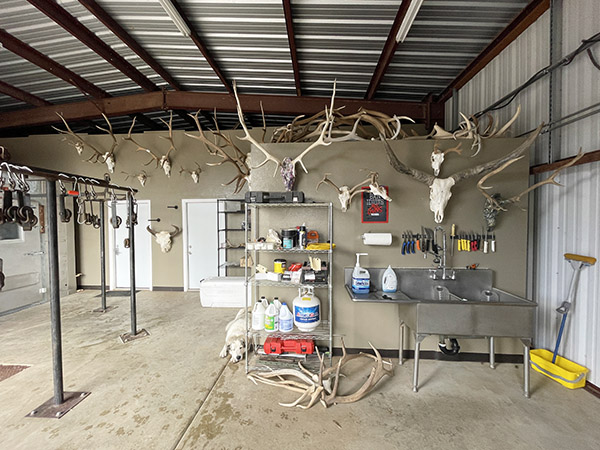
Speaking of storms, while Tom worked on John’s hog it started raining again. Hard. John and I stepped into the metal building and watched Tom work from under cover. When the rain turned to hail, Tom took a break and joined us in there.
I looked around inside the metal building and realized again that the Dunton Ranch offers all kinds of hunting. It really is an impressive operation. I felt lucky being able to experience it.
The dressing room. Not the kind of dressing room I’d been in before.
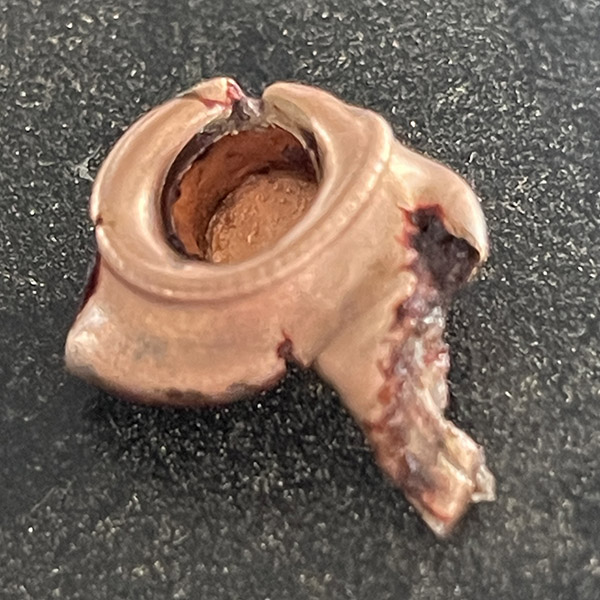
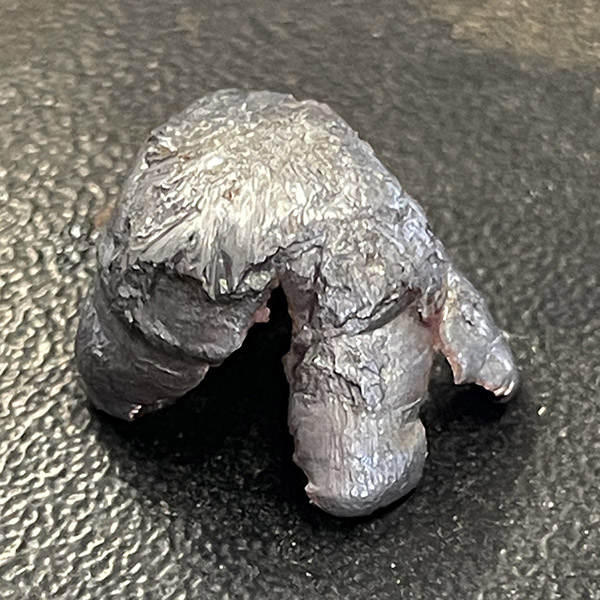
Tom finished up his chores on John’s hog and as he neared completion, he found John’s .25-caliber bullet. John used Federal factory ammo with 120-grain jacketed softpoint bullets. Unlike my Hornady bullet, the Federal bullet performed exactly as it was supposed to, mushrooming in a manner worthy of a bullet ad. It was located just under the skin on the opposite side of the hog.
The bottom side of John’s .25-caliber bullet. Note how the copper jacket had flowered out, and the lead adhered to the jacket petals.The business end of the John’s .25 06 bullet. It mushroomed to more than twice its original diamter and remained intact. This is stellar bullet performance.
That night (which was only the second day we’d been on the Dunton Ranch), John and I decided to head into Kingman for dinner. We could have cooked in our cabin, but we were reveling in our pig-hunting success and we wanted to celebrate. Tom recommended a Mexican restaurant in town (El Palacio) and his recommendation was a home run.
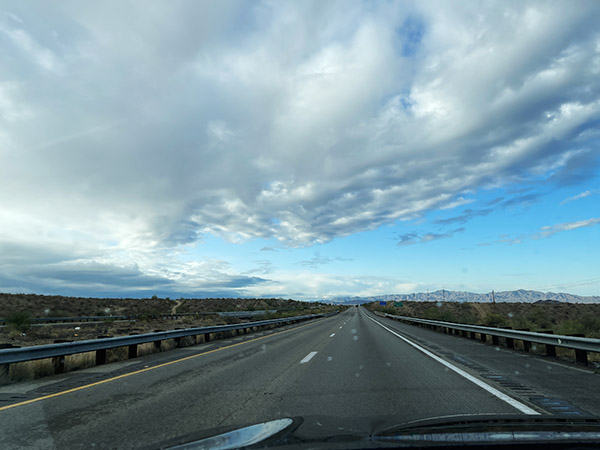
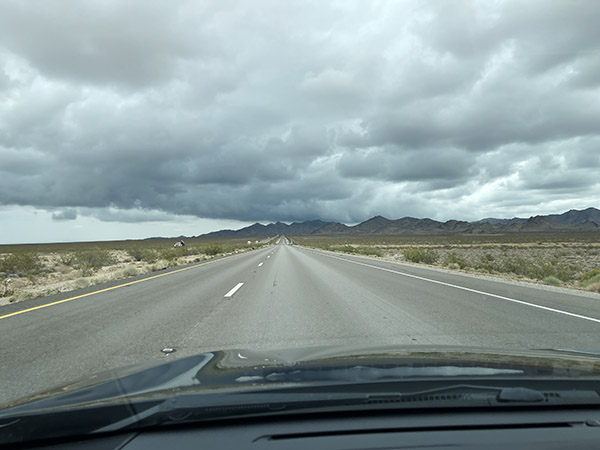
My Mexican plate at El Palacio. It was great!On Interstate 40, headed back to California, just west of Kingman. It was clear sailing all the way home.
The ride home was enjoyable. It rained hard all night Tuesday and it rained as I was leaving Wednesday morning, but as soon as I passed Kingman I could see the skies clearing. It was an easy ride back to California. I stopped at Del Taco in Barstow and had a taco (they’re the best Del Taco anywhere).
Once I was home, I unpacked, ran a patch soaked in Patch-Out (my preferred rifle solvent) through the No. 1’s barrel, and then I called Hornady. I spoke with a nice guy there and told him what happened with my .30 06 bullet. “It happens,” he said. It’s more likely to happen, he went on, if the bullet is traveling at extremely high velocities or if the game was too close (before the bullet had a chance to slow). I explained that my .30 06 load’s muzzle velocity was just below 2900 feet per second (I knew this because I had chronographed the load, I explained) and the hog was a measured 117 yards away (and I knew this because our guide had a rangefinder). The Hornady man was impressed that I knew all that, and then mentioned that if a bullet strikes bone, it is also more likely to separate. Ding ding ding! That was exactly what happened on my hog.
The Hornady engineer told me that one way to avoid cup and core separation is to use a monolithic bullet (they are made of solid copper, with no lead core). He was almost apologetic when he explained that monolithic bullets are more expensive than lead bullets because copper costs more than lead. That may be my next step at some point in the future.
We are not allowed to hunt with lead bullets in California (the folks in our legislature are afraid that we might kill an animal, leave it, and then a California condor might eat it and get lead poisoning). You know, the California Condor, the super rare endangered species (that there are almost none of) might ingest an animal carcass with the remnants of a lead bullet fragment in it and die of lead poisoning. I’m serious; that’s what our politicians here in California are worried about. I shouldn’t be too hard on them, I suppose, because we have something in common. I and the rest of the TDS loonies here in California can both make this statement: None of us ever found any Russians. For the TDS-afflicted, it is imaginary secret agents in Moscow. For me, it is a Russian boar. My Russians are real, though, and on one of these trips, I’ll get one.
Anyway, it might be time to start experimenting with monolithic bullets. Maybe it’s a good thing we have that no lead law here in LooneyLand.
To get back on topic: Our hunt was a rousing success. The Dunton Ranch showed us a great time, and John and I each got our pigs. I can’t wait to do it again.
It had been way too long since I hunted pig, and that was a character flaw I aimed to correct. Baja John immediately said “Hell, yeah” when I asked if he wanted to join me on an Arizona pig hunt, and it was game on. I’ve known John for half my life, and that means I’ve known him for a long time. We’ve done a lot of trips through Mexico and elsewhere on our motorcycles. We know how to have fun.
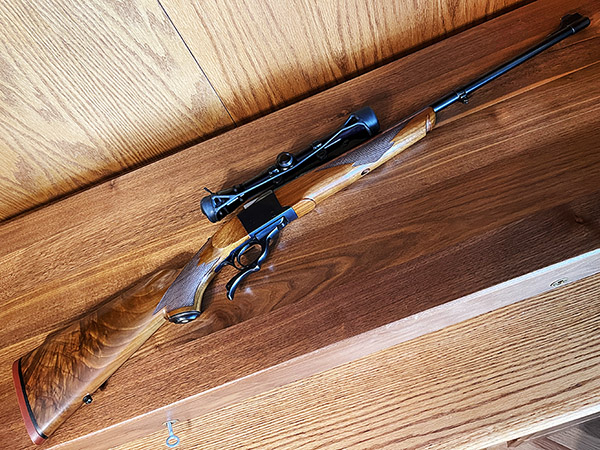
My Ruger No. 1 in .30 06. It’s a long time favorite. I mounted a 4X Redfield the year I bought the Ruger, and it’s never left the rifle.
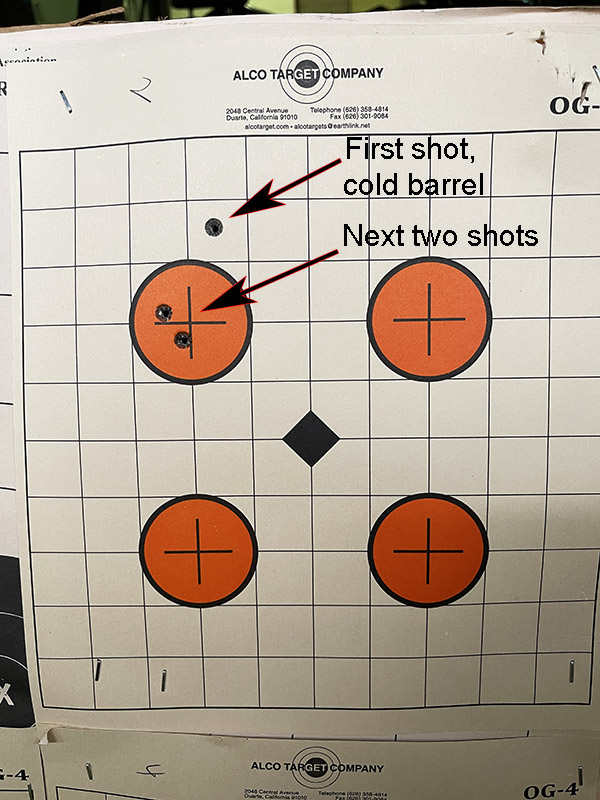
Getting ready for the hunt was nearly as much fun as the hunt itself. I knew I’d be bringing my 200th Year .30 06 Ruger No. 1A with me. It’s a rifle I’ve owned and hunted with for 50 years. You’ve read about it before here on the ExhaustNotes blog. On a previous hunt, I used Hornady’s 150 grain jacketed softpoint bullet in my Model 70 Winchester and it worked well. I had not developed a load with that bullet for the Ruger, though, so I set about doing that. The secret sauce was 51.0 grains of IMR 4064, which gave an average velocity of 2869.3 feet per second (with a tiny 14.1 feet per second standard deviation) and great accuracy. The load was surprisingly fast for the Ruger’s 22-inch barrel; the No. 1 shot this load at the same velocity as my Weatherby’s 26-inch barrel.
A week before the hunt, I checked the Ruger No. 1’s zero at 100 yards. The first shot from a cold and oiled barrel was a scosh high; the next two were right on the money. The rifle was ready.
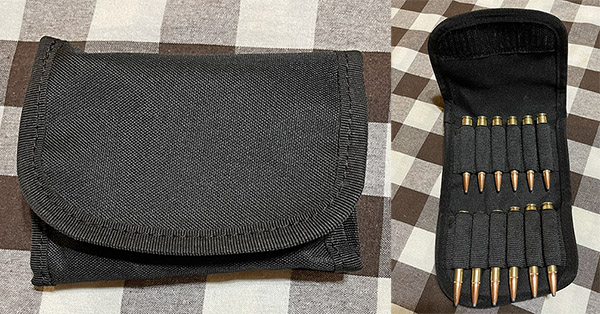
I knew I needed binoculars, which I already had, and a way to carry ammo (which I didn’t have). I found a cool belt-mounted ammo pouch on Amazon; the next day it was delivered to my home.
A cool little belt-mounted ammo pouch. It costs $8 on Amazon.
I had everything I needed; I loaded the Subie and pointed it east. We would hunt on the Dunton Ranch, about 325 miles away in Arizona. The weather was going to be a crapshoot. Everyone was predicting rain, and they were right. We would be lucky, though. It would be overcast and rain a lot, but not while we were in the field.
My six-hour ride under gray skies to Kingman was pleasant. It rained a bit, but it stopped just before I reached Kingman. Sirius XM blasted ’50s hits the entire way.
On the road to the Dunton ranch. I had a travel mug full of coffee Sue had prepared for me. I enjoyed the drive.
When I arrived at the Ranch, Tom (our guide) met me. John wouldn’t be getting in until later that evening. Tom asked if I wanted to hunt that afternoon, before Baja John arrived. You bet, I said, and we were off.
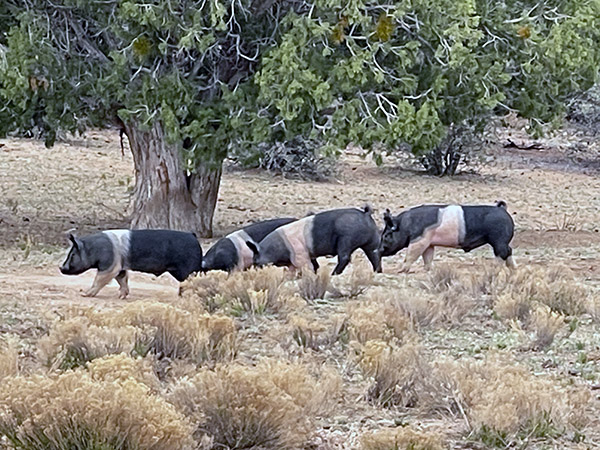
Ossabaw hogs in Arizona. They are an even-tempered pig. They are what Tom calls “meat pigs.”
Scott Dunton keeps his ranch stocked with at least three flavors of hog, including Russians and Ossabaw pigs. I had not seen a Russian boar on my last hunt, and I would not see one on this hunt, but that’s okay. It’s good to set goals in life, and one of my goals is to someday get a Russian boar. It didn’t happen on my Dunton Ranch pig hunt a decade ago, and it wouldn’t happen on this trip, but we started seeing Ossabaws almost immediately. Wikipedia tells us that the Ossabaw pigs are descendants of feral hogs on Ossabaw Island, Georgia. The Ossabaws were originally released on that island by Spanish explorers in the 16th century. Imagine that.
Tom and I set out and like I said above, we saw Ossabaws fairly quickly. I told Tom that I really wanted to get a Russian. “They’re smaller, they’re harder to find, they’re nocturnal, and they’re mean,” Tom said. “Some boys out here last week got a nice one.” He told me he could set me up in a blind, but the odds of seeing a Russian were low.
A while later, we came upon a group of Ossabaws. Tom had a rangefinder and he scoped the distance at 117 yards. “What do you think?” he asked.
My mind was racing. I started thinking about Mike Wolfe on American Pickers. He often says the time to buy something is when you see it. You don’t know if you’ll ever see it again. I thought it would be cool to have John there when I shot a pig, but I didn’t know if we would see any later. I wanted a Russian; these were Ossabaws. But they were there. I could hear Mike Wolfe: The time to shoot a pig is when you see one. “Can I shoot one of these and then take a Russian if we see one later?” I asked.
“You can do whatever you want,” Tom said.
Tom set up his tripod, which is a cool field version of a rifle rest. I had never used one before (I’d never even seen one before). I looked at the Ossabaw 117 yards away through the 4-power Redfield. The hog was standing broadside to me. Fifty years ago, I used to shoot metallic silhouette pigs that were a third that size at three times the distance (385 meters, to be precise), with no rest, shooting offhand. But that was 50 years ago. My eyesight isn’t what it used to be, my ability to shoot a rifle offhand isn’t what it used to be, and hell, I’m not what I used to be.
It was time. I rested the Ruger in the tripod rest and held on the hog’s shoulder. I watched the reticle sashay around against the hog’s dark form and started applying pressure to the Ruger’s trigger. Things felt right. I was in the zone. I didn’t hear the shot, and I didn’t feel the recoil, as is always the case for me when hunting. The hog fell over, away from me, just as a metallic silhouette javelina would do.
“That was a nice shot,” Tom said. I don’t think he said it because I was the client. He probably sees a lot of misses out here from other clients. The hog’s rear legs twitched in the air.
“Should I put another round in him?” I asked Tom.
“No, he’s gone,” Tom answered. “It would just destroy more meat.” I looked again and the hog was still.
Success: 117 yards, my Ruger No. 1, and an Ossabaw hog.
We walked up to the hog. I could see where the bullet entered (satisfyingly just about where I had aimed). I was surprised; I could not find an exit wound. When I .30 06’d a hog at the Dunton Ranch on my last visit, the bullet sailed right through. Not this time, though. More on that later.
I posed with my Ossabaw for the obligatory Bwana photo. Tom and I struggled to roll El Puerco over. We tried to lift it onto the back of the truck and could not. Tom told me he needed to get the trailer (which had a winch), and he told me he would drop me off at a blind. “You might see a Russian come by,” he said. That was enough for me. “I’ll come back out here later with John to pick you up.”
I got comfortable in the blind, which overlooked a watering hole about a hundred yards away. I scoped everything I could through my binoculars, imagining every rock and bush in my field of view might be a Russian. I felt like a Democrat looking for the imaginary Russians (I really wanted to see one, but they just weren’t there). A small group of Ossabaws showed up at the watering hole. I watched them through my binoculars. They did what pigs do, and then they started meandering around a bit. Towards me.
An Ossabaw hog just outside the blind’s window. Were they coming for payback?
Golly, I thought. The Ossabaw hogs were getting close. Then, they literally walked right up to the blind. I could feel it rock around as the pigs rubbed up against the walls. They know, I thought. I had shot Porky (or maybe it was Petunia?) and it was payback time. They had come for me.
I could hear the pigs grunting just below the blind’s window. I remembered my iPhone. I took a picture, holding the phone just outside the window. I don’t mind sharing with you that I was more than a little bit afraid. My Smith and Wesson Shield and its nine rounds of hot 9mm ammo were back in the Subie. The sportsman-like snob appeal of hunting with a single-shot rifle suddenly didn’t seem like such a good idea. I had my one round I could put in the chamber, but I wouldn’t be able to reload quickly enough if the pigs wanted to exact their revenge on me. One shot. I was the Barney Fife of pig hunters.
Nah, I thought, these are just pigs being pigs. Or were they?
If you crank up your computer’s volume all the way up and listen, you can hear their grunts.
After the pigs had their fill of terrorizing this septuagenarian New Jersey refugee, they wandered off. My heart rate returned to its normal bradycardic 50 bpm or so. I went back to glassing the surrounding vista. Nobody’s going to believe this, I thought.
An hour or so later, Tom and Baja John were back in the truck. No Russians had wandered by. I was glad John had made it okay but I was disappointed I had seen no Russians. I imagined I knew what Adam Schiff must have felt like when Robert Mueller testified before Congress. Where the hell are these Russians?
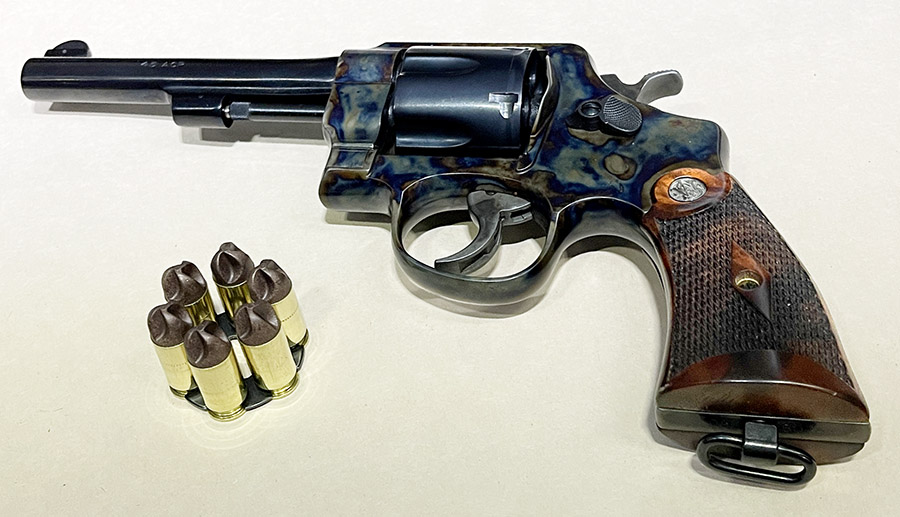
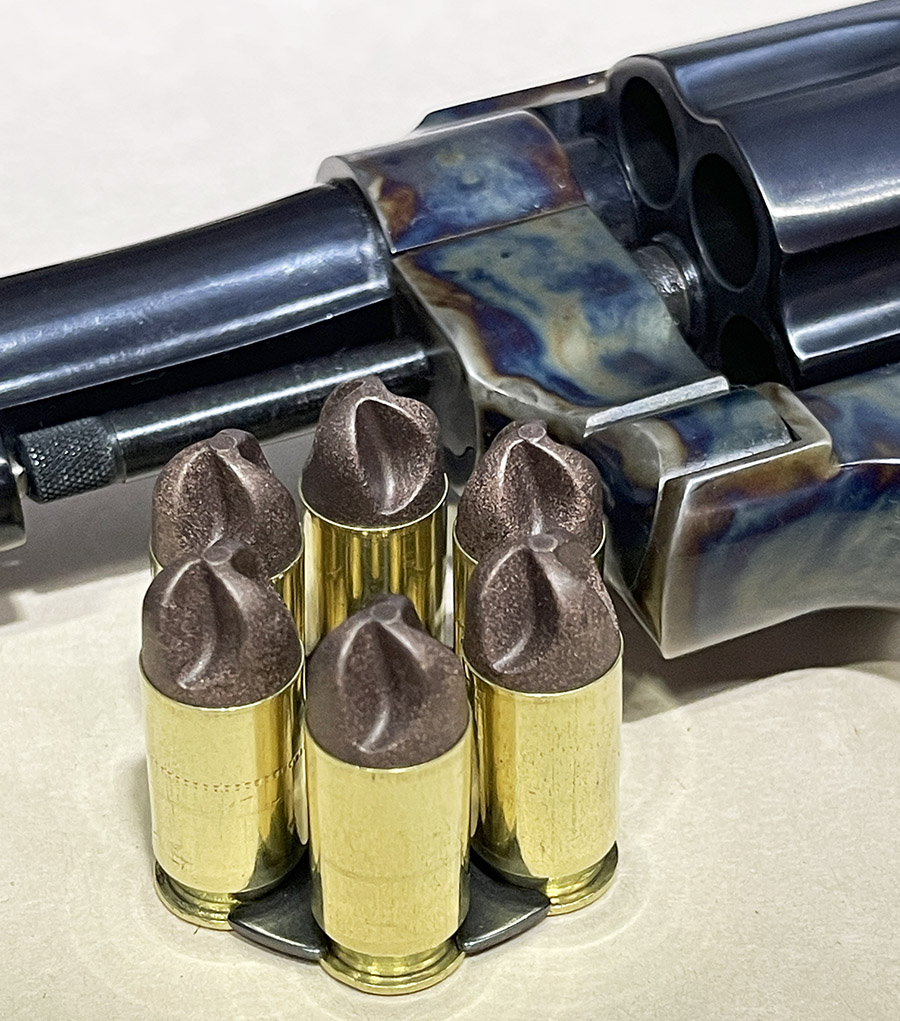
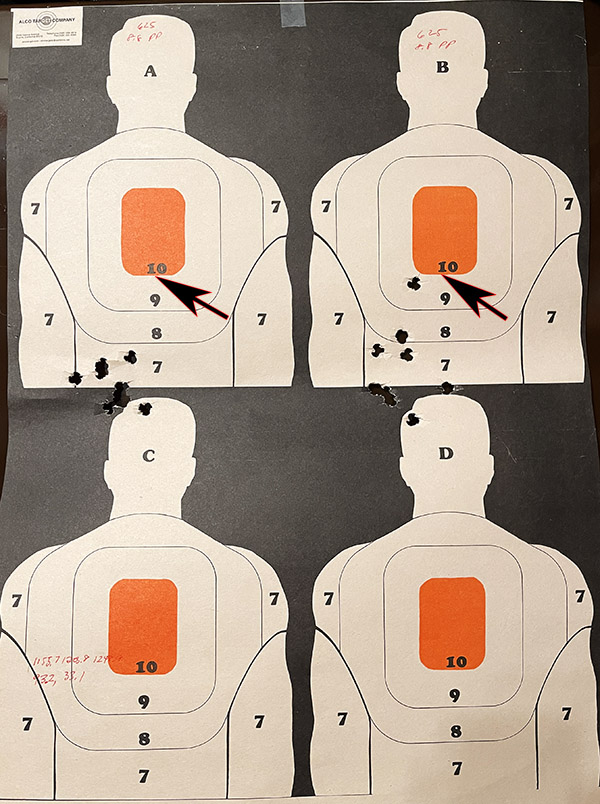
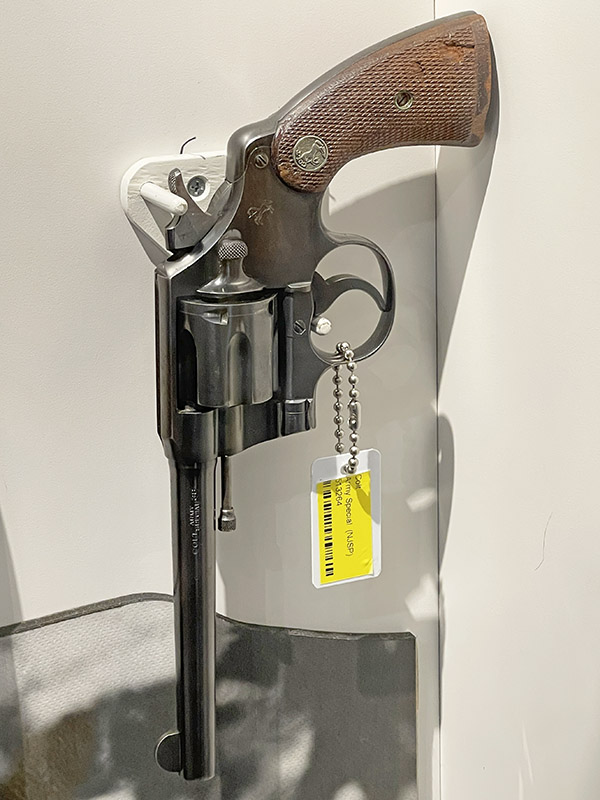
I went to my indoor handgun range to try the ARX bullets in two .45 ACP revolvers, my 1917 redo revolver and the 625 Performance Center Smith and Wesson. The 1917 is the one you see at the top of this blog. It’s a beautiful N-frame Smith styled to look like the 1917 US Army revolvers with a 5 1/2-inch barrel and a lanyard ring. Smith also added a nice t0uch: Turnbull color case hardening. It really is a beautiful revolver.
6 ARX rounds in a star clip, ready for shooting in the 1917 Smith.
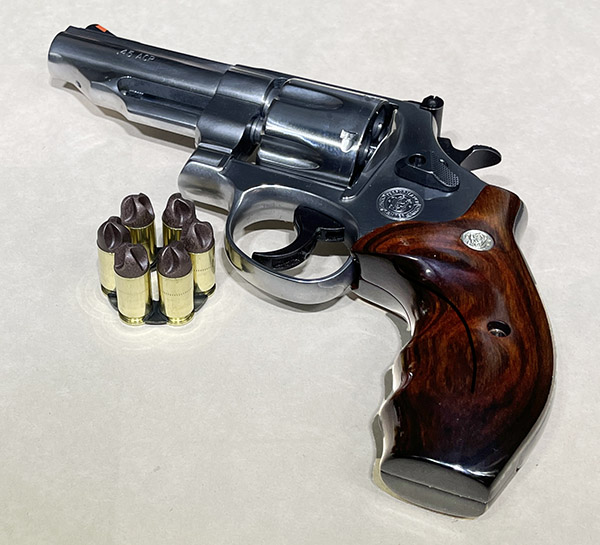
The 625 is a special number Smith offered about a decade or so ago. It has a custom barrel profile, ostensibly a smoother action, and better sights. It came from the Performance Center with a gold bead front sight, which I didn’t care for, so the revolver went back to Smith for a red ramp front and white outline rear sight. I thought the red ramp and white outline would be like what came on Smiths in the 1970s, but it wasn’t. The red isn’t nearly as vibrant, and the white outline is sort of a dull gray. Live and learn, I guess.
The Smith and Wesson Performance Center Model 625. This one wears custom grips.
I also added custom grips to the 625 (which I refinished myself, as I didn’t care for the red, birch, and blue clown grips that came with the gun). I know this Model 625 Performance Center gun to be an extremely accurate revolver. With 200-grain semi-wadcutters and 6.0 grains of Unique, this is one of the most accurate revolvers I’ve ever shot.
But enough about the revolvers. This blog focuses on how the .45 ACP ARX bullets performed in these two handguns. Everything we’ve written about the ARX bullets has been, up to this blog, about how the bullets performed in semi-auto handguns. I shoot .45 ACP in revolvers, too, and I was naturally curious about how the composite bullets would do in those.
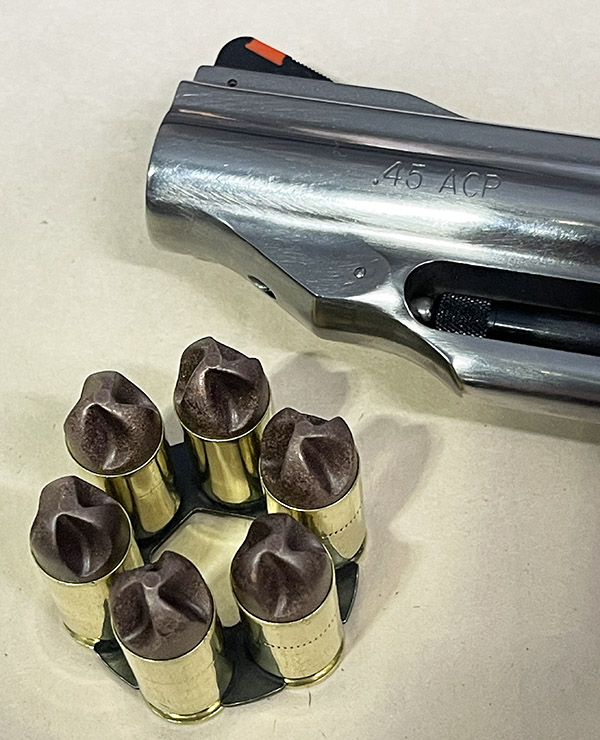
Another 6 ARX rounds in a star clip and the Model 625.
Here’s the bottom line:
The ARX composite bullets are not quite as accurate in my revolvers as they were in the 1911 with two different loads. The groups were good (as you’ll see in the photos below), but they weren’t as good as they had been in the 1911.
Both revolvers shot low at 30 feet. The 625 shot about 3 1/2 inches below the point of aim. The 1917 shot about 5 inches below the point of aim. In the 1911, the .45 ACP ARX load was spot on, putting the shots right where I aimed.
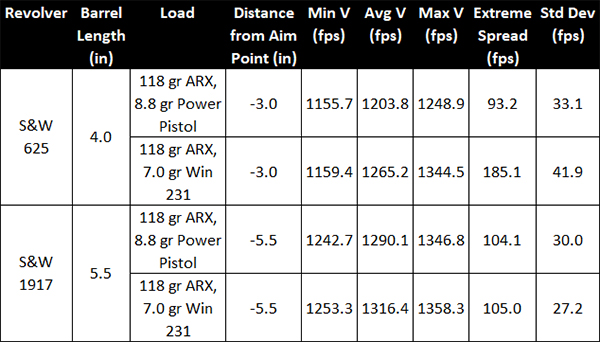
Here’s the relevant load and chrono data:
And here are the targets I shot with each revolver and the two different loads. First, the Model 625 targets:
The aim point on this target was the 6:00 position on the upper orange bullseyes (as it was for all the targets shown here). The bullets hit 3 1/2 inches low. This is the target with the 8.8-grain Power Pistol load. The groups were nothing to write home about.The Model 625 put the 7.0-grain Winchester 231 load in the same spot as the 8.8-grain Power Pistol load. The group sizes were about the same.
The next two photos show the 1917 targets:
The 1917 group with the 8.8-grain Power Pistol load was about 5 inches low. I wasn’t trying for head shots.The 1917 seemed to like the 7.0-grain Winchester 231 load a bit better, but the groups were still the same 5 inches low. As with the above targets, the aim point was at the 6:00 position on the upper bullseye.
As you can see from the above data, velocities from the 1917’s slightly longer 5 1/2-inch barrel were a bit higher than from the 625’s 4-inch barrel. In the revolvers, the Winchester 231 velocities were higher than the Power Pistol loads (but not by much). The opposite was true in the 1911. Group sizes maybe were a bit better with Winchester 231 in both revolvers, but not as good as with the 1911. The 1917 has fixed sights, so my only option there is to hold higher on the target. The 625 had adjustable sights, but I don’t think there’s enough adjustment to make up for the 3 1/2-inch drop.
One more observation: Winchester 231 is a much dirtier powder than Power Pistol. I didn’t notice this with the 1911 comparisons I did earlier, but with a revolver, it’s quite noticeable.
One of the ARX bullets’ principal advantages is they keep the bore clean. There’s no lead or copper fouling. When shooting any kind of bullet with Winchester 231 in a revolver, though, you’ll get plenty dirty.
In my opinion, the 118-grain ARX .45 ACP bullets are much better suited for the 1911 than they are for a .45 ACP revolver. That’s my opinion only; your mileage may vary.
So there you have it. This is our 6th blog on the ARX bullets, and I don’t have any more planned. I think ExhaustNotes has the most comprehensive evaluation of these bullets you’ll find anywhere on the Internet or in any of the print pubs, and I feel good about that. I like these bullets, and I really like them in my 9mm Springfield 1911, my 9mm S&W Shield, and my .45 ACP Springfield 1911. I ordered a bunch of both the 9mm and .45 bullets, and they are what I’ll be shooting for the foreseeable future.
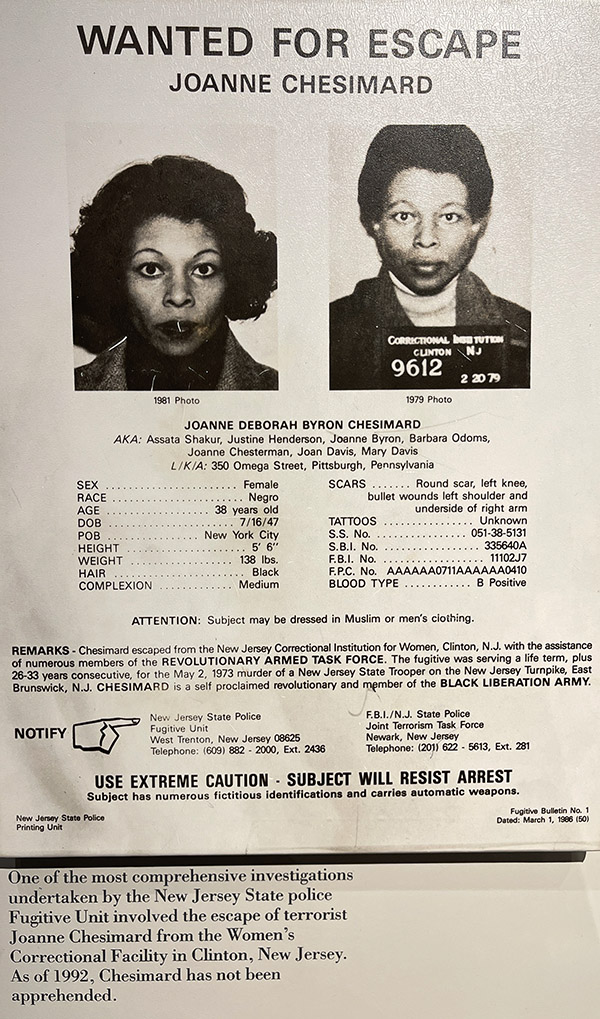
Here’s something different: A visit to the New Jersey State Police Museum in West Trenton, New Jersey.
A statue of a New Jersey State Trooper on the Museum grounds.
I’d seen references to the NJSP Museum on Facebook and elsewhere, and being back in New Jersey a short while ago, Susie and I found ourselves casting about for things to do. Ordinarily, our visits to the Garden State include the same stops: Lunch at the Shrimp Box in Point Pleasant (awesome seafood), every once in a while a visit to Bahr’s in the Highlands (another spot for awesome food), maybe a trip to Asbury Park (think Bruce Springsteen and Danny Devito), a few of the Soprano’s filming locations, the Rutgers University campus, the Old Mill in Deans, New Hope (just across the Delaware River), and a few of our other standard stops. This time we wanted to explore a bit more, and I put the New Jersey State Police Museum on the list. I knew that it had a couple of vintage motorcycles, and I figured it would probably have a few firearms on display. Guns and motorcycles fit the ExhaustNotes theme.
The New Jersey State Police is a paramilitary, well-disciplined, and impressive organization. I’d call it a STRAC outfit (in Army slang, STRAC is an acronym derived from skilled, tough, and ready around the clock).One thing I’ve never seen is an out-of-shape NJ State Trooper.
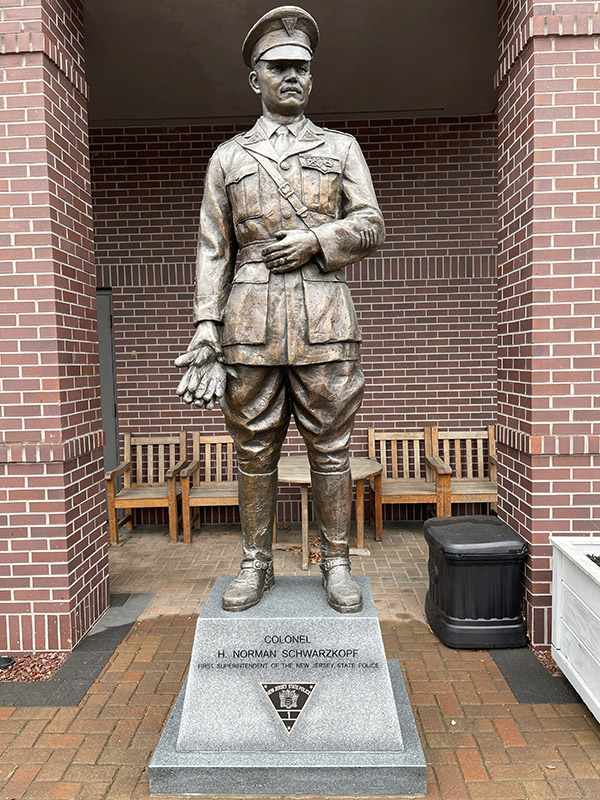
A statue of Colonel H. Norman Schwarzkopf near the NJSP Museum entrance.
New Jersey State Troopers are the Marines and Green Berets of the police world. That didn’t happen accidentally: The guy who formed the NJ State Police a century ago was none other than Colonel H. Norman Schwarzkopf. Not the guy who led US troops during the first Persian Gulf War in 1991 (that H. Normal Schwarzkopf was his son), but the original. Colonel Schwarzkopf was a US Military Academy graduate, and when he formed the NJ State Police, his vision was a military organization with the same look as that instilled at West Point. I’d say he succeeded.
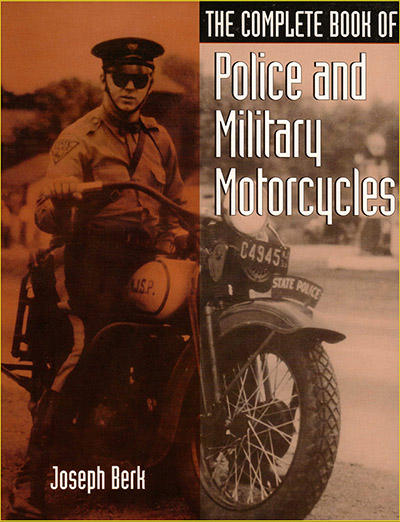
Trooper Ralph Dowgin gracing The Complete Book of Police and Military Motorcycles.
I touched on the NJ State Police when I wrote The Complete Book of Police and Military Motorcycles. The cover photo shows Captain Ralph Dowgin on a 1934 Harley-Davidson. Captain Dowgin went on to command Troop D, the NJSP branch that patrolled the New Jersey Turnpike and the Garden State Parkway. We also wrote about Jerry Dowgin, Captain Dowgin’s son and a friend of mine who owned a 1966 Honda 305 Scrambler (a bike featured here and in a Motorcycle Classics magazine story).
Getting to the NJSP Museum was relatively easy, although the location was tucked away on the NJSP Headquarters grounds. We just plugged the name into Waze, and after meandering through a bunch of small streets in West Trenton, we were at a manned gate. The location is essentially a military compound. The nice young lady at the gate called ahead to confirm the Museum was open (it was), and then she raised the gate. We followed her instructions and the map she gave to us, and we were there. We were the only visitors, so we had the place to ourselves.
The NJ State Police guns story is an interesting one.
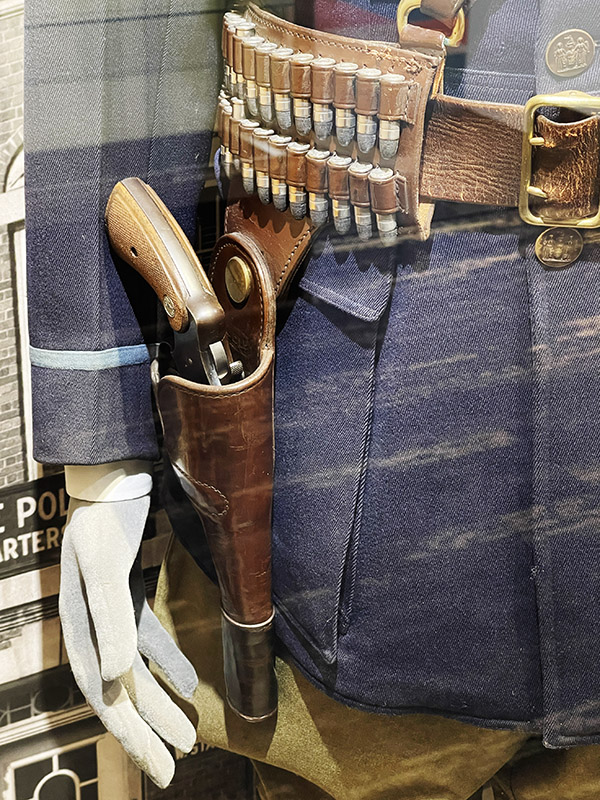
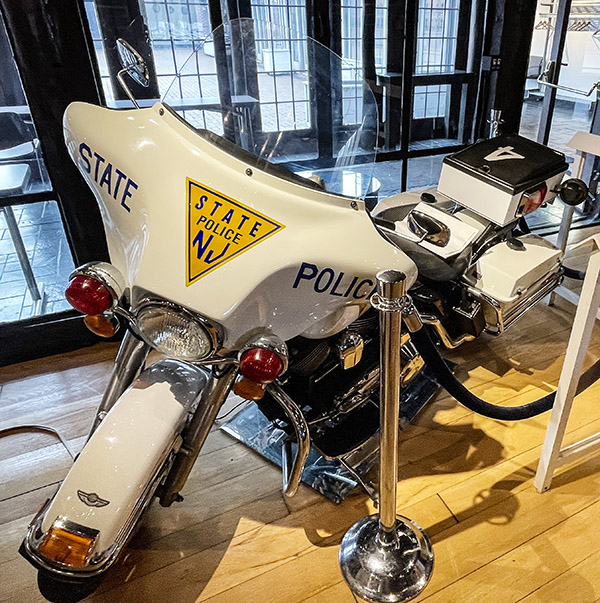
When the New Jersey State Police organization started in 1921, their first duty weapon was the Colt double-action revolver (a six shooter) chambered in .38 Special. This very handgun you see here was issued to Colonel Schwarzkopf.Four cylinders full of .38 Special ammo, for a total load of 30 rounds carried by each Trooper. Reloads had to have been painstakingly slow back in the day. I remember seeing these ammo carriers on State Troopers when I was a kid. With their Glock sidearms today, the gun itself and one additional magazine exceeds all the rounds seen above.Another .38 Special Colt revolver on display. Troopers have been assigned sequential badge numbers from the very beginning, with Trooper No. 1 being H. Norman Schwarzkopf.
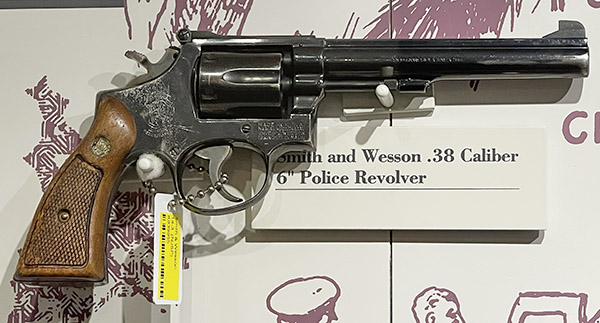
Back in the day, the NJ State Police also issued the .38 Smith and Wesson Combat Masterpiece to their Troopers, which was a 6-shot revolver with adjustable sights. This one has a 6-inch barrel. I’ve owned a few of the Smith and Wesson revolvers; they are good guns.
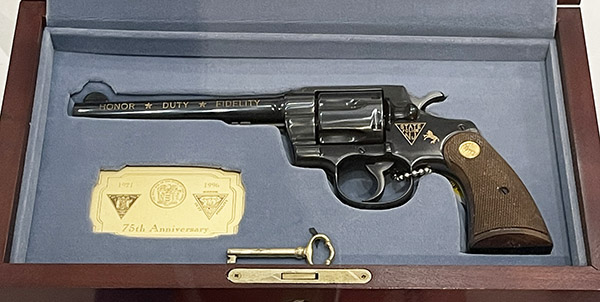
The Smith and Wesson Combat Masterpiece. These are beautiful revolvers.Colt released a commemorative NJSP revolver, with high polish blue and the NJSP emblem. Commemorative guns, for the most part, don’t appreciate at the same rate the basic (i.e., non-commemorative) guns. I’ve owned a few commemorative guns, but not this model.More information on the Colt NJSP 75th Anniversary commemorative revolver. We previously visited the Colt Custom Shop; you can read about that here.
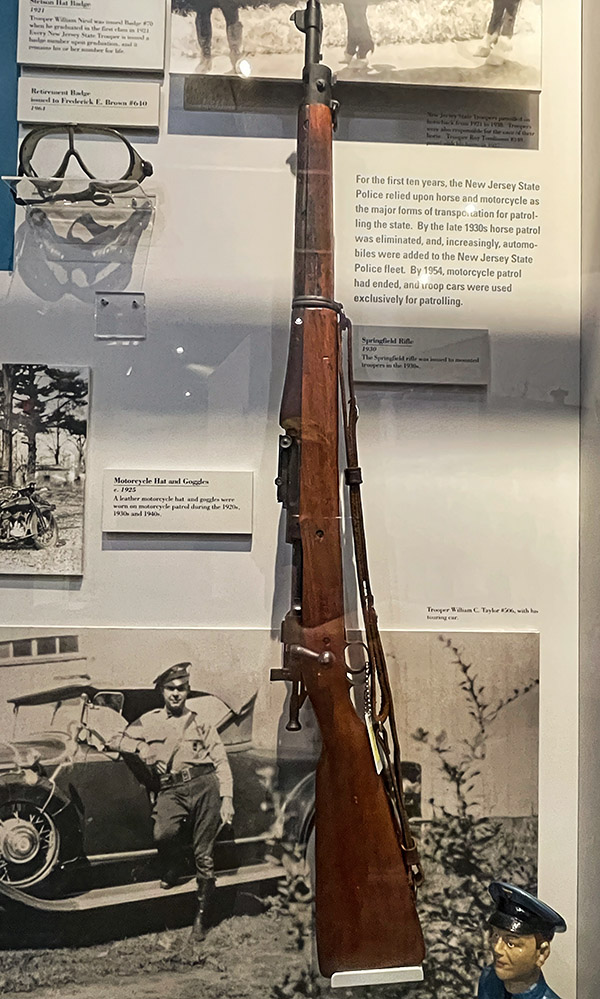
In those early days, the NJ State Police also used 1903A1 Springfield rifles. I have a 1903A1 in near perfect condition and I’ve written about shooting cast and jacketed bullets in it, and the rifle’s complex rear sight. They are nice rifles and they are collectible. Truth be told, though, I can shoot tighter groups with my 91/30 Mosin Nagant.
A NJSP 1903A1 Springfield. The 1903A1 has the 1903’s more complex right sight and the so-called “scant” stock. I was surprised to see this. You don’t encounter to many 1903A1 rifles.
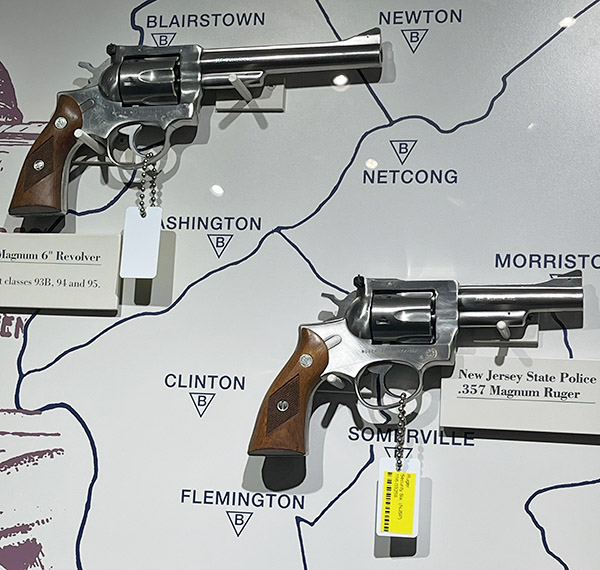
Later in their history, the NJ State Police used Ruger .357 Magnum double-action, stainless steel revolvers.
Ruger revolvers used by the NJ State Police, in both 4-inch and 6-inch barreled versions.
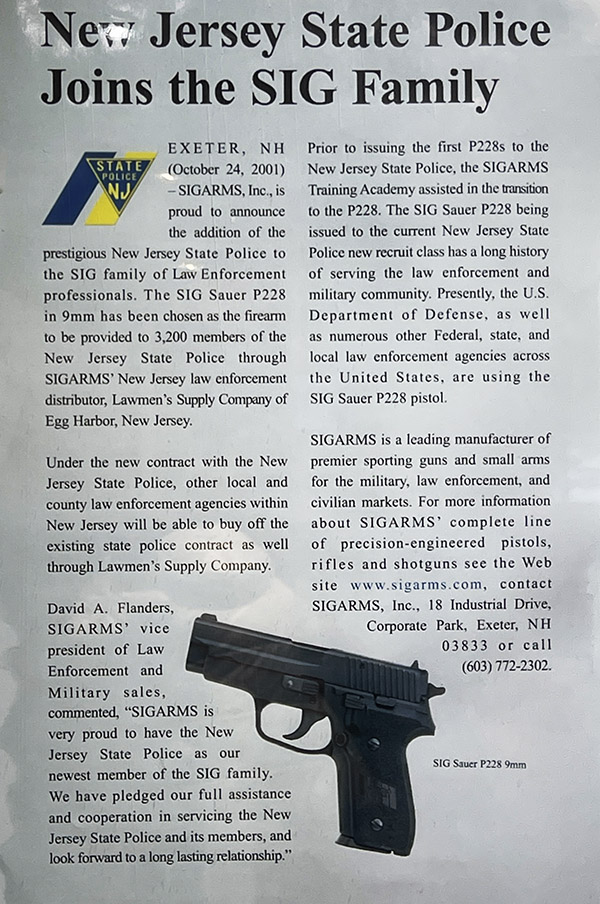
During the 1980s, many police departments made the switch from revolvers to 9mm semi-automatic handguns. Not all choices worked well for the NJ State Police. One firearm, the H&K 9mm squeeze cocker, was particularly troublesome. The NJSP experienced numerous accidental discharges. Sometime after that, the NJSP went to SIG handguns. That didn’t work out, either. When the NJ State Police made the switch to SIGs, the handguns had reliability issues, and when SIG couldn’t fix the problems, the NJ State Police sued SIG. It seemed like the NJSP couldn’t catch a break in their quest to adopt a 9mm handgun. Ultimately, the NJSP went with Glock 9mm handguns. That worked out well.
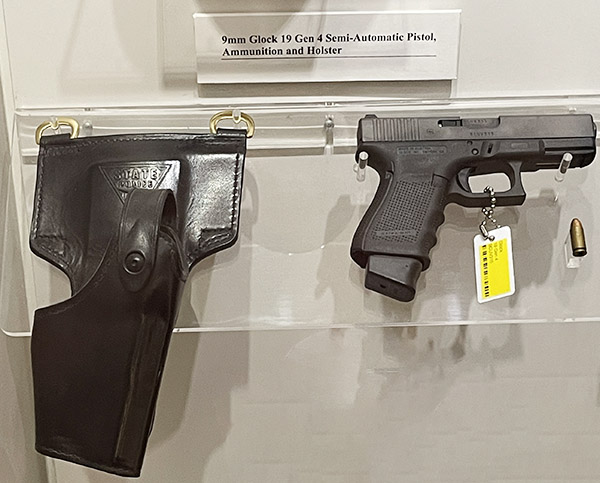
A Glock up top, and several SIG handguns. The SIG at the bottom of this photo is chambered in .45 ACP.Another SIG handgun in the NJ State Police Museum.Good intentions, but bad results. It’s unfortunate. I believe that SIG makes the finest 9mm handgun in the world. But I don’t carry one for a living (like the New Jersey State Troopers do).The 9mm Glock currently carried by New Jersey State Troopers.
The firearms exhibits also displayed other long guns used by the New Jersey State Police.
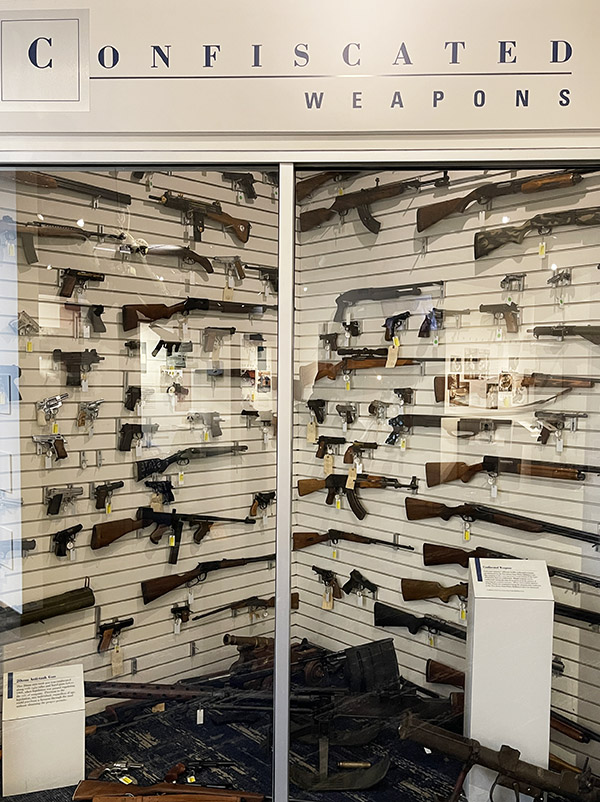
A .45 ACP Thompson submachine gun the NJSP used decades ago, and an M16. A submachine gun can fire in the fully automatic mode (like a machine gun). The “submachine gun” designation typically means the gun uses a pistol cartridge.An exhibit displaying a sampling of confiscated weapons. New Jersey police agencies typically confiscate between 7,000 and 10,000 guns annually. All are delivered to the NJSP Ballistics Unit for destruction.
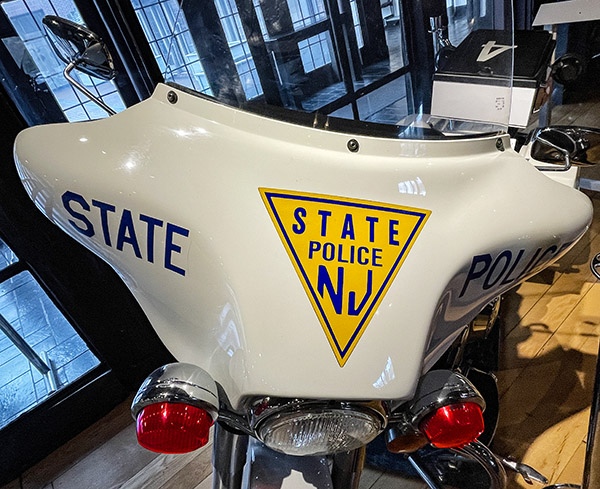
The New Jersey State Police also have a rich tradition using motorcycles, although they no longer use motorcycles for patrol duties. The NJSP has a few modern Harleys, but these are used for ceremonial functions only. In the early days, the NJSP used motorcycles year round, and in New Jersey, the winters can get cold, wet, snowy, and icy. Back in the day, the NJSP used tire chains when it snowed. That’s hard to imagine.
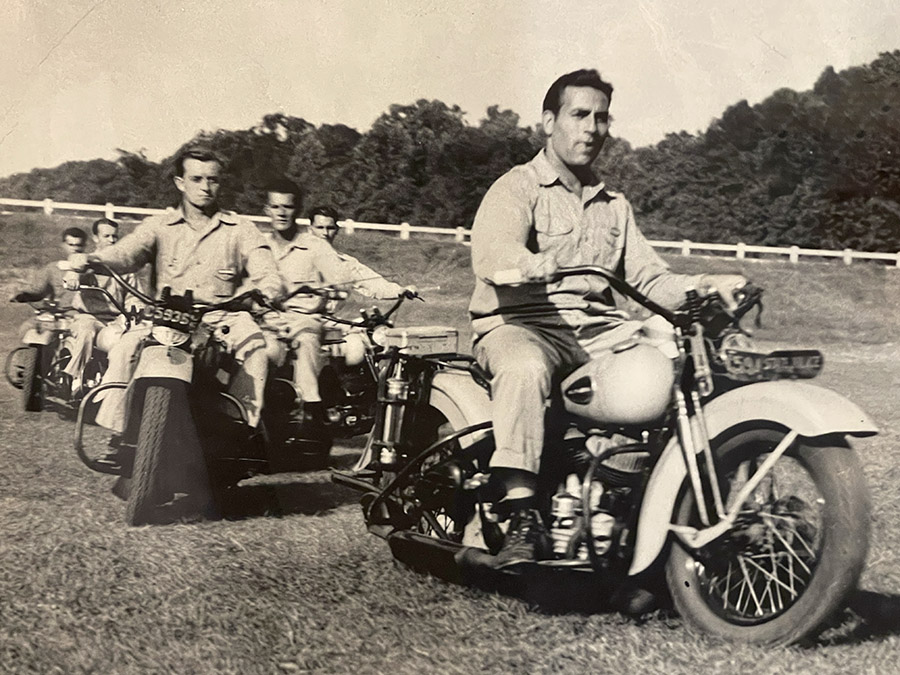
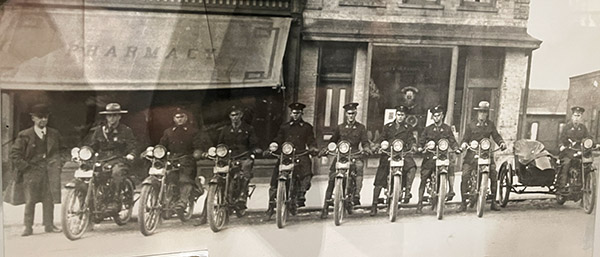
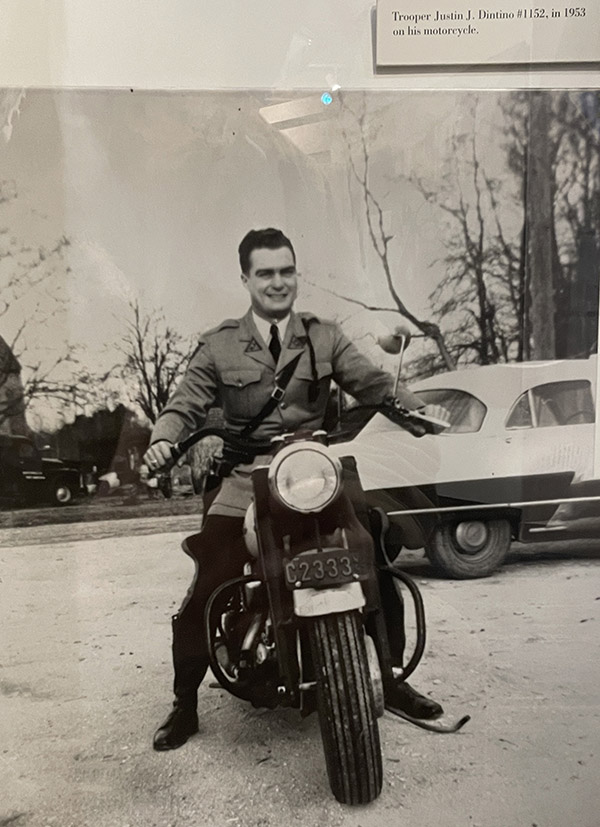
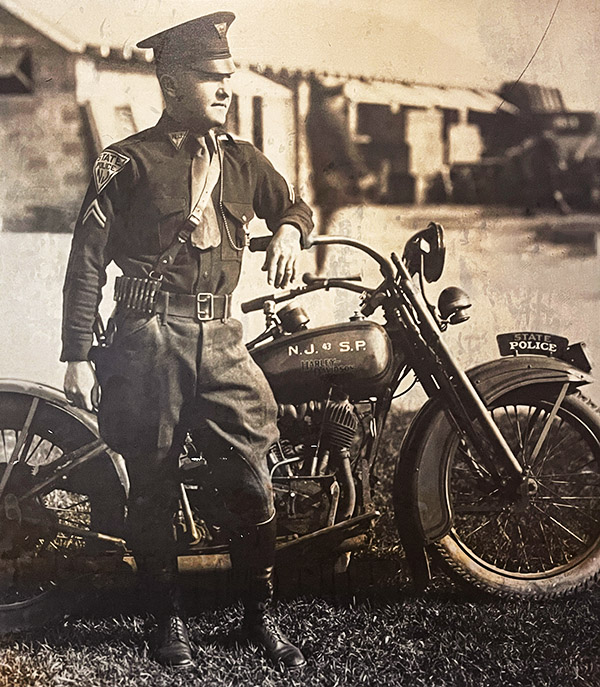
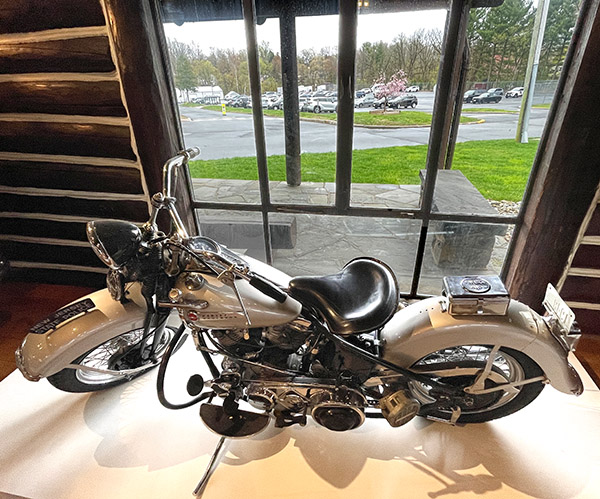
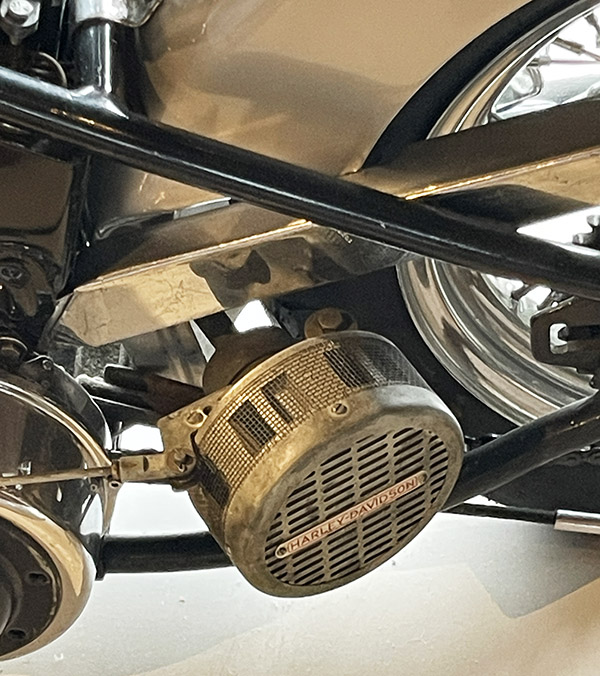
An early NJSP Motors group photo.Mittens used for cold weather riding. Those guys were tough. Unless they are electrically-heated, mittens like these don’t keep your hands warm for long.New Jersey State Trooper Justin Dintino, a motor officer who went on to become the 10th leader of the New Jersey State Troopers. Colonel Dintino graduated from the NJSP Academy two years after I was born.Trooper E. Paul Sjostrom with his Harley-Davidson police motorcycle in 1925. Back then, the NJSP had 40 Harleys, 40 horses, 20 cars, and a single truck to patrol the entire state of New Jersey.A more recent Harley police motorcycle. As mentioned above, the NJSP no longer uses motorcycles for patrol duties.A macro shot of the tank and engine on the NJSP Harley.Distinctive colors and a distinctive emblem.A 1948 Harley Panhead used by the NJ State Police. It had a hand shift and a foot clutch.The tombstone taillight Harleys used in 1948.The Harley siren used back in the 1940s and 1950s was activated by pivoting the entire siren such that it was friction driven by the rear tire. I used to have a similar siren on my Schwinn bicycle, which drove our neighbors nuts.Harleys rode with the NJSP from the very beginning. This is a 1921 NJSP Harley.A closer photo of the 1921 Harley’s V-Twin engine.
One of the NJSP Museum’s exhibits was a wanted poster for a particular person. That wanted poster is for Joanne Chesimard, who is a fugitive being sheltered by Cuba. Chesimard participated in the murder of New Jersey State Trooper Werner Foerster in May 1973. The murder occurred very near where my family lived. Another NJ State Trooper had pulled over a car driven by Clark Squire (Chesimard was also in the car). Foerster arrived in a backup patrol car. A gun battle ensued, Foerster was murdered, and Squire escaped into the woods just to the east of our home.
Squire remained at large, hiding in the woods, for several days. We thought he had escaped from the area, but police officers continued the search. Squire finally surrendered to a local police officer. We believed that if the NJ State Police had found him, Squire would not have been brought in alive (and that would have been okay with everyone I knew).
Squire, Chesimard, and a third person were convicted of murdering Foerster and sentenced to life in prison. Chesimard subsequently escaped and found her way to Cuba, where she lives in freedom to this day (sheltered by a Cuban government that refuses to extradite her to the United States). Incredibly, when Barack Obama wanted to recognize the Castro regime and lift sanctions on Cuba, returning Chesimard to serve out her sentence was not part of the deal. She remains on the FBI’s Most Wanted List to this day.
In yet another disappointment related to this Foerster murder, Squire was recently released on parole (50 years into what should have been a life sentence). I know. It’s not right.
To get back to the main topic of this blog, if you ever find yourself in New Jersey you might want to spend a few hours visiting the New Jersey State Police Museum in West Trenton. It’s free, it’s a great museum, and it’s an opportunity to learn a lot about one of the most elite police organizations in America. We enjoyed it. You will, too.
I am giving the .45 ACP ARX 118-grain bullets a thorough evaluation in my Springfield 1911. I’ve been using my Winchester 231 load (7.0 grains, to be precise), and I continue to be impressed with just how accurate these bullets are.
One day recently when I was on the range with the 1911 and my ARX reloads, it was very windy. I shot at 25 yards, had a decent group, and then two things happened:
I moved the target out to 50 yards, and
The wind picked up significantly.
You might call someone who evaluates a load for accuracy under high wind conditions not very bright. Hey, guilty as charged. That’s exactly what I was doing.
Under those extremely windy conditions, I was surprised. The bullets impacted the 50-yard target a foot to the right. I kept cranking in windage adjustments on the 1911’s rear sight and I still couldn’t get the bullets back on target.
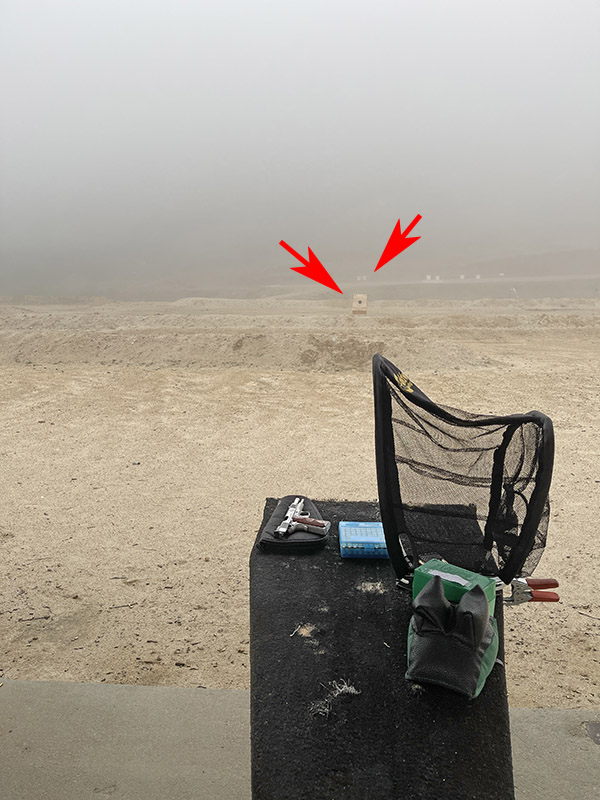
A cold and foggy morning on the West End Gun Club range. The left arrow points to my 25-yard target, which I subsequently moved out to 50 yards. The right arrow points to a target on the 100-yard line (I brought the Garand along; it’s not addressed in this blog). I had to wait for the fog to clear a bit; I could barely see the target.
Realizing there had to be more to the story, I went out to test the load again at 25 and 50 yards a few days later when the wind had died down. It was cold and foggy, but there was no wind.
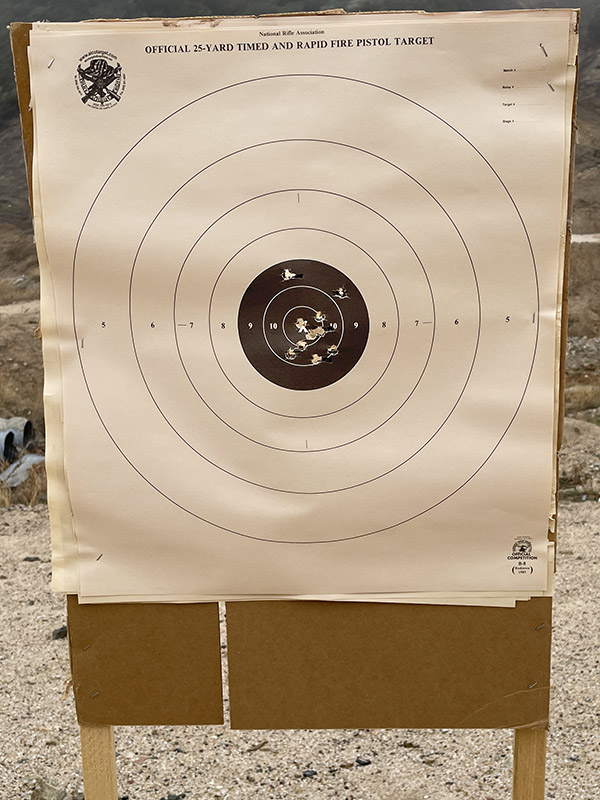
Five rounds with ARX bullets at 25 yards. All five went into the 10-ring.
I put the target at 25 yards and fired 5 rounds with my ARX load. Nice, I thought, as I looked through my spotting scope. All five shots were in the 10-ring, and 3 of those were in the X-ring.
I then moved the same target out to 50 yards and fired another five rounds. Wow, was I ever pleased. The 50-yard group was right on top of the 25-yard group, with a couple that went a little high (but they were still in the black).
Five more rounds on the same target as above (a regulation 25-yard pistol target), this time at 50 yards. Beware of old guys; some of us are still pretty good shots.
The above results and my experience the preceding week convinced me of three things:
The ARX bullets are probably more affected by wind than conventional bullets at longer ranges (not surprising, as they are half the weight of normal 230-grain hardball bullets),
The ARX bullets are exceptionally accurate, and
The ARX load is a relatively flat-shooting load (I didn’t have to make any sight adjustments when going from 25 to 50 yards).
I like these ARX bullets, and I like this load.
Next up? I’ll be evaluating this .45 ACP ARX load in a couple of my revolvers. That’s going to be interesting. I promise.
When you’re a retired engineer who likes to play with guns…well, read on.
After my great results with 8.8 grains of Power Pistol under the 118-grain ARX bullet in the .45 ACP, I learned that Power Pistol is no longer available. That was good news and bad news. The bad news is I that I can no longer get that powder. The good news is that I already have something like 850 loaded rounds with Power Pistol (those will last me for a while). More good news is that I have an excuse (not that I needed one) to find another load for my .45 with the ARX bullets.
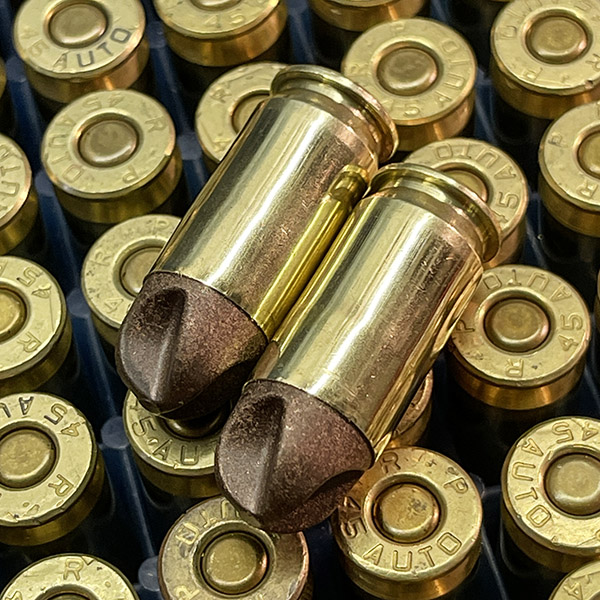
.45 ACP cartridges reloaded with ARX 118-grain poly/copper composite bullet.
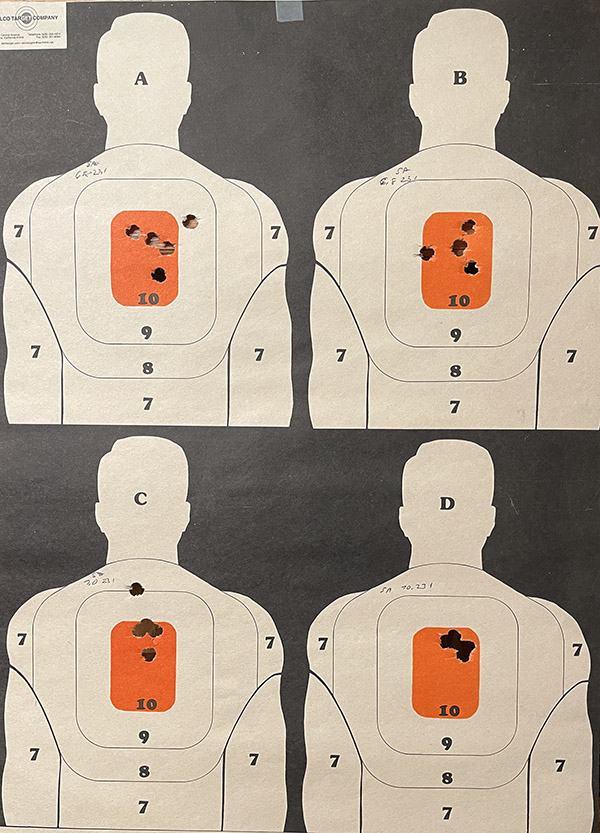
Winchester’s 231 worked great in the 9mm and I had some on hand, so that’s what I thought I would try next. Inceptor lists two load ranges; I stuck to the standard (i.e., non +P) range. With the 118-grain .45 ARX bullets, Inceptor showed the Winchester 231 propellant range to be 6.3 to 7.0 grains. I loaded at 6.8 and 7.0 grains. I test fired at 10 yards, just as I had done before with the Power Pistol loads.
In the full-sized Springfield Armory 1911, both 6.8 and 7.0 grains of 231 functioned reliably. The 7.0 grain group was noticeably tighter than the 6.8 grain load. The two targets on top were with 6.8 grains of 231; the two on the bottom were with 7.0 grains. The two 7.0-grain groups were right on top of each other if you look at both targets. There was one flyer in the first group, and that’s due to me. The second group was one ragged hole. This is a good load in the 5-inch Springfield 1911.
The top two targets were shot with 6.8 grains of Winchester 231; the bottom two were with 7.0 grains of 231. There are five shots on the bottom right target; they cut one ragged hole.
From a velocity and velocity variation perspective, the Springfield 6.8-grain load was tighter, but I’m sticking with the 7.0-grain load (it grouped better). If there was a difference in felt recoil between the two loads, I couldn’t detect it. Here’s the chrono readout for the Springfield and the 6.8-grain load:
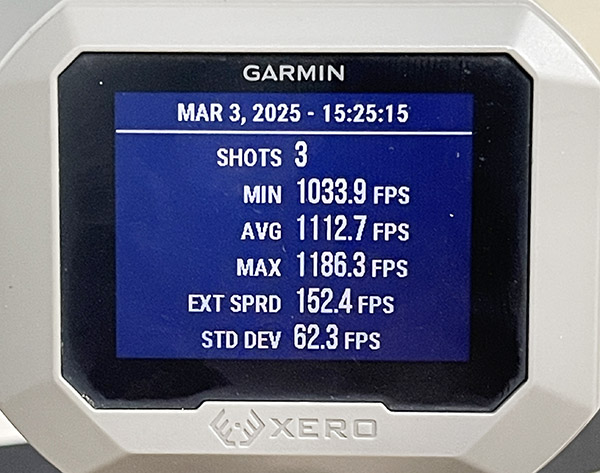
The 6.8-grain 231 load chrono results.
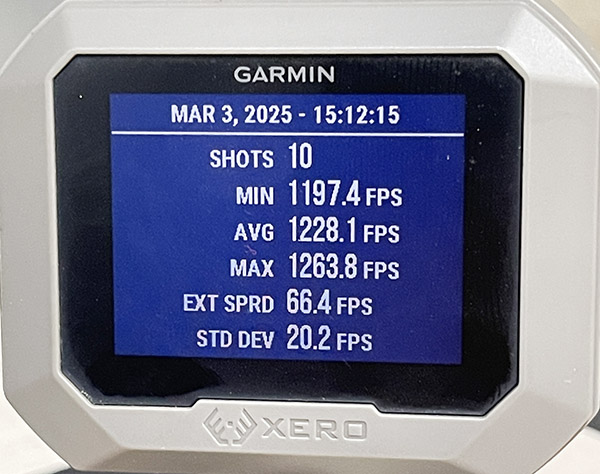
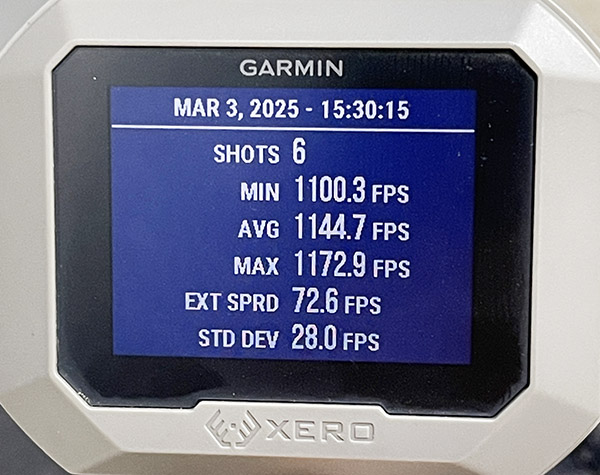
Here’s the chrono result for the Springfield and the 7.0-grain load:
The 7.0-grain chrono results. The extra 0.2 grains of propellant bumped the average velocity 57 fps.
As a point of reference, the average velocity with the 8.8-grain Power Pistol load was 1299 fps, so this is only a little bit slower (16 fps, to be exact). The bottom line is that the 7.0-grain 231 load is a suitable substitute for the 8.8-grain Power Pistol load in the full-sized 1911.
I next turned to the Rock Island Armory Compact. It’s one my good buddy TJ of TJ’s Custom Guns worked over for me and it is superbly accurate and reliable with conventional cast and jacketed bullets. The Compact has a 3 1/2-inch barrel. The ARX bullets did not perform well with either powder (Winchester 231 or Power Pistol) in the Compact 1911. They tumbled in flight and they were not accurate. The 7.0-grain 231 load functioned the pistol reliably, ejected all cartridge cases, and held the slide open after the last round. The 6.8-grain 231 load worked the slide and it stayed open after the last round, but on the last round the cartridge case remained in the chamber. These factors (along with the poor accuracy and the tumbling in flight) showed the ARX bullets and 231 are not good in my Compact 1911.
I tried the ARX bullets with my prior 8.8-grain Power Pistol load in the Compact 1911 Everything on the gun functioned the way it should (I had reliable ejection and the slide stayed back on the last round), but the accuracy was poor and the bullets tumbled in flight just as they had with the 231 loads. The shorter 3 1/2-inch barrel just doesn’t give the bullets enough velocity to stabilize.
Here’s what the targets looked like with the Compact 1911. The left top is the 6.8-grain 231 load, the top right is the 7.0-grain W31 load, and the bottom two are with 8.8 grains of Power Pistol. Accuracy was terrible with all, and like I mentioned above, all loads exhibited tumbling. This is why we test loads. Some work, some work wonderfully well, and some don’t work at all.
Whoa! Things went to hell in a handbasket with the ARX bullets in my Compact 1911.
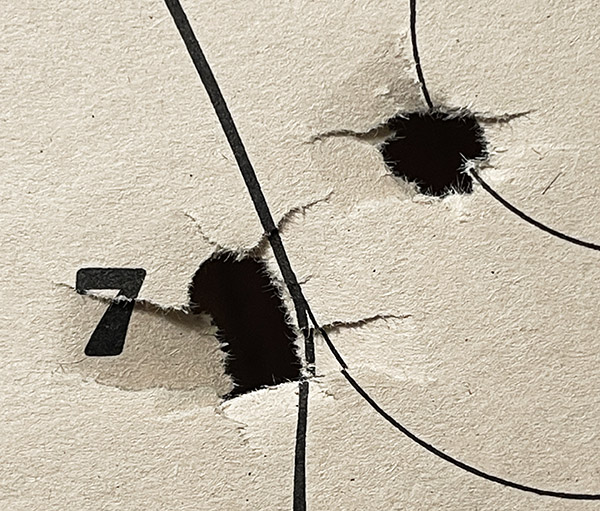
Here’s a closeup of the tumbling. It’s obvious what’s going on here.
The bullets tumbled in flight when fired in the Compact Rock. The lower left shot was flying sideways as it passed through the target.
These bullets need a minimum velocity to stabilize, and the Compact 1911’s shorter barrel isn’t delivering it. Here are the chrono results for the 6.8-grain 231 load (the chrono didn’t pick up a couple of the shots):
Lower velocity = less stability. Things fell apart with the Compact’s shorter barrel.
Here are the results for the 7.0-grain 231 load:
The chrono picked up a round fired by someone else. It didn’t matter; the results were not good at these lower velocities.
I didn’t bother chronographing the Power Pistol load in the Compact when I saw that those were tumbling, too.
It appears that the .45 bullets need something above approximately 1200 fps to stabilize. I’ll probably next test the 7.0-grain 231 load at 25 yards and 50 yards in the Springfield 1911 to see if the bullets are stable at those longer ranges. I don’t know how much velocity they’ll give up as a function of range and I’m not willing to stand downrange with the chrono to catch them as they fly by.