
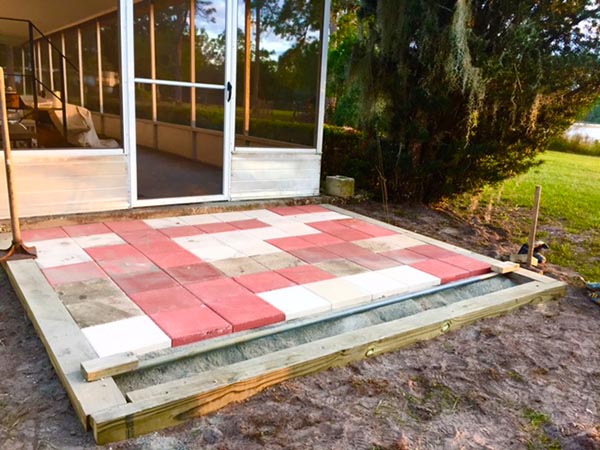
The Rustoration of Zed, my 1975 Kawasaki Z1 900, has once again hove into view. After several months of pouring concrete in Bay 2 of the big metal shed then building a retaining wall to level the back yard and pouring a side patio to slow erosion, the time has come to push Zed a little further down the road.
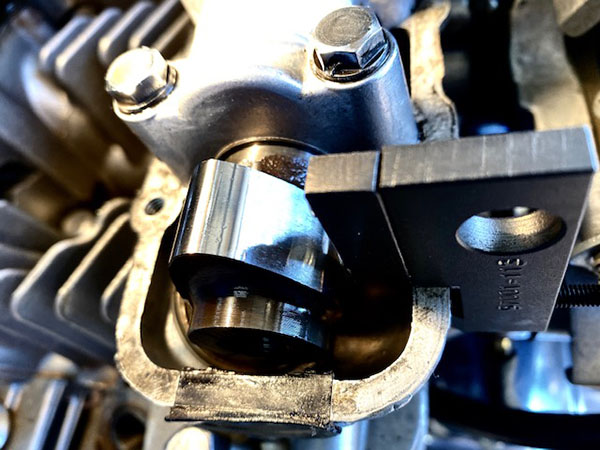
I left Zed somewhat assembled as far as the running gear was concerned. Today we will tackle adjusting the eight valves. You really can’t get an easier engine to work on than the Z1. After measuring the valve gaps and determining which valves need attention (four in my case), the first things you’ll need are a few old 29mm shims to stand in for the shims you are about to remove. These placeholders keep the cam from contacting the valves in an unfriendly way when the engine is rotated to access other valves. I don’t have any extra 29mm shims so I cut some out of a 1/16 bit of aluminum flat stock. These temporary shims can be a much looser fit (thus easier to remove), as you will not be running the engine with them installed.
I bought the correct Kawasaki brand valve shim remover tool online for around $40. There are other style shim tools but this one works well enough and leaves both hands free for the fiddly task of extracting the shim from its holder. I had to grind a little clearance into the tool where it straddles the cast-in tool boss on the Kawasaki’s cylinder head. The tool boss castings were slightly different thicknesses so after grinding it to fit the largest one I had to shim it with a plastic tie-wrap on the smaller castings.
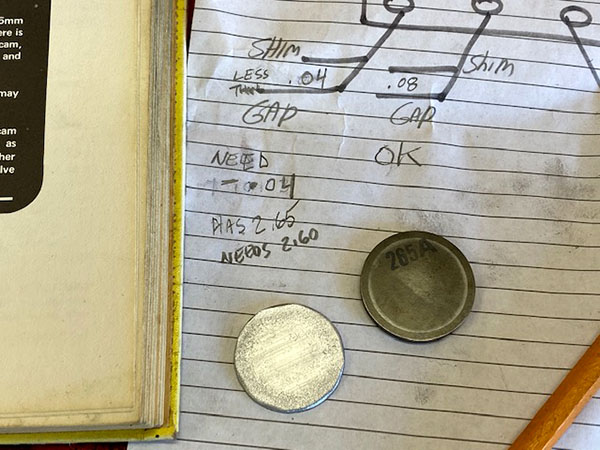
Now that you have measured all the valve clearances and removed the shims on the out-of-spec valves it’s time to play shuffle-shim. The shims are marked in millimeters and if the last guy who set the valves was not an asshole the markings will be readable on the side facing away from the cam. It’s a good idea to measure the shims with a micrometer but I don’t have a metric micrometer and it’s too much math to convert from inches. With my clearances I was able to relocate two shims leaving only two valves to go.
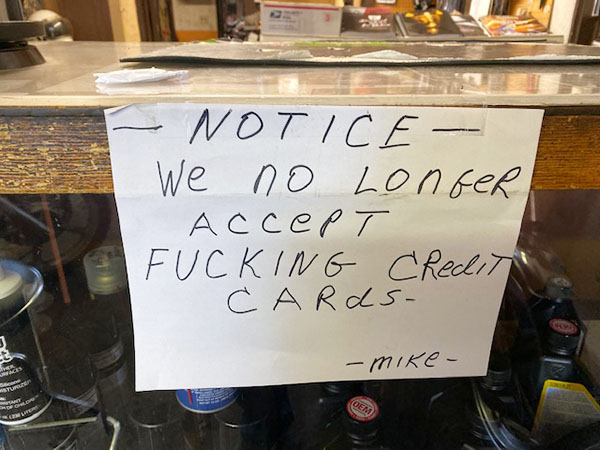
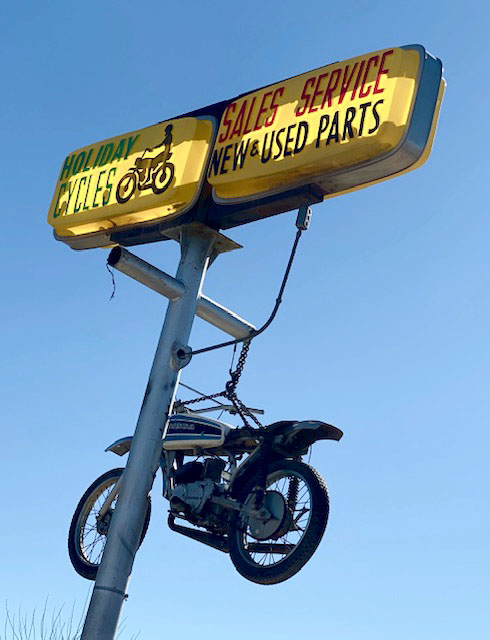
Holiday Cycles is our local Old School cycle shop. There are no dealerships; Holiday is an independent, pan-brand shop. The place looks like its been in business since 1939. I love it. You can see by the credit card sign that these guys don’t put up with bullshit. Holiday Cycles had one of the shims I needed and swapped me for mine. I’m not sure how they are going to make any money like that but I’m cheap so it really tugged at my heartstrings.
Next I went to Dave at the local Kawasaki dealership. Dave had shims but the Z1 is so old the shims were in his storage shed. I had to wait a day to pick up the next shim. I installed the new shims but the 3.00 mm one was too tight. That valve had a 2.95 shim and the gap was at .013 so I couldn’t understand why the 3.00 didn’t bring it down to .008. This is where measuring the shims comes into play. Dave told me that shims can vary a couple thousandths. Add in a bit of wear and it’s a crapshoot as to which replacement shim to get.

Trial and error has been my normal MO since forever so I ordered another 2.95 from Dave except he doesn’t want to go back to the storage unit right now so I am waiting on a call back. Once I get the valves set I’ll run the engine again to flush the carbs with fresh gasoline. Then I can get to work on the gauges and headlight area and try out the new electrical system. I really want to ride this bike before I die.
Read Parts 1 through 15 of the Zed’s Not Dead series!
 Zed’s forward progress has come to a temporary halt. Not due to any complications on the Kawasaki’s part, although the project has exceeded my initial estimate by double and I’m not done yet. No, Pitiful Man has to strike a balance between work and play. He must strive to appease the gods and their fickle ways while angering none. It’s a fine line we walk and sometimes we have to dance atop a vibrating string.
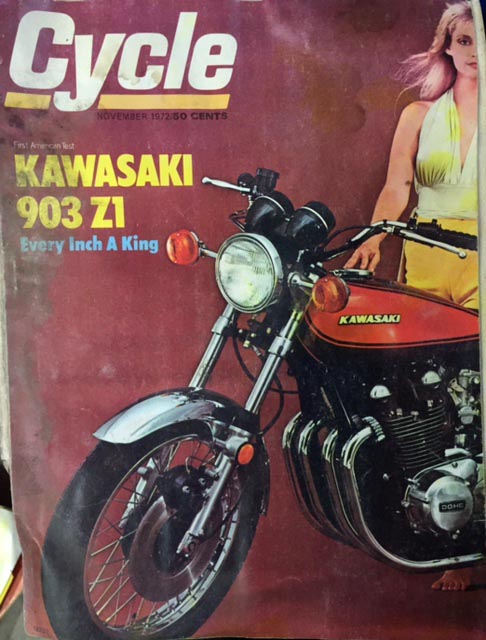
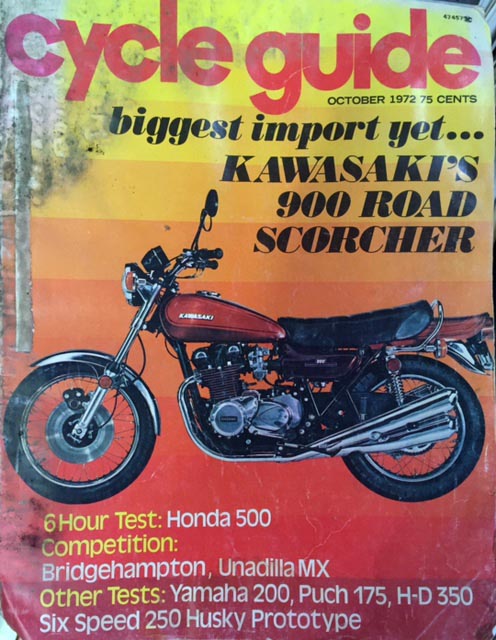 Those faithful Zed’s Not Dead readers that have not deserted me will recall Part One where I describe Zed’s crooked path back and home. After we bought Tinfiny Ranch I discovered a trove of paperwork from Zed’s previous owner. Several motorcycle magazines from the era featuring Zed were in a box along with a possible explanation for the Zed’s wiring issues described elsewhere in this series.
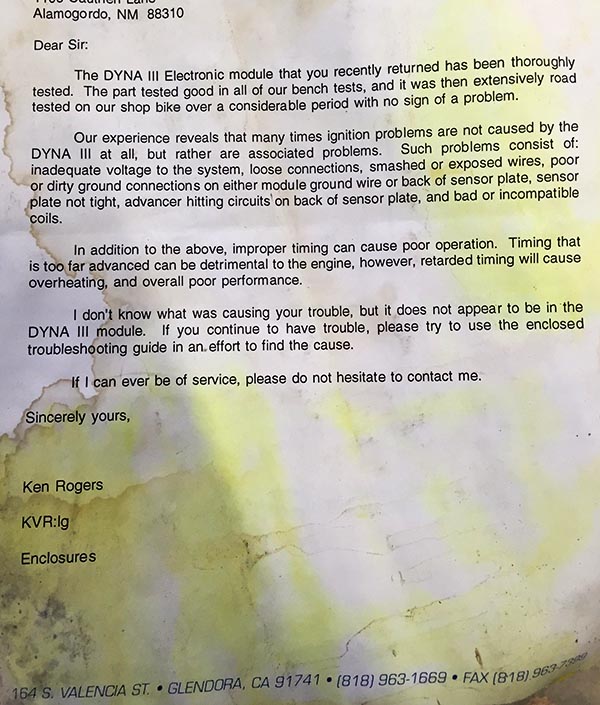 This letter dated August 3rd 1994 from Ken Rogers representing Dyna III ignitions (I’m guessing not the singer) explains to the previous owner how they have thoroughly tested the electronic ignition he sent back and have proclaimed it fit as a fiddle. Zed’s burned-up wiring harness may have been due to a faulty Dyna ignition installation. This would also account for the wiring to the coils being cut as those short bits were spliced into the Dyna module. I never found any of the Dyna stuff in my initial clean up but I haven’t gone through all the old guy’s junk.
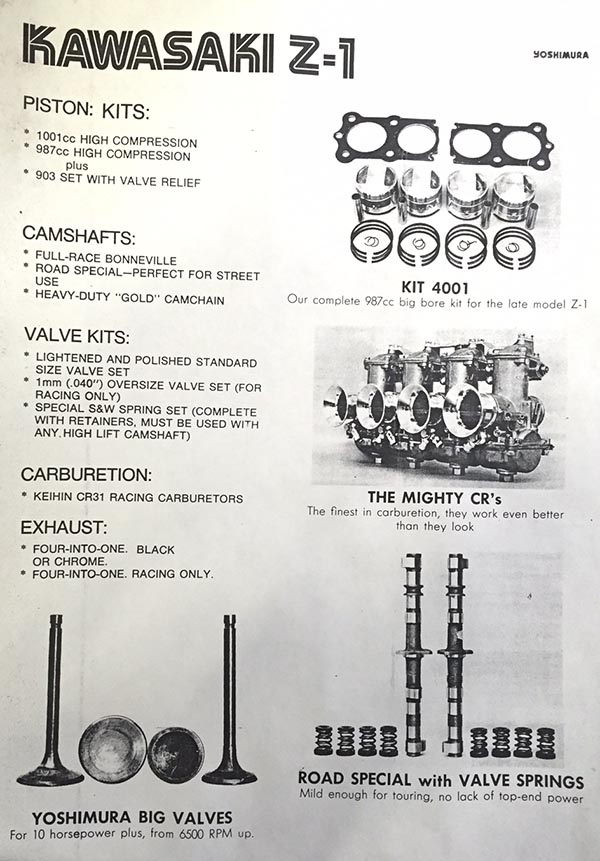
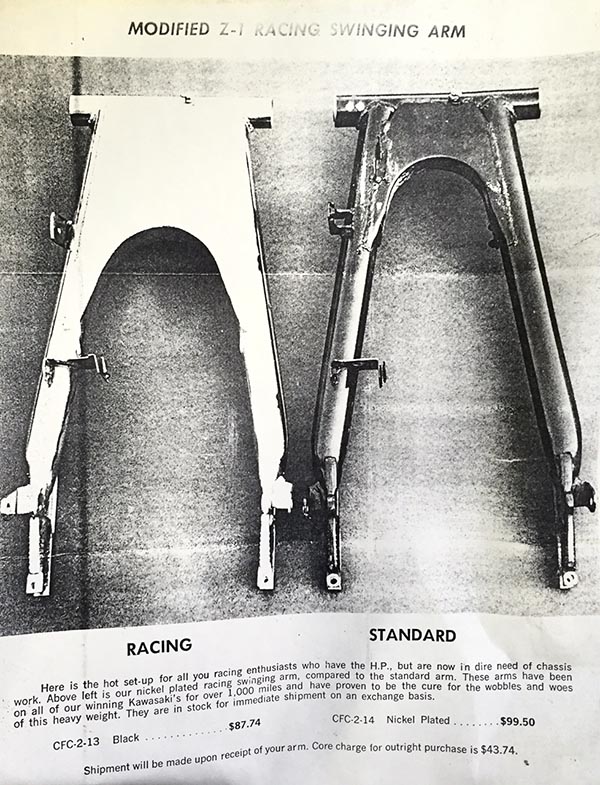 Along with the Dyna stuff there was a lot of Yoshimura brochures and price lists. After seeing the damage to the wiring harness on Zed I’m torn between hoping my bike has some nice performance parts installed and fearing that my bike has some nice performance parts installed. I should be able to measure the cams to see if they have additional lift but I’m not sure how to check displacement without winning an AMA national road race. I suspect the Yoshi stuff was bench dreaming because the bike runs too well to be hot rodded.
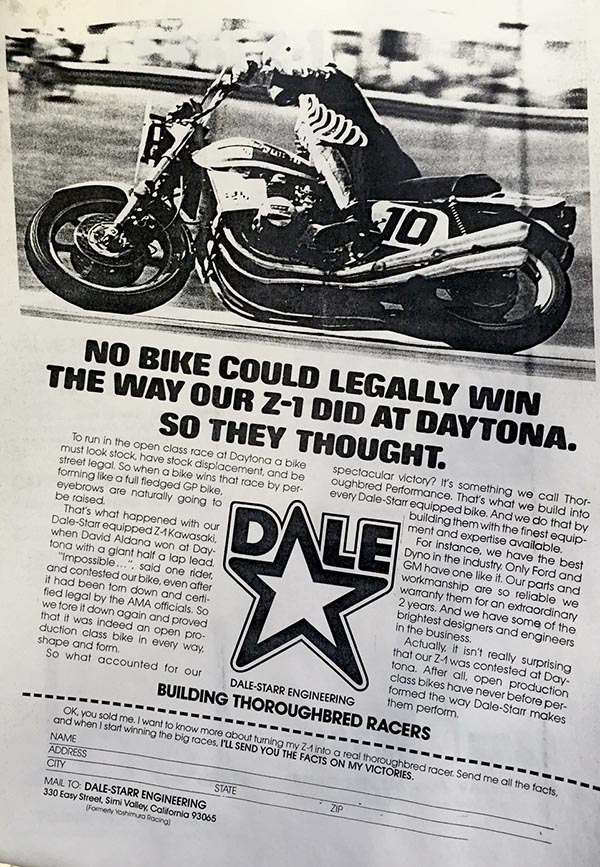 Finally here’s a nice photo from Dale-Starr of David Aldana winning the Daytona superbike race with a half-lap lead over the guy in second place. Apparently this caused protests that required Aldana’s bike to be disassembled twice! The bike was found legal and Aldana’s win stood. I met Aldana at Barberville one year. I was so excited to meet him I started doing the “We’re not worthy!” Wayne’s World bowing thing and Aldena told me to knock it off.
 The positive battery cable was swollen like a snake swallowing a pack rat. I cut the jacket away to reveal a green, copper powder. This is never a good sign and even though the cable will still read ok on an ohmmeter, under high current the flow of electricity will be restricted.
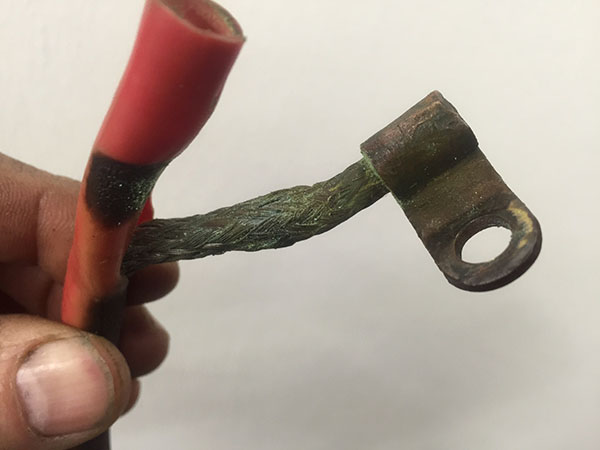 I de-soldered the original battery lugs and re-crimped and soldered a new 6-gauge positive lead. The original battery terminals are shaped to lay flat alongside the battery and you won’t find anything to match them at your local Home Depot. The terminals are solid copper so they clean up and take solder nicely. I also added a new 30-amp, inline fuse holder to replace the melted original.
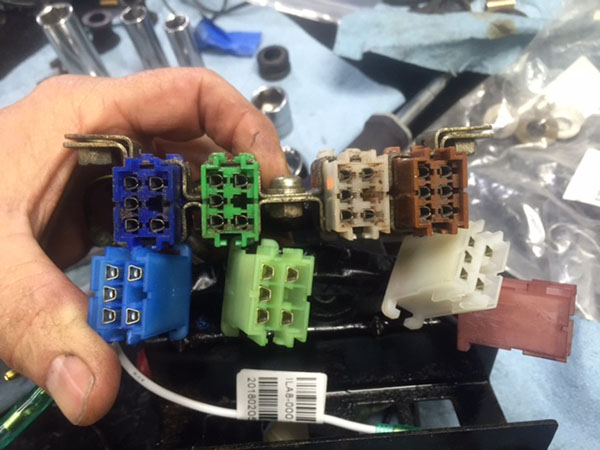
 This 3-way connection is the heart of Zed’s power supply. One lead is to the 20-amp fuse from the battery positive. One lead is charging current from the rectifier and the last lead supplies power to everything on the motorcycle (except the starter). This connection takes a beating and Zed’s was discolored, and overheating had taken the spring out of the female bullet connectors.
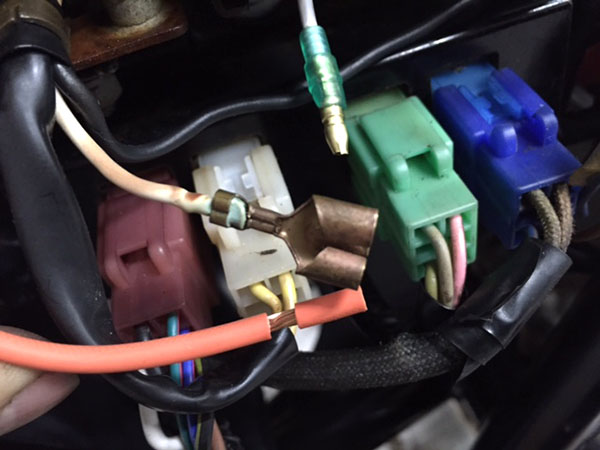 I decided to go off-script here because the three-way connection is one of the few bad design choices Kawasaki made on the Z1. Instead I used 3 soldered ring terminals and bolted the connection together. Then I insulated the connection with electrical tape and thick red heat shrink tubing (not shrunk).
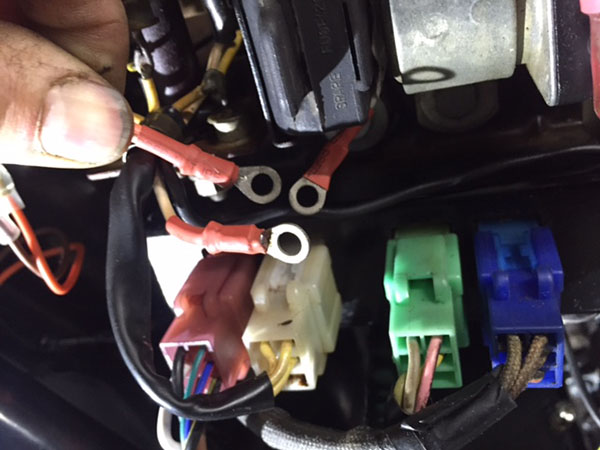 With the new fuse holder, jumper harness, battery cable, grounds to the block, blinker relay, brake light switch and tail harness everything under the right-side cover is complete. It’s not the prettiest wiring and may not faithfully follow original Kawasaki wiring practices but it should work and hopefully not melt down.
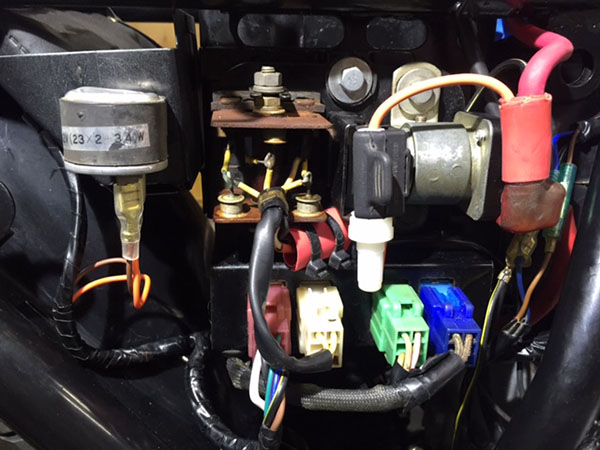 Hardcore Zed’s Not Dead fans will recall the hokey swing arm zerk fitting that was gnawing into my Zen. The main issue is the swing arm is metric thread and I’m too lazy to find a stock metric grease fitting. I pulled the offending fitting and cut the entire top off of the thing then drilled and tapped the part that fits into the swing arm for a ¼-28 zerk fitting.
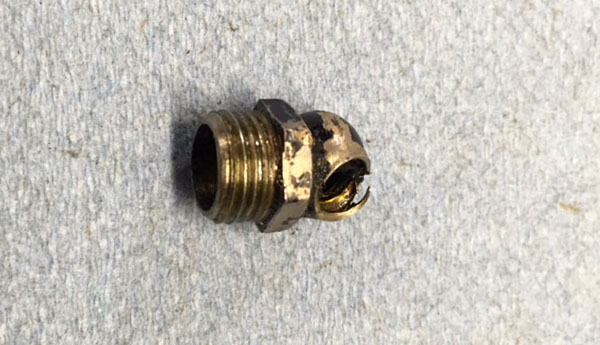 The new set up is much cleaner looking and even though no one will ever see it I’ll sleep better at night knowing it’s there. Oooooommmmmm…
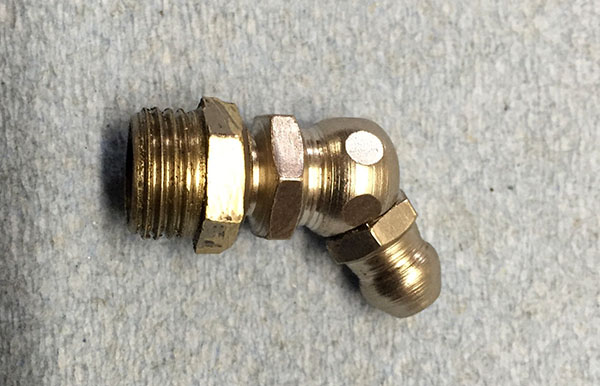 The left handlebar switch cluster was a cluster. The blinker switch was stuck and no amount of WD40 would free the lever so I dismantled the switch and cleaned all the tiny, rusted parts.
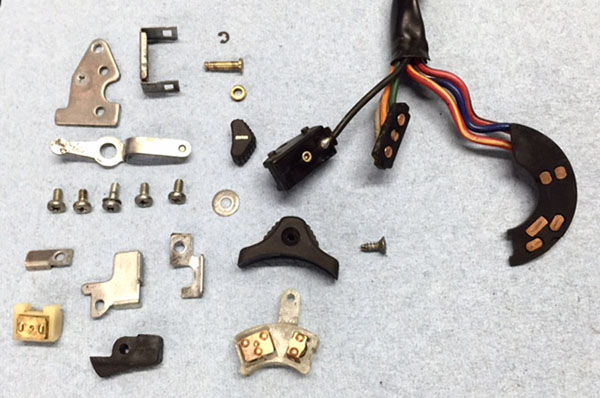 The switch now moves in all the right places. It remains to be seen if it actually directs the electrons where they are supposed to go. The last major electrical challenge on Zed is the instruments and the connections inside the headlight shell. I’ll tackle those in Zed 15.
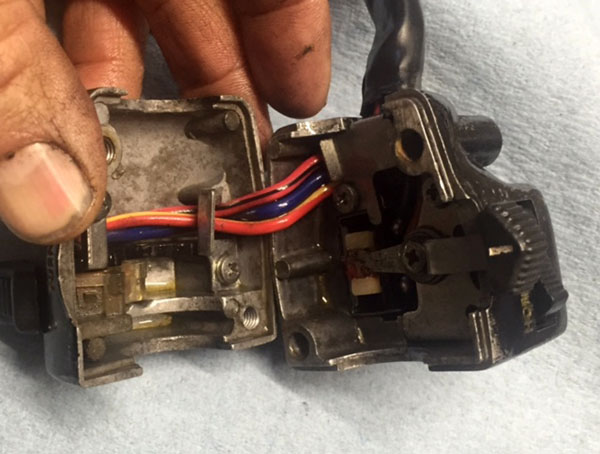
 Until I misted the swing arm, for some reason the transition zone between bare metal and original paint bubbled up making a mess out of the thing. I don’t know what the difference was but after trying to remedy the situation four times I gave up, sanded the swing arm and shot it with primer. The black paint laid down nicely after that but so much for keeping it original-ish.
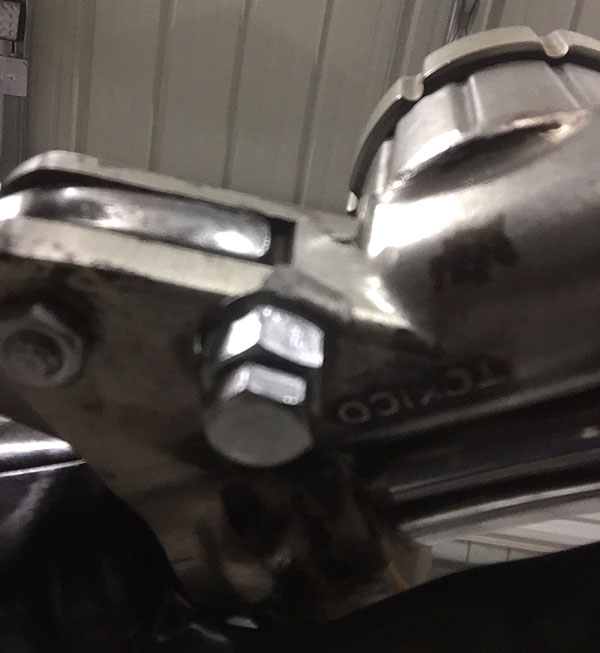 I started on the front brake system and noticed this cool little eccentric bolt that adjusts the free play on the master cylinder. There are so many nice touches like this on the Z1. Kawasaki tried to build the best motorcycle they could. The master cylinder was in good shape. These things are a bear to reassemble but after five tries I managed to get the plunger in the bore along with the c-shaped travel stopper and the snap ring. The only complaint I have against the Z1 Enterprises master cylinder kit is that it didn’t come with the rubber bellows (the part that keeps brake fluid from sloshing in the reservoir) so I’ll have to order that bit.
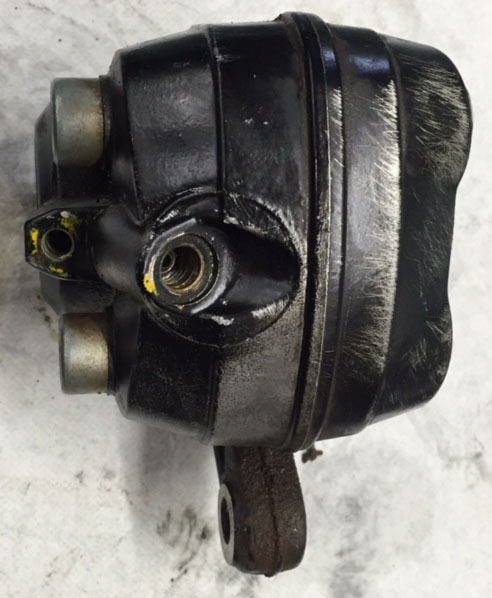 The metal brake line to the caliper was stuck mightily. I tried heat and penetrating oil and even bought a set of metric line wrenches but in the end it took a vise and brute force to remove the line. It’s not destroyed but I’ll be buying a new metal line along with both flexible hoses and the little bracket that holds the line away from the front fender.
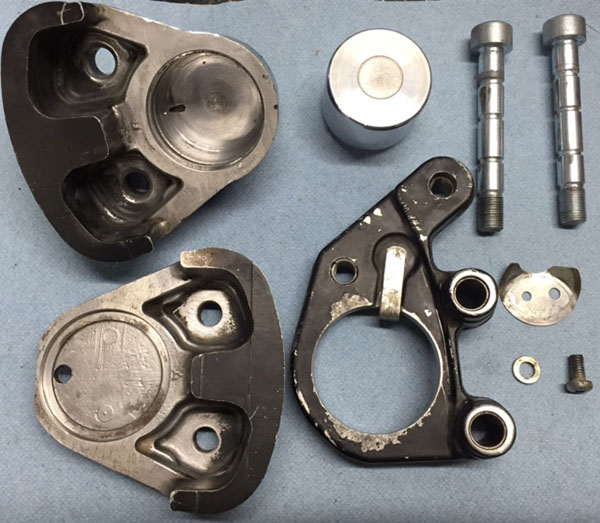 Once apart, the caliper was in excellent condition. I sanded the bore to remove corrosion and the
 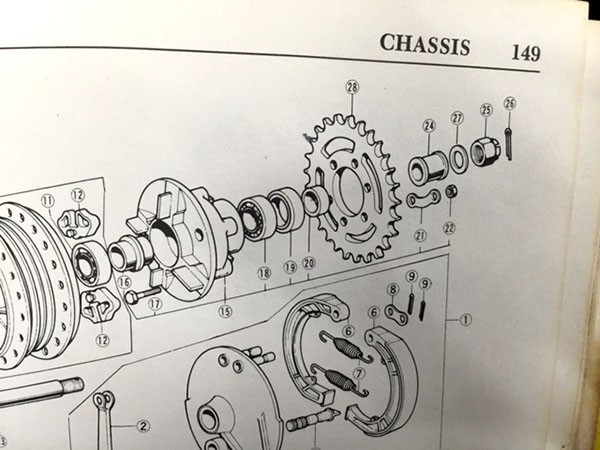 The previous owner had the rear axle assembled wrong and my book was illustrated with the spacers reversed so a quick message to Skip Duke and I had the spacer order correct.
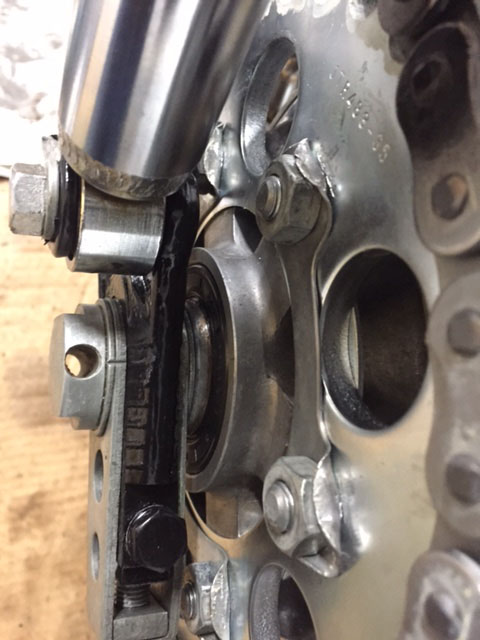
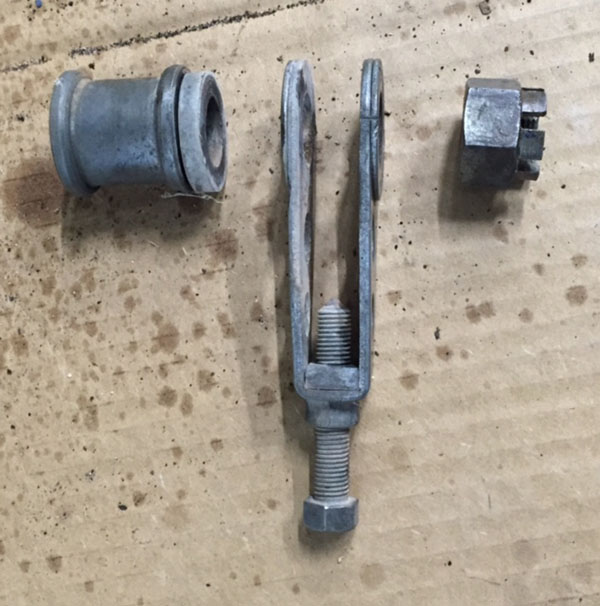
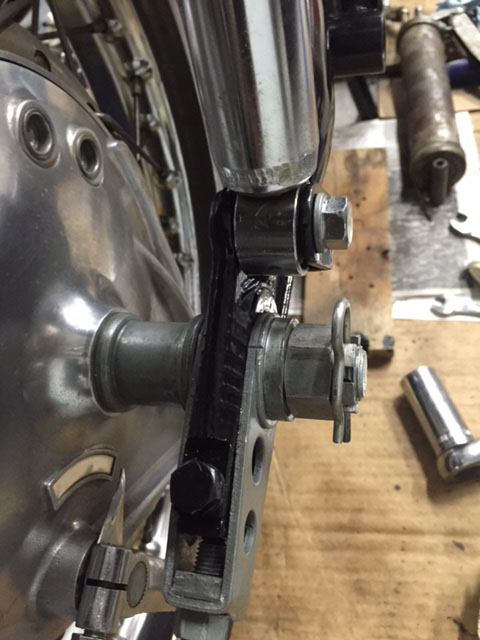 The sprocket side gets only the seal spacer while the drum brake side gets the long, necked-down spacer. The thick washer-spacer (that was jammed into the drum brake side) is actually a washer. It spaces the castle nut the correct distance for the cotter pin or hitch pin hole.
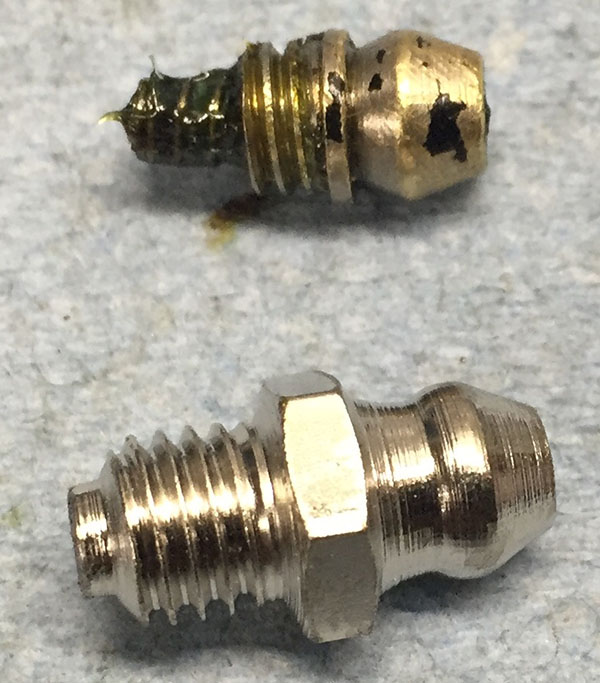 The stock swing arm grease nipple would not accept my grease gun fitting resulting in grease all over the place. In this photo you can see the differences. Rather than get the correct tool I tapped the fitting for a standard nipple and screwed the mess together.
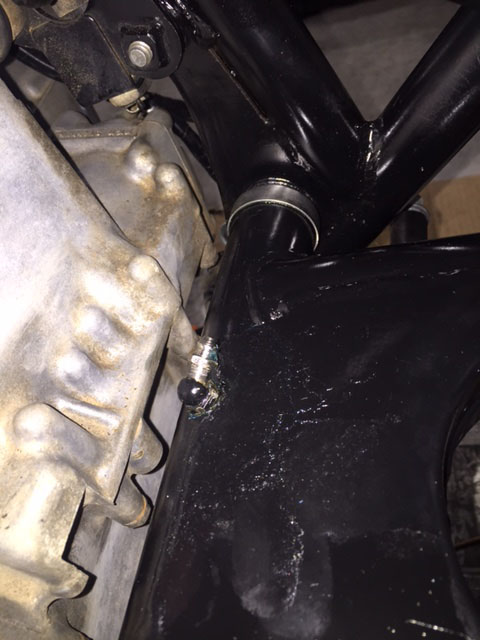 I’m not happy with the grease nipple set up although it did allow me to grease the swing arm. I’m going to remove the fitting and have another go at making it look better.
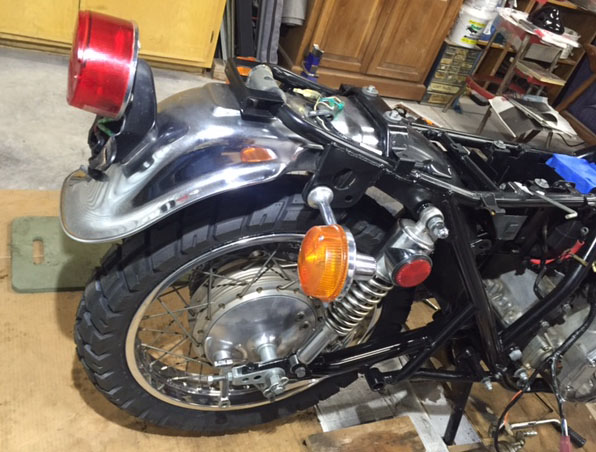 Zed’s rear end is coming along nicely. I think the 4.10X18 tire looks a little puny on the bike so you may get a Smokey burn out video after all. Next tire I get will be a 4.50X18.
 While I’m busting a new tire onto Zed I figured I might as well replace the rear wheel bearings. I could have cleaned them and re-greased them and if I was broke I would have.
 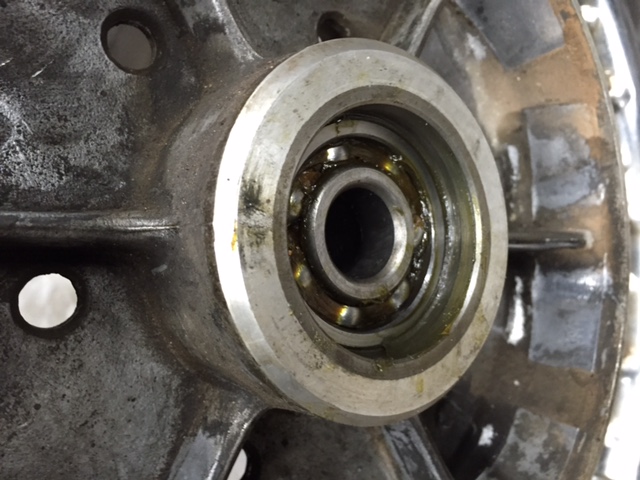 Kawasaki made a nice motorcycle when they built the Z1. Stuff like a brake shoe wear indicator was rare back in the 1970’s. Mama K even went to the trouble of recessing the brake shaft opening to fit a felt dust seal. That’s class, man. I’m not sure it does any good because the brake shoes generate more dust than you’d get kicked up from the street. Maybe it helps the shaft grease stay clean.
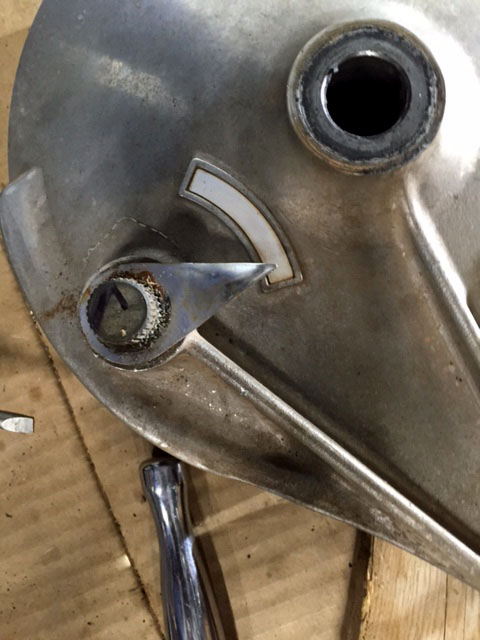 Kawasaki threw everything at the Z1. The sprocket carrier has its own bearing so that gives a total of three rear wheel bearings. Pretty sweet; I wish my Yamaha 360 had a better sprocket carrier design. The hub wears out and I have to feed spring-steel from a ¾-inch tape measure to take up the slack.
 Part of the fun of working on motorcycles is setting up the exploded parts shot. I like to get all the parts clean before reassembly because they will never be cleaned again. Rear discs are mostly standard now but a husky rear drum like this will stop a bike just fine.
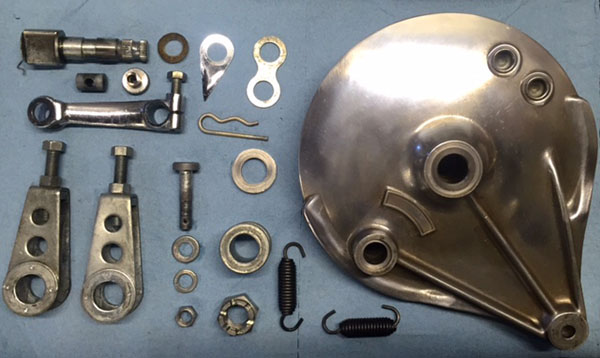 Changing tires is a lot of stress for me. If you don’t plan to use the tube or tire you can cut the work involved in half by cutting the old tire off. Use a razor, utility knife and lube the blade with a little oil. Then plunge in and pull the knife. Don’t saw at it. As you cut move around a little and you will find the thinnest part of the tire. Once you’re there, ride that sucker all the way around. After you do both sides the tread falls away leaving two beads. They pop off easy with no tire to create resistance and you can peel the remains off the rims without a tire iron.
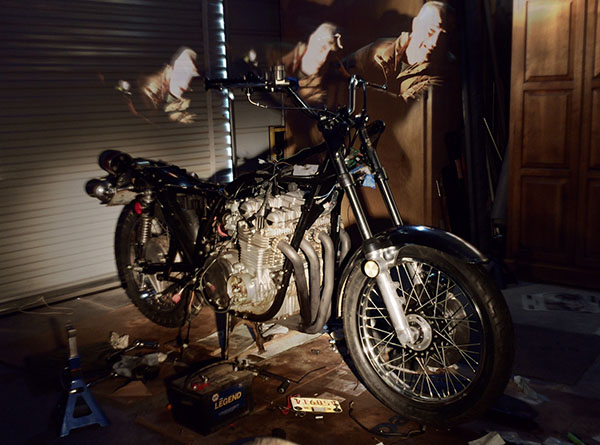
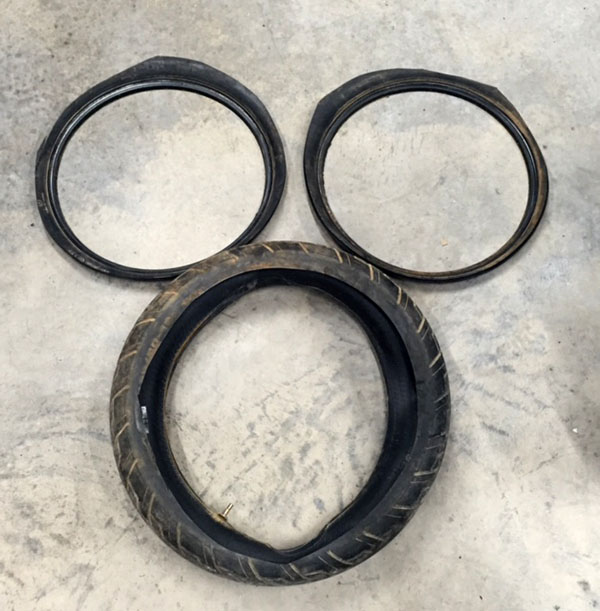 I removed the swingarm to check the bushings and lube the mess. Zed’s battery box is pretty rusty so I removed it to clean and paint the thing. I looked at the rear of the bike and decided there wasn’t much more to take everything off and give the rusty frame tubes a lick of paint. So I did.
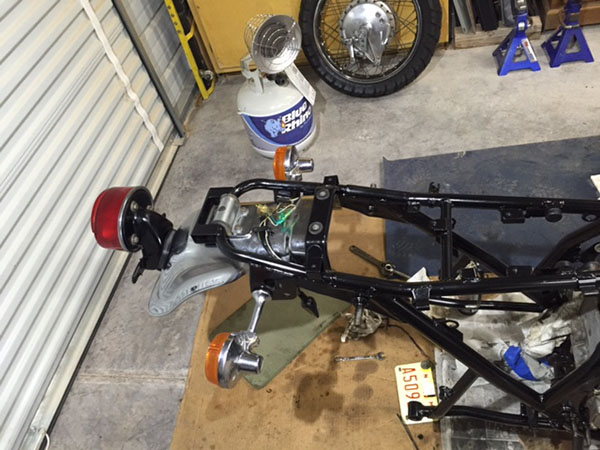 Reassembling the rear of the bike is going well and the
 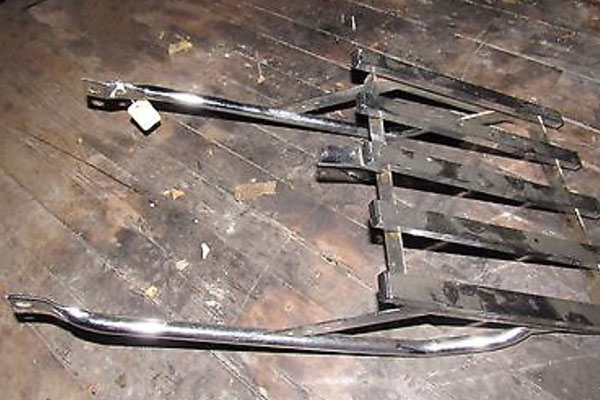 Zed is missing its chrome seat bar and rather than finding a stock replacement I grabbed this $50, period-correct luggage rack from eBay. All my motorcycles have rear racks. I need a place to strap stuff because I get around, you know? I dig the square tubing and the big-hair, 1980’s plastic plugs filling the open ends.
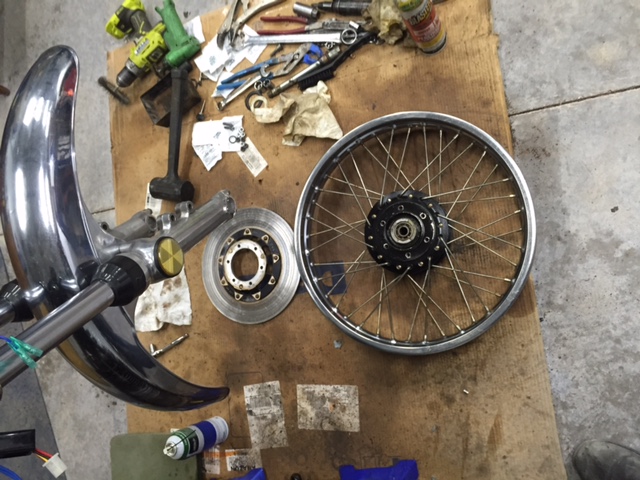 Zed’s 41,000 mile, front wheel bearings are probably stock and I could’ve cleaned them up and re-greased them but a new set is not that expensive so I popped the old ones out and fitted new bearings.
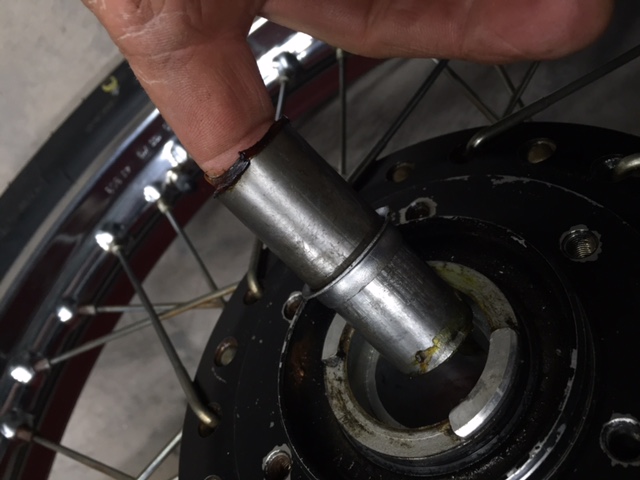 I had an old-ish Dunlop tire in stock. I bought it new to put on Godzilla for a run from Hunter’s place in Oklahoma to Florida and that’s all the miles it has done. I guess I should worry about the rubber aging. In my defense, it’s been stored in a dark trailer and the Fingernail-Probe test reveals a fresh feel to the rubber. Anyway, the Dunlop is about 20 years newer than the tire that came on Zed so I call it a win. No one will believe this but I did install a new tube in the front and managed to get the tire onto the rim without pinching the tube.
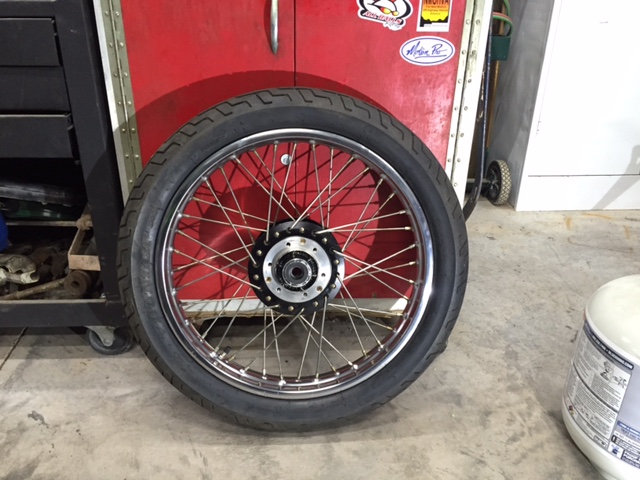 The grease inside the speedometer drive was hardened so I cleared out the muck and squished new grease into the worm drive parts. I also had to swap the disc to the opposite side of the wheel as Zed came with the caliper mounted backwards. They tell me this mod improved handling but I’ll not ride around listening to Z1 experts constantly telling me my brakes are backwards.
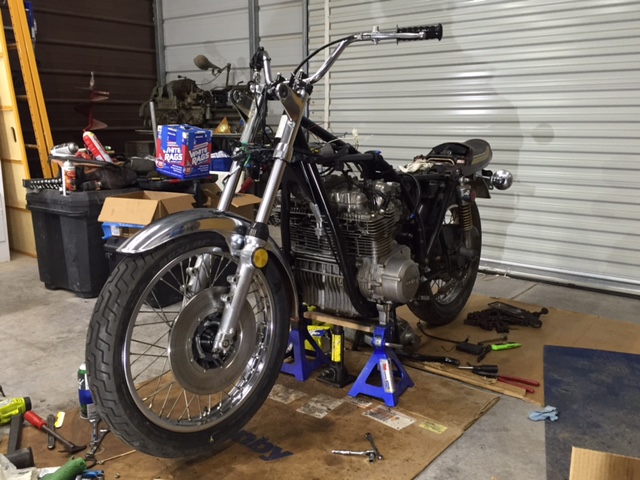 My latest order from
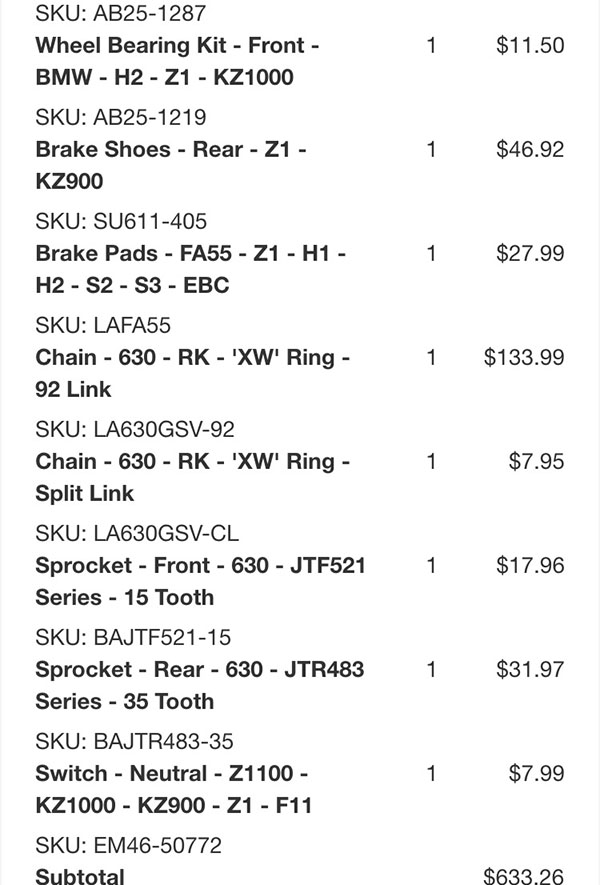
  The most expensive part of the order was the ignition advancer @ $159. My buddy Skip sent me a couple advancers in the hope one would fit but as luck would have it there must be 537 different advancers for the Z1. The left advancer fits the crankshaft bolt (loosely) and looks close from this side but the advancer has timing marks only for cylinders 1 and 4. Also note how close the “T” (top center) and the “F” (ignition fire) marks are. The center advancer unit has all the correct cylinder markings but the bolt hole is too small for the crank bolt. This unit also has “F” and “T” close together.
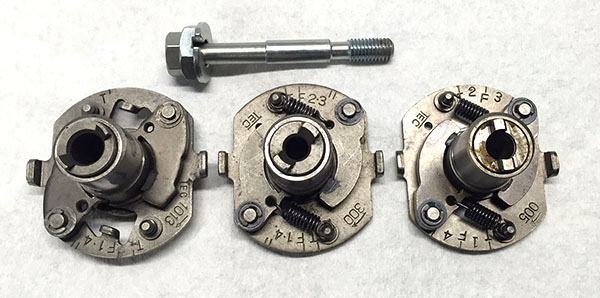 Moving to the backside of the three advancers we see that the left unit has a cup that prevents the advancer from sitting flush onto Zed’s crankshaft end. The middle unit will marry to the crank ok but note the slight degree angle difference on the locator-pin hole. Finally the new unit, like the bear’s soup, is just right.
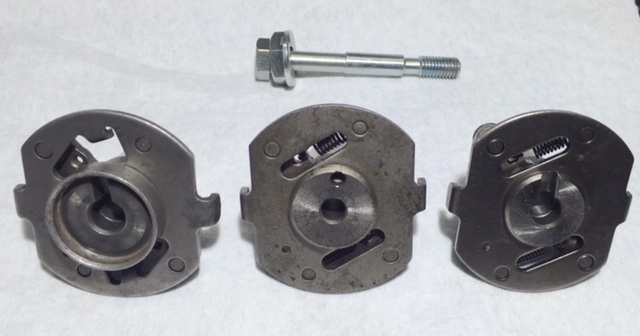 To attach the points plate I had to shorten 3 screws. The best way I’ve found to do this is to run a nut onto the screw, cut the screw, grind the screw making the grinding wheel cut towards the center of the screw (or dragging the metal away from the threads). Removing the nut will clean any swarf left in the threads. The nut should start back on the screw without problems, if not, I’ll clean the screw up some more with the grinder.
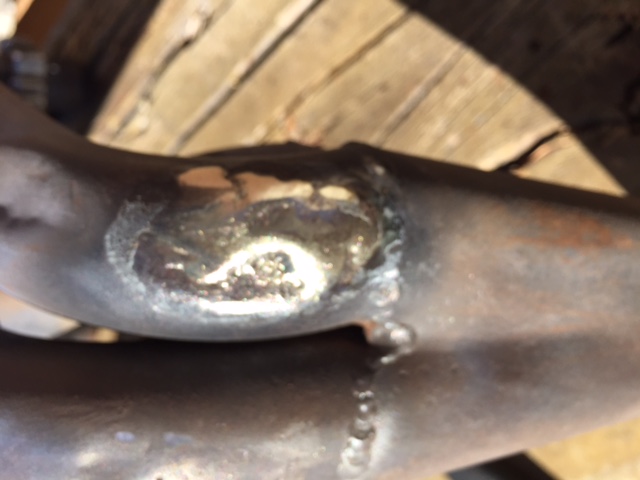
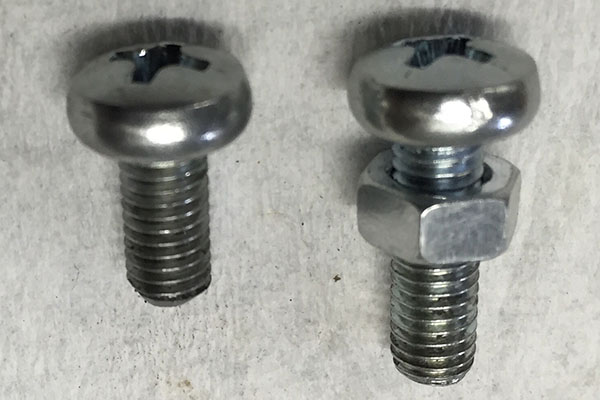 Zed’s exhaust system hangs low and as such has hit the ground frequently enough to create pinholes. When pipe gets this thin I prefer to braze the holes closed. The brazing rod requires less heat and leaves a nice, thick pad to give a dirt rider something to beat on.
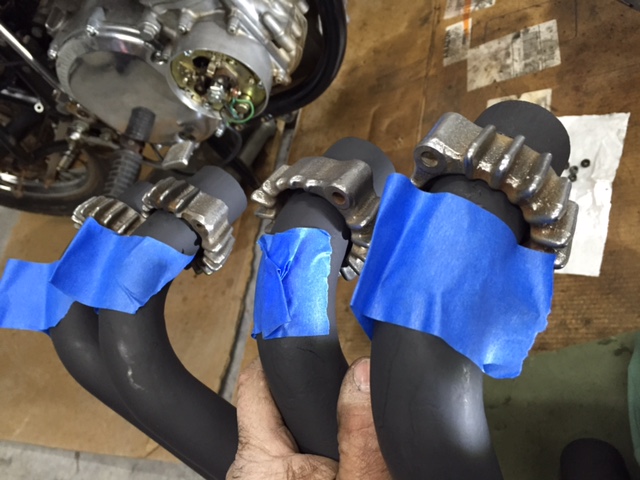
 Finally, when I fit the exhaust headers I tape around the frame tubes to help prevent scratches. I also tape the headers to keep the exhaust collars from falling down the pipe scarring up the new paintwork.
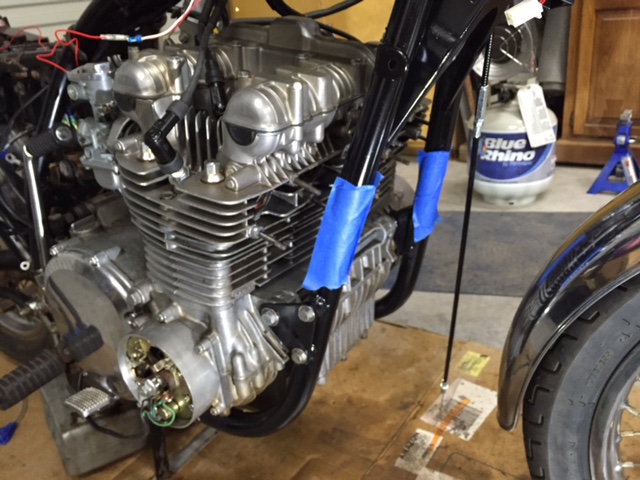
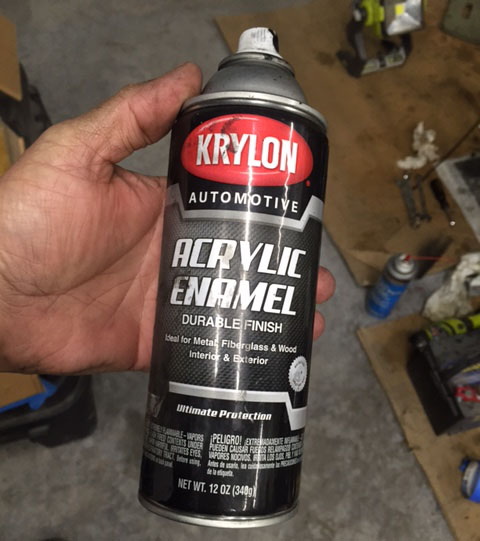
 This is not a restoration. This is a resurrection. I plan to ride Zed, not store it away like a stolen Rembrandt. The front down tubes were pretty chipped and scratched with lots of bare metal so I had to fog a little black paint onto them to slow down the rust. I know all things rust. As soon as ore is melted into steel it begins the long path back to earth. We live in a temporary world; as soon as we stop our struggles and ambitions the things we care about turn into dust. So I painted the Kawasaki’s down tubes.
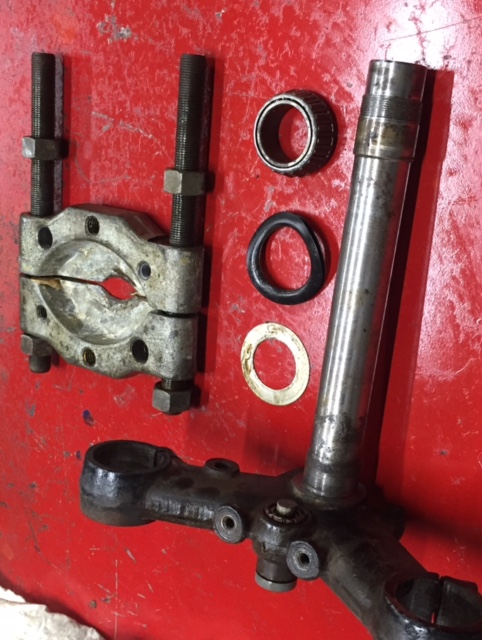
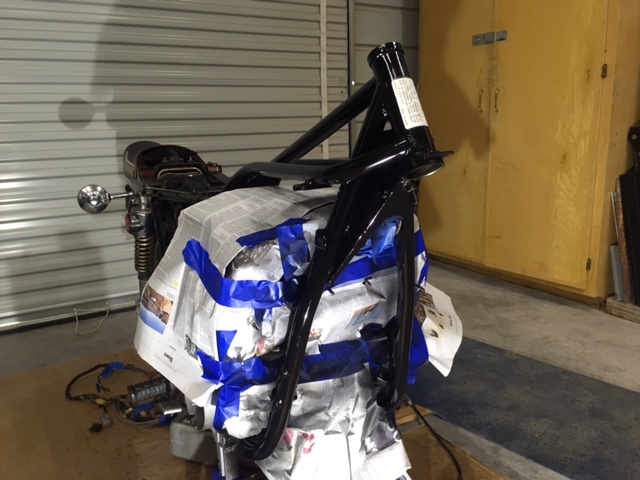 Next on my list were new steering head bearings. I have a Proto puller set that cost around $150 in 1970 and it mostly is still intact. From that kit I used the bearing separator to get behind the lower stem bearing. I clamped the stem in the vise and a few sharp raps later the bearing was off.
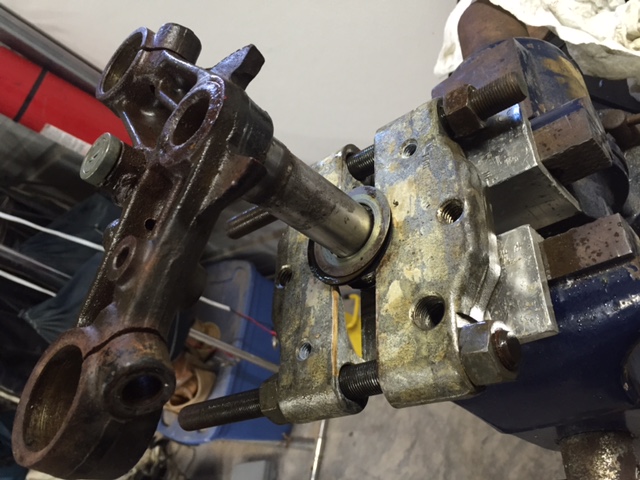
 Removing the races pressed into the fork stem is a little harder. There isn’t a whole lot of meat exposed to get a purchase. Some people weld a bead on the race then use that to punch the race out. I’m sure there’s a correct way but I don’t know it so I use two puller claws and force them against each other to wedge the puller tips behind the race. Since you have to hold the claws together with one hand you’ll need a length of old bronze boat shaft to pound on the claws. Most Old Boat Shaft stores carry lengths of bronze shaft. It’s finding the store that’s the hard part.
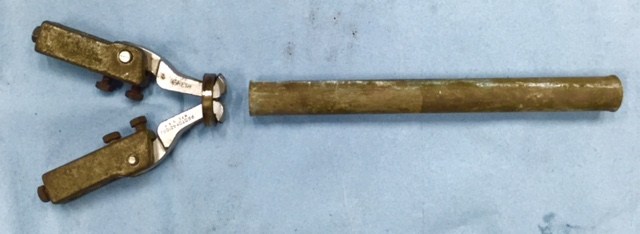 The new races pop in without trouble. I get them started with a dead blow hammer then finish seating them with a punch worked slowly around the circumference of the race. You can hear the hammer-tone change pitch when the race seats against the frame tube.
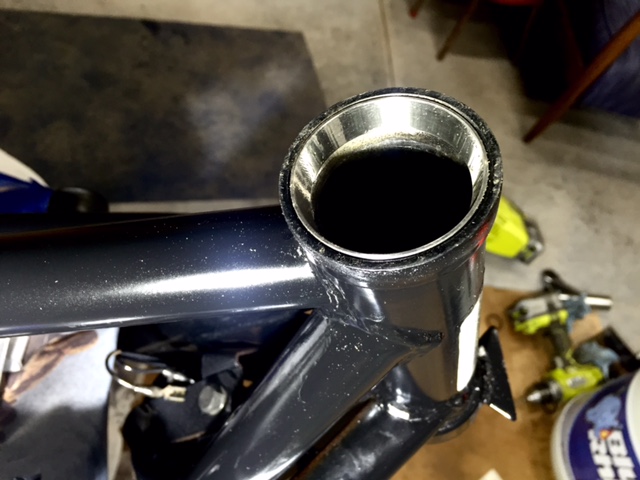 The triple clamps were a mess so I wire brushed them and shot some black paint on the things. I’m always aware that any paint work or cleaning I do destroys the originality of the bike so I try to keep it to a minimum. While the headlight ears were soaking in a vat of Evapo-rust I started assembling the forks.
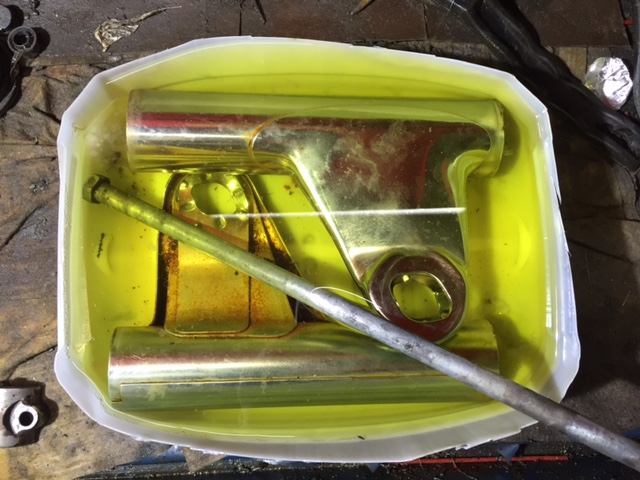 A new throttle/switch assembly from
 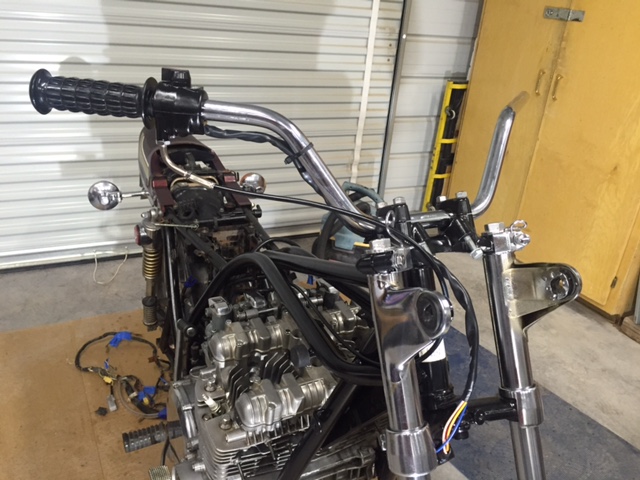 I’m close to $1000 in parts now. I’m replacing some wear items so I don’t think those should count against Zed.
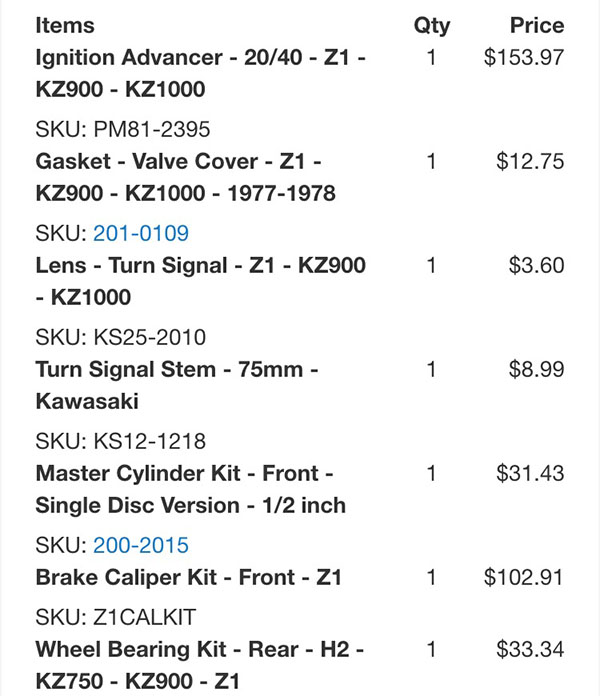
 Progress has slowed on Zed. I really wanted to start the beast up. The problem is I haven’t figured out the ignition advancer issue yet. My E-buddy Skip sent me two of the things but neither one will work on the 1975 Z1 crankshaft end. I feel bad that Skip is trying to do me a favor and that the poor guy has to keep digging around in his parts stash. It goes to show you: no good deed goes unpunished. I am going to suck it up and buy a new, $159 advancer from
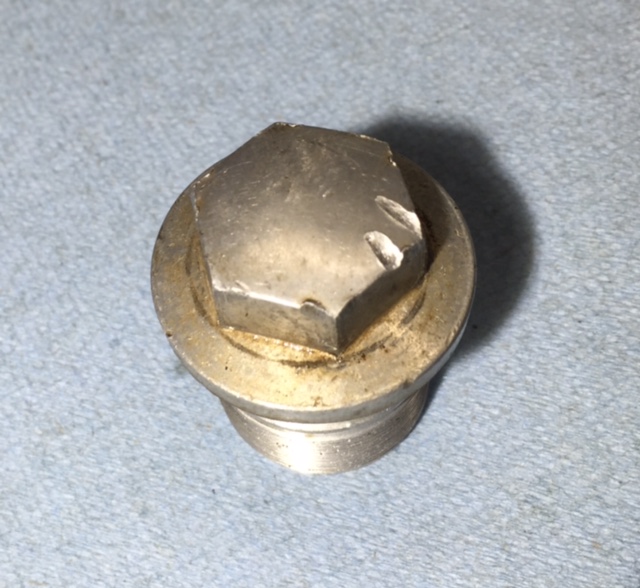
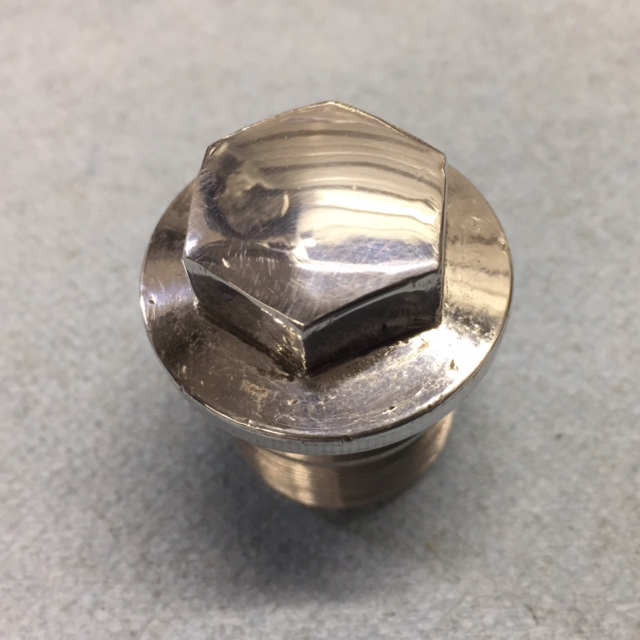 Meanwhile, I’m not ignoring the rest of the bike. Let’s face it, even if the engine is shot I have to get this bike running. The front forks were leaking and contained about 3 ounces of oil between both fork legs. This is down a bit from the 5.7 ounces per leg suggested in my shop manual. I know I said this was not going to be a show bike restoration but I couldn’t bear a future staring at this gouged fork cap bolt so I sanded the thing smooth and gave it a lick of polish. Of course this means that I have to do the other side also.
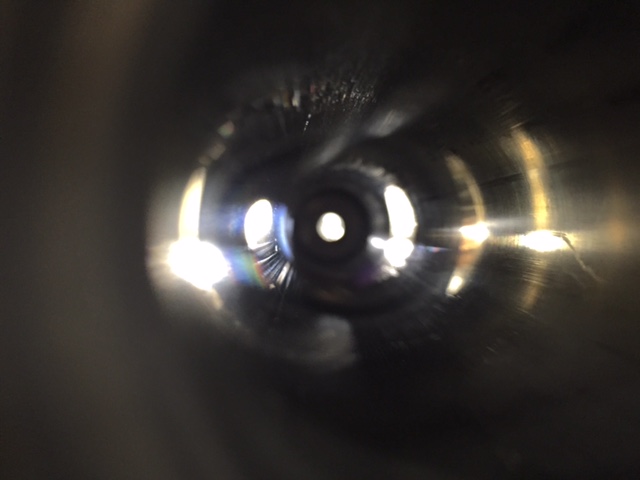 The internals of the forks were covered in sticky black goo, which required a ton of solvent and liberal doses of carb cleaner to cut loose. Then came rags stuffed down the tubes and pushed back and forth using a drill bit extension. The sliders came polished from the factory and since they were preserved under a coat of oil it took no time at all to spiff them up without crossing over to the dreaded Show Bike threshold.
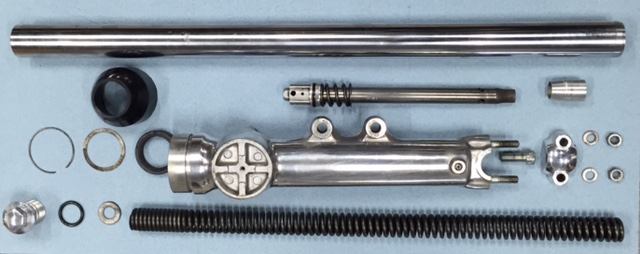 All the fork parts look usable if not perfect. The upper section of the fork tubes that were covered by the headlight brackets is pretty rusty. I’ve polished it off a bit and will lube the rusty areas to prevent further rust. None of the rust will show on the assembled forks but I’ll have to deduct points when the bike is in the Pebble Beach show.
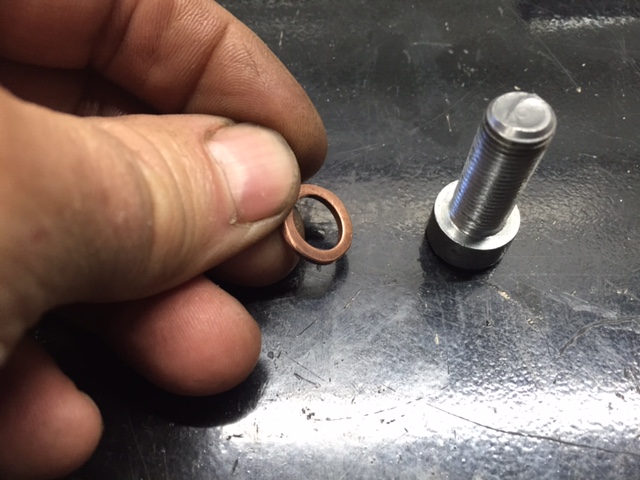 The fork sliders are held to the damping rod via this Allen-head bolt. There was a fiber washer to seal in the fork oil but I don’t have any fiber washers. I ended up grinding a copper washer to fit and I only have one of those. Looks like a trip to Harbor Freight is in order to buy their 5090 Copper Washer Warehouse kit.
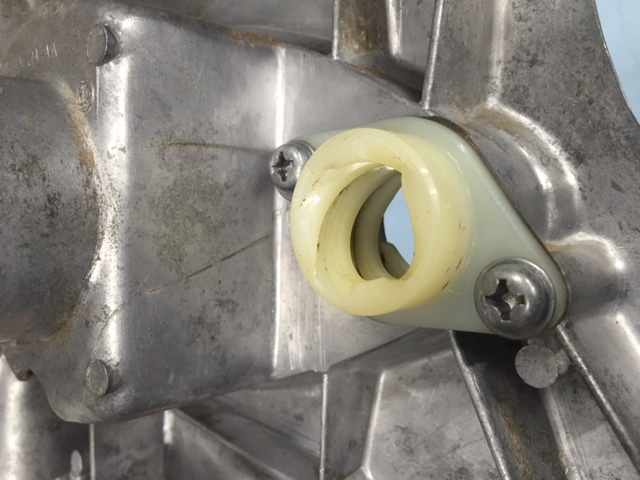 The clutch actuator was in good shape but dirty and dry. Most of the ones I bought for my old Yamaha had the helix cracked. I suffered along with the cracked helix until Hunter found a new, re-pop part and sent it to me, asking if he could have some of the ones I’d stolen from him in exchange. I have no idea what the old man is on about. This Kawasaki part is much sturdier than the Yamaha part and crack free so that’s one point to Kawasaki in the red-hot clutch actuator wars.
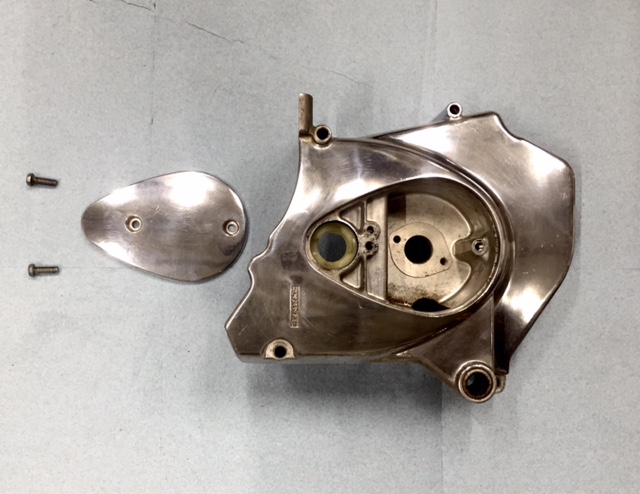 I’m placing another big order with
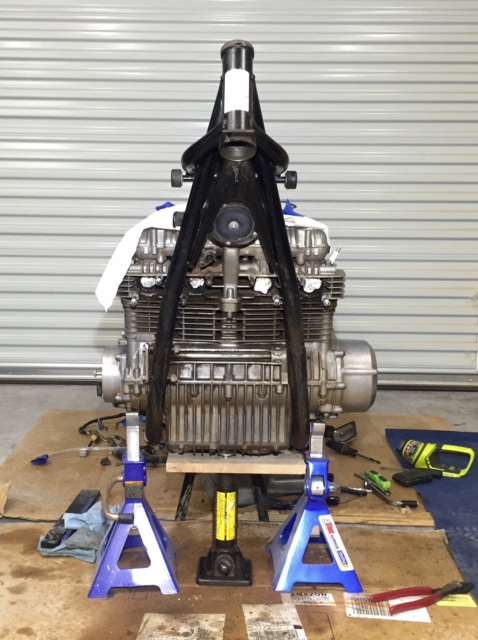
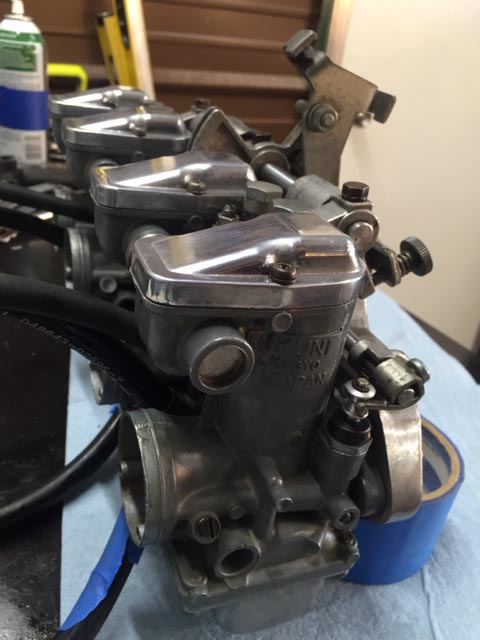
 After trimming some rubber flashing where the brass manifold vacuum ports enter the new rubber manifolds I managed to get them installed without stripping any more 6mm screws. The manifold clamps are soaking in Evapo-rust as we type.
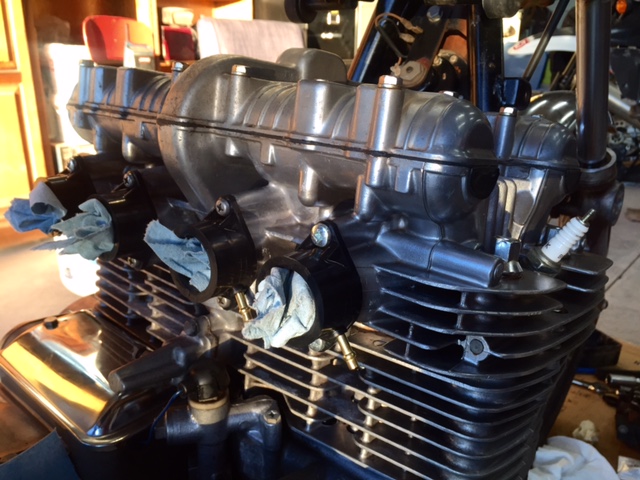
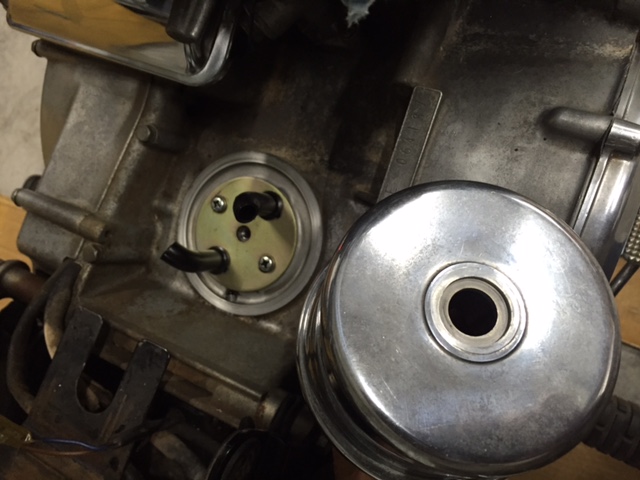 Next I checked the valve adjustment because I’ll be starting the beast soon and I don’t want to fight the system if the valves are way out of adjustment. Before removing the valve cover I marked the front in case it matters.
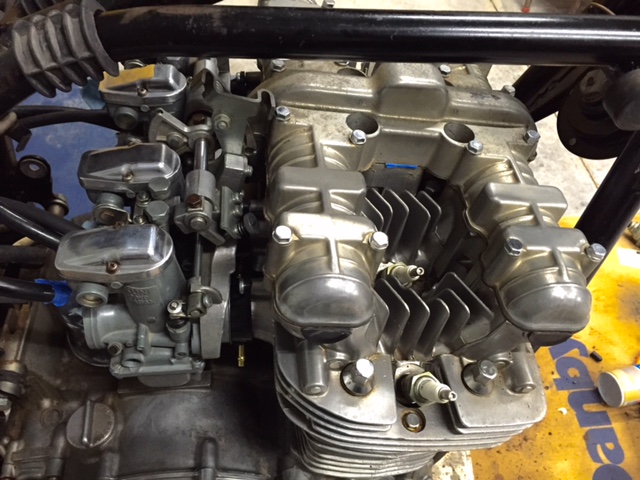
 The cams and valve shims look unworn. This bike shows 41,000 miles on the odometer! If this were a Honda the cam lobes would be galled. I know this because almost every Honda I’ve owned galled its cam lobes.
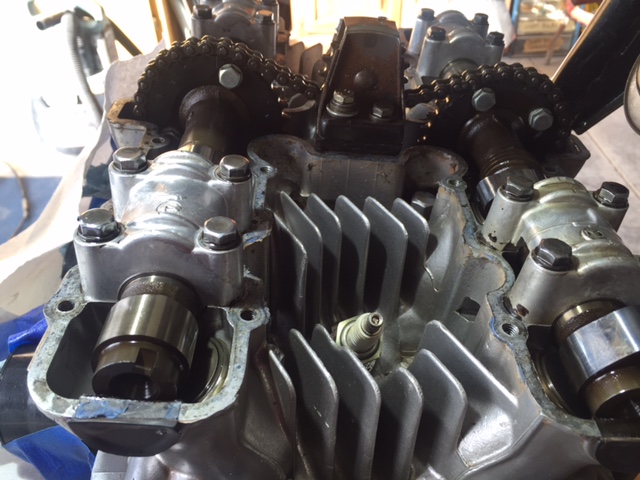 The valves are close enough to start the engine, two are on the tight side and two are on the loose side. Four valves are within spec. I’ll recheck everything after starting the engine in case a chunk of carbon or a mouse paw is affecting these readings.
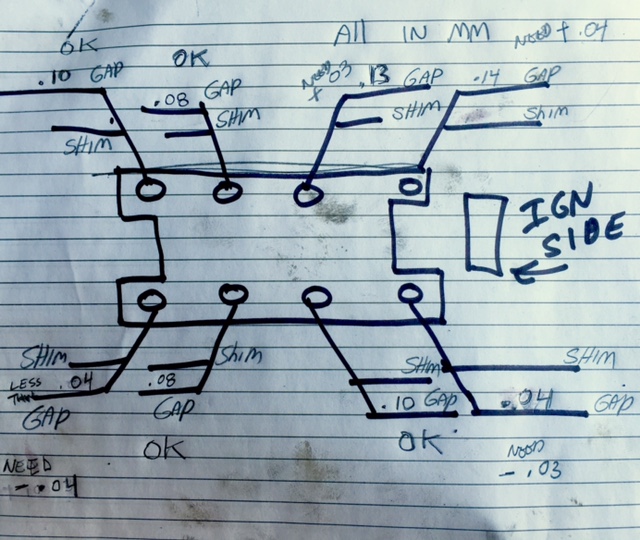 Zed’s clutch cable is in bad shape so I removed the clutch actuator housing/sprocket cover for replacement and cleaning/lube/adjustment. Inside I found the neutral light indicator switch broken off. I don’t think a ton of oil would have spewed out as the hole is not pressurized but it most likely would have leaked.
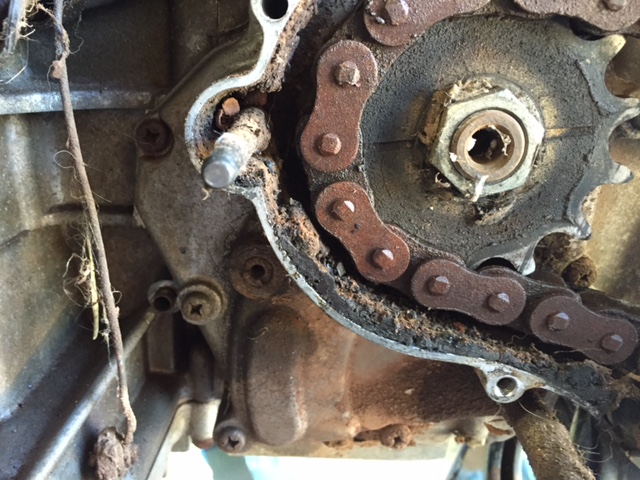 Zed appears to be going backwards but trust me she’s making progress. With the front of the bike jacked up you couldn’t miss the loose steering head bearings. Rather than just tighten them I took the forks apart to re-grease them. Much like removing the sprocket cover it’s a good thing I did. The top bearing looks fine but the bottom is pretty rusty. I’ve cleaned this mess up and in a pinch the bottom bearing, while pitted, could be used again but I’ll order new bearings. I’m in no mood to take the front apart again.
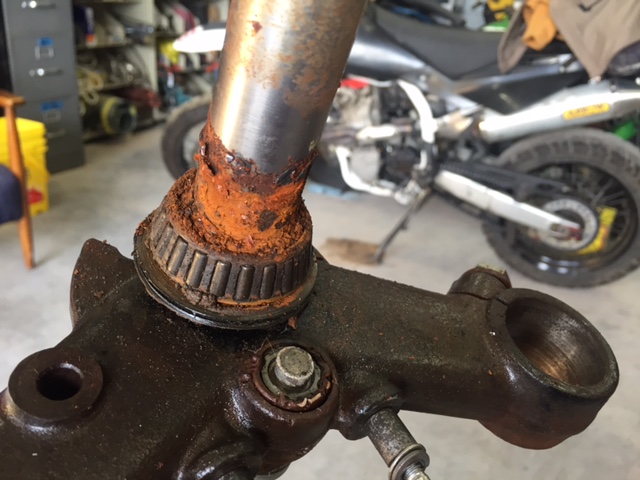 Zed’s fork seals were leaking. Another stroke of luck as the oil kept the lower section of the fork tubes from rusting. Under the headlamp ears the rust is worse. I’ll clean it off and coat that section with grease when I reassemble the forks. You’ll never see it. I’ve started cleaning the fork legs in preparation for disassembly. You probably already know this but remember to loosen the big bolt on top of the fork tube before removing the tubes and loosen the allen-head bolt on the bottom of the fork sliders (under the axle boss) before removing that big top bolt.
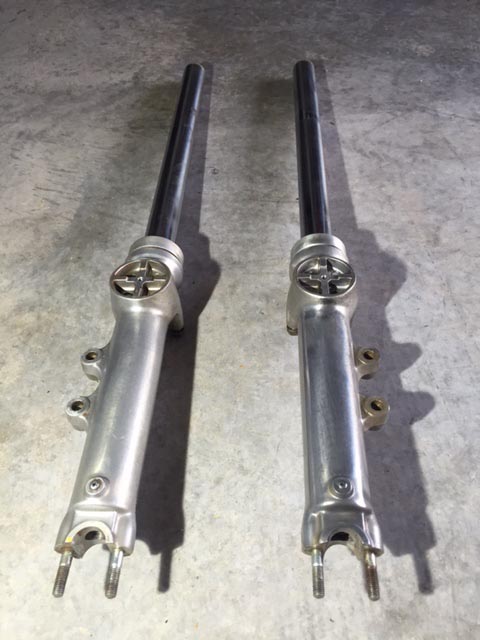 My buddy Skip sent what we hope is the correct spark advancer unit so Zed should have everything it needs to start soon. I’m a little concerned that I can only find first gear and neutral in the transmission. Hopefully, once the engine starts and oil is slung around the gearbox will shift.