An Enfield Oil Change

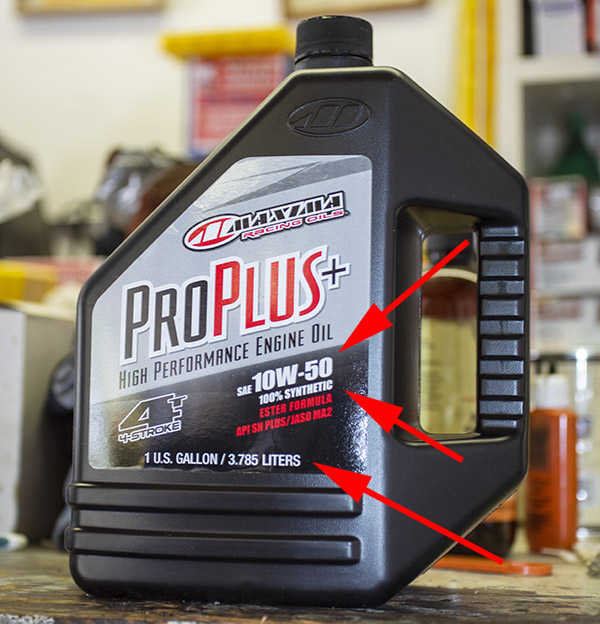
This blog is a maintenance tutorial on changing the Royal Enfield 650 Interceptor’s oil.  The Interceptor requires a motorcycle-specific 10W-50 synthetic oil.  Motorcycle-specific means that no friction reduction additives are in the oil.  If you use an automotive oil with friction reducers, the Enfield’s wet clutch will slip.

I bought Maxima oil online for this oil change (you can get it from CSC Motorcycles or from Amazon.com).  It’s the synthetic oil CSC uses in their motorcycles and it served me well in my RX3 and TT 250 (both of which are wet clutch motorcycles).
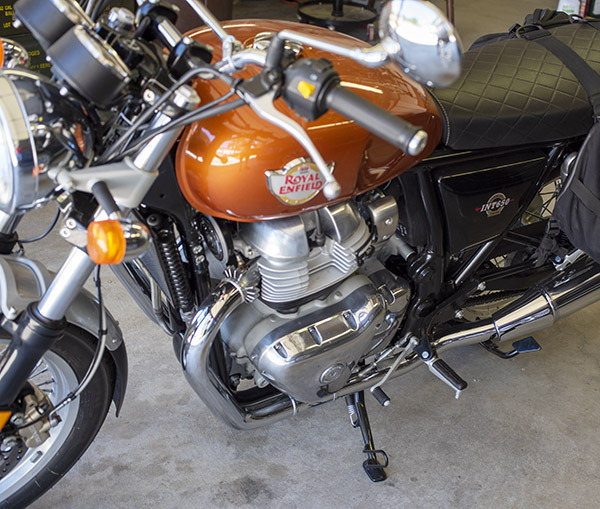
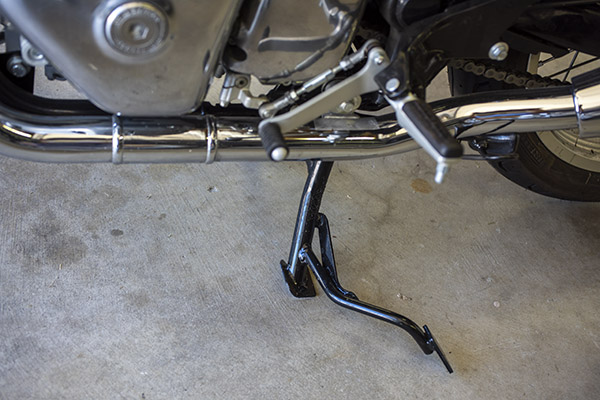
I changed the Enfield’s oil in my garage.  I usually leave the Enfield on its sidestand, but I put it on the centerstand for the oil change.
The bike should be straight and level for the oil change.  This will let the oil drain more completely and make the oil site glass reading more accurate.
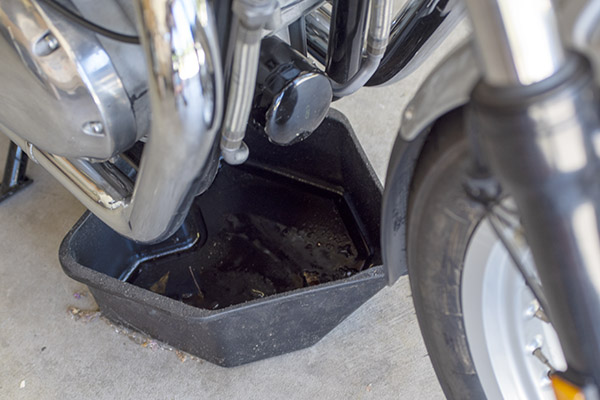
I have an oil drain pan I’ve used for years, and it was put into service again for this Enfield oil change.  You can see the oil filter in the photo below; it mounts on the front center of the engine.
Removing the oil filter for the first oil change was a challenge.  It was put on way too tight at the factory.  I have an accumulation of oddball tools in my rollaround tool cabinet, and I found this oil filter wrench.  I have no idea when I bought it or where.  It’s been with me for decades.
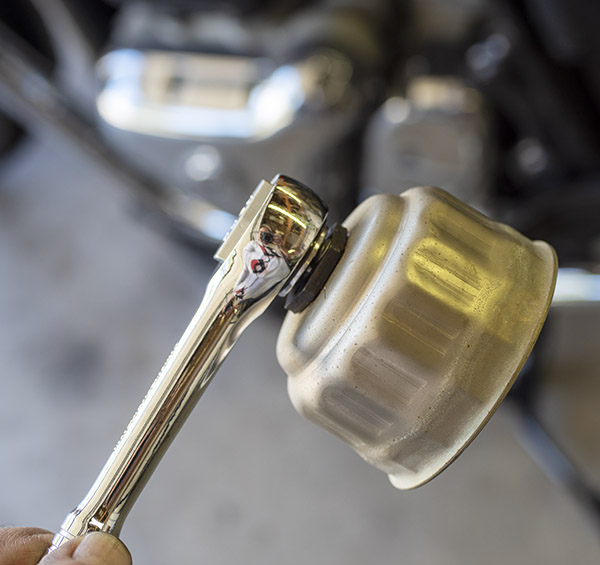
Even with the oil filter wrench, getting the oil filter to unscrew was not easy.
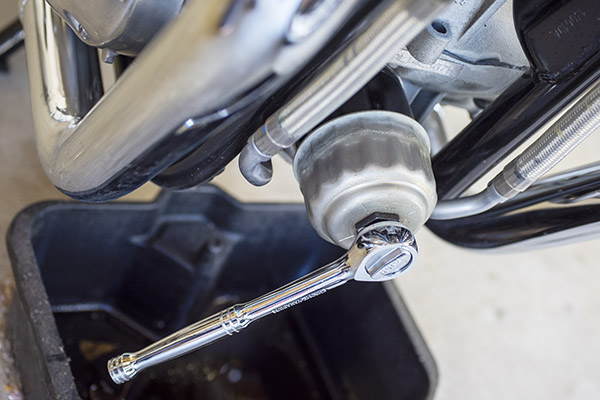
The oil filter finally came off, and I allowed the oil to drain into the pan.
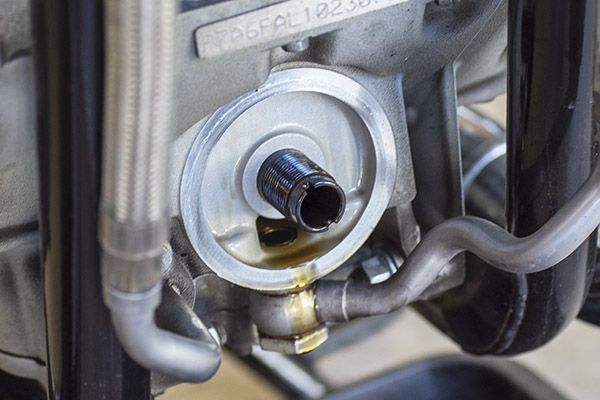
The oil drain plug is just to the right and below the oil filter mount (as you face the engine from the front).
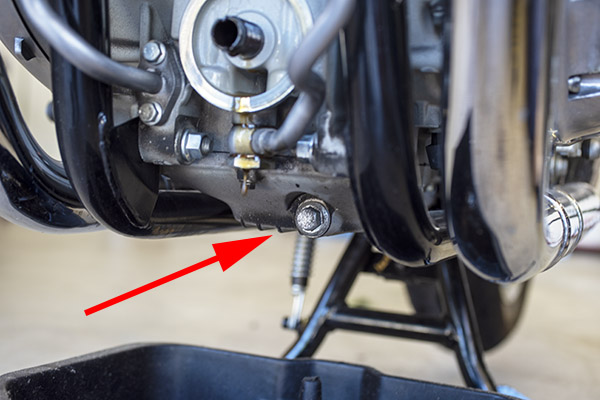
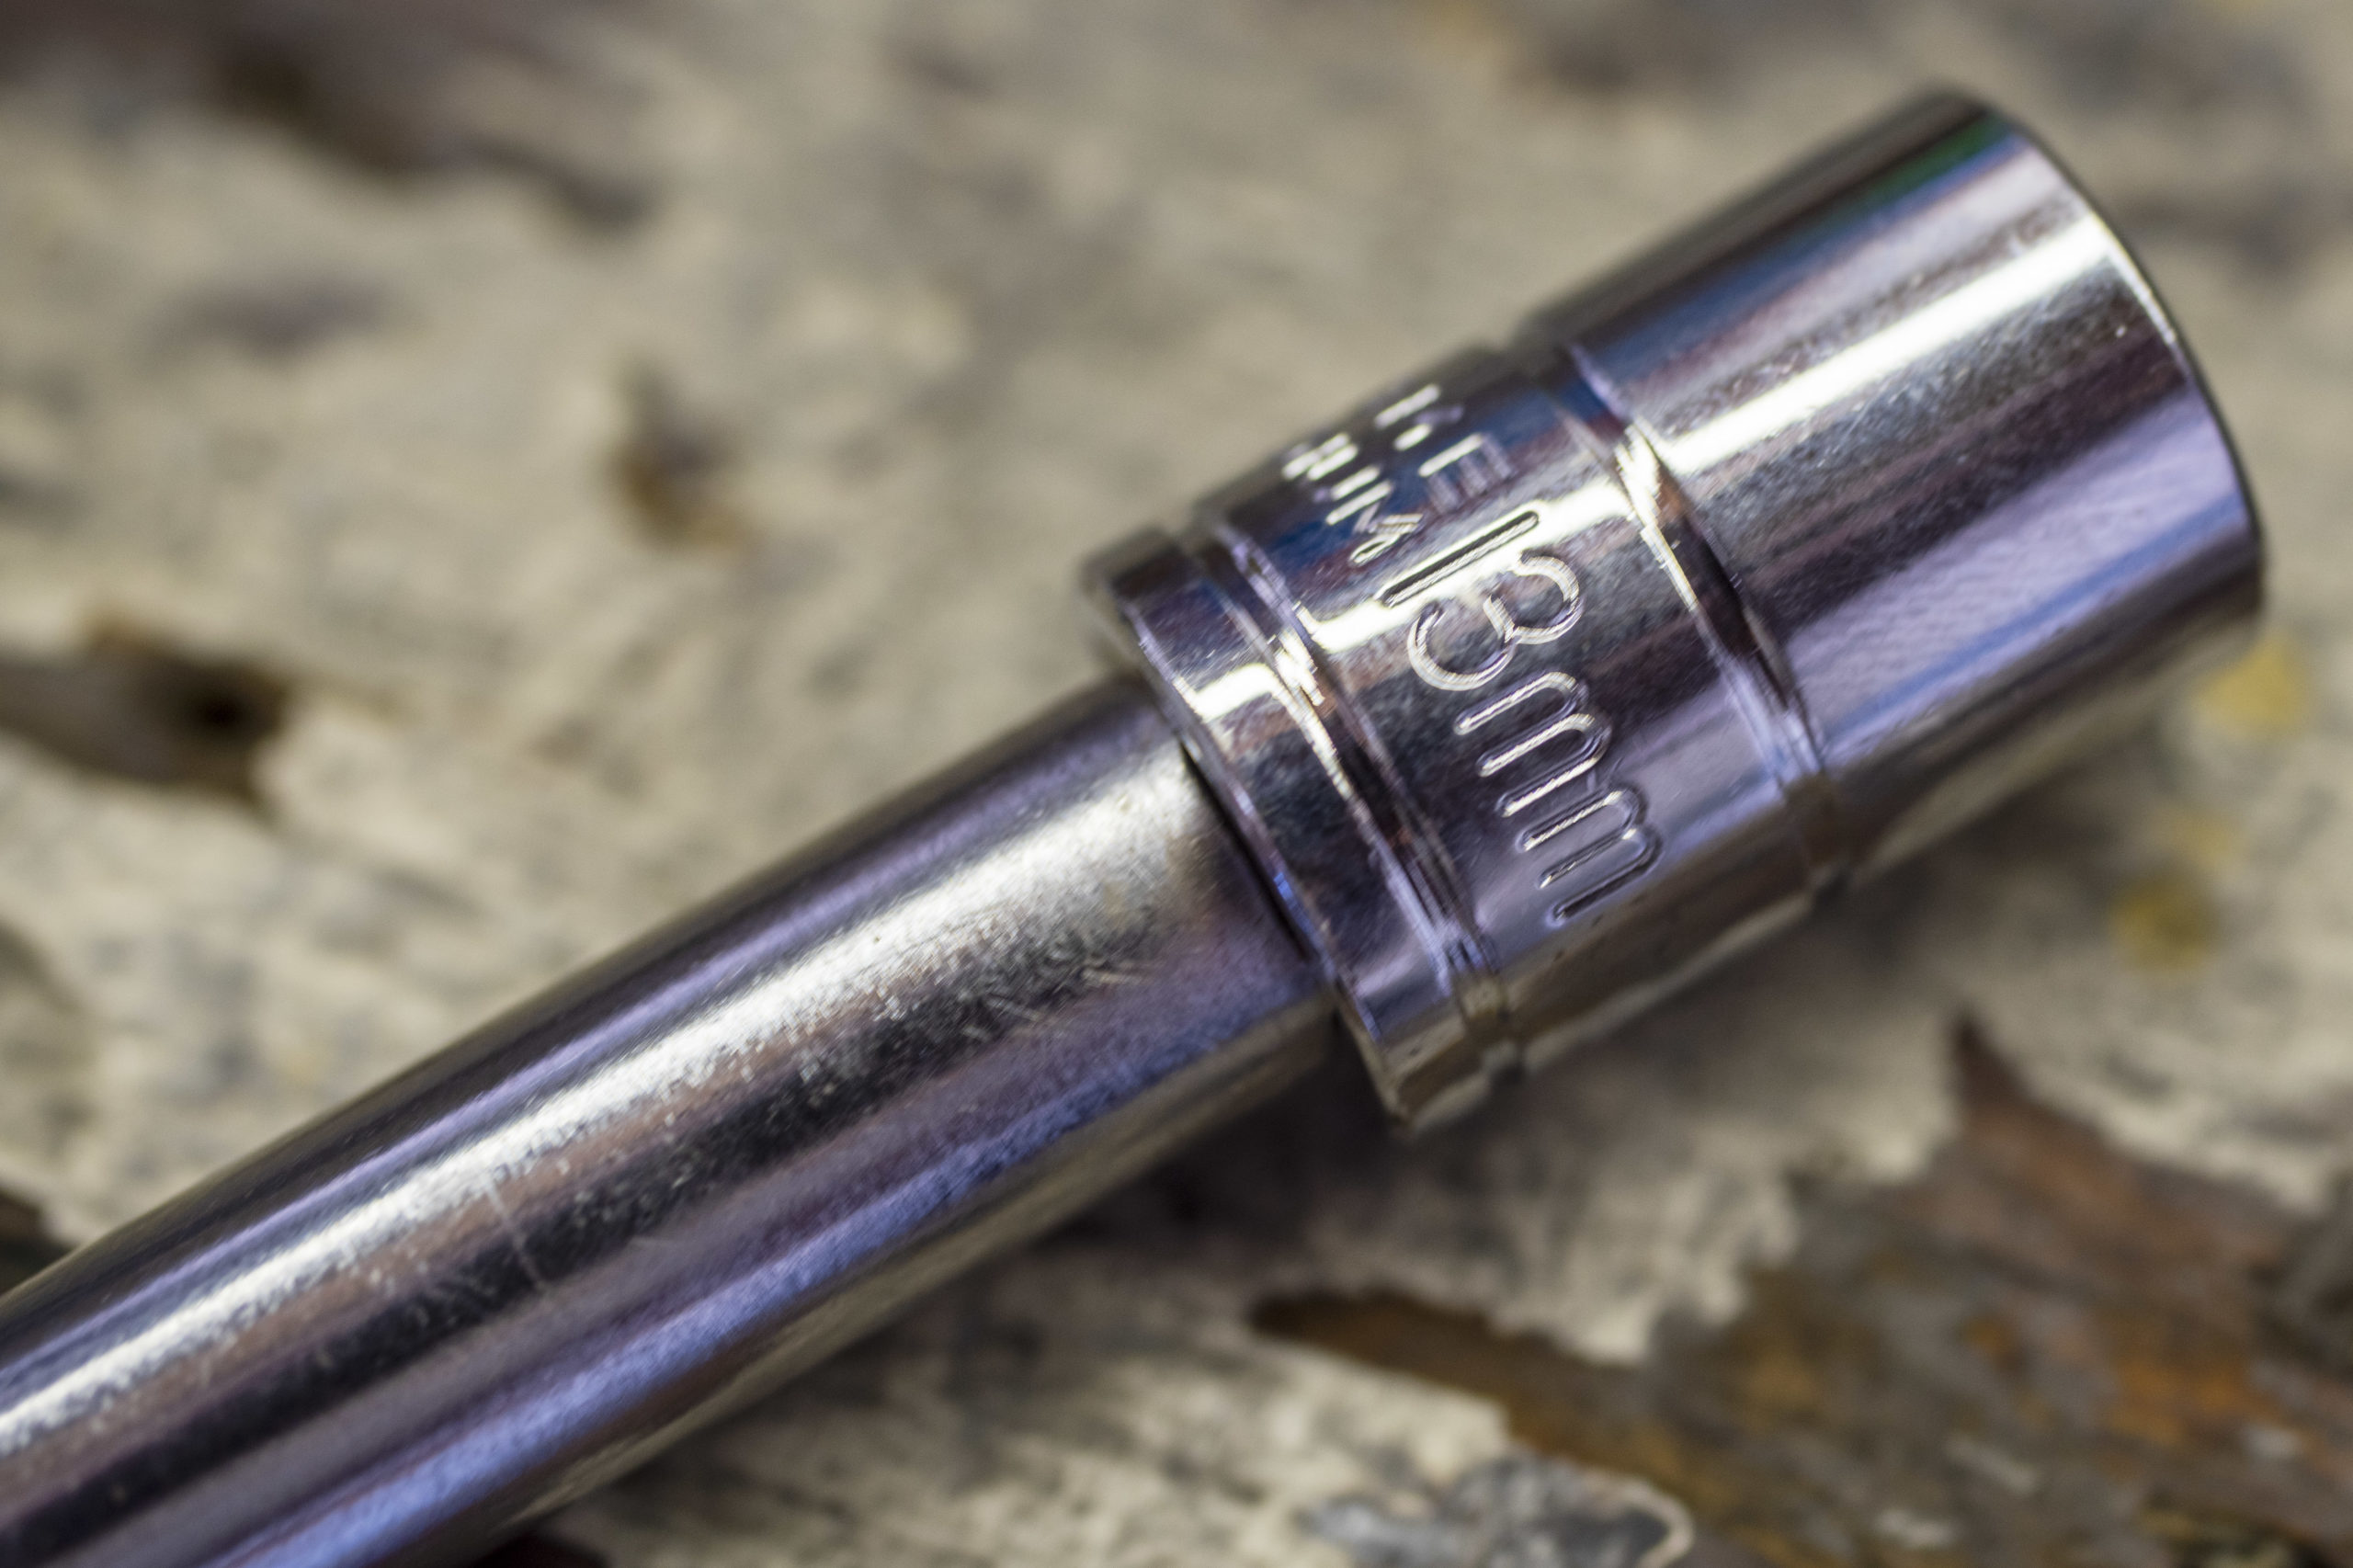
I guessed it was a 13mm, and I guessed right.  It, too, had been installed way too tight.
When the plug comes out, you’ll notice it has a crush washer (which doesn’t really look like a crush washer) and a magnetic pickup that sits in the oil bath.  The intent of that oil pickup is to grab any bits of loose steel that float around in the oil during the break in process (and after that, too).
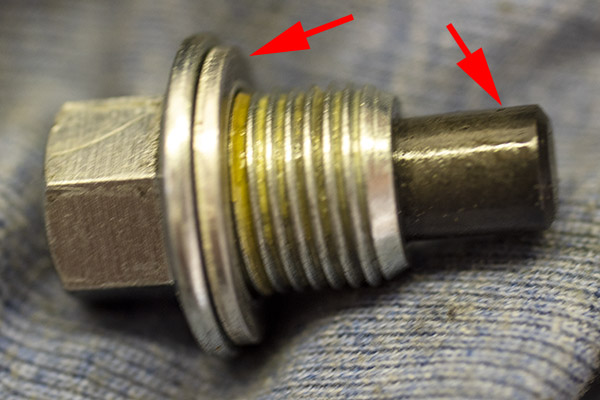
As mentioned above, the oil drain plug is way too tight from the factory.  Be careful not to screw it up taking it off.  And remember when you reinstall the oil drain plug, it’s a steel part threading into an aluminum engine case.  Don’t overtighten the drain plug when reinstalling it.

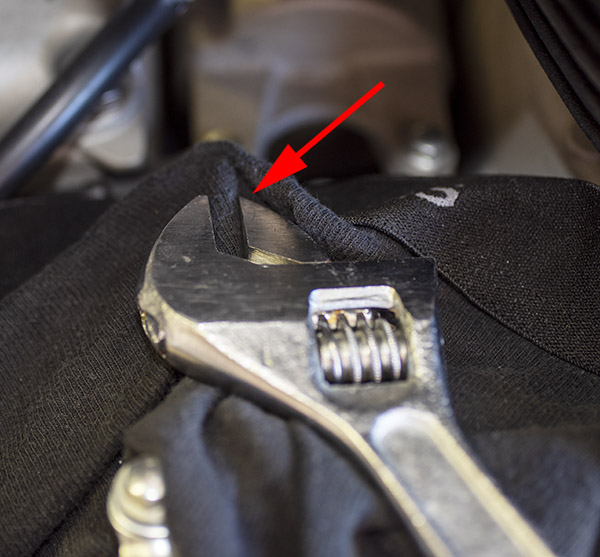
Next up is removing the oil fill cap.  Mine was installed way too tight and if you’re taking it off for the first time you probably won’t be able to remove it by hand.  I grabbed a rag to protect the plug and persuaded it a bit with an adjustable wrench to get it started.  Once it was loose, it unscrewed easily.
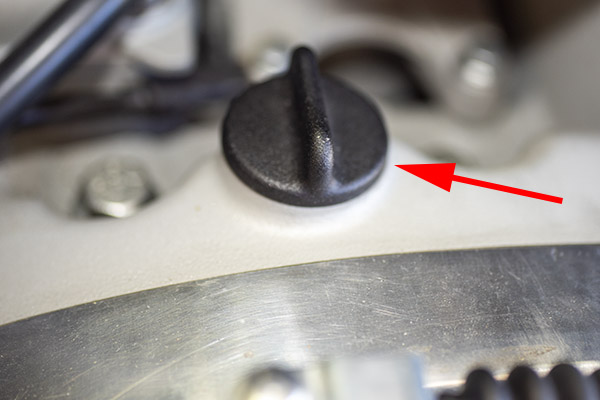
After the fill plug was out, I let the oil continue to drain.  Note that there is no dipstick on these bikes.
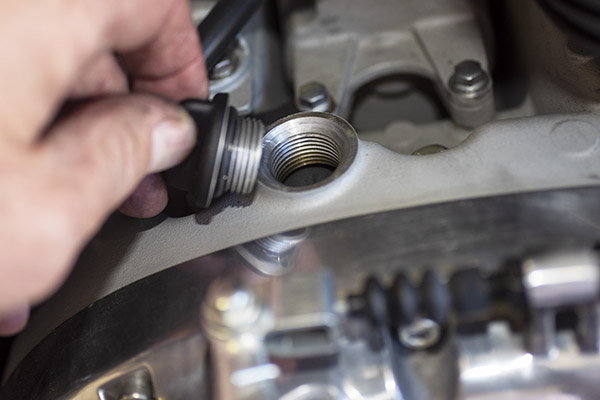
I let the oil drain about 20 minutes so it would drain completely.

After the oil drained, I installed the new oil filter.   You can order the Royal Enfield oil filter if you want to wait months for the official Royal Enfield filter or you can hit Amazon.com and get a Mobil 1 M1-104A oil filter.  You can guess the path I took.
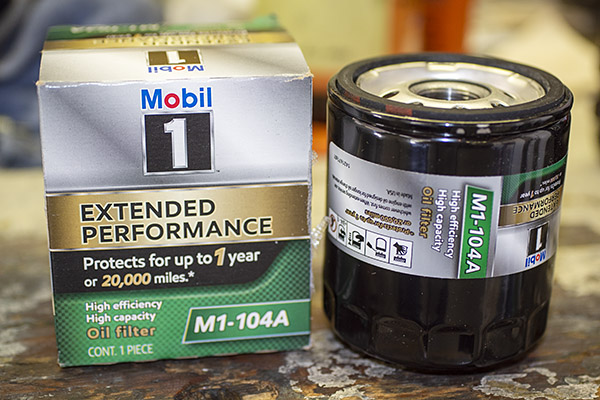
When installing the new oil filter, hand tightening (as tight as you can go by hand) is good enough.  Tighten it more and you’re just making life miserable for yourself at the next oil change.

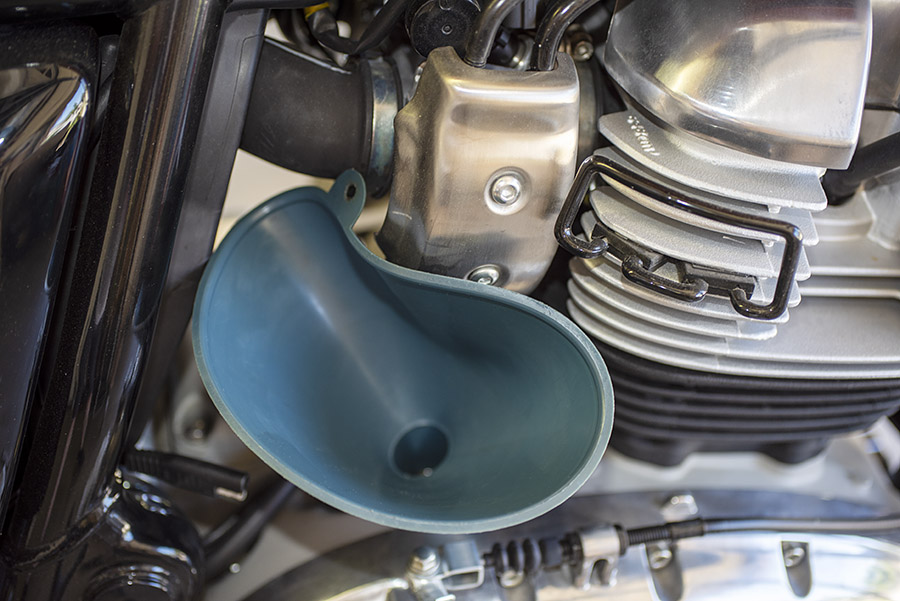
So, here we are.  Oil drained.  Oil plug reinstalled.  New oil filter installed.  It’s time to add the new oil.  You’ll need a funnel at this step.  My advice is to use a plastic funnel that will deform when you flex it.
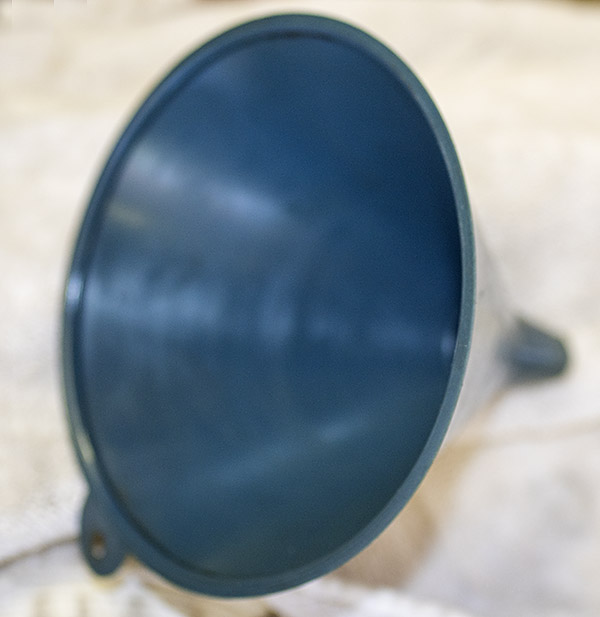
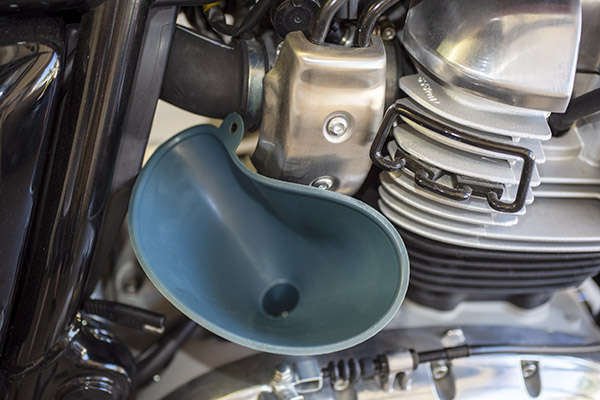
Wedge the funnel outlet into the oil fill port as shown below, and it will stay in place when you add oil to the engine.
There’s an oil sight glass on the engine’s right side.  The idea is to add enough oil (about 3.2 liters) so that the oil is approximately halfway between the lower and the upper fill marks.
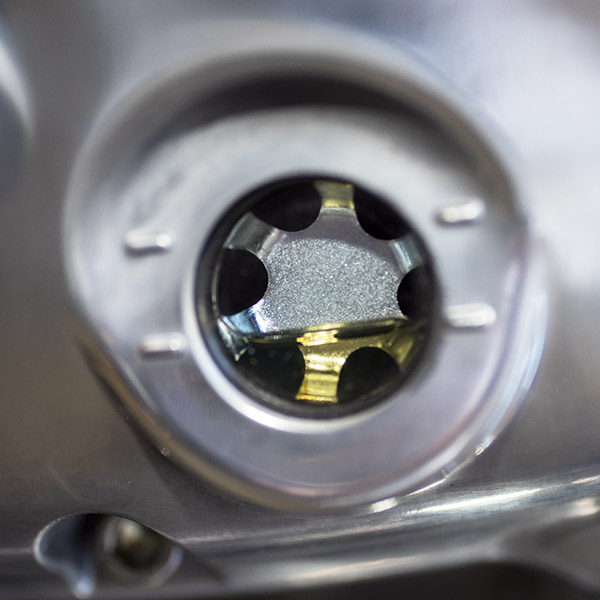
After you see the oil level between the sight glass upper and lower level marks, reinstall the fill port cap and then start the engine and allow it to run for a minute.  The level will go down.  Add a bit more oil to get the level where it is supposed to be.
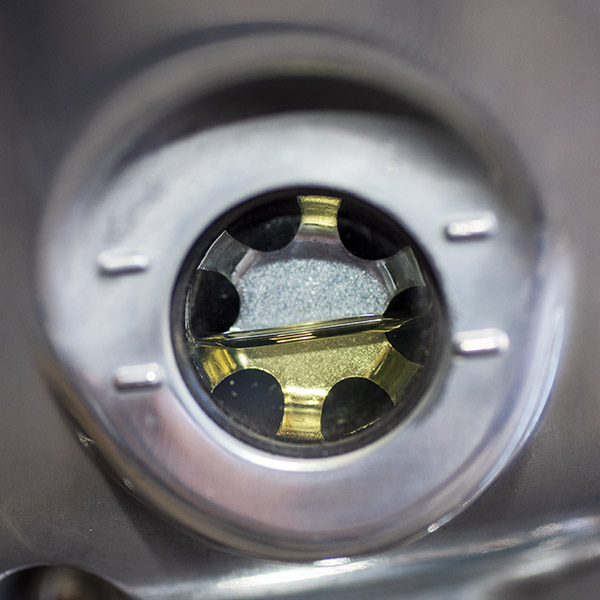
After adding a bit more oil, install the fill port cap, hand tighten it, and you are good to go.  Take the bike for a short ride and check for leaks.  And that’s it.

In case you were wondering, I called the nearest Royal Enfield dealer and asked how much they would charge for parts and labor to do what I described in this maintenance tutorial.  There’s no rocket science here, folks, and changing the oil is one of the simpler things you can do to maintain your motorcycle.  The dealer’s price for an oil change was a cool $170.  My cost to do what you see in this blog was about $50.

Our next tutorial will be on valve adjustment.  Stay tuned.

Malibu!

1.5 liters and 117 mph.  Don’t ask me how I know.

And at that speed, the Malibu rode on rails. Flat. Smooth. Planted. Well behaved. One with the road, in perfect harmony with the universe.  It was a glorious ride.

Color me impressed.  I rented Chevy Malibus on the last two secret missions and I loved the car.  I’m no James Bond and the Malibu is no Aston Martin, but as secret mission motor vehicles go, this is a cool car.  It would cruise easily at 85 mph, and jumping up to that big number listed above (117 mph) was effortless.

At first, I could only wonder what was powering the thing…a Z06 engine?

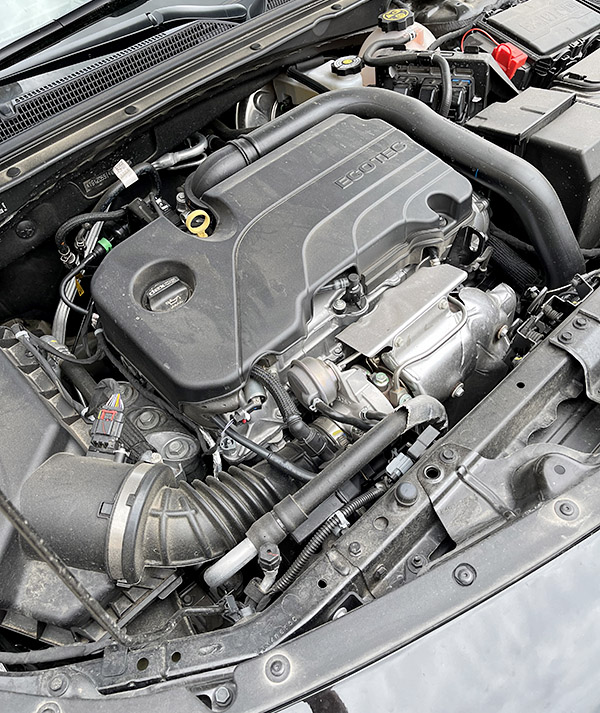
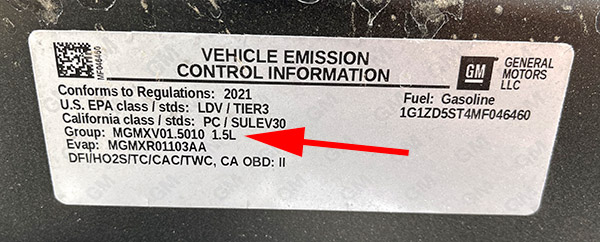
My preliminary Internet research showed the Malibu has two engine options:  The base model 1.5L four, and an upgraded 2.0L four.  Mine must have had the 2.0-liter four banger, I thought, because it was just flat quick.  There was nothing posted on the Malibu’s exterior to tell us how many hamsters were hiding under the hood, so Big John and I took a look.   Every secret agent needs a wing man.  Big John was mine.

1.5L.

Well, I’ll be.

How the hell did Chevy get that kind of giddyup out of a measly 1500 cubic centimeters?

Turbocharging.  That’s how.  But you could have fooled me.  The car has no markings to indicate it hides a turbo, there’s no discernable turbo lag, and it just feels good.

I think it looks good, too.

Chevy’s Malibu MSRP is around $23K, and that ain’t bad.  The car is roomy and comfortable.  There are no machine guns or passenger ejection seats, but the Malibu clocked around 40 miles per gallon.  In the real world, this thing checks all the boxes.

So what did I dislike?  Nothing, really.  Well, maybe that automatic engine shutoff at stop signs that all new cars seem to have these days, but I’m getting used to that.  I’m not in the market for a new car, but if I was, the Malibu would be at the top of my list.

Here’s another shocker.  It seems Chevy is going to discontinue the Malibu in the next year or two.  Discontinuing the Chevy Malibu.  We are living in a world gone mad.  I guess they are not selling, but I can’t see why.

Chevy, your marketing weenies are flat on their overpaid butts.  There should be lines around your dealerships waiting to buy these cars.  They are that good.  You should advertise with us.


Stay ahead of the curve.  Subscribe here for free!

Shoot and Scoot!

I should have won.  It was politics, I tell ya…that’s the only reason the Axis prevailed.  But I’m getting ahead of myself.

That photo above?  Like I said, I should have won.  That’s my photo.  I watched the two judges, stooges of the Axis powers, deliberate for several minutes, even delaying announcement of the winner while they looked for a plausible reason to deny what was rightfully mine.


Okay, back to the beginning.  Me and the boys used to hang out at Bob Brown’s BMW dealership on Saturday mornings, and back in the day, Bob and crew were always coming up with great ideas…you know, things to do.   They outdid themselves on the Shoot and Scoot deal.  You see, one of Bob’s BMW customers owned a camera store down in Chino Hills.   Between Bob and the camera guy, they had this idea:  Combine a day-ride to the Chino Planes of Fame Museum and a photo contest.  It worked for me.  I ride (my ride was a Triumph Tiger in those days) and Lord knows I’m a photography phreak.  I was in.

The day started with photo ops and donuts at Bob’s dealership, with a very attractive young model.   Attractive, yes.  Creative or unusual?  Hardly.  But I grabbed the obligatory fashion shot…

From there, it was a quick ride to the Chino Airport’s Planes of Fame Museum.  I’ve always loved that place.  The idea was to grab an interesting photo or twenty in a place jam packed full of interesting photo ops.  Trust me on this, boys and girls…if you’ve never been to the Planes of Fame Museum, you need to go.

Anyway, these are a few of my favorite shots from that day…I was working the Nikon for all it was worth and I was having a good time.  I could win this, I thought.

My last few photos of the day were of my reflection in that big radial engine you see above, and then it hit me.  Like a politician who knows never to let a good crisis go to waste, when I have a camera that’s how I feel about reflective surfaces.  I was getting some good shots of myself in the polished prop hub, and then it hit me.

“Hey Marty,” I said.  Marty is my riding buddy.  You’ve seen him here in the ExNotes blog in many places.  Mexico.  Canada.  All over the US.  “Get in the picture right here.”

And he did.  That’s when I grabbed the photo you see at the top of this blog, and as I saw the image through the viewfinder, I knew I had a winner.  It captured what the day had been about.  Great photography.  Air cooling and internal combustion.  Riding.  Friendship.

So we rode from the Planes of Fame Museum over to the photo shop and uploaded all our shots.  We returned that evening when the winners would be announced.  I wasn’t interested in placing.  I wanted to win.  And I knew I would.  Or at least I knew I should.  The funny thing was, the two judges were the camera store owner and the local Canon sales rep.  I could see they were having a tough time.  They were down to two photos, mine was one of them, and they were struggling with the decision.  I think my photo was the clear winner.  But alas, I shot it with a Nikon.  This was a Canon contest being at least partly sponsored by a BMW dealer (and I rode a Triumph).  The Germans and the Japanese.  The Axis powers.  Still trying to make up for World War II.  Not that it bothers me.  Much.  But I should have won.


Never miss any of our stories…sign up here for free!

ExNotes Product Test: TR Industrial Demolition Hammer

Whenever I’m not riding motorcycles I like to break things into smaller pieces. It makes life just that bit less tiresome and one of the best ways to break stuff is with a jackhammer. A real jackhammer weighs 90 pounds and is pneumatic, also called air-operated. I used to run one when I worked in construction. A 90-pound hammer is a wonderful tool, and the weight is not a burden since you don’t really lift the thing often. I’ve found laying the hammer on your leg and pivoting the 90 to relocate the chisel is easiest. It seems like the heavier a hammer is the less vibration is transmitted to you hands. Less vibration means fewer blisters and less hand-bleeding. Properly handled you can run a 90-pound machine all day long as your pants slowly become covered in compressor oil blown from the hammer’s exhaust port.

As fine a proposition as a 90-pound hammer is, for most homeowners the large, engine-driven compressor required to supply enough air is a deal killer. For more refined destruction and with a nod to apartment dwellers look to the many 35-pound electric jackhammers sold everywhere.

I bought this TR Industrial 35-pound jackhammer several years ago for a concrete spalling repair job. The job required a lot of work on a scaffold so I didn’t want a big, heavy hammer to lift. The TR worked great and when the job was done I put it away in the included storage case.

Fast-forward three house moves and I had forgotten all about the TR hammer. It wasn’t until I was almost finished with the shed footing project that I remembered the thing and dragged it out to break up the hard, rocky ground the shed sits on. What an improvement over the pickaxe! The TR cut my digging time and was less tiring to use. It felt like I was cheating.

The TR jackhammer came with two tool bits: a flat chisel and a pointed bit. The flat chisel is great for breaking rocks and concrete. Remember, don’t start in the middle, you have to work from the edge when breaking concrete so that the broken piece has somewhere to go. If you’ve used a 90-pound air hammer don’t expect the blows from an electric 35-pounder to have the same effect. Everything will take longer.

I haven’t used this point bit yet but then I haven’t done everything yet either. It may come in handy on extra hard or thick concrete. Maybe I’ll split logs with it.

I recently bought a clay spade for the TR hammer and it is perfect for the ground conditions at Tinfiny Ranch. You wouldn’t use a clay spade on concrete but for rocky soil it plows right through. When lightly excavating an area to be formed, say you need to remove 2 inches of fill; the wide paddle makes it easy to eyeball grade and loosen just the top layer while not unduly disturbing the ground underneath.

Not all hammer bits are the same. The TR takes this hex style but note the impact end is round. Some bits are hex all the way, some are fluted, and little ones have a mushroom shape. Bits for the TR are plentiful and easy to order online.

To change the bit you pull this little spring-loaded widget out and rotate it.  Insert the bit with the cutaway facing the widget and reverse the operation. Bit changing takes seconds and the bits stay put.

All jackhammers are oily but the electric ones are less so. There is an oil reservoir built into the TR hammer. Regular motor oil is recommended. To fill the hammer you unscrew the sight glass and dump whatever slippery stuff you have inside. If you ran the hammer for 8 hours you might need to refill the reservoir but for my sporadic use a fill lasts months. Note that oil will leak out of the machine even if you’re not using it, so plan accordingly.

One of the things I don’t like on the TR jackhammer is the side handle. It looks flimsy as hell and no amount of tightening will keep it in place. I thought about wrapping duct tape around the hammer to make the handle fit tighter but decided the tape would just wear off in a few minutes. Since you don’t really push on the hammer I leave the thing as-is with the floppy handle. The floppy handle is convenient in tight quarters, swapping sides is easy.

The TR hammer is probably cloned from a well-known brand and there are quite a few hammers that look exactly like the TR on eBay and Amazon. The design seems to be open source now and I can’t comment on the quality of those other clones. I will say that which factory a tool or motorcycle engine comes from is important. There’s a lot of variation in things that look the same.

I give the TR Industrial version high marks and can recommend it if you like to break things. My hammer is an older version no longer produced but the one in the link is an updated machine with better electrical isolation for the operator. This might be important if you work in wet areas.


See more ExNotes product reviews here!

My 1st International Motorcycle Adventure, Eh?

Everybody has their preferred riding schtick and for me it’s international motorcycle travel.  Anyone can ride their cruiser to a local hangout for a beer or their GS to Starbuck’s for a $6 cup of coffee.  My riding is all about crossing international borders and collecting cool photos in places most two-legged mammals only dream about.  Just to make a point, I once rode a 150cc scooter (my CSC Mustang) to Cabo San Lucas and back.  The day after we returned, I needed something at Costco and I rode the little CSC there.  When I parked it, a beer-bellied dude in a gigondo 4×4 pickup told me, “that’s a little cute bike.”  He didn’t intend it to be a compliment.

“Thanks,” I said.

“I ride a (brand name deleted to protect the guilty),” he announced, his chest swelling with Made in ‘Merica pride to the point it almost equalled his waistline.   “We ride all over.”  He emphasized the “all” to make sure I got the point.

“Cool,” I said.  “Where do you go?”

Cook’s Corner, the ultimate So Cal burger/biker stand.

“Last week,” he told me, “we rode to Cook’s Corner!”

Cook’s Corner is a southern California burger joint about 40 miles from where we were talking.

“Where do you all go on that little thang?” He actually said “you all” and “thang,” but he didn’t have the accent to match the colloquialisms.  Okay, I had the guy dialed.

“Well, we rode to Cabo San Lucas and back last week.” I said.

Mr. 4×4’s jaw dropped.  Literally.  He looked at me, speechless, dumbfoundedly breathing through his open mouth.  Without another word he climbed into his big truck and rode off.  Our conversation was over.  So much for the biker brotherhood, I guess.

My 150cc CSC Baja Blaster. I had a lot of fun and covered a lot of miles on that little Mustang.

The international motorcycle travel bug bit me when I was still in school.  I had a ’71 Honda 750 Four back in the day (that’s me 50 years ago in the big photo up top).  One of my Army ROTC buddies had the first-year Kawasaki 500cc triple.  It was a hellaciously-fast two stroke with a white gas tank and  blue competition stripes.  We were in New Jersey and we wanted to do something different, so we dialed in Canada as our destination.  They say it’s almost like going to another country.

And so we left.  Our gear consisted of jeans, tennis shoes, windbreaker jackets, and in a nod toward safety, cheap helmets (ATGATT hadn’t been invented yet).  We carried whatever else we needed in small gym bags bungied to our seats.  Unfortunately, in those days “whatever else we needed” did not include cameras so I don’t have any photos from that trip.  That’s okay, because all they would have shown was rain.

A 1969 Kawasaki 500cc, two-stroke triple. Widowmakers, they were called, in a nod to their often unpredictable handling.

As two Army guys about to become Second Louies, we joked about being draft dodgers in reverse.  We were looking forward to active duty (me in Artillery and Keith in Infantry).  We were going to Canada not to duck the draft, but as a fling before wearing fatigues full time.  We didn’t really know what we were doing, so we took freeways all the way up to the border. It rained nearly the entire time.  All the way up and all the way back.  We bought sleeping bags because they looked cool on the bikes (it was a Then Came Bronson thing), but we stayed in hotels.  It was raining too hard to camp, and besides, the sleeping bags were soaked through and we didn’t think to bring a tent.  We got as far as Montreal, which seemed far enough to give us Canada bragging rights.  We spent that single Montreal night in a cheap dive and pointed the bikes south the next day.

These days, I know to check the weather, bring rain gear (even if none is forecast), and study a map to find the most interesting roads (rather than the fastest).  But hey, we were young and dumb, it was an adventure ride, it crossed an internationational border, and riding four days in a steady cold rain was a lot of fun.  I didn’t think so at the time, but that’s how I remember it today.  In fact, I remember that ride like it was last month.  And it got me hooked on international motorcycle adventures.  Canada was to be the first of many.


Never miss an ExNotes blog.  Sign up here for free, unless you have a .ru in your email address!


More epic international rides?  Right here, folks!

TJ’s Bulldog

What does a professional, world-class pistolsmith use for his personal weapon of choice?

I asked good buddy TJ (of TJ’s Custom Gunworks) that question, and the answer was surprising.  This is a man who knows handguns inside and out, and a guy who is one of the top men in the world for custom-crafted combat handguns.  SIGs, 1911s, Colt and Smith revolvers and autos, and more.  A guy who could have just about anything he wanted.  His guns are carried by law enforcement officers, special agents, and others the world over.  So what is TJ’s personal sidearm?

It’s a highly-customized Charter Arms Bulldog, chambered in the mighty .44 Special cartridge.  It’s the one you see here and in the photo above:

As you might imagine, TJ did not leave the gun stock.  These are the custom features TJ’s personal .44 carries:

      • Satin brushed hard chrome finish
      • 1.5-inch barrel (cutdown from stock barrel)
      • Radiused and polished trigger
      • “Melted” (rounded – sharp edges removed) contours throughout
      • Night sights with orange DayGlo highlighting
      • Custom-contoured front sight
      • Level 1 action work
      • Action modified to double action only
      • MagNaPorted barrel
      • Bobbed hammer
      • TJ custom prototype laser grips (modified from Crimson Trace S&W grips)

TJ explained that double action is the only way he uses revolvers.  You know, there’s a school of thought that a good man with a double action revolver can fire faster than can one with a semi-auto handgun.  You can read more about that in Ed McGivern’s Fast and Fancy Revolver Shooting, a good read for anyone interested in improving their handgun shooting with a double action revolver.

TJ’s Charter Arms custom Bulldog is a very impressive weapon.  You can see more photos of it, and a few of TJ’s other custom guns, on the TJ’s Custom Gunworks website.


Help us bring more content to you:  Please click on the popup ads!


More Tales of the Gun!


Never miss an ExNotes blog:  Sign up here for free!

New Shoes for the Model 60

I visited with good buddy Paul up north last week, and while I was there he showed me a set of Altamont grips he had for his Smith and Wesson snubnose handgun.  When I saw the grips it was love at first sight, and I had to have them for my TJ-customized Model 60.  Paul was happy to oblige (thanks, Paul!), I came home with a new set of Altamont‘s finest, and they promptly went on the Model 60.  The Model 60 now looks like a scaled-down version of the big .45 ACP Smith & Wesson Performance Center Model 625, and I had to grab the shot you see above.   The 625 wears custom grips, too, but that’s a story for another blog.

There’s no question I’ve gone overboard in getting grips for the Model 60.  It came with the stock checkered walnut grips (the original equipment on this handgun), as well as a set of Pachmayr rubber grips.  The Pachmayrs would have been better for shooting, but I wanted a set of smooth rosewood grips and I found them on Ebay.  They looked great, but they were painful to shoot.

The Model 60’s OEM checkered walnut grips. Photo by TJ of TJ’s Custom Gunworks.
Smith and Wesson J-frame uncheckered rosewood grips. These are the same size as the walnut grips shown above.
The problem with both the OEM walnut grips and the replacement rosewood grips is that they are too small. My pinkie wraps around beneath the frame and takes a pounding with each shot.

The problem with the stock walnut grips and the Ebay rosewood grips is that my little finger gets under the grip.  The recoil from the little Model 60 is significant (as we engineers like to say, f = ma), and it would pound my pinkie every time I fired it.  Think about putting your pinkie sideways on a table and having someone whack it with a hammer, and you’ll have a pretty good idea what shooting this little snubbie was like.

All that’s changed with the Altamont grips Paul provided.  Take a look.  They’re beautiful.

Custom Altamont grips for the Model 60. Note the stippling (a crocodile pattern!) and the laser-engraved S&W logo.
The Altamont grips installed on the Model 60.

The new Altamont grips are extended just a bit below the frame and they have finger grooves.  It keeps my pinkie from getting underneath the frame, and with the new grips the Model 60 just feels right in my hand.

The Altamont grips provide a much better ergonomic hold. I like them a lot.

These new Altamont grips have a much better feel to them.  The wood-to-metal fit is way better than with the stock grips (the grips exactly contour to the Model 60’s frame, unlike the OEM grips).   The next obvious question, and the one that really matters is this:  How did the Model 60 shoot with the new grips?

In a word, it was amazing.  The new Altamont grips completely changed the character of the Model 60.  First, a couple of shots of the Model 60 on the range:

The Model 60 became an entirely different animal with the Altamont grips. It’s much easier to shoot now.
Good buddy TJ reworked my Model 60 extensively. It has an action job, selective polishing (ejector rod, cylinder, trigger, hammer, and cylinder release), and a red ramp front sight. TJ’s Custom Gunworks is the place to go if you want a bespoke handgun.

And here are two targets I shot at 15 yards (45 feet).  One has 10 shots on it; the other has 12 (each had two cylinders of 5 cartridges, and I had a couple left over to finish the box).

Two targets on the 15-yard line. That little Model 60 has near-target grade accuracy with the Altamont grips. If you have a snubbie, you need these grips!

Several things are amazing about the above targets.  The first is that it was windy as hell out on the range this morning, and even though I was shooting with both hands from a bench, I could see the sights swimming around as the wind gusted.  The second is that the groups are dramatically tighter than they had ever been before with this handgun.  And the third is that the revolver shot almost exactly to point of aim.  I was holding at 6:00 on the 50-foot slow-fire NRA targets you see above.  My load was the tried and true .38 Special target load:  2.7 grains of Bullseye propellant with the 148-grain Hornady hollow base wadcutter.  Before, with the OEM and rosewood grips shown above, this same load shot a good 12 inches to the right of the point of aim, and the groups were huge.  Evidently, as the revolver discharged, it was rotating to the right in my hands with those much smaller grips (and beating the hell out of me in the process).  The Altamont grips brought the point of impact essentially in line with the point of aim and just a bit high, which is what I want in a handgun.

You may recall from a recent blog that I have a load development test planned for the Model 60, and I’ll be firing the cartridges I loaded for it within the week.  I was up north on a secret mission last week and I didn’t get to shoot during that time.  I recently read that if you go 72 hours without firing a handgun your skills deteriorate.  I believe that, and I wanted to get in a little shooting before I shoot for group size.  Hopefully, the Santa Ana winds through the Cajon Pass will die down, conditions will be right, and I’ll get to do some real accuracy testing in the next few days.  You’ll get the full report right here.  Stay tuned, my friends.


More Tales of the Gun are right here!


Never miss an ExNotes blog:  Subscribe here for free:

Exhaustnotes Product Review: Gdrasuya 80-amp Battery Charger

You win some and you lose some on Amazon and with the Gdrasuya 80-amp battery charger I lost some. One of the few issues I have with my off-grid shed is snow. Here at normally sunny Tinfiny Ranch snow is infrequent which is not to say “never.” It does snow a few times each winter at 6000 feet and those times are when my solar panels get covered up and my batteries slowly lose power. Coincidently, when its cold and snowy I run pipe heaters to keep the shed’s PVC water pipes from freezing and splitting in the un-insulated space. It’s a double whammy: no power from the panels and a constant drain from the pipe heaters.

The system can go a few days like this but eventually the inverter shuts off and my pipes are left to live or die in New Mexico. To combat this I run a small 24-volt battery charger off my Harbor Freight Tailgator generator during the day to help resupply the batteries with precious electrons. I have an old Dayton 24-volt charger that puts out around 5 amps. With 12 batteries to charge it takes quite a while to bump them up.

Enter the Gdrasuya 80-amp charger. The Gdrasuya is 6v-12v-24v selectable and I assumed the 80-amp output was at 6 volts. That would mean the 12-volt setting would put out 40 amps and the 24-volt setting 20 amps. 20 amps charging is 4 times faster than the Dayton! I liked what I saw.

The charger arrived neatly packed and undamaged. The machine looked well made with beautiful glossy yellow paint and everything written in Chinese. No matter, battery chargers are easy to operate.

The first thing that gave me pause was the small diameter charge leads. The clamps looked pretty robust but no way was that small wire going to tote 80 amps without getting warm.

The small wires led me to investigate the inside of the charger to see how difficult it would be to install heavier wires. Once open I realized I didn’t need heavier wires because no way were these internals going to output 80 amps at any voltage.

The Gdrasuya uses a doughnut shaped transformer with various taps taken off the windings to select current to the battery. The wires are just a wee bit bigger than a human hair and the switching is very lightweight. Ok, I thought maybe they meant 8 amps instead of 80.

The main output breaker is rated 15 amps so no matter what you did to the thing 15 amps is all that’s passing through the breaker.

Worse than the misleading advertisement was the 120-volt AC input wiring. The green wire, or ground, from the plug was cut inside leaving the shiny yellow metal box in an ungrounded state. If the metal housing managed to short out to line voltage, a user touching the metal would receive a nasty shock.

Ok, the Gdrasuya 80-amp charger is dangerous and restricted on rated power by a 15- amp output breaker, but how does it work?

Turns out not too well. At 12-volt, max charging rate, the kilowatt showed the charger drawing 1 amp from the outlet, or 120 watts. On the DC charging side things looked bleaker. The Gdrasuya amp meter was reading 50 amps but my inline digital meter said 3.08 amps at a claimed 15 volts, a measly 46 watts. So not only was the Gdrasuya charger weak and dangerous, it was inefficient to boot.

In the description for the charger the 80-amp claim is made again along with a “power for 12V is 10A, for 24-v is 7A.” It does neither.

I haven’t tried it on 24-volts yet but you can figure maybe 2 amps tops or as we like to say in the electrical business, nothing. I was going to fix the ground issue but now that I’ve tested the charger it doesn’t seem like it’s worth the bother. That old Dayton putting out 5 amps looks like a champ in comparison.

It’s odd that someone would go through all this trouble to manufacture a charger that is pretty much useless. The thing consists of quite a few parts the sum of which is almost zero.

My recommendation is don’t buy the Gdrasuya. I’m not going to put an Amazon link in this story because I don’t want you to accidently buy one. I’ll put it back together and try to return the thing to Amazon. It serves no useful purpose in Tinfiny Ranch’s suite of electrical power products.


More ExNotes product reviews are here!


Subscribe to ExhaustNotes for free!

2022 KLR 650 Video

This flew into my mailbox last week from Kawasaki.  I’m still on their mailing list (I purchased a new KLR 650 in 2006).  I’ll let the video do the talking.

I had good times on my KLR. I don’t see another KLR in my future, but if the new model is as good as my 2006 KLR was, I think Kawasaki will do well with this motorcycle.   Both Gresh and I had thoughts about what the new model might feature; you can read those blogs here.

If I were going to buy a new KLR (I’m not, but if I were), I would probably wait until the 2023 models were out.  When Kawasaki introduced the Gen II KLR back in 2008, the 2008 bikes had oil consumption issues.  Kawasaki had a recall (if I recall correctly) and they fixed the problem in the 2009 model.  I think it’s best to let others work through the new model teething issues.

I’m guessing the full-freight new KLRs (luggage, ABS, etc.) will push $10K, which is roughly twice what a new CSC RX4 costs, and for me, selecting the RX4 over the Kawasaki would be a no-brainer.  For that kind of money, you could almost buy a new Sportster.


Never miss an ExNotes blog:  Subscribe here for free!


Want to see our predictions on what the new KLR would be?  Just click here.

Exhaustnotes Off-Grid: Part 2 What Battery Voltage Should I Use? Or, Going Native

Going off-grid requires many design decisions, none of them exceptionally hard or final. With off-grid you can always change your mind to suit your needs although you can save a bit of money if you have a plan and stick with it. Of course that’s not how I do things. I generally screw up and get it right the third time, you know what I mean?

The going native part in the title of this story pertains to base system voltage. In my mind a native setup uses roughly the same voltage for the panels, batteries and inverter as opposed to running high voltage panels and stepping them down to battery voltage.

Going native makes your system more resilient to failure. The two most complicated devices in an off grid system are the inverter and the solar panel voltage regulator (not counting strange new battery technologies). When either of those two fail you are pretty much done until you purchase parts. With a native system the regulator can be bypassed completely by connecting the solar array directly to the batteries. Depending on the size of the array you’ll have to keep an eye on your charging to not overcook the batteries but by simply shading or un-shading a few panels with cardboard you will be able to control the charge rate at a reasonable level.

When it comes to common battery voltages for your off grid system you have effectively 3 choices: 12-volt, 24-volt or 48-volt. Fast thinkers will realize that these voltages are all multiples of 12 and that’s because 12-volt batteries are the most popular. You can get batteries in other voltages; there’s no real reason the basic building block had to be 12-volt. You can buy 2-volt batteries all the way to 48-volt batteries.

One or more batteries connected together and powering your house are called a bank and like a bank you have to deposit energy into the batteries in order to draw energy out. For smaller off-grid systems 12-volt battery banks are popular. Inverters in the 2000-watt range powered by a 12-volt battery bank will work fine and are the simplest to connect if you’re electrically impaired. 12-volt banks become less desirable as power needs rise due to the large, expensive battery wires you’ll need to supply the amperage big 12-volt inverters need.

In favor of going native with 12-volt batteries, thanks to the RV industry there are a zillion products that operate at 12-volt. You can get 12-volt refrigerators, 12-volt coffee pots, 12-volt light fixtures, 12-volt pumps, 12-volt air conditioners, 12-volt televisions, 12-volt chargers for your phone and computer and you can even get 12-volt toilets. In fact, you could build yourself a pretty comfortable off-grid house using nothing but 12-volt appliances and skip having an inverter altogether. 12-volt is also fairly safe as your chances of being electrocuted increase along with voltage. Unless you’re really sweaty you can touch both poles of a 12-volt battery and not feel a thing.

The appliances that operate from native voltage will continue to operate with a dead inverter. In my shed that means lights and water pump still work with the inverter shut off. Going native allows you to slowly back out of the complex into the simple and simple things are understandable and reliable.

Going native at 24-volt limits the number of electrical devices you have to choose from. There are not nearly as many 24-volt things as there are 12-volt things. This is slowly changing and 24-volt stuff is becoming more popular. Most DC voltage LED lights are rated 10 to 30 volts. A lot of electronic devices and chargers are also rated 10 to 30 volts (read the fine print on that wall-pig that sucks up all the real estate on your outlets). Getting across 24-volts will give you a tingle and If you’re sweaty you’ll get a shock. Nothing that will kill you, we hope, but still it’s less safe than 12-volt for you electricityphobes out there.

In my off grid shed I’ve chosen 24 for my native voltage, kind of splitting the baby between 12 and 48. My solar panels are considered 24-volt (actually higher but close enough to connect directly). I only really need lights until I can rig up a small inverter to get critical things up and running. The water pump is 24-volt also. My 24-volt inverter is 6000 watts; if I went with a bigger inverter I’d probably go to 48-volt and lose some resiliency.

Going native at 48-volts is sort of useless because you can’t find very many things that operate off 48-volts except inverters. At this native voltage you should toss any hope of backing out of the system gracefully after a lightning strike and put your trust in the thousands of tiny electronic components inside those humming boxes. Go ahead and crank the solar panel voltage up and plan on being in the dark if the inverter fails. Safety wise, 48-volts will give you quite a shock and may even kill you if you are wet and have health issues.

There are devices that will allow you to run most any DC voltage from any other DC voltage. To me these are one more point to fail in the system and they aren’t cheap either. I have one to operate my 12-volt refrigerator from the 24-volt battery bank. It cost almost as much as the fridge!

If you’re planning an off grid system for a remote cabin consider going native. Give yourself the option to keep on keeping on when the buzzing widgets fail. And they will fail. Nothing lasts forever. By building resiliency into the system from the start you can use your head to make things work while others must scamper off to the Internet to order parts.


See Part I of our Off-Grid series!