So, the literature that came with my Gear’d Hardware ZX2-1116 watch said it was bulletproof.
We’ll see about that, I thought. I’ll take the challenge…
The Gear’d came through it just fine, and I’m having fun flashing this monster around. Gresh’s watch is on its way to New Mexico, and he’s got a hot 9 and a cement mixer to test it with. But I’ll let him tell you that story.
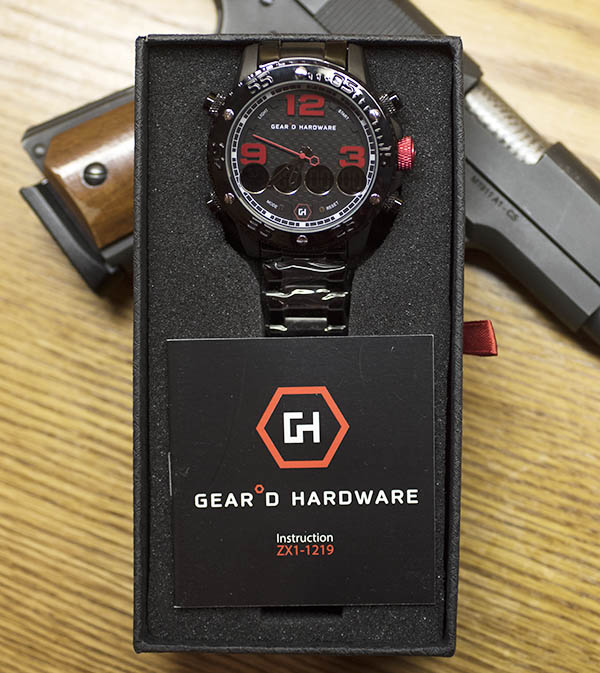
You might remember I told you we had a couple of watches from Gear’d Hardware. This is the one I showed on the blog last week:
The first of two Gear’d watches. This puppy is headed to the Tinfiny Ranch in New Mexico!
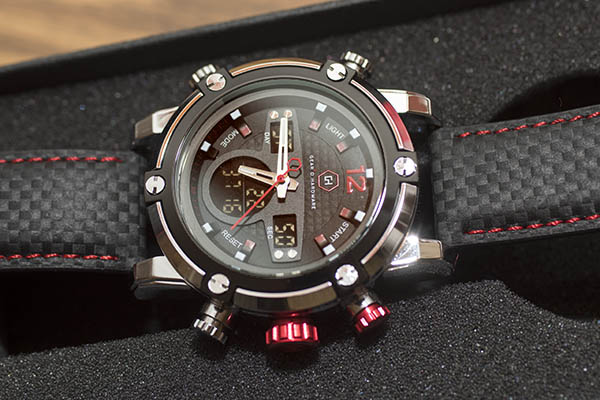
This morning I took the second Gear’d watch out of its shipper. It’s a stunner. Take a look:
Here’s a photo of the watch, which Gear’d calls its ZX2-1116 model:
The Gear’d watch I’m wearing. It’s a good-looking wristwatch. It makes me wish I’d kept the Corvette; the colors are an exact match to the Z06’s interior.
I’ve got a few things in mind for these watches. The top one is getting mailed to Joe Gresh today, and he’ll be providing his impressions. I’m going to read the instructions on mine, set it, and then my fun will begin. I’m not just going to be a male model here (although folks in the waiting room at the optometrist’s office tell me I’ve got the looks for it). Nope, what I have in mind are a few tests, like how well the watch keeps time, how it stands up to vibration (that means a motorcycle ride), and how well it stands up to shock. That may be a bit more than the Gear’d folks banked on when they sent the watches to us, but hey, it is what it is.
The games begin today. This afternoon I’m headed out to the range with my new Gear’d watch, my bright stainless 1911 .45 Colt, and a couple of boxes of hardball ammo. I’m going to send 100 rounds of 230-grain roundnose ammo (the heavy, hard-recoiling stuff) downrange and we’ll see how the Gear’d watch stands up to it. Y0u’ll be able to read about it tomorrow, right here on the ExNotes blog.
Horological test equipment. “Horological” means it’s related to time-keeping gear (that may not be what you thought it meant).
Snacks at an engineering seminar in Singapore. Those are hard-boiled quail eggs and they were good!
I’m back after a 3-day hop over to Singapore, and it’s good to be home. I thought I’d do sort of a catchall blog to mention a bunch of things. For starters, Singapore was fun (it always is), but that 15-hour time change is a bear. I was over there to teach a class, something I do two or three times a year. They treat me well in Singapore and I love traveling to Asia. I think I’m back on California time already, thanks to keeping an altered sleep schedule while I was in Asia and a good sleeping pill that let me sleep through the night last night. If you’ve never been to Singapore, you might want to add it to your bucket list. It’s one of the world’s great places.
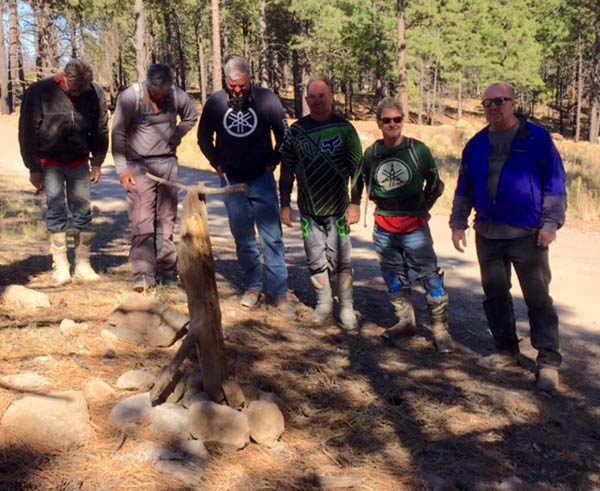
I kept up (as many of you did) with Joe Gresh’s Endurofest fun in Flagstaff, and it looks like the only downside to that adventure was his good buddy Hunter crashed and cracked a bunch of ribs. Hunter, we’re thinking of you. Get well soon.
At the spot where Joe’s buddy Hunter crashed. He got through it with six broken ribs. Ouch!
And speaking of cracking things, you’ll remember the story on my .257 Weatherby Ruger No. 1 cracking its Circassian walnut stock and me shipping it back to the factory. I called Ruger, but I still don’t have an update on the fix. They were supposed to get back to me later today, but it’s already later today so I expect I won’t hear anything until tomorrow or Monday. I’ve got a bunch of .257 Weatherby brass polished and primed, and I’ve got the Barnes monolithic copper bullets my good buddy Mississippi Dave recommended. I’m eager to get that rifle back and continue the load development for it.
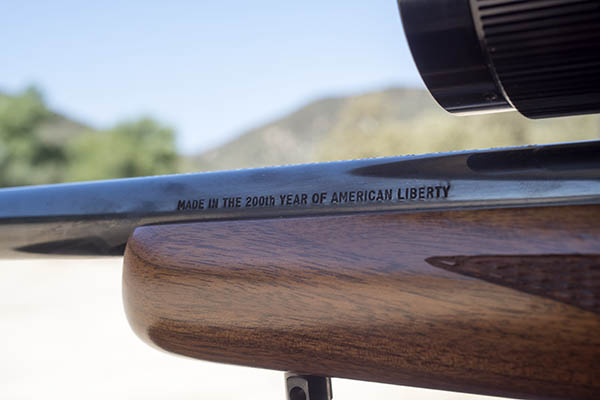
A 200th year Ruger 77 in 7×57. You’d think with all those 7s I’d get lucky, but I haven’t found a way to get tight groups yet. I’m working the problem.
In the meantime, I’ve been playing with a beautiful 43-year-old Ruger Model 77. It’s a 200th year Ruger in a very classy chambering, the 7×57, which is the old Spanish Mauser cartridge. I bought it used in 1977 and it is in pristine condition, and I think I know why the previous owner sold it. It doesn’t group worth a damn. But that makes it more fun (half the fun with these things is searching for a good load). Stay tuned, because if I ever find a decent load, you can be sure there will be a blog on this one.
The carb on my TT250 is gummed up and it won’t idle. That’s not the bike’s fault. It’s mine. I sometimes go months between rides on that bike, and that’s what happened here. I’ll take the carb apart to clean out the passageways, and when I do, I’ll photodocument the approach so you can see how I go about it. I’ll have to re-read the tutorial I did for CSC Motorcycles on the TT250 carb first. These bikes are super easy to maintain, and they have to be one of the best deals ever on a new motorcycle.
Hey, another cool motorcycle deal…my good buddy Ben recently published a book titled 21 Tips For Your First Ride South Of The Border (and it’s free). You can download it here.
Let’s see…what else? Oh yeah, we have a bunch of stuff in the blog pipeline for you. There’s the Yoo-Hoo product review (we haven’t forgotten about that one). There’s a very cool watch company (Gear’d Hardware) that follows the ExNotes blog, and they recently sent two watches to us for review. The review will appear here in the near future. That’s good; we’ve been meaning to start a watch review series and this will get the ball rolling.
A Gear’d Hardware watch, one of two Gresh and I will review for you here on the ExhaustNotes blog.
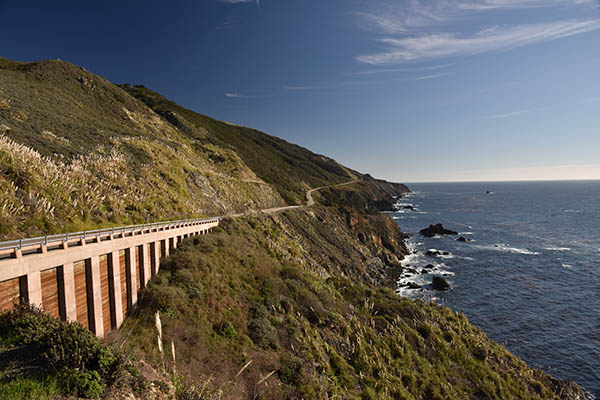
More good stuff: I’ve been playing with another Ruger No. 1 chambered in yet another Weatherby cartridge (the mighty .300 Weatherby), and I’ll be posting a blog about that soon. Another product review that’s coming up is one on turmeric, the dietary supplement that’s supposed to work wonders for arthritis. I don’t have arthritis, but that crash I had on my Speed Triple 10 years ago has bothered me mightily for the last decade, and taking turmeric is getting it done for me. I don’t normally believe in these supplement wonder pills, but folks, it’s working. Watch for the blog on this stuff. And we haven’t forgotten about a near-term ride up the Pacific Coast Highway (good buddy TK and I have been talking about that one).
California’s Pacific Coast Highway: It doesn’t get any better than this.
Stay tuned; there’s always good stuff coming your way here on the ExNotes blog!
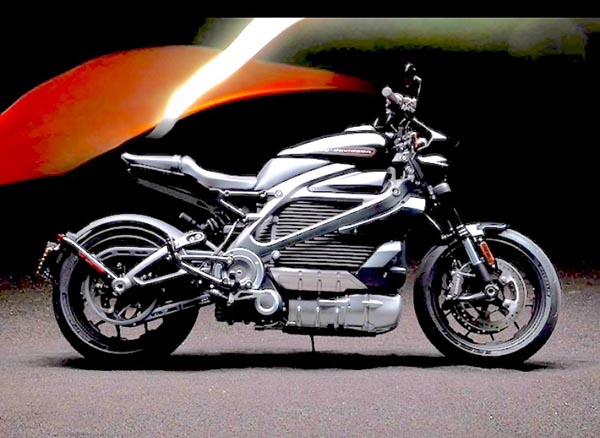
I’m a big fan of electric motorcycles. I like electrical stuff in general and I spent most of my working life as an electrician with benefits. Harley’s new Livewire E-Hog is an impressive first effort but at $30,000 dollars a copy it is a lousy deal compared to E-bikes from other manufacturers. You can easily beat the Livewire in both speed and distance for half the cost but that’s not the Livewire’s major problem.
The Livewire’s problem is industry-wide. Harley and those other guys are trying to duplicate the internal combustion experience with an electric motorcycle and they are burning a lot of joules doing it. Electric motorcycles are not direct IC replacements and their riders understand this.
For motorcycles, battery technology today is not compact enough and recharges too slowly for a rider with no fixed destination in mind. Until manufacturers can agree on a standard-sized, easily swappable battery pack we are stuck waiting for the bike. The first battery operated power tools were like this: you had to plug the whole tool in and wait. No work could be done until the thing was charged.
With standard-sized batteries (within a product line) cordless power tools have nearly supplanted the old, outlet-bound stuff. It takes only a second to swap in a new battery and you are back on the job doing whatever it is that you do. No one has range anxiety because there’s always a hot battery in the charger ready to use. Tesla is working on speeding up charge wait times by swapping the huge battery in their cars and it only takes a few minutes. When an electric vehicle can pull up to a gas station and swap in a charged battery as fast as I can change my power drill battery they will have become viable transportation.
The reality is, manufacturers are not going to standardize battery sizes. The best we can hope for is a battery changeable along the lines of the power tool situation: each battery is specific to the brand. Even that will not happen soon and maybe if you move the goal posts it doesn’t need to happen for the majority of users.
That leaves commuting back and forth to work as the ideal use for an electric motorcycle. You can have a charging source at both ends of the ride and you will be busy working or puttering about the house while the bike charges so there’s no down time. Give up on the idea of e-bikes matching IC bikes in all instances. The highest and best use of electric motorcycles is a situation where you have time to kill between rides.
I know The Motor Company is not going to listen to me, but here goes: Harley, stop making expensive, high performance electric motorcycles. I’ve seen your lighter weight electric bikes and they are so far removed from the traditional Harley-Davidson customer they might as well be electric Buells.
Harley’s marketing for as long as I can remember has been based on heritage. Timeless styling and traditional products have served you well. For a successful E-bike look to your past and the Topper scooter; it’s the ideal commuter platform to modernize (not too much) and electrify. The boxy rear section can hold a huge battery bank without looking like it’s holding a huge battery bank. It’s a classic form that simply drips Harley-Davidson heritage and the youth of America will go gaga over the styling. Keep the thing below $4000 so a normal person can afford one. You’ll have to outsource most of the drivetrain components to keep the price reasonable but you can slap the parts together in an old V-Rod factory and call it made in the USA!
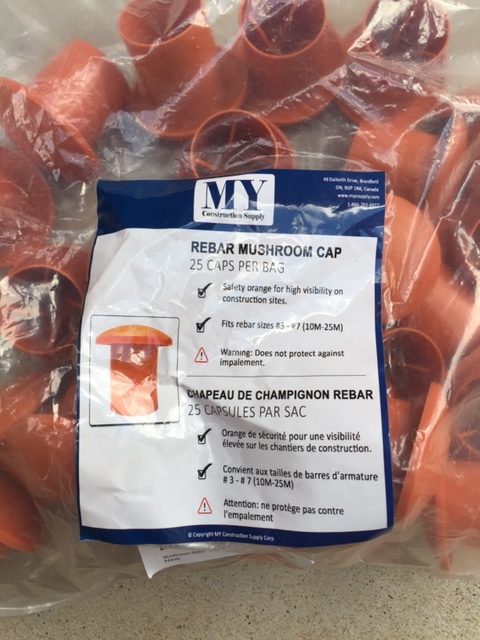
We never used re-bar caps back when I was doing construction. I don’t think they had been invented yet. It was a different time: You had to be tough, man and I was. If you tripped and fell onto an exposed re-bar the thing would go clean through you and out the other side. The jobsites I worked on were grisly with dead men impaled on rusting steel. I’ll never forget that smell. In the hot Florida sun the bodies bloated fast, seemingly still alive as they twitched and waved a stiff, blackened hand each time a bubble of gas escaped.
Guys getting skewered on re-bar was so prevalent we didn’t bother to pull them off until it was time to pour the concrete. Why bother, another man will just come along and land on the thing.
I never fell onto a rebar myself. I’ve come close but managed to avoid spearing the bar, because I didn’t run up a bunch of debt going to college or paying exorbitant hospital bills for puncture remedies. Back then people took responsibility for their actions, not like now. Those guys stuck on the rebar? Maybe they should have eaten less fast food or bought a cheaper car. Today you see rebar covers all over construction jobs. It’s all part of the dumbing down of America.
Back to the rebar covers, I’m reinforcing the ground surrounding The Carriage House and there are a bunch of re-bars sticking up from the retaining wall. I’m not so worried about falling onto them (because I made wise life choices) but the damn things are sharp. The bars will eventually be bent down into the formwork and covered with concrete, until then I’m getting cut to ribbons. A good-sized gash to the elbow was the final straw.
At first I was going to use empty beer cans to cap the bars. That visual might be too much for my wife to handle and anyway I’d have to drink like 75 beers to get the job done. I’ve been trying to lose weight by drinking gin and tonics as a calorie saving measure. Processing that many beers through my gastrointestinal system was a non-starter. I found the MY caps online for 50 cents apiece.
The caps fit rebar from 3/8” to ¾”, inside the cap are 4 vanes that conform to the different sizes. It’s a good set up. The bright orange color alerts you to the bar so there’s less tripping and zero cutting on my jobsite.
They’ve been out in the sun for a few weeks and the color hasn’t faded yet. Kind of funny that the packaging says “Does not protect against impalement.” Which is the main reason you buy the damn things. I suspect some cell-phone owning construction worker fell 13 floors onto the MY cap and managed to sue the company.
Go ahead and call me a nanny-state mason. I deserve it. I guess you could say I’m getting soft in my old age. Seeing all those orange caps sitting atop the rebar makes me sad. I miss the old ways. I miss personal responsibility. And, funnily enough, I miss that smell.
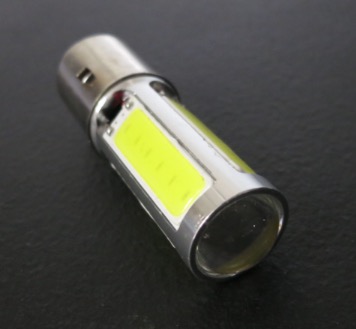
The Husqvarna 510 SMR came stock with a 35-watt/35-watt incandescent headlight bulb that was nearly useless. I say nearly because when it was lit it provided a weak beam limiting nighttime speeds to 30 miles per hour. But it was worse than that because for some reason the motorcycle constantly blew the bulb leaving me to get home using the little parking light bulb (which never blows out). The plastic headlight fixture shows signs of melting even with the standard bulb so I set about trying to find a better idea.
Husky uses an S-type light socket base like you’ll find in scooters and mopeds. This bulb was used as my baseline for temperature and current draw. I figured if I didn’t exceed the standard bulb on these two measurements the plastic headlight should survive and the electrical system would be able to keep up with the program. Baseline was 2.5 amps @ 13-volts and 230 degrees. I did all the tests using highbeam.
The stock incandescent light surprised me. It’s the oldest technology, they’ve been around more than a hundred years, yet it wasn’t the worst of the bunch. I had to try and find something better, though.
I bought the LED bulb off of Ebay and I have no ratings on it because I can’t find it for sale again. The bulb has no markings. It was like a one-shot deal I guess. The reason I chose this one was that unlike the other LEDs it didn’t have the large heat sink or cooling fan behind the bulb. It was a direct fit for the Husky’s push-and-twist bulb socket. The LED used so little power I had to check a few times to believe it. Only 0.14 amps were required to fire the thing up! It also ran much cooler than the other bulbs, producing only 134 degrees. I’m thrifty so I loved the thing but there’s a reason those other LED bulbs have such a big big cooling system: The light output from the minimalist LED was weaker than the stock bulb by a lot.
The halogen was a 50-watt high and low beam. I tried to find a 35-watt halogen but couldn’t at the time. I’ve since found a 35-watt and I’m going to get one and try it. As you would expect, the higher wattage bulb drew more current and ran much hotter: 4.9 amps and 337 degrees (still rising fast). I stopped the test early because I didn’t want to melt my headlight shell. The Halogen was very bright and did a great job projecting all that power to the front. It was the brightest bulb by far. I’d love to be able to run the halogen but I think I’ll have a meltdown if I do.
I found a HID bulb-ballast combination with a multi-fit base that would fit in the Husky’s socket but I would have to gut the contacts to allow the harness passage through. I didn’t want to do this so I just held the bulb in the reflector housing. It was a disappointing bulb consuming more power and putting out less light than the incandescent bulb. If you’ve ever had one of those adjustable, wide/narrow beam flashlights you know how little it takes to change the beam pattern. Bulb position is critical for good output and the HID must not have been in alignment with the reflector’s focal point.
In the video link you’ll see the four bulbs I tested and the statistics on each one. All the bulbs had their pros and cons but none of them solved the problem. I ended up using the LED even though the bulb was the weakest. I was going on a trip to Utah and wanted to see if it would stay together longer than the incandescent. It is still going after 2400 miles. The stocker never lasted as long.
I think I will have to replace the entire headlamp on the Husky to get a decent light. The plastic construction limits how much wattage I can use and is borderline melting at stock levels of heat. I don’t ride much at night but sometimes you get caught out and have to muddle through. I added a bright off-road light to the Husqvarna just for those situations.
Sign up here for automatic email notifications:
Like this blog? Want to have a page with links to Joe Gresh’s product reviews? Have other suggestions? Let us know in the Comments section!
Good buddy Jason, a Ruger No. 1 in .338 Win Mag, and a 400-lb, 7-ft Alaskan black bear.
As the title of this blog implies and in this case, my good buddy Jason was literally loaded for bear. For several years I had owned a Ruger No. 1 single-shot rifle in .338 Win Mag. That’s a monster of a magnum. I had never fired the rifle and I sold it to Jason. He told me he was going on a bear hunt in Alaska (something I’ve always wanted to do), and I was happy to the see the rifle go to a good home. Most recently, Jason sent the photo you see above and a recap of his hunt to me to share here on the ExNotes blog. Here you go, folks!
It all started in 2016 when I purchased my first Ruger No. 1 in 338 Win Mag from Joe. I’ve always wanted a Ruger No. 1, but I already had a Winchester Model 70 in 338 Win Mag. I planned to go on a bear hunt in 2018, so what I did was sell my Winchester Model 70 to my best friend, who went on the bear hunt, too. I would be using my Ruger No. 1. So this is a story about me and my new rifle and our quest for a big Southeast Alaskan black bear. It was a guided hunt through Alaskan Coastal Outfitters.
Our base camp was on a boat and in the evening we would take a skiff and cruise around all the little islands and bays looking for the right bear. We saw lots of bears (a lot of sows with cubs). We also saw a lot of boars. On Day 4 of our hunt we saw a really nice bear. We got as close as we could without spooking him. My guide told me to get out of the boat and he held the boat still for me. Then, as I was pulling my leg over the side of the boat I got hooked on to the edge of the boat and I fell face down in 8 inches of water.
The bear ran off and my beautiful Ruger No.1 was laying in 8 inches of salt water, so we raced back to the boat, took the rifle apart, and cleaned it up so it was like new.
The next day we went out again and this time I was extra cautious not to fall in when we came across the bear you see in the picture. He was about 300 yards from the skiff when we spotted him. We got as close as we could without spooking him, which was about 140 yards, and my guide kept on asking me if I could make the shot. I always answered “yes, no problem.” I lay down and rested my rifle on my pack. Wouldn’t you know it, I had to lay down in a little creek so I got wet again. We lay there for what seemed to be an eternity. My guide made sure it was a boar and not a sow. Finally, he gave me the OK.
Just then, the bear turned so he had his back to me (so I couldn’t shoot). It gave me an opportunity to situate my follow-up shot. I decided the quickest way to get a follow-up shot (if I needed one) was to shoot with the next round in my hand.
The bear finally turned broadside and I dropped the hammer. I hit him just behind the shoulder and he dropped. My guide backed me up with a 375 H&H rifle, but he didn’t need to fire it. The bear went down, and when we reached him, we saw he was the monster he appeared to be from a distance. The bear measured 7 feet and weighed about 400 lbs.
Jason, that’s an awesome story and a magnificent photograph. I was sorry to see that rifle go, but it obviously went to a good home and you sure put it to good use. You know, it takes a real sportsman to do what you did…going after bear with a single-shot rifle. Congratulations on a successful hunt, and thanks much for sharing your adventure with us here on the ExhaustNotes blog!
Would you like to write a guest blog for ExNotes? It could be a gun story, a hunting story, a motorcycle story, or any other idea you think might work for our audience. If you have an idea, please let us know at info@exhaustnotes.us. If we publish your story, you’ll get a signed copy of Destinations with our compliments and gratitude!
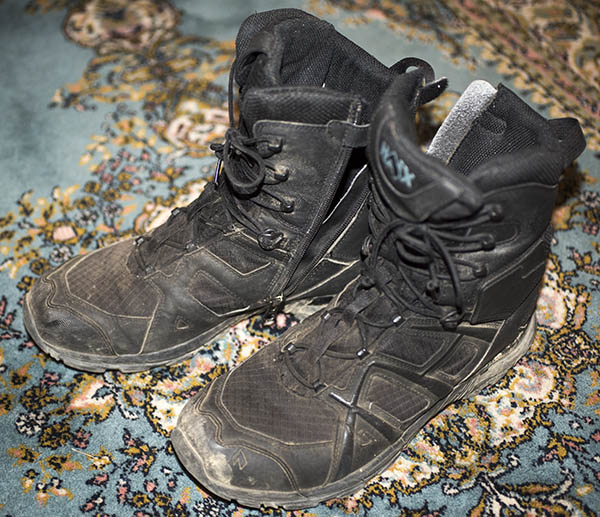
My second pair of Haix boots. They’re comfortable as slippers, they last forever, and they are perfect for adventure riding. These will last me until 2027, I think.
You read Joe Gresh’s Tested to Destruction piece on Rossi Boots. When I read it, I immediately thought of my Haix boots. My first pair lasted more than 10 years. After they finally wore out I tried a less expensive brand, but then I went back to Haix. I had worn the best; no substitute would ever be as good. Haix is pronounced “hikes” and they are, simply put, the best footwear I’ve ever owned.
I happened upon my first pair of Haix almost accidentally. The story goes like this: My good buddy Mike, whom I’ve known since the 7th grade, is a retired police chief. He worked his way up through the ranks of a major metropolitan city on the east coast, became Director of that department (it’s the top spot), and retired. Mike goes to the International Association of Police Chiefs conventions every year, in 2004 that convention was here in Los Angeles, and Mike invited me to go with him. It was a cool experience and we had a blast.
I had a to have a police connection to get in to the event, so Mike deputized me as the Administrative Assistant to the Chief of Police. My new position included a cool official-looking police ID card and I asked if I could get a gun out of the deal. Mike’s answer was a curt “No,” but hey, I tried. We had a hell of a time at that convention. There was all kinds of interesting gear on display. Guns. Helicopters. Police motorcycles. Patrol cars. Surveillance equipment. You get the idea. Oh, yeah. And boots. I’ll get to that in a second.
Facial recognition software. You know, Big Brother. That’s me and Mike being dropped into the data base.
There were cool guys there, too. Mike introduced me to Willie Bratton, senior FBI executives, and the head of the CHP (I asked that guy if he could help me with a speeding ticket and no one laughed…I thought it was funny as hell). We saw all kinds of cool gear, including a police helicopter that you could climb into. I did that and immediately starting pushing buttons from the pilot’s seat. One sent power to the turbine starter, the turbine started to whir, and the blades actually started to move. Mind you, all of this was indoors at the Staples Convention Center. Wow, talk about people descending on us quickly! When we walked by that helicopter later, it was roped off. You couldn’t sit in it any more, thanks to me.
Oh, yeah. The starter worked. We’re still laughing about that one!
But I digress. The point of this story was that one of the vendors displaying their goods was the Haix boot company, whom I had never heard of before. The boots looked good, I tried a pair on, and they felt great. Think slippers for comfort level, great support, and a cool combat boot look. They were $200, but I was in. The guy told me to take the pair I had tried on, and they would invoice me later.
I wore those boots everywhere for the next 10 years, and I always wore them on my motorcycle rides. That included the 2005 Three Flags Rally, tons of weekend rides, tons of Baja rides, the Hells Loop Rally, and lots more. They were waterproof, unlike motorcycle-specific boots they were comfortable to walk around in, they were lightweight, and they just felt great. After more than 10 years of abuse, though, the soles started to separate during the Western America Adventure Ride in 2015. I remember Gresh picking up some Shoe Goo for me in Cheyenne, Wyoming, which got me another year of use. But finally, I had to give in. It was time for a new pair.
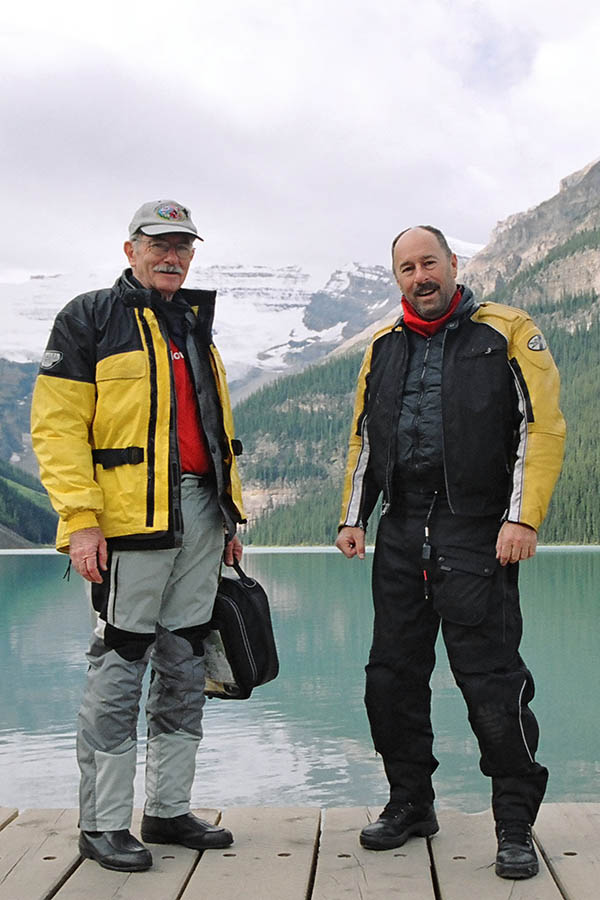
Yours truly on the right, wearing my first pair of Haix boots, in 2005. Marty and I were standing in front of Lake Louise in Canada. We rode in the 2005 Three Flags Classic Rally from Mexico to Canada.
I cheaped out and bought a pair of S.W.A.T.-brand boots on the Internet prior to leaving for the Colombia ride. They were stiff, they were uncomfortable, and after 5 days of riding through the Andes Mountains’ heat, humidity, and rain, they were toast. My take on it is that the S.W.A.T. brand is probably good for kicking butts and taking names, but they didn’t make it for me as a comfortable motorcycle boot. Nope, I needed me another pair of Haix.
Then good buddy Mike came to the rescue. There was another IACP convention (in San Diego, this time), I was Deputy Dawg again, and I shelled out $200 for my second pair of Haix. Which I’m wearing now, knowing they’re worth every penny of that $200. In 2027, I’ll be due for my third pair, and you can bet I’ll be going for HAIX again. I’m just hoping that the 2027 IACP convention will be here in southern California.
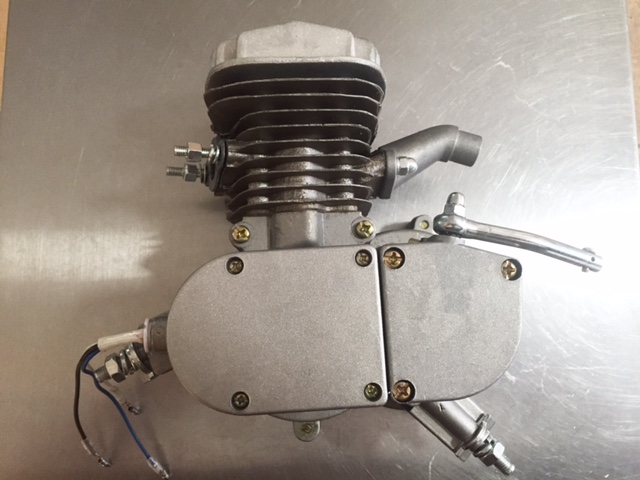
There is a universe of product testers who thrive on YouTube. The oddest bit of kit has at least three reviews and the information is almost always valuable. I never buy anything without checking YouTube first. I’ve had my eye on these little motorized bicycle kits for years and after watching several videos showing the kits as fairly good quality I finally pulled the trigger.
The amount of equipment you get for $108 and free shipping from Amazon is amazing. The kit is complete, no need to go to the hardware store for an extra widget or a bolt. Some of the U-Tubers replaced the nuts and bolts with higher spec stuff but it’s not necessary.
The kit comes with a zillion parts bagged by function. On the carburetor, behind the idle screw old school motorcyclists will recognize the tickler, a plunger device that drowns the carb float causing fuel to spill into the engine. The function of the tickler is to enrich the fuel/air ratio for cold starting. Kind of like a choke except more flammable.
Amazon has pages and pages of bicycle motors and most of them look like the one I bought. Prices range from $90 to $200 for what looks like the same exact thing. There are 50cc kits and 80cc kits so I opted for the 80cc. YouTubers will tell you the 80cc engine measures out to around 60cc, which is a good thing because the engine fins don’t look large enough to cool a bigger bore. You can also buy 4-stroke kits but then you’d be no friend of mine. The main reason I sprung for this one was because it came with a chrome exhaust pipe.
The transmission is a one speed, manual clutch set up and you’ll get the throttle, throttle cable with a matching grip for the left side. A clutch lever with a push button latch allows you to disengage and lock the clutch for pedaling the bike as normal. Included on the throttle housing is a kill button that plugs into the ignition coil. Wiring couldn’t be easier as there are only two wires and I’m guessing it doesn’t matter how they connect.
The hokiest part of the conversion is attaching the rear sprocket. Your average bicycle has no way to connect a rear sprocket so you have to use two rubber discs, three steel plates and the sprocket to sandwich the spokes. This seems like a bad idea from many angles but YouTubers say it works ok. Centering the sprocket is critical along with adjusting run-out. A flimsy looking chain idler pulley is included to keep the included chain from sawing through the lower frame rail but again, the Tubers say it ends up working well. Careful adjustment of the motor in the frame may eliminate the need for an idler. That’s what I’ll be shooting for.
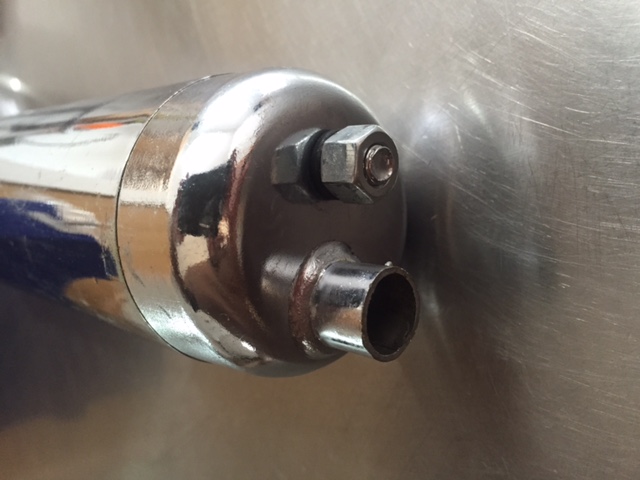
When I say complete I mean complete. You’ll get a chain guard, a petcock, a sparkplug and even fuel hose. Unless you want upgraded components there is really nothing else to buy.
The kit comes with a cool teardrop gas tank that bolts to the top frame tube. The tank comes glossy black and would look great sitting atop an 80 cubic-inch Indian flathead drag bike. Handwrite “The Jewel” on the side of the tank in that yellow junkyard paint and you will win all the bike nights.
The sheer quantity of parts for $108 makes me happy (a fringed T-shirt for a Harley costs $100). For me, it almost doesn’t matter it the thing works or not. I like looking at all the new pieces. My next step is to find an older, one speed, balloon-tired 26-inch bicycle for a host. One with curving frame tubes and chrome fenders. I’ll let you know when I find it and I’ll do a story on the install and road test of the little motor.
We’re starting a new feature here on ExhaustNotes.us called Tested To Destruction. TTD will be a life-cycle product test from purchase to the dumpster. You’ll not find so complete a product test anywhere else on the Internet, go ahead and look around. Due to the long test periods involved some of the products may be discontinued and no longer available. There’s not a lot we can do about that. One other note: By definition we are testing to destruction so all products will fail in the end. It happens to the best. Nothing lasts forever.
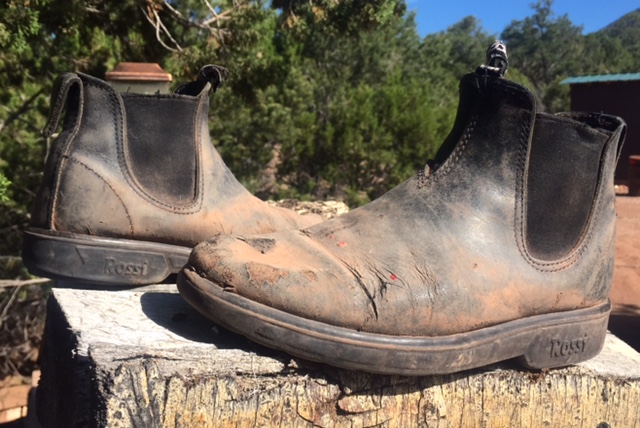
I first became aware of Rossi boots in Australia. Nearly every tradesman wore the things and the ones I spoke to raved about the classic, made in Australia boot. I was on extended leave in the outback and needed a tough boot for hiking and camping so I bought a pair of Rossi Enduras. The Rossies aren’t cheap (like me) but I splurged and who doesn’t love having boots named after the greatest modern-era motorcycle road racer?
The Rossies were comfortable from Day One. No blisters or slipping, soft and flexible with pull tabs and elastic sides to make installation a breeze. No wonder the Tradies wore them. That first pair lasted through Australia and back in the States through several boat rewires.
In my real job I worked in very oily conditions. The bilge of a commercial fishing boat is full of slimy gunk. Unlike every other boot or canvas shoe I have purchased, the Rossi soles stayed firmly attached to the uppers. The Rossies easily outlasted four pairs of regular boots.
One thing that disintegrates after a couple years is the rubber liner inside the bottom of the boot. This liner is supremely comfortable when new and I guess you can replace it with another liner. This has happened with both pairs I’ve owned. When mine fell apart I pulled out the pieces and kept on pouring concrete. The boot is still comfy without the liner, just less so.
The boots in the photo are my second pair of Rossies and they have gone through the wringer on countless construction jobs. Imagine: 2 pairs of boots for over 5 years of hard use. I used to go through work boots every 6 to 9 months. My second pair, like the first, never came apart and I’m retiring them only because they look so bad people keep offering me money for a cup of coffee.
I wear these boots when riding motorcycles, dirt or street. The comfort is great and being able to easily slip them off on hot rides is so nice. I know slip-on boots may fly loose in a crash situation so save your breath: I make my gear choices for me. You make your gear choices for you. Anyway, Flat Earthers and Vaccine Deniers tell me it’s safer to be thrown clear of the boot in an accident.
You can buy Rossi boots online but make sure to get the ones made in Adelaide, Australia. They’re not very stylish and you can expect to pay a lot but it’s like you’re getting four pairs of boots for the price of one. There are several boots that look the same as Rossies but are lower quality. Shop wisely.


 We never used re-bar caps back when I was doing construction. I don’t think they had been invented yet. It was a different time: You had to be tough, man and I was. If you tripped and fell onto an exposed re-bar the thing would go clean through you and out the other side. The jobsites I worked on were grisly with dead men impaled on rusting steel. I’ll never forget that smell. In the hot Florida sun the bodies bloated fast, seemingly still alive as they twitched and waved a stiff, blackened hand each time a bubble of gas escaped.
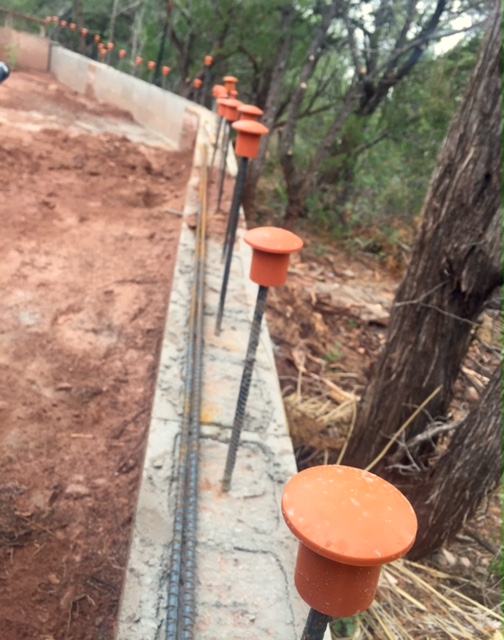


 I had a to have a police connection to get in to the event, so Mike deputized me as the Administrative Assistant to the Chief of Police. My new position included a cool official-looking police ID card and I asked if I could get a gun out of the deal. Mike’s answer was a curt “No,” but hey, I tried. We had a hell of a time at that convention. There was all kinds of interesting gear on display. Guns. Helicopters. Police motorcycles. Patrol cars. Surveillance equipment. You get the idea. Oh, yeah. And boots. I’ll get to that in a second.
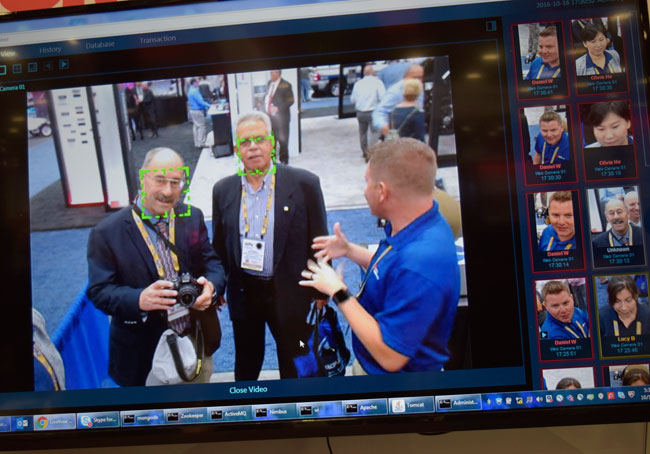
 The amount of equipment you get for $108 and free shipping from Amazon is amazing. The kit is complete, no need to go to the hardware store for an extra widget or a bolt. Some of the U-Tubers replaced the nuts and bolts with higher spec stuff but it’s not necessary.
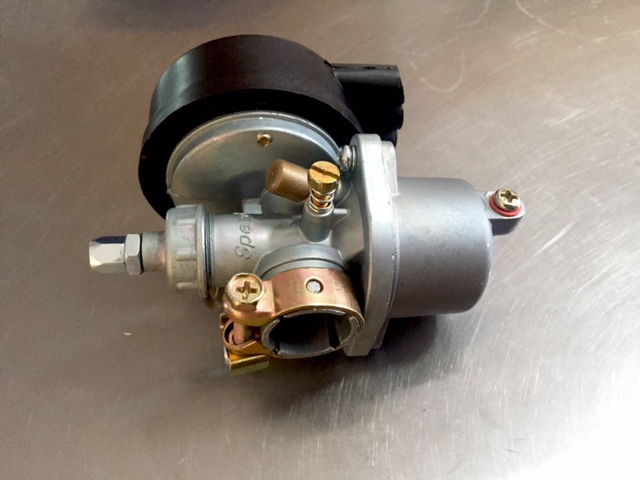 Amazon has pages and pages of bicycle motors and most of them look like the one I bought. Prices range from $90 to $200 for what looks like the same exact thing. There are 50cc kits and 80cc kits so I opted for the 80cc. YouTubers will tell you the 80cc engine measures out to around 60cc, which is a good thing because the engine fins don’t look large enough to cool a bigger bore. You can also buy 4-stroke kits but then you’d be no friend of mine. The main reason I sprung for this one was because it came with a chrome exhaust pipe.
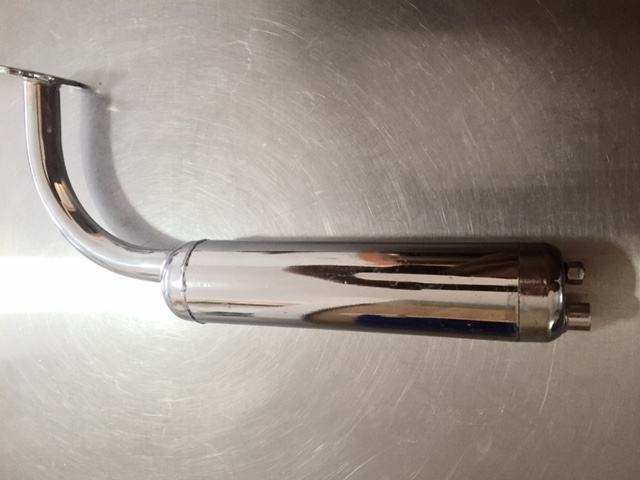
 The transmission is a one speed, manual clutch set up and you’ll get the throttle, throttle cable with a matching grip for the left side. A clutch lever with a push button latch allows you to disengage and lock the clutch for pedaling the bike as normal. Included on the throttle housing is a kill button that plugs into the ignition coil. Wiring couldn’t be easier as there are only two wires and I’m guessing it doesn’t matter how they connect.
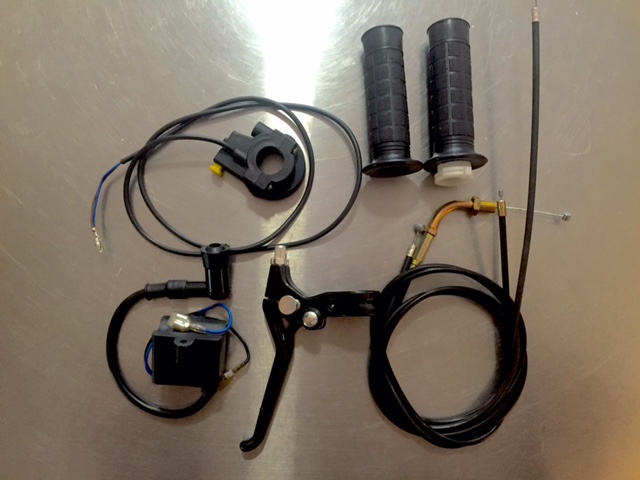 The hokiest part of the conversion is attaching the rear sprocket. Your average bicycle has no way to connect a rear sprocket so you have to use two rubber discs, three steel plates and the sprocket to sandwich the spokes. This seems like a bad idea from many angles but YouTubers say it works ok. Centering the sprocket is critical along with adjusting run-out. A flimsy looking chain idler pulley is included to keep the included chain from sawing through the lower frame rail but again, the Tubers say it ends up working well. Careful adjustment of the motor in the frame may eliminate the need for an idler. That’s what I’ll be shooting for.
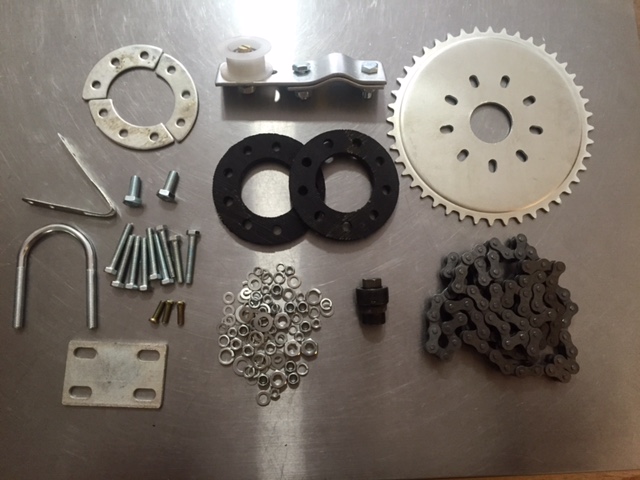 When I say complete I mean complete. You’ll get a chain guard, a petcock, a sparkplug and even fuel hose. Unless you want upgraded components there is really nothing else to buy.
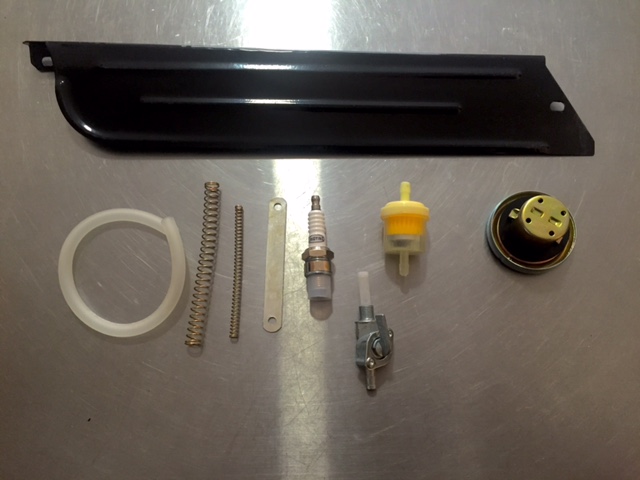 The kit comes with a cool teardrop gas tank that bolts to the top frame tube. The tank comes glossy black and would look great sitting atop an 80 cubic-inch Indian flathead drag bike. Handwrite “The Jewel” on the side of the tank in that yellow junkyard paint and you will win all the bike nights.
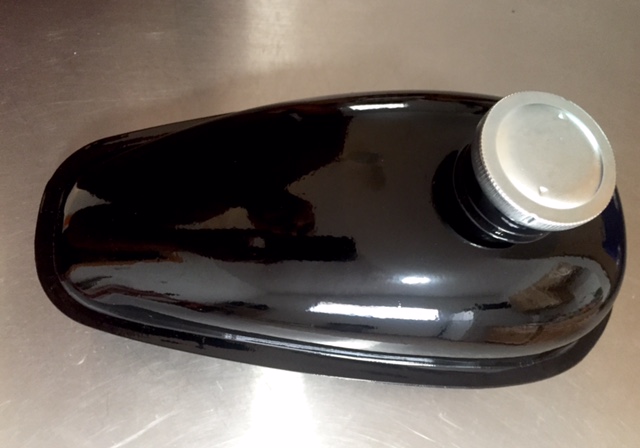 The sheer quantity of parts for $108 makes me happy (a fringed T-shirt for a Harley costs $100). For me, it almost doesn’t matter it the thing works or not. I like looking at all the new pieces. My next step is to find an older, one speed, balloon-tired 26-inch bicycle for a host. One with curving frame tubes and chrome fenders. I’ll let you know when I find it and I’ll do a story on the install and road test of the little motor.
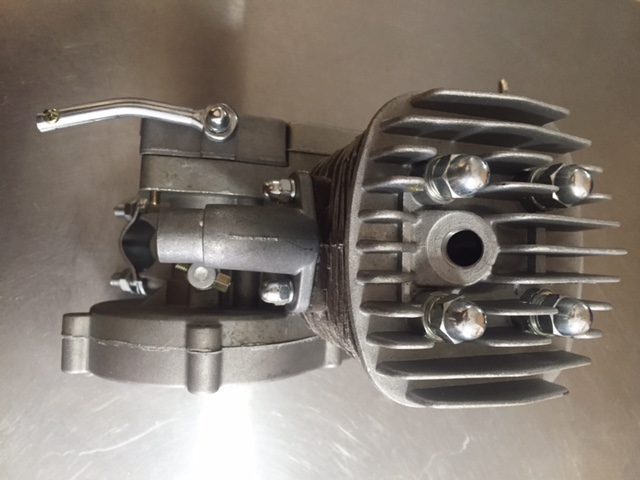
 We’re starting a new feature here on ExhaustNotes.us called Tested To Destruction. TTD will be a life-cycle product test from purchase to the dumpster. You’ll not find so complete a product test anywhere else on the Internet, go ahead and look around. Due to the long test periods involved some of the products may be discontinued and no longer available. There’s not a lot we can do about that. One other note: By definition we are testing to destruction so all products will fail in the end. It happens to the best. Nothing lasts forever.