Gresh’s story on Bonneville appears today in Motorcycle.com! You can read it here!
Motorcycles, Scooters, Guns, Adventures, Opinions, and More

Gresh’s story on Bonneville appears today in Motorcycle.com! You can read it here!
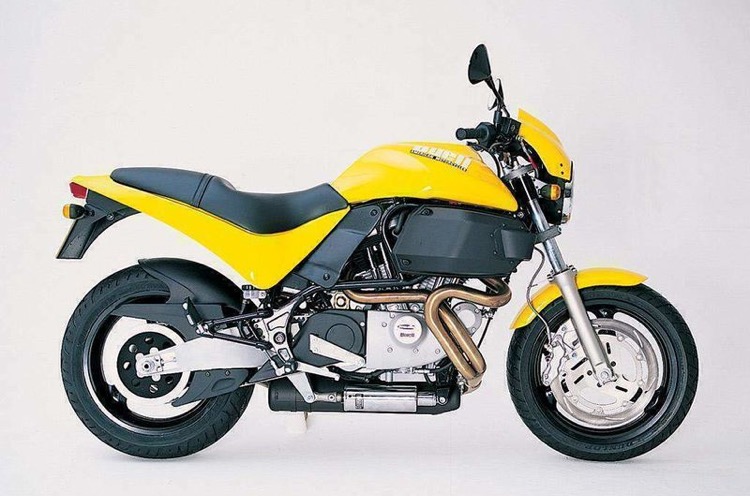
I like all the Buell models and the Buell M2 Cyclone is my favorite Buell of the bunch. I mean to have one before I shuffle off this mortal torsion. Unlike most of the motorcycles I want to own, this is one Dream Bike that is very affordable. Even an Internet blogger wannabe can pick up a running, low mileage copy for a couple thousand bucks. And if I ever get a couple thousand bucks ahead I’ll get one.
The M2 was manufactured in that brief window of history before Erik Buell went totally crazy. After the M2 Buell started mixing up all the traditional systems on a motorcycle just to show you that he could. Yeah, it worked but the motorcycling public wasn’t ready for inside-out brakes and aluminum frames full of gasoline.
The frame on the M2 is plain old steel tubing with a sturdy rear sub-frame that can support a passenger or luggage. The value of a sturdy sub-frame was made apparent to me on a recent trip to Bonneville, Utah. The swaying luggage on my pencil-necked Husqvarna 500 frame was nerve wracking. Similar to an old Norton, the M2 frame isolates all the motorcycle parts a rider comes in contact with from the shaking, quaking Sportster engine. That feature comes in handy on a long trip.
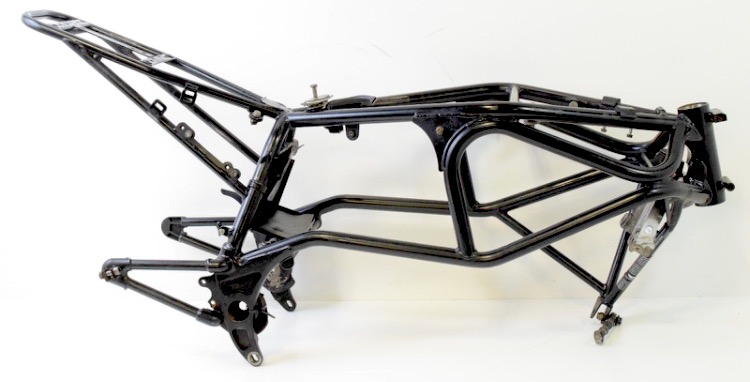
Steel is relatively easy to bend and weld. Even the most basic repair shop will have a set of 0xy-acetylene torches that can fix anything on the M2’s frame. I also like the standard gas tank position and conventional forks. I don’t road race on the street so the added stiffness of a cool, upside-down front end is wasted on a peon like me.
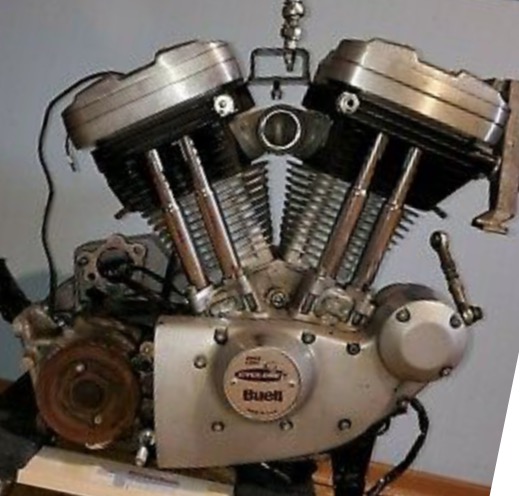
The engine on the M2 is a hot-rodded 1200cc Sportster putting out around 90 horsepower. 90 horsepower is a lot of go-go from a half-century-old design that puttered along at 50 horsepower for decades. Just getting a new 883 Sportster engine up to the 90 horsepower level would cost more than an entire Buell! Later, crazier Buells had even more power and more Buell-specific engine parts while still being based on the Sportster. Buell even used, God forbid, Rotax engines! I can see parts for those engines becoming scarce within the 100-year time frame I like to operate. No such problems with the M2 engine as it’s mostly plain-old-plain-old and parts for the Harley-Davidson Sportster engine will be available on into the next millennia.
The M2’s styling has hints of Buell’s Blast but it looks good to me. I like a standard-style motorcycle, one that can go from touring bike to trail machine with only the removal of a few bungee cords. It’s a model I keep a weather eye on in case a steal of a deal pops up on one of the Internet for-sale sites. And yellow is the fastest color.
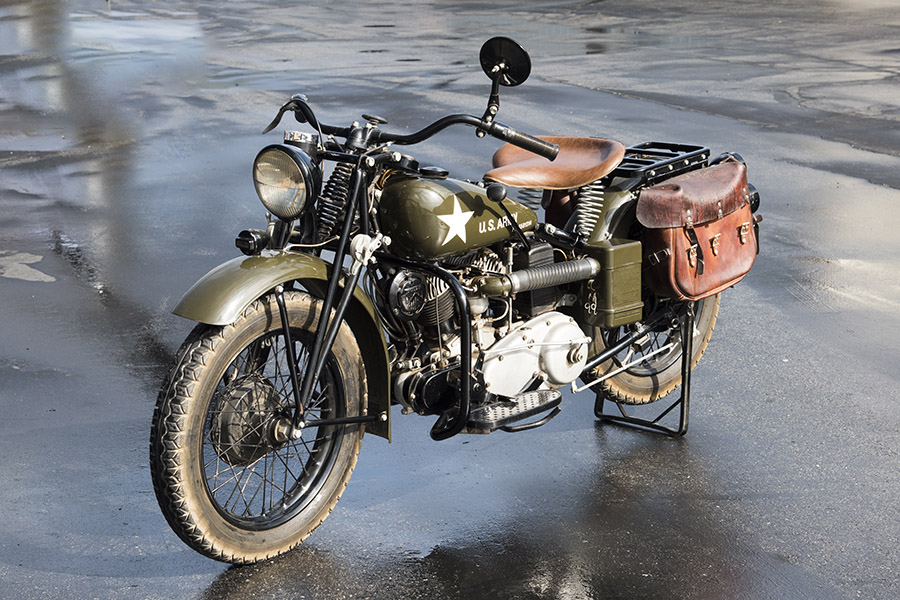
The world was at war, the Army said build motorcycles this way, Indian saluted and executed, and Harley told the Army to go pound sand. This is the Indian that resulted, it’s running in the current issue of Motorcycle Classics magazine, and you might want to read it.
Join our Facebook ExNotes page!
Never miss an ExNotes blog:

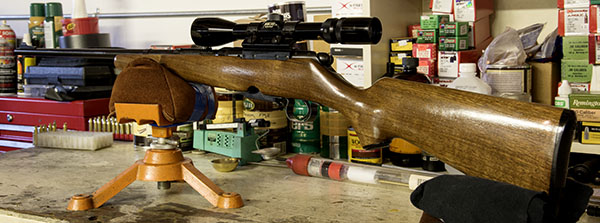
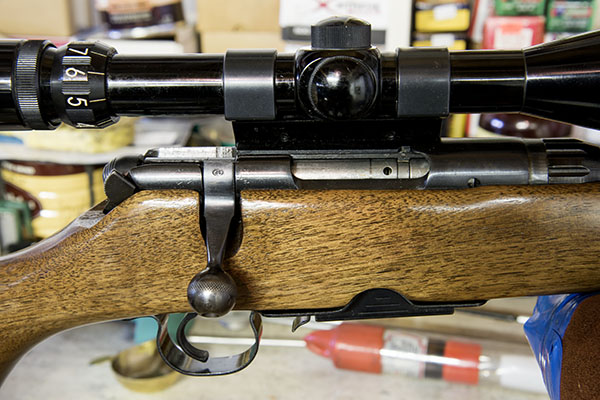
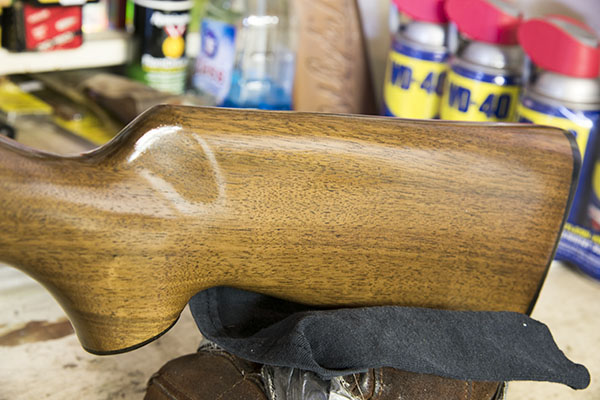
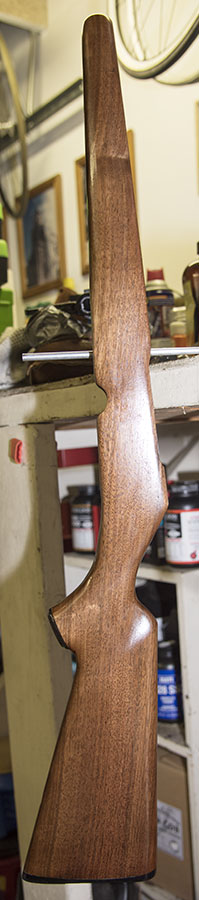
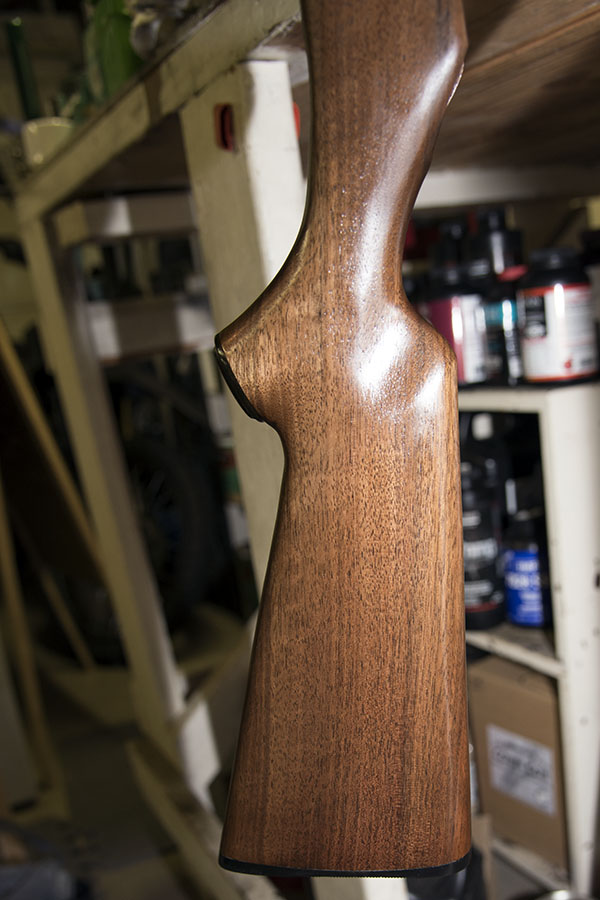
This blog will wrap up the series on refinishing the Savage 340 rifle. It’s been quite an adventure and the Savage is quite the rifle. As you may recall, I found this rifle on the consignment rack at a local gun store, and to my great amazement, my little $180-dollar econo gun turned out to be quite the tack driver. I purchased the rifle with a refinishing project in mind, and now it’s complete.
I stopped after eight coats of TruOil, as the results were the same after the sixth and seventh coats. The Savage went back to together in minutes, and it looks like a new rifle. Actually, that’s not quite right…the 340 Savages that left the factory never looked this good..
Here are a few shots from the right side…
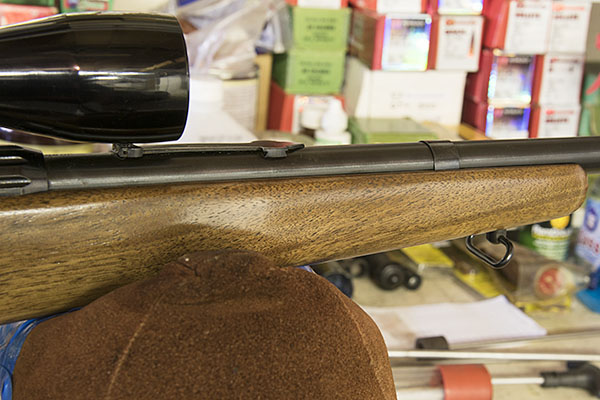
And a few from the left…
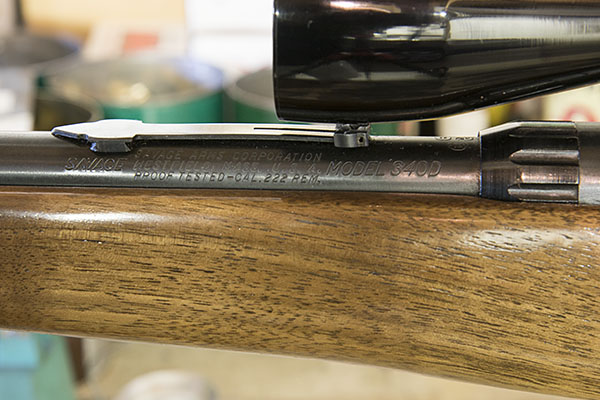
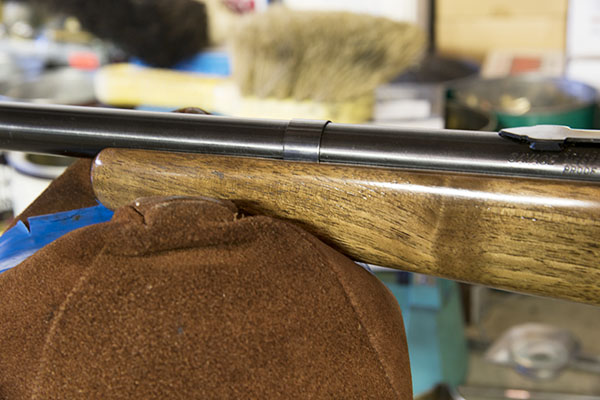
Here are a few before and after shots to allow a more direct comparison…
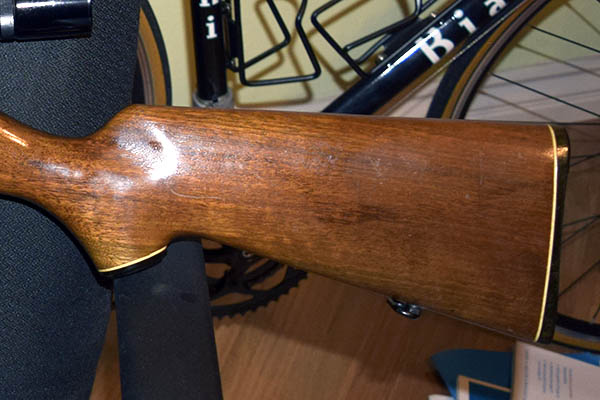
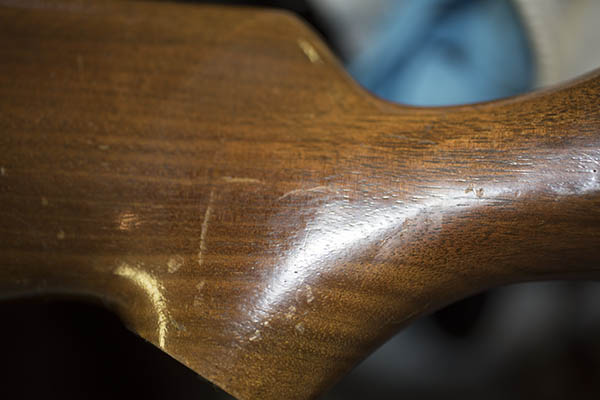
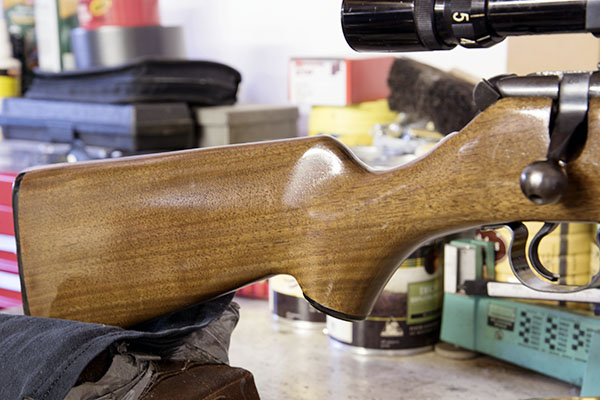
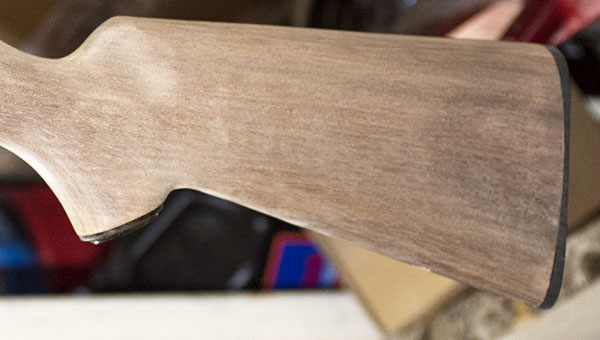
 The original finish had a lot of scratches and dings; those are all gone. The 340 originally had white line spacers between the buttplate and the stock, and between the pistol grip cap and the stock. I like the “less is more” look (I think it’s more elegant), and I think I achieved it by deleting the spacers. The rifle’s original finish was some sort of shellac or varnish that gave a reddish hue to the stock; the new TruOil
 finish allows the natural walnut color to emerge and I like that better.
There are other advantages besides just good looks to an oil finish. When the stock gets scratched or worn (and if it’s used in the field, it will), it’s a simple matter to just reapply the TruOil again. When you do that, the stock will be like new again. It’s easy to touch up an oil finish. Another advantage is that the stock is sealed. The oil finish is relatively impervious to moisture, and that keeps the stock stable. It won’t induce a shift in bullet impact as a result of the stock absorbing moisture and distorting. And of course, there’s that most basic advantage: It just flat looks good.
If you would like to see how this project began and read a bit about the Savage’s accuracy, you can do so here.
A Savagely Inexpensive Rifle
Savage Refinish Part I
Savage Refinish Part II
Savage Refinish Part III
It’s weird, I know, but I usually get the pre-ride jitters on every big motorcycle ride I’ve ever done. This time, I’m going into Mexico, back into the US, across the US from our southern border with Mexico to our northern border with Canada and then on up into Canada, and then back across the US to arrive home after riding roughly 4500 miles on the 2019 Three Flags Classic. The weird thing this time is I’m not apprehensive at all. I can’t wait to get started on this ride.
 I was able to hook up BajaBound Insurance with the Southern California Motorcycle Association and they are now the recommended insurers for the Mexico leg of this trip (hey, that’s what happens when you advertise with ExhaustNotes), and I’m going to get my insurance as soon as I’m done with this blog.
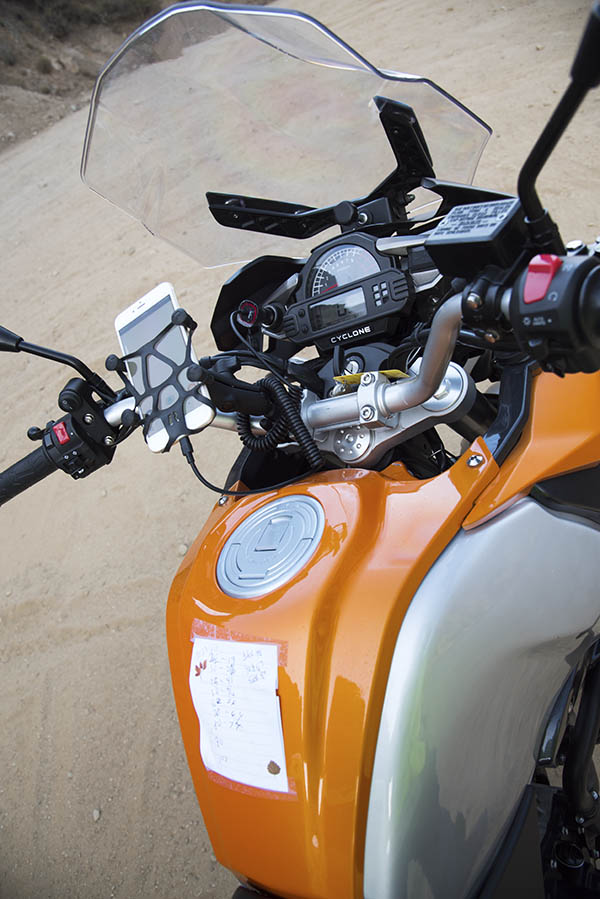
 The CSC RX4 I wrote about earlier is running like a champ, and the guys at CSC Motorcycles have done a super job prepping the bike for me. There really wasn’t too much to do…I asked for the big Tourfella bags so I can carry my Nikon and my laptop to give you folks all the great photos and blogs you’re used to seeing on any ExNotes ride, a mount for my cellphone, and a set of running lights. I could have done without the running lights (you know, the spotlights) because the headlight on the RX4 is so good, but don’t tell CSC I told you. You should buy the spotlights anyway. They look cool.
Man, I am looking forward to this one. I’m going to make new friends and see new sights. I can’t wait to meet the other 249 Three Flags Classic riders. And I’m going to do it all on the first RX4 in North America. It’s going to be great.
I won’t feel bad if you don’t believe a word of this story. I don’t believe it myself and I was there.
 Here’s the thing: my 2008 Husqvarna SMR510 single cylinder thumper has always gotten around 50 miles per gallon of gasoline. Sometimes it does 47mpg, other times 52mpg. These are mostly highway mile ratings because traffic doesn’t exist in La Luz, New Mexico. Rain or shine, for 12,000 miles the fuel usage has been consistent. That’s not bad mileage for a high-strung, near race bike engine so I’m happy.
The Husky seemed to be stalling more frequently than I like on the trip to Bonneville. The clutch was dragging a bit, the oil was overdue for a change, it was 100 degrees plus everyday and the 510 spins only the barest of flywheel to ensure quick revs. Added to all this is the Husky’s tall first gear, which requires a bit of slip to get off the line. I checked the intake system for air leaks and tightened the hose clamps and gave all the whatnots a good look over. Everything seemed ok. Maybe Joe Berk is right: Maybe I just don’t know how to ride a big 4-stroke single.
My riding buddy Mike and I were at the Pilot fuel station in Wendover and he suggested I try some Lucas fuel treatment. “That’s good stuff, pour some in the tank each time you fill up and see if the bike quits stalling.” Normally I put no faith in fuel additives. It’s all snake oil to me but I figured I’d humor Mike and pour some in for appearances. Nothing happened. The bike kept stalling. It ran exactly the same. I made a special effort to rev the piss out of the engine to keep from stalling in traffic and went about my business.
It was on the ride home that the strangeness started. I was getting well over 50 miles per gallon at our first gas stop. I dumped a little more Lucas snake oil in the fresh tank. The next couple gas stops I didn’t bother to check the mileage but each time I filled up I dumped a little of the Lucas sauce into the tank.
On the second day of our homeward trip the Husqvarna did 70 miles per gallon. I was stunned. I figured I must have been doing something wrong so I dumped a little more Lucas in the tank and ran 100 miles down the road. This next tank was only 67 miles per gallon. These mileage numbers kept up all the way back to La Luz. I’m out of snake oil so it will be interesting to see if the fuel consumption increases.
How is this possible? How can a few ounces of yellowish liquid increase mileage by 40%? What am I doing wrong? Get this: normally I can go about 150 miles before running out of gas. With the magic sauce I can go 210 miles! I can’t believe it. Has anyone else experienced this phenomenon? Tell me about it in the comments section, please. I need to know that I’m not insane.

I’m getting excited about the upcoming Southern California Motorcycle Association’s Three Flags Classic adventure and the CSC RX4 I’ll be riding on this epic rally. I’ve been putting a few miles on the RX4 CSC graciously provided and I thought I would fill you in on a few of the specifics I’m discovering on this bike.
I have a measured mile by my home and I was happy to see that the RX4 clocked it at exactly 1.0 miles. I think that’s pretty much what all the motorcycles do these days for obvious reasons. If the odometer read more miles than you actually covered, the manufacturer would be cheating you out of a portion of the warranty, and if the odometer read fewer miles, they’d be warranting the bike for longer than they intended to. The point is moot with a CSC motorcycle; their bikes are warranted for unlimited miles. But it’s nice to know that whatever distance it says you’ve gone is the real distance.
The next thing I checked was fuel economy, and I did so based on a mix of freeway, city, and mountain road riding. The bike I rode, with roughly 1200 miles on the clock, returned 66.34 mpg. I think CSC advertises 60 mpg for the RX4; I did 10% better than that with the one I’m riding.
Next up was motorcycle speed indicated by the speedometer versus GPS indicated speed. I found that the speedometer was 15% to 8% optimistic, depending on velocity. At higher speeds, the speedometer error decreased to the 8% range. It’s pretty common for motorcycle speedometers to be about 10% optimistic. It’s also very common for the percentage difference between actual speed and speedometer-indicated speed to not be constant (the error percentage changes with speed).

Next up was a quick look at engine RPM versus indicated speed. The RX4 cranks way less RPM at every speed compared to the RX3. Here’s what it looks like on the RX4…
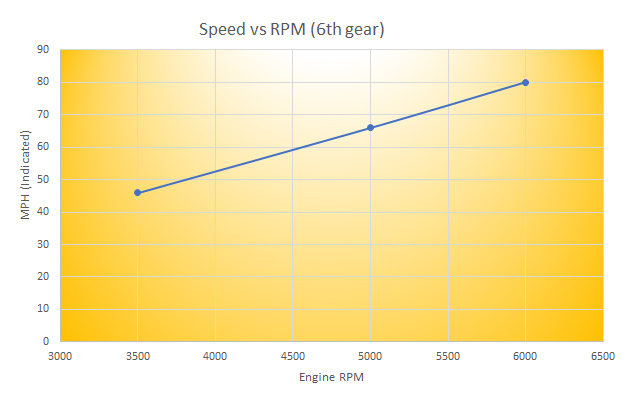
The RX4 has a torquey motor, and I was surprised at how low the RPM is at any given speed compared to the RX3. I know on my RX3, 80 mph is somewhere near the redline at 9000 RPM. On the RX4, the engine is just loafing along at a meager 6000 RPM. The RX4 engine pulls strongly from anything above 3000 RPM. You can downshift to move away more quickly, but you don’t need to on this bike.
And hey, because I know you’ll ask, here’s what the bike sounds like…
Another area in which the RX4 excels is its lighting. The headlight does a fantastic job; I was impressed riding it at night.

That’s it for now. I’ll have a lot more info on the RX4 and the 3FC19 ride, and I’ll be posting from the road every day. Make sure you sign up for our automatic blog updates so you don’t miss anything!
Want to learn more about the RX4 motorcycle? Take a look at our comparisons of the RX4 to the RX3 and the KLR 650 here. And don’t forget to visit CSC’s website, too, for more information on the RX4 and CSC’s other motorcycles.
In our previous blogs, we removed the Savage 340 barreled action from the stock, we stripped the old finish and made a few minor wood repairs, and we sanded the stock to a smooth finish with successively finer sandpaper. We’re now ready to get to the fun part, and that’s applying the TruOil for a rich, deep, and elegant finish.
 Applying the TruOil
 to the stock takes several days because it involves repeated applications and drying cycles. There are basically two ways to go here. We can create a deep gloss finish, or we can create a subdued satin finish. I like both, and as of this writing, I haven’t decided what the final look is going to be.
You’ll recall that I omitted the white line spacers between the stock and the buttplate and between the pistol grip cap and the buttplate because I like the look better without the spacers.
I always c-clamp a rod to my bench because that’s where I’ll hang the stock after each TruOil coat to allow it to dry. You can see that in the photo to the right.
The way I like to do this is I cut out a small square of old T-shirt for the TruOil applicator. I’ll put a small bit of TruOil
on the cloth and rub that into the stock, and then hang the stock to allow it to dry.
On this particular piece of walnut, I noticed that the walnut pores were large in a few areas, so I put on two coats over the space of a couple of days to see how they filled. I didn’t like the way the pores looked (they were not filling) after the second coat. That’s okay; we have an app for that. It involves applying a thick coat of TruOil and giving it several days to cure. That worked for me because I was going to be out of town for several days (another secret mission, you could say), and that would give the third coat plenty of time to thoroughly cure.
Some folks like to use a wood filler to fill the pores. I’m not one of them. I like to let the TruOil do all the work. I think it looks better than using a filler.
After the third, thick TruOil coat cured, I then went to work on the stock with 0000 steel wool. The idea here is remove all of the excess TruOil
from that third, thick coat, and get a uniform surface with no open pores. That worked out well, and I had a nice subdued stock finish that already looked way better than the original finish. I could have stopped at that point and reassembled the rifle, but I decided to go for a deeper finish. More TruOil
coming up, folks.
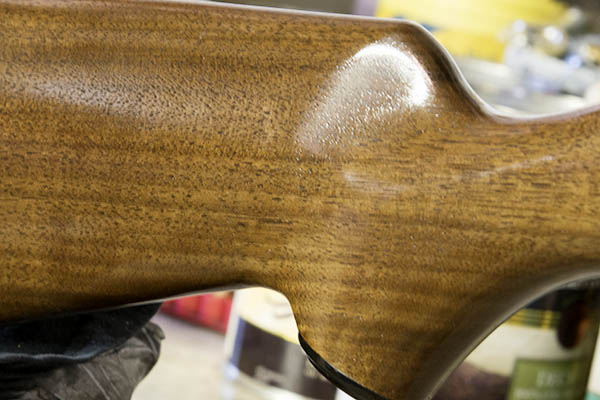
 I applied a thin fourth coat of TruOil
 and allowed it to cure overnight. The stock started to look very good, and I next applied a fifth thin coat. It’s what’s curing now, and it’s what you see in these photos. The drill is to go very, very light with each coat, rubbing it into the walnut with the cloth applicator. You want to get the wood wet, but just barely. If you get it too wet, the TruOil
will run (and then you have to rub it down with steel wool after it cures and start all over). I’m going to do this a few more times, and I’ll decide on the total number of TruOil
applications based on how the stock looks after I apply each coat. As I mentioned above, I may leave the high gloss finish as is, or I may opt to break the shine with 0000 steel wool and have a subdued satin finish. We’ll see.
Read more of our Tales of the Gun stories here, and don’t forget to sign up for our automatic email blog notifications!
Did you miss the earlier blogs on this Savagely inexpensive, tack-driving Savage 340? You can see them here, here, and here.
I told you a bit about my 222 Savage 340 in an earlier blog, and I described removing the barreled action from the stock for a refinishing project. This is the second installment of that project, in which I remove the old finish and prep the stock for refinishing.
At this point, all that’s left is the walnut stock, and that means it’s time to remove the old finish. The last time I did this I used an spray that took the finish off almost immediately, and it required only one application. This new stuff is supposed to be better for the environment, and the spray can said it might take a couple of applications to get all of the old finish off. The instructions also said to wait 3 hours after applying it. It did take three applications to get all of the old finish off. Somewhere a tree hugger is thankful, I guess, but it meant that with the wait times after each application this task was spread over 2 days. The way I used it was I sprayed the stuff on, I waited the three hours, and then I wiped the gooey finish remnants off with a towel. I wore disposable rubber gloves and wiped the stock down with an old terry cloth towel.

After that, I went to work with a heat gun on the stock. That sweated out the whatever oils were left in the wood, and then it was time to start the stock repairs and the sanding.
There were a couple of depressions in the stock (not chips, but slight depressions where the wood had been compressed). That called for the old wet washcloth and iron trick. The drill here is to lay a wet washcloth over the dings in the stock, and then apply the hot iron to the washcloth directly over the dings. The resulting steam is forced into the wood and it lifts the dents. It works well because the wood wants to return to its uncompressed state and the steam helps it do so.
After that, I reinstalled the butt plate and the pistol grip cap, but without the white line spacers. The white line spacer thing was a popular look in the ‘50s and 60’s, but I don’t care for it. I like the look of a black buttplate and pistol grip cap directly against the walnut. There was a bit of mismatch between these plastic parts and the stock, but that’s okay, too. It will be addressed in the next step.

You might think the walnut would be smooth because it was already smooth before the original finish was applied several decades ago, but that’s usually not the case in a project like this. Stripping the finish raises the grain a bit, and truth be told, original finishes from the factory are usually not so good, anyway. And, as hinted at in the preceding paragraph, sanding will assure a perfect match between the walnut stock and the butt plate and pistol grip cap. I start with 220 grit sand paper, then 320 grit, then 400 grit, and finally, 600 grit. Again, patience is a friend here. I worked to get the match I wanted between the stock and the black plastic parts, and I wanted a smooth surface all over the stock. I always sand with a block to support the sandpaper, and I’m careful not to round any edges where crisp edges are desired (like along the top of fore end).
All of the above took a little more than 3 days, and at the end of this phase of the project, I had a pristine stock with a perfectly matched buttplate and pistol grip cap. It was ready for the next step, and that’s the start of the TruOil applications for a rich, subdued, and elegant oil finish. That’s coming up in the next blog on this project.
Read more of our Tales of the Gun stories here, and don’t forget to sign up for our automatic email blog notifications!
Did you miss the earlier blogs on this Savagely inexpensive, tack-driving Savage 340? You can see them here and here!
I recently purchased a copy of Field and Stream, a magazine I had not read in decades. I was traveling, the selection of good reading material at airport newsstands is limited, and it was the only thing that looked even remotely capable of occupying my interest on a 3-hour flight. In scanning the cover, I saw that the magazine included an article on long-distance shooting, so Field and Stream it was for that flight.
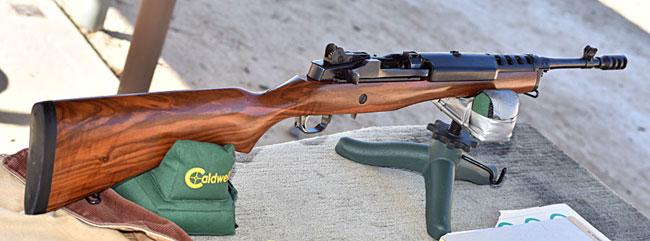
Back on topic, the Ruger Mini 14 is a rifle not known for its accuracy, and I was frustrated with mine. It was (I thought) barely okay as far as accuracy goes. I like shooting it, but the Mini 14 wasn’t great in the accuracy department and great was what I wanted.
The Field and Stream piece on long-distance shooting was partly focused on hunting at extreme distances (something in which I have zero interest), and partly focused on rifle marksmanship (something in which I have a keen interest). There was nothing new in the article (I’d been exposed to all the topics it covered at one time or another), but seeing them all in one place was a good refresher that made me realize I was getting sloppy in my old age. As I read the article, I realized that I wasn’t doing a lot of the things that are important for shooting tiny groups and I had been relying too much on the rifle and the load to make it all happen. This somehow seemed particularly relevant to the Mini 14 and it made me want to get to the range with it and focus on the techniques mentioned in the story. I realized there was more to this accuracy business than just the gear and the ammo. The nut behind the trigger plays a significant role, and this particular nut had not been focused on the basics.
I resolved to concentrate on the fundamentals mentioned in the Field and Stream article (things I learned 50 years ago in the Army) during my next trip to the range. As soon as I returned to California, that’s exactly what I did. And you know what? I shot better. A lot better.
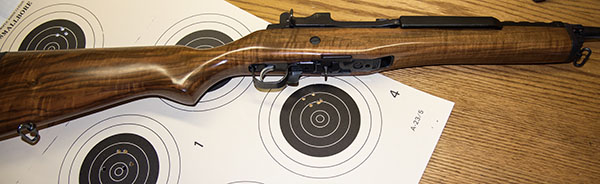
The load (a 62-grain bullet over 23.2 grains of ARComp) is one I had previously found to be a decent one in my Mini 14, but it had never given me groups like I shot that morning. That morning my groups were consistently tight and significantly smaller than what I had seen in the past. It was extremely satisfying, and I proved to myself once again that it’s the fundamentals that make a difference. Bear with me; I’ll get to those in a moment.
First, a comment or two on my Mini 14. Whenever I show a photo of it or take it to the range, folks ask about the stock. My rifle is a special run 580-series Mini 14 offered by Davidson’s (a Ruger distributor) about 10 years ago. It has a Circassian walnut stock (folks often ask if it’s a custom stock, but it’s not). I looked at a lot of Mini 14s online from that special run before I bought the one you see above. I wanted exceptional walnut and I think I found it in this rifle.
As configured from the factory, my Mini 14 didn’t meet the laws here in the Peoples Republik of Kalifornia. I had to remove the flash suppressor and replace it with a muzzle brake to bring it into the Golden State. I also replaced the Ruger rear aperture sight with one from Tech Sites (it’s a better design, in my opinion). Other than that, the rifle is completely original. I’ve put tens of thousands of rounds through my Mini 14, it’s my favorite rifle, and it’s absolutely reliable. But it’s never been terribly accurate (or so I thought) until I read that Field and Stream article and got back to the basics.
You might be wondering about what the fundamentals of sound rifle marksmanship are. Or maybe you already know what they are, but you would like a few reminders. That’s kind of where I was. Here’s what I took away from that Field and Stream article.
1. The first fundamental is to get into a good position. I shoot from the bench, and most folks might think that the rest, the rifle, and the bench make everything work. There’s a lot more to it than that. You need to get square to the rifle and sit directly behind the stock, and you need to adjust your position to achieve a natural aim. What that means is that after you think you are in the right position, you sit up away from the rifle, close your eyes, and then position yourself behind the rifle again. Open your eyes, and when you look through the sights, the sights should naturally align on the target. If they are not on the target, you’re not there yet. Move around and try it again. Keep doing this until you can shut your eyes, get in position, look through the sights, and find the target right where you want it to be. Trust me on this: It makes a difference.
2. The next fundamental is to focus on the front sight only. The Field and Stream article was about a rifle with a telescopic sight, but it mentioned front sight focus for iron sights and I knew I had a hard time doing it right when shooting the Mini 14. I guess I needed to be reminded. This is a tough thing to do for most people. I do it superbly well with a handgun, but I have a tough time doing it when shooting a rifle equipped with a rear aperture sight. I find myself wanting to look at the target, wanting to get the front sight post perfectly aligned in the rear aperture, and generally not doing this the way it’s supposed to happen. Focusing on the front sight only is almost zen-like in the concentration it demands. When I do it right, though, I actually don’t see the rear sight or the target and that’s tough for me to accept mentally. When I do it right, the only thing I see is the front sight and the muzzle flash when the hammer drops. Seeing that flash outlining the front sight lets me know I’m in the zone and I’m doing it the way it should be done. It’s a weirdly satisfying feeling. When it happens, I know the bullet will go where I want it to go.
3. The third important factor is breath control. None of us can hold a rifle steady while breathing, so I had to find a natural point to hold my breath. According to the Field and Stream article (and my old drill instructors) we can only do that for a couple of seconds before the sight starts to blur. In the Army, we were taught to take a breath and let it half out. The Field and Stream article pointed out that the “let it half out” thing may not be the best approach. The article said to find your natural point for holding your breath, so I tried that and sure enough, I seem to have a spot about two-thirds of the way down that feels like a natural stopping point. The article also mentioned that if the front sight starts to blur, don’t try to force the shot. Take another breath and start over. Not doing all of these things, I realized, were bad habits I had picked up.
4. The fourth important factor is trigger squeeze. Easy, steady, straight back, using the tip of my finger only. I have a tendency to get my finger too far around the trigger. On this outing, I forced myself to use only my finger tip, and wow, it really worked.
5. The last thing the Field and Stream article mentioned was holding the rifle properly with your trigger hand. Some of this stuff I knew, and some of it I didn’t. Shooting from the bench involves barely touching the rifle. That part I knew, and I think I did okay there. What I do is to just barely have my cheek on the stock without bearing down on it (you can impart torque into the rifle if you hold it too securely, and that works against accuracy). The other thing was how to hold the rifle with your trigger hand. This was something I hadn’t been doing correctly. The correct technique is to use my lower three fingers to lightly pull the rifle straight back into my shoulder, use my trigger finger tip to squeeze straight back on the trigger, and position my thumb off the rifle above my other fingers (I had to relearn not to wrap my thumb around the stock). That last part felt unnatural to me, but boy oh boy, it sure worked. I could see the difference on the target.
So there you have it. I focused on the fundamentals described above, and what do you know, I shot my Mini 14 better than I ever did before. My Mini 14 is suddenly far more interesting and way more fun to shoot, and I have a new respect for it. And the group sizes show it. Back to the basics. Good times.
More Tales of the Gun stories are waiting for you!
I use RCBS equipment for my reloads.
Tired of paying a buck a target or more at the range? Get targets delivered to your door for less. Click here!
Never miss an ExhaustNotes blog…sign up here for automatic email updates!