Lee Classic Turret Press Kit Part 2: The Lee Safety Powder Scale

By Joe Berk

This is the next installment of our Lee Classic Turret Press Kit series, and this article focuses on Lee’s Safety Powder Scale.  It’s the scale you see in the above photo and in the photos that follow.  I haven’t assembled the turret press yet (that’s coming).  Before I get to that, I’m doing this blog on the Lee scale, and then others on the Lee reloading manual and the Lee bench plate.  These will be followed by blogs on the Lee turret press, the powder dispenser, the priming tool, and the 9mm dies I’ll use with this equipment.
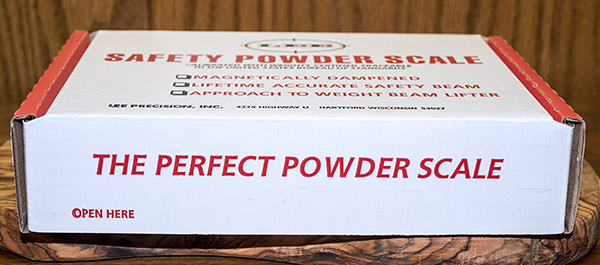
My new Lee Safety Powder Scale. I used a .223 caliber 62-grain Hornady full metal jacket bullet to check my zero and the scale’s accuracy.  Yep.  It’s good.
Packaging

The box you see below was inside the Classic Turret Press Kit, and the Turret Press Kit’s box was inside a bigger box.   It’s a box in a box (you know, Russian doll packaging, like I mentioned in the first blog on the Turret Press Kit). The Lee packaging is good.  Everything arrived undamaged.

The Lee Safety Powder Scale box. It’s well packaged.
What’s inside the Lee Safety Powder Scale box. You get the scale base, the balance beam, and the pan.
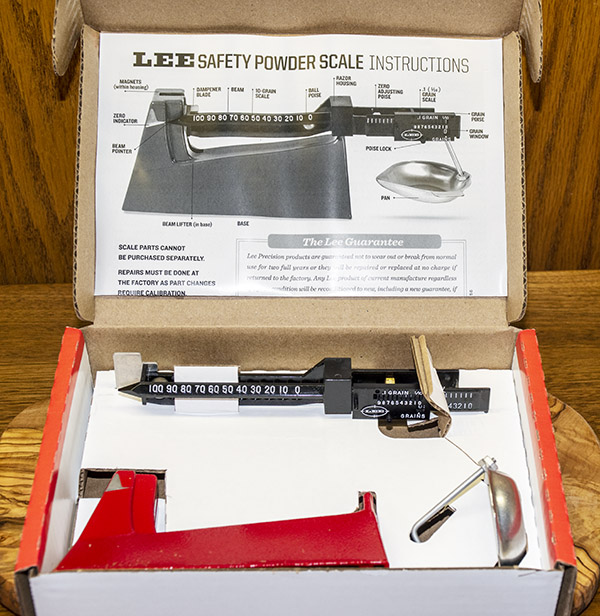
Lee Safety Scale Components

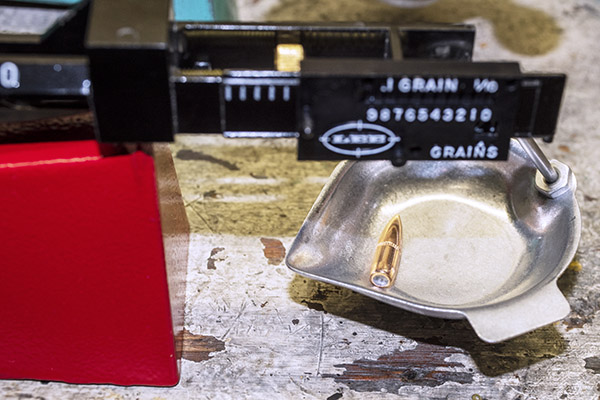
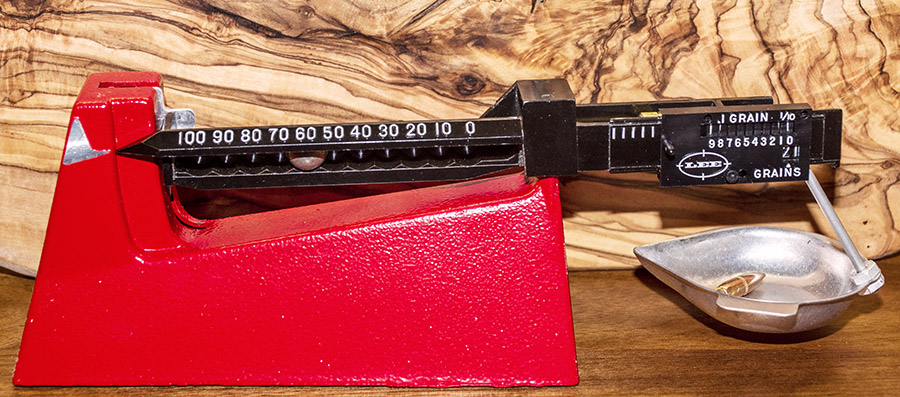
As mentioned in the photo above, there are three components in the Lee Safety Scale.  These are the scale base (that’s the cast red frame in the photo below), the beam (I call it a balance beam; it’s the black subassembly in the photo below), and the pan (that’s where the material to be weighed is placed).  The pan has an attached hook on it (it’s the bar extending up in the photo below) that hooks onto the right end of the beam.

The Lee base, balance beam, and pan.

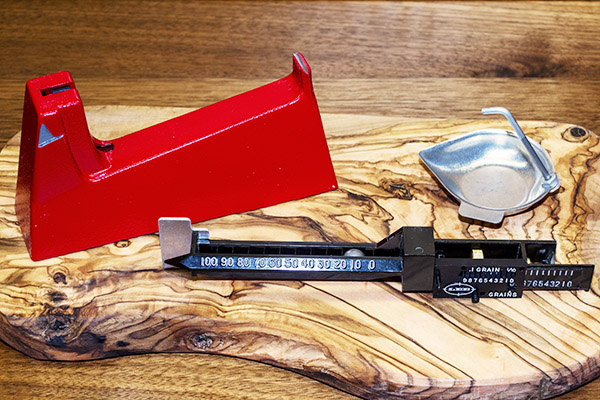
The red base has a machined groove on the piece that extends up on the right side.  The beam is placed over this, and it balances on a knife edge in this groove. There are magnets in the base to dampen the beam’s movement as it balances.   The photo below shows the scale with everything in place.

The assembled Lee Safety Powder scale.  The left arrow points to the index mark (the beam should point to it when weighing), the bottom arrow points to the 10-grain poise (more on it below), the center top arrow points to the 10-grain increments and markings on the balance beam, and the right arrow points to the 1-grain/.01-grain poise.

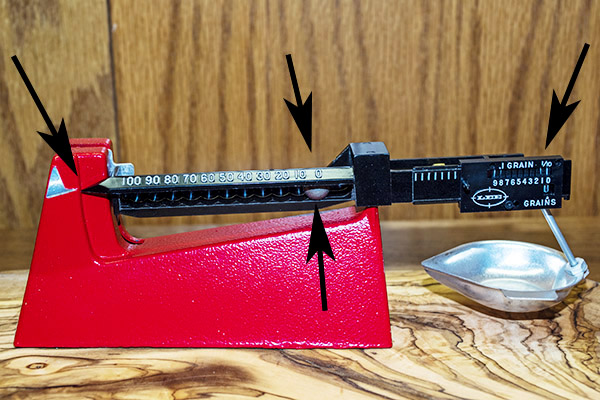
The magnetic beam dampers in the scale base work.  When weighing powder charges with the Lee scale, the beam balanced in just a couple of oscillations.

The Lee balance beam is a molded phenolic subassembly with two poises.  “Poise” an engineering term for the movable weights that balance the beam.  It’s a term Lee uses in their documentation.

When I was Director of Engineering at Aerojet (we designed and manufactured munitions…big stuff, 2000-pound bombs, anti-armor munitions, and other things I can’t tell you about), we used plastic on as many parts as possible (rather than metal) because plastic was less expensive, it does not not corrode, it can be molded to exact dimensions, and moving parts are less likely to jam.  Lee makes some of these same points in their literature.  My point here is this: Don’t dismiss the Lee balance beam because it is a phenolic part.  From an engineering perspective, it is the right choice.  As Richard Lee (Lee Precision Products founder) stated in his excellent reloading manual, Modern Reloading:

Lee Safety Scale has a phenolic beam.  Like a glass thermometer, if it is not broken it is still accurate.

Incidentally, the next blog in this series will be on Lee’s Modern Reloading book.  I’m reading it now and it’s good.

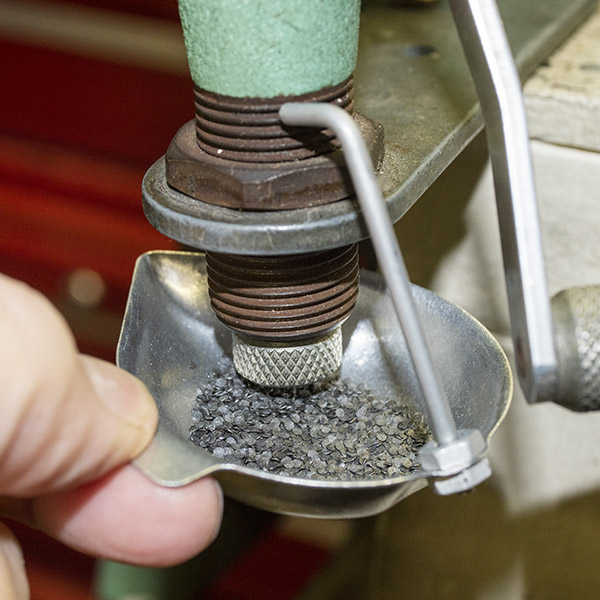
The Lee pan is a one-piece subassembly that consists of an arm (the pan hangs from it on the right side of the beam) and the pan.  The pan can be a bit difficult to get under a powder dispenser because the arm gets in the way.   That’s not a big deal, and when I was weighing .357 Magnum charges with the Lee scale (so I could adjust my powder dispenser to drop the correct charge), it didn’t affect my ability to catch and weigh the powder.

The arm on the Lee pan interfered with getting the pan directly underneath the powder dispenser, but it was a minor inconvenience.  That’s 8.0 grains of Unique you see above.
Measurement Range

The Lee scale can measure up to 110 grains.  That’s good news and bad news.  Most of us use powder scales for measuring powder, and if that’s your purpose, the Lee scale is the right tool.  The 110-grain measurement range gives superior sensitivity for detecting slight weight differences.  Other balance beam reloading scales can weigh up to 510 grains, but they do so with the same range of motion as the Lee scale, and that means they don’t provide the same sensitivity.

Sometimes we wish to weigh bullets (competitive bench rest shooters and cast bullet shooters might want to sort bullets by weight).  On the Lee scale, you can only weigh bullets that are 110 grains or less.  I’m what I would call a serious reloader, and in the last 50 years, I might have weighed bullets maybe a half dozen times.  I’m happy to lose the ability to weigh bullets in exhange for the increased sensitivity I’ll get when weighing powder charges with the Lee scale.  Your mileage may vary.

The bottom line is this:  For weighing powder, the Lee scale does a superior job within its measurement range, and that range is adequate for any thing I shoot (that includes .22 Hornet, .416 Rigby, .458 Win Mag, and many handgun and rifle cartridges in between).  For weighing bullets over 110 grains, you would be better served with scales offering a greater range than the Lee scale, but you give up accuracy with those scales.  Do you really need the increased weight range?  Most of us do not.

Zeroing the Scale

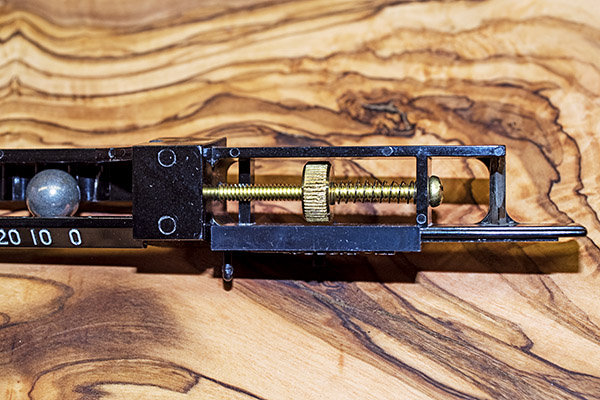
Like all scales, the Lee Safety Scale requires zeroing before use.  Lee incorporates a threaded brass  weight (in the form of a wheel) in the balance beam to move the beam up or down on its pivot in the base.

The Lee balance beam.  The black arrow on the right is used for zeroing the scale, which is explained below.  The red arrow points to the 10-grain poise.

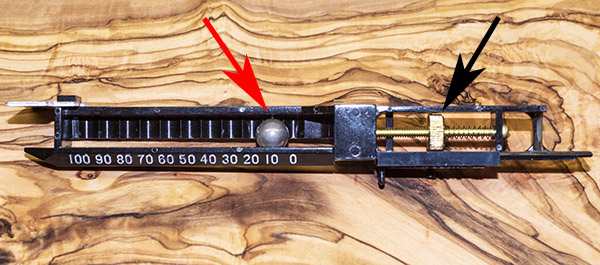
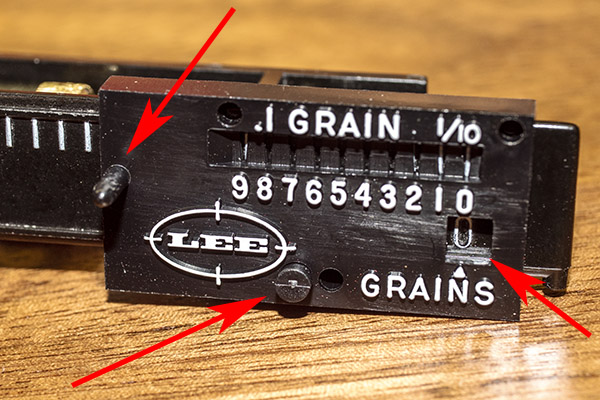
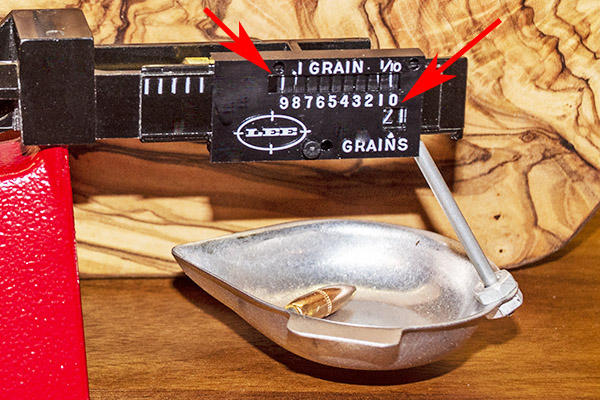
The idea is you set the both poises to zero (see below).  To set the 10-grain poise to zero, you roll it all the way to the right, and it comes to rest on the zero marker.  The balance beam has ridges that will position the 10-grain poise ball bearing in 10-grain increments, starting at 0 and going up to 100 grains.  To set the 1-grain poise to zero, you slide it all the way to the right, and lock the poise in the zero position with a little locking button on the bottom of the poise.

The 1-grain poise in the 0 position. The lower left red arrow points to the poise locking button (you push it in to lock the poise in place). The lower right arrow points to the 0 grains reading. The upper red arrow points to a protuberance that can be used as a little handle to move the poise. The “.1 grain” marking denotes the Vernier lines and windows used for reading tenths of a grain.

When the two poises are set to zero (as explained above), the brass wheel in the balance beam can be rotated to zero the scale.  As the brass wheel is rotated, it moves to either the left or right along its threaded shaft depending on which way the wheel is turned.  The idea is to turn the wheel until the balance beam is aligned with the index mark on the scale base as shown below.

The balance beam’s brass wheel. It’s used for zeroing the scale.
The lower black arrow points to the 10-grain poise. It’s a captured ball bearing that can be moved in 10-grain increments. In this photo, it’s in the 0 grains position. The right arrow points to the 1-grain poise.   The left black arrow points to the balance beam aligned with the base index mark.
Using the Lee Safety Scale

Using the scale after it has been zeroed when setting up a powder dispenser involves setting the desired powder charge with the 10-grain and 1-grain poises, and then adjusting the dispenser to provide an amount of powder that matches the scale adjustment.  It’s fairly straightforward, although using the 1-grain poise with its Vernier tenth-grain readings may be new to some people.

Or, you may have an item you wish to weigh.   Reading the scale is the same in either case.  It involves setting the 10-grain poise in the appropriate notch, and then moving the 1-grain poise to the appropriate place.

After I had zeroed the scale, I wanted to check its accuracy.  I weighed a .224-inch diameter, 62-grain Hornady jacketed boattail bullet to do this.  I put the bullet in the pan, moved the 10-grain poise to the 60-grain position, and then moved the 1-grain poise laterally along the balance beam until the beam was aligned with the base index mark.

A 62-grain Hornady bullet in the Lee scale pan.
The balance beam is balanced, with the pointed aligned to the base index marrk. The 10-grain poise is in the 60-grain notch.

Using the 1-grain poise is a bit tricky.  In the photo below you can see that the poise shows 2 grains in the lower window.  The Vernier windows on top of the 1-grain poise show that the 0 and .9 grain windows are aligned with visible lines, and a window is just a bit aligned with the .1 grain windows above and below the 0 and 9 windows.   Like I said, interpreting the Vernier approach is a bit complicated, but the Lee instructions contain several photos explaining how to do it.  What you see below for this measurement is interpreted to mean that the weight in tenths of a grain around the 2 grains in the lower window is somewhere between 1.9, 2.0, and 2.1 grains, and I interpolated that as 0.0 grains away from 2.0 grains.   Stated differently, the measured bullet weight is 62.0 grains, which is exactly what it is supposed to be.

The Lee 1-grain poise.  This sliding weight (or poise) is used for reading grains and tenths of a grain. Grains are read in the window denoted by the right arrow. Tenths of a grain are interpolated with a Vernier-based set of lines and windows denoted by the left arrow.

As a check, I also measured the bullet’s weight with the RCBS scale I’ve been using for the last 50 years, and it returned the same weight:  62.0 grains.

Cost

Lee did their usual outstanding job here:  The Lee Safety Scale price is significantly lower than the competition.  The Lee scale lists for $46.98 on the Lee website (interestingly, they also list factory second scales for $31.32).   You can also purchase the Lee scale from Amazon and other retail outlets, and Lee tells you on their website that their retailers typically have lower prices than Lee advertises.

The nearest competitor to the Lee scale is the RCBS M500 mechanical scale, and that lists for $125.99 on the RCBS website.  From a cost perspective, Lee is the clear winner here.

Documentation

The Lee scale includes a single-sheet, two-page instruction sheet.  It’s good, and it provides all the information you need to set up and use the Lee scale.  As mentioned above, the Lee instructions include information on using the Vernier feature on the 1-grain poise.

The Bottom Line

The Lee Safety Scale is accurate, inexpensive (less than half the cost of competitor products), and well built.  Reading the Vernier scale to get tenths of a grain takes a little bit of study and practice, but once you get it, you’ll find it quick and easy to use.  This is a good scale, it will serve any reloader well, and it should last a lifetime (and then some).


Help us out!  Please click on the popup ads!  And check out what else is available from Lee Precision.

Never miss an ExNotes blog:


Read our blogs on unveiling the Lee Classic Turret Kit and the Lee Deluxe 4-die sets:

Charlie Don’t Wheelie – A Vietnam Motorcycle Adventure: Part 4

By Mike Huber

By Day 3 we were fully acclimated to the roads, food, and culture and it was now time to start taking on more challenging rides. The next day entailed leaving Hoi An to continue north to Hue for a couple days.  Along the way we detoured to experience riding across the Hai Van Pass.  According to locals this was one of the best motorcycle roads in the country if not all of Asia.

As we entered the Pass there was a police road stop and I was waved over instantly.  “Ahhh, I’ve got this” I thought, thinking I would just play the dumb tourist and skate out of any ticket.  Well…it half worked. As soon as I began performing my best “sad tourist, I don’t speak Vietnamese” act the officer pulled out his phone with Google Translator.  “Shit,” I thought, this isn’t going to turn out too great.  Within a couple minutes another officer was called over. “Dammit!” I now thought, this definitely isn’t how it is supposed to go down.  It turns out I simply meandered into a lane that wasn’t designated for motos. The other reason was that the officers wanted to honk the pink horn attached to my moto and take some photos with me.  That was pretty cool.

Once our introductions to the local authorities were wrapped up we continued to the base of the Hai Van Pass.  By this time, we felt very comfortable in our abilities riding in Vietnam. It was just like riding a local road in the US:  Leaning, feeling, and embracing each moment while blasting (blasting for a 150cc bike, by the way) into the corners while traversing the mountain passes.  As soon as we gained our confidence in riding in this country, we received a big wake up call.  This was in the form of trucks passing recklessly on blind corners. I labeled these trucks “Terminators” based on my experience driving Humvees near the DMZ in Korea.  It didn’t take long before I took the lead and would shout over our Sena headsets to forewarn what was around the next turn: “Clear,” or in many cases “Get to the side of the road, NOW!”

After completing the Hoi An Pass, we hit a new alertness level.  A rule of thumb became that around every corner expect a Terminator to be coming at you head on and always have a sure path of egress when (not if) they did. This stayed with us as our Hondas continued winding north to the Hoh Chi Minh Trail.

These cautionary actions didn’t mean we weren’t having fun.  As we entered the city of Hue, I noticed the bike was riding quite rough as if the shock was just gone. It turns out that my showing off for the locals in traffic by performing wheelies and endos had caused the shock to go a bit sooner than anticipated and fluid was leaking out.  It was time to find a repair shop as this wasn’t something that would be tolerable for another 900+ miles. Fortunately, Hue is a large city and while working with our rental company, Tigit, they quickly referred us to a local mechanic named Mr. Kim.  As I explained the situation to him (I left out the wheelie part) I could hear all the mechanics honking the pink horn on my bike in the back.  One thing about Vietnam: They get things done, and fast.  Within two hours Mr. Kim had rebuilt the shock and “bike all fixed, Mr. Hooba, no more bouncy bouncy.”  Upon arrival to pick up the bike I continued to hear the honking of my horn in the back of the shop prior to them rolling it out.  The shock was repaired, and we could continue the ride with a few less wheelies along the way.

With another obstacle (self-induced) behind us we continued to Khe Sanh.  Khe Sanh looks as though it hasn’t changed one bit since the war. Gray concrete buildings line the streets, the smell of smoke from trash burning hung in the air, there were very few shops, and there were even fewer people along the main street through the center of town.  To add to this gloomy scenario, it was a dark cloudy day, and we were freezing from the ride.  The hotel we stayed in even had a chill that refused to leave and stayed with us all evening.  I began thinking about the soldiers that fought here 50 years ago and what their opinion of this town was, both then and now.  Our night was short and after eating a warm bowl of pho we returned to the hotel.  We planned a longer ride the next day, and we wanted to be fully rested as we wandered deeper into this country of never-ending adventure.


Please click on the popup ads!

Never miss an ExNotes blog:


If you missed Parts 1, 2, and 3 of the Vietnam ride, here they are:


More epic ExNotes rides are here.

The Wayback Machine: Pit Noir

By Joe Gresh

It’s March in central Florida, cool and clear. I get the call from Ed in the late afternoon. A couple of his California friends are racing motorcycles in the 600cc class. He wants me to help them out. The sun is setting low over Lake Schimmerhorn, the sky a blood-orange deepening to cobalt blue high overhead. White, high-persistence contrails cross the sky in an Atlanta-Orlando direction. The scene outside the Love Shack looks like a flag from The Republic of Kodachrome. “Yeah” I say, gently pulling the wrapper of a grape Jolly Rancher. The candy rotates clockwise between my fingers. “I’ll go.”

“Cool, you met Jeff and Beaver at the retirement party held after the anniversary party,” Ed said. “Remember Torrance?” In the background I hear a machine scraping metal: another of Ed’s big-block Moto-Guzzis. The man can’t leave motorcycles alone.

“Torrance?  Yeah, I remember, my wife said Jeff seemed kind of depressed. Happily married, good corporate job; didn’t he give up racing?”

“He did, then he didn’t,” said Ed. “Look for the Baby Appleseed pits. Get there early tomorrow, I told them you’re coming.”

It’s 38 degrees in the morning. My Italian-era Husqvarna 510 stumbles and stalls, then lights off on the fourth push of the button. I rev the engine and slip the clutch on the Husky’s tall first gear. A sloppy, brapp-brapp snarls out of the pipe and ricochets from aluminum singlewide trailers to sway-backed modular homes. I turn right onto Highway 40. Open the throttle and the Husky’s tachometer rips past 9000 rpm, front wheel climbing on the surge. Two, three, four, five, six, shift as fast as you can, man.

I’ve got to keep the front down. It’s dark. Highway 40 is damp with morning dew. The headlamp flickers intermittently between low beam and parking light, low beam and parking light. It’s a random problem and one I can’t solve. Oncoming cars dip their headlights, thinking I’m flashing them. I wish I could stop and explain Italian motorcycle electrical systems but there’s no time. It’s cold. My hands hurt.

At the very end of Pit Row the black, the white and red Baby Appleseed logo is splashed across two huge gazebo tents. I guess with Ed involved I expected one rusty Craftsman toolbox and a mid-eighties Moto-Guzzi Alfresco. I’d find Jeff and Beaver slumped over, gently sobbing. Beaver’s greasy jeans would have holes in both knees.

Pit row, Daytona.

“What’s the problem, boys?” My confident tone would instantly buck them up. “The bike has a high rpm miss, Gresh, we’ve been trouble shooting the damn thing for days.” I’d get in there and clean the fuel filter, maybe straighten a bent metering needle and the bike would run perfect, you know, save the day.

Baby Appleseed’s pit has two mechanics, electric tire warmers and a second rider, Neils, owner of the high-end baby furniture company sponsoring the team. There’re computers to track lap times, 120 volt AC generators and air compressors.

Both Appleseed motorcycles are decked out in Baby Appleseed racing colors. Back in the dry pits there’s a motorhome with a full-body Baby Appleseed wrap parked in front of a dual-axle Baby Appleseed trailer stocked with Baby Appleseed race parts. The mechanics wear Baby Appleseed logoed race shirts. Jeff has qualified in the front row for race one. To the untrained observer it appears they’re doing ok without me.

“My wife was worried about you.” I tell Jeff, “At that party in Torrance she said you seemed unhappy, settling for security.”

Jeff looks at me, grins, “I’m down to 140 pounds, I’ve been training every day, running. You’ve got to be light to keep up with these kids.”

“She’s sort of an Empath.” I explain, “Like Deanna Troy on Star Trek. When I told her you were racing again she got a little teary-eyed.” Jeff nods, unsure of the protocol. I better close it out. “Anyway, people tell her everything, man. I mean, people she’s never met spill their life story within two minutes.”

“Um,” Jeff says, “Tell her I’m ok. Tell her I’m happy.”

We’re watching the race feed one of the pit monitors. Jeff’s dicing for the lead, the crew is wound up tight. Two laps in, the front tire pushes and Jeff wads the Baby Appleseed bike, a hundred mile per hour get-off. Mostly we see a cloud of dust as the bike tumbles through the infield. It’s hard to tell what’s going on with the monitor. There’s Jeff walking away. Collective relief: “That’s all right then, we can fix the bike.” I think that was Neils’ dad.

By the time I get to the dry pits the bodywork on Jeff’s bike is already gone. Every part that sticks out is either broken, bent, or ground off. One mechanic is removing forks, the other removes the mangled sub-frame then goes back to pit row. Neils is still racing. Jeff surveys the damaged bike, “Damn. We don’t need this extra work.” The bike has to be fixed by 7 PM, when the dry pits close. I better help sort things out.

The bike is down to the frame and motor. “Can I do anything to help?”

The mechanic stops wrenching on the triple clamps, thinks three beats. “Uh, yeah, drain the gas from the wrecked tank.” I grab the tank, “What do you want me to put it into?”

The mechanic looks up again, “What?”

I hold the tank up, “The gas. Where you want it?”

He looks around the pits, “ Um, I don’t know, see if you can find an empty can in the trailer.” He goes back to the triple clamps. Jeff is sweeping the work area, picking up small bits of motorcycle. The mechanics dodge around us to work on the bike.

The trailer is locked. I go back to the pits. “Sorry to bug you again, man, the trailer is locked. Do you have a key?” Water runs from a radiator hose into a plastic, 5 gallon bucket.

“The key? It’s locked?” Hands dripping, “Lemme see if it’s in here.” He searches the top tray of his rollaway toolbox. “Damn, it was here.” He scans the pit area, “I don’t know where it went. Listen, I got to get this radiator off.”

I find Neils, still in his leathers. He just pulled in after a solid race, finishing 20-something out of 60 bikes. I ask him if he has a key to the trailer.

“What?” Sweat runs down his face, “Find my dad, I think he has one.” I wander past the trailer. The door is open. Beaver is inside. There’s an assortment of cans.

“Which can should I use to drain the gas from the smashed tank?” I ask.

“What?” Beaver replies, putting down two replacement wheels.

“I need to drain the gas from the old tank.”

“Oh, um…take this one.” Beaver hands me a can.

“You got a funnel?” The other mechanic is back. He’s sliding a new fork leg into new a new set of triple clamps.

“What?” He stops sliding the leg.

“A funnel, to pour the gas into this can.” I hold up the can Beaver gave me.

“Don’t use that can. Use the one under that pile of bodywork. I don’t want it mixed up.” I move a broken plastic tailpiece and there’s a can underneath. The fill opening is one inch wide.

“Man, I hate to bug you, I need a funnel.”

The mechanic stops working on the forks and gives a hunted look around the pit area, “Jeff, find this guy a funnel.”

“Look in that box on the rolling tray.” Jeff says. I find three big, red funnels. I fit the funnel and begin to pour the gas from the bent tank into the can.

“Hey! Put a sock on that funnel!” The first mechanic yells at me, putting down the handle bar he was about to install.

“A sock?” I have no idea what he is talking about. Jeff hands me a cloth filter with a sewn-in elastic edge to stretch over the wide end of the funnel. I fit the filter and pour the gas.

“Watch what you’re doing!” There’s a puddle of gas on the floor. I’m so intent on not missing the funnel mouth I don’t notice that the tank’s internal vent tube is pissing gas. It’s a like a frigging geyser, man. Tipping the tank upright increases the flow, broadcasting a liberal dose of high-octane race fuel around the pit area. Both mechanics drop their tools and run over with rags. They start mopping up the spill.

“We got to clean this up! If the AMA guys see this they’ll freak out, you can’t have pools of gas laying around in here!”

Beaver appears beside me and guides me by the elbow away from the spill. “Can you give me a hand moving the gear from pit row?” We walk out to the Baby Appleseed tents on pit row, a distance of some 300 yards. Beaver hands me two cartons of water, I walk back to the trailer. Next trip Beaver hands me three tires to carry, I take them back to the trailer, then a big stack of sprockets.

There’s one of those folding carts parked at the tents. Beaver hands me the portable generator. The damn thing is heavy. “Can I use that cart?”

“No.” Beaver says, “It’s easier to carry the stuff.” I move gear back and forth from pit row to the trailer. Late in the afternoon I glance over at the pits, Jeff’s bike is rebuilt and has passed tech inspection.

The next day Jeff’s rebuilt bike runs near the front all day long and in a photo finish misses the podium by inches. I call my wife with the results. She’s happy, she tells me Jeff is doing what he’s supposed to be doing. The sky turns blood-orange deepening into cobalt-blue high overhead. The Baby Appleseed team is upbeat, they’ve got an entire racing season ahead of them. I only hope they can do as well when I’m not around.


Do a friend a favor: Click on the popup ads.

Never miss an ExNotes blog:

Seiko and Honda: A Match Made In Takamanohara

By Joe Berk

The Honda Cub is the most-produced motor vehicle of any kind in the history of the world.  Not just motorcycles, but motor vehicles.  Honda passed the 100 million Cub mark years ago; today they still offer a Cub in the form of the 125cc Super Cub.  That 100 million figure doesn’t count all the knockoffs by Yamaha and the Chinese marques.  It’s a staggering number for a staggering vehicular concept.  So, if you’re a watch company and you want to produce a watch honoring a motorcycle…well, you know where this is going.

Seiko is the company, and this year they introduced a limited edition of the Honda Super Cub watch.  These watches have been nearly impossible to get, so I was astounded when on Christmas photog duty at the mall I wandered into a watch store and what do you know, there it was.  It was the only Seiko Super Cub watch I’ve seen and I knew I had to have it.   It’s self-winding and to watch weirdos like me it doesn’t get any better than a mechanical self-winding watch.  The ticket in was $400, I asked if there was any room in the price, the store manager said no, and I pulled the trigger anyway.  I bought it for list price and that was still a good deal.

Seiko is offering a limited run of the Super Cub watch in two colors.  I’ve not seen the black one in person, but that’s okay.  I like the green and white one better.

The Seiko Honda Super Cub watch has several cool details, including a NATO band, a rear cover intended to evoke a tail light, and a stem that looks like a Cub fuel gage.

Two of your blog boys (that would be Gresh and yours truly) both owned Honda Cubs back in the day (Huber didn’t, but he has an excuse…he wasn’t born yet).  I guess that made Gresh and I two of the nicest people you’d ever meet.

To my great surprise, I found a couple of photos of my Honda Cub buried in an old photo album.  The image quality is not up to my current standards, but hey, I took these photos with a Minolta C110 camera in the 1960s.  With those little 110 film cassettes, these 60-year-old pics ain’t half bad.

I bought the Cub for $50 (a dollar per cubic centimeter) from Zeb Moser (a buddy in New Jersey; RIP, Zeb), rode around on it a little bit, and then sold it for $70 thinking I’d done well.  There’s no need to say it, but I will anyway: I wish I still had my Cub.


Help us bring more to you:  Please click on the popup ads!

Never miss an ExNotes blog:

Charlie Don’t Wheelie – A Vietnam Motorcycle Adventure: Part 3

By Mike Huber

It was December 2018, and we were in Da Nang, Vietnam. Our steeds for this trip consisted of two Honda Winner 150cc motorcycles and we were ready to begin our adventure.  My moto had been fully decked out in a colorful light with bells, horns, and streamers.  With our route defined as northernly it was time to fire off this trip. We did this by starting in the wrong direction (south), and the reason for that was Hoi An was close to Da Nang .  There was a full moon festival happening there.  This was something not to be missed.

Arriving in the bustling town of Hoi An late in the day we noticed that the roads had been closed in a perimeter around our Home Stay (Vietnamese version of Airbnb) due to the Full Moon Festival.  The Home Stay was about a quarter mile away from the closest point we could get to. Leaving the bikes outside this perimeter wasn’t an option, nor was walking a quarter mile through the crowds with all our gear.  Having lived in Boston for 16 years and with the mindset of a paratrooper, I shouted over the headset loud enough for Bobbie to hear me over the crowds growing for the festival:  “Follow me! We’ll make this work.”

I clicked the bike into first geat and drove across the bridge to our Home Stay, on the sidewalk, and on the wrong side of the road while honking my favorite pink horn to alert those in our path that we were coming through.  The smile on my face was one that I’ll never forget.  This country was one of less rules and more of making it happen. I loved it! We made it to our Home Stay in time to unpack, catch our breath, and have a well-earned cold Saigon beer before heading out to find some chow.

Once properly hydrated from the Saigon beers, we walked the crowded streets of Hoi An as the glowing red sun began to set.  We gazed over the beautiful Hoi An River. The river was filled with thousands of lanterns on tiny paper boats with candles paying respects to ancestors.  This was a sight to behold.  It was beautiful in every way.  As the night wore on, our grumbling stomachs reminded us it was time to experiment with the Vietnamese cuisine.

Street vendors lined the alleys.  All had interesting dishes ranging from octopus, to frogs that looked like Mr. Olympias (due to their muscles under the vendors’ lights), to the quail that were runner up to the frogs in the bodybuilding contests.  Fried octopus seemed like the best choice. We ordered and sat at tables the same size used in preschool, with bright colors and flimsy plastic chair legs.  The food was DELICIOUS and just what we needed after a successful first day of riding in this wonderful country.

Hoi An was an easy city to love, so it wasn’t a hard decision to extend our stay.  One day entailed a full day of riding to a UNESCO Heritage World Site called My Son Temple.  This is a collection of Hindu temples hidden in the mountains 25 miles west of Hoi An. The site was incredible, with temples half overrun by the jungle, yet still in pristine condition even though some of them are 600 years old.  This location is deep in the jungle and as soon as we dismounted from our bikes we could feel the humidity. We spent much of the day exploring the ruins, with the overwhelming jungle darkness surrounding us.   The ruins were a mystical place that we were fortunate to have stumbled upon.

On our return ride it was time to make food choices again.  Choosing to stop at the first crowded place made sense. We soon discovered an establishment and radioed to each other that this looked acceptable.  Instantly, all eyes were upon us as we sat down in a three-walled, white-paint-chipped open room.  One thing we found in Vietnam wat that when you order food, you don’t always get what you asked for.  Often you get what they have, even though they will nod their head to your request while saying “ya ya ya.”  In this restaurant we kept it simple and ordered pho.

While waiting for our food we slowly drank a Hanoi beer that was warm (but much needed).  We tried to act normal as the locals pointed at us and chuckled. Finally, our food arrived but instead of our requested pho, we received what appeared to be cold water buffalo meat wrapped in a type of Vietnamese lettuce, a dipping sauce of some sort, and a consommé.  Eating with finesse isn’t my strong suit, and that became blatantly obvious. I was having issues making a wrap without having the meat spill out of the lettuce.

As all the patrons continued to stare at us an older lady came over to assist me in the proper way to prepare this dish, since I was clearly incapable of doing so myself.  She began wrapping it tightly with her hands that were blackened with dirt from working in the rice fields earlier and successfully tightly rolled it for me to eat. While she was performing this task other patrons in the restaurant were walking around me to go on the other side of the wall from which I was sitting to use the “facilities.”  With the sound of urine hitting the other side of the wall it was now time to finally eat my lunch. I bit into the wrap and noticed the meat was cold and I instantly thought it was raw and I’d get sick, but I still had to eat it to save face in front of everyone as they watched me chew each bite and swallow it.  The many onlookers gazed upon me as I finished about 60% of the meal while washing it down religiously with Hanoi beer, thinking the alcohol might save me from becoming ill. For the next 12 hours I was in full on hypochondriac mode. I had about six false alarms during this time when I would bolt to the bathroom thinking I was about to have an accident.  In hindsight this is funny, but at the time the threat of possibly having the runs while riding through Vietnam didn’t seem too humorous to me.

Returning to the Home Stay in Hoi An provided me with a bit of relief from my hypochondria and a chance to unwind.  We had ventured out while learning more about the culture, the food, and the people.  It was now time to map our next day’s ride, where we would correct our direction and return to moving north towards epic roads. With our gear fully organized and the bikes prepped, we called it an early night so we would be fresh for the next day.


Help us keep the hits coming:  Please click on the popup ads.

Never miss an ExNotes blog!


If you missed Parts 1 and 2 of the Vietnam ride, here they are:

Nose Job: 1971 Yamaha RT1-B Front End Refresh

By Joe Gresh

The Yamaha RT1-B 360cc that I call Godzilla has been my long haul dirt bike choice for years. The old Yamaha has criss-crossed the country on dirt and on pavement and I had it set up to carry a lot of gasoline and a lot of gear. Up front, I removed the non-functional speedometer/tachometer cluster and replaced it with a luggage rack. The rack worked great, it redistributed the weight of my travel gear and made the bike handle less worse than if everything was strapped to the back rack.

I crashed in Beaver, Utah a few years ago and mangled the front rack so I removed it for future repairs. While I was at it I got rid of the cheesy GPS mount that fit a GPS I no longer owned. Truthfully, I don’t need that stuff because haven’t been doing any long distance dirt rides lately. It seems like all my rowdy friends have settled down. Anyway, with that junk out of the way the view from the saddle was kind of sparse. I decided to freshen up Godzilla’s front end.

I rode Godzilla for many years with the stock handlebars (bottom bars) and they were fine. The last couple rides my wrists started hurting a bit and I think the sweep back angle was causing too much stress on my decrepit body. The bars on the Husky are almost flat across and very comfortable so I bought a new, lower, flatter bar (top bar). The new bar has no cross brace and is made of powder-coated aluminum; I’m hoping they flex a bit more to smooth out the really rough trails where I tend to crash.

After replacing the handlebars my horn quit working. I figured that the process of removing and replacing the switch must have disturbed the rust inside so I dismantled and cleaned out the three switches in the control module. The horn button was really rusty and the other switches looked none too good, either.

After all that work on the switches the horn still didn’t beep. The Yamaha wiring supplies the horn with power and the horn button grounds the circuit through the handlebars, triple clamps, and steering head bearings then on to the frame, which is grounded. This convoluted electrical path makes the horn go beep. I took the headlight apart and grounded the horn wire inside the headlight housing. It worked. Then I grounded the horn to the new handlebars: nothing. Turns out, powder coat is an effective electrical isolator. Instead of scraping the powder coat off to make a connection I ran an extra ground wire to the switch pod. Now I had a horn.

For a speedometer I decided to try one of those cableless, GPS, analog types from Amazon. The voltage input on the speedo is 9 to 32 volts and the thing powered up fine on Godzilla’s 6-volt battery. Since this fancy electronic wizardry was all new to me I also bought a 6-volt to 12-volt converter to make sure the speedo had plenty of voltage. All this junk needed to go somewhere so I made a LeCrox template and chopped the side out of a storage cabinet for sheet metal.

After bending and welding the gauge console I gave it a lick of spot putty and some black paint to hide the sins of my welding. Next all the pieces went into the housing and I pre-wired the speedometer so that it would plug into an unused, key-switched, 6-volt power wire inside the headlight.

I used the existing Yamaha speedo/tach mounting base by adding a couple rubber lord mounts and assembled the whole mess onto the motorcycle. It powered up fine and was ready for a test ride.

The test ride was a failure. Not because of the speedo (it worked great), but the cantilevered gauge console flexed the rubber mounts so much the gauge was dancing up and down like a set of those humorous, wind up chattering teeth. It was back to the shop for a quick brace on the front of the console.

I used the high beam indicator hole on the headlight shell and ran a short brace to another lord mount that steadied the gauge nicely. Now I can bang around in the dirt without the speedometer trying to slap me upside the head. Hopefully it won’t push the headlight aim down.

To finish off the front-end facelift I bought a new mirror to replace the crappy bar-end mirror. The old bar-end mirror was a bicycle part and never worked very well. It was there for legal, not visual reasons. The new mirror gives me a fairly clear view of what is going on behind me.

The GPS speedometer is smooth. You have to wait a few seconds while it acquires a satellite fix but from then on it seems just like a regular speedometer except it is accurate and the needle is steady. With no reception it won’t work indoors but I don’t ride far indoors. I zipped the RT1-B up to 75 miles per hour and all was well.

There are several functions you can access like different color backlights, Trip 1, Trip 2, odometer and compass. Trip 1 is sort of useless because it resets each time you turn the key off. Trip 2 supposedly saves the data and you have to hold a button for 3 seconds to clear it. The compass is a 360-degree type so you get a numerical reading instead of north, south, east and west. I’ll have to mess with the thing a little more to see how all this flimflammery works.

One thing I don’t like is that the mode and set buttons are on the back of the speedo. This is not a problem for a motorcycle because you can reach behind and push them. If the speedo was mounted in a car or boat dash this would be a deal killer. If I had it to do over I would try to find a unit with the buttons on the face. Also, it would be nice if the antenna could be incorporated into the gauge, eliminating the external antenna but that probably wouldn’t work in a car.

For a prototype my dash console works good enough. If the speedo holds up I may re-work the design a bit. If I flipped the mounting flange 180 degrees the mounting bolts would be hidden inside the console and it would move the speedo back a bit which I think would look better. As it is the gauge console has a clunky, AMF-era, Harley-Davidson look to the thing. I may remake the console using aluminum as the sheet metal one, while thin, is not very light. Godzilla is a high society motorcycle now with its modern, space age speedometer; I guess there’s nothing more for me to do but to join my peers down at the local Starbucks.


Help us continue to bring exciting content to you:  Please click on the popup ads!

Never miss an ExNotes blog:

Charlie Don’t Wheelie – A Vietnam Motorcycle Adventure: Part 2

By Mike Huber

As soon as we landed in Da Nang and got our bearings (as best we could with the jet lag, language barrier, and me) the first step was to pick up the motorcycles from Tigit, the motorcycle rental company.  My girlfriend Bobbie and I had reserved two Honda Winner 150cc motorcycles a month prior. I had some reservations about the smaller displacement, but the benefit of these little workhorse bikes was that the parts were so plentiful in the country and they were so easy to work on that if/when we did break down it wouldn’t stall the trip for more than a day or two.  This was an advantage compared to other models that you’d have to order parts and wait 3 or 4 days for even little maintenance issues. In hindsight this was a wise decision as we really beat the hell out of the bikes.

The rental process with Tigit was painless and with the owner giving us his Whatsapp contact number in event of breakdowns or other issues we instantly felt comfortable in this foreign land.  To further ensure our safety we had purchased Sena 10C EVO headsets so we could stay in close contact due to the ever-changing road and traffic conditions.  This purchase proved invaluable over the next three weeks and quite honestly saved our lives more than once. Knowing the road conditions would be challenging, we also opted to bring all our protective gear from home. Once we were all geared up and after a quick comm check with the Senas it was time to ride!

The first destination would be a local beach in Da Nang.  The wind and sun were just what was needed to flush out the jet lag and wooziness from our bodies.

In being true to myself I had to decorate the bike.  I had just recovered from a hip replacement in which I had a walker for a few weeks and decked it out with a bicycle bell, pink horn, pink streamers, and a pink basket.  The nurses loved it and old ladies in their walkers would give me dirty looks as I went about my errands on it (they were clearly jealous).  I had reasons for these decorations, more than just an opportunity to be obnoxious.  The bell was to signal I wanted pain meds, and the horn was for a cold beer.  The streamers….well, they just seemed to tie the entire walker together.  I brought them all to Vietnam to ensure my moto was properly suited to me.  It provided endless entertainment for me and proved to be rather annoying to everyone else.  Whenever I parked the moto, it just took a moment before children, police, or pretty much any local would be ringing the bell or honking the horn.  On more than one occasion, our hosts had us park the bikes inside their houses just so they could get a reprieve from the sounds of these add-ons, which benefitted us from a physical security standpoint.

At the start of this adventure, I felt a strange uneasiness.  This came from notions placed in my head from others telling me about their experience in the Vietnam War.  Feelings of guilt were constantly weighing on my mind as I met the locals and they asked where I was from. I was always extra respectful and humble when I said I was from the United States.  Having travelled much of the world this is always how I present myself, but in Vietnam I did so even more.  After a day or two I began to open up with several Vietnamese people about how I was feeling (I am a pretty open guy anyway so wanted to get this feeling resolved).  They all assured me that the people of Vietnam have long forgotten about the war and there would be absolutely no animosity over that from anyone.  It didn’t take long for me to put those feelings in the rear view mirror.  I began to fully embrace the beautiful people and their culture as I should have from the start.  As we continued to ride through the country this became even more apparent with every stop as the female locals grabbed Bobbie and brought her into their kitchen to pick out our meal, and the men invited me to sit on the stairs with them and smoke tobacco in bamboo pipes.  Sometimes it just takes a day or two to get comfortable with your surroundings.  Vietnam was no different.

I love it when a plan comes together, or doesn’t.  This is an especially great feeling when the plan is to not have a plan, other than a direction to travel in.  For us, this direction was north.  The goal was to hit the Vietnam North Pole, a remote area at the northern tip of Vietnam that bordered with China.  We had seen and read a lot about the ride and roads up there and it seemed one of the most epic adventures a motorcyclist could have. During this journey we wanted a leisurely pace with no pressure to travel if we didn’t feel like moving due to being tired or falling in love with a specific region.  Why rush this wonderful experience without savoring each mile to its maximum?  Our only constraint was to make our flight in Hanoi in three weeks, and this was plenty of time to cover 1,500 miles of the infamous Ho Chi Minh Trail if we chose to.


Do us a solid and click on the popup ads…it’s how we get paid!

More epic rides?  You bet!

The Wayback Machine: Mike Huber, the real deal…

By Joe Berk

On my last trip through Baja while riding with a dozen guys on RX3s, we stopped for fuel in Catavina while headed south. That’s on the long stretch between El Rosario and Guerrero Negro, where the distance between Pemex stations is over 200 miles. Catavina is a tiny town in a beautiful boulder field (in fact, it’s the area depicted in the lead photo on the ExhaustNotes Baja page). The locals sell fuel out of gas cans in Catavina, and on a motorcycle, you have to stop here to top off.  The boulder fields through this region are dramatic, almost other-worldly.  You can get a bit of a feel for the area from this photo…

Baja’s Catavina boulder fields.  This is some of the most dramatic scenery on the planet!

Anyway, we had stopped for fuel in Catavina when I noticed a guy on an adventure bike amongst our guys.  What grabbed my attention is that I didn’t recognize him.  It felt weird, because this was our second day on the road, and I thought I was losing it. Usually by the middle of the first day on these group rides I know everybody who’s riding with us.  Incidentally, if you want to know what it’s like organizing one of those tours, there’s a story on that topic appearing in ADVMoto this week (you can read it here).

Mike’s BMW topcase. All the way!

Anyway, I looked at this new guy and then I realized his bike wasn’t an RX3; it was a BMW GS1200. I was just about to razz him a bit about that, and then I saw the jump wings on his bike’s top case.   You don’t get US Army jump wings out of a Cracker Jack box, so I knew right away this guy was not going to be your typical adventure rider.   No one who rides a motorcycle in Baja is a “typical” anything, but I knew this gentleman was going to be something special.

I asked the guy if he was a paratrooper, the answer was yes, and over the next roughly thousand Baja miles I got to knew Mike Huber well. He rode with us for several days and all of us thoroughly enjoyed his company. As it turns out, Mike is not your everyday former US Army paratrooper (as if there ever could be such a thing); he’s a serious rider with a very cool lifestyle (more on that in a second).

Mike and I became good friends, and when he was in town a couple of weeks ago, Sue and I met him for lunch at La Casita Mexicana in Bell (just south of LA).  If you’ve never dined there, trust me on this, you need to make the trip.  It’s an award-winning restaurant with a unique cuisine that I learned about from Steve and Maureen at CSC, and to be blunt, it’s the finest Mexican food I’ve ever had.  But I digress…back to Mike…

Lunch with Mike at La Casita Mexicana.  Those enchiladas sure look good!

Mike is anything but a stereotypical guy.   Nope, he’s the real deal.  Mike’s has been living on his motorcycle and traveling North America (and a bit of Central America) for the last year, and he just published a story about his lifestyle in Intravel Magazine.  It’s a great read, and you can see it here.

Well done, Mike!  Ride safe and keep us posted on your travels!


Popup ads:  Please click on them!

Riding into Baja?  Don’t go there without BajaBound!

Albuquerque Balloon Fiesta

By Joe Berk

The turnaround point for our New Mexico trip was the Albuquerque Balloon Fiesta.  We had talked about it for years, and it combined nicely with our stops in Tucson and Alamogordo (and the visit to Tinfiny Ranch).  I shot all the photos in this blog with my iPhone.  I had the big Nikon D810 and its boat anchor 24-120 lens with me, but my leg was acting up (an old motorcycle accident injury) and I couldn’t lug that thing around any longer on this trip.  I might have shot better photos with the Nikon, or I might not have shot any at all if I didn’t have my cell phone.  Adapt, improvise, overcome.

The deal on our visit to the Balloon Fiesta was a tour group.  It’s really the only practical way to get in to see the balloons.  Here’s the deal:  Albuquerque’s population is 550,000 people (it’s the biggest city in New Mexico).  The Balloon Fiesta, however, draws a cool one million visitors.  Just getting to the field where the balloons lift off would take an hour or more due to the crush, and if you did that, you’d have to park far away to find a parking spot.  If you’re part of a tour group, however, you ride on the tour group’s buses from your hotel to the balloon field, and they take you right up to the gate.  The City of Albuquerque has done this event for years and they have it dialed.  They designate special bus lanes during Balloon Fiesta week.   Logistically, it’s a much better approach.

What the City can’t control is the weather, and hot air balloons are sensitive to the weather.  If there are electrical storms, low visibility, rain, or high winds, the balloon’s won’t lift off.  And there were plenty of all these conditions that week.  Our tour grip told us we’d be making three trips to the balloon field, but there were no guarantees we’d get to see the balloons lift off during any of our visits.  Two of our visits were early morning affairs (we arrived at the field before sunup), and another one was in the late afternoon.

The Balloon Fiesta field periphery is lined with vendors.

During our first early morning arrival, it was cold and too windy for the balloons to lift off.   The balloon fiesta had a backup plan, though, and in the distant skie we observed a light display.  At first I thought there was a large board with lights, but then the display lifted into the pre-dawn sky.  I learned it was all down with multiple computer-controlled drones.  That was impressive.

Cell phone photography is like halitosis…it’s better than no breath at all. Each of these lights is carried by a single drone. They were probably a mile away when I took this photo.

The images changed.  We couldn’t see or hear the drones, and there was nothing from our location that would indicate they were drones.  It was impressive.

A Puebloe Native American symbol, commandeered as the image on the New Mexico flag. This is the area where we had breakfast. Breakfast was a part of the tour package.

During our second visit, which occurred in the afternoon, the wind conditions weren’t acceptable and there was a thunderstorm moving in, which prevented the balloons from ascending.  But it allowed a parachute display, and I grabbed a few photos of it.

Selection.com is a personnel agency.

Evidently the smoke generators the parachutists used create debris.  One particle hit me in the face.  Fortunately, it caught me in the cheek and not in my eye.  That would have made for an interesting lawsuit.

Another photo of the parachutists.

Even though it was too risky for the balloons to inflate and ascend, there was a lot going on.  It was fun walking around and taking iPhone pictures.

A fire truck at the Albuquerque Balloon Fiesta.

Our third and last visit to the balloon fiesta field was on a brisk Sunday morning and it was the charm.  After being skunked on two prior visits, the word was out:  The balloons had the okay to inflate and liftoff.  The winds were suitably low, visibility was good, and there were no looming electrical storms.  It was a go for a mass ascension, which kind of sounds like a religious experience.  In a way, it almost was.

Balloons inflating after recieving the go ahead. You walk in amongst the balloons. It’s all very exciting.

In a strange kind of way, being in the middle of the mass ascension kind of reminded me of seeing the whales in Baja. You go out in a small boat and for a while, nothing happens. Then you see a lone whale spout in the distance (like that one balloon you see going up in the photo above). Then, suddenly, there are whales spouting all around you, and then they are right up close to the boat. The balloon fiesta is a lot like that. Nothing happens at first, then you get very excited when you see that single first balloon ascend. Then, suddenly, balloons are going up all around you.

Our first balloon going up.
Then, suddenly, there are balloons everywhere.
The cell phone was doing a decent job for me. I would have liked having the D810 with me, but it was not meant to be. Maybe next time.
The colors, and the vibrance, was off the charts. The balloon fiesta is a photographer’s paradise.
Approximately 650 balloons ascended within about 30 minutes. It was impressive.
Several of the balloons were more complex shapes, like this Felix the Cat version. There were turkeys and other shapes as well.
This last photo is a panoramic shot, in which you manually sweep the camera through an arc (in this case, about 180 degrees). The iPhone does a suprisingly good job. The actual image is a little over 16,000 pixels wide.

A question several of my friends asked is:  Did we go up in a balloon?  The answer to that is no.  You have to make a reservation far in advance to get a seat in one of the balloons (we had not), it costs several hundred dollars, and truth be told, I wasn’t too sure about doing it.  Joe Gresh, whom we visited on our trek to Albuquerque, had done it in the past and he told us he and Colleen enjoyed it.  Maybe next time.

If you have any thoughts about visiting the Albuquerque Balloon Fiesta, my advice is to go for it, and to do it through a tour agency for the reasons listed above.  It’s a bucket list sort of thing to do.   We went with the Road Scholars tour group, they did a great job for us, and they kept us busy for the three days we were in Albuquerque.


Please keep clicking on those popup ads…it’s what keeps the lights on!


Never miss an ExNotes blog:

The Wayback Machine: Eleanor II

By Joe Berk

You’ll recall a recent blog where I waxed eloquent about Eleanor, my Ruger RSM .416 Rigby rifle.   In that blog, I talked about reduced loads using 350-grain cast Montana bullets and 5744 and Trail Boss propellant.  It was fun…the Trail Boss loads had milder recoil and “good enough” (but not stellar) accuracy.  Take a look at these 50-yard targets:

The above target on the left was with 30.0 grains of Trail Boss; the one on the right was with 34.0 grains of Trail Boss.  I could feel a tiny bit more recoil with the 34.0-grain load, but both were light loads with modest recoil.   Weirdly, the point of impact shifted sharply to the right with the lighter load, but it moved back to the center with the 34.0-grain load (and it was slightly higher).  The Trail Boss loads shot okay, but they weren’t running in the same league as the load I had shot the prior week with 5744 propellant and the same Montana Bullet Works 350-grain bullet, as you can see from the 50-yard targets below.

I could see what I was getting with the Trail Boss and I could see that it wasn’t grouping nearly as well as the 5744 loads at 50 yards, so that stopped my testing with Trail Boss (that, and the fact that I had used up all my Trail Boss cartridges).

I was curious:  How would Eleanor do at 100 yards?  I still had some of the 5744 loads left, so I posted a couple of 100-yard targets and let Eleanor have her way.  I first fired a 3-shot group and after looking through my spotting scope, I was surprised to see how well they grouped.

I thought maybe that target was a random success, and I didn’t want to ruin it by throwing more shots at it.  So I fired another 3-shot group at the second target, and then another three at that same target.  That’s the one you see below.

Before all you keyboard commandos start telling me that these results are nothing special, allow me to point out that these are 100-yard groups using  open sights on an elephant rifle.   I’m calling it good to go.  Like I said earlier, when the elephants become an invasive species here in So Cal, I’m ready.   The load is 45.0 grains of 5744 (it’s the load the Lyman Cast Bullet Handbook specified as the accuracy load, and they were right), the 350-grain Montana Bullet Works .416 bullet sized to .417 and crimped in the cannelure, Hornady brass, and a CCI-200 primer.  I didn’t weigh each charge; I just adjusted my RCBS powder dispenser and cranked them out.  If you were wondering, I use Lyman dies for this cartridge.

A bit more about Eleanor:  The rifle is a Ruger 77 that the good folks from New Hampshire call an Express or RSM model (I think RSM stood for Ruger Safari Magnum).  They made them in 375 H&H, 416 Rigby, and 458 Lott (kind of a magnum .458 Magnum).  Ruger also made a similar one in a few of the standard calibers (7mm Mag, 30 06, and 300 Win Mag, and maybe one or two others).  These rifles were a bit pricey when Ruger sold them in the late 1990s/early 2000s, but evidently not pricey enough.  They were too expensive to manufacture, so Ruger stopped making them.  When you see these rifles come up for sale today (which doesn’t happen very often), they command a premium.  I wish I had bought one in 30 06 when they were first offered; to me, that would be the perfect rifle.

The rear sight on a Ruger RSM rifle is of the African “Express” style.  The elevation adjustment consists of a fixed and two flip-up blades, and they all have a very shallow V.  I guess the idea of that shallow V is that it lets you see more in case an elephant is charging.  The sight has two flip up blades behind the fixed blade; as range increases, you flip up the second blade, and if it is an even longer shot, you go for the third blade.  I got lucky, for me, the fixed rear sight blade is perfect with this load.  I made a minor adjustment for windage, and the elevation is spot on with a 6:00 hold at both 50 yards and 100 yards.

Incidentally, that rib the rear sight sits on?  It’s not a separate piece.  It and the barrel were turned and milled from one solid piece of steel.  It’s one of the reasons these rifles were too expensive to manufacture.

The front sight is the typical brass bead (you can sort of see it in the featured photo at the top of this blog), which I usually don’t like, but with these results I can’t complain.  I’ve shot better groups with two or three other open sight rifles using jacketed bullets at 100 yards; this is the best any cast bullet has ever done for me.


Popups:  Click on them to keep us going!

Want to see the first installment of the Eleanor story?  It’s right here.

Check out our other guns and reloading articles here.

Tough to get to a gunstore to buy targets?  Range fees for targets too high? Do what I do and order them online.  They’re delivered right to your door and they’re less expensive, too.

Need a calipers for measuring your group size?  This is a great place to find great calipers at a great price.

Want to check out Montana Bullets?   Here’s a link to their website.  Tell them Joe sent you.  Trust me on this:  These are best cast bullets I’ve ever used.


Never miss an ExNotes blog! Subscribe for free!