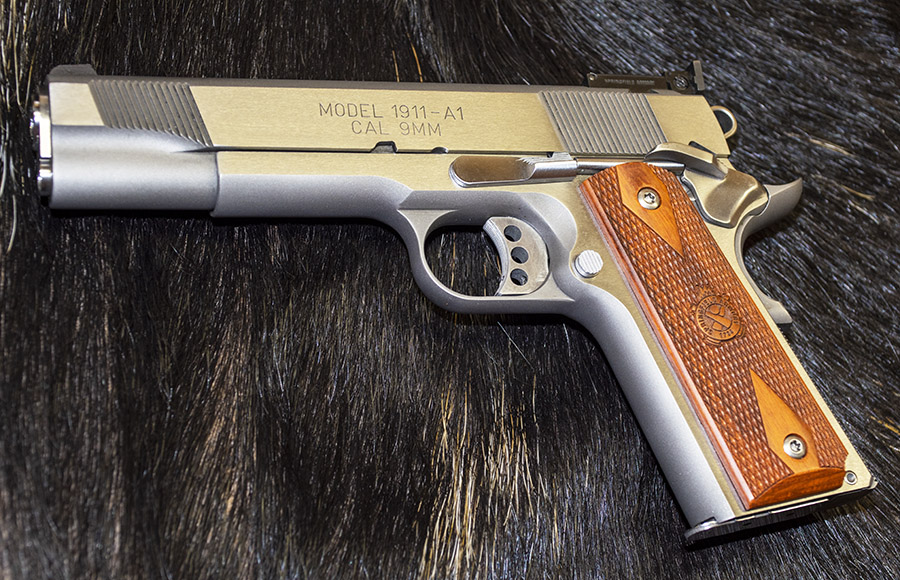
As mentioned in recent blogs on my 9mm Springfield Armory 1911, I took the gun to TJ’s Custom Gunworks to have it repaired and customized. I have the gun back now and I am very satisfied with the work.
When I took the 1911 to TJ, I asked him to repair the damage I did to my 1911 and to add several custom touches. That’s what he did, and I’ll describe them below. Most of the photos in this blog are from TJ. I took a few, too.
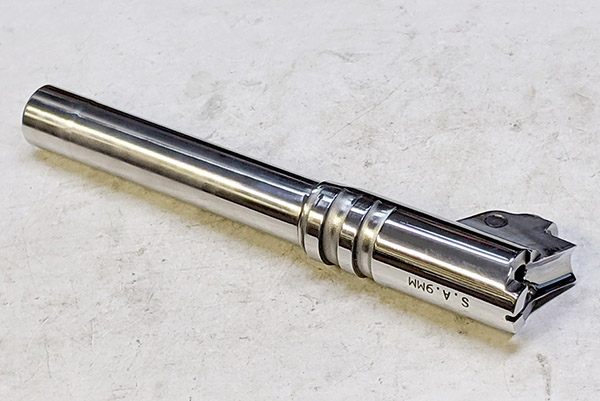
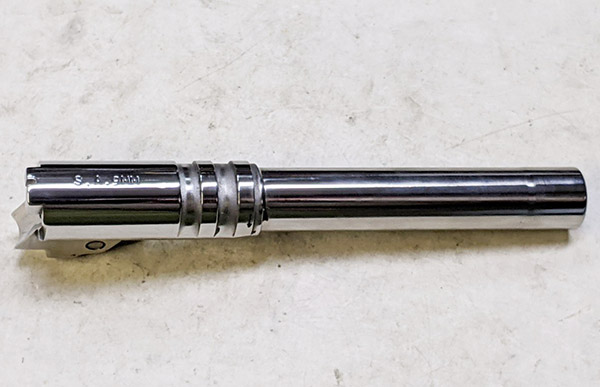
Fortunately, the 1911’s barrel was not damaged (the cartridge blew apart; the barrel and chamber survived). TJ polished the barrel, the chamber, and the ramp. The reinvigorated barrel looks great and it adds to the 1911’s appearance.
The polished 1911 barrel.It looks great, doesn’t it?
TJ polished the 1911’s ramp and chamber. This helps to prevent feed failures and assists in extraction. The polished ramp also helps to prevent bullet pushback into the case as the ramp is pushed from the magazine into the chamber.
The feed ramp before polishing.The feed ramp after polishing.
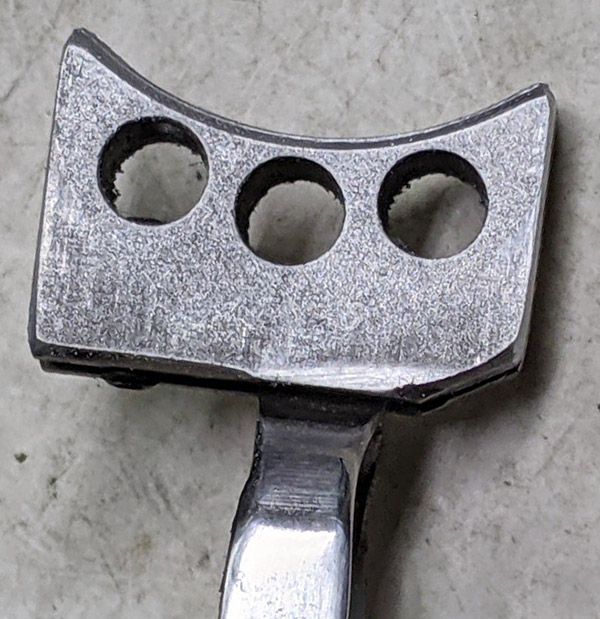
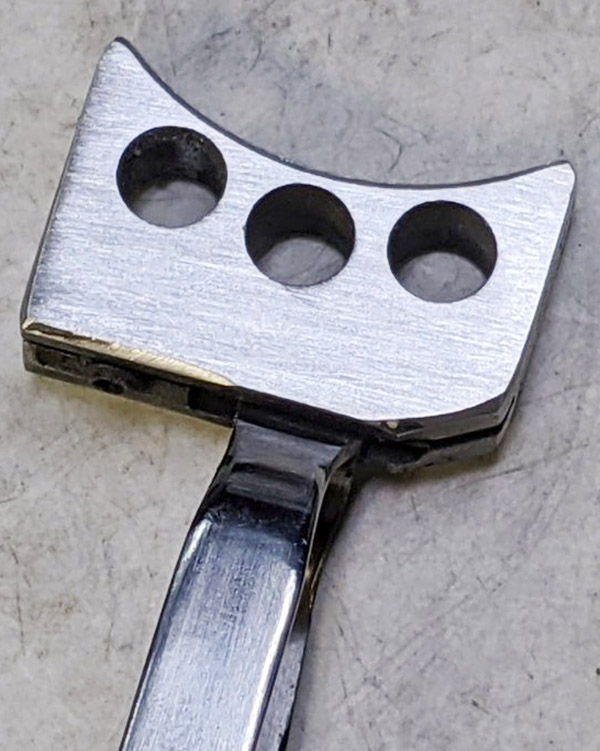
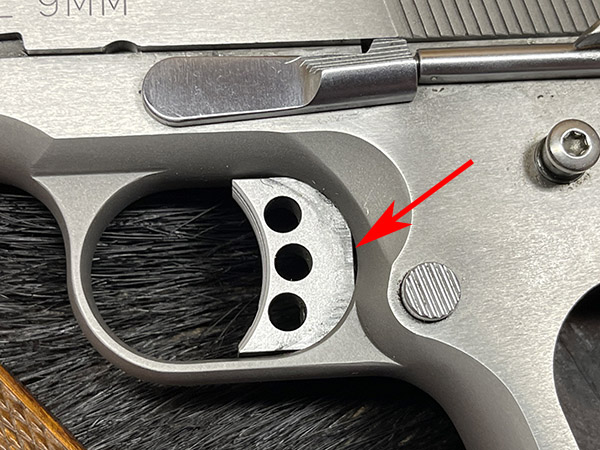
The trigger was in bad shape after the 9mm cartridge went into its sudden unintended disassembly mode. TJ cleaned it up, but I’m going to have him fit a new target trigger at some point in the future.
The rigger before TJ cleaned and finished it.The trigger and its bracket after brushing and polishing.
While TJ was in the gun, he removed and replaced the Springfield Armory firing pin and firing pin spring (which he does on all the Springfield Armory 1911s that come into his shop). Springfield uses a titanium firing pin and a heavier firing pin spring, which is a bad combination. I’ve had occasional misfires with my Springfield, and the primers have previously always shown light firing pin strikes. With the new Wilson firing pin and firing pin spring TJ installed, that problem is in the rear-view mirror (where it belongs).
TJ found that the extractor on my Springfield Armory 1911 was terrible. I thought that might be due the base of the cartridge bursting, but it was not. It was just a factory goof up. The photo TJ included shows the extractor about as I remembered it before the event that set all this in motion. The extractor had been extremely difficult to remove from the slide when I disassembled it for cleaning, but I never thought to check if it was engaging the cartridge (the gun had been ejecting). You would think an outfit like Springfield would know what they are doing in this area, but apparently they did not. TJ fit a new extractor to fix that problem.
This photo shows the original extractor not touching the cartridge case at all. It appears that the claw is just too short.The new extractor TJ installed; note that it now has a firm grip on the case rim.Another shot of the extractor on the case rim. It’s amazing the cartridges were extracting and ejecting before this fix. They were flying everywhere.The old extractor is on top; the new one is on the bottom. Note that the old extractor was not reaching in to engage the case.
Ejection is way better now. The gun drops all the cases in the same spot just to my right (they don’t go flying all over creation like they used to). It makes scooping up my brass a lot easier.
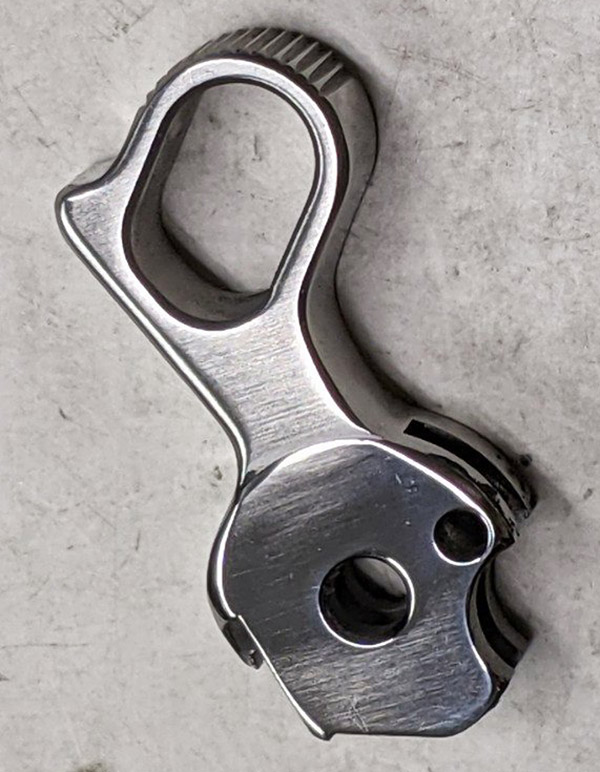
Reinstalling the slide release on my Springfield was difficult. The slide release plunger was too long and the camming surfaces on the underside of the slide release were not cut at the correct angles. TJ reconfigured both. The slide release snaps into place in a very slick manner now. There’s no more worry about scratching the receiver (the so-called idiot scratch) when the gun is reassembled.
The slide release plunger, as delivered by Springfield Armory, was originally too long. It made installing the slide release problematic. TJ shortened and recontoured it.The slide release has a contoured bevel to push the slide release plunger in when the slide release is installed. As delivered by Springfield Armory, the angles were incorrect. TJ recontoured this area to make installing the slide release much easier.
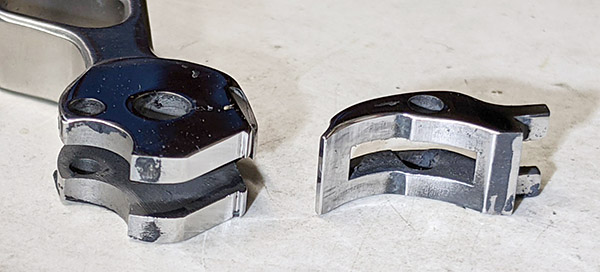
TJ polished and fit a new hammer, which looks better than the original. He also lightened the trigger pull. The new trigger is light and I like it.
A polished hammer and sear.The new hammer. It looks good.
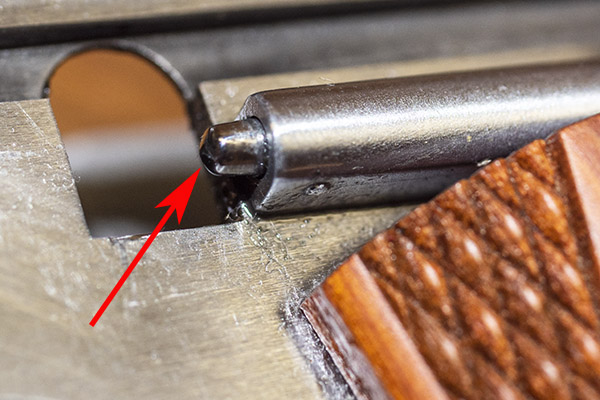
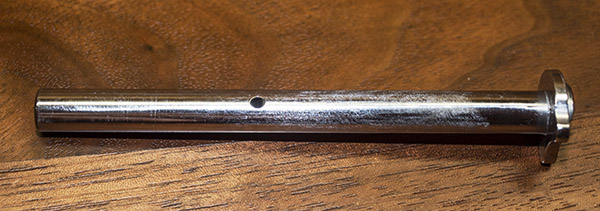
The Springfield Armory 9mm 1911 came from the factory with a two-piece guide rod, which I hated. It would constantly unscrew, even after applying blue Loctite after each cleaning. The stock Springfield guide rod needed an Allen wrench to unscrew and remove it (Springfield provided one with the gun). The gun required doing this to be able to rotate the barrel bushing after depressing the guide rod plug. In my opinion, two-piece guide rods are a solution to a problem that doesn’t exist. I don’t know why manufacturers fit them to new guns and I don’t why anybody would want one. I asked TJ to fit a polished one-piece guide rod to my 1911, and to make it short enough so that I could rotate the barrel bushing for disassembly without having to unscrew the guide rod. I like the new set up a lot better.
TJ installed a one-piece guide rod. I like it. The original two-piece guide rod was always unscrewing.The new guide rod in its bushing. TJ modified it so I could disassemble the 1911 without having to unscrew the guide rod. Not the polished end of the new guide rod, and the polished barrel end.
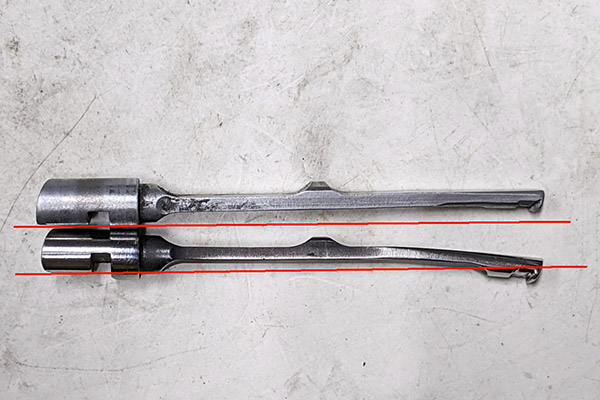
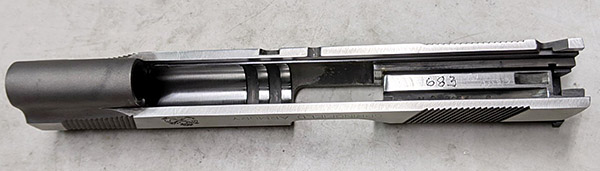
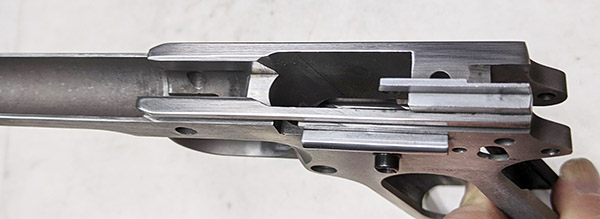
Finally, TJ polished the slide-to-receiver interface points. You can see this work in the photos below.
The 1911 slide underside.The 9mm 1911 receiver.
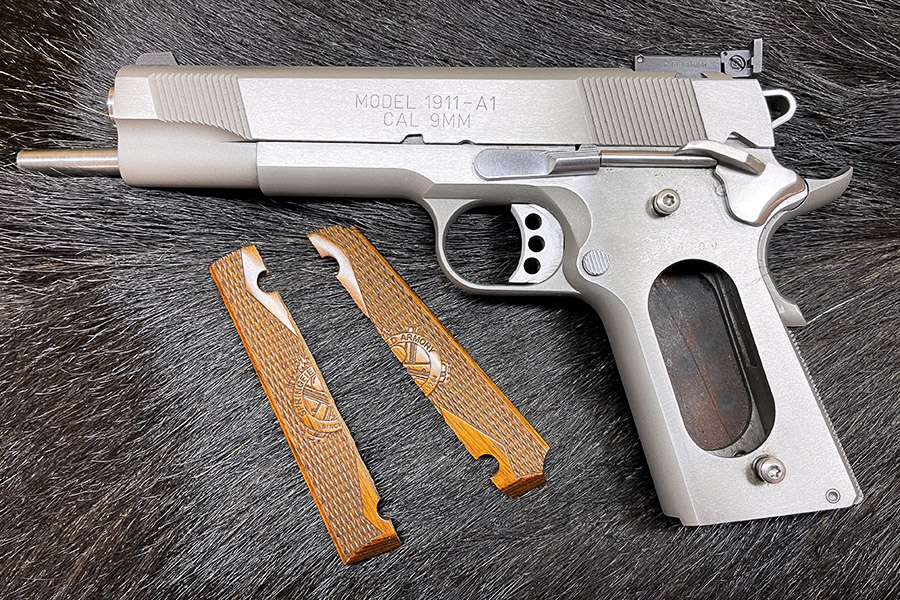
While TJ had the gun, I ordered new grips and a replacement magazine from the Springfield Armory website. The original crossed-cannon cocobolo Springfield grips were damaged when the cartridge burst, so I bought another set (they were reasonably priced at $32.95). The Springfield site also advertised a set of double-diamond checkered cocobolo grips (without the Springfield logo) for $15, so I checked that box, too (I like having an extra set of 1911 grips on hand). The grips and the new magazine arrived a few days after I ordered them.
I picked up the repaired and reinvigorated 1911 from TJ this week. I’ve already been to the range with it and it works well. Watch the blog; I’ll post a range report in the near term. I’ve also had a few more thoughts on what might have caused the burst round that started this adventure, and we’ll have another blog on that as well. Here are links to our prior blogs on this topic:
Help us bring more content to you…please click on the popup ads!
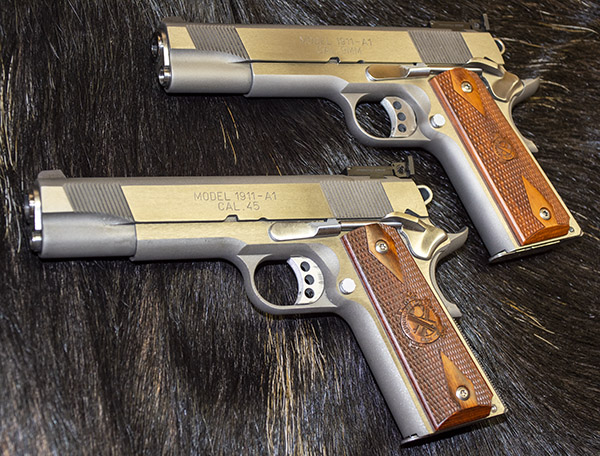
Seeing double? Nope. I liked my 9mm 1911 so much that when I saw the same gun in .45 ACP, I bought it, too. Watch for a report on it in an upcoming ExNotes blog.
The stream crossing to the West End Gun Club has been too deep to cross in my Subie Outback since early January. I tried it once back then and I wasn’t going to make that mistake again.
My January Meyer Canyon Road mishap. The Subie is not a submarine and I am not a U-boat commander, although we both came close that morning.
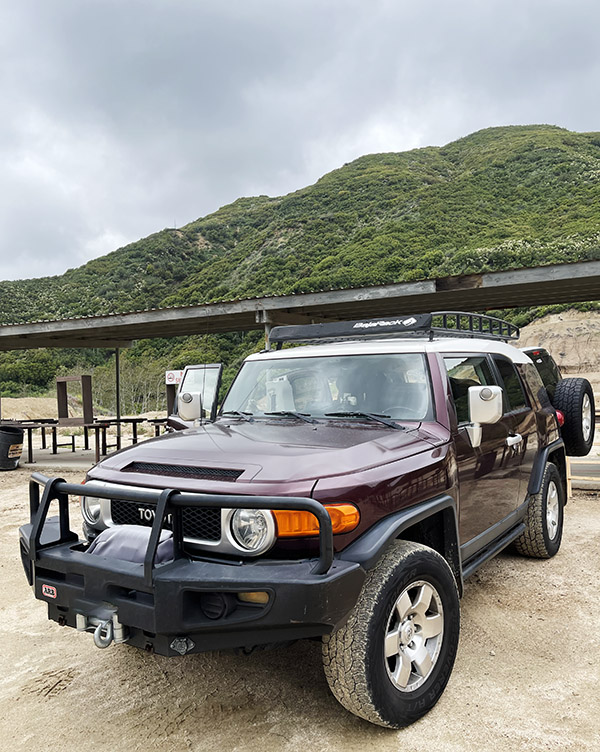
I’ve been going to the Magnum Range in Ontario (an indoor pistol range), watching the West End website for updates and occasionally driving out to check the stream. The Magnum Range is a good place to shoot, but I missed shooting my rifles. Then a good thing happened earlier this week: Good buddy Duane offered to pick me up and attempt a stream crossing in his Toyota 4×4. I was in.
Duane’s Toyota 4×4. It’s an impressive vehicle.
I’ve known Duane for years, going back to my work with CSC Motorcycles in their early days of the replica Mustangs and the RX3 250cc adventure bike. Duane and I both owned the CSC bikes and we traveled extensively on them.
Duane in the commander’s cupola.
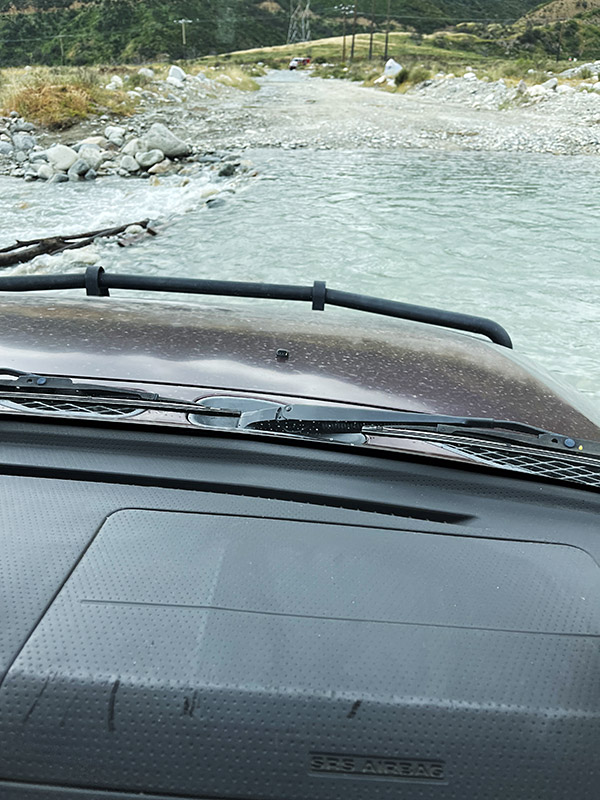
The Meyer Canyon Road stream crossing was still deep and the water was moving swiftly, but Duane’s Toyota had no problem crossing it.
Entering the fray…
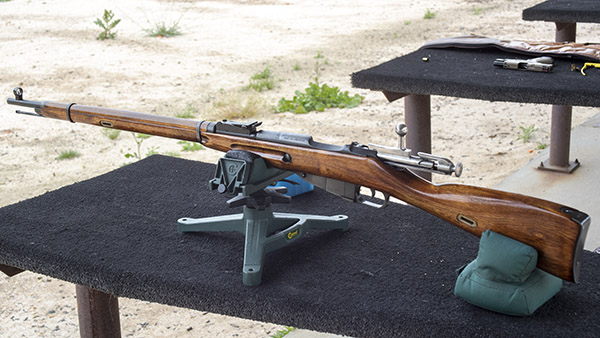
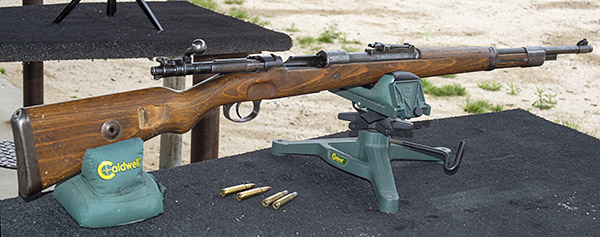
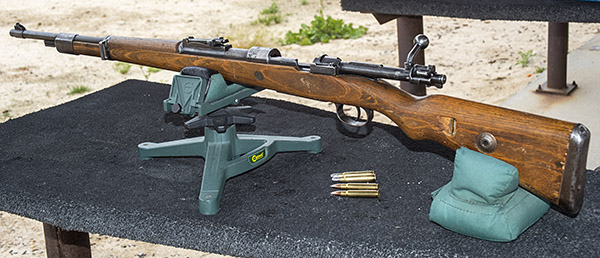
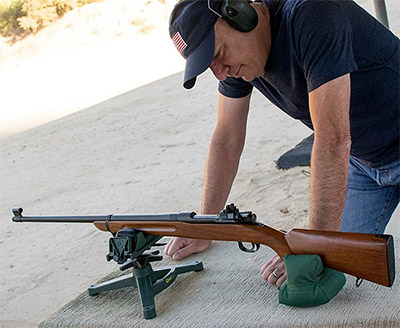
I knew which rifle I wanted to shoot when I received Duane’s email invitation: My Mosin-Nagant 91/30. It’s the one you see at the top of this blog. The Mosin is a favorite. It’s accurate, I reload 7.62x54R ammo, and it is fun to shoot.
My Mosin-Nagant 91/30. The Russians built 17 million of these rifles. They are becoming hard to get and prices have risen substantially. These rifles are surprisingly accurate.
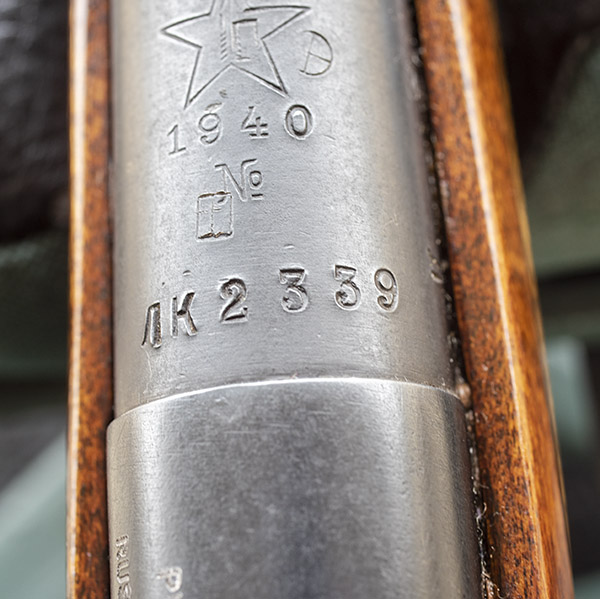
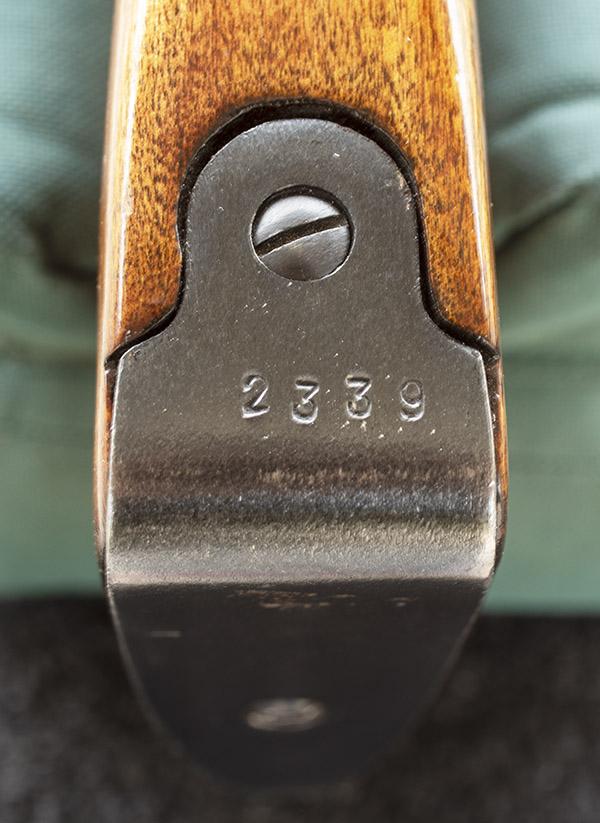
I’ve owned this Mosin rifle for maybe 10 years now. It came about almost as an afterthought. To me, the Mosins appeared to be cheap pieces of junk. Then one day after a class about engineering creativity, a student asked about the cover photo on a book I wrote. He told me he and his father owned a Mosin and enjoyed shooting the rifle. I saw a Mosin on the rack at a sporting goods store a short while later for $139. It looked crude, but for $139, I thought I’d take a chance. The guy who sold it to me did not know there was a bayonet in the Mosin’s cardboard box, and when he put the rifle back in its box, the bayonet scratched the stock. Neither of us knew this until 10 days later (after California’s silly waiting period). The store offered to sell me a different Mosin, but that meant starting the 10-day waiting period all over again. I viewed the scratch as an opportunity, and indeed it was. I refinished the stock (10 coats of TruOil worked nicely). Then I glass bedded the action, reworked the trigger, polished the bolt, and worked up a load. It was fun and I learned much about the rifle. Mine has matching numbers on the receiver, the butt plate, and the bolt. I know it’s weird: I own some really nice rifles, but the Mosin is one of the ones I love the most.
Serial Number 2339, built in 1940. Production rates ramped up sharply in 1940, but this rifle was built before that occurred. Fit and finish nosedived that year; mine is one of the good ones.The Mosin’s buttplate.The serialized (and polished) bolt.
When Duane and I arrived at the range, I set up a target at 50 yards. Like always, shooting the Mosin felt good. It had been too long.
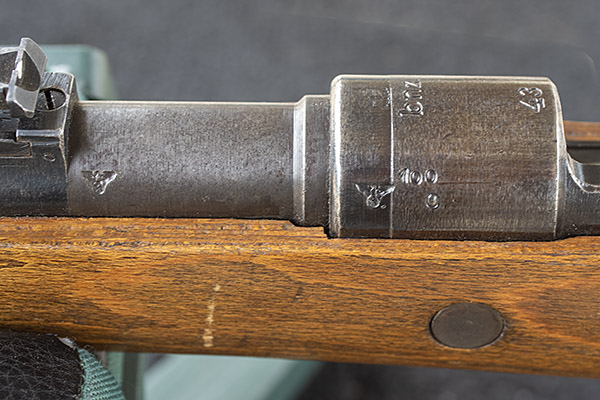
Duane is a milsurp rifle enthusiast, too. He has a beautiful 8mm Mauser K98 that his uncle took home from Germany after World War II. I keep trying to buy it from him. He keeps saying no.
A World War II K98 Mauser.Left view of the K98 Mauser.Nazi markings on the Mauser’s barrel and receiver.
Like me, Duane is a reloader. He had reloaded reduced loads for our outing. A reduced load is one loaded for lower velocity, which means the rifle has significantly less recoil. One of Duane’s loads had cast bullets. The other had jacketed 150-grain bullets. Both were loaded with Trail Boss powder, and both shot well.
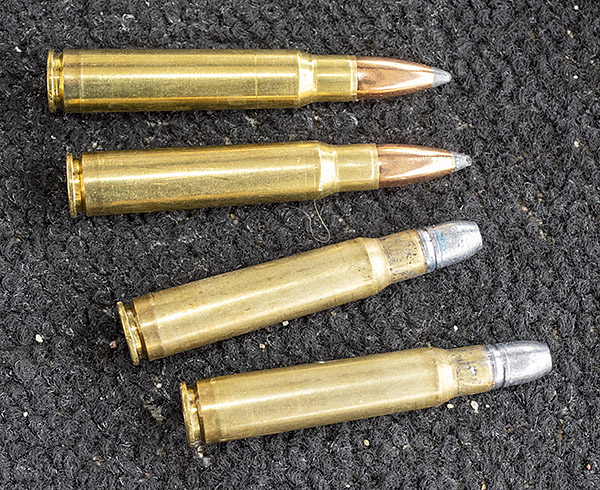
8mm Mauser reloaded ammunition. The upper rounds have 150-grain jacketed soft point bullets, the lower rounds have 150-grain cast bullets.
As soon as Duane fired his first shots, I knew he had reduced-load ammo. Check it out in the video below.
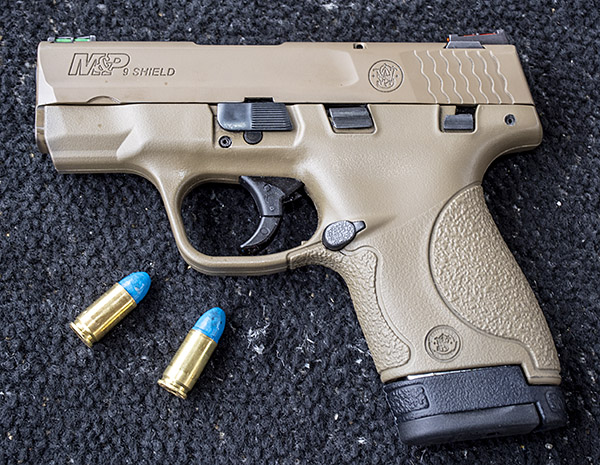
Duane and I both brought handguns, and to my surprise, we both decided to bring our Smith and Wesson 9mm Shields. I’ve written about the Shield before, as well as the custom work TJ (of TJs Custom Gunworks) did on my Shield. I shot my Shield at 50 yards. Using a short-barreled 9mm concealed carry handgun at 50 yards is not a formula for accuracy, but I managed to keep all of my shots on the target. The group was large, but at least they were on the paper.
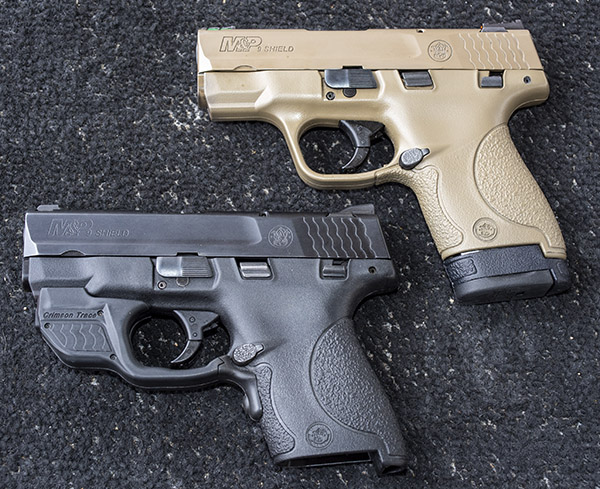
My Shield in flat dark earth. I shot my reloaded ammo with Gardner powder-coated bullets.My Sheild and Duane’s. Duane’s has a Crimson Trace laser just forward of the trigger guard. The laser is actuated by a pushbutton below the trigger.
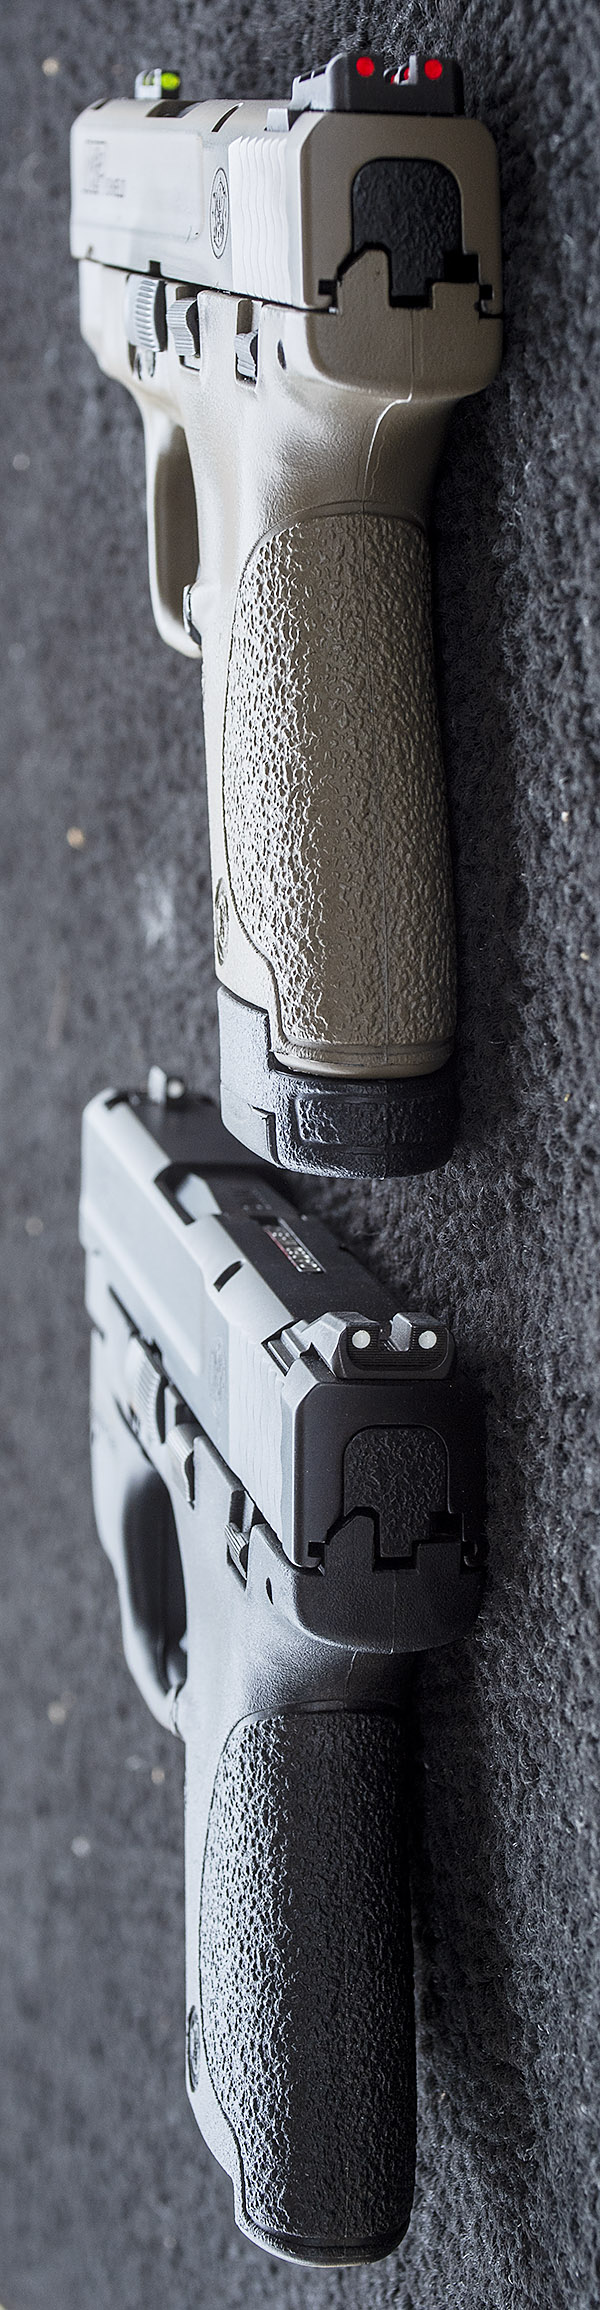
One of the things I like about my Shield is its bright sights. Duane’s Shield has white dot sights and a green Crimson Trace laser mounted beneath the slide. The laser is a cool touch for close in work. My Shield has high visibility fiber optic sights (they catch light from the side and light up green and red dots). They’re good if there’s any light at all. If there’s no light, the sights don’t light, but if there’s no light, it’s not likely you’d be shooting.
A comparison of the sights on both Shields. My pistol’s Hi Viz sights are the best I’ve ever used on a handgun.
Before we called it a day, Duane let me try a couple of shots with his Mauser. I shot at the same 50-yard target I’d been using with my Shield and the Mosin-Nagant.
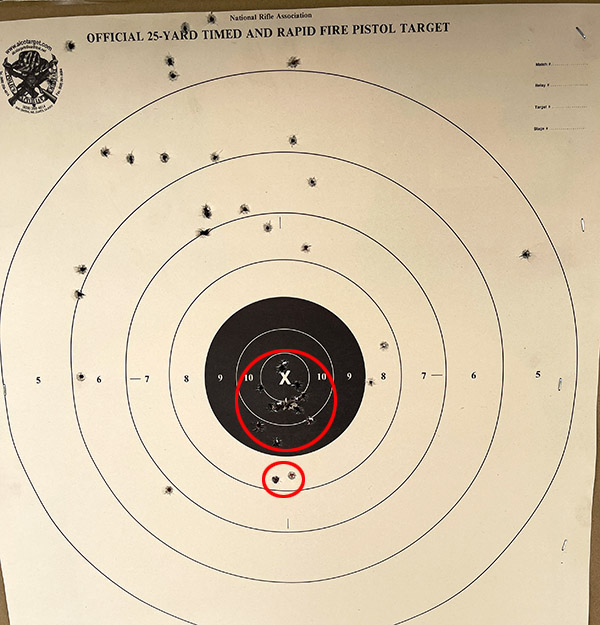
The proof is on the paper. The upper red circle surrounds the shots I fired with my Mosin-Nagant (with one exception, all are in the 10 ring…that one exception was the first shot I fired). The circle around the two shots below were mine, fired with Duane’s 8mm Mauser and his reduced-load ammo. All the other shots were with the Smith and Wesson 9mm Shield.
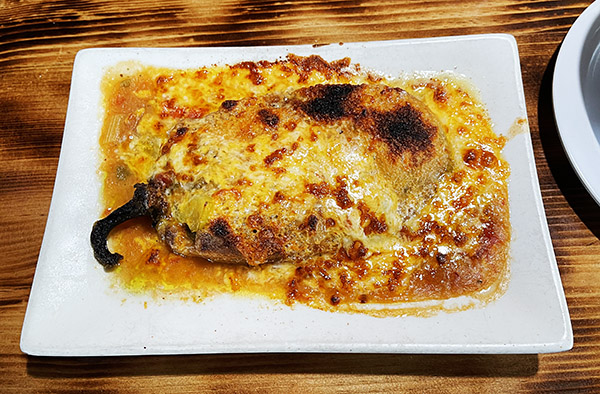
After the West End Gun Club visit, we stopped at our local Mexican restaurant. I had albondigas soup and a chile relleno. As always, both were outstanding.
A toasted chile relleno. It was excellent.
Help us bring more content to you: Please click on the popup ads!
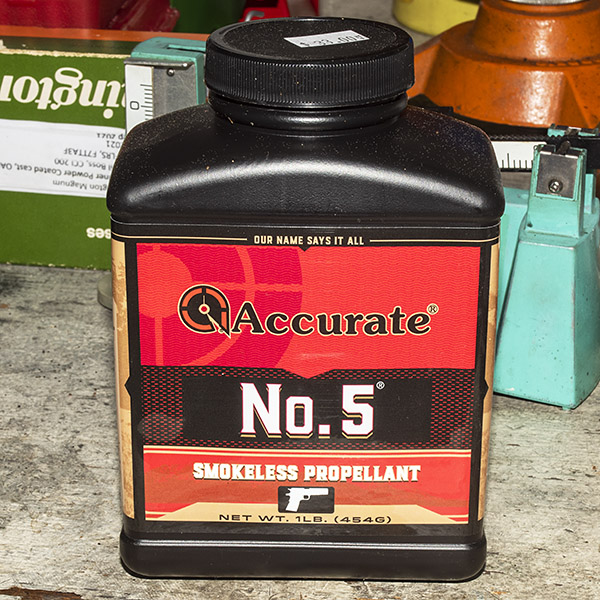
A few days ago I blew up my 9mm Springfield Armory 1911. It was hellaciously frightening. I wrote a blog about it and I’ll provide a link at the end of this post. My initial conclusion was that I had committed the cardinal reloading sin: I double charged a case. Instead of the intended 5.4 grains of Accurate No. 5 propellant, I cycled the round twice at the charging station and I inadvertently loaded 10.8 grains. I know what you are thinking and that’s okay. If I read about somebody doing this, I’d think they were a dumbass, too. I’ll get back to that later.
5.4 grains of Accurate No. 5 behind a 125-grain powder coated bullet is good. 10,8 grains is not.
Thinking about the double charge issue more, several additional thoughts emerged. Were there other possibilities?
One other possibility is that instead of the failure being due to a double charge, it might have been a squib charge (which would lodge a bullet in the bore) followed by another round. This was dismissed for several reasons:
I knew it wasn’t preceded by a squib charge because the prior round felt normal.
If it was a squib charge, the following round probably would not have chambered. Squib charges resulting from no powder and pressure being provided by the primer only (in a handgun) tend to push the bullet into the barrel a very short distance (the bullet doesn’t go into the barrel far enough to allow another round to chamber).
The were 5 holes on the target, which is the number of rounds I had fired.
The barrel was not bulged (TJ inspected it and pronounced it good).
Count them: 5 holes on the target. The fifth hole is the one at the bottom. This bullet was tumbling due to its low velocity. When the case blew out, the pressure vented elsewhere.
A friend asked if I could have seated two bullets in the case. I set bullets (one on top of the other) next to a cartridge case. I think you can see that seating two bullet in the case is not possible. The bottom bullet would set higher in the case than you see in the photo below (the web near the case base and the thickness of the case “floor” would cause it to seat much higher in the case). I would not have been able to seat the second bullet even if there was no powder in the case.
A photo showing that two bullets in a single case is not possible.
I pulled the bullets in the photo above from two cartridges using an inertia bullet puller. Both had exactly 5.4 grains of Accurate No. 5 propellant, which is what I intended. These are the pulled bullets on top of their cartridge cases:
125-grain powder coated bullets pulled from their cases and then placed back on top of their cases.
After I pulled the bullets and put the powder back in each case, you can see the level at which the right amount of propellent (5.4 grains) sets in the case.
5.4 grains of Accurate No. 5 in 9mm cartridge cases.
I wondered: Would a double charge (i.e., 10.8 grains of Accurate No. 5) fit in a cartridge case without it spilling out of the case? The answer is yes. I took the powder from one case and poured it in the other. The case can easily hold 10.8 grains of Accurate No. 5. Take a look:
10.8 grains of Accurate No. 5 in a 9mm cartridge case.
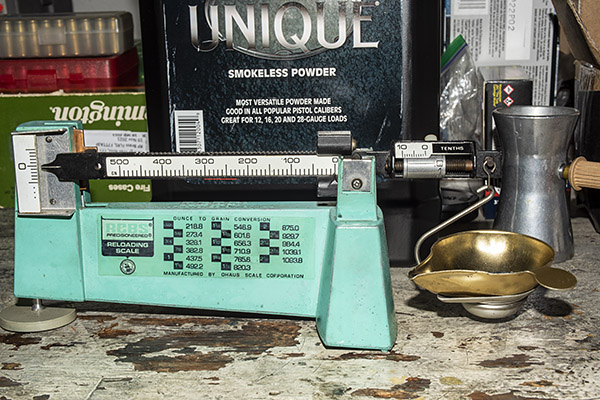
It would be better if the powder was bulky enough that it would spill over the case rim if I double charged it. I know that my 9mm Unique load sits higher in the case (my Unique load for the 125-grain bullet is 5.0 grains).
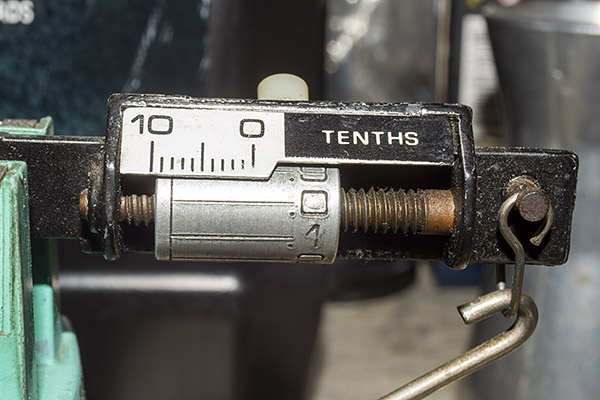
Trickling 5.0 grains of Unique onto the powder scale.
Here’s what 5.0 grains of Unique looks like in a 9mm case:
5.0 grains of Unique in a 9mm cartridge case.
The question then was how much Unique can a cartridge case hold? I was specifically interested in determining if a double charge of Unique would overflow the case. To answer this, I completely filled a 9mm case with Unique and weighed that amount of propellant:
A 9mm cartridge case completely filled with Unique.
I weighed the amount of Unique held by a completely-filled 9mm cartridge case. The filled 9mm case held 7.9 grains of Unique.
Weighing the Unique held by a completely-filled 9mm case.A completely-filled 9mm cartridge case can hold a hair over 7.9 grains of Unique propellant.
A double charge of Unique would be 10.0 grains. I concluded that a double charge of Unique would overflow the 9mm case, and this would provide an additional safeguard against an inadvertent double charge. I was careless enough to not notice a case double-charged with Accurate No. 5. I’d like to think I wouldn’t be careless enough to miss powder spilling out of the case, as would occur with Unique. The next time I load 9mm ammo, it will be with Unique.
You might be wondering about the numbers here. Bear in mind that Unique is a less dense propellant than Accurate No. 5. 10.0 grains of Unique occupies more volume than does 10.8 grains of Accurate No. 5.
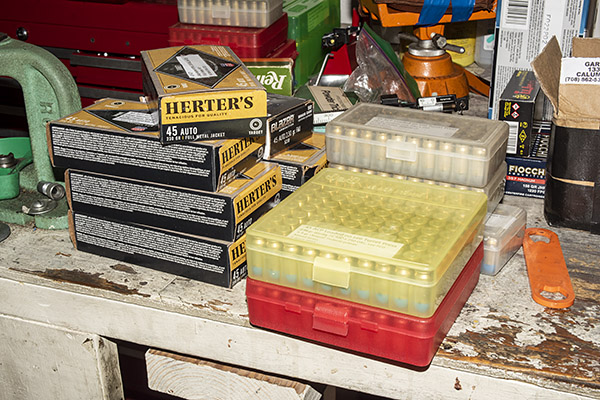
The challenge now is what to do about the approximately 1400 rounds of 9mm and .45 ACP I already have loaded on the Lee Turret press. I thought I might be able to quickly screen the rounds by weight, but that’s not going to work. The weights of the powder, the brass case, and the bullet all vary, with the bullet (as the heaviest item) having the greatest variation. On the 9mm cartridges, I found that the weight variation of the completed 9mm cartridges varies from 192 grains up to 198 grains. The powder charge is 5.4 grains. If a cartridge weighs 198 grains, would it just be at the upper edge of the weight distribution with the correct single charge, or would it be a 192-grain cartridge with a double charge? It’s even worse on the .45 ACP rounds, because the weight variability of the completed cartridge is more than the 9mm, and those powder charges are in the range of 5.0 grains or 5.4 grains (they are lost in the case compared to 9mm ammo). I can’t take the chance that there’s another double charge in there. I’m breaking down and checking every cartridge. It’s a lot of work, but it’s better than blowing up a gun.
This is the .45 ammo I loaded on the Lee turret press. It’s 700 rounds. I have another 700 rounds of 9mm ammo similarly loaded.
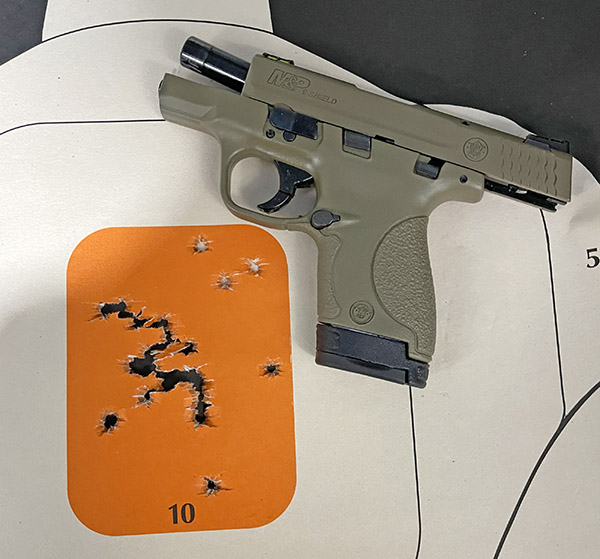
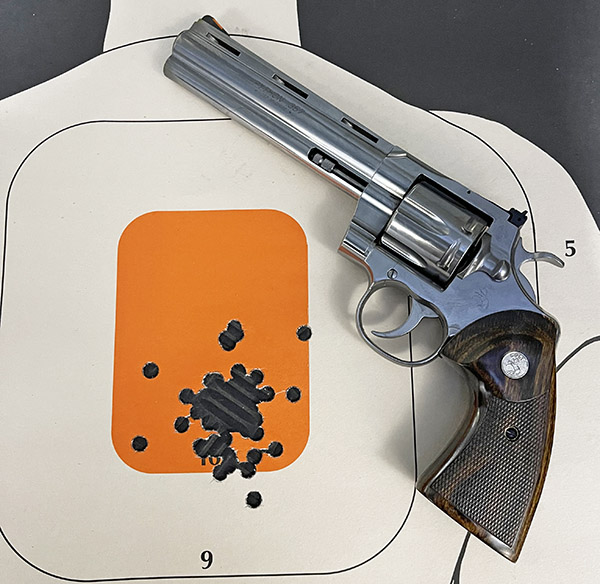
You might be wondering what it’s like to get back on the range after blowing up a gun. I was afraid I might return with a very serious flinch (you know, when you jerk the gun in anticipation of it firing). I’m happy to report (and maybe brag a little bit) that I’m just fine. I had my 9mm S&W Shield out with ammo that I tore down, checked, and reloaded, and I also had my Colt Python (in which I shot .38 Special wadcutters).
An S&W 9mm Shield target shooting the 5.4 grain Accurate No. 5, 125-grain powder coated bullet load described in this blog.A Colt Python target shot with 148-grain powder-coated wadcutters. I’ve done better and I’ve done worse.
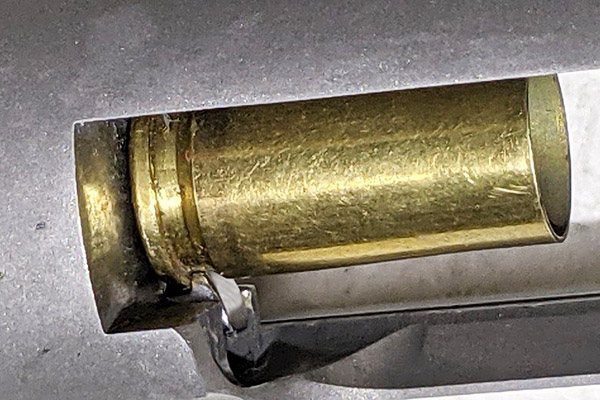
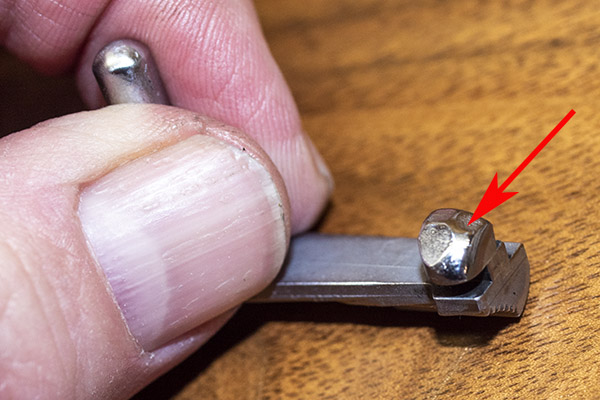
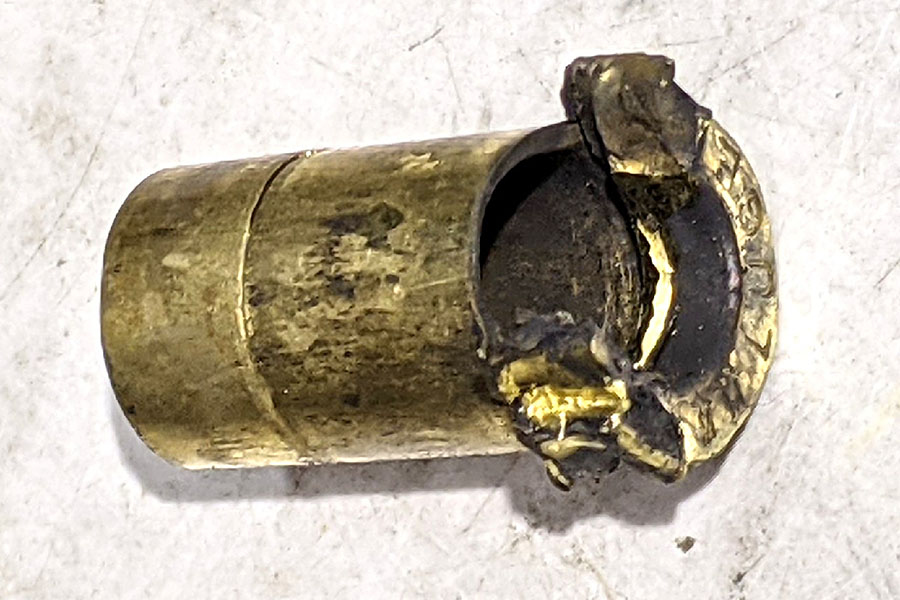
At this point, I’m convinced that I screwed up and double-charged the 9mm round I wrote about last week. TJ (of TJ’s Custom Gunworks) disassembled the gun and pulled out the case you see in the photo at the top of this blog. There was a lot of pressure in there (about 10.8 grains of Accurate No. 5’s worth, actually). Like I said in the earlier blog, it’s an opportunity. More good news is the barrel wasn’t damaged. Even more good news is that TJ is doing an action and reliability job on my 1911. TJ is replacing the two piece guide rod (two-piece guide rods are a solution to a problem that doesn’t exist) and doing a few more good things to this pistol. I’ve already purchased and received replacement grips and a new 9mm magazine. I’ll provide an update in a couple of weeks after I get the 1911 back, and I’ll do another blog on what it’s like disassembling and reassembling 1400 rounds of reloaded ammo.
It occurred in an instant, on the fifth and last round in the magazine. It was as if a cherry bomb had gone off in my face. I heard a voice yell “whoa!” and I realized the voice was mine.
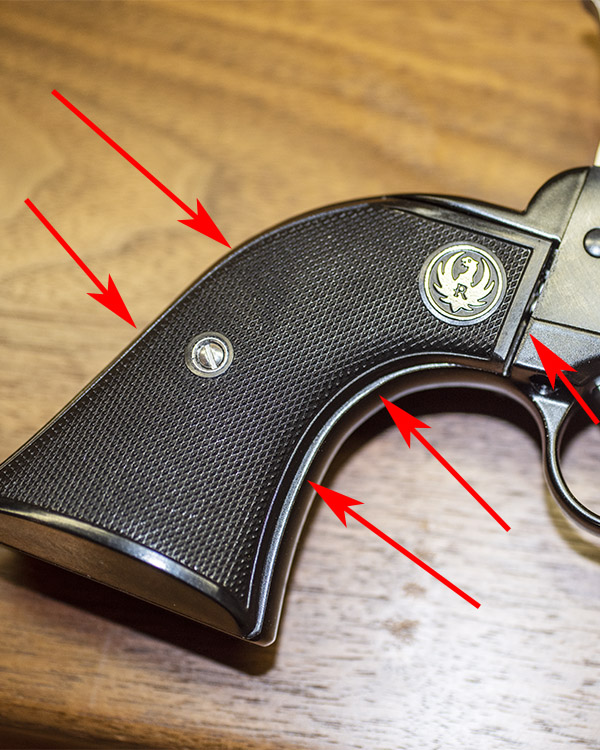
I stared at the smoking Springfield Armory 9mm 1911 in my hands, waiting for the pain, the blood, and whatever might follow. My hands, still wrapped around the grips, were stinging. I knew something bad happened, but I didn’t know how bad it was and I wasn’t especially looking forward to finding out. My gun had blown up. The entire gun was smoking and smoke continued to waft from places it wasn’t supposed to: The grips, the line between the frame and the slide, the trigger, around the hammer, and the ejection port (which was closed; at this point, I didn’t know if there was a live round in the chamber). Gray smoke curled out everywhere.
I slowly relaxed my grip and looked at my hands. There was no blood, but my palms stung like they had been slapped with a baseball bat. As I eased my hold, the 1911’s left grip fell away in two pieces (as you can see in the photo at the top of this blog). There were no cuts and there was no bleeding, but I had powder tattoos all over both hands. I returned my focus to the gun. It was still smoking. It smelled funny, too. Was that burnt flesh or just the powder and residual oil?
The first four shots from that magazine were delightfully tight, and I ordinarily would have felt good about seeing that. On each of the preceding four shots (and the fifth one, for that matter), the front sight had been outlined against the blurred rear sight and the bright orange muzzle flash, the way things are supposed to look when the hammer drops.
The first four rounds were forming a nice group. The fifth was a disaster.
I was still afraid to look at my hands. My face was now tingling and I knew I’d caught something. I had safety glasses on and I could see okay; that was good. I worked up enough courage to put the gun down and look at my hands more closely. They seemed okay. I knew from previous bad things happening that sometimes you don’t feel anything for a few seconds (the golden minute, I think they call it), but I looked again and I was okay.
The 1911’s right grip appeared to be intact (but it wasn’t; more on that in a second). The slide was locked forward. I tried to pull it back but it would only move about an eighth of an inch. I pressed the magazine release and nothing happened. I pulled on the magazine and it came out. It was mangled; the front was bent in and the follower angled upward. I still wasn’t sure if there was a live round in the chamber. I cocked the hammer and dropped it a couple of times…and there was nothing. I concluded it was safe to put the 1911 in its case. I scooped up my marbles and left. I didn’t even pick up my brass, and this was Remington brass that had only been reloaded once…that’s how shook up I was.
When I got home, I looked in the mirror. I had one little spot on my right cheek that bled and had already stopped (I’ve done worse shaving). I washed my hands to get the powder residue off (that took a while). There were no cuts. Dodged a bullet, I did. Figuratively and literally.
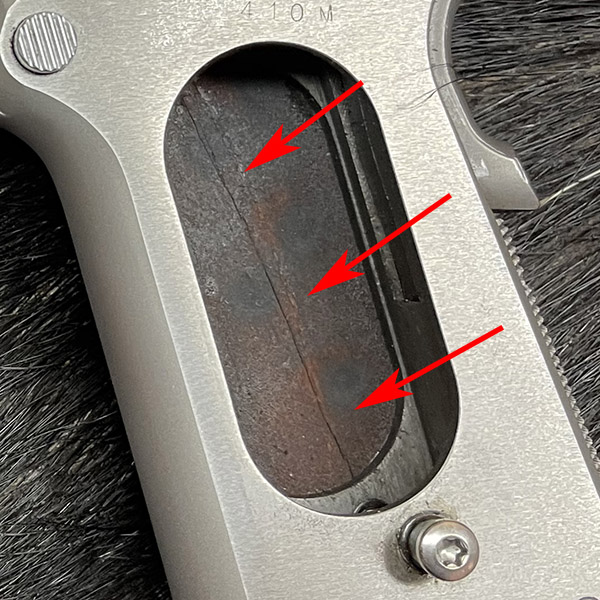
Once home, I examined the 1911 more closely. The trigger was too far forward in the frame. The event probably screwed up the trigger mechanism. The right grip, which I thought was okay, had a hairline crack along its length. Not that it matters; you can’t buy just one grip (you buy them in pairs). The slide would not move to the rear more than a little bit; it was not coming off the gun.
The trigger moved far forward. You can see the outline on the trigger denoting where it was normally positioned.The left grip fell off the gun when I released my grip. The right grip had cracked, but it remained in place.
What could have caused this? There are a lot of possibilities. The first (and most likely) is that I double charged a cartridge case when reloading. In other words, I put twice as much propellant in the case as I should have. Of all the reloading equipment I’ve ever used, it’s easiest to do this on the Lee turret press I’ve been raving about. I’m not badmouthing Lee or their turret press; I’m simply making an observation. If that’s what happened, it was entirely my fault.
I could have fired a squib load, had a bullet lodge in the bore, and then fired another bullet on top of it. I’m pretty sure that is not what happened because of the holes on the target. There are four clean holes from the first four rounds, and one lower, oblong hole from the fifth round (when the gun blew up). You can see this on the target above. The bullet didn’t have as much energy behind it and it had started to tumble.
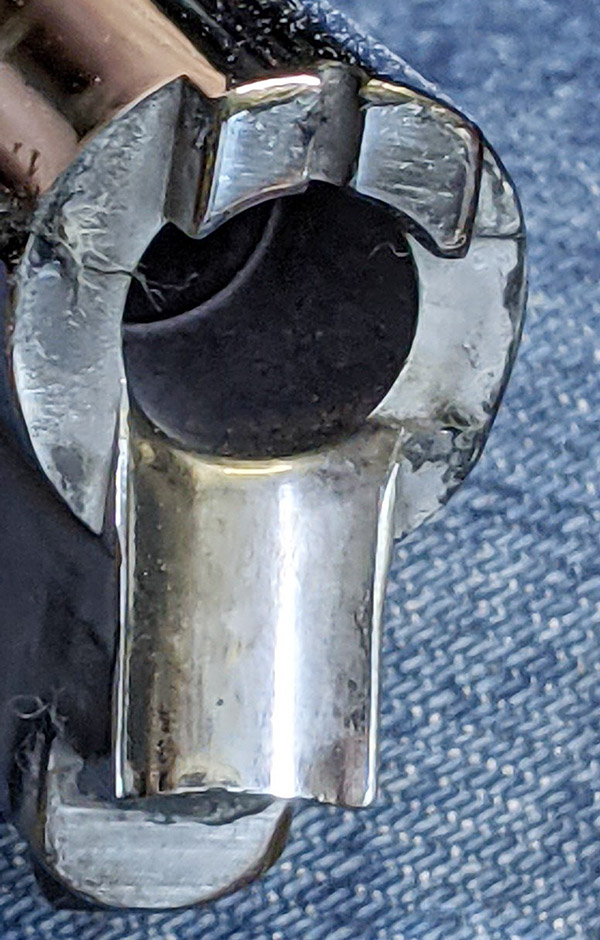
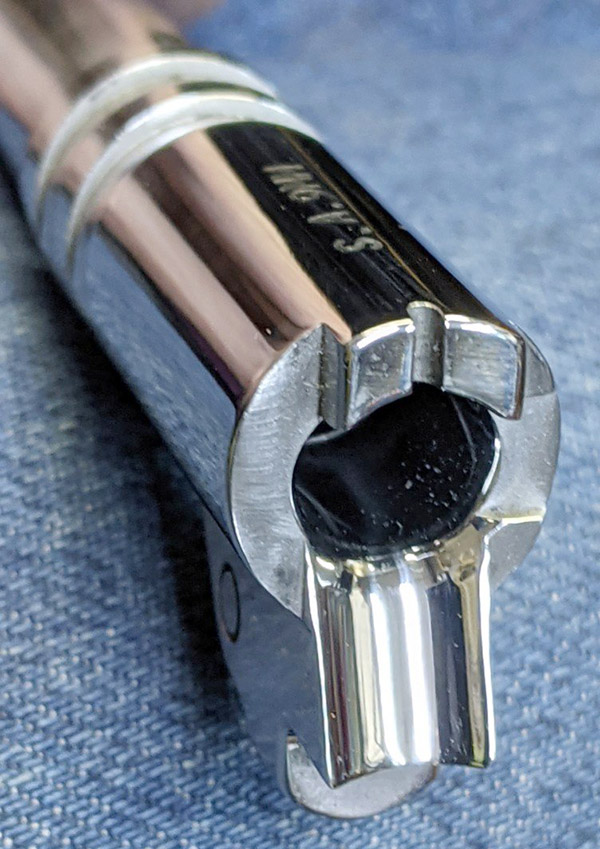
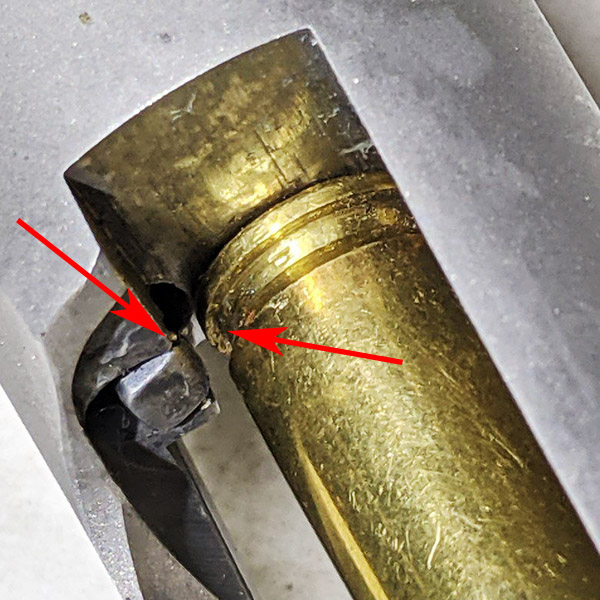
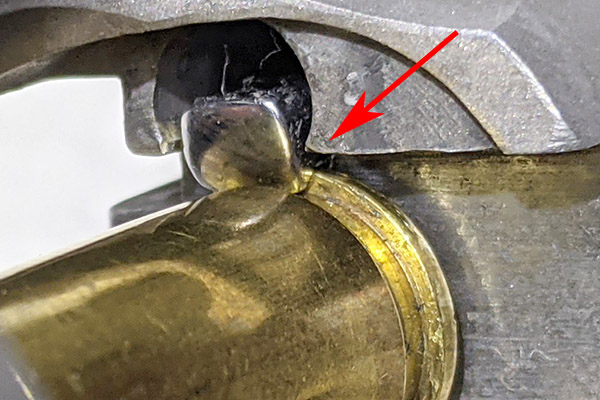
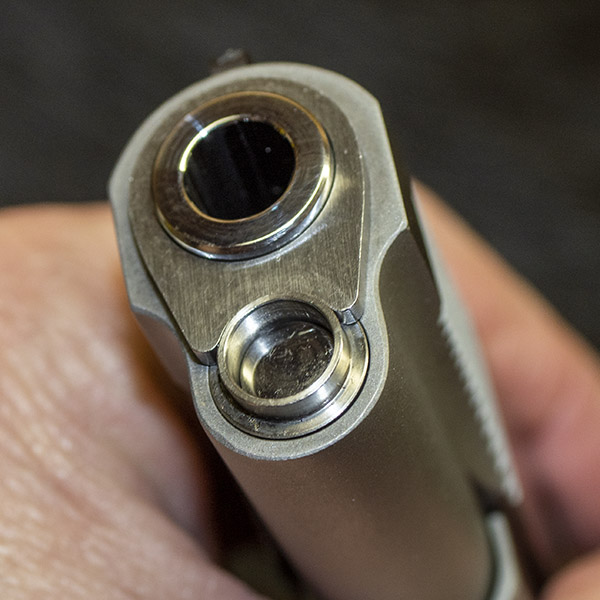
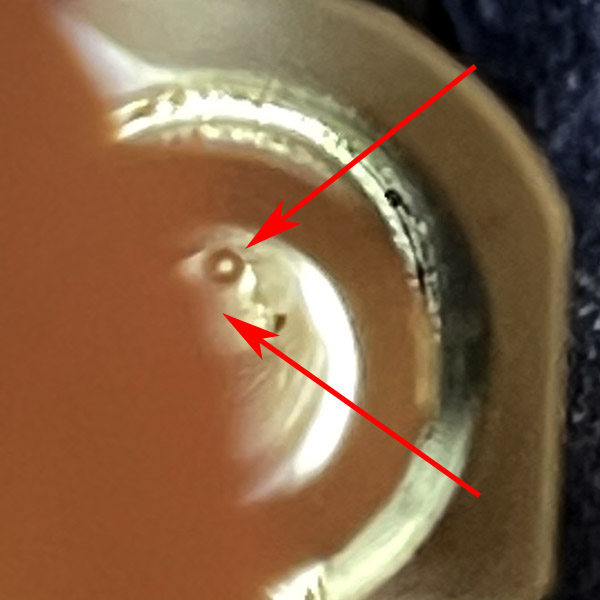
I could have experienced a case failure in which the rear of the case tore off, which would have allowed the hot gases to impinge on the gun internally. There’s some evidence to suggest this. I can look into the bore and see that the cartridge case is still present, but the interior of the case is partly torn away. The lower third of the case’s base is gone (the upper two thirds are present). In the area where the case’s base is gone, I can see the breech face and the firing pin. I later found part of the cartridge case inside the magazine.
This was a tough photo to get (mea culpa on the image quality). You are peering down the barrel from the muzzle end. The upper arrow points to what’s left of the cartridge case; the front of the firing pin is visible. The lower arrow points to the breech face.
The gun could have fired out of battery. That is to say, it may have fired without the slide being fully forward. I can move the slide back about 1/16-inch, cock the hammer, and the trigger will release it. I don’t know if it is doing that because the internals are damaged, or if it could do it before the event. Or, there could have been grit in the chamber that prevented the cartridge from chambering completely. When I look into the bore, I can see residual blue powder coating from the bullet that seems to be lodged between the case mouth and the forward edge of the chamber.
I cast around on the Internet a bit and I found several references to the 9mm 1911 Springfields having tight chambers. I know mine has a very tight chamber. Maybe a cartridge wasn’t resized completely and it failed to completely chamber? If that happens, the slide won’t go all the way forward and the gun shouldn’t fire so I don’t think that’s likely, but who knows.
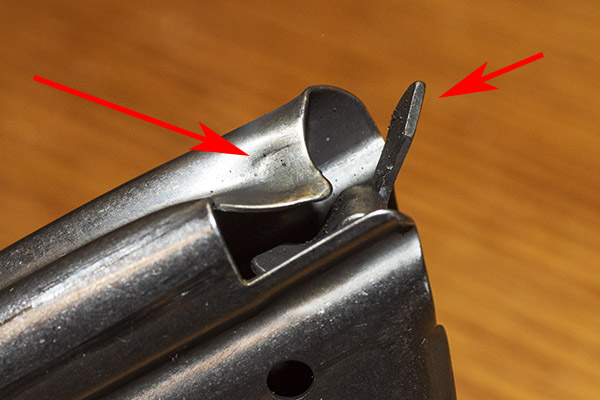
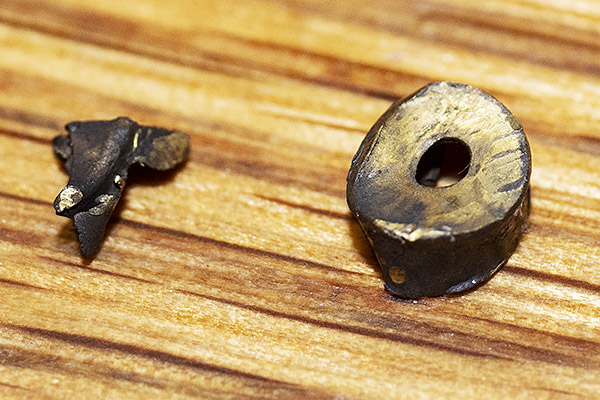
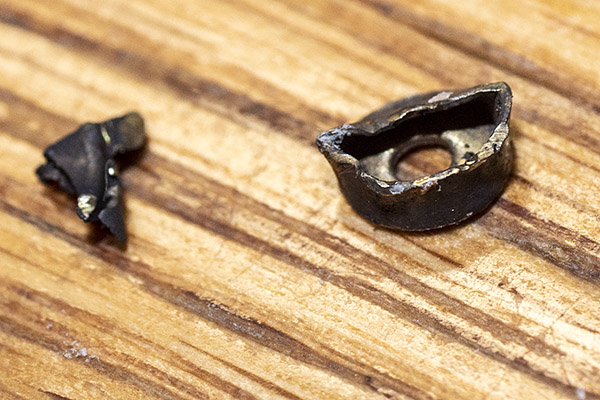
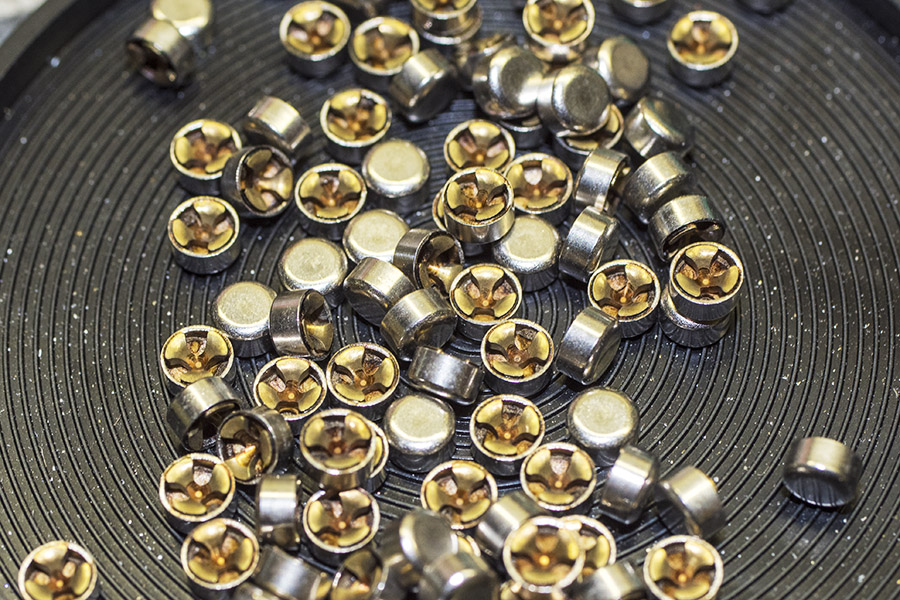
After I returned home, I examined the magazine again and I could see what I thought was an imprint of the primer on the magazine. I shook the magazine and felt something rattling around inside. It was the primer. It had been flattened, and there was a hole where the firing pin had struck it. I’m guessing the hole was caused by the excess pressure.
A mangled magazine. The left arrow points to the primer imprint. The right arrow points to the distorted follower.The primer and a bit of brass residue. These were inside the magazine.An inside view of the primer. Note the circular cutout where pressure sheared the brass against the firing pin hole.
My Springfield 1911 is toast, at least for a while. I have two ways I can go on this (well, three, if you count scrapping the 1911 altogether, but that’s not a choice I want to consider). One option is to return the gun to Springfield Armory, but I don’t want to do that. If the failure was a problem with the gun, I don’t want to have the same guys who screwed it up attempt to fix it. Every gun I’ve ever bought from Springfield has required at least one warranty repair (including this one, but for a different issue). Two of my friends bought 1911s from Springfield and they’ve had to go back for warranty repairs (one had to be returned twice when they didn’t fix the problem the first time). I don’t know what Springfield’s warranty repair turnaround times are these days, but it’s probably measured in weeks or months. The last thing that ruled out a warranty repair was that this event occurred with my reloaded ammo and that voids the warranty. I’m not in denial here; it is likely my reloaded ammo is the reason this happened.
Nope, I’m going to go with the approach that’s always worked for me. It’s the silver lining in this sad tale (that and the fact that I wasn’t injured). I’m bringing the 1911 to TJ’s Custom Gunworks tomorrow. I’ve already talked to TJ and he tells me my 1911 can be repaired. The repairs will be on my dime, but I know the work will be perfect and I know the gun will literally be better than new. I’ll have TJ do a bit of custom work while he has the gun, too. TJ told me he’ll have to cut slide release off to remove the slide from the frame, and when he disassembles it, we’ll learn more. I’m thinking a double charge is the likely culprit (which would be my mistake), but maybe TJ will find otherwise. I’ll keep you posted.
I had a serious debate with myself about posting this blog. It’s an interesting story; that puts it in the plus column. If I double-charged that case, that’s an admission of carelessness on my part and that puts it in the minus column. In the end, if it helps other people from making the same mistake (assuming the fault lies with me), this blog will have served a purpose and that is why it is here.
Please click on the popup ads!
Never miss an ExNotes blog:
More good reloading and firearms stories are here.
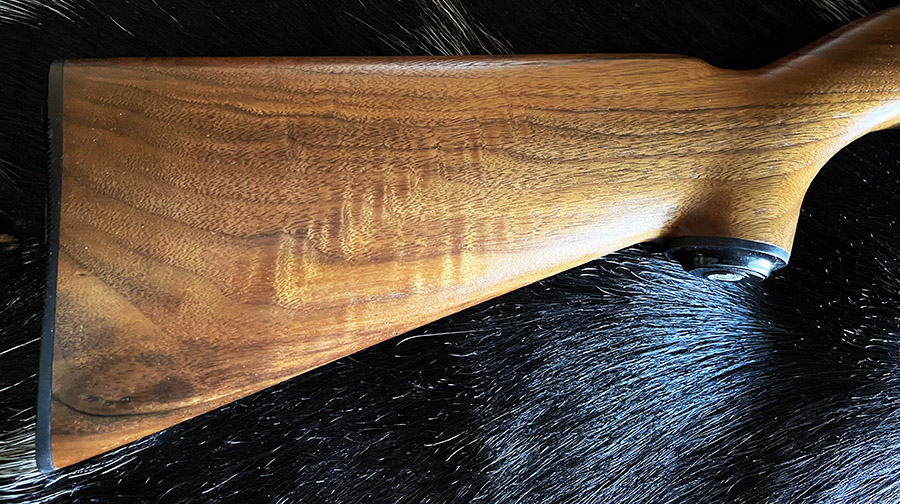
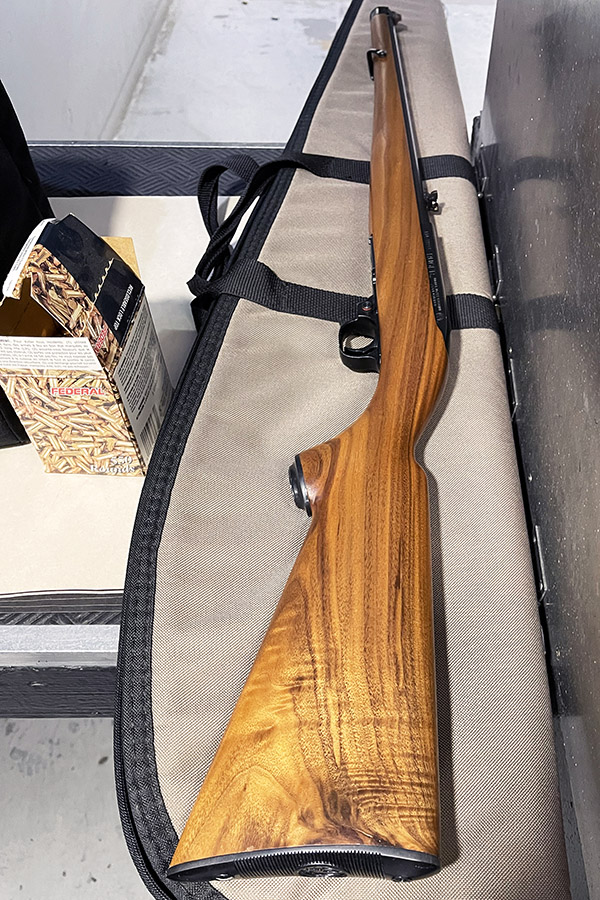
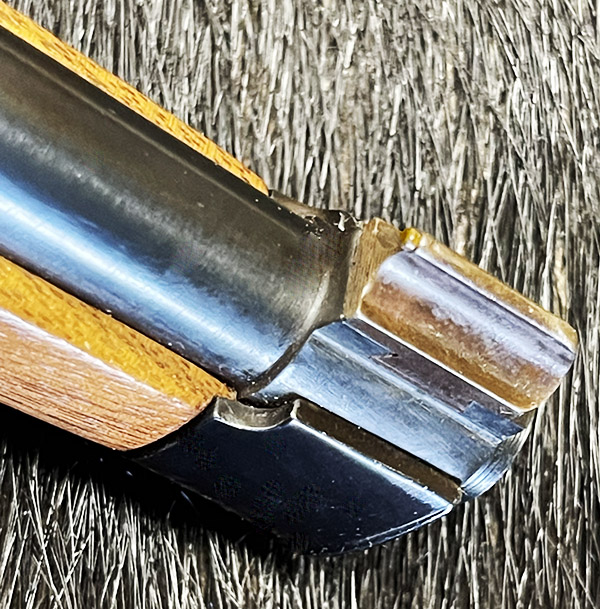
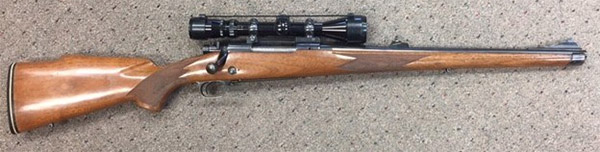
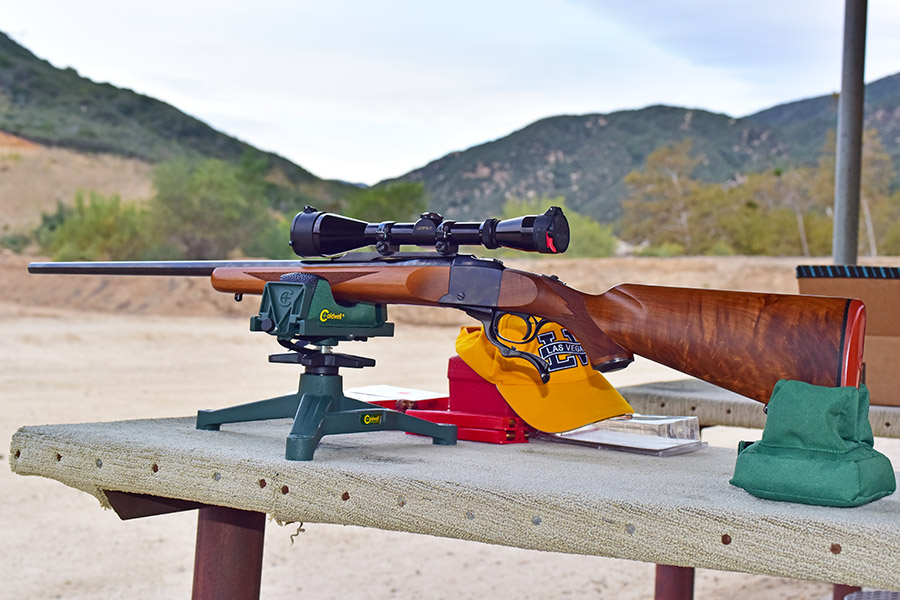
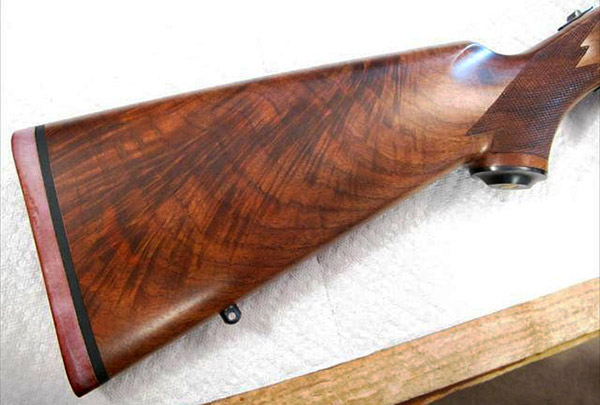
Sometimes picking the featured photo for each of our blogs is a challenge. Do you select a photo that captures the essence of the story, or do you feature a photo that highlights what you like most? A Mannlicher rifle almost requires a full length photo of the rifle as the lead, but for me and this rifle it was the wood. That’s why I went with the photo above. Here’s a photo showing the entire rifle…a Ruger 10/22 Mannlicher.
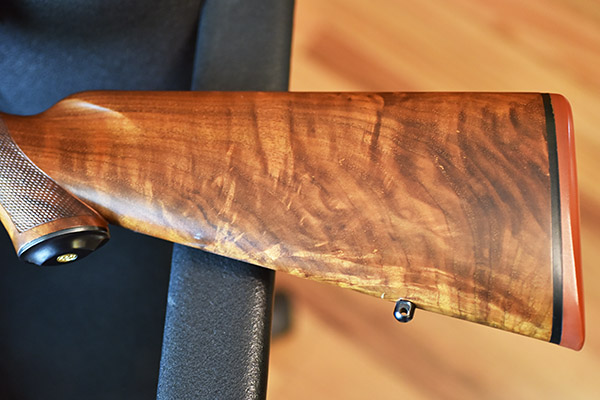
Fancy walnut gets me every time.
Introduced in 1964, the standard model Ruger 10/22 semi-automatic rifle has been in production continuously ever since. During that time, there have been more variations than you can shake a stick at. Walnut, birch, plastic, folding, Circassian stocks. Takedown models. Target models. Mannlichers, standards, and compact models. Bull barrels, regular, short, and long barrels. .22 Long Rifle, .22 Magnum, and .17 caliber rifles. All kinds of commemoratives. With production exceeding 5 million rifles, more Ruger 10/22s have been manufactured than any other .22 rifle (the highest production for any rifle in any caliber, though, is the AK-47, with total production quantities unknown but estimated to exceed 100 million). The 10/22 has a unique rotary magazine design, the rifle is relatively inexpensive, and a 10/22 simple to maintain. I’ve bought and sold several and I still have three or four stashed in the safe. I’ve shot the hell out of a few but I never wore one out. Reliability and longevity are two of any Ruger’s most endearing (and enduring) qualities.
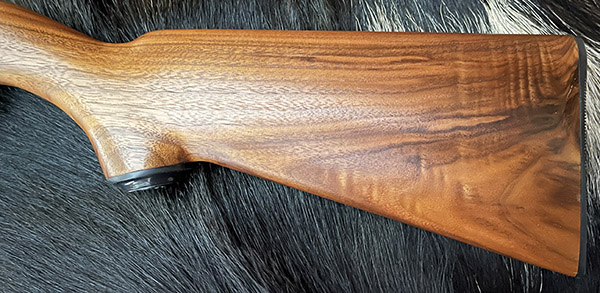
A view of the left side. The rifle has good figure on both sides.
One of my favorite 10/22 configurations is the Mannlicher, which has a full length stock. This is an early one manufactured in 1974. You can make a career out of collecting 10/22s, and there have been several variants of the 10/22 Mannlicher. I’m not a serious enough collector to go after all of them. This particular rifle caught my eye because of the walnut. I’m a sucker for any rifle with highly figured walnut, and good wood is not something you see too often on an inexpensive rifle like the 10/22.
Ruger’s recent run of Mannlicher 10/22s featured a laminated stock. There’s one on Gunbroker.com with a “buy now” price of $895. Hope springs eternal.
I paid way too much for my Mannlicher 10/22 several years ago, but that’s okay. Another way of looking at it is that I bought it too soon. Prices pretty much always go up on guns. This one has already caught up to what I paid.
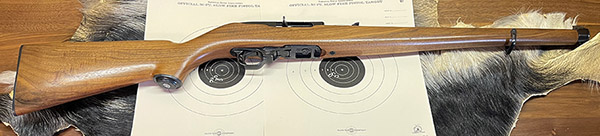
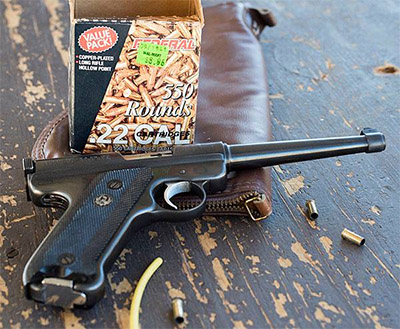
The 10/22 10-shot rotary magazine, a box of old Federal .22 Long Rifle cartridges, and my Mannlicher.Close enough for government work and open sights.
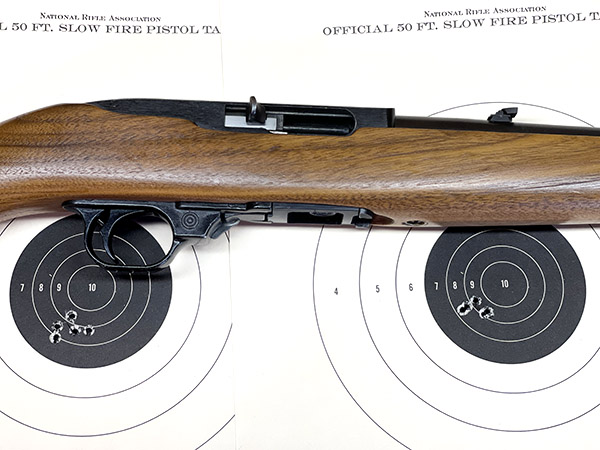
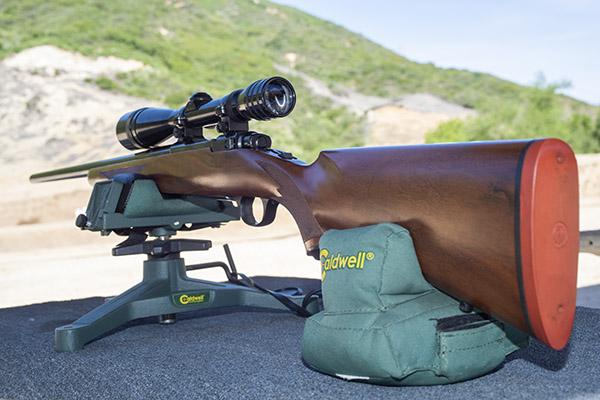
A Ruger 10/22 rifle can be surprisingly accurate. I wanted to get out and shoot at 50 yards, but the West End Gun Club is still inaccessible (the stream across the access road is running too high). So I took the Mannlicher to the Magnum Range (an indoor range) a couple of weeks ago. The distance was only 50 feet, but sometimes halitosis is better than no breath at all. I used my range bag as a half-assed bench rest and I managed to shoot a few decent groups using the Ruger’s open sights.
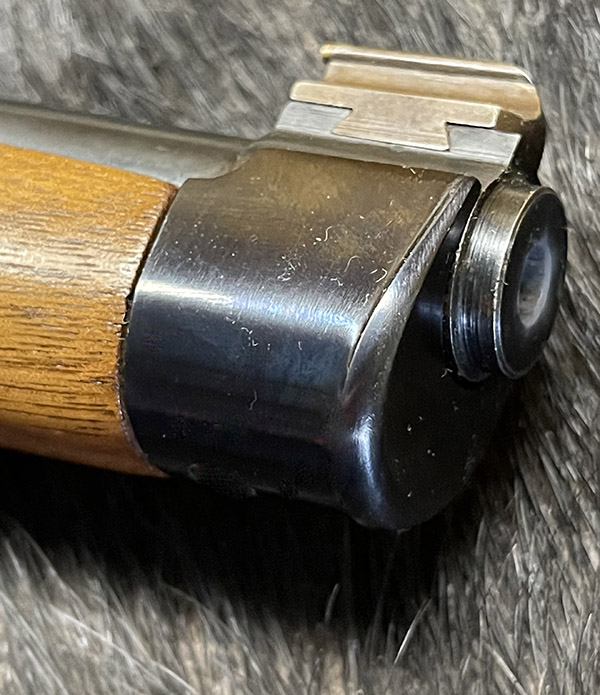
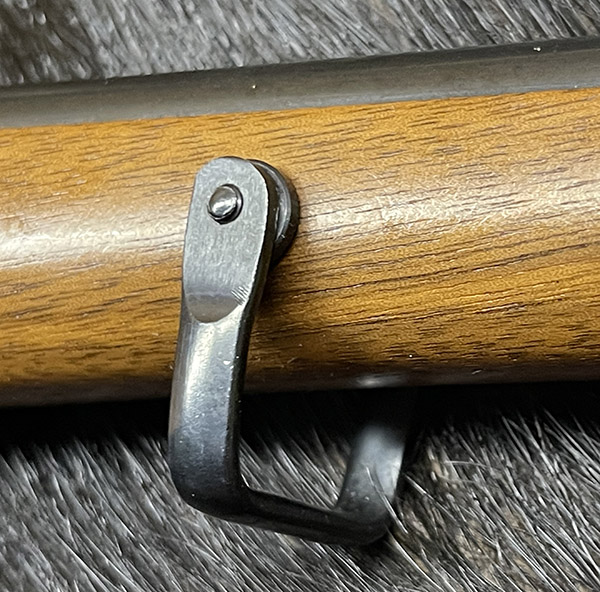
A simple rear sight. The plate can be adjusted up or down for elevation; the sight can be drifted left or right for windage. This one is pretty much right on the money as is.The Mannlicher’s front sight…a simple gold bead. The metal cap at the tip of the stock is a traditional Mannlicher touch.Another photo of the metal forearm cap on my 10/22 Mannlicher.The Mannlicher forward sling swivel is another nice touch. Instead of a screw in single attachment point beneath the forearm, a Mannlicher forward sling attachment straddles the stock as you see here.
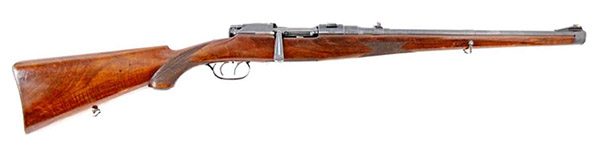
The Mannlicher style reaches back to the 1880s. Prussian military officers designed a rifle that featured a full length “Stutzen” stock with a metal cap at the end and a carbine (or short) length. This evolved into a sporting rifle in 1903 (Ernest Hemingway hunted with one). The slim profile, compact size, and full length stock came to be known as the Mannlicher style. I first saw a Mannlicher-style rifle on a limited run, used Model 70 Winchester at the Donn Heath gun shop in Fort Worth, Texas. That Model 70 was under $200 and I wish I had the foresight to buy it. It handled beautifully and it just felt right. Today, those Model 70 Mannlichers are in the stratosphere.
Ernest Hemingway’s Mannlicher. He took it on his first African Safari. In 1997, Hemingway’s Mannlicher sold for $6,325. It would bring considerably more today.The Winchester Model 70 Mannlicher. These rifles go for $4,000 to $5,000 today.
My 10/22 is an easily handling rifle that fits me well. I don’t shoot it that often, but every time I do, I enjoy it. I’m hoping that West End will open again soon so I can put the Mannlicher to work on the 50-yard range.
My 10/22 Mannlicher. It’s not for sale.
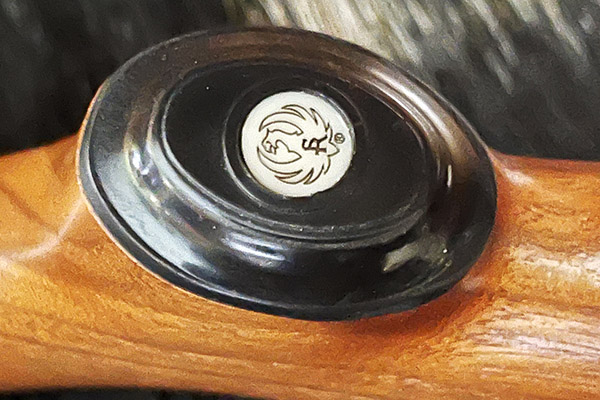
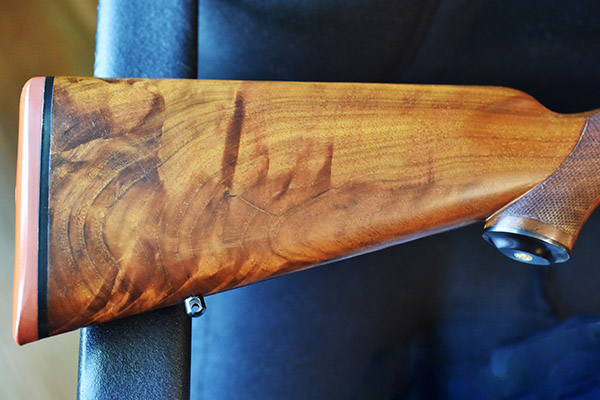
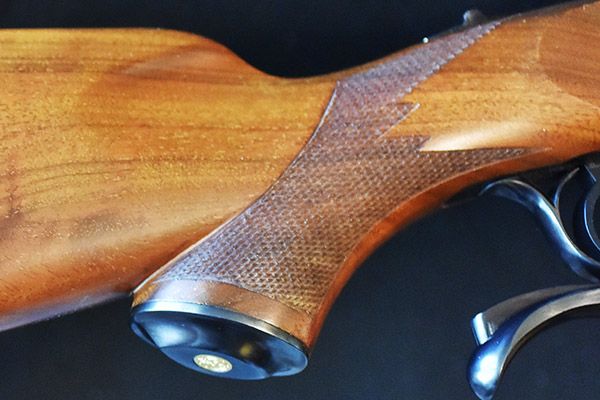
This old Ruger 10/22 has a couple of nice features. One is the pistol grip cap. It’s plastic, but it still looks good and this one is in good shape.
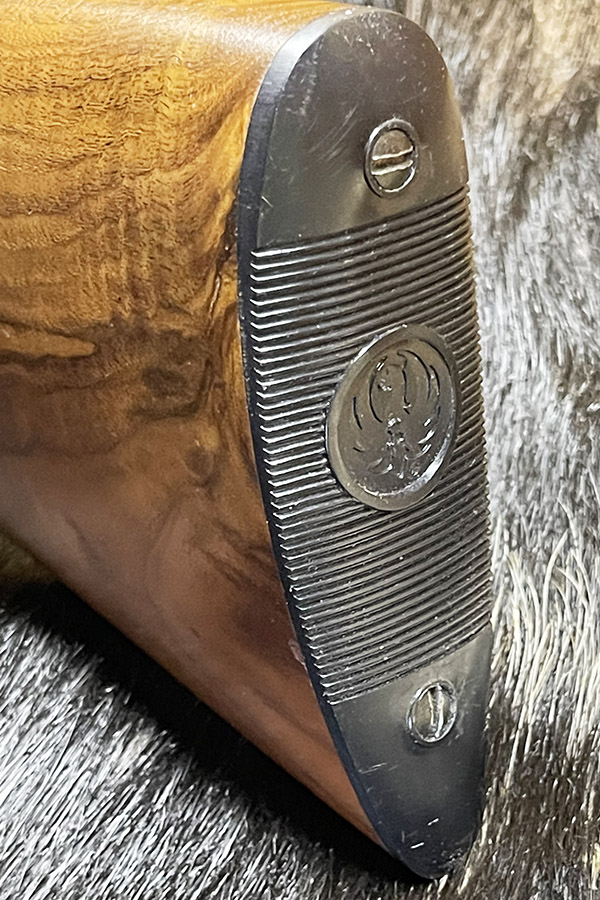
Another cool touch is the fancier black plastic butt plate. Other base model 10/22s have a simpler and cheaper butt plate. This one looks good.
So there you have it…the latest installment in our Rimfire Series. There’s more coming, so stay tuned.
Never miss an ExNotes blog:
If you would like to see our earlier blogs on .22 rifles and handguns, here’s a set of links.
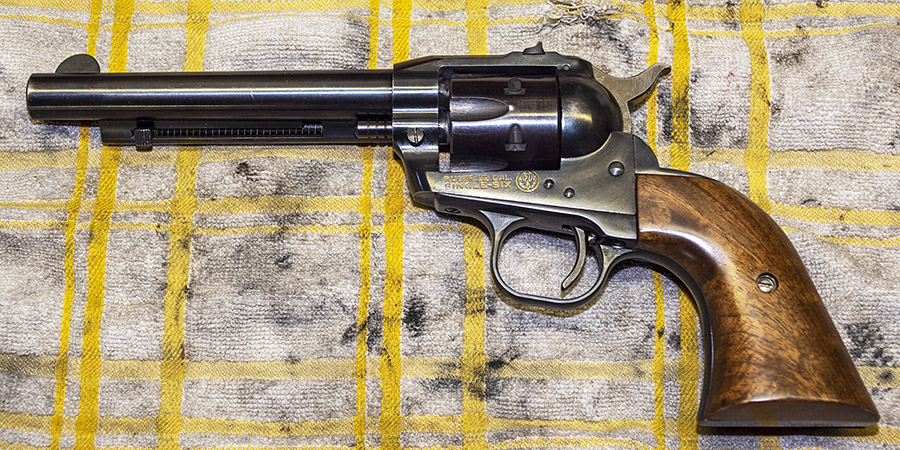
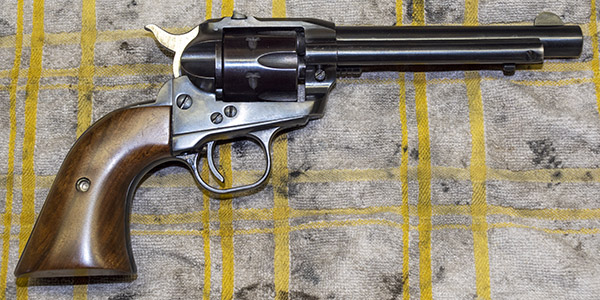
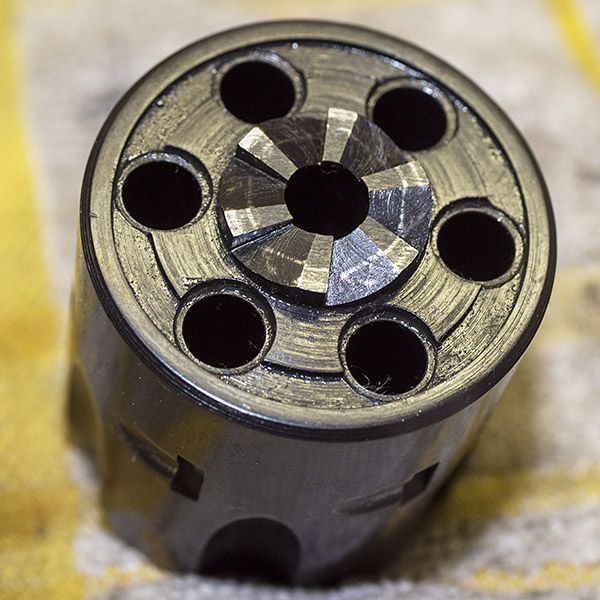
If you like old guns and family heirlooms, you’ll enjoy this blog. The Ruger Single-Six you see here was my Dad’s gun. This revolver’s 4-digit, no-prefix serial number puts its date of manufacture at 1954, which means it is just a little bit younger than me. Ruger introduced the Single-Six in 1953 and they only made 49 of these revolvers that year, so mine is a first year of production revolver. That’s cool.
Dad kept the Single-Six loaded in a drawer near his bed. I don’t remember him ever shooting it. He kept it there just in case. Storing any gun in a holster is not a good idea (the leather retains moisture) and it had a light coating of surface rust in a few spots when Dad passed. A bit of 0000 steel wool and oil took the rust off and the gun is in remarkable condition.
Don’t forget to take care of us: Please click on the popup ads!
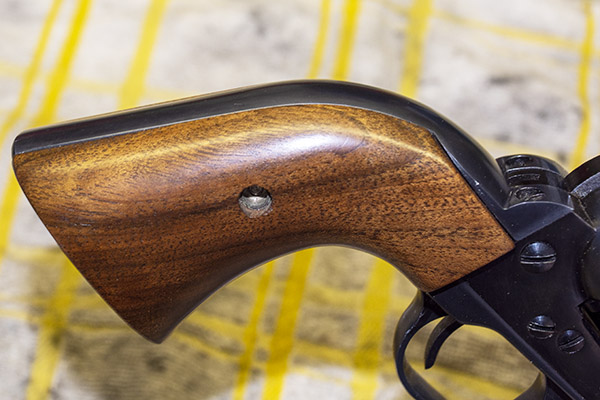
You probably noticed the custom walnut grips on this vintage Ruger. Dad was an excellent stockmaker (his work was on high end shotguns), but the stocks on his personal trap guns were usually kluged-up affairs with adhesive padding on the comb and glued-on spacers to get the fit he wanted. Dad didn’t care about appearance on his competition guns; all he wanted was a good fit so he could smoke clay pigeons. The work he did on his friends’ shotguns…that was another story. Those were stunning. Those other guys weren’t great shots; they cared more about looks. Dad was all about breaking pigeons on his guns, bringing home trophies, and bringing home cash (the monetary awards, especially for live pigeon shoots, were significant). We always had walnut blanks and remnants in Dad’s workshop, and one day when he didn’t have anything else to do he crafted the custom grips you see here. The wood-to-metal fit and the oil finish is perfect on these.
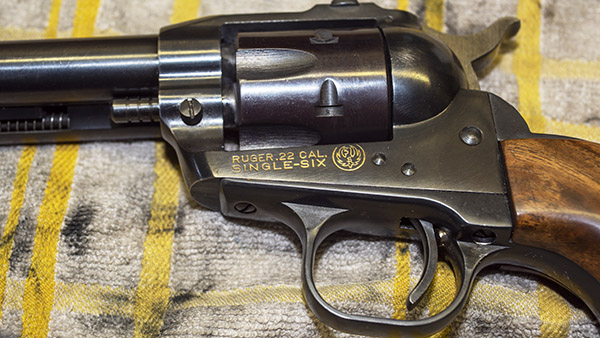
The right side of my 1954 Ruger Single-Six.A perfect wood-to-metal finish. They don’t come from Ruger like this.
I wish new Rugers had grips that looked and fit like that. They don’t. You may recall the blog I did last year about a new Ruger .357 Magnum Blackhawk. It’s grip-to-frame fit was atrocious.
A current production Ruger Blackhawk. Somewhere along the line, Ruger lost its attention to detail. These ugly gaps can’t be unseen.
As an original Single-Six, this Ruger is what is referred to as an Old Model. It doesn’t have the transfer bar safety, and what that means is that if you drop it with the hammer over a loaded chamber, it can fire. Call me old fashioned; I’ve got my own safety approach to this problem: Don’t drop the gun. But that’s just me.
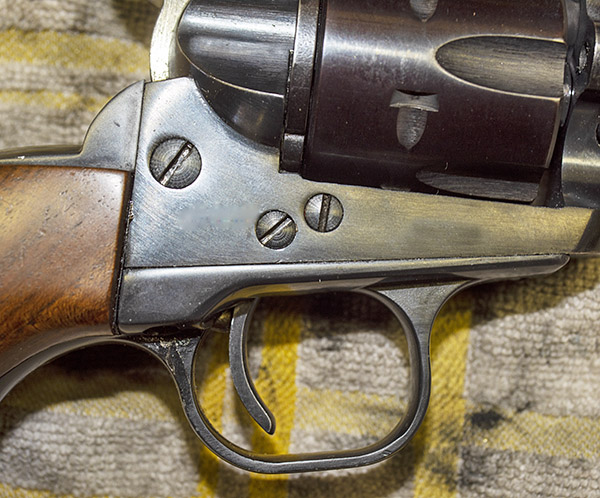
The Old Model Ruger revolvers are elegant. They are also referred to as three screw Rugers (because they have three screws on the right side; the newer model has two pins instead). The hammer cocking in the Old Model Rugers is similar to a Colt Single Action Army. There are four clocks, and that’s cool, too (especially for old guys like me).
The old three-screw configuration.
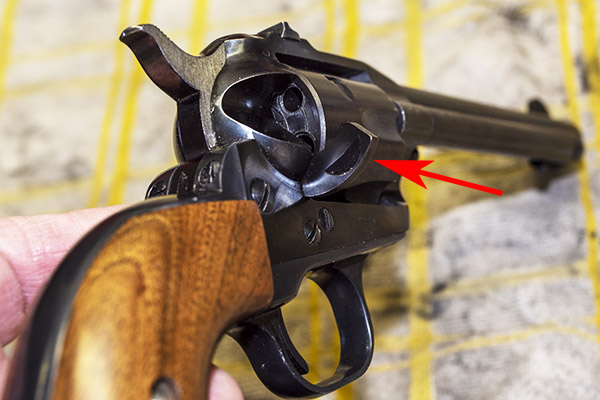
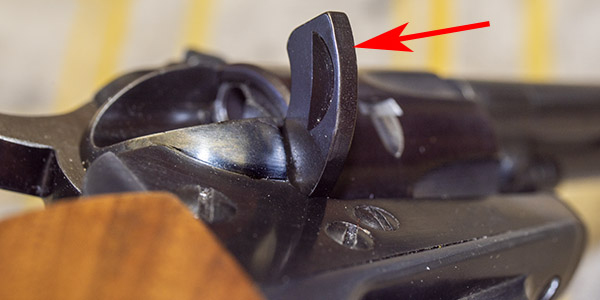
These old Ruger six shooters are also called flat gates because of the flat gate that opens for loading. The flat gate feature that didn’t stay on Rugers long. Ruger went to a contoured loading gate early in their history. It’s just something that sets this revolver apart.
The flat gate on my Ruger Single-Six.A better view of the Ruger’s flat loading gate.
The early Rugers had recessed chambers. I haven’t owned a new Single-Six in decades and I don’t remember if the newer ones do or not. It’s a classy feature.
Recessed chambers. Back in the day, everything was better. I know it’s dirty; I took this photo after the range session and before I cleaned it.
You probably noticed the gold inlay in this Ruger’s lettering. Back in the day, kits to do this at home were popular. I guess it holds up well; this was done quite a few years ago. You can still get these gold inlay kits from MidwayUSA.com.
Look for the Forster gold inlay kit on Midwayusa.com.Fixed sights and gold inlay. These old guns are awesome.
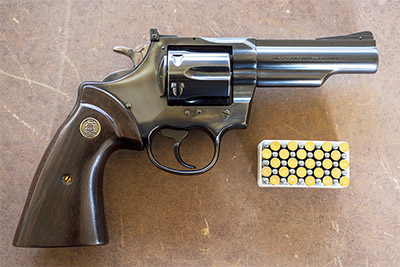
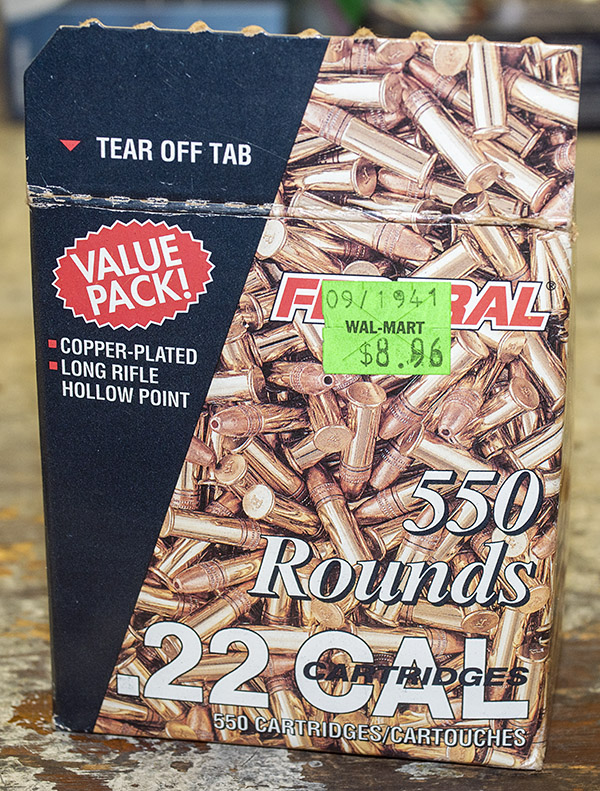
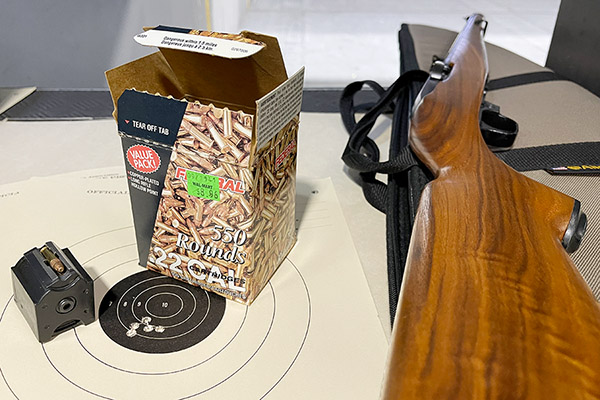
I grabbed an old box of .22 Long Rifle ammo and headed to the range a few days ago.
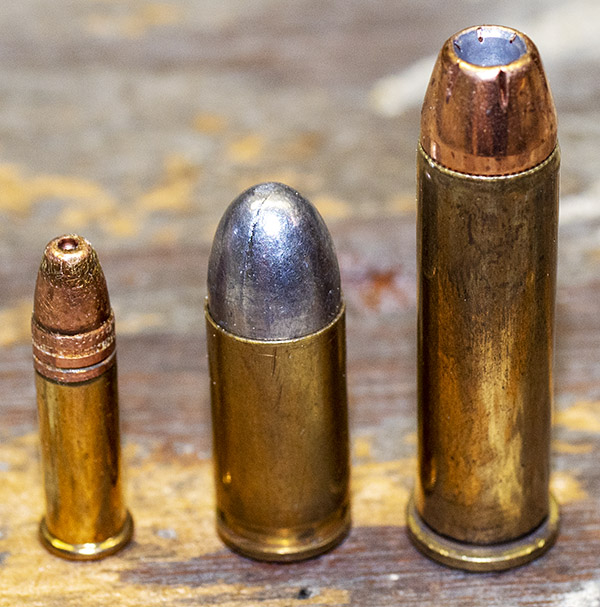
$8.96 for 550 rounds. We didn’t know how good we had it.Federal hollow point ammo. You can’t have these in New Jersey or San Francisco (they outlawed hollow point ammo). Sarcasm alert: That’s why their crime rates are so low.An ammo comparison. From left to right, it’s the Federal .22 Long Rifle hollow points featured in this article, one of my 9mm reloads, and a .357 Magnum hollowpoint.
I ran my targets out to 50 feet at my indoor range and had at it, shooting off hand with a two-hand hold. As always, the Single-Six did not disappoint. It has fixed sights, but they are spot on.
I held at 6:00 on the orange bullseye. If I had used a rest, the group would have been much smaller. For an offhand group, I’m happy.
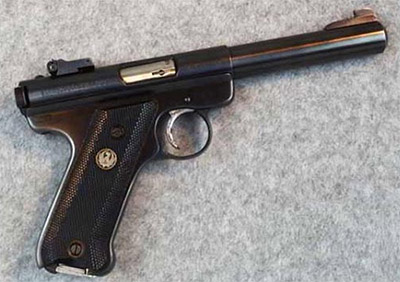
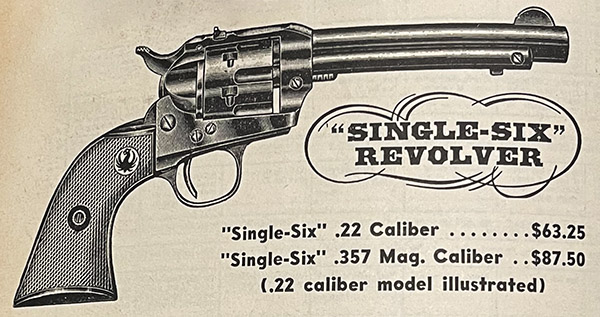
When first introduced in 1953, the cost of the Single-Six was $57.50. I grabbed this photo from my old 1956 edition of the Stoeger Shooter’s Bible. The Single-Six had gone up to $63.25 by 1956.
They don’t do covers like this today: The 1956 Shooter’s Bible.The ad for Ruger’s Single-Six in 1956. Ruger’s Standard .22 automatic pistol was only $37.50 back then. The Single-Six was a more expensive handgun.
If you enjoyed this Rimfire Series story, keep an eye on us. Our next Rimfire Series story will be on a very cool Ruger 10/22 Mannlicher rifle from 1974, one with exceptional walnut.
The same ammo and an old Mannlicher 10/22. Watch ExNotes for the story. It will be the next featured in our Rimfire Series.
If you want to make sure you don’t miss the upcoming 10/22 story, please subscribe to the ExNotes blog:
If you would like to see our earlier blogs on .22 rifles and handguns, here’s a set of links.
Reading good buddy Airborne Mike’s javelina story brought back memories. I’ve been chasing pigs for more than 50 years and I only ever got three. Two were captured simultaneously via film (the two you see above); the other was nailed in Arizona and brought home for consumption. Yeah, I’m a Jewish kid who ate pork. Don’t tell anyone.
I’d been on javelina hunting trips numerous times when I lived in west Texas, and on every one of those trips, we never even saw a javelina (we could have just as easily described those expeditions as T-rex hunts, because we saw about as many of them). Good buddy Jose commented on Mike’s previous post that javelina make for good eating, but I’ve never had the pleasure and if offered, I’d politely decline. Although they definitely look piggish, javelina are actually not in the pig family. I’m told they are rodents. No thanks. I’ll forego rat tacos.
Help us bring more stories to you: Please click on the popup ads!
About that Mama Javelina and baby photo you see above: All those javelina hunting expeditions when we didn’t see a single javelina? Well, we stayed on an Arizona guest ranch one year (not hunting anything except good times) and there were javelinas out the gazoo. We heard them snorting and grunting up a storm outside our cabin one night, so I went outside with my manual focus Minolta 35mm film camera and took a bunch of flash photos, moving the focus ring a little bit each time because I couldn’t see to focus in the dark. I got lucky with one of them. I didn’t know there was a baby javelina in the mix until I got the prints. The mama and her baby were only about six feet away (I was using the Minolta’s standard 50mm lens). A guy who saw that photo told me I was lucky Mother Javelina didn’t go after me.
I’ve been on three wild pig hunts (not javelina, but actual wild pigs). On the first one, we spent three days rooting around in northern California and we didn’t see a single pig. Our guide pointed out what he claimed was pig poop, but hell, it could have been any kind of poop. What do I know from pig poop?
On a second northern California wild pig expedition, we were skunked again. Not one pig and not one pig sighting. Not even pig poop this time. All I came home with was the worst case of poison oak I ever had. The itching was intense raised to an exponent, and nothing seemed to work except consuming large amounts of Budweiser, which I did for the three days it took to get over it. After that episode, I stayed away from hunting pigs for the next 30 years. Then, I got the bug again.
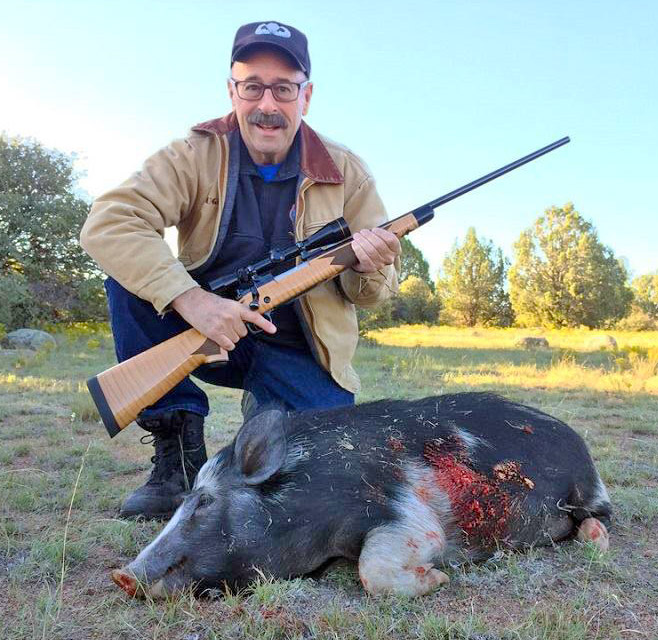
My pig and I, taken near Kingman, Arizona. That rifle (a maple-stocked SuperGrade Model 70 Winchester in .30 06) will shoot quarter inch groups at 100 yards.
About five years ago good buddy Paul and I hunted wild pig in Arizona and we both scored. Our guide told me mine weighed about 130 pounds; Paul’s was a monster at well over 200 pounds. I got an education on that trip. The butcher asked us about the cuts we wanted, but I really had no idea (it was my Jewish ignorance about all things of the porcine persuasion). I let the butcher recommend what to do. When we reached the end of the list, I realized we hadn’t added bacon to the list and I asked about it. “There’s no bacon on wild boar,” he patiently explained while looking at the top of my head (I think maybe he was looking for a yarmulke, or maybe where I had my horns removed). “Bacon is belly fat, and wild pigs don’t have any.” Hmmm. Whaddaya know.
That butcher’s guidance about wild pigs lacking fat had further implications. The meat had absolutely no flavor. Zip. Nada. Zilch. No fat, no flavor. I made a lot of chili with that meat over the next year (cumin, red chili flakes, and Anaheim chiles bring their own flavors). But one of the “cuts” was sausage and that was good because it included a little fat. I found a recipe for and made a wild mushroom and pork sausage barley casserole. It was outstanding, so much so it has me thinking about going pig hunting again.
I know what you’re thinking: This is going to be a blog either for or against conservatives.
Nope. It’s not. We don’t do politics here on ExhaustNotes. This story is about a Ruger No. 1 that shot far to the right and how I fixed it. If you want politics, watch the news or pick up a newspaper and take in what passes for journalism these days.
This is ExhaustNotes. We’re pure. All we care about are good stories and you clicking on the popup ads.
One of my good buddies bought a very slightly used Ruger No. 1 several years ago (it appeared to be unused) after hearing me rave about how classy these rifles are. It’s the one you see in the photo at the top of this blog. This Ruger No. 1 is particularly desirable. It is chambered in .22 250 (a wonderful cartridge), it has fantastic wood, it is an early production model (the serial number dates it to 1971), it has the early style checkering pattern, it has a red pad, and it is a pre-warning gun. My buddy and I both bought Ruger No. 1 rifles that day. His was the .22 250 you see here, and I bought one chambered in .22 Hornet.
Highly-figured walnut, a red ped, and old style checkering…it doesn’t get any better than this.
Both the .22 250 and the .22 hornet are stellar cartridges, but the .22 250 holds a special place in my heart. The first Ruger No. 1 I ever saw was in a sporting goods store in Bound Brook, New Jersey, and it was chambered in .22 250. The Ruger No. 1 had only recently been introduced, and my father really wanted the one we saw that day. Like all Ruger No. 1 rifles it was elegant, and as a varmint hunter Dad was in love with the .22 250. We didn’t get it, but seeing how excited Dad was left me with a lifelong appreciation for any Ruger No. 1 and the .22 250 cartridge.
The flip side.A close up of the original Ruger No. 1 checkering pattern.
So my friend bought the .22 250 (as I mentioned above) but on our first trip to the range his .22 250 was a disappointment. It shot way to the right at 50 yards, even with the scope’s adjustment all the way to the left. It was a frustrating day for him. My buddy removed the scope rings and found that one of them had been bubba’d (the victim of incompetent gunsmithing). It had been crudely filed in an apparent attempt to get the rifle on target. Bubba (the guy who did the work) didn’t understand what he was doing (or how Ruger’s ring design worked) because the material he had removed didn’t shift the scope alignment with the bore (if ignorance is bliss, Bubba was indeed a happy guy). My friend bought a new set of Ruger scope rings and remounted the scope. It made no difference; the rifle still shot far to the right. I was starting to understand why the rifle looked like new. Whoever owned it before encountered the rifle’s bias to the right, couldn’t fix it, and gave up on it.
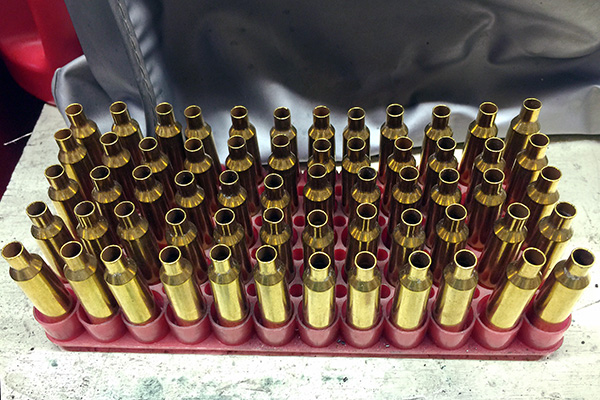
Resized, polished, and trimmed .22-250 brass waiting for powder and bullets. This is a great cartridge.
At that point, my friend lost interest in the rifle, too, and I picked it up from him. It made for an interesting project. I put a different scope on the rifle (a Leupold I had used on other rifles), but the problem was not the scope. The rifle still shot way to the right.
Help us bring more content to you: Please click on the popup ads!
In the past when I had encountered this problem, it had always been due to poor forearm bedding. I closely examined the Ruger and determined that the rear of the forearm had clearance between the forearm and the receiver on the right side, but it was contacting the receiver on the left side. That would push the barrel to the right, and it could cause the strong rightward bias this rifle exhibited. You’d be surprised; it doesn’t take much pressure on a rifle barrel to push the point of impact significantly off center. I removed the forearm, delicately sanded it at the rear to have the same forearm-to-receiver clearance on both sides, and remounted it. At the next range session, I saw that my efforts had no impact. The rifle still printed far to the right and the group size was running 2 ½ to 3 inches at 100 yards. It was terrible.
A closeup photo showing intimate contact between the rear of the forearm and the front of the receiver on the left side. On the right, there was clearance. This could have been the cause of the problem, but it wasn’t.
I next tried shimming the scope. Using thin metal shims, I angled the scope enough in its rings to get its range of adjustment on target. But I still had to have the scope cranked all the way to the left, and the rifle still grouped poorly. The scope shims were a Mickey Mouse, Bandaid approach. I knew this wasn’t the solution.
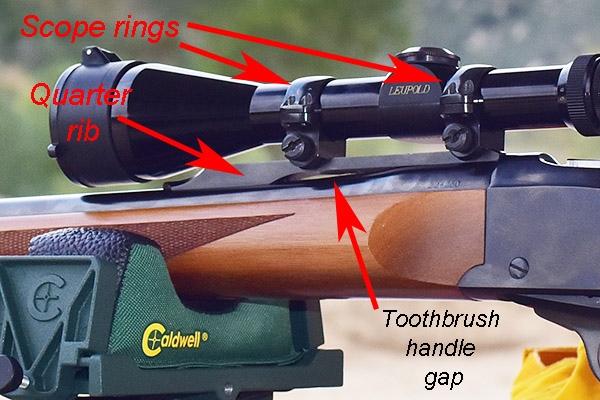
Sometimes when you can’t find the answer to a problem, the best thing to do is ignore it for a while. I put the rifle in the safe and forgot about it for a few weeks. Then one day when I was driving back from one of our adventures, my mind drifted back to the Ruger. The Ruger No. 1 has a very slick quarter rib at the top rear of the barrel. The scope rings attach to it, and the scope mounts in those rings. I wondered: What if that rib was mounted at an angle to the barrel’s bore? The solution, I thought, might be a new quarter rib.
I called Ruger’s customer service (a marvelously responsive organization) and told them about my problem and that I thought I needed a new quarter rib. A few days later, I had one. At that point, things became even more interesting. The older Ruger No. 1 rifles (including my .22 250) had quarter ribs that mounted with two Allen-head screws, and the barrel had a pin that fit into a hole in the quarter rib. The quarter rib Ruger had just sent to me had two holes for the mounting screws, but no hole for the pin on the barrel. I thought about that and it made sense; the barrel pin was a belt-and-suspenders feature and it was unnecessary. Ruger made the right engineering decision to eliminate it. I thought I could just drill a hole in the new quarter rib or I could pull the pin from the barrel. I would soon learn that neither one of these solutions was going to happen.
My first step was to remove the Ruger’s quarter rib. That’s when the fun began. As I mentioned earlier, the quarter rib is secured to the barrel with two Allenhead screws. The problem I immediately ran into was that the Allen socket is very small, and those screws were originally installed with a lot of torque. I put a small Allen wrench on each screw and both wouldn’t budge. I had an Allen socket head and a ratchet that would give me more leverage, but the screws were so secure I was afraid I would round out their Allen sockets trying to remove them. I was getting nowhere with the little Allen wrench. In for a penny, in for a pound, I thought. I mounted the Allen socket on my ratchet and, with great trepidation, starting putting more torque on each screw. It worked. Both screws came out with their Allen heads intact. They hadn’t been Loctited; they were just torqued by a madman (or a madwomen), or more likely, somebody at Ruger with a power tool.
The Ruger No. 1 scope mounting system.
Okay, the screws were out, so I thought I could now remove the quarter rib. “Thought” is the operative word in that sentence. That quarter rib wasn’t going anywhere. It was wedged onto the barrel like it was welded. There is a small gap between the bottom of the quarter rib and the top of the barrel (you can see it in the photo above), but I didn’t want to stick a screwdriver in there to pry the quarter rib off. It would have scarred the barrel or the quarter rib or both. I needed something softer that wouldn’t mar the barrel or the quarter rib.
If you’re like me, you save old toothbrushes and use them when cleaning your guns. I thought I could use one of mine. Its plastic handle wouldn’t damage anything. The toothbrush handle was too thick to fit in the gap, so I filed it down to create a wedge. That got the handle in between the quarter rib and the barrel, but the quarter rib wasn’t going anyplace. I worked on it for 20 minutes until I broke the toothbrush handle in two. So I filed down another toothbrush handle. Three modified toothbrushes and an hour later, the Ruger’s quarter rib came off.
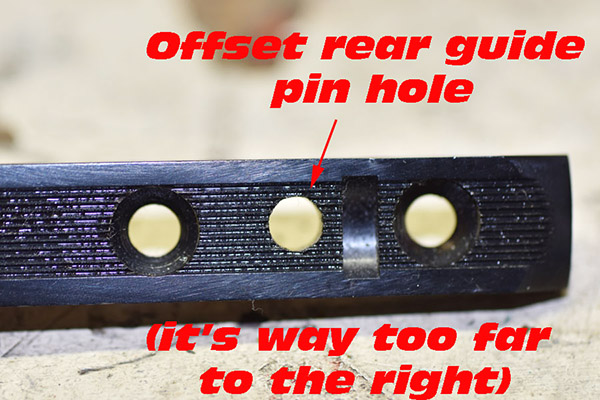
My initial thought was that what had made the rib so hard to remove was that its rear was interfering with the front of the receiver. That was sort of the issue, but it wasn’t induced by the quarter rib’s length or the receiver’s dimensions. I looked closely at the quarter rib and then I was really surprised. The hole for the barrel pin was off center. By a lot. Wow, I thought. That would certainly push the barrel to one side. It was what had been causing the rifle to shoot way to the right. It was a subtle anomaly. Who would have thought this had been the problem?
Whoa…something slipped while this part was being machined!
I was surprised that Ruger was able to assemble the rifle, but then I remembered what I had thought about earlier. Ruger probably used a powered screwdriver when installing the quarter rib’s Allen screws, and the technician who assembled the rifle probably did not notice the increased torque required to install the screws. The conversion of screw torque to linear force is extreme; I once participated in a fatality investigation where an operator sheared a munitions safety pin screwing on a submunition parachute without realizing what he had done (and the device detonated). But I digress; back to the Ruger story.
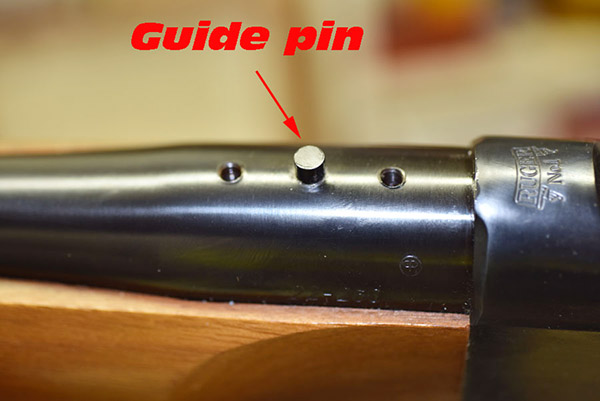
Older Ruger No. 1 rifles used a guide pin on the barrel. This was an unnecessary feature and it was later eliminated.
I examined the barrel pin (the pin that fit into the barrel to help locate the quarter rib). It was a press fit in the barrel, and it was obvious it wasn’t going any place. I thought about trying to pull it out with a pair of visegrips, but again, I didn’t want to bubba up this beautiful rifle. That meant I wasn’t going to use the new quarter rib Ruger had sent to me. When I tried to put the old quarter rib back on the barrel, the misalignment between the barrel rib hole and the screw holes was obvious. After thinking about this a bit (and realizing the barrel pin was unnecessary), I concluded that the best fix would be to simply enlarge the offset rib hole so that it allowed clearance between the barrel pin and the quarter rib hole.
I took a small circular file to the quarter rib hole and got nowhere fast. The quarter rib had been hardened to about two million on the Rockwell C scale. To enlarge the hole, I would have to grind it. I mounted a small rotary stone on my Dremel tool and went to work like a demented dentist. It took a while, but I finally enlarged the hole enough so that the quarter rib and its mounting screws could be installed and removed from the barrel easily. I used cold blue to blue the quarter rib’s hole inside diameter (where I had removed material), remounted the quarter rib, reinstalled the Ruger scope rings, remounted the scope, and headed to the West End Gun Club.
Three-shot groups at 100 yards. This is a very accurate rifle.
The trip to the range was extremely satisfying. The rifle’s extreme right bias completely disappeared, and after a few adjustment shots, the holes on the target were in the black. More surprisingly, the Ruger’s groups shrank dramatically. The No. 1 had been a 2 ½ to 3 minute of angle shooter before I corrected the quarter rib mounting issue; now it was a sub-MOA rifle. Life was (and still is) good. I love my Ruger No. 1 rifles, and I especially love this .22 250. I have two other Rugers chambered in .22 250. One is an unfired 200th year No. 1 with even better walnut (see below). The other is a tang safety Model 77 with the heavy varmint barrel (also see below). I could be talked into selling these two rifles, but not the .22 250 featured in this blog. I’m keeping that one for the duration.
My other .22 250 No. 1. It’s unfired. Nice wood, wouldn’t you say?A Model 77V tang safety. It’s a pre-warning, heavy barreled .22 250 that is extremely accurate.
One of the best things that’s happened to me is the MacManus Award, which I received in 1973 (50 years ago this year). Captain Colin D. MacManus was a Rutgers graduate who was killed in action in Vietnam in 1967. His memory lives on with this award, and CPT MacManus continues to inspire young Army officers.
US Army Captain Colin D. MacManus, Rutgers University ’63.
Each year the MacManus family presented a Colt 1911 to the graduating Rutgers ROTC cadet who held Captain MacManus’ position in the Corps of Cadets, and in 1973 that cadet was me. It was quite an honor. We’ve kept the tradition alive, and I’m happy to report that another graduating cadet has been selected and will receive his Colt 1911 this year.
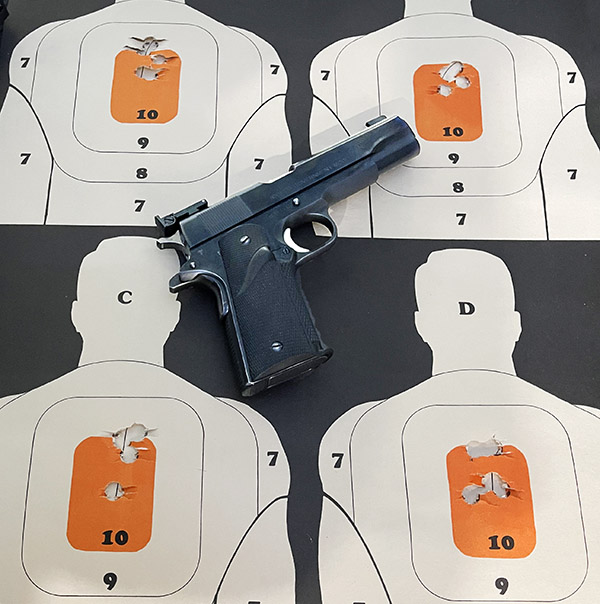
I still have and I still shoot my MacManus 1911, and 50 years after I received it, I can still hit the target. I had my MacManus 1911 out just last week.
The groups have grown just a bit over the last half century, but I can still do well with my MacManus 1911.
We’ve reported annually on the MacManus award, and if you’d like to read the earlier posts, here they are:
If you reload, you know that one of the toughest things to find over the last two or three years has been primers. I was one of the lucky guys…I laid in a stock of primers and I came through the shortage in fairly good shape. Primers are available again, but good Lord, the prices are obscene.
Before the pandemic, primers typically cost about $35 per thousand. That seemed to generally be in line with the last few decades of inflation (when I started reloading about 50 years ago, a brick of 1000 primers cost about $7). Then the pandemic came along, and BAM!, primers are now selling for $80 to $125 per thousand. As a former manufacturing guy, I can tell you that is outright gouging by the manufacturers and distributors. There’s nothing that changed in the materials that go into primers or their manufacturing processes that could possibly justify the 300% to 400% price increase. The manufacturers and distributors are gouging their customers.
The price increase has attracted at least one new player to the US market (the Argentinean firm Aventuras). But even those are $79.95 to $95 per thousand. The manufacturers, distributors, and resellers know that we’re willing to pay those prices so that we can continue to reload, but it’s an outrage. My message to the primer supply chain is simple:
Shame on you.
Want to know how primers are used in the reloading process? Check out our series on reloading .45 ACP ammunition.