By Joe Berk
The Benelli B76 is a relatively rare and delightfully different handgun designed and manufactured more than four decades ago. In the 1980s, police departments were making a wholesale switch from .38 Special and .357 Magnum revolvers to 9mm semi-automatic sidearms. Benelli wanted in on this action and they introduced their B76 in an attempt to get on that bandwagon. Commercially, the B76 was a resounding flop. But from quality, technical complexity, and cool factor perspectives, Benelli out-Ducati’d Ducati, and that’s no mean feat. As an engineer, I find my Benelli to be an intriguing firearm. It’s not red and it doesn’t have a clutch that rattles, but it’s still a pretty exciting bit of Italian engineering.
From a collector’s perspective, the B76 was a cool deal. I picked this one up in the 1980s when they were going for cheap and tucked it away in the safe, which is where it sat for the next 40 years. A few weeks ago, I had the urge to shoot it. Benelli only made around 10,000 of the things, and you almost never see them come up for sale anymore (while writing this article, I searched GunBroker.com and GunsAmerica.com and I didn’t find a single one). In the last couple of years, when they came up on the auction sites, well worn examples would sell for around $2K. Three or four years ago, one that was new in the box with all the papers (which is what mine was until a couple of weeks ago) sold for $4K.
The high market value kept me from shooting my unfired B76, and then I realized: I’m not going to sell my Benelli. All I was doing by not shooting it was acting as a warehouse for some guy who would buy it after I’m gone. So I made the only two decisions any responsible gun owner could make: I decided I’m going to live forever, and I’m going to shoot the thing.
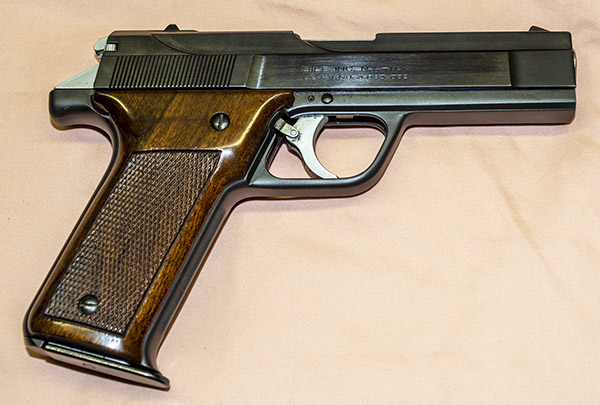
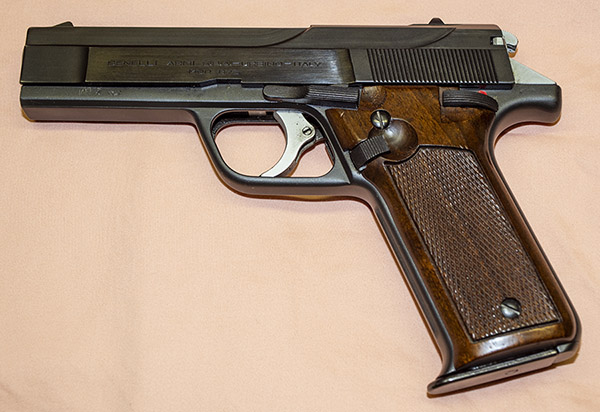
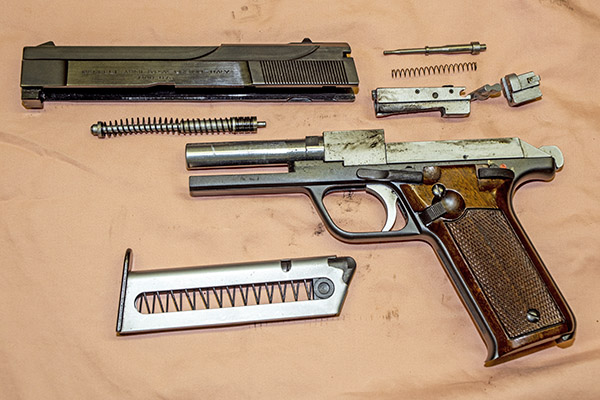
The B76 is a very high quality European handgun built like a lot of European weapons were back in the day. It is of all steel construction (except for the walnut grips). The polishing and bluing is deep and exceptional. Like pre-war Mauser rifles, it has matching serial numbers everywhere: The frame, the slide, the barrel, and the receiver (I’m making a distinction between the frame and the receiver, with the receiver being the part into which the fixed barrel is attached). You read the above right: The barrel is fixed (more on that in a second). Because all these parts are serialized, I’m guessing that there was a fair amount of hand fitting at the Benelli factory.
The B76 is both a double action and single action semi-auto, and the innards are complex. The expense associated with the design and the single stack magazine (the B76 holds only 8 rounds; the WonderNines of the 1980s could hold 14 or more cartridges) probably doomed the B76 in the police market.
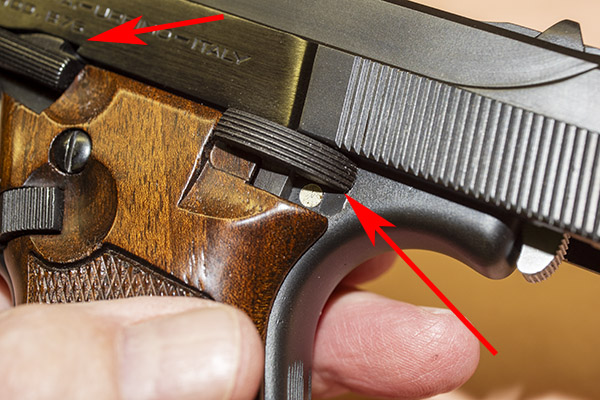
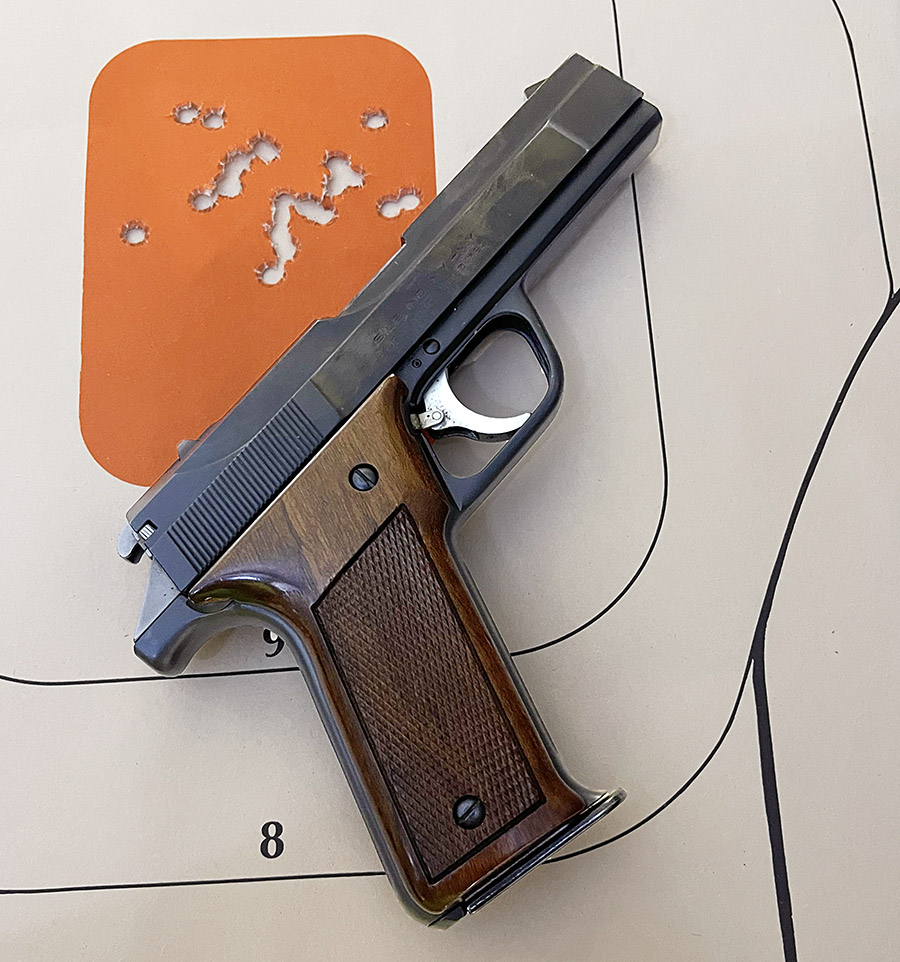
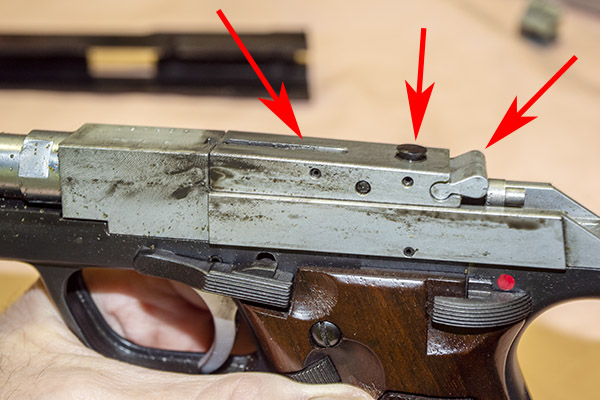
The B76’s controls are all in the right places, as you can see above. There’s a trigger (as noted above, both single and double action), a slide release, a combined safety and slide lock (more on this in a second), and a magazine release. Unlike the 1911 and most semi-autos, the magazine release is not pushed into the frame to release the magazine. You have to push it forward. When you do so, the magazine flies out of the frame.
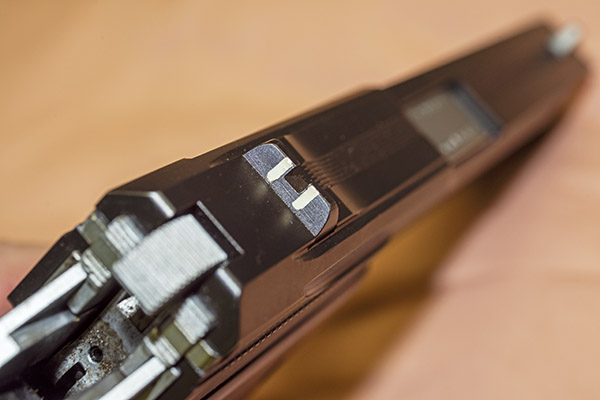
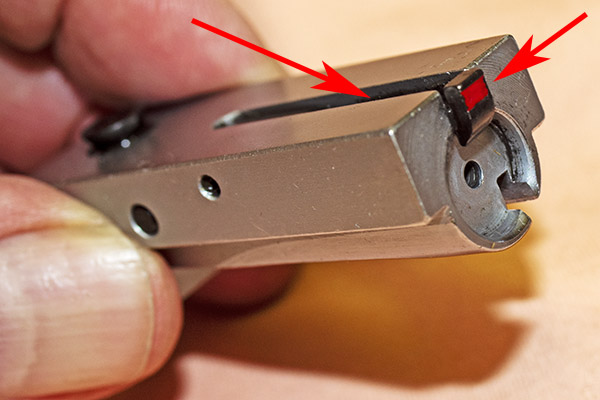
The B76’s fixed sights are a three white posts with no elevation adjustment. The rear sight can be drifted in its dovetail mount to move point of impact left or right. I didn’t need to move the sights on my B76; the windage is perfect (40 years ago, some dude in Italy at the Benelli factory got it right). I held at 6:00 on the orange bullseye on the target at the top of this blog. The B76 shoots a little bit high at 50 feet, but on a man-sized target, it’s close enough for government work.
I don’t really care for the three white posts on the sights, as they make aiming more difficult than it should be. There are two white posts on the rear sight. When aiming, there are gaps between the rear sight’s slot and the front sight (so that’s two more white posts). And then there’s the white post on the front sight. What this means to the shooter is that you have to align five white posts. To my old eyes, that’s way too complicated. I like a simple black post front sight and a simple black slot rear sight on a target gun. On a carry gun, the green and red dots on my Smith and Wesson Shield are about perfect, but in my opinion, that’s about the only thing Smith got right on the Shield.
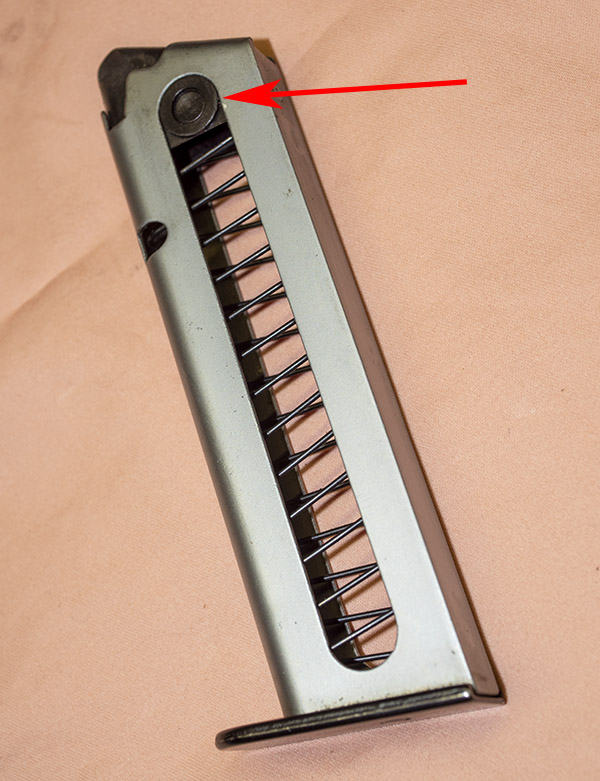
As mentioned earlier, the B76 magazine “only” holds 8 rounds. That’s not an issue for me, as I’m a target shooter and I never load more than 5 rounds at a time. An interesting tidbit: The average number of shots fired in a gun fight is less than 2. I’m okay with a magazine holding 8 rounds.

I found that I had to reload 9mm ammo to a shorter overall cartridge length for the Benelli. My other 9mm autos like the ammo to be loaded to an overall cartridge length of 1.105 inches (or more) for best accuracy. Loaded at that length, the cartridges won’t fit in the B76 magazines. To load ammo from the top by pushing one round in on top of the other, I have to hold overall cartridge length to 1.065 inches. I can go up to 1.080 inches, but to load cartridges of this length I have to pull the follower down and then slide the cartridges into the magazine. I fired cartridges of both lengths and I could see no difference in accuracy.
One last word on the Benelli B76 magazines: They are scarce. When you see them on Gunbroker.com, they go for $250 or more, and even at that price they don’t sit around long.
B76 disassembly for cleaning is different than a 1911, but still relatively simple. It starts by dropping the magazine from the weapon, pulling the slide all the way to the rear (beyond where it normally is restrained by the slide release lever), and then pushing the safety all the way up to hold the slide in this beyond-fully-retracted position.
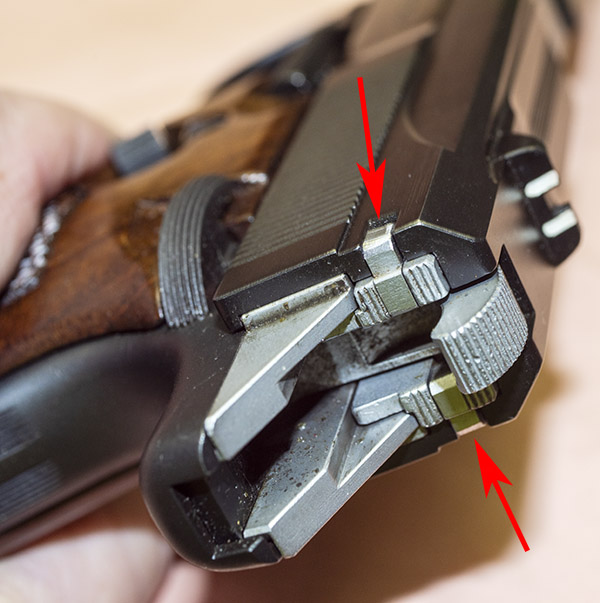
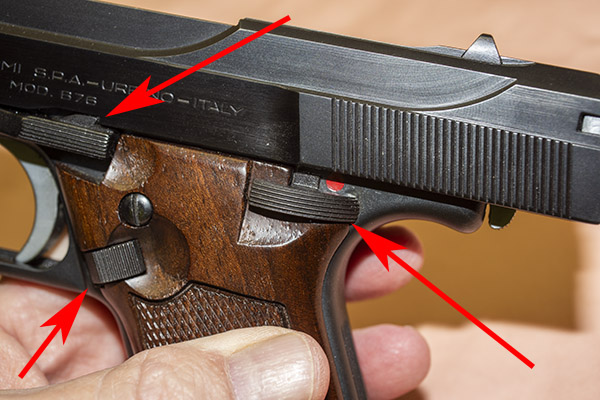
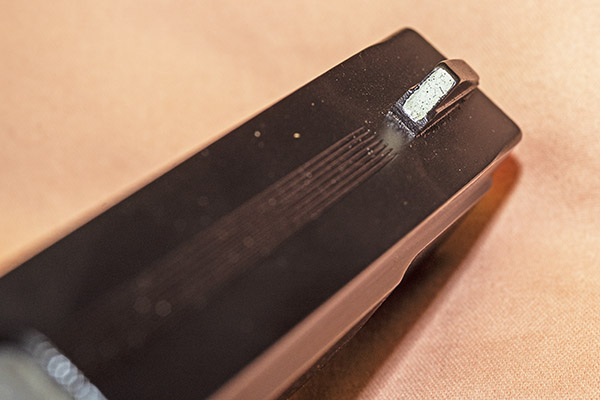
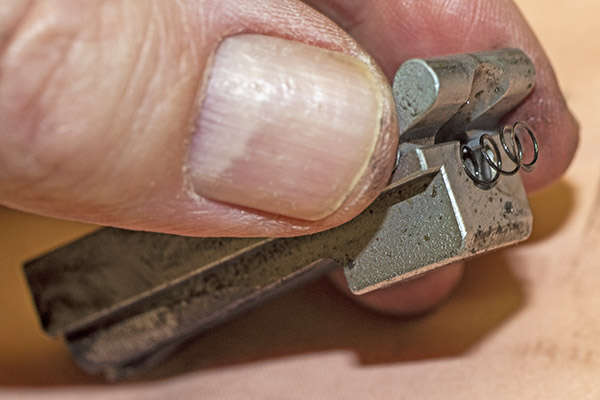
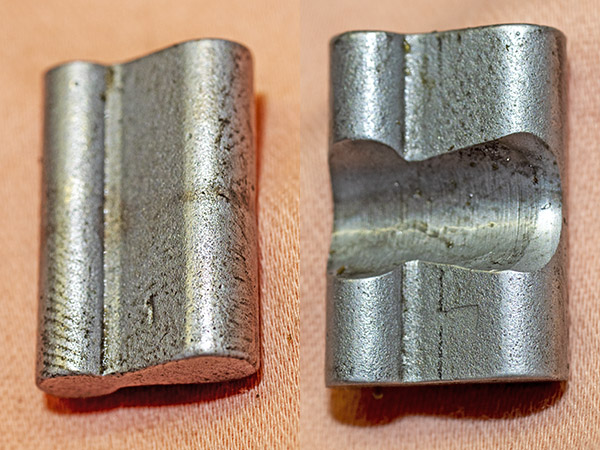
Disassembly continues with the locking pawls on either side of the hammer. In the photo above, with the slide in battery (all the way forward), the locking pawls are shown in the locked position. In the photo below, the slide has been pulled all the way back and locked, and the left pawl has been unlocked. The pawls unlock by rotating them to the rear.
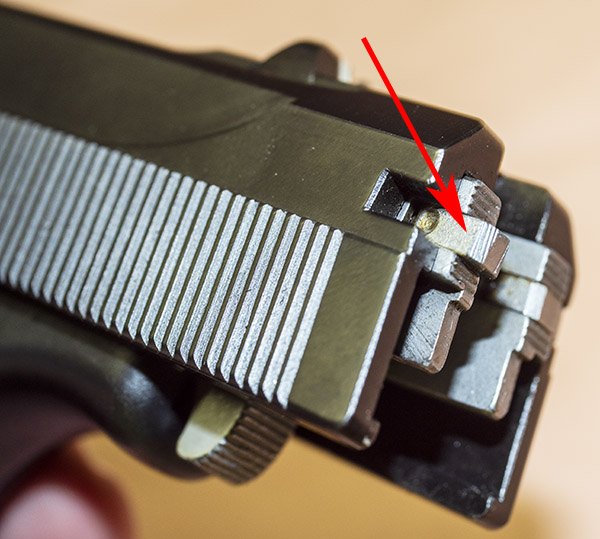
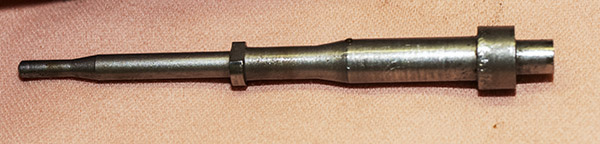
The next step requires pushing the firing pin in (I used a brass pin so as to not scratch any surfaces) and pulling the firing pin retainer and bolt locking support downward. It will drop out of the slide.
Once the firing pin retainer and bolt locking support has been removed from the slide, the slide can be slid forward off the frame (you have to lower the safety to release the slide). At this point, all of the major components are accessible and easily removed from the gun. I took my B76 apart for cleaning after putting several hundred rounds through it, so in the photos below the gun is kind of funky. Mea culpa.
So how does the B76 work? It’s complicated. There are a few YouTube videos that attempt to explain the B76 theory of operation and a few other explanations sprinkled around the Internet, and they are all either so superficial as to be useless or just flat wrong.
Larger caliber semi-auto handguns (9mm and up), other than the B76, rely on a design called locked breech recoil. Locked breech recoil systems keep the breech (the rear end of the chamber) locked against the slide until the bullet exits the muzzle, which allows pressure to drop to a safe level before the cartridge case is extracted and ejected. Larger caliber semi-auto pistols like the 1911 (and others) do this by keeping the barrel and the slide locked together initially. One thing to note at this point is that on these other guns, there is no separate bolt (the piece that fits up against the rear of the chamber). On these other guns the entire slide, in effect, is the bolt. It contains the firing pin and butts up against the chamber when the gun is in battery. When these guns fire, the barrel and the slide initially move together. As they move rearward from recoil and after the bullet has exited the barrel (by which time the pressure has dropped to a safe level), the slide keeps moving to the rear and the barrel is pulled downward. The barrel then unlocks from the slide, the slide continues to the rear, and the cartridge case is ejected as the slide’s extractor pulls the case from the chamber.
Going tangential for a second, you might wonder: Why not just let the recoil push the slide back to pull and eject the case from the chamber? Smaller handguns (e.g., 380 autos, .22 autos, etc.) work this way. But simply allowing the fired cartridge to push the slide rearward and eject (also known as blowback operation) is not feasible on the big dogs. There’s too much energy involved with the larger caliber guns, and too much gas pressure would be released near the shooter.
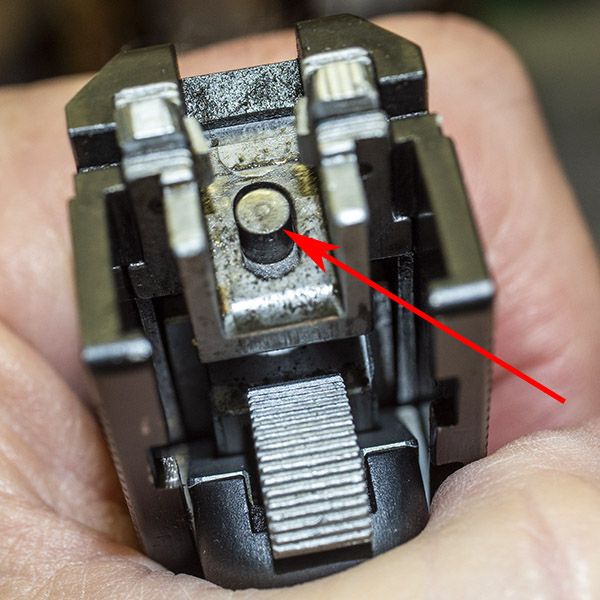
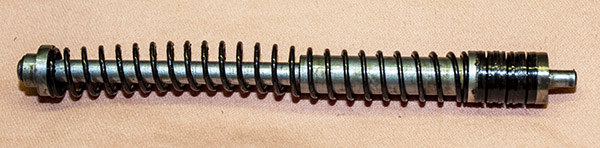
Benelli took a different approach. It’s quite clever and a bit abstract. In the Benelli literature, Benelli calls their system a delayed blowback locking system, but that term can also be applied to the 1911 approach. I’ll call the Benelli approach a lever-locked inertial system. The Benelli, unlike a 1911 or other larger caliber semi-auto handguns, has a separate bolt with a toggle lever lock and a bolt control stud. You can see these parts in the photo below.
When the B76 slide is in battery (all the way forward), the firing pin retainer and bolt locking support (that’s a complicated name, but it’s all one part) at the rear of the slide push forward on the toggle lever lock. In this position, the top of the toggle lever lock butts up against the inside of the slide top, which holds the bolt down against the frame. In this position, the chamber is closed and the gun is in battery. When the bolt is in this position, a ramped surface at its rear engages a similar ramp in the frame. Until the hammer drops (and for a brief instant after), everything is locked closed.
When the B76 fires, the entire gun (the slide, the receiver, the whole gun) recoils and starts moving backward. The toggle lever lock is held down by the slide, and the toggle lever lock pushes down on the rear of the bolt, keeping it locked, too. But then a funny thing happens. The shooter’s hand, holding the receiver, slows the gun’s rearward motion (the motion that was induced by recoil). The slide, however, continues moving to the rear due to its inertia (the inertia it picked up when the gun was in recoil and everything was moving to the rear). As soon as the slide starts moving further to the rear than the receiver, the toggle lever lock drops and it no longer forces the bolt down. The bolt is now driven up by the ramp on its bottom that mates to a corresponding ramp in the receiver, and that drives the bolt control stud on top of the bolt into a slot in the underside of the slide. By this time, chamber pressure has been reduced significantly. And by this time, the bullet has cleared the muzzle and is headed downrange. The bolt and slide continue rearward. The bolt extracts and ejects the spent cartridge case.
After all the stuff I describe above occurs, the slide slows to a stop as it reaches the end of its rearward travel. The recoil spring force drives the slide forward again. The slide is still hanging on to the bolt control stud at this point, so the bolt is driven forward, too. As the bolt moves forward, the bolt picks up the next cartridge in the magazine and drives it into the chamber. And as the slide continues its forward motion it pushes the toggle lever link up, the toggle lever link pushes down against the bolt’s rear, the bolt control stud drops out of its slot inside the slide, and the bolt goes back into battery. Clever people, these Italians are (well, except for that desmo valve thing on their Ducatis). But they sure nailed it with this handgun design. Nobody else does it like this.
I love my B76. It is accurate enough, it is a fine handgun, it is extremely reliable, it is made of blue steel and walnut as God intended guns to be, and it is certainly something different. I have never seen another one on the range or in a gun shop, and that means something to me. It’s unique and it’s cool.
Never miss an ExNotes blog:
Check out our other gun stories!