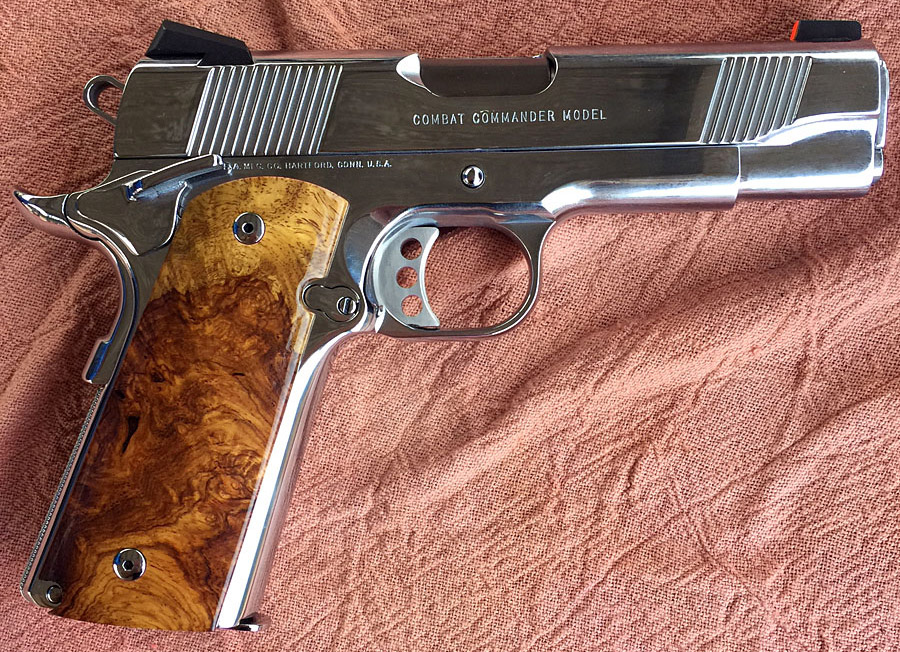
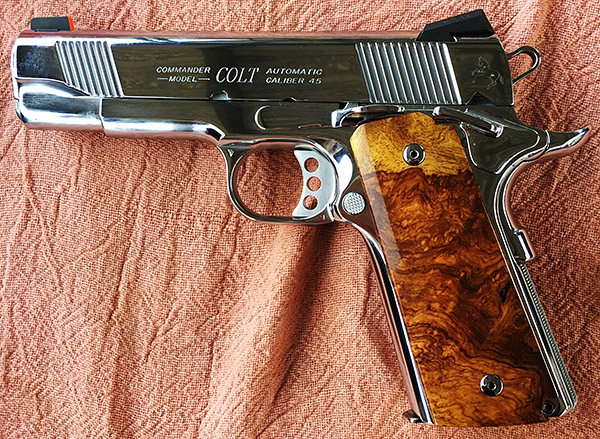
We’ve featured TJ’s Custom Gunworks a few times here on the ExNotes blog. I’ll take credit for influencing another good buddy who had TJ work his magic on a Colt Combat Commander, and this one is a honey. Colt’s Combat Commander is a 4.25-inch barreled version of the 1911. This TJ custom auto is hard chromed and it is a stunning example of TJ’s workmanship. You can see it in the photos and you can see the results on the range.
The Combat Commander shown here has had the following modifications:
Polished hard chrome finish over stainless steel.
Throated and polished barrel and frame.
Fitted and polished extractor.
New match trigger and action job.
New match hammer.
Smoothed breech face.
Polished full length guide rod.
Satin polish on barrel hood and chamber.
Extended slide catch.
New and rounded steel mainspring housing.
Trigger pull set to 3.0 lbs.
Melted sharp edges.
Reduced strength and smoothed magazine release button.
DayGlo red front sight.
Honduran rosewood burl grips.
I’ve seen this gun in action on the range and it is a thing of beauty. I’ve had a few guns customized by TJ, and I’ve steered a few friends there. I’ve had six handguns and a rifle customized by TJ, and every one of them is a stellar example of his craftsmanship. These include a Model 59, a bright stainless Colt 1911, the MacManus Colt 1911, the Rock Island Compact, a Model 60 Smith and Wesson snubbie, a Ruger Mini 14, and a new Colt Python. TJ’s emphasis is on reliability and perfection and on all of my guns he met those objectives in every case. When it comes to custom firearms, it doesn’t get any better than TJ’s Custom Gunworks.
You can read more firearms features on the Tales of the Gun page.
Enjoying the ExNotes site? Want to help support us?
Never miss an ExNotes blog. Sign up here for free!
We don’t do politics here on ExNotes, mostly because we don’t want to lose all our readers. If Gresh expressed his views, we’d lose half of you, and if I expressed my views, we’d lose the other half. That said, what has been happening in the world the over the last week transcends mere politics (von Clausewitz’s definition of war being an extension of politics by other means notwithstanding).
I don’t agree with much of what the current team at 1600 Pennsylvania Avenue has been doing for the last year, but I think we are taking the prudent course of action regarding Russia. Not the moral course of action or the course of action President Volodymyr Zelenskyy and his nation deserve, but the prudent course. What do you do when a madman has his finger on the nuclear trigger? It’s not a time to call his bluff, and for that, I think what’s happening here on the home front is prudent. But if ever a nation and a leader deserved our intervention, this is it. President Zelenskyy’s response when offered US help to flee Ukraine was eloquent: I need ammunition, not a ride. This, my friends, is a leader. A combat commander. The real deal.
People are comparing Zelenskyy to Churchill. The comparisons are valid, but the more appropriate comparison I think of is General Anthony McAuliffe. When surrounded by the Germans at Bastogne, McAuliffe’s response to their surrender demand was similarly eloquent: Nuts. General George S. Patton said that a man so eloquent deserved to be saved. That is certainly the case for Volodymyr Zelenskyy and the people of Ukraine.
Maybe we are seeing real leadership in Washington. We can only hope. Tightening the screws on the oligarchs and kleptocrats surrounding Putin may well lead to Putin’s demise. I’m guessing that’s the game plan. I hope it happens quickly.
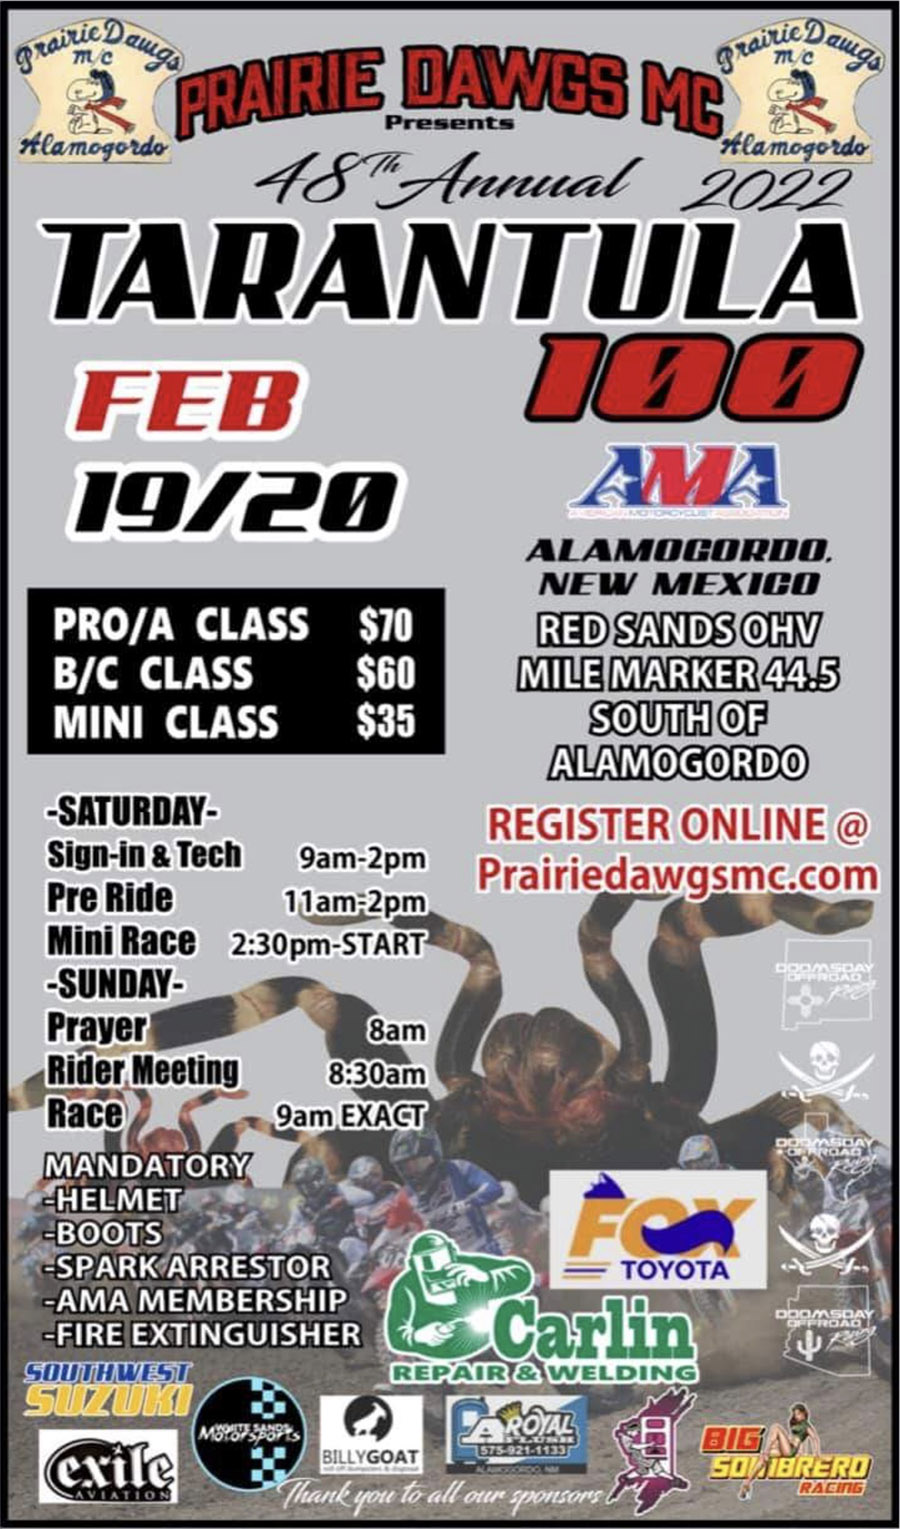
They say time flies and that’s corny-true but I think time accelerates the closer you get to the end. We have been living on Tinfiny Ranch for 6 years now and I have missed the Prairie Dawgs Tarantula 100 desert race each of those years. It seemed like there was always something that needed doing or I was off somewhere else. I usually hear about the race after it has run and say to myself: I’ve got to make it down to mile marker 45 and check it out next year.
This year was the someday year. My old high school chum Greg was in town so we burbled Brumby down Highway 54 early Sunday to catch the second day of Prairie Dawg action. The event is held at a huge off-road playpen about halfway between El Paso and Alamogordo. When we first moved to La Luz I attended a Prairie Dawg club meeting. They were a great bunch of guys and gals (another of those things I keep meaning to do is join The Dawgs). I’m not real big on organized motorcycle events preferring instead to toss about on the floor picking up cat hair like a gigantic sticky lint roller. To enter a race, to pre-run the course, to get in physical shape so that I could hold on to a bucking 1971 Yamaha 360 for 100 miles of desert seems like a lot of effort.
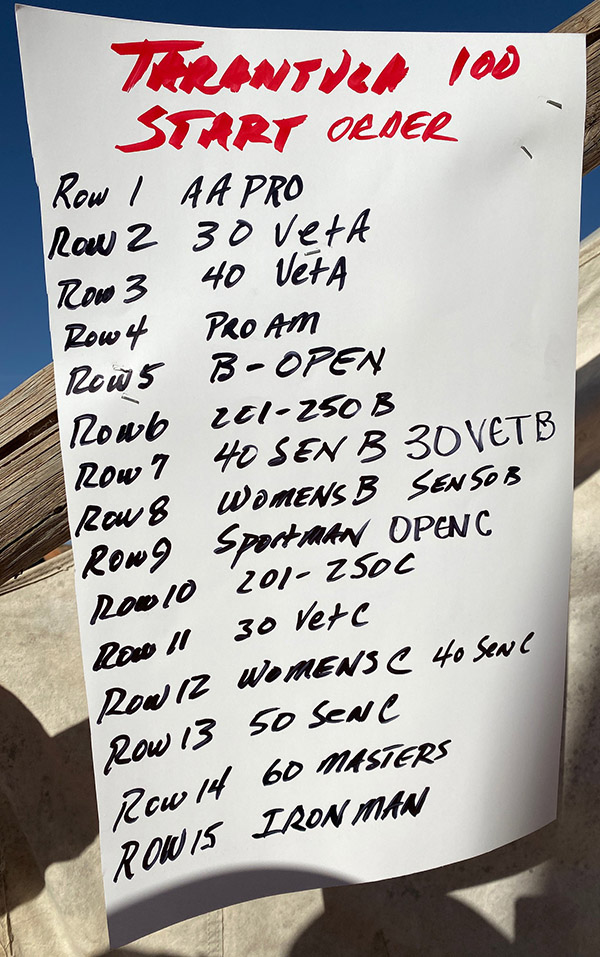
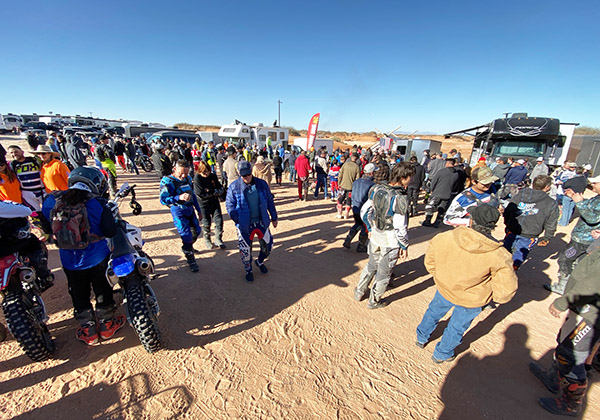
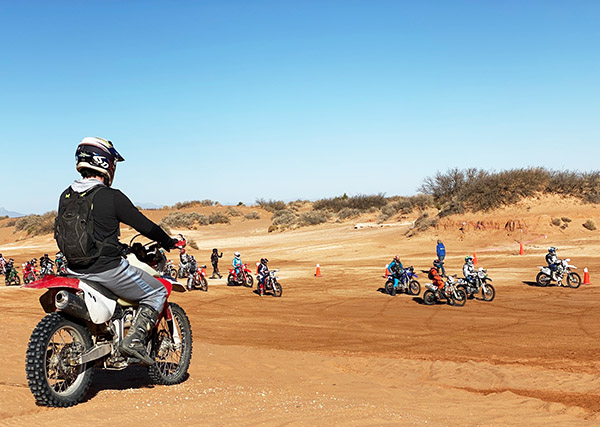
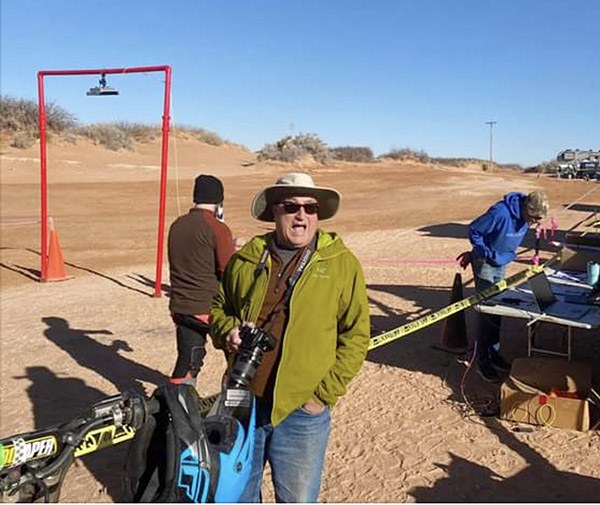
Effort that could be better spent consuming beer and eating beef jerky in the warm February New Mexico sunshine. So that’s what me and Greg did. We arrived on a perfect day just as the riders meeting was ending and wasted no time getting to the start line. The PD riders lined up according to class. The start is dead-engine. When the flagman, who gave no 30-second board or hint of when he was going to drop the flag, gave the signal you had to start your bike and off you go. It was so unexpected I missed several photos. With the dead-engine start, the electric start bikes had a bit of an advantage over the kick start bikes.
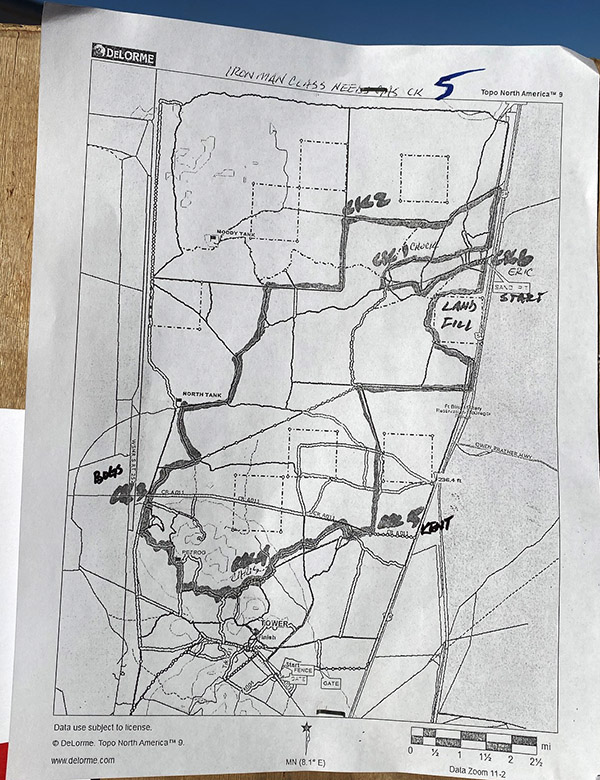
The race is run in 50-mile loops. When the riders come back through the pit area they ride underneath a red, pipefitting type of arch where the transponder records their time. We had a bit of a wait after the last class was on their way so we got our chairs, beer and beef jerky and settled down to discuss how old we were getting, the various ailments we were suffering under and to try and remember some long ago event that the other guy was reminiscing about.
One hour later the first of the Pro Class arrived at the transponder. Most everyone took on a gallon of gas, a swig of water and were on their way for the second lap. Some guys pushed their bikes under the yellow pit-tape ribbon and called it a day. Greg and I set up behind a hill at a spot that had a good view of the last mile or so of the course and the red transponder arbor. Some pits were located before the transponder, some after, but I guess it didn’t matter as the second lap was the one that counted. The sun beat down, the early morning chill was long gone, and our world became a balmy 70-degree red dirt sand dune. We shed our jackets and settled into a mellow, New Mexico low simmer.
Greg was heading to Fort Stockton, Texas later in the day so we decided to hang around until the first youth-class rider completed his lap. That came around 2 hours into the race or almost exactly twice the time it took the first pro-class rider. We folded up our chairs, shook the sand off and went back to the Alamogordo Moose Lodge where Greg had left his gigantic motorhome. I read later on the Prairie Dawg’s Facebook page that there was some trouble with the scoring system and I’m not real sure who won. I figure why mess up such a nice day out with accounting issues.
I don’t know if I’ll ever compete in the Tarantula 100. I’m still able to trail ride all day long but can only make about 2 miles at race pace. Staying up to speed for 100 miles would leave me rubbery-armed with blood pooled in my calves. I don’t want to take that helicopter ride. There is a 60+ class but those guys looked pretty fit. Maybe they’ll let me enter the mini-cycle class. Pouring concrete would be easy in comparison.
A wise man once said there comes a time in every man’s life when he decides to hang it up…his riding days are over. Ignoring the sexist tone of that gender-specific comment, I guess the follow-on comment has to be: Or does there?
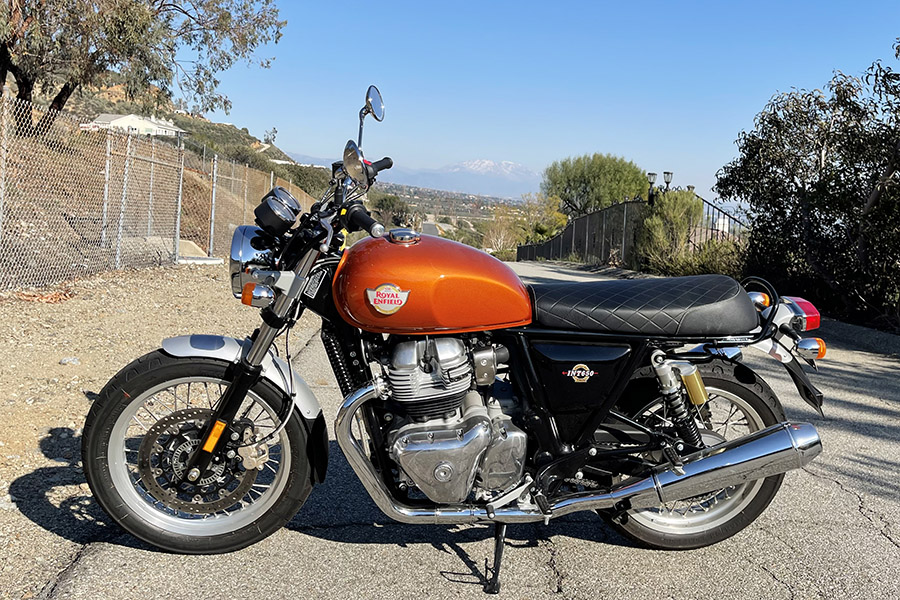
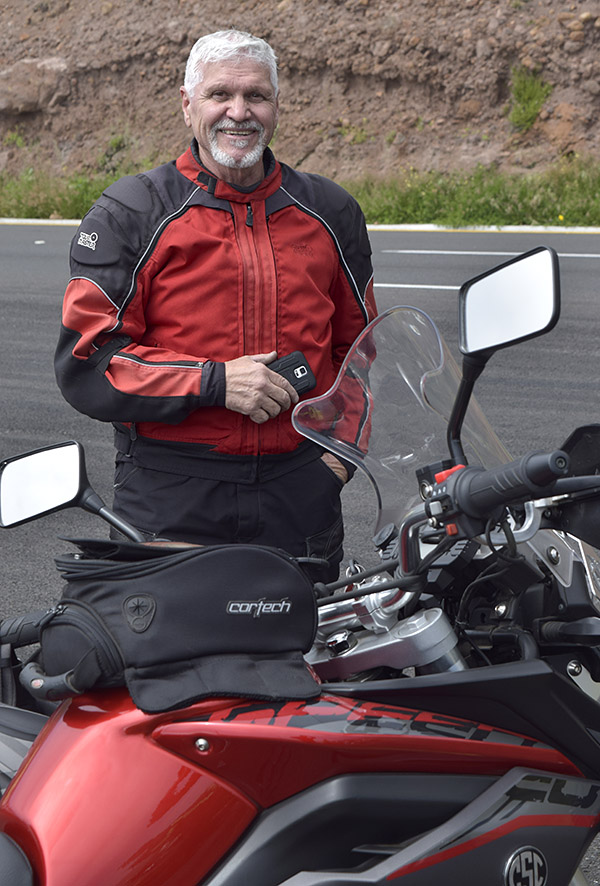
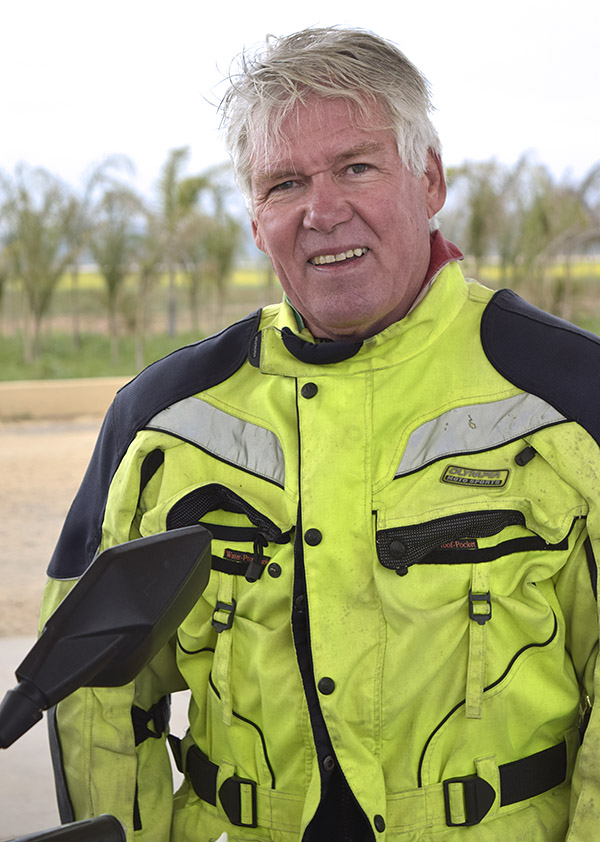
I turned 71 a few months ago. To a lot of folks, that’s old. The funny part of it is, though, I don’t feel old. A little earlier today I was putzing around in the garage and my Royal Enfield was making me feel guilty. I hadn’t had the 650 twin out on the road in the last few weeks, a character deficiency I promptly corrected. The old girl and I had a nice ride around the neighborhood, I got the oil circulating again (in the Enfield and in yours truly), and I snapped that great photo you see at the top of this blog. That’s snow-covered Big Bear you see off in the distance, a destination I’ve visited many times on a motorcycle.
But to get back on topic: At what age should we think about hanging up our riding gear? Now that I’m a septuagenarian (I had to look it up, so you can, too) I’m wondering about things like that. But then I think about the guys I’ve ridden with and maybe I’ll continue riding for another 20 years or so. Take a look.
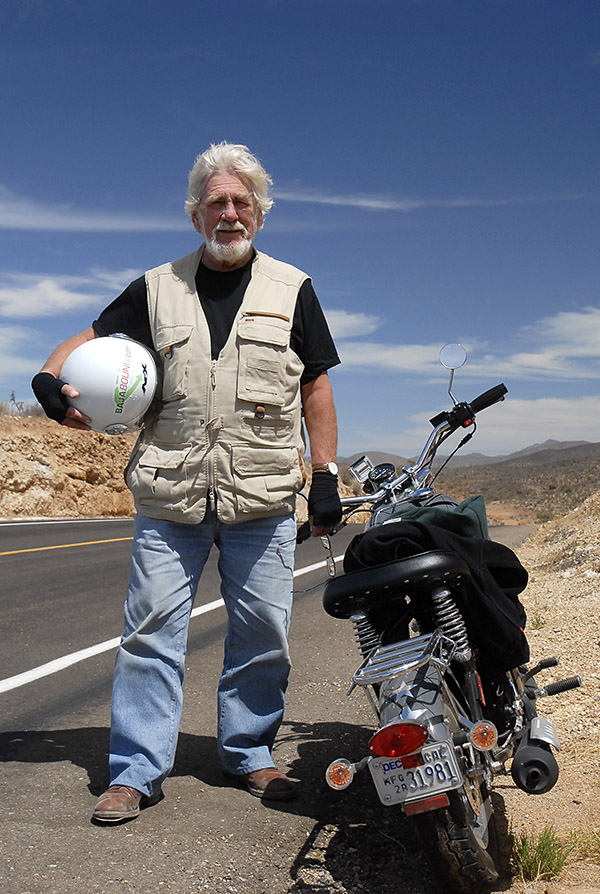
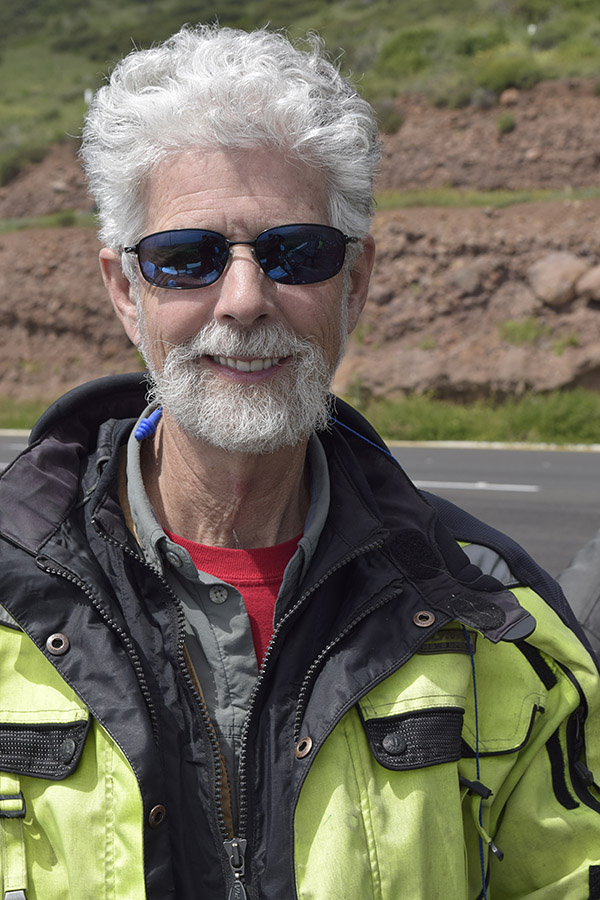
Simon Gandolfi, who just turned 90 and is arguably the most interesting man in the world, is a novelist and moto adventurer extraordinaire. He’s ridden around the world on small displacement bikes.Colorado Dan, the man. He cuts a dashing figure and is a great traveling companion. He’s a year or two older than me.Another most interesting man in the world…good buddy Willie. He’s usually riding when he’s not pitching Dos Equis.James, our Texas Ranger and a serious traveler, is in my cohort and he rode Baja with us.
You know, the funny thing is the tone of the conversations during and after a good ride hasn’t changed at all over the nearly six decades I’ve been riding. The topics have changed a bit, but not really that much. We still mostly talk bikes and good roads. But instead of bragging how drunk we were the previous night and who we spent the night with (which was mostly bullshit, anyway) the topics today address different specs. Instead of 0 to 60 times, quarter mile performance, and top ends, now it’s things like our A1C, PSA, and HDL numbers. You fellow geezers know what I’m talking about. But the discussions are just as lively, I think a little more interesting, and probably a bit more truthful. We’ll touch on politics on occasion, but if the conversation gets too heated or goes too far in that direction, I can always get us back on track (and get a good laugh) when I weigh in with a single question:
You guys know what the problem is in politics today? All the guys who really know how to run the country are out screwing around riding their motorcycles.
So, at what age should you hang it up? I’m finding that’s hard to say and most guys my age and older seem to just keep on going. I’ve ridden with guys well into their 70s, 80s, and sometimes even more. Good buddy Dan is heading down to Baja next month to camp on the beach near Gonzaga Bay, and he’s a little older than me. Sim0n Gandolfi, the British novelist and adventure travel writer, rode to Cabo San Lucas and back with us on 150cc CSC Mustangs about a dozen years ago, and he’s about to leave on another epic moto trip at age 90. James from Texas bought a new motorcycle and rode one of the Baja trips with us. He spun off somewhere about halfway down the length of the Baja peninsula to take the ferry across to mainland Mexico, and he was going to ride home to Texas through Mexico. And Willie, another most interesting man in the world, rides every chance he gets when he’s not doing Dos Equis commercials. Like me, all of these guys qualify for that 89-cent cup of coffee at McDonald’s.
Yeah, I think I’m going to stay at it for a while. I think you should, too.
Never miss an ExNotes blog…sign up here for free!
The best riding in the world? In my opinion, it’s unquestionably Baja. Take a look!
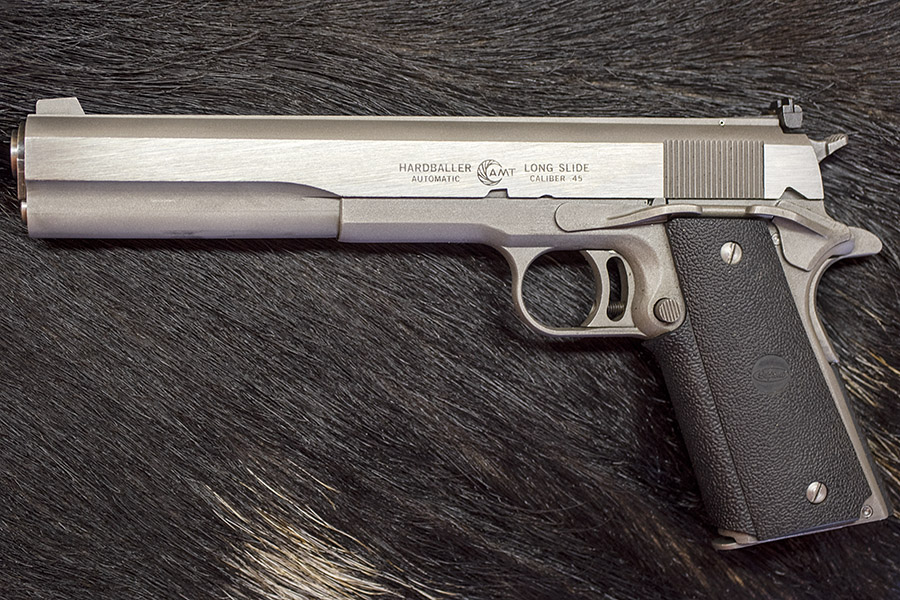
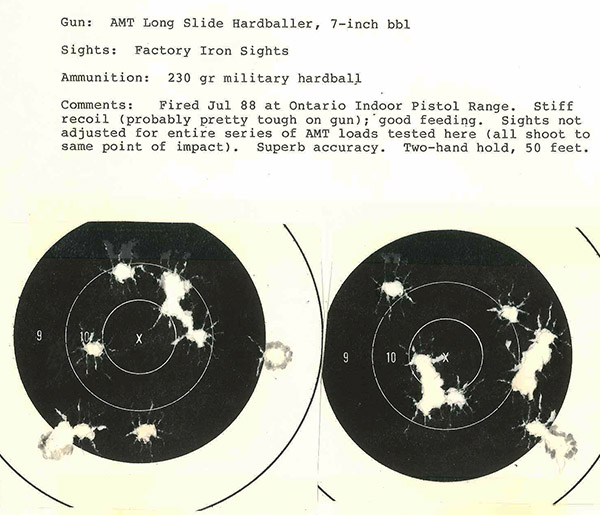
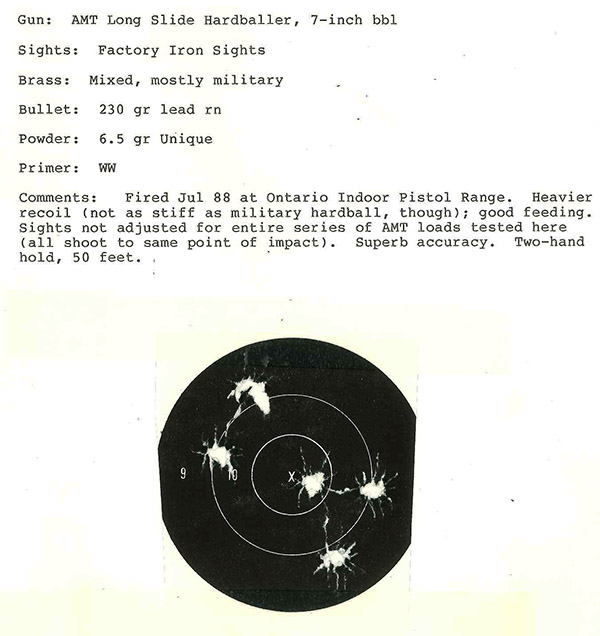
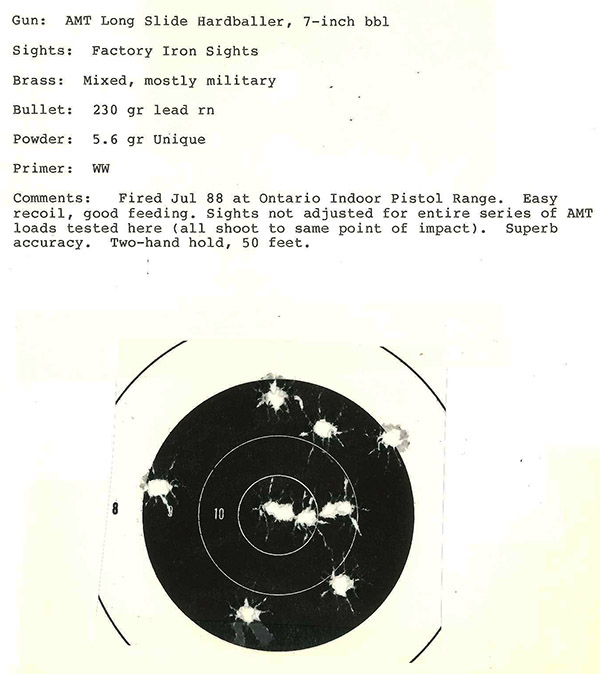
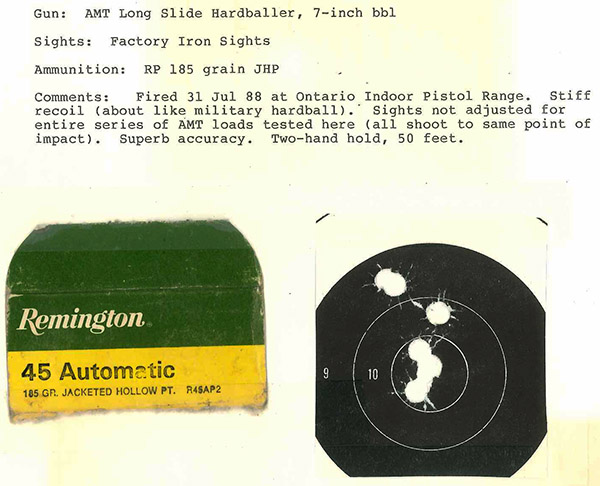
“I’ll be Bach,” of course, is the written Austrian-accent impersonation of the Governator (i.e., Arnold) in what has to be one of the best sci-fi movies ever, Terminator. One of the several guns that received top billing in that movie was an AMT Long Slide Hardballer equipped with a laser sight.
There are a lot of cool things to know about the Terminator movie and its armament, not the least of which is that laser target designators were not yet available for handguns when the movie was released in 1985. Ahnold’s (misspelled intentionally) AMT Hardballer had a custom 10,000-volt laser, and the wiring for all that power was hidden in the future governor’s jacket sleeve. I liked the movie, but I especially liked seeing the Long Slide Hardballer 1911 in it. You see, I own one. It cost just $365 back in the day and it was manufactured by Arcadia Machine and Tool (hence the AMT moniker) just up the road from me in Monrovia, California. It is a stainless steel 1911, it has a 7-inch long slide and barrel, and it is accurate. That’s my gun you see in the phot0 at the top of this blog. One of these guns recently sold for close to $2,000 complete with box and papers. I have the box and papers that came with mine. And no, it’s not for sale.
The Hardballer is surprisingly accurate. The 2-inch longer sight radius really works. Mine has not been tightened up, accurized, or modified in any way. The trigger pull is a bit higher than I would like, but it’s crisp (one of these days, I may get around to having TJ of TJ’s Custom Gunworks do a trigger job on it). I found the targets you see below in an old reloading notebook; they were all fired by yours truly, standing, at 50 feet. I guess that old saying is true: The older I get, the better I was.
I’ve owned my Hardballer for close to 40 years now. The AMT company is no more, so there won’t be any more of them. It’s a classic, and I need to get out and shoot it more often. Maybe I’ll do that today.
Keep us afloat: Click on those popup ads!
Never miss an ExNotes blog…sign up here for a free subscription:
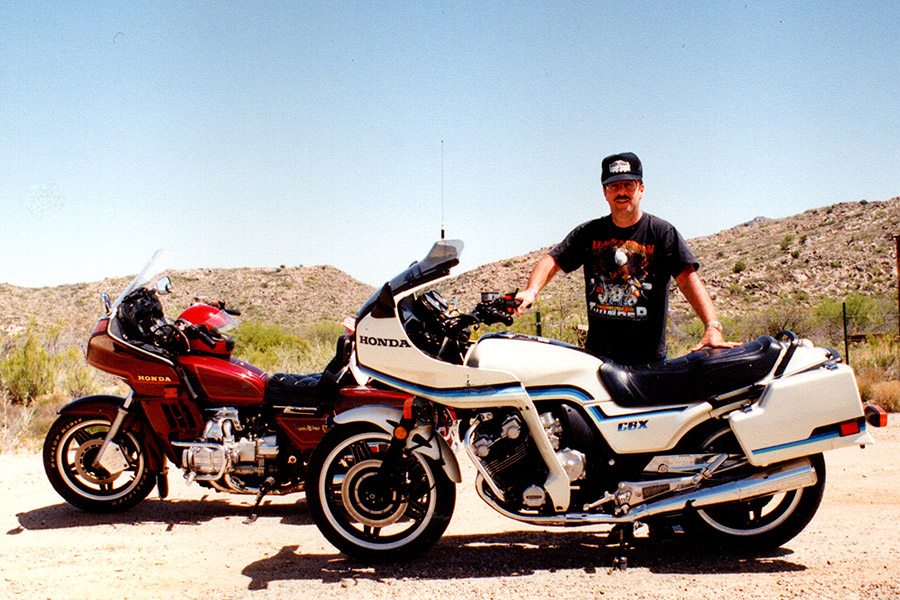
Not as measured by the compass, mind you, but as measured in dollars. A 1980 Honda CBX recently sold at auction in Las Vegas for a whopping $49,500. Wow.
The CBX originally debuted in 1979, and production continued through 1982. The first two years featured naked bikes (no windshield, no fairing, and no bags); the last two years were equipped with bags, fairings, and a little bit of detuning to make them a bit more reliable. The bikes were (and are) impressive, with wide engines (the engine was a straight six mounted across the frame), six carbs, six headers, and 24 valves. I think those CBX Hondas were and still are beautiful.
When the CBX first came out in 1979, I was living in Fort Worth. I rode my Triumph over to the local Honda dealer, and the guy let me take a silver one out (by myself) for a test ride. I immediately headed to Loop 820. It’s where I used to open up my ’78 Bonneville, which would touch an indicated 109 miles per hour. Naturally, being a wise-beyond-my-years 28, I did a top end run with the brand new CBX. I don’t remember what its speedo went up to, but I do remember running out of resolve at something north of 135 miles per hour (the bike still had more left). The CBX was an impressive motorcycle.
I turned it around and headed back to the dealer, and when I arrived, I leaned the bike over on its side stand and left the engine running. It was leaking oil from the left valve cover, and it was kind of pulsing out like I had nicked an artery. The sales guy came up, eager to close a deal, and asked what I thought of it. “Not for me,” I said, pointing to the oil leak. “It’s already leaking oil.”
But the CBX bug had bitten. About a dozen years later, I had moved to southern California and I rode a ’92 Harley Softail (didn’t everyone back then?), and I saw a pristine ’82 CBX at Bert’s MegaMall in Azusa. It was $4500, and I had to have it. I bought that bike and rode it for another 10 years, and I did some serious touring on it. That’s me you see in the photo at the top of this blog somewhere in Arizona with good buddy Lou and his Goldwing.
The CBX was an amazing machine, and I felt that way the entire time I owned it. I sold it when Honda stopped stocking parts for the CBX because I was worried that if something complicated broke, I’d have a $4500 paperweight. I put it in the CycleTrader and it sold the next day. I thought I had done well because I sold it for what I had paid for it 10 years earlier. If I only knew what they’d be going for today.
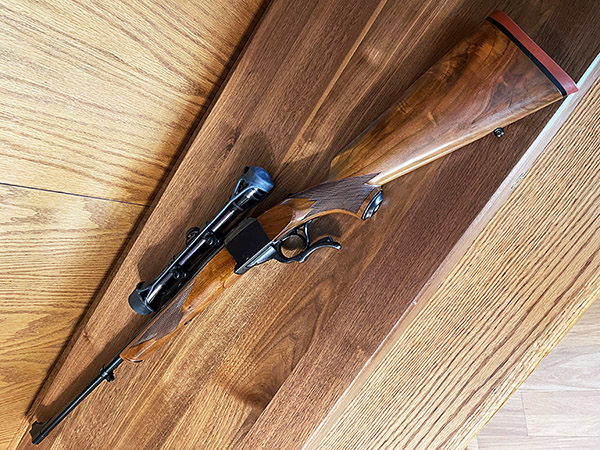
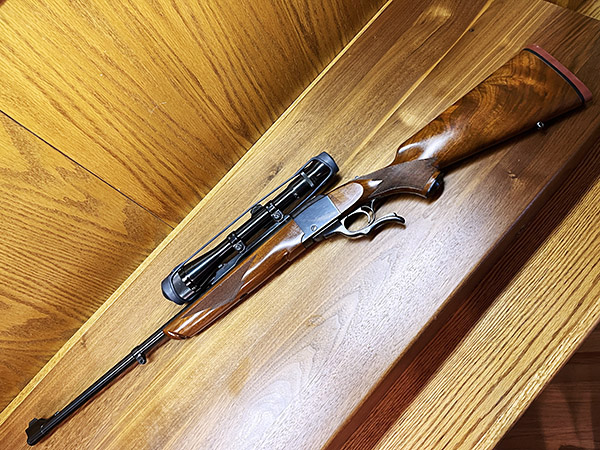
I’ve been a Ruger No. 1 fan for close to 50 years. It started with one I’ve written about before, and that is a Ruger No. 1A chambered in the awesome .30 06 Government cartridge. I’ve spent time on the range and I’ve hunted with this rifle, and it is probably my all-time favorite firearm.
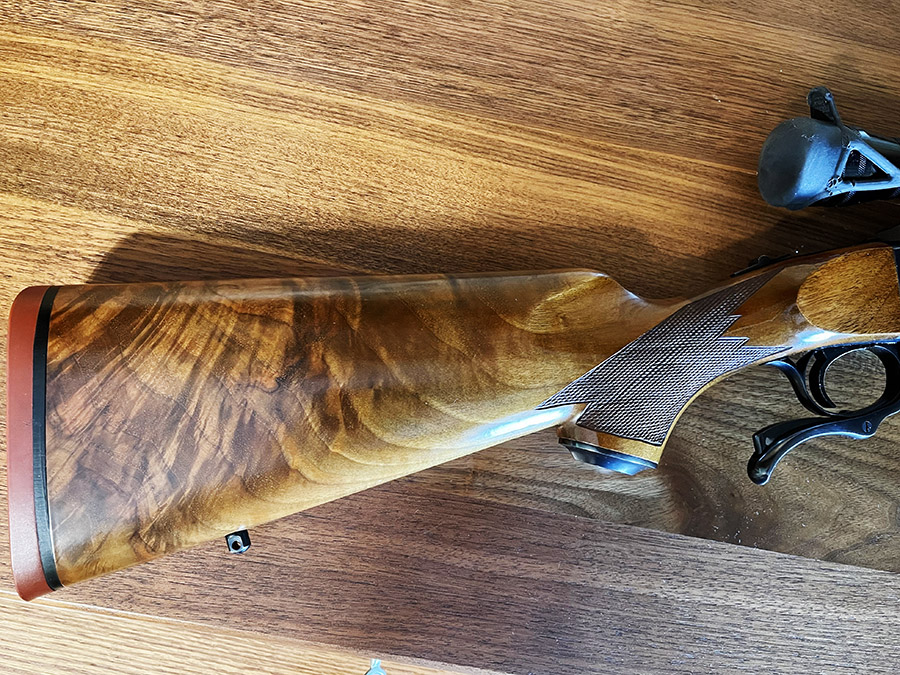
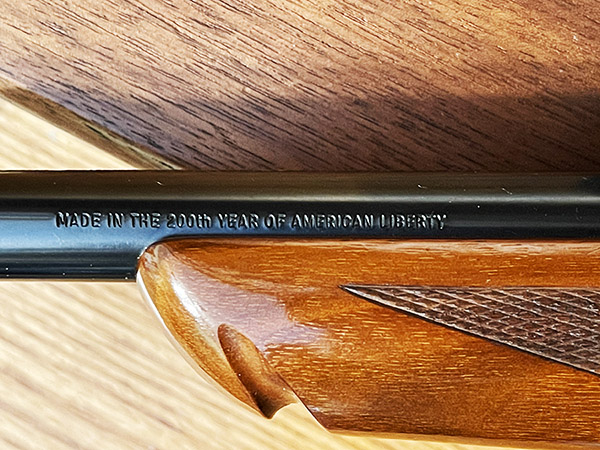
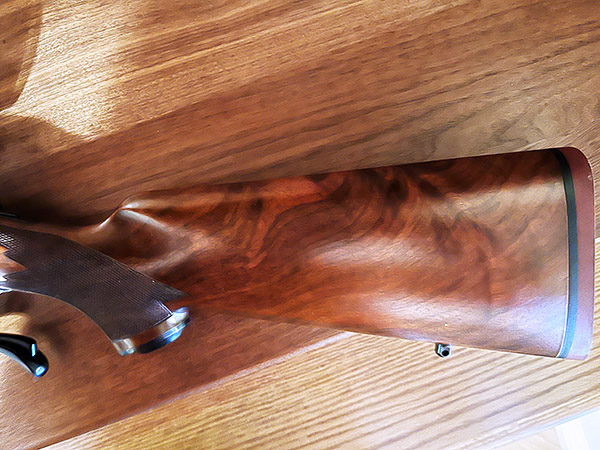
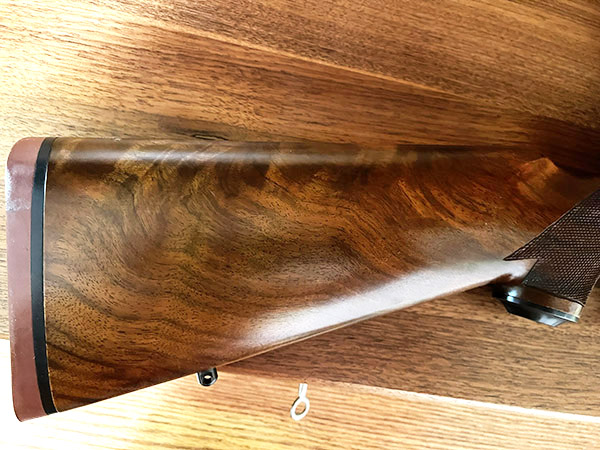
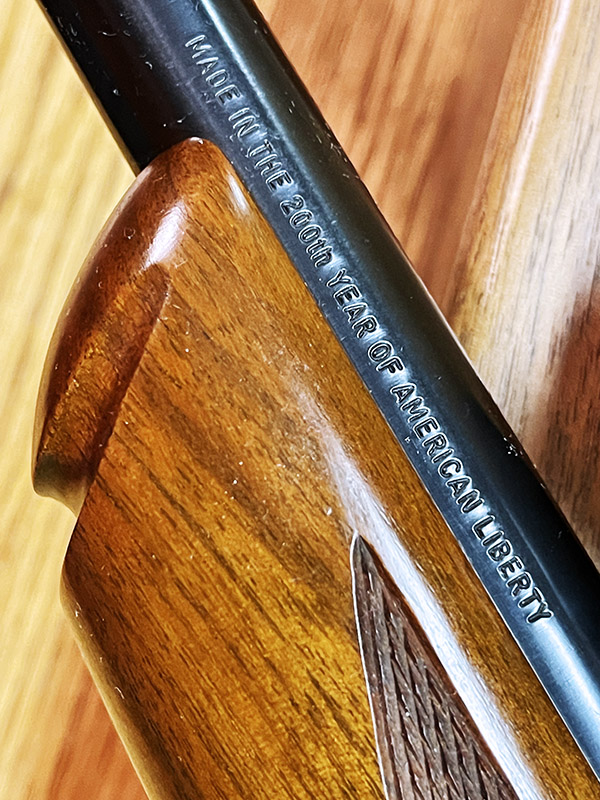
What attracted me to the No. 1 was my father’s fascination with the rifle (he never owned one, but he wanted to), the beautiful and exquisitely figured walnut Ruger used on these rifles, and their style. To me, they just look right. My fixation started in 1976. Ruger roll-stamped every firearm they manufactured with “Made in the 200th Year of American Liberty” that year.
Rugers with this roll-marked stamp are known as Liberty or Bicentennial guns.Like I said, the walnut on my Ruger .30 06 is exquisite on both sides.As I said, the highly-figured walnut is exquisite on both sides of this .30 06.
The Ruger No. 1 came in different configurations, and the ones you see here are what Ruger called the 1A. They had 22-inch barrels, iron sights, and the Alex Henry fore end (that’s the fore end with the notch at the front). There are all sorts of suppositions about what why the notch was originally included on the Farquharson rifles that influenced the Ruger No. 1 design, but no one seems to know for sure. I just like the look of the thing. To me, these rifles are elegant. They’re not particularly light, but they’re short and it’s easy to get around in the woods with one. Back in the day, I bought a straight 4X Redfield scope and a still prefer a 4X non-variable scope for hunting (even though it’s tough to find one these days; high-powered variable scopes are all the rage).
Those west Texas days back in the ’70s were good. We spent a lot of time (essentially every weekend) out in the desert north of Fabens chasing jackrabbits and coyotes, and the No. 1 you see here sent a lot of those critters to the Promised Land. Jackrabbits were grand fun. It was hard to believe how big some of them were.
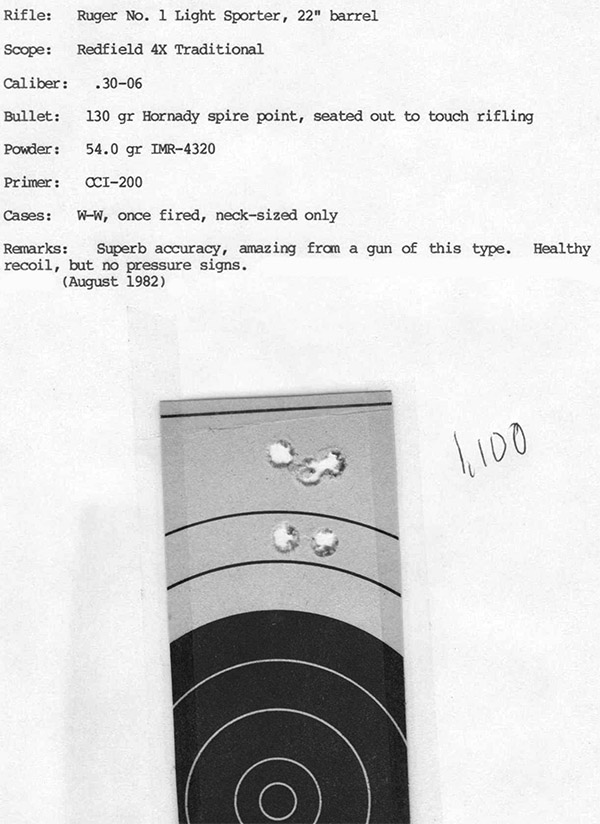
The accuracy load for my .30 06 No. 1 is the 130-grain Hornady jacketed softpoint bullet over a max load of IMR 4320 propellant. IMR 4320 is no longer in production, but I’ve got about 10 pounds of it so I’m good for a while. The rifle will put that load into an inch at 100 yards all day long, and the 130 grain Hornady bullet seems to be perfect for jackrabbits. Yeah, I know, that’s maybe a little more power than needed for Peter Cottontail, but hey, like Donald Rumsfeld used to say: You go to war with the army you have.
Gee whiz…a group I shot 40 years ago!
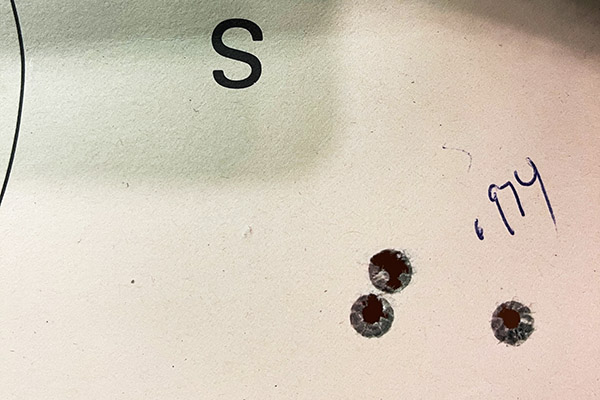
The .30 06 also does well with other loads. I was on the range with the ammo I had on hand a week or so ago with heavier bullets and I was pleased with the results. I tried 180 grain Remington bullets loaded on top of 48.0 grains of IMR 4064. Those loads shot low and had perceptibly heavier recoil, but they grouped under an inch at 100 yards.
Three shots at 100 yards with the Ruger .30 06 No. 1A. The load was the 180 grain Remington jacketed soft point bullet and 48.0 grains of IMR 4064, with military brass and a CCI 200 primer.
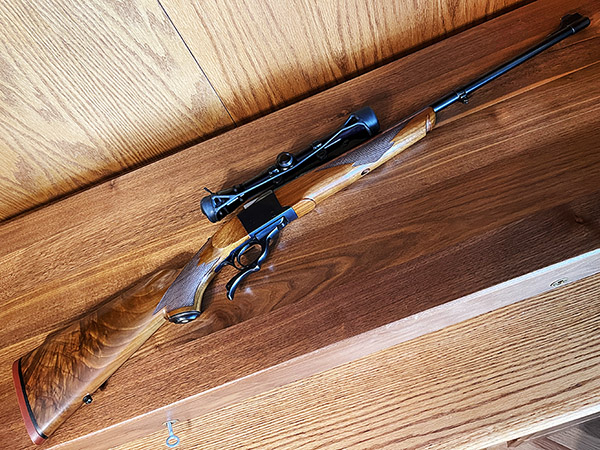
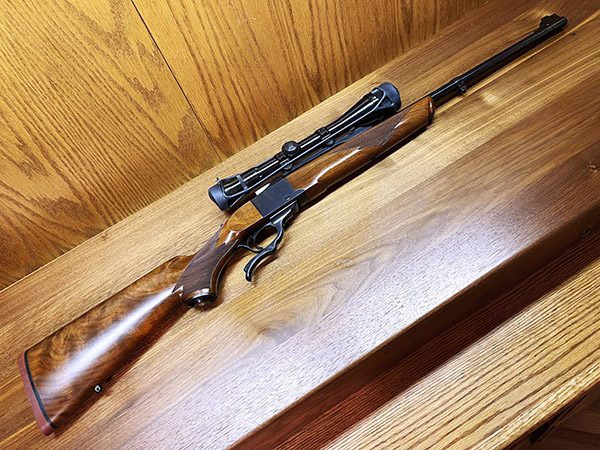
The title of this blog is A Tale of Two Bicentennial No. 1 Rugers, and that brings us to the second rifle. I was in Ohio on a secret mission about 15 years ago and the guy I visited there learned of my interest in guns. He took me to a local shop that only sold through an online auction (that was the gunshop’s business model). When we arrived, I quickly noticed another Ruger No. 1A, this time chambered in .243 Winchester. It was a bicentennial rifle, it looked to be a near twin to my .30 06 1A, and I had to have it. I tried to buy it while I was there and have shipped to my FFL holder in California, but the owner confirmed what my friend told me…I had to bid on it at auction. I did, and I won the auction at $650. Bear in mind that these rifles’ list price in 1976 was $265, and they typically sold at $239 back then. If you think I got scalped, think again. I won the auction, and the MSRP on these rifles today is something around $2,000. And the ones made back in the 1970s are, in my opinion, of much higher quality in terms of walnut figure, checkering, and other attributes.
A .243 Winchester Ruger No. 1. It wears a period correct El Paso Weaver 4×12 telescopic sight.The left side of the .243 No. 1.Ruger used to put fancy walnut on the No. 1 rifles. Today, not so much.A fancy walnut, red pad Ruger No. 1. Sweet!Like the .30 06 No. 1 featured above, this .243 is also a Liberty gun.
Most recently, good buddy John gave me a bunch of assorted brass and I started loading bits and pieces of it. I loaded the .30 40 Krag and wrote about it a week or so ago. There were a few pieces of .243 Winchester brass and that had me thinking about the .243 No. 1 in this blog. You see, I bought that rifle, stuck it in the safe, and never fired it. That was a character flaw I knew I needed to address.
I thought I had a set of .243 dies, but I was surprised to find I did not. I had some ammo, so I guess at some point I had .243 dies. I bought a new set of Lee dies, and I already had some .243 bullets. And as it turns out, the Lyman reloading manual lists IMR 4350 as the accuracy load for 60 grain bullets, and I had some. I only loaded six rounds (using the brass John gave to me), and I thought I needed to buy .243 brass (everybody is sold out of .243 brass right now). Then I started poking around in my brass drawer and it turns out I have five boxes of new Winchester 243 brass. I swear I’m gonna find Jimmy Hoffa or an honest politician in my components storage area one of these days.
The Tula factory ammo I had didn’t shoot worth a damn. Tula is cheap ammo, this stuff was old, and it grouped around 2.9 to 3.5 inches at 100 yards. I also had some very old reloads that had 100 grain Sierra bullets and 34.0 grains of IMR 4064, and it did only marginally better. The six rounds I loaded myself with the brass good buddy John provided was better. At least I think it was better. I used 65 grain Hornady V-Max bullets and 43.2 grains of IMR 4350 powder. I had one good group and one lousy group. But hey, Rome wasn’t built in a day, and I’m just getting started. I’ll buy some heavier 6mm bullets (.243 is 6mm), I’ll try them with a few different loads, and you’ll get to read about it here on the ExNotes blog.
More stories on Ruger single-shot rifles (the No. 1 and the No. 3) are here.
In a previous life I managed operations that sold aircraft components to Boeing. And I’ve taught related courses to Boeing companies and Boeing suppliers. Boeing’s emphasis on quality assurance, safety, and reliability was extreme and Boeing went far beyond what any other organization required. That’s why I was so surprised a few years ago when facts began to emerge detailing how Boeing concealed flight control augmentation systems information on their new 737 Max aircraft.
When I returned home from another secret mission a couple of nights ago and we tuned into Netflix, a documentary on Boeing’s 737 Max failures popped up when Netflix opened. Downfall: The Case Against Boeing had just been released that day.
Downfall: The Case Against Boeing is an inside look at the events surrounding the two crashes that occurred shortly after the 737 Max began flying. It’s about the 737 Max, its two crashes, Boeing’s resistance to revealing MCAS (that’s Boeing’s acronym for Maneuvering Characteristics Augmentation System), the aircraft’s susceptibility to a single-point failure, Boeing’s prioritizing sales over safety, the Federal Aviation Agency’s inadequate response, and more.
I thought Downfall: The Case Against Boeing was extremely well done. If you get a chance, this is a show worth viewing.
Utah, hands down, is the most beautiful state in the Union. I’ve been to every state in the US except North Dakota, and unless there’s something hiding up there, Utah gets my vote. There are places in Utah with scenery and riding that are as close as you can get to heaven without a one-way ticket. There’s Zion National Park (to be covered in a future blog), there’s Bryce Canyon National Park, Grand Staircase-Escalante National Monument, and Capitol Reef National Park (which I’ll cover in this blog), there’s Cedar Breaks National Park (a topic for a future blog), there’s Kodachrome Basin State Park (another future blog), there’s Flaming Gorge National Park (that’s coming up in another blog), and there’s Arches National Park (to be yet another blog). And then there’s the Dinosaur Highway. I’ve been to all of them, and I’m telling you, if you like road trips it doesn’t get any better than Utah.
Panguitch on the western end of this trip, and Hanksville on the eastern end. It is a grand ride.
There’s a reason I’m touching on Bryce, Grand Staircase-Escalante, and Capitol Reef in one blog. Two reasons, actually: State Routes 12 and 24. These two roads run through all three National Parks, and they are two of the best roads I’ve ever ridden. If you want to plan this grand adventure, start in Panguitch, ride Utah SR 12 and 24, and spend the following night in Hanksville, Utah. I’ve got good places to have dinner in both towns, and I’ll share them with you in this blog. It’s a full day’s ride to get from one to the other (maybe longer if you want to stop and see the sights).
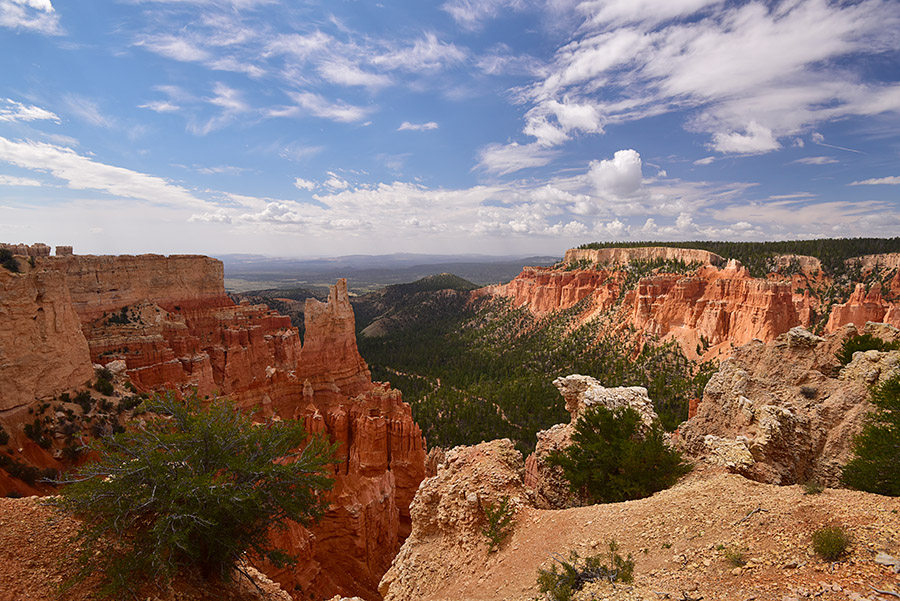
The large featured photo at the top of this blog is in Bryce Canyon National Park. This is another photo in Bryce. Unlike Zion ((where you are in a basin looking up at the rock formations), in Bryce you are up top looking down into the colorful canyon. Bryce has stunning views.
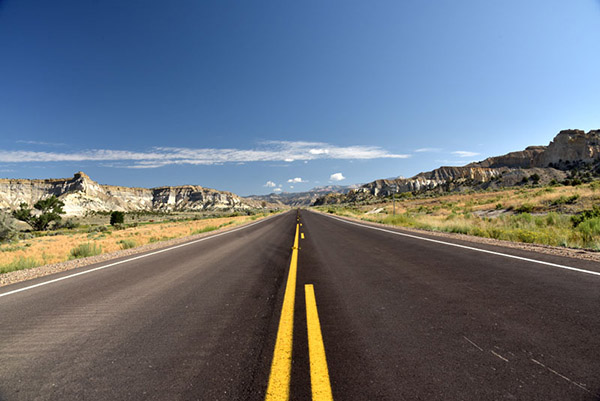
This is the most beautiful stretch of the planet I’ve ever ridden. The colors and the riding are stunning. Think bright blue skies, vibrant and verdant pine trees, and multi-colored pastel rock formations. The formations include stunning pinnacles called hoodoos, plus arches, large rock mounds, exposed vermillion cliffs and monstrous domes and folds in the Earth’s surface. Although the region was once alive with dinosaurs, you most likely won’t see fossils. But you will see an artist’s palette of pleasing pastels: reds, pinks and browns due to iron in the sandstone, yellows and creams created by limonite, and purples presented by pyrolusite. Whatever the chemistry, the display through this stretch is dazzling.
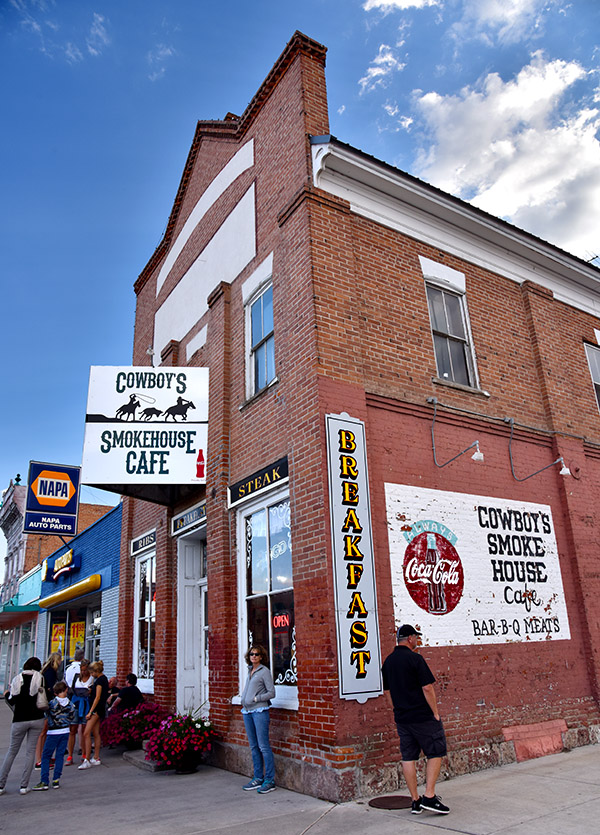
The spot for dinner in Panguitch is the Cowboy’s Smoke House Cafe. You’ll probably have to wait to get in. Trust me: It’s worth it.
You can ride US 89 from Panguitch to pick up SR 12 at its western end. Head east and in just a few miles you’ll be at Bryce Canyon National Park. Bryce is one of America’s jewels, with hoodoos arranged in several natural amphitheaters. An early morning start will help capture dramatic photos; the sun will be low in the eastern sky and the resultant lighting makes the colors pop. Native American Paiutes thought these hoodoos were ancestors turned to stone. Take a long look at some of these formations and you’ll see why.
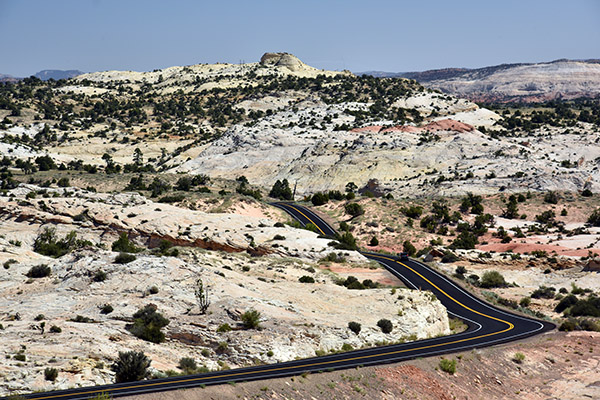
Stay on SR 12 after Bryce and you’ll skirt Grand Staircase-Escalante National Monument on tantalizing twisties. All of SR 12 is breathtaking; it is something out of a dream. It takes you through a series of red rock formations and then winds along a ridge with sheer drops on either side. Forget about guard rails and shoulders; you’ll feel as if you are riding the sky. Cook a corner too fast on this stretch and you’ll wish you were wearing a parachute. This area, more than any other I have ever ridden, is a near-religious experience.
The red rocks of Utah along SR 12.It was tough to keep going on Utah SR 12…I wanted to stop after every corner for photos.One of many scenes along Utah SR 12. You need to ride this road. It’s one of the best.
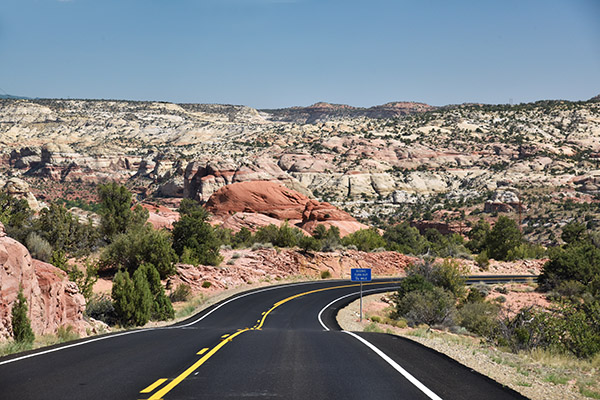
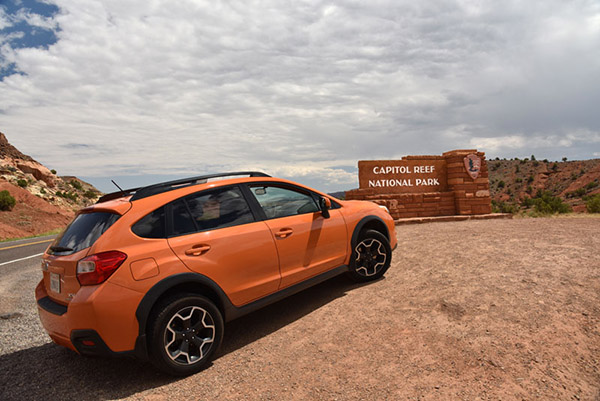
State Route 12 tees into SR 24, but you’ll be able to see Capitol Reef National Park long before you get to SR 24. Head east on SR 24 toward Hanksville and you’ll ride through much of the accessible portion of Capitol Reef. It’s perhaps the least known of Utah’s national parks, but its scenery is as stunning as any of the other parks.
Capitol Reef and Utah SR 24.
Only a portion of Capitol Reef is visible from SR 24, but it is outstanding. Hundreds of miles of unpaved roads into Capitol Reef offer similar scenic views. The park’s unique white sandstone domes (similar to the U.S. Capitol building) were formed by a warp in the Earth’s crust 65 million years ago. “Reef” refers to any barrier to travel, and when you see these formations, you’ll certainly understand the name.
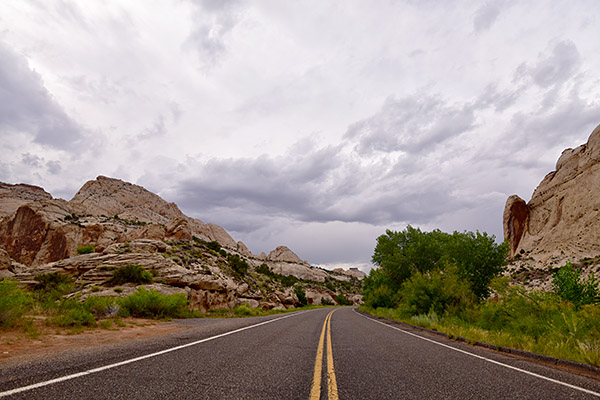
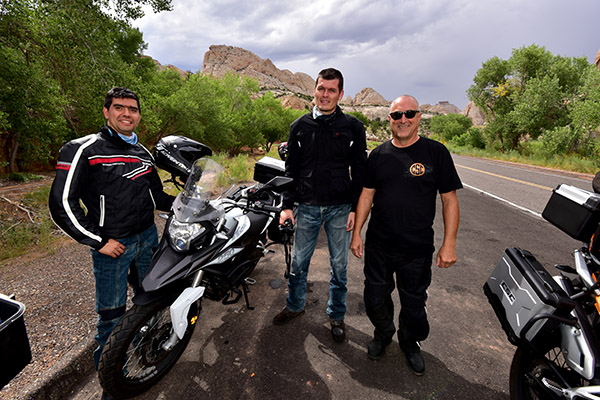
Another scene along SR 24 heading east.Gabriel, Juan Carlos, and Uncle Joe along SR 24 after rolling through Capitol Reef. We rode 5000 miles through the western United States on brand new 250cc CSC motorcycles. It was a great ride with great guys.
State Route 24 follows the Fremont River through Capitol Reef National Park, and as it twists and turns on its way to Hanksville, you’ll be thanking me for turning you on to these very special roads. The Whispering Sands hotel is a good, clean place to spend the night, and Duke’s Slickrock Grill is a great place for dinner. Try the trout; it’s wonderful. And don’t miss the photo op standing next to Duke.
Want to discover more great moto destinations? We’ve got you covered!
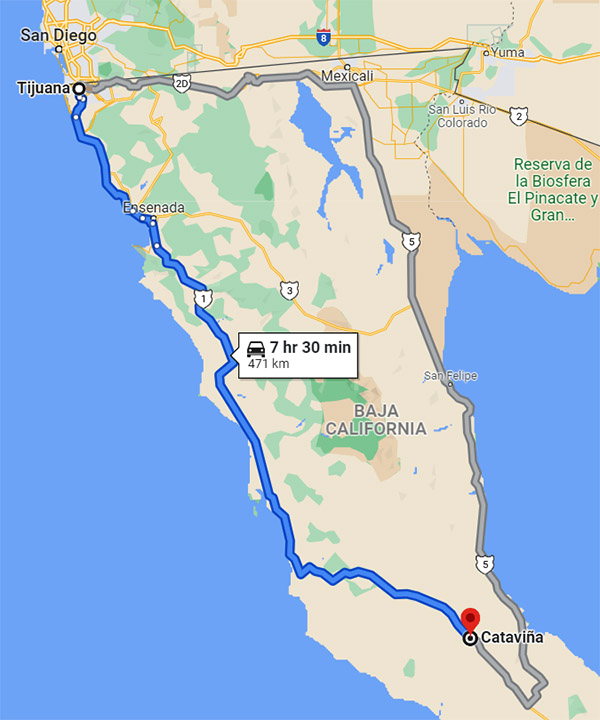
Located 297 miles south of the US border, Cataviña makes for a good spot to stop after your first day’s push into Baja. You might also try to make it all the way to Guerrero Negro, but that’s another 140 miles. When traveling in Baja through the mountains and all the small towns from Ensenada to El Rosario, you can’t grind out big miles like you can on a US freeway. And, trust me on this, you don’t want to travel at night in Baja. A 300-mile day in Baja when you’re starting at the US border is a good day, and that puts you smack dab in Cataviña.
Cataviña’s location on the Baja peninsula.It’s a full day’s drive from TJ to Cataviña.
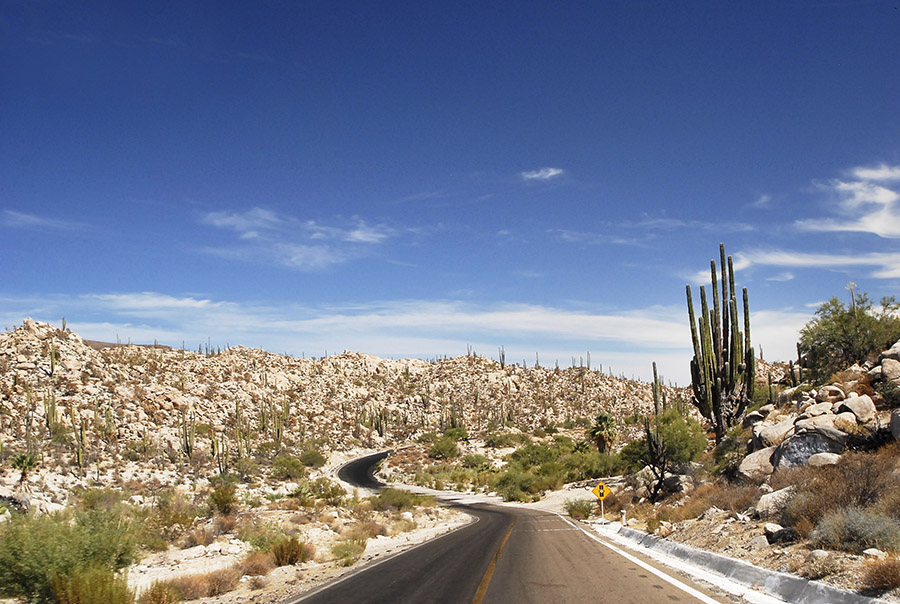
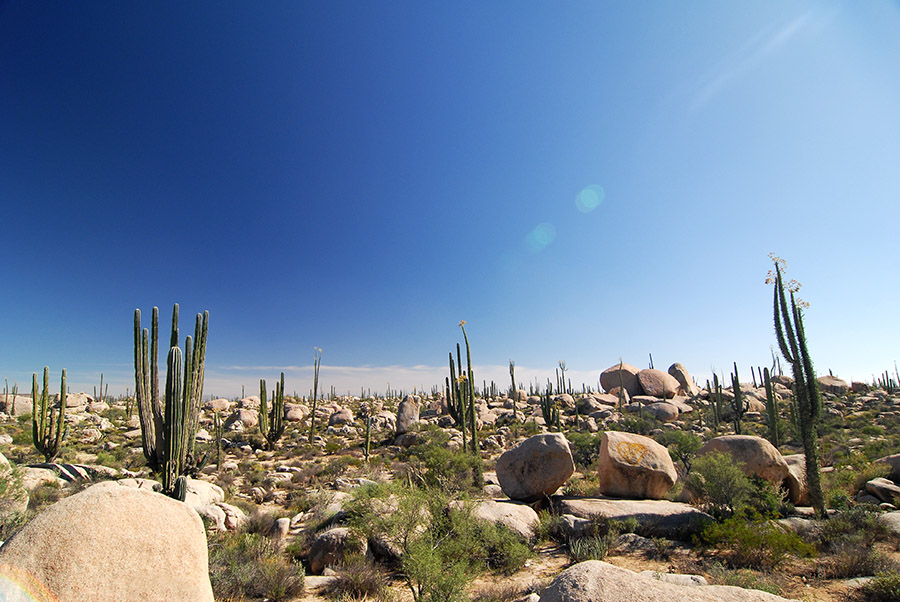
What’s cool about Cataviña is that it is in one of Baja’s boulder fields, as depicted in the big picture at the top of this blog. Those are just flat wild…the stark landscape, the giant boulders, the Cardon and Cirio cacti…it’s all impressive. The boulders were formed by wind erosion, which is kind of amazing. I didn’t believe that at first, but I checked with one of my Cal Poly colleagues in the Geology Department (I’m a retired university professor) and he confirmed it for me. Wow.
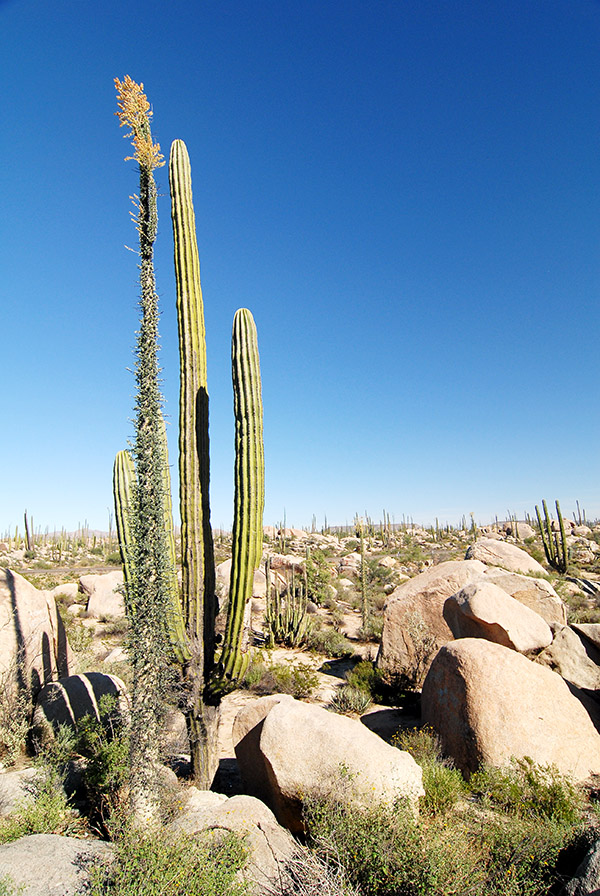
That’s a Cirio plant in front (the long thin one), and a giant Cardon cactus behind it, all in the boulder fields of Cataviña.
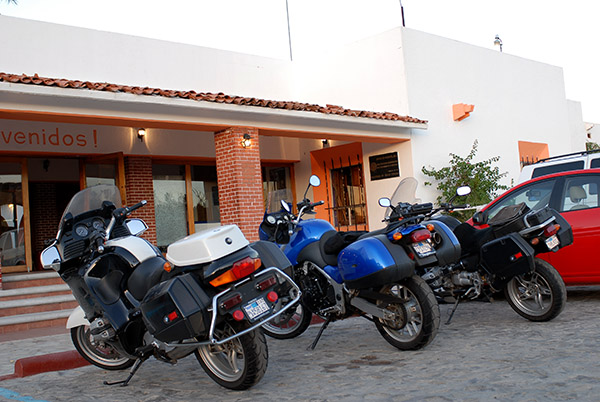
There’s only one decent hotel in Cataviña and it’s the Hotel Mision Cataviña. It’s gone through a number of name changes in the 30+ years I’ve been traveling in Baja (the La Pinta, the Desert Inn, and maybe one or two others), but the hotel has stayed the same and that’s a good thing. The Hotel Mision Cataviña has a good restaurant and bar. It also has a nice swimming pool, and that pool has been just what the doctor ordered for me and my friends on more than a few occasions riding Mexico Highway 1 through Baja.
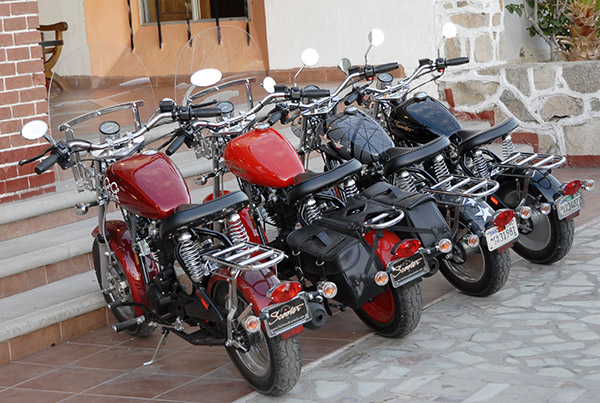
Parked in front of the Hotel Mision Cataviña. I’ve toured Baja on all kinds of bikes. The blue Triumph Tiger was my ride on this trip.My friends and I once rode all the way to Cabo and back on 150cc CSC Motorcycles Mustang replicas. You can read about that adventure here. We spent the night in Cataviña.
At around $80 a night it’s a bit pricier than most other Baja hotels, but it’s still inexpensive by US standards. There’s really nothing else in the Cataviña area for either hotels or restaurants other than a concrete-floored hotel on the other side of the highway. We had to stay in that other hotel once when the Hotel Mision Cataviña was full. That was more than 20 years ago and my wife still mentions it when she gets mad at me. Take my advice on this: The Hotel Mision Cataviña is where you want to stay.
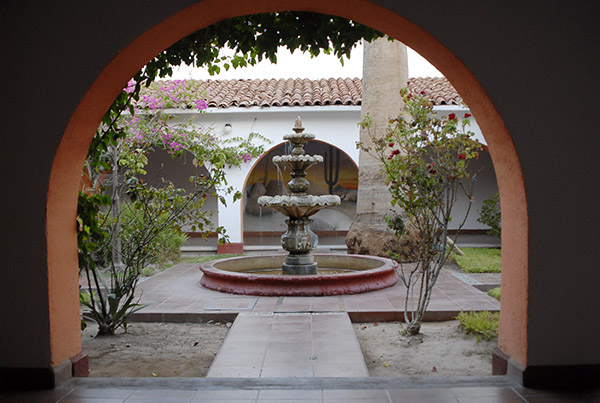
One the Hotel Mision Cataviña’s coutyards. It’s a classy place.
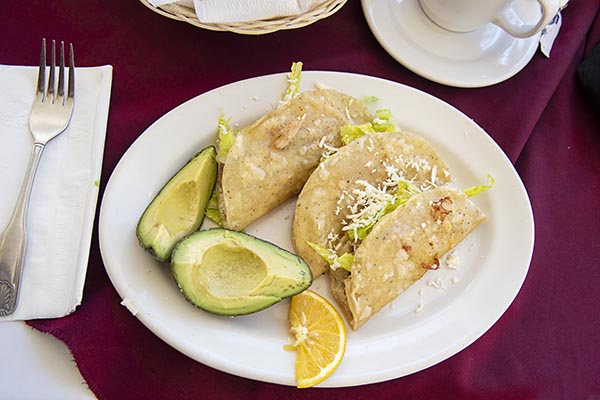
I enjoy eating in the Hotel Mision Cataviña’s restaurant even if I’m just passing through. If you let the staff know you’re in a hurry, they’ll get you in and out. If you don’t, things kind of run on a Cataviña pace. That’s cool if you’re staying for the night; it’s not if you’re trying to make Guerrero Negro. I’ve done that, but it is a very long day. The restaurant and bar have kind of an arched brick roof in the dining room. It’s fun. As you might imagine, they are well stocked with Tequila and Tecate.
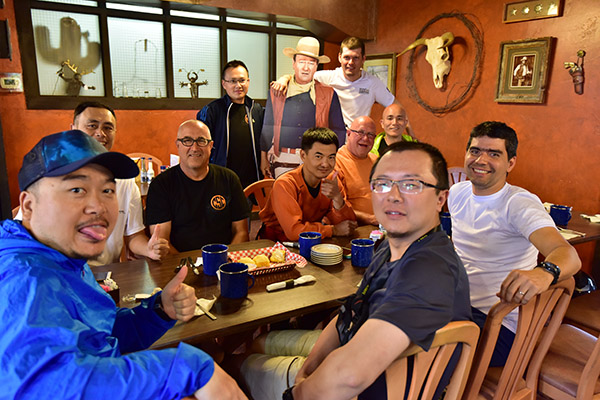
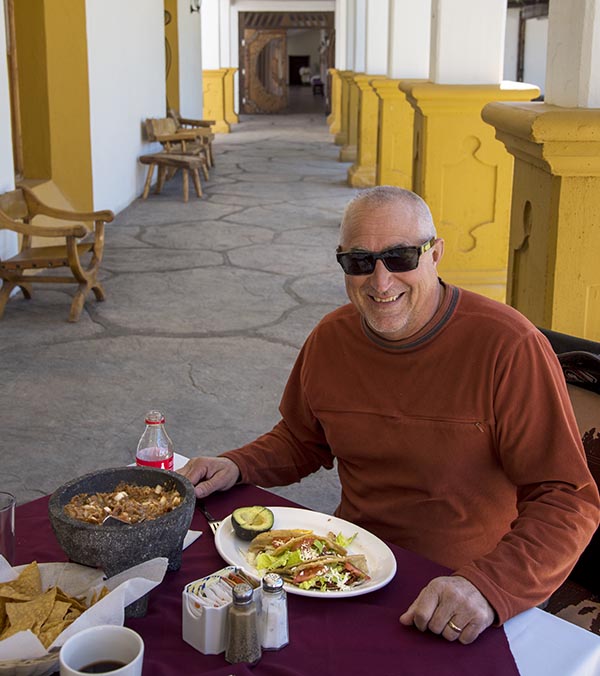
Joe Gresh enjoying chicken tacos during a brief stop at the Hotel Mision Cataviña restaurant.They look good, don’t they?
If you’re traveling with a bunch of guys and you don’t mind sleeping 8 or 9 to a room, the Hotel Mision Cataviña built a separate just to the north of the main hotel and it has a dormitory style room. I don’t know what it costs, but it’s got to be (on a per head basis) cheaper than one of the double rooms. The rooms are nice. The place is clean, it’s air conditioned, and its comfortable. The only issue with the new building is that the hotel runs a diesel generator all night, and if you stay in the new building, it might keep you up.
Fuel is less of a concern today than it used to be. We used to buy bottled gasoline from enterprising guys by the side of the road, but there’s a convenience store just across Highway 1 from the hotel now with gas pumps, so I think getting gasolina today is less of an issue.
If you would like to know more about the Hotel Mision Cataviña, you can do so here.
Headed into Baja? Make sure you insure with the best, and that’s BajaBound!
Check out our reviews of other Baja hotels and restaurants, destinations, and more on our Baja page!
Never miss an ExNotes blog! Sign up here for free!
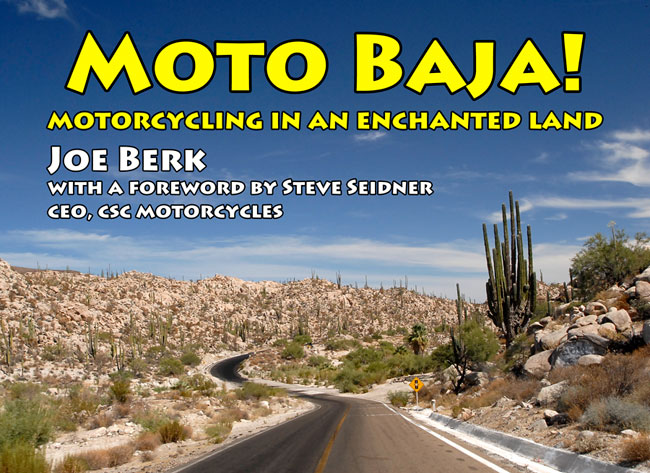
Want to know more about some of our moto trips in Baja? Pick up your own copy of Moto Baja!