After a Covid-cancelled year in 2020 Endurofest came roaring back in 2021. Unfortunately the 2-year lay-off has already eroded my meager off-road skills.
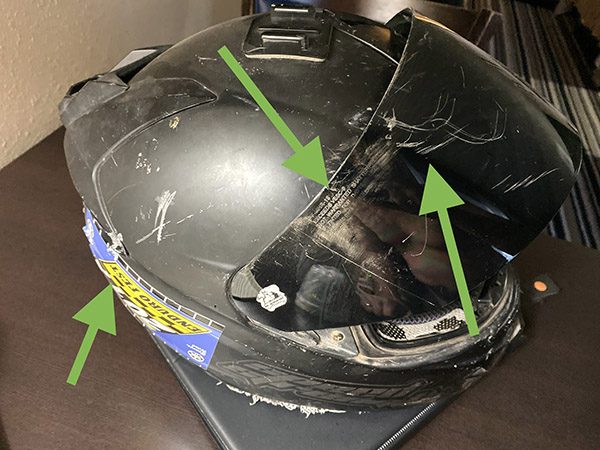
On our very first ride I managed to do a header in a rough rocky section. I was bouncing along ricocheting from rock to rock when a combination of tired arms, inattention and poor riding skills pitched Godzilla’s front wheel sideways and down I went on my right side.
It was a hard landing on rocks and for a moment I couldn’t move, like in those dreams where you can’t move except I was awake. Or maybe I wasn’t awake. It was probably only a few seconds. As my senses returned I rolled over onto my back and looked up at the brilliant blue Utah sky in wonder. How did I get here?
My foot was pinned under the motorcycle and Larry had to lift the bike off me. I stood up pretty well and managed to get Godzilla started. I went very slow the rest of the trail.
Never one to miss plugging sponsor’s freebies, my BMG jacket and ancient, Speed & Strength helmet from The Helmet House took the brunt of the crash and I am only a little sore. Godzilla suffered a bent foot peg and a damaged front food platter.
I really need to ride more dirt to stay sharp. Dirt riding, like any skill, improves with repetition so I’ll go attack some more rocks.
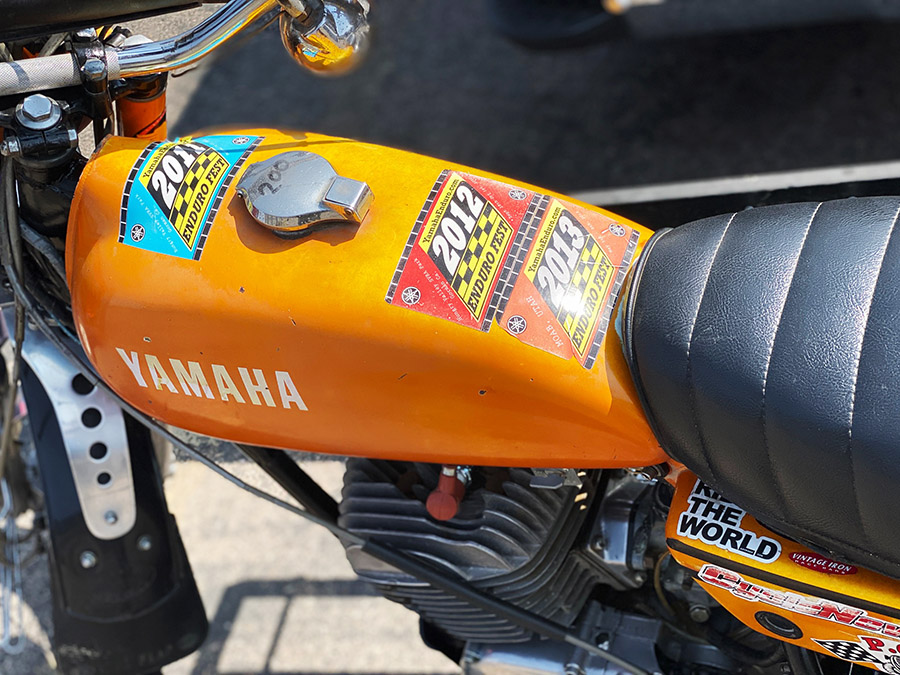
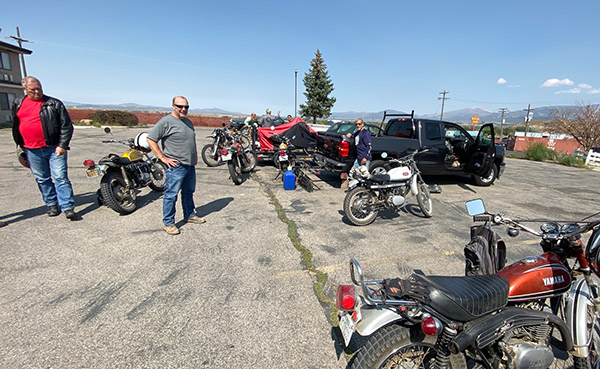
I think we have about eight Enduros at this year’s fest. Down a bit but understandable considering the crappy year our entire planet had in 2020. It’s just good to see your old friends and shoot the breeze without worrying about dying.
Endurofest headquarters this year is at the Beaver, Utah Quality Inn. It’s a great location if you’re into a Fawlty Towers kind of management. I showed up early and the manager was freaking out saying “I can’t put you in the room the people haven’t left yet!” There was no panic from my end. I mean, I get it. Just asking.
I got a suspicious look when I asked for a room with two beds. “There’s only one of you. Why do you want two beds?” I don’t know why but I defended my request,”My buddy Hunter might show up.” That seemed to satisfy Basil so the deal went down as planned.
This blog may be riddled with errors as I’m typing it on a cell phone and can’t actually read what it says. More riding tomorrow!
I have a bunch of projects stacked up here at Tinfiny Ranch but I really wanted to take the RD for a spin. One little problem: the front brake was not working on the motorcycle. I can ride with a lot of stuff out of commission on a motorcycle, like no air in the tires or a spark plug fouled but I can’t ride without a front brake. So I played hooky from my responsibilities and dug into the brake system.
Installing the aftermarket brake caliper was a doddle, it fit perfectly. The same was true of the aftermarket master cylinder on the right handlebar. The issue came when I filled the brake reservoir with DOT3 and started bleeding the air. I got nothing, zip, nada. Not amount of pumping and bleeding would produce a drop of brake fluid at the caliper.
I thought maybe the new master cylinder was bad so I loosened the master cylinder banjo nut and gave the lever a squeeze. Brake fluid shot out all over my RD’s beautiful purple paint. I was fast with the water hose rinse so no damage was done; at least now I knew something was plugged.
Taking the entire system apart revealed both upper and lower rubber hoses were plugged solid with dried up brake fluid. It took a length of bailing wire worked back and forth to clear the hoses. Then I squirted brake cleaner aerosol through the lines until they ran clear. I also blew out the brake switch manifold, as it was easy to get to with the rest of the brake system dismantled. Before you get all Internet Outraged, I have new rubber brake lines on order. The cleared hoses are temporary just to see if the bike runs ok.
Putting everything back together I could bleed the system and got fluid out of the caliper but the lever didn’t want to build much pressure. I read somewhere that if you pull the lever back to the handlebar and tie it off leaving it that way will get air out of the system. I don’t see how it can but I tried it. It didn’t work.
The next day I tried bleeding the brake again. I was getting good fluid without any air but the lever needed rapid pumping to get pressure on the disc. In short it sucked. I started thinking that there must be something wrong with the new master cylinder and took it apart. Everything looked good inside the bore. The piston and seals looked new.
Reassembling the master cylinder I noticed the lever didn’t completely release from the piston. There was no free play. No play at the master usually makes the brakes pump up not the other way around but I was open for ideas. The after market unit did not have a free play adjusting screw like the stock Yamaha master. I had two ways of adjusting the free play: Grind the lever where it contacted the piston or cut a sliver off the lever stop so that it could travel farther from the handgrip.
I cut a thin sliver from the stop and gained a bit of play. Putting the master back on the bike and bleeding the system again yielded the same results. There was no pressure until the last bit of lever travel.
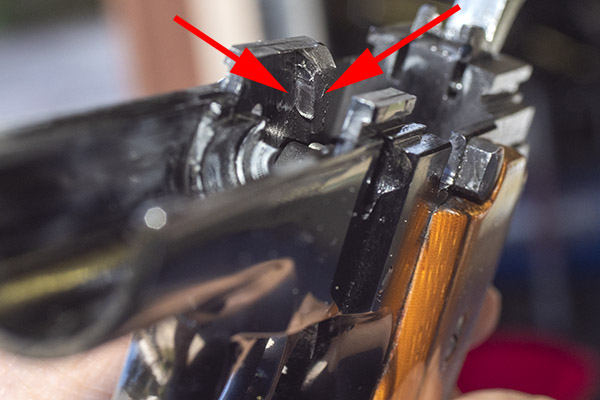
This led me to examine the inner workings of the reservoir. It seemed like the return hole, the orifice that allows the fluid to return to the reservoir at rest, was bypassing a lot of fluid for the first 75% of lever travel. Plugging the return with my finger (the red arrow) immediately made good pressure at the lever.
You and I both know you can’t very well ride a motorcycle with your finger in the reservoir. It’s not conducive to proper control. I debated plugging the return hole and drilling another further up the bore to make the piston build pressure sooner and was nearly ready to attempt it when a tiny little voice in my head said, “You’re screwing up, Gresh.” I’ve never heard that voice. Must be old age.
At that point I gave up and ordered an Ebay rebuild kit for the stock Yamaha master cylinder. It irked me to no end that the kit cost more than an entire new, non-working master cylinder. The kit showed up and of course it was not at all like the original. The piston differed where the spring connected. The original had a plastic bobbin to seat the spring where the new kit simply lets the spring push directly onto the seal. I suspect the spring will eventually cut through the seal. When that happens tag my tombstone with “He rebuilt master cylinders.”
Until that day I’ll have brakes because the rebuilt master cylinder bled as normal. The RD350 has a killer front brake now. I’m serious: the RD350’s braking is only a step or two behind most modern bikes. It’s amazingly good and will stand the bike on its nose.
Finding a stock air filter was impossible so I sprung for a foam-type Uni filter from Dennis Kirk. It was on sale but still pricy and it fit the RD air box well; if anything it’s a bit too snug. Along the same air-flow lines I pulled the baffles out of the mufflers for cleaning. They were not very dirty leading me to believe the mileage on the bike is lower than the 20,000 the title states.
With a clear exhaust pipe, fresh new air cleaner and working brakes I took the RD for a 15-mile, unregistered spin and the thing ran like a dreidel. I ran through the gears and got to 80 miles per hour in short order. Everything seems to work and the next step will be to repack the steering bearings, replace the fork seals and install new brake hoses. The carbs might need a little synchronizing and I’ll work on that once I get around to lubing all the cables.
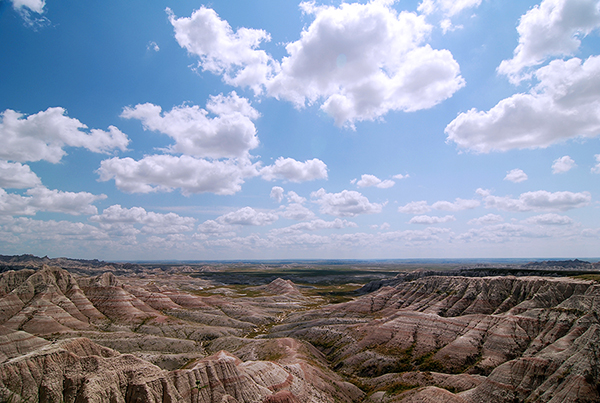
Located in southwestern South Dakota, Badlands National Park is one of life’s bucket list destinations. We visited it in 2008 when we were doing South Dakota’s Black Hills and, by accident, the Sturgis Rally. I’m not big on Sturgis, but we were in the area to see Mt. Rushmore and we caught the tail end of the rally. Okay, Sturgis: Check. If anybody asks, I can say I’ve been. But there are far more interesting things to see and do in this part of the world, and Badlands National Park is one of them.
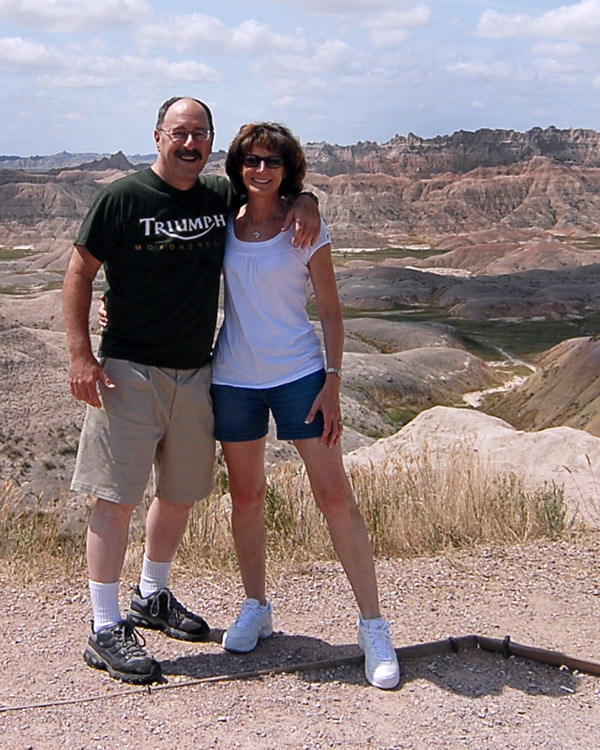
Yours truly and Mrs. Yours Truly in Badlands National Park. We were Triumph people in those days, as you probably can tell.
Badlands National Park is about 100 miles east of Sturgis, and it’s one of a half dozen cool things to see if you ever make Sturgis. There’s Rapid City (a cool town with one of the best gun stores I’ve ever visited), Custer State Park (magnificent roads and scenery), Mt. Rushmore (amazing; words can’t do it justice), Devils Tower 100 miles to the west in Wyoming (think Close Encounters), Badlands (today’s topic), and the Minuteman Missile National Historic Site (I’ll touch on that, too). South Dakota is a great place to visit.
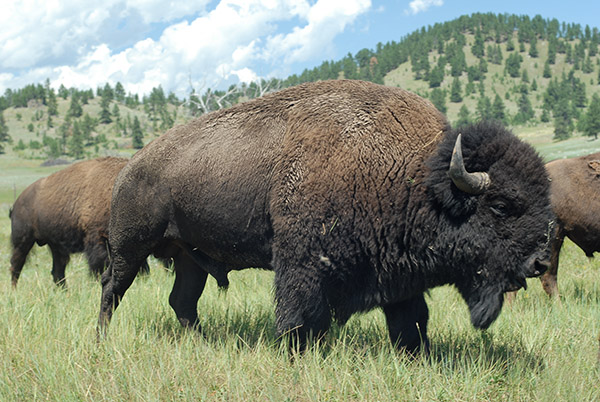
So, back to Badlands. This place is magic, but that’s not just my opinion. It’s a view I share with my hero Theodore (as in Theodore Roosevelt). Roosevelt came here in 1883 to hunt buffalo (we call them buffalo; the correct term is bison), and then again to remake himself when dealt a double whammy a year or two later (his wife and mother died on the same day). He came as a dandy (a skinny, Harvard-educated, New York politician) and left as a rancher, a true Westerner, a future Rough Rider and President of the United States.
50 bison were transferred to Badlands National Park from Theodore Roosevelt National Park in 1963; today, the Badlands bison population is north of 1,000 animals.
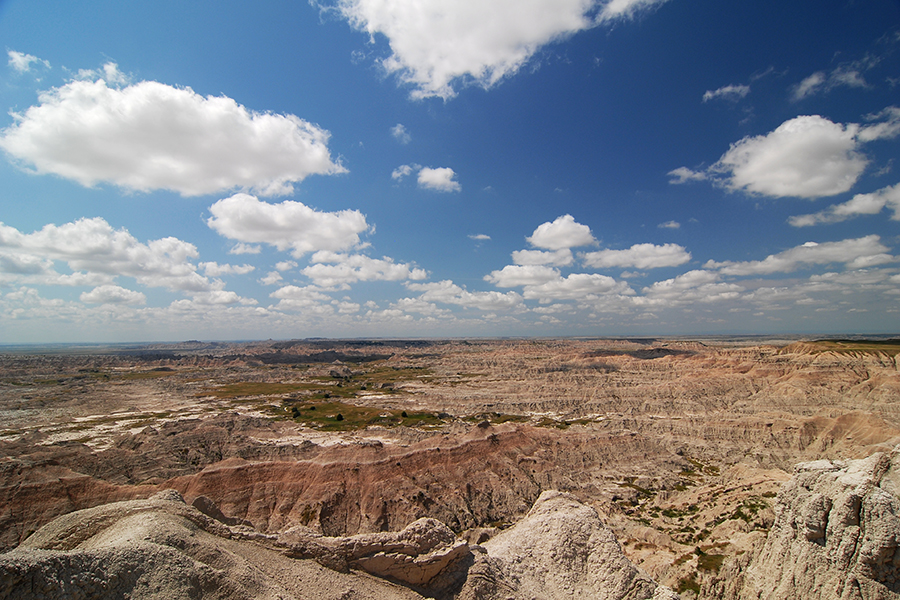
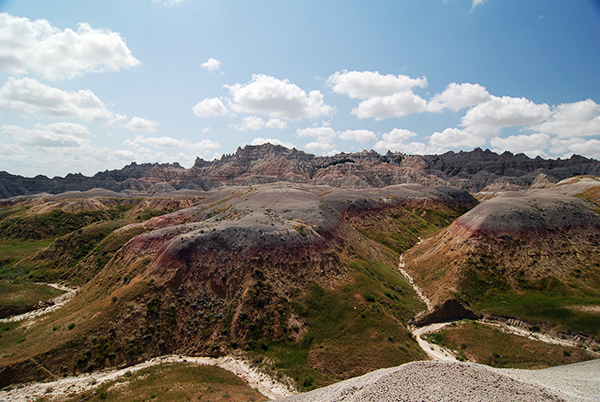
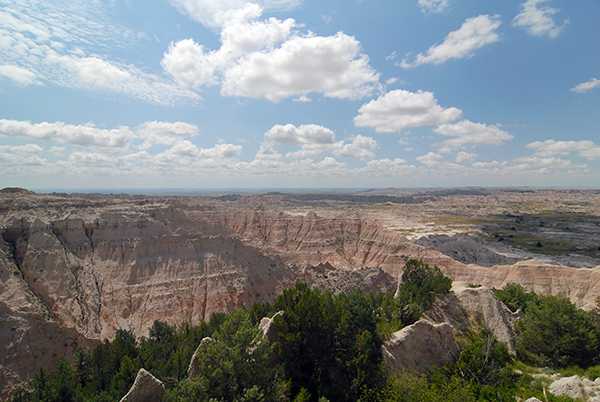
To call the Badlands terrain dramatic is a massive understatement; you really need to stand before the landscape and take in the erosion-formed pinnacles and colors to get the full effect.
Badlands National Park in one word: Wow!Stunning panoramas are the norm in Badlands National Park.
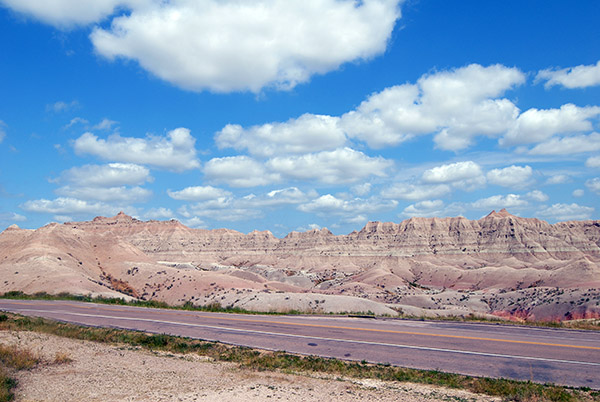
Highway 240, the Badlands Loop, through Badlands National Park.
The region’s history is a story of persistence, paleontology, politics, and (from a Native American perspective), duplicity. Paleo-Indians hunted the area 11,000 years ago, followed by the Arikara people, and then the Great Sioux Nation. The Oglala Lakota (one of seven Sioux tribes) named the area “mako sica” (it translates to “bad lands”). Homesteading by white settlers began in the 1850s, continued during the Civil War, and then picked up dramatically before and after the turn of the century. In an 1868 treaty, the US government promised the Sioux the area would be theirs forever, but you can guess how that went (we broke the treaty a short 21 years later). Calvin Coolidge designated the area Badlands National Monument in 1929, it was formally established as such in 1939 by Franklin Roosevelt, and then redesignated a National Park in 1978.
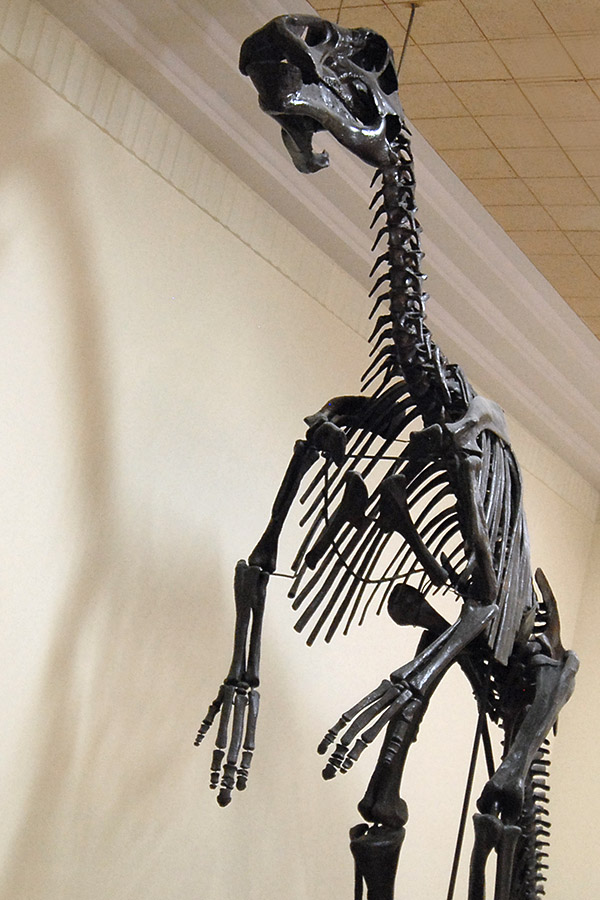
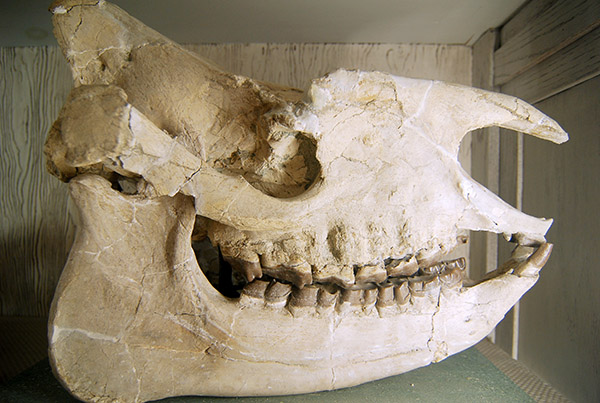
The Lakota Native American people were the first to find fossils in the area and they correctly ascertained the area was formerly an ancient sea. The Badlands are one of the richest fossil fields in the world with specimens reaching 33 million years into the past (there are 84 known extinct species; 77 of them are from this area). Here’s another tidbit worth knowing if you plan a visit to the region: The South Dakota School of Mines in nearby Rapid City has an outstanding museum displaying some of these prehistoric finds.
A School of Mines dinosaur in Rapid City.A fossil on display in South Dakota’s School of Mines.
Like much of South Dakota, the Badlands are rich with bison, badger, bighorn sheep, bird species galore, prairie dogs, bobcat, coyote, fox, elk, mule deer, white-tailed deer, pronghorn, rattlesnake, and porcupine. We saw many, including a princely, portly porcupine proudly padding along as if he owned the place (in retrospect, I suppose he did).
There’s all kinds of critters out there. We didn’t see any snakes, but we probably walked right by a few.
Parts of Dances with Wolves and Thunderheart were filmed here.
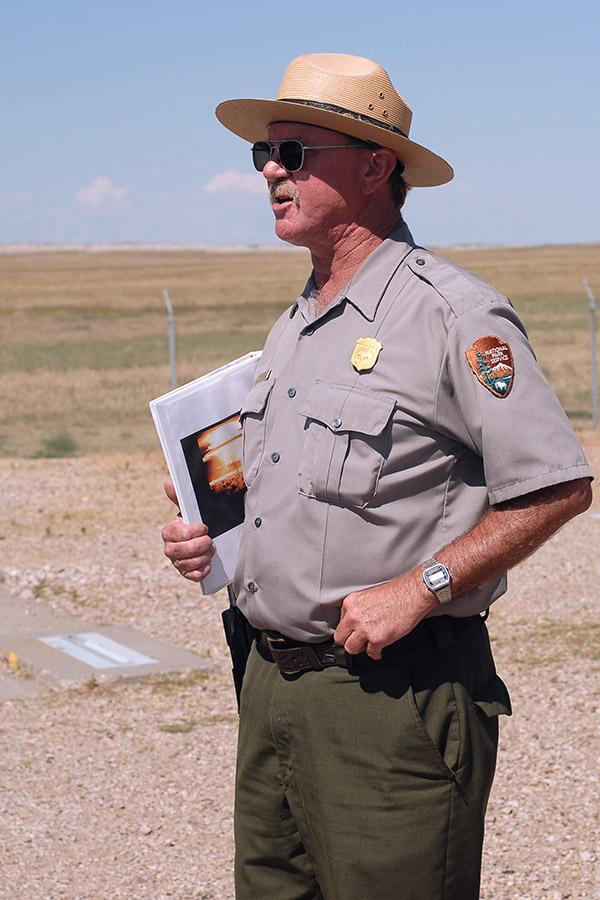
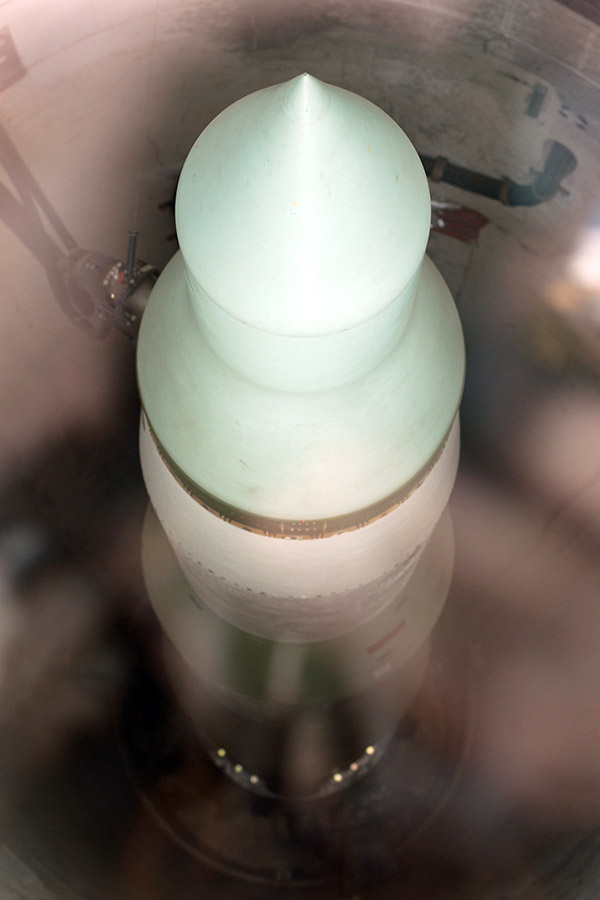
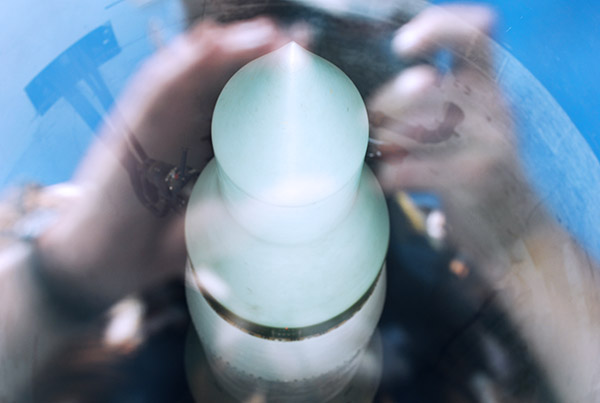
Here’s another cool little secret about the area: The Minuteman Missile National Historic Site is positioned right at the northeast edge of the Park. The U.S. Government took a former operational intercontinental nuclear missile site and turned it into a national historic site. You can’t just show up and get in, though. You have to make reservations and they only take a few people at a time, but wow, is it ever cool. You go down to the control module, which is this tiny, thick wall, metal, electronics-crammed structure way underground. The command capsule is mounted on giant springs, you know, to protect the occupants from an incoming bad guy nuclear intercontinental missile. After you’ve seen that, the park rangers (all former USAF senior NCOs who actually served on Minuteman sites) take you outside to peer into a silo and view a Minuteman missile (presumably, one that’s been disarmed). It’s shades of the Cold War, Dr. Strangelove, and Mutually Assured Destruction all rolled into a tourist attaction. Trust me on this: It’s cool and unless you stood guard against Ivan during the Cold War, it’s unlike anything you’ve ever seen.
A Park Ranger and former USAF ICBM NCO at the Minuteman National Historic Site. This is cool, folks.A thermonuclear threat…the real deal. Peering down into the silo was a bit unnerving. What is really unnerving is that there are similar missiles on the other side of the world still pointed at us.My artsy-fartsy Dr. Doomsday photo.
So there you have it…Badlands National Park, the Minuteman National Historic Site, and more. South Dakota is one of my all time favorite places to visit. If you are headed that way, don’t just wallow in the weirdness that is Sturgis. There’s much more to see and do in South Dakota, and these two spots should be high on anyone’s list.
I took these photos back in 2008 with my Nikon D200 camera and a first-generation Nikon 24-120 lens. As I view them today, they are not up to the richness and quality I would get from my current D810 Nikon and its VR 24-120 lens. I may have to return to get better photos.
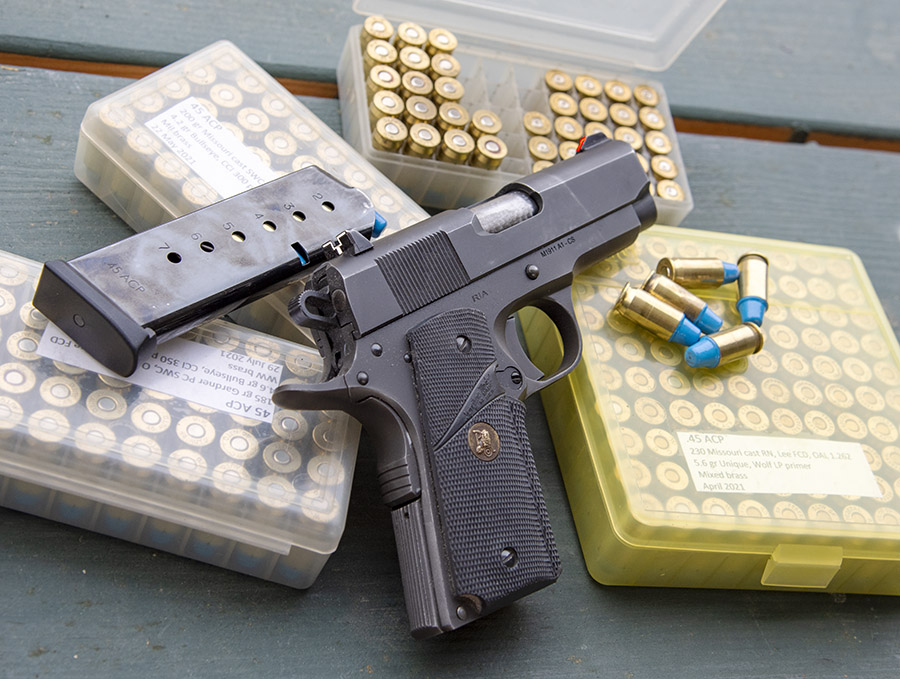
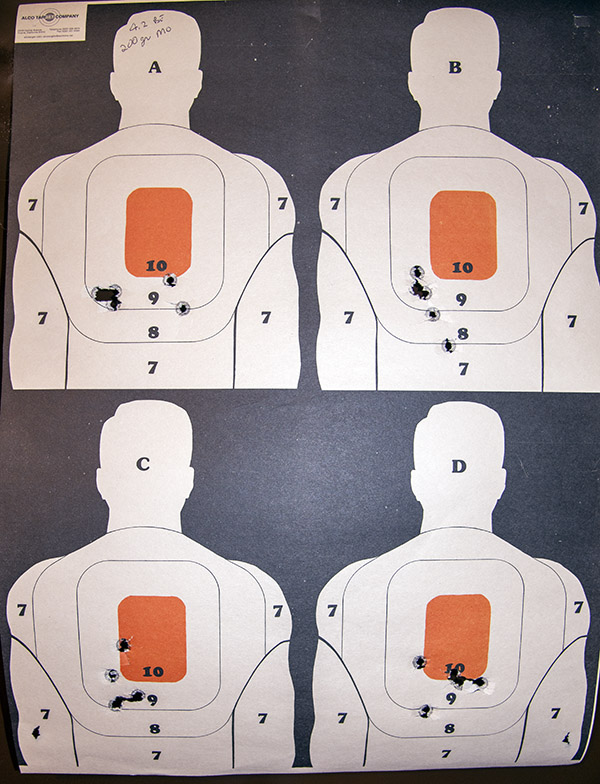
My Rock Island Armory Compact 1911 is a favorite. I carry with factory ammo (Winchester’s 230-grain hardball, like I had in the Army). But that’s not what I shoot on the range; there, I shoot reloads exclusively. This blog answers a question keeping all of us awake at night: Where do different loads shoot compared to factory ammunition?
What you’re going to see aren’t tiny target groups. The Rock Compact 1911 is a concealed carry handgun. I know Facebook trolls can shoot dime-sized 1911 groups at 100 yards with both eyes closed. What you see below are my groups.
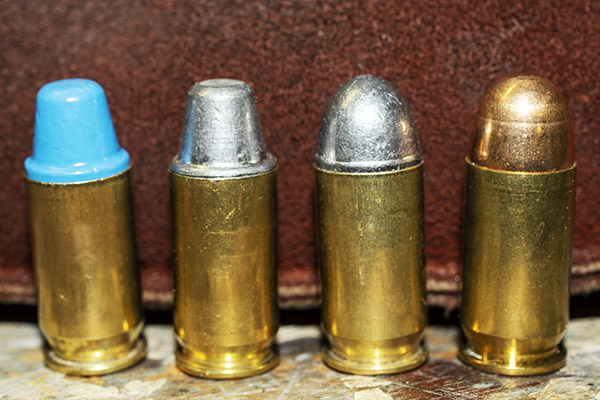
I have three favorite loads for my .45. The first is one I’ve been shooting for 50 years. That is a 230-grain cast roundnose bullet (I like Missouri bullets, although I’ve had good luck with just about any cast 230-grain roundnose), 5.6 grains of Unique, whatever primers I can find, and whatever brass I have on hand. I use the Lee .45 ACP factory crimp die on all my ammo; overall length is 1.262 inches. This load is a bit lighter than factory ammo, but not by much. The good news is it feeds in any 1911 (it doesn’t need a polished ramp and chamber) and wow, it’s accurate.
From left to right: 185-grain Gardner powder-coated cast semi-wadcutter, 200-grain Missouri cast semi-wadcutter, 230-grain Missouri cast roundnose, and Winchester 230-grain full metal jacket hardball .45 ACP ammunition.
The next load is a 200-grain cast semi-wadcutter bullet (I use Missouri or Speer), 4.2 grains of Bullseye, anybody’s primers, and mixed brass. Cartridge overall length on this one is 1. 255 inches. The semi-wadcutter profile usually needs a polished feed ramp and chamber.
The third load is a 185-grain cast semi-wadcutter bullet and 4.6 grains of Bullseye. For this test, I had CCI 350 primers. My usual 185-grain cast load uses 5.0 grains of Bullseye and a CCI 300 primer, but primers are tough to find these days so I dropped the powder down to 4.6 grains. Lately I’ve been using Gardner powder-coated bullets. They look cool and they’re accurate. Cartridge overall length is 1.260 inches. Like the load above, this one needs a polished ramp and chamber, too.
And then there’s factory ammo. I use 230-grain hardball from Winchester. Just for grins I measured its overall length; it is 1.262 inches. Factory hardball typically runs between 1.260 and 1.270 inches.
Good buddy TJ over at TJ’s Custom Gunworks polished my Compact’s ramp and chamber (it feeds anything), he recut the ejector (no more stovepiping) and fitted a better extractor, he polished the barrel and the guide rod, he engine-turned the chamber exterior, and he installed red ramp/white outline Millett sights. The Compact didn’t need a trigger job; it was super-crisp from the factory. I added the Pachmayr grips. You can read more about the Rock here.
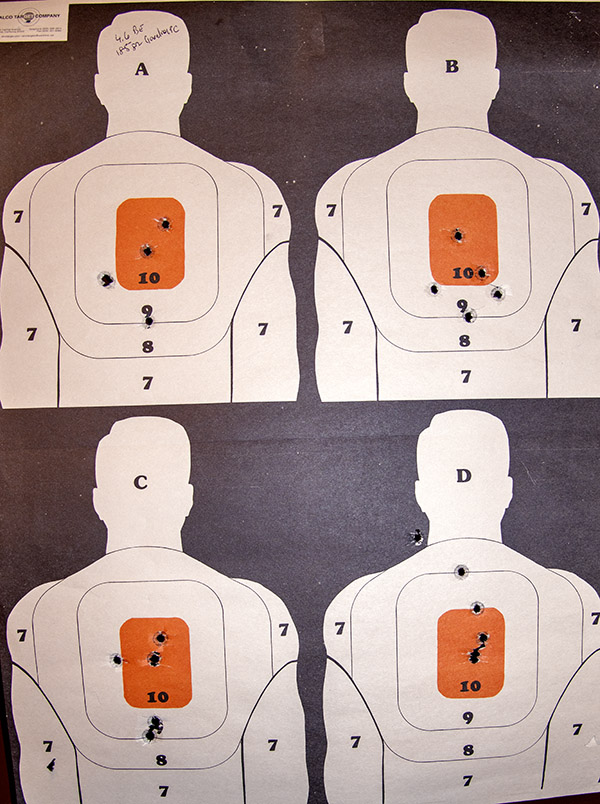
All shooting was at 50 feet, all groups (except with factory ammo) were 5-shot groups, I used a two-hand hold, and my point of aim was 6:00 on the bullseye.
I shot my first set of four groups with the 185-grain cast semi-wadcutter load. As you can see on the target below, the groups move around a bit. That notwithstanding, the center of the groups seems to be pretty much right on the point of aim.
185-grain Gardner bullets and 4.6 grains of Bullseye.
About that 4.6 grains of Bullseye with the CCI magnum primers: The standard load (5.0 grains of Bullseye and regular primers) is a much more accurate load.
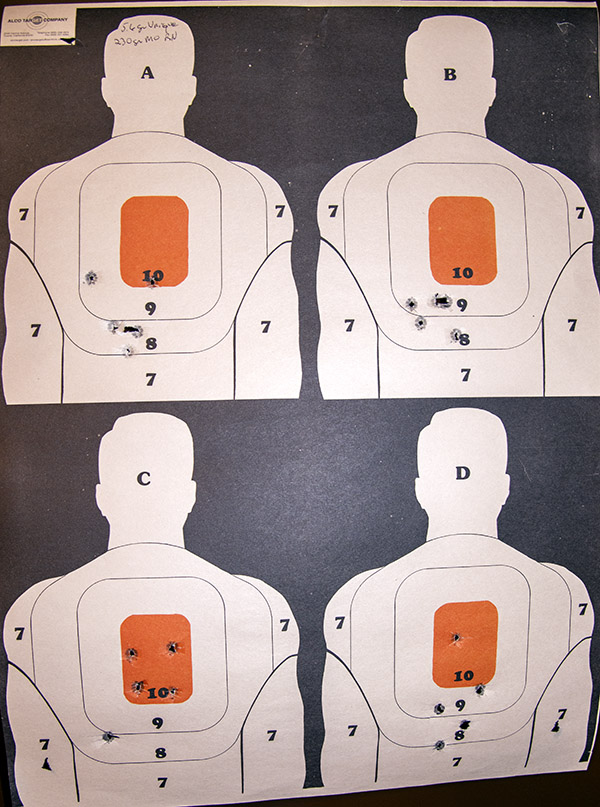
The next four groups were with the 200-grain cast semi-wadcutter. The center of these groups is maybe just below the point of aim. Maybe. It’s very close to the point of aim.
200-grain semi-wadcutter Missouri cast bullets.
Next up was the 230-grain cast roundnose load. The groups are about 2 inches below the point of aim and maybe slighly biased to the left, but they’re still pretty close.
230-grain cast roundnose Missouri bullets.
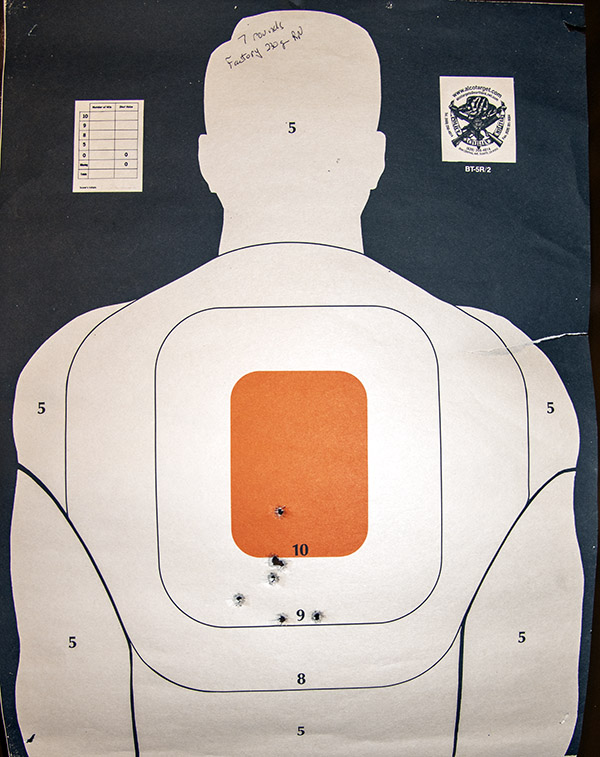
My last shots were with the Winchester 230-grain roundnose factory ammo. I used a full-sized silhouette target (not the four-targets-per-sheet targets you see above) and again, I held at 6:00. The point of impact is just about at point of aim (maybe a scosh lower).
On target with 230-grain Winchester hardball ammo.
The bottom line? The Compact shoots different loads to different points of impact, but the difference isn’t significant. Predictably, the 230-grain loads shoot a little lower than the 200-grain loads, and the 200-grain loads are a bit lower than the 185-grain loads. Factory ammo shoots essentially to point of aim. The differences wouldn’t matter on a real target. For a fixed sight combat handgun all are close enough for government work.
One last comment: Every load tested fed and functioned perfectly with my TJ-modified Compact Rock. If you want world class custom gun work, TJ’s Custom Gunworks is the best.
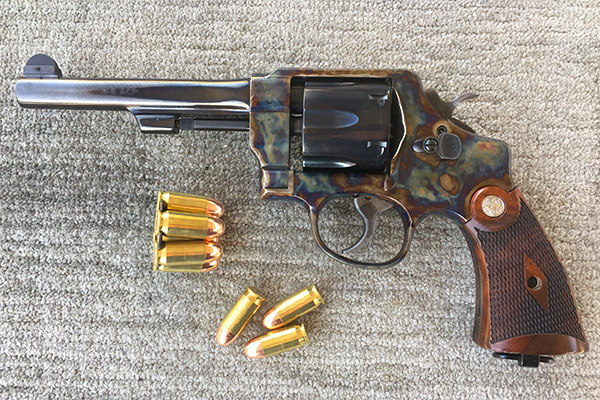
What’s next? I’m going to repeat this test, but with a Turnbull-finished Smith and Wesson 1917 revolver. That’s going to be fun.
A 1917 Smith and Wesson with Turnbull color case hardening. It, too, shoots the .45 ACP cartridge.
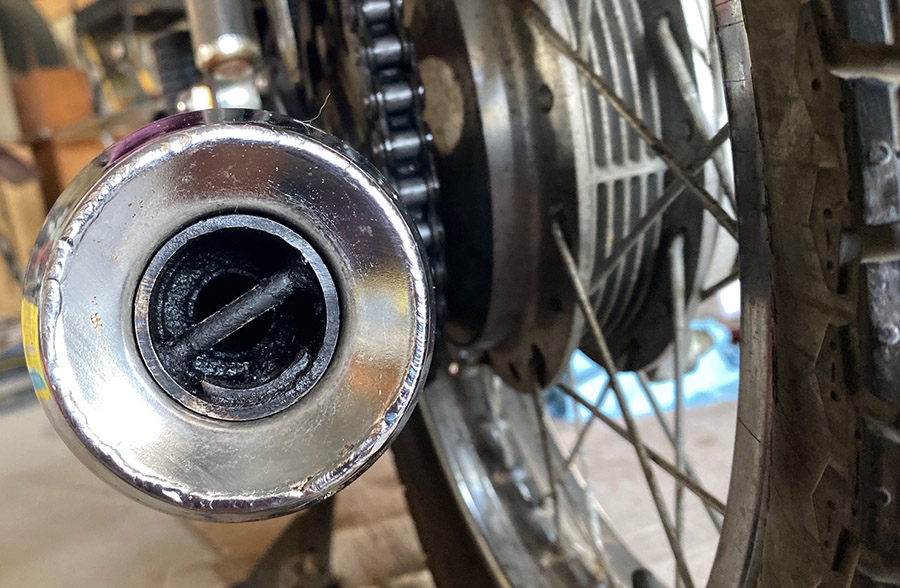
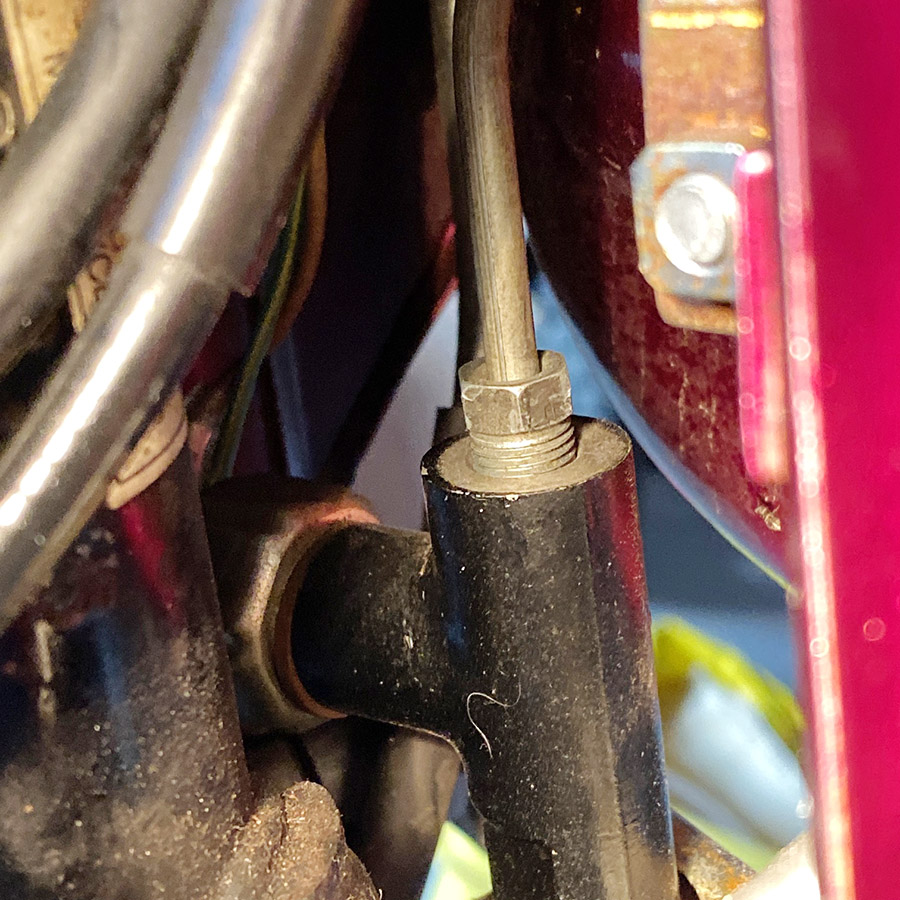
I have a set of metric line wrenches somewhere. Craftsman brand, I believe. I used to do brake jobs at JC Penny on 49th Street in Hialeah so I have most everything you would need to work on metric and SAE brake systems. The cover image is a shot of the flare nut on the RD350’s brake switch manifold and is a reminder of the results you get when you can’t find the correct tools.
I feel pretty terrible about the situation. The RD350 is in super original condition with very few rounded and buggered fasteners. The flare nut on the brake manifold was as installed from Yamaha those many years ago. It was pristine. Not a mark on it: a perfect, six-sided masterpiece. Unfortunately, the brake hoses were clogged solid with hardened brake fluid and so they needed to come off.
And then I put a regular open-end wrench on the thing and rounded the corners. Sure, the nut came loose but at the cost of my emotional well being. My sense of self-worth took a huge hit. Anyway, I unplugged the rubber brake hoses and got the RD’s front brake working temporarily although I’ll need new hoses.
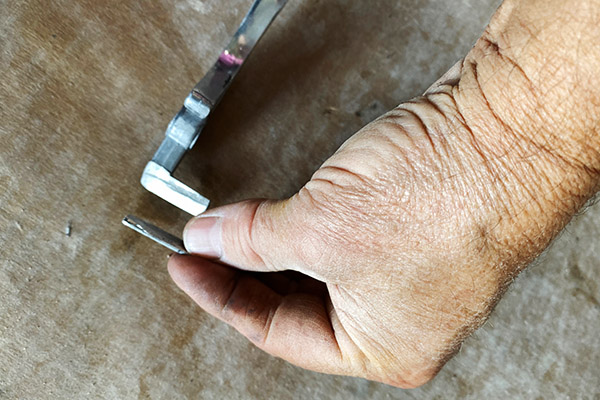
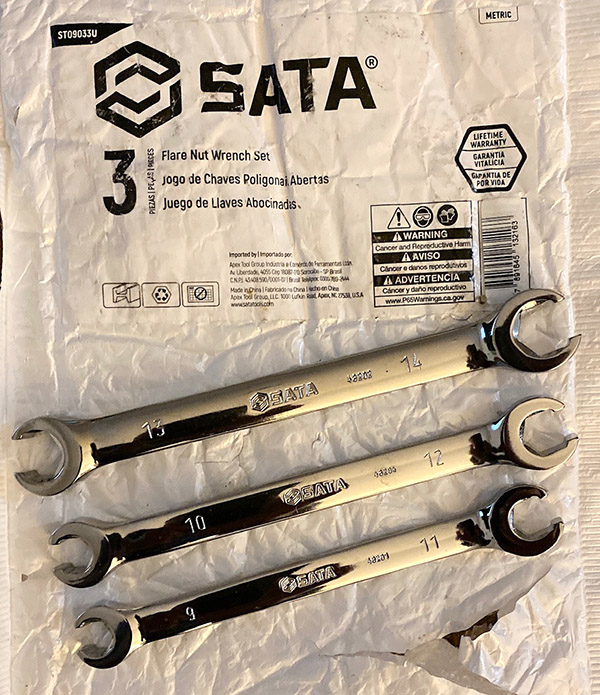
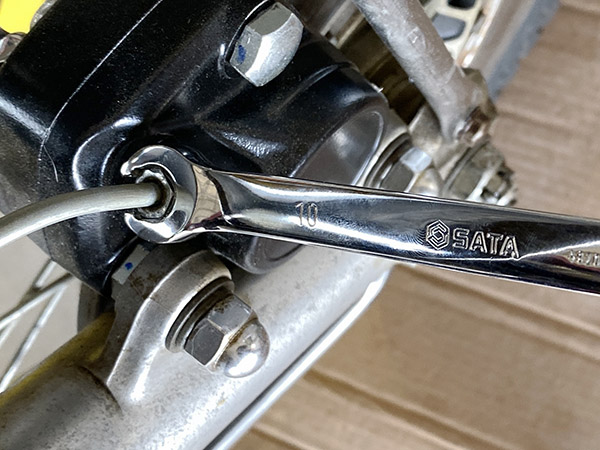
Much like letting smoldering horses out of a barn after it burns down, I ordered a set of Sata metric line wrenches, also called flare-nut wrenches. I’ll find my Craftsman set eventually but the RD350 is pristine right now. I don’t want to be the guy that ruins it.
The Satas, like practically everything we buy today, are made in China. They look really well made. I haven’t put extreme pressure on the wrenches but that’s mostly because flare nuts deform easily. You can’t put much oomph on them. A casual glance and you’d mistake Sata for Snap-On products (some of which are also made in China). The chrome work is smooth and glossy. The 10mm and 14mm fit snugly. I haven’t tried the other sizes.
The Satas are flank drive, meaning the wrench grips the flats of the nut instead of the corners. Flank drive wrenches are less likely to round off nuts and bolts. Flank drive has been around forever and most wrench manufacturers employ the design.
I’m pretty happy with the Satas. For a measly $10 you get a decent set of wrenches that are plenty strong for the weak nuts they will be turning. Another advantage to the Satas is that they resemble expensive tools so most likely your drunk and obnoxious riding buddies will never know that you cheaped out.
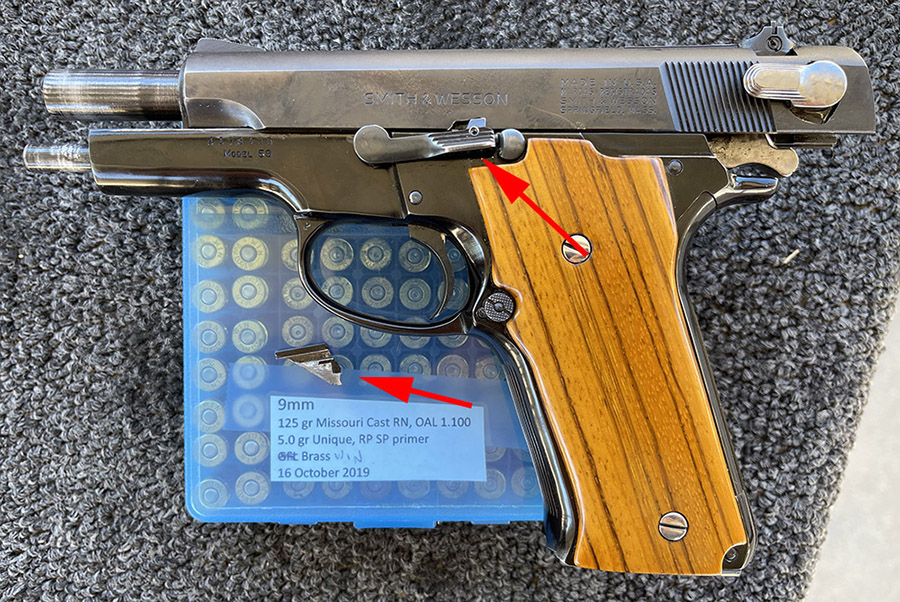
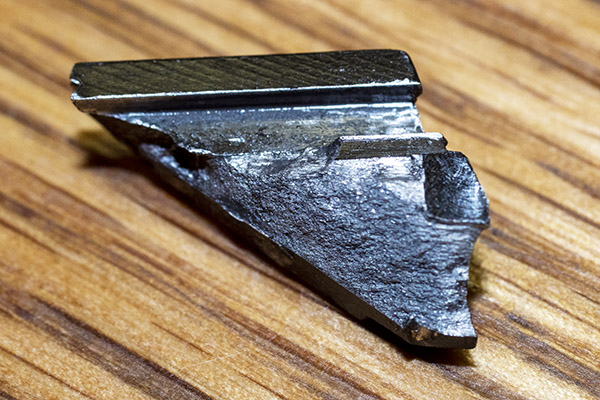
Well, I had a good day on the range until my Model 59 broke. It’s the gun my father bought for me before I went overseas and I’ve had it for 50 years. I was having fun and I’d just fired 80 rounds at a 25 yard target. I went to put the next magazine in and it wouldn’t seat. Uh oh. When I pulled it out, the piece you see above fell from the magazine well. I pulled the slide release, dropped the slide, and wowee. This wasn’t good. Or maybe it was (more on that in a second).
Please click on the popup ads…it’s what keeps the blog going!
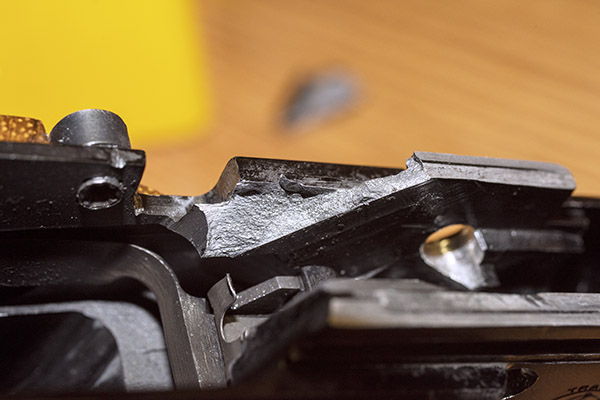
Ugly, ain’t it? Surprisingly, the surface fractography doesn’t look like a fatigue failure (there are no characteristic beach marks). I make it to be a brittle failure.
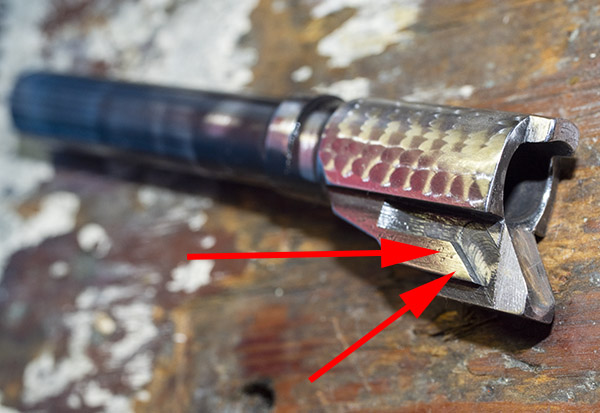
The photo below is my beautiful jeweled Model 59 barrel, all dressed up with no place to go. The arrows point to the ramps on either side of the chamber (the photo below shows the ramps on the left side). Those ramps are what smack into the aluminum frame with each shot.
The arrows in the next pic point to the matching right side of the Model 59 frame. Note the worn area. It’s where the barrel ramp contacts the frame ramp when the gun recoils. That ramp (along with the mating ramp on the barrel) drops the barrel slightly to disengage it from the slide when the slide moves to the rear. You can see this area took a beating over the last 50 years. The photo shows the opposite side of the frame, where it didn’t break.
You might think I’m mad at the gun, but I’m not. I have a good dose of mechanical empathy. Imagine you are that aluminum ramp on the Model 59 when a 9mm cartridge lights off and the barrel is recoiling toward you at speed. WHAM! Do that 20,000 or 30,000 times in a row and think about how you would feel. Nope, the Model 59 did its job for 50 years. I can’t be mad at it.
You read that right. I had 50 years of fun with my Model 59 on the range, carrying it on hunting trips, keeping it handy when I felt I needed to, and on one occasion, threatening a late night marsupial Sue thought was a burglar (the ‘possum was not impressed). I’ve fired between 20,000 and 30,000 rounds through my Model 59 (a guess based on how many boxes of 9mm I’ve reloaded). Very few of these (maybe none) were light loads, as the best 9mm accuracy is at the top of the spectrum. From what I’ve found in the endless stream of what passes for information on the Internet, semi-auto aluminum handgun frame life expectancy estimates are around 10,000-20,000 rounds, so I’m in the zone. Maybe I’m even ahead of the game.
I figure the cost of my reloaded 9mm ammo is about $.15 per round, so if I fired 20,000 rounds through this gun, that’s $3K in ammo. Dad paid something like $135 for the Model 59 back in 1972. Ignoring inflation, the ammo costs make the gun the least expensive part of the deal. Somehow that makes the fact that my Model 59 is toast slightly less bothersome. I probably could part it out (grips, slide, barrel, jeweled parts, etc.), but I don’t think I will. My buddies suggested putting it in a wooden frame and hanging it on the wall. That sounds like a good idea. I guess I can’t bitch too much. 50 years of service ain’t too shabby.
Some of you might be wondering why I don’t just get the gun repaired. It can’t be fixed; even Smith and Wesson told me it’s a goner. They didn’t offer to buy it back like Ruger did when I wore out a .357 Mag Blackhawk, but hey, Ruger is Ruger and Smith is Smith. One of my friends said I should buy a new 9, and I’m ahead of the curve on that, too. I bought a SIG P226 Scorpion a year or two ago. The SIG is the finest 9mm handgun I’ve ever owned, a worthy successor to the Model 59. If it lasts 50 years like the Model 59 did, I’ll be 120 years old and I’ll feel like I got my money’s worth with it, too.
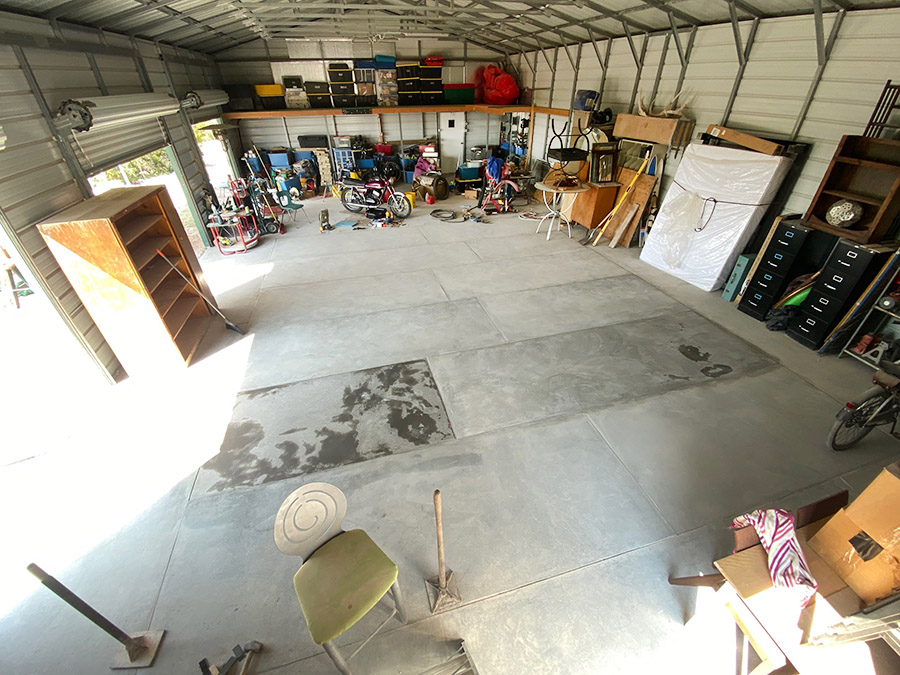
The first thing everyone asks me is why didn’t I pour the floor first. It’s a valid question. The reason the shed went up on graded dirt had to do with time and money. Money was a problem because we had just bought Tinfiny ranch and our house budget allowed for a building or a slab, but not both.
Time was a problem because we were moving from a 3000 square foot rental house into a 600 square foot garage converted into a one bed, one bath home. All that junk from the big house had to go somewhere and renting a storage shed was out of the question. We were done renting crap.
We ended up buying a 30 X 50 Eagle Building for $13,000. Eagle buildings are the best square foot per dollar on the market and that price includes assembly on your land. The buildings are designed with a continuous steel sill that can be set up on bare ground as long as the ground is fairly even. No foundation needed.
The bad part about Eagle buildings is that they are not super heavy duty. They are a little stronger than a typical metal lawn building but not nearly as strong as a Mueller type building. Mueller buildings are very sturdy but cost twice as much as an Eagle and are delivered to your land on a series of pallets. You have to assemble the building yourself. Muellers also require a pre-poured slab with a foundation and all the attendant costs associated. I priced a 30 X 50 Mueller at $23,000. The foundation and slab was $26,000 from a local contractor. That $49,000 left you with a nice slab and numerous stacks of steel: you still had to build the building. I got a price of $6000 to assemble the Mueller from another local contractor.
Besides the fact that we couldn’t afford the Mueller and all that the Mueller involved, it would have been many months before we had storage for our junk. Three weeks after we bought the Eagle Building it was erected on Tinfiny Ranch and full of the junk we had dragged across country along with furnishings from the big rental.
I tried to get a local guy interested in pouring the shed floor but the job must have seemed too involved what with the building already in place and full of junk. I gave up for a year; just let the situation stay as is for a while. Then mice started burrowing under the edge of the building and wreaking havoc.
One of my Internet buddies is fond of saying, “Do it right or don’t do it at all.” He’s right, of course, but “Don’t do it at all” was not an option. That left “Do it wrong.” Sometimes in life stupid moves are the only moves you have left.
I started shunting junk towards the middle of the shed and pouring small sections whenever I felt in the mood. The solar power junction area was the first section I completed which allowed me to finish the off grid power system and shut that damn generator off.
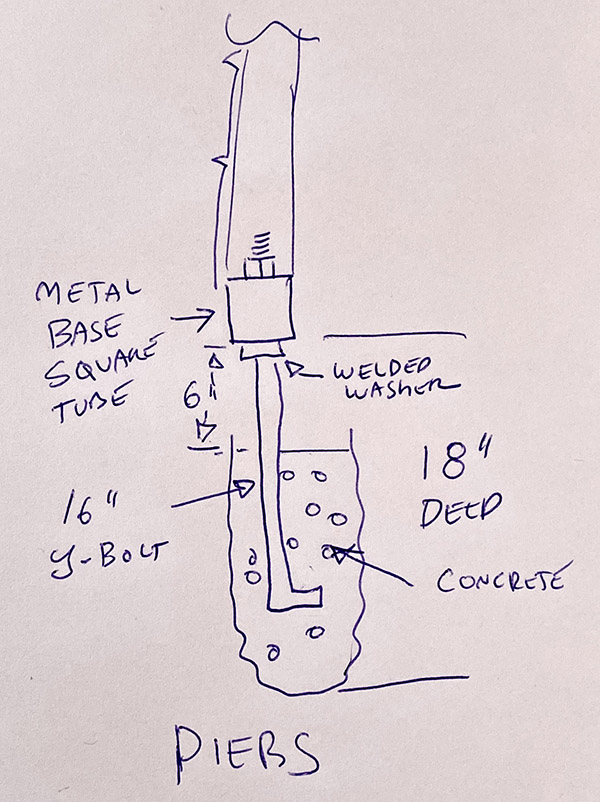
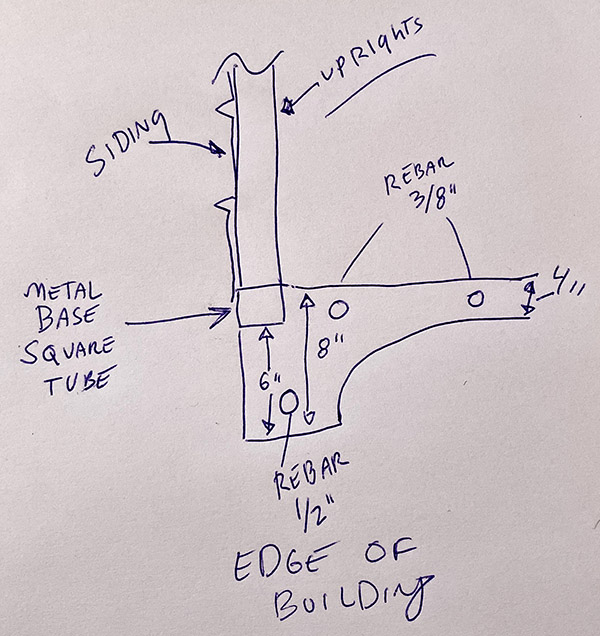
The shed needed a foundation so I poured 16-inch J-bolts every 4 feet or so and once they were set I could excavate under the edge and pour a section of footer. I may not have needed the support from the J-bolts but the Eagle was flimsy and if the thing sagged or buckled even a little it would be a bear to fix. I erred in favor of not buckling the shed.
Progress was slow because there was so much stuff stored in the shed I could barely make room for a pour. When she wasn’t working CT and I would go through the hundreds of plastic tubs and each time we got rid of a few. Pieces of furniture neither of us liked were donated to the thrift store. Slowly I made headway and had enough room to build a loft where a couple hundred tubs of really good junk could be moved. The floor space kept increasing and I kept pouring.
The job was not a continuous thing. I might work on it one week and leave it for a month, or 4 months. Mice were a blessing and a curse. Once they chewed up an item or tub full of clothing it was an easy decision to take it to the dump. The dust was incredible; each breeze sent a cloud of fine sand whirling around the interior of the building.
I’ve been sporadically working on the shed floor for 3 years. It was overwhelming at times but as I got closer to the finish line I kicked it into high gear: This last month I could smell the barn if you don’t mind that sort of lame wordplay. It’s funny, I have no common recollection of the work I did. I mean, if I think about it I can remember pouring each slab but I feel no personal connection, the slab is just a slab, like it has always been there or I hired a guy to do the job. It’s enough for me that the floor is done and done wrong. Let’s take a look at the numbers:
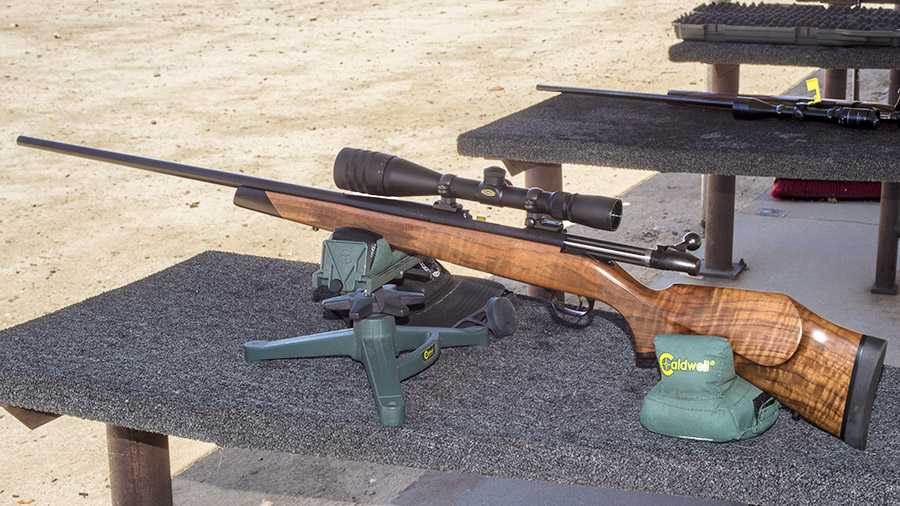
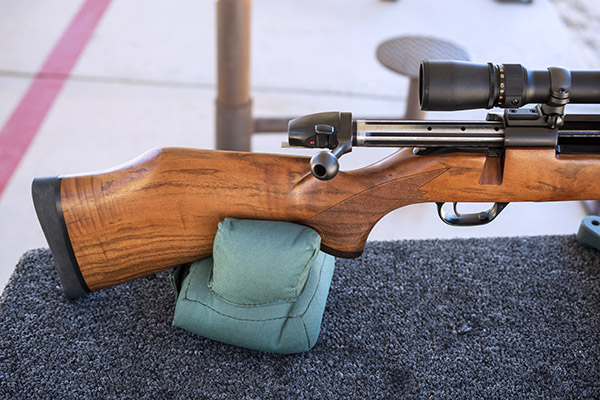
I’m in the money with the Mark V .300 Weatherby now, but it took some doing to get there and the journey isn’t over yet. My recent reloads with this rifle were all over the place at 100 yards. I suspected it was more me than the rifle (or the loads) and I was probably right about that. This rifle has serious recoil, way more than I am used to. I was developing a flinch in anticipation of getting whacked by the Mark V.
I have a friend who shoots the .300 Weatherby a lot, and he’s about the same size as me. I thought about him a bit, mentally picturing him on the range, and then I realized: He uses a shoulder pad. It was a click or two on Amazon until I found the Caldwell recoil shield.
I had the Caldwell recoil shield the next day, and I had to play with it a bit to find how to wear the thing. I bought the thickest version, figuring that if some is good, more would be better.
I next researched the Internet to find ways to improve my bench rest technique and I immediately found two improvement opportunities: Parallax, and how I positioned the rear rest.
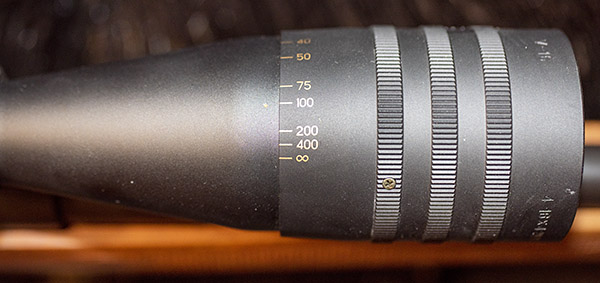
With regard to parallax, it’s a real thing and a real issue. Most scopes don’t have any adjustment for parallax, but the 4×16 scope I have on the Mark V does. To adjust for parallax, you set the rifle in the rest and put the cross hairs on the target. Then, without touching the rifle, you move your head around and see if the reticle moves around on the target. On a scope with parallax adjustment, what I read is that you ignore the markings on the parallax adjustment and move your head around, adjusting the parallax adjustor until the parallax is minimized. I couldn’t completely eliminate the parallax on my 100 yard target, but I was able to greatly reduce it. After making the adjustment I looked at the scope objective (the parallax adjustment feature), and what do you know, it was right on the 100-yard mark. I guess those Weaver boys knew what they were doing.
I had a rifle with me that has a non-parallax-adjustable scope and checked it for parallax at 100 yards, and wow, when I moved my head around the reticle was moving around a good 3 inches on the target (left to right, and up and down). To control parallax with a non-parallax-adustable scope, the trick is to get your eye in exactly the same spot every time. In fact, that’s good technique with any scope.
The next thing for me was to get the rear rifle rest directly under where my face rested on the stock. You can see the front and rear rest in the large photo at the top of this blog (I use Caldwell equipment). The idea behind getting the rear rest directly under where your cheek contacts the stock is that the downward force from your cheek is transmitted directly through the stock into the rear rest without flexing the stock. It may not seem possible (or even detectable), but if your face is ahead of the rear rest or behind it, you will impart a torque into the rifle and it can be enough to shift the point of impact at 100 yards.
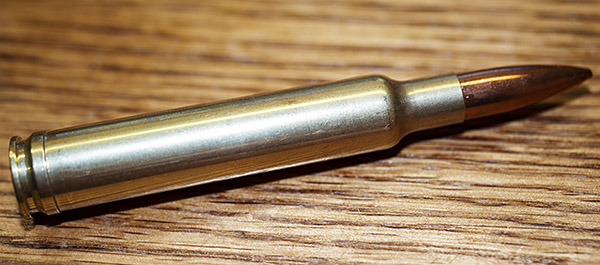
On to my loads: I reloaded the next set of .300 Weatherby cartridges, going with 73.0 grains of IMR 7828, the CCI 250 magnum primer, 200-grain Sierra MatchKing bullets, and every trick I knew of to improve accuracy. This is a relatively light load. I neck sized three different sets of brass (fireformed .300 Remington cases made from .300 H&H brass, Remington .300 Weatherby brass, and Weatherby brand .300 Weatherby brass). I have a Lee .300 Weatherby collet die that squeezes the neck down to size, and I used brass I had previously fired in the Mark V rifle. I also seated the bullets out much further (the reloading manuals all show the cartridge overall length to be 3.560 inches, but I seated the Sierras out for an overall length of 3.718 inches). The Weatherby Mark V rifles have a lot of freebore. The cartridges still fit in the magazine and the bullets did not contact the rifling, so I was good to go.
It was a quick trip to the West End Gun Club and I had the range to myself. I got everything set up, pulled on the Caldwell shoulder pad, and went to work. The Caldwell shoulder pad was awkward at first (as you might imagine), but it was wonderful. The .300 Weatherby Magnum is still a beast, but the Caldwell pad did its job. It greatly alleviated my fear of getting clobbered every time I squeezed the trigger and my groups tightened up immediately.
So my groups were way better, but I had a new problem. Many of the cases were sticking in the chamber after firing. The bolt would rotate freely, but the cases didn’t want to come out. When I pulled harder on the bolt, the extractor popped over the rim and the case stayed in the chamber. I had to tap the cases out with a cleaning rod. Other than the cases sticking, there were zero indications of excess pressure. No flattened primers or anything. The Remington cases were sticking almost 100% of the time (both the fireformed .300 H&H cases and the .300 Weatherby Remington cases). The Weatherby brass did not stick in the chamber, although a couple felt like they wanted to.
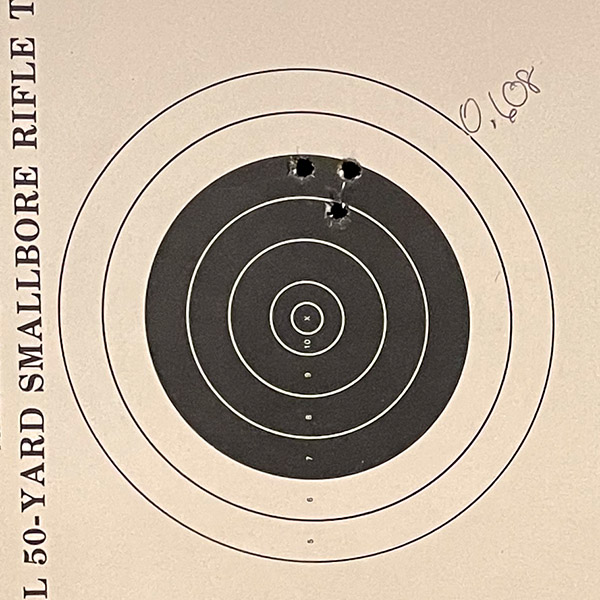
On to the good news: My best group was a .608-inch 3-shot group at 100 yards, which ain’t half bad on a fire-breathing monster like the .300 Weatherby. Before you trolls tell me I should shoot 5-shot groups, I will share with you that in my experience it’s pretty difficult to get animals to sit still for five shots. If your dead set on being critical, let’s get your butt out here. I want to watch you shoot 5-shot groups with your .300 Weatherby.
The next morning, after cleaning the rifle, I rechambered a couple of the fired Remington cases, and then when I withdrew the bolt the cases stuck in the chamber again. And again, I had to tap them out with a rod. The Weatherby brass did not, but it was tight. I measured each of the cases that stuck, and they all met the SAAMI .300 Weatherby specification. My conclusions are:
I don’t have an excess pressure situation. I loaded at the bottom of the propellant range, the bolt rotated freely, there were no pressure signs on the case base, and the primers were not flattened.
Neck sizing on my .300 Weatherby Mark V is not a good way to go (notice I said mine; your mileage may vary). I full length resized one of the cases that stuck (a Remington case) and it chambered and extracted easily. Weatherby brass is better (but it is hard to get).
I need to full length resize when reloading for this rifle.
The Weatherby Mk V extractor is weak. For a dangerous game rifle, that’s not a good thing. Maybe the extractor spring is weak.
I think the real issue was the neck sizing approach. I’m out of IMR 7828 propellant (powder goes fast with the 300 Weatherby) and no one seems to have any in stock, so I’ll try either H1000 or IMR 4831 next. Like we always say, stay tuned.
Good buddy Mike was in town for a few days, and what better way to spend it than on the range ringing the gongs that good buddy Duane built for me. We had a blast. We’ve known each other since the 7th grade. Mike and I joke about who’s the better shot, and after our session at the West End Gun Club, that’s still an open question. The man can shoot (and so can I).
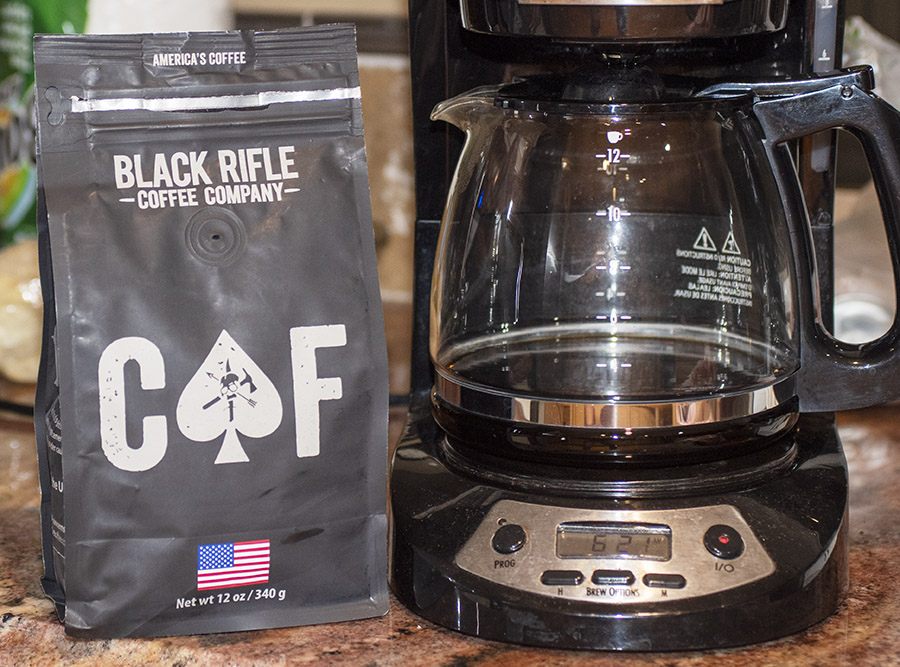
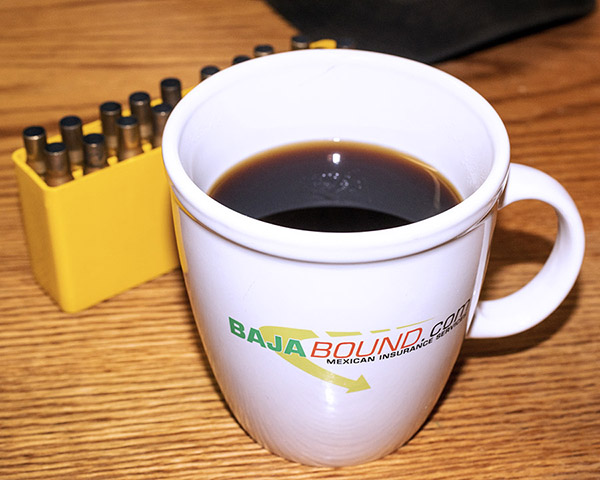
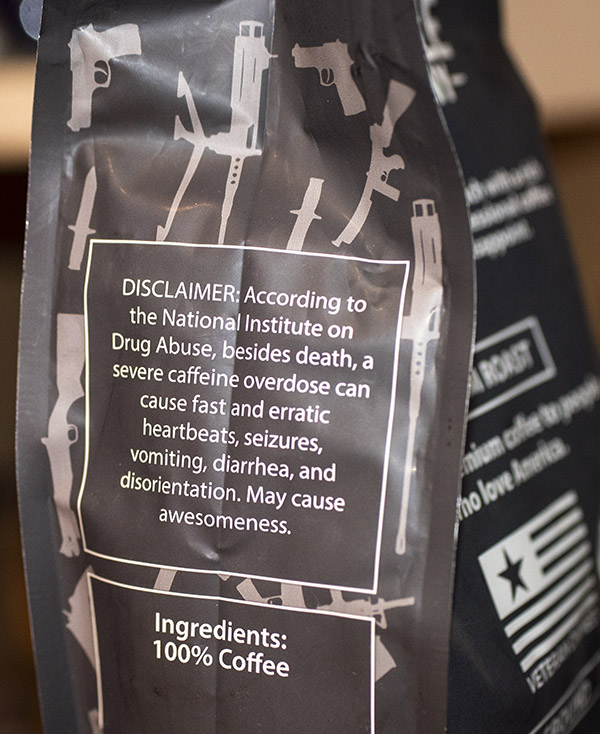
Mike wanted to stop at a nearby 5-11 outlet to pick up a few clothing items, and while we were there he pointed out the Black Rifle coffee. If you read the blog you know that I’m not a member of the Mattel crowd and I have negative interest in so-called black rifles. In fact, the closest thing I have to a black rifle is my Ruger GSR (it’s what you see Mike ringing gongs with above). It has a green and black laminate stock that Ruger calls black laminate, so I guess maybe it could be called a black rifle. The GSR is a fine weapon, and Mike and I were both making the gongs sing with those big 173 grain full metal jacket .308 bullets.
But I diverge. This blog is about Black Rifle Coffee and the company that makes it.
In a word, Black Rifle Coffee is great. I wish we had it when we rode across China, but like they say, better late than never. You know, they don’t drink coffee in other than the big cities in China, and staying awake on the bike was a challenge for me on that ride. But here at home I start every day with a cup of black coffee (the only way to drink it), and Black Rifle Coffee was rings my gong well.
Black Rifle Coffee is veteran owned and a portion of the profits go to veterans’ groups, police, and other first responders. That’s a good thing. And Black Rifle Coffee is a U.S. company. Reading the labels tells me that the owners have a sense of humor, too. That’s good. Good coffee and a good sense of humor make the world more fun, I think.
It’s good stuff, and it became my coffee of choice as soon as I had my first taste. Give Black Rifle Coffee a try. You can thank me later.
Never miss an ExNotes blog. Product reviews, firearms, reloading, bicycles, motorcycles, motorcycle gear, adventure trips, camping gear, resurrecting old vehicles, Baja, and more. If it’s an interesting topic, odds are we have a blog or two on it in the nearly 1000 blogs we’ve posted over the last three years. Sign up with the link below:
Want to reach your audience? Just click here to advertise with us!
I’ve been on a tear lately. The shed floor is nearly done and I’m laying down some slabs, man. That doesn’t mean I haven’t managed to sneak in a little tinkering on the 1974 Yamaha Rd350. I mean, once the slab is poured and finished you’ve got to let it cure for a day. Green concrete is very fragile.
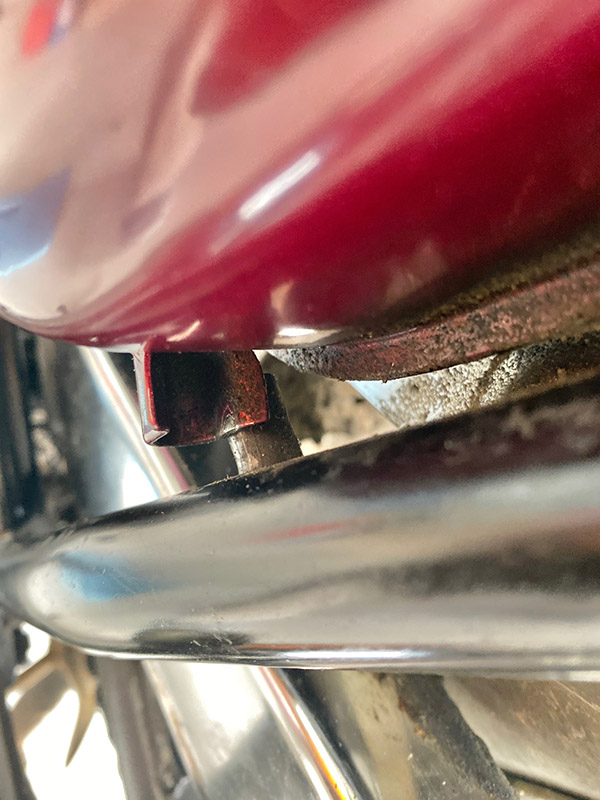
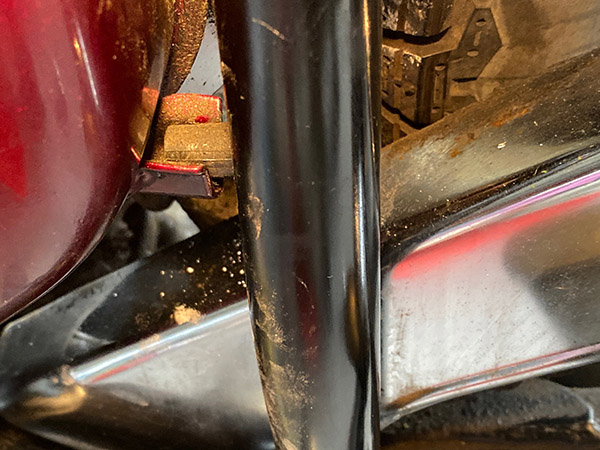
I wanted to drain the RD 350’s fluids before getting too far along. Which was kind of good because I discovered the oil tank wasn’t slotted into the rubber frame peg correctly. That meant taking out the battery to access the oil tank bolts.
It was no trouble at all to pull the tank, drain it and re-slot it onto the frame peg. The original feed hose drooped underneath the carburetors then rose over the clutch cover forming a trap. I didn’t like the looks of the trap so I shortened the feed hose a bit and routed it without a loop.
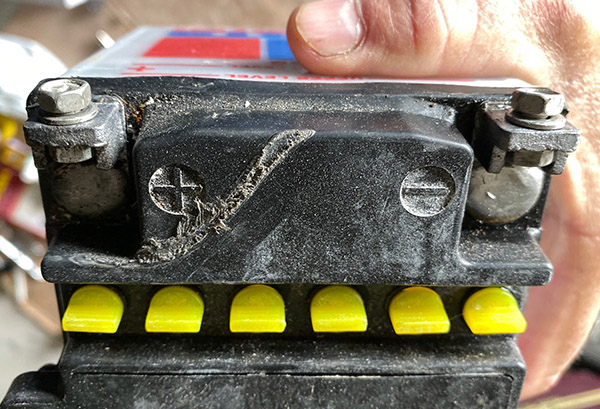
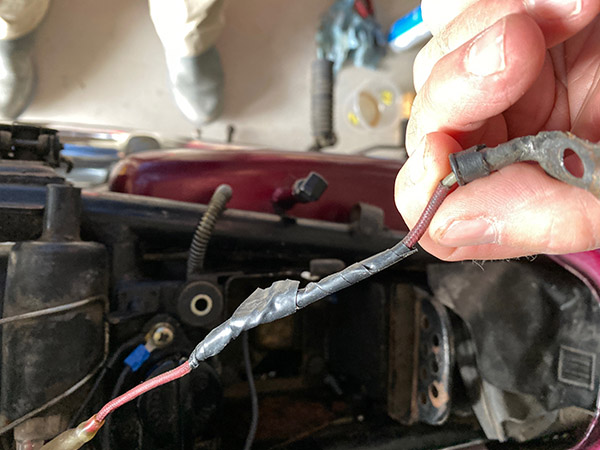
When I pulled out the battery to fix the oil tank I noticed the top of the battery had a melted spot. This melted spot corresponded with a melted positive wire to the battery. I suspect the battery is the wrong one. It looks too tall and there was a section of old inner tube covering the battery. I see no evidence of arcing on the seat pan but something melted the positive wire as it has been wrapped with electrical tape.
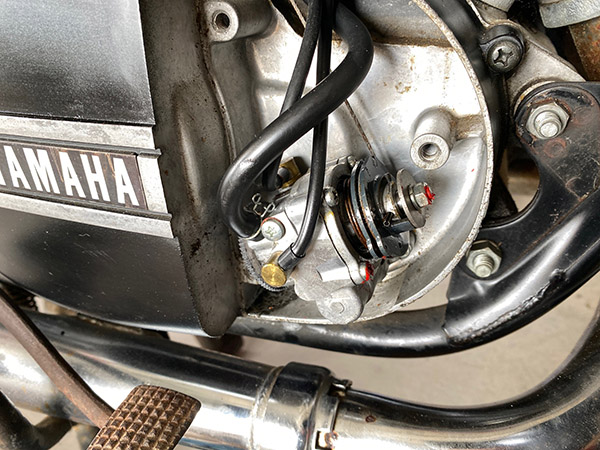
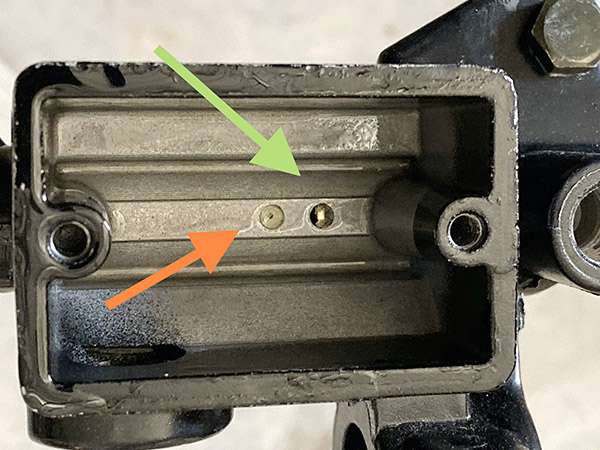
After refilling the oil tank I needed to bleed out any air in the feed line to the autolube pump. The pump area was shockingly clean. It looked like a new motorcycle inside.
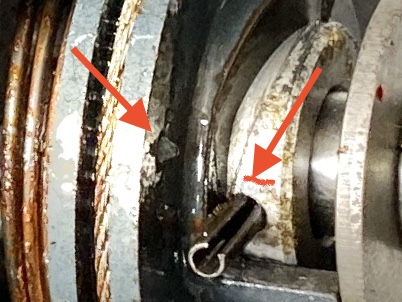
I sent Deet photos of the pump as I was well pleased and wanted to show the thing off. Zooming in on my photo Deet noticed that the autolube pump was not adjusted correctly. The pin and dot are supposed to line up at idle.
The oil pump cable was adjusted as loose as the lock nuts would allow. This RD is near perfect except where mechanics have fouled it up. Resetting the pump was quick and now the pin lines up with the mark at idle.
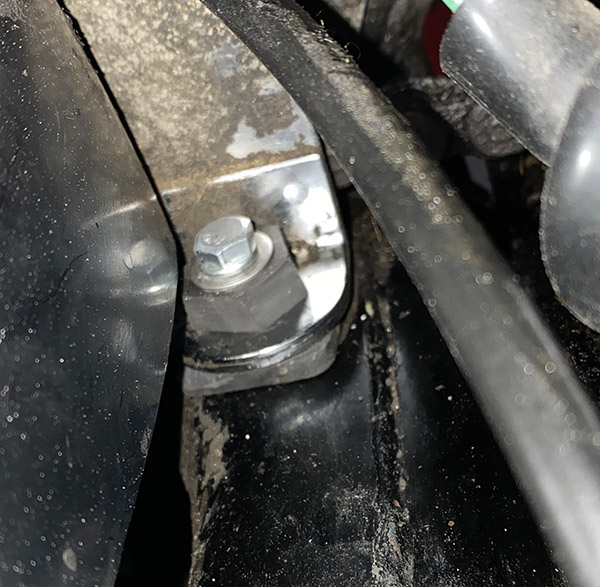
The chain guard was sort of floppy because the front mount was missing its bolt and the rubber bushing, along with the spacer. I cobbled one together from bits and pieces; it will work until I find the correct parts.
The more I mess with the RD350 the more amazed I am at how unmolested it is. All the case screws look perfect (except for the ignition and pump screws). Opening things reveals factory fresh assembly. It’s almost too perfect: I’ve got to up my mechanical game to treat this motorcycle with the care it deserves.


 The arrows in the next pic point to the matching right side of the Model 59 frame. Note the worn area. It’s where the barrel ramp contacts the frame ramp when the gun recoils. That ramp (along with the mating ramp on the barrel) drops the barrel slightly to disengage it from the slide when the slide moves to the rear. You can see this area took a beating over the last 50 years. The photo shows the opposite side of the frame, where it didn’t break.