I had a 1954, small-window Dodge truck back in the 1970’s. It’s funny how a 20 year-old truck seemed so much older when I was younger. My 1990 Suburban is the same age now as the old Dodge was then but the Suburban seems modern to me. I can remember new Suburban’s rolling off the dealer lots that looked exactly like mine. I wasn’t even alive when the ’54 dodge was built.
The Dodge had a flathead 6-cylinder engine that sucked gas at an alarming rate. 10 miles per gallon was as good as it got. The truck had a three on the tree and was geared very low. Top speed was 70 miles per hour. On top of the cylinder head was a ball valve tapped into one of the cylinders. The valve had a quick-release air chuck fitting. The idea was to supply compressed air (with a bit of gasoline mixed in) for tire filling or bomb making. I never used that feature.
Besides the clutch, brake and throttle the Dodge had a floor switch for high beams and a fourth pedal that engaged the starter motor when it was depressed. The starter had no solenoid; the floor pedal did it all. You could turn the key off and the starter would still spin the engine. I thought that was a great idea. In 1954 Dodge gave you a horn and brake lights but no turn indicators. I used arm signals like on a motorcycle. It’s a hard habit to break so I still signal the old way in a panic situation.
Underneath the driver’s side floor was a battery compartment. The electrical system on the Dodge was 6-volt but a standard modification back then was to install an 8-volt battery. You didn’t have to tweak the voltage regulator and the lights were much brighter. Starting was a breeze with the extra couple volts. The 8-volt battery in my Dodge was shot. It was weak, even after a night on the charger the engine would slowly crank.
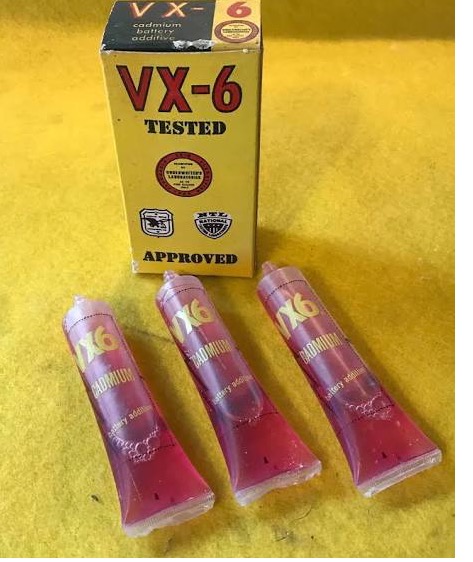
The obvious solution would be to buy a new battery but I didn’t have a lot of money to blow as I was trying to get out to California. A battery was expensive. We lived behind a gas station so I went over there looking for a used battery. The service guy handed me a couple packages of VX-6 battery additive stuff and said, “Try this first, it works good.”
What the heck, Lee Petty endorsed VX-6, he said he’d rather run without tires than his VX-6. That was good enough for me. Lee Petty does not bullshit. So I dumped the stuff in the nearly dead 8-volt battery and let it sit overnight. The next morning I tried the starter and the engine started like it had a new battery.
I was stunned. I mean, that hocus-pocus additive junk has never worked for me. Not only that but the battery worked perfectly from then on. I drove the truck to California and all over San Diego for years. The VX-6 battery was still in the truck when I traded it for a Yamaha 125 Enduro.
Recently I looked around for VX-6 and can only find old stock on Amazon and Ebay. It figures, the Battery Illuminati must have gotten to VX-6’s manufacturers. Maybe they threatened VX-6 employees or their families. Battery sales were suffering. Their stuff was too good. It’s no coincidence that you can’t even access the cells on most new batteries.
A Bill Murar self-portrait at 60mph while riding the Lake Erie Loop.
In the early days at CSC, when we were casting about for ways to the publicize the new CSC Mustang replicas, we heard from a guy named Bill Murar. Bill is a retired firefighter, vintage Allstate motorcycle expert, and motorcycle endurance rider, and he wrote to ask if he could ride one of the 150cc Mustangs in the Lake Erie Loop. That’s a 650-mile endurance run around the periphery of Lake Erie for small bikes and scooters. It was a godsend for us, and it was one of the things that helped put CSC on the map.
Bill Murar, at speed, on a CSC 150 riding the Lake Erie Loop.
Bill and I became good friends, and we’ve stayed in touch over the last decade. I was pleased to get this news from Bill yesterday…
Joe,
I’m pleased to let you know I’ve been named to the Board of Directors of the Antique Motorcycle Foundation. Starting a new page in the Murar chronicles. Yikes, responsibilities! If you go to their website there’s a photo of all the members of the board along with a short bio.
I helped the VP of the AMF restore his Allstate 175, mostly with hints over the phone, me sharing my personal parts source people, as well as my own stock of Allstate stuff. That and 50+ years of Sears Allstate buying and selling and collecting helped as well. He also used his own unique collection of painters, re-chromers, cable makers, foreign parts suppliers, etc., and he finally had a product good enough to grace the cover of this Spring’s edition of the Vintage Motorbike Newsletter.
With everything I had going for me with my Allstate knowlegde, coupled with almost 15 years as the north Central WERA-Vintage regional race director, and overall general knowledge of small displacement bikes, he thought I might be a good fit to fill one of the Board of Director openings.
So, I was interviewed via a phone conference call and ended up getting voted in by the Board. We’ll have out first meet and greet with the entire board at the Wauseon, Ohio meeting of the Antique Motorcycle Association on July 19th.
My new life chapter begins.
As a side note, I rode to AMF VP Roger Smith’s home north of Pontiac, Michigan where we finally met face-to-face (everything up til then was all via email, texts and old fashioned phone calls) last Thursday. He was kind enough to arrange a tour of the studio of Biker Build Off legend, Ron Finch. What a treat that was! Ron is an unbelieveable visionary with his projects. Do yourself a favor and Google his place, I’m not sure of the name of his shop, I simply entered “Ron Finch Studio Michigan.”
Bill
Bill, congratulations to you! Thanks very much for letting us know about your new spot and sharing it with us here on the ExhaustNotes blog. Ride safe, my friend, and best of luck to you in your new assignment.
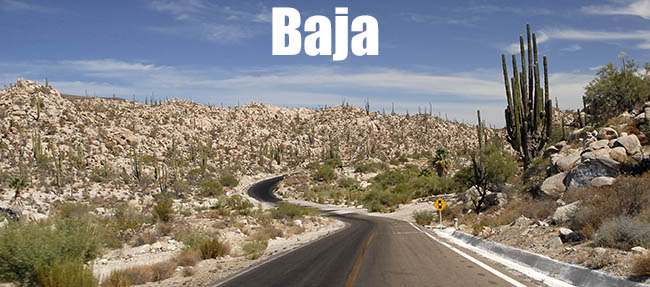
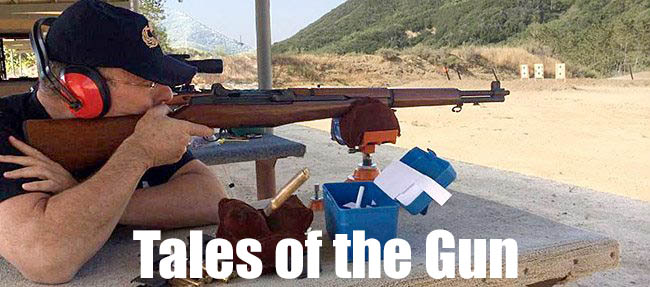
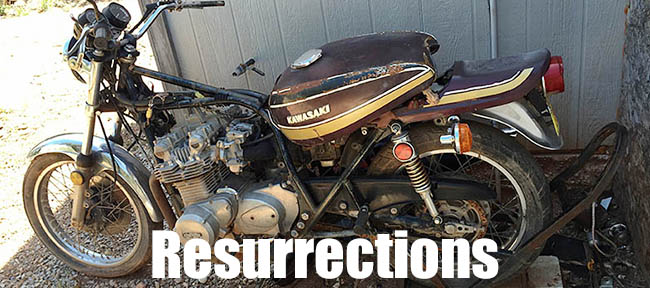
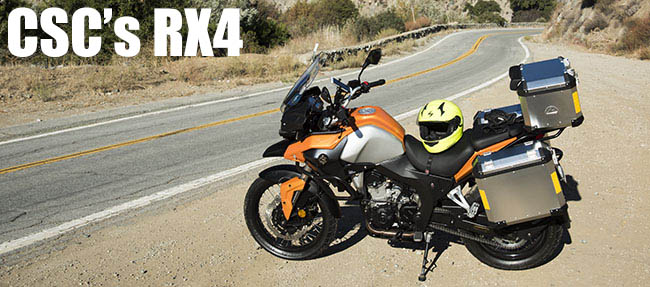
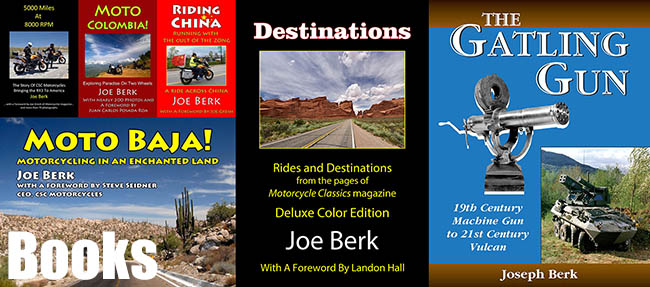
This is the first image on the ExhaustNotes home page, and it provides a link to the ExNotes blog. This is the Gobi Desert in northwestern China, and that’s the real deal…a camel caravan. Gresh and I rode there on our motorcycles.The link to articles by Joe Gresh previously published in a variety of magazines. There’s good reading here! The photo? That’s Gresh entering the Gobi Desert on a Zongshen RX3.This is at the entrance to the Forbidden City in Beijing, and it’s your link to magazine articles by Berk.Want to know what the ExNotes site is all about? You can get the story here. That photo? Hey, Gresh and I like gladiator movies. We were actors in one filmed in central China, near the city of Liqian.Trust me on this: You need to advertise on ExhaustNotes.us. Here’s the link to get that process started. This photo was up on the Tibetan Plateau, with the city of Aba in the background.The best riding on the planet, and it starts just across the border! Click this link to get our stories, our guidance, our suggested itineraries, and more on this magical place. I took this photo while riding my CSC Mustang through Baja’s Catavina boulder fields.Yep, we’re a motorcycle site, but this is one of the busiest places in all of the ExhaustNotes empire. Click this link for our Tales of the Gun stories. That’s me firing the mighty M1 Garand. My daughter shot the above photo on her iPhone, capturing the cartridge case in midair!The only thing better than our Epic Motorcycle Rides page is actually getting out and creating the adventure yourself! Enjoy our tales of the adventure riding trails here! Oh, and that photo? It’s Gresh on an Enfield in Mexico!Gresh doesn’t do 100-point restorations. Nope, his deal is rustorations, not restorations. A bike is only original once. The photo is Gobi Gresh’s mighty Z1 Kawasaki at the Tinfiny Ranch. It runs now, and you can read about how Joe brought it back to life here.The stuff of dreams, the ones that got away, and more. You can peek into our dreams here. That’s my old 1200 Triumph Daytona after a 120-mph sprint across Highway 58 in California.Who you calling Tubby? Here’s a cool collection of our videos. The photo was taken in Qufu, the birthplace of Confucius. Gresh and others are grabbing videos during a changing of the guard ceremony.Motors, the best job on the force. I believe it, and you should, too. We’ve recently added a page indexing our police motorcycle stuff, and you can get to it here. The photo is good buddy Jim Watson on a Honda ST1300P police motorcycle.The RX3 is a great bike, but folks wanted more displacement. Zongshen responded with the RX4, and upsized version of their iconic RX3, and CSC is taking orders now. You can read all about the RX4 and how it compares to the RX3 and the KLR 650 here. We rode the one above in the San Gabriel Mountains, which is where we shot this photo.It’s a new world out there, folks, and electric motorcycles are part of it. You can catch up on what’s happening here. That’s a CSC City Slicker, a phenomenal buy at just $2495!Writers write. Hey, it’s what we do. With something north of 20 titles under our belt, yeah, we’re gonna brag a bit. Read all about it here, and get links to buy our books on this page!Want the e-ticket ride back to the ExhaustNotes home page? It’s right here. And that photo? It’s the Bridge of the Gods, spanning the mighty Columbia River from Washington to Oregon. When I’m there, it feels like it’s a place where I belong. What could possibly be a more fitting home page link?
There you have it, my friends. You’ll see all of the above when you open our home page, and it’s your nav system to the rest of the site.
Hey, there’s more good stuff coming your way. We do our best to blog every day, and we’ve got great stories lined up for you:
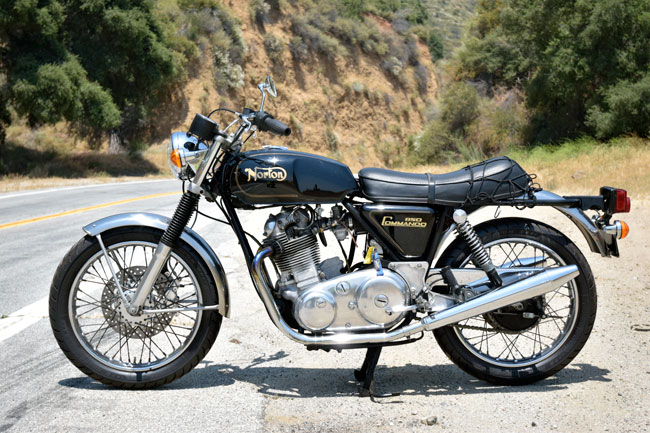
Good buddy Steve’s Norton Commando
More vintage police motors
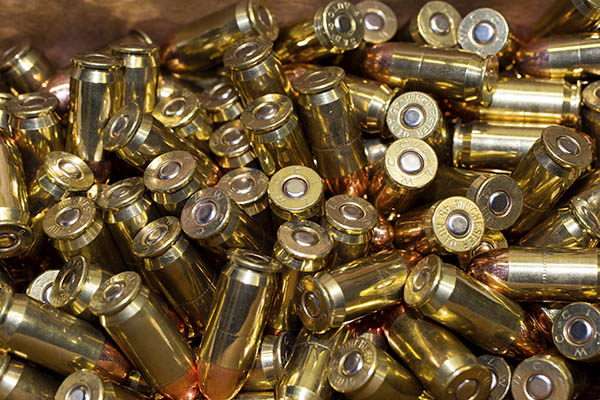
The continuation of our .45 ACP ammo series
The Indiana Jones aspects of riding in China
And much, much more. Don’t miss any of it…sign up for our automatic email updates (add your name to our email list), and you’ll stay up to date!
Hey, Motorcycle Classics magazine is running my story on Tecate in the next issue! You can read it here. More good news: I have another story in that same issue. Buy a copy if you’re not already a subscriber!
Reloaded .45 ACP ammunition. Bright, shiny, and far more accurate than factory ammunition in my Colt and Rock Island 1911 pistols. I’ve got the targets to prove it.
In our first post on this topic, we talked about the equipment and components needed for reloading the .45 ACP cartridge. In this blog, we talk about the reloading process. We won’t cover all of it here (we’ll get about halfway through), and we’ll cover the rest of the process in a subsequent blog or two. In our first blog, we discussed the basic equipment. In this blog, we’ll talk about a few more bits of equipment that I use, but they are not essential. You can get by without them.
If you want to catch up with the first blog on this topic, you can do so here.
Let’s say you’ve been to the range, you’ve made .45-caliber holes in your targets, and you’ve collected your spent brass. That’s the only part of the reloading process I don’t like…at my age, bending over and picking up all that brass is a pain-in-the-you-know-what. But I still do it. In fact, if I see somebody leaving brass on the ground, I’ll collect it. I grew up collecting brass to reload, and leaving brass at the range feels to me like a crime against nature.
So we’re home, and you’ve got your fired brass…
Fired .45 ACP brass. I just can’t leave brass at the range. To me, it’s like leaving cash on the ground.
This next step I’m going to show you is an optional one, and that’s cleaning the brass. You don’t need to do this, and I reloaded .45 ammo for a lot of years without ever cleaning my brass. I always do it now, though, and I do it for two reasons: Cosmetics and accuracy
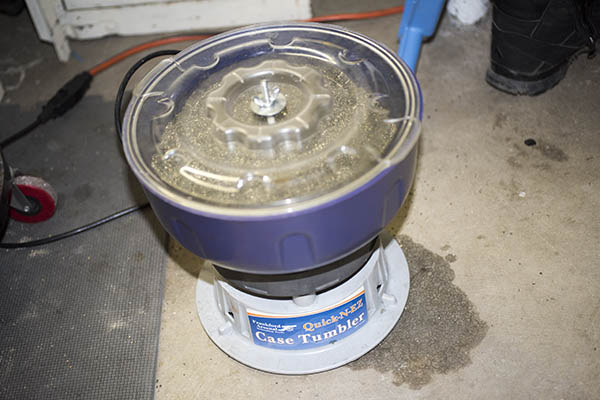
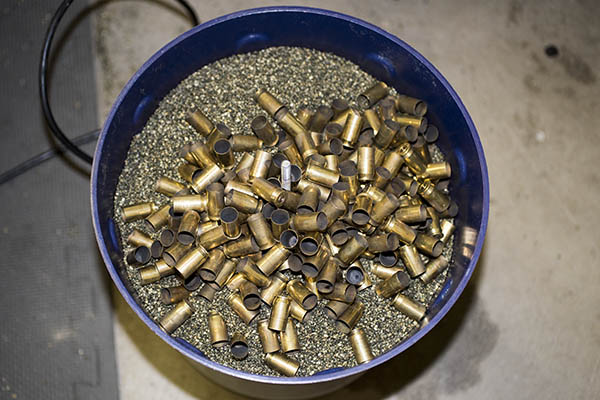
Here’s how I go about doing it. I dump the brass into my vibratory tumbler and let it rock for a couple of hours.
My Frankford Arsenal vibratory cleaner. I call it a tumbler. It has corn cob media. You unscrew the butterfly nut on top, remove the cover, and dump the fired brass into the media.Here’s the tumbler with the cover removed and the brass placed on the media. The cover goes back on and I let the thing vibrate for a couple of hours.
Like I said above, I tumble my brass. One of the reasons is that I like bright, shiny ammo (it just looks cool). But a far more important reason is that it makes the ammo more accurate. When you tumble the brass, you’re cleaning it on the inside and the outside. The outside is cosmetic. The inside affects the grip the brass case has on the bullet. We’re not interested in making it shiny on the inside; we’re interested in making that grip consistent. I’ve found over the years that a consistent inside case surface (where the case interfaces with the bullet) makes for a more accurate cartridge. It’s extremely significant in a rifle (I’ve seen 100-yard groups shrink from 3 inches to a quarter of an inch in my .30 06 Model 70 Winchester just by tumbling the brass). The accuracy improvement in a handgun is not that significant, but it’s still there. You don’t have to do this (you can reload the brass without tumbling it), but it’s something I do.
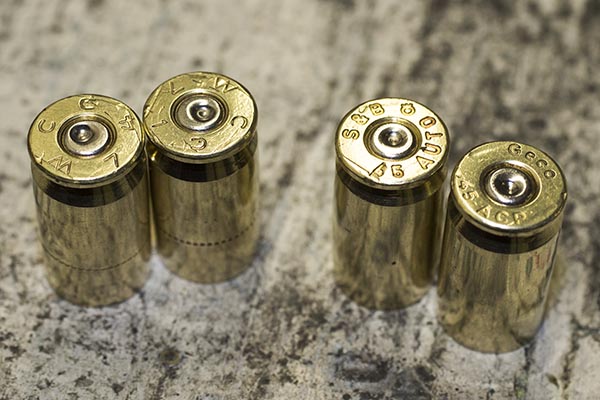
Here’s what the brass looks like after it’s been tumbled….
Squeaky clean and shiny. Fired, cleaned brass.
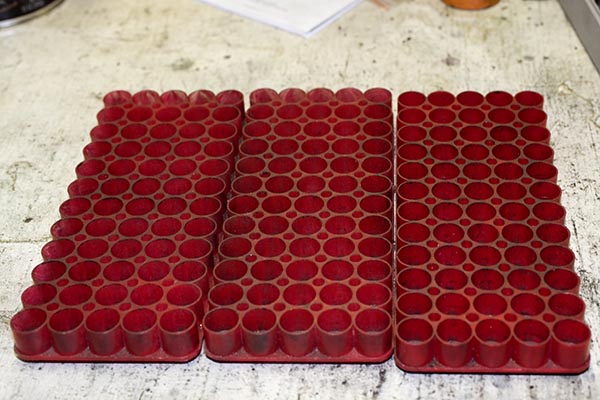
Now we’re ready to start the resizing operations. We’ll want to get our ammo trays ready…
Reloading trays. Each tray holds 60 rounds, but I only load 50 in each one.
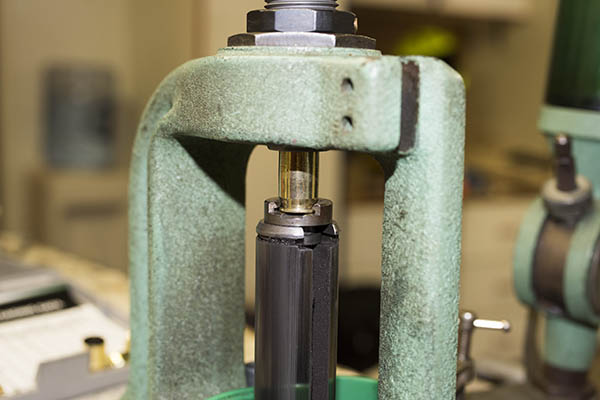
The next step is to install the first of our reloading dies (the resizing die) in the press. We’re going to use this die to squeeze the cartridge case back to its unfired case diameter and simultaneously knock out the fired primer.
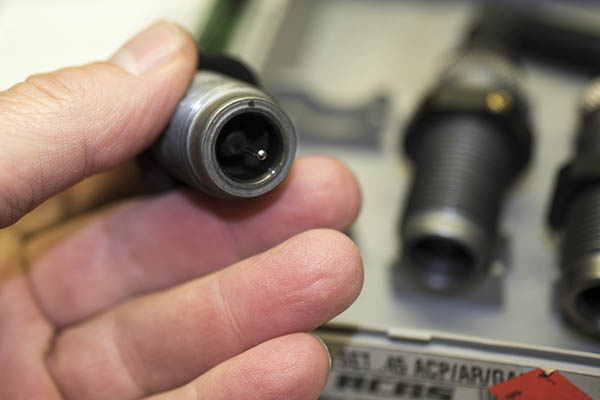
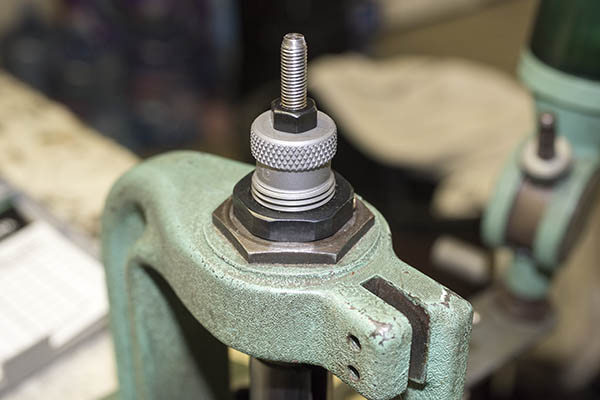
The resizing die. Note the protruding pin; it’s what pushes the old primer out of the brass case.The resizing die, threaded into the reloading press. Note the large locknut at the base.With the shell holder installed on the press ram, we fully elevate the ram, thread the resizing die down to contact the shellholder, withdraw the ram slightly, turn the die in just a bit more, run the ram up, and then lock the die in place with its locknut. What we want is to feel a slight “knuckle over” when the ram is fully elevated.
At this point, we’re ready to start resizing and depriming cases. Here’s what that looks like.
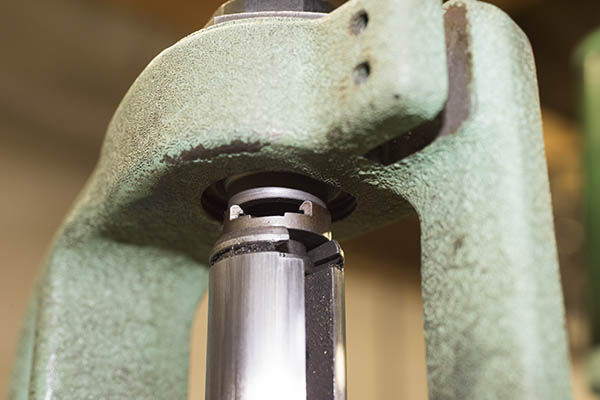
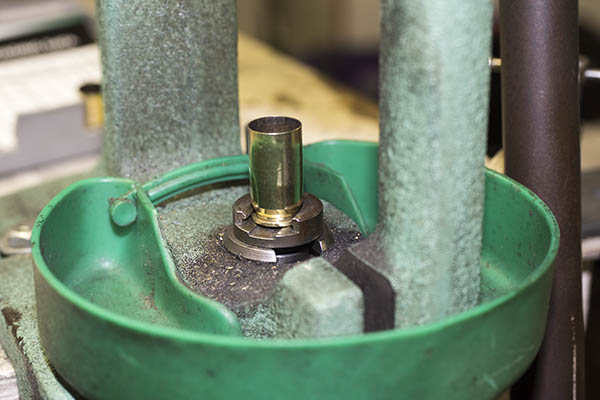
A case in the shellholder. When we raise the ram, it will be resized and the old primer will be pushed out.The ram is raised all the way to the top of its stroke. Here we see the case just starting to enter the resizing die. You don’t want to get your finger caught between the die and the fired case (don’t ask me how I know). The ram will go up until the shellholder contacts the bottom of the sizing die. As that occurs, the case is resized to its original diameter, and the primer is pushed out of the case.
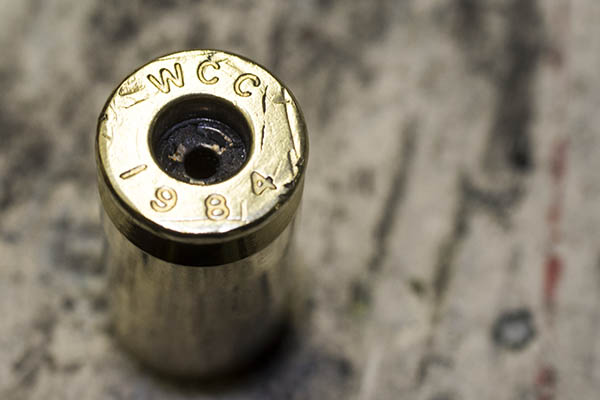
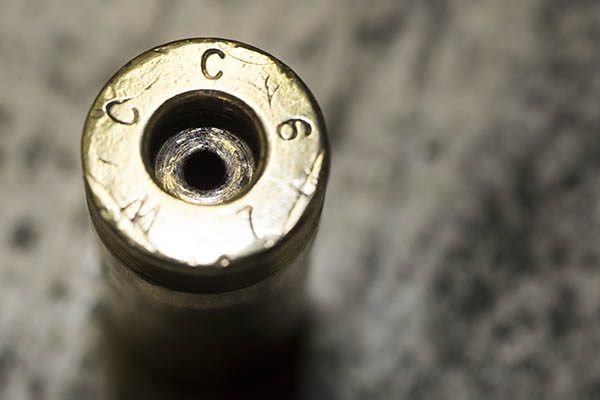
This is what the case looks like after it has been resized. Note that the primer is no longer in the case. Also, note how funky the primer pocket is. It’s gunked up with combustion residue.
A resized, deprimed case. Note the combustion reside remaining in the case’s primer pocket. And yes, I’ve been reloading this case since 1984. I’ve got some that are even older. .45 ACP brass lasts a long time.
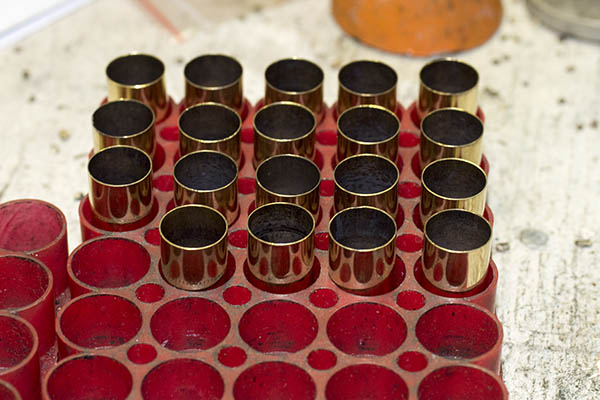
As each case comes out, I’ll place it in the reloading tray, like you see below.
Resized and deprimed cases in the reloading tray.
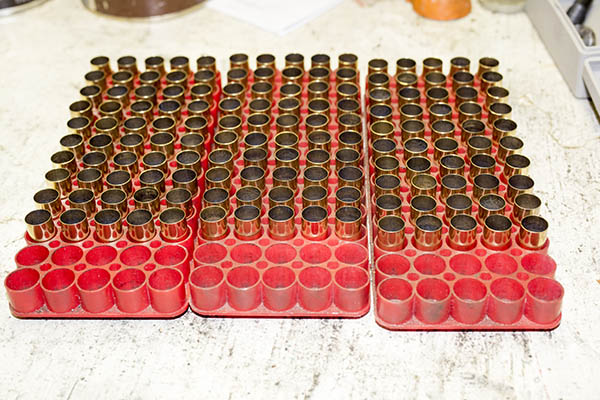
When I reload, I’ll generally do between 20 and 200 rounds in a batch. I reloaded 150 rounds in this batch.
150 resized and deprimed cases. Note that there are 10 empty spaces in each tray.
I use reloading trays that hold 60 rounds, and the reason I like these is that for a group of 50 cases I can track which case I’ve performed an operation on and which ones remain. Each time a case undergoes a reloading step, I move it over such that I always have 1o open spots between the cases that have undergone a reloading step and those that have yet to undergo the step.
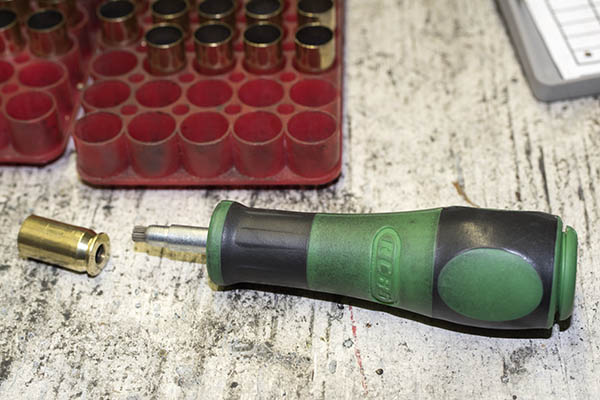
Ah, but those primer pockets. Remember how dirty they were after we pushed the primers out? Well, this is another optional step. I clean the primer pockets. I do each case manually, one at a time, using a primer pocket cleaning tool.
The primer pocket cleaning tool. It’s a primer-pocket-sized wire brush, and it removes the primer pocket combustion residue.A cleaned primer pocket. It doesn’t need to be bright and shiny; we just want to remove the clumps of combustion residue so the new primer can fully seat.
Like I said, primer pocket cleaning is optional. I reloaded for a lot of years and won more than a few matches without primer pocket cleaning, but these days I do it on every case. The reason we want the residue gone is that the residue can interfere with the new primer seating fully in the case (we’ll talk more about that in the next .45 ACP reloading blog). Having the primers all seated to the same depth will theoretically make for more accurate ammunition (less variability always equals more accuracy). It won’t effect functioning if the primers are at slightly different depths in a 1911, but if you’re reloading ammo for a revolver, a primer that is seated above flush (one that sticks out beyond the cartridge case base) can interfere with the cylinder turning.
At this point, we’ve got cleaned, resized, and deprimed cases. We’re ready to bellmouth the cases, install the primers, charge the cases with propellant, and seat the new bullets.
So that’s it for now. Stay tuned; this series will continue right here on the ExNotes blog!
Good buddy Chris sent this photo to us a yesterday wearing a T-shirt he said was made with ExhaustNotes in mind. I think I agree…
More good news…you can now buy Destinations through Motorcycle Classics magazine. They gave a nice review, and if you click on the photo below, it will take you to the MC store.
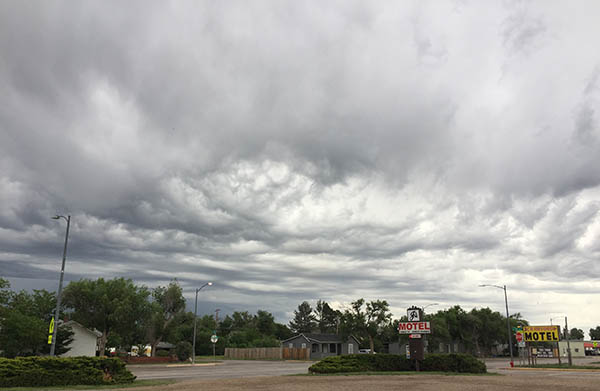
Things are hopping in Colorado. I got caught in a hail storm yesterday on a drive through the eastern part of the state, and the weather was ominous. They tell me a tornado touched down about 6 miles from where I was. The weather is similarly imposing today…here’s a photo showing the skies a few minutes ago…
Fun times. There’s a joke in that photo somewhere about not being in Kansas anymore.
The entrance to Sand Creek National Historic Site.
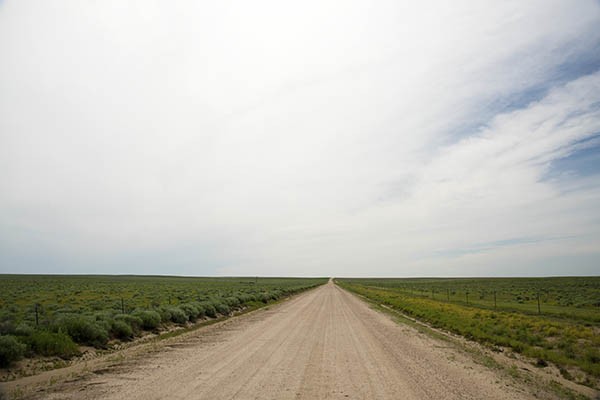
I’m on a secret mission in eastern Colorado, and when I saw the sign for the Sand Creek National Historic Site yesterday, I knew I had to exit the highway and visit it. Sand Creek is one of our newest national historic sites. It’s about 180 miles east of Denver and let me tell you, it is remote. The last 13 miles were on a county highway, but don’t that descriptor fool you. It was a dirt road.
An eastern Colorado county highway.
The short story (and I hate to do a short story on something this significant and this tragic) goes like this: On November 29, 1864, a group of volunteer US Cavalry militia soldiers led by Colonel John Chivington of the US Army attacked a peaceful village of Arapaho and Cheyenne Native Americans early in the morning. There were 675 US Cavalry soldiers, and a somewhat smaller number of Native Americans. The Native Americans thought the Army came in peace, and they came out to greet the Army. The Army attacked. The Cheyenne and Arapaho fled; the soldiers ran them down and slaughtered approximately 230 women, children, and old people. The Indians were mutilated and soldiers kept body parts as souvenirs. It was unquestionably one of the darkest moments in US history.
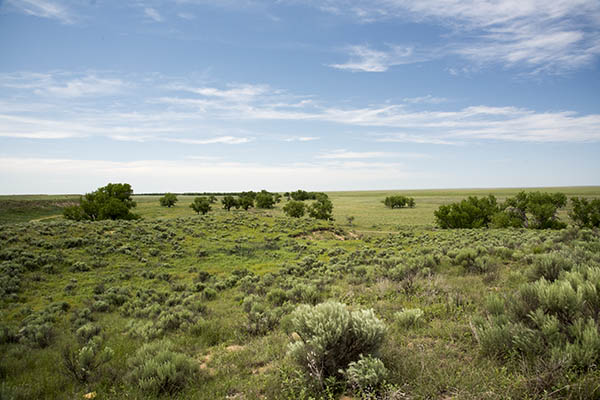
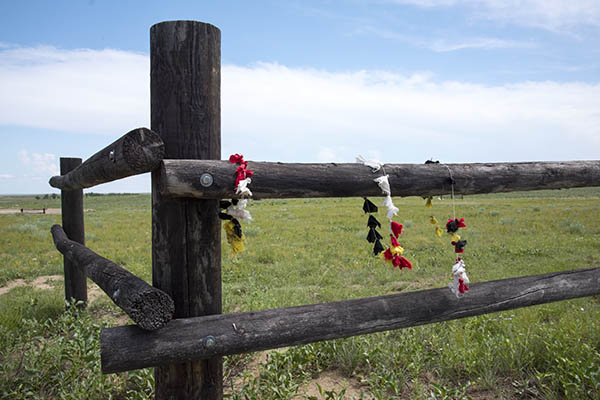
The view looking north over Big Sandy Creek (it’s dry now). The Cheyenne and Arapaho had made their camp among the trees. When the Army attacked, the Indians fled to the north and the west.Body parts kept as souvenirs from the 1864 tragedy are still being recovered. When found, they are interred here.
I visited with the US Park Ranger at the Sand Creek National Historic Site and he told me a bit more about the place. I was the only person out there yesterday afternoon, so I had the run of the site without having to worry about other people crowding my photographs. The Ranger told me to watch out for rattlesnakes (they’re out in force this time of year) and sure enough, I saw one, but it slithered away before I could get a photo. I wasn’t going to follow it into the weeds.
If you’re out this way, it’s a good place to stop and think. I had not heard about the Sand Creek Massacre story until I saw the sign pointing to the National Historic Site and I took the trip out there. Most people have never heard of Sand Creek and the events that occurred here.
The finished product: Reloaded .45 ACP ammunition. This handcrafted ammo is tailored for my 1911, and it is much more accurate than factory ammunition. Our blogs on reloading will cover the equipment and components needed, and the steps involved, in reloading ammo for the .45 Automatic.
I’ve had a few requests for a blog on reloading. You know, not just favored loads for different cartridges, but how to go about reloading. I know it can be a bit intimidating if you’ve never done it, but (trust me on this), learning how to reload adds an entirely new dimension to shooting, and many of us view reloading as being as much fun as shooting. In fact, one of my friends often jokes about shooting…he says it’s what we do so we get to reload ammo again.
A very cool guy named Roy Johnson taught me how to reload when I was in the Army. I was assigned to Fort Bliss, Texas, and Roy ran the Rod and Gun club there. Roy was a colorful El Paso fixture, and they named the road to the Rod and Gun club Roy Johnson Lane when he died. I was 22 years old when Roy taught me how to reload, and I’ve been reloading ever since.
I thought I would approach this topic in two or three parts, with the first blog focused on the equipment and components you’ll need to reload, and a subsequent blog or two on the actual reloading process. I had to pick a cartridge, so I thought I would start with the first one I learned to reload: The .45 ACP.
With that as a backdrop, here we go…
Reloading reverses the process of firing a bullet, and reversing that process requires several pieces of equipment.
One part of the equipment list is the dies that force the fired brass case back into shape (the brass expanded during firing) and knock the used primer out of the case.
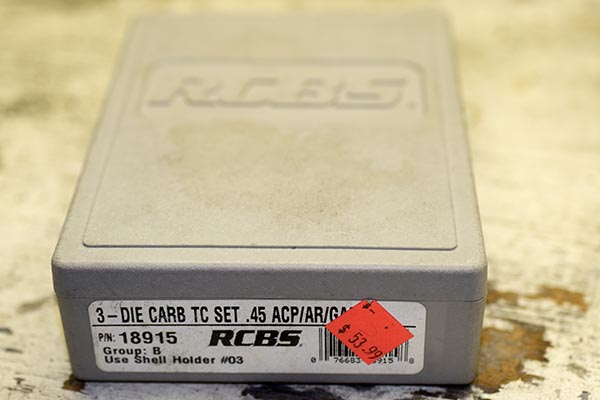
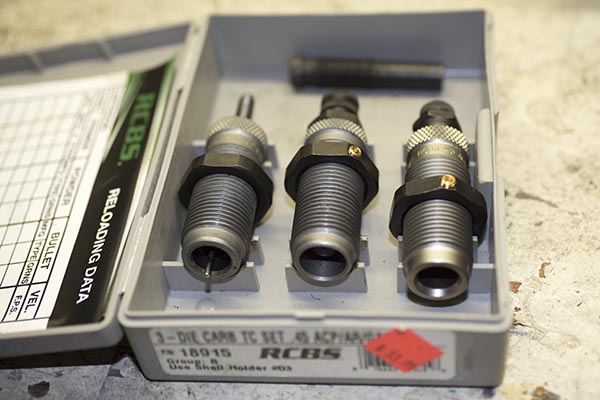
A set of RCBS carbide dies for the .45 ACP cartridge.A die set consists for a pistol cartridge typically includes three dies. From left to right, they are the resizing die (it sizes the brass case back to original dimensions and punches the primer out of the case), the expander die (it opens and flares the case mouth to accept the new bullet), and the seating die (it seats the new bullet in the case and removes the case mouth flare).
I stick with RCBS dies, as I’ve learned over the years they work best, but there are other manufacturers out there. I also use Lee dies for a few of the cartridges I reload (they are typically less expensive than RCBS dies, and they are as good). An added advantage of the Lee dies is that they include the shellholder with the die set, so you don’t have to buy a separate shellholder and pay extra for it. I don’t care for Hornady dies, but as they say, your mileage may vary. I’m the guy doing the writing here, so I’ll share my experiences and preferences, and I like RCBS and Lee. A new set of RCBS carbide dies are a little north of $50; Lee dies are typically $10 to $15 less than the RCBS dies (and like I said earlier, the Lee dies come with a shellholder).
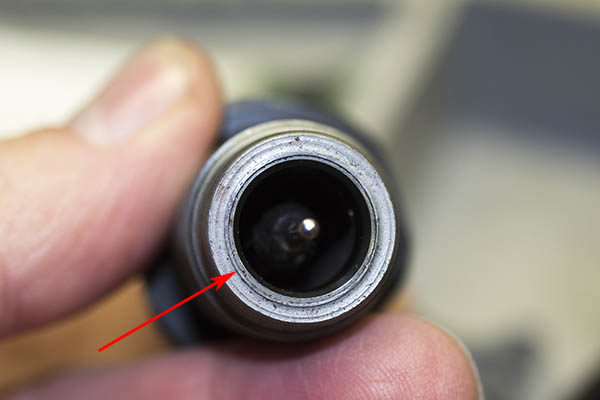
The business end of the carbide resizing die. The red arrow points to the carbide insert.
I use carbide dies for pistol cartridges. A carbide die has a super-hard carbide insert that interfaces with the brass case, and it allows you to squeeze the case back to its unfired configuration without having to lubricate the case first. The downside is that carbide dies are slightly more expensive than non-carbide dies. For straight-walled pistol cartridges, there are three dies in a set. We’ll discuss in more detail what each does in Part II of this series.
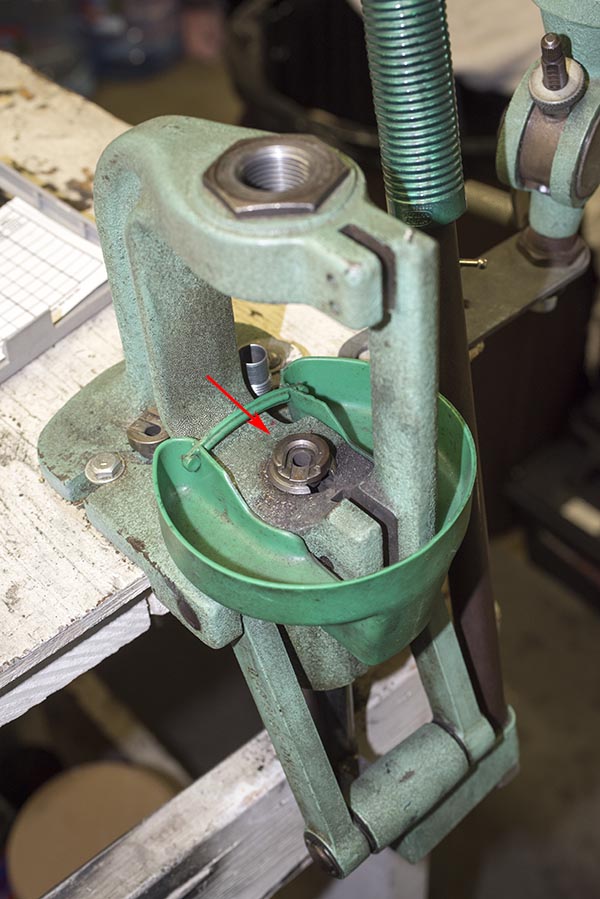
You will also need a reloading press and a shellholder for the brass cartridge case. I use an RCBS Rockchucker press I bought new nearly 50 years ago when Roy Johnson taught me how to reload. A good press lasts forever.
The RCBS Rockchucker reloading press. A good one lasts forever. The red arrow points to the shell holder. Different cartridges take different shell holders. We’ll see how all this stuff is used in Part II of our reloading series.
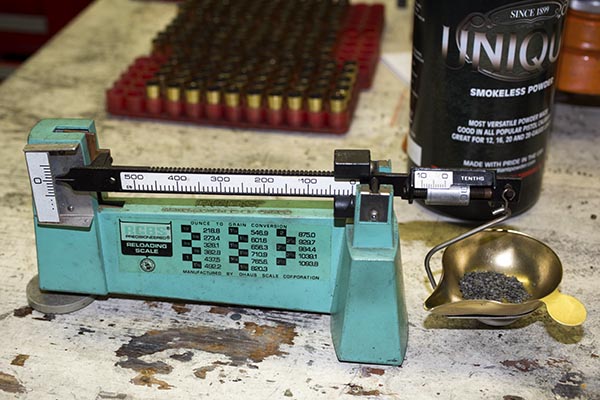
A scale is necessary for measuring propellant charges (also referred to as powder). Several companies offer scales specifically designed for reloading.
My RCBS reloading scale. Like the Rockchucker press shown above, I’ve been using this for a half century.
It’s a good idea to have reloading trays for the cartridges. These are relatively inexpensive, and they seem to last forever, too.
Reloading trays. These hold the brass cases we are going to reload, and allow for easy tracking and inspection of each reloading process step.
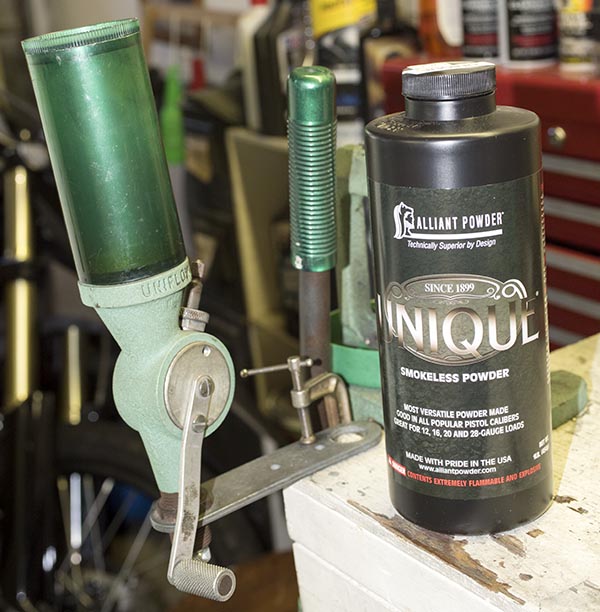
A powder dispenser allows you to dispense the correct amount of propellant in each cartridge case.
A powder dispenser, and the propellant I like to use for loading .45 ACP ammunition. I bought that dispenser back in the day, along with the scale and the press. My preferred propellant is Unique.
At this point, we’ve covered the equipment necessary; let’s now turn to the components. One is the propellant you see in the photo above. As seen in the photo below, for the .45 ACP cartridge, I prefer Unique.
You’ll need previously-fired cartridge cases. You can also buy new brass that has never been loaded if you don’t have any, or you can buy factory ammo, shoot it, and save the brass. I don’t think I’ve ever purchased new brass for the .45 ACP, mostly I had plenty available from my days in the Army. The .45 ACP cartridge is a relatively low-pressure cartridge, and the brass seems to last forever. I’ve been reloading the brass you see here for a long time.
Fired .45 ACP brass. It’s dirty. I usually polish mine, but it’s not necessary that you do so. We’ll talk more about that in the next blog.Polished .45 ACP brass. It cleans up well and it seems to last forever (look at the stamps on the two cases on the left).
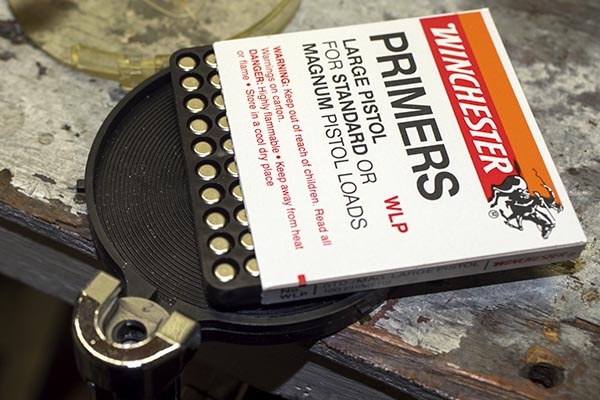
You’ll need primers. The primer is the little cap that the firing pin strikes when you pull the trigger. There are two or three companies making primers these days. I usually buy whatever the shop has in stock. I haven’t found that primers make a difference in accuracy or reliability for handgun shooting.
Winchester primers. We’ll talk about the tool you see below the primers, and how to install the primers, in the next blog.
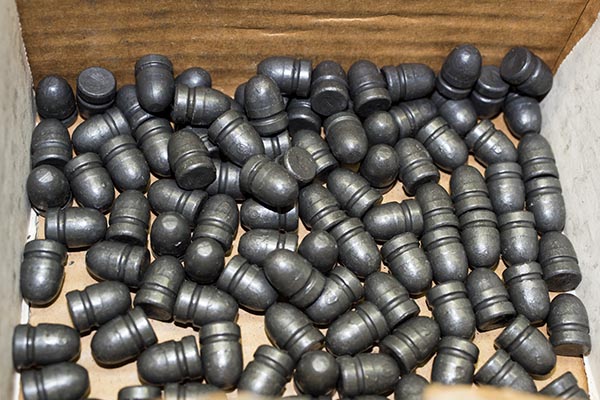
And finally, you will need bullets. I’m using moly-coated 230-grain roundnose lead bullets these days, like you see in the photo below, mostly because I have a bunch of them in my reloading locker. Many other bullet configurations are available.
Bullets. I usually buy them in boxes of 500 because I do a lot of shooting. There are different kinds of bullets available, but that’s a discussion for another time, too. If you’re just starting out and you’re reloading .45 ACP ammo, my advice is to get a 230-grain roundnose bullet in either cast or jacketed flavors. It will feed reliability in nearly any 1911. We’ll talk more about this in the next blog, too.
There’s one other item I strongly recommend you purchase, and that’s a reloading manual. These manuals list different loads for different cartridges and different bullets and propellants. The whole idea here is to experiment with these combinations (within the parameters provided by the manuals) to find the recipe that produces the best accuracy and reliability in your gun. My preference is the Lyman manual, as it lists different bullet manufacturers and cast bullets, too. You can buy manuals from the bullet manufacturers, but the downside there is they only show data for their bullets.
You can buy all of the equipment separately (as I did a long time ago) or you can buy a complete kit that has everything you need to get started. RCBS has a kit that goes for about $350. Lee has a similar kit for a lot less (about $150), and it will get you into the reloading game. I have a friend who bought the Lee kit a few years ago, he uses it to reload .308 Winchester ammo for his Model 700 Remington, and the ammo he makes routinely delivers 1/2-inch groups at 100 yards. With either kit, you’ll need to buy the dies required for the cartridge you wish to reload, and the components as described above.
You might be wondering: Where do you buy this stuff? Most gun stores sell reloading equipment and components. Cabela’s and Bass Pro are two that come to mind. You can also buy components and equipment online from places like Amazon, Midway, Natchez Shooter’s Supply, Grafs, and other places. Buying the energetic components online gets a bit more complicated (propellants and primers), but the stores can fill you in on that. In most areas, there’s usually a shop that is known for being the best in your neck of the woods for reloading stuff, and you can find these places with a quick Google search or by asking around.
So there you have it. I’ve described the equipment and the dies you’ll need to reload the .45 ACP, but the procedures I’ll describe in subsequent blogs will be the same for nearly any handgun cartridge (.38 Special, .537 Magnum, .380, 9mm, .40 S&W, .44 Magnum, and .45 Colt). All you need will be different dies and shellholders, and of course, different types of bullets.
Our next reloading blog will cover the first steps of the reloading process. Stay tuned; it’s coming up!
Read our other Tales of the Gun stories for the loads we prefer. Disagree with anything above or want to toss your $0.02 into the discussion? Hey, there’s a comments section below and we’d love to hear from you.
One last thing…ever wonder what the “ACP” stands for in .45 ACP? Well, here you go…wonder no more.
There are more ways to measure wealth than money. Sure, traditionalists rely on a strict net worth approach, adding up the figures on electronic statements in a system where the winner is whoever has the highest number. You can count all sorts of things, though. You can count friends, you can count grandchildren, you can count experiences: These are forms of wealth that won’t show up on that balance email from the bank.
When it comes to future projects I am a very wealthy man. I’ve got them lined up out the door and around the corner. And my account keeps growing; with compound interest my Project Bank doubles every seven years. Most of these projects will never see the light of day but they remain secure in my thoughts, if not in my actions.
On of my largest assets is the 4-speed Suburban project. When I bought the ’90 ‘Burb it came with a malfunctioning automatic transmission. I hate automatics and malfunctioning ones even more so. The 700R4 works in Drive and Reverse but not in 1-2-3. The truck runs fine and it will tote a 3000-pound load without complaint but that boring automatic has got to go. It’s a rare Suburban that came with a 4-speed from the factory and even rarer to see a ½-ton version. I’ve only seen one 4-speed ‘Burb and it was ¾-on. This project keeps earning interest and I’ve been training a weather eye on Internet sale sites for a cheap, manual transmission, 4X4 GM truck to steal the guts from. I found a late model, 4X4-IFS 1/2-ton truck with a 5-speed and a nice FI engine that ran well but the transfer case and transmission housing were broken and besides everything was on the wrong side for the old straight axle suburban.
The chalky blue, 1974 MG GT came with Tinfiny Ranch and was listed as an out building on the deed. This car was on the chopping block until I started reading about MG’s with Buick 215 cubic-inch aluminum engine swaps. I really have to stay off the internet. The Buick engine triples the horsepower, doesn’t weigh much more than the iron 4-banger it replaces and sounds cool as hell revved up to 6000 RPM. This is one asset I kind of wish was not in my Project Bank as I’ve never been that interested in cars. Still, it’s there waiting on me.
Tinfiny Ranch itself is a huge source of endless work, but beyond the physical plant The Ranch continues to deposit surprises into my Project Bank. This Merry Tiller project revealed itself as I was hauling away two, multi-panel garage doors. The doors sections were stacked with spacers in the popular rat-paradise fashion and I gave chase to a couple fat rats but they got away from me in the thick brush down by the ravine. The Merry Tiller looks like it will come in handy for the raised-bed vegetable garden (yet another deposit in The Project Bank) I’m planning for the back yard. The engine on the tiller is not stuck and being a Briggs & Stratton I’m sure it will run so I’m leaving it in The Bank for safe keeping.
I will never be bored or lonely. My Project Bank is overflowing with cool things that need time and attention. After I level the back yard I’m going to build a shear wall for the shed, then I need to get back on the Zed. After that I’d like to pop a 6-cylinder + AX15 transmission into Brumby the Jeep. The Suburban needs new paint; I’m going to change it from black to white so it will be cooler inside. Better yet I’ll fix the air-conditioner, it’s all there except for the compressor. I really need a second rain barrel, too, as I’m leaving water on the table with only 2500 gallons of storage.
The projects pile one atop the other and the magnitude of the undertaking gives me a great sense of importance. When I die I want to be buried like a Viking in his ship except my grave will be filled with all the unfinished projects that kept me company while I was alive. You really can take it with you, mainly because no one else wants your junk.
Yep, by popular demand, it’s another Tales of the Gun piece, this time focused on shooting cast bullets in my 1903A1 Springfield. I like shooting cast bullets in a rifle, and my intent is to use the Springfield with cast bullets only. I have two good buddies who also own ’03 Springfields, and we’ve all been playing with different loads to see what works best. I think I’m out in front here. I’ve been sharing my results with ’03 buddies, and I thought I’d share what I’ve found with you, too.
My Springfield is one that was built up from parts as an ’03, but with the scant stock, so it is sort of a wannabe 1903A1 in essentially as new condition. I bought it from a guy who had it built up but hadn’t fired it. I’ve written about the Springfield before here on the ExNotes blog, but I had not gone into any detail on the loads I am developing for it. The intent today is to talk a bit about some of the cast loads I’m playing with for this rifle.
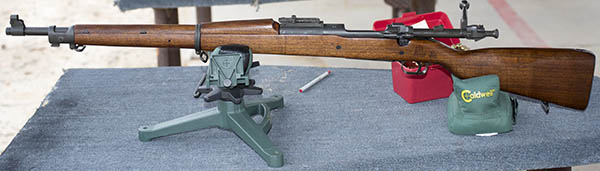
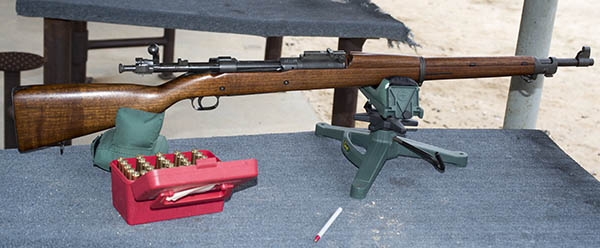
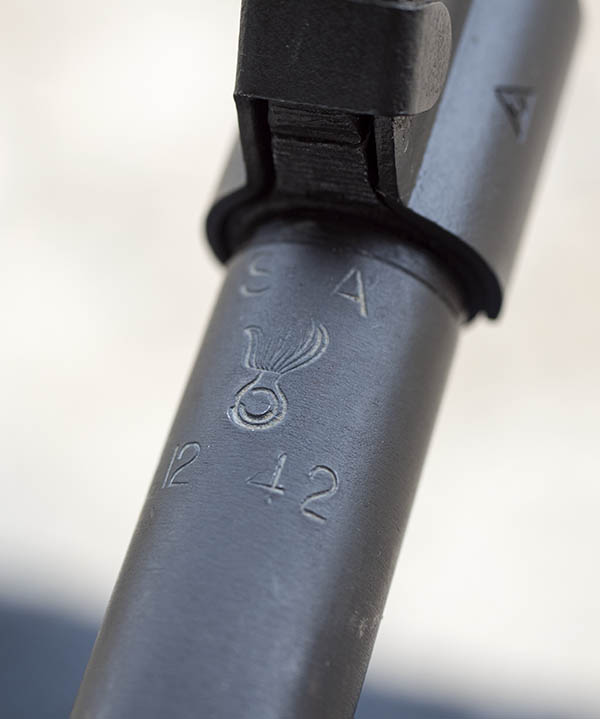
But first, here’s a look at my rifle. It’s a magnificent old warhorse…
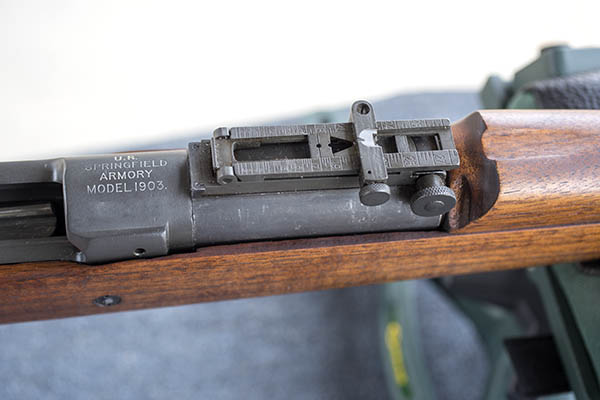
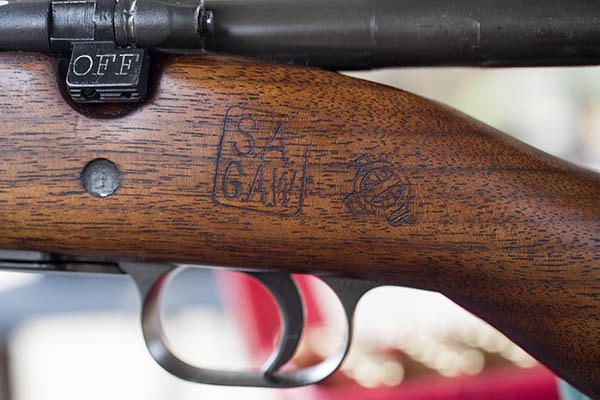
Sweet, huh?The right side of my Springfield. Folks who know what they’re seeing have stopped to admire this rifle each time I’ve been to the range with it.The 1903A1’s rear sight. It is a complicated little arrangement, which the government simplified dramatically on the 1903A3 version.The man who built this rifle from parts knew what he was doing. Check out the cartouche.The barrel on this rifle was a new old stock 1942 Springfield barrel.
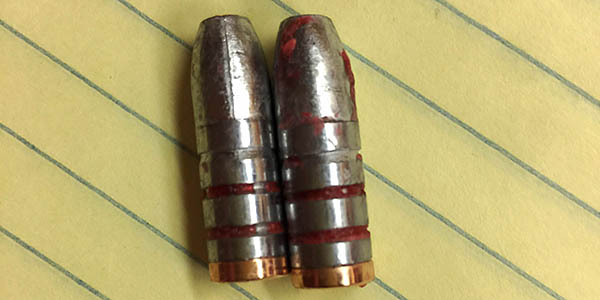
I had reasonably good results in an initial range session with this rifle using 190-grain gas-checked bullets sized to 0.309. I have a local guy who casts these bullets for me. The idea behind using a gas check is to prevent leading the bore.
190-grain cast bullets. I like shooting cast bullets. There’s a story behind that, but it’s one for another blog. The copper thingamabobber on the aft end of these bullets is the gas check. The red stuff is bullet lube, designed to ease the passage of the bullet down the bore. Both the bullet lube and the gas checks serve to prevent leaving deposits of lead in the rifle’s bore.
For the initial range session mentioned above, I had prepared loads ranging from 21.0 grains to 24.0 grains of SR 4759 propellant, and I had the best results (just eyeballing the results) at 24.0 grains. In the first outing with the Springfield I wasn’t being too rigorous in my accuracy and test protocols; I just wanted to get an idea of what worked and what didn’t.
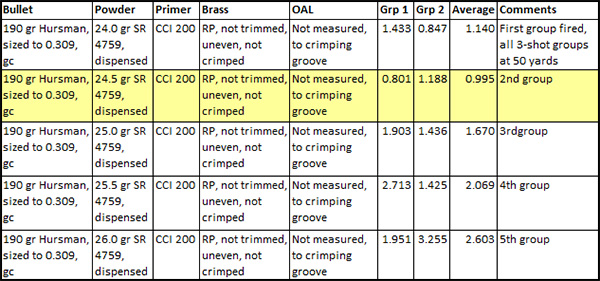
For my next set of accuracy tests, I went from 24.0 grains to 26.0 grains of SR 4759 in half-grain increments. Here are the results…
Test results for SR 4759 propellant and 190-grain cast bullets in the Springfield 1903A1. The yellow-shaded row highlights the best accuracy. 24.5 grains of SR 4759 is the secret sauce here.
The risk in assessing accuracy from any of these tests is that a lot of the variation is my aiming error, and the resulting group sizes may not truly represent how the different loads perform in the rifle. Based on the above data, though, it looks like my Springfield wants to be at 24.5 grains of SR 4759. My Lyman manual says the muzzle velocity at that charge is somewhere around 1750-1800 fps. That’s hotter than I normally would want to be with cast bullets, but the above loads didn’t lead the barrel too badly. Recoil was moderate. For these loads, I did not trim the brass cartridge cases and they were uneven, and because of that, I did not crimp the bullets. I’m pretty sure I can get better accuracy if I trim the brass to a uniform length, weigh each charge, and crimp (I’ve always found cast bullets do better when crimped).
The above results were encouraging. The accuracy with cast bullets was good, but not quite as good as my Mosin or my 1909 Argentine Mauser. The Springfield shot just under an inch at 50 yards, which would be just under two inches at 100 yards, and with cast bullets and iron sights, that ain’t half bad. My Mosin and my Argentine Mauser will sometimes shoot into a half-inch at 50 yards. The Springfield might do that, too, if I trimmed the brass and employed all of the other accuracy tricks mentioned above. The good news is that I’m getting there. It took a while to get everything right for the Mosin and the Mauser. Rome wasn’t built in a day, as they say.
Encouraged by the above results, I reloaded more ammo with the 190-grain cast bullets to confirm the SR 4759 propellant results and to evaluate a few additional powders, including IMR 3031, IMR 4227, IMR 4198, 5744, Trail Boss, and Unique. The reason I wanted to explore using other propellants is that SR 4759 is a discontinued powder. I have a stash of it, but my two Springfield buddies do not, and someday I’ll run out of 4759.
I was able to repeat the 4759 results (it’s a good propellant for cast bullets), and I found the other propellants show potential for great accuracy, too. Here are the results (all at 50 yards) with the other powders…
IMR 3031 and IMR 4198 are looking good. IMR 4227 is good, too.
It was raining when I shot the above loads and I got my targets and loads mixed up a bit (eh, it happens). I got enough out of the range session, though, to form some general impressions. The loads generally seem to fall into two categories:
Hotter loads. These loads were roughly 70%-80% of what jacketed loads would be (with recoil nearly like a jacketed load). Surprisingly, these had very little leading with the cast bullets. In particular, IMR 3031 worked well and it nearly had the recoil of a regular 30 06 jacketed load.
Milder loads. These were in the 1500 fps range. These have lighter recoil and were moderately accurate, but they drop significantly at 50 yards compared to the hotter loads. These are easy on the shoulder, but the drop put them off the target and they would require flipping the elevated ladder sight up on the ’03 to get back on target. For that reason, I’m not doing any more work with these. In this group, though, 13.0 gr of Unique gave decent (not great, but decent) groups. Trail Boss did okay, too. The Trail Boss loads were super light. Recoil was about like a .22.
The good news is that IMR 4227 works well in the 30 06 Springfield with the 190 grain bullets. (The reason it’s good news is that one of my Springfield buddies has a lot of 4227 on hand.) The bad news is that 4227 is not in the current Lyman reloading manual. I have older manuals from the 1970s that list 4227, and that’s where the load data came from.
In cleaning the Springfield after the above range sessions, I checked the action screws (the two that secure the barreled action in the stock) and while they were snug, they were not fully tightened. I tightened them and it’s likely accuracy will improve. Next time, folks. A properly-secured action, trimmed brass, crimped bullets, and good weather with no wind at the range…those half-inch Springfield groups are out there. I just need to find them.
Like what you’re reading here? Check out our other Tales of the Gun stories, and please sign up for our automatic email blog updates!

 I had a 1954, small-window Dodge truck back in the 1970’s. It’s funny how a 20 year-old truck seemed so much older when I was younger. My 1990 Suburban is the same age now as the old Dodge was then but the Suburban seems modern to me. I can remember new Suburban’s rolling off the dealer lots that looked exactly like mine. I wasn’t even alive when the ’54 dodge was built.
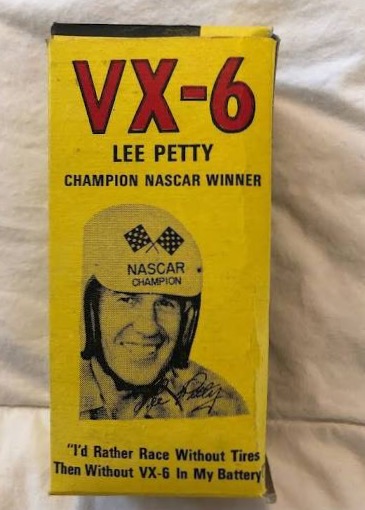 What the heck, Lee Petty endorsed VX-6, he said he’d rather run without tires than his VX-6. That was good enough for me. Lee Petty does not bullshit. So I dumped the stuff in the nearly dead 8-volt battery and let it sit overnight. The next morning I tried the starter and the engine started like it had a new battery.


 Hey, there’s more good stuff coming your way. We do our best to blog every day, and we’ve got great stories lined up for you:

 More good news…you can now buy Destinations through Motorcycle Classics magazine. They gave a nice review, and if you click on the photo below, it will take you to the
 Fun times. There’s a joke in that photo somewhere about not being in Kansas anymore.
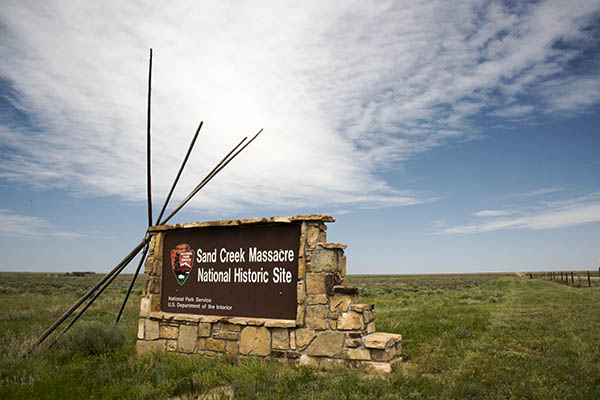
 There are more ways to measure wealth than money. Sure, traditionalists rely on a strict net worth approach, adding up the figures on electronic statements in a system where the winner is whoever has the highest number. You can count all sorts of things, though. You can count friends, you can count grandchildren, you can count experiences: These are forms of wealth that won’t show up on that balance email from the bank.
 On of my largest assets is the 4-speed Suburban project. When I bought the ’90 ‘Burb it came with a malfunctioning automatic transmission. I hate automatics and malfunctioning ones even more so. The 700R4 works in Drive and Reverse but not in 1-2-3. The truck runs fine and it will tote a 3000-pound load without complaint but that boring automatic has got to go. It’s a rare Suburban that came with a 4-speed from the factory and even rarer to see a ½-ton version. I’ve only seen one 4-speed ‘Burb and it was ¾-on. This project keeps earning interest and I’ve been training a weather eye on Internet sale sites for a cheap, manual transmission, 4X4 GM truck to steal the guts from. I found a late model, 4X4-IFS 1/2-ton truck with a 5-speed and a nice FI engine that ran well but the transfer case and transmission housing were broken and besides everything was on the wrong side for the old straight axle suburban.
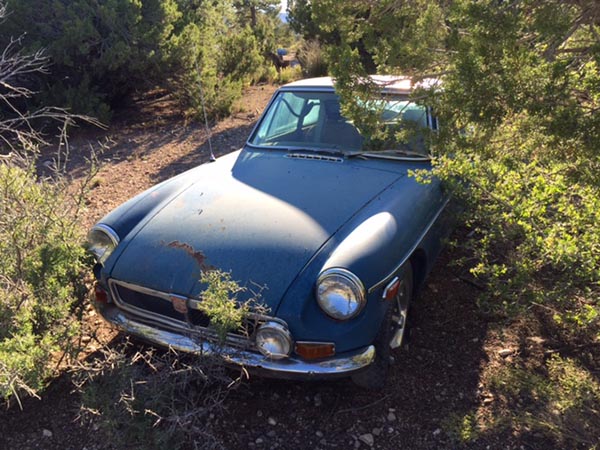 The chalky blue, 1974 MG GT came with Tinfiny Ranch and was listed as an out building on the deed. This car was on the chopping block until I started reading about MG’s with Buick 215 cubic-inch aluminum engine swaps. I really have to stay off the internet. The Buick engine triples the horsepower, doesn’t weigh much more than the iron 4-banger it replaces and sounds cool as hell revved up to 6000 RPM. This is one asset I kind of wish was not in my Project Bank as I’ve never been that interested in cars. Still, it’s there waiting on me.
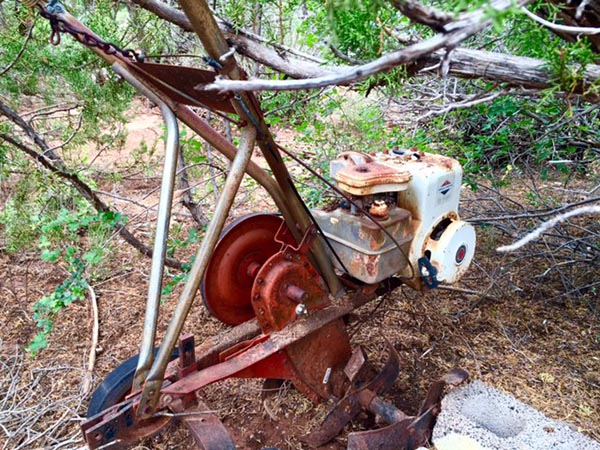 Tinfiny Ranch itself is a huge source of endless work, but beyond the physical plant The Ranch continues to deposit surprises into my Project Bank. This Merry Tiller project revealed itself as I was hauling away two, multi-panel garage doors. The doors sections were stacked with spacers in the popular rat-paradise fashion and I gave chase to a couple fat rats but they got away from me in the thick brush down by the ravine. The Merry Tiller looks like it will come in handy for the raised-bed vegetable garden (yet another deposit in The Project Bank) I’m planning for the back yard. The engine on the tiller is not stuck and being a Briggs & Stratton I’m sure it will run so I’m leaving it in The Bank for safe keeping.