Hershey, Pennsylvania

There’s an old saying:  The difference between success and failure is this:   A failure is a person who stays down.   A success is a person who refuses to stay down. By that measure, Milton Hershey certainly was a success.  His first two attempts at candy companies did not end well.  Hershey made it big on the third attempt, though, and his company became an American icon.  This blog is a story about the town that bears his name and a great Pennsylvania destination:  Hershey, Pennsylvania.

The man and the legend:  Milton Hershey.  This is a mural as you take the ride into the chocolate “factory.”

I’m not a chocoholic, but I love Hershey, Pennsylvania and the story of the Hershey company.  One man had an idea about a new candy, and he worked tirelessly to build the candy company that bears his name.  As he was doing so, he built a town designed to be a better place for his employees.  I’d say he succeeded on all counts.

Signs lining the highway into Hershey. Note the iconic street lights.

I first visited Hershey back in the 1960s.  My Dad was a world-class trap shooter and our traveling was nearly always related to a shoot someplace in the northeastern United States.  Pennsylvania, New York, Maryland, Ohio, New Hampshire, and more.  Mom, my sister, and I would visit nearby attractions, and the town of Hershey was one of them.  Two things stood out in my mind:  The streetlights were styled like Hershey’s kisses, and the entire town smelled like chocolate.

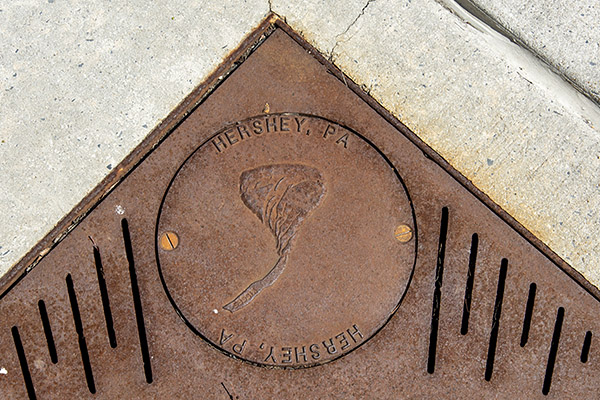
A sidewalk grate in Hershey.

The streetlights hadn’t changed (they were still the same Hershey’s kisses), but I was surprised when we arrived:  I couldn’t smell the chocolate I remembered.  My aunt lives near Hershey and she told me that changes daily.  It’s a function of what the Hershey plant is doing that day, the wind, and maybe a few other factors.   We missed the chocoholic aroma (which was the bad news), but it still occurs sometimes (that’s the good news).  I’m guessing tighter emissions requirements might be playing a role here, too.

There are several things to see and do in Hershey, but the factory tour I remembered as a kid is no more (more on that in a second).  There are things to do in Hershey, starting with just walking around the town and taking in its beauty.  There are also Hershey attractions, including the Hershey Museum and the current Hershey factory tour.   We hit the Hershey Museum first.

Inside the Hershey Museum. It’s a real museum (unlike the factory tour, which I’ll get to in a minute), with equipment from the early days of Milton Hershey’s work and excellent exhibits.
One of the exhibit areas inside the Hershey Museum.

I had seen the large Hershey smokestacks on the way into town and I wanted to get a photo.  While my wife and sister were taking in the Hershey Museum, I left a bit early and walked up the street to get a better photo of the smokestacks.

One of the better photos, I think, from our Hershey visit. The weather was perfect.

Next up was the factory tour.  I thought I remembered the factory tour from my visit in the 1960s, but I either remembered it wrong or I was projecting what I wanted into a memory that had dropped a few digits over the decades.  I thought we would see the actual Hershey factory.  That’s what I wanted.  I’m a manufacturing guy, and I’ll never pass on any opportunity to get into a manufacturing facility.  But the factory tour I remembered as a kid had been replaced by a theme park ride.  The Hershey factory tour involved getting into little cars that were pulled along a track and going through a dumbed-down Disney-like version of what the real factory looks like.   I suppose Hershey has to protect its proprietary process technology, but still, I was hoping for an engineering text and what I got was a Saturday morning cartoon.

Upon entering the factory tour building, you have to first go through what has to be the world’s largest candy store.  And yeah, we bought some candy.  It’s not like we needed it. But we were there.  When in Rome…you know the rest.

If you have a sweet tooth, Hershey’s candy store is the place you want to be.
At the entrance to the Hershey factory tour.
You go through the Hershey factory tour on an amusement park like ride in these little cars. It was fun.
Modern manufacturing methods, dumbed down to the lowest common denominator. Still, it was fun.

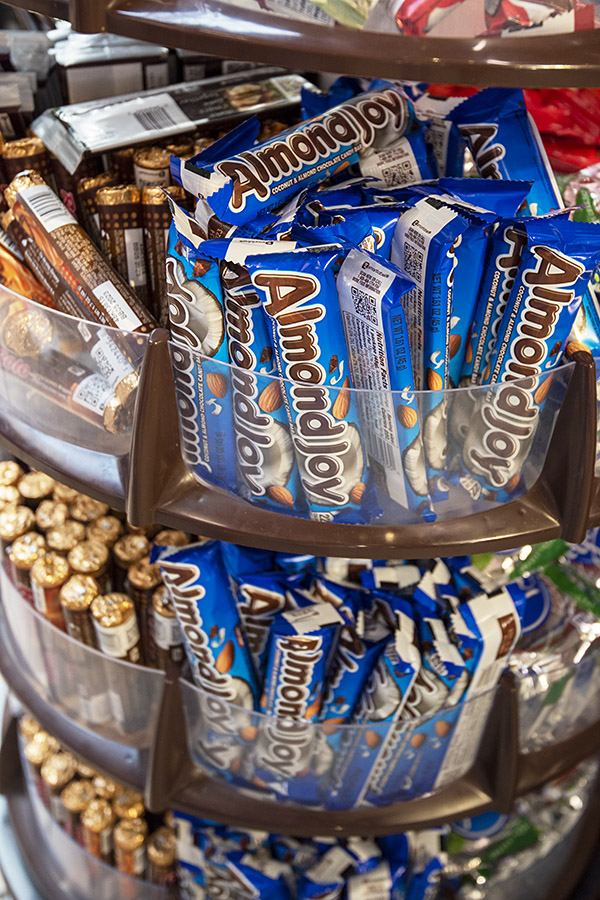
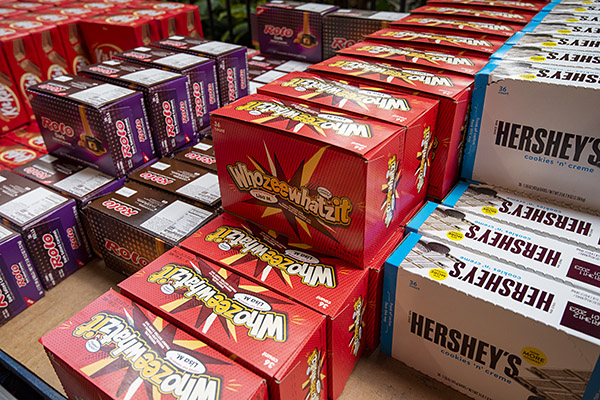
Not surprisingly, after you exit the factory tour little cars, you go through the candy store again.  Wow, there sure was a lot of candy.  I saw varieties of currently-available Hershey’s candies I’d never seen before.  It was not a total bust:  I had my Nikon and the displays were more than colorful.

It all looks good. I was mentally converting each treat to time on the treadmill.

Hershey’s owns Reese’s.  Reese was a guy who worked for Hershey, and then started his own company.  Then Hershey’s bought Reese’s.  There are Reeses peanut butter cups with peanut butter.  There are Reese’s peanut butter cups with peanut butter and potato chips.  There are Reese’s peanut butter cups with peanut butter and pretzels.  There are Reese’s peanut butter cups with peanut butter and marshmallows.  There are Reese’s peanut butter cups with peanut butter and, well, you get the idea.

Candy, as far as the eye can see.
More candy.  More calories.
And more.  More calories.  More mandatory time on the treadmill.

You might be surprised to hear this, but I gained a few pounds on this trip.  As soon as I finish this blog, I’m headed to the gym where I’ll spend quality time on the treadmill.  I need it.


The best kept secret in Hershey?  For starters, there are Pennsylvania’s back roads.  If you get off the freeways, just about any country road makes for a magnificent ride.  I rode many of these roads more than 50 years ago when I was stationed at Indiantown Gap Military Reservation, which is not too far away from Hershey.  I rode a 750 Honda Four in those days, and the roads are as magnificent today as they were then.  Folks, let me tell you: Pennsylvania is a motorcycling paradise.

Here’s another hidden gem:  If you want a world-class dinner (I’m talking fine dining raised to an exponent), there’s a restaurant called “What If” tucked away in Hershey.  It’s in the basement of a Howard Johnson motel, and if you don’t look for it, you won’t see it.  Trust me, it’s awesome.  I didn’t grab any food photos and that’s okay:  It’s my excuse for making plans to return some day.  But that’s in the future.  For now, it’s more time on the treadmill, and lots of it.


Never miss an ExNotes blog!

Bill’s Old Bike Barn…a first peek

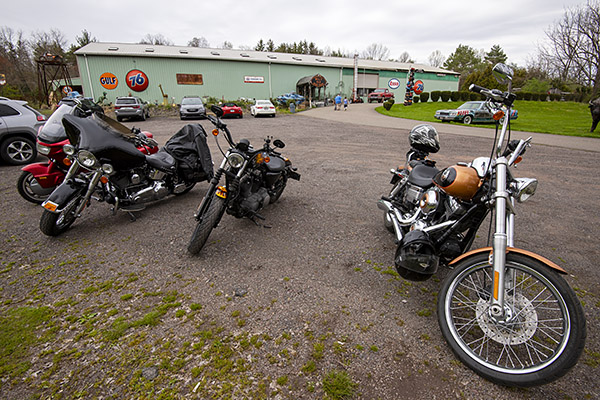
Stop what you’re doing.  Get off the Internet (and for sure, get off Facebook and the other moronic “social media” time wasters).  Start planning a trip to Bloomsburg, Pennsylvania.  You need to see Bill’s Old Bike Barn. The riding is fabulous in rural Pennsylvania and with Bill’s as a destination, the ride is even better. You can thank me now or you can thank me later, but you will thank me.

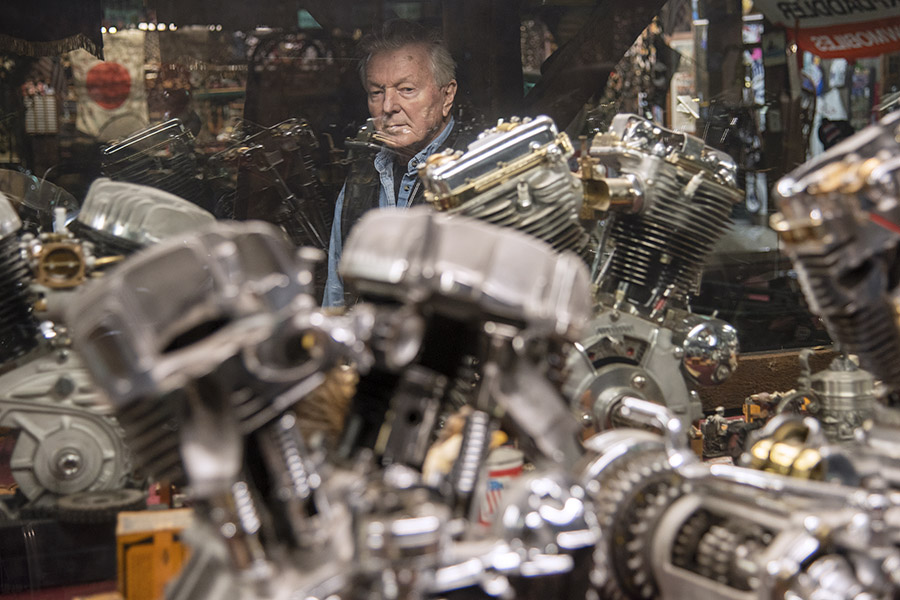
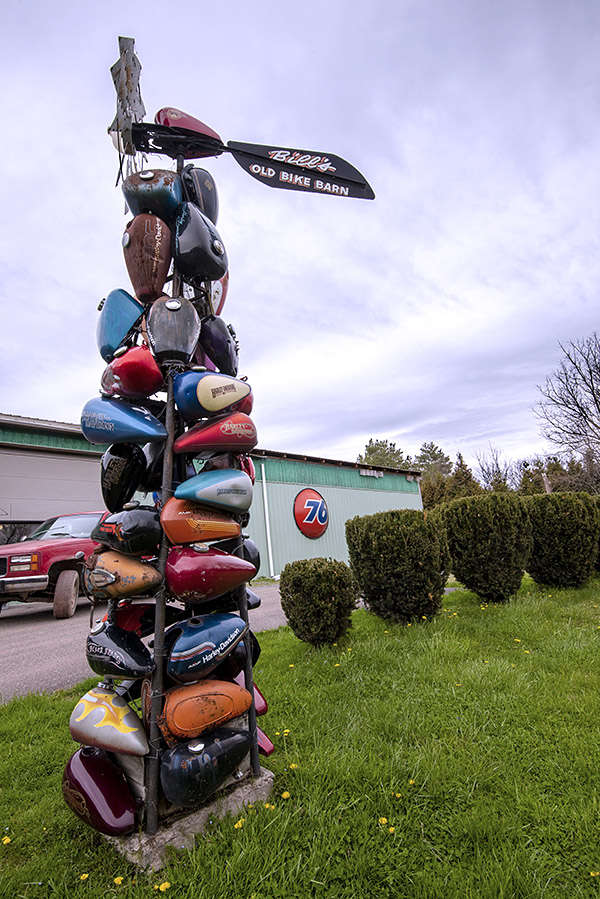
Any motorcycle museum that includes in its directions “turn where you see the dinosaurs” should grab your attention.  In the case of Bill’s Old Bike Barn, your undivided attention is warranted.  To say I was blown away would be an understatement of immense proportions.  To cut to the chase, I’ve never seen anything like Bill’s, and I know for damn sure I’ve never met a man like Bill.  That’s Bill artistically framed by Milwaukee iron in the photo above, and yeah, I shot that picture.  I’m proud of it.  It hints at the dimensions of the man and what he’s created out there in Pennsylvania.

During our interview I asked Bill his last name and he told me:  Morris, just like the cigarettes.  I didn’t get it until later, and then I couldn’t stop laughing.  If you don’t get it immediately, you will.  Bill has that kind of slingshot wit.  I love the guy and his collection.  You will, too.

Above all else, Bill is two things: A collector, and a people person.  The extent if his collection…well, I can’t describe it.  You need to see it.  You’ll get just a hint here in the ExNotes series of blogs we’re doing.  When you visit the place, you’ll feel like you owe me.  When you meet Bill, you’ll know you’ve made a friend.  A most interesting friend.

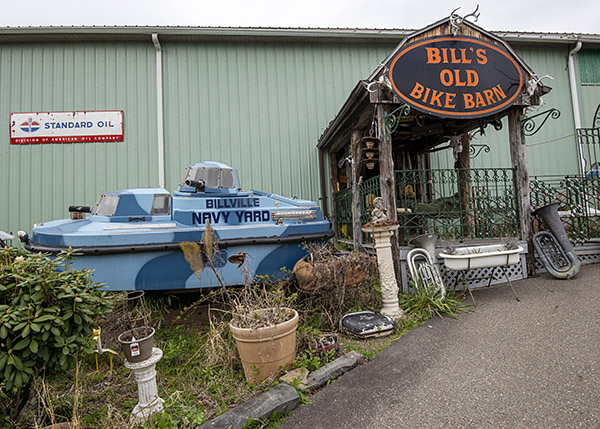
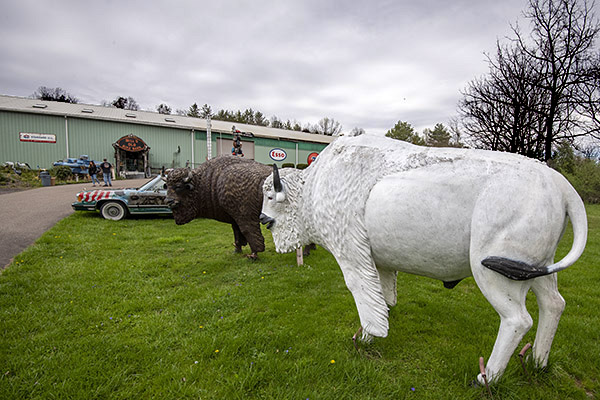
Up above, that’s the building that houses Bill’s collection.  You can’t really see it from the highway.  You have to look for the dinosaurs (just like the directions say), turn, and then head uphill.  You’ll go by the bison, some other cool items, and more.  The building looks deceptively small from the outside.  Inside…you could spend weeks and not see all of what’s in there.

You can learn about Bill’s Old Bike Barn on his website, but we’re going to give you more here on ExNotes.  We’re going to do it over the span of several blogs over the next few weeks, and in an upcoming article in a major moto mag.  Ever watched and enjoyed American Pickers?  Trust me on this (and trust me on everything else, for that matter): Bill Morris puts American Pickers to shame.  You and I have never seen anything like what’s in Bill’s Old Bike Barn.

I’m excited about what I’ve seen and what I’m going to be sharing with you.  I’ll do my best to bring it to life in print and in the photos, but it won’t be enough.  You really need to visit Bill’s Old Bike Barn.


Never miss an ExNotes blog…sign up here for free:

A Model 60 Hand Job

You know, you can have a lot of fun dreaming up titles for blogs.  When I told good buddy Mike about this one, he’s the guy who suggested the above.  Yeah, it’s racy, but it’s not what you think.  This blog is about timing.  Life, success, good comedy, and a host of other things are all about timing.

Take revolvers, for instance.  Timing is critically important.  For a revolver, timing refers to having the chamber precisely aligned with the barrel when the hammer drops.  If it’s not, the barrel becomes a salami slicer, which is good if you’re a mohel but bad if you’re a shooter (or another shooter on the firing line).
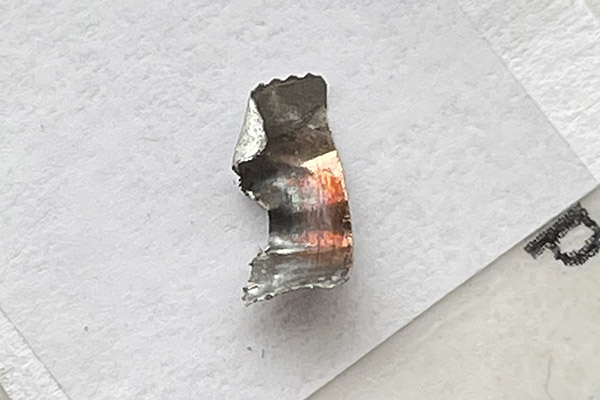
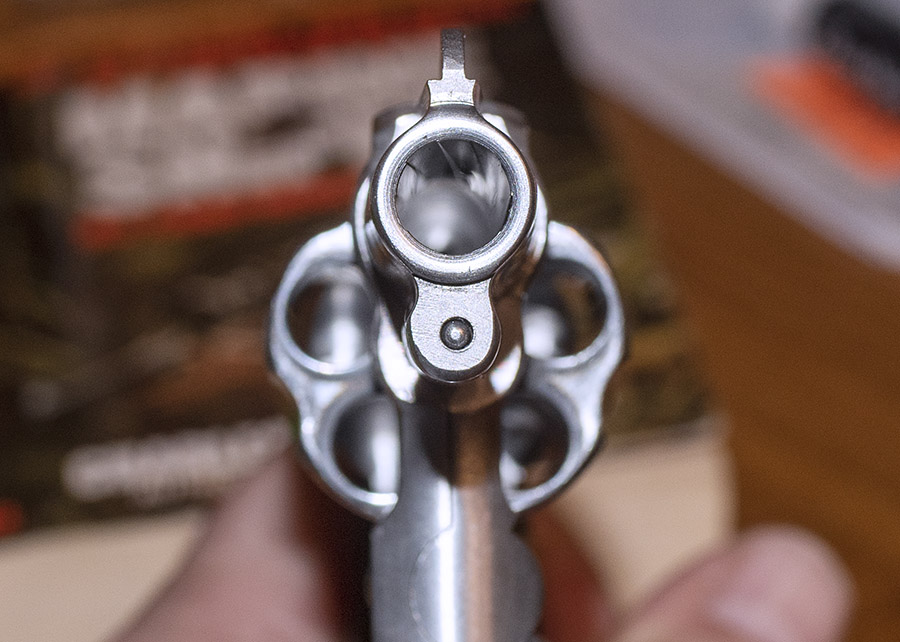
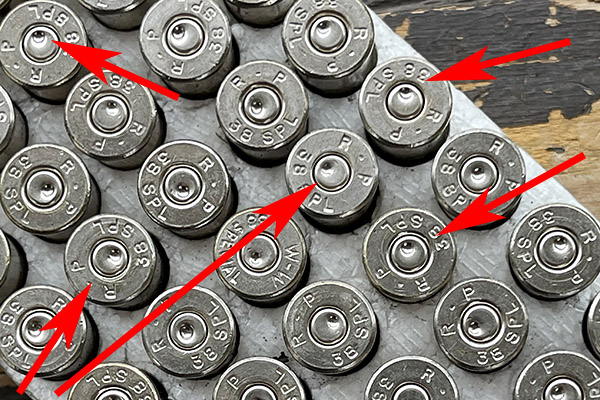
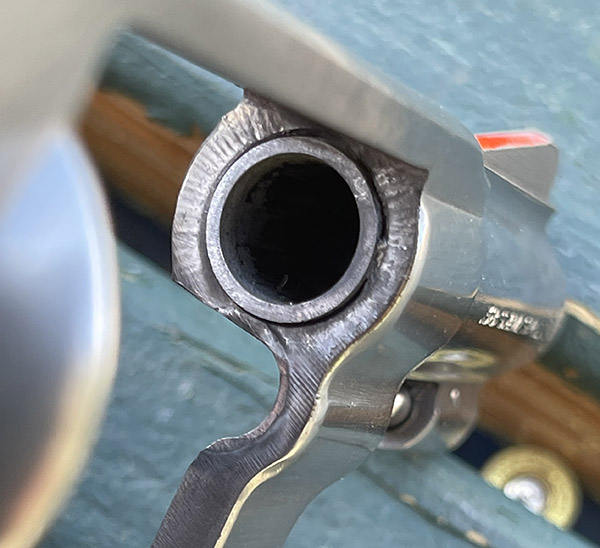
Take a look at that lead shaving in the photo above.  It’s what squeaked out of my Model 60 and went sideways at high velocity between the cylinder and the barrel.  It did that because the revolver went out of time.  Primers can be another indication of incorrect revolver timing, as shown in the photo below.  When the firing pin’s primer indentations are offset like you see here it means you’ve got trouble in River City (or anyplace else you’re firing the revolver).
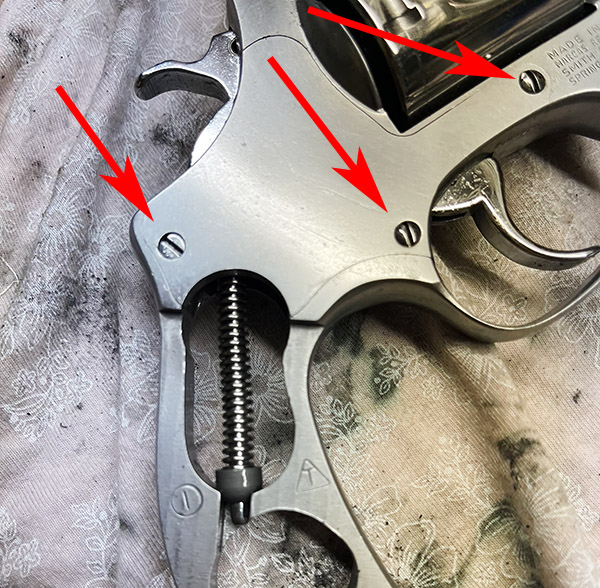
This blog explains how to correct an incorrectly timed revolver.  We’ll start, as always, by making damn sure the gun is unloaded.  Once we’re satisfied it is unloaded, the next steps are to remove the revolver’s grips and sideplate.  The grips detach with a single screw.  Three screws secure the sideplate, and each of them is different.  The one at the rear of the sideplate is easy to distinguish because it has a flathead to fit under grips.  The other two have domed heads, but they are not identical.  The screw at the front of the sideplate is dimensioned such that it locks the yoke in position fore and aft, but it allows it to rotate.  If you switch the two domed screws when you reassemble the revolver, the cylinder will not swing out of the frame freely.
Once the grips and sideplate screws are out, don’t try to pry the sideplate off the revolver frame.  Hold the revolver over your workbench with the sideplate facing down, and give the left side of the grip frame a few sharp whacks with a plastic mallet or a screwdriver handle.   The sideplate will drop out, and the transfer bar will drop with it.

After the grips and the sideplate are off, here’s what the guts of a Model 60 look like.   The transfer bar is the piece denoted by the left arrow.  It will probably have already fallen off the gun when you removed the sideplate.  Our focus in this blog will be on the hand, which is the piece noted by the red arrow on the right in the photo below.  The hand will pivot counterclockwise in the photo below. Rotate the hand counterclockwise and you can lift it out.
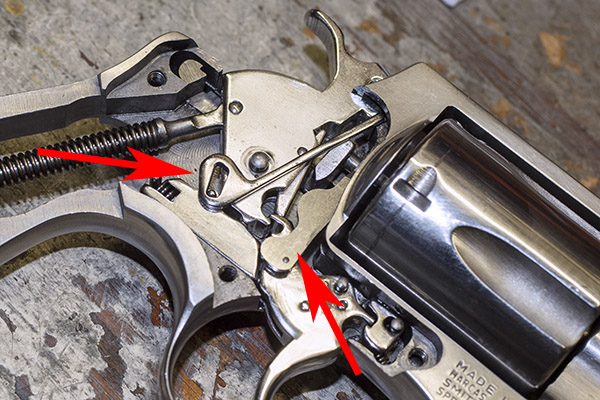
The hand is what moves upward as you pull the trigger or cock the hammer.  It fits through a slot in the revolver’s frame to engage the little nubs on the cylinder’s ejector.
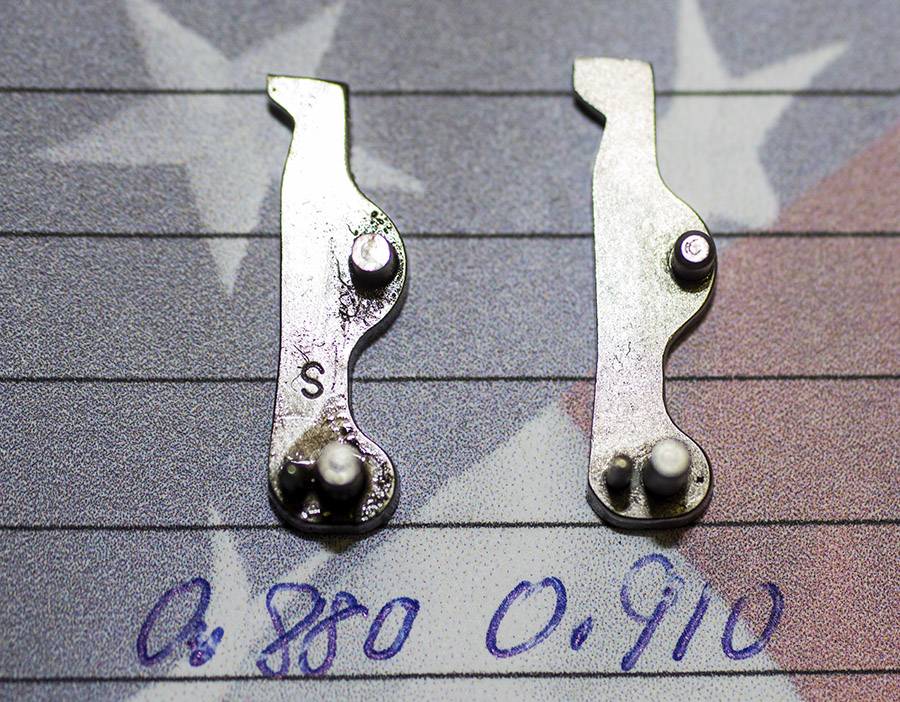
Here’s what the hand looks like after you have taken it out of the revolver.  The hand on the left (in the photo below) is the one that was in the revolver and Model 60 to go out of time; the one on the right is a brand new one.
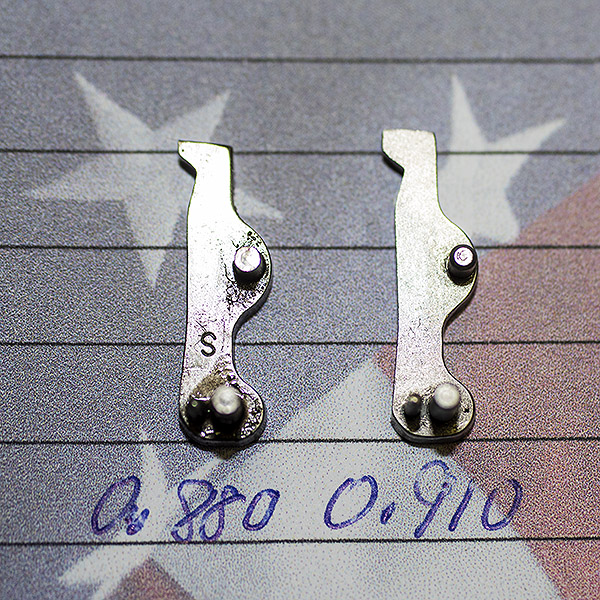
You can see there’s a big difference in length between the old and the new hands.  I bought my new hand from MidwayUSA.com.  It was about $25.

The next steps involve removing most of the revolver’s internal pieces.  You don’t have to do this to get the hand out of the gun, but you will have to remove and reinstall several internal components several times to properly fit the hand.  This involves checking both single and double action function testing, disassembling, removing very small amounts of material from the upper part of the hand, reassembling, and repeating the process several times until the revolver is functioning satisfactorily.

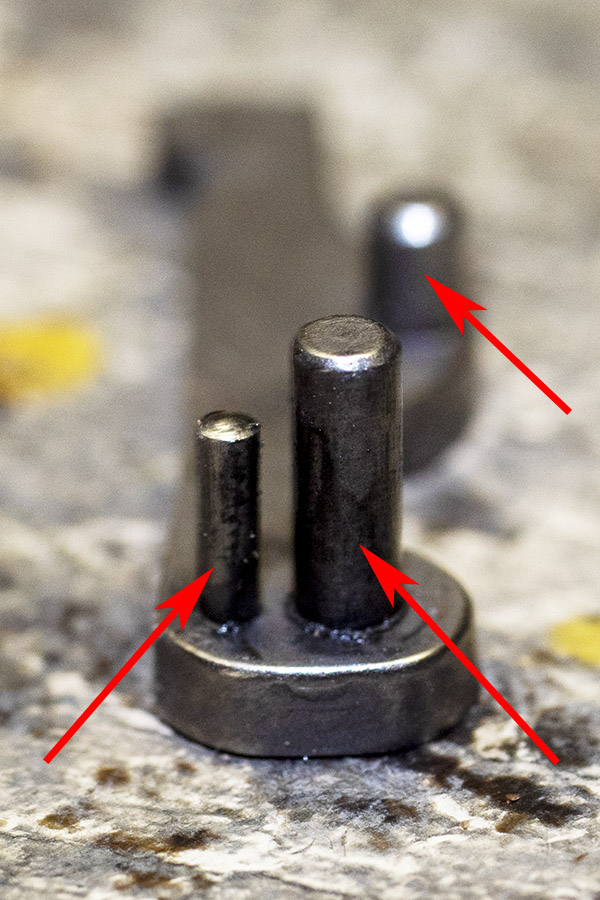
We’re going to remove the hammer spring and yoke using the same paper clip custom tool we used for installing the lighter hammer spring (denoted by the left arrow).  Those other two arrows denote where the hand’s two  bottom pins fit into the trigger.  We’ll come back to that later.
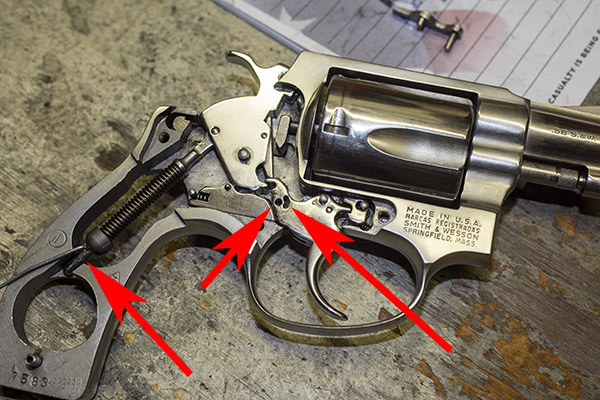
This next two photos show the hand’s bottom pins.  The third pin is a stop. We’ll come back to that later, too.
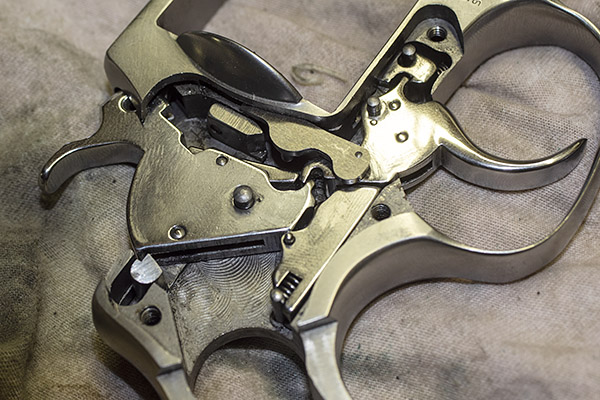
At this point, push the revolver’s cylinder release forward, lower the cylinder out of the frame, and slide the yoke and the cylinder off the revolver.

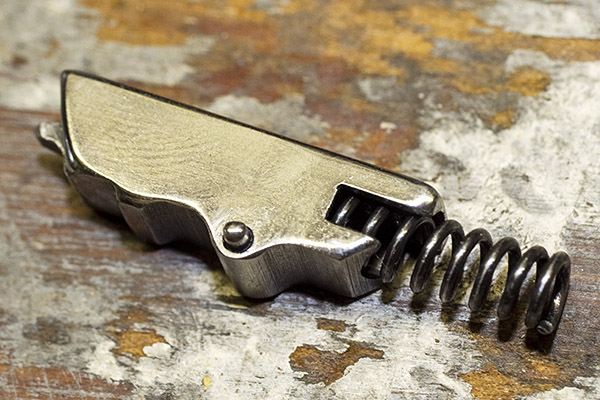
We’ll next remove the revolver’s hammer.  It lifts out to the right.   Then we get to the trigger spring and rebound slide.   It’s tricky.  It’s the piece just below the hammer in the photo below.  Note that it has a spring acting against a post at the rear.  After you have removed the hand and the hammer, you can pry the rebound slide away from the revolver’s frame, but make sure you cover that spring.  If you don’t, it will go flying.  Don’t ask me how I know.
Here’s the trigger spring and rebound slide after removal from the revolver.
At this point, you can lift the trigger out of the revolver.

This is where things get even more tricky.  We’ll fit the new hand to the revolver.  Doing so will require installing it as delivered to get a rough feel for how much material we need to remove from the hand, reassembling the revolver to check functionality, disassembling again to remove the hand, stoning the upper surface down a little, reassembling, and repeating the process.  It took me three assembly/disassembly/reassembly cycles to get it where it needed to be.  Slow and gentle is the approach here.  You can take material off the hand; you can’t put it back on.  Take too much off, and you’ll ruin the new hand.

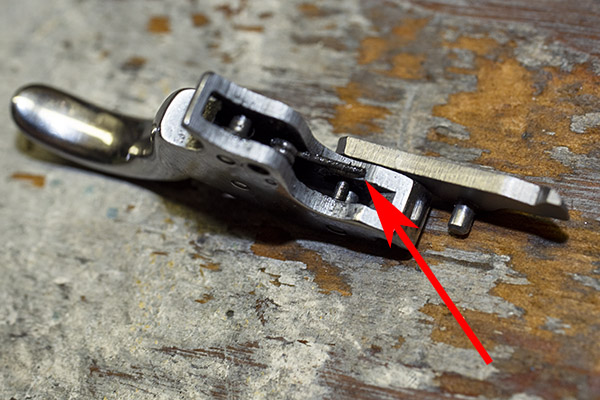
The first thing we need to do during the reassembly step is install the new hand in the trigger, and that’s tricky, too.  There’s a tiny torsion spring in the trigger, and its purpose is to keep the hand pressed forward against the extractor.  You can see the red arrows pointing to the spring in the photo below.
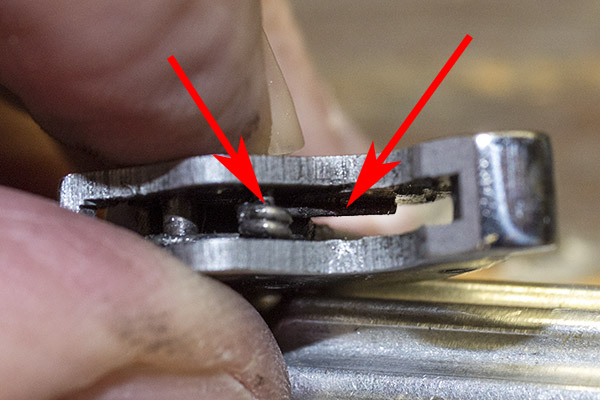
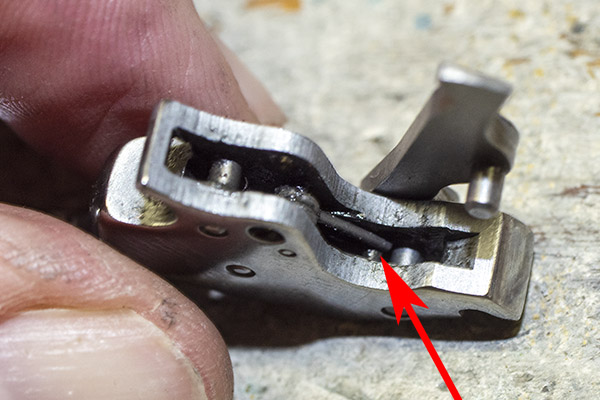
That little spring needs to be on top of the hand’s smaller lower post, and in order to get it there, the easiest way is to push it up from beneath the trigger before you attempt to install the hand, rest the spring on the side of the trigger, install the hand, and then push the spring back into the trigger.  Here’s what it looks like with the spring pushed on the side of the trigger.
After you have inserted the hand into the trigger (as you see above), you can then push the spring back into the trigger’s slot.
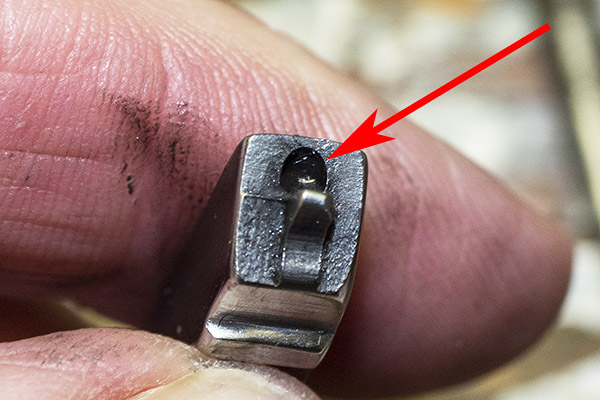
We are now ready to start the fitting process.  Put everything back together again except the transfer bar, the sideplate, and the grips.  When you reinstall the rebound bar, make sure the little shaft that extends from the rear of the trigger engages the cavity in the front of the rebound bar.  You can see that cavity in the photo below.
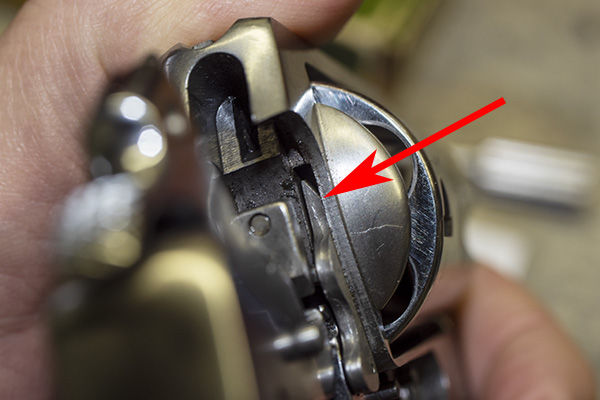
When you look at the revolver from the rear, you’ll see the hand inside the revolver frame slot, and how it moves up and down when the hammer is cocked (if you are firing single action) or when the trigger is pulled all the way to the rear (if you are firing double action).  The hand acts against the little nubs on the extractor to rotate the cylinder.  You can see one of the extractor nubs in the photo below.
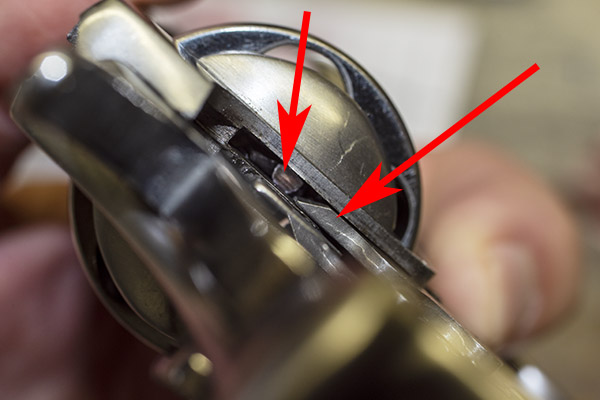
On a new hand, the hand will most likely be too long.  The revolver may or may not rotate the cylinder when you actuate the trigger in a double action mode, and the hand probably will not actuate the cylinder when you cock the hammer as if you were firing in the single action mode.  That is because the hand is so long it slides along the rear of the extractor nubs without dropping in between them, which it needs to do to ratchet the cylinder so the next round comes into battery.  In the photo above, you can see a little bright witness mark at the bottom of the upper red arrowhead where this occurred.

We next disassemble the revolver’s guts as described above to fit the hand to the revolver.  We’ll remove a bit of hand material from its top portion using a stone.  I angled the top edge of the hand.  Here’s what that looks like.
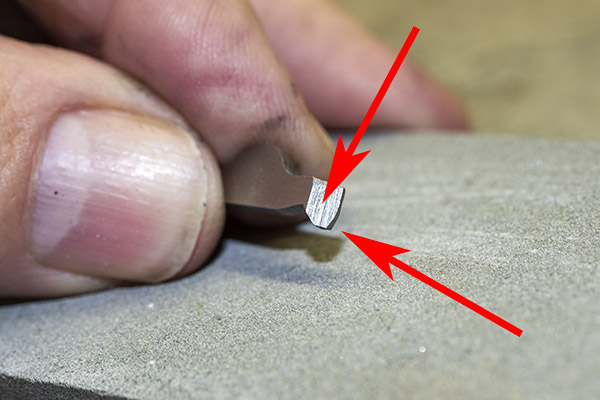
The lower arrow in the photo immediately above shows where I removed hand material.  The upper arrow shows the hand’s angled surface that completes the cylinder’s advance.  Leave this area alone.
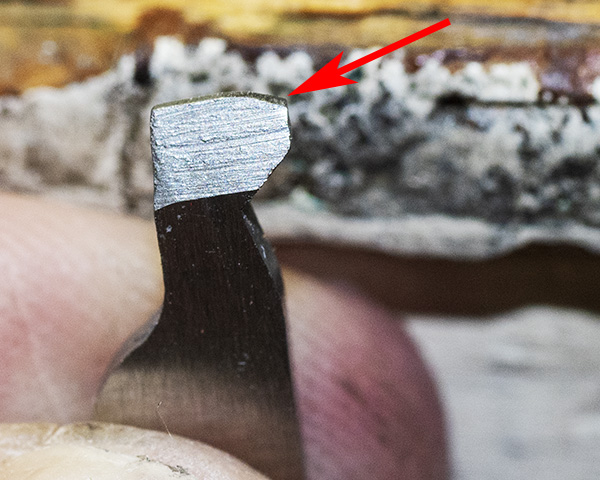
The photo above presents another look at the same angled portion of the hand as it is delivered.  The red arrow points to the area where I removed material to fit the hand to the revolver.  The larger angled area is how the hand came from the factory.  It looks rough as hell, like it is begging to be polished, but I left that part alone and my revolver is silky smooth.

After we’ve done the above assemble/check/disassemble/remove hand material a few times, you’ll get to where the revolver looks the cylinder in place right where it is supposed to be (you’ll need to reinstall the cylinder and yoke to do this).   What we want to do is put your finger on the cylinder so that it has a little drag while cocking the hammer.  When the hammer is fully to the rear, the bolt at the bottom of the cylinder should click into place.  Then we want to do the same thing (put your finger on the cylinder to impart a little drag) and pull the trigger to the rear double action style.  The bolt should snick into the cylinder just before the hammer falls.

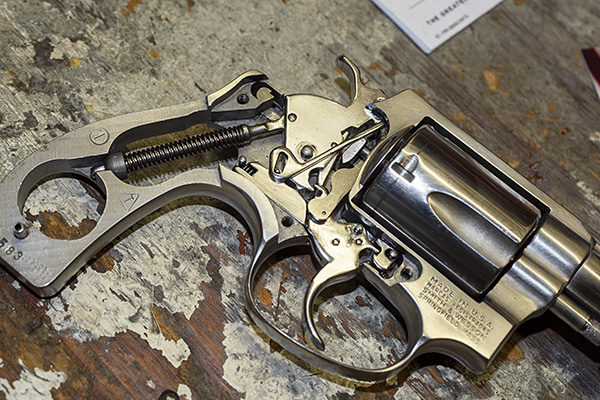
When you think you’re there based on the above checks, it’s time to fully reassemble the revolver.  Lay the revolver on its left side and place the transfer bar on top of the hammer as you see in the photo below.  You have to have the transfer bar all the way up so the pin in engages is at the bottom of the transfer bar slot.  If you don’t have it positioned as you see below, the sideplate will not fit back on the revolver.
After doing the above, good buddy Paul suggests loading dummy rounds in your Model 60 to make sure it cycles correctly.   Before you go to the range after doing this kind of work, it’s a good idea to take some fired cases and cycle them through the gun in both single action and double action modes.  If you have some with the primer indentations off center (as shown in the photo at the start of this blog), check to make sure that the new indentations are now more centered (they were on my Model 60).  DO NOT put live primers in an otherwise empty case for this test; they can back out of the cartridge case and lock the gun.  You also want to make sure that there’s no interference between the new hand and the case rims.  I haven’t encountered this on a Smith and Wesson revolver; Paul has on a Taurus revolver.

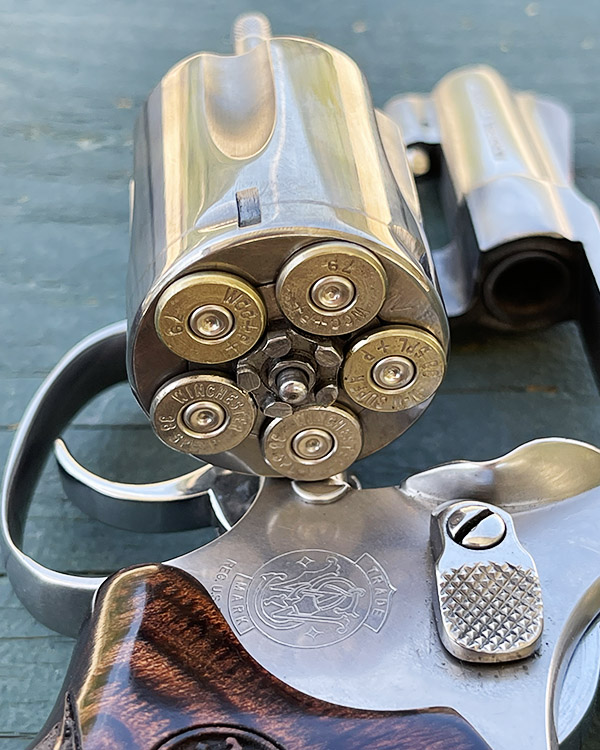
I used the fired empty cases you see in the photo near the top of this blog (the ones with the off-center primer strikes) and cycled five through single action, and another five through double action.  The gun cycled flawlessly, and the previously fired cases now had primer indentations in the center of the primers.  Things were looking good, but the real test would be on the range.

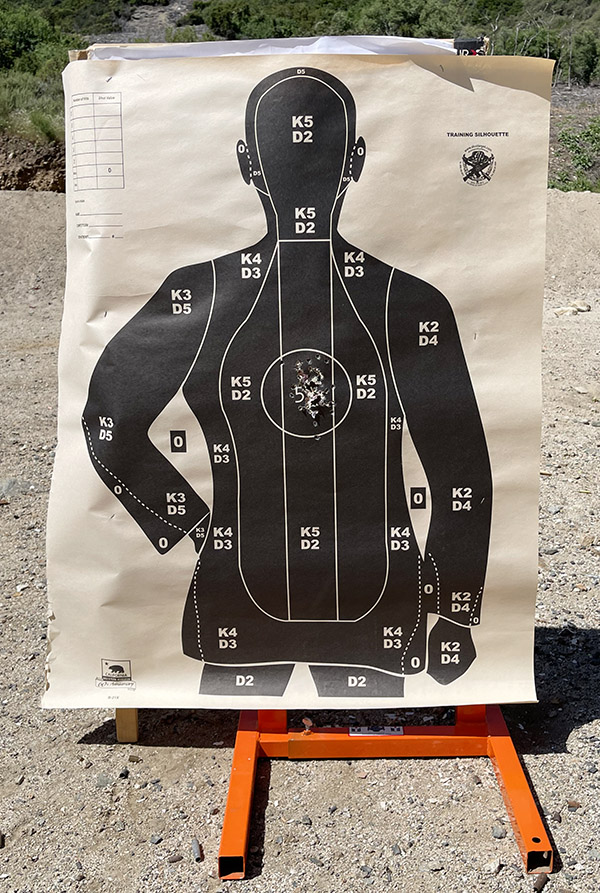
I set up a police qualification target at 7 yards and pumped a box of ammo (5o rounds) through the Model 60 shooting double action rapid fire.  Wow, was I pleased with the on-target results.
After the first few cylinders of ammo, I looked at the forcing cone around the frame.  Unlike earlier, when there was a heavy lead spatter pattern on the right side of the frame only, the spatter was now evenly distributed around the forcing cone.  That’s another indication that the cylinder was centered in the forcing cone (i.e., aligned with the barrel).  Things were looking good.
I then examined the primer indentations in fired cases.  They were smack dab in the center of the primer, right where they should be.
And folks, that’s it.  This revolver is between 50 and 60 years old, and it’s now as good as new.  It’s a favored handgun and it does good work, as that target above attests.

Watch the blog, as the Model 60 will continue to appear here.  It’s just too good and too much fun to relegate to the safe.


More Tales of the Gun!


Never miss an ExNotes blog…sign up here for free!

The NY Auto Show

You’ve read here on the ExNotes blog about good buddy Mike and me having an adventure or two.  I’ve known Mike since junior high school, which means he’s pretty old.  So am I, now that I think about it.  Anyway, Mike and I still talk every week or so (it’s a bicoastal relationship), and he most recently told me about the NY Auto Show.  I suggested a guest blog, and what you see here is the result.  It’s well done and well photographed.  Enjoy, my friends.


After a two-year absence due to the pandemic, the New York International Auto Show returned to the Jacob Javits Convention Center in Midtown Manhattan.  The NY Auto Show has been in existence since 1900.  I can remember attending the show during the ’60s with my father at the New York Coliseum off Columbus Circle.  In 1988 it was moved to the Jacob Javits Center.

The NY Auto Show always featured the latest models of all makes as well as the experimental prototypes designed by the best auto designers in the world.  If you wanted to see the latest and greatest, this was the show to attend in the Northeast.  A highlight of all the shows has always been the beautiful models on stage with the cars.

Probably the most memorable show, for me, was in 1979 when a close friend of mine decided to sell his 1978 Corvette Indy Pace Car at the show.  We had the car transported to the show on a flatbed and after numerous inspections and paperwork we had it on display.  Besides the excitement of showing a car at this prestigious event, the most exciting part was having my then girlfriend (and now wife) Carol model the car.  Needless to say, the display drew a lot of attention, not because of the car but because of her presence.  She wore a black jumpsuit and silver blouse.  Great attention, but no sale.

I always attend on the first day of the show and this year was no exception.  Upon entering, I was greeted by Ford’s full display.  The centerpiece was an original Ford GT and the newest Ford GT.

After going through the various displays (including Mopar, Chevrolet, Nissan, and more), I soon realized the focus was on electric vehicles.  Performance was there (with the new Z06 Corvette and convertible), but the primary focus was electric.  In my opinion, it was very boring and a waste of my time.

The international marques were also present, including Rolls Royce, Bentley, Lamborghini, Porsche, Volvo, and Alfa Romeo, along with the usual Japanese.  The largest displays were by Toyota and Subaru.  Mercedes, BMW, Jaguar, Ferrari, and not even Cadillac were present.  What a disappointment!  I recently ordered a 2022 Cadillac CT5 and was looking forward to a close examination of that car.  After walking for miles up and down the center I finally found an information booth where I learned Cadillac was not attending.  Unbelievable, but true.

The 2022 NY International Auto Show was a waste of my time.  No prototypes, no customs, no major performance cars, along with the inability to see all the cars made and speak with the representatives, this may be last for me.  Did I mention, no beautiful models either?  Nope, none.  The highlight of the day was having a hot dog, pretzel, and a beer.


Awesome, Mike, and thanks very much.  You have a way with a keyboard, and we appreciate hearing about the legendary NY Auto Show.

Hey, anybody else out there have a topic you want to cover?  Imagine the prestige in telling your amigos you’ve been published.  It can happen, and it can happen right here.  Let us know!

And don’t forget…click on those annoying popup ads!  The popper-upper people pay us every time you do so!

Ho-Made Tools I Don’t Use

I’ve been cleaning out the shed on and off for about four years now. When we first moved here we stuffed everything into the shed. There was no time to sort through the junk. We had to return the Penske truck. After the junk sat there a few years the mice made a lot of decisions for us: if it was chewed up we tossed it.

I had tools at my work, tools at the house, tools at The Love Shack, three of everything. I just can’t bring myself to toss out tools. I have some home-built tools that no longer serve a purpose but I hang on to them. Because you never know when you’ll need to remove the centrifugal oil filter on a Honda 305.
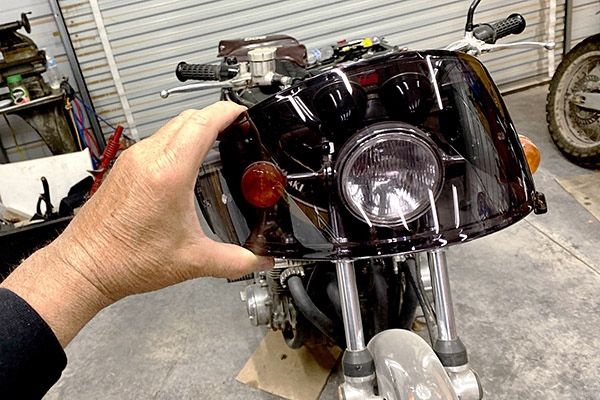
This wrench was made from a cut down socket and a rear fender support from a Sportster. It fits the output flange nut on a boat V-drive. The output flange sits pretty low in the bilge and after a while the salt water splashing around in the bottom of the boat corrodes the seal. To remove the seal you have to separate the prop shaft from the V-drive. The problem is the prop shaft will only slide back a few inches before the prop-shaft flange hits the stuffing box. With this set up I could change a v-drive seal without pulling the engine. It was a stupid move on my part because at the time I was paid by the hour. The faster I went the less I earned. I still keep the wrench; maybe it will fit something else someday.
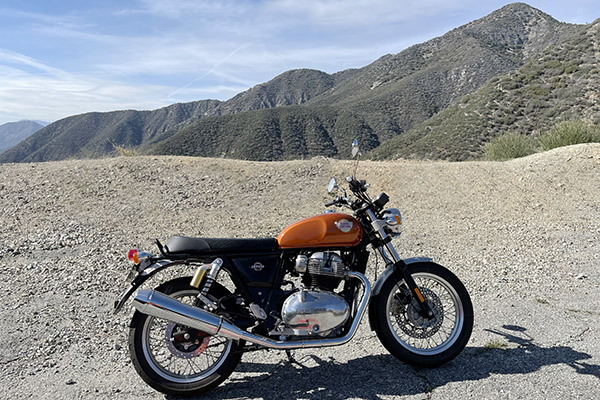
I mentioned the stuffing box and here’s the cut down pipe wrench I used to remove the packing nut and loosen the lock nut. Stuffing boxes are used where the prop shaft goes through the boat hull, a bronze casting called a shaft log. The stuffing box is a large nut that has several rows of flax packing, also called cat gut. These rows of packing are fitted into the packing nut or the shaft log depending on the design of the shaft log.

The flax packing seals the shaft log where the shaft enters so that water won’t leak into the boat…almost. In practice you want to leave a small drip, maybe a drop every 30 seconds, for a water supply to cool the stuffing box. If you crank down on the packing too much you can burn up the flax and the shaft log will leak. The pipe wrench is short because the stuffing box nut is large and it’s always hard to access between the stringers of the boat. You can buy a store bought stuffing box wrench but they are made like a flimsy adjustable wrench with a cheesy wing nut to lock the jaws into position. Trust me: the pipe wrench works better. A hammer also works but tends to damage the bronze stuffing box.

I didn’t make the dial indicator, just the Z-shaped bracket. This tool is used to set the timing on a 1971 360 Yamaha Enduro. The ’71 Enduro (and other years) has an angled sparkplug hole. The angled hole precludes measuring the piston stroke through the plug hole. With the cylinder head removed this tool bolts up and can measure the stroke. You have to know the piston position to accurately set the ignition timing. Once you’ve set the correct fire position there is a little tab inside the flywheel area that lines up with a flywheel mark. Bending the tab to line everything up will save you from measuring the piston stroke every time you want to adjust the points. It’s a use-it-once type of tool unless you disturb the timing marks. Godzilla runs so good I may never need it again.

This tool is made from Monel, a metal found around boat yards, which isn’t important to its function. There are a few other holes in the tool but I’ve forgotten what they do. The two holes marked by the red arrows will fit a Norton Lockheed front disc brake caliper. In operation you insert a couple drill bits into the tool; the bits line up with two holes drilled into the Lockheed caliper. The caliper plug this tool fits unscrews and allows removal of the caliper piston. You need this long lever because the plug gets pretty tight after 35 years. I’m hanging on to the tool because I may own another Norton one day.

At one time my dad and I owned BMW motorcycles. He had the 600cc and I had the 750. These were early 1970s models with the new, suitcase engine. In building the suitcase engine BMW relocated the cam below the crankshaft so the pushrod tubes were below the cylinder rather than above like on earlier engines. This was done to raise the cylinders higher in the bike allowing steeper lean angles in the corners. The problem was the pushrod tubes leaked oil where they contacted the crankcase. This tool slips over the pushrod tube and by tapping the base of the pushrod tube you could tighten up the seal area. It sounds crude but it was easier than pulling the heads to install new pushrod tube seals. I think you can buy a factory tool that looks much better than mine but does the same thing. I’m not adverse to owning the early GS 800cc, the ones that are clean and light and don’t have all the useless garbage BMW loads onto new motorcycles.

This tool is used to remove the nut from a Honda 305 centrifugal oil filter. I had two 305 Hondas. Those bikes had beautiful engines that were made extremely well. Early Hondas had a spinning cup type filter that oil circulated through. In the spinning motion heavy particles suspended in the oil were slung outward, clean oil flowed through the center. It was a good oil filter and if you wanted to take the engine apart like I did you needed this tool. After thousands of miles you would remove the right side cover to gain access to the filter. A wire clip held the o-ringed lid on the filter and I’d pull the thing off for cleaning. It wasn’t unusual to find 1/8-inch of compacted swarf stuck to the walls of the filter.

Back to boats. This tool is used to remove the macerator from Raritan Crown marine toilets. Working on boats isn’t the glamorous job that you see in the movies. Sometimes you had to fix toilets. The Crown was a very popular toilet back in the day. It used a large starter motor to spin a macerator and two rubber impeller pumps. One pump supplied seawater to the bowl then a macerator chewed up the poo and finally another impeller pumped the mash to a holding tank or overboard depending on how far offshore you were. After much use the seals would start leaking and the stuff leaking out wasn’t peppermint.

You had to disconnect hoses and the bowl then turn the motor (usually) to get to the end plate. Small straight slot screws held on the plastic end plate, removing the end plate allowed access to the macerator and the poo. The macerator had two pivoting chopper arms; removing these arms allowed you to screw the puller tool onto the macerator and a center bolt would pull the macerator. It was not a fun job. I wish I never made the puller tool. I could have told customers, “Sorry I don’t have the tools to fix your toilet.”

I have more homemade, or as we say in the south “ho-made” tools that I may write about on a day like today, a day when I’m sifting through the accumulated junk of my life.


More product reviews!


More Joe Gresh!


Never miss an ExNotes blog!

ExhaustNotes Road Test: Shoei RF SR Helmet

I finally managed to put some miles on my new Shoei RF SR helmet. I took the RD350 out for a loop of the mountains and Tularosa’s TulieFreeze Ice cream shop. I had a Sundae with hot fudge, nuts and whipped cream. TulieFreeze always puts a cherry on top.

Oh yeah…the helmet. The Shoei was quiet at highway speeds, none of my bikes have windshields so I get the air full blast and I like it that way. Turning my head side to side was comfortable and the wind didn’t over-rotate my head side on. All in all the Shoei RS cuts a pretty clean swath through the air. There was no shaking or turbulence.

The fit is perfect on the top parts of my head (your head may vary) but the cheeks are still too tight as the pads press in on my jowly visage more than is appropriate for two people who just met. Luckily the cheek pads are made to be easily removable in case you have crashed. Hopefully the EMT will know to remove the pads before trying to force the helmet off and severing your spinal cord.

I’ll probably wait a bit longer before shaving down the cheek pads. I still have hopes it will break in. I need to stop and remove my helmet to relieve the face-pressure after 50 miles. It gives me a chance to admire the RD’s metallic purple paint. The tight-ish flip shield has loosened up a bit, I gave it a squirt of Shoei oil and after 10-20 flips it’s ok.

Speaking of the shield I have Shoei’s auto-darkening face shield. That sucker cost more than any helmet I’ve ever bought. Since I now have had both cataracts removed from my eyes I can see much better at night. I’m planning to step up the after hours summer riding and the auto-tint works fabulously. From the outside it appears super dark but from inside the helmet it’s not so dark. In fact, I wouldn’t mind if it got darker. As it is I can ride in bright sunlight without squinting. It seems to keep the inside of the helmet cooler.

When the sun goes down it’s as clear as a clear shield. On thing that worries me is how resistant the coating is to gas station squeegees and bug guts. I’m going to put a heavy coat of paste wax on the shield and even that makes me nervous. What if the wax screws it up?

It was cool but not cold on my ride and I totally forgot to open the vents to see if they had any effect of the interior airflow. At 70 degrees with the vents closed it was comfortable. I’ll test the vents after the doctor gives my new eye the ok to thrash around on a motorcycle.

Another week or two and my eye should be back to full strength. That means I can lift concrete bags and ride around without a care. I’ve already planned a trip to Tina’s Mexican food in Carlsbad; they have reopened after Covid shut them down for a year. It’s good to see things returning to normal after such a trying two years.


Never miss an ExNotes blog…subscribe for free!


More product reviews!

Coming up…more good stuff!

We’ve got a bunch of cool stuff coming your way in the next few weeks.

I’m working on a detailed tutorial on how to time a revolver…it’s my beloved Model 60.  It seems the more things go south on that old war horse, the more I love it.  This time, the revolver went out of time (that means it’s firing with the chambers misaligned with the barrel), and the way to correct that is by fitting a new hand.  That’s the piece you see in the big photo above, showing the well-worn 60-year-old original hand on the left and a new one on the right (the hand is the part that advances the cylinder for each shot).  Good times.  Did I mention I love that gun?

I’ll be on a bunch of secret missions in the next few months.  I’m visiting Janus Motorcycles in the next few weeks and I’m going to ride their new Halcyon 450.  You may remember I rode with the Janus guys in Baja three years ago (wow, those three years went by quickly).  The Janus trip was a hoot and I was blown away by the quality of these small motorcycles.

I’ll be in Gettysburg soon…four score and seven years ago, and you know the rest.  Gettysburg was the turning point, and the bloodiest battle of the Civil War.  I’m looking forward to the photo ops, and you’ll see the Nikon’s output right here.

And another:  Hershey, Pennsylvania…an entire town blanketed in the aroma of good chocolate, streetlights that look like Hershey kisses, calories galore, and tasty treats.  That will be a sweet ride!

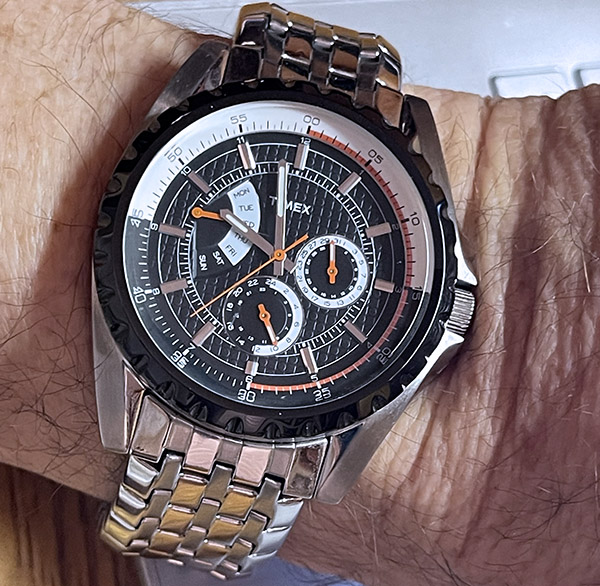
Folks love listicles.  There are a dozen or so reasons why a Timex is as good as a Rolex.  That one will generate a few comments, and we’ll be bringing them to you here.

How about the Indianapolis Motor Speedway?  You’ll see it right here on ExNotes.  Good stuff.  Yep, we’ll be there, too.

Bill’s Bike Barn…yet another vintage moto museum.  Never heard of it?  Well, you will!

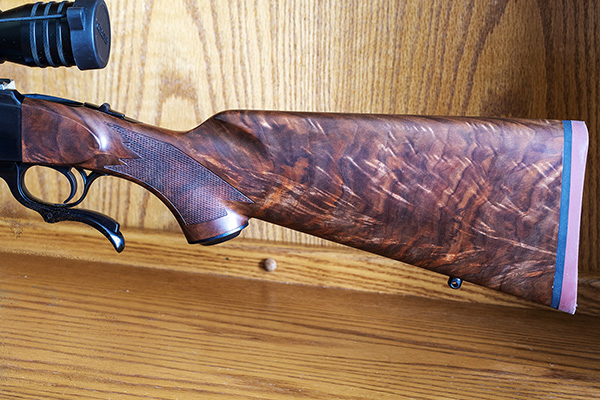
More gun stuff?  Absolutely.  Fine walnut and blue steel.  I’ve got a cool story about the most beautiful stock I’ve ever seen on an absolutely incredible .257 Weatherby Magnum Ruger No. 1.

Look for a follow up on the Shoei helmet Gresh wears these days…it’s in the mix, too.

A road trip to New Mexico, and that means a visit with Joe 1 (or is he Joe 2?) and another video or two.  Gresh has a bunch of motorcycles.  Maybe I’ll borrow one and he and I will go for a ride.  Who knows?

And more rides on my effervescent and exciting Enfield, one of the best bargains in biking (we’ll have a listicle coming up bargain bikes, too).  Now that the left-leaning evil time suck (i.e., Facebook) is in the rear view mirror, I have lots more time.  I’m doing what the Good Lord intended, and that’s riding my motorcycle and writing about it.

Stay tuned.

ExhaustNotes.us Book Review: Maus By Art Spiegelman

The main reason I read the two-part graphic novel, Maus, is because a school board in Tennessee banned the book from their curriculum due to nudity and bad language. I wanted to see what the school board found so sexy about the holocaust.

Spoiler alerts ahead.

Maus is mostly about one Jewish man’s survival of the Nazi’s effort to exterminate the Jewish people. You’ve heard the stories and the subject has been covered extensively. Maus is a different in that the hero of the book, Vladek (I call him a hero because just surviving took an incredible, heroic will to live.) seems to have an unnatural ability to thrive in any situation no matter how desperate. Vladek never loses his spirit and can find the positive slant in a horror of degradation and abuse. It takes a strong man to feel he’s lucky to be in Auschwitz instead of Birkenau.

The road to the concentration camps was not a direct line. There were many slights and inconveniences that the Jewish people tolerated because this was their home. All their friends and relatives were here. Little by little the Nazis increased the pressure, still no one could have imagined the full extent of the plan and by then it was too late. The numbers killed are staggering. Vladek’s nighttime visit to the bathroom is shocking to us now: he steps over and on dead bodies lying on the floor hoping not to slip down and become one of them.

A second story line runs parallel to the Nazi extermination; this is the son’s story of trying to come to terms with his father’s obsessive cleaning and extreme thriftiness. Vladek’s terrifying life has left him unable to stop preparing for the next holocaust even when he’s safe in America and financially well off. Vladek counts matches to avoid running out, returns half eaten boxes of cereal for credit and is perpetually on the make for a deal. These traits served him well in the concentration camps and I don’t see any downside to them after he is freed. Compared to what Vladek had been through any minor embarrassment on his son’s part was no big deal.

My Dad and grandparents were from the depression era and I saw some of the same kind of economy and scarcity mentality when I was young. For my Dad, wasting food was the biggest crime you could commit. He told me often how joining the US Navy was the best thing he ever did. He couldn’t believe the amount of food the Navy provided and didn’t understand how some of the other sailors could complain about the food. He thought it was heaven.

The comic book style of Maus might make it more accessible to younger readers and the short sentences keep the story moving along. The artwork is black and white using a brutal sort of drawing. Each panel looks like a carved linoleum print. The Jewish people are shown as mice, Polish people are pigs, Germans are cats and the American GIs look like dogs. At times the Jewish characters try to disguise themselves by wearing the mask of a pig or a cat. Sometimes it works.

There is a third storyline running in the background. This is the love story of Vladek and Anja, husband and wife. They become separated in the Nazi’s roundup of Jews. Luck plays a big part in life and by luck Vladek and Anja end up seeing each other in the concentration camps. As the war came to an end and the Allies closed in the Nazis stepped up their abuse and started shipping Jews back into Germany for killing, sometimes leaving the Jews in locked cattle cars for weeks until they were all dead. Vladek survives the rapidly worsening conditions like he always does by eating snow and horse trading for sugar.

I think schools back in the 1960s and ’70s were a bit more enlightened and less of a political/ideological battleground than they are today. The school curriculum was set by professional educators, not by angry, politically motivated parents. I know the story of the holocaust because we were taught it in school. The ovens, the gas chambers, the millions killed by clockwork death factories and the chimneys always rendering fat. The scale was unbelievable. Maus is a believable, personal story and the eyewitness account made me despair for our species.

I truly believe something like the holocaust could happen in America. Native Americans will tell you that it has happened here. Black slaves were treated only marginally better than concentration camp prisoners. I’ve seen how people in our country rose up and cheered a kid who shot protesters. One of their side had shot some people from the other side and that was praiseworthy. I’ve seen Americans fighting over toilet paper. Jewish synagogues and gravestones are routinely defaced. I see Nazi marchers parading in American cities. There is plenty of hate to go around in the American psyche and by the hour we are being indoctrinated to regard the other side as less than human. It takes so little to create a monster.

There is nudity and bad language in Maus but if you’re the type of school board that finds mountains of naked bodies being doused with gasoline and set on fire or a woman dead in a bathtub titillating or erotic there is really nothing more to be said. If your real goal is to stop people from reading Maus then you will identify with the cats in this book.

Anyway, I figure that by the time an American kid reaches 12 years old he’s seen around 50,000 murders on television or at the movies so that kid should be ok to read Maus. The story of the holocaust needs to be told over and over in as many ways as possible. It should be drilled into each student’s head until they can recognize the first sign of evil: like an American school board trying to ban a book about Nazi crimes. Instead of being banned Maus should be required reading from junior high onwards.


More product reviews (including book reviews) are here.

Chongqing!

Other than good buddy Arjiu (that would be Joe Gresh), I’m guessing most of you have never been to Chongqing.  Chongqing is home to China’s motorcycle industry and it was the starting point for your two blogmeisters’ putt across the Ancient Kingdom.  I enjoyed that ride enormously.  Gresh and I had some fantastic times.

I first visited Chongqing and Zongshen as a consultant to CSC when we used Zongshen’s 250cc engine in our Mustang replicas.  One thing led to another, and before too long CSC was Zongshen’s exclusive North American importer, and CSC introduced the RX3 to the US.  I was blown away by Chongqing, the people, the size of the city, the photo ops, the cuisine, and more.  I’ve been there many times and I’d go back again in a heartbeat.

Good buddy Fan shared this video a few days ago, and I knew I had to share it on the blog.  Pro tip:  Hit the little button on the bottom right of the video (after you start it) to view it full screen.  It’s impressive.

You can be a China hater all you want. I know more than a few people over there I call my friends. Yeah, the world is going through some shaky times right now, but that’s not the Chinese people and it’s for sure not the guys I know. I like the place.

If you want to know more about our trip across China, pick up a copy of Riding China.   There’s a link here on the blog.  And take a look at our Epic Rides page, where we have links to posts about that ride.


Never miss an ExNotes blog!

New Boot Day

Life is full of tiny, traumatic incidents. Each day we are met with hundreds of micro-decisions that demand little of our attention yet matter enough to require a few seconds of our time. New Boot Day is not one of these decisions.

I was going to the Harbor Freight in Alamogordo to pick up one of their welding carts that was on sale for $34. Or maybe was it a closeout? Inventory reduction? Anyway, I try not to leave the house in my bathrobe and slippers so I put on my day clothes and boots for the excursion. That’s when it hit me. My boots were looking pretty bad.

I’ve been wearing Rossi boots for about 8 years now. They are super comfortable right out of the box. Style-wise the Rossi boots are no great shakes but who wears boots for style? If the Rossi’s can be said to have a flaw that flaw is that they last forever. The damn things simply never wear out. Since they still work as boots you never know when to call them done.

Today though, the Rossi’s looked pretty tattered. The soles were still firmly attached and the uppers were all in one piece, it’s just that the overall boot looked like something you’d see worn by the unfortunate men in one of those grainy photos of a depression-era food line. I began to be self-conscious about my foot wear: will the clerk at Harbor Freight take a look at my beat up boots and decide to call security?

I’m hard on boots. My shuffling pace, the lazy-feet constantly tripping over rocks and thresholds and my need to crawl around on the ground to do the things I like to do all tend to shorten the life of boots qua Gresh. Popular, well-known brands of leather work-boots will last about 6 months on me.

Conversely, I hate to get rid of a pair of boots unless they are utterly destroyed. Part of it is my natural thriftiness and part of is my deep-seated feeling that I don’t really deserve a new pair of boots. What have I done to warrant new boots? There are many, many people who work much harder than me and these people do not get new boots…ever. I feel like such a fraud wearing new boots. Who do I think I’m fooling?

Then there’s the distress caused by having to witness my brand new boots get scuffed up. One time I had new boots on and the first day I tripped over a sharp piece of rebar, the rebar put a 1-inch long slice on the toe of my new boot. It nearly killed me. Not the trip: the slice. I find my movements inhibited with new boots on. I can’t do my thing and worry about the finish on my boots at the same time.

After much anxiety and teeth gnashing new boots become old boots and my world can settle down. Everything is in order, I can pull on my boots and go about my daily business, be it motorcycle riding or concrete placement, without a second thought. I’m free and loose with old boots.

But not today. Today I have on new boots and every step I take in them is a toxic cocktail of fear and self-loathing. I will step high, always watching for obstacles that could mar the beautiful ebony leather of my new boots. I will bend at the knees. I will stand soles down and I will wish I could leave my new boots safe in their shoebox forever.