If you’ve been keeping up with us here at ExhaustNotes you’ll know I had a lot of trouble getting Zed, my 1975 Kawasaki Z1 900, running correctly.
In between rebuilding the carbs and tinkering with most everything I could think of it dawned on me that maybe the engine was just tired. After all, it wouldn’t be unusual for a 50-year-old, air-cooled engine to wear out after 46,000 miles.
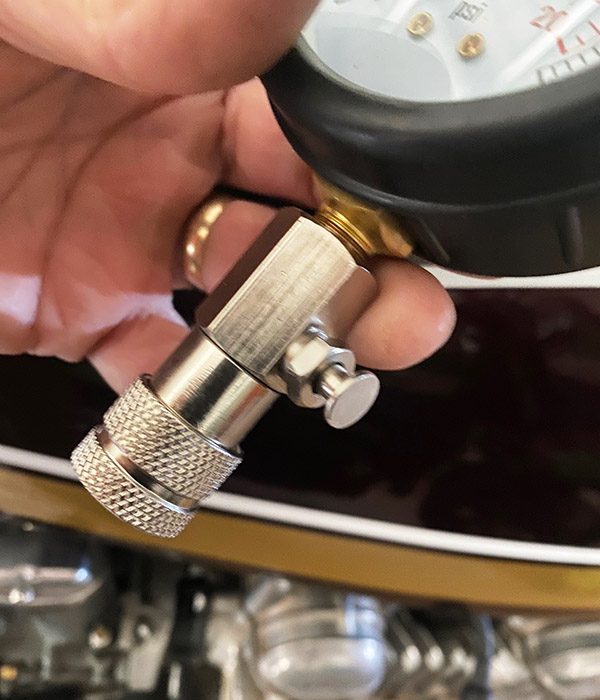
I used to have a nice compression tester that was at least 40 years old. In the big move west I can’t seem to find it. Maybe it got tossed after one of the many floods that inundated our house in the Florida Keys. I forget the brand but it had a flex hose and several adaptors for different size spark plugs.
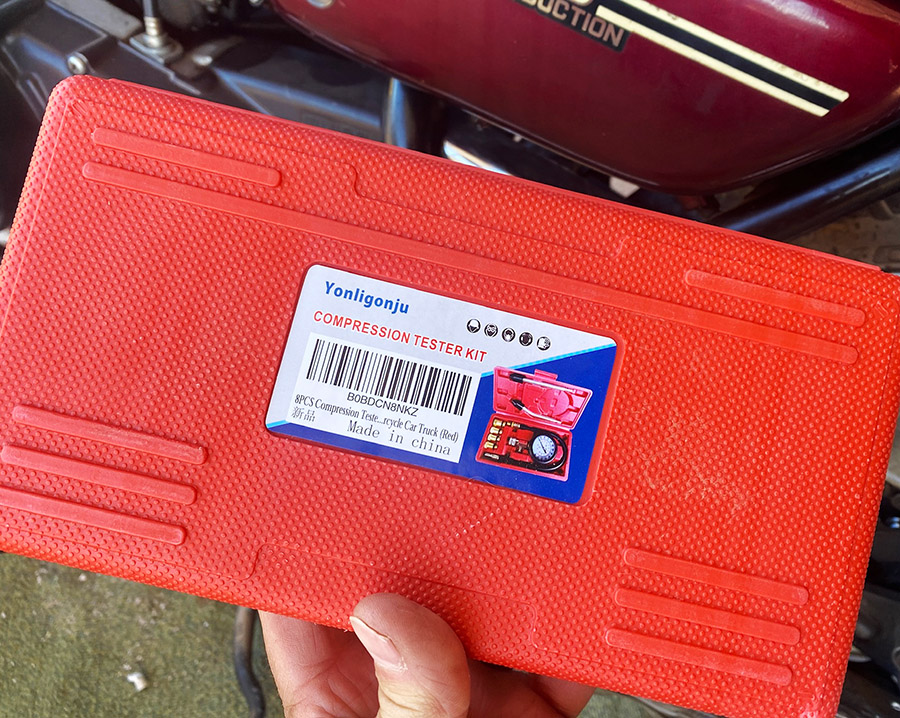
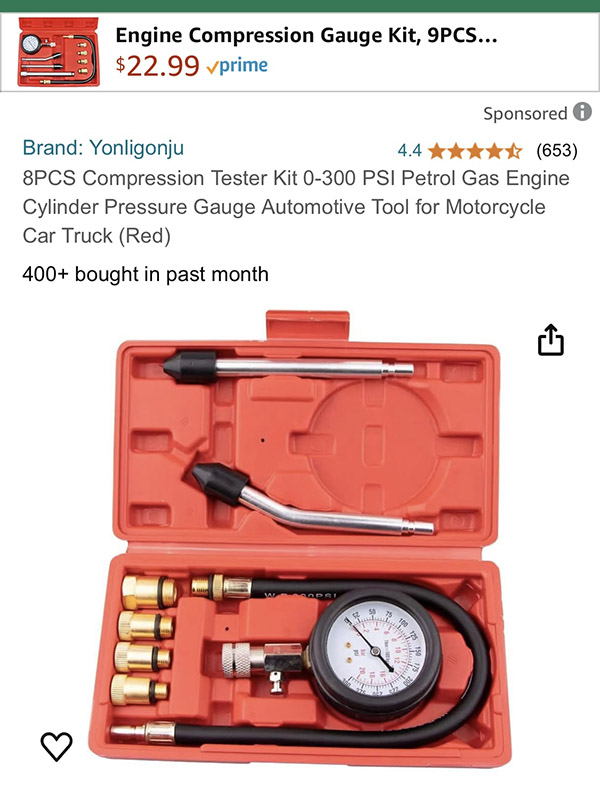
I don’t need a pro-level compression tester as I’m not in the mechanical business anymore. This cheap, cheerful Yonligonju (say it three times fast!) Chinese kit on Amazon looked like the goods for less than 20 dollars.
The Yonligonju comes with a nice, blow molded plastic case that keeps all the little bits in order.
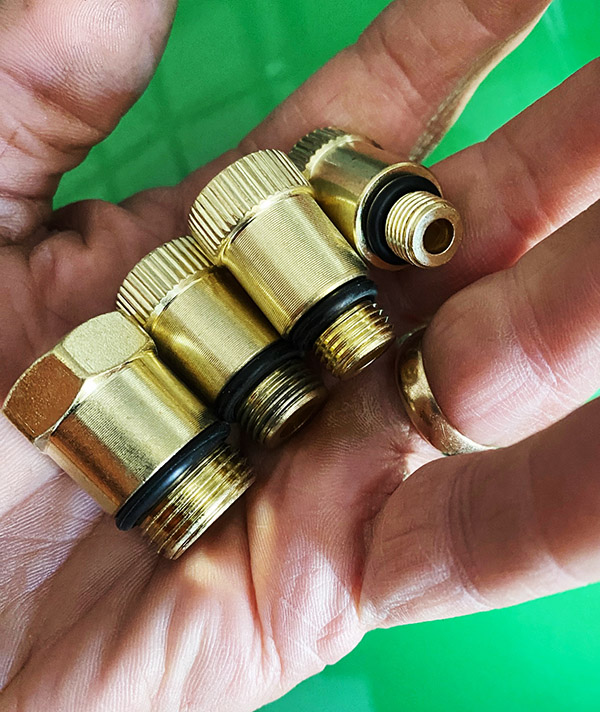
It amazes me how China can build such a nice kit for so little money. Including the quick release flex hose, this kit comes with adaptors to fit 5 different spark plug sizes.
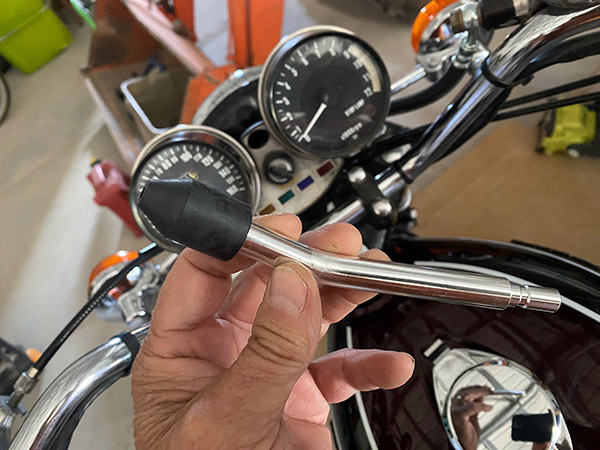
In addition, the set came with two of the rubber bung type connectors. To use these, you just hold the compression tester tightly in the spark plug hole. It speeds things up on a multi cylinder engine. This works well enough if you’ve got enough hands for the job.
My Yonligonju worked well, showing 80-ish psi on all four Kawasaki cylinders. This isn’t great compression but the cylinder pressures were nearly even and Zed might have done better if the engine wasn’t cold. My Kawasaki manual claims 85 psi as the lower limit and Zed may get there warm. What do you want after 46,000 miles?
Besides compression, what you’re looking for with a compression tester is one cylinder being much lower than the others. This indicates a problem in the cylinder. The actual psi number is less important. Unless they are all really low…
Anyway, the Yonligonju gauge proved compression wasn’t the reason my Kawasaki was fouling plugs. See the latest Zed update for the full story.
The compression gauge held the reading without bleeding off for the few minutes it took me to look at it. There’s a pressure release valve on the side of the gauge that also worked as it should.
This isn’t a kit that will see a lot of usage. If you’re like me, a home-shop tinkerer, the thing will do the job for not much money. Hell, just taking your bike to a motorcycle shop once to test the compression would cost five times what the tool cost.
I think people rebuild old motorcycle engines more than is needed. Two-strokes especially get the piston, ring and bore because it’s so easy to do. Most likely the bike would have run fine the way it was.
For classic bikes that don’t see everyday use it’s enough that the engine runs well. There’s no need for a ton of compression with today’s crappy fuel anyway. I’m guessing the Yonligonju will last a while sitting in my toolbox waiting for another engine to test.
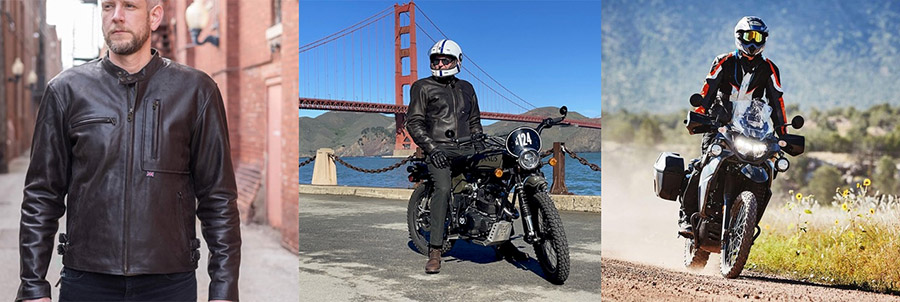
Good news! Good buddy Andrew Capone, Isle Of Man empresario and British Motorcycle Gear baron is having an exclusive sale for ExNotes readers. It’s a whopping 21% off any BMG brand jacket. When you enter your order on the British Motorcycle Gear site, just add the code BMGJOES21 at checkout. British Motorcycle Gear also has great deals on Belstaff closeouts (as well as nice gifts in the $100 range) for under your Christmas tree. Andrew tells us that the 21% BMG jacket discount is 1% more off the sale he’s currently running, and that’s because we ExNoters are his kind of 1%-ers.
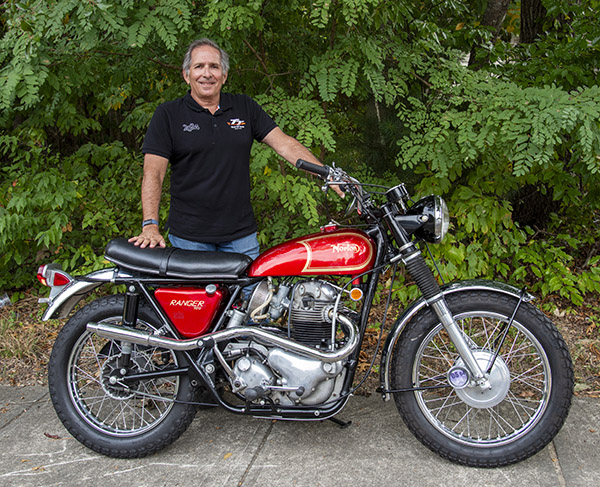
You read about Andrew here on ExNotes before. He’s the real deal and he’s a real rider. The latest issue of Motorcycle Classics magazine (Jan-Feb 25) is about to hit the newsstands, and Andrew’s magnificent Norton P11 is featured in it. It’s a great read about a great bike (I know because I wrote it). Pick up a copy when you get a chance. Or, if you have a subscription, you can read it online.
You’ve also read about BMG gear here on ExNotes. Joe Gresh tested several of their items, he’s a crusty old fart, and he gave all the British Motorcycle Gear high marks. You can read Gresh’s BMG reviews here.
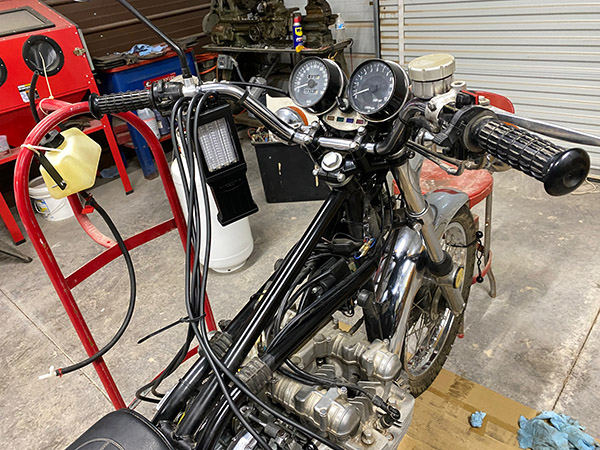
I like to think of myself as handy with a wrench. I try to fix most things even if I have no clue and oftentimes succeed. This Kawasaki 900 though, this Zed has been giving me fits. It almost makes me question my do-it-yourself mantra. Almost…
After initially getting Zed running a few years ago I enjoyed 4000 relatively trouble-ree miles. Zed had a slight hitch in its giddy-up right off idle but otherwise it ran fine. Then the bike started fouling spark plugs and missing. Occasionally gasoline would pour out the carb overflow tubes and a sharp rap with a screwdriver handle was needed to stop the flow.
So my first line of attack was the float needles because they were original and came out of corroded carbs. I went online and bought some cheap carb kits that included needles and seats.
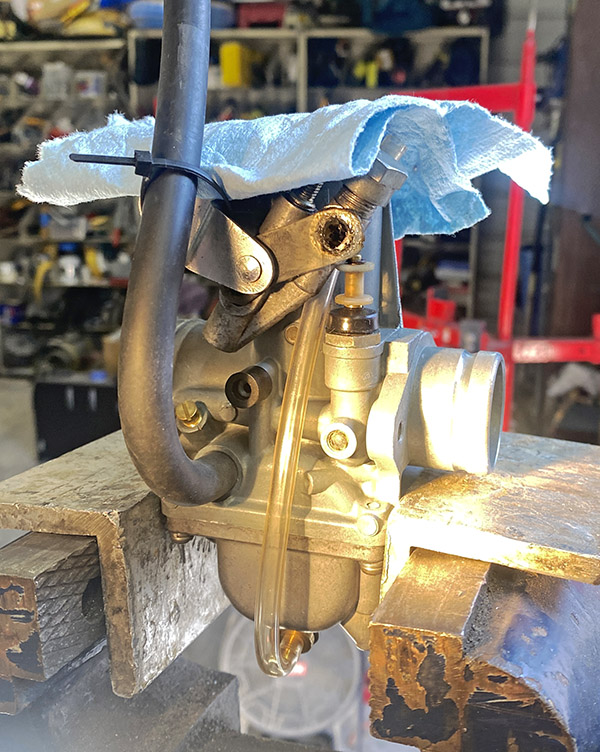
Setting float height on carbs using plastic hose screwed into float bowl drain.
On a 1975 Z1 Kawasaki the carbs sit up high off the engine block so you can do a lot of tinkering without removing the carb bank. I changed all the needles and set the float height using the clear tube tool that screws into the carb bowl drain.
New fuel tees @ $26 each!
This didn’t really cure anything. Plugs were still fouling. I started to suspect an ignition problem. After messing with the points and several test runs I was getting nowhere so I purchased a new, aftermarket ignition system. They’re cheap, like $90 or so.
Carbs removed from Zed. A scene I got accustomed to. After the 4th round trip I decided to look elsewhere.
The new system came complete with new coils and wires. This was nice as the old coils were butchered by the previous owner. I installed the new ignition system and the bike still ran terrible and fouled plugs.
I rechecked the aftermarket floats and upon examination I found the needle seats miss-punched with what looked like lettering for the needle size. This caused a wrinkle in the exact spot the needle needed to seat.
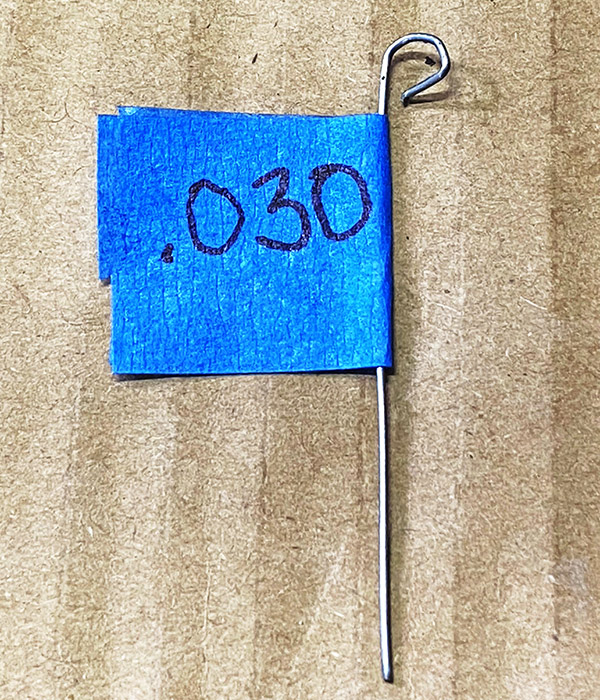
.030 tool for setting baseline carb slide height.
Next, I bought new Mikuni needles and seats. I put the Mikuni stuff in and re-set the float levels. The bike ran like crap and foiled the plugs. At least I knew the ignition system was ok.
I was at my limit of understanding, my attention went back to the carburetors. I pulled the carbs, dismantled them and cleaned everything.
Zeds carbs sat like this for 2 years. I was befuddled, vexed, stressed right the “F” out.
I bought another, more expensive carb kit and new Mikuni enrichener plungers. The carbs were in a million pieces on my bench and I lost interest. Other things were happening, concrete need pouring and the carbs gathered dust for two years.
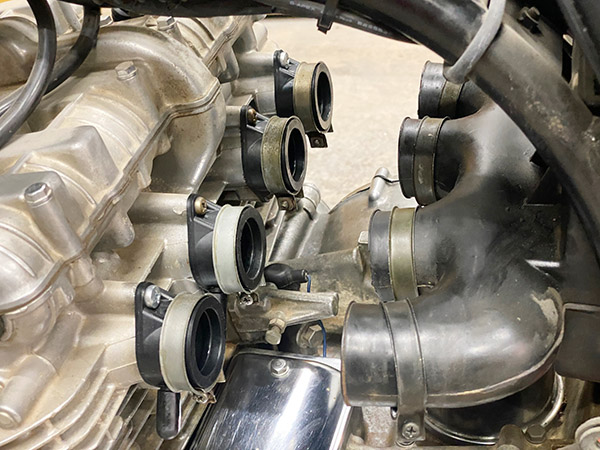
A few months ago I decided to get Zed running for the Motorado vintage motorcycle show up in Santa Fe, New Mexico. Buckling down, I reassembled the carbs and using new rubber manifolds (the others had dry rotted in only a few years!) I slid the carbs back into Zed and the bike ran like crap, still fouling plugs.
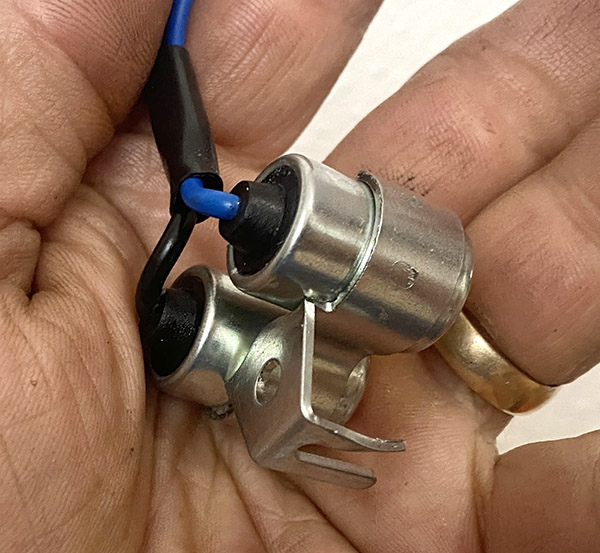
I couldn’t get the bike running well enough to sync the carbs. A bad condenser was messing up two cylinders.
I took the carbs off the bike and went through them again making sure everything was spotless. And the bike ran like crap. Again, I took the carbs apart racking my brain over the flooding issue. And the bike ran like crap. I changed jets, I changed float heights, I swapped pilot air jets, I swapped emulsion tubes. The third time I took the carbs apart and triple checked everything the bike still ran terrible.
I was in the weeds bad-like and decided to think hard on the situation. I told myself that carbs aren’t all that complicated and that even if I didn’t get them perfect it should still run. And that the bike ran fine for 4000 miles with those carbs. That was when I decided to go back to the new ignition system.
One of the new points had a whitish coating. I thought maybe the bike sat so long the points corroded. Then inspiration hit me: the condensers! I checked the condensers with an ohm meter and found one of the two condensers bad.
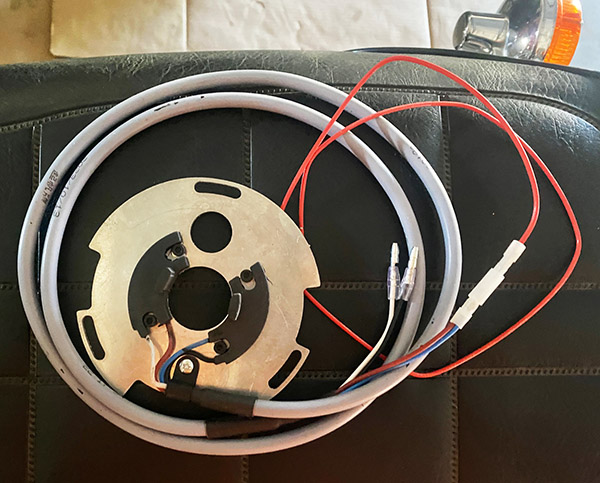
Bad condenser from new kit.
I had started with one problem: fouling plugs and by using aftermarket needles I installed a worse set of needles. By removing the original ignition system I installed an entirely new problem with the bad condenser.
These two errors were compounded by my inability to believe that the new parts were bad out of the box so I kept rebuilding the carbs over and over.
The condensers on the old ignition system tested ok and I swapped them into the new plate. And the bike ran. Not perfectly because I had all the jets wrong in my attempts to make the bike run.
I walked the carbs back to their original settings. First the old slide needles and emulsion tubes went back in. Then the main jets, then the pilot jets until finally everything was back to where I started from two years ago.
Zed was running pretty good so I took a little 300 mile test loop. No fouled plugs. Stupid hurts and I was so damn stupid chasing gremlins that I was creating even as I was installing new gremlins.
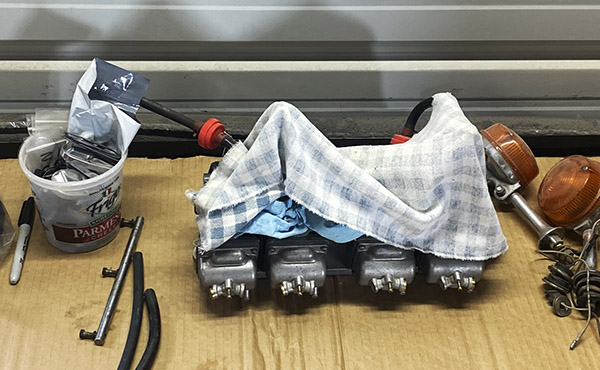
Home built replica of the official Kawasaki carb sync tool.The business end of the carb sync tool.
Next up is a good carb sync and since parts are so crappy now I will try an electronic ignition system just for fun because I haven’t screwed things up enough yet. Stay tuned.
New electronic ignition. Only $68 on Amazon. Cheaper than points! What could go wrong?
Want to follow the initial resurrection of Zed? It’s right here!
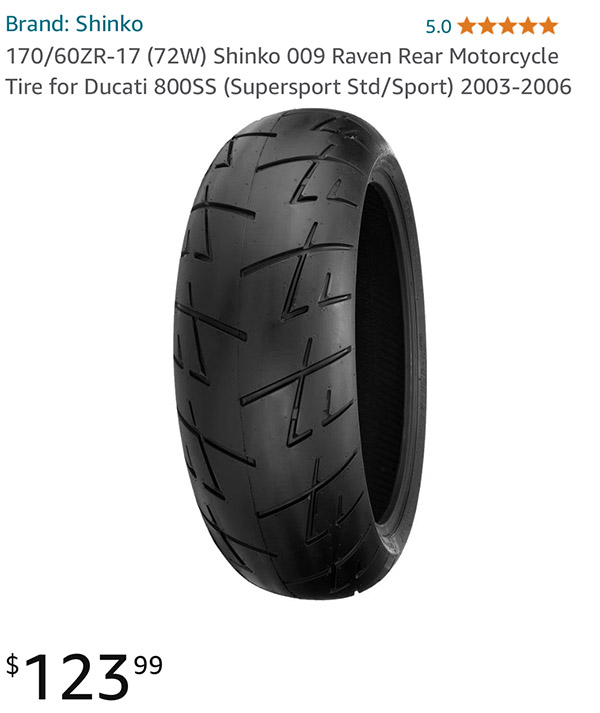
There are many fast motorcycle riders/writers that would be better suited to the task of reviewing motorcycle tires. Unfortunately, none of them are available at the moment so you’ll have to go with my impression of these Shinko Raven tires.
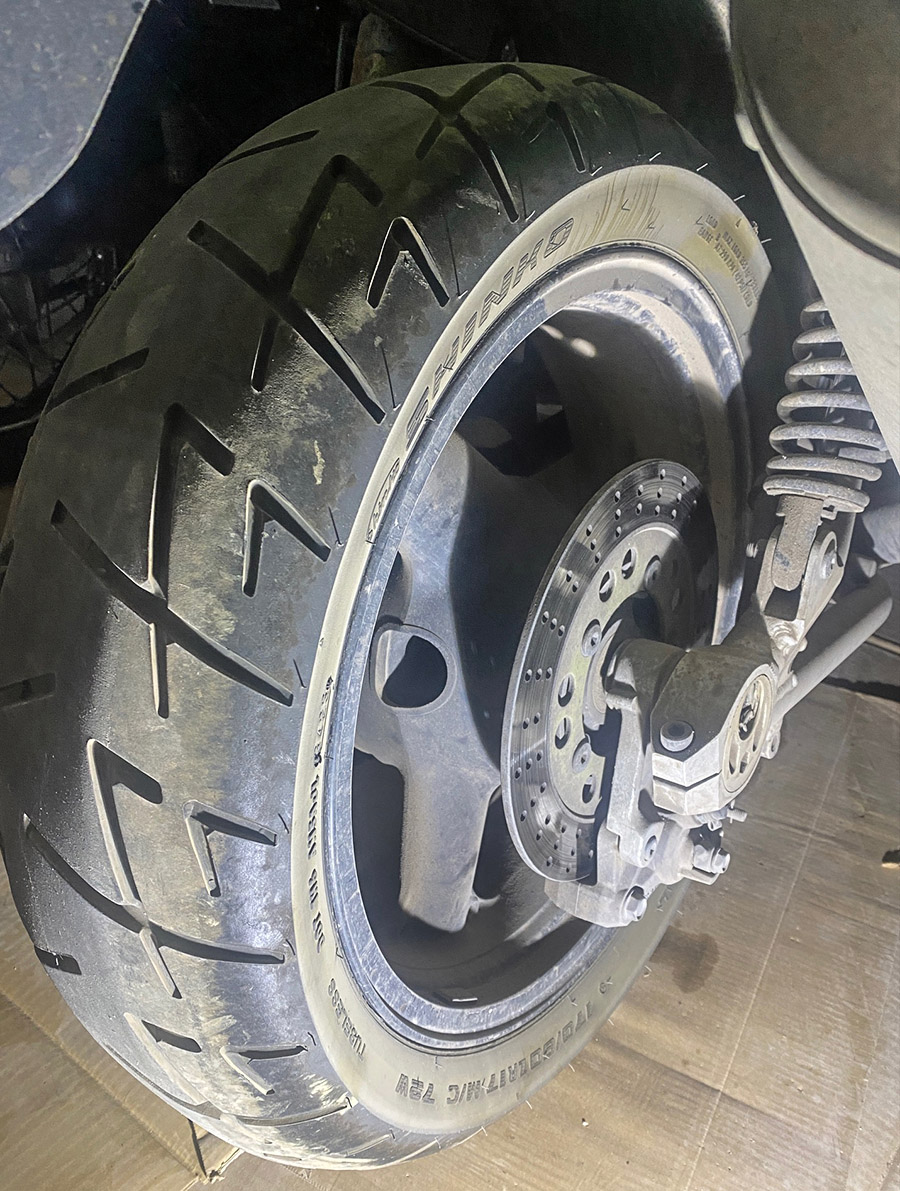
I previously ran Continental Conti-Motion tires on the ZRX1100 mostly because they were cheap. I got a good deal on a set of front/rear tires with shipping included. The Conti-Motion set came with a 180/55-17 rear tire that was a little bigger than the original 170/60-17 called for on the ZRX. The wider, lower profile tire seemed ok at the time because I hadn’t ridden the motorcycle for 9 years. After I fitted the Shinko Ravens I could tell a difference.
The Harbor Freight tire machine along with the tubeless rims on the ZRX made swapping the tires a breeze. The new tires took only a few ounces of weight to balance so I assume the rubber is pretty evenly distributed around the tire.
I have around 4000 miles on the Shinko tires and it looks like the rear might go another 3000 miles or so. The front tire is wearing much slower and looks like it will go 10,000 miles. Like I said: there are faster riders that could eat these tires up in one day.
The Shinko Ravens are supposedly aramid belted radials with a speed rating of Z, or 149 mph plus. The ZRX1100 won’t do 149 falling out of an airplane so I should be good. Shinko claims the Raven is their longest wearing sport tire. Until they start making car tires, that is.
In a straight line the Contis and the Shinkos are about the same. However the Shinko tires feel much different than the Contis in corners. With the wide 180 series Continental rear tire it felt like the ass end of the bike raised as you laid the bike into a corner. Or maybe the front end dropped. Hitting a bump mid-corner made the rear of the bike want to twist outwards instead of absorb the bump. You had to counteract that wagging sensation with a firm grip on the bars.
No such problem with the Shinko Raven 170 series tire. The ZRX leans into a curve with the ride height feeling evenly matched front to back. No effort on the handle bars is required. Mid-corner bumps don’t have the twisting feel and the rear suspension articulates without drama.
These sensations are all relative and feelings are hard to quantify, maybe it’s just me, and on a race track there might not be any difference in lap times. But then what are you doing racing a heavy street bike on cheap street tires? Stop that.
I much prefer the handling characteristics of the Ravens even though I can’t find the word “Raven” anywhere on the tire. They are stable, go around corners nicely and are round and black.
I haven’t had many opportunities to try the Shinko tires in the wet. In the dry season it rains infrequently (hence “dry season”) and when it’s monsoon I tend to stay home. Still, it’s possible to get caught in the rain here in New Mexico. What little time I have in the wet with the Shinkos didn’t feel all that grippy. I took it easy as the oils accumulated during the dry season rose to the top of the asphalt. Cracking the throttle on the torquey 1100cc 4-cylinder can induce wheel spin on a wet road so don’t do that. In a wet corner you can get the big ZRX drifting easily. Don’t do that either.
In the dry I have yet to lean the bike over far enough to use all the available tread, also known as crashing. The mountain roads where I live are swept only by wind and rain. It’s not surprising to round a corner and find a steaming cow turd in the road. Or sand. Or a downed tree. Anyway, that’s my excuse.
The Shinko tires are a great match for the ZRX1100, I wouldn’t think a small thing such as tire size would have such an outsized effect on the overall feel of a motorcycle but there it is. I would buy another Raven if they go on sale but then I’m the worst guy to take tire advice from, as there are other, faster shills.
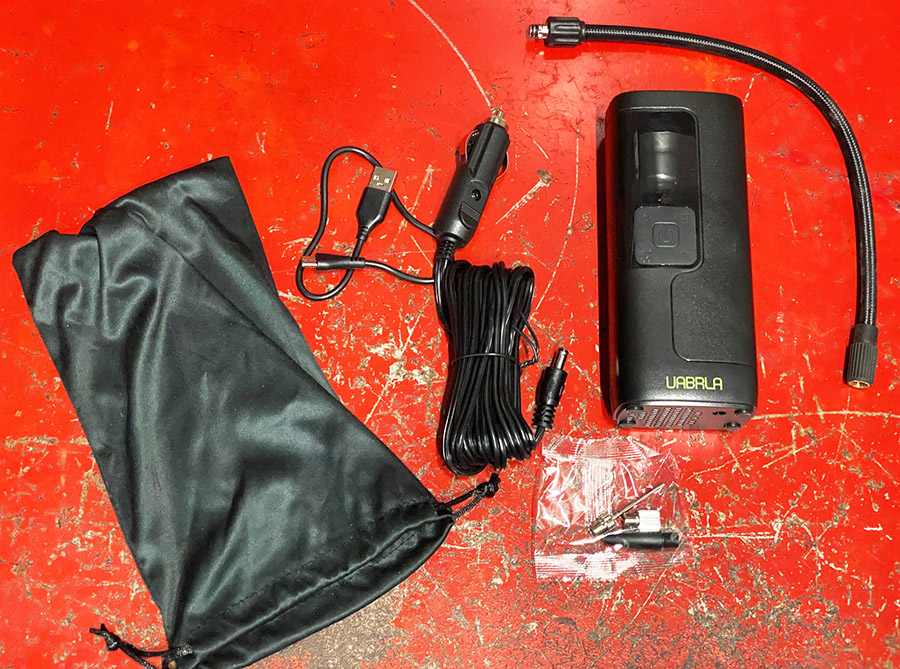
There’s a reason we call this pump a tire inflator instead of an air compressor. The thing is pretty small to start with and half of that size is battery to power the thing. Don’t expect to run your 1/2″ air impact wrench with the UABRLA is what I’m trying to say in an original, thought-provoking manner.
I have a small, 12-volt Slime brand tire inflator that I carry on whichever bike I’m riding. It works well and is like 15 years old now. The main issue (I hate to say problem because it’s more of a design limitation) is that you have to connect it to the motorcycle’s battery. On the RD350 that’s not a big problem but on some bikes, like the ZRX1100, the battery is buried under a bunch of junk I store on the bike. You have to remove the dirty socks, chucks of broken concrete, a dried up Sharpie marker and last year’s Laguna Seca vintage racing schedule. That gains access to the battery door, then you have to slide the battery out to access the terminals.
For airing up bike tires in the shop I use a larger 12-volt compressor (it has some grunt) and a 12-volt car battery.
I bought the UABRLA because I sometimes forget on which bike the Slime pump is stored. I’ve ridden off to the hinterlands thinking I had flat tires covered yet the Slime was packed away on a different motorcycle.
You’re probably wondering if I’ll ever get to the UABRLA review.
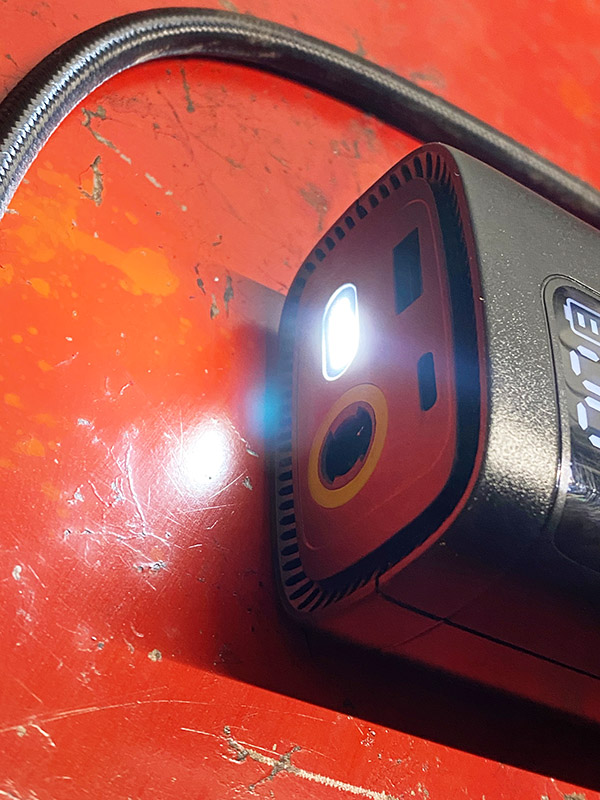
The UABRLA was delivered from Amazon in only two days. That’s pretty fast considering where I live. It came with a hose for connecting to tires, a charging cord, a 12-volt cigarette adaptor so you can keep filling tires even if the built-in battery is dead and a little collection of adapters for beach balls, inflatable mattresses and New England Patriots footballs. A handy tote bag is included. The unit also has a flashlight and a USB port for charging small electronics. The flashlight has three modes: on, on-strobe, on-SOS. Four modes if you count off.
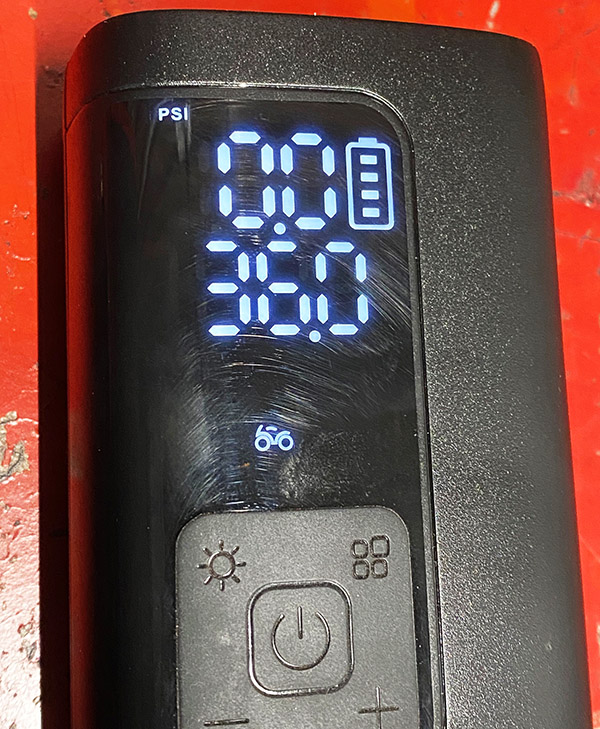
The inflator has presets for car tires, motorcycle tires, bicycles and sports equipment. I can’t see the need as air is air but maybe if you were a complete novice it would help.
A nice touch is the auto-shutoff that kills the inflator when the tire reaches a preset pressure. The setting is pretty accurate being only a pound or two off when checked against a pencil-type gauge. Or maybe the pencil gauge is off. Regardless, I can’t tell a tire is low until the rim scrapes the ground.
The built in battery supposedly has 20,000 mah capacity but I can’t be bothered to test that. I filled up two bicycle tires and topped up 6 motorcycle tires with the little inflator and it was still showing 2 of 4 bars. I’m guessing you could fill one car tire with the built in battery. After that you’ll have to switch to the 12-volt cigarette adaptor.
Anyway, I wouldn’t use this machine for car tires. Maybe adding a few pounds would be ok. My experience with these little inflators is that they get hot if you run them too long so I’d let it cool a few times if you’re filling a 40-inch tall muddier tire.
One thing I would like different is a 90-degree air chuck instead of the straight chuck that comes with the UABRLA. It gets a little tight on some motorcycle wheels.
The UABRLA is a nice-looking bit of consumer glitter. I’ll be tossing this pump into my motorcycle travel kit and hopefully it will last more than one or two uses.
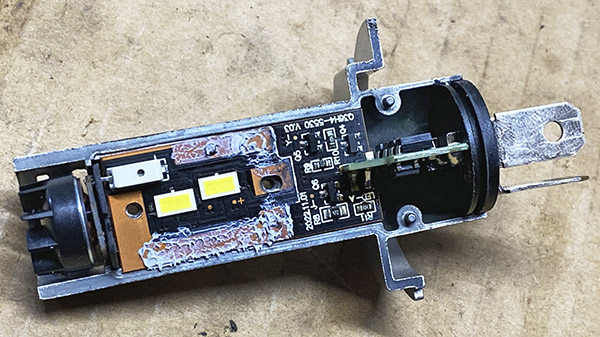
As you’ll recall from the Oxilam headlight review we published on ExhaustNotes a while back, I loved the thing. It gave a much brighter view at night and the light source was positioned in the correct spot for the reflector on the ZRX1100 Lawsonsaki. Low beam was wide and had a sharp cutoff so as to not blind oncoming drivers, and high beam lit up the dark New Mexico roads nicely.
Unfortunately. the bulb burned out on my bike after only 3000 miles. Considering the original halogen bulb lasted 35,000 miles, 24 years, and was still going strong, I was disappointed.
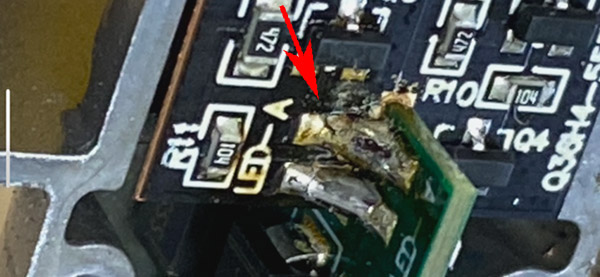
Taking the bulb apart revealed a neatly constructed circuit board, a cooling fan, heat transferring grease to the large aluminum heat sink, and broken solder connections at the main board/plug connector junction.
The board connections are tiny and I may try to re-solder the connections (there are four of them broken: two on either side of the circuit board) but I don’t hold out much hope.
The Oxilam kit came with two bulbs, and I’ll pop the other one in to see if my failure was just a fluke. I do like the quantity of light produced and riding with a plain old halogen seems dark now.
My new, revised rating on the Oxilam LED headlights is: Don’t buy them just yet. Wait until the second Oxilam has proved itself for 24 years. I’ll be sure to report back here if I’m still alive.
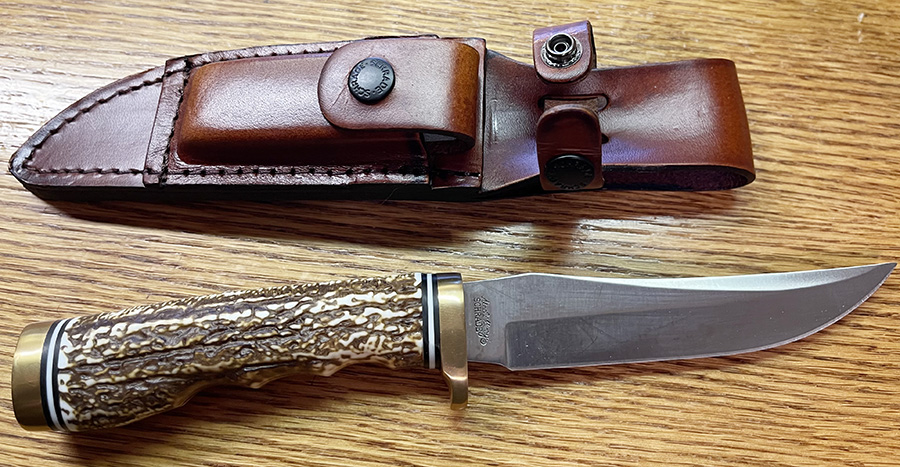
For a guy who doesn’t collect knives, I sure seem to have a lot of them laying around. The one you see above came to me as part of what is perhaps the greatest sales gimmick of all time: The “$100 Ships Free!” offer.
You know, the MidwayUSA.com come on…orders over $100 ship free. I ordered a Safariland 1¾-inch wide belt in a smaller size because I lost weight, I got down to the last belt buckle hole on my old Safariland belt, and my pants were still loose. The new belt was $71 (a lot, I know, but it works well when carrying concealed and Safariland makes a very high quality item). If I could kick the order over $100 the belt would ship free. Shipping if I didn’t make the $100 hurdle was $15. So this Uncle Henry knife popped up, and it was like getting the knife for half price, because it ordinarily cost just over $30.
Bam! Add to cart. A no brainer, if ever there was one.
The knife is a Schrade, part of their Uncle Henry line. I don’t know if that means it’s good or not so good. I couldn’t find anywhere on the knife that says it’s made in China, but I guessed that it was. A quick Google check confirmed it. That’s not a bad thing, though. The knife appears to be well made. A lot of things that are made in China are good.
The Uncle Henry knife came with a sheath and a tiny sharpening stone in another piggy-backed sheath (the idea being that you’ll always have a way to sharpen your knife), not that I’ll ever use the sharpening stone. The stone is small enough that I could see myself slicing my hand open trying to hold it.
The Stagalon grip material is some sort of plastic that is supposed to look like, you know, stag. That’s okay by me. For just over $30, I wasn’t expecting real stag. I wasn’t expecting the Stagalon to look as good as it does, either. That was a nice surprise. Stagalon. I guess I could make a video of the knife and call it a stag film. Maybe just saying stag film will result in a lot of hits. Do they still call them stag films these days, or is that no longer politically correct?. Isn’t that terminology kind of insulting to all the deer out there sweating out this hunting season? Anyway, to get back to Stagalon, the handle doesn’t quite match the look and feel of real stag, but it is kind of cool and it is nice.
I’m not sure what I’m going to do with my Uncle Henry Stagalon knife, other than look at it for awhile and write a blog about it. If I was a camper I suppose I could wear it in the woods, but I don’t camp much these days (in my golden years, I find I like motels a lot better). No, this knife will go on the shelf, along with a bunch of other “$100 Ships Free!” knives. It is kind of cool, though.
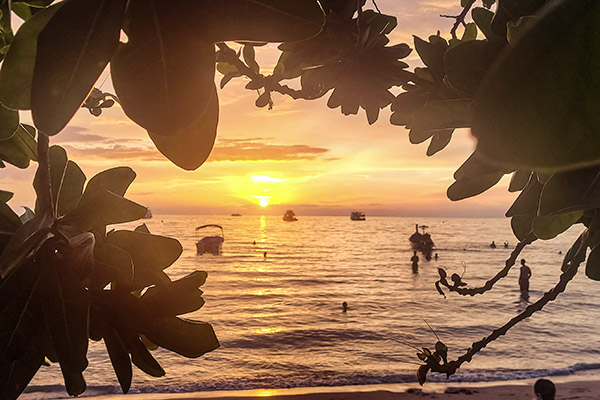
With an open schedule and in need of some routine I took it upon myself to enroll in a Rescue Diver Certification Course. With still being in Thailand and continuing to dive while learning every mistake not to make it only made sense to become more proficient if not for myself, then for the fellow divers around me.
Returning to Koh Tao Thailand seemed the perfect place to take this course. With so many dive shops on the island and being unsure who to use for this next level class I did what I always do. I went to a bar and chatted other divers up. One shop that seemed to always be spoken highly of was Scuba Shack. It was not only a great decision to choose them for their professionalism, but it was right next door to where I was staying on Sairee Beach.
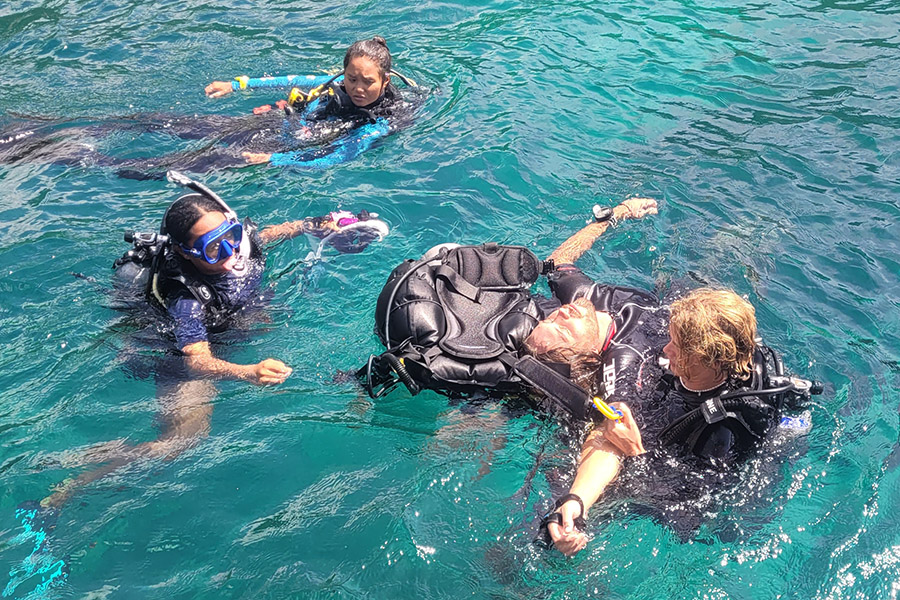
There are several requirements prior to beginning the rescue diver course. One is having an advanced scuba certification which allows you to dive to a depth of 30 meters and further educates you on proper buoyancy while underwater. Having just taken this a month prior helped me as the fundamentals were still fresh in my head. The second was to obtain an updated First Responder course. This part of the class was half a day and entailed covering CPR, proper bandage application, and procedures on how to help others in numerous types of emergency situations from car accidents to everyday incidents you may come across anywhere on land. Once that was completed and I passed the online course, the real challenge began. Scuba rescue operations while at sea include incidents well below the water’s surface.
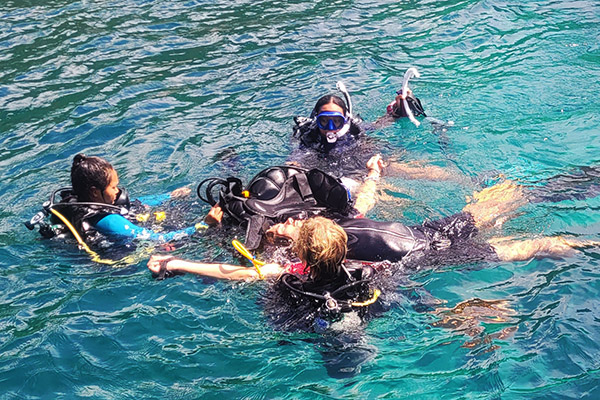
The water rescue portion was what I was really itching to learn. It was a challenging experience both mentally and physically. Many of the scenarios involved how to identify and treat divers who are exhausted, panicked, or unconscious. Another major prop I will give Scuba Shack is the actors in these scenarios did a fabulous job (I think I may still have a lump on my head from rescuing the panicked diver). The most work was in having to rescue an unconscious diver underwater. This included how to bring them safely to the surface, how to bring them to the boat while they are yelling for help, and providing rescue breaths every 5 seconds (including doing wo while taking both your gear and their gear off). It was humbling how much work and focus it took to perform these tasks with precision. My partner, Naz and I managed to successfully perform these tasks both solo and as a team.
Upon completing our final skills test (which was an underwater navigation search and rescue), we both relaxed on the boat celebrating with some coffee and fresh fruit when we heard several people screaming for help in the water. It was the final exam. Naz and I had to rescue three divers needing help. We had to prioritize each one and work as a team to safely rescue them all in order of priority. We performed this successfully.
We both passed our course, and our confidence and diving abilities greatly increased from attending this class. Naz is currently in the Dive Master Program with Scuba Shack on Koh Tao. She will be an excellent dive master. My travels are continuing; I’m currently examining a map and selecting the next country I’ll visit.
I want to thank all the wonderful people at Scuba Shack and our instructor Sita on the great experiences during this class and on our fun dives we performed several times each week.
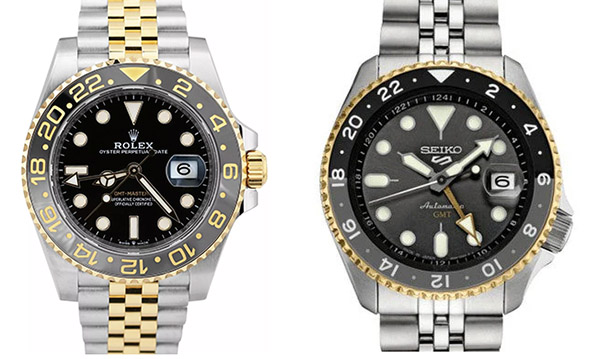
Some time ago, we wrote a blog comparing the Casio Marlin and Rolex Sea Dweller dive watches. This one is similar; it compares my nearly 40-year-old two-tone Rolex GMT II to a recently-released Seiko two-tone GMT.
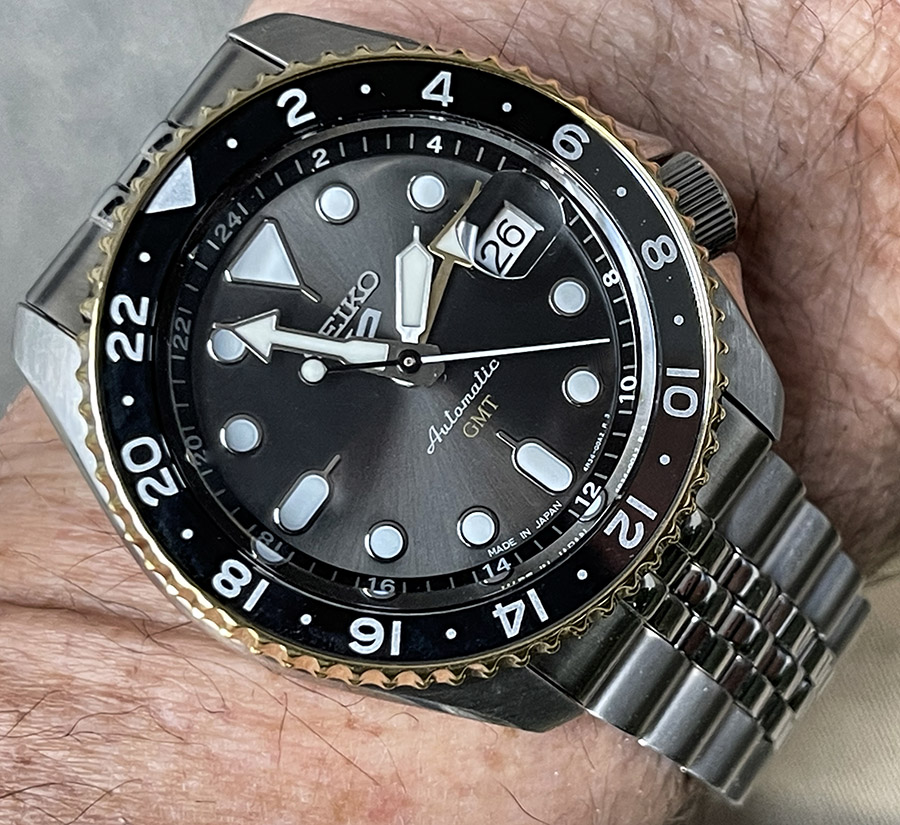
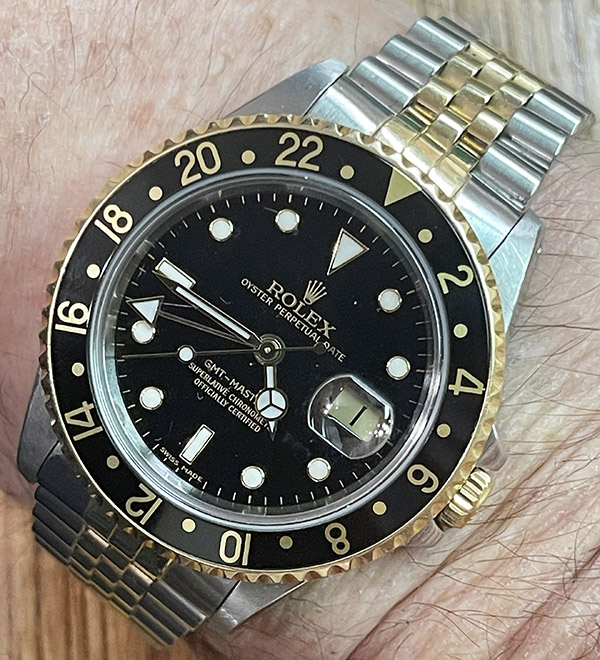
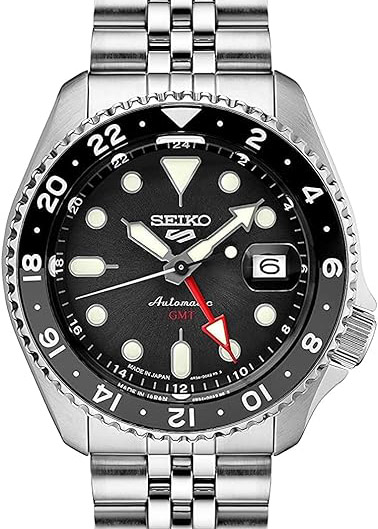
Two GMT watches: The Rolex GMT Master II (left) and the Seiko two-tone GMT (right). in the photos here, the Rolex has a much richer appearance; in real life, the Seiko looks just as good.A close up of my Rolex GMT Master II, purchased new in 1986 when I was still a yuppie. Note the cyclops lens over the date. It really works. The older I get, the better it works.The Seiko two-tone GMT, purchased a few days ago. The Seiko also has a cyclops lens over the date. It’s a cool and useful touch. This is a very nice watch.
I’m a sucker for a good-looking watch. Many of my retired friends take pride in not wearing a watch, and many young people don’t wear watches (they’re glued to their cell phones all day; they can get the time there). I always wear a watch.
The first watch I ever owned was a gift from my parents. It was an inexpensive Timex that was completely unexpected, I loved it, and I wore it for years. I first recognized watches as a status symbol and a cool thing to own when I was in the Army, and like all the other lieutenants overseas, I bought a Seiko chronograph at the Base Exchange. After the Army came the aerospace industry where a Rolex was the status symbol, and when I was back in D.C. lobbying Congress to buy Aerojet cluster bombs instead of Brand X (Honeywell was Brand X for us), a jewelry store had the Rolex GMT Master II you see here. I wore it full time for years after I first bought it, and then only intermittently after that. I felt the Rolex was pretentious around clients, and I was afraid it would reinforce a feeling that they were paying me too much (which they were). Now that I’m retired, the fear of being pretentious has been replaced by the fear of getting mugged, so I don’t wear it very often.
The hands of fate. The top arrow points to the bezel, which can be rotated in relation to the GMT hand (lower left arrow) to tell time on a 24-hour scale in a different time zone. The second-from-the-top red arrow points to the minute hand. The arrow on the right points to the conventional hour hand. If you look closely at the inverted diamond at 12:00, you can see the bezel is slightly off.
So what is a GMT watch? Basically, it is a watch that allows you to tell time in three time zones. If you wanted to, one of the time zones could be Greenwich Mean Time (GMT), which is the time at the Greenwich Observatory in England. Most of the time, I could care less what the time is in England, but that’s where the GMT descriptor originates.
Today, there are multiple approaches for time telling in different time zones, but the classic approach (and one followed by the Rolex and Seiko watches in this blog) is through the use of a third hand and a bezel with 24-hour numbering. The way it works is this:
The standard hour and minute hands tell the local time.
The third hand can be shifted to tell the time in a different time zone.
The bezel can be rotated to tell the time in a third time zone.
There are variations on the above (like switching local time with destination time, etc.). All of this may sound like a solution looking for a problem, but trust on this, when you travel to different time zones, it’s a very useful feature.
The Rolex GMT allows you to “step” the hour in one-hour increments by use of the winding knob when the knob is partially pulled out (some folks say this makes the Rolex a “true” GMT). On the Seiko, it doesn’t have the “step” function; use of the winding knob advances either the third hand or the conventional hour hand without the one-hour clicks (depending on which click you bring the stem out to). To me, either approach is acceptable.
The Rolex GMT Master II retails today for $14,050; the Seiko goes for $475. There’s a lot more to the pricing story, though. Prices on a Rolex are all over the map, and Rolexes sell for well above their suggested retail price. Some, even used, sell for three or four times their suggested retail price. I don’t know what my Rolex would sell for today as a used watch, and I’m not really interested because it’s not for sale. The Rolex will eventually go to one of my grandsons. I paid $3287 for it new in that Washington, D.C. jewelry store in 1986. I could easily get my money out of it if I wanted to, but like I said, that’s not going to happen.
Staying on pricing for a minute, the two-tone Seiko GMT is a relatively new model, so I couldn’t find it discounted on Amazon. If the two-tone coloring is not important to you, you can get the all-stainless version on Amazon for $317, which is a smoking deal (it’s $158 less expensive than the two-tone version).
My Seiko GMT was an impulse buy. Sue and I went out for lunch and there was a small watch shop a couple of doors down. They had the two-tone model, which I had not seen before other than in online watch forums and Seiko’s website (I was in Tokyo last year, and I didn’t even see it there). I asked the shop about a veteran’s discount, the guy said “you bet,” and mine set me back $402. I like supporting local businesses, I like doing business with shops that offer a veteran’s discount, and I liked being able to see the watch in person before I pulled the trigger.
My Rolex runs fast, gaining about a minute a week. That’s adjustable and would no doubt be corrected if I took the watch in for service, but I’m probably not going to do that. I’ve had the Rolex serviced twice. The last time was 25 years ago at the Rolex service center in Beverly Hills (where else could it possibly be?). Rolex clipped me $1000 for the service. I wasn’t happy at all. After the servicing, the numbers on the click-detented bezel were offset from where they should have been, and when I bitched about that, they remounted the bezel. It was better, but it is still offset a bit. Within six months of that service (which included replacing the crystal), I noticed a gouge on the crystal. I had worn the Rolex for 10 years before that and never had a scratch on the original crystal, so I have to wonder if I really received the sapphire crystal I paid for. A servicing today will probably be about $1500 if I get the crystal replaced and the bezel numbers remounted. It’s not likely I’ll spring for that. Maybe I will. I don’t know. It’s something I think about now and then, but then I think about getting out on the range with a milsurp rifle or riding my motorcycle and I forget about it. So far, the Seiko is keeping perfect time. I’ll let you know if that changes.
The Seiko is a new watch, so I haven’t had it serviced yet. Poking around a bit revealed that a typical mechanical watch servicing costs from $200 to $250. I think my local guy would probably be less than that. It’s quite a bit lower than what a Rolex service costs.
Both the Seiko and the Rolex are automatics. That means they are mechanical, selfwinding timepieces. The good news is there are no batteries, and it doesn’t matter if I stay out in the sun long enough to charge the solar power source. The bad news is that if I don’t wear an automatic watch for a few days, it stops. When that happens, prior to the next time I wear it I need to wind it and set the time. The Seiko, fully wound, has a 41-hour power reserve. The Rolex has a 70-hour power reserve. Rolex gets the nod here.
Regarding cosmetics, the “gold” bezel on the Seiko isn’t really gold; it’s plated. The accents on the Seiko hands and the watchface are similarly gold colored (i.e., they are not real gold). The Seiko’s jubilee bracelet links center areas are left a natural stainless steel finish. On the Rolex, they are gold. Another thing to note: On any Rolex, wherever you see something gold, it’s real gold. Nothing is plated on a Rolex. The bezel, the watchface accents, the hands, the winder, and the jubilee bracelet are all solid gold. Both watches look great, in my opinion. The real gold obviously drives the cost of Rolex higher than a Seiko, but not enough to explain the $14,000 (or more) difference. Most of the price difference is prestige pricing (Rolex gets away with it because some folks think they need such a thing). I used to be one of them. I’m not anymore.
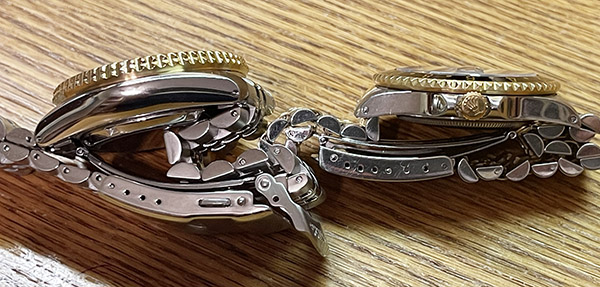
About that jubilee bracelet: What they refers to are the smaller links in the watchband’s center section. Non-jubilee watches have bigger, single links instead of the jubilee bracelet’s three smaller links. To me, the jubilee bracelet makes a real comfort difference. The non-jubilee bracelet just doesn’t feel as good.
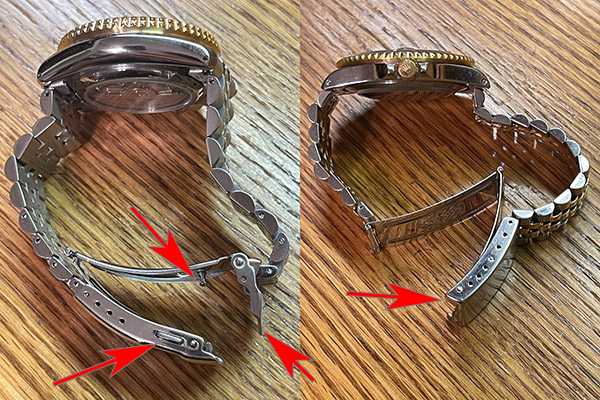
The Seiko is a much thicker case, and it sits higher on the wrist. It’s enough to be noticeable. The Rolex is thinner and I like the feel of it better for that reason.
Note the increased case thickness of the Seiko (on the right) compared to the downright thin Rolex. Rolex gets the nod here.
The Seiko’s stem winder is a push in/pull out affair. The Rolex stem winder unscrews, which theoretically makes it more waterproof. I don’t wear my watch in the shower any more (ever since I ruined a G-Shock by doing so), so the difference is meaningless to me.
One last area I’ll touch on is the clasp design. Hands down (pardon the pun) the win here goes to Seiko. The Seiko’s clasp has three retaining features compared to the Rolex clasp. The fear, of course, is that the watch clasp comes undone and the watch slips off the wrist. It could be damaged by a fall onto, say, concrete, or worse, go unnoticed. The other fear is pickpockets. I don’t know how difficult it would be for a pickpocket to lift your watch. I once had a guy (a magician) remove a watch I was wearing without me noticing it. That watch had a leather band and I later learned there’s a trick to it. I don’t know if there’s a comparable trick for a metal bracelet, but if there is, I would think the Rolex would be more susceptible to such a thing.
The Seiko (on the left) clasp has three retaining features; the Rolex (on the right) has only one (which is a small dimensional difference between the outer clasp and the mating pin on the inner clasp). The Seiko design is better.
The bottom line to me is that the Seiko is a hell of a deal for under $500, and if you are looking for a watch that offers all the advantages of a GMT and is dressy, the Seiko is a good buy. I own both, and I think Seiko hit a home run here.
There are other approaches to a GMT watch. Citizen has a different dual time approach with their Nighthawk and Blue Angels models. Many digital watches (some identified as GMT watches and some not) can display the time in different time zones at the touch of a button. Casio has several cool models that do this. The Citizen and the Casio watches are reviewed on our Product Reviews page.
With the temps hitting over 100 degrees out here, I thought it might be a good idea to rerun a blog we ran a few years ago. Let’s stay cool out here, folks!
I visited Chiriaco Summit and the Patton Museum last week (we’ll have a blog on it soon) and it was awesome. But wow, was it ever hot. As in 111 degrees when we left, and that’s not an unusually warm day out there in the Sonoran Desert. The next town over is called Thermal, and a little further north there’s this place called Death Valley. Death Valley recorded a whopping 131 degrees three weeks ago. Sensing a pattern?
Looks like the Mojave, doesn’t it? Nope. That’s Joe Gresh in the Gobi Desert. Gresh and I rode across it after coming down off the Tibetan Plateau. It was a bit warm out there.
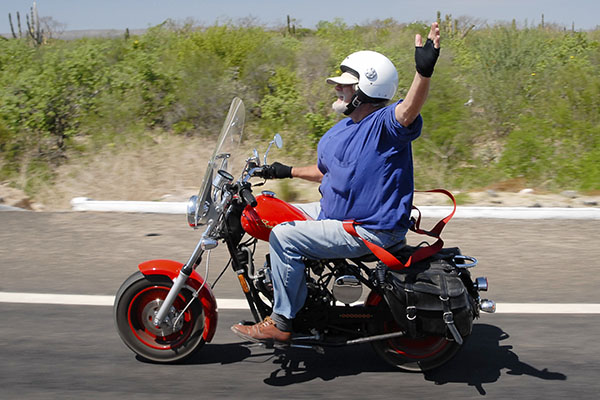
Yeah, it gets warm in these parts, and in other parts of the world as well. Hot weather is not ideal riding weather, to say the least, but sometimes we find ourselves riding in shake and bake conditions. I’ve done it. I rode a 150cc scooter all the way down to Cabo and back in Baja’s hottest month of the year (September, when it was well over a hundred degrees every day). It was humid down there, too, once we crossed over to the Sea of Cortez side of the peninsula. We were literally entering the tropics as we crossed the Tropic of Cancer. Whoa, that was rough riding!
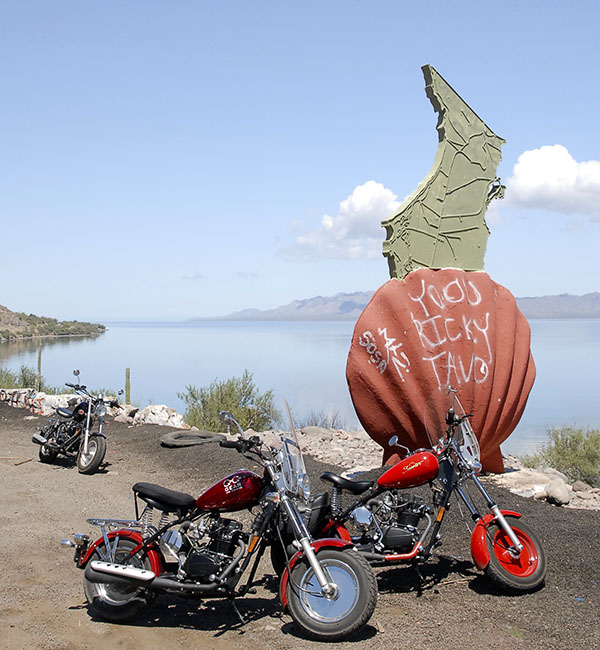
Simon Gandolfi, suspenders flying in the breeze, riding my Mustang replica bike south of the Tropic of Cancer in Baja California Sur. It was one of the hottest rides I ever experienced.
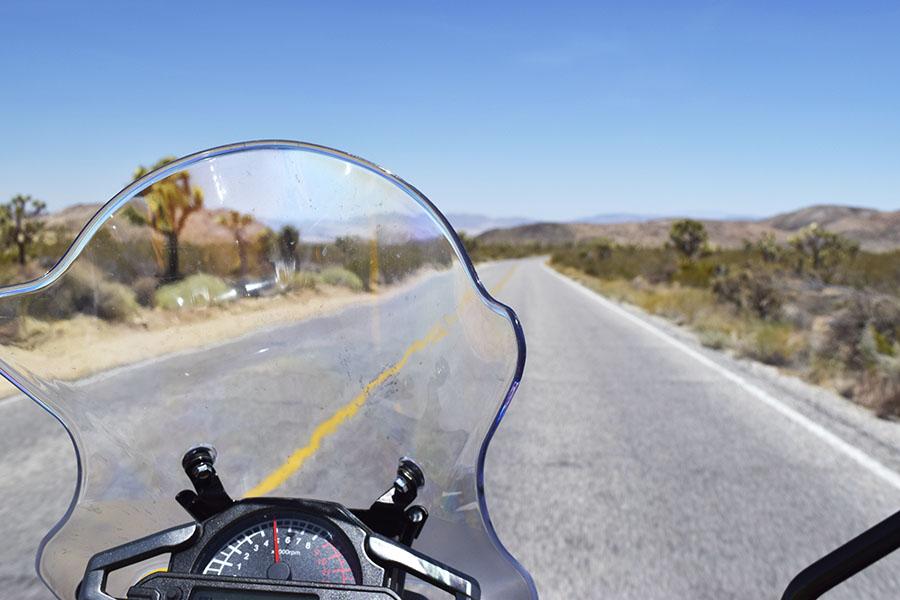
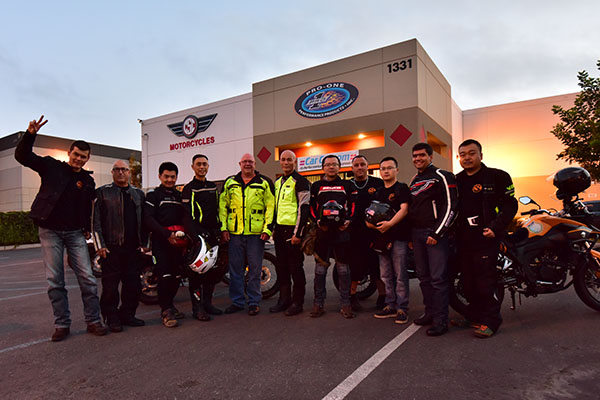
When we did the Western America Adventure Ride with CSC and the guys from Zongshen, we rode through the same corridors described earlier above, riding across California and the Mojave Desert, through Joshua Tree, and on into Arizona with temps approaching 110 degrees. That was brutal riding.
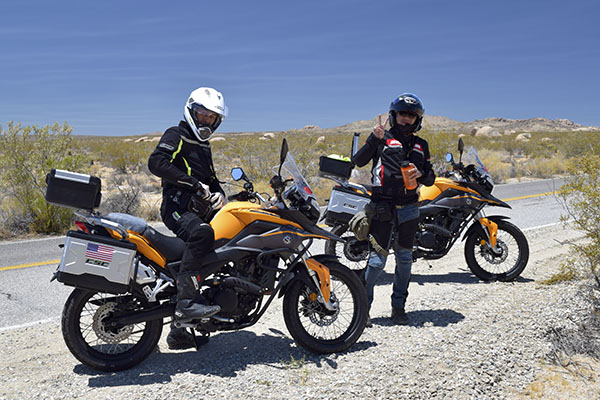
King Kong and Mr. Zuo in Joshua Tree National Park. That was another brutally hot day. Higher higher temps were still in front of us when we later rolled through Amboy, California. This picture became the cover photo for 5000 Miles At 8000 RPM. You should buy a copy or three (they make great gifts).
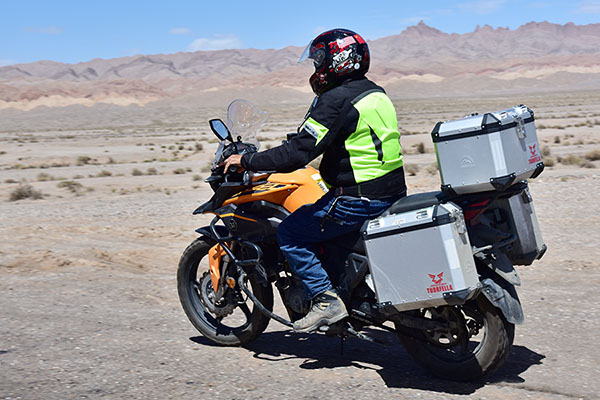
The ride across China that Joe Gresh and I did had similar challenges. It started out hot, then it got cold as we rode into the Tibetan Plateau, and then it became brutally hot and humid as we descended into central China and rode east to Qingdao. That was a 38-day ride, and I’d guess it was well over 100 degrees for at least 30 of those 38 days.
The risk, of course, is heat stroke, and it’s often not the kind of thing you can feel coming on. You’ll think you’re okay one minute, and the next you’re waking up in an emergency room wondering what happened. If you start to feel a headache while riding in hot weather, you are already perilously close to heat stroke. You need to stop, drink copious amounts of water, and get some shade. The better approach, though, is to not let yourself get anywhere near that condition, and that’s what this article is all about.
It almost seems like heresy to say it, but my first bit of advice about riding in hot weather is: Don’t. Given the choice, postpone the ride. But let’s assume that this is not an option, as was the case for each of the rides mentioned above. Okay, then…here’s my guidance on the topic.
12 Hot Weather Riding Tips
One: Don’t ride naked. I’m not trying to be funny here, and I’m not implying you might be the kind of person who would go down the road wearing nothing at all (although there is that story about Gresh riding around with only a bathrobe). Nope, what I’m talking about is not shucking your safety gear. You have to wear it. All of it. ATGATT. All the gear, all the time. You can’t peel it off just because it’s hot. It’s saved my life.
My Viking Cycles mesh jacket and the mighty Enfield.
Two: Wear a good mesh jacket. These are available from several sources. I have a Viking Cycles jacket I’m wearing these days and it works well. I wore a Joe Rocket mesh jacket on the ride across China and it made a big difference. You can get them from Viking Cycles, CSC Motorcycles, British Motorcycle Gear, and other sources. Trust me on this…you need a ventilated jacket for riding in hot weather. EDIT: We’re getting interesting comments advising not wearing a mesh jacket in hot weather. Make sure you read the comments below, and for those of you who responded, thanks very much!
Three: Use a cooling vest. These things actually work, but they’re not as easy to use as it sounds. They don’t work for long, but they work. The idea is you soak them, and then wear them under a jacket. The airflow causes the water in the vest to evaporate and that cools the vest and you. I’ve found that on really hot days these vests need to be remoistened about every thirty minutes, but you should be stopping that often anyway (more on that later). It’s the remoistening part that I don’t like. It seems like they take forever to soak up water when you remoisten them. I’ve found it easer to just get my clothes wet (see the next point below).
Four: Go soak your head (and everything else). Don’t laugh; I’ve done this. On the Baja ride I mentioned above, it was so unbearably hot that we took to pouring water down the inside of our riding jackets and inside our helmets at every stop. We became rolling evaporative coolers. It helped.
Five: Change your riding hours. On the really hot days, I like to hit the road at 0:Dark:30. Get out and get a hundred or so miles in before it gets unbearably hot. You’d need good lighting on your bike to do this (I generally don’t like to ride at night, but I’ll make an exception when I know it’s going to be hot). This is difficult to do when riding in a group because it’s hard to get everybody moving that early. If it was just me and Gresh or Welker, we’d leave way early and get in a couple of hours of riding (or more) before the sun comes up.
We knew it was going to be brutally hot riding through Joshua Tree and the Mojave Desert, so we left just before sunup on the first day of the Western America Adventure Ride.
Six: Drink a lot of water. The problem with riding in high temperatures is you don’t realize how much water you lose through perspiration. My advice is to stop every 30 minutes and drink a bottled water. Like I said above, most of us ain’t spring chickens, and you might be wondering if this means you’re going to be stopping a lot to pee. Hey, it’s a common old guy problem, but it won’t be in hot weather. Drink a lot of water; you’ll lose it through perspiration as you ride.
Seven: Avoid alcoholic beverages. Alcohol will cause you to dehydrate more rapidly, and that’s the opposite of what we’re trying to do here. You shouldn’t be consuming alcohol on a motorcycle ride anyway. Drinking any kind of alcohol while riding in hot weather is just stupid. Where I found you really have to watch this is when riding in a large group (there will be one or two riders who have to have that beer or two at lunch).
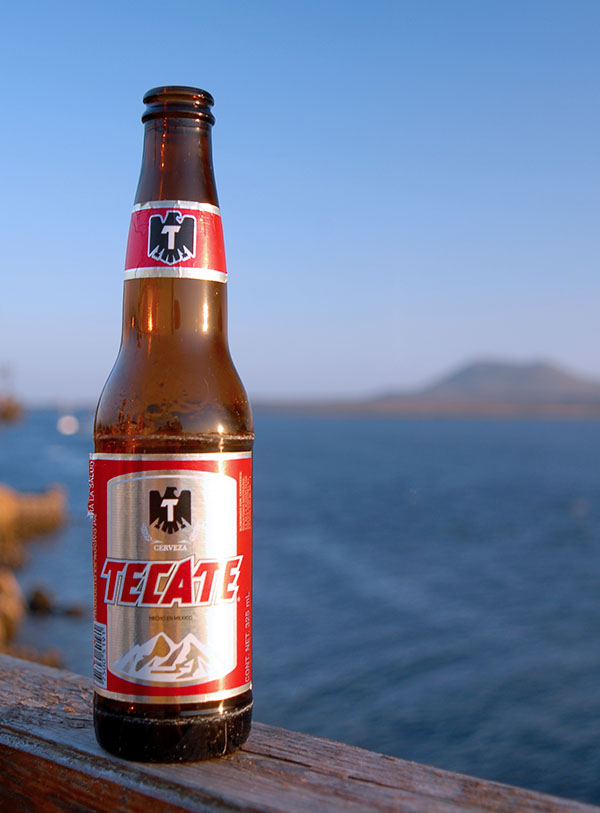
Beer is good, especially when it’s a Tecate at the Old Mill in Baja overlooking Bahia San Quintin. But save it for the end of the day, when the bikes are parked for the night.
Eight: Stop regularly to cool off. Find a bit of shade or someplace air conditioned, and get off the bike to cool down. When I ride in hot weather, I usually stop to cool off and rehydrate every 30 minutes or so.
Stopping to cool off at the Tropic of Cancer. Wow, it was hot and humid down there! We were off standing in the shade, drinking bottled water.
Nine: Keep your tires at recommended pressures. Another thing you definitely don’t want on a hot day is underinflated tires. Tires flex with every rotation, and flexing causes the tires to heat. Throw in high road surface temperatures with underinflated tires, and you’re flirting with a blowout. This is especially important to remember if you’re one of those guys or gals who deflate their tires for dirt riding. Don’t forget to pump them back up when you get back on the asphalt.
Ten: Don’t speed. Tar melts on hot days, and melted tar is slick. Factor that into your riding when it gets toasty.
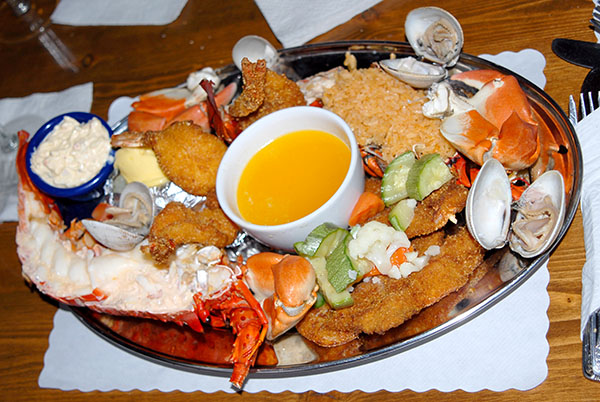
A meal fit for a king, but not for lunch. You wouldn’t want to ride in hot weather immediately after this Baja seafood extravaganza.
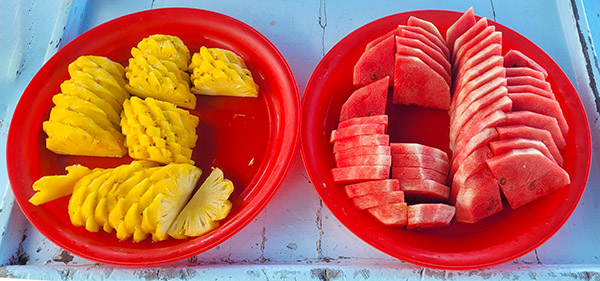
Eleven: Eat light. Don’t over indulge. Heavy meals put a strain on your digestive system and your heart, and that can elevate your body temperature. When I was involved in testing munitions out in the Mojave on hot days (where it was sometimes over 120 degrees), we always brought along melons for lunch and nothing else. We didn’t need to keep them cool. They were a great treat, they seemed to make it a little cooler on those horrifically hot days, and they help to keep you hydrated. Good buddy Sergeant Zuo seemed to know all about that in China, too. We were riding through Ledu in central China one ferociously hot day when our favorite Chinese NCO stopped the group, disappeared, and returned with a couple of watermelons. That was a welcome respite and a marvelous treat. We ate a lot of watermelon in China.
Gresh taking a break in Ledu, China. That’s the Yellow River (China’s Mother River) behind Uncle Joe.
Twelve: Lighten up on the low sodium schtick. A lot of us older guys try to watch our sodium intake. When I was in the Army, they actually gave us salt tabs on really hot days when we were in the field, the theory being that we needed the sodium because we were losing so much through perspiration. I later heard the Army reversed that practice, but the fact is you lose a lot of minerals through perspiration. I don’t worry about my sodium intake when riding on hot days.
So there you have it. You know, most folks who ride motorcycles these days…well, how can I say this delicately? We aren’t spring chickens anymore. Motorcycling tends to be a thing mostly enjoyed by full-figured senior citizens, and we have to take care of ourselves, especially when we venture out on hot days.
If you other ideas about hot weather riding, let us know in the Comments section. We love hearing from you.


 I have a small, 12-volt Slime brand tire inflator that I carry on whichever bike I’m riding. It works well and is like 15 years old now. The main issue (I hate to say problem because it’s more of a design limitation) is that you have to connect it to the motorcycle’s battery. On the RD350 that’s not a big problem but on some bikes, like the ZRX1100, the battery is buried under a bunch of junk I store on the bike. You have to remove the dirty socks, chucks of broken concrete, a dried up Sharpie marker and last year’s Laguna Seca vintage racing schedule. That gains access to the battery door, then you have to slide the battery out to access the terminals.
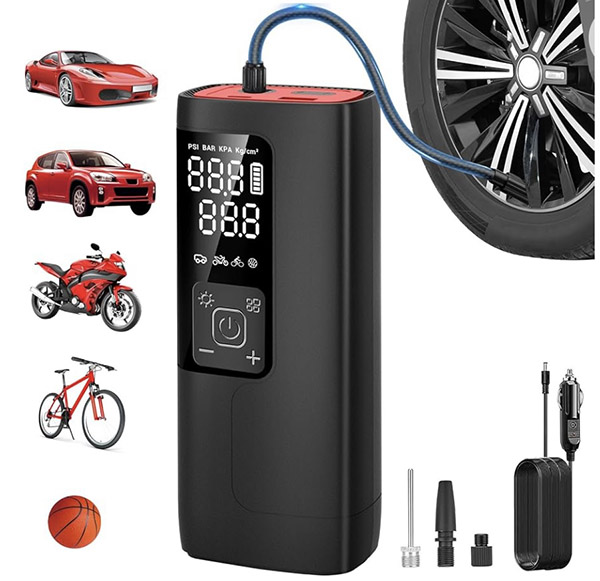
 Returning to Koh Tao Thailand seemed the perfect place to take this course. With so many dive shops on the island and being unsure who to use for this next level class I did what I always do. I went to a bar and chatted other divers up. One shop that seemed to always be spoken highly of was Scuba Shack. It was not only a great decision to choose them for their professionalism, but it was right next door to where I was staying on Sairee Beach.