I’ve never had any desire to hunt African game and I probably never will. But I’ve enjoyed reading about the African plains rifles since I was a kid in junior high school. Bringing a copy of Guns & Ammo magazine to school would probably get you a quick trip to the principal’s office these days…but I digress.
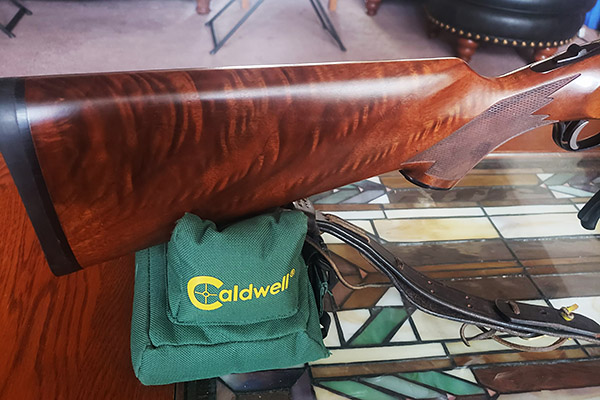
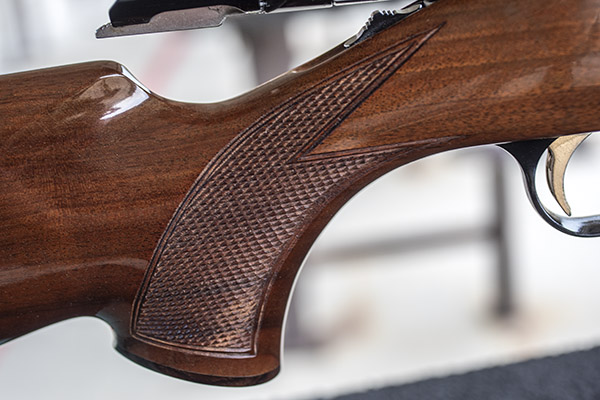
Exquisite walnut is often found on the older Ruger No. 1 rifles.
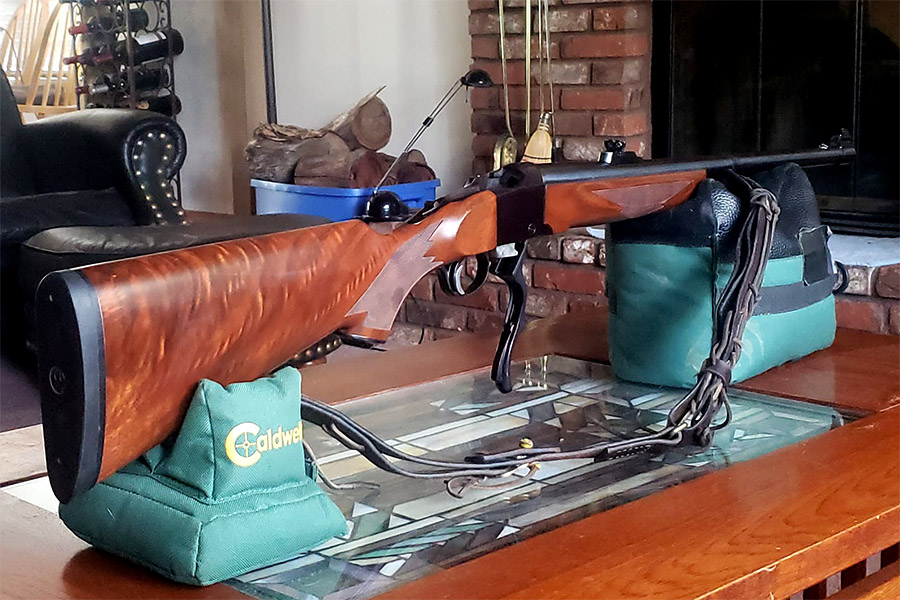
Quite a few years ago I saw an old Ruger No.1 Tropical in the consignment rack of a small gun shop that is now long gone. The owner said, “just pick it up and feel the heft.” And of course, I did and the next thing you know we were talking price, knowing I would never pay $2,000 for a collectible Ruger No. 1. Shaun confided in me that the rifle’s owner couldn’t find the obsolete 405 ammo for it anywhere and he wasn’t a handloader, so he wanted to sell the rifle. Another problem with the rifle was that a previous owner had cut down the front sight, probably because he had been shooting handloads with .41 caliber pistol bullets. So we settled on $500 and I became the owner of my first “unobtainable” Ruger No. 1!
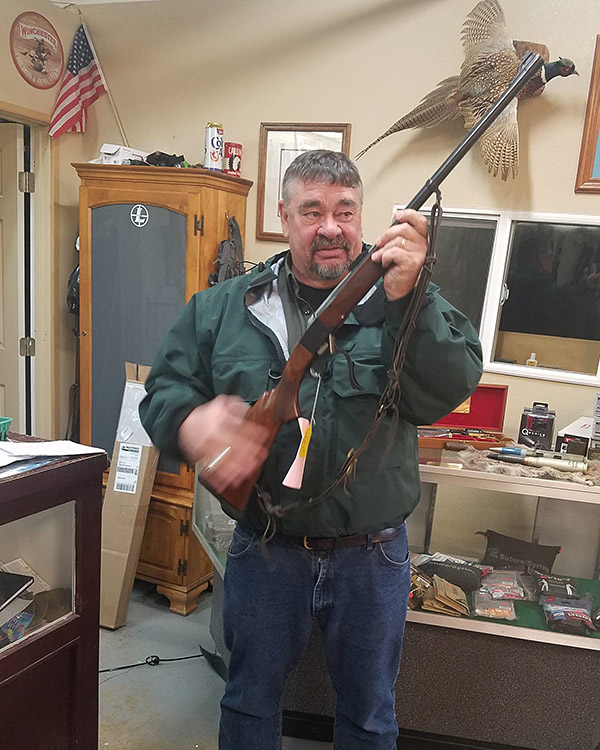
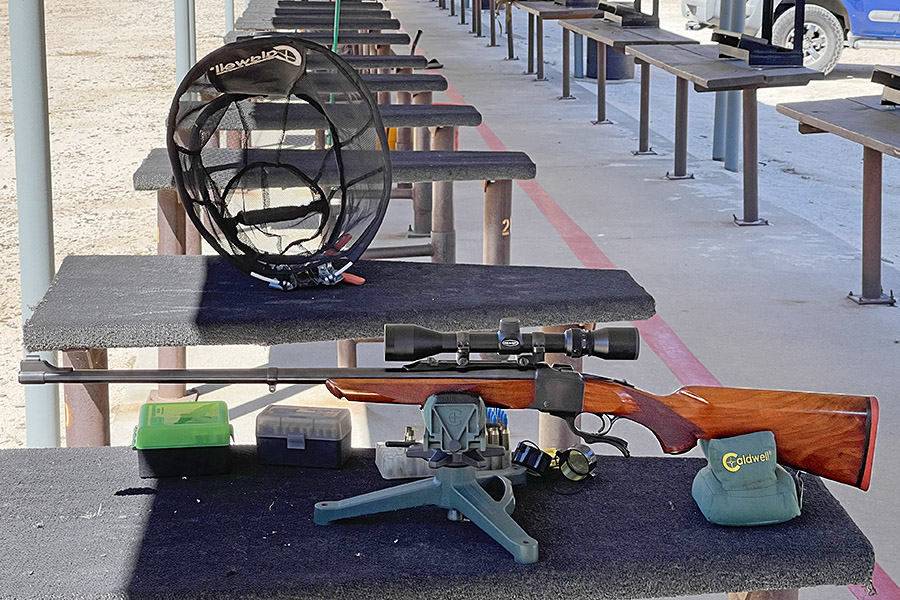
In the gun shop years ago eyeing the Ruger No. 1. Salesman Shaun said, “hand me your phone and let me take a photo of you so you can see how good you look with that rifle!” Shaun passed away a couple of years ago, but I know he smiled down from Heaven yesterday as I fired the Ruger No. 1H Tropical for the first time. And he was right, this gun was meant for me!
It took me a lot of searching over the past few years, but I finally located a set of 405 Win reloading dies, the shell holder, and all the components to bring this rifle back to life.
Hornady had made a run of new 405 Winchester brass and I was lucky enough to find a new old stock box of 50 shells. I also located some new Barnes .412, 300-grain TSX bullets.
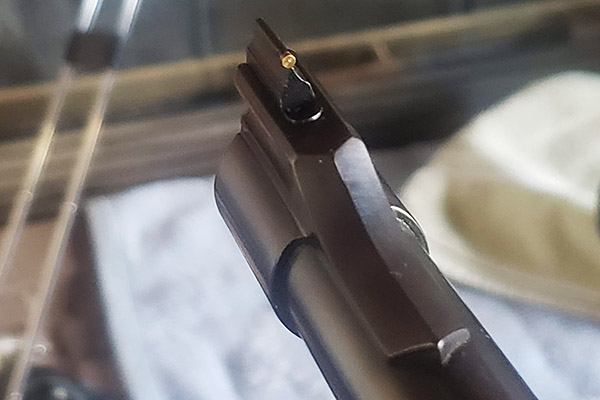
The first step in restoring the old 1H Tropical was to contact Ruger and purchase a new gold bead front sight. That was a simple install as the blade is held in place by a small detent spring.
New Ruger NOS gold bead front sight blade installed.
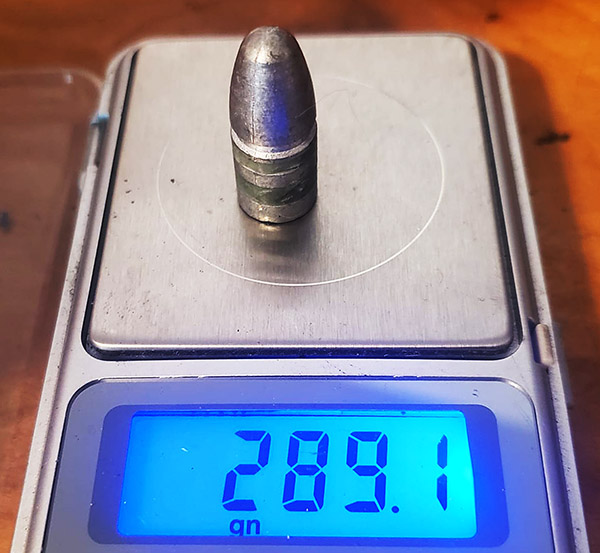
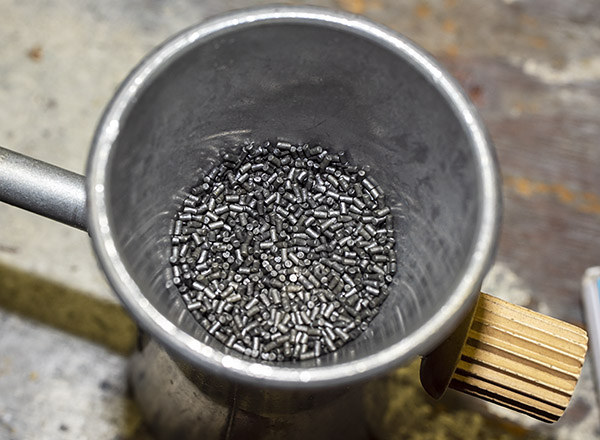
Not wanting to use the expensive Barnes TSX bullets quite yet, lead bullets were cast from lead wheel weights with a bit of tin added using a Lyman 412263 plain base mold to cast 288 grain bullets. These were sized to 0.413 inch and lubed with Alox. Lyman has since discontinued this fine old bullet mold.
A Lyman 412263 bullet, lubed and sized.
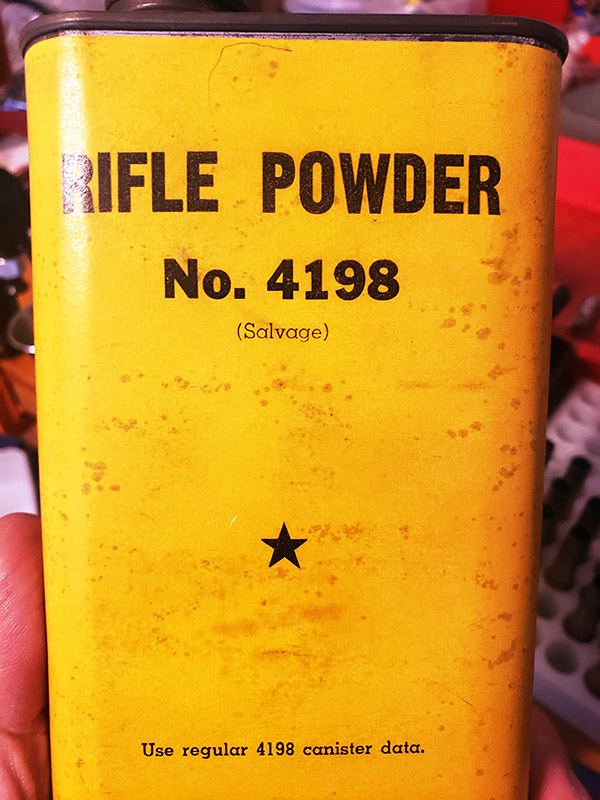
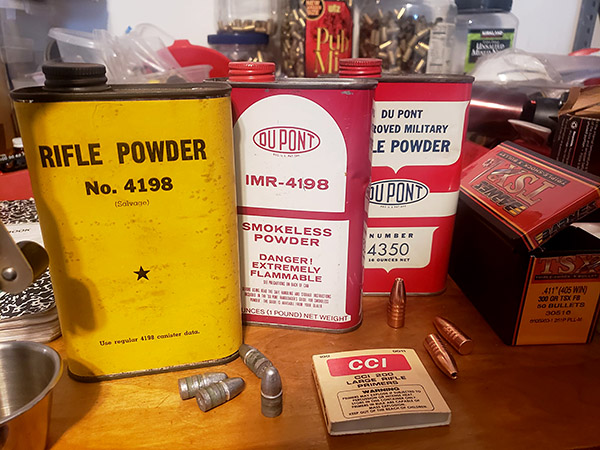
Finally, yesterday morning I decided it was time to resurrect this old rifle! Besides, the project would give me the opportunity to test some old “salvage” Hodgdon 4198 powder I’ve had sitting on the shelf for nearly two decades. The powder is probably from the 1950s or early 1960s. I also had some ancient CCI 200 large rifle primers on hand.
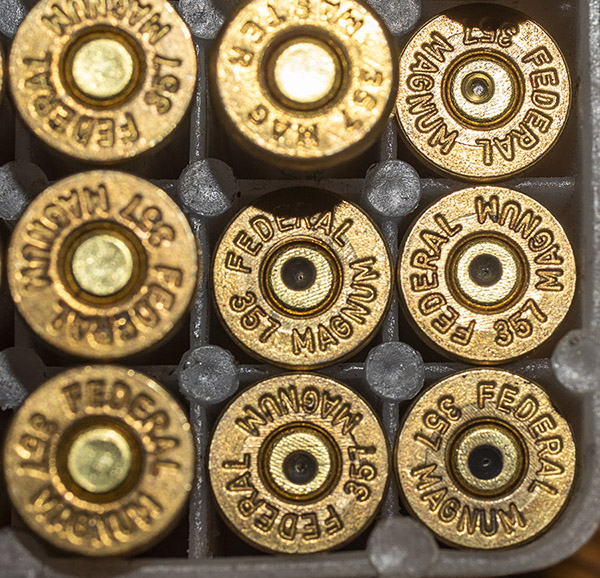
Hodgdon “salvage” 4198 smokeless powder. The powder is probably WW II US Military surplus powder that Hogdon bought in bulk and repackaged in the late 1950s or early 1960s.Vintage components for a vintage cartridge.
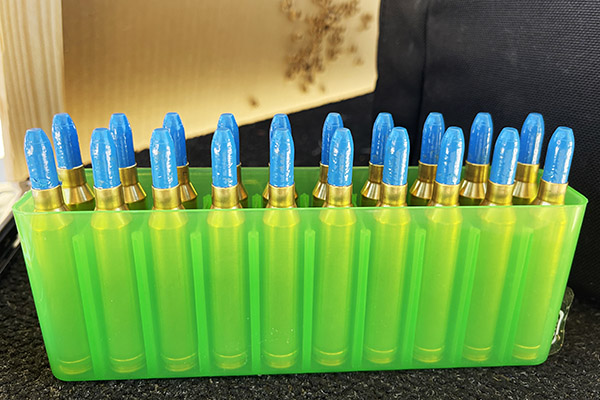
I loaded 20 rounds of 405 Winchester ammo using the cast lead bullets and a starting load of 38.5 grains of 4198 and headed down the hill with good friend Yvon to an informal shooting range on BLM land.
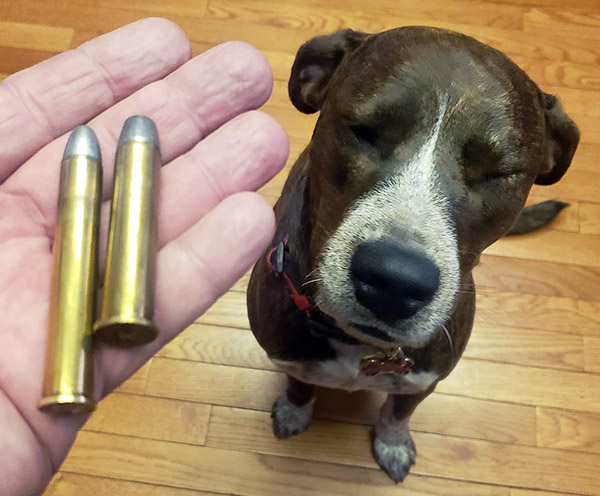
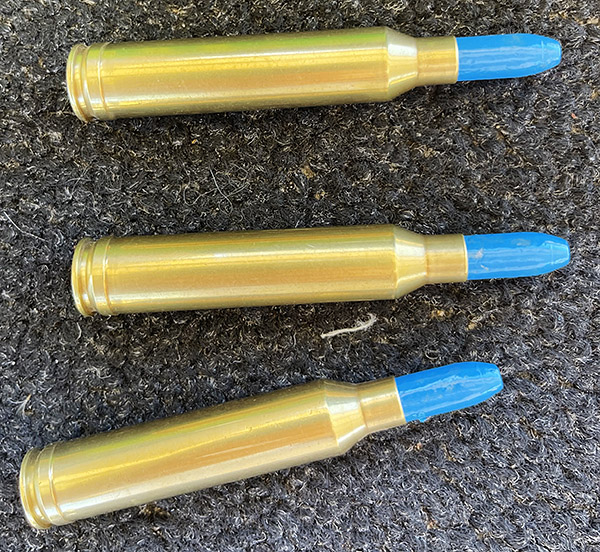
The obsolete 405 Winchester cartridge (left) and the popular 45-70 Government cartridge (right) used by 1880s plains buffalo hunters of the American west. I don’t shoot buffalo and never will. But I enjoy reviving and firing old guns!
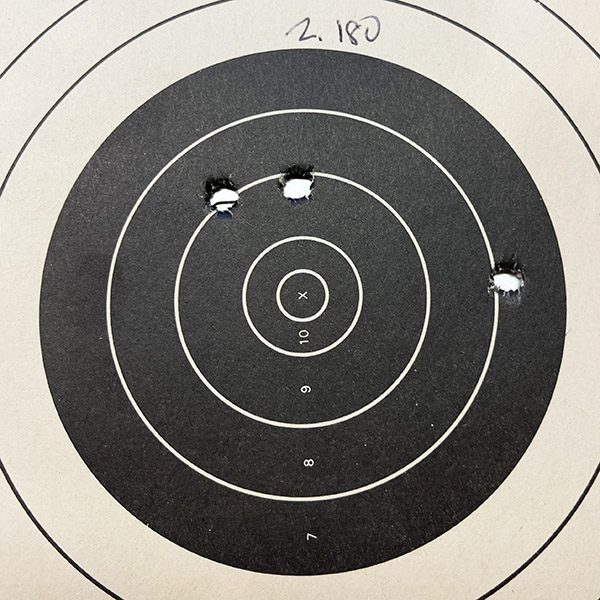
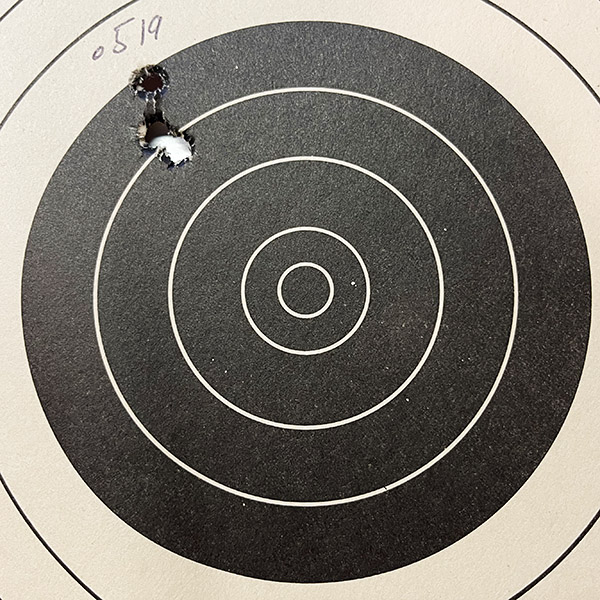
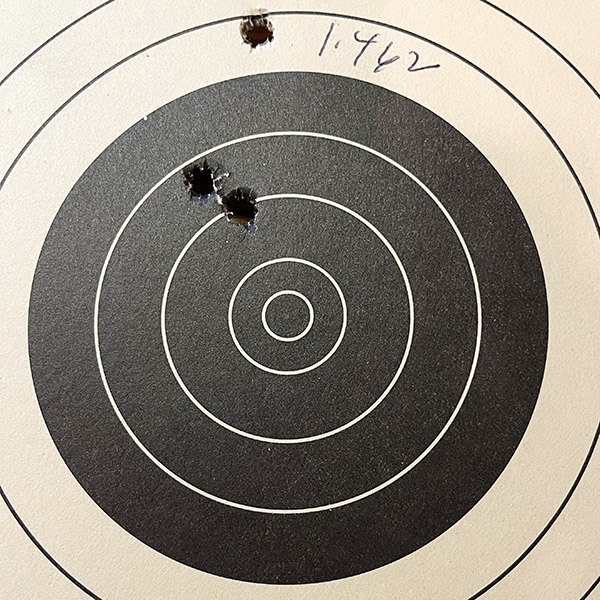
Let me say that this Ruger No. 1H Tropical in 405 Winchester lives again. It shoots incredibly tight groups with the cast bullets and gold bead open sights.
My next project will be to develop a non-lead hunting load using the 300 grain Barnes TSX bullets.
Bringing life back into old obsolete rifles can be tons of fun.
A quick preface before you read Joe Cota’s blog: Wow, we are up to three Joes on ExNotes…Joe Gresh, me, and now, Joe Cota. Joe Cota has contributed a few blogs to us previously (before we implemented our new writers program). When Joe most recently sent this in, I felt it was time to include him as one of our regulars, and with this blog, he is. Joe is one of the good guys. He is a professional geologist, an active off-road racer in Baja California, a handloader and bullet caster of 18 years, and an avid flintlock rifle and pistol shooter. Joe lives in the San Bernardino Mountains of Southern California. When not working or racing trucks and buggies in Mexico, Joe can be found fly fishing at his summer home on the Henry’s Fork River in eastern Idaho.
– Joe Berk
Written on Christmas Day, 2023
Merry Christmas to all 🎄❄️🎅!
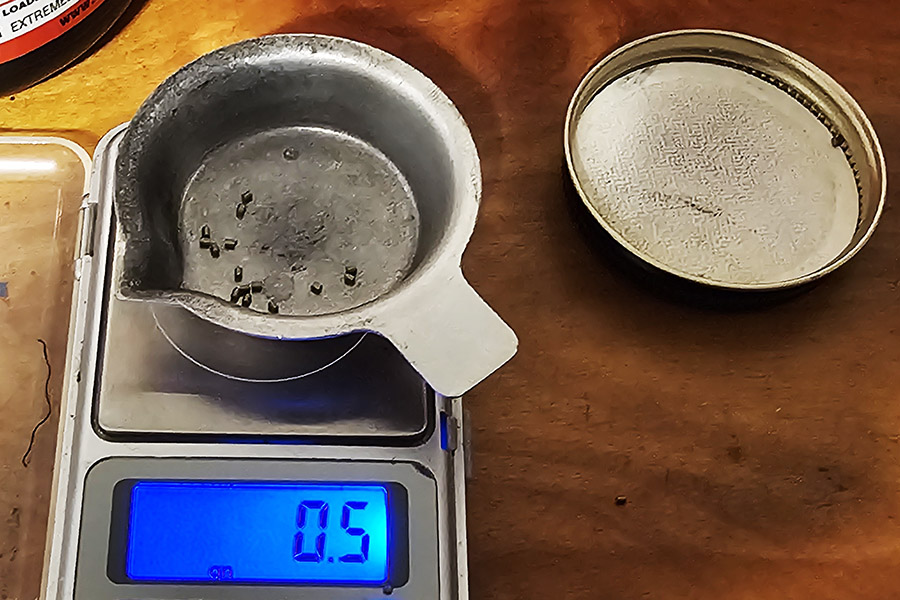
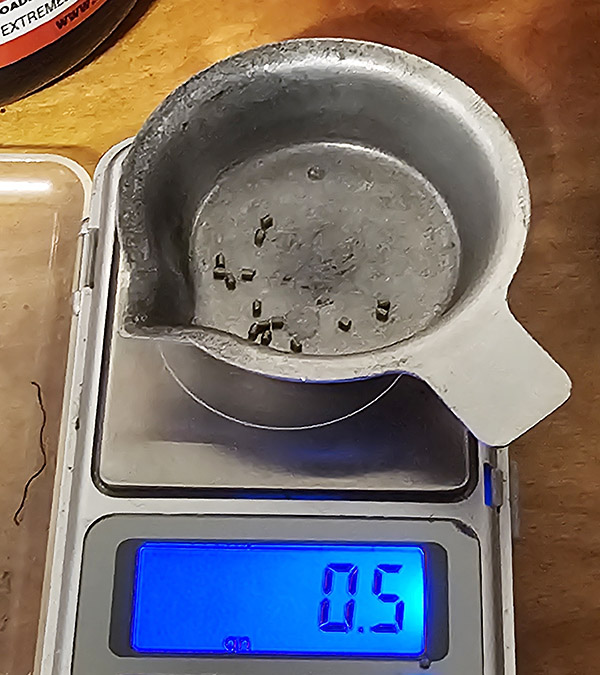
A lot of you will be casting and handloading today, some with their new reloading equipment! Here’s something for your consideration that came up on another message board. Powder weight weenies will argue that all handloaders MUST unequivocally weigh each and every single powder charge to one tenth of a grain of powder or less. Some wildly claim that a half-grain (0.5-grain) of powder makes a 50 to 100 feet per second difference or more in rifle cartridge velocity while others often use this as flawed reasoning as back-up for claiming that volume-based powder dispensers, such as the Lee Auto Disc used on turret presses, are highly inaccurate and produce terrible and unacceptable ammunition. This could not be further from the truth! Let’s bust some reloading myths.
The variation that my ancient Lee Auto Disk throws is about 0.1 to 0.2 grain, depending on if I am using ball powders versus extruded powders. The photos below is what 0.5 grain of Hodgdon H4831 SC extruded rifle powder looks like. For reference, the variation in powder charges that my Lee Auto Disc throws is less than half of the 0.5 grain of H4831 shown in the photo.
So what does a half-grain of powder actually mean in terms of velocity in a typical big game hunting rifle? Let’s explore a real life example. I load .300 Weatherby Magnum ammunition with 168-grain bullets and H4831SC powder. Per the Hodgdon Reloading Data Center, the starting load is 74 grains (which provided 2,865 feet per second in their test rifle) and the maximum load is 81 grains (which provided 3107 feet per second in their rifle). That’s a 242 feet per second difference in velocity over a full 7-grain powder spread. Interpolating these results linearly (a 242 feet per second velocity difference over a 7-grain propellant spread) means that each additional grain of propellant over the minimum powder charger yields an additional 34 feet per second. Therefore, a half grain of powder would make only 17 feet per second difference in velocity! Everyone who uses a chronograph knows that 17 feet per second is typically only a fraction of the extreme velocity spread most rifles and rifle ammo produce.
What about pistol handloads? Take the .45 Colt, using a 255-grain cast lead bullet and Winchester W231 ball powder. The starting load is 5.1 grains (which provides 677 feet per second) and the maximum load is 6.9 grains (which provides 917 feet per second). Using the same methodology as the above rifle computations and comparisons, each 0.1 grain of W231 powder equates to only about 13 feet per second. Again, this is far less than the extreme spread one can expect in .45 Colt ammo.
Does case size matter? I believe it does, but not that much. Take the .223 Remington cartridge, for example, loading 55-grain Hornady bullets with Winchester 748 powder. Straight from the Hornady manual (the 7th Edition), 1 grain of powder between starting and max loads for this combination is 100 feet per second per grain of powder, or 10 feet per second for each 0.1 grain. And again, 10 feet per second is only a fraction of the extreme spread one could expect from perfectly identical powder charges.
So variations in powder volume does matter a little more in the smaller rifle cartridges, but not enough to make anyone steer clear of auto powder dispensers on turret presses versus individually weighing each charge. Richard Lee was right when he wrote in his Modern Reloading book that powder volume is more critical than weight and that one should periodically weigh a charge only as a double check for volume.
So there’s little justification for being a Tenth of a Grain Weight Weenie! Don’t be THAT guy who bashes turret press and powder dispenser users based on misconceptions posted by folks on the Internet.
Happy handloading and a prosperous new year to all!
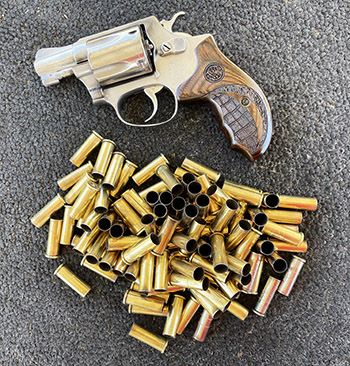
In a prior blog I described bidding on a Ruger .357 Blackhawk that had been owned by Hank Williams, Jr. The Rock Island Auction folks predicted the gun would sell for between $900 and $1,600, and I wanted it so I put in a bid at $2,000 (which I thought was ridiculously high). That gun sold for $5,000. There are evidently guys out there who have the disease worse than me.
The Hank Williams, Jr., Ruger .357 Magnum Blackhawk. It sold for $5,000. The buyer’s premium on top of that would have been nearly a thousand bucks!
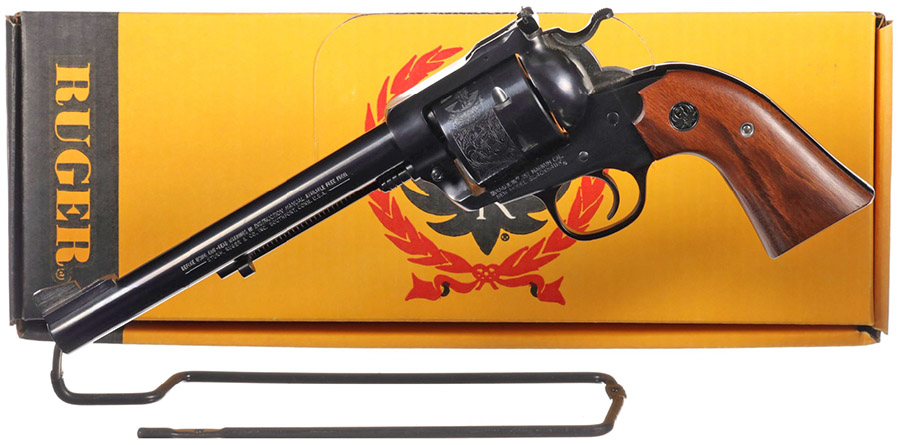
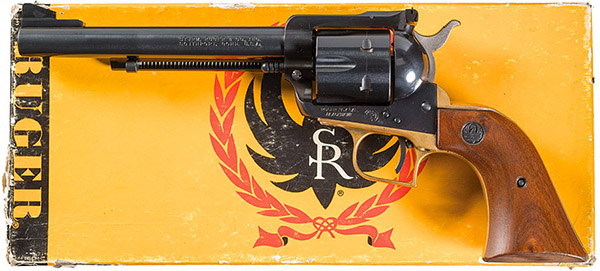
Then last month another Rock Island auction rolled around, and this one had a Ruger .357 Bisley. The concept and history of the Bisley is interesting. Bisley is the name of a target range in England, and when Colt introduced a target variant of its famed Single Action Army revolver in 1894, they named it the Colt Bisley. The most obvious differences between the Bisley and a standard Single Action Army is the Bisley’s longer grip with a more pronounced hump. Colt’s Bisley also had a rear sight that is adjustable for windage and interchangeable front sight posts for elevation adjustment.
Ruger introduced a modern Bisley version of its Blackhawk revolver line in 1985 (with revolvers chambered in .357 Magnum, .41 Magnum, .44 Magnum, and .45 Colt). I always thought the Ruger Bisley was a marketing thing and I thought the Bisley’s odd-shaped handle was visually unappealing, so I never felt the need for one. But needs and wants can change. A friend of mine let me try his .357 Magnum Ruger Bisley a few years ago. I liked its heft and slightly longer barrel (7 1/2 inches versus the standard Blackhawk’s 6 1/2 inches). Ruger stopped making the .357 Magnum Bisley a few years after it was introduced, and they are hard to find now.
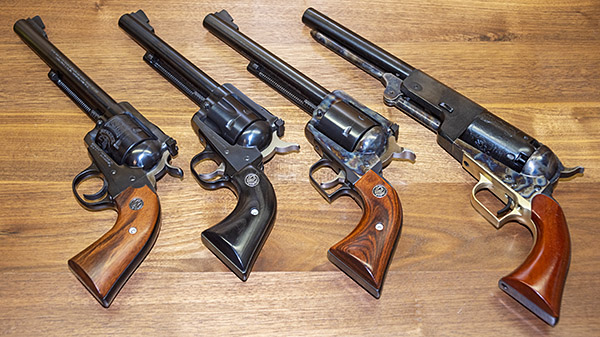
A sense of scale: Ruger .357 Bisley, Ruger .357 Blackhawk, Ruger .44 Super Blackhawk, and Uberti Colt Walker. They are all big guns.
The modern Ruger Bisley has a massive appearance, and that’s kind of cool. At 7 1/2 inches, the barrel is an inch longer than the .357 Blackhawk and the Bisley has the larger grip frame. The Bisley grip frame feels awkward to me, but it is easier on the hand under heavy recoil. I’m probably just used to the standard Blackhawk grip frame. For me, the larger Super Blackhawk grip frame is the best of all.
Some might call these big guns horse pistols, which have been defined as handguns usually carried in a holster while riding a horse. The Bisley is smaller than a Colt Walker (a monster of a handgun), but by any other measure the Bisley is a huge revolver. It is heavier than the regular .357 Magnum Blackhawk for four reasons: The unfluted cylinder, the longer barrel, the grip is larger, and the gripframe is made of steel instead of aluminum.
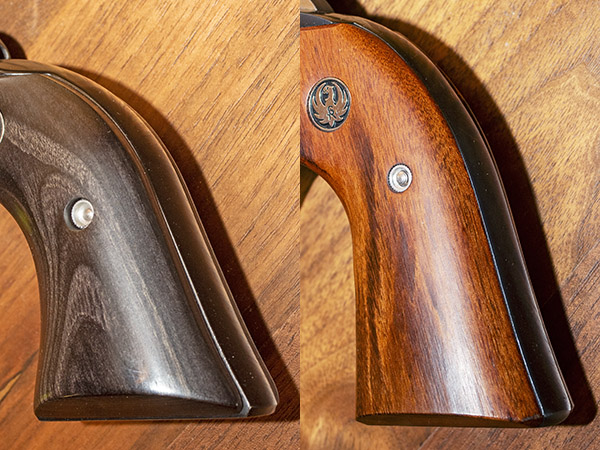
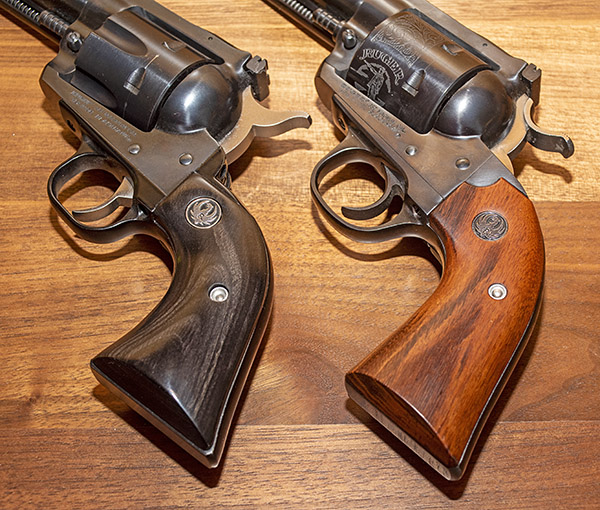
Ruger’s .357 Magnum Blackhawk (on the left) and their .357 Bisley (on the right). Note the difference in the grip shape and length.
The Rock Island folks guessed that the Ruger Bisley would go for between $600 and $900 on their website before the auction. I bid $600. I wanted it, but not so badly that I was willing to go crazy, which is kind of what my previous results told me you had to be to win in the Rock Island crazy competition. To my great surprise, I won the Bisley with my $600 bid. Then I received the emailed invoice and I was even more surprised. There was a 17.5% buyer premium, which tacked another $105 to the price. There was a 3.5% credit card fee, so that was $21. The gun had to ship 2nd day air to my FFL, and that was $46. There was insurance, and that added $7.05. And of course, the Peoples Republik of Kalifornia sales tax for another $60.39. My $600 Bisley suddenly became an $839.44 toy and it hadn’t even arrived. When it did, there was the California DOJ fee and the FFL transfer fee ($74.90). My $600 Bisley was now up to $914.34. I guess that’s okay, though. If I had seen a .357 Ruger Bisley in new condition for a thousand bucks, I would have pulled the trigger (literally and figuratively) and felt good about it. In that sense, I was $85.66 ahead of the game.
Another difference between Ruger’s standard .357 Magnum Blackhawk and the Bisley is the cylinder. The standard Blackhawk has a fluted cylinder; the Bisley has an unfluted and roll-engraved cylinder.
When I saw the gun in person (the day I started my 1o-day waiting period), I was blown away (figuratively speaking, of course). I could see that it was in excellent condition. The quality, fit, and finish are light years ahead of what Ruger is producing these days. You’ll recall that when I lost the Hank Williams Auction I bought a new Ruger .357 Blackhawk and its quality was terrible. The Ruger Bisley’s quality appears to be much better in both fit and finish. I looked up the Bisley’s serial number on Ruger’s website and learned that my gun was manufactured in 1986; I guess Ruger cared more about what was leaving the factory back then.
I’ve been to the range a couple of times with my Bisley. On my first day out with the new-to-me Ruger, one of my friends (a bench rest shooter) came over to watch. There was an old bowling pin laying on its side on the 100-yard line. You know the situation…like the bad guy in an old western movie, it was just begging to be shot. I asked my friend to spot for me. The first shot went high, kicking up a dust cloud about three feet above the pin. I held lower and my second shot sent up another dust cloud two feet below the pin. Okay, I had the elevation dialed in (I wasn’t actually adjusting the Bisley’s sights; I was just holding the front post at different heights). My third shot hit just to the right. On my fourth shot I nailed it, sharply kicking the bowling pin back 10 yards and spinning it violently. Now, just the pin base was facing me, presenting a 3-inch diameter circle. “Okay, let’s see you make that shot,” my friend said. I did, and the pin was kicked back another 10 yards. I looked back and smiled. “Piece of cake,” I said, and we both had a good laugh.
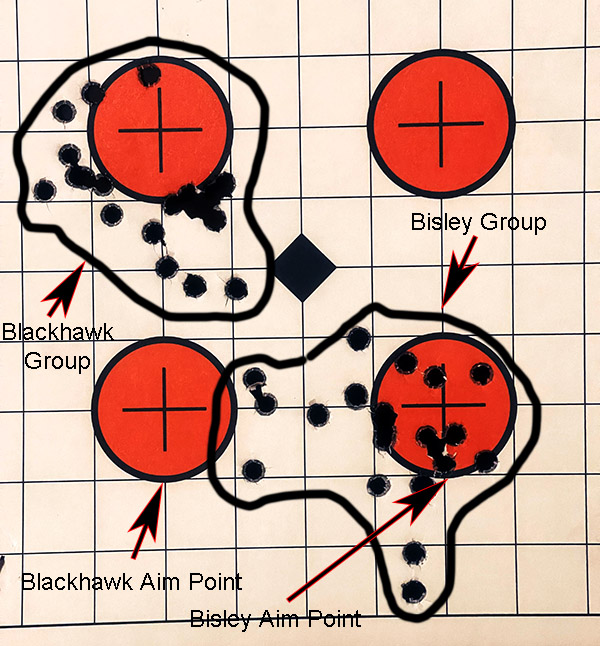
25-yard targets shot with the .357 Magnum Ruger Blackhawk (left) and the .357 Magnum Ruger Bisley (right).
On a subsequent range outing I compared the Bisley’s accuracy to the regular Blackhawk using the same heavy .357 Magnum load in both revolvers (8.0 grains of Unique and the Hornady 158-grain XTP jacketed hollow point bullet). They both shoot groups that were about the same size, and both are biased with the sights adjusted as far as they will go. The regular Blackhawk shoots high at 25 yards with the rear sight all the way down (the front sight is not tall enough). The Blackhawk prints about 3 inches high at 25 yards with the rear sight adjusted as low as it will go. I’ve contacted Ruger and they sent me their shortest rear sight blade for the Blackhawk, but that’s the one the revolver already had in it. Custom gunsmiths offer a taller front sight (Fermin Garza comes to mind), but I don’t know if I want to do that. It’s custom work I shouldn’t have to pay for.
The Bisley’s elevation is okay at 25 yards, but it shoots to about one inch to the left at 25 yards. When I received the revolver from Rock Island Auctions, the rear sight had been cranked almost all the way to the right by the former owner. He ran out of adjustment range and the gun still shoots to the left of my aim point. I thought that the leftward bias could be due to a poor ejector rod shroud fit, or it may just be due to the fact that I was shooting max loads and it’s how the gun reacts in my hand. I fired a few rounds of .38 Special wadcutters and the gun still shot to the left, so I don’t think it is a function of how hot a load I’m shooting or how it reacts to my grip. Then I took the ejector rod shroud off to see if that would make a difference. The ejector rod shroud was very poorly fit to the Bisley and it was pulling the barrel to the right, but when I took it off, the point of impact did not change. You would think the manufacturer would deliver a gun that shot to a point that was within the gun’s adjustable sight range. I’ve been inside a revolver manufacturing facility (not Ruger), and all they do is proof each gun with a high pressure load; that other manufacturer did not check where the gun printed. Ruger evidently does not, either.
The regular Ruger Blackhawk ejects all cases easily (even with the max loads I was using). The Bisley does not. With the max loads I shot in the Bisley, one chamber wants to hang on to the cartridge case. Less than max loads (38 Special and mid-range .357 mag loads) eject satisfactorily from the Bisley. The Bisley has a sloppy surface finish inside its chambers (there are machine marks from the chamber reaming operation). It shouldn’t have left the factory back in 1986 like that, but it did.
There’s one other quality-related observation on the Bisley I should mention. The Bisley makes a firing pin primer indentation in the primer that is bigger and deeper than any I have ever seen. Looking at the firing pin after it has been hit by the hammer, it looks bigger and sticks out of the breech face more than I am used to seeing. I had a bunch of max load .357 rounds with Aventuras primers I had assembled earlier, and Bisley pierced the primers on the first five (so I didn’t shoot any more of those). The firing pin is smooth and round (there are no sharp edges on it); it’s just taking the primer cup material near enough to its yield point that the pressure takes it the rest of the way. These same cartridges worked fine in my regular (i.e., non-Bisley) Blackhawk with no pierced primers, and the same .357 load with CCI primers and Winchester primers worked fine in the Bisley. Note to self: Don’t use Aventuras primers for hot .357 loads in the Bisley.
The Bisley’s firing pin in the extended position. It’s smooth, but big.Pierced primers on .357 Magnum cartridges loaded with 8.0 grains of Unique, the 158-grain Hornady XTP jacketed hollow point bullet, and Aventuras primers.
So there you have it. My knowledge base on the Ruger .357 revolvers continues to grow (and yours does, too, if you’re reading this). I’m still looking for that perfect .357 Magnum revolver. I’ve owned a bunch over the last 50+ years, and I’ll keep looking. I still dream about wandering into a rural pawnshop somewhere and finding a brass grip Blackhawk like that Hank Williams, Jr., Ruger for $200. You never know.
The New Year hits tonight. The years keep rolling by and it’s time for my 2024 resolutions. I’ve made a few, and with your indulgence, I’ll share them here.
I’m going to continue to hold my tongue (and my keyboard) on all things political. I’ve never seen anyone read a social media post or a blog or listen to someone with an opposing viewpoint and suddenly exclaim, “ah, now I understand…of course you’re right, and I was wrong all along…” Nope, the era of intelligent political discourse ended in the 1960s with the Vietnam War protests. Back then, and now, everyone is convinced their opinion is the only true path. I’m never going to call anyone ever again a leftwing idiot or a rightwing idiot, partly because of this resolution and partly because I hate being redundant.
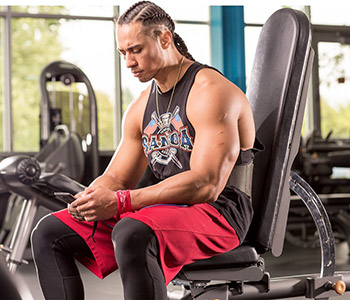
I’m going to stop getting upset with people at the gym tying up machines while screwing around on their cell phones. Nope, you can sit on a machine and text to your heart’s content. I’ll just move on to another piece of equipment. Someday, though, when you’re standing in front of the Pearly Gates, you’ll have to answer. And I’ll be there. Just in case there are any questions.
I’m going to lose weight. The answer is to use that calorie tracker on my cell phone and exercise. Really. This time I mean it. I want to be skinny like Gresh.
I’m going to cook more, but in line with the resolution above I’ll eat less. I do a great barbequed salmon, a marvelous Italian meat sauce, delicious stuffed shells, a wonderful chili, incredible stuffed peppers, a great wild pork sausage and mushrooms casserole, tasty chicken tostadas, and a few others. I want to try making my own chile rellenos this year and find at least three more dishes to add to my repertoire.
I’m going to sell a few guns. I own too many to enjoy and more than a few that I don’t shoot. It’s time to convert these investments into cash and let others have some fun.
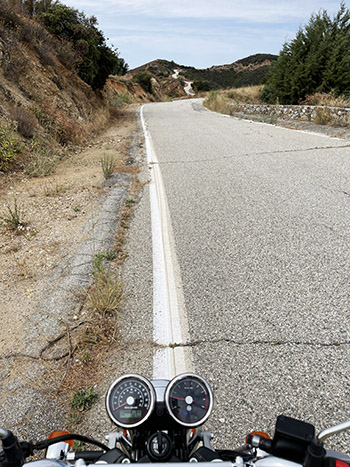
I’m going to ride my motorcycle and my bicycle more. I’ve slowed down on my riding quite a bit in the last three years. Part of it is the pandemic…law enforcement on our public roads has dropped to nearly nothing, and there are too many people driving like maniacs out there…speeding, weaving in and out of traffic, and screwing around on their cell phones. I’ve been hit by cars twice in my life while on two wheels (once on a motorcycle and once on a bicycle), and I don’t care to add a third bone-breaking event to my resume. But I haven’t been riding enough and I want to get out and ride. Get my knees in the breeze. You know the feeling.
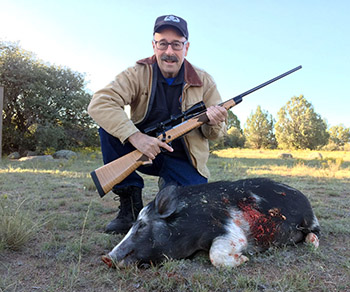
It’s time to put more pork on the table. I’m going to do at least two hunts in 2024. One will be a varmint hunt for coyotes in Arizona with Baja John; the other will be a pig hunt with my 6.5 Creedmoor (location to be determined). If you’re a vegetarian or fundamentally opposed to hunting, you have my permission to skip any blogs I write about these events.
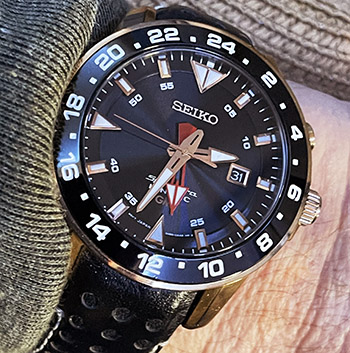
I’m not going to buy any more watches. I came across Segal’s Law last year, which holds that a man with a watch knows what time it is, but a man with many watches is never sure. I’m the guy who’s never sure, raised to an exponent.
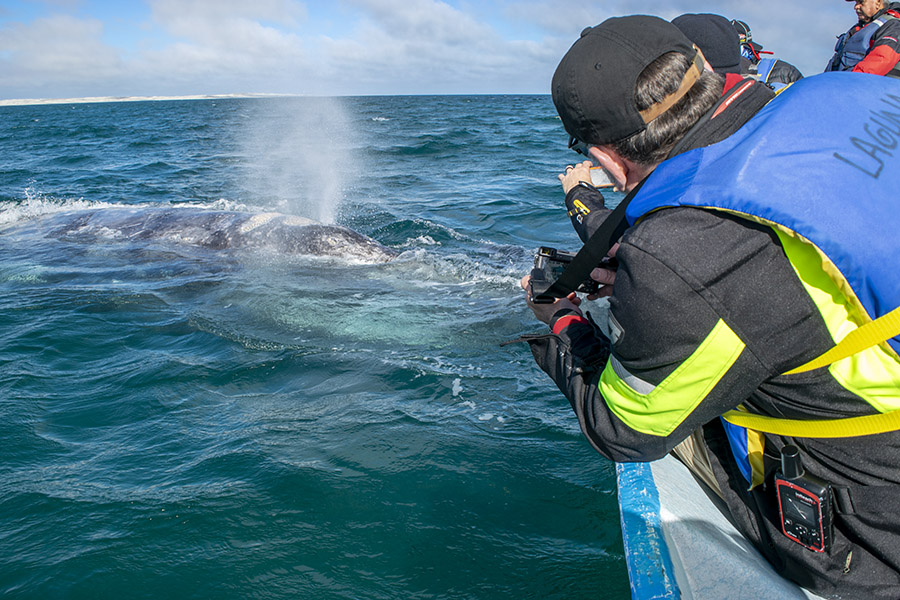
I’m going to do Baja again, most likely in March so I can see the whales, eat a chile relleno in San Ignacio, and visit Javier at the La Casitas in Mulegé. I think Gresh wants to go, too. Maybe we’ll get our other ExNotes writers in on the action. You’ll read all about it here on ExNotes.
I’m retiring, for real this time. I’ll still write for the ExNotes blog and Motorcycle Classics magazine (I enjoy writing for both and I never viewed either as work), but I’m done with everything else. It’s time.
There you go…my 2024 resolutions. How about yours?
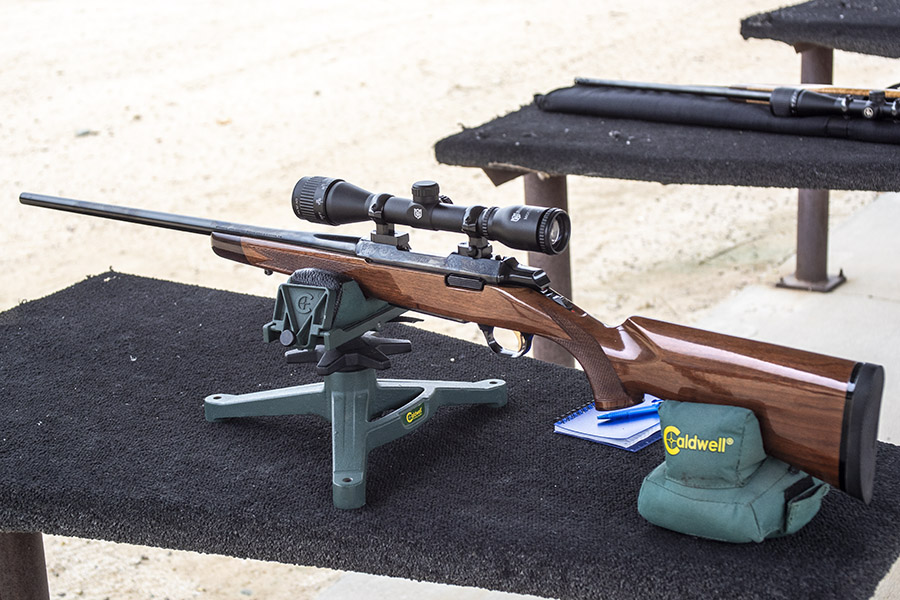
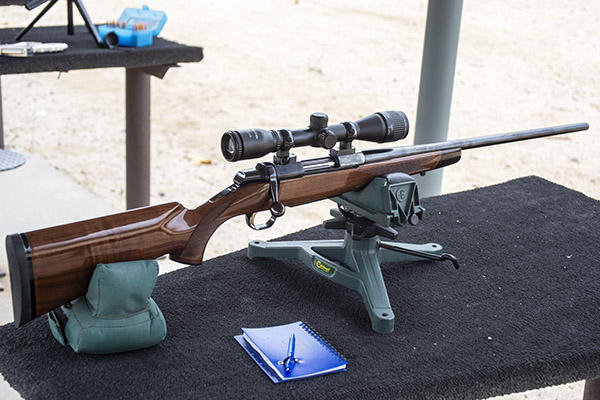
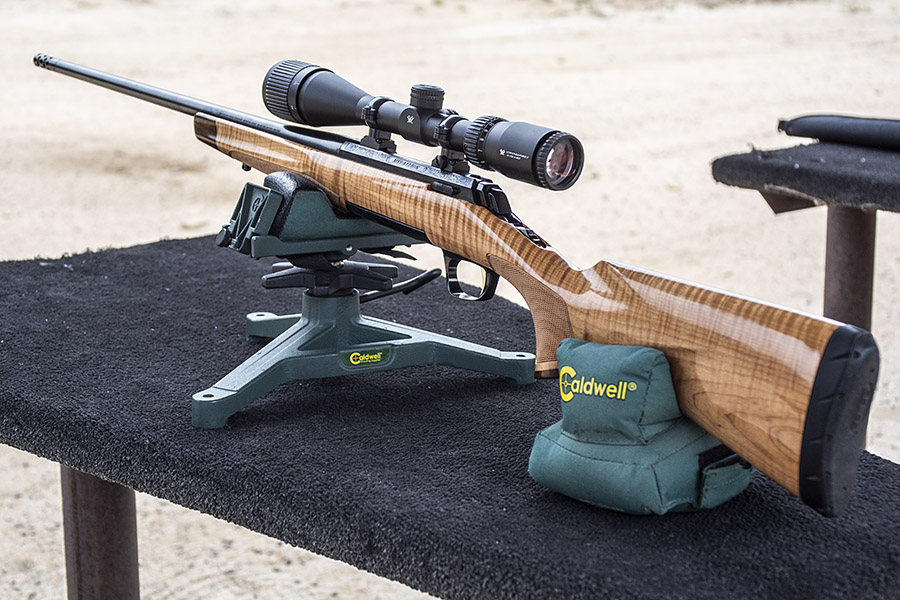
I recently posted a blog about a couple of accuracy loads for the 6.5 Creedmoor Browning X-Bolt. This blog focuses on a different Browning: A .223 Browning Micro Medallion A-Bolt. It’s the rifle you see here.
I bought the A-Bolt new from a local gun shop in southern California about 35 years ago. I paid $339 for it. It doesn’t have fancy walnut but when I saw it on the rack I asked to see it. I soon as I held it I wanted it. It just felt right. I fancied it as a walking around varmint rifle suitable for rabbits and coyotes, although I’ve never taken this rifle anywhere but the West End Gun Club 100-yard rifle range. I still make gun purchase decisions based on the kind of hunting and shooting I did 50 years ago in Texas. Someday I may get out and chase jack rabbits and coyotes with this rifle again. I can dream.
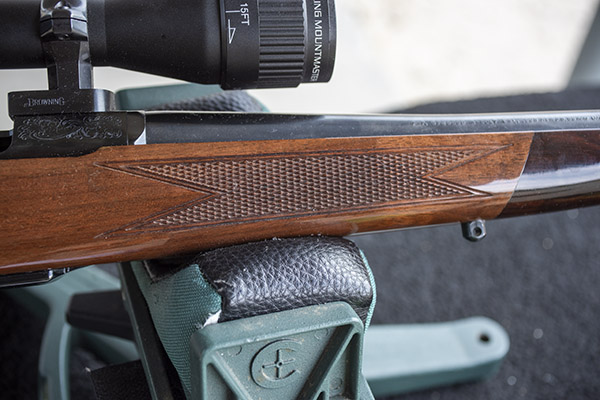
The right side of the Micro Medallion.
Browning offered their A-Bolt Medallion series, which were full-sized rifles, and their A-Bolt Micro Medallions, which have a shorter barrel and a shorter stock. The Browning Medallions and Micro Medallions were discontinued a few years ago when Browning shifted to the X-Bolt rifle, but you can still find the Micro Medallion A-Bolt rifle on the used gun racks and on the gun auction boards. A recent check showed that they go for around $650.
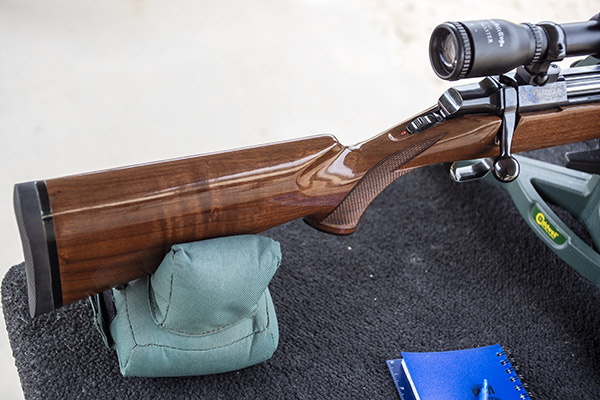
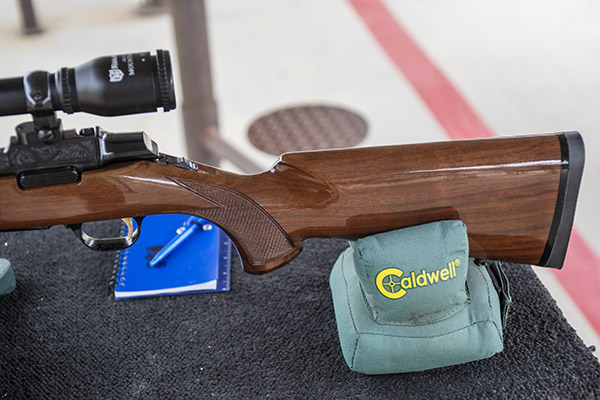
The rifle you see here is Browning’s Micro Medallion. I like the smaller size. It’s a lighter rifle and the shorter stock fits me well. I don’t like the gloss finish, but at the time it was all Browning offered (they later offered a satin finished rifle). What’s nice about the gloss finish, though, is that it has held up well. It and the deep bluing make this firearm look brand new. I like the rifle’s cut checkering and the darker fore end pistol grip tips, too. Browning made a big deal about their rifle’s short bolt angle in their advertising back in the 1980s and 1990s (bolt angle is the angle the bolt turns through to allow extraction, ejection, and loading). I like it, but if the rifle had a c0nventional bolt throw it wouldn’t have bothered me. It’s something different, but it’s not necessary. It is cool.
Fairly plain, gloss finished walnut. The Browning’s bolt throw is a short 60 degrees, much less than a conventional bolt action rifle’s 90 degrees. The rifle’s bluing is amazing.A nice rifle. I use the notepad to keep track of which load I fire at which target.Cut checkering on the Browning. These rifles were manufactured in Japan. They did a nice job.The fore end tip and the pistol grip have rosewood caps. They look good.
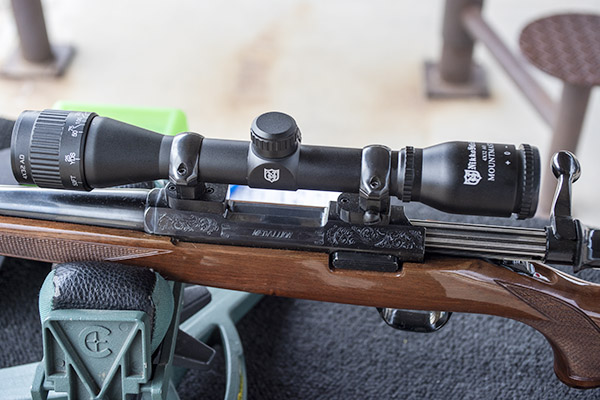
Shortly after I bought the rifle, I mounted an inexpensive 4X Tasco scope on it. That worked okay for a couple of years and then the scope called it quits, so I bought another inexpensive 4X scope (a Nikko this time). The Nikko has held up well.
You might wonder: Why a nonvariable 4X scope? Why not the more popular 3-9X you see on most rifles? In my opinion, the 4X is a lot more useable in the field. I don’t get dramatically better groups with higher magnification scopes, and I like the lightness and the much larger field of view a 4X offers. Unfortunately, not too many companies offer fixed power 4X scopes these days. The scope companies’ marketing has convinced everyone they need variable scopes with high magnification.
The Nikko 4X scope was inexpensive. It has parallax and focus adjustments. Not the roll engraving on the receiver.
In my recent blog about the Browning maple Medallion 6.5 Creedmoor X-Bolt, I described a couple of accuracy loads I developed for that rifle. This time, my objectives were different. I wasn’t shooting the .223 Micro Medallion for accuracy. I was harvesting brass.
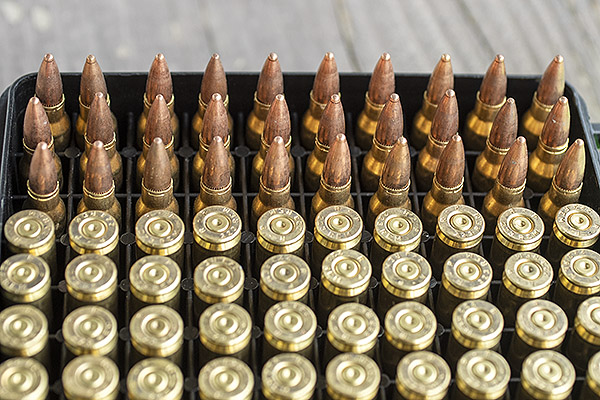
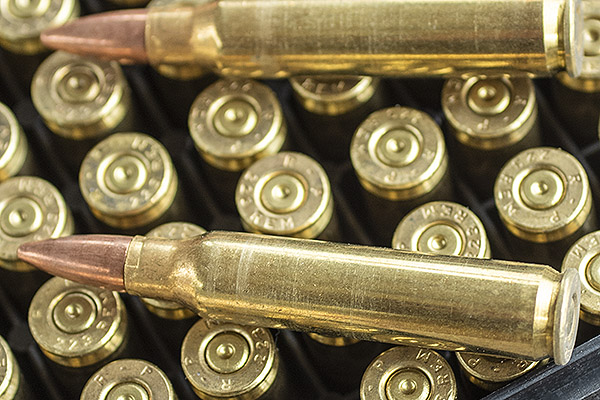
Bulk Remington .223 ammunition. It comes in a big plastic bag. I counted out 100 rounds for this range session.A macro shot of the bulk Remington .223 ammo. Note the crimp applied to each round. I generally find that uncrimped ammo is more accurate with this cartridge. I think the crimping induces a bit of tilt in the bullet.
Several years ago I scoured the Internet looking for Remington brass. I’ve always had good luck with Remington brass (it lasts longer and it provides better accuracy, in my opinion). At that time and to my surprise, loaded Remington bulk ammo was cheaper than unprimed brass. For me it was a no brainer: I ordered a thousand rounds of loaded .223 Remington bulk ammo. When I need .223 brass, I’ll shoot up a bunch of the bulk ammo to get the brass.
The bulk Remington ammo was notoriously inaccurate in my Ruger Mini 14, which is the only rifle I had previously used with this ammunition. I wanted to see how the ammo would shoot in the Browning. I knew the Browning was accurate based on previous range testing at 100 yards (some of my reloads would shoot into a quarter of an inch in the Browning; I’ll give you those loads at the end of this blog).
The Remington ammo did well enough in the Browning. It held loads right around a minute and a half of angle at 100 yards, and it printed about where the scope was zeroed. Take a look:
Cheap ammo, but results that weren’t too shabby. I could hunt with this load.
This accuracy is good enough for minute of jackrabbit or coyote. The Browning Micro Medallion rifle is fun to shoot, too. It has negligible recoil, the shorter Micro Medallion barrel helps to keep the weight down, and it connects well at 100 yards.
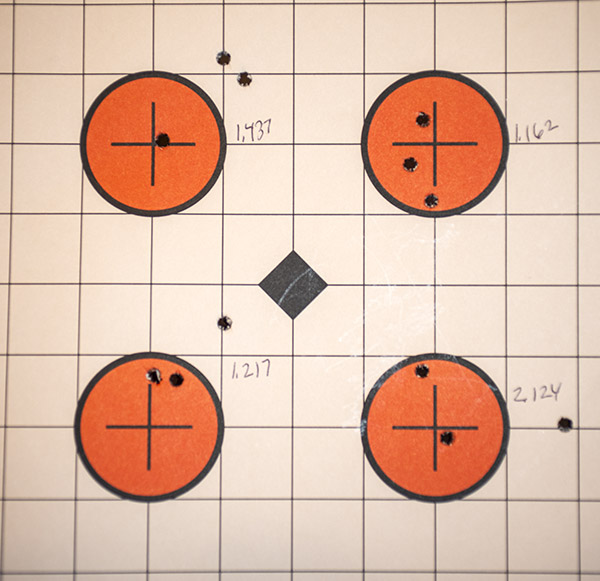
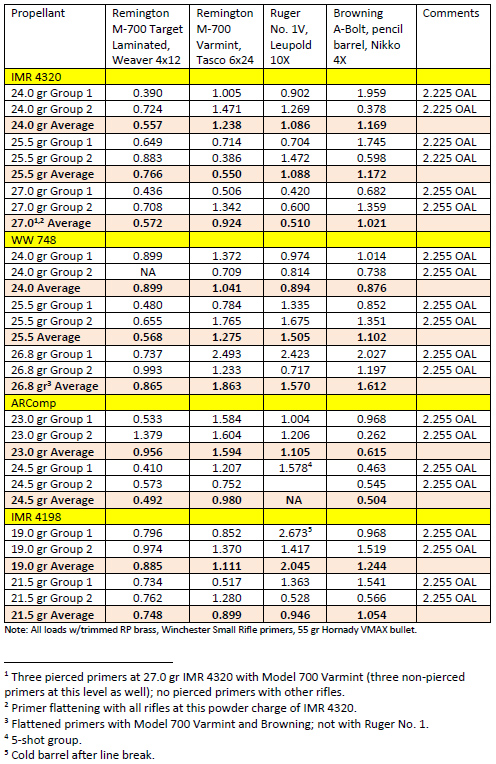
About the accuracy loads I mentioned above: In a previous load development effort I tested .223 loads in several rifles, including two Remington 700 varmint guns with bull barrels and big scopes. To my surprise, the Micro Medallion and its 4X scope had no problem running with the big guns and their much heavier barrels and much higher magnifications. Here’s how the Micro Medallion and three other .223 rifles grouped a few years ago at 100 yards:
The Browning Micro Medallion shot half-inch groups with ARComp propellant (and it was basically a minute-of-angle rifle with nearly all other loads). I’ll reload the brass harvested from this range session with the Hornady V-Max bullet and ARComp propellant. This is great performance, especially considering the lightweight barrel and the 4X scope. It’s a great rifle.
Never miss an ExNotes blog:
Please click on the popup ads and visit the folks who advertise with us.
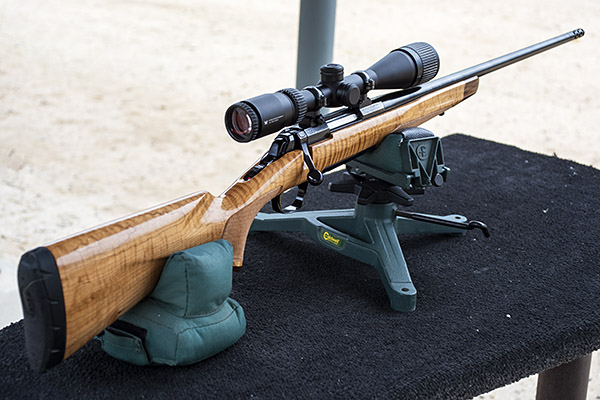
The creek is dry and getting to the West End Gun Club is a lot easier these days, so I reloaded some 6.5 Creedmoor ammo in the brass good buddy Johnnie G sent to me. I wanted to try a couple of new loads in my maple-stocked X-Bolt.
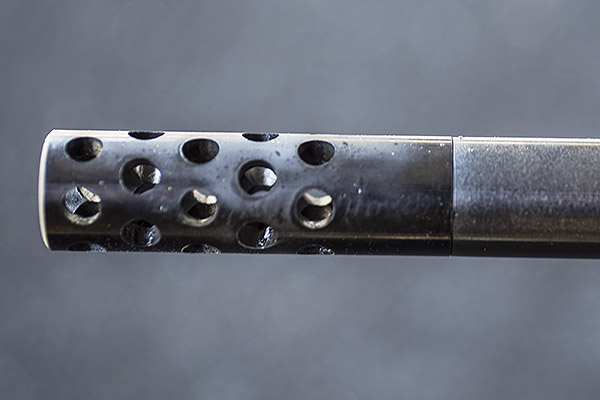
A right side view of the Browning 6.5 Creedmoor rifle. Note the muzzle brake on the end of the barrel.
I bought the X-bolt when I saw the wood, and it had a cross-country ride and a half to get to me. I saw it in a shop in Lamar, Colorado, and I knew I had to own the Browning as soon as I saw it. You don’t see many rifles with wood of this caliber.
There was a problem, though. The Colorado shop owner wouldn’t ship it to California. There’s an extra hoop or two a dealer has to jump through to ship a gun to California and I guess folks in Colorado aren’t basketball players. Here’s where capitalism came to the rescue. There’s a guy in Virginia who makes a living off of these kinds of situations, so I had the Colorado dealer ship it to the Virginia dealer, who then shipped it to my dealer in California. None of these dealers did so for free (going to Colorado-to-Virginia-to-California route wrapped the Browning in another $100 bill, and you can guess who had to pay up). But that’s okay. I wanted the rifle and now I have it. It really is an exquisite firearm. And it is exquisitely accurate. I’ll get to that in a minute.
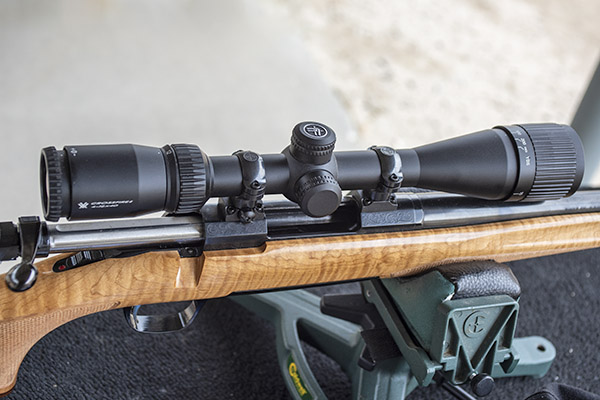
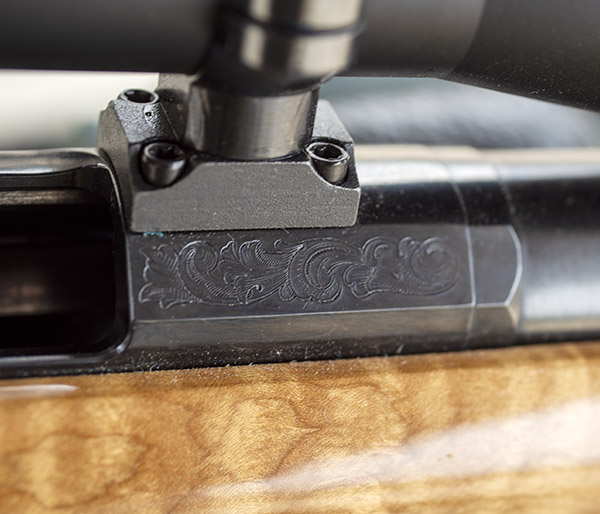
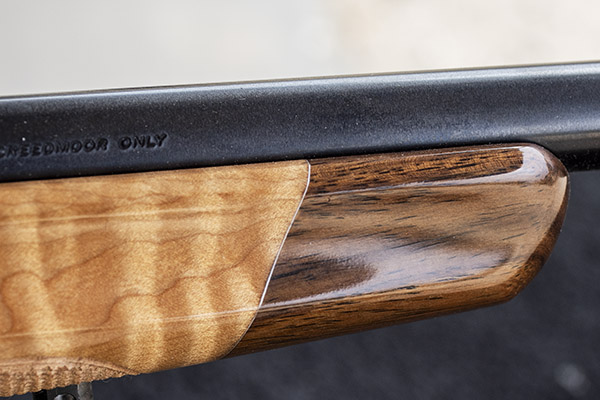
I mounted a 4×12 Vortex scope on the Browning 6.5 Creedmoor. Check out the roll engraving on the receiver.Another view of the 6.5 Creedmoor Vortex scope. The scope includes a parallax adjustment on the objective lens.A macro shot of the receiver’s roll engraving. It’s a nice touch.The stock has a darker wood fore end tip. It’s a classy rifle. The action is glass bedded from the factory.The X-Bolt has a muzzle brake. The bluing is fine; that’s powder residue you see on it. I can feel a light puff a fraction of a second after the bullet leaves the barrel.
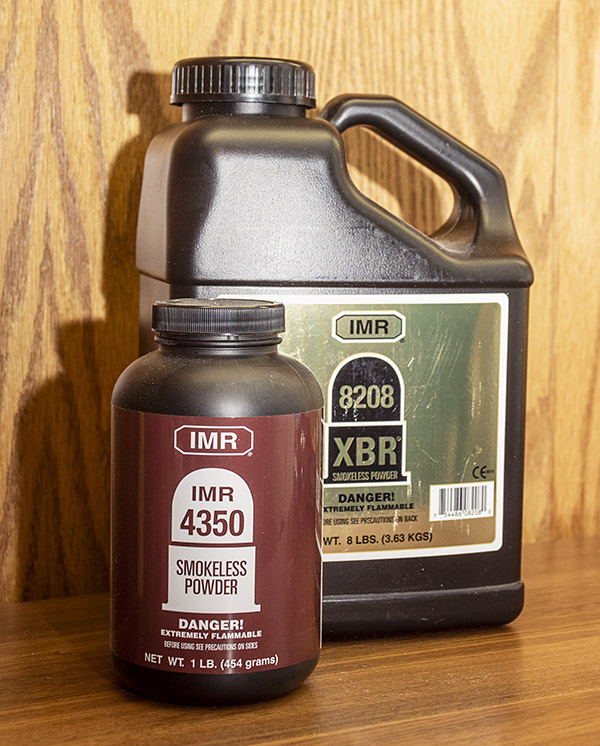
I used the Hornady 140-grain full metal jacket boat tail bullet for two loads I wanted to test; one with IMR 4350 propellant and the other with XBR 8208 propellant.
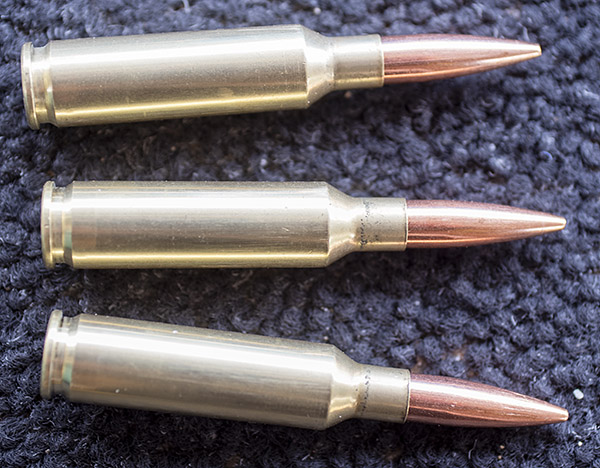
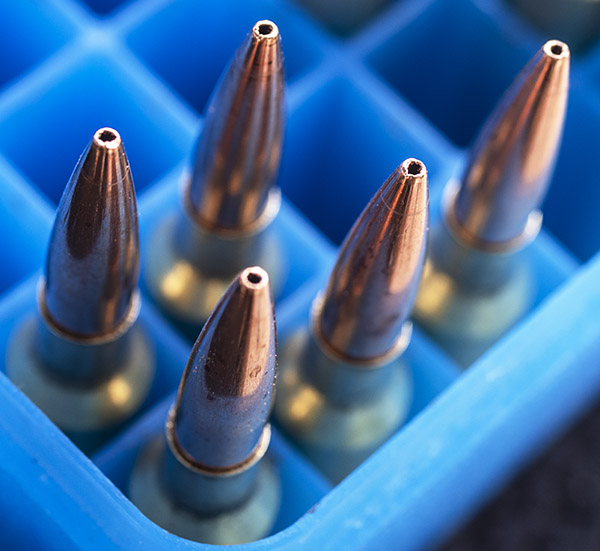
Reloaded 6.5 Creedmoor ammo with Winchester brass and the 140-grain jacketed hollow point boat tail bullet. It’s good looking ammo.The business end of the 140-grain Hornady bullets.
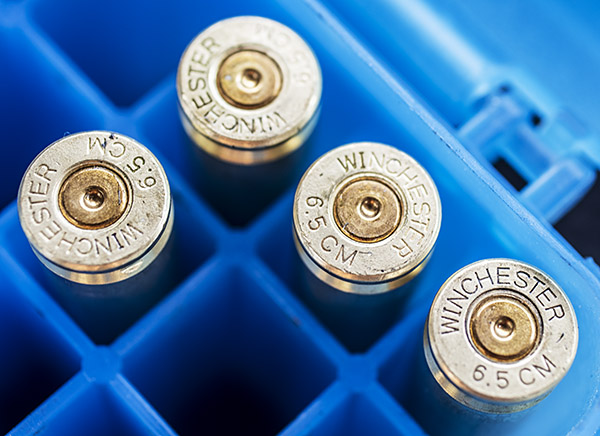
The loads showed no signs of excess pressure after firing. The bolt opened easily and the primers were not flattened.
Winchester brass, and unflattened Winchester large rifle primers.
I full length resized the 6.5 Creedmoor brass because I have two rifles chambered in 6.5 Creedmoor (see our earlier story, A Tale of Two Creedmoors). The alternative approach is to neck size the brass only (which can theoretically offer improved accuracy), but when you neck size the brass the reloaded ammo will only fit into the rifle in which the brass was previously fired. I didn’t want to try to keep my ammo segregated by rifle, and as it turns out, I don’t need to. The full length resized 6.5 Creedmoor brass provided great 100-yard results in the Browning X-Bolt rifle with both the XBR 8208 and IMR 4350 loads.
The first shot of the day at the upper left target was low and to the left, which is a common occurrence when shooting from a clean and lightly oiled barrel. The next three grouped tightly into the orange target (I could see the bullet holes with the rifle’s 12X scope). I let the barrel cool for a few minutes, and then I fired another three rounds at the upper right target. I was pleased; the load returned an even tighter three shot group in about the same spot as the first group. Both groups, when measured later, were a satisfyingly tight half minute of angle.
I let the barrel cool again, and then I moved on to the IMR 4350 loads. Wow, talk about consistent. Both shot to the same part of the target, and both were exactly the same group size: 0.829 inches.
Two great 6.5 Creedmoor powders: IMR 4350 and XBR 8208.My old RCBS powder trickler still works well.
I had read that IMR 4350 was a “go to” powder for 6.5 Creedmoor accuracy, and my results confirmed that. I had not found much information about XBR 8208 accuracy in this chambering, but it sure seemed to get the job done for me. As the above target shows, the XBR 8208 performed even better than the IMR 4350 loads. Here’s a bit more on info on these two loads:
Both had the Hornady 140-grain bullets seated to an overall cartridge length of 2.800 inches.
I did not crimp the bullets in place.
I did not trim the brass for either load.
The powder charges for both loads were weighed for every cartridge. I used my powder dispenser to drop a little bit lower charge, and then trickled in the last few grains.
I used 31.5 grains of XBR 8208.
I used 39.0 grains of IMR 4350.
I used Winchester brass with Winchester large rifle primers.
So there you have it: Two great 6.5 Creedmoor loads for the Browning maple Medallion.
I had a chance to fire the new SIG M18 9mm handgun, which was recently added to the California Department of Justice roster of approved handguns here in the People’s Republik. I was impressed with the M18’s accuracy, grouping, comfort level, feel, and sights. I love the desert tan colors. I was not impressed with the trigger (more on that in a bit).
It was a good day on my local indoor pistol range, and as I was leaving, my good buddy Shannon asked where I’ve been (I hadn’t been there in a few weeks). “Overseas,” I told her. She then pointed to the new M18 SIGs they had in the display case and asked if I’d like to try one. That reminded me of the old joke about the guy with the wooden eye. I responded with an affirmative and rhetorical, “Would I?”
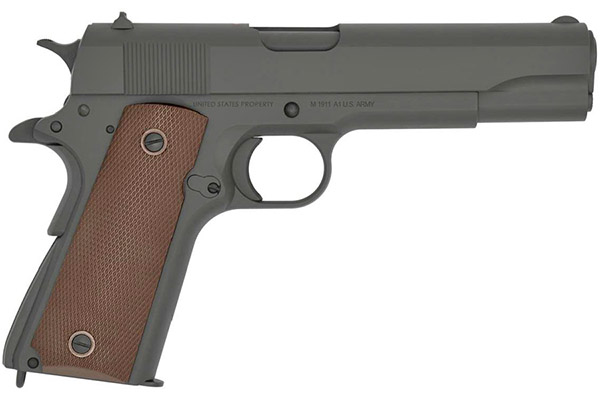
The venerable 1911. It’s chambered in .45 ACP. All steel and with a Parkerized finish, as God intended. In my opinion, you can’t improve on perfection, but the Army had other ideas.
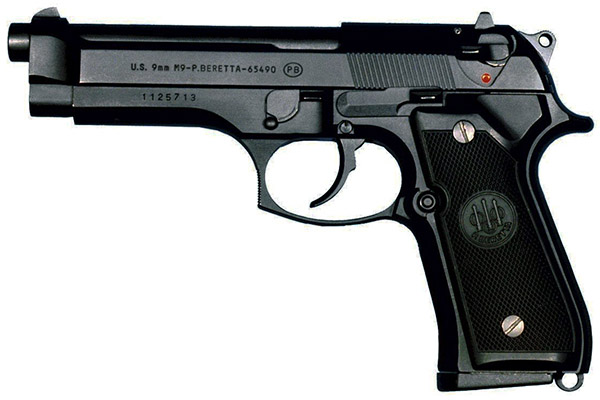
A bit of background: The US Army and I have something in common: We change handguns on a regular basis. The Army had been using the venerable .45 ACP 1911 since about, well, 1911. It served the Army well (and still serves well in certain special ops units), but the Army decided it wanted something better. That led to adoption of the 9mm Beretta 92 (designated as the M9 for the military) in 1985. I never cared for the Beretta, so I’ve never owned one and I can’t tell you anything about how it shoots or feels. The M9 had pushed out my beloved 1911, so I didn’t like it. Period. No handling or testing required.
The Army wanted a smaller pistol cartridge, and it settled on the Beretta M9. The M9 has an aluminum frame. Bob likes it.
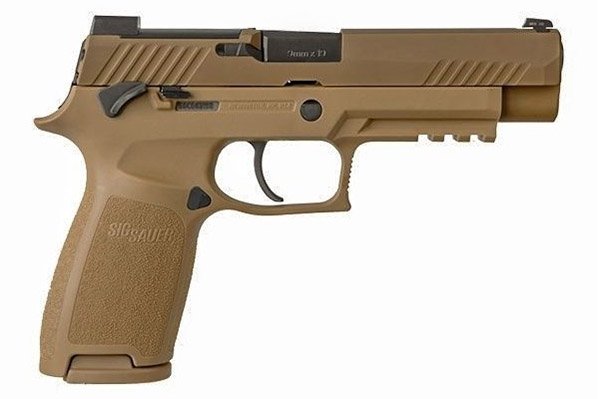
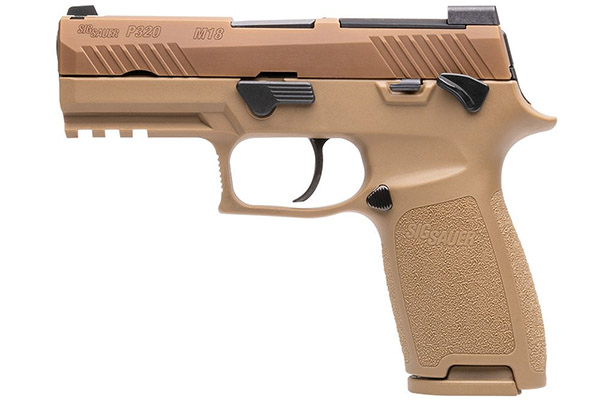
The Army quickly decided it didn’t much like the Beretta, either. But the Army is big and it moves slowly when it’s not lobbying for more funding from Congress, and it wasn’t until 2017 that they decided to go with a militarized version of the 9mm SIG P320. There are two versions of the new military handgun: The M17, which has a 4.7-inch barrel, and the M18, with a 3.9-inch barrel. Both are full sized handguns with magazines carrying a gazillion rounds, and until recently, neither was available to lowly and untrustworthy civilians here in the People’s Republik of Kalifornia. Nah, scratch that. Lowly or not, trustworthy or not, no California civilians could purchase either of the new SIGS, although weirdly, we could purchase the civilian gun from which it was derived, the SIG P320. Go figure.
The SIG P320, the gun the M17 and M18 handguns are based on. All three guns (the P320, the M17, and the M18) have a polymer gripframe. You can tell they’re swell (I’m not going to explain that comment; you have to be old enough to get it).The 9mm SIG M17. Note the longer barrel length.The gun I fired: The SIG M18.
The SIG M18 recently appeared on the California Department of Justice approved handguns roster. That’s just a bit on the weird side, too, because the M18 is the version with the shorter (i.e., slightly more concealable) barrel. You’d think in their wholesome attempts to keep us pure our legislators would have approved the longer-barreled M17. Maybe they will in the future.
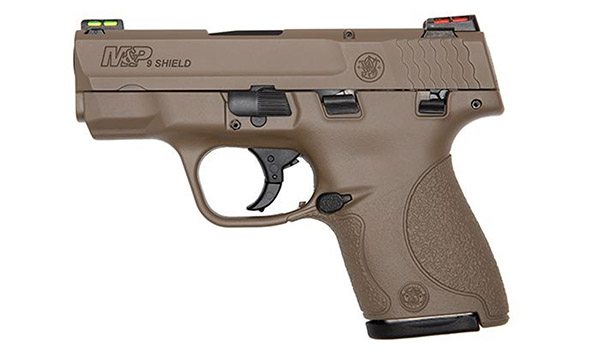
The Rock Island Compact 1911. This is a short barreled, shorter grip frame 1911 chambered in .45 ACP.My Smith and Wesson Shield. It has a very short barrel compared to either the SIG M17 or M18, which makes my shooting with it a bit less accurate.
I had fun on the range. I shot a box of .45 ammo in my Compact 1911, and then two boxes of ammo in my Smith and Wesson Shield. I was doing pretty good with both, too. It’s a pleasant way to spend an afternoon. As I was leaving the range, Shannon told me about the new M18s they had in stock and offered a trial run, so I put a box of 50 rounds through one of them.
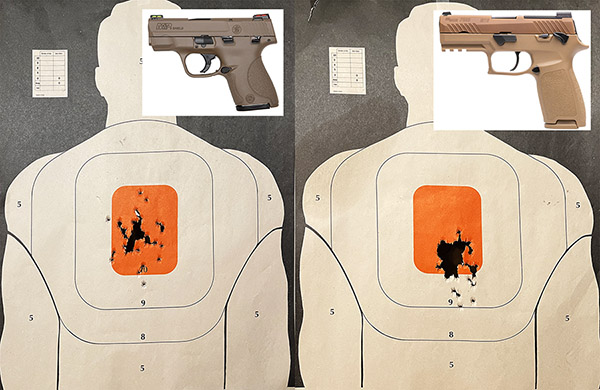
I used a 6:00 hold on the orange bullseye on both targets, and I fired 50 rounds at each. The Shield target is on the left; the SIG target is on the right. Both guns are good enough; the M18 is surprisingly accurate.
As I said above, I didn’t care for the M18 trigger (the M18 is a striker-fired handgun; give me a hammer-fired gun any day). But the thing was accurate, even with the Joe Biden trigger (it was clumsy and creepy). I put nearly all 50 rounds through a single jagged hole at my point of aim 10 yards downrange, and then I started hitting low with the last few rounds. The few that dropped a bit below the orange bullseye were entirely due to me being tired and shaky (it wasn’t the gun; I was coming up on 200 rounds in that range session and I’m an old man). The bottom line: I like the new M18. A lot. I may buy one somewhere down the road, unless the M17 gets approved in California first.
I had a good morning at the West End Gun Club recently. I shot the 6.5 Creedmoor rifles, a .223 Browning Micro Medallion, and Jim Gardner’s powder-coated cast bullets in a 7mm Remington Magnum Ruger No. 1. I might get around to writing about the other rifles, but for today, the focus is on the 7mm Magnum No. 1 and powder-coated cast bullets. I’ve written about shooting 7mm cast bullets in the No. 1 before; those results were mediocre and the barrel leaded enough after five rounds that accuracy went to hell (I had to clean the bore with a bristle brush after ever group). The powder coating Jim applies makes a difference. The Gardner powder-coated bullets did not lead the barrel (at all) and the results were good. I think I’ve finally found a decent cast bullet load for this rifle.
I have had a lot of difficulty making this rifle perform with the powder-coated cast bullets. It was apparent they weren’t leading like my other cast bullets had, but they weren’t very accurate. Neck sizing only, which often improves accuracy, compounded the felony. It didn’t work well at all, mostly because I couldn’t chamber most of the rounds (even though they had been fired in the same 7mm Magnum Ruger No. 1 rifle). I also tried seating the bullets further out, but one got stuck when I chambered a round and when I removed it, the bullet came out of the case and Trail Boss propellant spilled all over the guts of the rifle. That led to it not extracting, so I had to disassemble the action and clean everything. I also tried crimping, but those rounds weren’t any better.
This morning’s batch were full length resized, not trimmed, and not crimped. I flared the case mouth just a tiny bit to let the Gardner powder -coated bullets enter without shaving any of the powder coating or the lead, and I seated them a little deeper so that they did not contact the rifling. When I seated the bullets this time, they expanded the case mouth just enough to eliminate the flare. This batch chambered easily.
I had one round left over from a previous batch, and I fired it first (all shots are and groups discussed here were 50 yards from a rest). That one round was left over because it wouldn’t chamber the previous time I had the rifle out because the case had deformed slightly when I overcrimped it. I had to run that round through the full length resizer (bullet and all, with the decapping pin removed) so it would chamber. It was my first shot of the day and it shot a little to the right (as you can see above). That first group was the biggest group of the morning.
I then shot four more groups, and all the rest grouped nicely.
At 50 yards, these aren’t what I would call amazing groups, but they are getting better and that one half-inch group shows promise. I bought a thousand of the Gardner powder coated bullets, so it’s nice to know I can get then to work. The powder charge was 18 grains of Trail Boss, dispensed (not individually measured). I may go out to a hundred yards on the next outing to see how they perform. But where they are, I’d feel comfortable chasing rabbits with them.
The tricks to this load were full length resizing, no crimp, very slight case mouth flare, 18.0 grains of Trail Boss, Winchester large rifle primers, Remington brass, and a cartridge overall length of 3.127 inches. I’m going to try this load again. The brass is in the tumbler now.
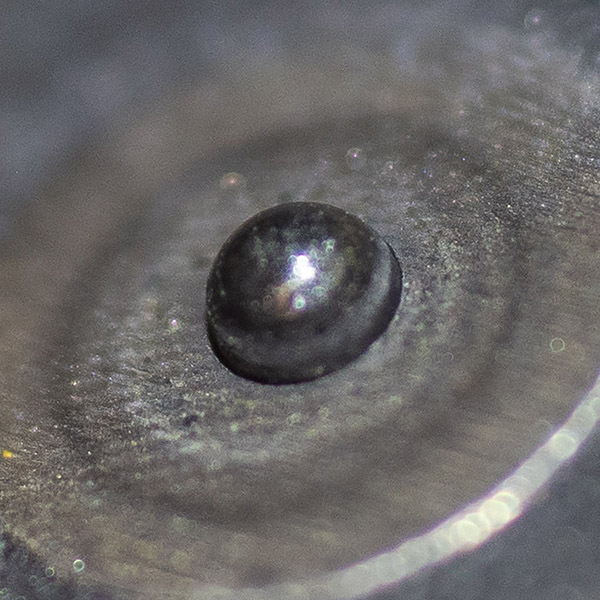
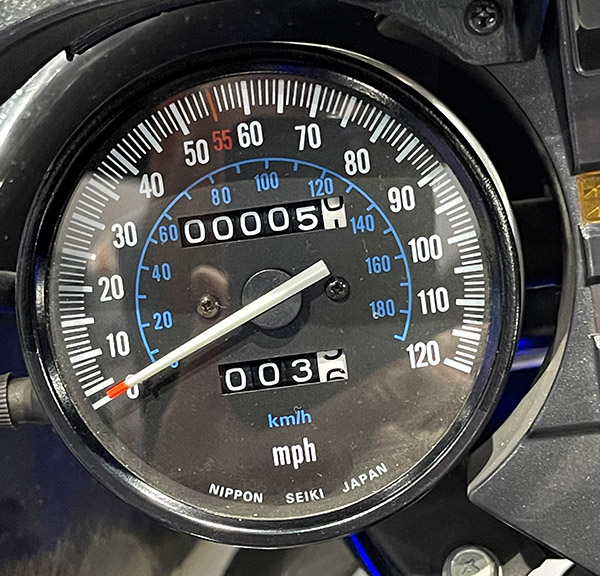
The International Association of Chiefs of Police…it’s an organization most folks have never heard of, but it’s been around for 130 years. My good buddy Mike is a member and he invited me along as his guest to the 2023 IACP convention (Mike and I have known each other since the 7th grade, and that means we’ve been friends for more than 60 years). It’s the third or fourth time I’ve attended the IACP show, and it’s always great. The IACP convention was in San Diego this year, and any time I have an opportunity to visit that beautiful town, I’m in. Susie and I rolled south in the Subie; Mike had already flown in. All kinds of companies have exhibits at the IACP convention, and many federal and state law enforcement agencies have displays. The United States Secret Service was there and they had one of the presidential limos on display. The photo at the top of this blog is yours truly reflected in the presidential limo’s deep black paint.
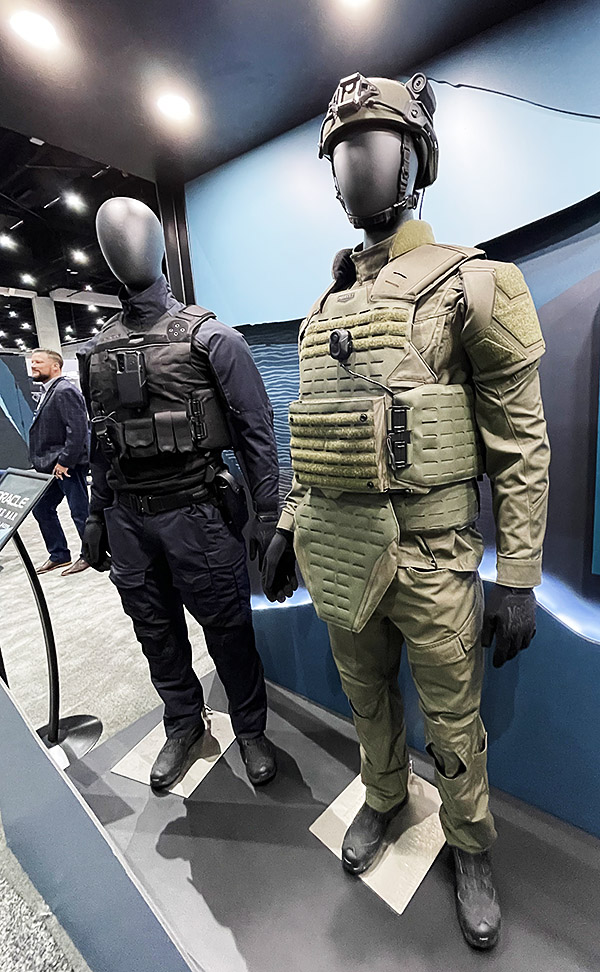
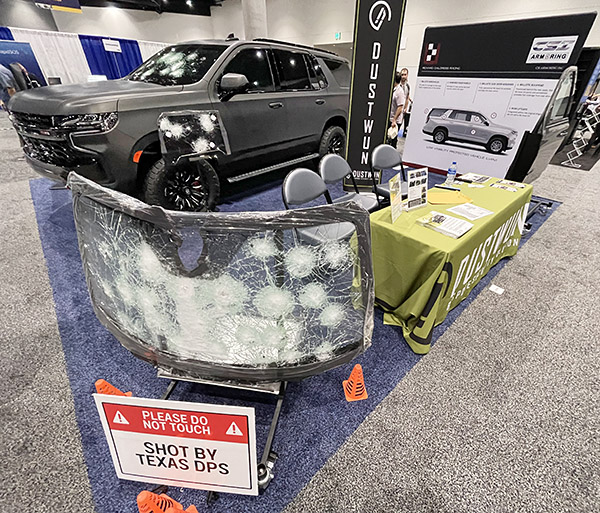
So who exhibits at the IACP? All kinds of government organizations and all kinds of businesses. Many of the exhibitors were software companies (including Microsoft) specializing in data base and other police applications. There were several outfits advertising armor plating for people, automobiles, war wagons, and more.
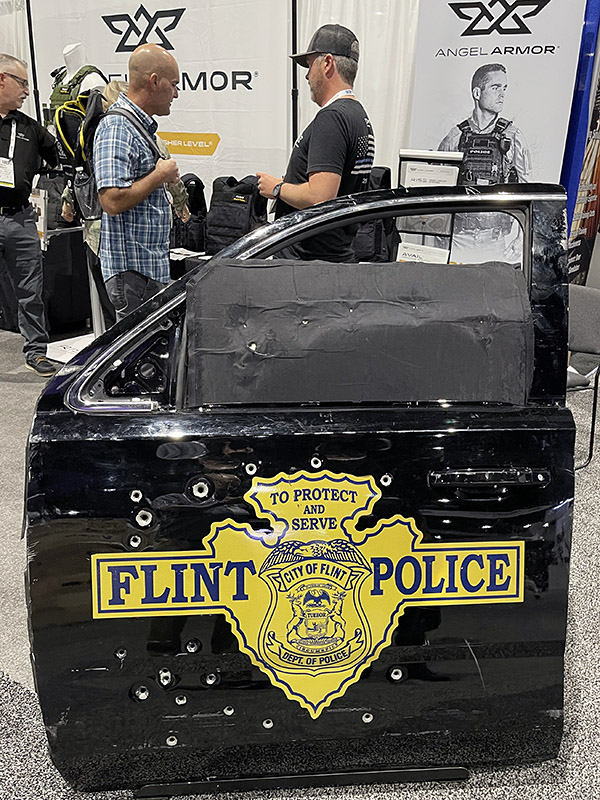
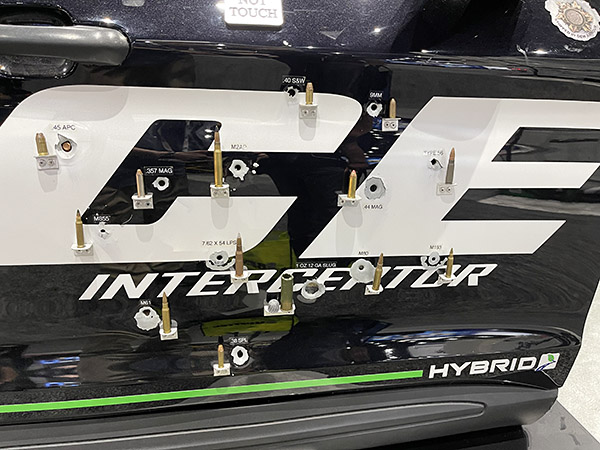
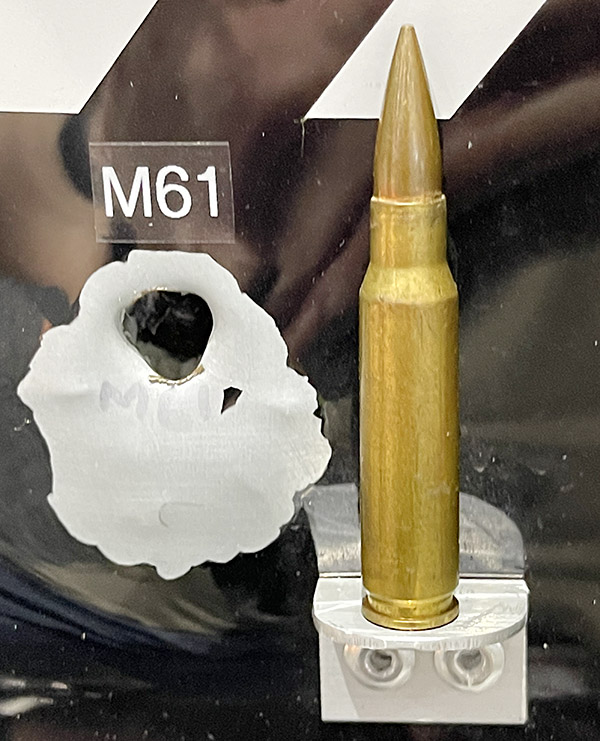
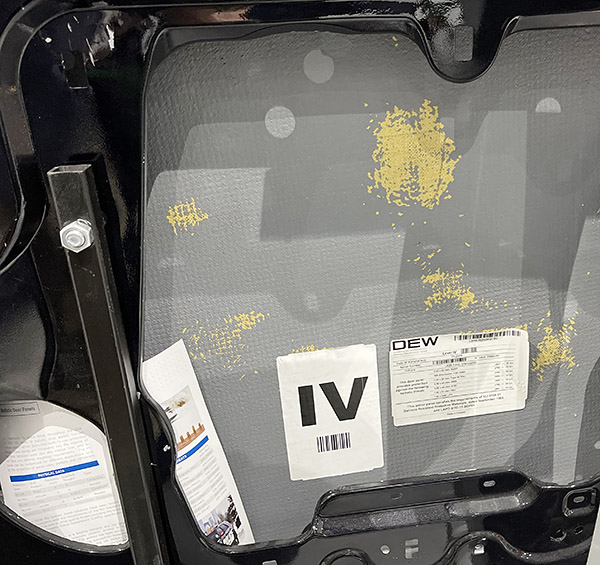
Body armor in your choice of colors. I’d wear it, but it would make me look fat.Impressive. Bullet proof glass may become an optional accessory for civilians here in the Peoples Republik of Kalifornia.Another bullet proof barrier supplier. Check out the photos below.Here’s another bulletproof barrier company, with several of the cartridges its material can stop displayed.A close-up photo of one of the cartridges.The above door interior. None of the bullets made it through.
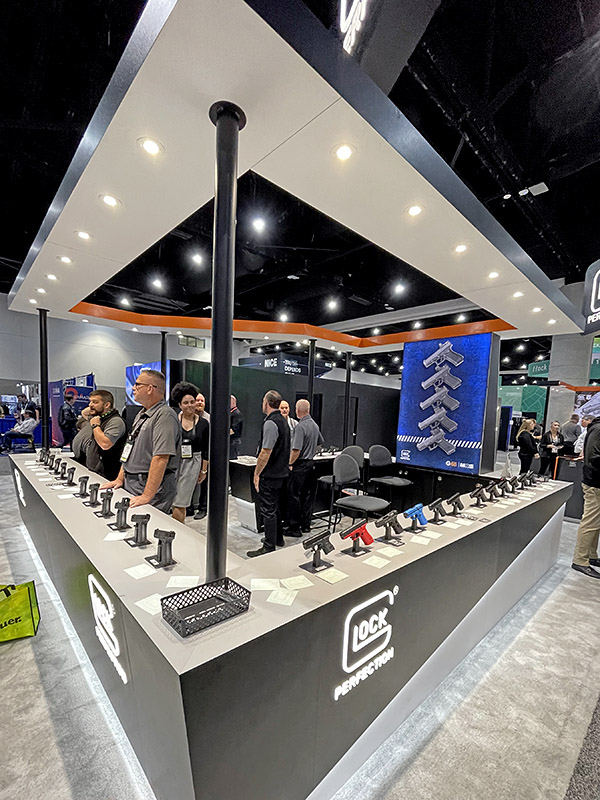
As you might expect, gun companies also display at the IACP convention. The ones I saw this year included Glock (with the largest display), SIG Sauer, Beretta, and a few different AR manufacturers. Surprisingly, Smith and Wesson wasn’t there (if they were, I missed them), nor was Colt (not many police departments carry Colt handguns these days).
Glock’s booth at the IACP convention. These guys had a lot of visitors. Glocks are popular and they are relatively inexpensive.
The Beretta and SIG booths were quiet. There was a lot of activity at the Glock exhibit. I spent some time at the Glock booth talking to one of their reps, and he was informative when I asked about using cast bullets in a Glock. I’d previously heard that Glock advises against using cast bullets in their pistols, and I asked if that was true. Glocks have barrels with polygonal rifling, and as such, there are no lands and grooves (there are just raised and lowered areas that twist along the barrel’s length). The Glock rep explained to me that they do indeed recommend not using cast bullets, as the lead has nowhere to go when it accumulates in the bore. When the barrels experiencing leading, it constricts the bore, and this raises pressures higher than what would be experienced in a conventionally-rifled pistol barrel. He said if you clean the barrel often enough (so that leading does not accumulate), shooting cast lead bullets would probably be okay, but how many shots can be fired before this becomes a problem is too dicey a proposition for Glock to provide a number. I also asked about copper plated (as opposed to jacketed) bullets, and the Glock rep told me that they advise against using those as well. To me, it’s not a big deal, as I don’t own a Glock, I always clean my guns, and virtually every firearm manufacturer advises against shooting reloaded ammo anyway. Eh, what do they know? The only time I ever shoot factory (i.e., non-reloaded) ammo in my handguns is when I have to requalify for my concealed carry permit.
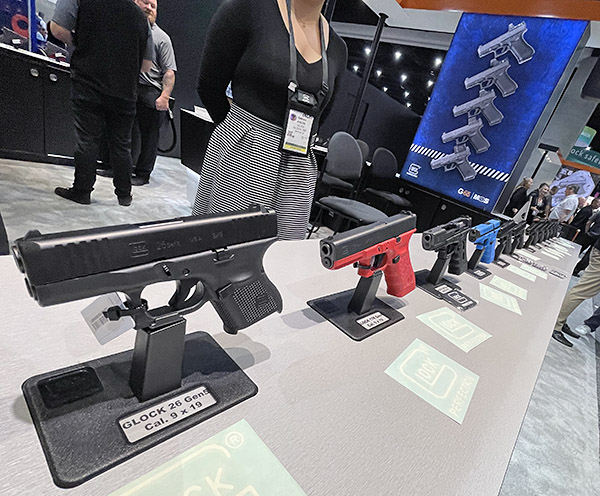
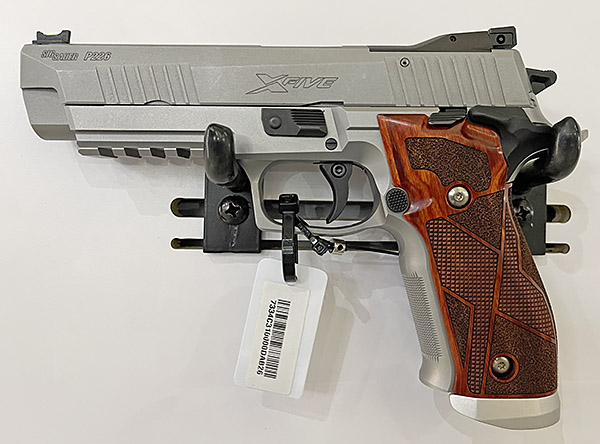
Glock pistols. I don’t follow Glock, so I don’t know what their different models are. The red and the blue guns are training guns.SIG Sauer’s 226 X-5. This is an impressive handgun.
I saw the new SIG target model (the 226 X5) and I fell in love with it. Unfortunately, the X5 is not available to us here in the Peoples Republik of Kalifornia (it’s not on the California Department of Justice roster of approved handguns). The SIG X5 is expensive at $2219, but I’d buy one in a heartbeat if it was sold here. It fits like my hand like a glove and the trigger is superb. The grips are nice, too. The X5 has all steel construction, so it’s heavier than the standard 226 (which has an aluminum frame). I sure wish it was available here. On the plus side, SIG’s M18 is now available in California. It’s the Army’s new sidearm. It has a striker firing mechanism (there’s no hammer), so the trigger pull is not what I would call good (as is the case, in my opinion, with all striker-fired handguns). The M18 is about $700 and I am tempted. I like SIG handguns.
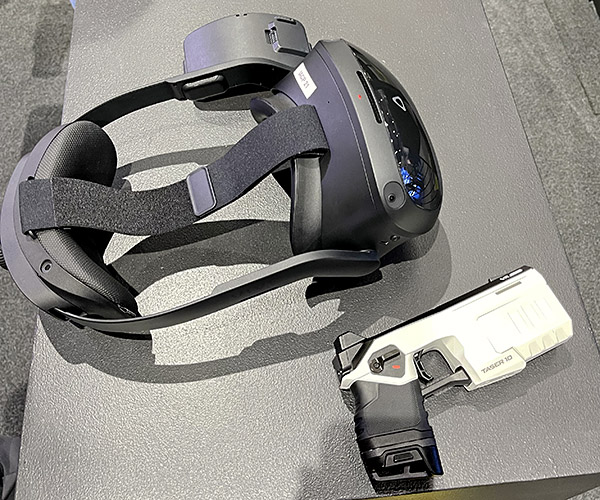
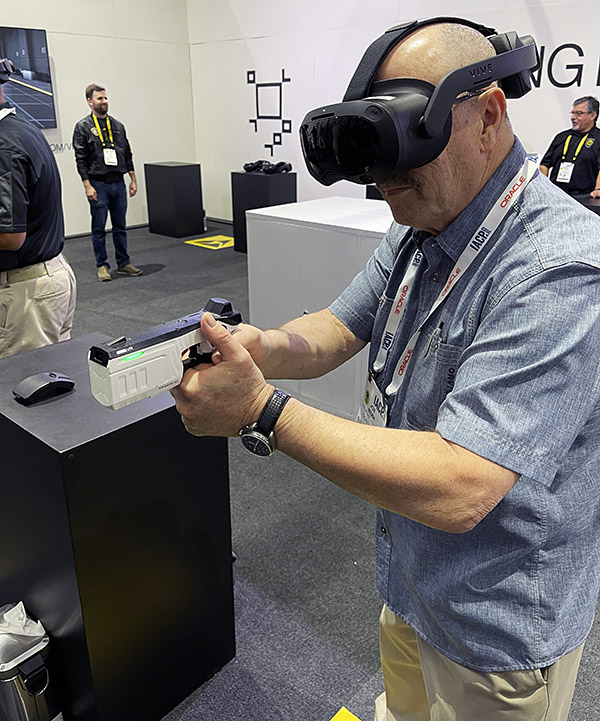
There were taser manufacturers and firearms training simulator manufacturers at IACP, too. The photos below show a taser virtual reality simulator. You wear a headset that covers your eyes and hold a taser gun. I think the company was Axon. They had about 20 stations for people to try it. The rep explained that you have to fire twice…once in a noncritical area and then again in another non-critical area. When you do that on the simulated bad guy in the virtual reality headset, the bad guy goes down. Sometimes you have to fire more than two times because your suspected felon doesn’t cooperate and keel over immediately. You get about 15 runs against assorted bad guys, and I toasted every one of them. Then there’s an officer needs assistance call where you roll up on a police officer having difficulty subduing a bad guy. I fried that bad guy, too. It was fun.
Virtual reality and a taser. It was awesome.Me, in my VR world.
Another company, Sim Lab, had a target gallery with moving silhouette targets and your choice of either a SIG or a Glock (I went with the SIG). I did pretty good on that one, too, and after I had toasted their bad guys the Sim Lab rep said I was a good shot. That made this IACP convention one of the best ever for me.
The Sim Lab setup. I opted for the SIG M18. I may get a real M18 one of these days.
After I shot the Sim Lab course, the rep asked if I wanted a video. Hey, does a man in the desert want water? Does a California resident want gas prices below $5 a gallon. “You bet,” I answered, and I fired the course again. It was fun. (Pro Tip: The video looks better if you expand it to full screen.)
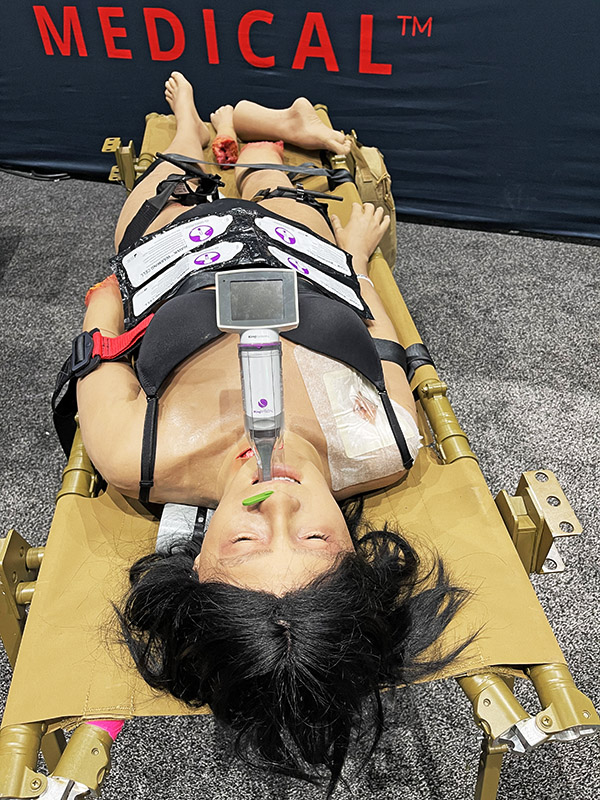
There were a couple of first aid equipment manufacturers at IACP 2023, and the exhibits were surprisingly lifelike. And gruesome. You couldn’t walk by their exhibits without looking (and taking a photo or two).
This young lady is having a bad day. She lost a leg, she lost a hand, and someone slit her throat.
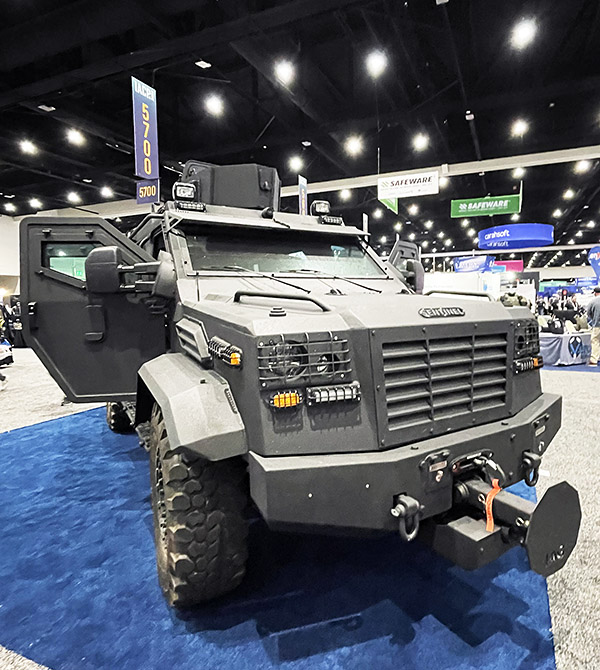
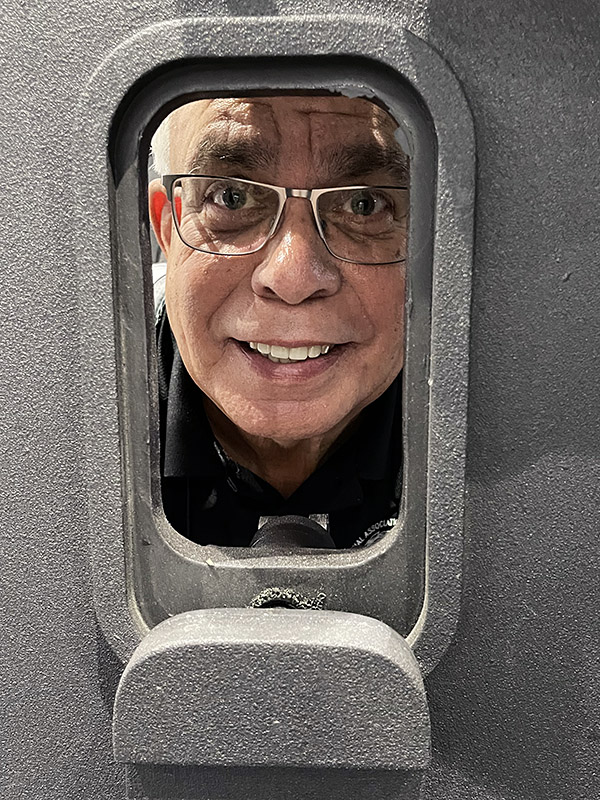
There were several vehicles on display. One was the Riverside County Sheriff’s command center. It was awesome. There were also armored vehicles. They were really cool. And there were police motorcycles.
The Riverside County Sheriff’s Mobile Command Post. It is impressive.An armored vehicle with a battering ram. Check out the gun port on the right door.Good buddy Mike peeking through the gunport.
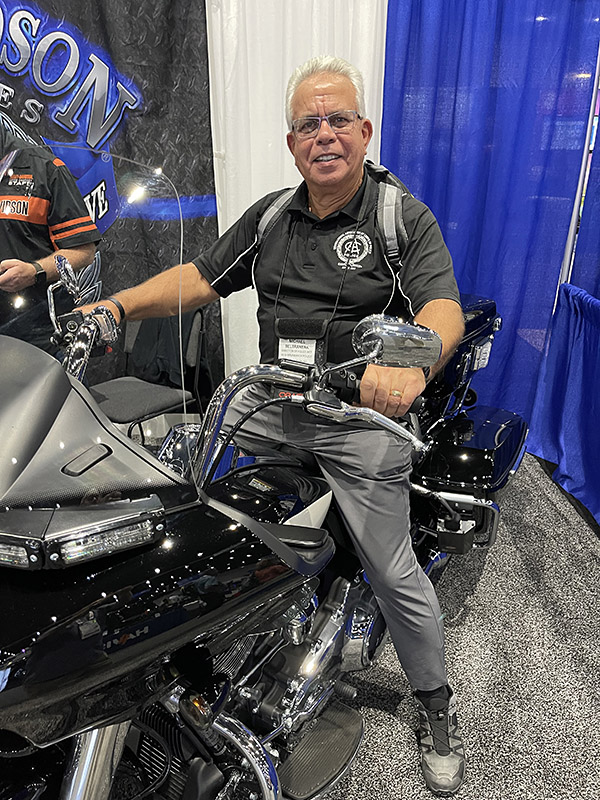
Harley and BMW were the only two police motorcycle suppliers in attendance (which is probably fitting, as they are the only two gasoline-powered motorcycle manufacturers selling to US police departments). Mike and I both sat on the Harley. Its weight (840 pounds) could only be described as oppressive. I guess I’ve grown weaker in my old age. I could barely get the thing off the side stand. I’ve owned a couple of Harley full dressers. No more, though. For a lot of reasons, my Harley days are in the rearview mirror.
Mike on the police Harley. We both agreed: It’s a porker.
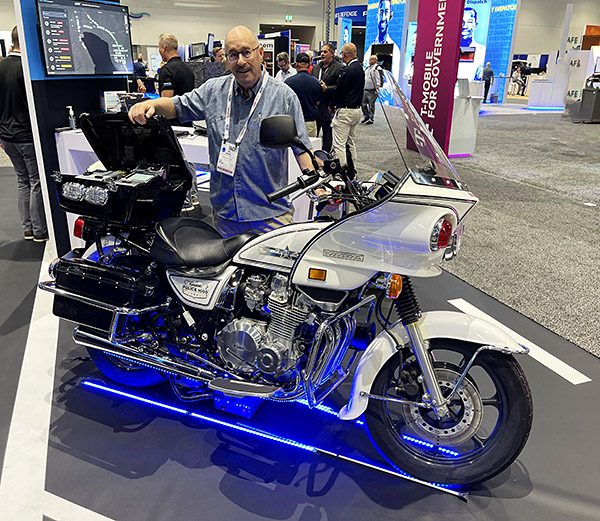
The Kawasaki KZ1000P, an iconic police motor if ever there was one, went out of production at least 20 years ago. But there was a pristine one on display. It was in a booth advertising communications equipment, and that company used it to showcase the early police comm equipment they used to manufacture. The Kawasaki (although it was 20 years old) was immaculate, as it should be. The odometer showed only 5 miles. Mike and I were both impressed. I would like to own this bike.
Yours truly with the no-longer-manufactured KZ1000P Kawasaki.The real deal, with just 5.3 miles on the odometer.
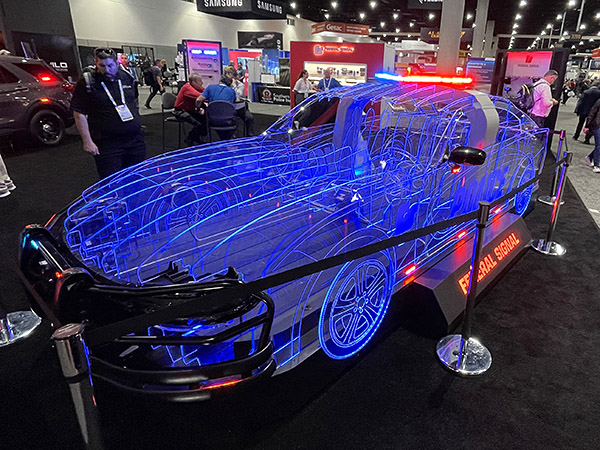
There was a company displaying an artistic Lucite arrangement lit up. It was interesting. I can’t remember who the company was, so I guessed it bombed as an advertisement, but it was cool. In the photo below, it shows Federal Signal. I’m not sure what they do. But if I ever needed a Lucite car bit of artwork, they would be my guys.
A Lucite car.
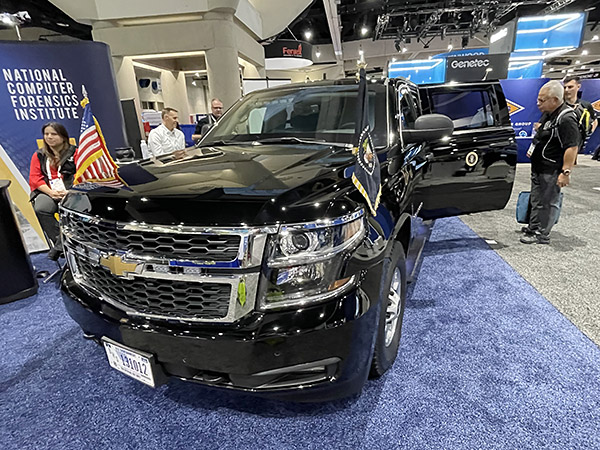
The United States Secret Service had what was probably the most interesting exhibit. It was one of the President’s Chevy Suburbans, complete with the presidential insignia and flag. I sat in the rear seat. There were real Secret Service agents there and they were nice guys. We joked with them a bit about taking care of Old Joe, because we sure didn’t want Kamala in the White House. They tried not to laugh, but I sensed strong agreement.
Hail to the Chief! The window glass on this SUV is at least an inch thick.
Boston Dynamics was there with a couple of their robotic dogs. You might have heard of Boston Dynamics. They were featured on 60 Minutes (the television show) a couple of years ago. The robotic dogs were cool. There was a real police dog there, too. It was not sure what to make of the robots.
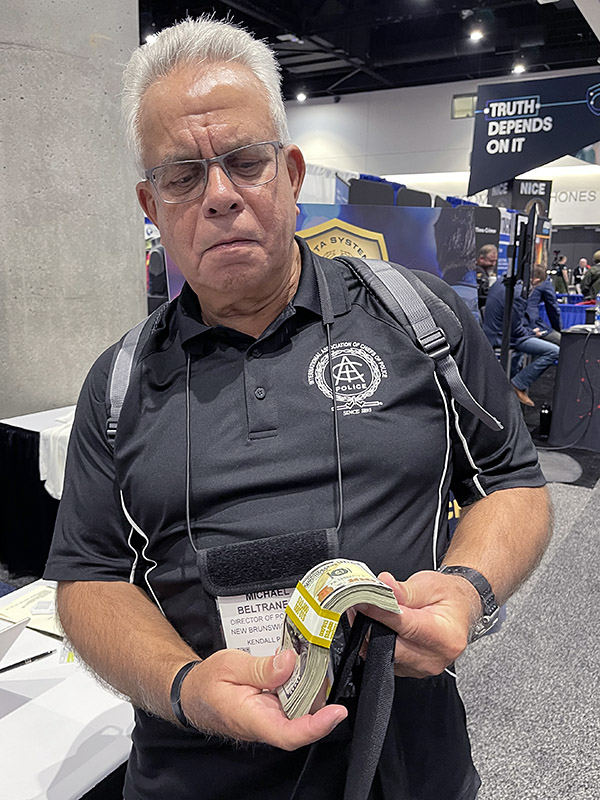
One of the exhibits had a large table full of counterfeit $100 bill bundles. This was another cool exhibit that I have no idea what they were selling. But it was cool and it made for a couple of cool photos.
Money money money. I’m not sure what these guys were selling.Thumbing through a stack of hundred dollar bills.
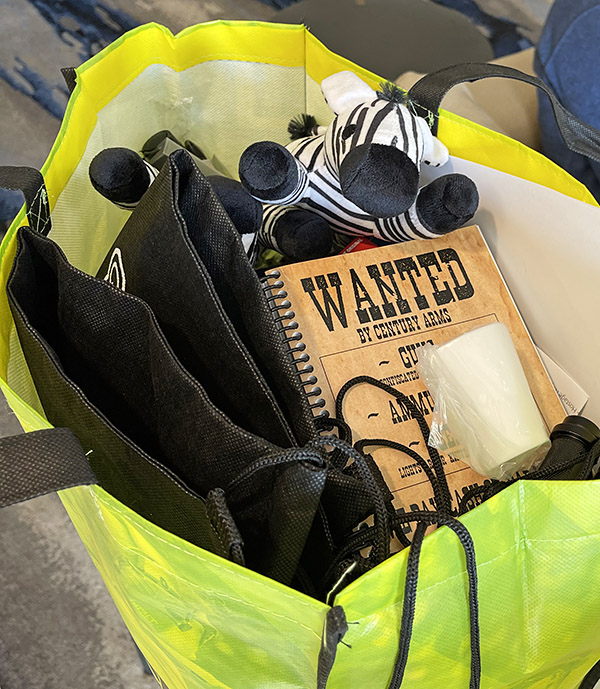
One of the great things about these kinds of conventions are the goodies. Many of the exhibitors had bags (mine was from Blauer), and nearly all the booths had goodies. I was a grownup playing trick or treat, and I didn’t even need to wear a costume. Ordinarily, I don’t pick up much in the way of goodies at trade shows, but I have four grandchildren now and I was scooping it all up for them. At least that’s my story, and I’m sticking with it. I will tell you I won’t need to buy another pen for probably another 50 years.
The goodies bag. It was heavy by the end of the day. The grandkids will be pleased.
Mike and I had a super time wandering around in the IACP convention. So much so, in fact, that we reached the end of the day without eating lunch (and for me, that’s unusual). That was okay, because it made us look forward to dinner as we left the convention. As always, the dining in San Diego was superior. Whenever Sue and I visit another city, we don’t go to the touristy restaurants; we always search for the local favorites (and Sue does a stellar job in finding these). Valero’s got the nod our first night in town; it’s a small, family run Italian restaurant, and it was excellent. I had eggplant parmigiana, Sue had angel hair pasta with pesto sauce and mushrooms, and Mike had the pasta puttanesco. I’d never heard of that last one and when Mike translated the name to English I didn’t believe him initially, but he was right. I’ll have to try that one on our next visit. And there will be a next visit. Valero’s was outstanding.
Eggplant parmigiana that tasted as good as it looks.Angel hair with pesto sauce and mushrooms. It was awesome, too.Pasta puttanesca. It’s on the list for the next visit. Mike enjoyed it.
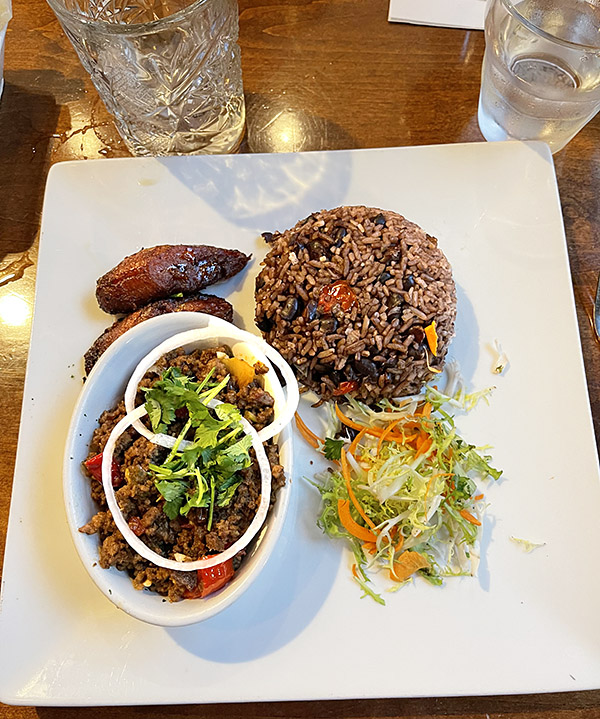
Our second night in town brought us to the Havana Grill, a Cuban restaurant not far from Old Town San Diego. It, too, was a local favorite and it was excellent.
Picadillo, which is beef seasoned with onions, peppers, garlic, olives, and raisins. I had it for dinner and it was fantastic.
So there you have it: A great visit with good buddy Mike, a super time at the International Association of Chiefs of Police Convention, and a great couple of days in San Diego.
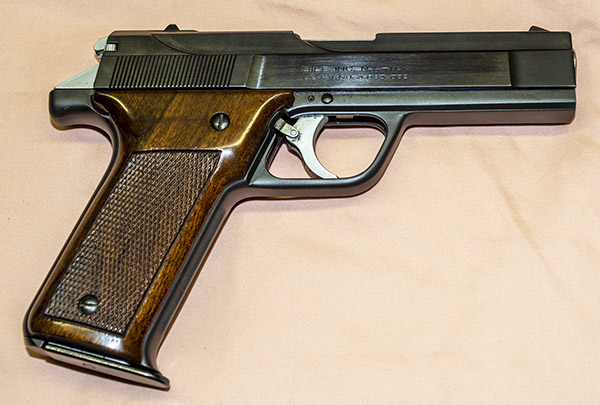
The Benelli B76 is a relatively rare and delightfully different handgun designed and manufactured more than four decades ago. In the 1980s, police departments were making a wholesale switch from .38 Special and .357 Magnum revolvers to 9mm semi-automatic sidearms. Benelli wanted in on this action and they introduced their B76 in an attempt to get on that bandwagon. Commercially, the B76 was a resounding flop. But from quality, technical complexity, and cool factor perspectives, Benelli out-Ducati’d Ducati, and that’s no mean feat. As an engineer, I find my Benelli to be an intriguing firearm. It’s not red and it doesn’t have a clutch that rattles, but it’s still a pretty exciting bit of Italian engineering.
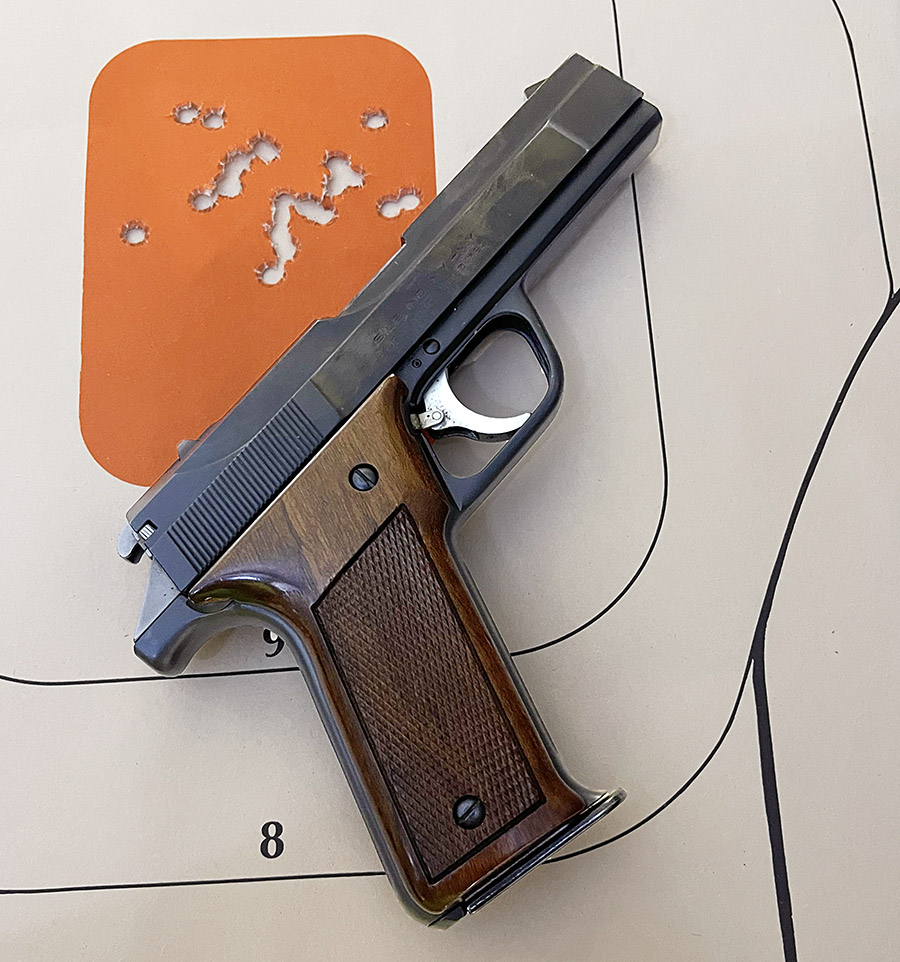
Benelli B76 9mm handgun, viewed from the port side. It is an attractive weapon.
From a collector’s perspective, the B76 was a cool deal. I picked this one up in the 1980s when they were going for cheap and tucked it away in the safe, which is where it sat for the next 40 years. A few weeks ago, I had the urge to shoot it. Benelli only made around 10,000 of the things, and you almost never see them come up for sale anymore (while writing this article, I searched GunBroker.com and GunsAmerica.com and I didn’t find a single one). In the last couple of years, when they came up on the auction sites, well worn examples would sell for around $2K. Three or four years ago, one that was new in the box with all the papers (which is what mine was until a couple of weeks ago) sold for $4K.
The high market value kept me from shooting my unfired B76, and then I realized: I’m not going to sell my Benelli. All I was doing by not shooting it was acting as a warehouse for some guy who would buy it after I’m gone. So I made the only two decisions any responsible gun owner could make: I decided I’m going to live forever, and I’m going to shoot the thing.
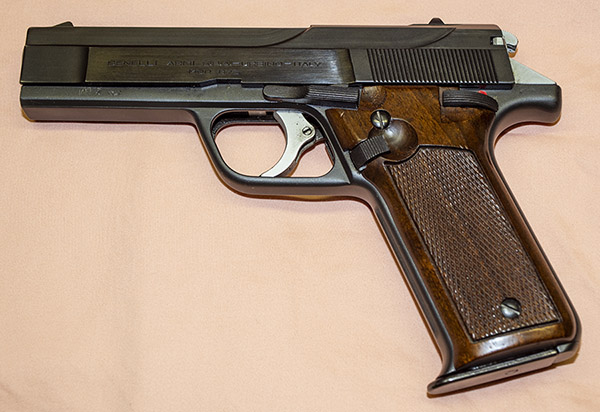
Starboard view of the B76. It is an attractive pistol.
The B76 is a very high quality European handgun built like a lot of European weapons were back in the day. It is of all steel construction (except for the walnut grips). The polishing and bluing is deep and exceptional. Like pre-war Mauser rifles, it has matching serial numbers everywhere: The frame, the slide, the barrel, and the receiver (I’m making a distinction between the frame and the receiver, with the receiver being the part into which the fixed barrel is attached). You read the above right: The barrel is fixed (more on that in a second). Because all these parts are serialized, I’m guessing that there was a fair amount of hand fitting at the Benelli factory.
The B76 is both a double action and single action semi-auto, and the innards are complex. The expense associated with the design and the single stack magazine (the B76 holds only 8 rounds; the WonderNines of the 1980s could hold 14 or more cartridges) probably doomed the B76 in the police market.
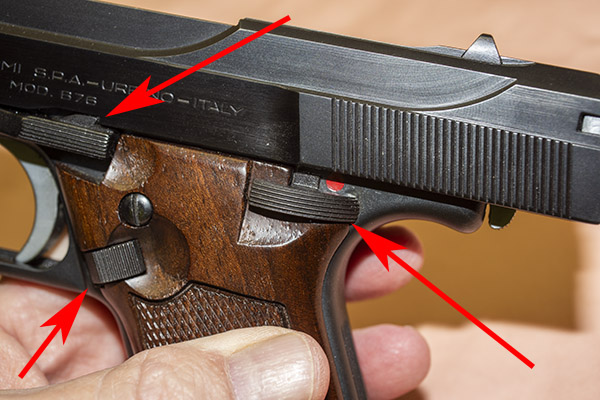
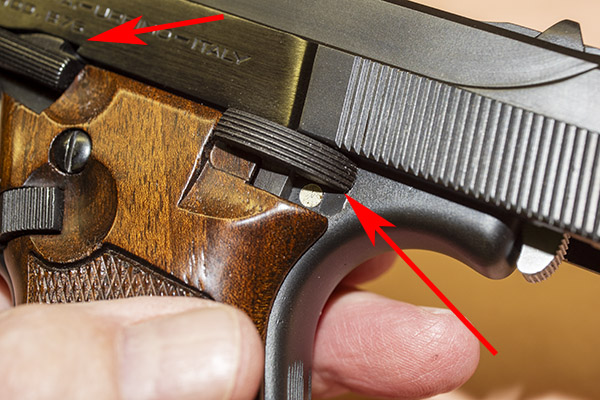
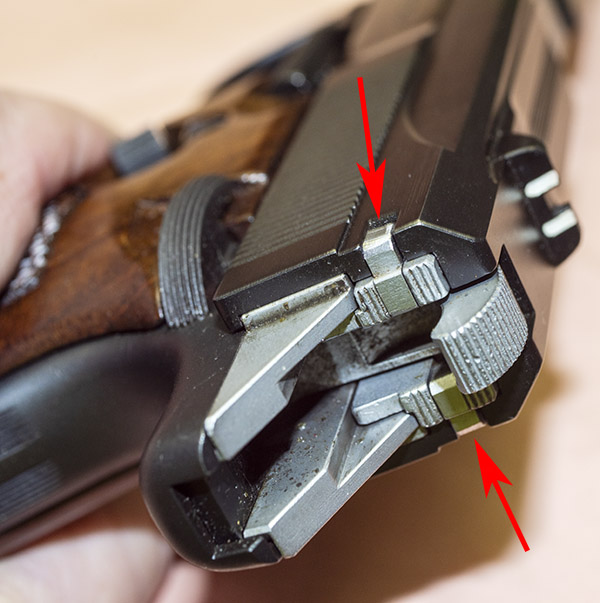
B76 controls. The top arrow points to the slide release, the lower left arrow points to the magazine release, and the lower rear arrow points to the manual thumb safety (a combined safety/slide lock).Disassembly requires pulling the slide all the way to the rear, and raising the manual thumb safety (right arrow). Note that in this position, the slide is further to the rear than it would be when locked open by the slide release.
The B76’s controls are all in the right places, as you can see above. There’s a trigger (as noted above, both single and double action), a slide release, a combined safety and slide lock (more on this in a second), and a magazine release. Unlike the 1911 and most semi-autos, the magazine release is not pushed into the frame to release the magazine. You have to push it forward. When you do so, the magazine flies out of the frame.
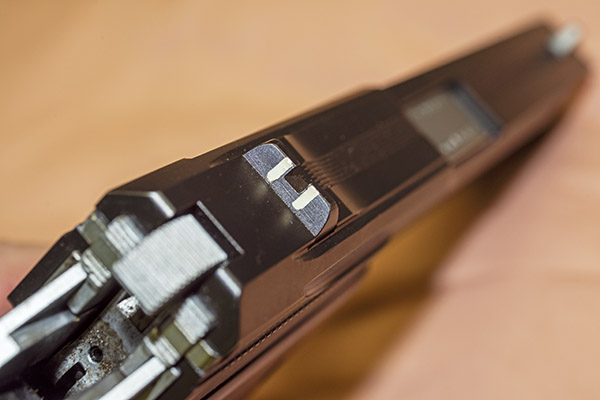
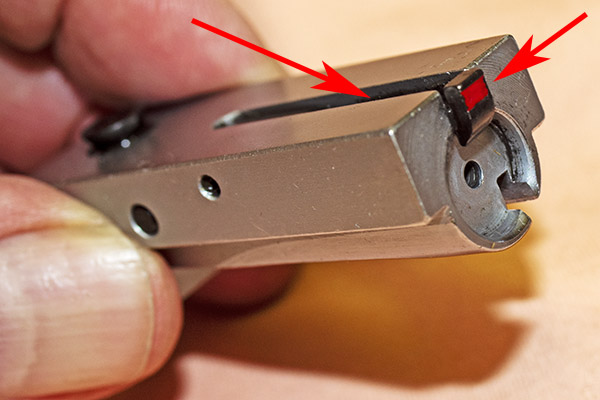
The B76 front sight.The B76 rear sight.
The B76’s fixed sights are a three white posts with no elevation adjustment. The rear sight can be drifted in its dovetail mount to move point of impact left or right. I didn’t need to move the sights on my B76; the windage is perfect (40 years ago, some dude in Italy at the Benelli factory got it right). I held at 6:00 on the orange bullseye on the target at the top of this blog. The B76 shoots a little bit high at 50 feet, but on a man-sized target, it’s close enough for government work.
I don’t really care for the three white posts on the sights, as they make aiming more difficult than it should be. There are two white posts on the rear sight. When aiming, there are gaps between the rear sight’s slot and the front sight (so that’s two more white posts). And then there’s the white post on the front sight. What this means to the shooter is that you have to align five white posts. To my old eyes, that’s way too complicated. I like a simple black post front sight and a simple black slot rear sight on a target gun. On a carry gun, the green and red dots on my Smith and Wesson Shield are about perfect, but in my opinion, that’s about the only thing Smith got right on the Shield.
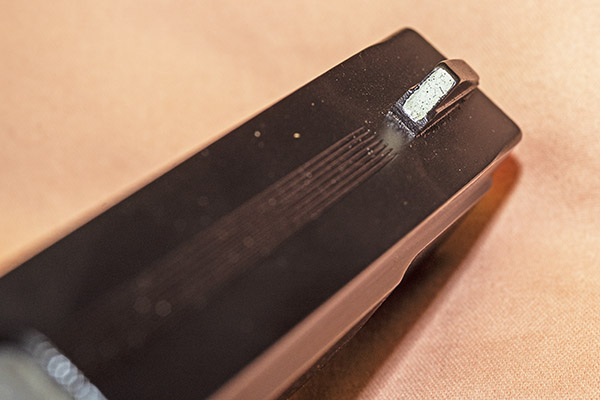
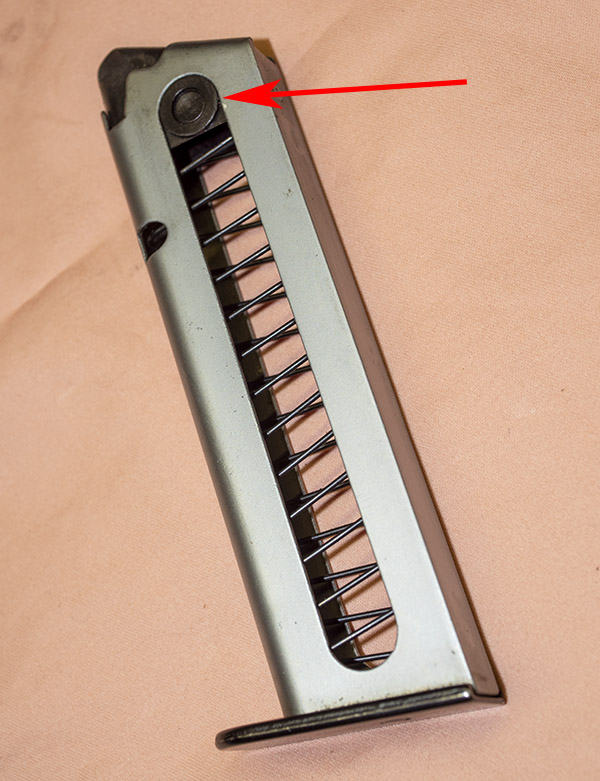
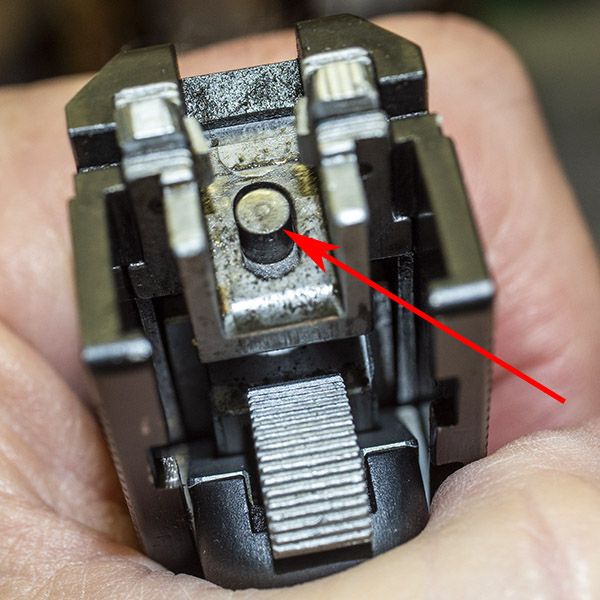
The B76 magazine. The red arrow points to the magazine follower.
As mentioned earlier, the B76 magazine “only” holds 8 rounds. That’s not an issue for me, as I’m a target shooter and I never load more than 5 rounds at a time. An interesting tidbit: The average number of shots fired in a gun fight is less than 2. I’m okay with a magazine holding 8 rounds.
Front to rear, there’s not a lot of real estate there. Overall cartridge length in this photo is 1.065 inches. Those are my reloads.
I found that I had to reload 9mm ammo to a shorter overall cartridge length for the Benelli. My other 9mm autos like the ammo to be loaded to an overall cartridge length of 1.105 inches (or more) for best accuracy. Loaded at that length, the cartridges won’t fit in the B76 magazines. To load ammo from the top by pushing one round in on top of the other, I have to hold overall cartridge length to 1.065 inches. I can go up to 1.080 inches, but to load cartridges of this length I have to pull the follower down and then slide the cartridges into the magazine. I fired cartridges of both lengths and I could see no difference in accuracy.
One last word on the Benelli B76 magazines: They are scarce. When you see them on Gunbroker.com, they go for $250 or more, and even at that price they don’t sit around long.
B76 disassembly for cleaning is different than a 1911, but still relatively simple. It starts by dropping the magazine from the weapon, pulling the slide all the way to the rear (beyond where it normally is restrained by the slide release lever), and then pushing the safety all the way up to hold the slide in this beyond-fully-retracted position.
Locking pawls in the firing pin retainer and bolt locking support. The locking pawls are in the closed position.
Disassembly continues with the locking pawls on either side of the hammer. In the photo above, with the slide in battery (all the way forward), the locking pawls are shown in the locked position. In the photo below, the slide has been pulled all the way back and locked, and the left pawl has been unlocked. The pawls unlock by rotating them to the rear.
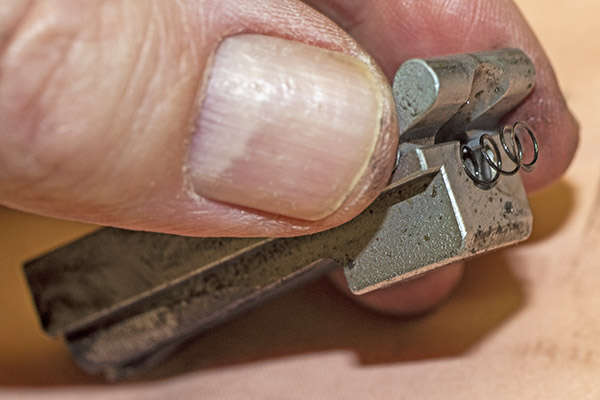
Locking pawl in the open position. The little levers rotate outward.
The next step requires pushing the firing pin in (I used a brass pin so as to not scratch any surfaces) and pulling the firing pin retainer and bolt locking support downward. It will drop out of the slide.
The firing pin in the firing pin retainer and bolt locking support. When the firing pin is pressed in, the firing pin retainer and bolt locking support can be slid down and out of the slide.
Once the firing pin retainer and bolt locking support has been removed from the slide, the slide can be slid forward off the frame (you have to lower the safety to release the slide). At this point, all of the major components are accessible and easily removed from the gun. I took my B76 apart for cleaning after putting several hundred rounds through it, so in the photos below the gun is kind of funky. Mea culpa.
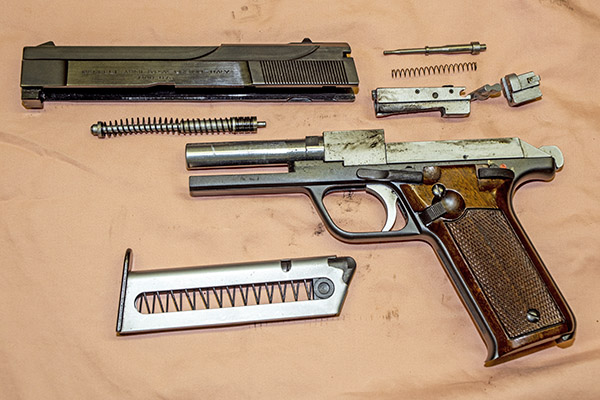
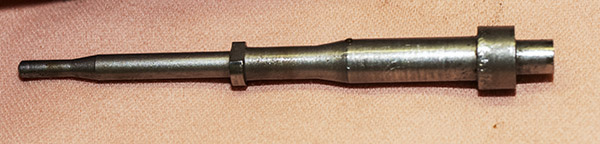
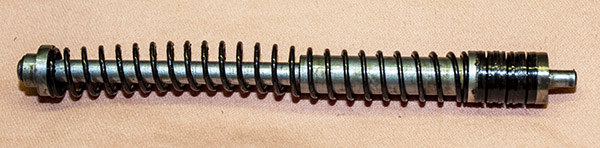
A very dirty B76 taken apart for cleaning. In this photo, you can see the slide, the firing pin, the firing pin spring, the blot, the firing pin retainer and bolt locking support, the bolt, the recoil spring assembly, the receiver, and the magazine. Note that the barrel is fixed to the frame. Theoretically, this should make the B76 more accurate, but I found its accuracy to be about the same as other 9mm handguns.The bolt, with the firing pin removed. The firing pin spring and the toggle lever lock are still in place. The spring is very light and it wants to stay in the bolt; exercise caution when removing it so as to not cause the spring to stretch too far and yield.The firing pin. It has a flat on the forward collar, which has to face up for assembly,The recoil spring assembly. It’s lighter than other semi-auto springs. That’s because the B76 slide is lighter than other slides.The bolt and its extractor. The extractor is also supposed to serve as a loaded chamber indicator, but in that regard it’s useless. It doesn’t protrude very much above the chamber, the red is covered with soot after the first shot, and the red is only visible when in front of the weapon.
So how does the B76 work? It’s complicated. There are a few YouTube videos that attempt to explain the B76 theory of operation and a few other explanations sprinkled around the Internet, and they are all either so superficial as to be useless or just flat wrong.
Larger caliber semi-auto handguns (9mm and up), other than the B76, rely on a design called locked breech recoil. Locked breech recoil systems keep the breech (the rear end of the chamber) locked against the slide until the bullet exits the muzzle, which allows pressure to drop to a safe level before the cartridge case is extracted and ejected. Larger caliber semi-auto pistols like the 1911 (and others) do this by keeping the barrel and the slide locked together initially. One thing to note at this point is that on these other guns, there is no separate bolt (the piece that fits up against the rear of the chamber). On these other guns the entire slide, in effect, is the bolt. It contains the firing pin and butts up against the chamber when the gun is in battery. When these guns fire, the barrel and the slide initially move together. As they move rearward from recoil and after the bullet has exited the barrel (by which time the pressure has dropped to a safe level), the slide keeps moving to the rear and the barrel is pulled downward. The barrel then unlocks from the slide, the slide continues to the rear, and the cartridge case is ejected as the slide’s extractor pulls the case from the chamber.
Going tangential for a second, you might wonder: Why not just let the recoil push the slide back to pull and eject the case from the chamber? Smaller handguns (e.g., 380 autos, .22 autos, etc.) work this way. But simply allowing the fired cartridge to push the slide rearward and eject (also known as blowback operation) is not feasible on the big dogs. There’s too much energy involved with the larger caliber guns, and too much gas pressure would be released near the shooter.
Benelli took a different approach. It’s quite clever and a bit abstract. In the Benelli literature, Benelli calls their system a delayed blowback locking system, but that term can also be applied to the 1911 approach. I’ll call the Benelli approach a lever-locked inertial system. The Benelli, unlike a 1911 or other larger caliber semi-auto handguns, has a separate bolt with a toggle lever lock and a bolt control stud. You can see these parts in the photo below.
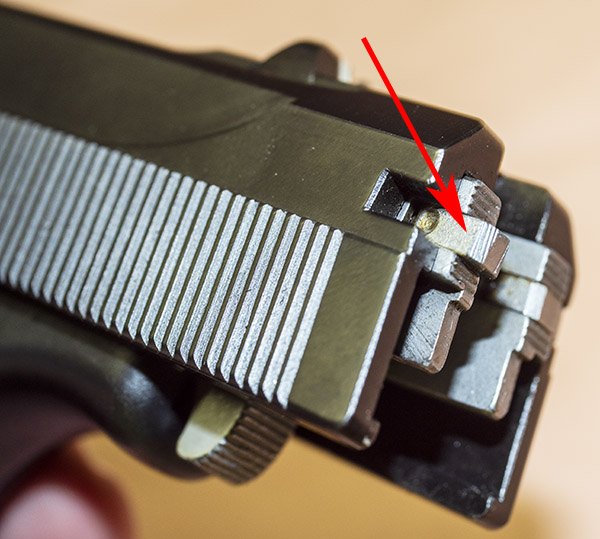
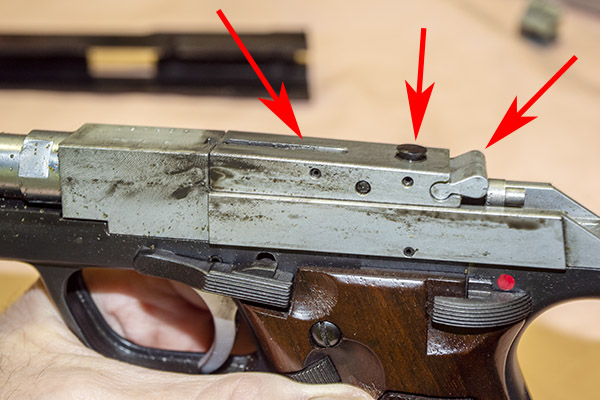
The bolt in place in the B76 receiver. The arrow on the left points to the bolt, the center arrow points to the bolt control stud, and the arrow on the right points to the toggle lever lock. It’s dirty, I know. I shot these photos while disassembling the Benelli to clean it.
When the B76 slide is in battery (all the way forward), the firing pin retainer and bolt locking support (that’s a complicated name, but it’s all one part) at the rear of the slide push forward on the toggle lever lock. In this position, the top of the toggle lever lock butts up against the inside of the slide top, which holds the bolt down against the frame. In this position, the chamber is closed and the gun is in battery. When the bolt is in this position, a ramped surface at its rear engages a similar ramp in the frame. Until the hammer drops (and for a brief instant after), everything is locked closed.
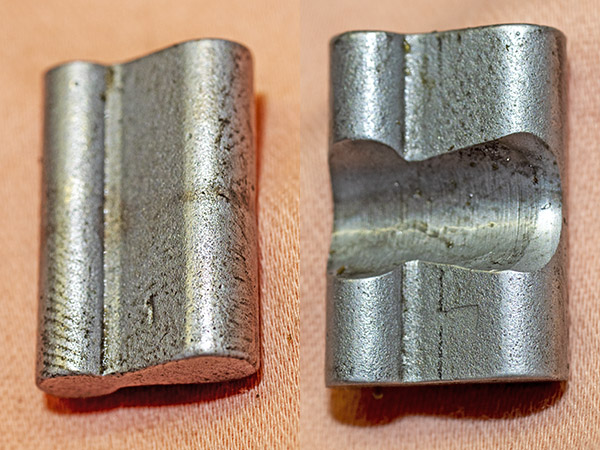
Top and bottom views of the toggle lever lock. I’m guessing this is a hardened machined forging. I sure hope this piece never breaks.
When the B76 fires, the entire gun (the slide, the receiver, the whole gun) recoils and starts moving backward. The toggle lever lock is held down by the slide, and the toggle lever lock pushes down on the rear of the bolt, keeping it locked, too. But then a funny thing happens. The shooter’s hand, holding the receiver, slows the gun’s rearward motion (the motion that was induced by recoil). The slide, however, continues moving to the rear due to its inertia (the inertia it picked up when the gun was in recoil and everything was moving to the rear). As soon as the slide starts moving further to the rear than the receiver, the toggle lever lock drops and it no longer forces the bolt down. The bolt is now driven up by the ramp on its bottom that mates to a corresponding ramp in the receiver, and that drives the bolt control stud on top of the bolt into a slot in the underside of the slide. By this time, chamber pressure has been reduced significantly. And by this time, the bullet has cleared the muzzle and is headed downrange. The bolt and slide continue rearward. The bolt extracts and ejects the spent cartridge case.
After all the stuff I describe above occurs, the slide slows to a stop as it reaches the end of its rearward travel. The recoil spring force drives the slide forward again. The slide is still hanging on to the bolt control stud at this point, so the bolt is driven forward, too. As the bolt moves forward, the bolt picks up the next cartridge in the magazine and drives it into the chamber. And as the slide continues its forward motion it pushes the toggle lever link up, the toggle lever link pushes down against the bolt’s rear, the bolt control stud drops out of its slot inside the slide, and the bolt goes back into battery. Clever people, these Italians are (well, except for that desmo valve thing on their Ducatis). But they sure nailed it with this handgun design. Nobody else does it like this.
I love my B76. It is accurate enough, it is a fine handgun, it is extremely reliable, it is made of blue steel and walnut as God intended guns to be, and it is certainly something different. I have never seen another one on the range or in a gun shop, and that means something to me. It’s unique and it’s cool.