Feeling sad departing Ecuador as it was quickly becoming a home for me where I was very comfortable, I boarded a flight to Lima, Peru to take in a new corner of the world. Peru has always felt like the pinnacle of South America, and even though I had never been there and knew very little about it, there was a calling for me to embrace this country. In fact, this resonated so strongly with me that I had purposely cut a lot out of Ecuador just to conserve my vacation for Peru.
After only two days in Lima, I quickly learned this wasn’t the Peru I was looking for. It was just a large city, and cities weren’t where I would find the culture and experiences that would help me grow. Knowing this, I booked a 12-hour bus ride to Cusco. Surprisingly, I clearly hadn’t learned my lesson from the Nicaragua to Panama bus ride, but I figured the chances of a repeat performance of Fireproof being played nonstop were pretty slim.
Falling asleep on the overnight bus ride while gazing out the window at the ocean and expansive desert of Lima, and then awakening to the massive vistas of the Andes Mountain range wasn’t a bad way to travel. I did however have a killer headache upon arrival in Cusco. Wasting no time, I found a cab to drive me to my AirBnB where I could relax for a bit. The host noticed I wasn’t looking too well and made me some tea. Within an hour I felt great. Turns out the elevation of approximately 12,000 feet, along with some minor dehydration, was the cause of my headache. The tea she gave me had coca leaves in it. These leaves not only are the cure for the altitude sickness, but soon became a replacement for my morning coffee.
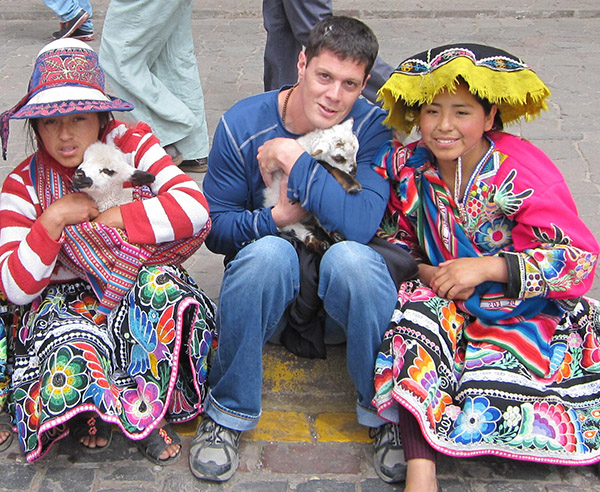
As with Ecuador, it didn’t take long for me to get into a productive work and exercise routine. My lunchtime became a break from technology which was replaced by runs through the city of Cusco. It was beyond magical. This place was a perfect balance of culture and history with some color mixed in. During my runs I noticed there were always girls dressed in full Peruvian dresses walking around with what looked like baby llamas. It turns out you can hold and pet a baby llama for like 3 sole (about $1 USD). I like baby llamas. I mean, who doesn’t? So, every night during my evening strolls I ensured I had a few soles to give them and looking back I probably spent more on pictures with the baby llamas than I did for dinners.
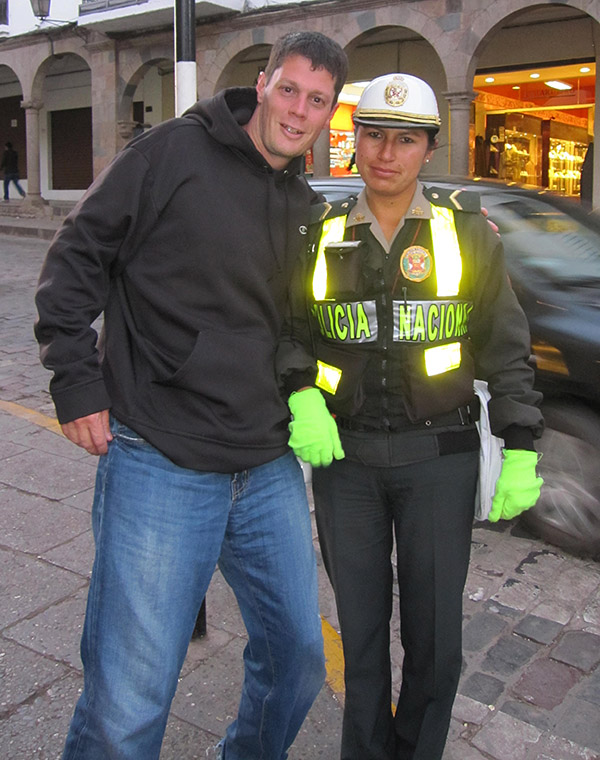
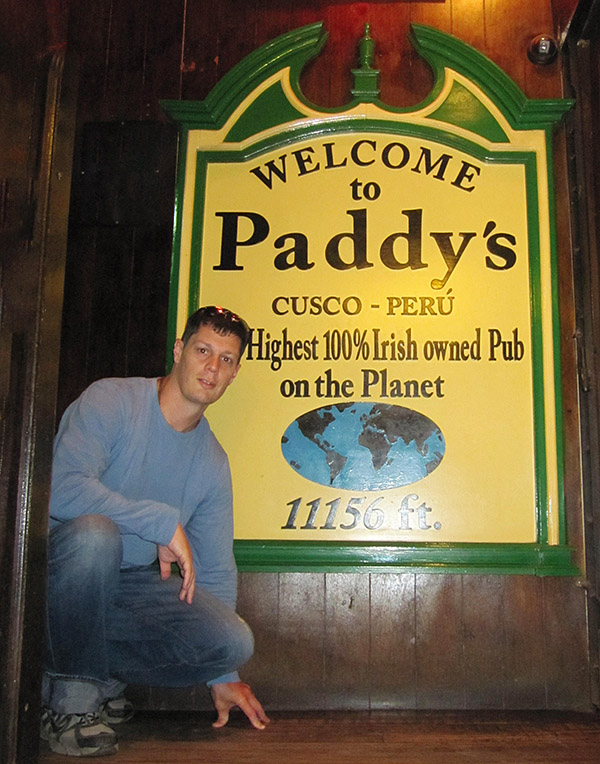
Obtaining Peruvian soles for currency was as simple as going to an ATM. One problem that seemed to constantly arise was if the money was not in pristine condition the stores would refuse to take it. This refusal was often after a long huddle of the store’s employees and management to confirm the currency was too badly damaged to accept. After a few frustrating days of this I happened to visit Paddy’s Pub. It is the world’s highest Irish pub. I noticed they took my currency no matter what condition it was in. Perfect! Adding Paddy’s Pub to my daily itinerary to launder money for baby llama petting was an outstanding solution. The world was coming together quite nicely for Paddy’s, the llamas, and me.
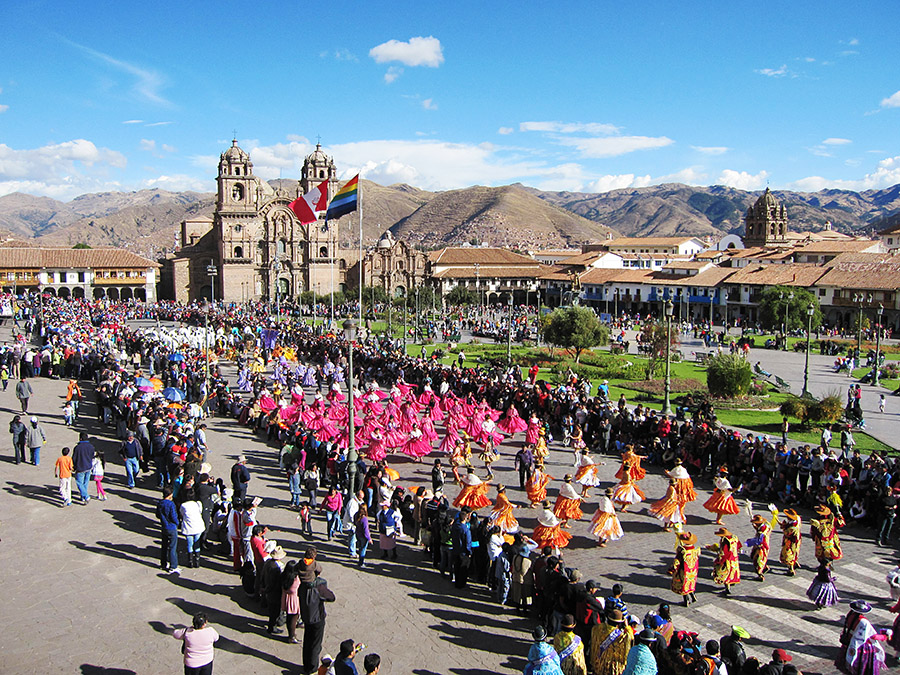
It took no time for me to fall in love with Cusco. The people were wonderful, every weekend there was some type of event in the square, it was easy to jump on any random bus and end up in hidden ruins, AND there were baby llamas everywhere to hang out with. My work performance was improving even more than in Ecuador. At this time no one knew I was anywhere but Boston and would occasionally ask “How’s the weather up there Boston”, which I would quickly google it and reply “Meh, 60s cloudy, it’s Boston, ya know?” I never lied to them on where I was, they just never thought to ask, and even if I had told them they never would have believed me.
With my morale greatly improved and in a productive routine I was convinced Cusco would be home for the foreseeable future. Even better, my AirBnB host’s son was a travel agent. Perfect. We met for dinner, and he helped me set up plans to travel to different parts of the country every weekend, and many became 4-day weekend trips allowing me not to rush and really absorb the beauty and culture in remote areas that many would never see or experience. These trips included Machu Picchu, Lake Titicaca (like I would miss out on going to not only the highest alpine lake on Earth, but endless jokes based on the name, “Lake Titicaca”). After three weeks of adapting to Cusco it was time to get out and really take a bite out of the surrounding areas that would yield some of my greatest memories and travel experiences to date. That’s coming up.
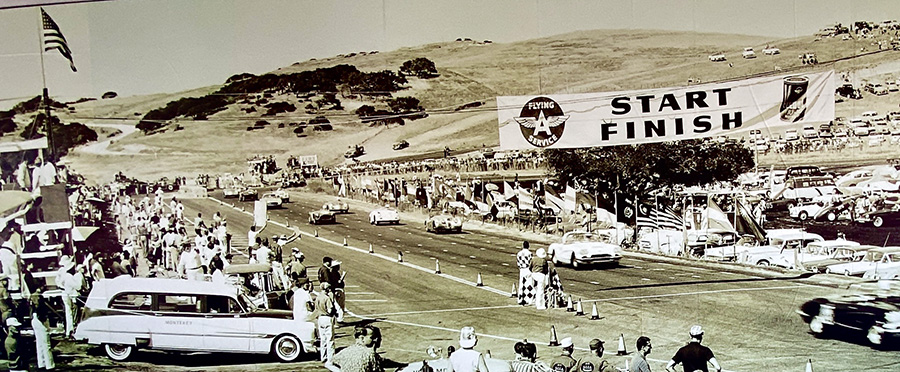
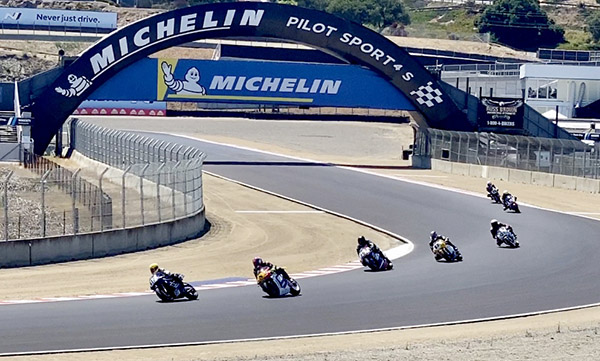
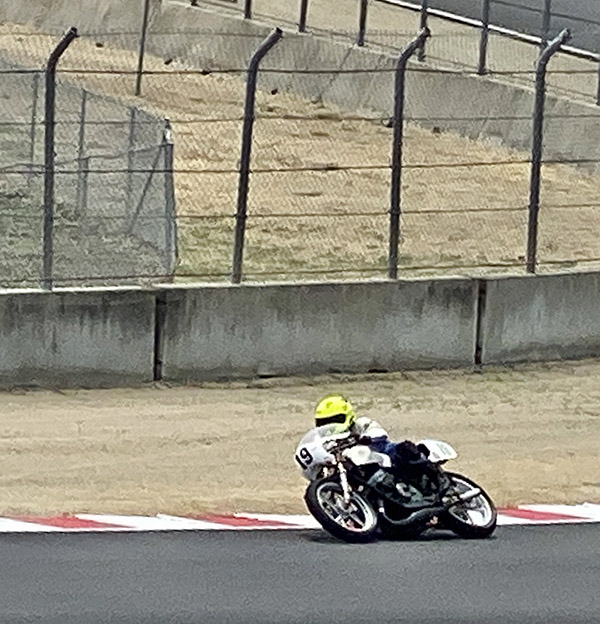
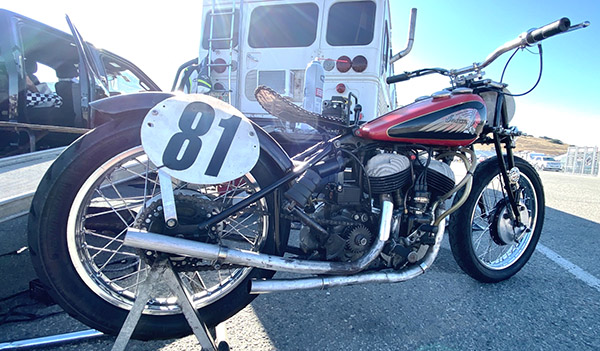
After riding through the stifling heat of Utah, Nevada and central California the cold, foggy mists of the Monterey Peninsula penetrated my mesh jacket and I shivered. It was wonderful to be cold and it was wonderful to be at Laguna Seca’s Weather Tech Raceway. This wasn’t my first visit to Laguna Seca but it was my first time inside the track. Years ago I rode up from San Diego back when Laguna Seca was a date on the world championship calendar. Today, Austin’s COTA circuit has usurped that role in America but Laguna Seca is still way prettier.
Two strokes ruled Moto GP racing in that era and when I pulled up to the entrance gate the $50 ticket price almost gave me a stroke. I was earning $3.50 an hour working on boats and $50 was a ton of money. I figured the hell with it and went to the Monterey Bay Aquarium instead. Oddly enough, the entry fee for AHRMA’s Motofest vintage racing was still 50 dollars some 40 years on. This time I paid for a ticket because riding from La Luz, New Mexico is a long way to go for nothing.
Motels around Monterey are sort of expensive. Your best deal is the 4-day camping pass at the track. I bought a reserved campsite because I wasn’t sure how things worked inside. Turns out there were plenty of campsites available for this event. I had site 110A, which gave me a view of turn 5 in one direction and a view of the bikes going up Rahal hill to the Corkscrew in the other direction.
Site A-110: it’s a good place to spend the weekend.
Plenty of portable toilets were sprinkled around the venue and hot showers were available in the more substantial structures. All the faucets were marked non-potable so bring plenty of water. I had to buy those little bottled waters in the paddock at $3 a bottle. The ground at my site was pretty hard so I never got my flimsy aluminum tent pegs to penetrate. Luckily my site had an old steel spike that someone left behind. I drove the spike into the hard ground on the windward side, tied the tent to the spike and used my gear to hold the other three corners down. The hydraulic jack came in handy as a hammer.
I say the ground was hard but apparently the hundreds of ground squirrels had no problem burrowing holes every 15 feet. The squirrels are all over the place at Weather Tech. I’m surprised that an aged vintage motorcycle racer hasn’t fallen in a squirrel hole and broken a leg. I’ve heard that when they get up in years it’s best to shoot them rather than let them suffer.
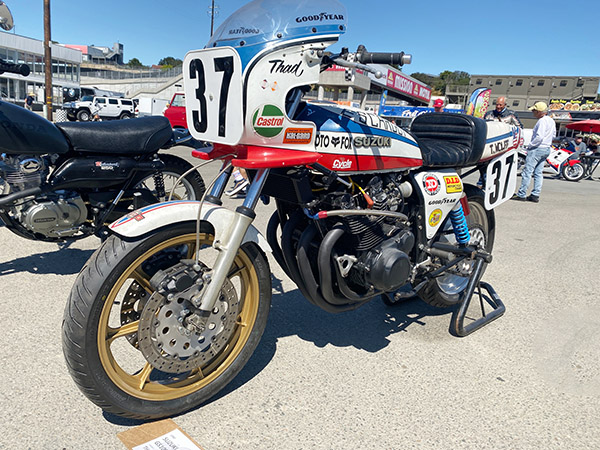
Me and Milich, he’s tall with a lot of drag but still wins. You can visit Milich’s websites at http://guzzipower.com/ and https://www.ducpower.com/.Thad Wolf’s Suzuki. I never did find Wolff, he must have known I was looking for him.
Thursday was practice all day. The bikes were sent out in groups with staggered starts. There are a lot of classes in AHRMA, like dozens, to keep track of but I mostly just listened for two-strokes. AHRMA’s Motofest had a sort of mini Motorcyclist magazine reunion vibe. The Kevin Hipp racing family was there along with Thad Wolff and Ed Milich. Go-Go Gulbransen, whose name the announcer never tired of uttering was there also. Go-Go was the guy who tested the upper limits of new sport bikes for Motorcyclist magazine. All these guys live and breathe motorcycles and it’s the passion you can’t fake that made them such good journalists.
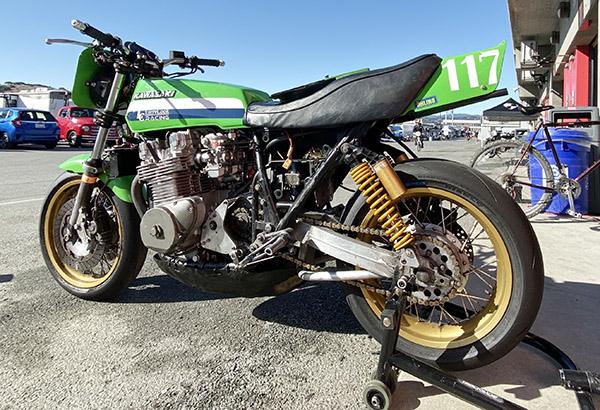
This might be a real S2 Kawasaki production racer. Very few were built. You had to know somebody.
Vintage racing today looks a bit different from when the motorcycles were current models. Hondas seem to dominate. The 160cc slopers, 175 twins and 350 twins were much faster than I remember them. In fact, I don’t remember them racing at all. I assume it’s due to better oils and electronic ignition systems, because in the old days the small bore grids were mostly Yamahas with a few Suzukis and Kawasakis. If there was a Honda racing it was usually sputtering at the tail end of the pack and the rider was wearing construction boots and welding leathers. Of course, things were different at the GP/factory level where Honda did all right for itself considering the handicap it was working under. It helps to have Mike Hailwood and Freddie Spenser on your team.
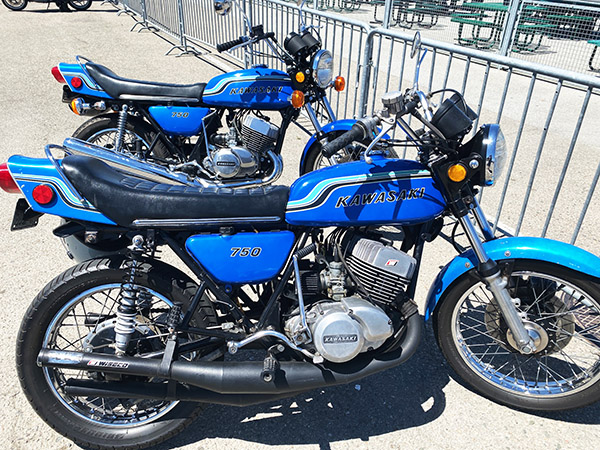
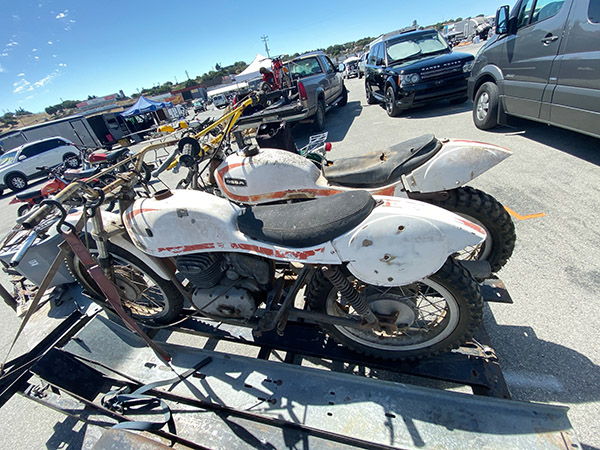
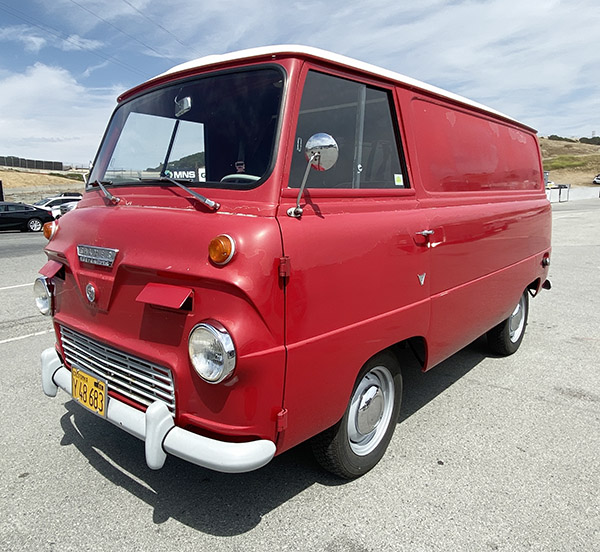
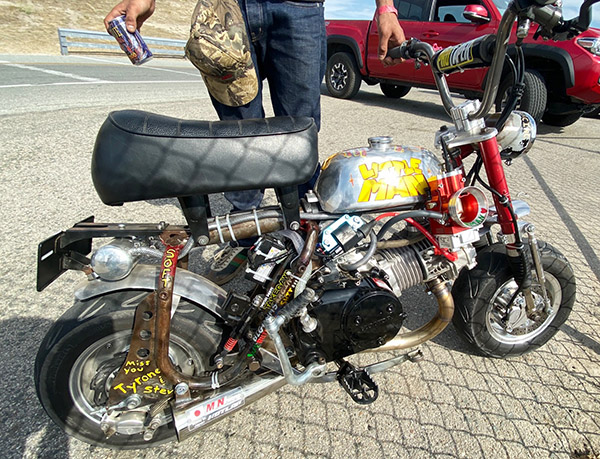
A brace of H2s these sounded good when they pulled in.Jewel-like T500cc twin Suzuki. This was a revolutionary bike when it came out. Some people thought you couldn’t go this big without heating problems. Another bike I want to own one day.Zoomie RD 350 with DG sunburst heads. Going for that squish band action.A pile of Ossas. These are Stilettos; I want a Pioneer.Thames van. I imagine it’s British.Stretched Honda Mini Trail with custom Grom-based block. 350cc, tops out around 100 miles per hour. I asked the kid if it was dangerous. He said he lived in Oakland, so it was the least dangerous thing he did.
After setting up camp I walked all over Laguna Seca: I needed the exercise after sitting on the ZRX1100 for five long days. To get to Monterey I took the long way around, up through Colorado to Grand Junction then across Utah and Nevada to California. I tried to ride Highway 120 through Yosemite Park but the road was closed. I detoured north from Lee Vining to Highway 108 and was rewarded with one of the world’s great motorcycle roads. Anyway, from my campsite to the paddock was only a 15-minute walk. Less if you didn’t tangle with a ground squirrel.
Vintage racing is all about the paddock. The racing, while serious, is almost secondary to checking out the old race bikes. The paddock is where the food is, where the beer is and where the old motorcycles are. Most of the spectators hang out in the paddock area. I wandered around for hours looking at motorcycles. I ate a turkey sandwich and drank a beer that was like 28 dollars but we need to support the moneymaking aspect of Laguna Seca or it’ll become luxury housing.
Turn 4 action.Yamaha RD400 scooting right along.
Saturday and Sunday were race days. I hung out with Motorcyclist Magazine alumni Ed Milich for a bit. Ed has an admirable cost per win philosophy in that he expends just enough effort to get first place and no more. His bikes look like hell but they run great. Paint don’t win races, says Ed. On the track he never seems to be trying hard, the gap between him and second place grew larger as if by magic. Ed won every race he entered (four) I did some math and determined that Ed spends around $4.37 per win. Hipp won his races also. Hipp’s bikes are those fast Honda 350s and they look like show bikes. Hipp’s wins probably cost more than Milich’s, but they still count.
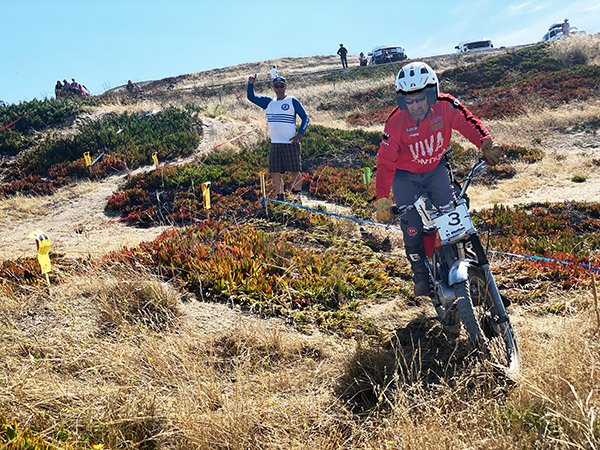
Montessssa on the trials course.
Sunday morning I went over to the trials section. Set in gullies and on the sides of hills, trials riding never looks too hard until you try it. Trials events at the level Laguna Seca puts on have the advantage of being relatively safe as the speeds are very low and you can’t fall very far. This isn’t the crazy stadium trials you watch on YouTube but it suits the old motorcycles participating. I might try the trials on Godzilla next time I go to Laguna.
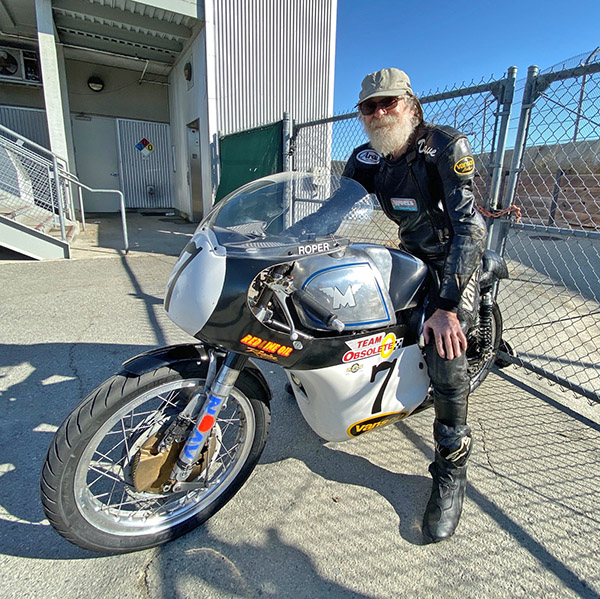
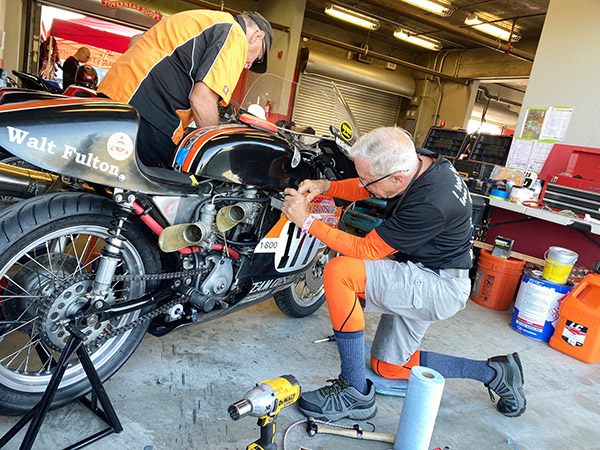
The legend Dave Roper. I think he’s still the only American to win at the Isle of Man races.Walt Fulton fetteling his XR750.
With such wildly different motorcycles it’s hard to compare rider skill. Except when it comes to Dave Roper: Roper, who resembles a stick of beef jerky with a cotton ball stuck on one end, was smooth and fast on any bike he rode. Roper and Walt Fulton, with a combined 300 years of racing experience, put on quite a show with their matching H-D branded, Aermacchi Sprints. There was a vintage motocross at Laguna Seca but it ran concurrent with some other races so I missed it. You really need to be two people to see all the action at AHRMA’s Vintage Motofest.
Nice, tank shift flattie. This bike sounded good on the track, very low rpm drone.
It was nice to have the campsite for Sunday night; I didn’t have to rush to pack and head out into the unforgiving freeways of California in the late afternoon. Wherever I ride the ZRX1100 it attracts attention. I’ve had people take selfie photographs standing next to the bike, I get asked what year it is almost every ride. The thing is bone stock. Laguna Seca was no different, the bike garnered a steady stream of complements from my camp neighbors. I must look hard up because the guy camping across from me handed me 40 dollars and said I had dropped it. I think he was trying to be nice to a vagabond. Normally I would have taken it but I’m trying to become a better person and told the guy it wasn’t mine.
Californians and Ex-Californians like to bitch about their state, but the damn place is beautiful. California has it all from the beaches to the mountains to the desert and all types of terrain in between. With straight roads crowded by farm equipment, the central valley (also known as The Breadbasket of America) was like the Tail of the Dragon for my nose. Sweet manure, grassy hay, dust and soil, the smells kept swapping back and forth giving my nasal passages whiplash. If it wasn’t so expensive, I’d live in California again but my total running costs at Tinfiny Ranch are less than the annual taxes on any house I could afford there. The Californians I met were universally friendly and interesting to talk to, we would start up a conversation like we had known each other for years and had just spoken last Thursday.
I’ll go to AHRMA’s Monterey bash again. It’s closer than Daytona for me and with the camping, about the same cost. I give the event high marks for value. You really get your 50 dollars worth with AHRMA.
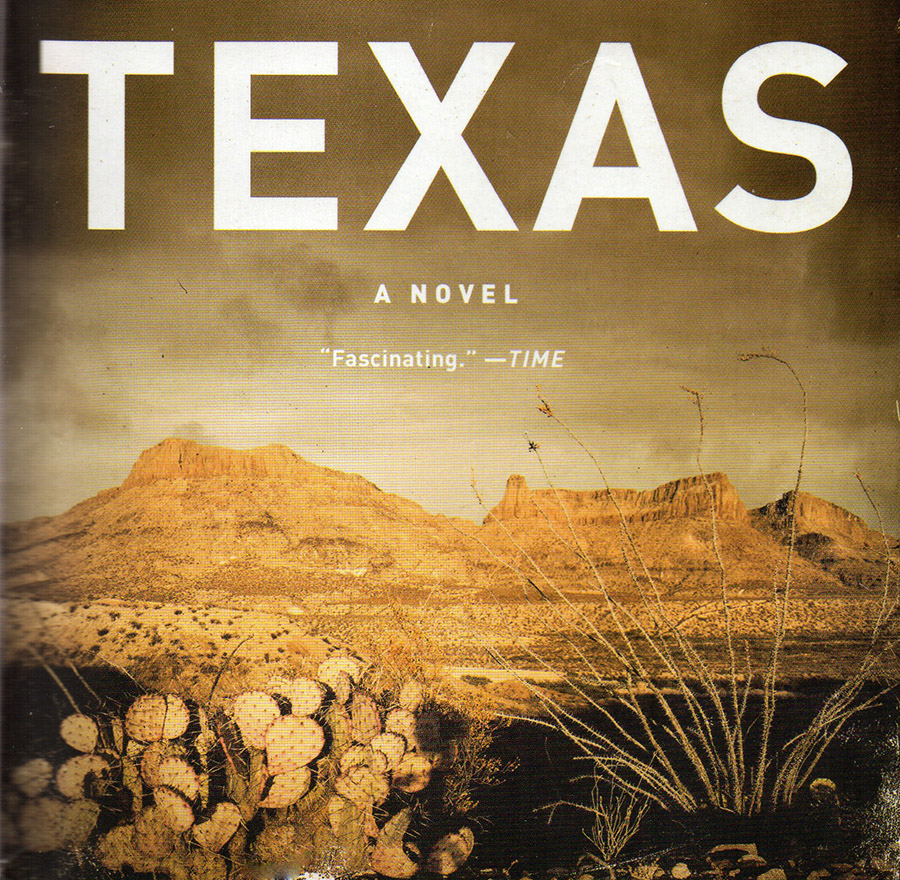
I’ve been on a James Michener kick lately. You read my recent review of The Source. After reading that wonderful novel I wanted more Michener, but I wanted one I had not read yet. I read Alaska a few years ago and loved it. I set my sights on Michener’s Texas, and it was stunning. I used to live in Texas (El Paso and Fort Worth) in an earlier life and I thought I knew a little bit about that state’s glorious history. It turns out I was right…what I knew was just a little bit. Michener’s rich historical novel paints a much more enlightening picture.
At 1,419 pages, Texas is not a trivial read. It took me a good three weeks to get through it. I recently had a weeklong teaching gig at a company in Wyoming; I took Texas with me and read it at lunch, at night, and in the hotel fitness center while riding the stationary bike. I did the same thing at the gym here in California before and after I went to Wyoming. You could say Michener helped me get in shape. Before I realized it nearly every night I’d spent an hour on that bike. Texas is that good.
Michener’s approach in both The Source and Texas is to create a setting that taps into the present, and then he jumps historically with fictional characters and stories based on what actually occurred. In The Source, Michener’s temporal stretch extends to prehistoric times and the beginnings of religion. In Texas, the rearward time jump is shorter (about four centuries). The based-on-real-history fiction starts with the Spanish conquering Mexico, and then progresses through 21 generations. Each generation is a story detailing events and personalities, with richly-textured and believable characters.
The context for the group that ties all the above together is a five-person panel appointed by the Texas governor. The panel is charged with defining the history curriculum for Texas schools. What emerges is that the panelists are descendants of the people described in each of the novel’s historical tales. It really is a masterful approach.
Parts of Texas reminded me of Larry McMurtry’s Lonesome Dove (another wonderful novel and a personal favorite I’ve read six or seven times already). The stories in Texas and the way Michener ties them together from one generation to the next is nothing short of, well, I’ll use the word again: Masterful.
While reading Texas, a friend mentioned that there also a DVD (Texas became a movie). I bought the Texas DVD, but I haven’t watched it yet. I don’t see how it can possibly be as good as the book (the book was that good). Trust me on this: Pick up a copy of Texas. It is a hell of a story.
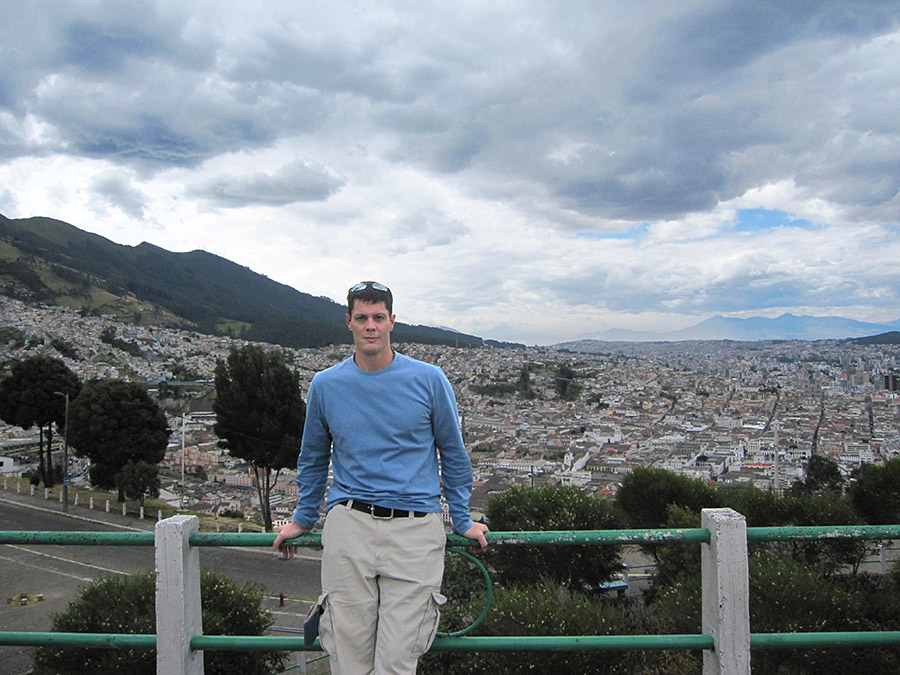
Feeling confident that Quito, Ecuador would work out for the foreseeable future I wanted to begin absorbing the culture as I did in Nicaragua. One of the best ways of doing this was to begin taking Spanish lessons. A great thing I learned about Ecuador almost instantly is they spoke Spanish much slower than in Central America, where I was frequently lost by the lightning speed with which they spoke. This would be the perfect place to take lessons where I could retain and practice speaking Spanish constantly as I went about my daily routines. Fortunately, there was an excellent Spanish school just two blocks from my aparthotel, so I could attend classes during lunch. It felt great taking steps towards integrating into this incredible culture.
I adjusted to a routine of work and Spanish lessons during the weekdays and on weekends I would explore local hikes and rainforests. I was almost at the base of Cotopaxi, which technically is the highest mountain in the world as it is on the equator and bulges out more than Mt. Everest (if you’re one of those rare people that believe the Earth is round).
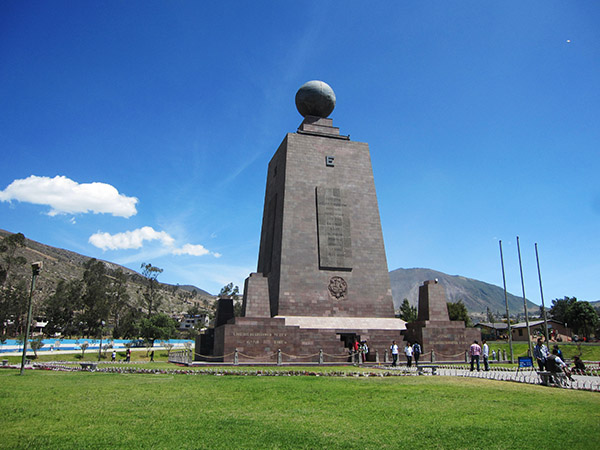
With my weekday schedule and routine defined by Spanish classes and runs to increase my tolerance at the high elevation, I returned to being successful at my day job as a project manager. Doing the best to conserve my vacation days for the next country (an upcoming blog will get into that adventure), weekends were the only time to explore the surrounding areas of Quito in more depth. This, of course, had to include a trip to the equator.
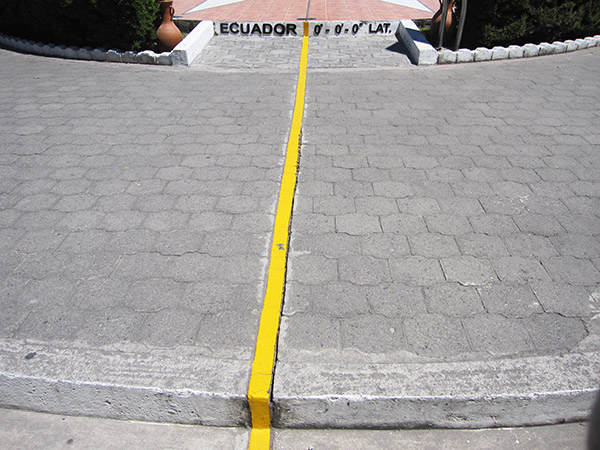
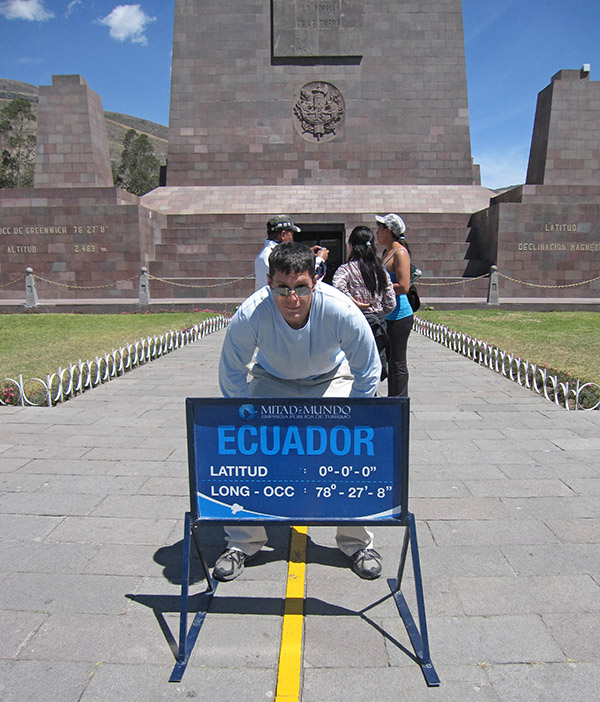
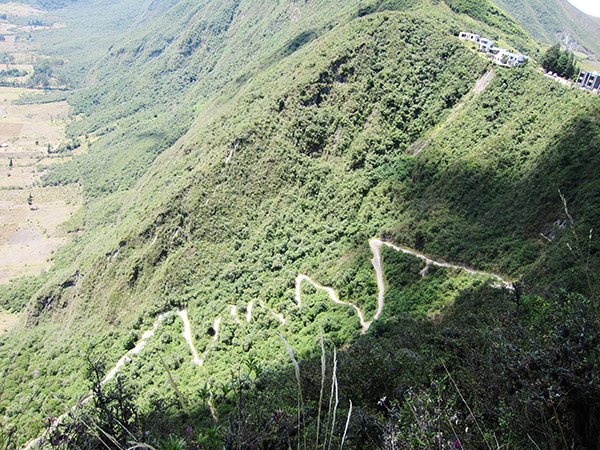
The equator was just a short train ride from Quito. I fully understood it would be a total tourist trap but where else would I have this opportunity to jump on both sides of the line like an idiot? It felt almost mandatory to do so. When preparing to leave I saw an indigenous tour that brought you into the Andes mountains and included a 4-mile round trip hike. As I boarded the bus figuring I would be solo on this trip, three Germans jumped into the bus reeking of BO with nothing but a tiny backpack they each held. As we were dropped off and began the hike into the Andes I began a conversation with one of them who didn’t have shoes. It seems someone stole his shoes in Chile while playing soccer with some kids and he decided not to purchase another pair. It was also interesting that the only items in his backpack were a machete, a journal book, and his passport. I was instantly intrigued. These guys were minimalists to another level. Coming from me that is quite an extreme statement.
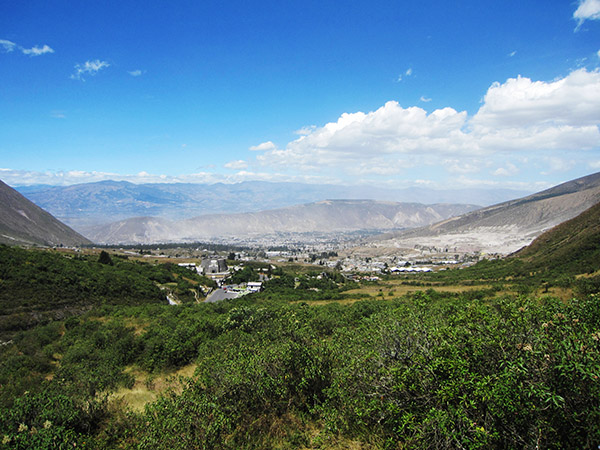
As we reached the summit of our hike there was an overlook that peered down into a small village in the valley of the Andes. It was abundantly clear that time hadn’t touched or changed this hidden village. As the guide ushered us in a half circle for him to sing and give thanks to all the beauty around us, the German I had befriended was fidgeting around and produced a marijuana joint and sparked it up while the guide was deep into his singing. Although some would see this as very disrespectful the guide seemed to relish in the smoke that emitted from the joint. This German represented full freedom to me. He was probably the most carefree person I have ever met in my life, and most of the people I surround myself with are pretty carefree, so this guy now has another title to add to minimalist in my eyes.
As my Quito adventure continued, I settled into a routine. One of my better work habits is writing a to-do list over the weekend for work tasks with dates. This has helped me in not only my organization, but also in the prioritization of tasks to stay ahead of any deadlines my team or myself are responsible for. Normally I write this list on a Friday afternoon when I am in good spirits and tend to over commit yet hold myself accountable for these deadlines. With hiking most weekends in Quito and exploring I found myself not having written out my list and it was Sunday afternoon with no plans.
I chose to go to a dark Irish bar in the heart of Quito to write my list. As I ordered a cold beer and began outlining my objectives for the week, I didn’t notice the bar became less and less crowded. It was now about 4:30 PM and I was alone in the bar with three beautiful Ecuadorian females. The bartender began pulling the shades down and locking the doors. With no idea where this was going, I thought I would order another beer before the bartender asked me to go home. It seems in Quito if you are IN the bar when they close you can stay. It didn’t take long for the Ecuadorians to invite me over and I quickly decided my task list was completed for the day. I was in love with Quito, Ecuador!
As the weeks flew by my time was filled with hiking, work, and immersing myself in the culture of this beautiful country I now called home. My frustration with work problems melted away as soon as I left the aparthotel every afternoon to meet new friends and partake in all the activities throughout the city of Quito.
Entering Week 4 in Quito I began to feel in the groove enough to venture forward. Although Ecuador has endless activities and places to explore, I was saving my vacation for the next country that I wanted to become even more immersed in. There would be no coin toss for this next stop as my soul has yearned to visit this country for years. Peru!
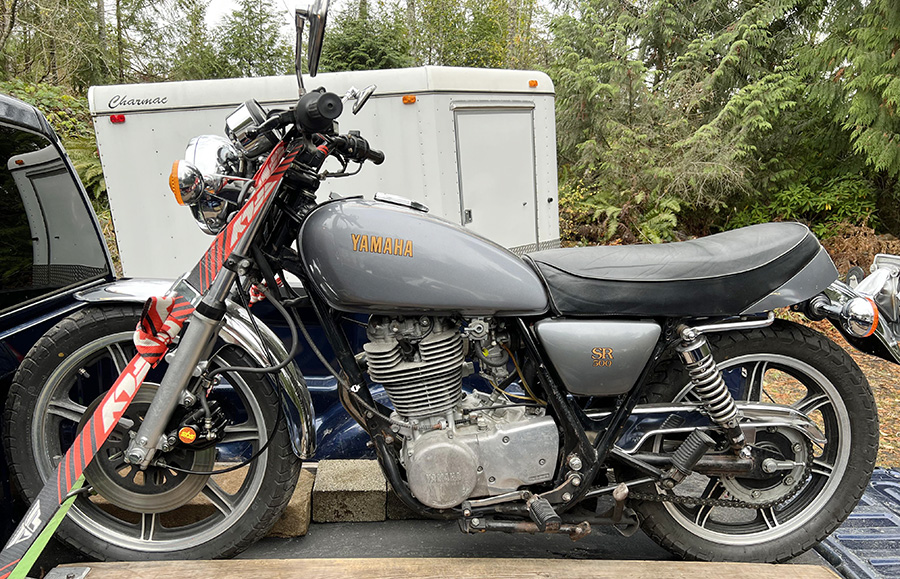
When Joe Gresh posted his article yesterday about downsizing his project list and knowing his limitations, we received an interesting comment from one of our readers:
Now that your flush with cash, how about a SR500, Its on my chopping block. With my recent dive in to the Ducati end of the pool I’m gonna keep the 1974 Suzuki Titan and the 99 Suzuki Bandit 1200s and the Ducati Monster S2R 1000… Thinking I have finally done it…. then boom, Hey come look at a 1965 BSA C15… Free. Dammit
Well, that comment sure had my attention. I’ve always wanted an SR500 Yamaha. So I wrote to Dragonknee about it, and here’s what he told me:
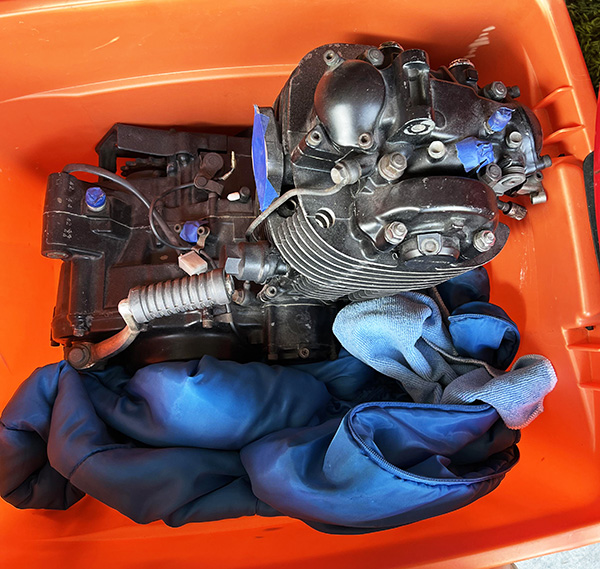
I do have photos and I’m asking 1850.00 for it. I do have extras but with those I’m into it about 2300 bucks. I have a spare motor and a bunch of period correct extras. Supertrapp and Lockhart oil cooler along with the parts to do a dual disc set up and just tons of other things.
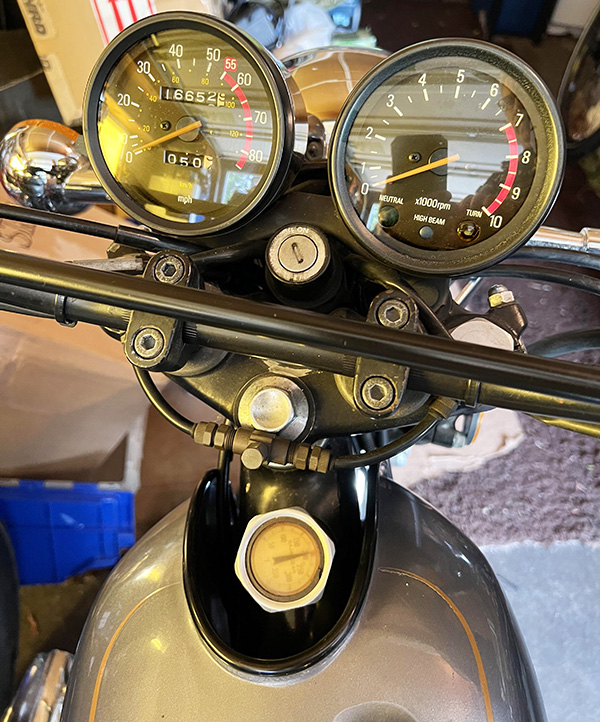
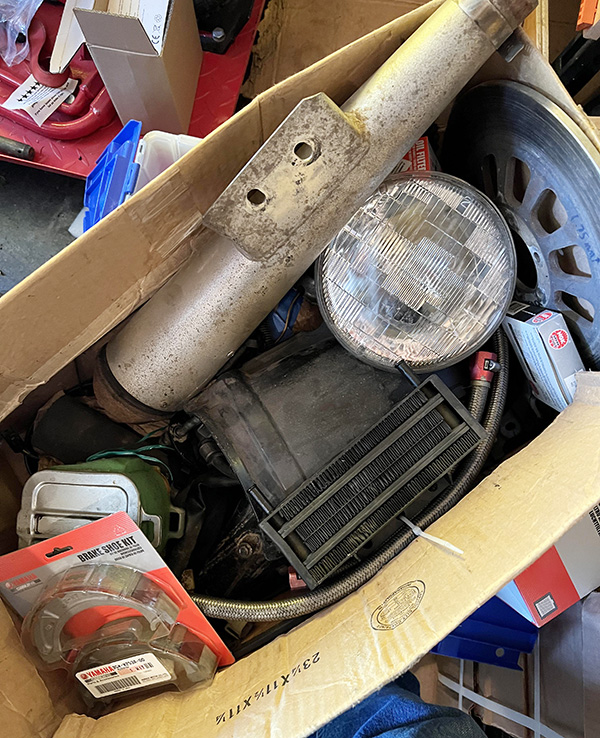
In addition to the photo at the top of this blog, here are three more.
Dragonknee is up in the Pacific Northwest, and that’s a bit far for me. The bike seems like a hell of a deal. If you’re interested, leave a comment with your email address.
The famous line was from a Clint Eastwood movie, I think, but regardless it rings true for me as I ease into my salad years. Or is that my pabulum years? Recently I did a few simple mathematical equations and then ran the results through my life expectancy chart. The results were not encouraging. I would need to live another 124 years, 7 months to complete all the projects I’ve started. That’s if I didn’t gain any additional projects in the ensuing 124 years. Unfortunately, the projects still drift in by ones and twos. It’s time I got to know my limitations.
I was building the driveway retaining wall at The Ranch when the epiphany came. I looked around at the tools spread around the front yard, the stack of lumber and the pallets of concrete and decided that there was just no way to do it all and that I needed to shed a few projects. At least get them off my books. The low hanging fruit was first to go.
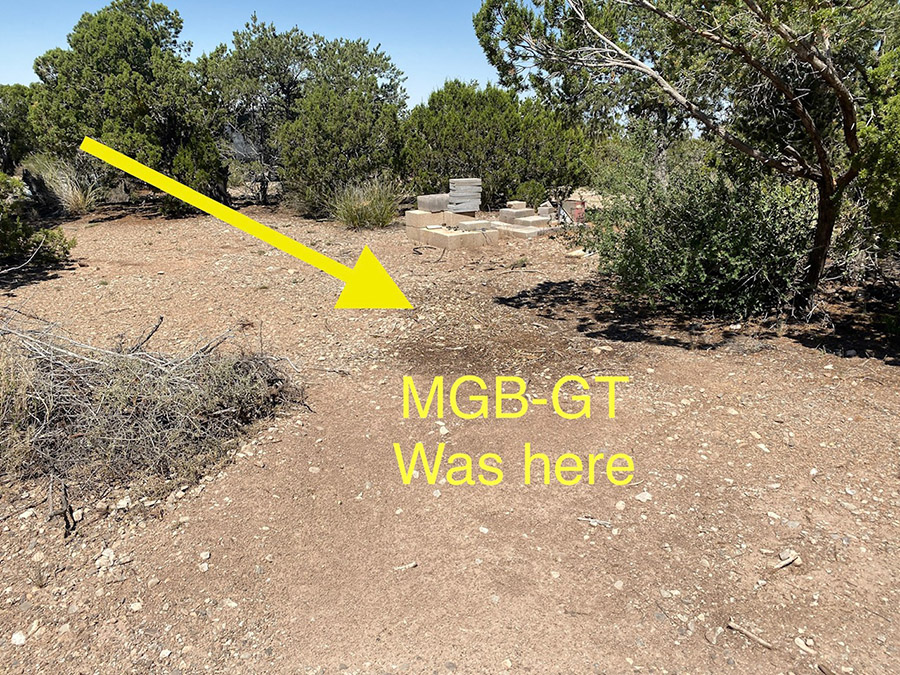
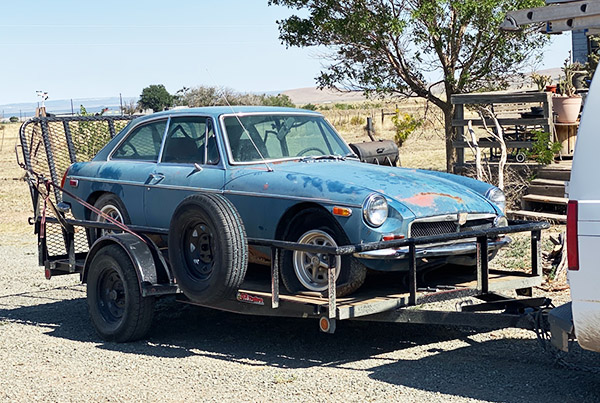
The 1974 MGB-GT was a candidate because I haven’t spent much money on it yet and it’s a huge, time consuming proposition. It needs many, many manhours and truthfully I never really wanted a MGB-GT anyway. It was just on the land when we bought the place and I thought it was a cool looking car. I bandied about about selling it but the prospect of wading through all the Internet scammers and tire kickers didn’t appeal to me. My buddy Mike from the Carrizozo Mud Chuckers expressed an interest in the car so I made him a deal he couldn’t refuse: I gave it to him.
Before you get all wound up and start telling me how you would have given me $500 for the car I have this to say: “No, you wouldn’t.” Just like you wouldn’t buy a Janus if it had an American made V-twin engine or an electric car if it went 100 miles further on a charge. Mike has a trailer that fit the MBG perfectly and we loaded it up using two come-alongs in series. With 3 flat tires it took about a half-hour to move the car 20 feet. Inches add up to miles and the blue, MGB is now residing 69 miles away at Mud Chuckers central. Seeing the car roll off the property gave me a real lift. It’s like I bought an extra year of my life.
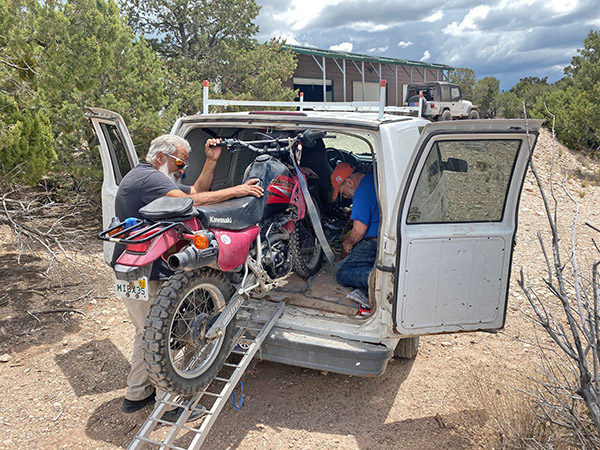
The next thing to go was the KLR250. When I had the Love Shack in Florida the KLR was the bike I left in the shed. Whenever we were in residence the KLR faithfully dragged me around central Florida. It wasn’t fast but I could hold 70mph on the highway if there wasn’t a headwind. The KLR sat as we moved junk across the country and then sat in the shed here at The Ranch for a few years. You know how that goes. The carb gummed up and it wouldn’t start.
I decided to sell the bike but first I had to fix the front brake, fork seals and replace the front tire. After accomplishing those chores I wandered off to construction projects and the KLR languished. The final straw was when I skipped over the KLR250 to get the ZRX1100 running. I realized that the liquid-cooled 6-speed enduro bike had fallen completely off the to-do list.
Mike came to the rescue again and picked up the KLR250 for a cool 1000 dollars and dragged it back to his place. He has since replaced the stock constant velocity carb with a Mikuni clone off of Amazon and the bike starts and moves under its own power again. The new carb is jetted too rich so there’s a bit more fettling to be done but I won’t be doing it.
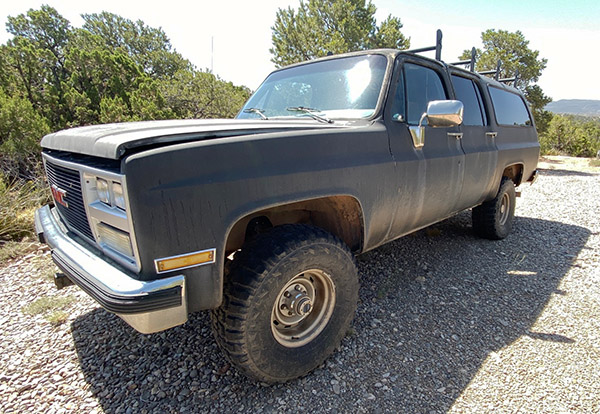
Having those two projects out of the way emboldened me to get rid of more junk. The Bomber is on the chopping block. I originally bought the Bomber for its running gear. I planned to put the Bomber’s small block Chevy and ½ ton running gear into Brumby (the Jeep). But the Bomber was so handy for hauling concrete the Jeep swap never took place. CT signed me up for a Lowes card and with the card Lowes will deliver anything to The Ranch for $20. This means no more concrete hauling and no need for the Bomber along with the Bomber’s tags and insurance.
I’ve got a few things to fix on the Bomber but I think I can get $1500 or so for the beast and that will be another project off my books and another year of my life back.
The trend line is clear to see: Stuff not getting used is going away. The 1975 Kawasaki 900 isn’t even safe now that the ZRX1100 is running. It has become too valuable and selling it would enable me to finish a few other projects, like my Honda 50 with a 140cc Lifan motor. Zed mostly sits because the purple Yamaha RD350 has taken over top spot in the vintage street bike category. I can only ride so many motorcycles at once.
You may say I’m getting lazy or maybe just old but I say I’m being realistic. There are still a few old motorcycles I’d like to own and clearing the decks is a time-honored tradition for normal people. Anyone need a Huffy beach cruiser with a 60cc two-stroke motor attached? It’s too fast downhill and too slow uphill. The thing is going to kill me if I don’t get rid of it.
When I first met CT I used to read a lot of books. We didn’t have a television (by choice) and the Internet hadn’t been invented yet so reading a book was entertainment. I’ve slowly fallen out of the habit. Part of it was that my failing eyesight made it harder to read small print. My job was physically demanding and I had to work outside in the hot Florida sun. I ran my own business and I was always busy working, trying to pay off the American Dream. When I got home I was so washed out I just wanted to sit, drink beer and not think.
For some reason it seemed like the places we lived were always poorly lit. It’s hard to read in the dark. Later, bright computer screens made it easier to read but I consumed mostly junk. Ad copy, moto-journalism, poorly done Youtube videos: my mind had become a vast, featureless wasteland.
I had a couple cataracts replaced with new lenses a year ago and that operation made things a lot brighter. Maybe those places we lived weren’t all that dark after all. For kicks I had the eye surgeon install long-distance lenses and now I can see far away things pretty good. My up close vision isn’t the greatest and I’ve been too busy to get reading glasses. I started a few books but lost interest. Stupid memes and arguing with strangers on the Internet were more to my liking.
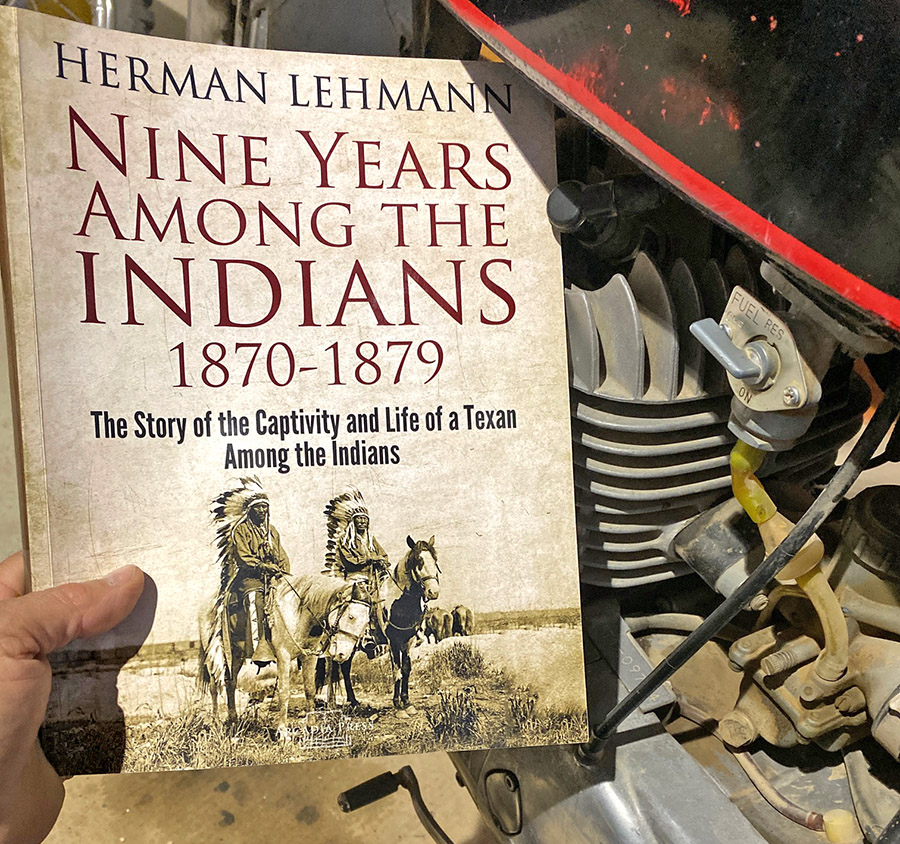
It’s been awhile since I’ve plowed through an entire book but I plowed through Nine Years Among The Indians in two short days. You know how they say you can’t put it down? I did put it down but only because my eyes were tired.
NYATI was first published in 1927 about events from 1870 to 1879, which places the language used in the book far from modern sensibilities. It’s the story of Herman Lehmann who was abducted by Apache Indians when he was 8 years old. Herman was raised by the Apaches and became an Apache. The Apaches were his family and Herman tells how the process was accomplished so thoroughly he forgot how to speak English and spoke only Apache.
One of the reasons I liked the book so much was that the area where the action happened (and there is plenty of action), New Mexico and west Texas, feature prominently. The Apaches at that time lived in nomadic bands and traveled to suit the seasons. River crossings serve as waypoints as you follow the tribe across the modern day southwest.
Lehmann writes in a matter-of-fact way and doesn’t sugar coat the things he did as an Apache warrior. Human life was not valued any higher than common animals in the wild west and a lot of people were killed. The Apaches were in an end-of-times war with the White Man and due to superior numbers and disease the White Man just kept coming and taking everything he saw before him. The Buffalo hunters were the worst. They killed and skinned buffalo, leaving the meat to rot and they killed buffalo in the millions. Buffalo were critical to the Apache. How would you feel if someone came along and destroyed your entire way of life? Bitter, I imagine.
Later Herman has a falling out with the Apaches and becomes a Comanche, and he remained Comanche the rest of his life. The Comanches were slightly less stern than the Apaches and Herman noted there was more joy and laughter as a Comanche. There are really no good guys in the book. The Whites are/were just as savage as the Indians and it’s sad how it ended for the Indians.
You know how it played out: eventually the White Man manages to subjugate the Indian tribes and force them to live on reservations. After reading NYATI I can’t imagine a worse fate for a free-roaming American Indian of the west. Herman is sent back to his family but now he is completely Indian-ized so it takes a while to relearn English and the White Man’s dull way of life.
Nine Years Among The Indians kept me reading when the other books didn’t. Each chapter is a story that stands alone once you know the background of the writer. The Apaches lived and continue to live such a different life from Europeans. Herman got to know both cultures and I think if he had his choice between the Apaches, the White man’s world, and the Comanches, he’d be back with the Comanches.
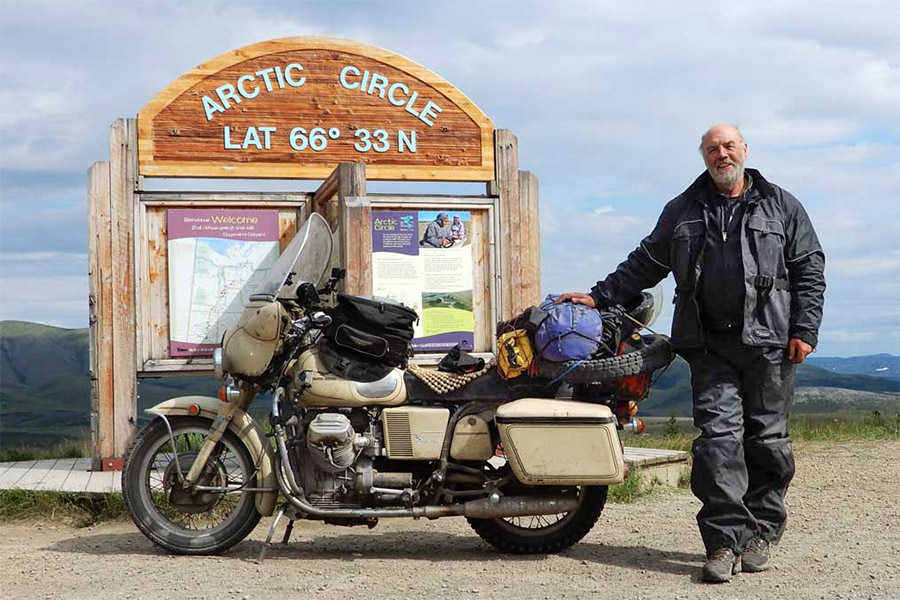
Sometimes you get lucky and a hidden Internet gem emerges. NickAdamsWriting.com is that hidden gem for me. I found it surfing the web for Moto Guzzi information. I always wanted a Moto Guzzi, preferably an older classic, and when searching on that topic Nick’s website popped up.
Nick Adams is a guy my age who has cool website and an even cooler set of videos. He’s based in Canada. The video below about his ride across that great land is a treasure. Nick is a skilled videographer and photographer, his narration is soothing, and the scenes and the story are magnificent. The fact that he rides a classic V-twin Guzzi makes it a joy to watch. My advice: Grab a cup of coffee, click on the video, expand it to full screen, and enjoy. I sure did.
Nick wrote a series of books on a variety of topics (including motorcycle touring). I ordered one a few days ago (you might consider doing the same), and after I’ve read it I’ll post a review here. I’m expecting a great read, and I intuitively know Nick won’t let me down.
One of the many disadvantages of big, heavy motorcycles is the extra strain they place on your body doing routine maintenance. Oiling the chain, a simple task on a lightweight motorcycle (you just lean the bike onto its kickstand and spray away) becomes a chore lifting and spinning bit by bit. God help you if you get a flat or need to remove a wheel.
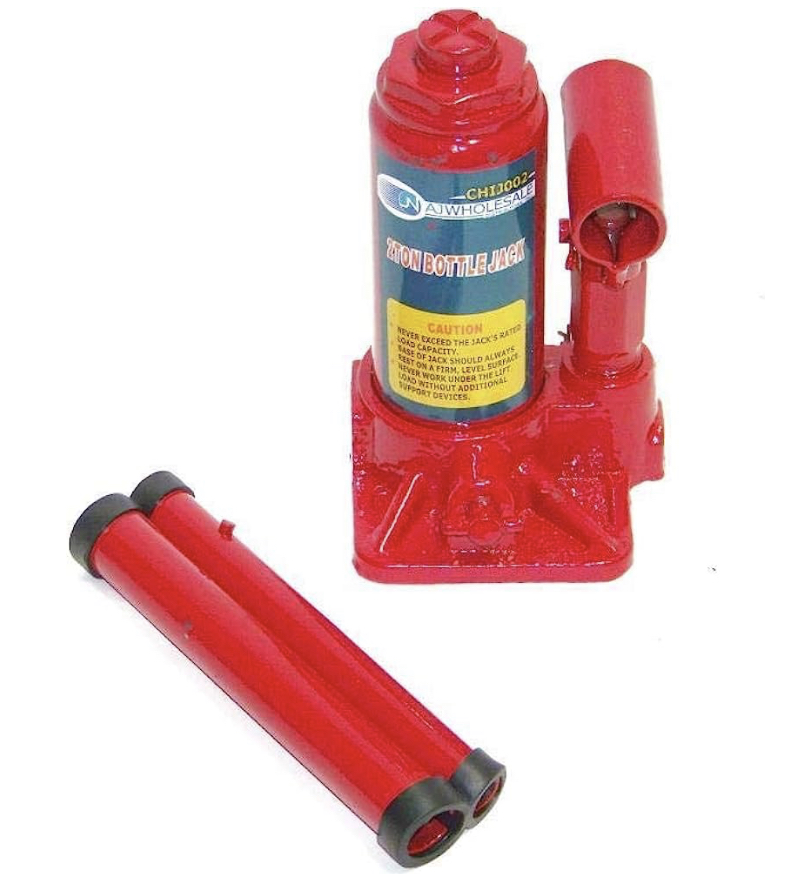
Motorcycles used to come with center stands (a few still do) and seeing how obese modern bikes have become I don’t know why manufacturers don’t tack on a bit more junk that would be actually useful. I’d rather have a center stand than a thin film instrument cluster, ride mode selector or ABS brakes. Here’s a link to the Amazon motorcycle jack.
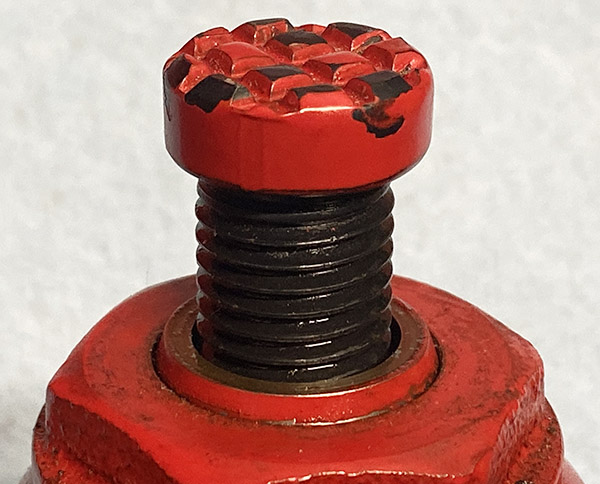
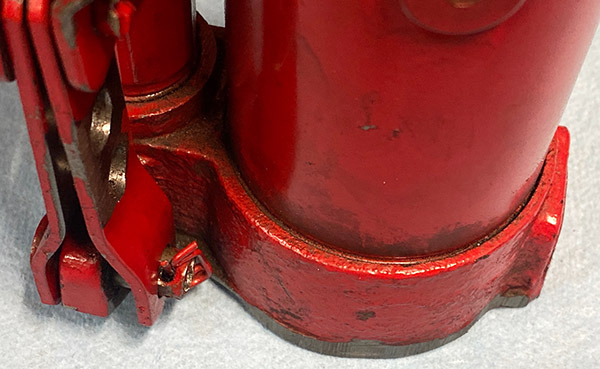
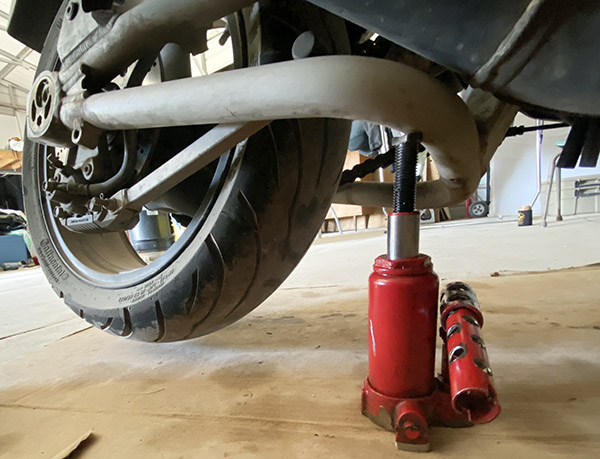
This El Cheapo, Chinese 2-ton hydraulic Jack is slightly shorter than the other El Cheapo Chinese jacks and as such it is low enough to fit under your swing arm or front frame rail. Positioned correctly, you can rig a stable 3-point setup to lift either end of your portly motorcycle.
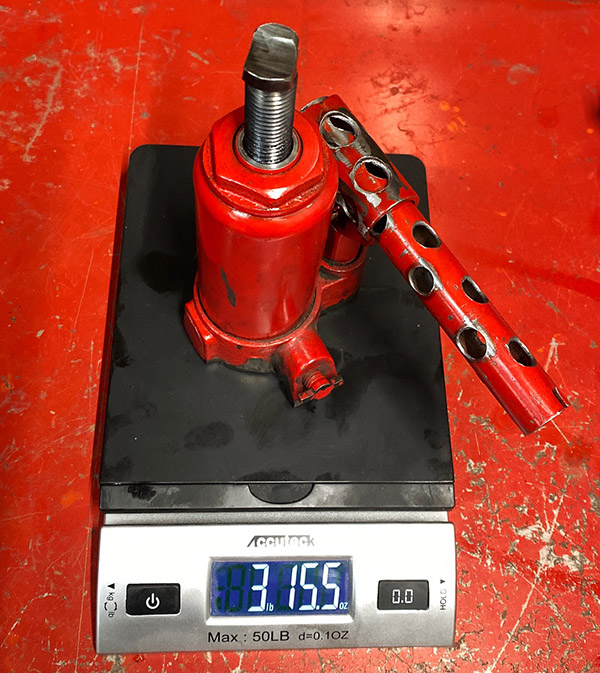
But the thing isn’t exactly travel friendly. Weighing in at a stout 4 pounds, 5.7 ounces it is not the sort of thing you want to carry around on your motorcycle unless you’re taking a long-ish trip. Of course I’m taking a long-ish trip so I decided to trim some excess weight off of the jack.
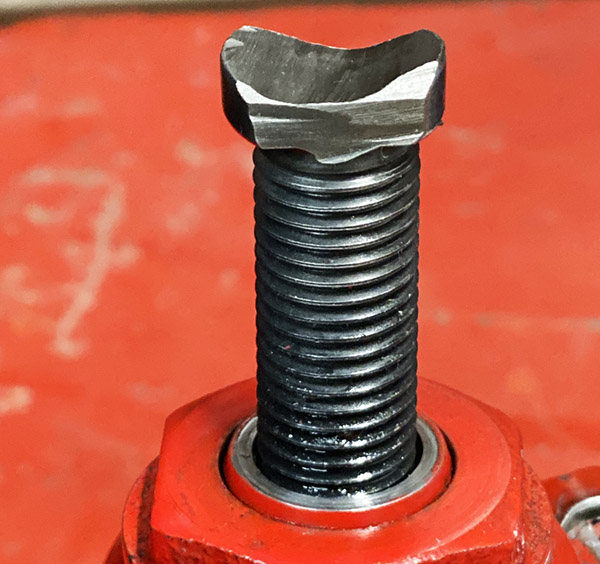
As delivered, the jack’s working end isn’t ideal for round tubes like a swing arm or frame so I chopped the sides off and ground a swale into the face in the hope of preventing the jack from slipping when in use. This worked pretty well it turns out, and while I wouldn’t jump up and down on the motorcycle while suspended it was fairly stable. Saving a few ounces was an added plus.
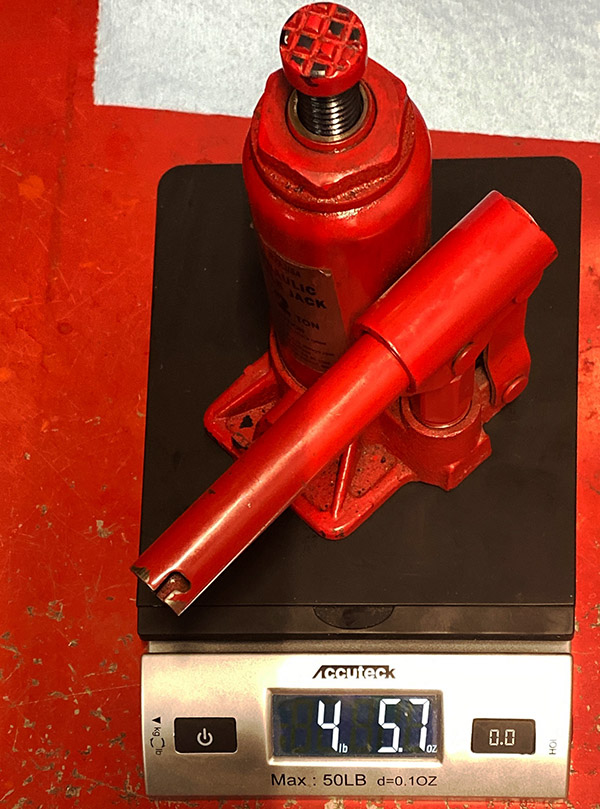
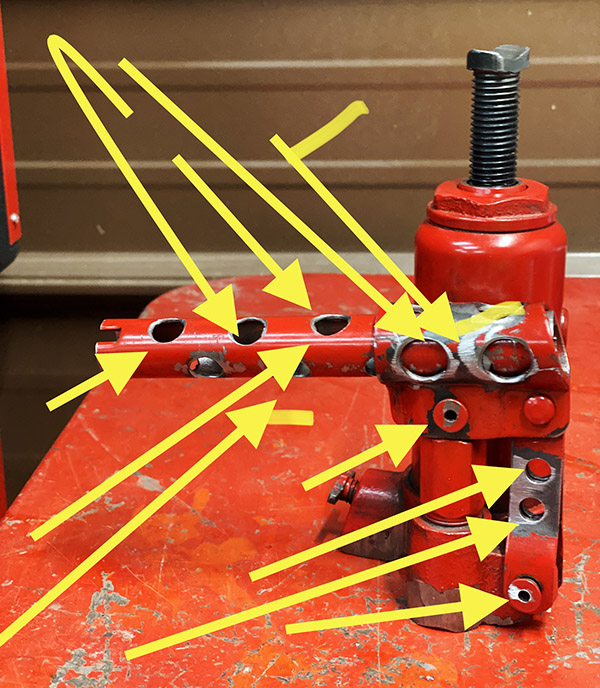
Since I’m using only a fraction of the jack’s 2-ton capacity I decided it was safe to Swiss cheese the extension lever and pivoting mechanism. This included drilling the pivot pins and connecting rod.
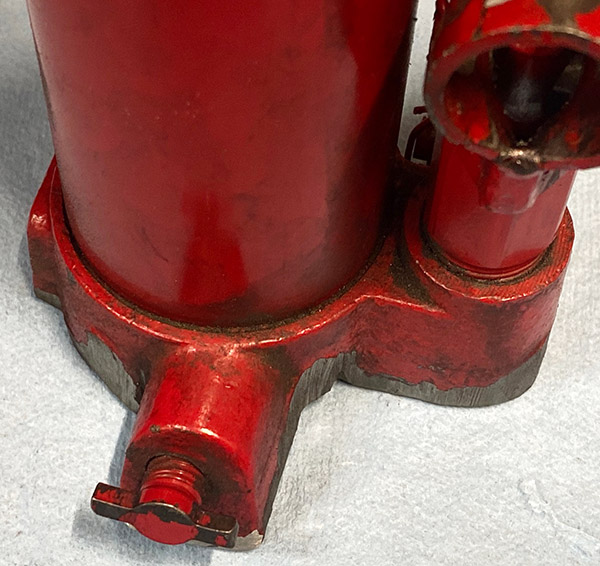
All this drilling removed a satisfying amount of weight and the jack was no worse for the damage. I know what you’re thinking: “Why stop there?” The base of the jack is a cast iron affair with plenty of ribbing and surface area. Again, I’ll only be lifting a few hundred pounds at most so I don’t need quite so much strength. I attacked the base with a 4-inch cutting wheel and removed everything that didn’t look like an elephant.
Trimming all that excess fat felt good and the resulting 3-pound, 15.5 ounce reading means I got rid of around a half-pound of useless weight and the jack looks better, has lower cholesterol, and can fit into its old high-school clothing again.
As far as the jack function, it works as you’d expect although it will slowly lose pressure overnight and lets the bike back down. Plan accordingly if you want the bike jacked up more than 5-6 hours. I see a few more places that I can trim but my recent experience grinding through a 200-dollar brake caliper gave me pause. I don’t want to hit an artery. I’ll need to look inside to determine how far I can go with the grinder but I believe I can thin the base at least 1/8 inch and cut a lot more metal around the pressure release valve. I’d like to get the jack down to 3-1/2 pounds just to see if I can. This will do for now, I’ll bring the jack along with me to Laguna Seca next week so if you’re in the area you can stop by and check it out.
It seems I am the only one of your ExNotes writers not on the road. Joe Gresh rode his resurrected Kawasaki ZRX to Laguna Seca (where he is camping and spectating this weekend), Bobbie Surber rode her Triumph Tiger up to Canada for a Horizons Unlimited event, and Mike Huber is rolling around the Pacific Northwest on his recently repaired BMW GS (presumably headed for the same event as Bobbie in Canada). I need to get out on my Enfield. Soon, my friends, soon.
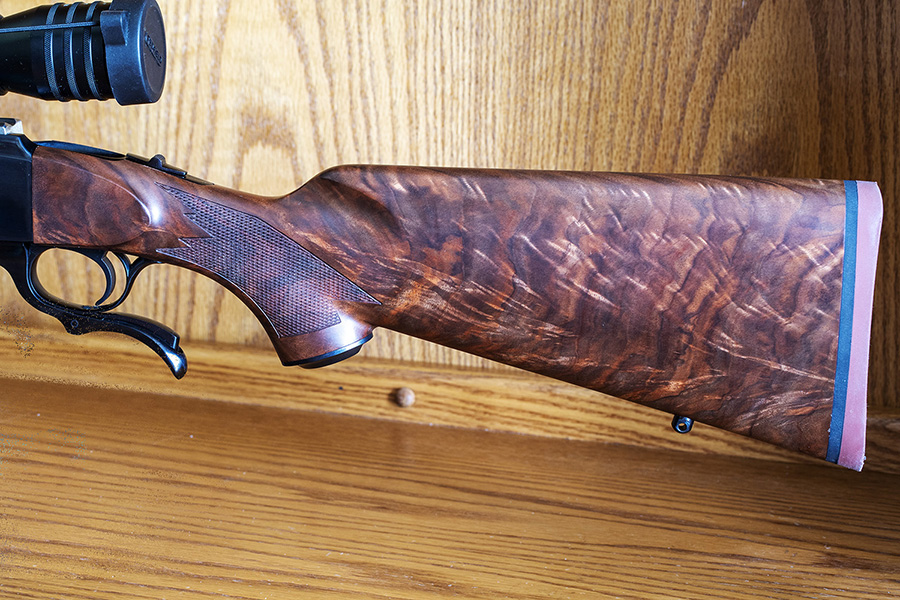
Me? I’m home, continuing to play with things that go bang. That big photo up above? It’s a Ruger No. 1 in .257 Weatherby, with the best piece of wood I’ve ever seen. Keep an eye on the ExNotes blog; we’ll have a story on how my .257 Roy No. 1 came to wear such exquisite lumber.
Stay tuned; there’s good scribblings coming from all of us.

 After only two days in Lima, I quickly learned this wasn’t the Peru I was looking for. It was just a large city, and cities weren’t where I would find the culture and experiences that would help me grow. Knowing this, I booked a 12-hour bus ride to Cusco. Surprisingly, I clearly hadn’t learned my lesson from the Nicaragua to Panama bus ride, but I figured the chances of a repeat performance of Fireproof being played nonstop were pretty slim.
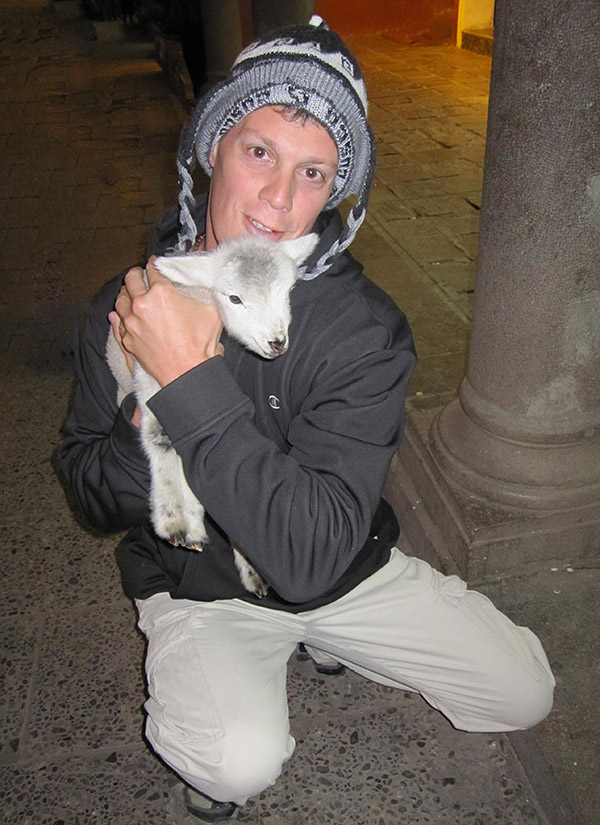


 I adjusted to a routine of work and Spanish lessons during the weekdays and on weekends I would explore local hikes and rainforests. I was almost at the base of Cotopaxi, which technically is the highest mountain in the world as it is on the equator and bulges out more than Mt. Everest (if you’re one of those rare people that believe the Earth is round).