Half a lifetime ago I was a yuppie, and the symbols of being a successful yuppie included an MBA and a Rolex. The Rolex was easy (the only requirement was having more money than brains). The MBA was more difficult. It required going back to school, which I did. Getting the MBA definitely gave me a boost. My career at the munitions company was on fast forward; at one point I was the youngest vice president in the Aerojet corporation (then I got fired, but that’s a story for another time). I loved being in the bomb business (business was booming, so to speak), and being a former Army guy, I was in my element.
That could have been me in the ’80s and ’90s. I wore a jacket and tie to work every day. I had the big glasses, too.
Anyway, while I was going to night school for the MBA, one of my classes was titled Human Behavior or something like that. The guy who taught it was a Ph.D in one of the soft sciences, and I knew pretty quickly that he leaned way left. That’s okay; in my book you can lean however you want as long as you don’t expect me to agree with you on every issue.
The first night of class the prof had everyone tell the rest of their class their name and what they did. We were all yuppies, we were all young, and we all had good jobs. It made for good entertainment, but I had a feel for how things were going from the first several yuppies who told us what they did and the prof’s reactions and questions. Yep, the guy was a definite leftie. I started to wonder what his reaction would be to me…a guy firmly entrenched in the military industrial complex working for a munitions company.
“So what do you do, Joe?” Dr. WhatsHisName asked.
“Uh, I’m an engineer,” I said, hoping he would leave it at that, but knowing he wouldn’t.
“What kind of an engineer are you, and who do you work for?”
“Uh, I’m a mechanical engineer,” I said. No sense in oversharing, I figured. Maybe he wouldn’t notice I didn’t name my company.
“Who do you work for?”
“I work for an aerospace company.”
“What company, and what do you engineer?” This guy wasn’t going to give up. I liked my job and I liked what I did, but I wasn’t about to tell Jerry Rubin here I supported the Vietnam War.
“I work for Aerojet, and we make a variety of products.” It had become a contest, and I was losing.
“What are your products?” He had me. Time to ‘fess up.
“I do cluster bombs.” There. It was out. I knew the guy was going to call whoever it is you call when you find someone violating the Geneva Convention. The good doctor stared at me for several seconds. The other 30 or so yuppies in the class were dead silent. It was a pregnant pause if ever there was one and we were pretty close to the 9-month mark. Somebody’s water was about to break.
“Does your family know what you do?” he softly asked, speaking almost in a whisper.
“My wife does,” I said, mirroring his subdued tone.
“And how does she feel about how you earn a living?”
At this point, I knew I had to come clean. “Truth be told, Professor, she’s disappointed in me.” I had hoped that would end the discussion, but the guy would not let up. He was a dog and I was the bone. Then I sensed a way out, anticipating what his next question would be.
“What does she say to you?” he asked.
“Well, Doc, like I said, she’s disappointed, and she’s made that known on several occasions.” The good Professor was nodding knowingly. He was hearing my confession. I don’t recall specifically, but I’m pretty sure he was smiling. I was on a roll and I continued. “You see, Professor, my wife works for TRW’s Ballistic Missiles Division. They do nuclear intercontinental missiles and she’s always asking me why I’m wasting my time screwing around with conventional weapons. If you’re going to go, she always says, go big. Go nuclear.”
My yuppie classmates started laughing. Me, I was scared. I was running a perfect 4.00 grade point average in the MBA program up to that point, and I thought I had just blown any chance of aceing this course. The professor nodded without expression, made a note on his pad, and went on to the next yuppie. My being a wiseass had earned a good laugh, but that note he made couldn’t have been a good thing and I was afraid it would cost me.
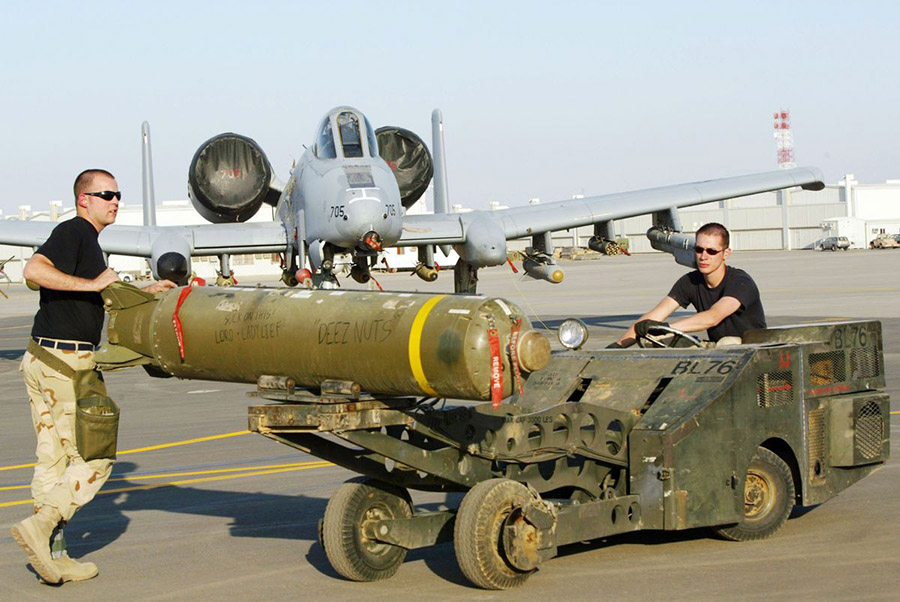
So how did it turn out? I busted my chops in that course and I got my A. But I was sweating bullets for the rest of the term. Little, non-nuclear bullets, but bullets nonetheless. More importantly, the cluster bombs I helped engineer won the Gulf War a few years later in 1991. Most of Saddam Hussein’s Republican Guard tanks were taken out with CBU-87/B cluster bombs and GAU-8/A 30mm ammo (and my company, Aerojet Ordnance, also made the ammo for those A-10 Gatlings). Sometimes when studying human behavior, the guys who know (I mean, really know) reach the only conclusion and solution possible: An adequate quantity of high explosives delivered on target. I’m not at all embarrassed about having had a hand in that. Fact is, I’m proud of it.
In Part 1 I shared with you my adventure from Sedona, AZ, crossing the border for the first time on a bike, and heading down Mexico’s Transpeninsular Highway to Guerrero Negro. This blog continues the adventure.
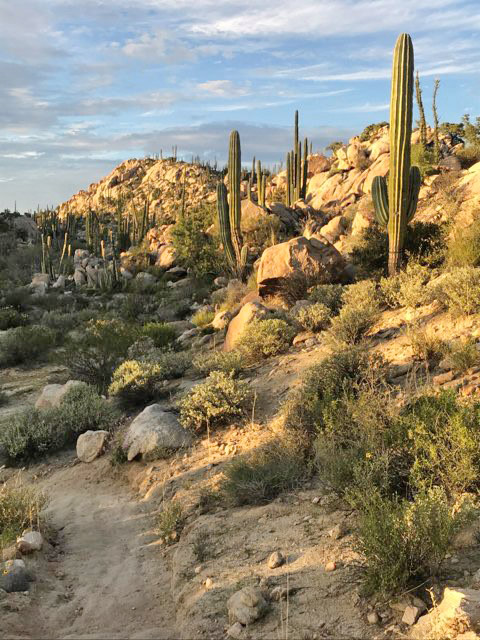
After an early morning departure leaving behind the comforts of the Hotel Mision Cataviña, I continued on Highway 1, enjoying a quiet morning and the rare good luck of an empty road. Settling into the ride with a deep breath that allowed me to loosen my tight muscles after two long days of riding, I felt the joy start to creep in as I took in the vastness and emptiness of the Sonoran Desert. The fierceness of the summer sun had already begun turning the winter greenness to a light wheat color. This did not diminish the stark beauty of her desert, with the surrounding hills in the distance with their deep purple shadows demanding a second look. My bike was doing great; her little single-cylinder engine was a gem off-road and could manage up to 80 miles an hour, more than enough in Baja. She was a perfect bike for the moment, made for Baja.
The desert south of Cataviña.
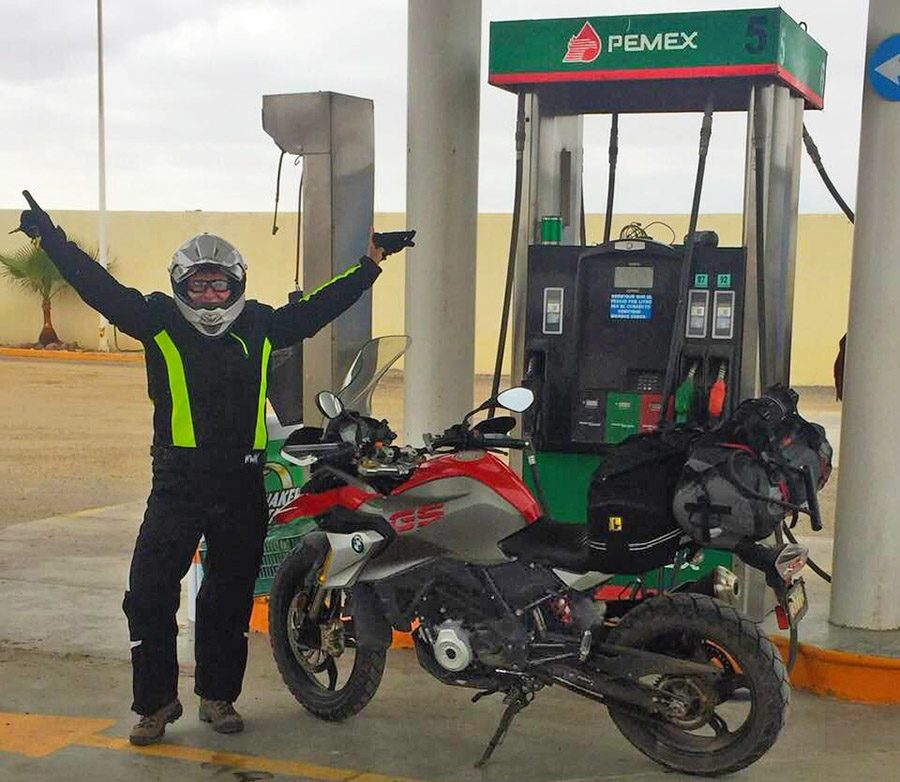
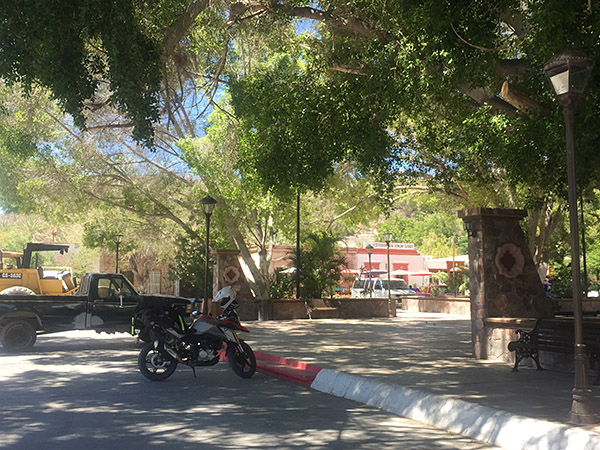
Rolling down into Villa Jesus Maria I was more than ready for a break, something cold to drink and some much-needed gasoline. I did well with the drink and break, but as can happen in Baja, the Pemex had no gas. It was another 40 kilometers to Guerrero Negro; as I emptied my MSR liter of gas into my tank, I said a little prayer to both Jesus and Maria to extend my range to Guerrero Negro.
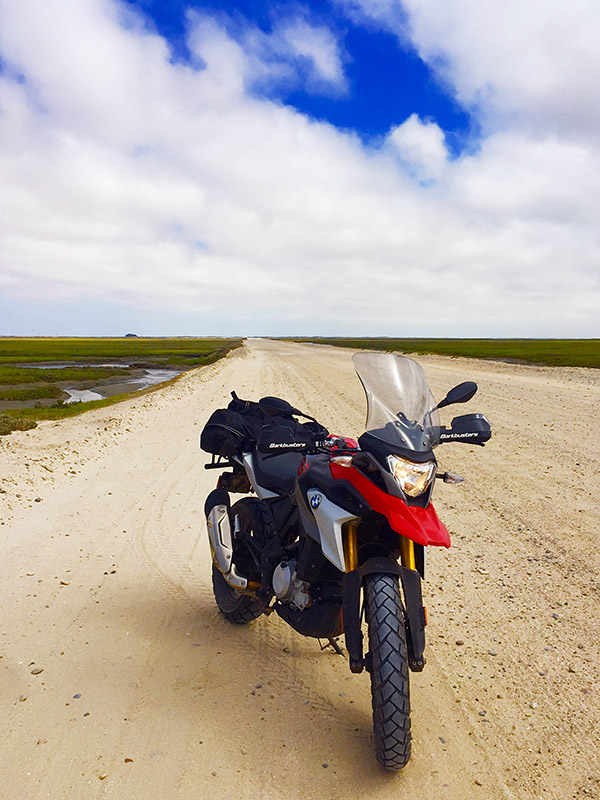
In the Guerrero Negro salt flats.At Scammon’s Lagoon in Guerrero Negro.
Prayers answered, by perhaps both Jesus and Maria, I arrived with a smidgin of gas fumes left in my tank. Reaching Hotel Don Gus, which several riders had recommended as both affordable and bike safe, I pulled into the dirt parking lot to check in. This is a typical motel-style lodging with comfortable rooms and a simple restaurant serving hearty portions. My room settled, I headed for a taco truck that every rider raves about, Tony’s Fish Tacos. Let me tell you, I often dream of Tony’s fish and shrimp tacos with the perfect batter and lime crema!
Keep us going…please click on the popup ads!
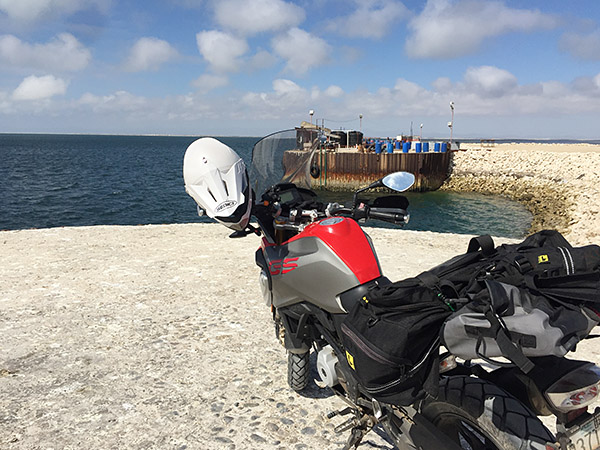
Fully satisfied and with still enough daylight left, I went to explore the salt flats famous in this area. A short ride from town, the salt flats looked like a mirage at times, fooling the eye into believing it was a vast lake. This soon gave way to the commercial operation with magnificent mounds of salt with trucks and bulldozers on the top of the salt hill so high that the trucks looked like toys. Soon I was passing the small boat dock and positioned my bike for a good pic. The sun was warm but blissfully not hot with the Pacific breeze. I set up my small camp chair, pulled out a flask filled with an excellent local Vino Tinto, and gave a silent toast to a perfect Baja day.
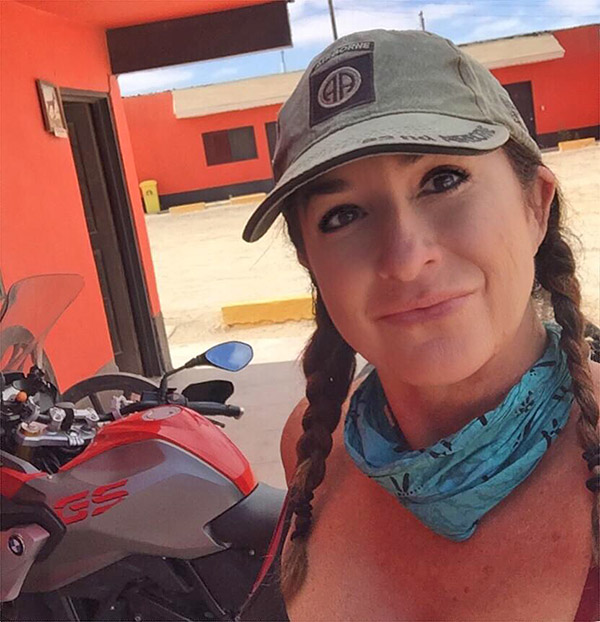
A Don Gus Hotel selfie.
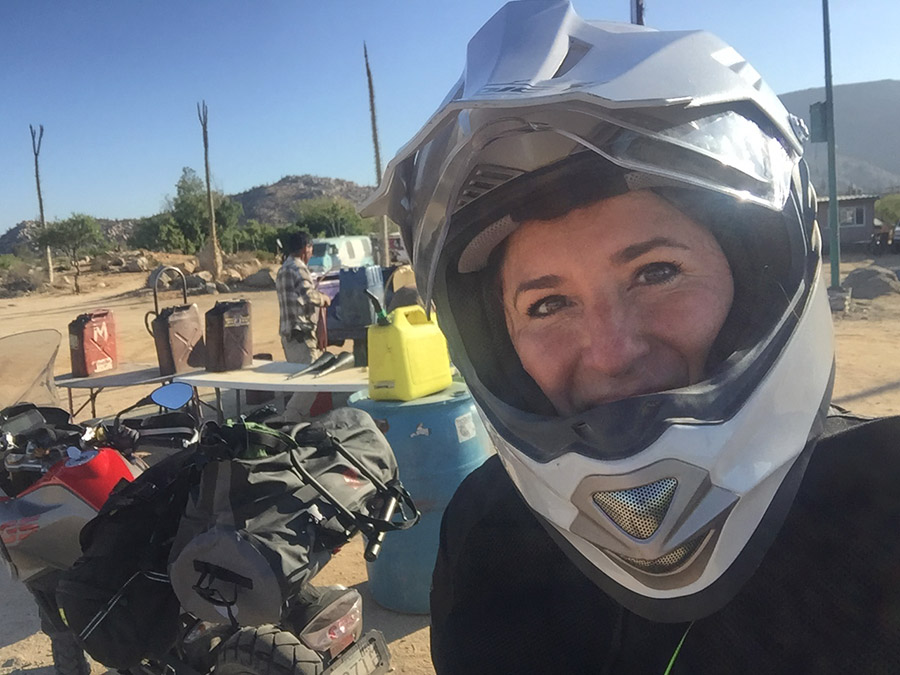
I woke the following day with growing excitement, and unable to wait for daybreak I loaded my bike impatiently, waiting for the restaurant to open for a much-needed cup of joe. You will often find that opening and closing times in Baja are more of a suggestion than a hard rule. A half-hour later, I was in my room, firing up my rocket pocket stove and making do with a Starbucks instant coffee and some leftover tortillas. Bike ready and stomach full, I headed to the gas station to fill up Red, only to find I had caused a stir and was noticed by a few locals who wanted to meet the female American solo rider. A few of the younger ones asked what seemed like endless questions, wanting to know where I had been and where I was going. This completed, I was on the road heading to the part of Baja I had been waiting for, Mulege and the famous Bahia Conception.
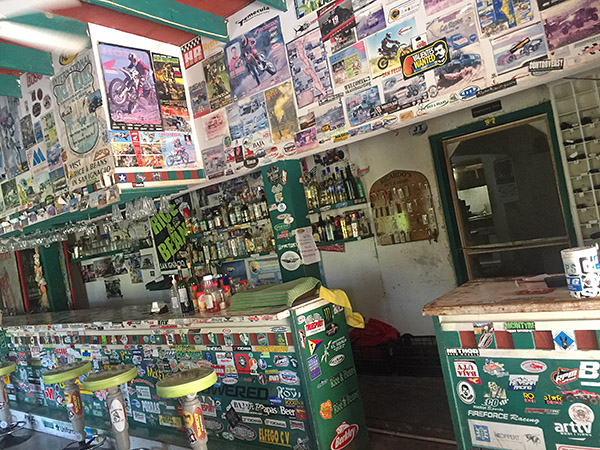
The road out of town was uneventful, an endlessly flat straight that challenged me to stay awake and focused. About an hour later, I passed the midsize town of Villa Alberto with plenty of gas, shopping, and lodging. I stopped long enough for gas and was back on the road. My interest in the highway picked up as I neared San Ignacio. A few kilometers before San Ignacio there was another military stop, which was uneventful other than the guard looking at me, my bike, and a long look down the road with was becoming the norm question and answer: Solo? Si Solo! With an astonished look, he waved me on, wishing me a safe ride. My next stop was a visit to the Baja 1000 popular pit stop, Rice and Beans, a restaurant and hotel just off the highway with good food and cold beer. I left satisfied and headed to the main square of San Ignacio.
Inside the Rice and Beans Restaurant in San Ignacio.
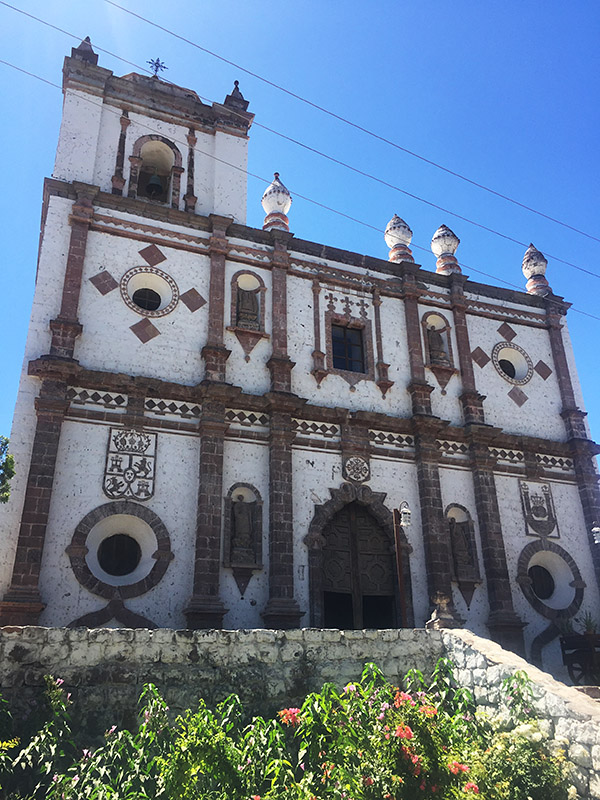
The town of San Ignacio is a true desert oasis with more palm trees than you could count and a river running through the town. San Ignacio seems caught in a time warp as elderly men sit in the shade of the massive trees that frame the small-town square, reading and playing cards as they eye me parking my bike. Curious about this gem, I found just enough cell coverage to look up her history. San Ignacio was founded in 1706 by the Cochimi tribe. In 1728, missionary Juan Bautista de Luyando discovered San Ignacio and committed to building Misión San Ignacio Kadakaamán. The building is made of volcanic rock from the nearby mountains. Her mission sits quietly, waiting for the next visitor, and I was lucky to find her open and welcoming.
The San Ignacio Mission.San Ignacio’s town square.A restaurant in San Ignacio.
I reluctantly got back on my bike, heading back to the highway with a promise that I would return to San Ignacio for further exploration and to enjoy her peaceful river and nearby lagoon. With one more top off of gas, I headed down the road finding the excitement of endless twisties and, on the horizon to my left, the peaks of Tres Virgenes. One last climb took me to another peak, with soon a sweeping view of the Sea of Cortez. Massive winds kept me alert. The heat was near overwhelming, and the wind only accelerated my dehydration. I was physically spent with still another hour to my destination. Pulling into Santa Rosalia, I sadly passed her mission for another time. I stopped just long enough to douse myself with water at the gas station, drink as much water as possible, and get back on the road.
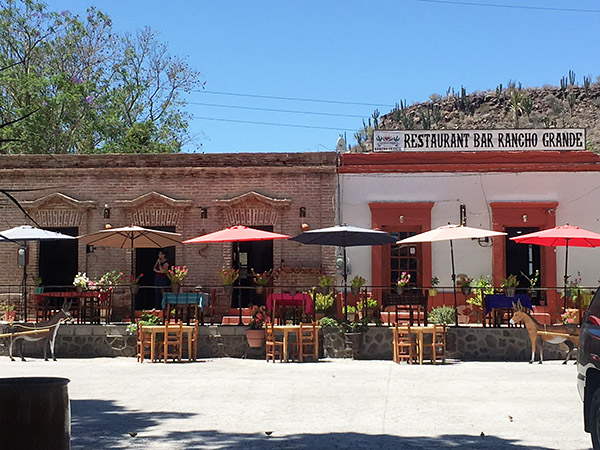
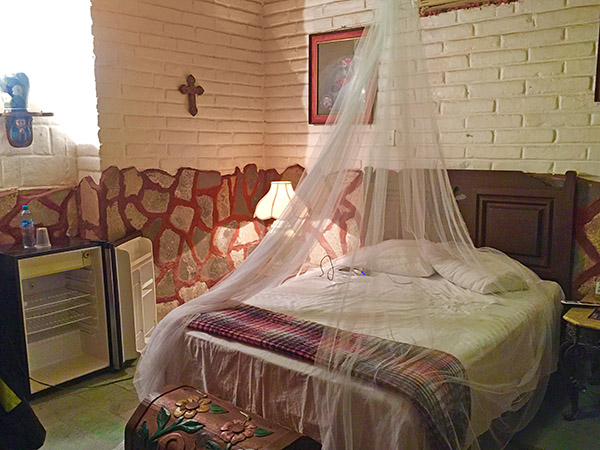
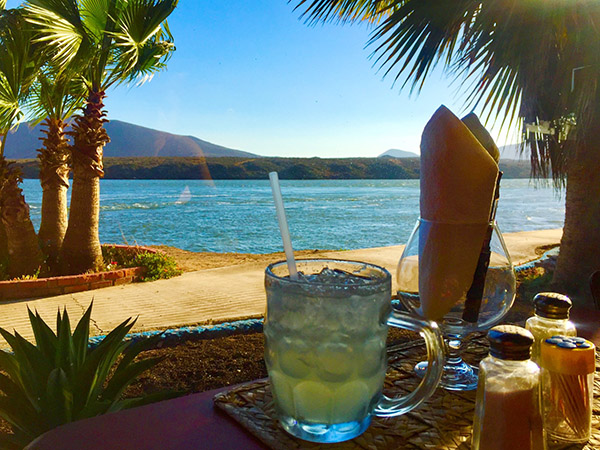
Soon I was riding through the arches that welcome you to the proper start of the town of Mulege. My destination was Historico Las Casitas. After several attempts to find the hotel cursing my Google Maps, I finally arrived. I walked in, took off my riding gear, and as if they were waiting for me to arrive, a young man said not a single word; instead, he handed me a glass of lemonade, a drink from heaven made with fresh limes, lemon, and cane sugar. I emptied my glass in two long swings. Gratefully finding an ounce of composure, I asked about a room for the night. I soon settled into my volcano rock room with mosquito netting; it took me no time to pass out with cold air soothing my heat-exhausted body.
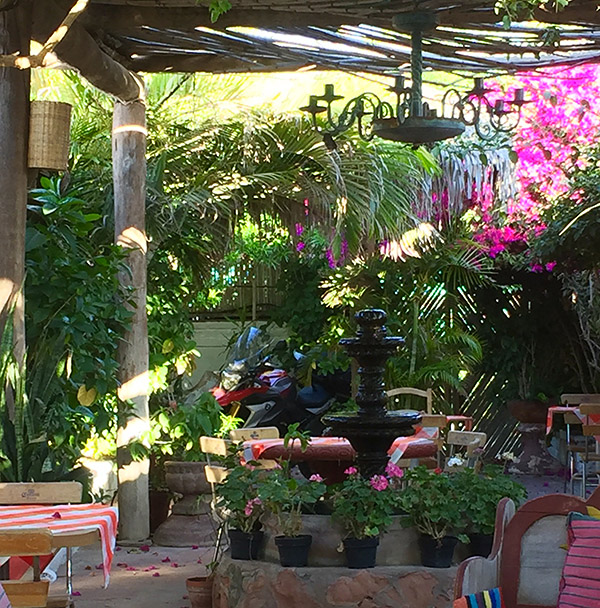
The Hotel Las Casitas courtyard.My room in the Las Casitas.
Waking in the late afternoon, I discovered the L-shaped courtyard covered in vines and trees, allowing for continual shade against the heat of the June sun. My bike was safely parked in the courtyard; I made my way to the bar to the young man who had saved me with his magical lemon concoction and ordered another (with tequila this time). Sufficiently recovered, I headed out to discover the town and look for another perfect taco. Mulege, another mission town founded in the early 1700s and known for the beauty of the river that runs her length ending at the Sea of Cortez, her proud mission sets up on a hill overlooking the palm trees and river. Sadly not open, I wandered around the grounds taking in the softness of the sunset overlooking the river. I headed back to the town square, and with a food stand next to the market, I had a satisfying plate of carne asada tacos with the best beans I’ve had in Baja. Heading back to the hotel, I found the courtyard packed with locals and visitors enjoying the evening coolness. I was lucky to be greeted by the owner, I learned more about the hotel’s history, and I met a friend of his who could take me horseback riding the following morning. With plans set for the next day I gratefully slipped between the crisp white sheets, pulled my mosquito netting around me, and drifted off to sleep dreaming of the adventures ahead.
I know many people on this page camp and ride, but some have yet to dive into mixing these two great passions. My objective in this article is to help you bridge riding and camping, alleviate any concerns on this topic, and build a foundation of knowledge for those new to motorcycle camping. In doing so you will discover a deeper level of motorcycling that many riders experience.
Help us bring more to you…please click on the popup ads!
Start with Less
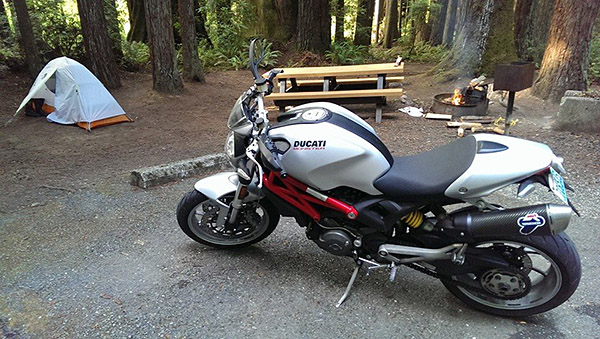
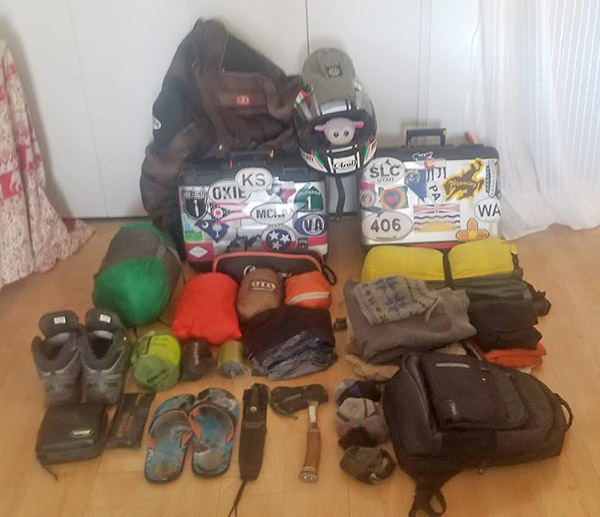
With all the social media posts of riders from around the world sharing their epic adventures and providing reviews of the gear they use can cause anxiety. Intimidation from the expense and amount of equipment people use for moto camping can become overwhelming when starting this hobby. I’m not saying any of these riders are wrong in the gear (or the amount) they use, but my philosophy while motorcycle camping is less gear is much more efficient and cheaper. My first time moto camping I had nothing other than a one-person Kelty tent (which I still use), a sleeping bag, and a small personal hygiene kit. I planned to give moto camping a shot and figured I could survive one night out on Washington’s Olympic peninsula even if I was a bit uncomfortable.
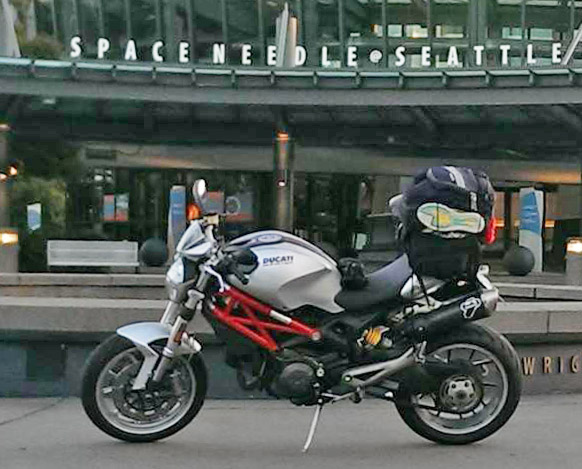
I wasn’t uncomfortable at all. In fact, other than adding a 6-pack of beer and a crushed Subway sandwich my gear didn’t grow or change for the next 8 more years (even after “maturing” from a Ducati Monster M1100 to a BMW GS1200). Would I have been more comfortable with a sleeping pad, cooking set up, and maybe even a chair? Yes, but that came years later after learning from others (I am a bit set in my ways even if they force me to be uncomfortable). Starting from such a minimalist perspective and adding gear slowly allowed me to tailor my equipment perfectly. You will find everyone has a “better” way of doing things; you might want to learn what works best for you and expand slowly.
Start in a Familiar Location
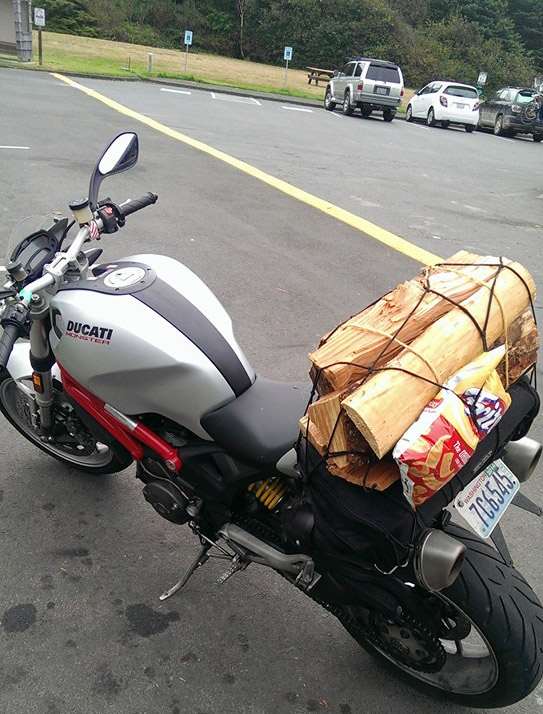
Roaring through the dense rainforest of the Olympic Peninsula on my Ducati Monster I was excited to be camping with my motorcycle for the first time. In hindsight this choice was probably a further and more isolated location than I should have started with, but it worked for the most part. I had ridden the road several times, I was comfortable with the distance, and I was aware of the ever-changing weather conditions. Being new to this I didn’t pack rain gear and of course it rained heavily that night (I was forced into my tent by the weather by 7:00 p.m.). You must pack raingear if you want to ensure it never rains on your moto camping trip. But even with the weather not cooperating it was a fun first night and it was enough to get me hooked on the lifestyle.
Looking back, a more comfortable way to experience my first moto camping adventure would have been a more controlled environment. Even for those well-seasoned campers, testing new gear in your home or backyard to learn how to set up, adjust, and break down the equipment makes for a less stressful time in a real-world environment. Purchasing lots of expensive gear, not testing it, and going on a multi-state tour can be a painful way to learn the gear isn’t right for you or the climate. Another way to learn your equipment and build experience is at a state park close to your home or a KOA. Even if you have to retreat to the KOA store or end up back inside your house, don’t be discouraged. That’s what this step is for. Take notes on what worked and what didn’t, and build off that until you are comfortable with the next step, which can be dispersed camping or a longer distance ride. It is better to learn in this semi-controlled environment than to have a horrific night with improper gear in poor weather and become completely deterred from ever moto camping again.
Learn From Experience
Having completed a successful test runs with your gear it is now time to begin learning how to increase your confidence in harsher and more remote environments. This point in your experience level is also the perfect time to make gear adjustments based on your notes. With a few nights camping under your belt you can seek advice and learn from others, including their set up tricks and in what type of climate they moto camp. In doing so you will fine tune your camping outfit so that it is perfect for you, your motorcycle, and the climate.
During this phase it is important to remain open minded. Everyone has a method that works best for them. For some it is a half shelter at a roadside pullout, for others it can be as elaborate as a 6-man tent with copious gear that requires 2 hours to pack. Normally when I travel and moto camp it isn’t for just one night. I’m on the road for two to three months at a time with Airbnbs or hotels as resting points or for working. Even though I am comfortable with my moto camping equipment it’s always fun to chat up other motorcyclists. In most cases, even if their set up is completely different there is usually one or two takeaways I learn from conversing with them.
Conclusions
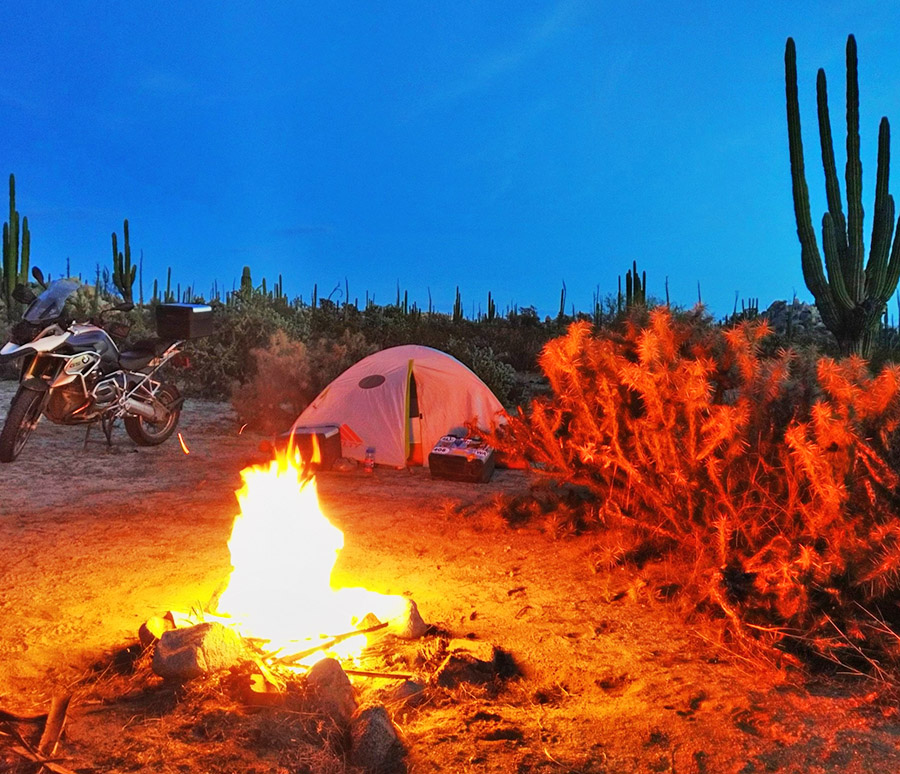
Moto camping is an easy and inexpensive way to escape the rat race with less effort than many would think. These experiences and the people I meet along the journey are some of the most best I have had. Being so removed from everything as you sit relaxing in the glow of a warm campfire reflecting off your moto is a fulfilling feeling that few venture to achieve.
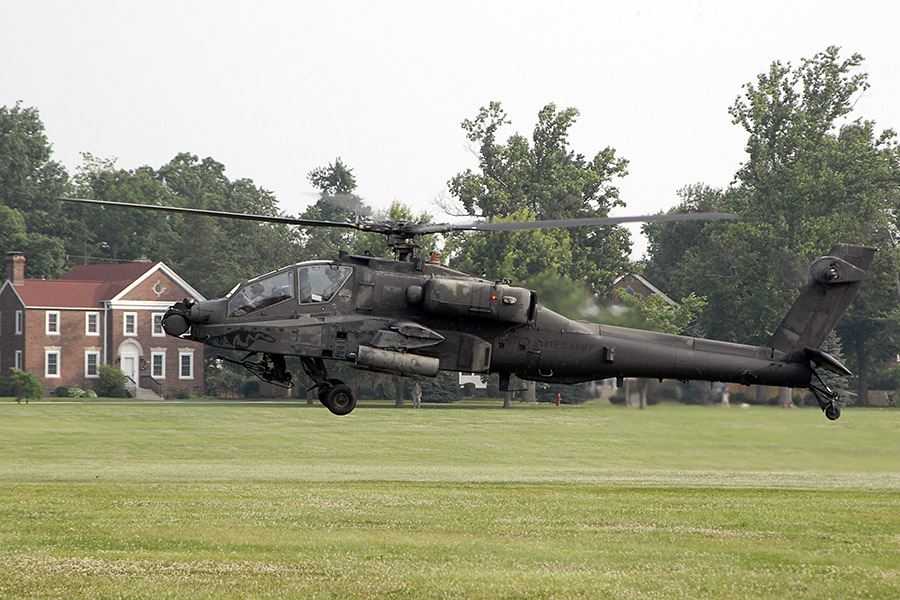
Like that photo you see above? Yeah, me, too. I took it on the parade grounds at Fort Knox, Kentucky, a few years ago. I used to run the Composite Structures plant that made rotor blades for the Apache helicopter. It was one of the best jobs I ever had.
We recently reposted (under the Wayback Machine banner) our blog about the Gator mine system, and in it I promised to write about the Apache main rotor blade failures. This is another defense industry failure analysis war story that crosses company lines and supplier/customer boundaries, and I’m not entirely sure that there wasn’t some nefarious behavior going on at McDonnell Douglas. I’ll tell you what happened and you tell me.
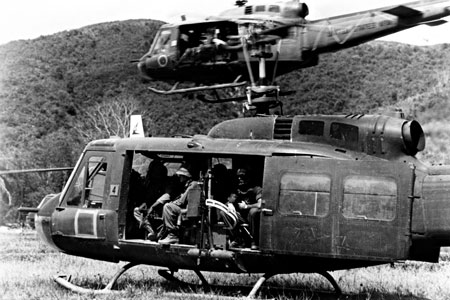
The UH-1 Huey was a Vietnam War workhorse. It was extremely susceptible to small arms fire and you could hear it coming miles away.
During the Vietnam War, the Army (my alma mater) found that the Huey helicopter had a few shortcomings. I guess that’s to be expected; it was the first time the Army used helicopters in a major way in a real war. The Huey was susceptible to small arms fire (and big arms fire, too, for that matter) and it was noisy. On a clear night, you could hear a Huey coming in from a long way out with its characteristic “wop wop wop” signature as it beat the air into submission. That “wop wop wop” sound was actually the rotor tips breaking the sound barrier on the left side of the helicopter, so the Army knew it had to do something to get the blade tip speed below the speed 0f sound on its next-gen helicopter. Another big problem was small arms fire; a single .30-caliber AK-47 bullet through a Huey rotor blade would destroy the blade’s structural integrity (and there were a lot of AK-47 rounds in the air in those days). When that happened, the helicopter and its crew were lost. There could be no autorotation (you can’t autorotate without a blade) and you couldn’t bail out. The next-gen helicopter blades would have to be impervious to small arms fire.
Fixing the blade tip speed problem was simple. Instead of having two blades like the Huey, the Apache went to four blades. That cut the rotor speed and let the blade tips go subsonic. “Wop wop wop” no more. Easy peasy.
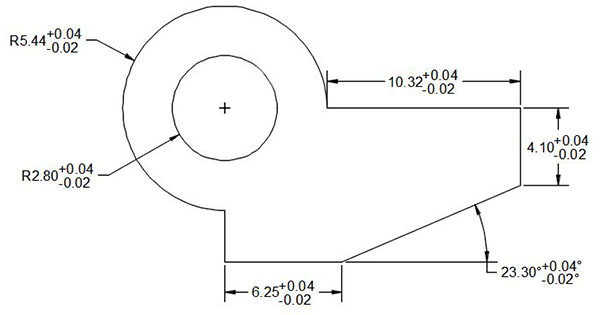
The structural integrity issue was the more significant challenge. The engineers at McDonnell Dougas (the Apache prime contractor) designed a blade that had four spars that ran longitudinally (with the length of the blade) contructed of AM455 stainless steel (a special blend used on the Apache and, at the time, nowhere else). The spars had overlapping epoxy-bonded joints that ran the length of the blade. The idea was that a hit anywhere on the blade (up to and including a 23mm high explosive Russian anti-aircraft round, roughly the explosive equivalent of a hand grenade) would damage that spar, but the remaining three spars would hold the blade together. It worked. An Apache blade actually took a blade hit from an Iraqi ZSU-23/4 and made it back to base.
A cross section of the McDonnell Douglas Apache blade showing the four spars.
So here’s the problem: The Army specified a blade life of 2200 hours (blades on a helicopter are like tires on a car…they wear out), but our blades were only lasting about 800 hours before the blades’ bondline epoxy joints holding the spars together starting unzipping. It wasn’t a catastrophic failure (the helicopter could still fly home), but the blades had to be repaired. The Army would send the blades back to McDonnell Douglas, and McDonnell Douglas sent them back to us at Composite Structures for refurbishment. If they couldn’t be repaired, we sold McDonnell Douglas a new blade (back in the 1990s, each blade cost just north of $53,000, and McDonnell Douglas put a hefty markup on that when they sold the blade to the Army). When they could be repaired, we still charged a hefty fee.
When I entered the picture as the plant manager, I learned that both Composite Structures (my company) and McDonnell Douglas (my customer) had made half-assed efforts to fix the blade problem, but neither company was financially motivated to eliminate it. We were making good money selling and repairing blades and so was McDonnell Douglas. The Army, however, was taking it in the shorts.
This was also a major problem for me as the manufacturing guy. I didn’t like having to make two blades to get one good one. We were rejecting one of every two blades we made for spar disbonds in the factory. You read that right: We had to make two blades to get one good one. Because of this, we were in a severe past due delivery condition, and my mission was to correct that situation. So we went to work on solving the problem. We found and fixed plenty of problems (blade cure profile issues, cleanroom assembly shortfalls, epoxy shelf life and pot life issues, nonconforming components issues, and contamination issues), but the blade disbonds continued. McDonnell Douglas continued to pound us for quality issues, all the while secretly smiling all the way to the bank as they continued to sell twice as many blades as they should have been selling.
We went through everything and finally concluded that there had to be a design issue with the blades; specifically, that the bondline width where the spars were glued together had too much variability. If that glue line was small enough, we reasoned, it wouldn’t hold up and the blade would disbond. We asked McDonnell Douglas about that (McDonnell Douglas was responsible for the design; we were building it to their engineering drawings), but they kept blowing us off. The bondline width wasn’t dimensioned on the McDonnell Dougas drawings. The other parts were, and McDonnell Douglas’ idea was that if the blade parts met their drawing requirements, the bondline width would be okay. That’s what they hoped for, anyway. But you know what they say about hope. You can poop in one hand and hope in the other, and see which one fills up first.
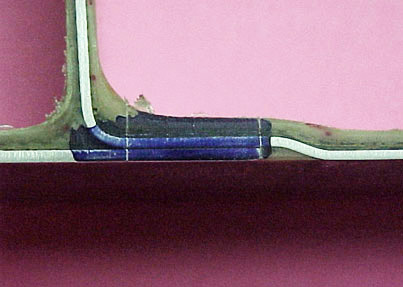
A macro shot of the bondline joint. The scribe lines (in the blue Dykem) show the bondline area.
I asked for a meeting with our company and McDonnell Douglas on the blade failures, and they wouldn’t meet with us. So I sent out another invitation, and this time I included the Army. McDonnell Douglas was livid when the Army quickly said yes; now, the McDonnell Douglas wizards had to meet with us on this issue. That meeting started about like I expected it to, with McDonnell Douglas tearing us a new one on the blade failures, telling us our quality was terrible, and basically letting me and the rest of the world know that, in their opinion, things had gone downhill since I had taken over as plant manager (no matter that this 50%-rejection-rate blade issue had existed for a dozen years prior to my arrival). I patiently explained the issues we had found and corrected, and then emphasized that the problem with blade separations had continued unabated. I then asked the McDonnell Douglas program manager about the bondline width and the fact that this apparently critical requirement was not on their engineering drawings. He denied it was the issue and went off about our poor quality again. When he ran out of steam, I asked the question about the bondline dimension yet again, and specifically, how narrow the bondline could be and still provide an adequate joint. There were more accusations about our lousy quality (the guy only knew one tune and he loved singing it), and I again waited for him to finish. When I asked the question a third time, before McDonnell Douglas lit up about our poor quality again the Army representative asked “yeah, how narrow does it have to be before the blade fails?”
The McDonnell Douglas guy stared at me like cobra looks at a mongoose (I’ve only seen this in YouTube videos, but I’m pretty sure the analogy is a good one). He sputtered and stammered and I think I saw a little spit fly from his mouth. “If you make it to the drawing it will be okay,” he said. I mean, under the circumstances it was the only thing he could say. I almost felt sorry for him, in the same way you feel sorry for a rat when a red-tailed hawk is swooping down with talons extended. You feel bad, but you look forward to seeing the hawk doing his thing.
The Army guy sensed this was something big. “How low?” he asked again. If there is such a thing as a perfect impersonation of a deer caught in the headlights, the McDonnell Douglas dude was nailing it. It was what we in the literary world call a pregnant pause, one of those “what did the President know, and when did he know it?” moments. As I type this, I can remember the scene like it happened 10 minutes ago, but it’s been close to 30 years.
“0.375 inches,” the McDonnell Douglas dude finally answered. He actually said the zero in a half-assed attempt to add engineering gravitas to his answer. “As long as they build it to the print, they’ll be okay,” he added, with a “so there” smirk. He was answering the Army man, but the smirk was all for me.
What the McDonnell Douglas guy didn’t know was that my guys could see the bondline width in an x-ray, and we x-rayed every blade returned for repair. And I guess he didn’t realize how easy it was to do a tolerance analysis to show what the drawings allowed the bondline width to be.
What happened next was one of those moments I’ll remember for the rest of my life. I looked my engineering guy and my QA guy. They knew what I wanted. They both left the room. Fifteen minutes later they were back. My engineering guy handed me the results of his tolerance analysis. The McDonnell Douglas engineering drawings tolerance stackups allowed the bondline width to go as low as 0.337 inch. The QA guy had even better information. All the blades that had been returned to us for spars unzipping (which was the only reason we ever saw a blade returned) had bondline widths less than 0.375 inches (McDonnell Douglas’ admission for the lower limit) but above .337 inches. In other words, our quality was fine. The failed blades met the McDonnell Douglas engineering drawings but were below the value I had finally prodded McDonnell Douglas into revealing.
I could have been more diplomatic, I guess, but that wasn’t me. I shared that information with the room. The Army rep smiled. “I think you guys might want to continue the meeting without me,” he said. And then he left.
The McDonnell Douglas guy exploded as soon as the door closed. He was apoplectic (I looked that word up; it means overcome with anger and extremely indignant, and that was him). McDonnell Douglas had been screwing the Army for years with a deficient design and now it was out in the open. They were potentially exposed to defective design claims from the Army (and from us) for hundreds of millions of dollars. Think about it: 12 years of Apache blade production, a 50% failure rate in production, a blade life of only 800 hours (against the Army’s spec requirement of 2200 hours), and the fact that we and McDonnell had factored all that waste into our pricing.
Fortunately for McDonnell Douglas, the Army wasn’t interested in suing them (all they wanted was good blades). My boss wasn’t interested in pursuing a claim against McDonnell Douglas, either, as they were our bread and butter and he wanted to keep the business. We fixed the problem by holding the blade components to tighter tolerances (tighter than McDonnell Douglas had on their drawings) so the bondline width would always be above the magical 0.375 inch, and we never had a blade unzip in production again. McDonnell Douglas did not correct their drawings, as it would have been an admission of guilt on their part that would absolutely guarantee a loss if the Army ever took them to court.
So there you have it: The Apache main rotor blade failures, all caused by sloppy engineering at McDonnell Douglas. It’s hard to believe that the blades had a 50% failure rate and didn’t meet the Army’s specified blade life for a dozen years before the problem was fixed, but that’s what happened. It’s also hard to believe that nobody at McDonnell Douglas went to jail for it.
Discovering motorcycles came late in life for me. My first ride was in 2014 on the back of a KTM. From the first ride I knew I was hooked, and I knew being on the back was not for me. By January 2015, I purchased my first bike, a 2006 Yamaha 225 XT. I drove from Sedona, AZ, to Denver, CO, to pick her up. On the drive home, I kept looking at her in my rearview mirror and dreaming of my future adventures. That is, once I learned to ride!
A day later I was on a quiet street teaching myself how to clutch and ride. The clutching came easy, and I had no fear as a newbie. Soon I was competent enough to go down the block, then to the store and friends’ houses, and soon off-road. Boy, I fell a lot at first, but I was surrounded by a group of guys who encouraged and taught me the basics. Many remain mentors to this day. I still have that little 225 XT and would never sell her or give her away. She will be with me till the end.
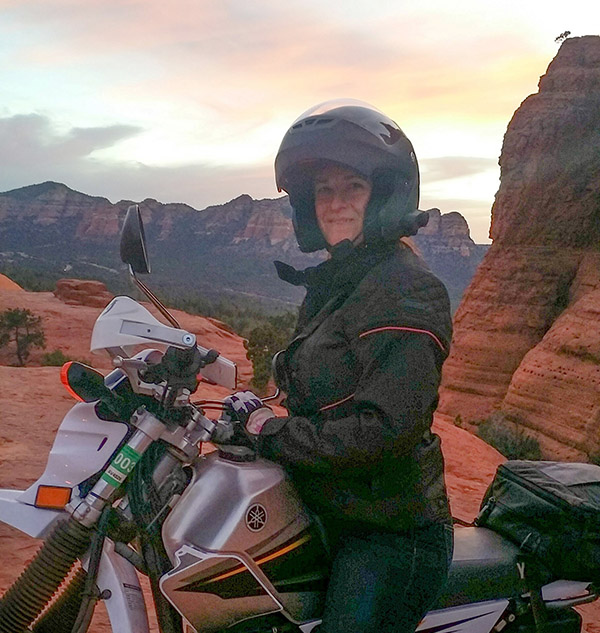
I soon added a Honda 750 Shadow to my new addiction and split my time between dirt and road adventures. It seemed a perfect balance as I gained more skills off-road with the 225 XT and could now venture further without trailering as I rode the Shadow. This led me to my third bike, new to the USA: A BMW 310 (a single cylinder in hot demand in Europe and Asia). She was a red bike far faster than my little goat, the Yamaha.
Broken Arrow Trail, Sedona, AZ.
With a bike that was great off-road while still able to handle the open roads, I set my sights on several bucket list trips, including the Pacific Coast Highway (Highway 1 up the California coast) and the Sierra Nevadas. These two trips in 2018 gave me the confidence to plan another solo ride. This time I would ride Baja, the peninsula in northwestern Mexico bounded to the north by the United States, to the east by the Sea of Cortez, and to the south and west by the Pacific Ocean. I set my plans for a Spring ride, but a trip to Hawaii and paddling the Colorado River got in the way in May, delaying my departure to June.
Want more stories? Help us bring them to you by clicking on the popup ads!
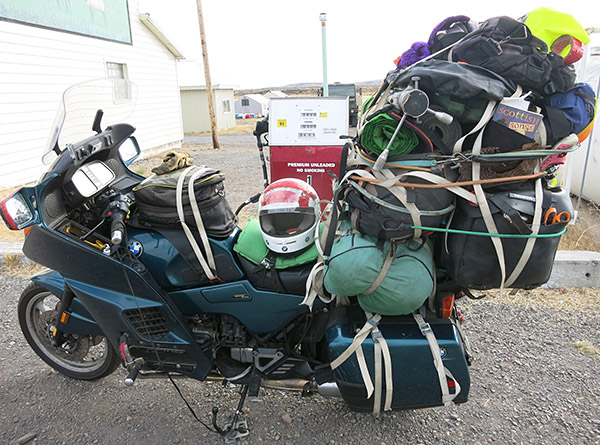
Adding a new 40-liter Wolfman tail bag, I departed Sedona, AZ, heading for a small town south of Tijuana, Alisito, known to the gringos as La Fonda. This was my first time crossing the US border on a bike, challenging my skills while negotiating what seemed like 100 lanes with traffic darting between the lanes. It was soon my turn to cross at San Ysidro south of San Diego. I had done this several times in a car, but what a whole new ball game on a bike!
Turning hard to the right, I made my way to Mexico Highway 1, following the Pacific coast out of Tijuana. The air was crisp even on a June morning as I pulled into the left lane to pass a line of trucks and a group of protesters, soon finding my groove, indulging in music through my helmet speaker and enjoying the sights along the way. An hour later, I pulled into the parking lot at Dmytri’s Restaurant, well-known by locals and visiting gringos alike. It was a time to meet friends and show off my new girl (BMW, to clarify!). The margaritas and conversations flowed as I assured all of my friends that I was utterly competent to ride Baja solo in the growing heat of June.
Bravada got me thru till the morning of my departure, then a massive wall of apprehension flooded me. WTH, I was not competent enough to take on this challenge solo in Mexico! A repeated flaw as I once again found myself vacillating between the urge to push myself and my endless fear of failure and the unknown. I did what I do best, shoved the fear down, and got on my bike heading south on Highway 1 while enjoying the ocean breeze and the endless views of the Pacific Ocean. All the while, I negotiated traffic and the epic potholes that ranged from minor to “might swallow my bike” in one epic plunge.
With the efficiency of the toll road, I was soon in the traffic and mayhem of Ensenada, a port city that is a frequent stop for cruise ships. The smell of exhaust and burning trash contrasted against the street stalls grilling fresh fish and carne asada. I could not resist and soon found a place to pull over for a cold Tecate and a plate full of tacos. The local girls working the roadside restaurant were enthralled with my bike, asking for photos on it it with the sultry hotness that only a Latina could pull off while wearing an apron. I accommodated their requests for pictures and answered a soon-to-be-frequent question of “Solo?” with “Si, Solo,” followed by “No, no, where is your man?” Ha, I didn’t even have a man at home, let alone on this trip, but I had someone I was thinking about a lot on this trip (a story I will tell in another post).
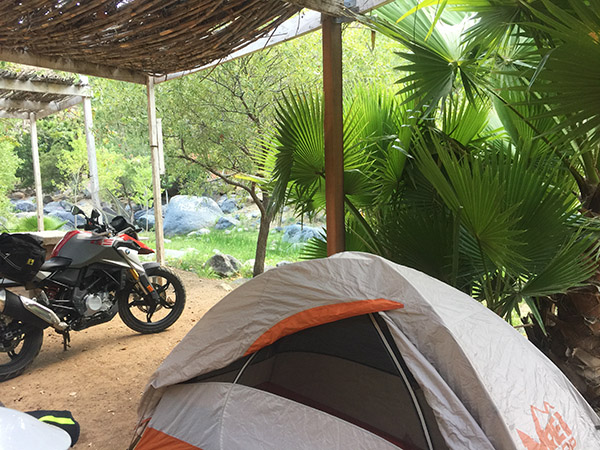
A Baja Campground.
With Ensenada’s noise and challenges behind me, I headed out of town to a campground with hot springs and soaking pools. The ride getting there was all dirt, rocky as hell, with several water crossings. These were my first water crossings on my own. I was both thrilled and nervous as I gave the throttle a firm twist and flew through creating a satisfying rooster tail. It was a short day full of first-time accomplishments that felt right and bolstered my confidence for the adventure ahead. I paid my entrance fee of 200 pesos, about $10, and proceeded to enjoy the hot tubs, complete with little cabanas and a hot shower.
Relaxing in the hot springs.
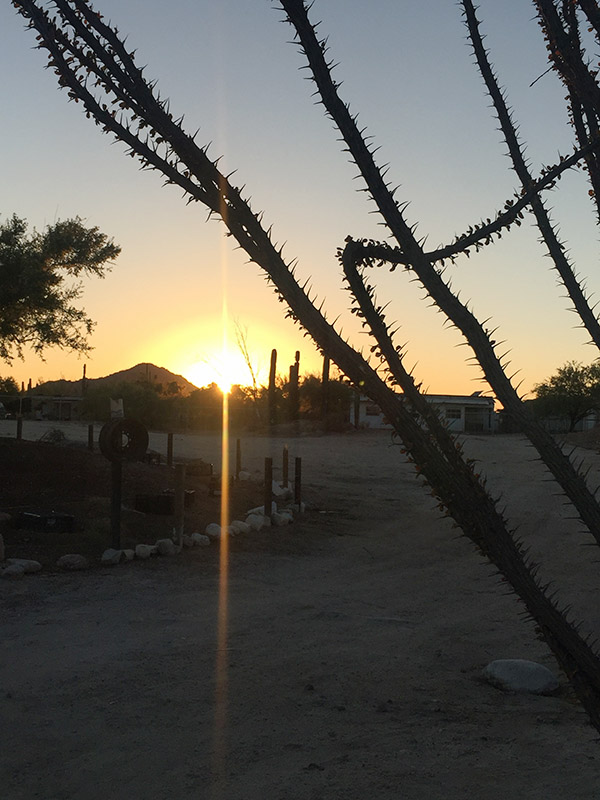
The next day I found myself back on the road. My destination would be the tiny town of Cataviña, a community of fewer than 200 residents. Cataviña is known for cave paintings, colossal rocks mixed with desert vegetation, and epic sunsets. This place could be on Mars with its endless boulders stacked at impossible angles and the stark beauty of the high desert plateau.
The day called for 380 kilometers, about a six-hour ride without stops. The morning started slow and easy as I retraced my ride back down the mountain and through the water crossings of the day before. After a quick stop at the OXXO convenience store for a burrito and coffee, I was on the road heading down Highway 1. The road went into the interior, passing through several tiny dusty towns and a few newfound favorites, including San Vicente and San Quintin. One of my favorite finds is Don Eddie’s Landing Hotel and Restaurant, an oasis with comfortable rooms, sports fishing, and even a few camping spots. I settled in at their patio, enjoying the views of the Pacific and Eddie’s legendary hospitality. This place is an ideal rest spot for enjoying a perfect plate of shrimp ceviche with just the right intensity of lime and chilis, complete with Don Eddie’s legendary hand-crafted margaritas, the likes of which I’ve never found in the USA.
A Don Eddie’s Margarita.
Reluctantly leaving Eddie’s, I continued south on Highway 1, turning inland at El Rosario de Arriba, climbing up from sea level to 1841 feet. The elevation change did little to abate the day’s growing heat. I arrived intending to camp, but the reality of a 98-degree afternoon soon had me sapped. I pulled into the only commercial enterprise besides a little store across the street and a few tiny restaurants.
The Hotel Misíon Santa María – Cataviña looked like she was built in the colonial era; in reality, I learned she was built by the Mexican government as part of their tourism outreach. With a courtyard full of flowers and mature trees, I found a haven and counted my good fortunes to stay in such opulent digs (opulent compared to my humble tent). After securing my room for the night, I quickly dumped my gear, splashed some cold water on my face, and confirmed that I looked like I had ridden in the heat all day. I landed outside in the shade near the little bar enjoying my margarita. The bartender generously gave me endless glasses of water while we chatted about the heat, my bike, and his childhood in Arizona. Soon it was time to head to bed. I reached down to grab my bag and Delorme. A momentary shock as my Delorme was nowhere to be found. The little safety device would allow me to signal for help if needed and text my friends and family when off the beaten path and far out of cell coverage. The bartender and manager helped me search the grounds to no avail. I gave up and went to bed, cursing myself for my carelessness.
Catavina Sunset.
The following day bright and early I rode across the street to purchase the only available gas in this remote region from locals selling gas in plastic drums and liter-size soda bottles. Saying a prayer for the safety of my engine, I had them fill up my tank and MSR fuel bottle I always carry for the just-in-case moments.
Soon I was on the road headed to Guerrero Negro. The wind brushed over me gently with no hint of the high wind advisory posted for later that day. I left the unpleasantness of my Delorme loss behind and leaned into the joy of the ride. As it was a Sunday, I had the road to myself, with the added blessing of many commercial vehicles being home for the day. This was precisely what I had been dreaming of. As the starkness of the desert unfolded in front of my bike, I knew how lucky I was to be on this adventure! I was once again reminded to grab my dreams, ignore the naysayers, and embrace the adventure ahead.
Never miss an ExNotes blog:
Venturing into Baja? Insure with the best: BajaBound. It’s what we use.
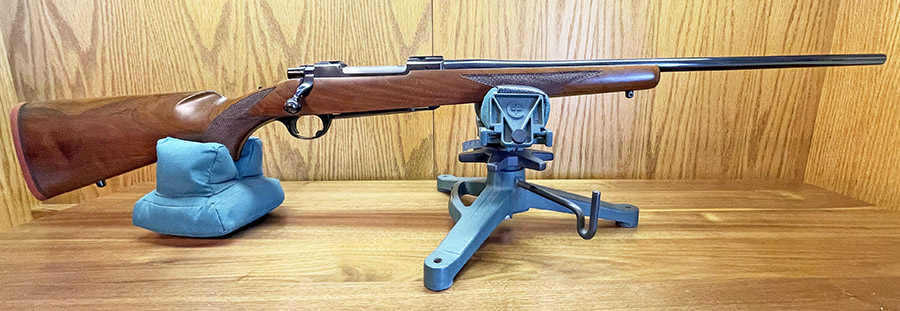
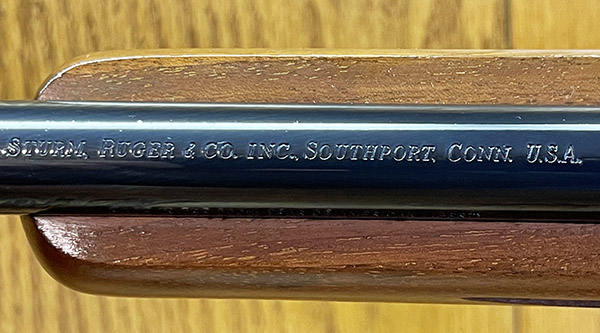
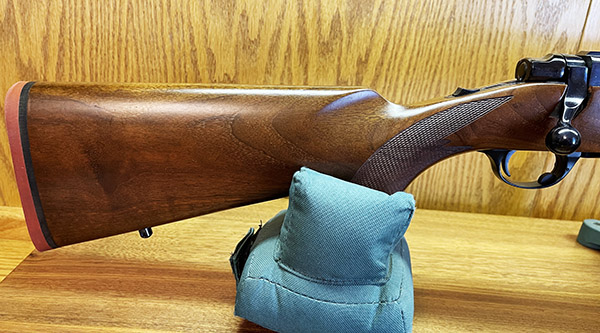
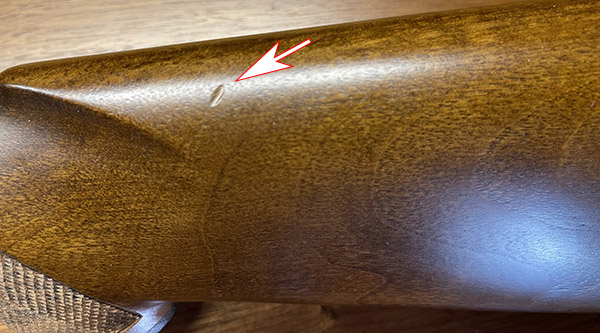
The Ruger Model 77 rifle goes back to 1968. It gave Ruger a place in the centerfire hunting rifle class, and like the Remington Model 700 and Winchester Model 70 it would compete against, it outdid both by using the lucky number 7 twice in its name. The Model 77 is a good-looking bolt action rifle based on the Mauser design, with a classic walnut stock designed by famed custom rifle builder Lenard Brownell. I’ve owned several Model 77 Rugers, including this new-in-the-box .30 06 Liberty gun. I’d like to be able to tell you how accurate it is, but I can’t. I’ve never fired it. Nor has anyone else, other than the person who test fired it before it left the factory.
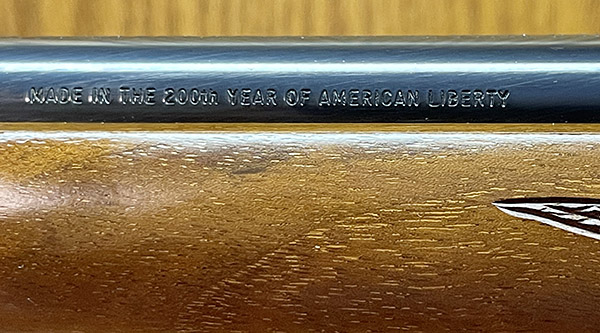
Every firearm Ruger manufactured in 1976 carried this inscription.There’s no lawyer’s warning on the barrel about reading the instructions. We call these “pre-warning” guns. They were made in a time when people had more common sense.
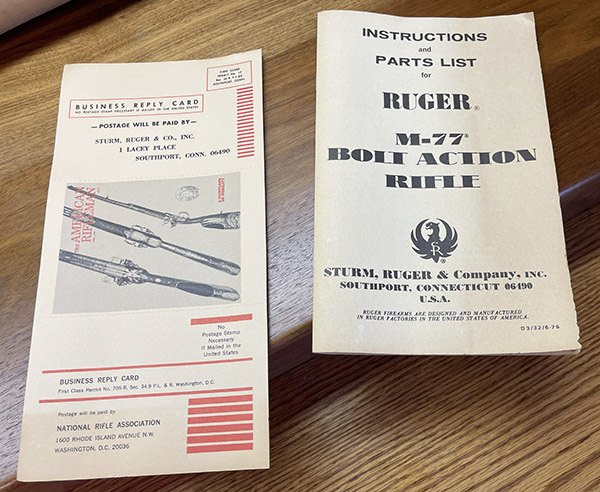
The Liberty designation mentioned above refers to the “Made in the 200th Year of American Liberty” roll marking on the barrel, which was a feature Ruger had on all its guns made in 1976. I bought the rifle in El Paso that year (I was in the Army stationed at Fort Bliss). This one has every thing that came with the rifle (the original serial numbered box, the scope rings and their blue cloth bag, the instructions, and the warranty card). It’s a brand new, unfired, almost-50-year-old rifle.
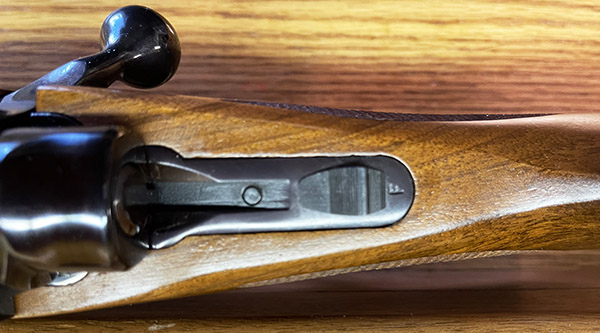
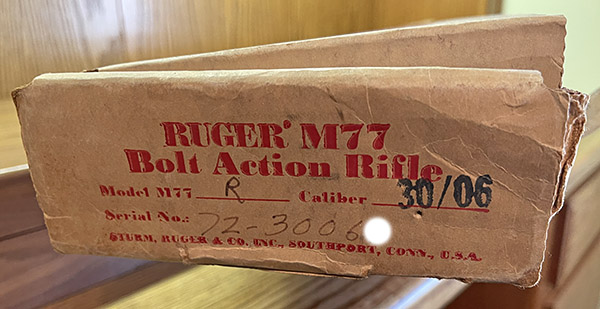
The tang safety Model 77 is considered more desireable.The original box. The cardboard held up surprisingly well. This gun is new in the box (NIB) and this is the original box.Original documents!The box is serialized to the rifle. I obliterated the last number, which almost makes it look like the serial number matches the chambering.
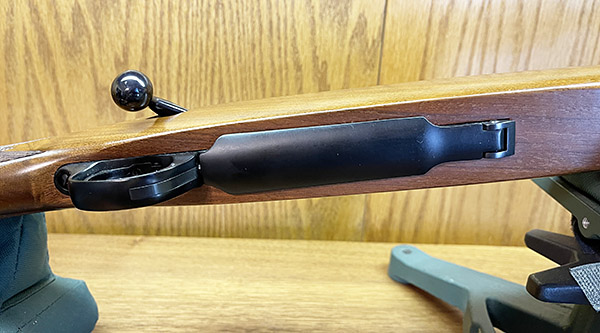
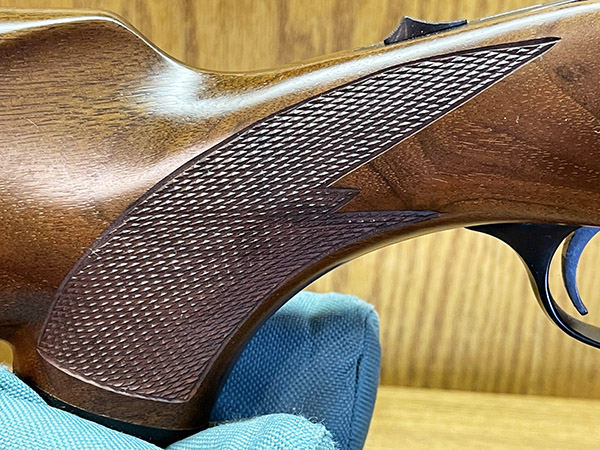
You know, Rugers (and most guns, for that matter) were different 50 years ago. The bluing was deeper, the checkering was hand cut (and way better than the laser cut fuzzball checkering you see today), and the guns just felt better. This Ruger is like that. It’s immaculate, and there’s only safe ding on the stock. Other than than, there’s not a mark, dent, ding, gouge, scratch, or (Heaven forbid) spot of rust anywhere on the rifle. Even the anodized aluminum floorplate is pristine.
The Ruger Model 77 MSRP was $169.50 in 1976 and I believe I paid something like $139 for this one. I probably have the original receipt for it somewhere. A new Ruger Hawkeye in .30 06 (the rifle the Model 77 evolved into) lists for $1399 (yep, ten times what I paid in 1976), but a new one is not as cool as the one you see here.
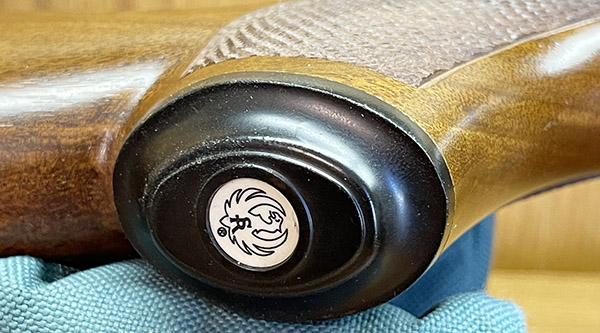
Plain walnut, but elegant in its own way.The unmarred anodized aluminum floorplate.Early Ruger Model 77s wore this grip cap.Check out this gorgeous hand cut checkering. You don’t see that too much today!The rifle’s sole safe ding, done by yours truly. Nobody’s perfect. It will steam out. I’m leaving it like this.God’s cartridge. The .30 06 is one of the all time greats.
This rifle may be going on the block soon. It’s time to start downsizing the armory and it’s time for someone else to enjoy owning it. You’re probably wondering how much I’m going to ask for it. So am I. As I look at this magnificent example of 1970s firearm manufacturing and post these photos, I’m having second thoughts. It is a .30 06, and that’s God’s cartridge. Maybe it needs to send a few rounds downrange, and maybe I’m the guy to do it. We’ll see.
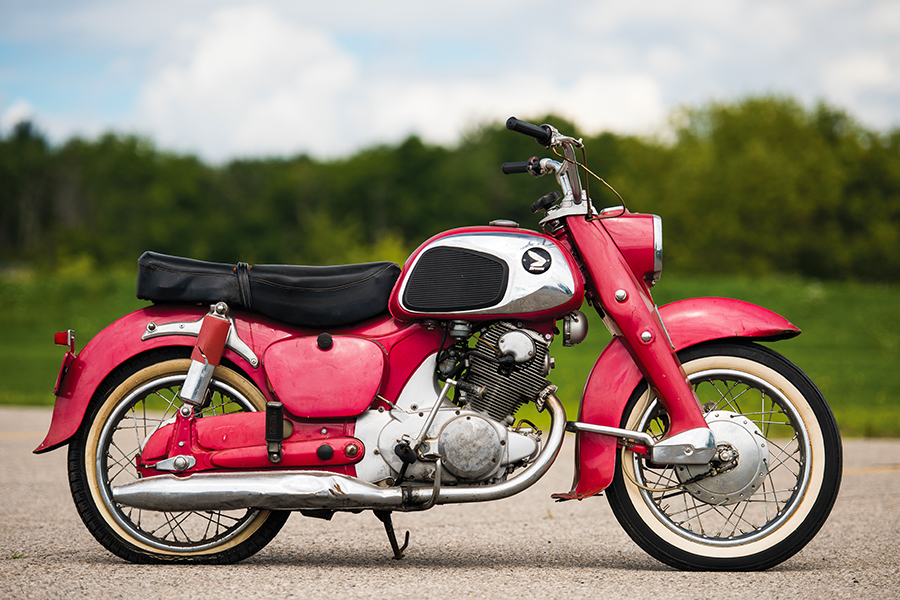
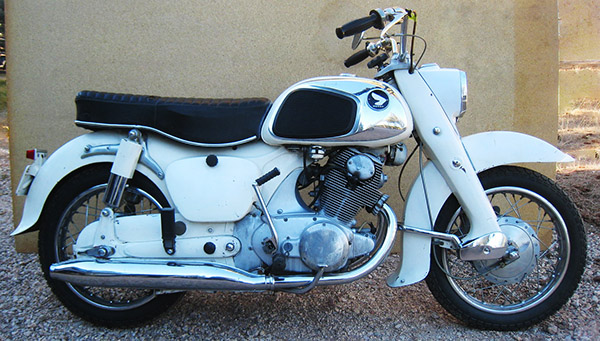
My Dad and I saw our first Honda ever in 1964 at a McDonald’s in East Brunswick, New Jersey. It was a 150cc Dream, the smaller version of the bigger CA 77 305cc Dream. I was 12 years old at the time. In those days, it was a fun family outing to drive the 20 miles to Route 18 in New Jersey and have dinner at McDonald’s (that was the closest one), where hamburgers were 15 cents and the sign out front said they had sold over 4 million of the things. And the Honda we saw that day…Dad and I were both smitten by the baby Dream, with its whitewall tires, bright red paint, and the young clean cut guy riding it. True to Honda’s tagline, he seemed to be one of the nicest people you could ever meet (although admittedly the bar wasn’t very high for nice people in New Jersey).
Keep us in clover…please click on the popup ads!
Dad and I started looking into Hondas, and that included a trip to Cooper’s Cycle Ranch near Trenton. Back then, it really was a ranch, or at least a farm of some sort…the showroom was Sherm Cooper’s old barn. The little Hondas were cool, but the big ones (the 305s) were even cooler. A 305 was the biggest Honda available in the mid-1960s and Honda imported three 305cc motorcycles to America: The CA 77 Dream, the CB 77 Super Hawk, and the CL 77 Scrambler. The Dream was not designed to be an off road motorcycle (that was the CL 77 Scrambler’s domain) or a performance motorcycle (in the Honda world, that was the CB 77 Super Hawk).
Of the 305 twins, It’s probably appropriate to discuss the CA 77 Dream first. The Scrambler and the Super Hawk were intended to appeal to motorcycle enthusiasts; the Dream was a much less intimidating ticket in (into the motorcycle world, that is). The typical Dream buyer was either someone stepping up from a smaller Honda, or someone who had not previously owned a motorcycle.
Honda first used the name “Dream” on its 1949 Model D (a single cylinder, 98cc two-stroke). No one knows for sure where the Dream moniker came from, but legend has it that someone, upon first seeing the Model D, proclaimed it to look like a dream. The C-series Dreams first emerged in Japan in 1957. Pops Yoshimura built Honda engines with modified production parts that ran over 10,000 rpm for 18-hour endurance races, proving the basic design was robust. Some say Honda based the engine design on an earlier NSU engine, but Honda unquestionably carried the engineering across the finish line. Whatever. When’s the last time you saw an NSU? Another big plus was that Honda used horizontally split cases and that (along with vastly superior quality) essentially eliminated oil leaks. The other guys (and in those days, that meant Harley and the Britbikes) had vertically split cases and they all leaked. Honda motorcycles did not, and that was a big deal for a motorcycle in the 1960s.
There were several differences between the Dream and the other two Honda 305cc motorcycles. The Super Hawk and the Scrambler had tubular steel frames and forks; the Dream used pressed steel for both its frame and fork. The Dream was a single-carb motorcycle; the Super Hawk and the Scrambler had twin carbs. The Dream had large steel valanced fenders, the other Hondas had more sporting abbreviated fenders. The Dream was the only 305 that came from the Honda factory with whitewall tires. The Dream had leading link front suspension; the Scrambler and the Super Hawk had telescopic forks. The Dream used the Type II crankshaft (so did the Scrambler) with a 360-degree firing order (both pistons went up and down together, but the cylinders fired alternately). The higher performance Super Hawk had the Type I, 180-degree crankshaft. Like the Super Hawk, the Dream had electric starting (the Scrambler was kick start only). The Dream came with a kickstarter, too, but why bother? I mean, you weren’t going to be mistaken for Marlon Brando when you rode a Honda Dream.
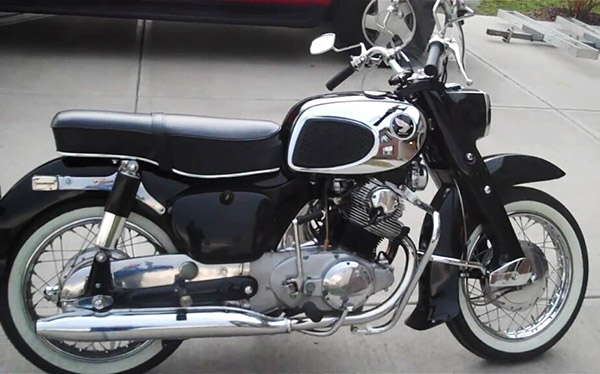
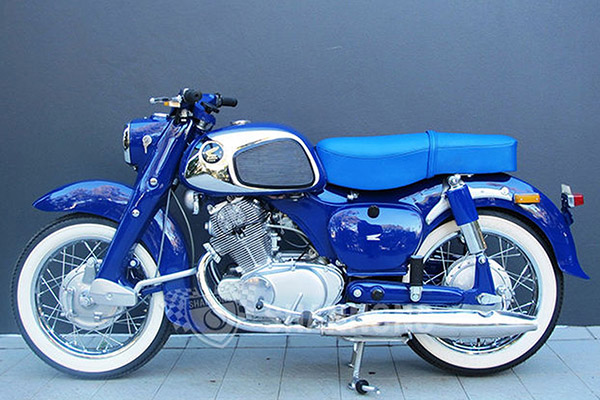
The Dream’s 305cc engine had a single 23mm Keihin carb and it produced 23 horsepower at 7500 rpm (not that the rpm was of any interest; the Dream had no tachometer). With its four-speed transmission and according to magazine test results, the Dream was good for between 80 and 100 mph (depending on motojournalist weight, I guess). The Dream averaged around 50 mpg, although in those blissful days of $0.28/gallon gasoline, nobody really cared. Honda Dreams came in white, black, red, or blue. With 20/20 hindsight, I wish I had bought one in each color and parked them in the garage. My favorites were black or white; those colors just seemed to work with the Dream’s whitewall tires.
Honda built the Dream until 1969. The Dream retailed for $595 back in those days, but a shrewd negotiator could do better.
I had a tough time choosing a title for this blog. I went with what you see above because it reminds me of one of my favorite Dad jokes…you know, the one about how you tell the difference between a crocodile and an alligator. If you don’t see it for a while, it’s a crocodile. If you see it later, well, then it’s a gator. The other choice might have been the old United Negro College Fund pitch: A Mine is a Terrible Thing to Waste. But if I went with that one I might be called a racist, which seems to be the default response these days anytime anyone disagrees with anyone else about anything.
Gresh likes hearing my war stories. Not combat stories, but stories about the defense industry. I never thought they were all that interesting, but Gresh is easily entertained and he’s a good traveling buddy, so I indulge him on occasion. Real war stories…you know how you can tell them from fairy tales? A fairy tale starts out with “once upon a time.” A war story starts out with “this is no shit, you guys…”
Don’t forget to click on the popup ads…it’s how we get paid and how we keep the blog alive.
So, this is a “no shit” story. It sounds incredible, but it’s all true. I was an engineer at Aerojet Ordnance, and I made my bones analyzing cluster bomb failures. They tell me I’m pretty good at it (I wrote a book about failure analysis, I still teach industry and gubmint guys how to analyze complex systems failures, and I sometimes work as an expert witness in this area). It pays the rent and then some.
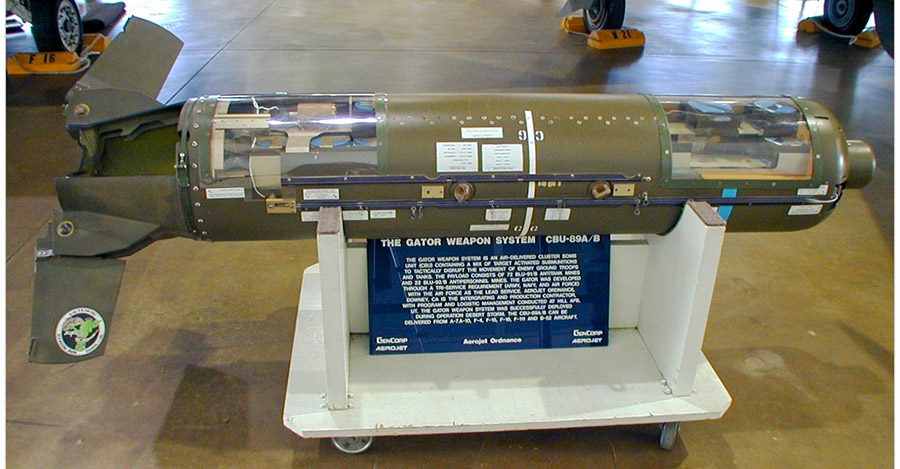
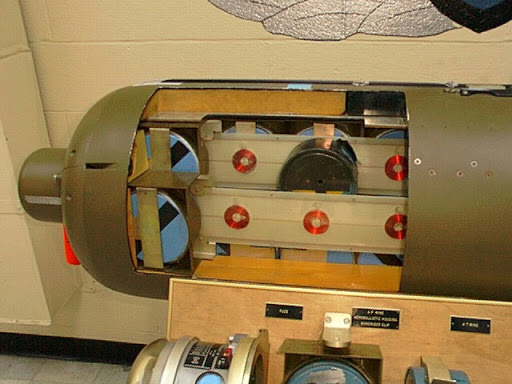
So this deal was on the Gator mine system, which was a real camel (you know, a horse designed by a committee). The Gator mine system was a Tri-Service program (three services…the Army, the Navy, and the Air Force). It was officially known as the CBU-89/B cluster munition (CBU stands for Cluster Bomb Unit). The way it worked is instead of having to go out and place the mines manually, an airplane could fly in and drop a couple of these things, the bombs would open on the way down and dispense their mines (each cluster bomb contained 94 mines), the mines would arm, and voila, you had a minefield. Just like that.
It sounds cool, but the Gator was a 20-year-old turkey that couldn’t pass the first article test (you had to build two complete systems and the Air Force would drop them…if the mines worked at a satisfactory level, you could start production). The UNCF slogan notwithstanding, the folks who had tried to take this Tri-Service camel and build it to the government’s design wasted a lot of mines. In 20 years, several defense contractors had taken Gator production contracts, and every one of them failed the first article flight test. When my boss’s boss decided we would bid it at Aerojet, I knew two things: We, too, would fail the first article flight test, and it would end up in my lap. I was right on both counts. We built the flight test units per the government design and just like every one else, we failed with a disappointing 50% mine function rate. And I got the call to investigate why.
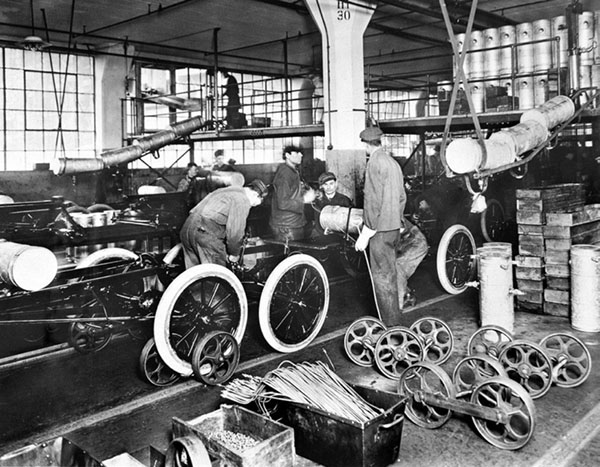
So, let’s back up a couple of centuries. You know, we in the US get a lot of credit for pioneering mass production. Rightly so, I think, but most folks are ignorant about what made it possible. Nope, it wasn’t Henry Ford and his Model T assembly line. It was something far more subtle, and that’s the concept of parts interchangeability. Until parts interchangeability came along (which happened about a hundred years before old Henry did his thing), you couldn’t mass produce anything. And to make parts interchangeable, you had to have two numbers for every part dimension: The nominal dimension, and a tolerance around that dimension. When we say we have a 19-inch wheel, for example, that’s the nominal dimension. There’s also a ± tolerance (that’s read plus or minus) associated with that 19-inch dimension. If the wheel diameter tolerance was ±0.005 inches, the wheel might be anywhere from 18.995 to 19.005 inches. Some tolerances are a simple ± number, others are a + something and a – something if the tolerance band is not uniform (like you see in the drawing below). But everything has a tolerance because you can’t always make parts exactly to the nominal dimension.
Where companies get sloppy is they do a lousy job assigning tolerances to nominal dimensions, and they do an even worse job analyzing the effects of the tolerances when parts are built at the tolerance extremes. Analyzing these effects is called tolerance analysis. Surprisingly, most engineering schools don’t teach it, and perhaps not so surprisingly, most companies don’t do it. All this has been a very good thing for me, because I get to make a lot of money analyzing the failures this kind of engineering negligence causes. In fact, the cover photo on my failure analysis book is an x-ray of an aircraft emergency egress system that failed because of negligent tolerancing (which killed two Navy pilots when their aircraft caught fire).
I don’t think people consciously think about this and decide they don’t need to do tolerance analysis. I think they don’t do it because it is expensive and in many cases their engineers do not have the necessary skills. At least, they don’t do it initially. In production, when they have failures some companies are smart enough to return to the tolerancing issue. That’s when they do the tolerance analysis they should have done during the design phase, and they find they have tolerance accumulations that can cause a problem.
Anyway, back to the Gator mine system. The Gator system had a dispenser (a canister) designed by the Air Force, the mines were designed by the Army, and the system had an interface kit designed by the Navy. Why they did it this way, I have no idea. It was about as dumb an approach for a development program as I have ever seen. Your tax dollars at work, I guess.
The Navy’s Gator interface kit positioned the mines within the dispenser and sent an electronic pulse from the dispenser to the mines when it was time to start the mine arming sequence. This signal went from coils in the interface kit to matching coils in each mine (there was no direct connection; the electric pulse passed from the interface kit coils to the mine coils). You can see these coils in the photo below (they are the copper things).
In our first article flight test at Eglin Air Force Base, only about 50% of the mines worked. That was weird, because when we tested the mines one at a time, they always worked. I had a pretty good feeling that the mines weren’t getting the arming signal. The Army liked that concept a lot (they had design responsibility for the mines), but the Air Force and the Navy were eyeing me the way a chicken might view Colonel Sanders.
I started asking questions about the tolerancing in the Navy’s part of the design, because I thought if the coils were not centered directly adjacent to the matching coils in each mine, the arming signal wouldn’t make it to the mine. The Navy, you see, had the responsibility for the stuffing that held the mines in place and for the coils that brought the arming signal to the mines.
At a big meeting with the engineering high rollers from all three services, I floated this idea of coil misalignment due to tolerance accumulation. The Navy guy basically went berserk and told me it could never happen. His reaction was so extreme I knew I had to be on to something (in a Shakespearian methinks the lady doth protest too much sort of way). At this point, both the Army and Air Force guys were smiling. The Navy guy was staring daggers at me. You could almost see smoke coming out his ears. He was a worm, I was the hook, and we were going fishing. And we both knew it.
I asked the Navy engineer directly how much misalignment would prevent signal transmission, he kept telling me it couldn’t happen, and I kept pressing for a number: How much coil misalignment would it take? Finally, the Navy dude told me there would have to be at least a quarter of an inch misalignment between the Navy coils and those in the mine. I don’t think he really knew, but he was throwing out a number to make it look like he did. At that point, I was pretty sure I had him. I looked at my engineering design manager and he left the room. Why? To do a tolerance analysis, of course. Ten minutes later he was back with the numbers that showed the Navy’s interface kit tolerances could allow way more than a quarter inch of misalignment.
When I shared that with the guys in our Tri-Service camel committee, the Navy guy visibly deflated. His 20-year secret was out. The Army and the Air Force loved it (they both hated the Navy, and they really hated the Navy engineer).
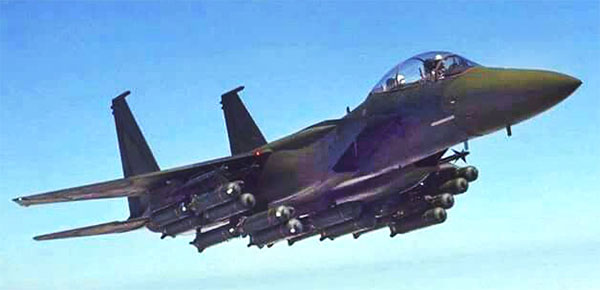
We tightened the tolerances in our production and built two more cluster bombs. I was at the load plant to oversee the load, assemble, and pack operation, and when we flight tested my two cluster bombs with live drops from an F-16 we had a 100% mine function rate (which had never been achieved before). That allowed us to go into production and we made a ton of money on the Gator program. I’m guessing that Navy weasel still hates me.
It’s hard to believe this kind of stuff goes on, but it does. I’ve got lots of stories with similar tolerance-induced recurring failures, and maybe I’ll share another one or two here at some point. Ask me about the Apache main rotor blade failures sometime…that’s another good one and I’ll post a blog about it in the next week or so.
Sometimes the story you set out to write doesn’t want to be written. Something is wrong, there’s no ju-ju, there’s no vibe, or in this particular case, there are no decent photos. I have an expensive Canon 5D that takes beautiful racing photos and I have a pretty good 300mm zoom lens with selectable, 2-axis stabilization. It’s not a professional lens by any means but it can do a fairly good job if you’re steady enough and don’t shoot at nighttime. The problem with the 5D and 300mm lens combo is that it weighs a ton and I don’t like carrying the thing around.
Anyway, it’s foolish pride on my part to try and capture the moment because as soon as I stop to think about a camera it’s not a moment any more. It becomes staged. It seems phony and something like grasping for the shot that will make the story. I don’t want to be a photojournalist and I never was. I learned the basic operation of a camera only because photos were a necessary evil in order to sell a story to magazines.
Oh, how I envy Cameron and Egan. Man, those guys have it made. They write their columns propped up on six pillows in an overstuffed bed between 1000-count Egyptian cotton sheets while green-skinned slave girls serve wine and grapes as they type each 600-word, 10,000-dollar column. And they do it without photos. Sometimes the magazine’s art director will tack on a few squiggly line drawings for the folks that need a picture. When I read their stuff I don’t miss the photos one bit.
Keep us going…please click on the popup ads!
Since I’ve pretty much given up on cranking out content for paper magazines, I find myself wanting to enjoy the story in real time. I want to live the story, absorb all the sounds, sights and smells, and then write about it later. Events may not be recorded exactly as they happened but they record what happened to me. At least I imagine it happened to me. Memories are funny things; each of us views the world looking out from different eyes.
Still, websites are a visual medium and photos do make the page look better. They also attract readers. For the Vado races I brought along the little Canon S100, a higher-end point and shoot camera not much bigger than a cell phone. I thought I could get a few photos good enough to use for this story but the shutter lag was hard to plan for. I’d press the release and a second later the camera would take the photo. In racing things move a long way in a second. Annoyingly, the auto focus kept locking on the barrier fence instead of the cars behind the fence. I have a bunch of really sharp shots of the fence
My first attempts were a mess. The S100 needed the shutter sped up and to do that it needed a higher ISO setting. And then the auto focus had to be disabled in the menu. All these settings required scrolling through the various menu pages or pushing buttons and turning dials, which I had forgotten how to do. Switching the S100 from regular stabilization to panning stabilization took twenty-three keystrokes to accomplish. For the same task on the Canon 5D you just flip a switch.
A man’s got to know his camera and the seductive lure of the cell phone has caused my camera skills to atrophy. While I was staring down into the S100’s tiny screen life was happening all around me. I turned off the camera, put it in my pocket and decided to watch the races.
The whole reason we were at the races in the first place was because of the Sylings. The Sylings are friends of ours who live in Alamogordo. They are forever going on fun outings then putting cheerful, Team Syling posts on Facebook. CT and I decided it would be a good thing to be more like Team Syling so we are making an effort to do fun things around New Mexico. The trip to Vado Speedway was CT’s birthday present/Team Syling adventure. I don’t want you to get the idea I’m not romantic; I also bought her a 12-gauge Mossberg pump shotgun.
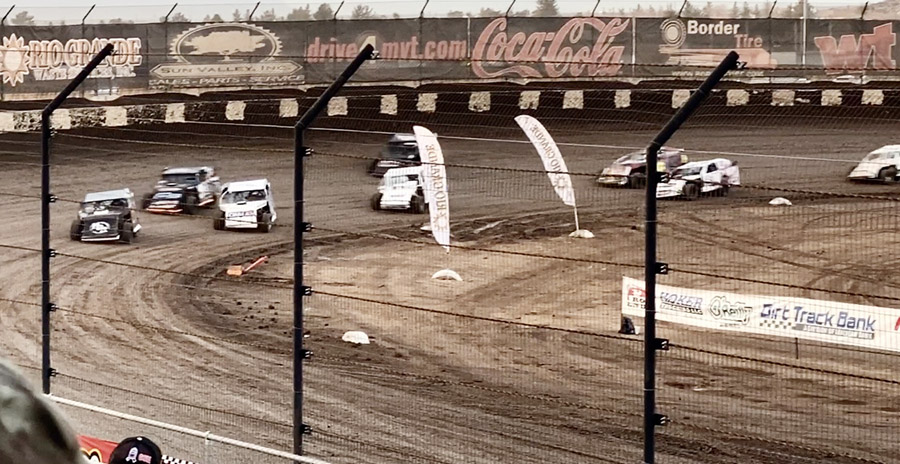
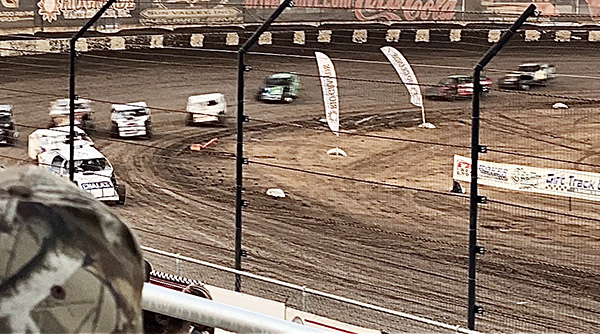
Vado Speedway is a fairly new track about 15 miles south of Las Cruces, New Mexico. You can see it from Interstate 10. The track looks small but they claim it’s 3/8th of a mile. Maybe the outside is 3/8 mile. It’s a dirt track, like God intended us to race on, and the corners are banked. The straights are short but the track is wide enough to allow plenty of passing. There are two lines at Vado: the high line and the low line. Both have their advantages but late in the evening the low line became very bumpy at the apex of the corner. Cars were bouncing up on two wheels in the rough. Most of the fast guys stayed up high where it was smooth, only dropping down to block a rival. As the evening wore on cars started to use the outside wall as a contact point like a slot car dragging the rails.
Stock car racing has changed a lot since the seemingly unlimited supply of Chevelles dried up. The night we went all the classes looked like Super Modified. There were no stock bodied cars. The lowest class cars are beat up sheet metal concoctions that look like something a child of three would draw when asked to draw a car. They resemble station wagons with large panels of metal aft to act as air dams. Think of the last outlaw sprint car race you went to with those giant billboard wings on top. It’s the same idea. The front wheels ran exposed on some of the cars. I don’t remember what they were named but in my day this class would be called the Sportsman class except for the homemade bodies.
The next step up from the flapping, crashing station wagon class was more station wagons. For all I could tell it was the same class, maybe “A” to the previous “B.” This class would have been called Late Models when I was going to stock car races back in the days when the planet Mars could still support life. These cars looked like the ratty-class cars but were built much better. The sheet metal was straighter and it didn’t flap around or fall off. The paint jobs and lettering were nicer and they crashed less. Besides being uglier than old style stock cars the Late Models’ engines sounded crisper and revved faster than the other, looser station wagons.
The top-tier division, known to me as Super Modifieds, were really nice cars. You could tell the owners had a ton of money in them, probably as much or more than a NASCAR stock car. They were fast and didn’t crash very often. The Super Modified cars didn’t look like station wagons but they still had acres of sheet metal on the side to assist with corners. All the wheels were covered by bodywork. NASCAR driver Kyle Larson was racing in the Super Modifieds with a Hendricks car and he did fairly well. He got a Main Event second place finish against drivers that spend their entire career in this specialized form of competition.
The racing was very close and heats were frequent. All the classes had several heat races to determine which cars made the main event and the grids were well populated. Driver/teams from Kansas, Wyoming, Illinois, California and other states attended. The stands were another story. When CT bought our tickets she was told they were sold out of general admission so she bought reserved seats. After everyone was seated the grandstands looked about 60% full. Maybe the cold, night air kept spectators away.
When the racing was over the announcers thanked the track owner for keeping stock car racing alive. Whenever you hear that sort of talk it’s not a good sign. South-Central New Mexico used to have a stock car track in Tularosa, another a few miles away near Alamogordo, one on Highway 9 west of Sunland Park near the border with Mexico, and I think Deming might still have a track and maybe El Paso.
Stock car tracks used to be everywhere. Where I grew up there was a track in Medly and one just across the Miami River in Hialeah. Those tracks are gone now. I wonder if dirt oval tracks are disappearing all over America. I believe part of the reason for grass roots oval racing’s decline is that none of the cars racing are related in any way to the cars found in the parking lot. That is if you can find a car in the parking lot. Today everyone drives bloated SUVs or pickup trucks.
Then there’s the high bar of entry into the sport. Even those ratty station wagons require a lot of work to build. Maybe the demise of cheap, rear-wheel drive sedans is part of the problem. The class structure never adapted to new realities in the marketplace. Look how NASCAR’s rigid rules have created a situation where you can buy a box stock Dodge, Chevy or Ford off the showroom floor with more horsepower than a NASCAR contender. I know the old time stock cars shared few common parts with the cars they resembled but at least they resembled them and had engines you could check off on the dealer’s option page.
Finally, the “Car of Tomorrow” eliminated the last tentacles connecting the cars on the track and the car you drove to the track. Now all the bodywork is the same and only paint creates the illusion of several brands. The situation is probably not as bad as I’m making it sound. I’ve gotten grumpy as I got old. I liked it when stock car racing was the most exciting thing happening on a Saturday night.
I’ll be back to Vado Park Speedway. Later in the year they are hosting USRA Modifieds, which look a lot like old style stock cars. Then there are the winged and un-winged Sprint cars along with Super Trucks. We all need to do our part to keep this uniquely American form of racing alive. Hopefully a new generation will get interested in stock cars and start racing cheap, two liter, front-wheel drive sedans around those well groomed dirt ovals. I know a couple unused tracks nearb. Just add drivers.
I’ve always been a watch guy. It probably started when my parents surprised me with a Timex when I was a kid. The thought of having my own wristwatch was heady stuff for a boy back on the east coast (or anywhere else, I imagine). To make a long story short, I’ve been a watch collector ever since. I don’t specialize, and many times I won’t keep a watch forever. If I like the way a watch looks and it’s not crazy expensive, I’ll wear it for a while, with the duration of “a while” usually determined by the time it takes for the next interesting thing to catch my eye.
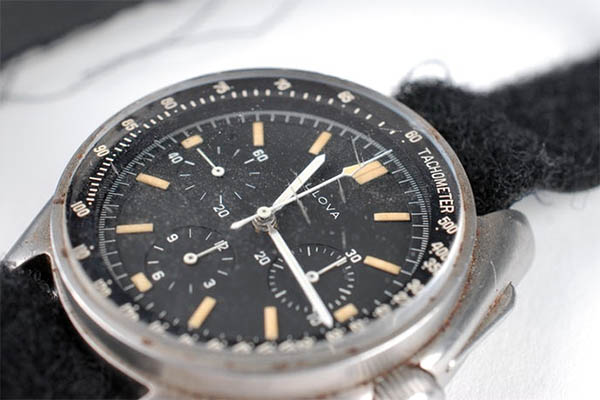
The real deal: Apollo 15 Astronaut Dave Scott’s Bulova, which sold for a cool $1.625 million at auction.
I make no excuses: I like watches, and I always wonder about guys who don’t wear them. Not wearing a watch is a common thing with young guys today. When I taught in Cal Poly’s College of Engineering, one of my topics focused on how to do well in an interview. My guidance was simple. Dress sharply, be early, look the interviewer right in the eye, speak up, don’t use the word “like” incessantly when you speak, and wear a watch. A lot of kids today don’t wear watches. If they have any interest in knowing what time it is, they look at their iPhone. That’s a no go, I’d tell my students. If you don’t wear a watch, the person interviewing you will conclude you have no sense of time-based urgency. It’s what I always concluded when someone showed up not wearing a watch.
Anyway, to get to the subject of this blog, I want to tell you about the Bulova Lunar Pilot. It’s a cool piece with an interesting story that goes like this: With the advent of the Apollo lunar exploration program (the NASA endeavor to put men on the moon), the US government decided we needed an official space watch. Omega won the competition with their Speedmaster watch, and for the next 14 missions, that’s what astronauts wore.
Here’s where it gets complicated and where the story gets Internet-fuzzy. Depending on which source you believe, Astronaut Dave Scott wore a Bulova watch on the Apollo 15 mission for one of the following reasons:
He wore the Bulova watch because his Omega broke.
He wore the Bulova watch because he felt like it.
He wore the Bulova watch because Bulova was trying to replace Omega as the official NASA watch.
He wore the watch because the US government, Bulova, or other parties wanted the official watch to be something made in America.
Whatever the reason (and you can find stories supporting each of the above floating around in that most authoritative of all sources, the Internet), Dave Scott wore the Bulova on the Apollo 15 mission, and Omega went from being “the only watch worn on the moon” to “the first watch worn on the moon.” It could not have gone over well at the Omega factory.
Dave Scott’s original Bulova, the one he wore on the moon, sold at auction a few years ago. The predicted auction price was $50,000. As predictions go, it wasn’t a very good one. When the gavel came down and the dust cleared, Scott’s Bulova sold for a cool $1.3 million. Throw in the auction commission and other fees, and you’re talking about a $1.625-million wristwatch. Wowee!
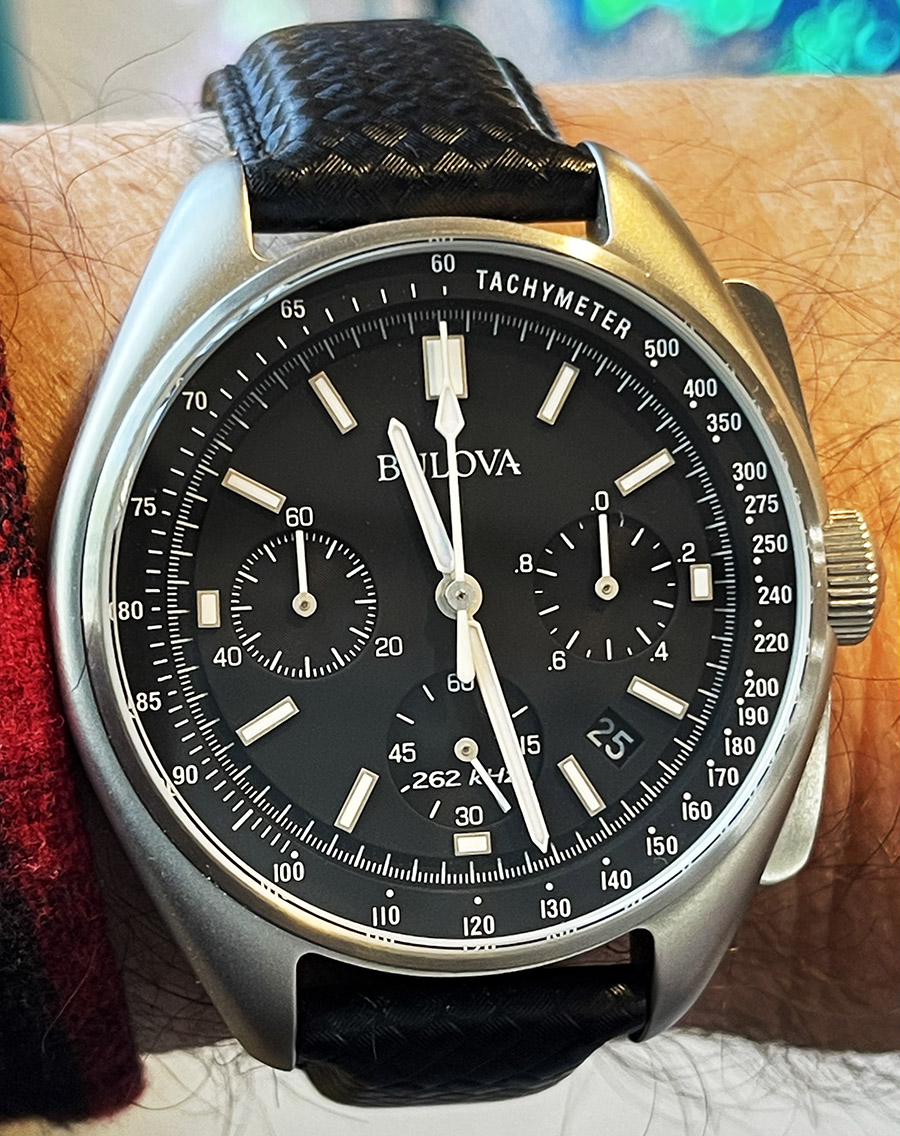
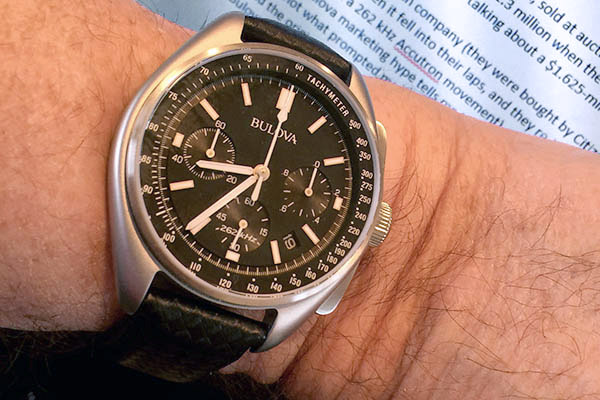
Bulova, today no longer an American watch company (they were bought by Citizen a few years ago) recognized a marketing opportunity when it fell into their laps, and they re-issued an internally updated version of Scott’s watch as the Bulova Lunar Pilot, complete with a 262 kHz Accutron movement. I have no idea what a 262 kHz movement is, except that the Bulova marketing hype tells me it means it’s super accurate.
The not-so-real deal, but a hell of a deal nonetheless: The Bulova Lunar Pilot, purchased for just under $300. Yep, as I type this, I’m wearing my Bulova.
The increased accuracy really didn’t matter to me when I saw the watch (I’m retired now and I seldom need 262 kHz accuracy when I decide I feel like going somewhere), so that’s not what prompted me to pull the trigger. I just like the way it looks, I like the swirl of stories around the original Bulova moon watch, and my Dad wore a Bulova when I was a kid.
Oh, one other thing helped…a trick that has prompted me to pull the trigger on other discretionary purposes. You know how the Internet spies on us, right? I mean, folks complain all the time about looking at something on Amazon or whatever and then it starts showing up in their Facebook feed. That’s not always a bad thing. When I first looked at the Bulova Lunar Pilot it was a $600 bauble. I wasn’t going to pay that kind of money, and I guess the spymasters/Internet marketeers figured that one out. They and I knew it was a waiting game to see who would blink first. Because I had looked for the watch on Amazon, I started getting emails from different retailers to buy the watch for less, and I let those roll in. Delete, delete, delete, and then one day, an offer floated into my inbox for $299. Hmmm. Delete. And sure enough, a day or two later and that $299 offer came with a coupon for $20 off and free shipping on my first order. Ka ching!
Help us bring you these stories: Please click on the popup ads!