We’re starting a new series here on ExNotes, and it’s one I think you’ll enjoy: A series on our favorite hotels in Baja. There are some great places to stay in Baja, and unlike hotels here in the US, they are not part of any big hotel chains. I love exploring Baja, and the hotels are part of the experience.
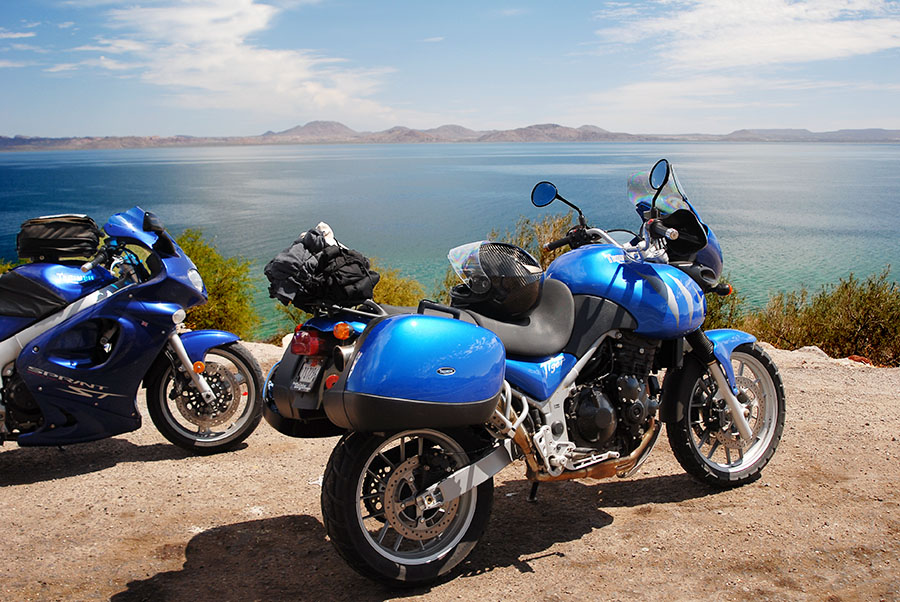
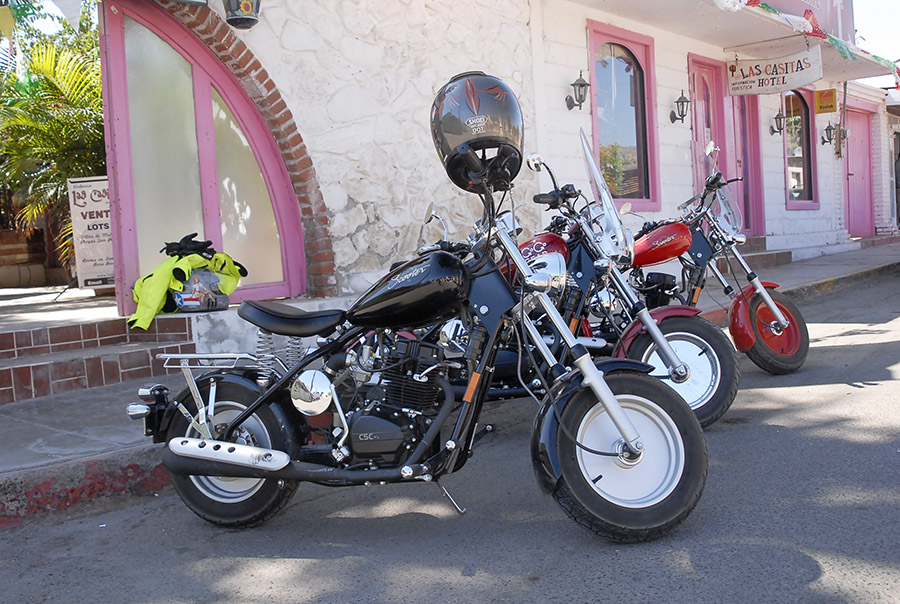
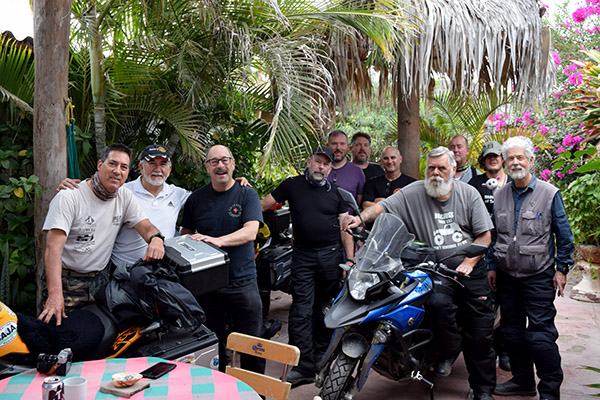
That’s enough introduction…let’s get to my all time favorite Baja hotel first: The Las Casitas Hotel in Mulegé. It’s the hotel you see those little CSC-150 Scooters parked in front of in the big photo above.
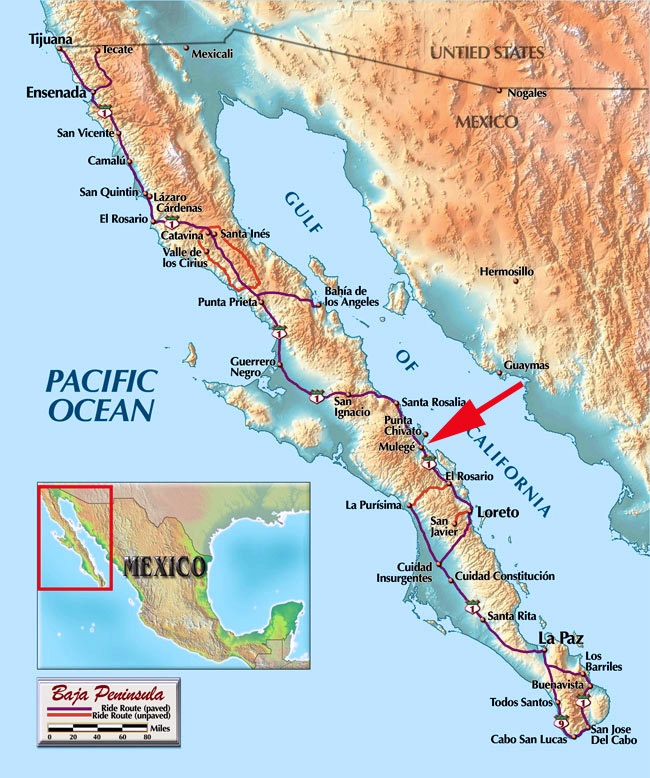
Mulegé is a special place. It’s about 630 miles south of San Diego, and you can get to it by either riding south from Tijuana on Mexico Highway 1, or you can take what is now a paved road all the way down from Mexicali on the Sea of Cortez side. Either ride is stunning.
Mulege is on the Sea of Cortez about 600 miles down the road from the border.
One note we always add on any Baja story is to make sure you have Mexican insurance before you enter Baja. Our recommendation is to go with BajaBound (the insurance we always use).
Mulegé is one of my favorite towns in Baja, and the Las Casitas just adds to the experience. It’s not hard to find. Just bear to the right at the first fork in the road as you enter Mulegé and you’ll be there (the official address is Valle Vadero 50 Colonia Centro 89518 Mulegé, Baja California Sur, Mexico). But like I said, it’s not that hard to find, and if don’t find it immediately, you’ll like riding around in Mulegé. If you want to make a reservation, you can reach the hotel at lascasitas1962@hotmail.com or you can call +52 615 153 0019.
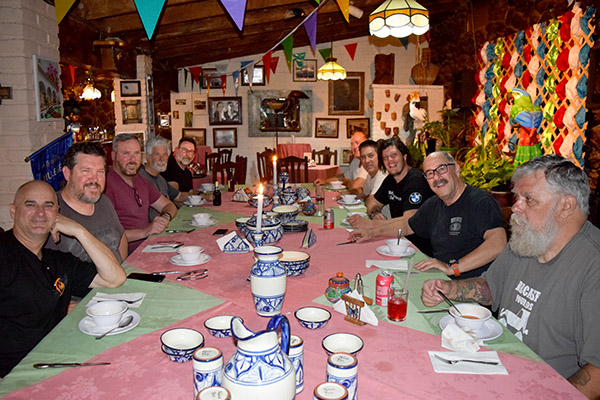
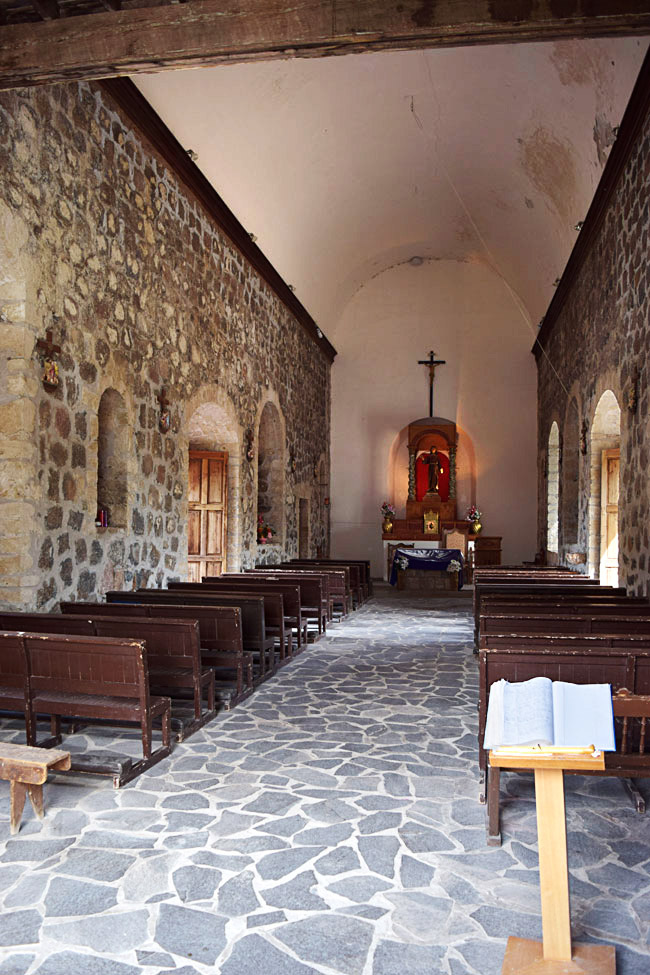
The Las Casitas has two locations…the original one, and then one a block or two away. The original location includes a bar and a restaurant, and when I’m in Mulegé I put both to good use.
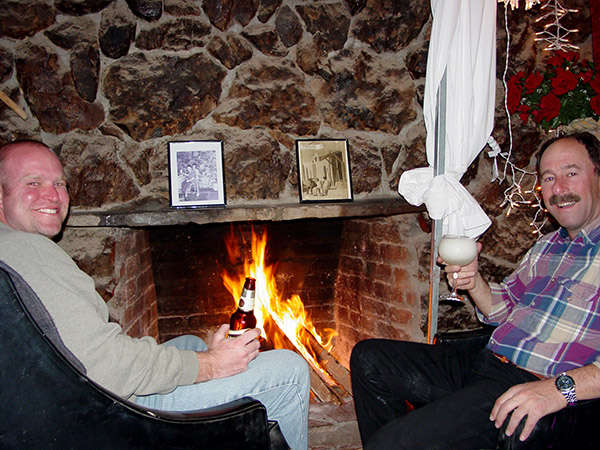
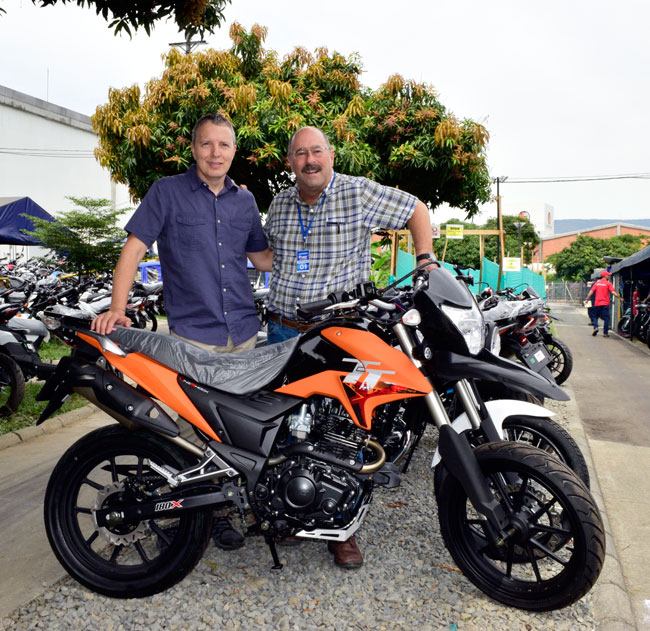
Good buddy Brian and yours truly at the Las Casitas Hotel, kicking back after a long day on the road.
Francisco Javier Aguiar Zuñiga is the proprietor (he has been for 40 years). Javier is an all around nice guy. If you’re going there with a group, let him know and he’ll prepare a special meal. I’ve done that on group tours I’ve led through Baja, and every meal at the Las Casitas has been a treat.
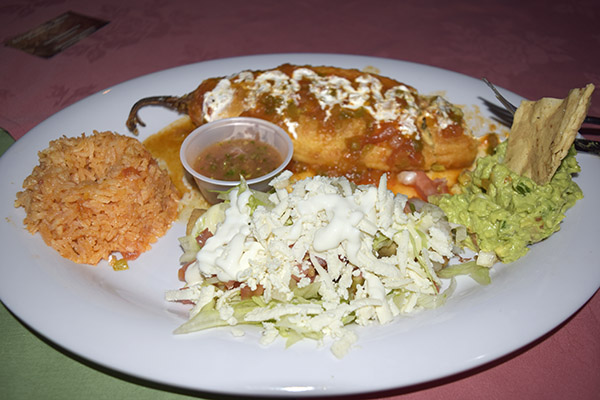
Dinner in the Las Casitas Hotel during one of the CSC Baja expeditions.Chile rellenos, as prepared and served by Javier and the staff at the Las Casitas Hotel. They were exquisite. Being right on the Sea of Cortez, the seafood is outstanding, too. Breakfasts are spectacular.
You know, I looked through my photos for the restaurant, and to my great surprise, I could only find a couple. I think that’s an indication of just how good things are there…the hospitality and the cuisine are so fabulous (and I enjoy both so much) that I only had my camera out a couple of times. The breakfasts are outstanding, too…Javier always has fresh orange juice ready to go, and trust me on this, you want to try it.
A great group of graybeards posing for photos in the Las Casitas Hotel courtyard. Javier is second from the left.
The Las Casitas has a central courtyard that is distinctly tropical in appearance and feel, and for good reason: Mulegé is only a few miles north of the Tropic of Cancer, where the tropics officially begin. Javier will let you park your motorcycle into the courtyard, although I don’t know that it’s necessary. On one of my trips, we overindulged in Negro Modelos and margaritas in the Las Casitas lounge and left our bikes parked on the street that night. They were just fine the next morning.
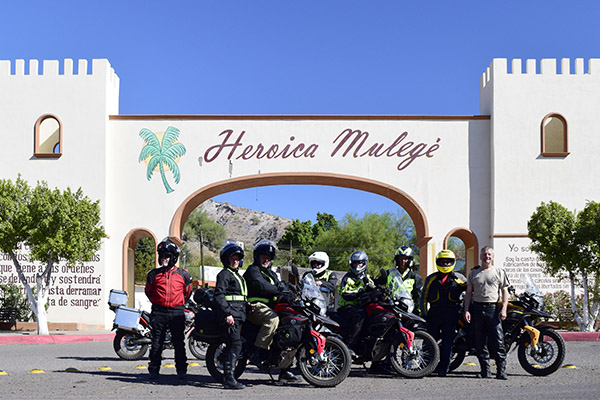
Entering Mulegé. The Mulegénos kicked our butts in the 1800s, but all has been forgiven and you’ll be treated like royalty today.
The town calls itself “Heroica Mulegé.” During a dinner at the Las Casitas one evening I was telling the story behind that name. The Heroica part has to do with the Mexicans holding off a much larger military force, except as I relayed the tale I couldn’t remember who they were fighting. “It was you,” Javier politely reminded me, and indeed it was. All this happened during the 1846-1848 Mexican-American War. As you might guess, relations have improved since then.
When you visit, be sure you make time to stop by the Misión Santa Rosalía de Mulegé (it’s one of the original Baja missions).
Inside the Misión Santa Rosalía de Mulegé.The view looking out from inside the Misión Santa Rosalía de Mulegé. There’s an observation deck up top, too, with a commanding view of Mulegé’s date orchards and the Rio Mulegé.
Mulegé also has an historic prison that is now a museum. Let me tell you how good life was (and is) in Mulegé: Back in the day, prisoners were allowed to leave during the day to work, and the prison had no bars. Things were so good in Mulegé that no one (including the prisoners) wanted to leave. I can understand why. You will, too, when you visit this magnificent little gem of a town and the Las Casitas Hotel. They are two of Baja’s best kept secrets.
If you’re planning a Baja trip, there are two books we’d like to suggest you consider to gain more insight into what Baja has to offer. The first is, of course, my book on motorcycling in Baja, Moto Baja. It’s good. The other is Jennifer Kramer’s Tijuana to Los Cabos, which is another excellent resource.
One more thing…if you’re making the trek into Baja, you’ll want to capture great photos, folks. You want a good single lens reflex digital camera for an adventure like Baja, and Nikon’s D3500 is one of the best. It’s what I shoot. Gresh works his magic with a comparable Canon digital camera, and they’re good, too.
Gougers. People who overcharge simply because they can when supplies are low. Someone who takes advantage of a bad situation. There’s a lot of that going on in the ammo and reloading components business today. What’s driving it is extreme demand induced by the pandemic, the breakdown in law and order in some urban areas, a change of administrations, and the resulting ammunition and components shortages. People are buying guns and ammo in unprecedented numbers because they are afraid. It’s being fueled by uninformed and malicious folks on the Internet.
Me? I’m not worried. We’ve been through this before. The pendulum swings both ways, and it always returns to center. It may take a while, but common sense always prevails.
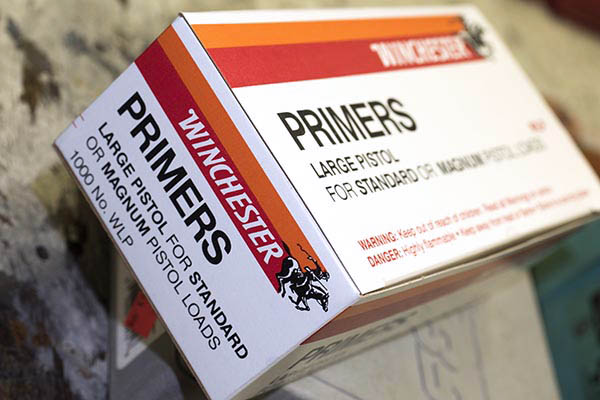
Before all this shortage business began, primers sold for about $34 or $35 per thousand. Gougers have kicked that up to around $100 per thousand, and even at that price, they are difficult to find. Thanks, but I’ll take a pass. I’ll wait it out. It’s that pendulum thing I mentioned above.
I imagine it’s tough being in the ammo business these days. For the most part, the folks who make ammo are the same folks who make reloading components, and with the unprecedented demand for ammo, their components are necessarily being consumed by their own factories. I get that, too.
This video from the CEO of an ammo and components company popped up in my feed yesterday, and I think it’s a good one. You might want to watch it.
I get it, Mr. Vanderbrink. The trolls who start rumors, spread rumors, and post stupid stuff on the Internet are as despicable as the gougers, and I give Vanderbrink a lot of credit for calling it like it is. I’d call the trolls morons, but that would be an insult to morons everywhere. You folks in the ammo business keep doing what you’re doing. We’ll be here as loyal customers when the shortages end, as they always do.
Guns, ammo, reloading, motorcycles, product reviews, trip reports, and more! Never miss an ExNotes blog:
At Tinfiny Ranch it’s been kind of cool this winter. I haven’t been riding motorcycles much at all lately. Zed, the Z1 Kawasaki, needs its float needles changed as it has developed an intermittent incontinence on the far right carburetor. I have to keep turning off the fuel petcock because I don’t trust the carbs to reliably do their carb thing.
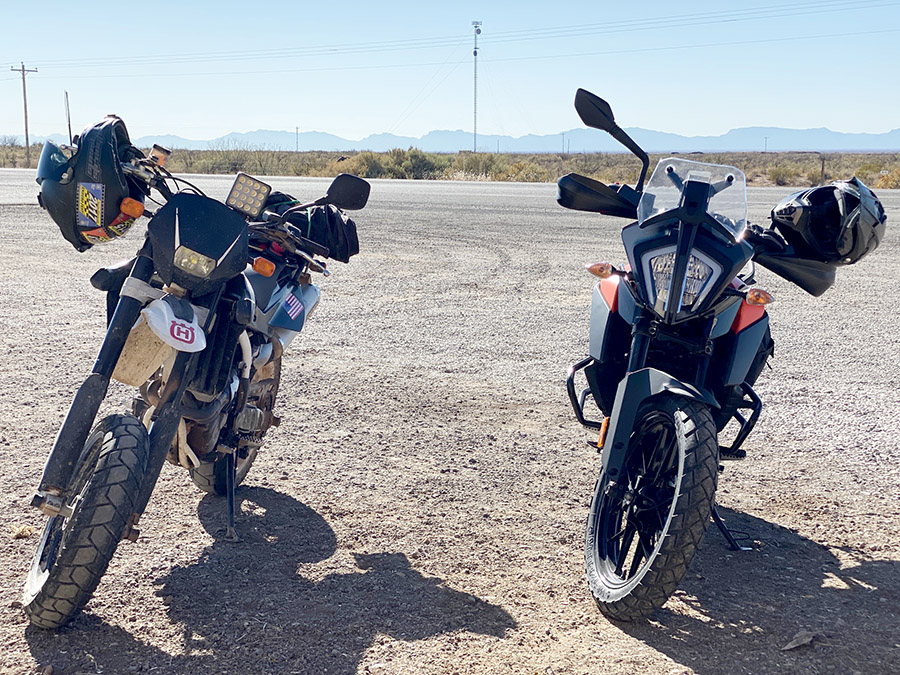
The Husky is way overdue for a valve adjustment but I have too many other projects apart and going on to hobble my Italian/Swedish mish-mash motorcycle at the moment. The Husky still runs fine so when Mike, my Eastern Assassin riding buddy texted me photos of his new KTM 390 Adventure bike and said, “The hell with this cold, lets do a little ride and you can check out my new bike,” I was all over it.
Mike rides more dirt than anyone I know. I’ve done thousands of miles of gravel roads with him and I’ve only seen a quarter of the trails he has. His normal trail bike was a 650 BMW single but that bike turned out not so great on rough trails. It’s a heavy, low-slung bike and it tended to fall over a lot. Mike, a reformed street rider, had a Harley Davidson Fat Boy that was gathering dust in his garage so he sold it off and used the proceeds to buy a new KTM 390 Adventure. I’m guessing not many people go from a Fat Boy to a KTM 390. The 390 weighs about 100 pounds less than the 650 BMW and straight-line performance is nearly the same although naturally the 390 spins faster to get the job done.
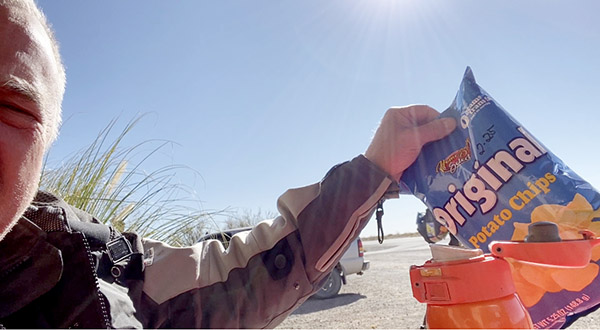
We met up for coffee and potato chips at a little tourist trap on the corner of Three Rivers and Highway 54. The 390 looks great. It’s very light feeling off the kickstand. The bike came with street tires similar to the crappy tires I run on the Husqvarna. The KTM is a bit high in the saddle but its wide seat is actually lower than the Husky seat. My short legs reach the ground about the same on both bikes.
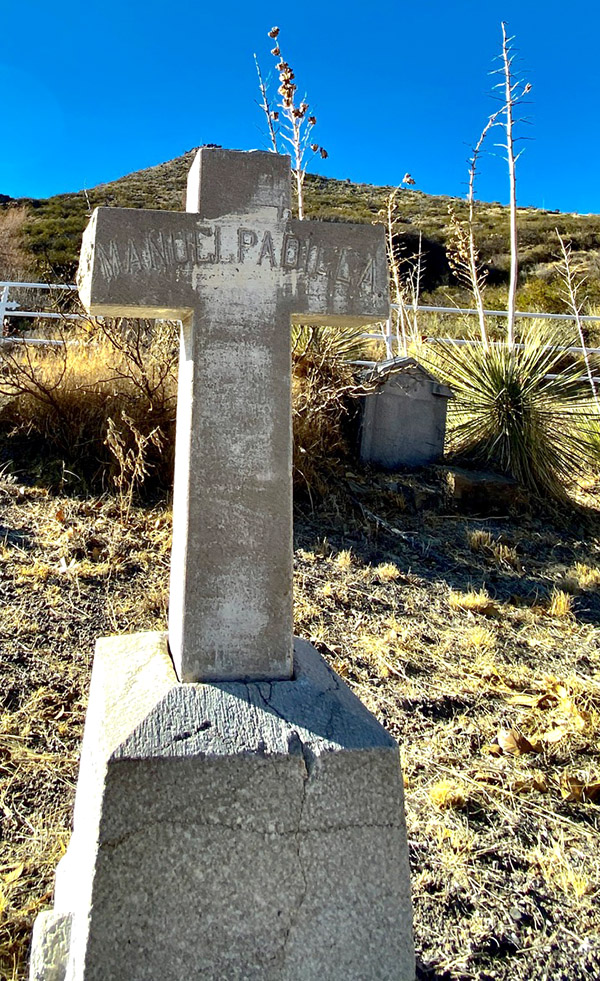
We rode towards the Sacramento Mountains ending up at the little Santa Nino de Atocha church. While not a religious man, I like earnest churches and old graveyards. Last time I was here my Kawasaki gas tank sprung a leak and I had to hurry home before I ran out of gas. I didn’t have time to check things out properly.
The graves at Santa Nino de Atocha are fairly well maintained. It’s a lonely spot but I believe the church still draws a few congregants from the huge ranches situated all the way to the mountains.
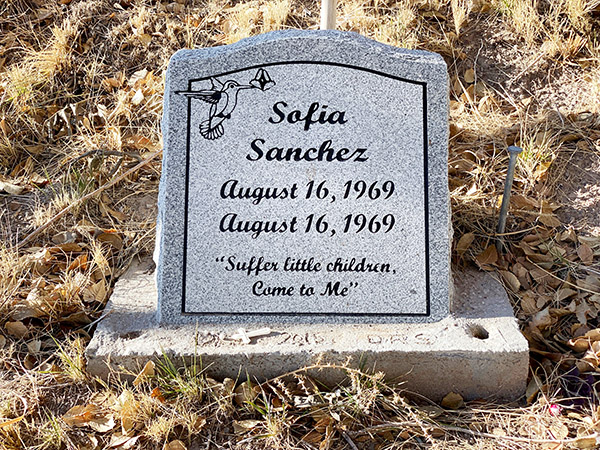
Poor little Sofia never had much of a chance. As I grow older I realize everyday is a gift.
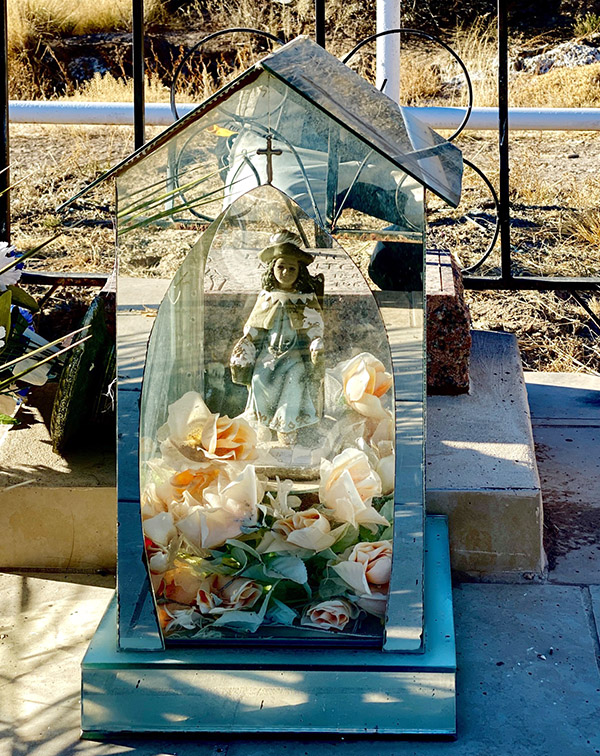
Fancy glass-enclosed Mary (I think, I don’t know my saints)
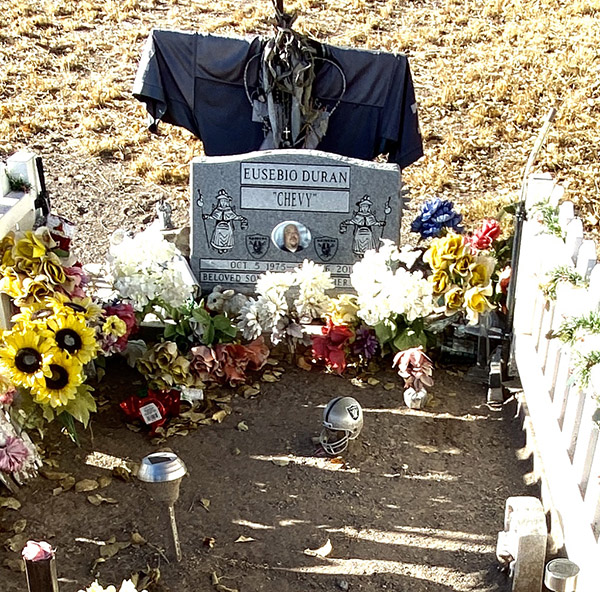
Raiders fan for all eternity.
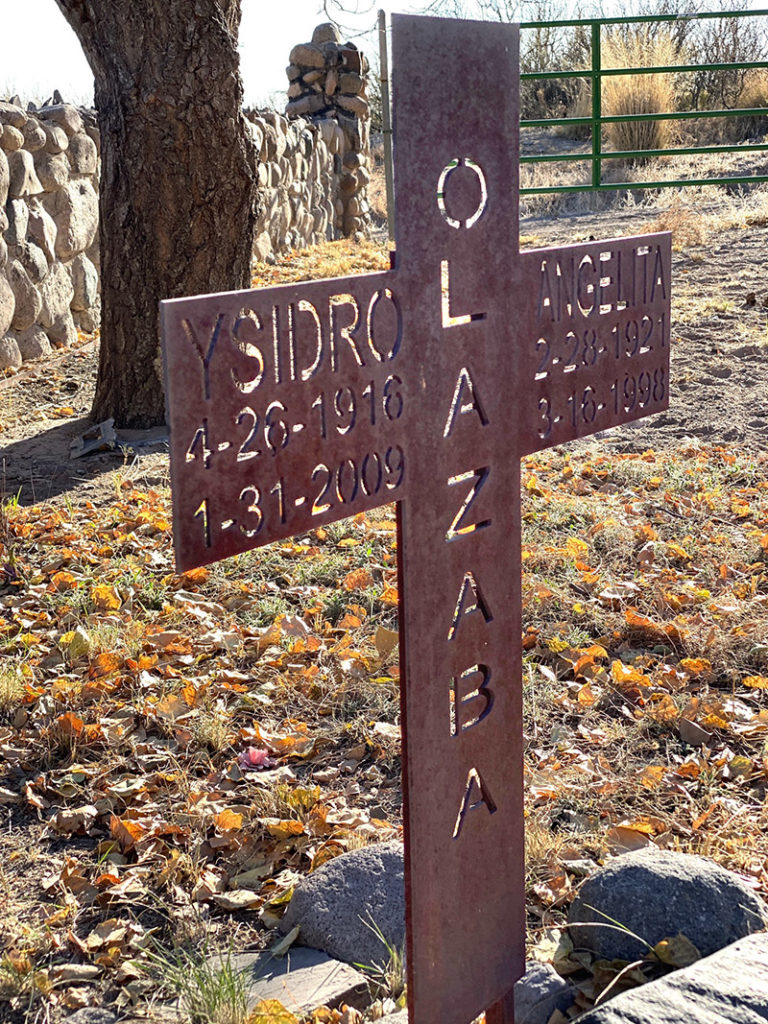
Laser-cut steel cross. Very nice metal work.
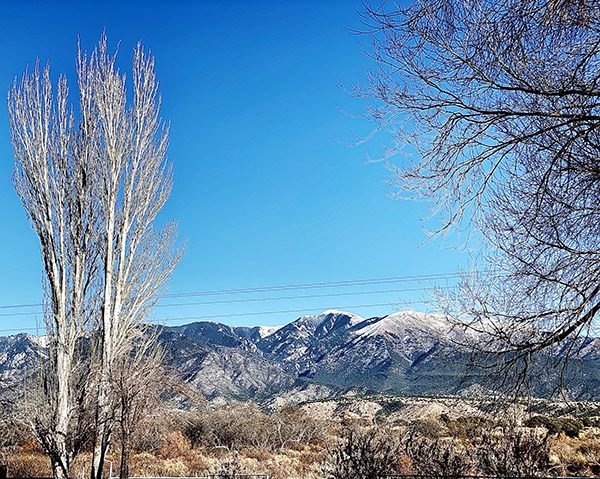
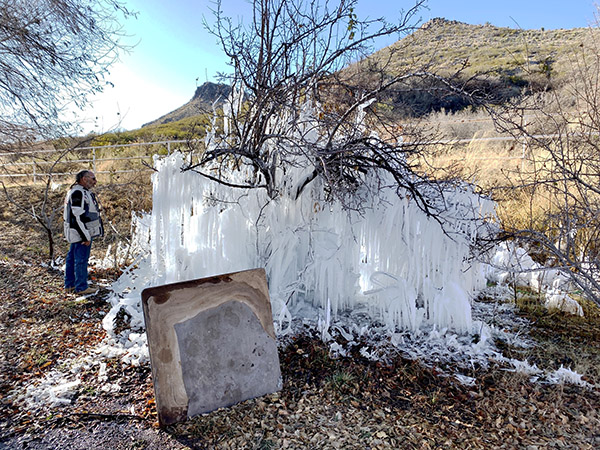
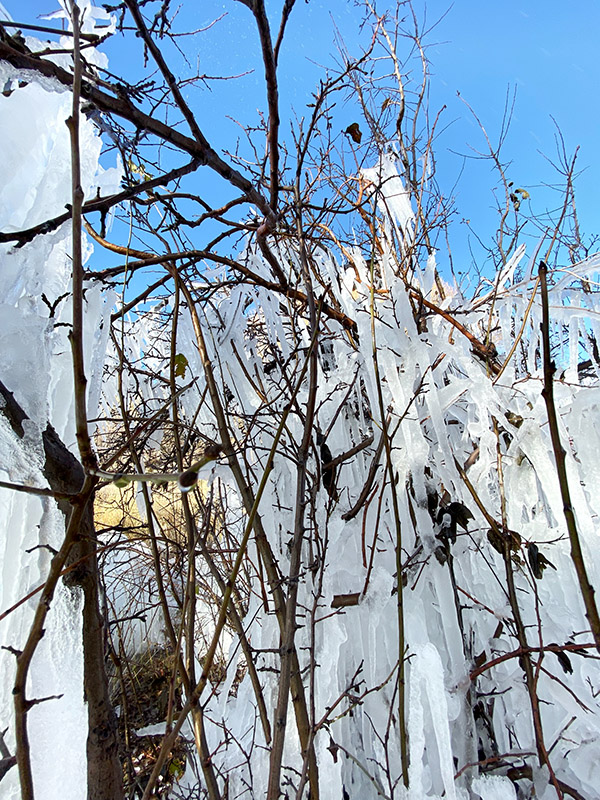
It gets a little nippy in New Mexico’s winter but the brilliant blue sky warms your soul.
Somebody left the sprinkler on and created an ice fantasy over by the church’s RV camping area.
Mike and I shot the breeze for a while and made grand plans for the rides we will take his new motorcycle on until the temperature started dropping along with the sun. I don’t want to do much night riding anymore so we bundled up and headed back to our little towns on opposite ends of Highway 54 (La Luz and Carrizozo).
It was only a 100-mile ride but I felt recharged when I got home. Mike has managed to put a thousand miles on the KTM in only a few cold weeks. If I don’t hurry and get back to motorcycles he’ll have the thing worn out before I ride again.
Need more Gresh?
Joe Gresh’s published articles in Motorcyclist, Adventure Rider, and other pubs are here.
You can see all of Joe Gresh’s blogs by clicking on his name in the upper left corner by his avatar (as shown by the red arrow).
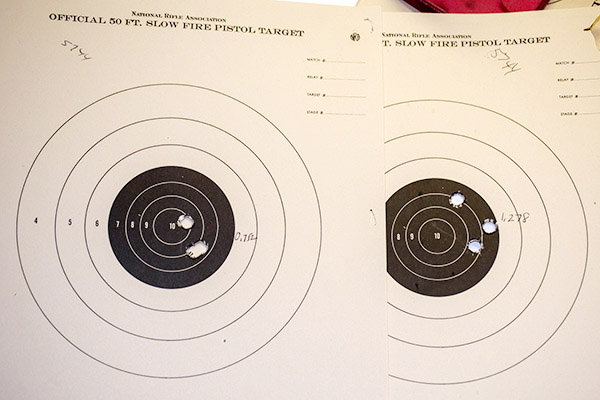
You’ll recall a recent blog where I waxed eloquent about Eleanor, my Ruger RSM .416 Rigby rifle. In that blog, I talked about reduced loads using 350-grain cast Montana bullets and 5744 and Trail Boss propellant. It was fun…the Trail Boss loads had milder recoil and “good enough” (but not stellar) accuracy. Take a look at these 50-yard targets:
The above target on the left was with 30.0 grains of Trail Boss; the one on the right was with 34.0 grains of Trail Boss. I could feel a tiny bit more recoil with the 34.0-grain load, but both were light loads with modest recoil. Weirdly, the point of impact shifted sharply to the right with the lighter load, but it moved back to the center with the 34.0-grain load (and it was slightly higher). The Trail Boss loads shot okay, but they weren’t running in the same league as the load I had shot the prior week with 5744 propellant and the same Montana Bullet Works 350-grain bullet, as you can see from the 50-yard targets below.
I could see what I was getting with the Trail Boss and I could see that it wasn’t grouping nearly as well as the 5744 loads at 50 yards, so that stopped my testing with Trail Boss (that, and the fact that I had used up all my Trail Boss cartridges).
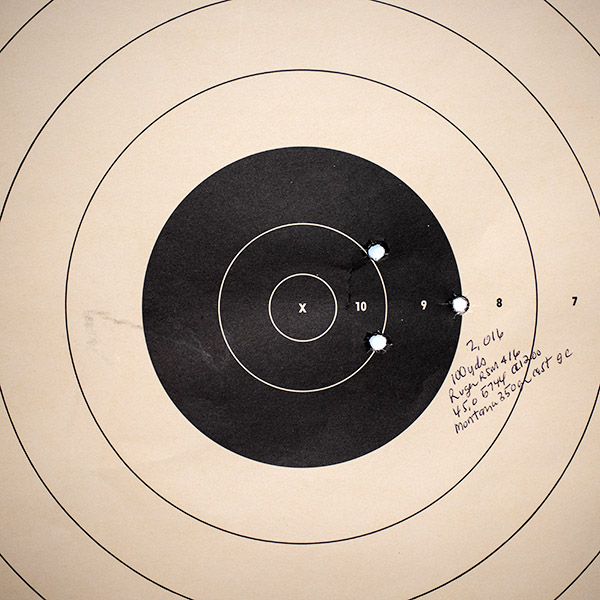
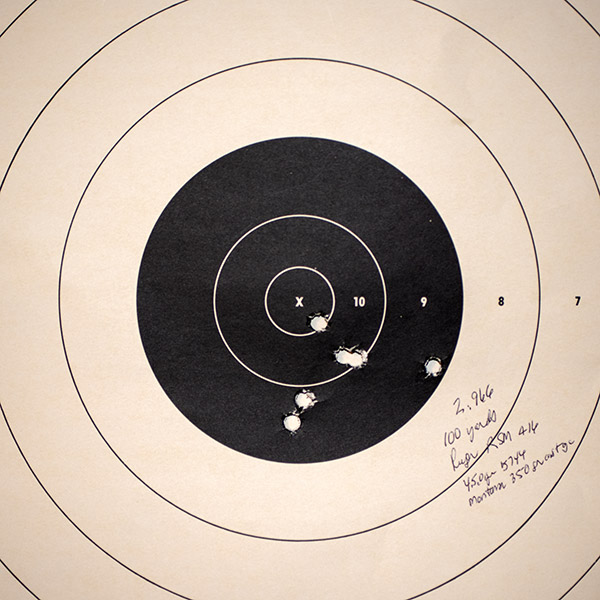
I was curious: How would Eleanor do at 100 yards? I still had some of the 5744 loads left, so I posted a couple of 100-yard targets and let Eleanor have her way. I first fired a 3-shot group and after looking through my spotting scope, I was surprised to see how well they grouped.
I thought maybe that target was a random success, and I didn’t want to ruin it by throwing more shots at it. So I fired another 3-shot group at the second target, and then another three at that same target. That’s the one you see below.
Before all you keyboard commandos start telling me that these results are nothing special, allow me to point out that these are 100-yard groups using open sights on an elephant rifle. I’m calling it good to go. Like I said earlier, when the elephants become an invasive species here in So Cal, I’m ready. The load is 45.0 grains of 5744 (it’s the load the Lyman Cast Bullet Handbook specified as the accuracy load, and they were right), the 350-grain Montana Bullet Works .416 bullet sized to .417 and crimped in the cannelure, Hornady brass, and a CCI-200 primer. I didn’t weigh each charge; I just adjusted my RCBS powder dispenser and cranked them out. If you were wondering, I use Lyman dies for this cartridge.
A bit more about Eleanor: The rifle is a Ruger 77 that the good folks from New Hampshire call an Express or RSM model (I think RSM stood for Ruger Safari Magnum). They made them in 375 H&H, 416 Rigby, and 458 Lott (kind of a magnum .458 Magnum). Ruger also made a similar one in a few of the standard calibers (7mm Mag, 30 06, and 300 Win Mag, and maybe one or two others). These rifles were a bit pricey when Ruger sold them in the late 1990s/early 2000s, but evidently not pricey enough. They were too expensive to manufacture, so Ruger stopped making them. When you see these rifles come up for sale today (which doesn’t happen very often), they command a premium. I wish I had bought one in 30 06 when they were first offered; to me, that would be the perfect rifle.
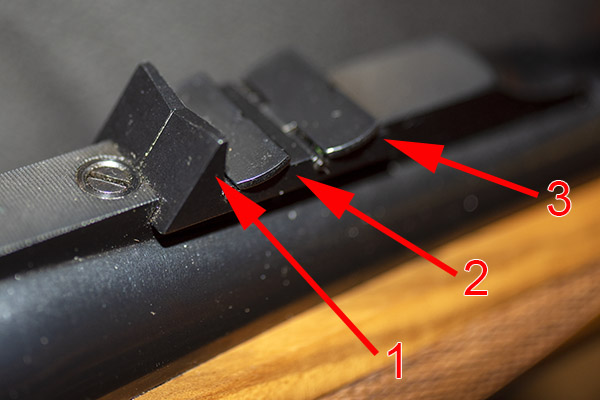
The rear sight on a Ruger RSM rifle is of the African “Express” style. The elevation adjustment consists of a fixed and two flip-up blades, and they all have a very shallow V. I guess the idea of that shallow V is that it lets you see more in case an elephant is charging. The sight has two flip up blades behind the fixed blade; as range increases, you flip up the second blade, and if it is an even longer shot, you go for the third blade. I got lucky, for me, the fixed rear sight blade is perfect with this load. I made a minor adjustment for windage, and the elevation is spot on with a 6:00 hold at both 50 yards and 100 yards.
Incidentally, that rib the rear sight sits on? It’s not a separate piece. It and the barrel were turned and milled from one solid piece of steel. It’s one of the reasons these rifles were too expensive to manufacture.
The front sight is the typical brass bead (you can sort of see it in the featured photo at the top of this blog), which I usually don’t like, but with these results I can’t complain. I’ve shot better groups with two or three other open sight rifles using jacketed bullets at 100 yards; this is the best any cast bullet has ever done for me.
Want to see the first installment of the Eleanor story? It’s right here.
Tough to get to a gunstore to buy targets? Range fees for targets too high? Do what I do and order them online. They’re delivered right to your door and they’re less expensive, too.
Need a calipers for measuring your group size? This is a great place to find great calipers at a great price.
Want to check out Montana Bullets? Here’s a link to their website. Tell them Joe sent you. Trust me on this: These are best cast bullets I’ve ever used.
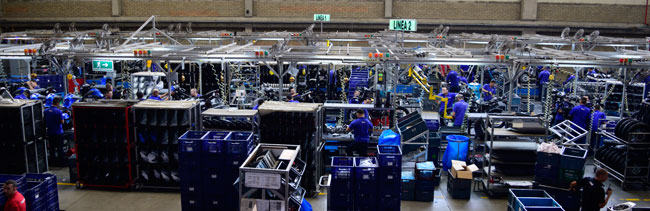
After zipping through the Andes Mountains in Colombia for a week on RS3 motorcycles with my good buddies Juan and Carlos (the RS3 is the carbureted version of the RX3), I spent a day in the AKT Motos plant. AKT Motos is the importer and assembler of Zongshen motorcycles in Colombia.
The AKT factory was impressive, and not just because of the fact that they make motorcycles there. I’ve been in and around factories for most of my life. There are good ones and there are bad ones. I can tell the difference as soon as I walk in just by looking at the people who work there and the condition of the facilities. The vibes were all good…AKT is a good place to work and the people there love what they do.
Here’s the AKT Moto assembly line:
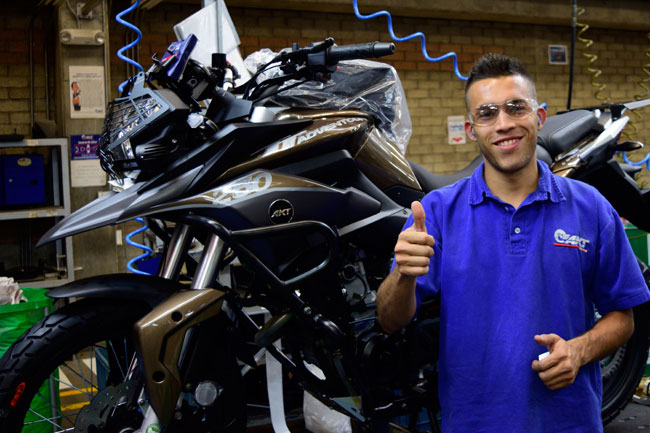
Juan Carlos grabbed the photo below of yours truly with Enrique Vargas, AKT Moto’s General Manager.
Here’s a video showing the AKT Motos plant in action:
Enrique is a genuine nice guy and he’s the real deal. He rides a different AKT Motos motorcycle to work every day (in Medellin traffic, that’s no small feat), and he races motocross on the weekends. Enrique is the guy who invited me on the Colombia trip, and I had a wonderful time on that ride. You can read about the adventure in Moto Colombia, our book about the ride through Colombia. It was the ride of a lifetime, and the book makes a great gift.
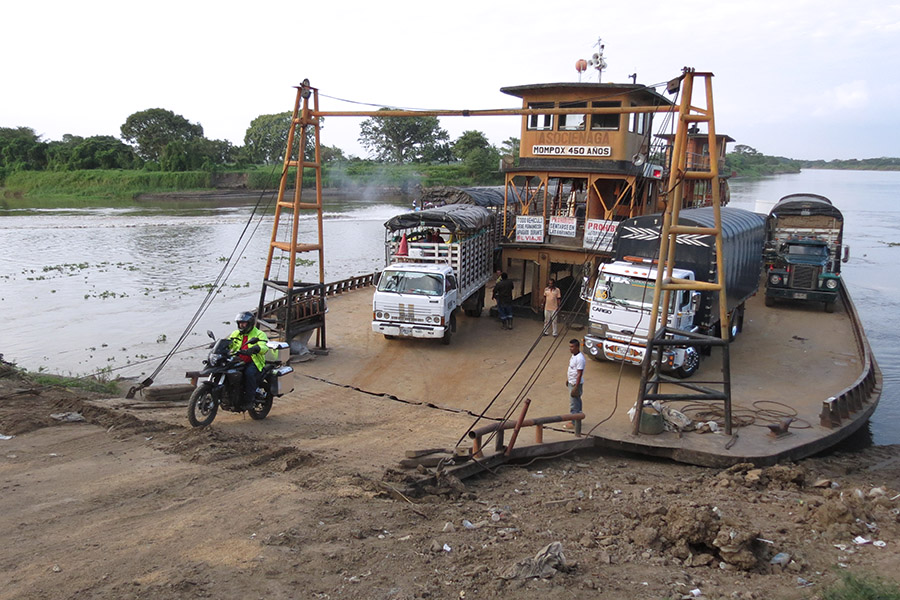
That photo at the top of this blog? It’s yours truly leaving the ferry that had carried us down the Magdalena River to Mompox, one of my favorite places in the world and unquestionably one of the more exotic spots I ever visited on a motorcycle. Here’s a video I did on that ferry ride with a few scenes in Mompox at night, and another riding through the Andes.
You’ve thought about reloading, you’ve read stuff from us and others about the benefits of reloading, and you want to do it. But how?
Hey, I was born into it. My Dad was a reloader and I had a pretty good idea what to do when I wanted to start, but the urge to do so didn’t hit until I was a young guy in the Army at Fort Bliss. I was lucky. The guy who ran the Fort Bliss Gun Club (Roy Johnson) had a room set up for just that purpose and he walked me through the process some 50 years ago. But Roy has gone on to his reward, you’re probably not stationed at Fort Bliss, and you want to get into the game. That’s what this blog focuses on, and in particular, the equipment you’ll need to get started.
Inside the Fort Bliss Gun Club. This is a fabulous place where I spent a lot of time as a young Army dude. Next time I’m in El Paso you can bet I’ll stop in again.
Reloading Advantages
There are three advantages to reloading: Cost, accuracy, and availability.
Generally, reloaded ammo costs less than factory ammo, and in some cases (especially for more exotic rifle ammunition), the savings are huge. For example, factory .416 Rigby ammo costs $170 for a box of 20 rounds; I can reload .416 Rigby ammo for well under a buck a round.
From an accuracy perspective, reloading is the only way to go. You can tailor a load to a particular firearm by varying bullet type, bullet seating depth, crimp, powder type, powder charge, brass, and primers to arrive at a combination that delivers superior accuracy (and it’s fun doing this). I have rifles that shoot 3-inch groups at 100 yards with factory ammo; with my custom reloads, I can get half-inch groups.
Today, if you reload and you’ve laid in a good stock of components, you can reload your way through any ammo shortages. Nobody has .45 ACP, 9mm, or .223 ammo in stock right now; I have enough components on hand to reload thousands of rounds. I’m on the range two or three times a week enjoying my shooting hobby while other folks are online whining about not being able to buy ammo.
What You Will Need
The things you will need to start reloading fall into two categories: The reloading equipment, and the reloading components. The reloading components are the things that combine to bring an empty brass cartridge case back to life (that includes the bullets, the propellant, and the primers). The reloading equipment includes the gear you need to take the components and turn them into a ready-to-fire cartridge.
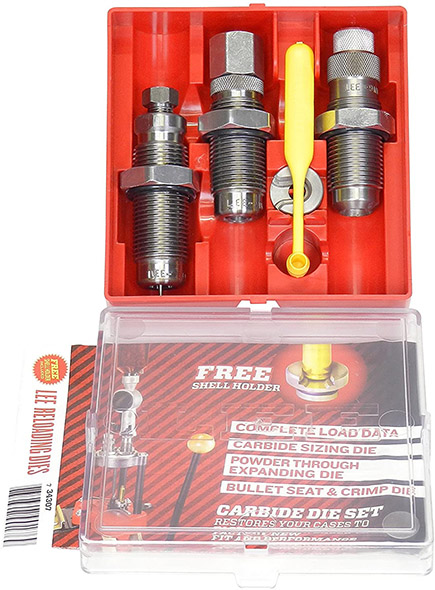
If you want to get into the reloading game, I believe the best way to do so is to buy a complete equipment reloading package from one of the suppliers like RCBS or Lee. That’s the RCBS kit shown in the big photo above. I’ll talk about it, the Lee kit, and a couple of others further down in this blog. First, let’s review each bit of gear.
The Reloading Press
That’s the lever-operated press that accepts the dies (more on that in a second) for reloading your ammo, and sometimes the press includes a mechanism for seating primers in the cartridge case after the old primer has been removed. In other cases, a separate priming tool is used. Presses are offered by RCBS, Lee, Lyman, Hornady, and other companies.
The Lee Challenger press. It’s a decent unit at a decent price, and an ideal way to get started in reloading.
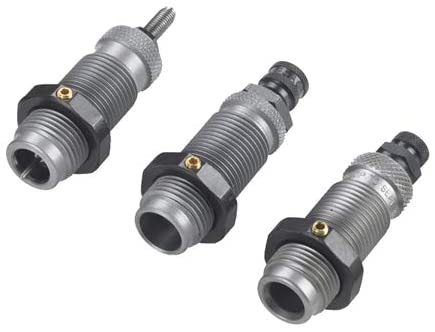
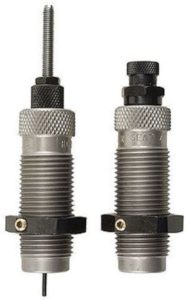
Dies
The dies are cartridge specific. For handgun cartridges, the die set usually includes three dies; for rifle cartridges, the die set usually includes two dies. The good news is that die threads are pretty much standardized, and every company’s dies will fit every company’s reloading press. In other words, if you buy Lee dies, they’ll work on an RCBS press. If you buy RCBS dies, they’ll work on a Lee press. Dies are offered by several companies, with the most popular brands being Lee and RCBS.
A three-die pistol set from RCBS. The first die knocks out the old primer and resizes the fired case. The second die flares the case mouth to accept a new bullet. The third die seats the new bullet and, if you want, crimps the bullet in place.An RCBS two-die rifle set. The first die knocks out the fired primer and returns the case to its original dimensions. The second die seats the bullet and, if desired, crimps it in place.A three-die pistol cartridge set from Lee Precision. Lee includes the shell holder with their die sets.
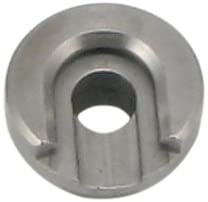
Shell Holder
You will need a shell holder for the cartridges you wish to reload. That’s the piece that holds the cartridge case in place so the press can push it up into the die and then extract it from the die. RCBS does not include the shell holder with their die sets (so you’ll need to buy RCBS shell holders separately); just about all other die makers do (when you buy their dies, the die set includes a shell holder for that cartridge).
A shell holder. You need to buy these separately if you buy RCBS dies.
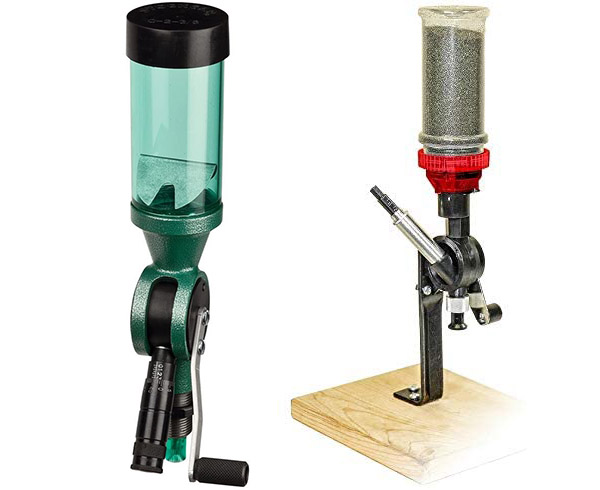
A Powder Dispenser
This is a device for dropping a precisely-metered powder charge into each cartridge case. There are fancy (read: expensive) electronic powder dispensers, but you don’t need those to get started and a lot of folks (myself included) don’t like them. A simple mechanical dispenser will work fine (as mine has been doing for 50 years). Both RCBS and Lee offer good powder dispensers; the Lee is substantially less expensive.
An RCBS powder dispenser on the left, the Lee powder dispenser on the right.
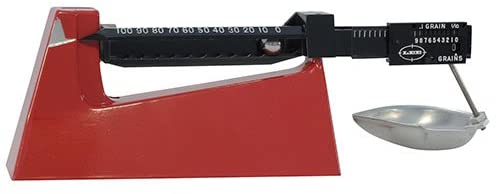
A Powder Scale
This is a simple balance beam scale to allow you to measure the weight of the propellant charge and adjust the powder dispenser to throw that charge. There are electronic scales, too, but they add complexity and considerable expense where none is required. Again, the dominant brands are Lee and RCBS.
A simple Lee balance beam reloading scale. These scales can measure to a tenth of a grain.
Cartridge Trays
When we reload, we use a cartridge tray (to hold the cartridges as we work through the process of reloading). A variety of manufacturers offer these.
An RCBS cartridge tray. These are available from several manufacturers. I’ve been using mine for nearly 50 years.
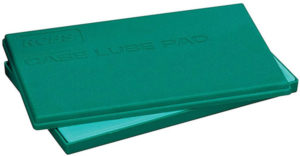
A Case Lube Pad
This is a simple foam pad. You put case lube on the pad and roll the brass cases on it to lubricate the exterior prior to running them through the resizing die (the first die used in the reloading process). If you have a straight wall pistol cartridge, you can buy tungsten carbide dies that don’t require lubing the cartridge cases. If you’re going to reload 9mm, .38 Special/.357 Magnum, .45 Auto, or .45 Colt, my advice is to spend the few extra bucks and get the carbide dies.
An RCBS case lube pad. You put a bit of case lube on the pad and roll the brass on it to lube the cases prior to running them through the resizing die.
Case Lube
This is the lube used as described above. To mention it again, if you’re going to reload straight wall pistol cartridges and you buy tungsten carbide dies, you won’t need case lube (or the case lube pad).
RCBS case lube.
Alternatively, you can buy spray-on case lubes, which eliminate the need for the case lube pad. I’ve tried spray-on case lubes and I prefer using the pad and case lube instead. Other reloaders like the spray-on approach better.
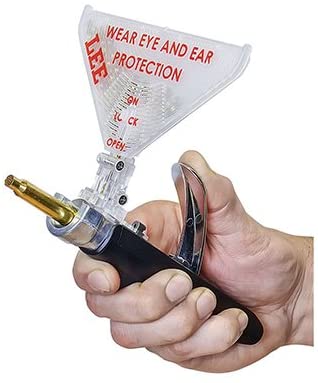
A Primer Seating Tool
Some reloading equipment companies incorporate a primer seating tool in their press; others offer separate primer seating tools. I have an RCBS press that came with the primer seating tool, but I like using a manual hand priming tool instead. Several manufacturers offer these; I use one from Lee.
The Lee hand priming tool. These work well. You can feel each primer seating and better control seating depth with these hand priming tools.
A Bench
You may already have a sturdy workbench where you can mount the reloading press; if not, there are reloading-specific benches available.
A Lee reloading bench. These work well if you don’t have a workbench for mounting your press.
A Reloading Manual
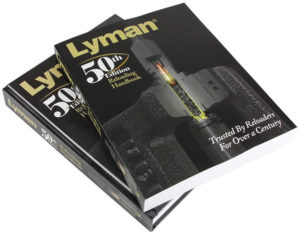
There are several available, including the excellent offerings from Sierra, Speer, Hornady, and Lyman. Don’t think you can skip this; a good reloading manual is a must-have item for any reloader. They all explain the reloading process at the beginning, and they include safe recommended load levels for nearly all cartridges. I’ve acquired several reloading manuals over the years and they are all good; my favorites are the ones from Lyman. Others are published by bullet manufacturers (these include the manuals from Hornady, Speer, and Sierra) and those manuals include loads only for their bullets. The Lyman manual is more generic. But like I said, they’re all good.
I have reloading manuals going back 50 years. The Lyman manuals are probably the best.
That’s the reloading equipment. In addition to that, you’re going to need the ingredients for the cartridges you want to reload. That includes the brass cases, the bullets, the powder, and the primers.
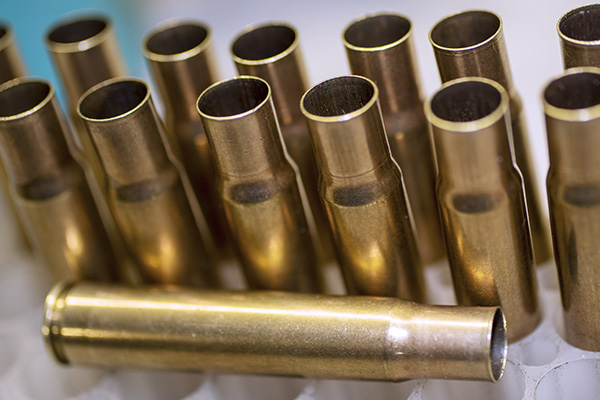
Brass Cartridge Cases
You can buy virgin brass online, you can buy once-fired brass at the range or at most gunstores, or you can do like most of us have done: Save your brass when you shoot factory ammo and reload it.
.35 Whelen brass waiting to be charged with propellant. This ammo costs $43 for a box of 20 factory rounds (and you can’t find anybody who has it in stock right now); I can reload it for under 50 cents a round.
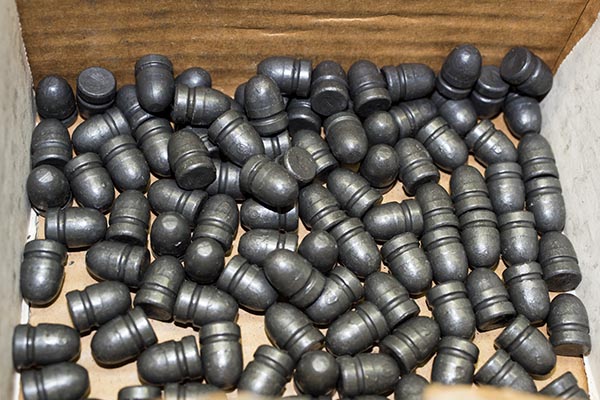
Bullets
You’ll need bullets to reload your ammo. There are lots of options here, and they basically break down into either cast or jacketed bullets. I’m a big fan of cast bullets for handgun and reduced velocity rifle reloads, and I use jacketed bullets for full-bore factory level (high velocity) rifle loads. Most folks these days order bullets online from reloading suppliers like MidwayUSA, Graf’s, MidSouth, Powder Valley, Natchez Shooting Supplies, and others. Smaller gun stores are disappearing, and you usually don’t find decent prices at the big chain stores.
Cast bullets waiting to be loaded into .45 ACP cases.
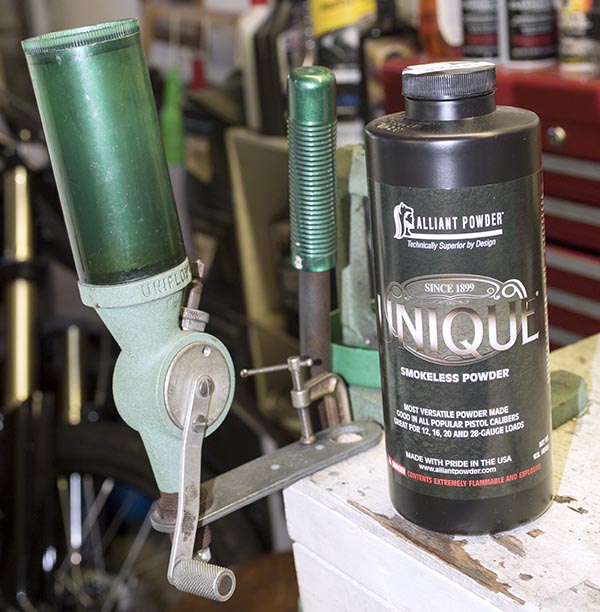
Propellant
For lack of a better term, we usually call propellants “powder,” and there are a wide variety of powders available. The reloading manuals show which powders work best for the cartridge you wish to reload.
Unique propellant and my RCBS powder dispenser. The reloading manuals will help you select the powder you need. Unique is a good general purpose propellant I’ve used for a variety of handgun cartridges and a few cast bullet rifle loads.
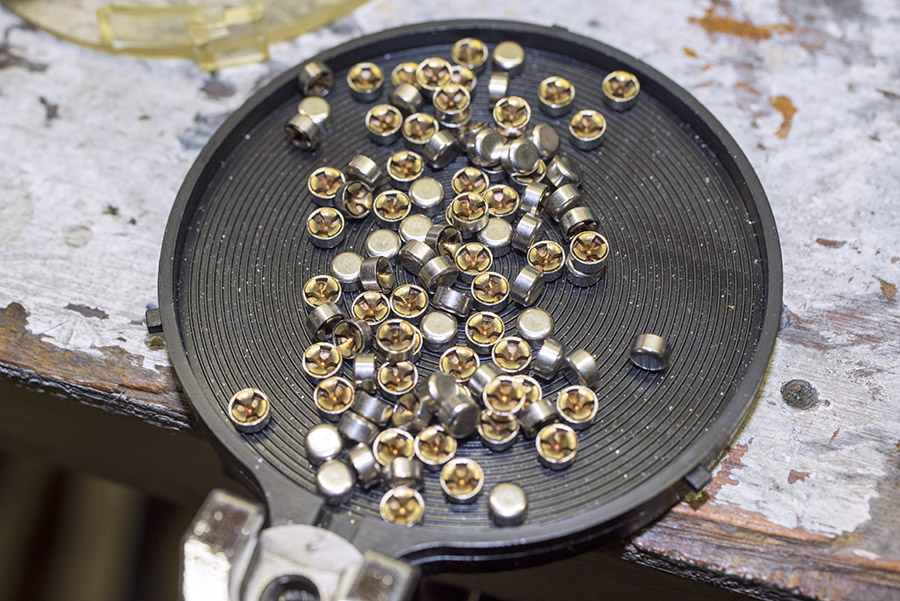
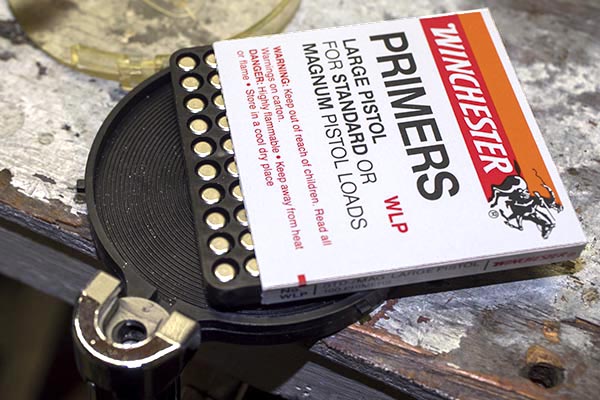
Primers
The primer is the component that lights the candle when you pull the trigger. There are several primer suppliers. The trick today is finding them, as there has been a run on primers since the pandemic began. If you can find primers in a local shop, buy them. The same suppliers listed above for bullets also sell primers (they are all out of stock now, but that will change as supply catches up with demand).
Winchester primers being loaded into my Lee hand priming tool. Other primer makes include Remington, CCI, Federal, and a few more.
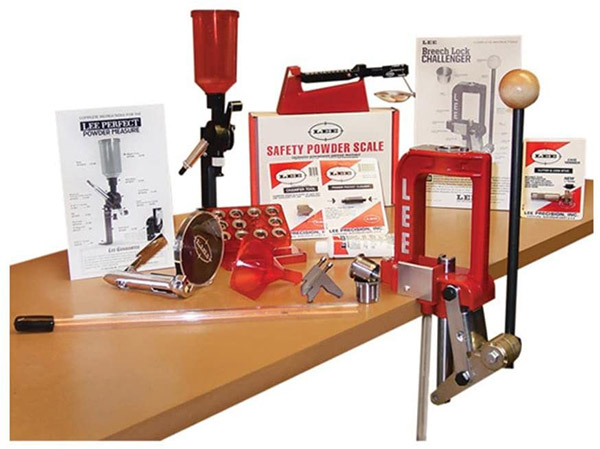
The Best Equipment Approach: A Complete Kit
As I mentioned at the start of this blog, I believe the best way to get into the game is to buy a complete equipment reloading package from one of the reloading equipment suppliers. My advice if you are a new reloader is to go with the Lee package. It’s the least expensive and if you decide that reloading is not for you, you’ve minimized your cash outlay. I should add, however, that I don’t know anybody who ever tried reloading who didn’t get hooked on it. It is a marvelous hobby, and I believe it is as much fun as shooting.
I’ve used reloading equipment over the years from all the manufacturers. My personal setup is centered around an RCBS Rockchucker, but equipment from any of the suppliers is good. Basically, you can’t go wrong in this game from an equipment perspective. With that said, let’s take a look at what’s out there.
The Lee Challenger reloading kit. These were sold out on Amazon (and everywhere else) when this blog was published. Keep an eye on the Amazon site; it’s a good place to order the kit.
There’s only one problem with the Lee Challenger reloading kit: It’s such a good deal (well under $200 for the entire kit) that literally everyone is out of stock right now. As you know, we’re going through unprecedented times in the shooting world (guns, ammo, and reloading components are sold out due to the civil insurrection in many large cities, a new anti-gun administration on the horizon, and the global pandemic). That will change, but at this instant, no one I could find has the Lee kit in stock.
The RCBS reloading kit. RCBS makes high quality equipment that will last a lifetime. It costs more, but it’s worth it.
I’ve been using RCBS equipment for the last 50 years, and I believe it to be the best. It is built to last. If I couldn’t get the Lee package as a newbie, or if your budget will allow it, I’d go with RCBS equipment. At about $400, it’s just over twice the price of the Lee kit, but it’s still a great deal compared to buying all the different equipment items separately. The RCBS package shown above includes an electronic scale instead of a beam scale, a powder trickler (it allows you to finesse adding individual powder kernels to attain a precise charge weight), and a couple of case preparation tools that the Lee kit doesn’t include.
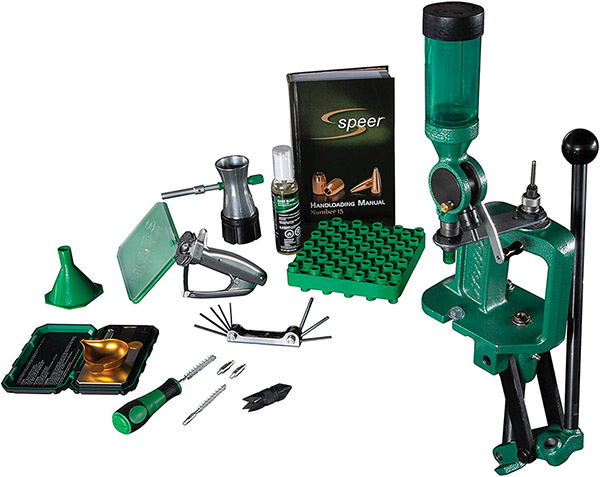
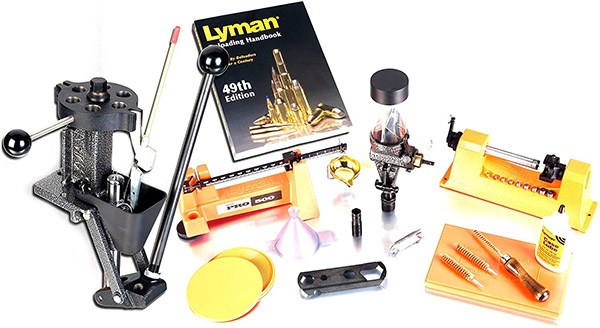
Lyman is another outfit offering a complete reloading kit:
Lyman’s reloading equipment package.
What’s a bit different about the Lyman kit is that it comes with a turret press, which allows you to mount all the dies in the press head and rotate them as you progress through the various reloading steps. I’m not a big fan of this approach; other folks are. The Lyman kit is just under $1000; the turret press and the inclusion of a case trimmer are what drive the price to that level.
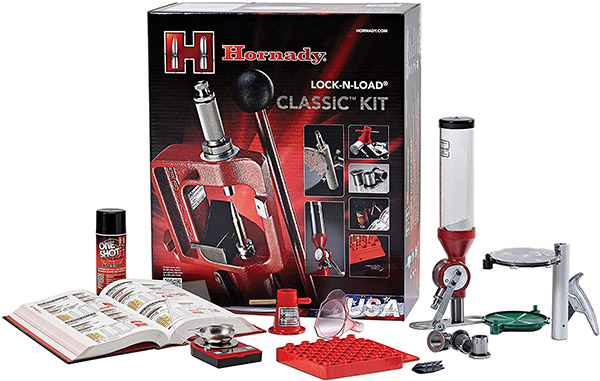
Hornady’s reloading package. I have the least experience with Hornady reloading gear, and I’m not wild about their dies. Hornady bullets are fantastic.
The Hornady kit is about $550. That’s substantially less than the Lyman kit, but more than either the Lee or the RCBS kits.
So there you have it. Remember that no matter which reloading kit you buy, you’ll still need dies and a shellholder specific to your cartridge. You’ll probably want to purchase more equipment as your reloading interest develops, including more dies (so you can reload more calibers), case cleaning and polishing accessories, a micrometer, and more. But what we’ve outlined here will get you started and keep you in the game for years.
In this blog we’ve covered the equipment you’ll need to get into reloading. If you would like to read about how to use this equipment, we have you covered there, too. We have a bunch of information on reloading various cartridges on our Tales of the Gun page, and a complete series on reloading handgun ammo that you can review here:
Here at ExhaustNotes we don’t limit ourselves to giant, 10-bike comparison tests and feature stories describing the joys of motorcycle riding. ExhaustNotes is much more hands-on than those other guys. In this case we were a little too hands-on.
Loyal readers will know this but for you newbies I’ll say it again: I’ve been building stuff around the house and letting the moto-journo aspect of my career flounder. Normally that’s not a problem as I lie about most of the things I write about anyway.
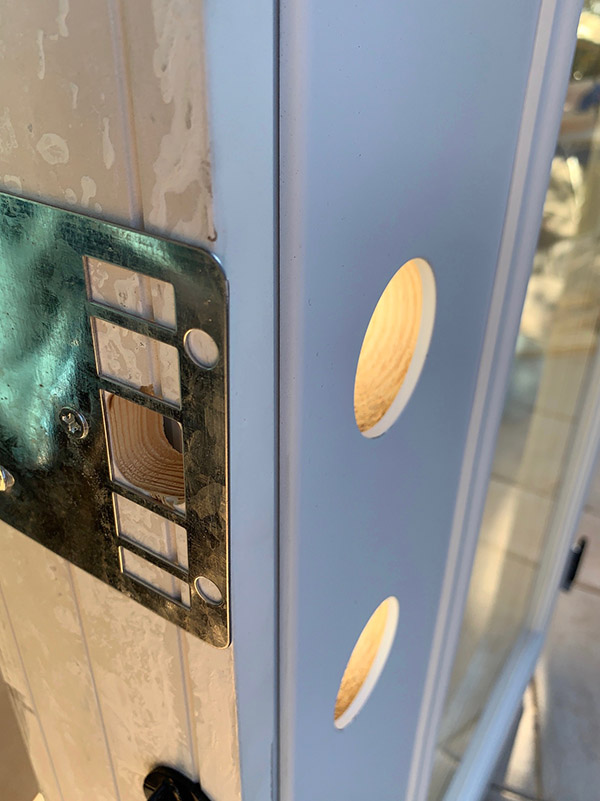
This story starts with a pre-hung door installation on the Sun Porch behind Tinfiny’s Carriage House. Yes, everything at Tinfiny Ranch has a proper name. The door is all glass except for a metal/wood surround to hold the glass and make space for the doorknobs, hinges and bolt.
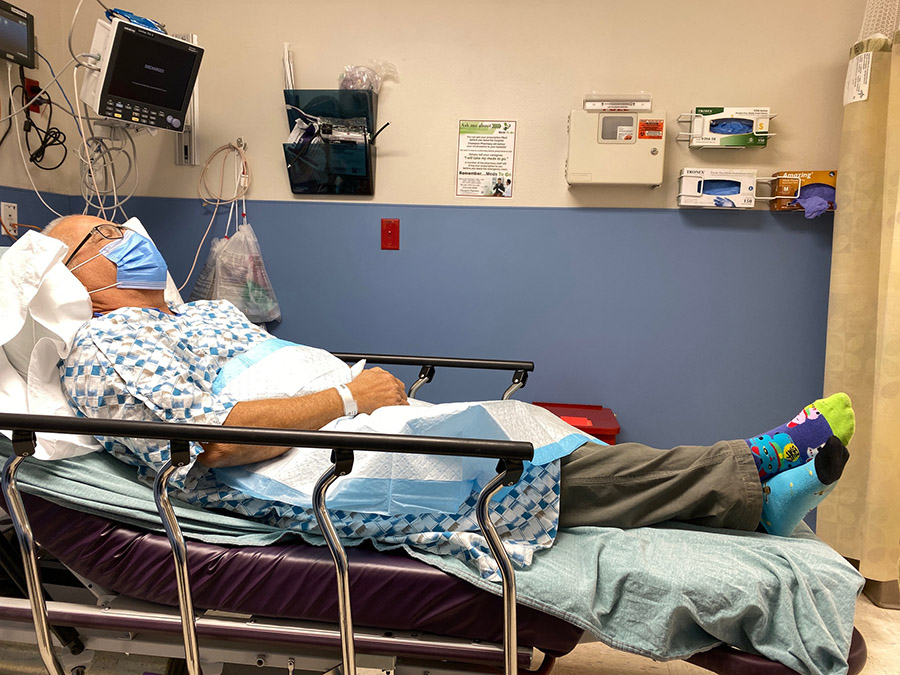
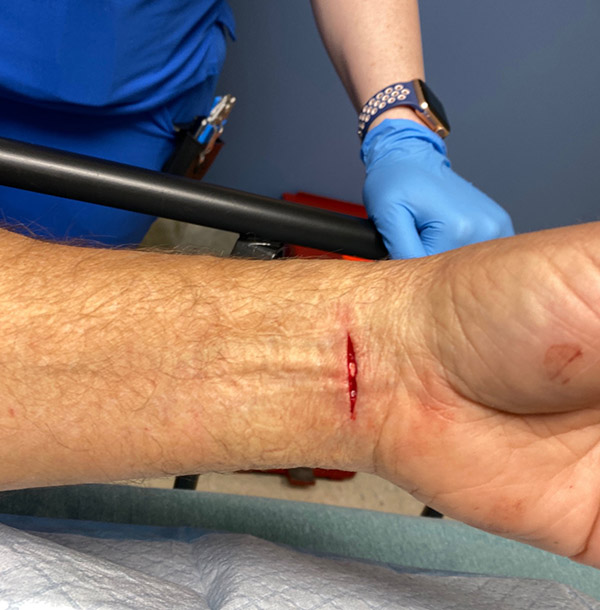
Being double pane and all glass the door is sort of heavy and as I was lifting it into position I let the door slide slowly down to the floor. I felt warmth on my left wrist but chalked it up to the early stages of Covid infection. Unfortunately I was not as lucky as that. Blood was dripping from a deep cut over my wrist and could see tendons and what I thought was bone. I started freaking out; it was like the scene in Terminator where Arnie peels back his skin to reveal the mechanical parts of his arm. I couldn’t figure out what happened and since I usually faint at the sight of blood I knew I was on borrowed time. I quickly clamped the door to the existing studs and went to the bathroom to throw up.
As it turns out there was a razor sharp piece of metal screwed into the frame of the door, I imagine reinforcing the lock area. This piece of metal was standing proud of the door by about ¼-inch. That’s the bit that cut me.
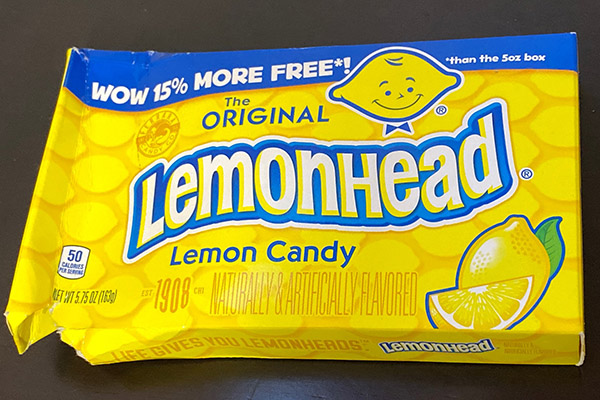
My new weight loss diet consists of Lemon Heads, a candy that is around 98% pure sugar. I call it The Ferrara diet. What with the sugar rush I wasn’t feeling all that hot before I sliced my arm open. The wound made me even queasier. CT was running around trying to find a bandage to stanch the flow of blood as I sank down onto the bathroom floor in a cold sweat. CT found some paper towels and tape and eventually I felt good enough to walk out to the car.
The ride to the hospital took about ½ hour during which I kept yelling “Yi-Yi-Yi-Yi!”, “Michigan!” and “Whoa Daddy!” to keep my mind off the injury. Our local hospital is undergoing expansion so the emergency room has been relocated between two employee parking lots and miles of temporary fence.
CT pulled up to the front and told me to wait in the car while she got a wheel chair. “Oh hell no!” I said, “I don’t need a wheelchair, this is embarrassing.” We had a brief, ultimately futile argument for me, and out came a hospital guy with a wheelchair.
The hospital guy wheeled me to wait in a hallway where a lady was coughing up Covid viruses the size of Lemon Heads. She answered yes to every Covid-question the nurse asked her. It was like her body was a perfect storm of Covid. The hospital guy wheeled me into another room. “Here’s the guy that cut his wrist,” he told the admitting clerks. What the hell? Now I’m a suicide risk? I said, “Look, let me be clear. I did not try to kill myself, I cut my wrist on a door.” It sounded phony as hell.
Back out in the hallway the old lady was gone but the corona virus cloud was still so dense I could actually see the little bastards tugging at my facemask trying to gain access to my respiratory system.
Enough time had elapsed from the initial injury that I was feeling somewhat cocky. Like maybe I had lain on the bathroom floor just to elevate the injury. Yeah, that’s it. I was even thinking about how good a Lemon Head would taste right about now. I was wheeled into Room 9 and the nurse told me to take off my shirt and put on a hospital gown. I had on mismatched socks.
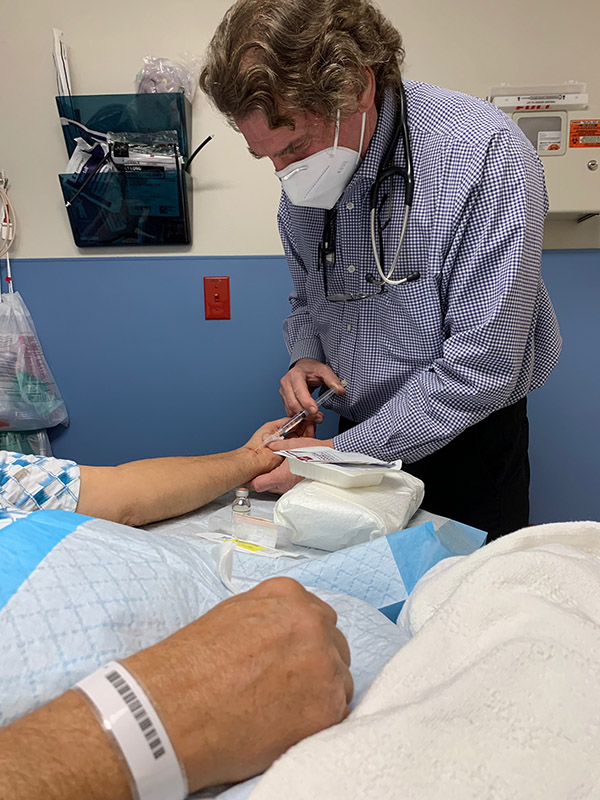
Dr. Wells came in to examine me. I told him about the door but of course I would say something like that if I were trying to conceal a suicide attempt. He said that it was a nice clean cut and that he would be back later to stitch it up. I took a nap as things seemed under control.
True to his word, Dr. Wells came back and asked me all kinds of questions about my job and boats during which he shot some numbing agent into my wrist area. After a short burning sensation I couldn’t feel a thing. As he sewed me up, it felt like someone tugging on my sleeve. Drugs and a good bedside manner really help.
By this time I felt the crisis was past and I could look at my injured wrist without any nausea. I guess it’s true what they say, time does heal all wounds. CT took me home and my wrist seems ok. Luckily I didn’t cut any tendons or veins. After taking a day off I finished installing the door with CT helping to lift the thing.
On a side note: that piece of sharp metal is gone. I don’t care if it weakens the locking system. Kick the door down for all I care. I’ll have to be more observant with my home projects, turns out it’s safer to ride motorcycles than install doors.
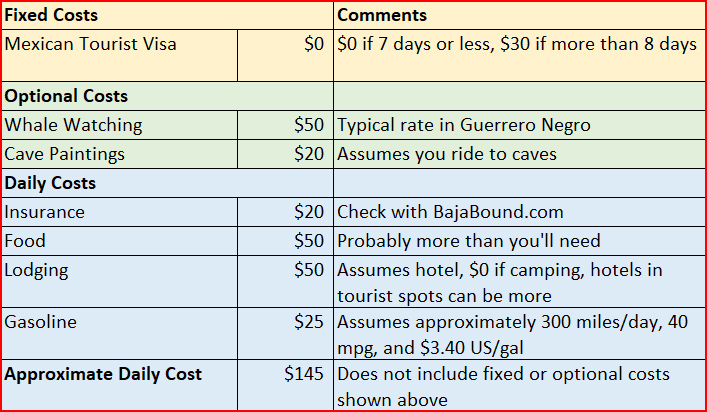
From time to time, I hear this question: How much cash should I take to Baja? Costs have gone up in Baja (like everywhere else), but Baja is still a cheap date. How much you’ll need will depend on your tastes, how much you drink, and where you stay. To cut to the chase, when I ride in Baja, I’ll take a thousand bucks with me if I’m going to be there for a week, and I always come home with money in my pocket. You can bring a credit card to Baja, but once you get out of the tourist spots (Ensenada, San Felipe, Loreto, La Paz, and Cabo), Baja is mostly a cash proposition. In these tourist spots, costs will be more in line with what you’d pay in the US for food and lodging, too. You can’t depend on being able to use your credit in the smaller towns and at the more remote gas stations.
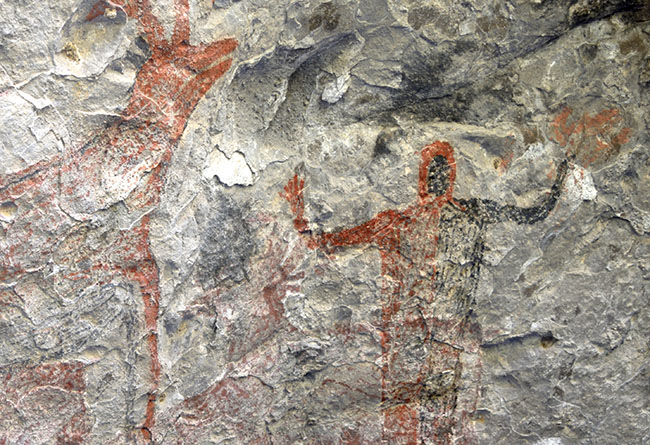
Expenses in Baja will include food, gasolina, lodging, and if you’re going to see the whales or the cave paintings, the cost of admission for those things. Figure on $50 for a half-day whale-watching tour (it’s worth every penny, in my opinion); the cave paintings a little less. Both are great things to see (many folks describe them as life-changing, and I’m in that category). If you plan to have a drink or two at night, you’ll need a bit for that, too.
Gasoline prices in Baja are usually about the same as they are in California. That’s usually works out to something north of $3 per gallon. They sell it by the liter and it’s easier to pay in pesos, but they’ll take dollars at an exchange rate that is not usually in your favor. It’s best to have pesos and pay in the native currency. You can see our earlier blog on fuel in Baja for more information.
Food is inexpensive if you eat in other than touristy restaurants. My friends think I’m a genius at finding good spots to eat in Baja, but my secret is simple: I just look for the spots with lots of cars and pickups parked in front. It works every time. I’ll usually budget $25 US a day for food. It’s easier to pay in pesos, but most restaurants will also take dollars. I might add this: I’ve never had a bad meal in Baja. I could write a book just about the restaurants down there. There are many hidden treasures. We’ve listed a few on our Baja page.
Hotels are typically between $25 and $70 per night outside of the tourist towns. In the smaller spots, $25 seems to be the norm. In the more well known hotels (like Malarrimo’s in Guerrero Negro), it’s going to be more like $70 per night. The rooms won’t be fancy, but they will be clean, and if you’re like me, you’re not going to be riding Baja as a hotel critic.
Don’t forget your Baja insurance. You have to get a separate insurance policy for your motorcycle when you go into Baja, and based on my 30-plus years of riding south of the border, BajaBound Insurance is the best. You should purchase it online before you cross into Mexico, and the BajaBound website makes that easy to do.
If your stay is going to be longer than a week, you’ll need to pay for a Mexican tourist visa (a week or less is free). The cost for a tourist visa is $30. You can (and should) pick up your tourist visa as soon as you cross into Mexico.
Here’s a summary of how the above stacks up (all amounts are in US dollars):
As I mentioned at the start of this blog, when I go into Baja for a weeklong trip, I’ll usually start with $1000 in my wallet and I usually return with money left over. In the event you do need more cash, there are banks in the larger towns with ATMs, and they’ve always worked for me.
We have much more information, including suggested riding itineraries, on our Baja page. You can read about some of our great rides in Baja here.
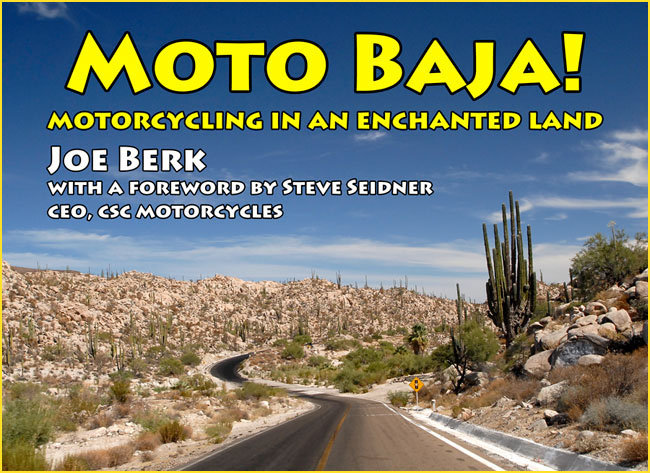
Want more info on exploring Baja on a motorcycle? Pick up a copy of Moto Baja!
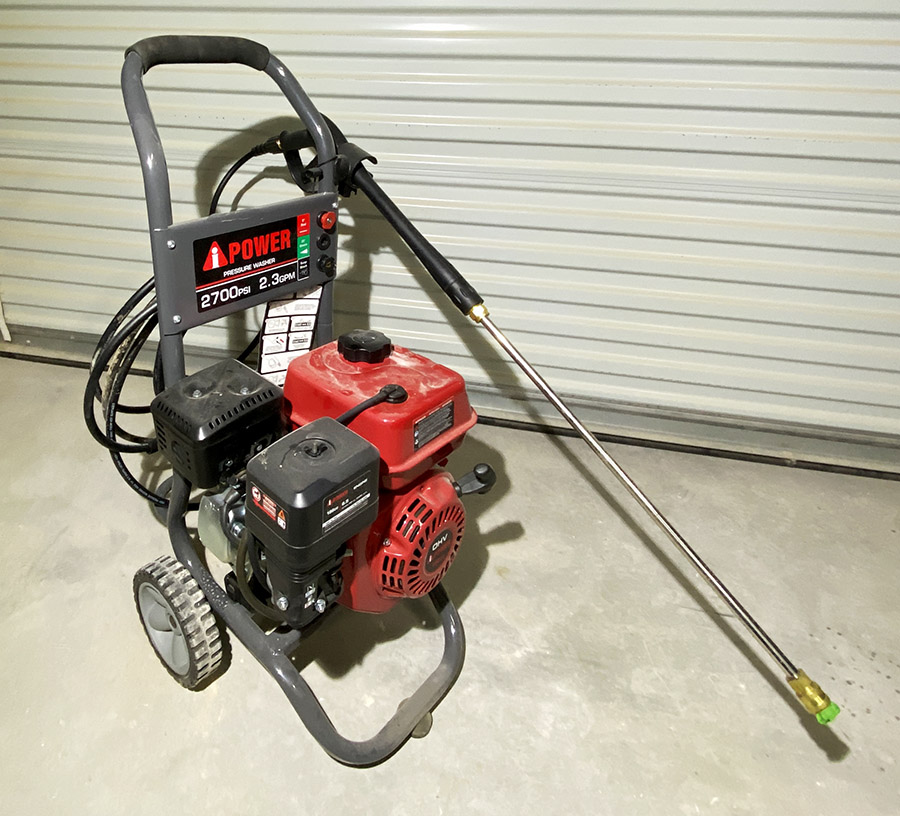
With all the home projects I’ve been doing lately I haven’t had much time for motorcycle hijinks. Poor Berk is having to carry the blog’s content-load all by himself. While I may not have moto-content I do have a few new toys to review, one of them being the APW2700C pressure washer.
Normally I like electric power for infrequently used power tools and I have a Harbor Freight electric pressure washer that does everything I need it to do with only one hitch. That hitch being the amperage the washer draws is so great it doesn’t like running on a long extension cord. That’s a problem at the Love Shack where the (unpowered) carport is 100 feet from the shack. Pressure washing out there is impossible unless you have a fairly good-sized generator to run the washer.
Another place the electric washer won’t work is on Christine, the MGB GT project as it is a fair distance from the shed at Tinfiny Ranch. I could move the car closer but there is so much rat guano inside I’d rather field clean it where she sits. In anticipation of your next question, ”Why not move one of the 35,000 generators you seem to have stacked at Tinfiny Ranch?” I say that kind of attitude will get you no new tools.
I bought the APW2700C pressure washer because it was cheap, had good reviews and it’s a horizontal crankshaft engine. The vertical crank pressure washers are ok, I guess, but if the high-pressure pump quits the engine is pretty much useless. The horizontal crank prime mover can be repurposed into any number of mini bikes, go-carts or log splitters.
I got mine on sale for around $200 and that’s really cheap compared to the average $350 price tag for a gas-powered washer. Shipping was free also! The quality looks really good with jewel like bits and pieces scattered all over. The unit even came with a quart of oil.
The APW2700C pressure washer is delivered broken down in a smaller box so there are a few parts to assemble. The handle snaps into the frame of the washer and a wand holder bolts on the side. Other than that, connect up the hose, wand and choose a tip and the unit is ready to go.
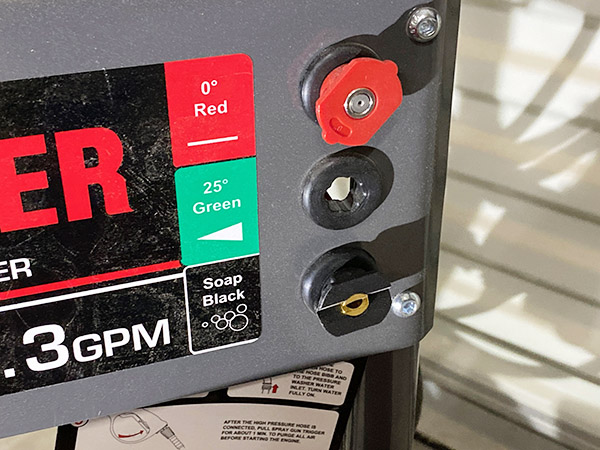
When the time came to blast the rat poo out of the MGB GT’s engine room the pressure washer started up second pull and ran perfectly. There are three different tips to alter the spray pattern but I’ve only used the wide pattern. The high pressure hose seems plenty long and the machine came with a soap dispenser bottle should you decide to mix detergent with the spray.
I’m happy with the APW2700C pressure washer, and I’m amazed at how good this pressure washer looks for only 200 bucks but since most of my possessions are junk I may have a skewed idea of what good means. The 2700 in the product name refers to the amount of pressure the unit supposedly makes. I have no way of measuring the output pressure but it’s plenty strong. It blew the paint off the MGB’s valve cover but didn’t remove the body color paint on the sides of the engine room.
I’ve got a few more pressure washing jobs for the APW2700C pressure washer and then I’ll drain the fuel until I need it again. I have no idea how long the washer will last but with my home-shop duty cycle it might be years before I find out.
This could be a long blog read or a short one. It’s your call. I have two YouTube videos today that are pretty amazing, in my opinion. One is short and one is long.
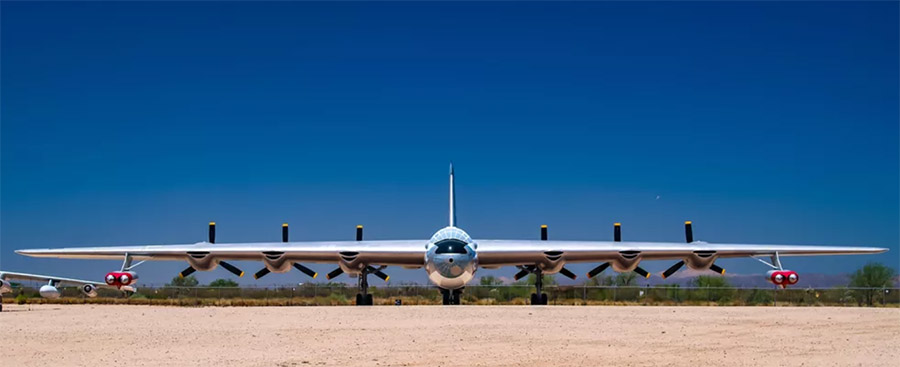
By way of background, my first job as an engineer was on the F-16 program at General Dynamics in Fort Worth, Texas. The reason I guess that’s significant is a few years ago I came across this video, Six Turning Four Burning, and as I watched it, I recognized the General Dynamics plant where I worked in the background. The video is an excerpt from Strategic Air Command, a 1950s movie starring Jimmy Stewart. It features the Convair B-36 bomber, an airplane with six radial piston engines and four jet engines (hence the six turning, four burning title). I think you’ll enjoy it.
Yesterday, I was channel surfing on Netflix and I found a documentary about the B-36. That had my attention, because when I worked at General Dynamics 40 years ago, there were still guys there who had worked on the B-36 engineering development program. They spoke about the B-36 in reverential tones, and to them, it was perhaps mankind’s greatest accomplishment.
Everything about the B-36 was Texas sized. It had a wingspan larger than a 747. The tail was so tall they had to raise the aircraft nose 18 feet to get the tail to clear the Convair plant exit as these giants came off the assembly line. I don’t know what impressed me more…the aircraft itself, or the way those oldtimers talked about it.
The last B-36 built at the Convair plant in Fort Worth, Texas. The nose had to be raised to allow the tail to clear the huge doors at the end of the mile-long indoor assembly line. I worked in that plant on the F-16.
The B-36 documentary I found on Netflix is also on YouTube. This video is about an hour long, but it’s a good one, and if you like the kinds of things you see here on the ExhaustNotes blog I think you’ll enjoy it. I sure did.
Even though I lived in Fort Worth and spent a ton of time on the Carswell AFB runway working F-16 issues, I had no idea how prominently Fort Worth and a man named Amon Carter figured into the B-36 story. The B-36 movie above educated me on that topic. When I lived in Fort Worth, I visited the Amon Carter Museum of American Art, which has perhaps the world’s greatest collection of Frederic Remington paintings and sculptures. One that really spoke to me was Remington’s Old Stagecoach of the Plains. It was a huge painting, so realistic I could almost see the stagecoach moving and hear it creaking and rattling. It was awesome.
Frederic Remington’s Old Stagecoach of the Plains, on display in the Amon Carter Museum of American Art in Fort Worth, Texas.
If you are ever in the Fort Worth area, I think the Amon Carter museum on Camp Bowie Boulevard is a “must see” destination.


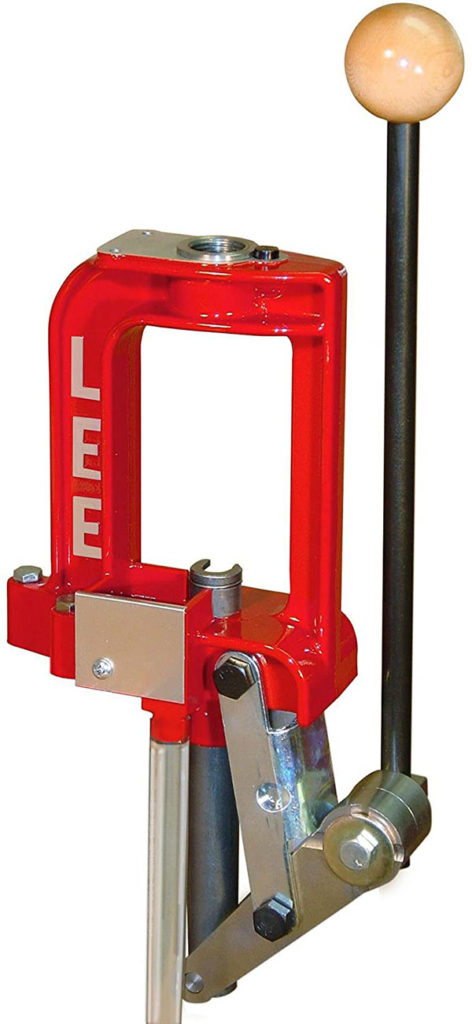


 Challenger reloading kit. These were sold out on Amazon (and everywhere else) when this blog was published. Keep an eye on the Amazon site; it’s a good place to order the kit.