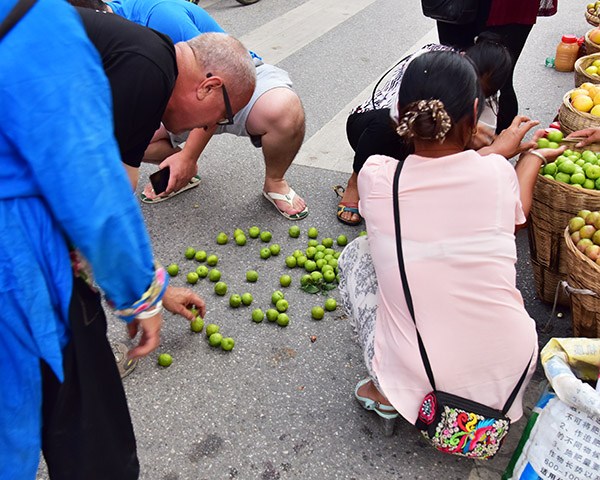
There are photogenic people in Wenchuan. One is the Wenchuan man I described in a previous Phavorite Photos blog, and another is the young lady shown in the large photo above. For lack of a better name, I’ll call her Apple Annie. Some of you folks my age or older might remember the 1961 feel-good film A Pocketful of Miracles, in which Bette Davis played a character named Apple Annie.
Bette Davis has nothing on our Wenchuan Apple Annie. After Gresh and I got out of the Wenchuan police station (we had to register as foreigners), we were walking along a main street through Wenchuan. Apple Annie was selling fruits and vegetables on the sidewalk, and somehow her bushel full of apples tipped over. Before you could say “Oh, no!” in Mandarin, apples literally rolled into four lanes of busy Wenchuan traffic. That’s when our pocketful of miracles occurred: Traffic absolutely stopped, Gresh hopped into the street before Annie or I realized what had happened, and then we jumped in, too, along with a bunch of other Chinese good Samaritans. As traffic patiently waited (not one horn honked), we recovered every one of Annie’s apples. She gave Gresh and I one as a small thank you, along with the beautiful smile you see above.
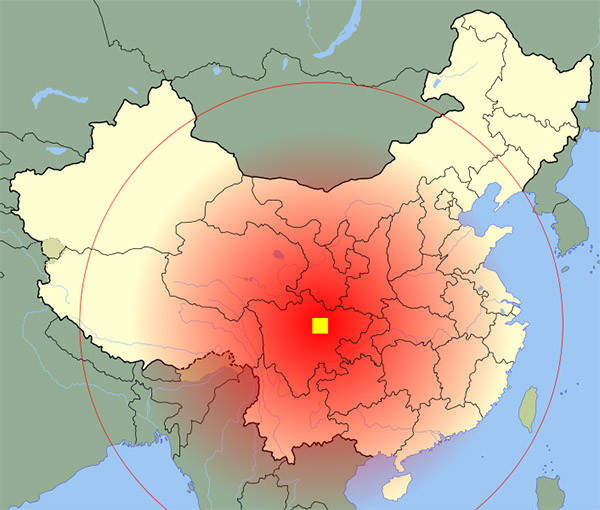
In 2008, Wenchuan had one of the largest earthquakes in recorded history (a magnitude 8.0 quake), and between 65,000 to 80,000 people died. Something like 80% of the buildings in Wenchuan collapsed.
Some of the damaged buildings were left standing as a tribute to Wenchuan’s victims. We saw those. People are resilient, perhaps even more so in Wenchuan. You can read more about what we saw in Wenchuan and elsewhere in China in Riding China.
Earlier Phavorite Photos? You bet! Click on each to get their story.
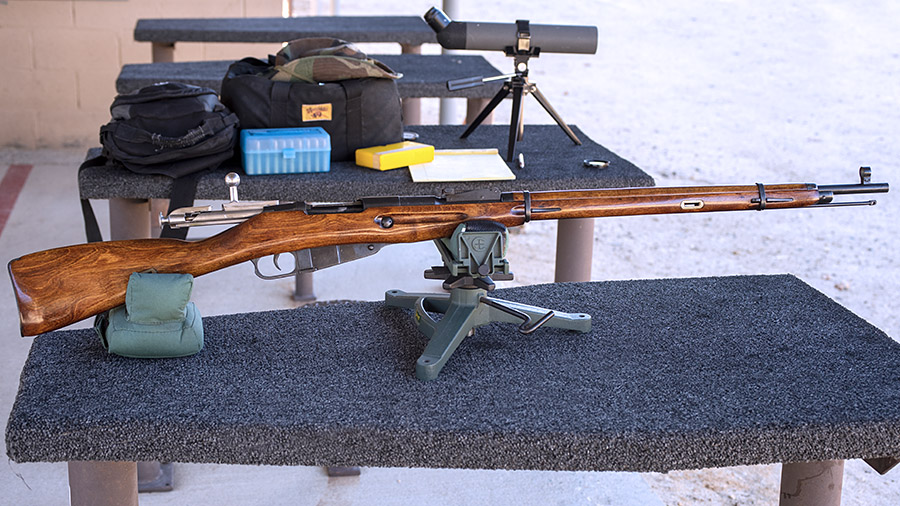
I used to not think too much of Mosin Nagant rifles. They looked cheap, they were crusted with cosmoline, and how good could a rifle be if it was made in Russia and sold at Big 5 for under a hundred bucks? (That under a hundred bucks thing, incidentally, is no more…prices on these rifles have climbed substantially.)
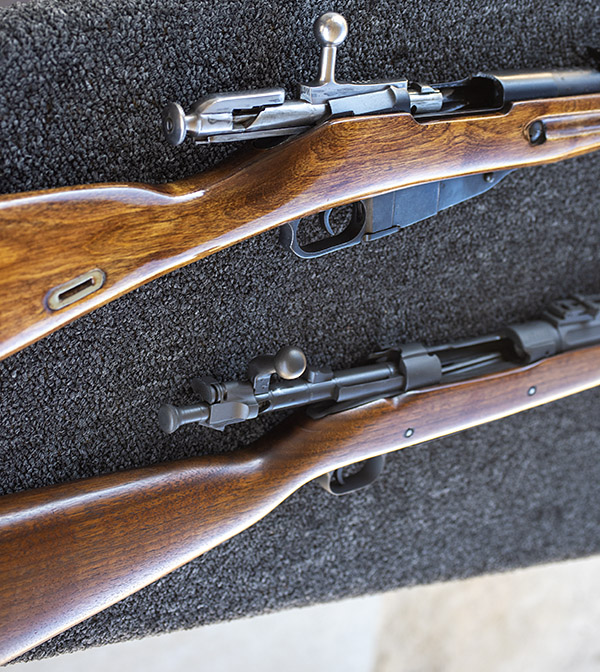
It was a grand day on the range with two old warhorses…a Mosin Nagant and a 1903 Springfield. It’s hard to say which one I like more.
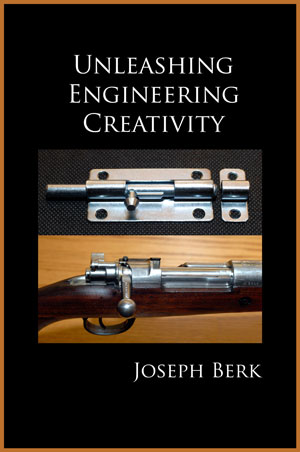
Then one day after I taught an engineering creativity class at Cal Poly, one of my students approached me to ask if I was a shooter. He had noticed the 1909 Mauser on my book.
A Modelo 1909 Argentinean Mauser on the cover of Unleashing Engineering Creativity. Don’t wait for the movie. Buy the book!
I told him I was and we talked about the Mauser a bit. He told me that he and his father had recently purchased a Mosin Nagant and they were having a lot of fun with it. That got my attention for a couple of reasons. The first reason was that prior to that, I hadn’t spoken with anybody who owned a Mosin. The second reason was that I always like hearing from young folks who enjoy shooting. This was a young man who was enjoying the Mosin he and his dad owned. You don’t hear that too much these days, and I enjoyed the discussion and this young engineering student’s enthusiasm.
The next time I was in a gun store….well, you can guess where this story is going. I pulled the trigger, and 10 days later, I bought my first Mosin home.
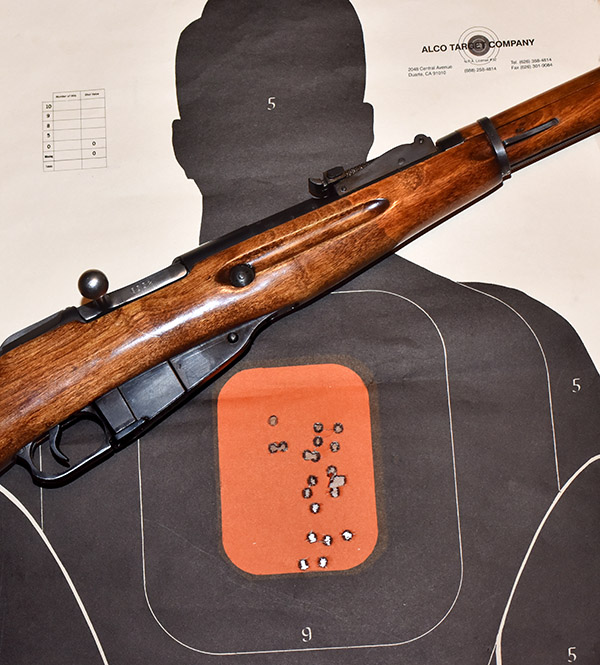
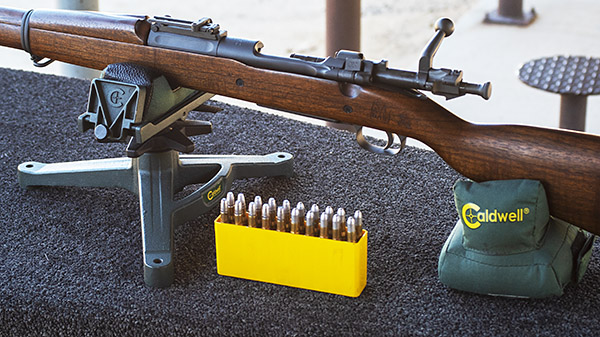
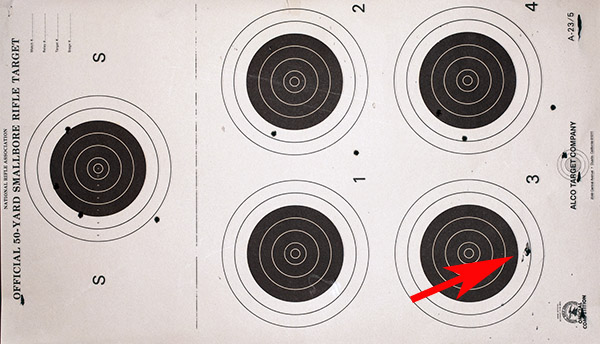
20 rounds from my Mosin at 100 yards with my accuracy load: 43.7 grains of IMR 4320 and the Hornady 150-grain jacketed bullet. I shot this in one of our informal West Gun Club Milsurp matches two or three years ago. The shots crept up as the barrel heated. Still, that’s not a bad 100-yard group from an 80-year-old combat infantryman’s rifle.
The first time I went to the range with the Mosin, my opinion changed completely. The rifle was reliable, it was fun to shoot, and wow, it was accurate. Don’t let a Mosin’s appearance and price fool you. Trust me on this: The Russians knew what they were doing. These are fine rifles.
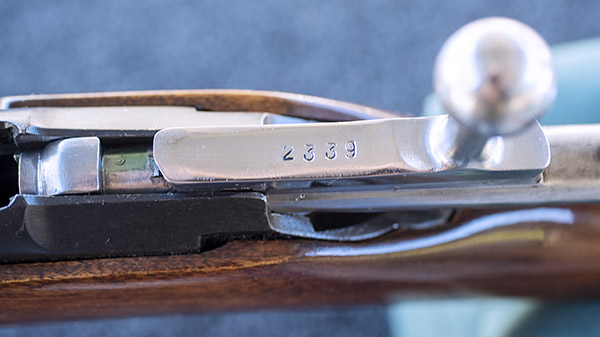
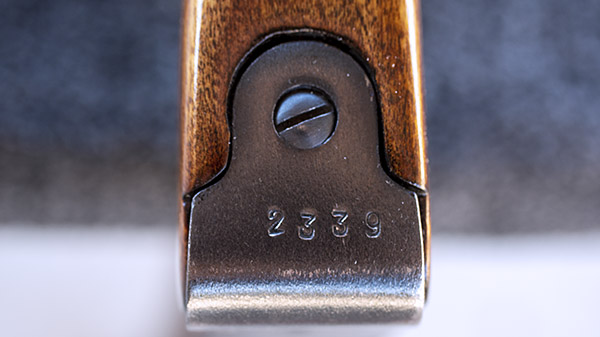
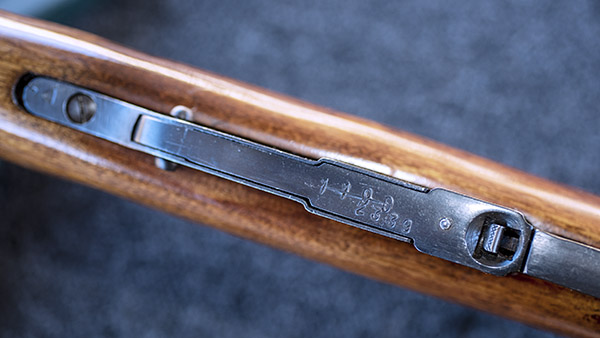
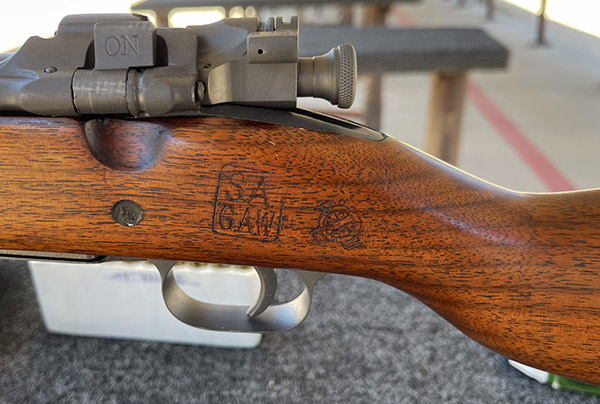
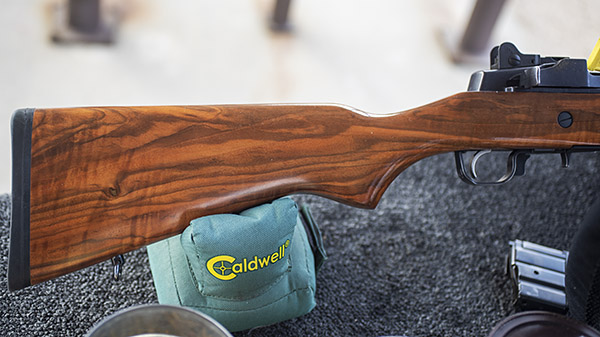
My Mosin was made in the Soviet Union’s Tula arsenal in 1940 and it has matching serial numbers on the receiver, the butt plate, and the bolt. The trigger guard/magazine is what we call a forced match. That means it had a different serial number, but Ivan struck through it and stamped a new serial number to match the others. That didn’t concern me at all. What I worry about are the serial numbers on the bolt and the receiver. If they match, the headspace is most likely good. If they don’t, you’ll want to make the seller show you with headspace gages that the headspace is within spec.
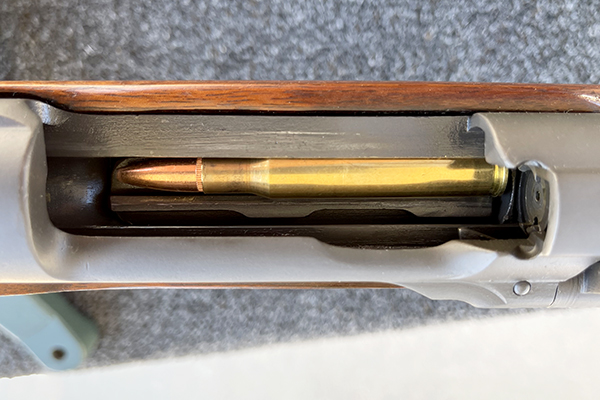
I’ve done a bit of work to my Mosin…glass bedding, a trigger job, and a TruOil refinish. I’ve also done a fair amount of load development (the last time my Mosin saw factory ammo it was in the hands of a Russian soldier; I’ve never shot factory ammo in my Mosin).
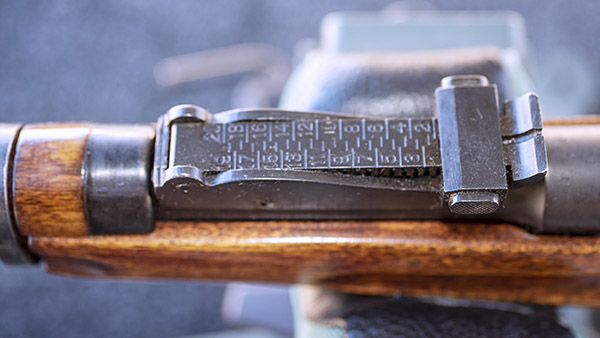
Note the star signifying Tula Arsenal production, and the 2339 serial number. Mosins will have another serial number on the side of the receiver stamped there by the importer, but that’s not the one you need to worry about.The bolt serial number matches the receiver serial number on my rifle, and that’s good. If the serial numbers in these two locations don’t match, you should always check that the headspace is within specification.Note that the butt plate serial number also matches. That’s cool, but it’s not necessary from a headspace or functionality perspective.A forced match. Ivan grabbed a trigger guard (the trigger guard and the magazine floorplate are a subassembly) that wasn’t on the rifle when it was originally manufactured at the Tula Arsenal in 1940. Nyet problemski thought the arsenal rebuild crew; we’ll just strike through the old serial number and add the new one.
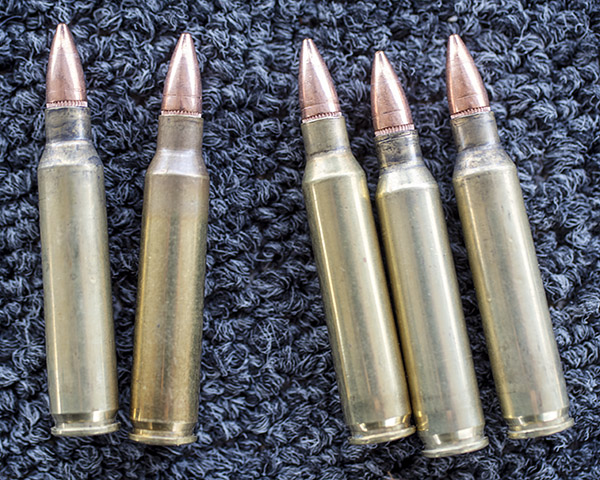
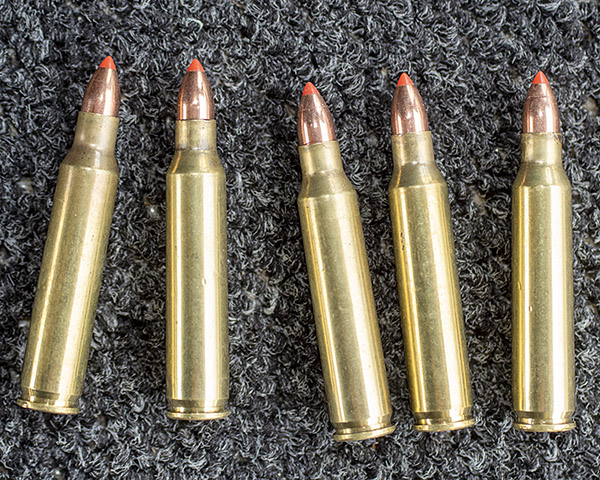
My 7.62x54R ammo “go to” accuracy load is 43.7 grains of IMR 4320 under a Hornady 150-grain jacketed bullet. That load groups exceedingly well at 100 yards. But that’s when I can find the components I want, and that’s a tough thing to do these days. IMR 4320 is no longer made and it’s hard to find bullets, primers, and brass.
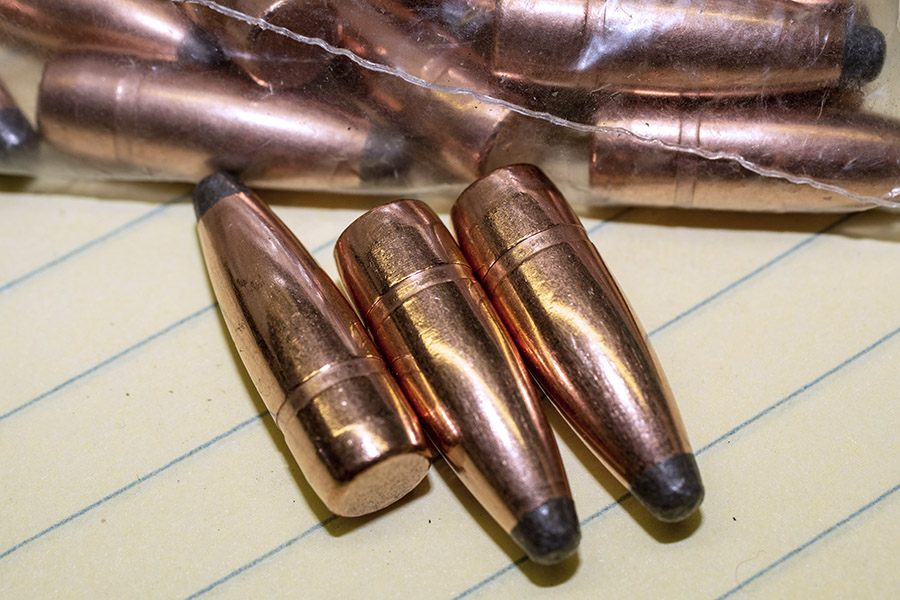
Fortunately, I have always tended to overbuy components and when I spot a good deal on something I think I can use, I scoop it up. When the pandemic and civil unrest shortages emerged a couple of years ago, I didn’t feel the impact from a components perspective. I had plenty of 7.62x54R PRVI brass, I had primers, and I had bullets. That was two years ago, though, and this is now. I shot up a lot of what I had, including my Hornady .312-inch diameter jacketed bullets. But when components were available back in those good old pre-pandemic, pre-Portland-anarchy days, I had spotted a couple of bags of PRVI Partizan 150-grain jacketed bullets. Being the curious pack rat sort of fellow I am, I bought them.
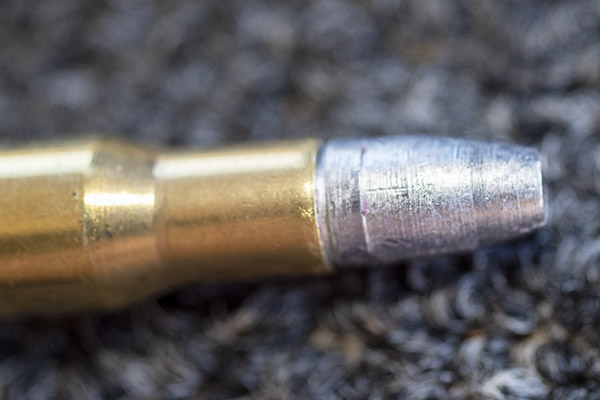
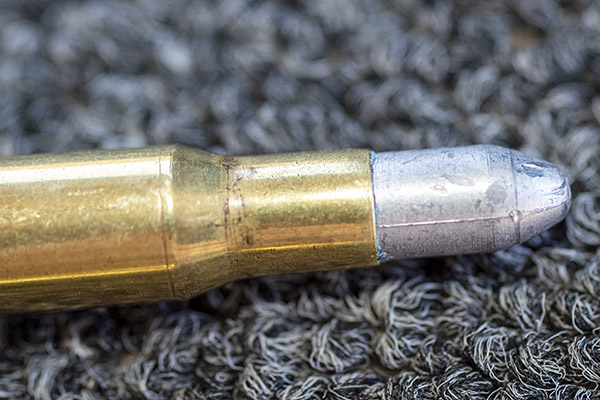
PRVI Partizan (or PPU) 150-grain jacketed softpoint bullets. If you see these, buy them. They’re good. If you see these and don’t buy them, let me know and I will.
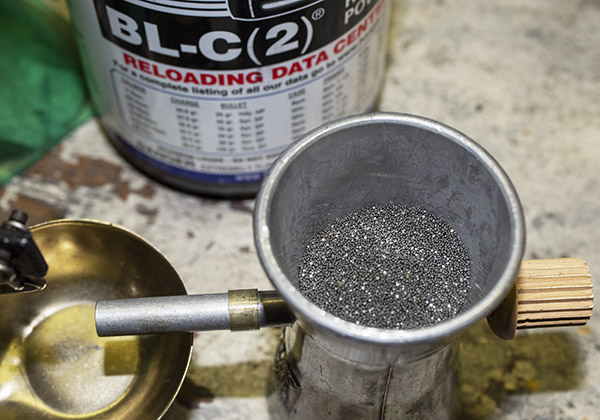
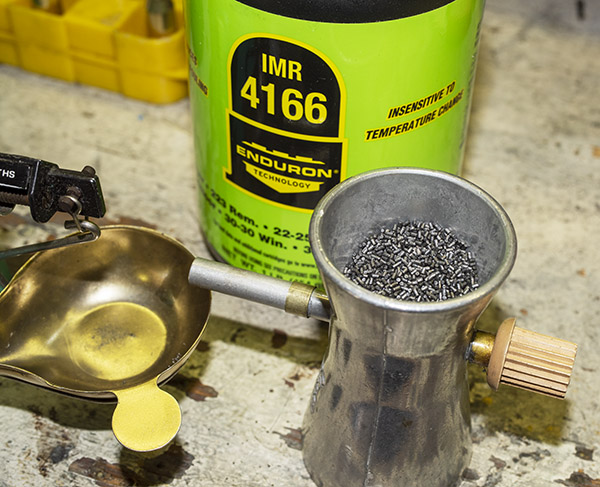
Most recently, my components dealer had a few powders on the shelves, and I picked up some new propellants. I wanted to see if I could work up a good load with the PRVI bullets for my Mosin. One propellant was IMR 4166, which is a powder designed to prevent copper fouling. I’ve already tried it in a couple of 30 06 loads and I was happy with the results, and I wanted to see how it would do in the Mosin. Another was Ballsy 2 (that powder is designated BL(C)2, but everybody calls it Ballsy 2). IMR 4166 is a relatively new powder. Ballsy 2 has been around for decades, but I had never used it. When I saw it, I grabbed a couple of bottles. The time to buy components is when you see them, especially these days.
Ballsy 2 is a spherical powder. It meters through the powder dispenser well.IMR 4166 is an extruded rod powder that looks a lot like 4320 and 4064. It doesn’t meter as well as Ballsy 2, but it meters well enough.
I also wanted to try my previous accuracy load (43.7 grains of IMR 4320) with the PPU bullets first. It didn’t take long to load the ammo I wanted…my previous accuracy load with IMR 4320, two load levels of Ballsy 2, and two load levels of IMR 4166.
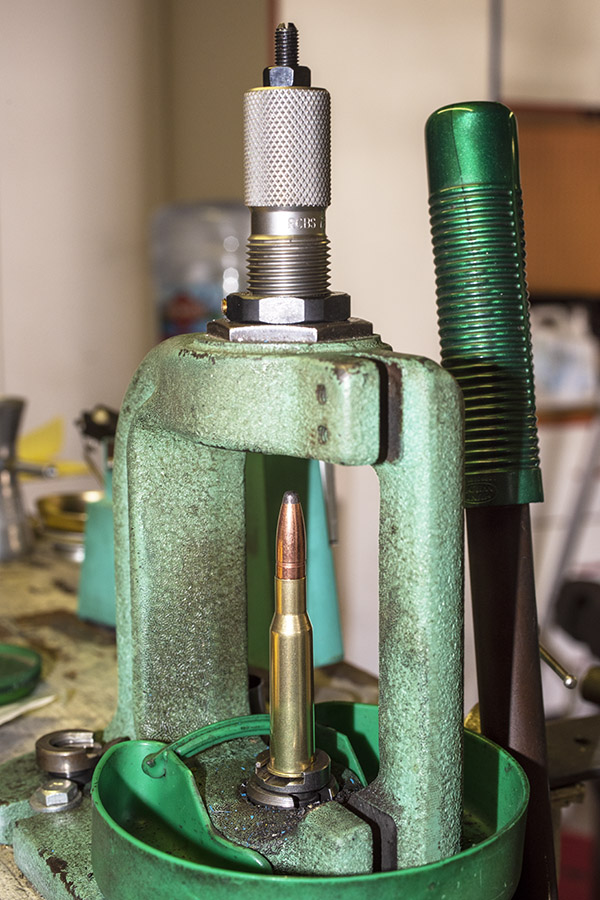
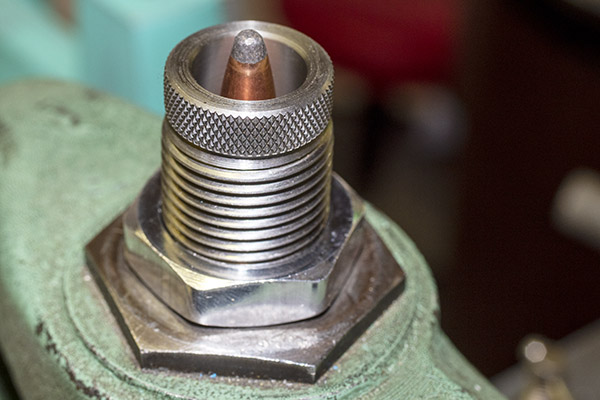
Seating the PPU bullets in my RCBS Rockchucker press.
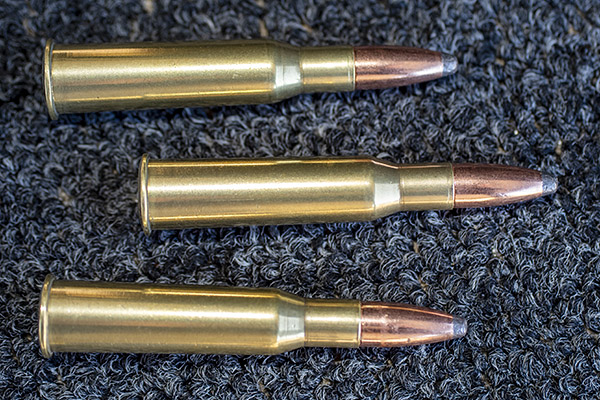
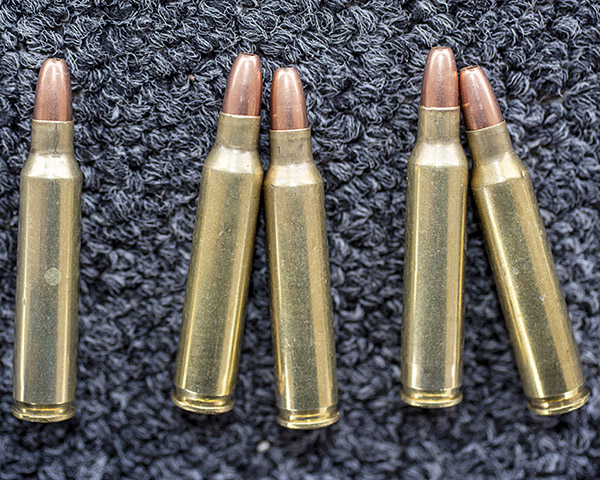
After charging the cases and seating the PPU bullets, I then labeled the ammo and it was off to the range.
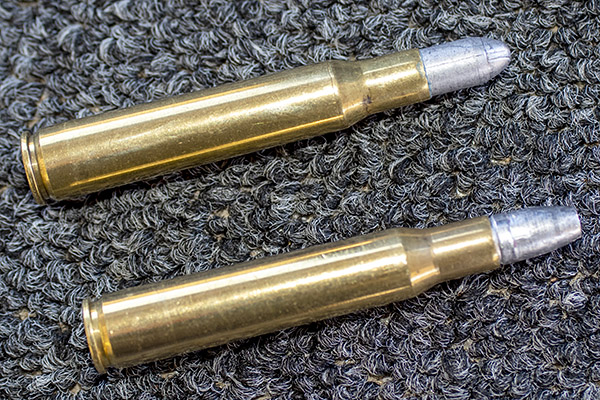
7.62x54R reloaded ammunition. It looks good. It shoots well, too.
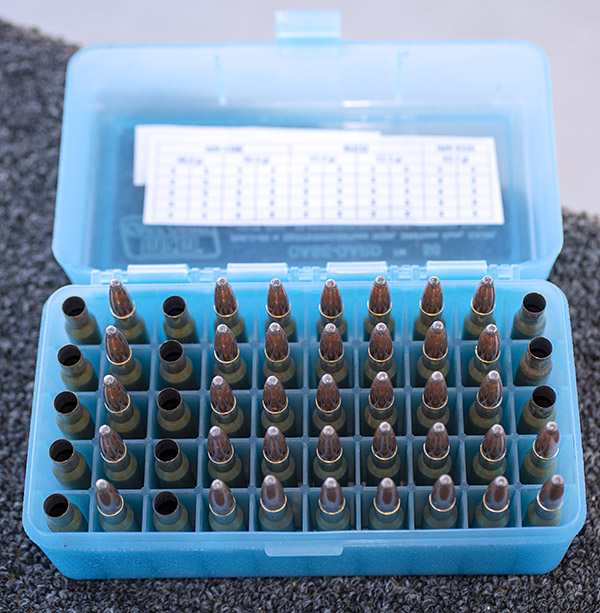
That labeling thing is important. I always label my ammo as soon as I finish loading it. I can’t rely on my memory to know what I loaded.
Loaded and labeled. Reloading is as much fun as shooting, I think.
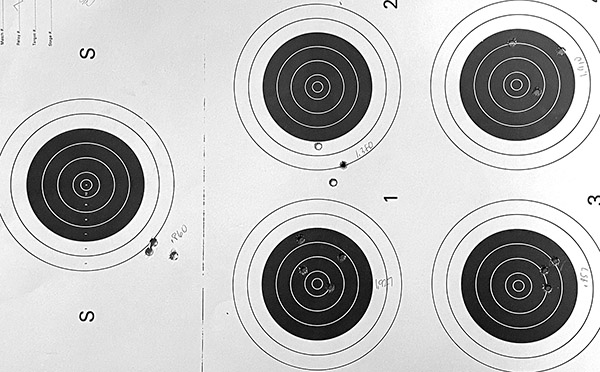
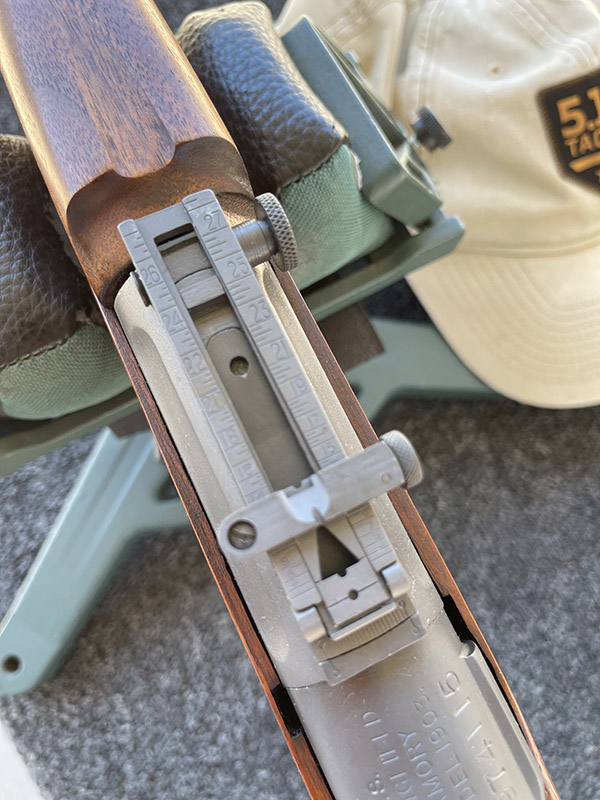
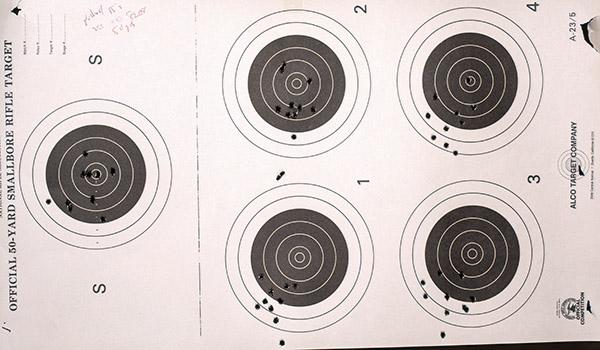
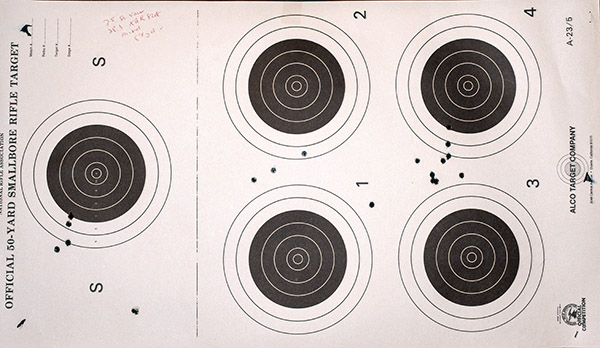
I shot all of my targets at 50 yards as a first look, and I had 10 rounds each. The first target I shot printed a little low, so I raised the rear sight a couple of notches and that put me in the black. The Mosin has great sights.
The rear sight on a Mosin Nagant. You slide the slider forward to raise the rear sight.The Mosin has a crisp, easy to use front sight post. I actually prefer the sights on the Mosin to most modern rifles (I’m not a brass bead fan). Simple is better, and because the Mosin’s length, it’s very easy to get a crisp front sight picture.
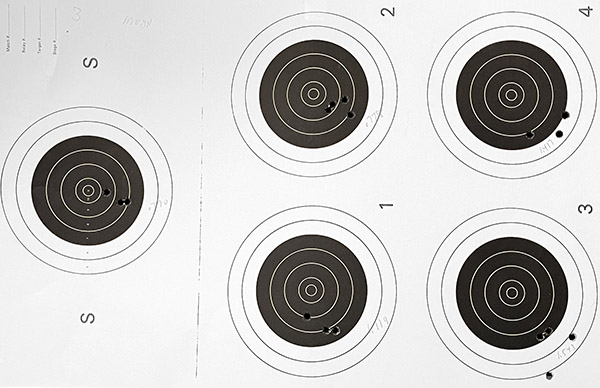
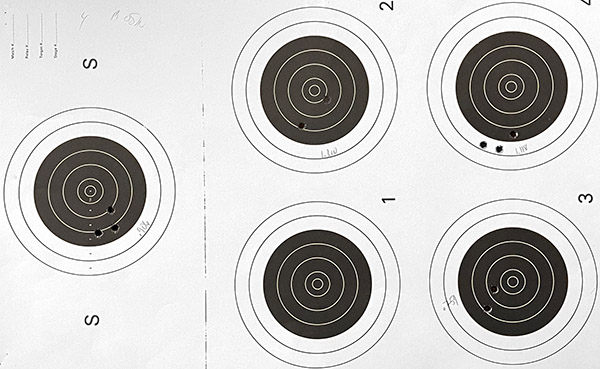
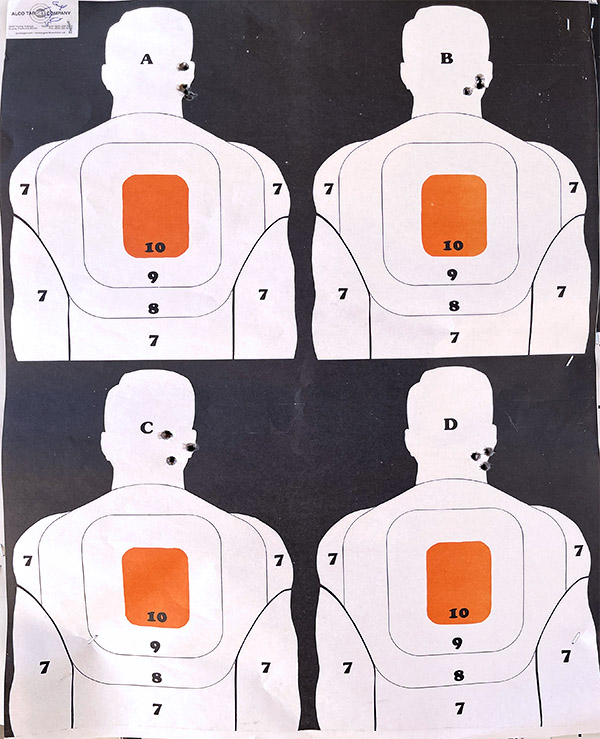
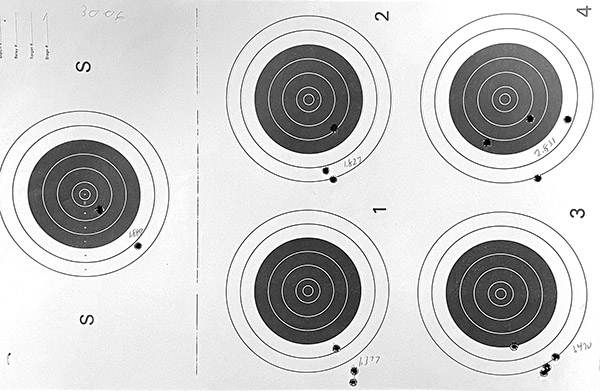
How did I do and what loads worked well? Here are the targets:
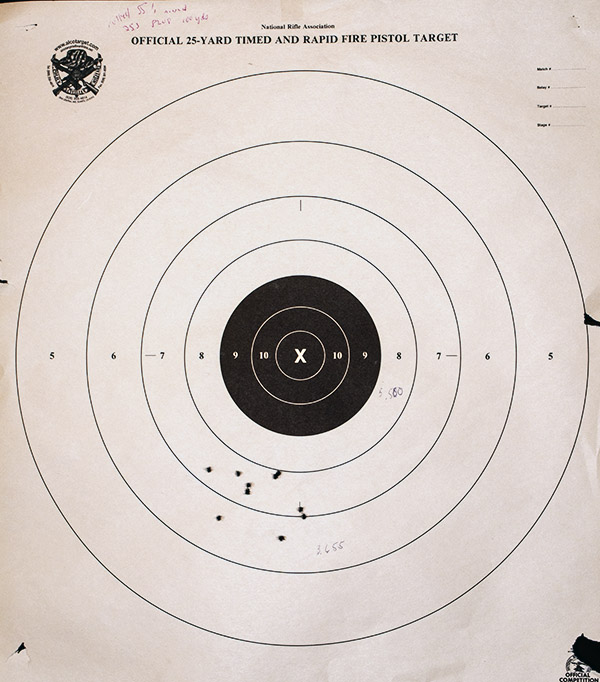
The bullseye on the left was shot with a 1903 Springfield (covered in another blog). The other four bullseyes were Mosin targets with IMR 4320 propellant.Mosin results with two levels of BL(C)2 propellant.Mosin groups with IMR 4166 propellant. Everything shot well in the Mosin.
The results from the targets shown here are tabulated below.
The bottom line is that my former accuracy load (with Hornady 150-grain jacketed soft point bullets) didn’t do as well with the PRVI Partizan bullets, but the PRVI bullets shot very well with BL(C)2 and IMR 4166. That’s good because even though I have a good stash of IMR 4320, it’s no longer in production and the other powders (BL(C)2 and IMR 4166) are available and they are accurate with the PPU bullets. Good times.
About now you might be wondering…how can I get a Mosin-Nagant rifle? It’s not as easy as it used to be. We’re not importing them from Russia like we used to, and you can’t pick them up for cheap at places like Big 5 any more. I felt they were exceptional bargains at those earlier price levels and I bought several (none are for sale), including a sniper Mosin I’ll write about one of these days. I checked on Gunbroker.com and you can still find Mosins, but they seem to be starting north of $300 now, and going up sharply from there. I think they’re still a bargain, even at those prices.
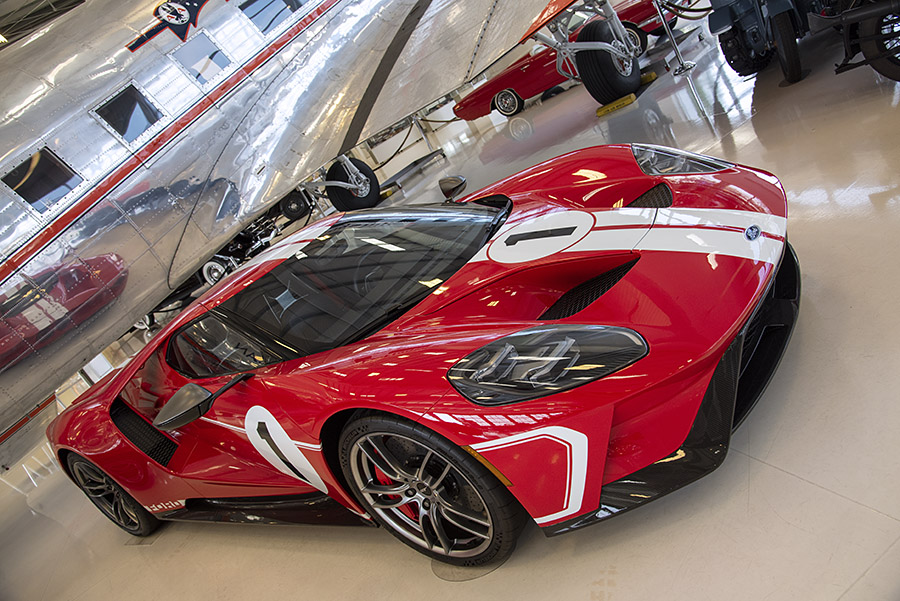
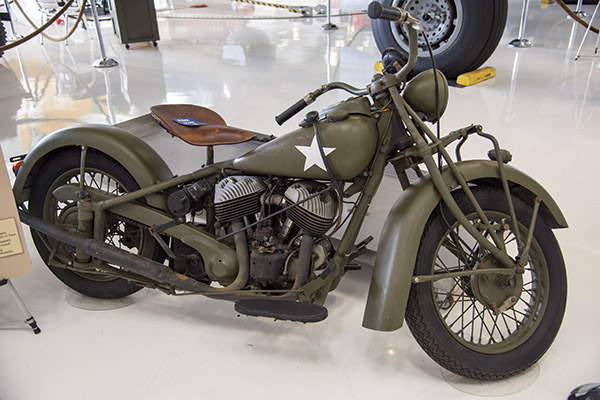
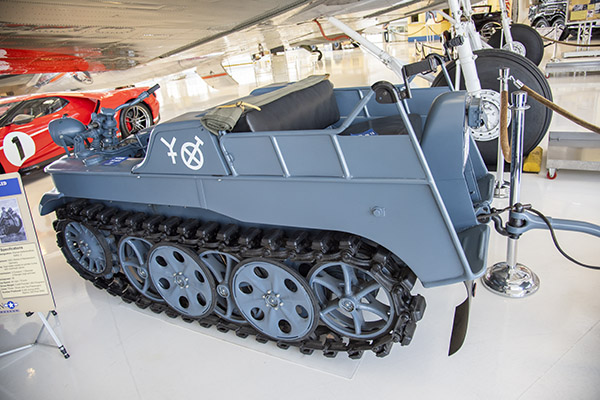
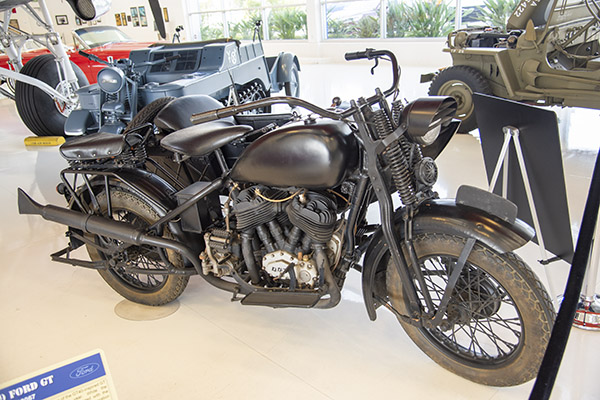
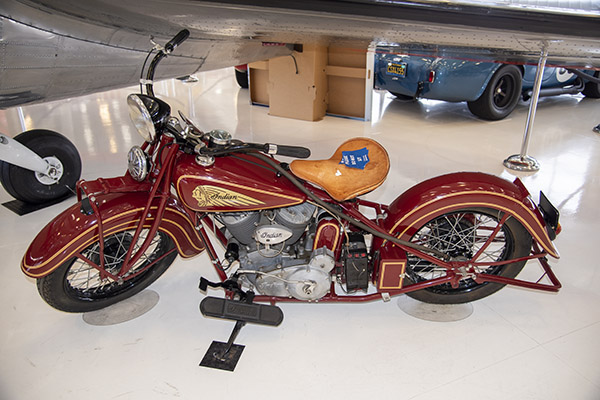
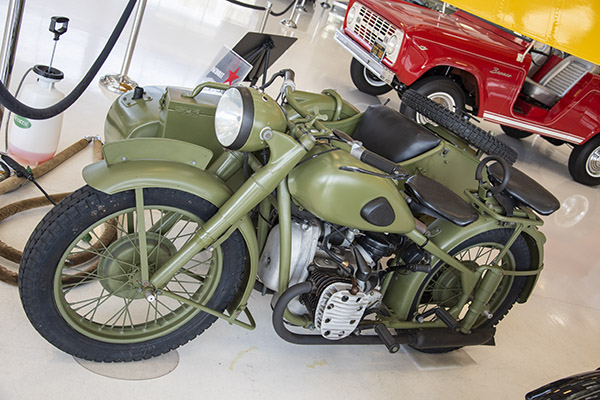
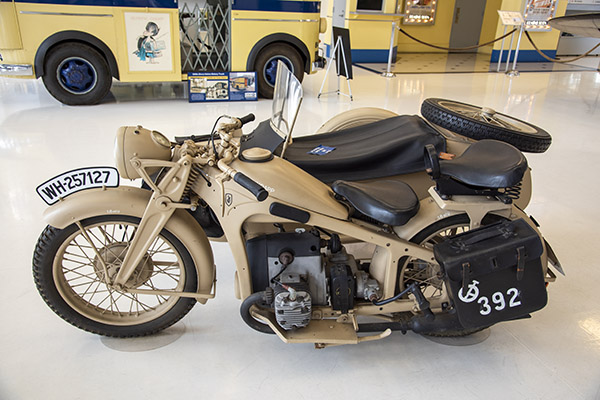
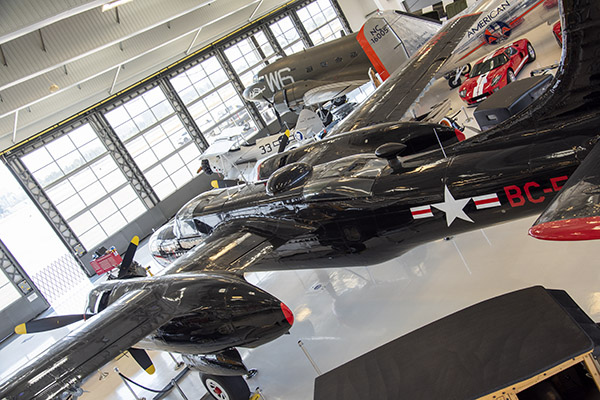
This is a cool story. Good buddy Mike was visiting us here in Leftist Lunacy Land (i.e., the Peoples Republik of Kalifornia, where I hang my hat) and we thought we were running out of things to do. Sue hopped on the Internet and found the Lyon Air Museum near John Wayne Airport in Orange County. I’d never heard of the place, but it was awesome. As expected, the Museum had the obligatory collection of restored World War II aircraft, but (to my surprise) the place also housed a great collection of vintage motorcycles and more than a few interesting cars. Take a look at the motorcycles.
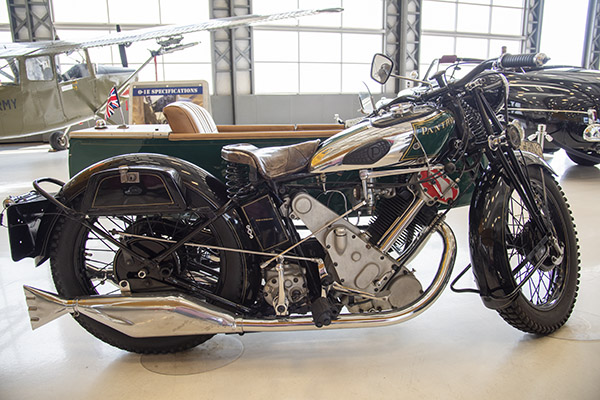
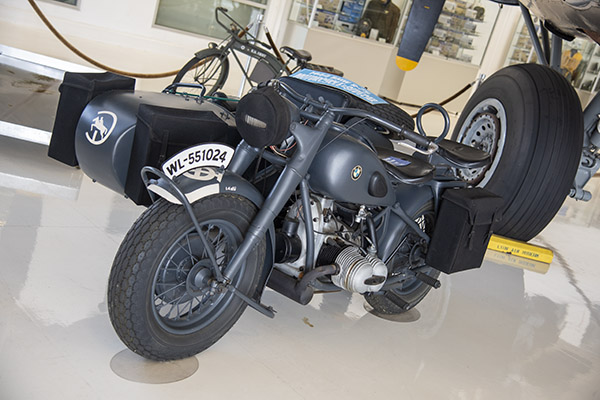
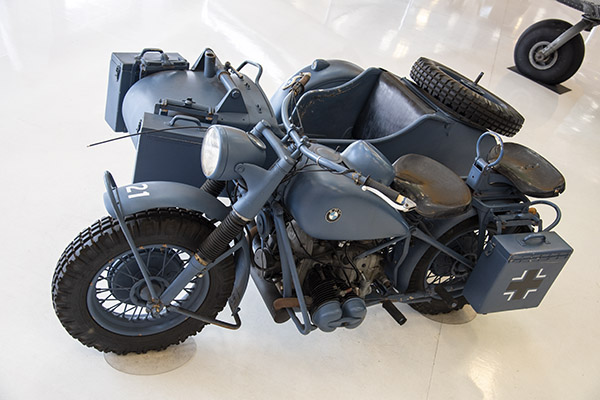
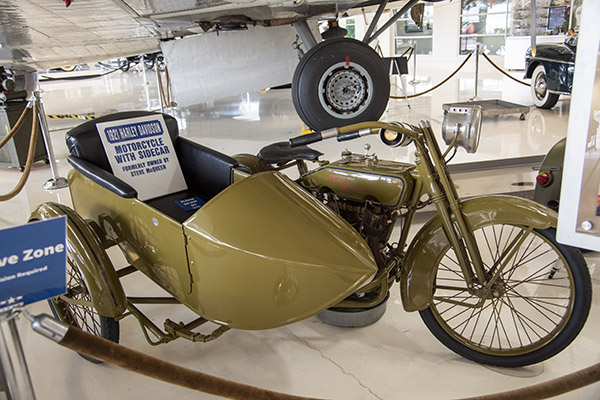
1945 Indian 340B as used by the US Army.1943 German NSU Kettenkrad HK 101 Tracked Motorcycle.1943 Japanese Rikuo Motorcycle and Sidecar.A 1931 Panther Motorcycle with sidecar.A German BMW.1943 BMW R75 with Sidecar.A 1921 Harley.An Indian V-twin.A Russian M-72.A 750cc German Zundapp, another motorcycle used by Germany in World War II.
The Museum was founded by Major General William Lyon, an entrepreneur and civic leader based in southern California. The William H. Lyon Company is one of the largest real estate developers in the world. General Lyon died a few years ago at age 97.
A view from the Museum’s balcony.
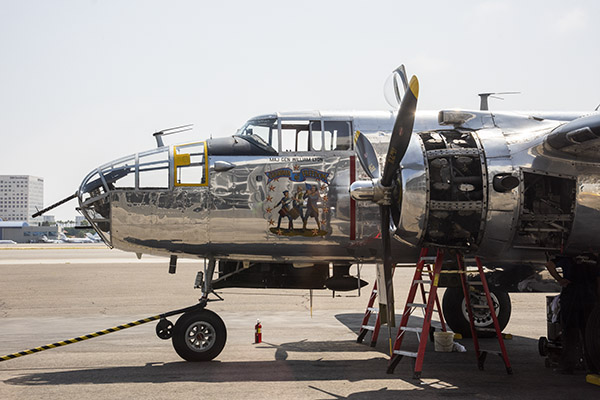
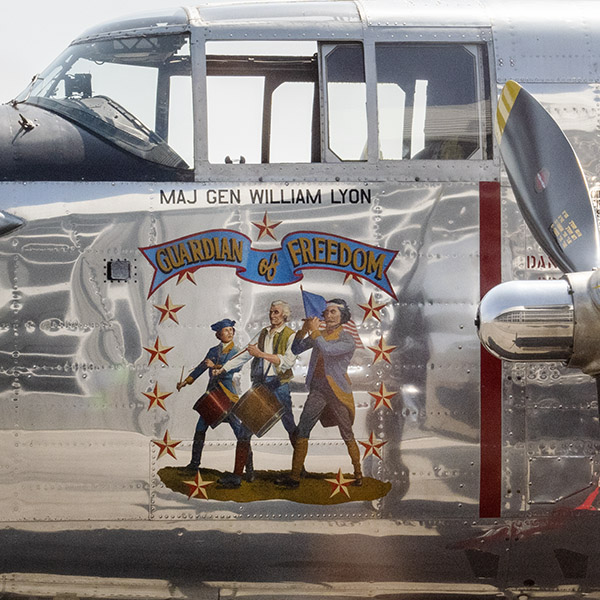
There are many interesting aircraft on display inside the Museum. One of the coolest exhibits was outside the display area, however, on the tarmac just outside. That’s the highly-polished B-25 that was General Lyon’s personal aircraft.
On the tarmac, just outside the display area.Fantastic nose art.
The Lyon Air Museum is located at 19300 Ike Jones Road in Santa Ana, California. You can learn more about the Lyon Air Museum here. Trust me on this: It’s worth the ride. You’ll have a good time.
Never miss an ExNotes blog. Sign up here for free:
One of my many personality flaws is that I’m overly fond of television talent shows. It’s pretty embarrassing how many of these type of programs I watch by dribs and drabs on YouTube. I’d like to break free from the habit but it seems like there is always another undiscovered talent that needs my attention. One of my favorite talent show singers is a chick named Hadwin.
Hadwin has a very distinctive voice like Amy Winehouse or Janis Joplin had distinctive voices except she’s not like them at all. When she was very young, Hadwin’s strange body movements bordered on uncomfortable-to-watch but now that she is older she seems to have calmed down a little. Her voice ranges from a squeak to a low, hollow echo and it’s not so much the quality of her voice that makes her great, it’s the way she rips apart songs with abandon. I wouldn’t call her voice sweet but you’ll be able to tell it is her singing as soon as she opens her mouth. It doesn’t hurt that she looks a little bit like Emma Peel from the 1960’s British TV show The Avengers.
Which is an off-kilter intro for my first big ride on the 1974 RD350. The bike still needs some work but I really wanted to put some miles on the thing to see how it would fare on a longish ride. I started with a run up highway 54 into Carrizozo. 54 is a long, straight road that averages about 4500 feet elevation. As it’s located down in the Tularosa Valley, 54 is usually a bit warmer than the mountain roads to the east. Most of the time traffic on 54 is going about 70 mph and on this day the RD350 was keeping up easily, spinning between 55 hundred rpm and 6 thousand. Unfortunately the RD’s speedometer was showing 85 miles per hour and no way was I going that fast unless a RD350 tops out at 130. I calculated my fuel mileage at the first gas stop as 41 miles per gallon. I thought that was pretty good fuel mileage for a thirsty two stroke. Must be that Torque Induction?
On the way up 54 I noticed the RD350 had a narrow blubbery spot around 5000 rpm and as I turned onto Nogul canyon road and climbed in altitude the blubbery spot grew wider. Nogul canyon road takes you by many curves to the base of the Ruidoso/Alto area. It’s a fun road to let the RD350 wail a little and the road tops out at a little over 7000 feet. I couldn’t wail too much because the RD’s oversized rear tire rubs the fender in hard corners. I have new, correct size tires ordered. By managing my engine speed, a process made easier by the Yamaha’s smooth-shifting 6-speed gearbox, I could get past the rich spot on the fuel delivery and from 5500 up the bike ran fine. You could feel the power loss the higher you went. Gavalin Canyon Road skirts Ruidoso to the east; it’s a twisty road but has a lot of local traffic trying to avoid the zillions of Texans who visit Ruidoso. Many times there are more Texans in Ruidoso than Ruidosoans.
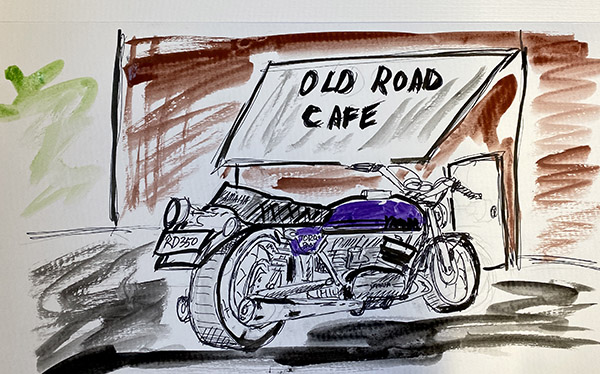
On my way downhill on 70 to Tularosa I took the old road to The Old Road Café on the Mescalero Indian Reservation. The Old Road Café is a multi level place that looks like some sections are real adobe. The back porch area has a decided slant, I wouldn’t be surprised if it toppled over one day. The Old Road Café has the best tacos around. They are oily corn tacos with shredded beef, homemade salsa and I love the things. I loaded up on tacos, rice, beans and iced tea before taking the final plunge into Tularosa and the Tuliefreeze ice cream shop for a little reward.
All in, the RD350 tootled through the mountains and the valley for 150 miles. It was a blast listening to the little twin sing that old song and I was surprised by the RD’s ability to keep up with modern, yet rural traffic. If you had to you could run 80 miles per hour as long as you wanted to hold on. From faded memories I thought the RD would be more of an around town bike but after I get it sorted I see no reason the bike wouldn’t do well on long trips. The only limiting factor is the 3-gallon gas tank, which means you need to find a gas station every hundred or so miles. That’s not always easy to do in New Mexico.
There’s cool, and then there’s really cool. When I was kid back in New Jersey, Richie Haluska was really cool. He lived in New Brunswick and he was my next door neighbor Pauly’s cousin. Richie was a few years older than us and he was always way ahead of the curve when it came to cool. Pauly and I weren’t old enough to drive, but Richie was, and in line with his coolness he showed up at Pauly’s one day driving a 1965 GTO. Alpine blue with a black vinyl top and a black interior, three deuces and a four-speed, and a 389 (remember that last phrase; you’ll hear it again shortly). Did I mention this guy was cool?
I’d never seen anything as beautiful as that GTO. The looks, the wheels, the wide oval redline tires, and, you know, the exhaust notes. I could (and did) look at that car for hours, from every angle, dreaming of one day owning my own GTO. John De Lorean was the guy who pioneered the muscle car concept and Pontiac was the first to drop a big block motor into a mid-size car. Pretty soon all the manufacturers were doing it, but Pontiac was the first and it was the GTO. De Lorean later went on to fame making snowmobiles (the Back to the Future car), but we didn’t know any of that in the mid-1960s. We just knew that the GTO was so cool a rock group sang a song about it. And Richie had a GTO. Like I said, this guy was cool.
One day I was playing hookey (I can’t remember why, but in those days I didn’t need much of a reason) and later in the day I decided I needed to get to school. Richie offered to take me. A ride in GTO! I had never been in one. I think I was maybe 14 years old.
The car was magnificent, but the best was just seconds away. We reached the road to my school and after making that sharp right, Richie put his foot in it. Up to that point I had not felt a muscle car as the Lord intended muscle cars to be felt, but that character flaw disappeared in an instant. Pushed into the seat and hearing the deep ExhaustNotes growl, seeing that big hood scoop loom large, I remember what I thought: I have got to get me one of these!
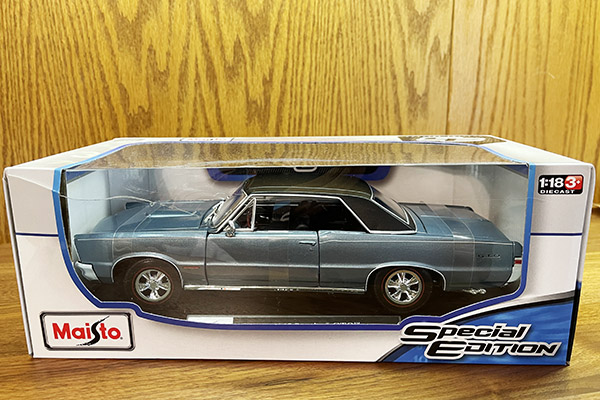
The other day Susie and I were in Costco. They had a bunch of die cast metal car models, and they were blowing them out for just $14.95. They were all awesome, but the one that instantly arrested my attention was the 1965 GTO. It’s as if the Maisto maestros had Richie in mind when they created it. It was exactly like Richie’s. Alpine blue. Black interior. Black vinyl roof. White pinstripes. It was perfect. And it’s mine now.
Richie has gone on to his reward (he passed a year or two ago). I hadn’t seen Richie since I was a teenager. But I remember Richie and I remember that ride to school like it was yesterday. That’s Richie and his wife Dina in the photo above, and the photo captures his personality perfectly. He was a cool guy.
Rest in peace, Richie.
Never miss an ExNotes blog…get your free subscription here:
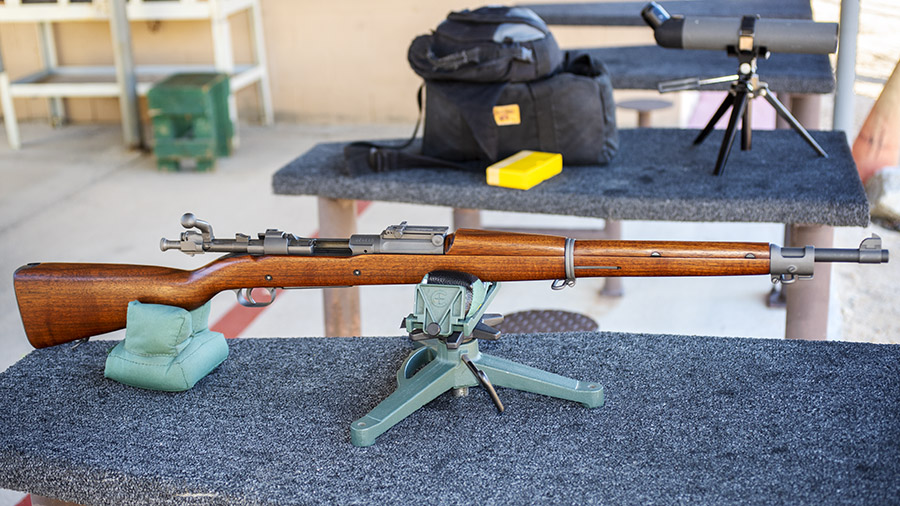
This is an interesting story and it’s one of the very few times in my life I was hosed on a firearm purchase. The rifle is a 1903 Springfield I bought a few years ago and didn’t shoot much. The times I shot it previously I had experimented with cast bullets and it shot okay, but not great. Then I tried it with jacketed bullets (loads at much higher pressures), and what do you know, I had a headspace issue. I could see it in the primers that had partially backed out of the brass after firing, and on one round, I split a case circumferentially just ahead of the base (indicating with near certainty an excess head space issue). I borrowed good buddy Greg’s 30 06 head space gages, and the bolt closed on both the no go and the field service gages. That’s a no no.
The 1903 Springfield rear sight. The 1903A3 went to a much less expensive stamped steel rear aperture sight.
My first thought was to have the existing barrel set back and rechambered, but that didn’t work. The 1903 Springfield has a barrel collar that holds a very sophisticated rear sight and positions the upper handguard. When we set the barrel back, the rear sight integrity was greatly weakened and the front handguard had excess play. Nope, I needed a new barrel.
I checked around and came to the conclusion that the best place to get this kind of work done is the Civilian Marksmanship Program (CMP) Custom Gunshop. This is a quasi-government arsenal and these folks are the experts. I priced having a new barrel and rear sight collar installed on my 1903, cutting a new 30 06 chamber with the correct headspace, and having the entire gun re-Parkerized. The work was surprisingly reasonable. I had to wait my turn in line, but that’s okay. I had other guns I could shoot.
With a re-Parkerized finish and a new barrel, my 1903 looks great.Very cool. The 1903 “scant” stock, complete with cartouche.
When the rifle was returned to me, it was stunning. It literally looked like a brand new 1903. A quick trip to the range followed, and I tried some jacketed bullet factory level reloads. I loaded and fed from the magazine, as the 1903 is a controlled round feed and it’s best in these guns to let the cartridge rim ride up and find its position behind the extractor.
A 30 06 cartridge in the 1903’s magazine.
I shot a few targets with copper jacketed bullets and found that the rifle shot about a 8 inches high and slightly to the right. The rear sight would take care of the right bias, and I figured the high impacts were okay. Some military rifles of this era are designed with a 300-yard battlesight zero, which means they shoot to point of aim at 300 yards at the lowest sight setting (everything in between is high, with the idea being that if you hold center-of-mass on a human size target, you’ll have a hit out to 400 or 500 yards).
High and slightly to the right with factory-level reloads. My point of aim was 6:00 on the orange bullseye.
I could buy a taller front sight blade to lower the point of impact, but that wasn’t the way I wanted to go. Nope, my plan was to shoot cast bullets in this rifle. My guess was that if the rifle shot 8 inches high at 50 yards with jacketed bullets, cast bullets would be right where I wanted them to be.
Loading my first batch of 1903 cast bullet test ammo was easy. Years ago I was on a reloading tear, and I had loaded a bunch of plated 110-grain round nose bullets with 14.0 grains of Unique. I knew those loads were terrible in other 30 06 rifles (the lead under the copper plating is dead soft and it tears off, resulting in terrible accuracy). Hey, no problem. I pulled the plated bullets, left the 14.0 grains of Unique in the cartridges, flared the case mouths, and seated different cast bullets. One was the 180-grain cast Hursman bullets with gas checks (these worked well in the .300 Weatherby), the other was the 210-grain Montana bullets I picked up from good buddy Paul (these are also gas checked bullets). After seating the cast bullets, I crimped the brass with my Lee factory crimp die.
The Lee factory crimp die. It’s shown here with a jacketed bullet. It has collets that circumferentially crimp the case mouth to the bullet.30 06 reloads with cast bullets. That’s the Montana bullet on the upper cartridge, and the Hursman bullet in the lower cartridge. If you look closely, you can see that the case mouth has been crimped by the Lee factory crimp die.A macro shot of the Hursman 180 grain bullet. The case was crimped with a Lee factory crimp die.A similar photo of the Montana bullet. It’s cast with a Lyman mold. The Montana bullet’s rounded nose fed better from the 1903 magazine.
I only loaded 20 rounds (10 each with the two different cast bullets), as this was to be a “quick look” evaluation.
A morning at the range on an overcast day, a beautiful 1903 Springfield rifle, and .30 06 ammo loaded with cast bullets. Life doesn’t get much better.
Both loads shot reasonably well. I’m not going into the upholstery business with either of these loads (they are not tack drivers), but they are good enough. I was particularly pleased with the 210-grain Montana bullets. The Hursman bullets had proved to be the preferred load in the .300 Weatherby; the Springfield showed a decided preference for the Montana bullets.
I shot at 50 yards with both loads; future testing will be with the Montana bullet at 100 yards.
The Hursman bullet load at 50 yards. The load was 14.0 grains of Unique; it may be that the Hursman bullets will group better with other propellants.The Montana bullet at 50 yards on the left-most bullseye (the other bullseyes were shot with a Mosin-Nagnt rifle, covered in another blog). I found a sweet spot with that 14.0-grain Unique load and the Montana bullet.
Unique is not the best powder out there for loading cast bullets in rifle cartridges. In the past, I’ve shot much better groups in other rifles with IMR 4227, 5744, SR 4759, and Trail Boss. Those evaluations in the 1903 are coming up. For now, I know I’ve got a good load with Unique and the Montana bullets.
One of the big takeaways for me in this adventure is that when you buy a milsurp rifle, always check the headspace to make sure that it is within specification. It’s pretty common for these rifles to have gone through arsenal rebuilds and to have been cobbled together from parts bins, and when that occurs, if the chamber isn’t matched to the bolt you can have an excess headspace problem. That’s a bad situation, as it can be dangerous to the shooter and anyone nearby.
You can find headspace gages on Amazon and elsewhere. If you’re going to buy a military surplus rifle, checking the headspace should be part of the drill.
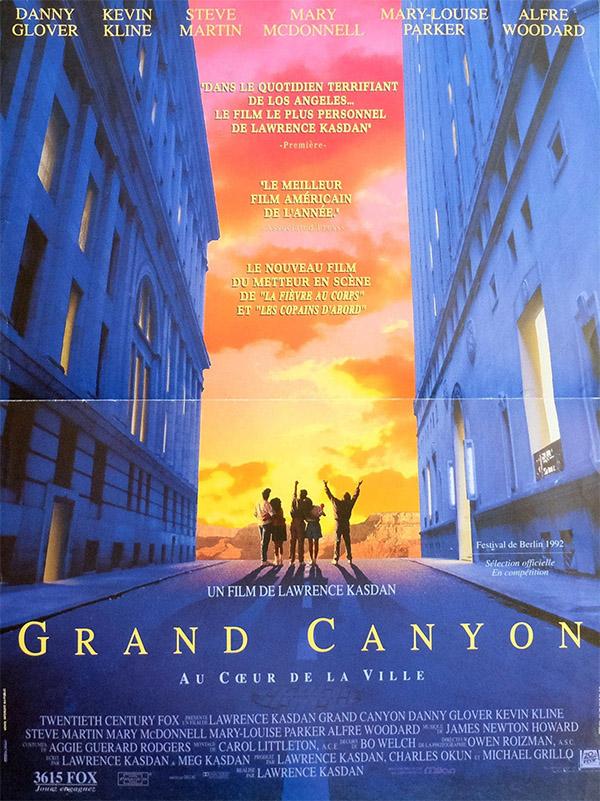
Arizona’s Grand Canyon National Park is another bucket list destination. As As was the case described in our recent blog on Devils Tower, a movie inspired my first visit. A contemporay review of the 1991 Grand Canyon movie said it was about “random events affecting a diverse group of people exploring the race- and class-imposed chasms which separate members of the same community.” That’s an artsy-fartsy tinsel-town mouthful. Grand Canyon was pretty good and it had some big name actors in it. But we’re not here to talk about the movie.
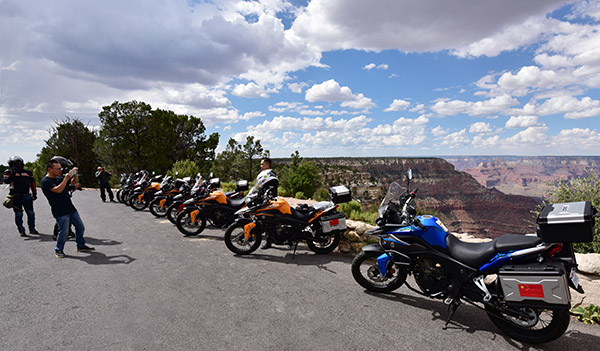
On to Grand Canyon National Park. The name sounds majestic, and the Grand Canyon surely is. I’ve been to the Grand Canyon many times (it’s only a day’s ride from home) and I would not pass on an opportunity to see it again. It’s a great ride in a car or on a motorcycle. I’ve done full-family car trips and I’ve done a number of motorcycle trips. Interestingly, some of the best rides were on the 250cc CSC RX3 motorcycles with guys from China, Colombia, and the US (you can read more about the RX3 trip in 5000 Miles At 8000 RPM).
A Grand Canyon photo from the 5000-mile Western America Adventure Ride.
There are two places to see the Grand Canyon National Park, the North Rim and the South Rim. The South Rim is by far the most heavily visited area and offers the best views, but the North Rim is a better ride, especially the last 50 miles or so along Arizona Route 67 (also known as the North Rim Parkway). Getting to the South Rim involves riding through a spectacular desert to get to Grand Canyon National Park, at which point you enter a beautiful pine forest. And when you visit the South Rim, you can continue on in the direction you were traveling when you leave — you don’t have to backtrack. The North Rim is different: There’s one way in, and one way out. It takes longer to get to the North Rim along heavily-forested Route 67 (and that road shuts down when it snows), but wow, what a ride!
My first Grand Canyon visit brought me and a riding buddy to the North Rim on a couple of Harleys nearly 30 years ago. It rained all the way in, we were thoroughly soaked and chilled, and I still remember how much fun I had. The Grand Canyon Lodge is the pot of gold at the end of the rainbow. It’s a magnificent place to stay or you can just have lunch there. The view is awesome, but I think the views from the South Rim are even better (and there are more vantage points).
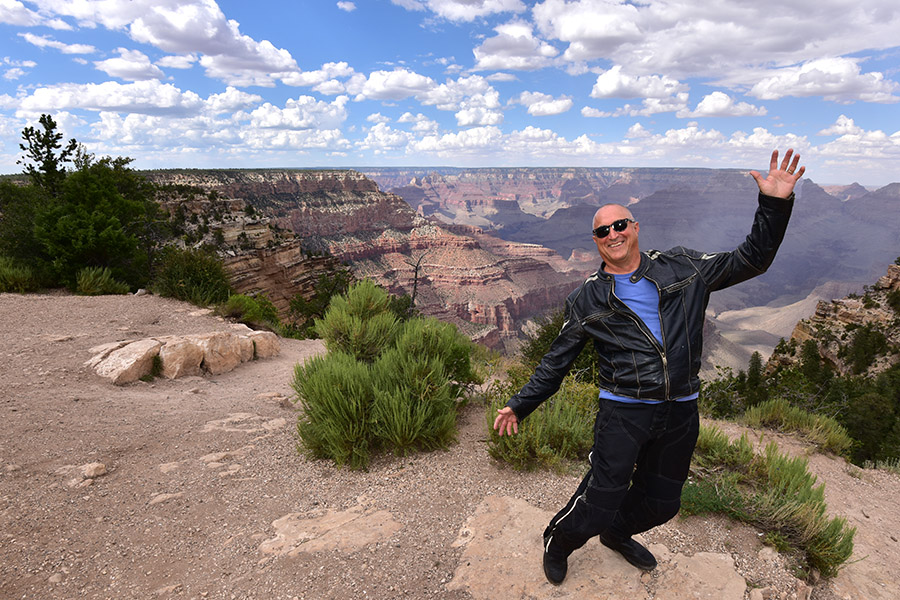
Ah, the South Rim. That’s where I took the big photo at the top of this blog and it shows none other than world-famous concrete consultant and moto-journalist Joe Gresh. It almost looks fake, like I had a cutout of Gresh and pasted it into the photo, but it’s not. He’s just a very photogenic guy.
You can approach the South Rim from either the east or the west via state Route 64 running along the canyon’s southern edge. On my last trip, we came in from the eastern end, paid our fees to enter the park, and a helpful Ranger explained that there were a series of viewpoints along the way. We hit every one and each was beyond stunning. It’s hard to believe what you see when viewing this magnificent region, and it’s easy to understand why the early Spanish explorers concluded it was impossible to reach the Colorado River a mile below. You can see all the way to the North Rim (10 miles away as the hawk flies, but a full day on a motorcycle). On a clear day you can see 100 miles.
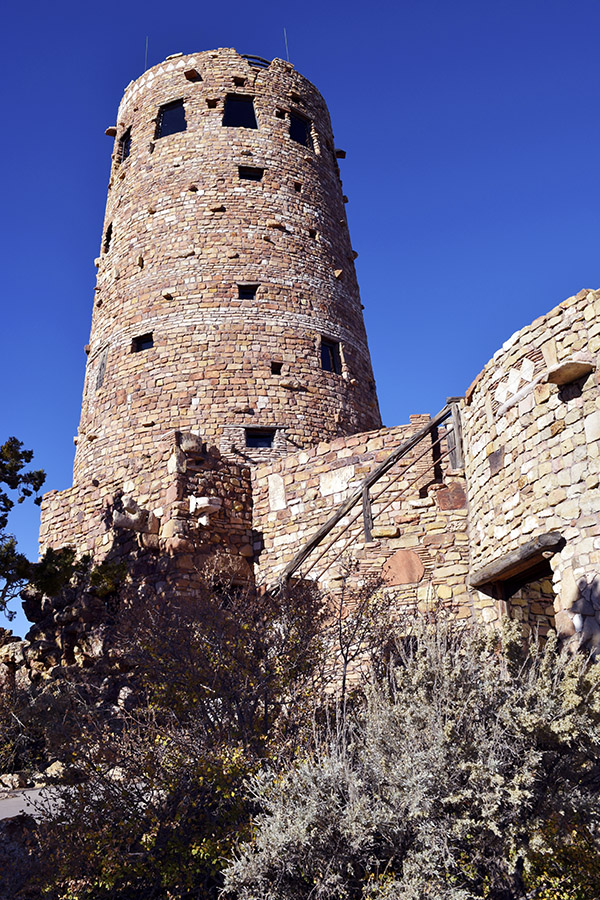
The Tower at the eastern edge of the South Rim.
There’s an ancient tower of sorts on the easternmost viewing spot along the South Rim and we had an interesting experience there on the CSC Destinations Deal tour. Our good buddy Orlando left his gloves on this new RX3 while we were taking in the view, and when we returned, we caught a thief red-handed trying to steal them. Or rather, I should say red-beaked. It was a big old crow (a bird, not the whiskey) and he was trying to make off with one of Orlando’s gloves. We all started screaming at that big old blackbird, and it dropped the glove and flew away. That was a good thing. It was super cold that morning and Orlando would have had a tough time continuing the ride without both gloves.
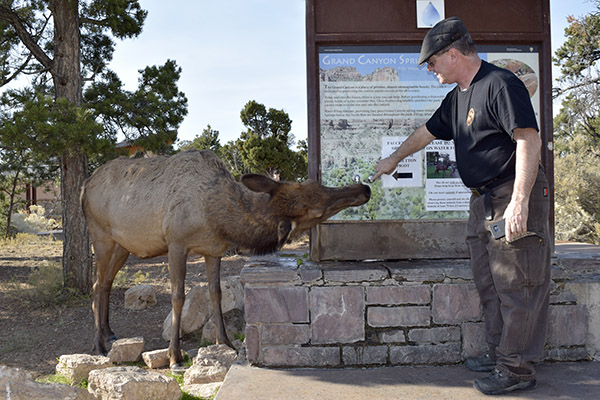
Good buddy Rob giving a Grand Canyon elk a drink on the CSC Destinations Deal ride. Don’t try this at home, kids.
The earliest known Grand Canyon habitation occurred during the Paleo-Indian period nearly 12,000 years ago, but the emphasis here is on “known.” Archeologists are still discovering ancient stuff down there. Geologically, the Grand Canyon started about 20 million years ago. The Colorado River, flooding, ice, wind and seismic shifts worked their magic to create the 277-mile-long, 15-mile-wide, and mile-deep Grand Canyon.
Fine dining in Williams’ Red Raven restaurant, right on Old Route 66. That’s me and good buddy Paul after a wild boar hunt.
Hey, here’s one more thought: If you’re doing the South Rim, it’s something that you can take in in a day. Most folks stay in Grand Canyon Junction just outside the entrance to the South Rim, but that’s a real touristy area and if you don’t like McDonald’s or pizza, your dining choices are limited. My advice is to stay in Williams, about one hour south. It’s just off I-40. Williams is a bit touristy, too, but the hotels and restaurants are a cut above what’s in Grand Canyon Junction. It’s a nice ride north to the South Rim early the next morning. Trust me on this; you can thank me later.
When you’re a reloader you get a bunch of odds and ends components and you go on a jag to load them all just to get the stuff off the bench. Oddball bullet dribs and drabs, brass you don’t want to bother cleaning, trimming, or sorting, that sort of thing. I had a bunch of the above laying around crying out to become .223 ammo, I hadn’t been to the range with my Mini 14, and it was time to shoot up the leftovers.
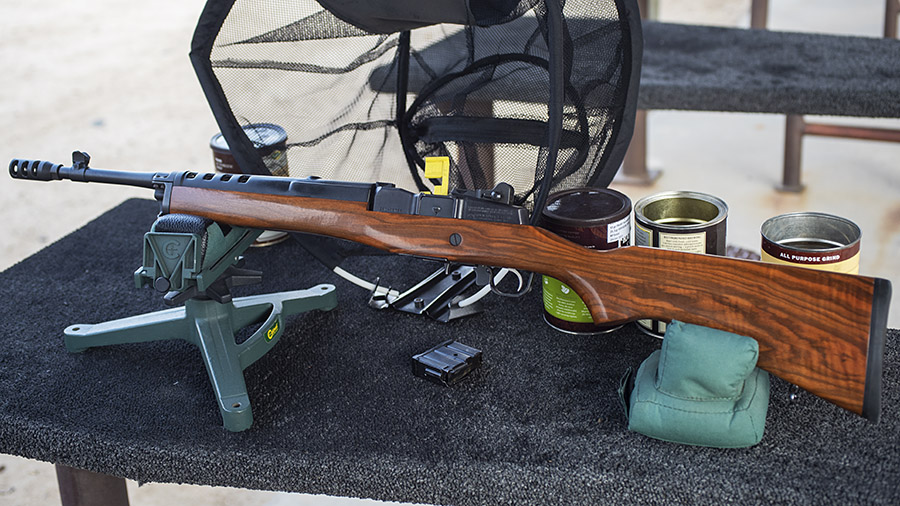
First, a bit about the rifle. It’s what Davidson’s called the Mini 14 Tactical, and it was a limited run they had Ruger make with Circassian walnut stocks. I looked at a bunch of them on Gunbroker before I spotted the one you see here and I pounced (most had very plain walnut).
An unusual Mini 14 with a Circassian stock. I get a lot of compliments on this rifle. It’s not for sale.
This is a rifle that gets compliments every time I bring it to the range. I’ve written about my Mini 14 before here on the ExNotes blog and I know what it takes to make this puppy group. This wasn’t going to be one of those days; like I said, I was just using up remnants from reloading sessions for other rifles.
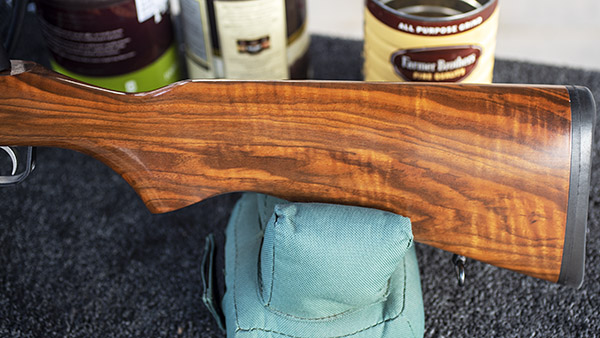
The left side of the Mini 14’s Circassian walnut stock.The right side. This sure is a nice-looking Mini 14.
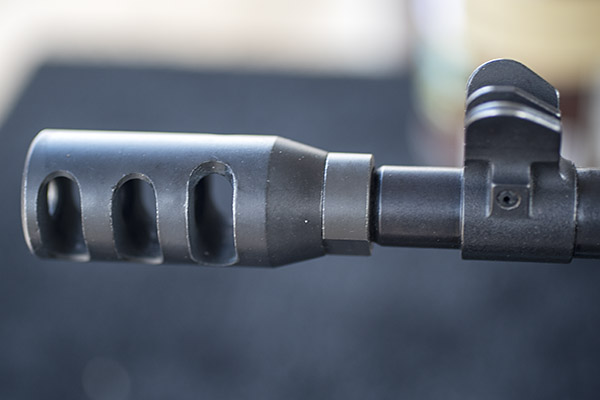
The Davidson’s Mini 14s came with 30-round mags and a flush suppressor, both of which are apparently favored by folks who rob gas stations and convenience stores (our legislators have their heads so far up their fourth points of contact they haven’t seen daylight in decades). I replaced the flash suppressor with a muzzle brake to make the rifle much less intimidating.
You might laugh at a muzzle brake on a Mini 14. It works, though. Fire a Mini 14 with a muzzle brake and then fire one without and you’ll feel the difference.
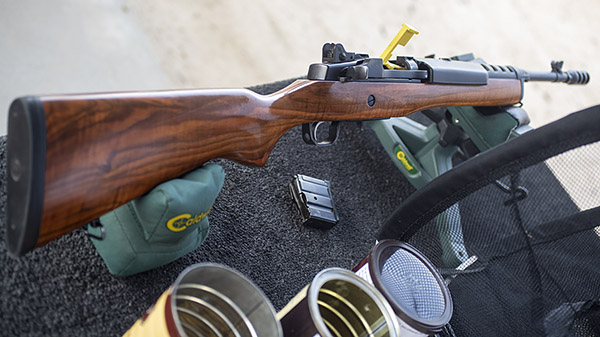
I also installed the Tech Sights Mini 14 rear aperture sight, which I like a lot better than the standard Mini 14 rear sight.
The Tech Sights rear aperture sight. If you have a Mini 14 and you don’t have one of these, you’re missing the boat.
I loaded three configurations of ammo. The first was a new load I had developed using XBR 8208 propellant. For reasons I can’t remember, I had a bunch of Hornady 55-grain full metal jacket bullets I had pulled from another load. If you look closely at the photo below, you’ll see the circumferential ring where the collet puller grabbed the bullets. My thought was that pulled bullets would degrade accuracy, which is why they were tucked away and ignored for a long time. The load was 25.3 grains of XBR 8208, mixed brass previously fired in the Mini 14 (neck sized only for this load), and Winchester small rifle primers. I seated the bullets about midway in the cannelure, but I didn’t crimp. For this load, I didn’t tumble or trim the brass, either.
55-grain bullets loaded in .223 Remington brass for the Mini 14. Note the circumferential bullet puller collet marks just above the cannelure.
Surprisingly, the above load shot relatively well. If the marks on the bullets affected accuracy I couldn’t see it. I shot a few 10-shot groups at 50 yards just to get into the swing of things, and then I fired a 10-shot group at 100 yards (which I’ll get to at the end of this blog). The 10-shot group at 100 yards wasn’t too shabby. The rifle shot low left (my aim point was at 6:00), but I hadn’t adjusted the sights for this load.
50-yard groups with the above load. The flyers are do to operator error. The groups showed promise at 50 yards, and I knew I would test them at 100 yards.
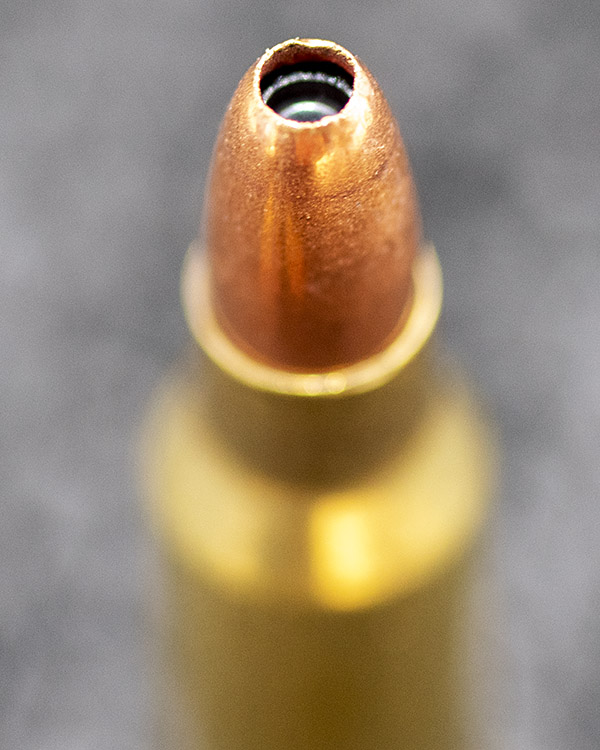
For the next load, I had a few 35-grain Hornady V-Max bullets I normally use for my .22 Hornet. This is a bullet I guessed would not do well in the much-higher-velocity .223 Remington cartridge, and I was right. Some of them grouped okay at 50 yards, but they were right on the edge of instability. A few tumbled and went wide. I didn’t bother firing these at 100 yards; if they were flaky at 50 yards, they would be positively flaky at 100.
.223 Remington cartrdiges loaded with 35-grain Hornady VMax Hornet bullets. The ammo looks good, but it was not a good load for the Mini 14.The 35-grain VMax loads at 50 yards. The bullets were right on the stability threshold.
The last group was one I put together using another set of leftover Hornet bullets, the 46-grain Winchester jacketed hollow point bullet. They shot poorly when I tested them in my Ruger No. 3 Hornet, and they were really terrible in the .223 Mini 14. I suspect they were breaking up in flight. Several went wide or through the target sideways.
46-grain Winchester hollowpoint jacketed bullets loaded in .223 brass. This didn’t work out at all.A huge hollowpoint. It might work well on prairie dogs in the .22 Hornet, but these bullets weren’t stable and didn’t group well in the .223 Remington cartridge.
The 46-grain Winchester groups were huge at 50 yards and I could see on the target that they were unstable. At least one tumbled. Some never even made it to the target.
The above load’s poor performance was predictable, but I’m one of those guys who has to pee on the electric fence. You know, just to make sure. The arrow points to a spot where a bullet went through the target sideways.
After testing the above bullets at 50 yards, I knew that the Hornet bullets were a no go. Actually, I kind of knew that before I tested the load. But I had the bullets and I thought I would give it a try.
I wanted to see how the pulled 55-grain Hornady bullets would do at 100 yards, so I moved a target out to 100 yards they did relatively. The group centroid shifted from my usual Mini 14 load, but it was fairly tight for iron sights with junk/untrimmed mixed brass.
55-grain full metal jacket boattail pulled Hornady bullets, 25.3 grains of XBR 8208 propellant, Winchester small rifle primers, and mixed brass provided a 3.65-inch 10-shot group at 100 yards. The black bullseye is 5.50 inches in diameter. I was pleased with these results.
Well, you live and you learn. I cleaned off the reloading bench, I had a little fun, and I now know from personal experience that 35-grain and 46-grain Hornet bullets won’t do very well in the .223. Sometimes it’s good to learn what doesn’t work as well as what does.
More guns and reloading content? Like fancy walnut? Hey, it’s all right here!
You can’t beat free…sign up here and never miss an ExNotes blog.
Timely, perhaps…with the reactions we received on our recent Nine Reasons You Should Ride A Chinese Motorcycle blog, I received a nice email from Sergeant Zuo, the man who led our ride across China a few short years ago.
How are you doing recently? I bought the Zongshen RX3S, which is an old version with a displacement of 380cc. The RX3 has been 96,000 kilometers in 8 years. Our country’s motor vehicles have mandatory scrapping regulations, so I’d better replace them with a motorcycle. Who makes me like it. No matter how much I like RX3, I have to sell it, because I can only apply for one parking space in our carport, so let’s find someone who likes RX3.
Is the epidemic situation here for good or bad? Is the epidemic situation there any better? Be sure to protect yourself.
A friend who knows that you and I are good friends once said: “The real Sino-US friendship is among the people.” I like this sentence very much and I give it to you.
Enclosed are some photos of my RX3S. (You can use the letter and photos I sent you anyway). Miss you very much, my friend! Say hello to your wife and family, especially your grandchildren.
——— Zuo Zhenyi 2021.10.16 China•Lanzhou
Here are a couple of additional photos that Zuo sent to us:
So there you have it. That “uncle” business…I used to be a secret agent, you know, the Man from U.N.C.L.E., and…nah, just kidding. The Chinese named me Big Uncle and they called Gresh Little Uncle when we rode across China with them. The Chinese words are Da Jiu and Ar Jiu (Big Uncle and Little Uncle) and the “jiu” parts sounds a lot like Joe, so it was kind of a natural fit.
Don’t miss anything…get the latest as soon as it’s published!
Want to ride with us as we crossed China? Hey, it’s all right here!
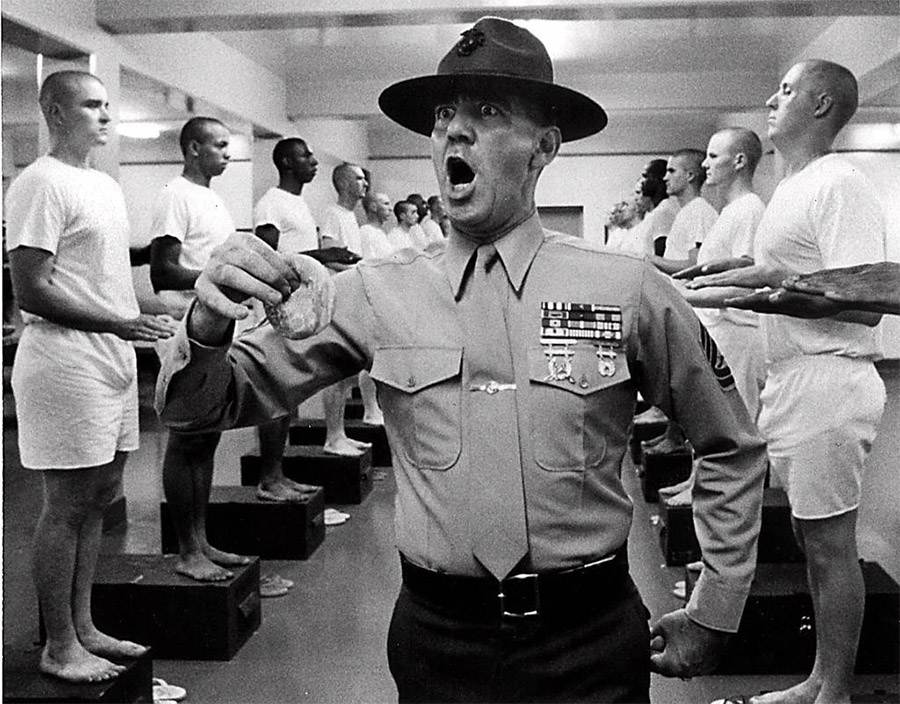
R. Lee Ermey was the real deal. A United States Marine and a drill instructor hired to advise the actors in Full Metal Jacket who was so impressive in showing the phonies how to be a real Marine the folks in charge hired him to play the role (or so the story goes; there are various versions floating around). We’ve all seen the movie; I watch it every time it airs.
What grabbed my attention is that the late R. Lee Ermey’s gun collection is about to go up for auction. I looked through the guns listed out of curiosity to see what Gunny Lee had, and he had good taste in firearms. Lee Ermey owned a lot of shotguns, a few handguns, and a few rifles.
Here are a few of the Gunny’s guns that got my attention.
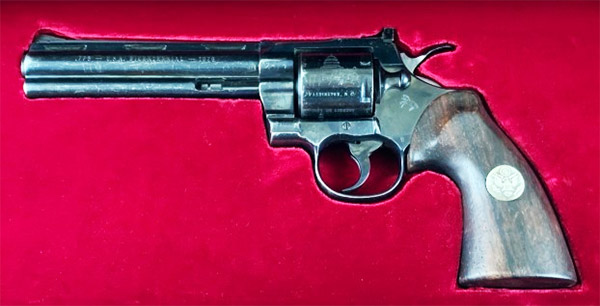
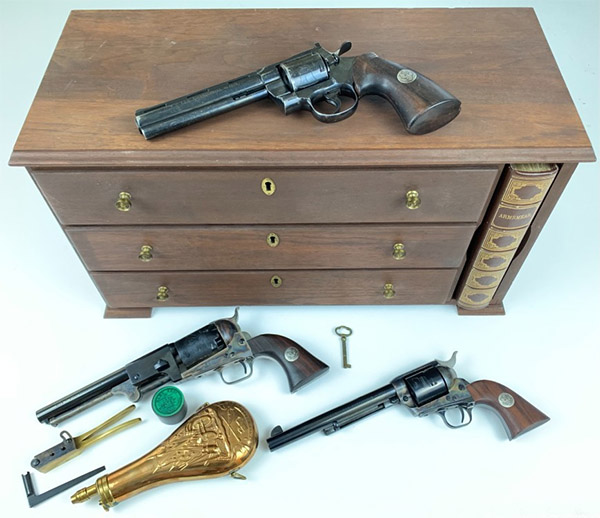
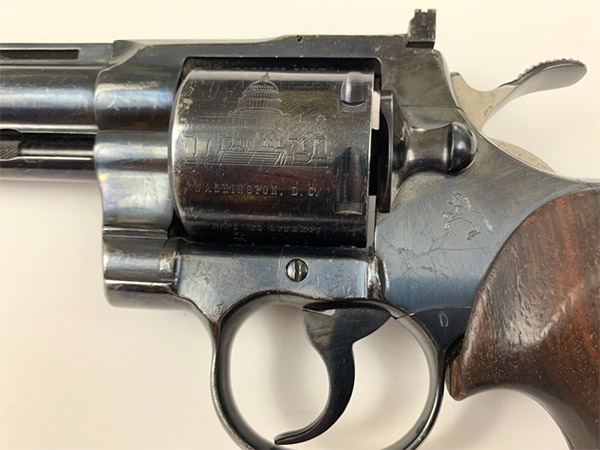
The first is a Colt Python that is part of a three gun cased set Colt offered several years ago (the set included a Python, a Single Action Army, and a black powder revolver). What’s interesting to me is that Gunnery Sergeant Ermey used his Python (it’s got the scratches and finish wear showing that).
Another one that’s interesting is the Model 62 Winchester. I have one of those that my Dad left to me; he bought it when he was a kid. One of these days I’ll do a blog on it.
And one more of the many that are going on the block. It’s a 1932 Mosin. If you’ve spent any time on the ExNotes blog, you know I love shooting my Mosins. Gunnery Sergeant Ermey was a man who knew his guns.
You can view the complete Lee Ermey auction here. I’ll be watching the auction as it unfolds, especially on the Mosin pictured above. It’s likely it will quickly go beyond my pay grade, but you never know.