Another favorite photo, and as you can see, it’s a bit unusual. This was a young chimp in the Guangzhou zoo about a dozen years ago. I was there on a secret mission and we wanted to do something on the weekend. One of my Chinese contacts told me there were two zoos in Guangzhou…the big one and the little one. The big one was outside the city limits and the little one was in the center of town, so we opted to stay in town. I didn’t think the zoo was little at all (it was at least as big as the LA zoo), and I caught a lot of great photos there. This one was of a young chimp who seemed as interested in us as we were in him.
The photo makes it look like the chimp is just about to take something (or maybe give something) to the young lady reaching out to him. I had my old Nikon D200 and the similar-era Nikkor 24-120 lens (two boat anchors, to be sure, but they worked well), along with a cheap polarizer that eliminated reflections. There was a piece of inch-thick plexiglass between us and the chimp, and I took a bunch of photos playing with the polarizer and my position to get the angle right so the glass barrier would disappear. I think I succeeded.
Two earlier favorite photos, one in Bangkok and the other in Death Valley. You can click on either to get to the story that goes with each.
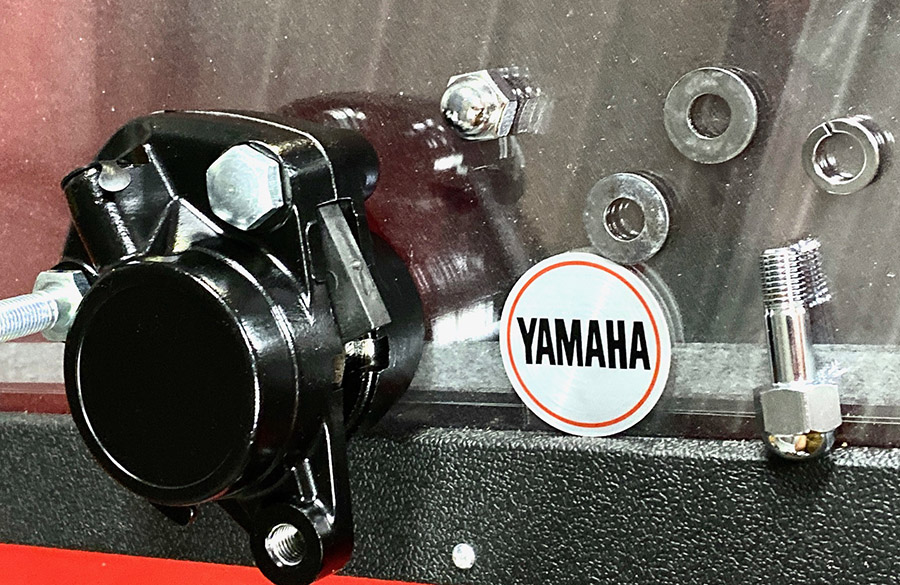
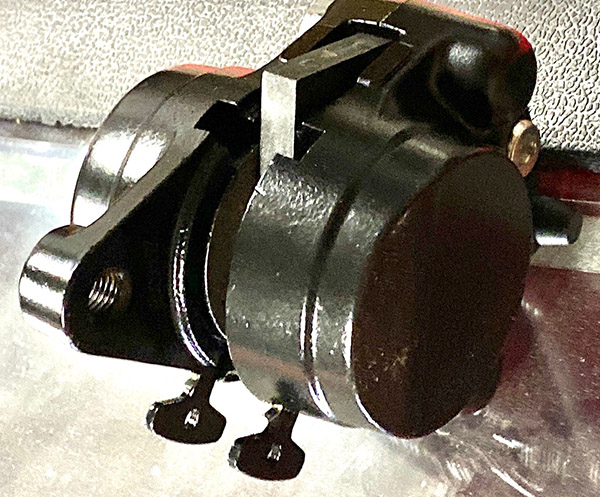
This brake caliper represents a tectonic shift in my thinking. I’ve always rebuilt rather than buy new because rebuilding is less expensive. And that’s still true, sort of. The shift comes from my adding personal time into the value equation. Until recently I’ve never given my time a fair shake when it comes to fixing things. I mean, I’ve always had plenty of time, you know? But as I slip into the golden years, those final few moments of a fleeting existence that only the lucky few get to enjoy, I’ve begun to budget how I spend the remains of the day. “He Rebuilt Brake Calipers” is not what I want on the tiny, polka-dot ceramic frog that holds my ashes.
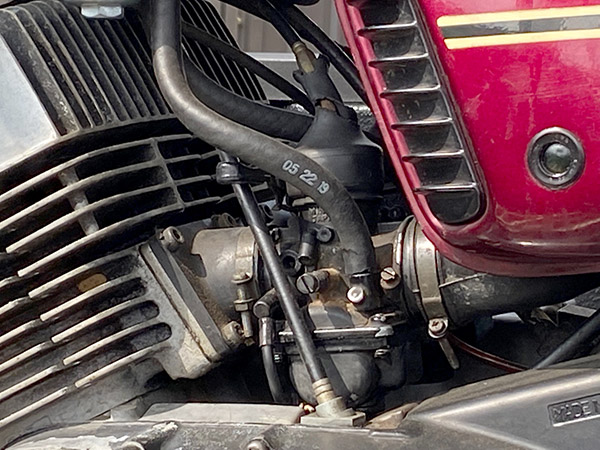
The new-to-me RD 350’s front brake is not working. Reports from Deet in Raleigh indicate the fluid is gone or the master cylinder piston is stuck in the bore. There is no resistance at the lever, futile or otherwise. I’m pretty well snowed under with self-induced projects at Tinfiny Ranch so after adding up a seal kit ($20), brake pads ($20), and the little Yamaha emblem, along with shiny new chrome hardware, this complete and new caliper at $117 seems like a fair deal if you deduct the hours it will take me to make the old caliper as sweet as the new caliper.
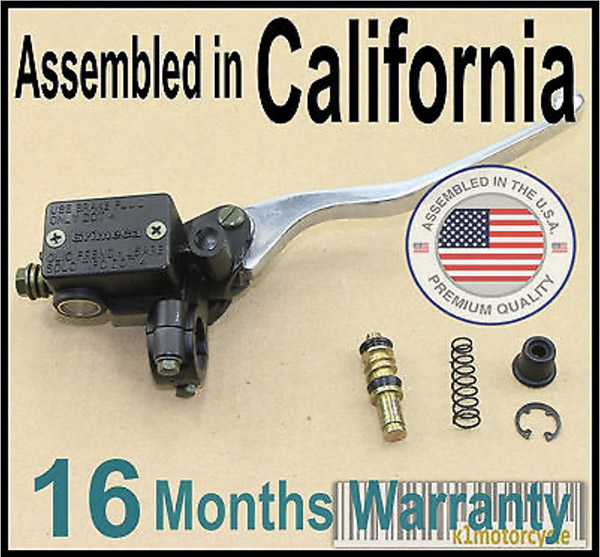
Vintage purists will freak out, “It’s not OEM!” they’ll cry. “Chinese junk,” they’ll type on their Chinese electronics. Look, I don’t like those purist bastards anyway. The non-stock master cylinder will really get them going. It’s a generic unit that is nothing like the original unit but I want to take the RD for a spin and this $20 master cylinder is the fastest way to get on the road. Since an OEM aftermarket copy is not available I plan to rebuild the original master cylinder when I get time. There’s that word again: Time.
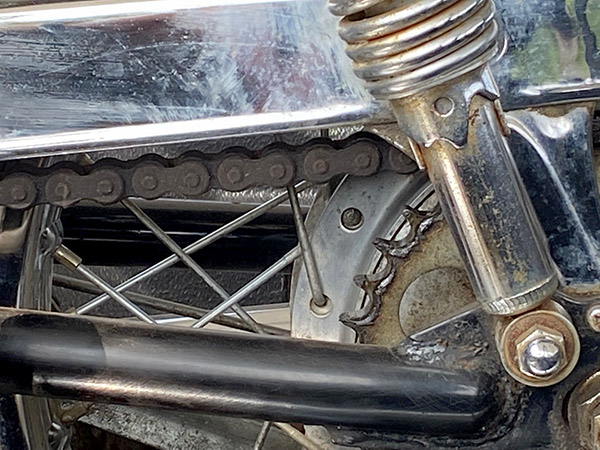
For $137 I have a mostly new brake system. Going the rebuild route would end up costing around $70 and that wouldn’t include the new chrome hardware or the aluminum Yamaha caliper insignia. Keep clicking on ExhaustNotes.us and we shall see if the time saved was worth the extra money spent.
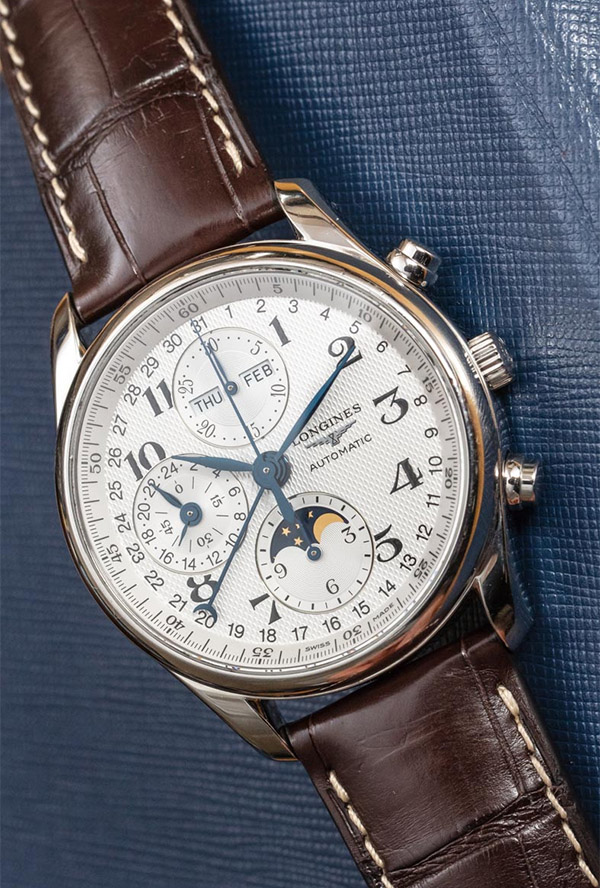
I know. You’re probably wondering: What’s with the watches? We want motorcycle stuff! Or gun stuff. Maybe even reviews of 50-year-old air compressors. But watches?
Hey, I like watches. Give us a day or two. We’ll post another motorcycle blog. I promise.
So, about that watch you see above.
Overall, it’s hard to imagine a more useless feature on a watch than a phase of the moon indicator, and a watch without luminescent hands or a backlight would ordinarily make a timepiece a nonstarter for me. Throw in a $3550 list price, and it would all but kill the deal. This Longines checks all those deal-killing boxes, but wow, it’s stunning and I want one.
The store where I saw the watch was fittingly in the high rent district (the Stanford Shopping Center, in the shadow of Silicon Valley and the big bucks that reside in that region). The price was pegged at MSRP, but the dealer came down quickly and without my asking. Not all the way to Internet levels (where these Longines watches can be had for around $2400), but an impressive drop nonetheless. It’s still not low enough for me (even the Internet prices are too rich for my blood).
The Longines perpetual moon phase watch can be had in either a 40mm or 42mm version with either a stainless steel or leather band. I like the look of both and I think the leather looks better, but I’d probably go for the steel bracelet. They just hold up better. But that’s if I was going to buy one, and I am not.
In the watch moon phase indicator business, there’s basically two types. One essentially just shows daytime and nightime (the moon dial shows the moon at night and the sun during the day, like on my Orient, a very classy and much less expensive mechanical watch). The other shows the actual phase of the moon, as is the case on this Longines. It takes a full month to progress through the moon’s phases, just like the real moon does. I mean, you never know. There might come a time when I need to know how much of the moon is showing and I wouldn’t want to actually look out the window or check my iPhone. This watch is designed for just that situation.
The Longines watch is complex, but I like it. The date is told by what looks to be the second hand (the days of the month are arranged around the watch’s periphery), the big second hand is part of the stopwatch feature, and the perpetual thing means you don’t need to adjust the day or date for months with 30 versus 31 days. The watch just mechanically figures it all out by itself. The watch doesn’t compensate for leap years and you have to reset the thing every year at the end of every February, so I guess Longines‘ definition of perpetual is one year. It’s still pretty cool, though, and for a completely mechanical thing it’s very advanced. If you really want to pour cold water on any feelings you might have for this watch, you can watch Longines’ YouTube video on how to set it. It makes doing Ducati desmo valve adjustments look easy (I have no plans to buy a Ducati, either).
You really don’t buy a watch like this for telling time, though. And you don’t buy it because you just can’t exist without knowing what the moon is doing. You buy it for the same reason people buy CVO Harleys, GS BMWs, and Ducatis. It’s bling. There’s no way I’m going to shell out something north of $2K for a wristwatch, although I am tempted.
At its heart the Longines is really a dress watch, and I no longer travel in circles where a dress watch is necessary. If I was a yuppie again I might go for it, but my yuppying days are a distant dot in the rear view mirror. Still, the Longines watch is beautiful. And it would be nice to know what the moon is doing. You know, without actually having to step outside and look at it.
More watch and other stuff is on our Reviews page.
I’m a shooter and a collector. I’m old enough and I have enough toys that each time I buy a gun I’m pretty sure it will be my last. Occasionally a friend will ask if there’s anything I still want and usually the answer is no. But then something comes along and I decide I have to have it. The Weatherby Vanguard Safari is a rifle that fits that description, except it came and went before I even realized Weatherby had offered it.
Okay, let’s back up a bit and do Weatherby 101. Weatherby offers two basic rifles. The high ticket, fancy-schmancy rifle is their renowned Mark V. This is the original Weatherby and it’s a beautiful rifle. I’ve written about them here on the blog before, and I’ll give you the links that will get you to those stories at the end of this one. Then there’s the other Weatherby, and that’s the Vanguard. The Vanguard was originally conceived as a way to offer Weatherby rifles to someone who’s not a movie star, a head of state, or a blog writer. The funny thing is, though, that the Vanguards are usually more accurate than the Mark V. There’s a bunch of technical reasons for that I don’t need to get into here, and like always, I’m sure there’s an army of Internet assholes out there who will take issue with this conclusion. That’s fine. I own both and I will tell you that a Vanguard will usually shoot tighter groups than a Mark V. If you disagree you can leave a comment, or better yet, start your own blog and write an article about it.
A Weatherby Mark V chambered in .300 Weatherby Magnum.
Look, I like Weatherby rifles, and I make no excuse about that. I met Roy Weatherby 40 years ago and I’m still talking about it. I am a Weatherby fan boy.
Okay, so on to that collecting thing…in 2018, Weatherby offered a Vanguard model they called the Safari, and it was really something special. They were only available for about a year and only in three chamberings (.30 06, .300 Weatherby, and .375 H&H), and then Weatherby discontinued the model. That made me want one even more, but there were none to be had. Then the pandemic was on us, and they were really gone. As in POOF!, no more. I called Weatherby (they are in Wyoming) and offered to pay up if they would make one for me, but they wouldn’t. Absence. It made my heart grow fonder.
I kept my eye on Gunbroker and the other gun sites, but I had not seen a Vanguard Safari for sale in the last two years. I kept looking, and I kept getting frustrated. Finally, on a whim, I did a Google search a couple of weeks ago (“Weatherby Vanguard Safari for sale”) and what do you know, a small gun store in Oklahoma City had one. I called, and yes, it was new, and yes, they still had it. It was chambered for the mighty .300 Weatherby Magnum and that was what I wanted (I would have been okay with the .30 06 or the .375 H&H, too, but I wanted the .300 Weatherby). The price was $699, which might have been a mistake on the dealer’s part ($699 was the price for the non-Safari walnut Vanguard, another excellent rifle, but as Lloyd Bentsen might say to the regular Vanguard, “You’re no Safari, Senator.”
I asked the dealer they could do anything on the price and they knocked off $30 (which brought it down to $669), so I did what people do with guns and I pulled the trigger. I really scored.
Last Friday, my cooling off period ended and in the eyes of the Peoples Republik of Kalifornia, I had achieved the mandated state of acceptable chill. That’s nanny-state speak for my 10-day waiting period ended and the rifle came home with me. I’d never seen one in person before this.
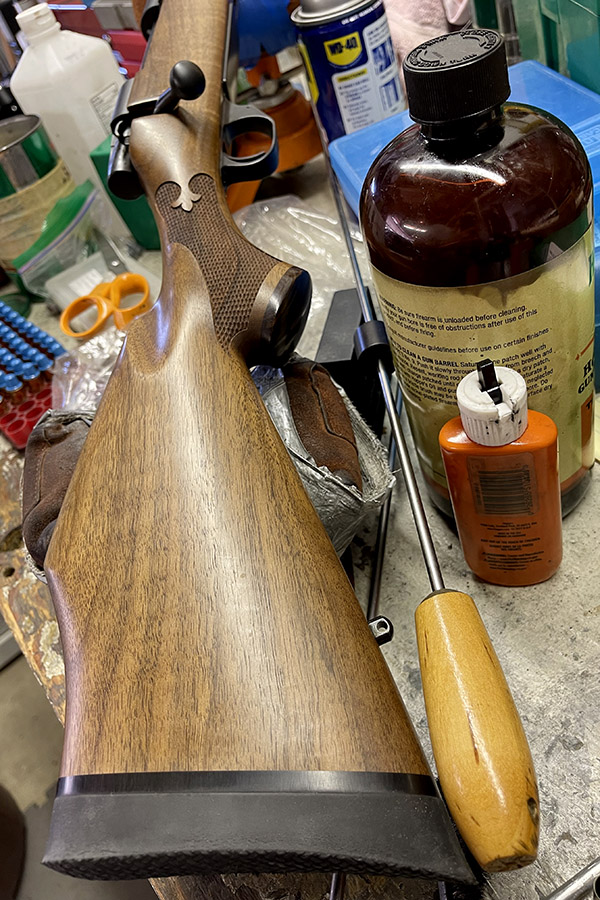
The Weatherby Vanguard Safari. Ooooh, it’s nice.
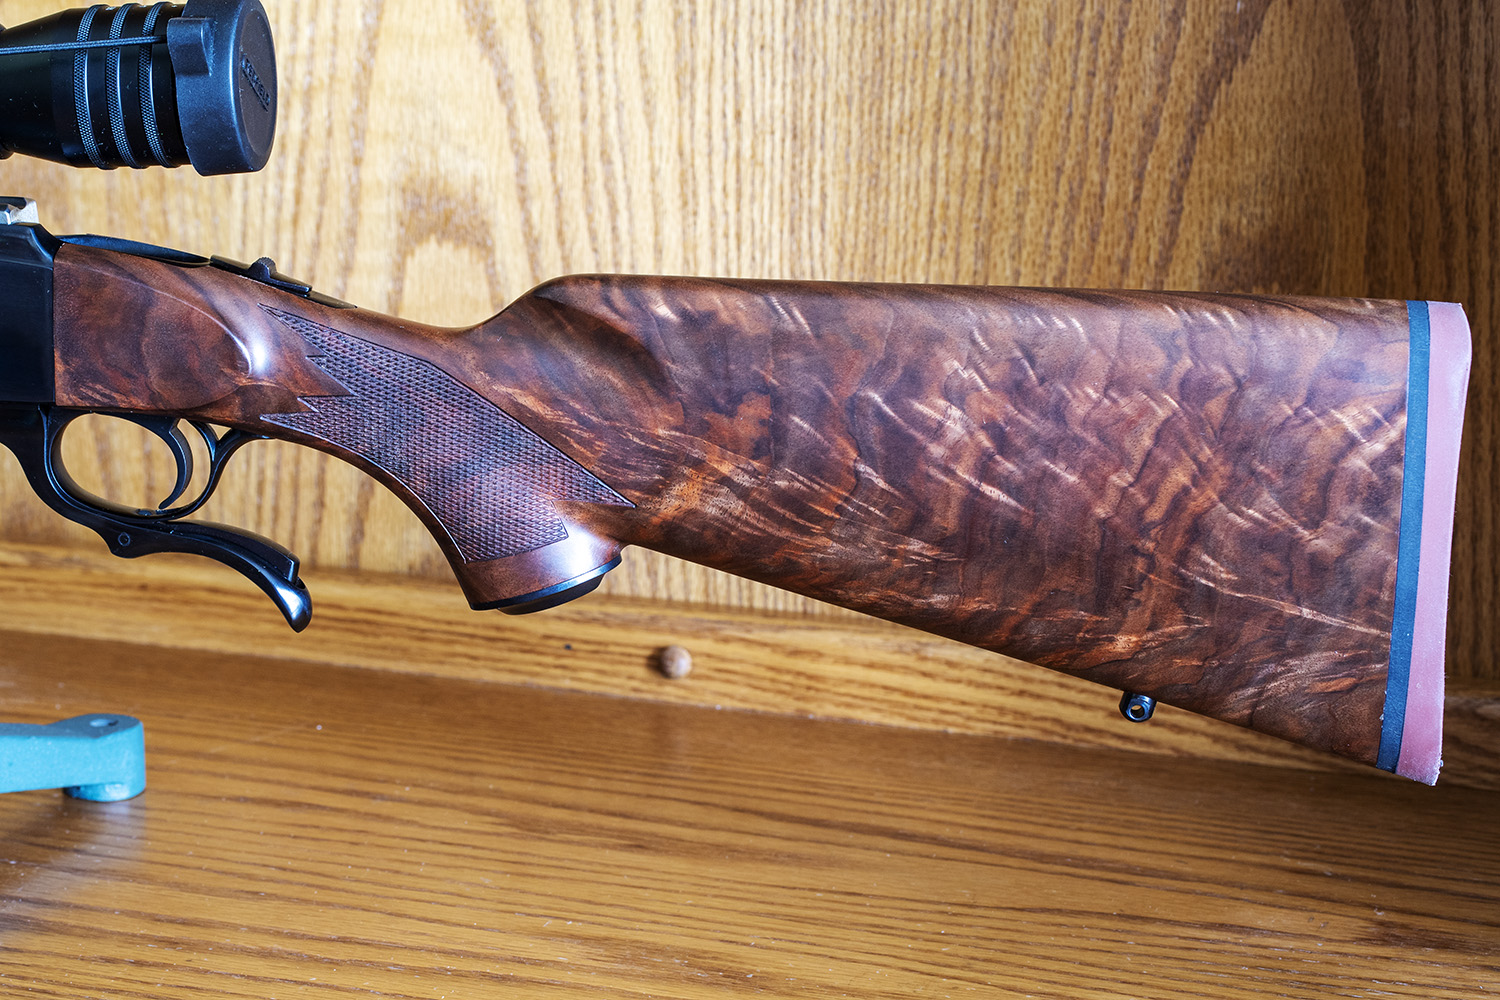
With apologies for the disheveled state of my reloading bench and the iPhone photos, this blog includes some first look pics. The rifle looks even better in person than it does in the photos. The trigger is excellent. Weatherby calls it a two-stage competition trigger. It’s light and unlike that other political party, it is creep-free. There’s about 1/8-inch of slack takeup, then it breaks super clean at what I’m guessing is about 2 pounds. It’s exceptional for a factory gun. It would be exceptional for a custom gun, too.
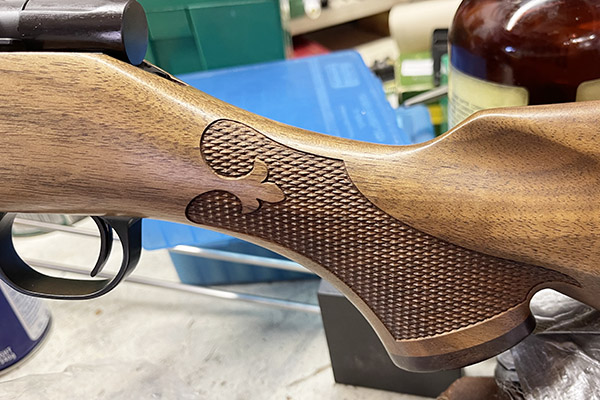
A classic Weatherby stock profile. People said it was too Hollywood when Weatherby first introduced it, but it works.
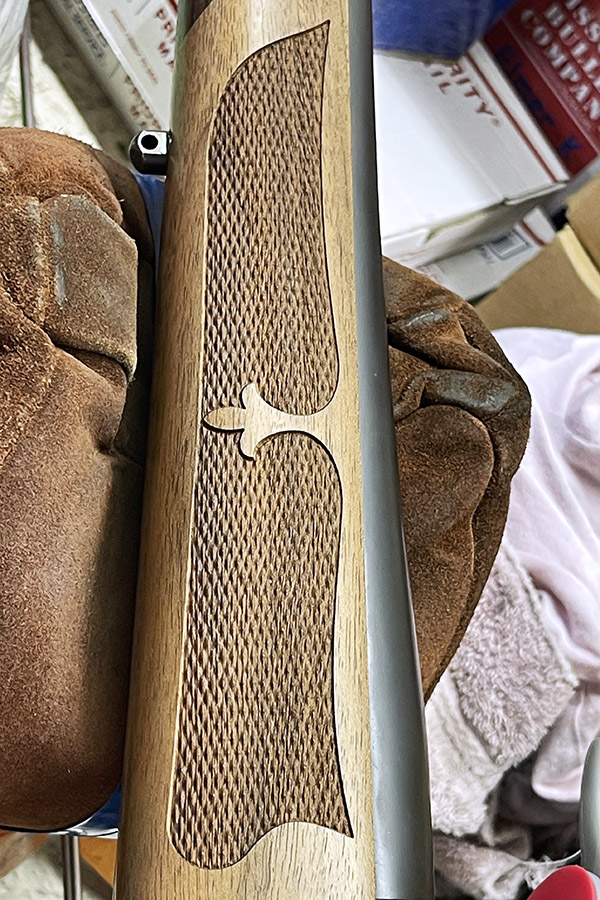
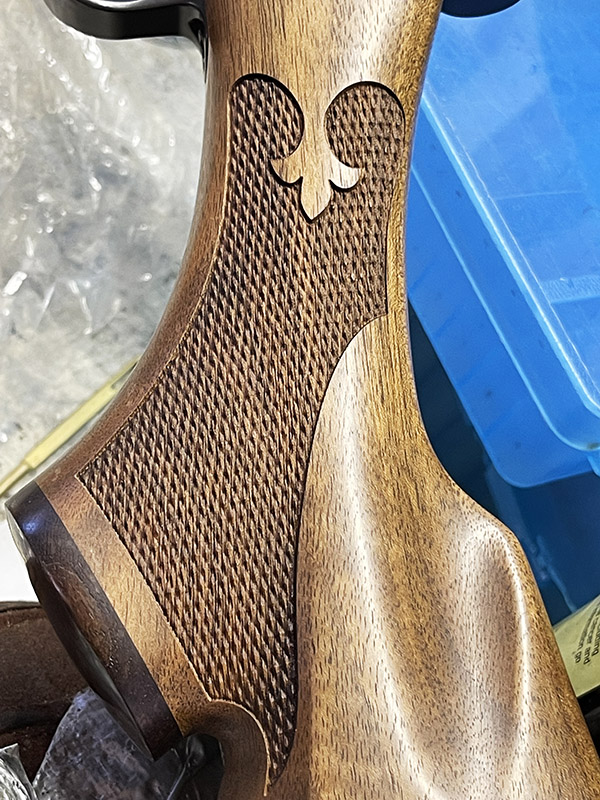
The checkering is laser cut, but Weatherby did an above average job on it. There’s no fuzz like you would normally see on laser-cut checkering and it’s fairly sharp. I like the fancy pattern (fleur de lis, they call it) and the contrasting rosewood grip and fore end accents. The Weatherby website claims these rifles have an oil finish and that’s a plus for me, too. (In case you were wondering, fleur de lis is French and it means flower of the lily.)
NIcely laser cut fleur de lis checkering. It is well done.Pistol grip checkering on the Vanguard Safari.A closer shot of the laser-cut checkering. Weatherby’s supplier has this process dialed.
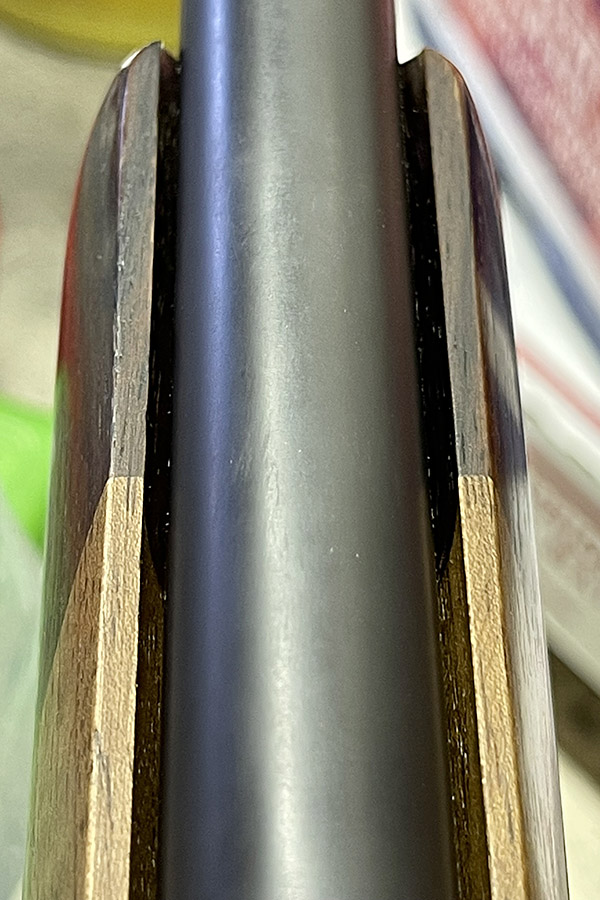
The 26-inch barrel is free floated and I believe the action comes from the factory glass bedded, but I can’t see enough to confirm that from the outside. Weatherby appropriately relieved the area behind the stock tang, which is good (it will prevent the stock from cracking).
The free floated barrel. There’s plenty of clearance here. Free floating prevents the barrel from moving as it heats, which prevents successive shots from walking or stringing (or so the theory goes).Relief around the rear tang. You want this so that the tang doesn’t act as a wedge and split the stock under recoil.
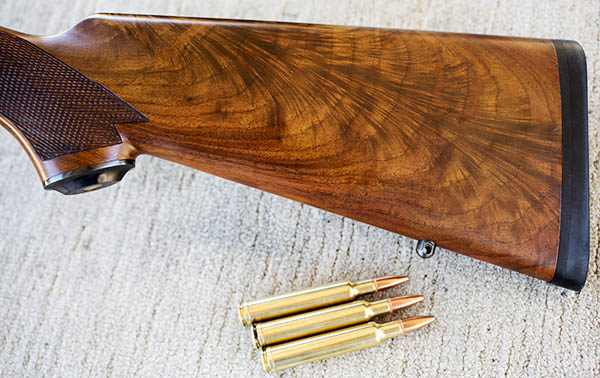
Everything is subdued, including the satin oil finish and matte bluing. The walnut figure is not fancy, but I like it anyway. There’s just enough contrast to make it look good.
I called Weatherby to learn more about the Vanguard Safari line, and wow, I was impressed. The nice lady I spoke with told me the .300 Weatherby Magnum Vanguard Safari was only offered for about a year. Weatherby shipped 146 in August 2018, and then another 4 in 2019, so this is a relatively rare puppy. I guess that makes it worth more, but it’s a moot point. This one is not for sale. Still, it makes me feel better knowing I have something other kids on the block don’t.
I have a new Leupold FXII 4X scope that I essentially got for free from Leupold and I am going to mount it on this rifle. I bought a set of Leupold rings and mounts after I bought the rifle, and I will probably mount the scope in the next day or so. Then it’s out to the range. I have a bunch of .300 Weatherby ammo already loaded. I’ll let you know how it shoots.
Roy Weatherby in his office in the old South Gate facility. I met Roy in that office and had a nice conversation with him. Click on the photo to get the story.
That photo above? My good buddy JBFLA posted it on the Chinariders.net forum a few years ago along with the following comments:
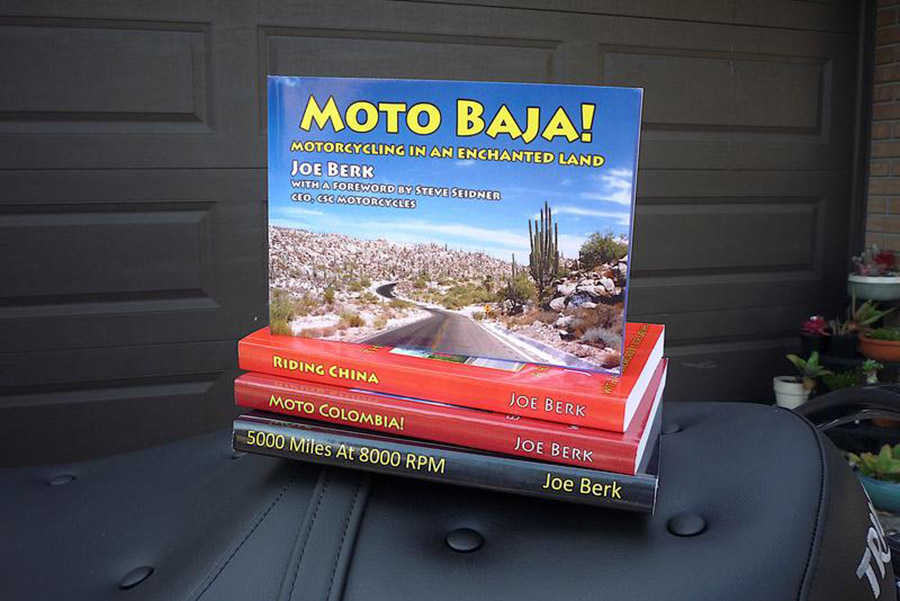
I finally received Moto Baja. Another good read by Joe Berk. At 116 pages of light reading with lots of photos, it can probably be read in one sitting. It took me 3 sittings, with time spent perusing the excellent photos, and my mind wandering…imagining a ride to Baja…..and being chased by wild dogs.
Seeing that comment again got me to thinking about what the next book might be. I have the urge to write. I just have to decide about what.
My two favorite topics? Motorcycles and guns. I’m thinking about a gun book, as I’m about tapped out on riding books. Maybe a photo book featuring fancy walnut gunstocks. The problem with a photo book, though, is that it cries out for color and books printed in color get expensive fast. And expensive books don’t sell.
Fancy walnut on a .257 Weatherby Ruger No. 1.
We’ve done a lot of stories on gun stuff here on the blog; maybe a collection of favorite stories with just a few photos might work as a gun book. It would be easy to put together. Another thought is a Mini 14 book. There are a few Mini 14 books out there, but none of them look interesting to me. When we blog about the Mini 14 blog we get a ton of hits. There might be a market for a Mini 14 book.
My Ruger Mini 14.
I’ve been trying to talk Gresh into writing a book. He’s got a ton of good stuff that would work well as a set of collected works. I mean, the man can make a 50-year-old air compressor story interesting. Joe is that rarest of human beings: A writer who sees things most of us miss. And Gresh can describe these things so they become visible to us (and then make us wonder how we missed what Joe makes seem obvious).
Gobi Gresh, in (of course) the Gobi Desert. The Gobi Desert, man!
I’ve been after Gresh to write a book for years. Help me out here, folks.
Most of us have seen the 1977 movie, Close Encounters of the Third Kind. It’s what we think of when we see Devils Tower (which I’ll get to in just a bit). Before I do, consider this question: Are there close encounters of the first, second, fourth, and fifth kind? The short answer is: Yes.
The concept of classifying suspected alien encounters came from a guy named Allen Hynek. Hynek defined the first three categories, and then two more were added. Here at ExhaustNotes, we try to formulate the questions you might have before you even know you have them, so we did. Here’s the answer to what has been keeping you up at night.
Close Encounters of the First Kind: These are viewings of unidentified flying objects less than 500 feet away. They are relatively rare, like seeing a GS 1200 actually in the dirt.
Close Encounters of the Second Kind: These involve unidentified flying objects with some sort of associated physical effect, like interference with your vehicle’s ignition or radio, animals reacting to a sensed alien presence, or an alien craft leaving impressions on the ground. They are things for which there simply is no earthly explanation. I think $1500 freight and setup charges on new motorcycles fall into this category.
Close Encounters of the Third Kind: This is the one we all know about. It’s when you climb to the top of Devil’s Tower for an alien rock concert and laser show. Seriously, though, the people who write these descriptions say a close encounter of the third kind involves things like seeing a living being inside an unidentified flying object. In the motorcycling world, I guess it would be like waving at a Starbuck’s-bound GS rider and having him return the wave.
Close Encounters of the Fourth Kind: This is when the aliens abduct you. I imagine it would be a lot like a free weekend at a posh resort, but you have to listen to the time-share pitch.
Close Encounters of the Fifth Kind: These involve direct communications between humans and aliens. These actually happen to me a lot, and they usually start with unsolicited cell phone calls for solar power, paying off student loans, extending car warranties, or contributing to a Hillary Clinton campaign. These people have to be from outer space. No Earthling would ever expect me to go for any of the above.
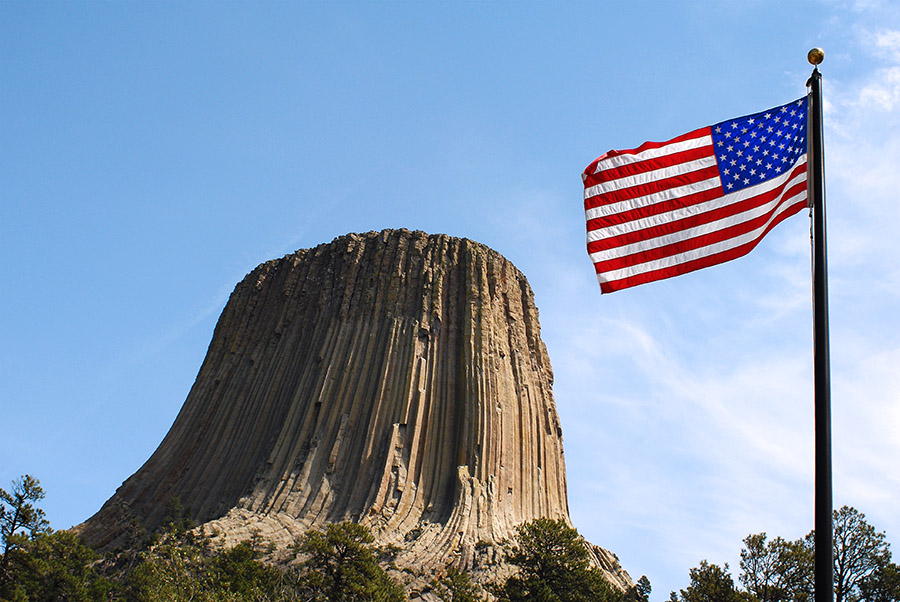
So there you have it. On to the topic of this blog, and that’s Devils Tower, Wyoming. It’s awesome, and if you haven’t made the trek it needs to be on your list.
I first visited Devils Tower when we toured South Dakota’s Black Hills and Mount Rushmore in nearby South Dakota. Devils Tower was a short 90 miles to the west, I’d seen the movie, and I had to see the place in person. It was worth the trip. Instantly recognizable, the dark tower climbs 867 feet above its surroundings. Eerie is not too strong an adjective. The thing just looks other-worldly, and attributing the divine, the supernatural, or an extraterrestrial vibe to Devils Tower is a natural reaction. No fewer than six Native American peoples, Steven Spielberg, and U.S. President Theodore Roosevelt have done exactly that. I get it, and when you see Devils Tower in person, you will, too.
I also visited Devils Tower when we rode the RX3s through western America with a crew from China and Colombia (that’s what the video above is from). It’s in a good part of the country…Mt. Rushmore, the Black Hills, the Badlands, and more are in this area and the riding is awesome. If you ever do Sturgis, Devils Tower needs to be one of your stops, but it’s best to see this part of the world when the Sturgis Rally is not underway (there is such a thing as too many motorcycles, and the tattoos, open pipes, and body odor that goes with Sturgis gets old quickly).
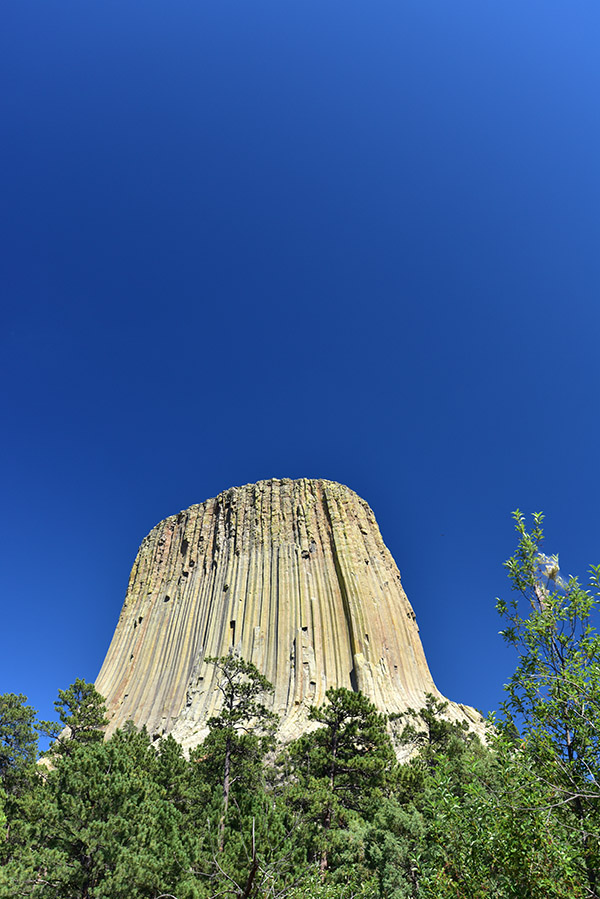
One of the things that makes Devils Tower so dramatic is its distinctiveness; it just doesn’t look like it should be there. Even the experts can’t agree on how it came to be. The rock docs agree that it was formed by magma (molten rock) forcing itself up between other rocks; what they argue about is how this occurred. One camp holds that the formation was pushed upward by molten rock below, another that Devils Tower once was a larger structure worn down by erosion, and yet another feels the tower is the throat of an ancient volcano. To get geologic for a moment, it is a laccolithic butte (a wonderful term that could be applied to a few people I know) comprised of phonolite porphyry (dark-colored rock). Devils Tower is comprised of sharply-defined trapezoidal columns with four, five and sometimes seven sides. They look like they were machined, and in a sense, I guess they were.
The Lakota, Cheyenne, Crow, Arapaho, Shoshone and Kiowa Native Americans all treat Devils Tower and its surrounding regions as sacred ground. Theodore Roosevelt designated it the first U.S. national monument in 1906. Native American names for the monolith include mato tipila (bear lodge), the bear’s tipi, the bear’s home, the tree rock, and the great gray horn. An 1875 U.S. Army expedition misinterpreted one of the Native American names as Bad Gods Tower, and that became Devils Tower.
The Tower is visible from great distances — there’s no missing it or mistaking it for anything else — and the ride in provides varying perspectives. Once inside the National Park, you can walk to the base, you can take a hike around Devils Tower, or you can climb to the top. I’ve been there several times, and I think it’s one of our great destinations.
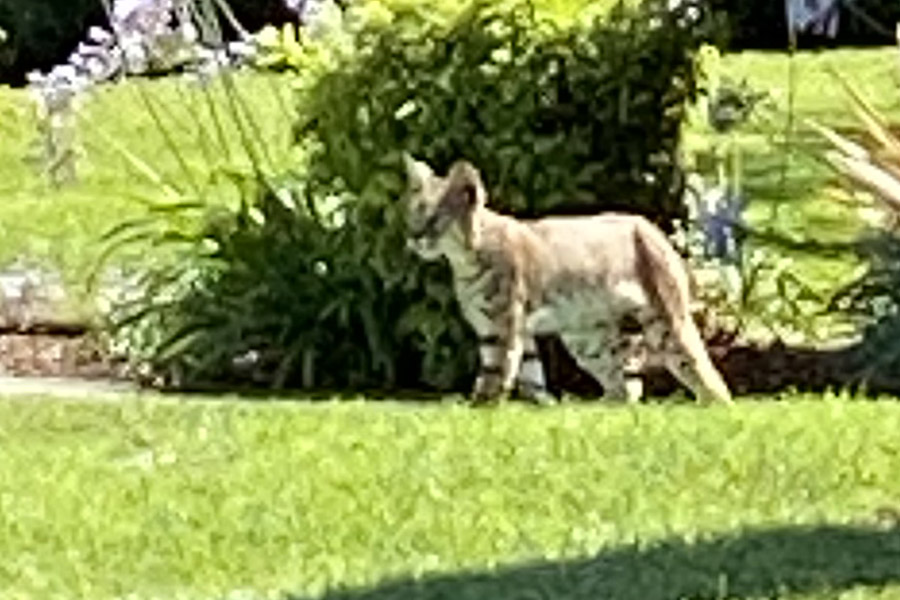
That photo above is greatly enlarged and that’s why the resolution is a bit on the low side…it’s taken from a video Susie captured of our resident bobcat. You read that correctly…we have a bobcat that hangs around our neighborhood. We see him (or her) regularly. Sue caught Bob (or Bobbi) on video a few days ago:
We frequently see interesting wildlife here in So Cal. Bob is one of our more interesting sightings.
Like you, I’ve seen a variety of wildlife on my motorcycle trips. There was a herd of an estimated 100 deer early one freezing morning in Montana on the Three Flags ride back in 2005. I had a close encounter of the scary kind with a gigantic bison on the Western America Adventure Ride about 6 years ago in Yellowstone. Baja John and I were charged by an errant tarantula in Baja in 2009. A bear ran across the road in front of us on the RX3s in the San Gabriel Mountains right here in California. How about you? Have you had any interesting encounters you’d care to share with us? Just leave a comment here on the ExhaustNotes blog!
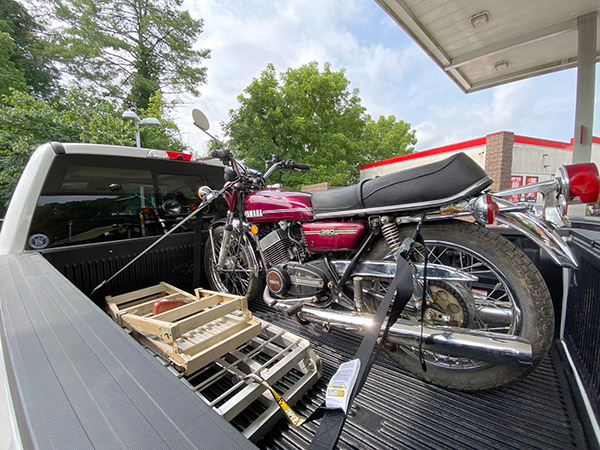
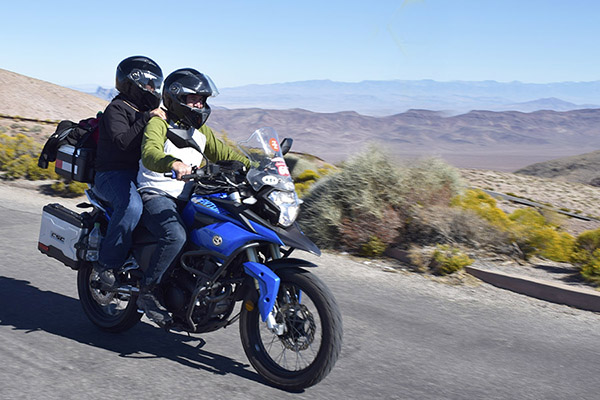
One of my long-time dream bikes has been Yamaha’s RD350 twin built back in the mid-1970’s. My old buddy from childhood, Billy Mac, had a new 1973 RD350 and every time I rode it back then I was amazed at the power and agility of the 350cc two-stroke twin. The bike could do it all from off road to flat tracking sideways in asphalt parking lots. With power, braking, handling and style, a RD350 had it all over the other bikes built in that era. I never forgot the thrill of riding such an utterly competent motorcycle.
The 1974 RD350 was my favorite year. The deep purple paint and tasteful graphics were made for royalty such as I. Prices for RD350’s keep slowly climbing and seem to always stay just out of reach on my personal value/desirability scale for vintage motorcycles. Stock bikes are getting harder to find as every Teen-Spirit RD350 owner butchers the bike trying to improve on perfection.
Last week, on a routine Craigslist scouting mission I came upon this RD350, my RD350. The thing is bone stock and I paid too much for it but I really don’t have that many years left to spend looking for the ultimate barn find deal. I sent a link to my wife, CT, and she said “If you don’t buy the thing I’m going to buy it for you.” She knew the bike was The One as I have been telling her about how great RD350’s are for many years.
My next step was to get a set of trustworthy eyes on the machine as it was 1700 miles away. A call to Deet, AKA Dr. Enduro, was made and he agreed to enable my addiction by driving 3 hours each way to look at the bike. And, oh yeah, buy the bike for me. The bike price was at the top-end for RD350’s but was in much better condition compared to other top-price bikes I have checked out online.
“The bike started first kick and sounds fine.” Deet told me. I left the purchasing decision up to Deet, as I could add nothing to the mix from my lair in New Mexico. The seller was a flipper and knew his values well. Thankfully he had only replaced the battery and left the bike as he found it, which was fine by me. Deet managed to beat the seller down $350, understandable as it was Deet’s money funding my dream. So we ended up at $4250. I know, I know, it’s a lot of money for an old bike.
The bike is now safely ensconced inside Deet’s top-secret Enduro hospital and after I get a few things done around here I’ll be heading to North Carolina to retrieve my prize. I guess the only question left is do I ride it back to New Mexico or bring it home in the truck?
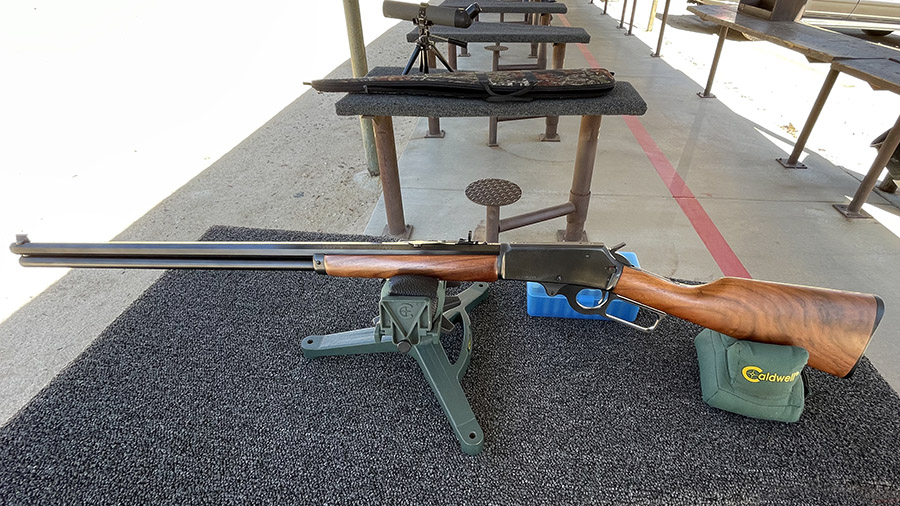
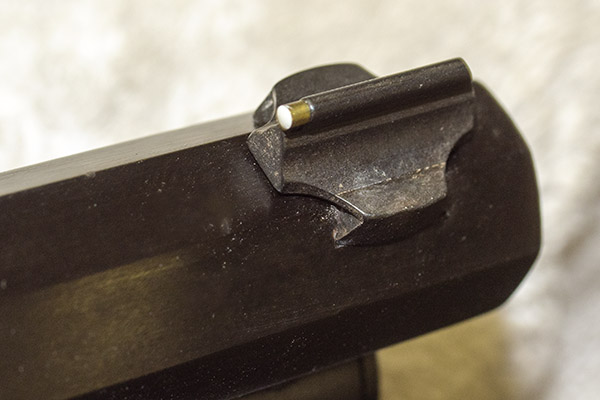
I shot on the 50-yard range at a smallbore rifle target. The top center S target caught my first three shots (with my 405-grain cast bullet load) and they were a touch high, so I dropped the rear sight one click and drifted it slightly to the right with my brass punch and a small hammer. Targets 1 and 2 caught the next six rounds (all with the same 35.0 grains of IMR 4198 and the 405-grain Missouri cast bullet). By Target 2, I was dialed in…dead center and hitting right at the point of aim. Then I switched to another favored but lighter accuracy load, and that’s 16.2 grains of Trail Boss with a 300-grain Hornady jacketed hollow point. I shot that load at the bottom two targets.
The Marlin Cowboy rifle kicks hard with the 405-grain bullet when shooting from the bench, but it sure is accurate. Both loads can shoot one-hole groups at 50 yards if I do my part. I didn’t do as well at 100 yards (the above are 50-yard groups), but I think that was because I was feeling the effects of too much recoil already. That front sight change worked for me, and the 1895 is a good shooting lever gun.
I’ve visited a few places in my time and I have a few favorites. The Columbia River Gorge is at the top of the list. Sue and I flew to Portland a few years ago for a quick 48-hour circumnavigation of the Columbia River Gorge. I wish I could tell you we rode a motorcycle, but it was four wheels this time. I have motorcycled through the Columbia River Gorge several times so I guess I’ve got my bona fides if I needed to prove something. But I don’t and there are times when a car is my preferred mode of travel. You know, if it gets cold, you turn on the heater. If it gets hot, you turn on the AC. If it rains, you hit the windshield wipers. Yeah, I know, I’m not being manly. It is what it is, my brothers.
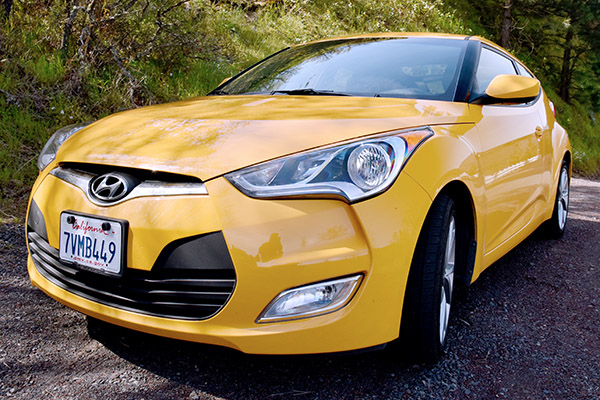
So anyway, we grabbed a Hyundai Veloster at the Portland rental lot. It appealed to us, it promised to sip fuel gingerly (a promise it met), and it was comfortable for our weekend getaway.
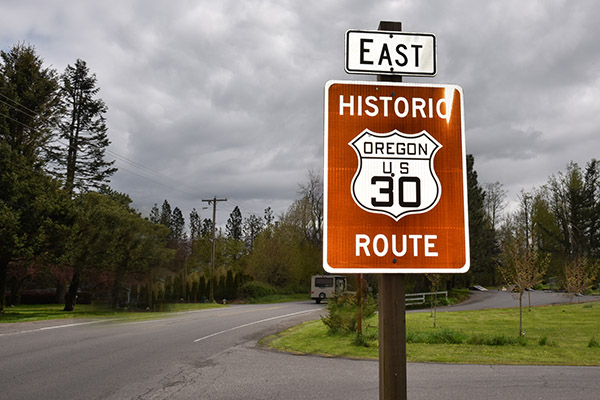
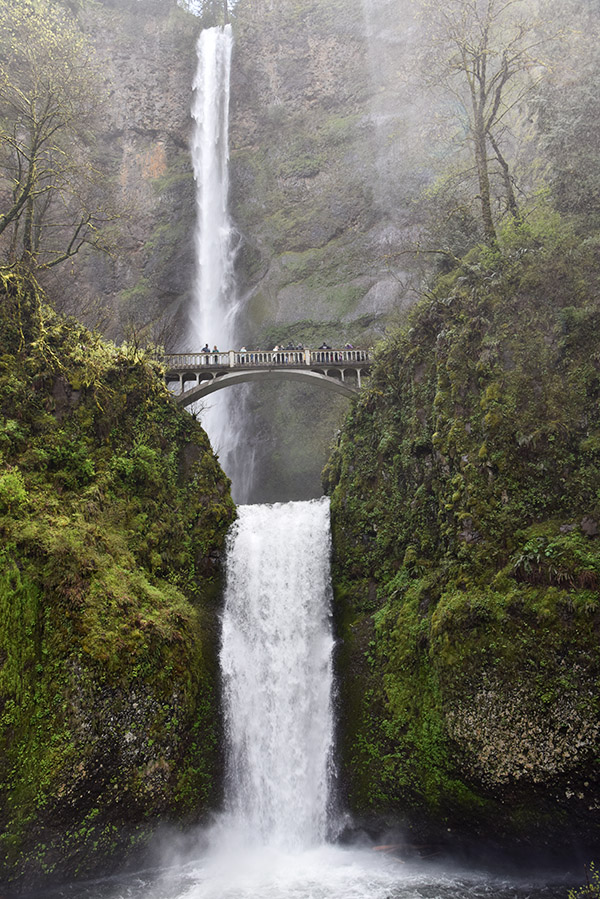
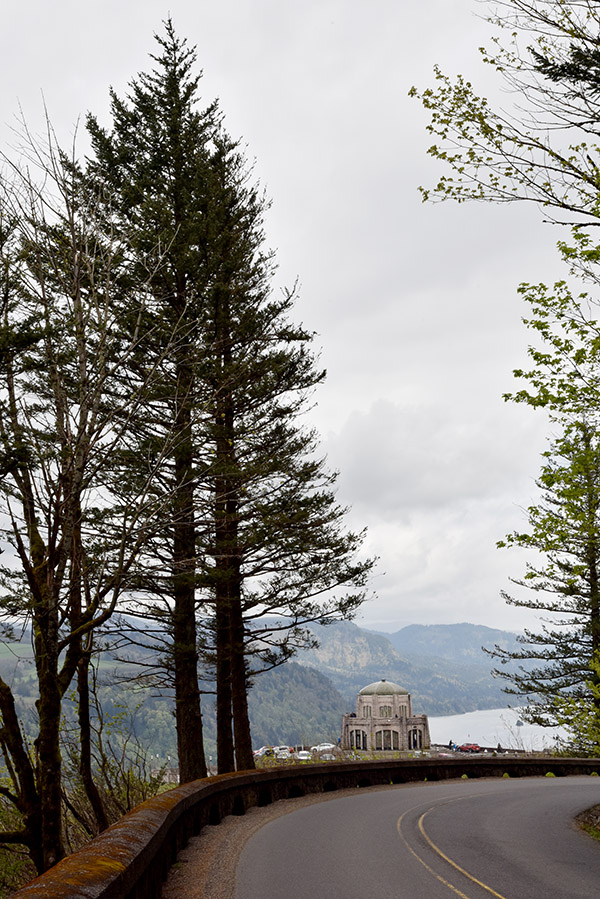
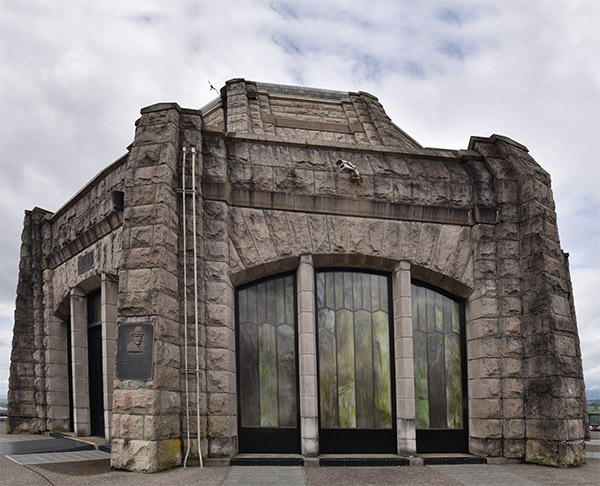
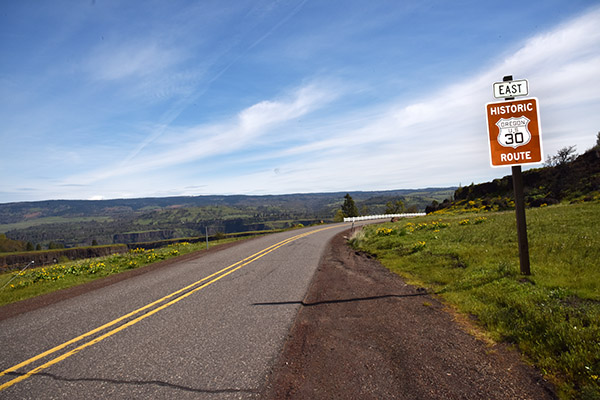
The smart (and scenic) money on the Columbia’s Oregon side is Highway 30 (also known as the Oregon Scenic Byway), an historic (read: two-lane, non-freeway) route that parallels the Columbia River. Twisty and green with stunning views of the falls and more quiet, and offering lots of things to stop and photograph…it’s a road that checks all the boxes. There’s Multnomah Falls, the Vista House, moss-covered concrete guardrails, and much more.
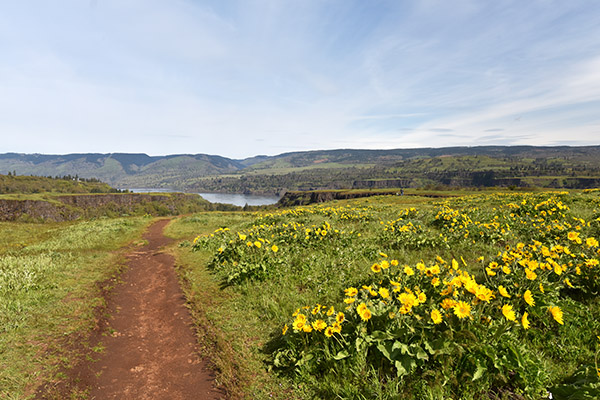
Continuing east along Highway 30, still south of the Columbia River, is a ticket into a flower-covered stretch of scenery through the Rowena Crest area. Rowena Crest kind of sounds like a suburban housing tract, but it is anything but. This is good country up here in the Pacific Northwest.
This is a premier wildflower area, and they were out in force during our visit.
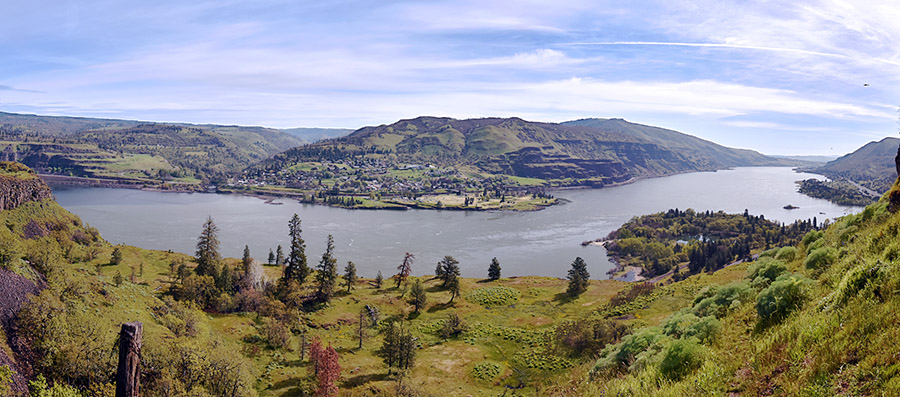
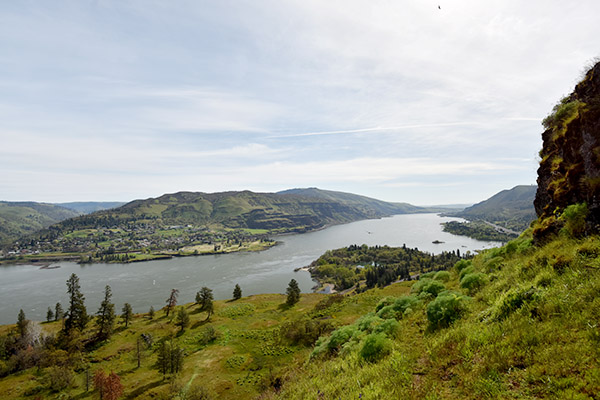
Here’s a shot a shot of the Columbia River in the Rowena Crest area.
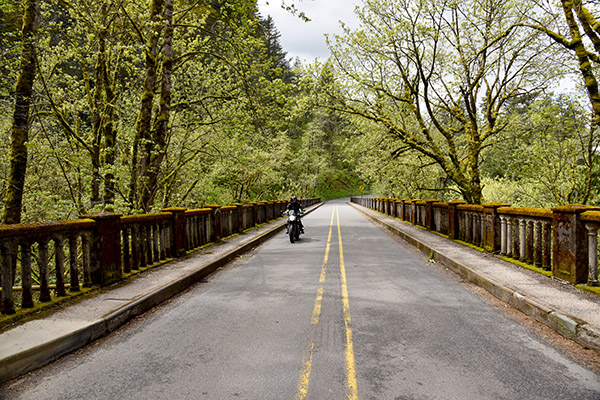
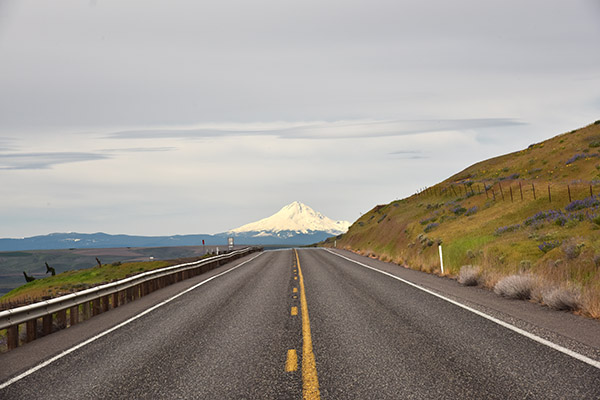
We crossed the Columbia River (after riding east for most of that morning) at Biggs. Once we were in Washington, we turned left on Highway 14, the road in Washington that parallels the Columbia on the Washington side. It’s another two-lane road, although it’s busier than Highway 30 on the Oregon side.
Traveling west on 14, we were pointed directly at Mt. Hood (a snow-covered inactive volcano in Oregon).
The views and the roads are impressive on both sides of the Columbia River.
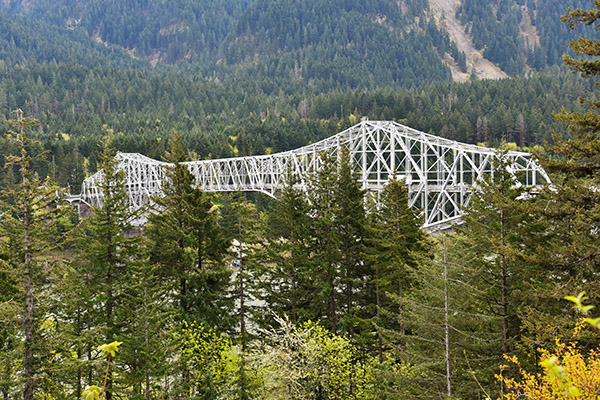
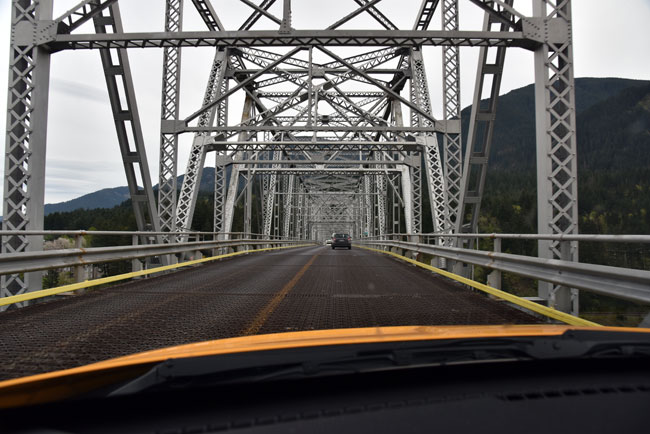
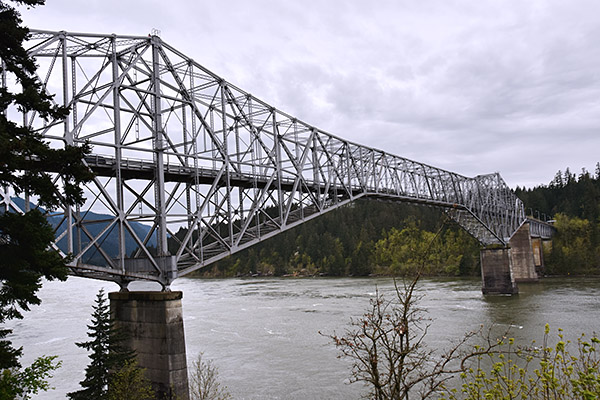
After driving for a while on the Washingon side, we came to the Bridge of the Gods. It was our ticket back into Oregon. I first rode across this bridge after riding the 2005 Three Flags Classic Rally. Good buddy Marty and I had been up to Canada and we were returning to southern California through Washington and Oregon. I love everything about the Bridge, not the least of which is the road surface. It’s grated iron, and if you look down while riding a motorcycle, it’s as if you’re flying. You can’t see the road surface at all…all you see is the Columbia River water way below. It’s really cool.
Here’s the view from the Washington side.
Here’s what it looks like as you drive across.
And one more photo, this time from the Oregon side…
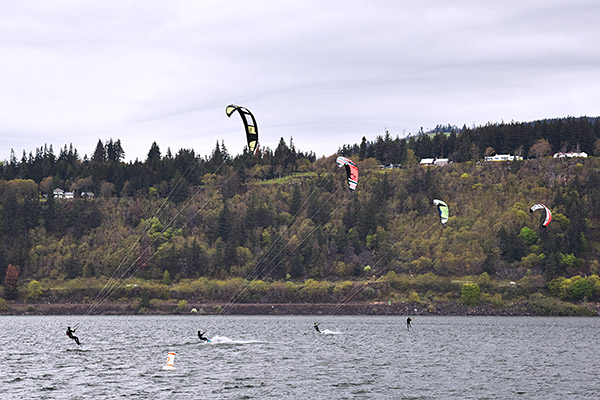
During our weekend in the Columbia River area, we stayed in Hood River, a nice little town on the Oregon side. Our hotel was on the river, near a favored spot for kiteboarding and standup paddling.
A circumnavigation of the Columbia River Gorge, using the Bridge of the Gods and the bridge at Biggs at the western and eastern anchor points, makes for an ideal two-day adventure ride. Hood River is the place to stay.
Hey, want to get notified when we post a new blog? Sign up here:
Take a look at the Motorcycle Classics story on the Columbia River Gorge, and more of our published works are here.


 The store where I saw the watch was fittingly in the high rent district (the Stanford Shopping Center, in the shadow of Silicon Valley and the big bucks that reside in that region). The price was pegged at MSRP, but the dealer came down quickly and without my asking. Not all the way to Internet levels (where these