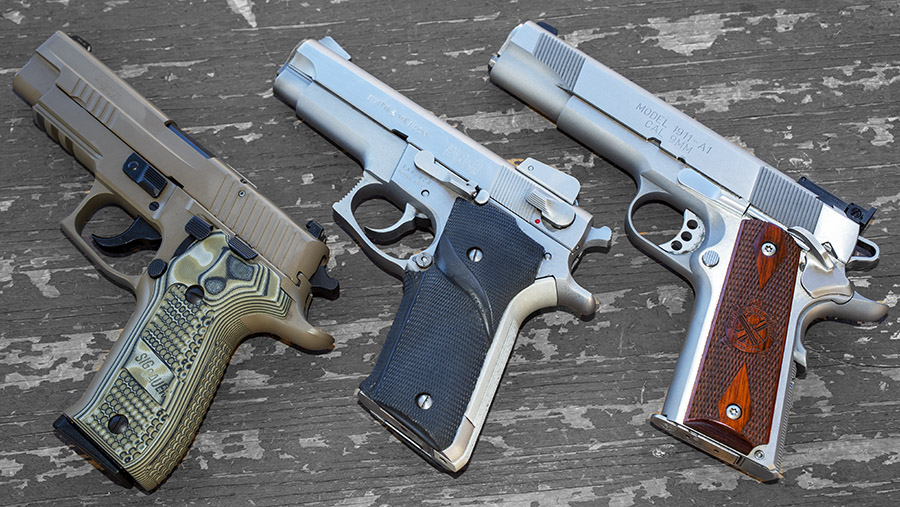
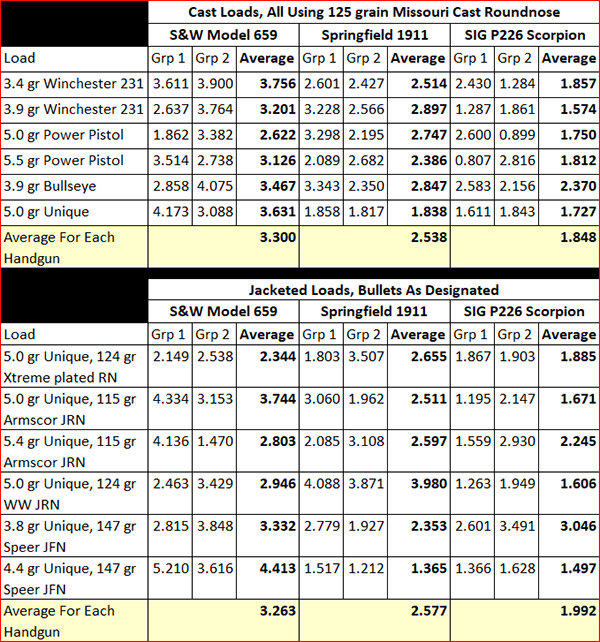
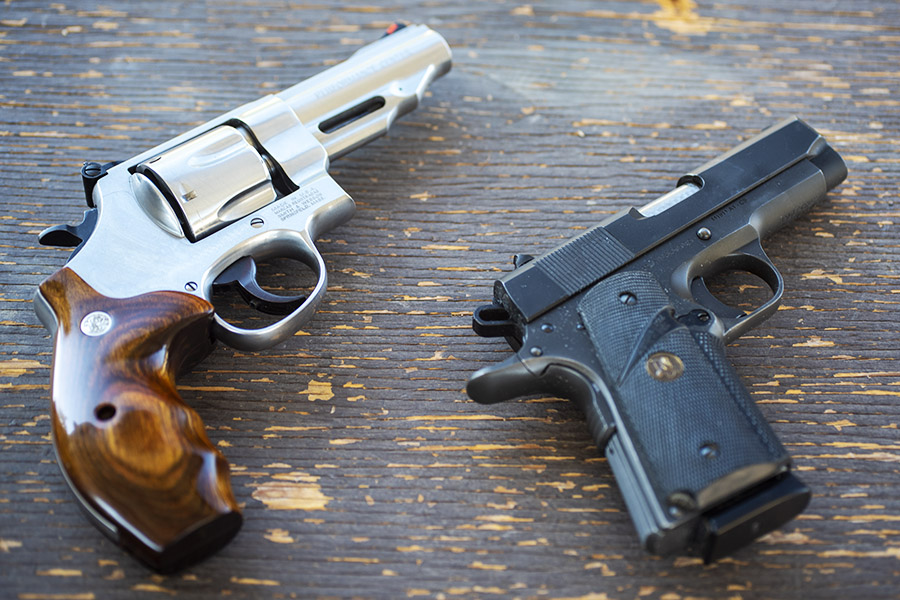
Back in January I tested a bunch of 9mm cast bullet loads in the three handguns you see above: A SIG P226 Scorpion, a Smith and Wesson Model 659, and the Springfield Armory 1911 Target. For that test series (you can read it here), all the loads used the Missouri 125-grain cast roundnose bullet with different powders and different charge weights. My cast bullet testing showed the SIG to be the most accurate, followed by the Springfield and then the Smith and Wesson Model 659.
I promised an update with jacketed bullets to assess accuracy and functionality of all three handguns (and to find favored accuracy loads for each). It took a while, but I finally got around to making good on that promise this past week. The six different loads I tested for the jacketed 9mm test series are summarized below:
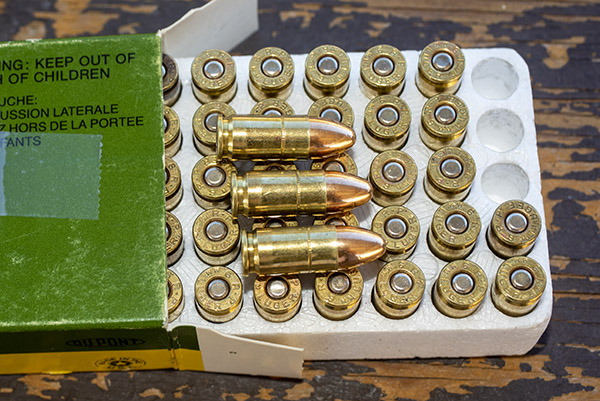
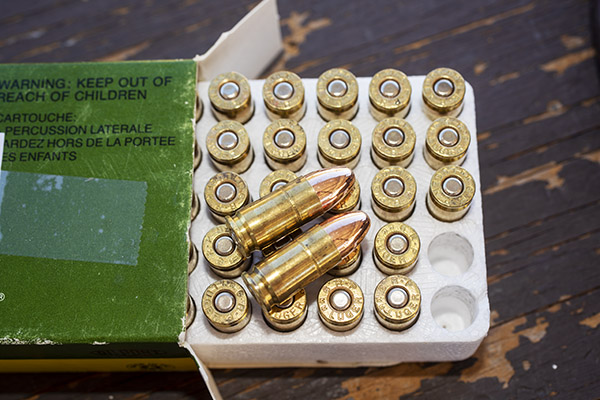
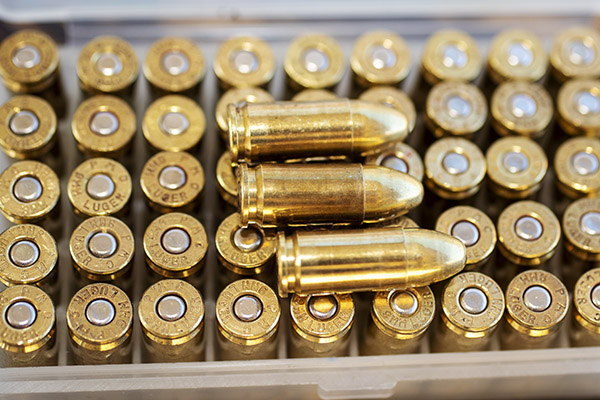
Actually, the term “jacketed” doesn’t really apply to the Xtreme bullets (they are copper plated, not copper jacketed). The Armscor bullets are brass jacketed. Both the Winchester and Speer bullets are copper jacketed bullets. As you can see from the table above and the photos below, the Xtreme, Armscor, and Winchester bullets were of the roundnose configuration. The Speer 147-grain bullets were jacketed flatnosed bullets. I didn’t try any hollow points in this test series; I prefer roundnose bullets in my 9mm handguns. They are reliable.
All groups were 5 shot groups. I shot a total of 360 rounds in the two test series (both the jacketed and cast bullet accuracy tests).
While I was shooting last week, I was a little disappointed. I thought I had done a lot better with the cast bullets back in January. I thought my jacketed groups were larger when I eyeballed the targets, but you never really know until you measure the groups.
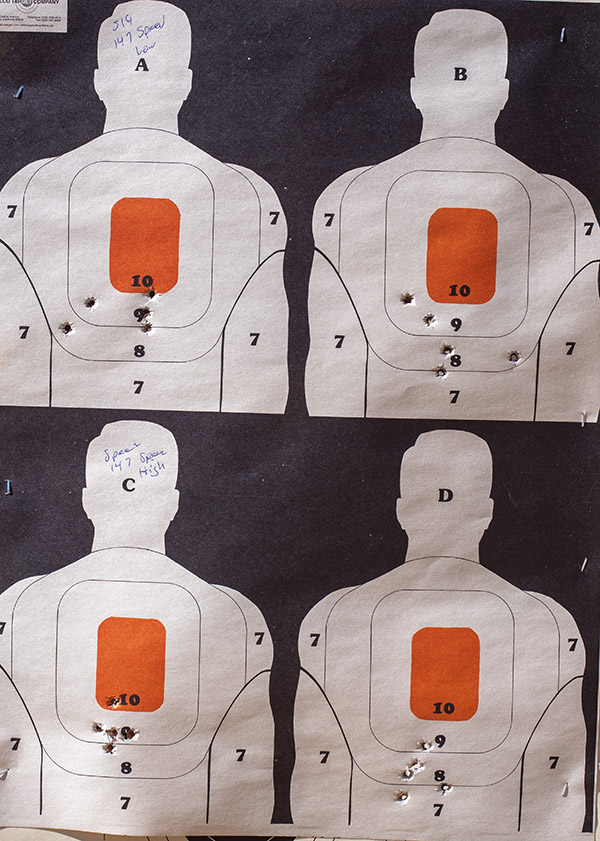
9mm jacketed bullets on an Alco target. I like using the Alco target that has four mini-silhouettes on a single target. All testing was at 50 feet.
When I returned home, measured the group sizes, and tabulated the results, I was surprised. The results of the jacketed and plated bullets were not too different from what I had achieved with the cast bullets almost a year ago. Take a look:
The most surprising finding, for me, was that the average results with the jacketed bullets (versus the cast bullets) were almost identical. Here’s that data extracted from the above, shown in a table that makes it a little easier to make the comparison:
My testing showed essentially the same results for the three handguns I tested whether I used cast bullets or jacketed bullets: The SIG P226 Scorpion is the most accurate (it is a magnificent handgun), followed by the Springfield Armory 1911, followed by the Smith and Wesson 659. It doesn’t matter whether it’s with cast or jacketed bullets: The averages are eerily similar for each gun, with a very slight accuracy advantage going to the cast bullets for the SIG and the 1911, and a very slight accuracy advantage going to the jacketed bullets for the Smith 659. But the differences between jacketed and cast bullets are so small they can be ignored. Cast bullets are usually a lot less expensive than jacketed bullets, so this is good knowledge.
Help us continue to bring stories to you: Please click on the popup ads!
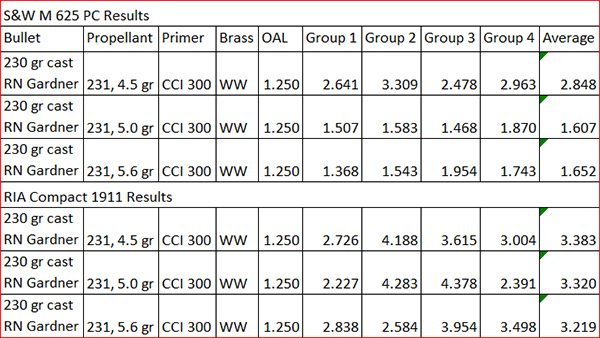
A couple of weeks ago I tested three .45 ACP loads in a Model 625 Smith and Wesson and my Rock Island Armory Compact 1911 using Winchester’s 231 powder and Jim Gardner’s 230-grain cast roundnose bullets. We’ve done a bunch of accuracy testing in both .45 ACP revolvers and autos with other loads (and you can find those stories here). This blog focuses specifically on Jim’s 230-grain roundnose bullets with Winchester 231 propellant.
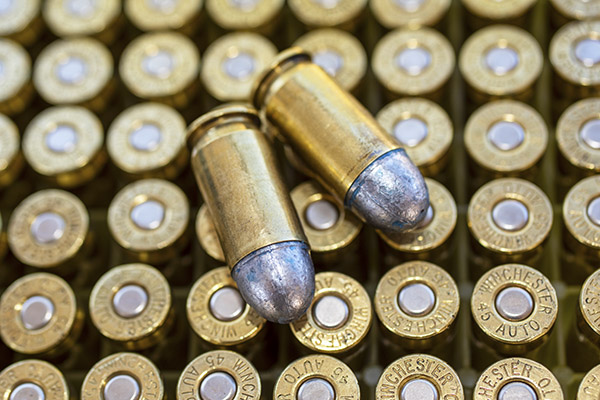
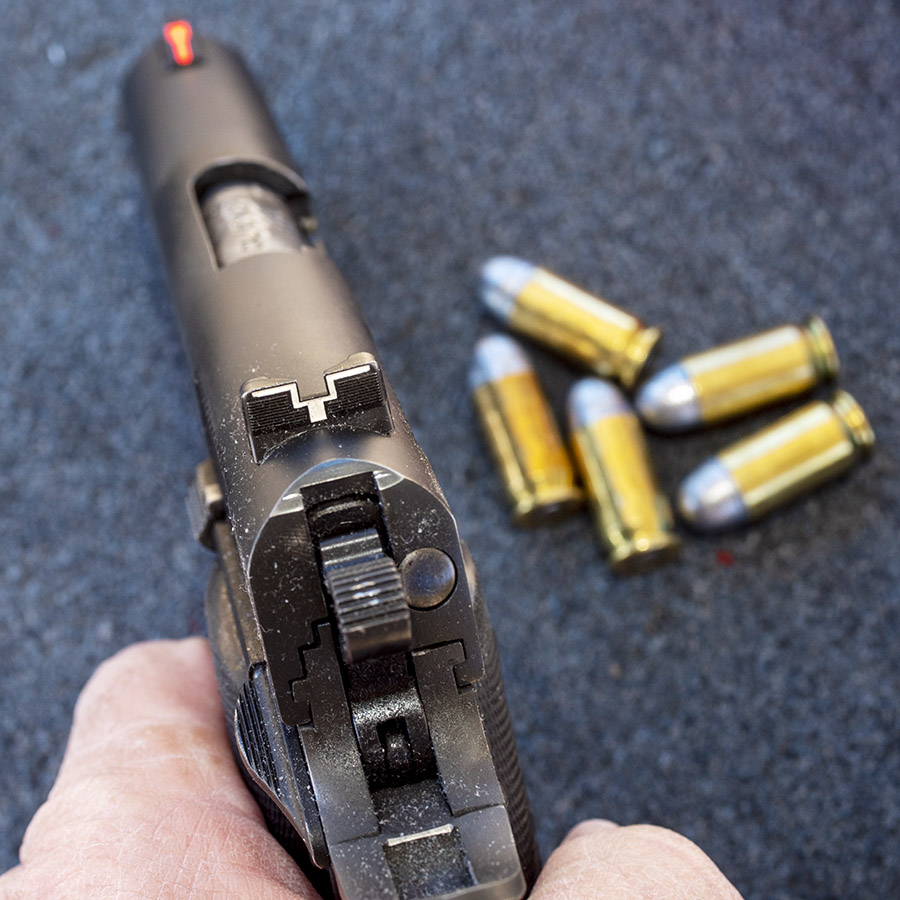
Reloaded .45 ACP ammo with Gardner 230-grain cast roundnose bullets. The 230 cast roundnose bullets replicate GI hardball ammo and this bullet feeds in just about any .45 auto.
To get to the point quickly, the Gardner 230-grain cast roundnose bullets did well (as you’ll see below). My testing consisted of three .45 loads with 4.5, 5.0, and 5.6 grains of WW 231 powder:
I was checking for accuracy and functionality in both guns. Here’s what I found:
The Compact 1911 likes 5.0 grains of 231, and that load functioned best with this powder in the automatic. The slide locked back after the last round the way it is supposed to; it would not do so with 5.6 grains of 231. Getting a short-barreled 1911 to function well is a bit tougher than a full-sized 1911. With 5.0 grains of 231 and the 230-grain cast bullets, my Compact 1911 functions reliably. Your mileage may vary.
4.5 grains of 231 functioned okay in the 1911, too, but it is the least accurate load in both the 1911 and the Model 625 (of the three loads that I tested).
The Model 625 likes both 5.0 and 5.6 grains of 231, with a slight accuracy edge going to the 5.0-grain load (although what you see here is probably more a result of my skills than anything else). The 625 is not as accurate with the lighter 4.5-grain 231 load.
Lyman’s reloading manual has 5.8 grains of 231 as the accuracy load with this bullet, but I didn’t go that high (it was a max load). Like I said, it doesn’t function reliably in the Compact 1911, and my testing showed 5.0 grains to be the Model 625’s sweet spot from an accuracy perspective.
All shots were at 50 feet, and all loads used the Lee factory crimp die (which assures easy chambering in 1917-style revolvers). The loads would do better from a machine rest or a steadier shooter. It was hot out on the range the morning I fired these targets and that probably adversely affected accuracy, too.
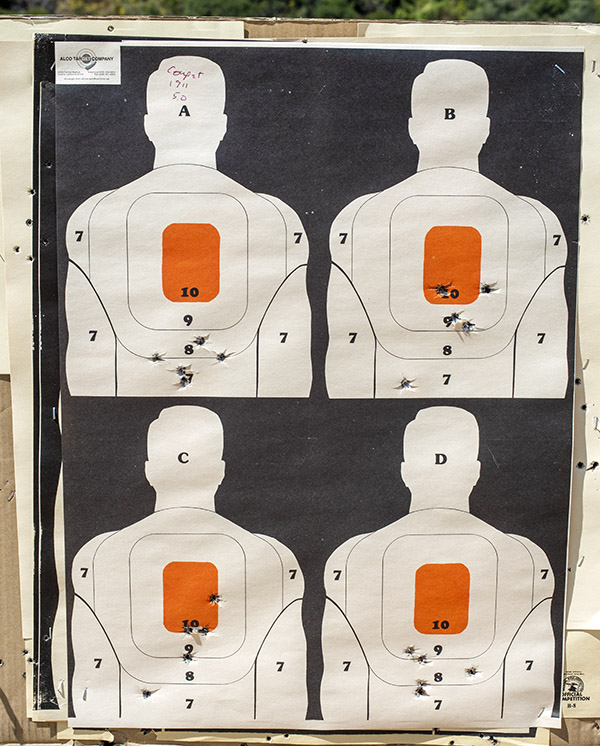
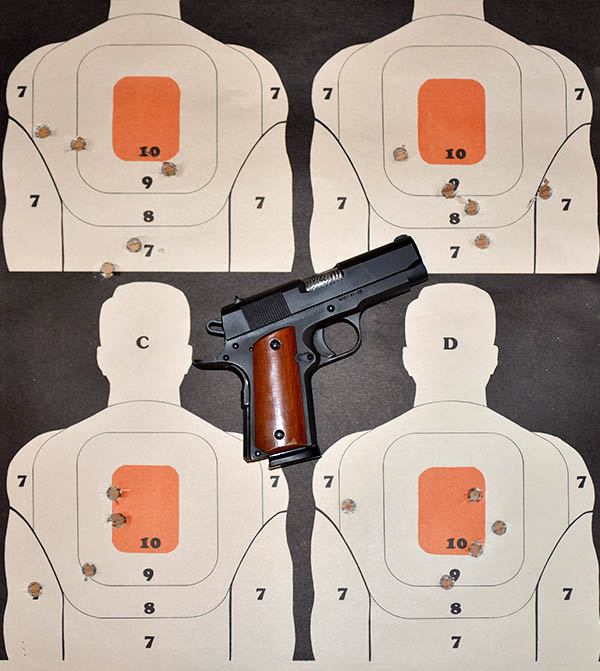
Here are the Compact 1911 targets that I shot using the 5.0-grain 231 load:
Compact 1911 results: Close enough for government work. I use Alco targets for this kind of testing; these have four silhouettes per sheet.
The Compact 1911 is not a target gun, but it is accurate enough for its intended purpose. The Rock Compact 1911 is very concealable and it’s the handgun I carry most often. They are surprisingly inexpensive and surprisingly accurate with the right loads.
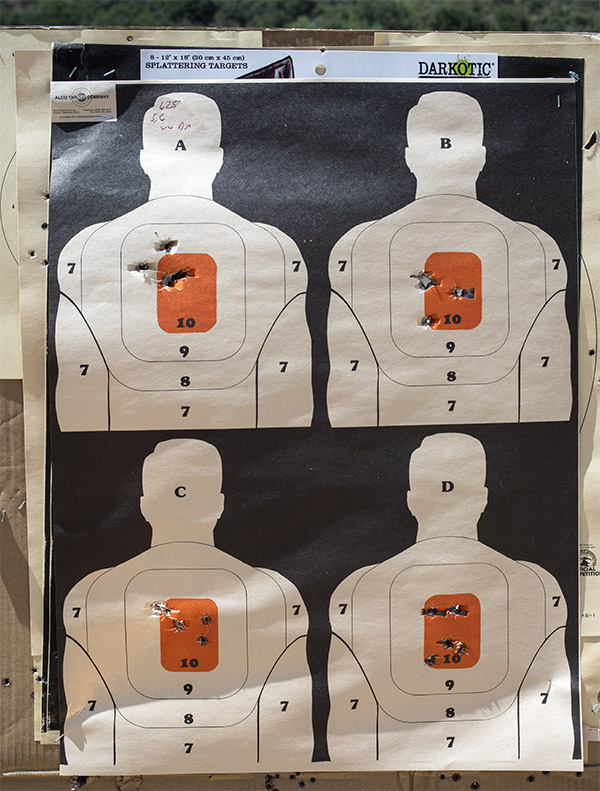
These are the targets with the Model 625 and 5.6 grains of 231:
The big Smith and Wesson Model 625 worked well with 231 and Jim’s 230-grain roundnose bullets. This is the 5.6-grain target; 5.0 grains of 231 were even more accurate for me.
The Model 625 Smith and Wesson is more accurate than the Compact 1911 (hey, no surprises there). They are both fun guns to shoot.
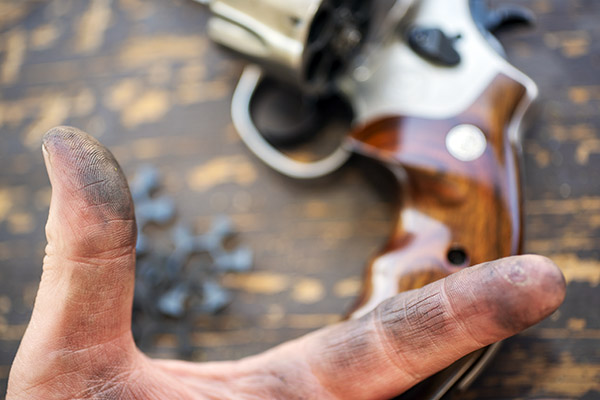
I usually load .45 ACP ammo with either Unique or Bullseye powder, but I thought I would try 231 just because I had some on hand and I wanted to see how it would do. I have an accuracy load for the Compact 1911 with Bullseye and a 185-grain bullet that we wrote about earlier. Other guys tell me 231 is their preferred .45 ACP propellant and I still had a can of it that I had purchased for the 9mm cast bullet comparo some time ago, so I thought I would give it a try in the two guns featured here. With the sketchy availability of reloading components during these uncertain times, it’s good to know that this powder works well in .45 ACP. But after this test, I’m going to stick with the other two propellants (Unique and Bullseye), assuming I can get them. What I didn’t like about 231 is that it is a sooty powder…I found it to be significantly worse in that regard than Unique.
WW 231 propellant is accurate, but it sure is a dirty powder. My left hand was covered in powder soot after just a few rounds.
I’ve been real happy with Gardner’s bullets. They are less expensive than other cast bullets, the accuracy is good, and I observed no leading in either handgun. I’ll be purchasing Gardner bullets again. If you haven’t tried Jim’s bullets, you might give them a try.
More Tales of the Gun, 1911, 1917, bolt action sporter, milsurp, load data, and other good shooting and reloading posts are here!
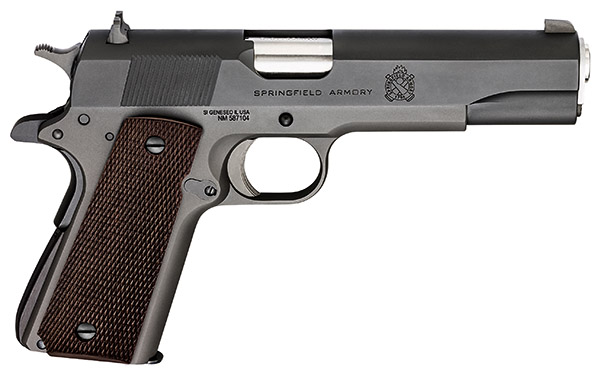
Stainless steel barrel, Parkerized finish, fixed sights, checkered wood grips, arched mainspring housing…the Springfield Armory Mil Spec 1911 gets the nod for the 2020 Colin D. MacManus Award to be presented later this year to a graduating cadet in the Rutgers University Reserve Officers Training Corps. We reviewed the offerings from several 1911 manufacturers and I have personal experience with the .45 autos from many of them. The Springfield Armory Mil Spec 1911 is the clear winner from several perspectives, not the least of which are accuracy, reliability, and close adherence to the US Army 1911 configuration. I own a Springfield 1911, and three of my good buddies bought this exact model. One of them is my friend Greg, and I’ve seen his gun shoot one-hole, 5-shot groups at 50 feet. With any handgun, that’s as good as it gets.
The MacManus .45 shipped yesterday from the Springfield Armory factory, and it is on its way (through a New Jersey FFL, of course) to its new owner. We’ll write about that when it happens, so stay tuned!
US Army Captain Colin D. MacManus, Rutgers University ’63.
Captain Colin D. MacManus, a US Army Infantry officer and an Airborne Ranger, graduated from Rutgers University in 1963. He was killed in action in Vietnam in February 1967. A synopsis of his Silver Star citation follows:
Captain (Infantry) Colin David MacManus, United States Army, was awarded the Silver Star (Posthumously) for conspicuous gallantry and intrepidity in connection with military operations against the enemy while serving with Company C, 1st Battalion, 22d Infantry Regiment, 4th Infantry Division, in the Republic of Vietnam.
The New Jersey Vietnam Veterans’ Memorial Foundation assembled this tribute to Captain MacManus:
Colin D. MacManus was born on August 29, 1941 to Mrs. Barbara MacManus in Elizabeth, NJ. He lived in New York and Quincy, MA before moving to Newark, NJ. He graduated from South Side High School in 1959. He attended Rutgers University and graduated in 1963 with a bachelor’s degree in sociology and an award as a distinguished military student. While he was an undergraduate, he was a member of the university’s track team, and Scabbard and Blade, an ROTC honor society.
Following graduation, the captain attended Paratroop and Ranger schools at Fort Benning, Georgia. He was then stationed with the 3rd Armored Division “Spearheaders” in Frankfurt, Germany. While there, his mother explained, Captain MacManus led the rifle team representing the United States at the 1965 Central Treaty Organization games in Istanbul, Turkey. The squad finished second in the contest and received special honors from the U.S. commander.
In a February 22, 1967 article from the Newark Evening News his brother, John, stated “Colin was always very proud of the work he was doing. When we tried to sway him from volunteering from combat duty, he simply said that he had the training necessary to do the job–the type of training ‘those young boys’ with fear written on their faces didn’t have.”
MacManus was planning to marry Linda Neeson, the secretary of his commanding officer in Germany. The couple postponed their plans when he received his orders to report to Vietnam.
He entered the US Army from Newark, NJ and attained the rank of Captain (CAPT). MacManus was killed in action on February 16, 1967 at the age of 25. He was serving with C Company, 1st Battalion, 22 Infantry, 4th Infantry Division.
Captain McManus’s mother stated that her son wrote in his last letter that he was going out in the boondocks and had just reached his goal of being named a company commander, and that he would be unable to write for a while. His mother said that he never mentioned the fighting at all. He received a full military funeral.
There is a memorial at Rutgers University in New Brunswick, NJ dedicated to the graduates who were killed or missing in action from the Vietnam War. MacManus’ name is listed among those killed in action.
To commemorate his life, each year the MacManus family awarded a Colt .45 Auto to the graduating senior who held his Rutgers Corps of Cadets assignment. In 1973, that was me. I never had the honor of meeting Captain MacManus (he graduated before I started my engineering studies at Rutgers), but I felt like I knew him through the Rutgers Reserve Officers Training Corps. We all knew of Captain MacManus. I met the MacManus family when I graduated in 1973, and his brother John (the same one mentioned above) presented the 1911 to me. It was a Series 70 Government Model Colt (the US Army sidearm back then), and receiving that award was a very big deal. It was a big deal to me in 1973, and it’s still a big deal to me today.
My first handgun: The Colin D. MacManus 1911 and a couple of 5-shot, 25-yard hand held groups I fired with it. I had it accurized in the 1970s, and it is still a tack driver.
That 1911 was the very first centerfire handgun I ever owned. US Army Sergeant Major Emory L. Hickman taught me how to shoot my .45 while I was a grad student at Rutgers (you can read about that here). I had a gunsmith accurize the 1911 a few years later when I lived in Fort Worth, and I still shoot the MacManus .45 on a regular basis. I most recently had my good buddy TJ (of TJ’s Custom Guns) go through it to make sure everything is in good working order (and it is). The MacManus 1911 and I go way back. It means a lot to me.
Somewhere along the way during the last 46 years, the MacManus Award fell by the wayside, and when I heard about that, it just felt wrong. So I called the ROTC detachment at Rutgers and spoke to the Professor of Military Science (the commander there). Colonel Cortez agreed: The MacManus Award is something that needs to continue. I did a bit of sleuthing online, one thing led to another, and last night I had a nice conversation with a young man from the MacManus family (I spoke with Colin D. MacManus, who was named after his uncle). We’re going to revive the Captain MacManus Award, and I’ll keep you posted on the status of our efforts right here on the Exhaust Notes blog.
I’ve done a few blogs on the 1911 handgun and, in particular, on a Rock Island Armory Compact I bought a couple of years ago. I love the Compact, it’s accurate enough, and it carries well. But I’ve had several issues with this handgun and because I’ve written about it before, I feel like I owe you an update.
Quick offhand shots with the Rock Island Compact 1911 at 50 feet. The load was a 185-grain wadcutter with a stiff charge of Bullseye propellant. It’s accurate enough for its intended purpose, and every shot was on the target. My 230-grain hardball loads are more accurate.
I’m going to share my experiences with you, but I want to make this point early on: I love my Rock Island Compact, and I would buy one again in a heartbeat. Yeah, it’s had problems, but let me make my point again: I’d buy another one in a heartbeat. I thought long and hard about doing a blog focused on the Compact’s failures, mostly because I’ve used the gun longer and harder than most. I’ve put several thousand rounds through the Compact, and nearly all have been full-power, hardball equivalent loads. Having said that, let’s get into it.
Firing Pin Stop Release
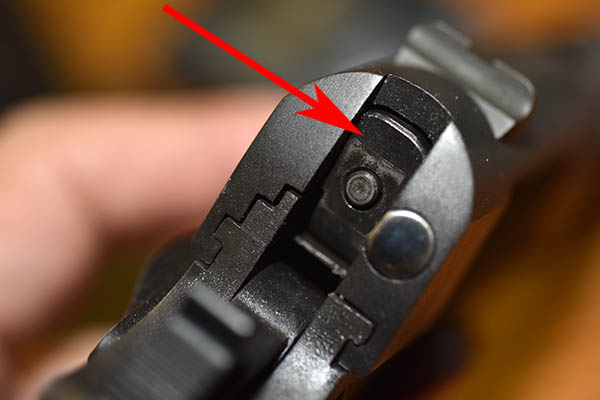
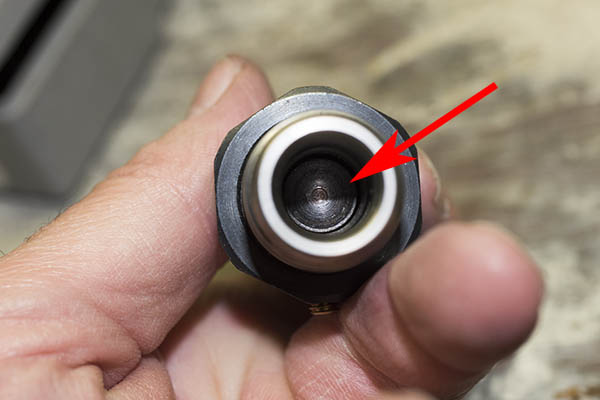
The first time I had the Compact on the range, it locked up a couple of times. The culprit? It was a weird one, something I had never encountered on a 1911 before. The firing pin stop was sliding off the firing pin.
The red arrow points to the firing pin stop. It is held in place by the firing pin (shown in the center of the firing pin stop) during recoil, but the firing pin has to be pushed back by its spring to do so.
This fix for this one was easy. After removing the slide from the frame, I depressed the firing pin, pulled the firing pin stop, and then I pulled the firing pin and its spring from the slide. I stretched the firing pin spring just a bit, figuring it needed a little more oomph to push the firing pin back to hold the firing pin stop in place. After that, this failure never recurred.
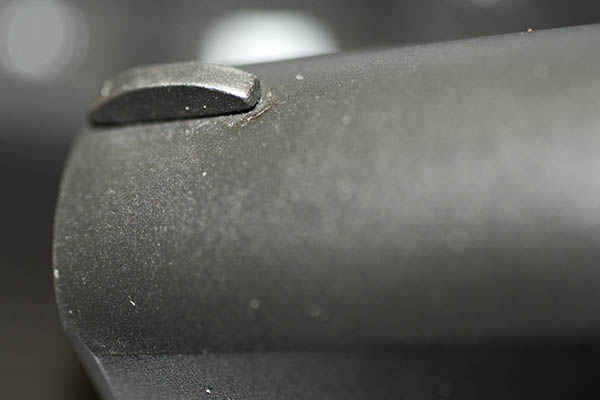
Staked Front Sight Failure
The Rock Island Compact front sight. It loosened within the first thousand rounds through the gun.
The front sight on my Compact came loose very quickly. That’s common enough on 1911s for staked sights (I’ve had it happen on a Colt 1911 and I’ve seen it happen on a couple of Springfield Armory 1911s, so it’s not a problem unique to the Rock Island handgun). If I was running Engineering at Rock Island, I’d specify a dovetailed front sight. The Compact replicates the look of the original Army 1911 (and I love that about the gun), but I think most purists like me would be willing to give up a tiny bit of the original GI look for a dovetailed front sight. Staked front sights on a 1911 (especially a Compact, which really gets knocked around by hardball-level recoil) are not a formula for long term reliability.
Rock Island made good on the front sight failure with their lifetime warranty. I sent the gun back and they fixed it, and the front sight is staying put.
Extraction and Ejection Failures
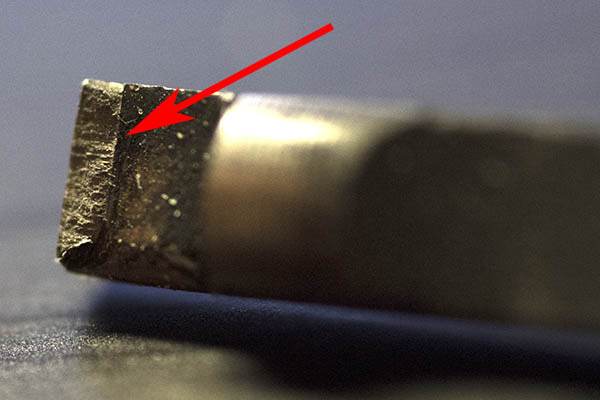
I had a ton of extraction and ejection issues. I sent the Compact back to Rock Island on the warranty and they fooled around with the extractor, but it still had extraction problems (at a lower frequency, but they still occurred). After the gun came back and I fired maybe another thousand rounds through it, the extractor broke so I replaced it with an aftermarket extractor (at my expense, because I didn’t want to send it back to Rock Island again). The nature of the failure indicated the extractor steel was too brittle.
The fracture surface of the Rock Island extractor. The surface fractography indicates the material was too brittle (perhaps a consequence of an inadequately-controlled heat treat process).
Ejection was flaky, too, and the gun frequently failed to eject the last round fired. It would stovepipe the brass as the slide went forward, and that brings me to another problem: The slide frequently would not lock to the rear after firing the last round. I mentioned that when I sent the gun back to Rock Island for the extraction issues, but they didn’t completely solve this problem, either. It got better, but it still occurred.
I then took the gun to a real gunsmith (good buddy TJ, about whom I’ve written before). TJ looked at the ejector and immediately recognized it was cut at the wrong angle. He recut it and the gun now ejects flawlessly. To state the obvious, you shouldn’t have to do this on a new gun.
Magazine Issues
Regarding the slide not locking back after firing the last shot in the magazine, that problem required a couple of fixes. One issue was the relationship between the magazine follower and the slide release. I bought two extra mags from Rock Island thinking (and hoping) that maybe I just had a bad magazine, but all three mags had the same problem. The magazine follower is supposed to push the slide release up after the last round is fired with enough force to lock the slide to the rear, but on my gun it wasn’t doing this reliably. I believe it was because one of the magazine follower bends is in the wrong place.
The magazine follower. The arrow on the right points to the follower bend I believe positions the flat portion of the follower (denoted by the other arrow) too low to effectively engage the slide release. I think that bend needs to be about 0.030 or 0.040 inches higher.
TJ addressed the magazine follower issue by welding a bead on the bottom of the slide release where it engages the magazine follower. That made sure the magazine exerted positive upward pressure on the slide release after the last shot, and that made a significant improvement. I think what Rock Island needs to do is modify the design of the follower bend, or better control the manufacturing process to make sure the follower bend is in the right place (it might be that the engineering drawing for the follower places the bend at the wrong location, or it might just be the magazine follower doesn’t meet the Rock Island drawing).
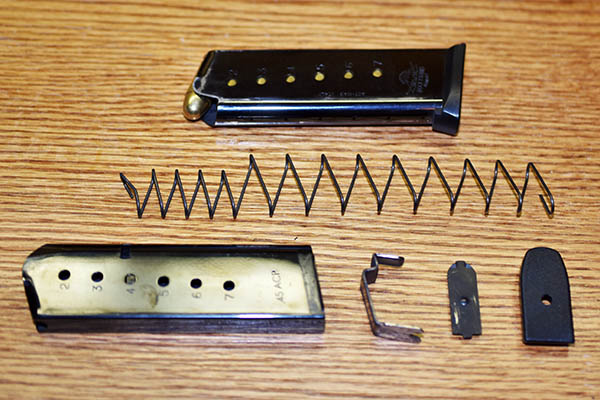
A fully assembled loaded magazine, and a disassembled magazine. One of the magazine issues is a weak magazine spring. The fix was simple enough: I elongated it and that fixed the slide not staying back after the last round.
The other issue is that the magazine springs were wimpy. I pulled the springs and stretched them, reinstalled them in the magazines, and the problem disappeared. The slide now stays back after firing the last round every time.
Slide Deformation
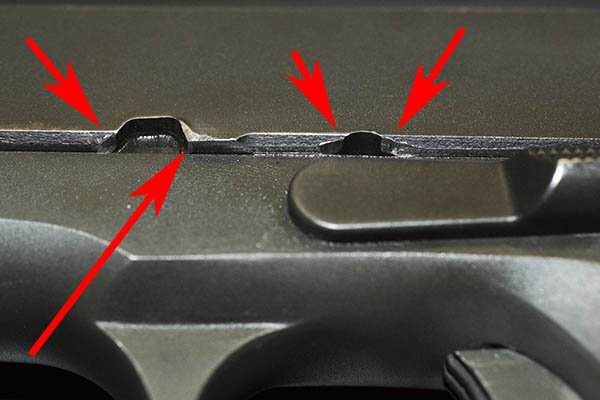
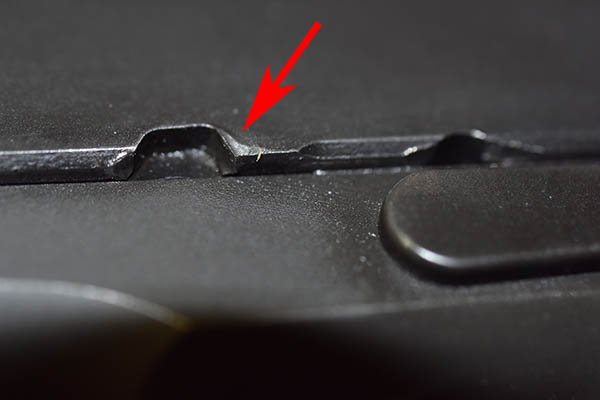
I believe the slide material is too soft. This resulted in a big burr on the slide at the rear of the machined cutout for the slide release, which I ground off because it was scarring the inside of my leather holster and it just looked ugly. You can see the deformation in the photos below.
Metal deformation on the Compact 1911’s slide. A small amount of this is to be expected, but this is excessive.Deformation in the slide’s release slot.
To some extent, a modest amount of slide material deformation is to be expected, and the problem is somewhat self-correcting. As metal deforms, it work hardens, and this natural work hardening tends to prevent further deformation. I’ve seen this occur on other 1911s I’ve owned (including one manufactured by Colt). I just saw way more of it than I expected on the Rock Island 1911.
Guide Rod Plug Failure
My most recent failure involved the guide rod reverse plug (I call it a bushing). I think this part failed because it was too hard (the fracture surface indicates a brittle failure); I’m guessing the heat treat made it too brittle. This part needs to be more ductile. I also think it is too thin in the area in which the failure occurred.
Rock Island calls this part a plug; I call it a guide rod bushing. The plug fractured and Rock Island shipped a replacement part to me at no cost.The new plug installed on the guide rod. The paper clip is holding the plug in position while the 1911 is being reassembled.The guide rod, recoil spring, and replacement plug installed in the slide.The guide rod plug, viewed from the business end. My barrel and the guide rod have been polished; the stock parts have a Parkerized finish.
Poor Heat Treating Suspected
With the exception of the guide rod plug (which I think is a weak design) and the magazine follower, the issues described above are not faults in the basic design. I think they are being caused by inadequate heat treating process control. Heat treating was always a challenge in the defense plants I managed. To heat treat properly, you have to pull a partial vacuum to prevent hydrogen embrittlement, and it’s difficult (but not impossible) to get accurate temp readings in a partial vacuum. You think it’s one temperature, but actually it’s different temperatures at different locations in the heat treat oven. The result? You get parts harder or softer than specified on their respective drawings, which makes them more brittle or more ductile than they’re supposed to be. This issue of parts being too hard or too soft could be a contributor to the slide deformation issue, the front sight failure, the guide rod reverse plug failure, the extractor fracture, and the magazine and firing pin springs being too weak.
RIA Compact 1911: The Bottom Line
Yeah, I am putting more rounds through my Compact than most folks, who might get to the range once a month or more likely a couple of times a year. But the gun ought to be able to handle it. And yeah, the Compact has a lifetime warranty and the folks at Rock Island have been good about honoring it. I just wish I didn’t have to use it as often.
Having said the above, though, I’ll also tell you that new gun issues are not unique to Rock Island Armory. I’ve had to send three Rugers back for warranty service, my very expensive Smith and Wesson Performance Center revolver went back to Smith for repeated failures to fire (they took what I considered to be an inordinate amount of time to fix it), and my Springfield Armory M1A went back to Springfield for ejection issues (those guys took a long time, too). Two of my friends have Springfield Armory 1911s, and they both had to go back to Springfield for front sight failures (one of them had to go back twice because Springfield screwed up the repair). All of this has been in just the last few years. It’s unfortunate, but quality issues abound in the gun industry, and it seems like things are getting worse. When folks say they don’t make them like they used to, I can tell you from a lifetime of playing with things that go bang that’s true.
Help us keep the content coming: Please click on the popup ads!
I should also tell you that one of my good buddies tried my Compact, liked it, and he bought one. He hasn’t had any issues with his. None. Zip. Nada. So I can’t say my experience is representative of what you might expect. I’m only telling you what I experienced.
All the above notwithstanding, I’m happy with my Rock Island Armory Compact 1911 and like I said above, I love the gun. I’ve fixed the thing so many times that the Rock and I have what you might call an intimate relationship. We know each other. Like Gresh said about his relationship with the Royal Enfield Bullet, my Rock Island 1911 needs me.
You might wonder: Why not just buy a compact 1911 from a higher-end supplier, like Springfield, Kimber, Sig, or one of the custom builders like Les Baer or Wilson? Well, in a word, price. These other compacts start at roughly twice what the Rock costs (and go up sharply from there), and there’s no certainty they wouldn’t have problems, too. You could argue that you get what you pay for, and my response to that would be: Sometimes.
You can buy Rock Island 1911s for $499 all day long, and I’ve seen them on sale for as little as $429. That’s a great deal on a new 1911. I’ve had to work my way through the issues outlined above, but my Rock Compact is extremely reliable now and it’s a constant companion. Someday I may wear it out completely and if that ever happens, I’d just buy another one. If something goes wrong, odds are I’ll know how to fix it.
So, the literature that came with my Gear’d Hardware ZX2-1116 watch said it was bulletproof.
We’ll see about that, I thought. I’ll take the challenge…
The Gear’d came through it just fine, and I’m having fun flashing this monster around. Gresh’s watch is on its way to New Mexico, and he’s got a hot 9 and a cement mixer to test it with. But I’ll let him tell you that story.
This post wraps up our tutorial on reloading .45 ACP ammunition, although from time to time we’ll be posting favored .45 loads as we continue to add Tales of the Gun blog posts featuring this fine old cartridge. If you’d like to catch up by reading the first three parts of this series, here they are:
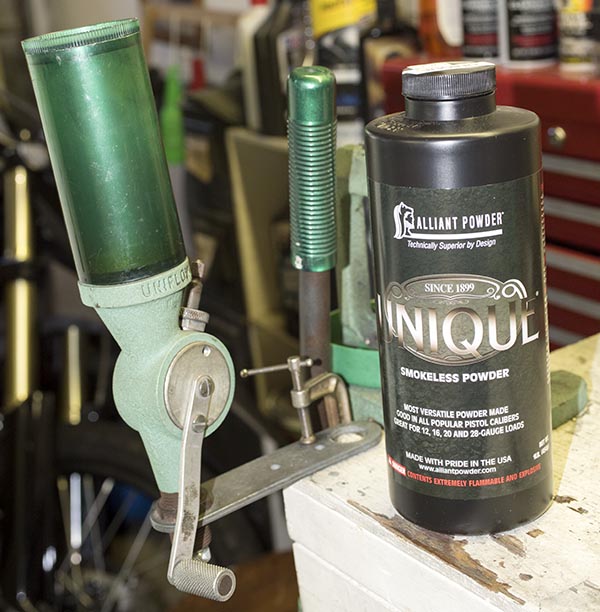
We’re in the home stretch now, folks, with the last steps in creating our custom-crafted .45 ACP ammunition. The tools and components we’ll use in these remaining reloading steps are the propellant, the powder dispenser, our previously prepped-and-primed .45 ACP brass cases, bullets, the third reloading die, a reloading scale, a caliper to measure cartridge overall length, and boxes and labels to hold and identify the ammo we’ve created.
That’s the powder dispenser on the left, and Unique propellant on the right. I use an RCBS dispenser. Several reloading equipment companies offer these.
My preferred propellants for .45 ACP ammo are Unique or Bullseye, and of the two, I prefer Unique. Some folks prefer Bullseye. Others may use different propellants. One of the more enjoyable aspects of the reloading process is you can try different recommended propellants (and different charges of these propellants) to find the secret sauce that works best for you.
Help us bring more articles to you…please click on the popup ads!
What does that mean? For a revolver, it usually means the load that is the most accurate. For a semi-automatic handgun (like the 1911), accuracy is not the only requirement. You also need to have a load with enough energy to cycle the action. Usually, the loads shown in a reloading manual are powerful enough to cycle the action. You should never go above the maximum propellant charge listed in any reloading manual, and you should only approach that by testing loads at the lower end first, and then working up to a higher level if you feel a need to for accuracy or functionality reasons (but never go above the max load).
Adding Unique propellant to the powder dispenser.
Here’s another important point: Whichever powder you choose to use, never have any propellant other than the one you are using on your reloading bench. You don’t want to get the propellants mixed up, or mistake one for another.
After you’ve added propellant to the powder dispenser, tap the dispensing handle against the lower stop several times to settle the powder. What we’re going to do next is to adjust the throw weight (the weight of powder dispensed) by adjusting the dispenser with the threaded adjustor shown in the photo below.
The dispenser’s adjustor. You can screw it in to dispense less powder, or out to dispense more powder. Once it dispenses the correct amount, lock it in place with the locknut.
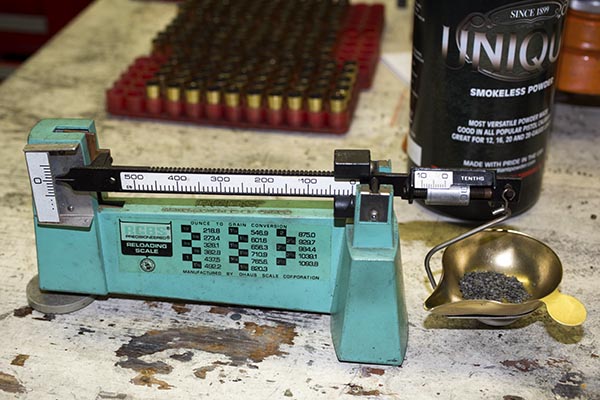
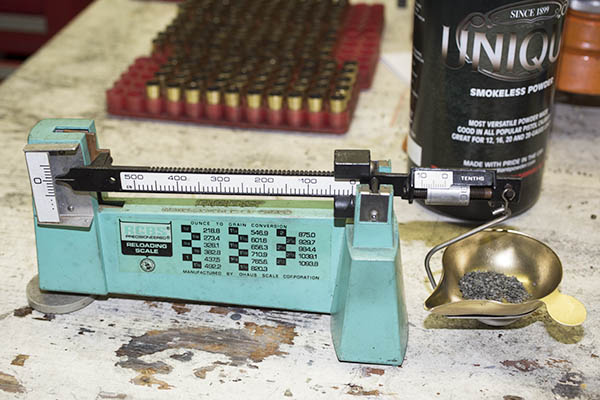
What we do at this point is get our reloading scale, set it to zero grains, and make sure the indicator (the balance arm) is in a neutral position (as indicated on the left side of the balance arm against the graduations on the scale markings on the left of the scale. Once the scale is zeroed, use the sliding and turning adjustors for the weight of propellant you wish to use. After years of accuracy testing and shooting, I’ve settled on 5.8 grains of Unique as the load I use with a 230-grain cast roundnose bullet.
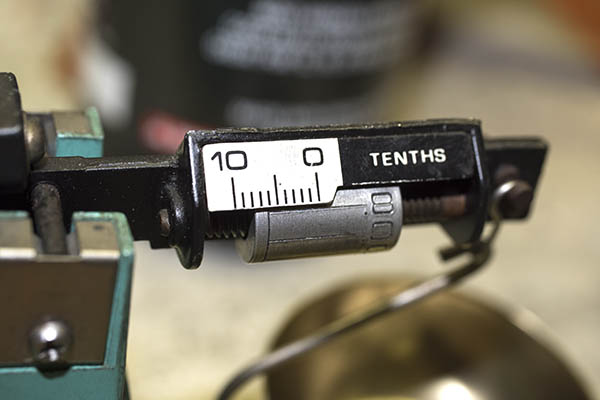
My RCBS reloading scale set to 5.8 grains.
Note in the photo above that the sliding weight is at zero grains, and further note in the photo below that the rotating adjustor wheel is set to 5.8 grains. For anything under 10 grains, you leave the sliding weight at zero and set the weight with the rotating barrel as shown below. For most .45 ACP loads, we use the rotating barrel only.
The rotating barrel adjusting wheel is set to 5.8 grains.
After adjusting the powder dispenser’s adjustor and checking the weight with the scale, we now have the dispenser releasing 5.8 grains of Unique propellant every time the dispenser is actuated. I’ll throw several charges to make sure the dispenser is dispensing consistently, and once I’m satisfied it is, we’re now ready to dispense 5.8 grains of propellant in each of the prepped and primed cases we prepared in Part III of of our .45 ACP reloading series.
There are 5.8 grains of Unique in each primed case. Note that the propellant levels are approximately equal in all cases, and no cases have been missed.
When you dispense powder, it’s important to be consistent. I don’t like to stop until I’ve done the entire tray of prepped and primed cases, and I don’t like to be interrupted while I’m doing this. After you’ve dispensed the propellant in each cartridge case, visually inspect the tray to make sure every case is charged with propellant, and all propellant heights are approximately equal. We’re looking for missed cases here (if that happens, the primer will push the bullet into the barrel just a bit, which requires disassembling the firearm to hammer the bullet back out with a rod, and that’s basically the end of your shooting session that day). We’re also looking for any cases that are double-charged (i.e., cases that have two charges of powder in a single case). A double charge is real serious and dangerous business, as it will most likely blow up the gun, injure you, or worse. You have to pay attention to what you’re doing here. Like I just said, this is serious business.
So, after we’ve charged the cases with propellant, we now ready to move on to the next step, which is seating the bullets.
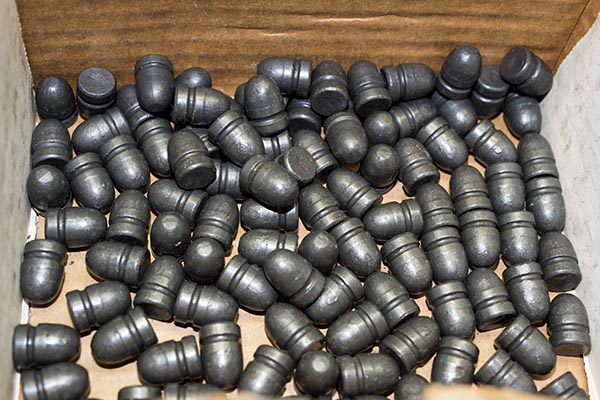
.45 ACP 230-grain cast roundnose bullets. I like this bullet design and weight. It’s accurate, and it feeds reliably in just about any .45 auto.
We’ll now use the seating die, the last of the three dies in our die set. This part of the operation requires a bit of adjusting and a bit of finessing on our part. We’re actually doing two things with this third and final die. We’re seating the bullet to the correct depth in the cartridge case (to meet the cartridge overall length requirement, which is found in your reloading manual), and we’re removing the cartridge case bellmouth that allowed the bullet to enter the case.
The business end of the seating die. The red arrow points to the part of the die that interfaces with and pushes the bullet into the case.
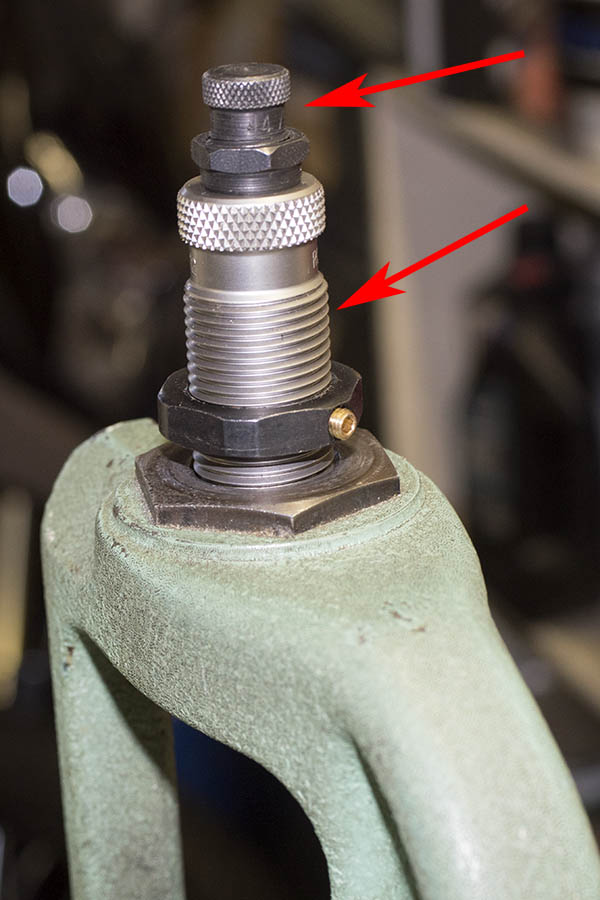
In order to make both adjustments, we’ll work with how far we thread the entire die into the reloading press (this affects both bullet seating depth and crimp), and we’ll also work with the bullet seating adjustor. These two parts of the die are shown by the red arrows in the photo below.
The bullet seating die in the reloading press. The upper threaded adjustor (denoted by the upper red arrow) adjusts bullet seating depth. The crimp or bellmouth removal adjustment is made by how far the entire die is threaded into the press (denoted by the lower red arrow), Once the crimp (or bellmouth removal for the .45 ACP cartridge) is set and the cartridge meets the desired overall length, lock both the die and the bullet seating adjustor in place with the two locknuts.
Here’s how I do this. I first screw the bullet seating adjustment all the way into the die, and then I’ll use this to seat the bullet to the right depth by threading the entire die into the reloading press, a little at a time. With each adjustment, I’ll run the charged case (with a bullet on top) into the die with the press. I keep doing this until the cartridge overall length is where I want it to be. For a 230-grain roundnose bullet, I adjust the seating depth such that the cartridge overall length is 1.250 inches, as specified by my reloading manual. That cartridge overall length is good, as it allows the cartridge to feed into the chamber, and it allows the cartridge to fit into the magazine.
Once I have the bullet seated to a depth that provides the correct cartridge overall length, I then back the bullet seating adjustor all the way out. Then I’ll start the crimping adjustment process by threading the entire die deeper into the press, a little bit at a time, running the cartridge into the press with each incremental downward die adjustment. The reason I ran the bullet seating adjust all the way out is that I don’t want it to push the bullet in any further while I adjust the crimp.
Here’s what going on here. Remember that I said the seating die does two things: It seats the bullet to the correct depth, and it crimps the cartridge. In the case of the .45 ACP, we’re not really crimping the bullet into the case. We just want to remove the brass case bellmouth that we previously added to allow the bullet to start into the case. The inside of the seating die has a reduced circumference step. Our purpose in making this adjustment is to thread the die into the press just enough to have the case make contact with the inner die step. That will remove the bellmouth. We’re not crimping here; we’re just removing the bellmouth so that the brass case becomes a straightwall case around the bullet.
Once I have adjusted the die body by screwing it into the press enough to remove the case bellmouth (and with the press ram raised to position the cartridge all the way up in the die), I then run the bullet seating adjustor all the way down, such that it contacts the top of the bullet. This will position the die such that it removes the case bellmouth, and simultaneously seat the bullet to the correct cartridge overall length. At this point, I can lock everything in position with the two locknuts (one for the die body in the press, the other for the bullet seating adjustor in the die) while the ram is in the raised position with a cartridge in the die. At this point, I’m ready to finish the rest of the cartridges.
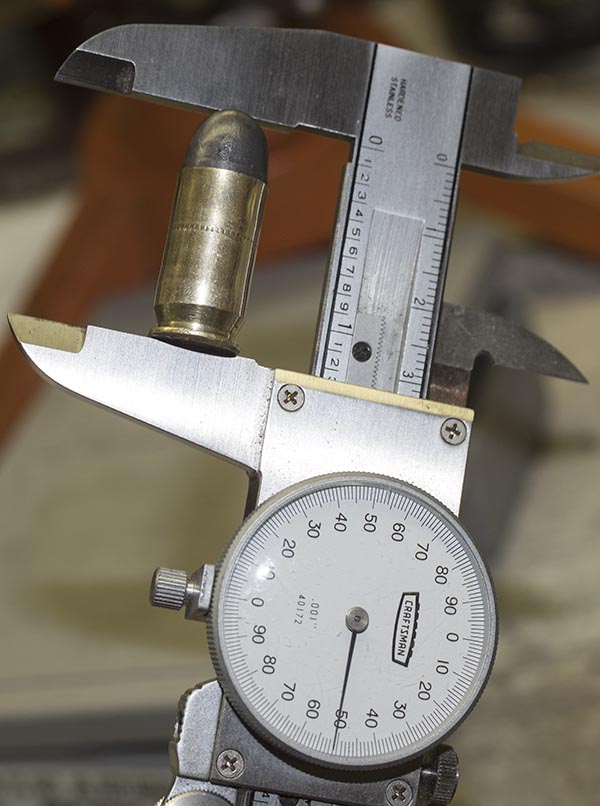
A case with the bellmouth removed, and the bullet seated to the correct depth. The cartridge overall length is 1.250 inches. Life is good. I can hit a gnat in the ass at 25 meters with this cartridge.
At this point, what I do is put a bullet on each charged case, and then I start running each cartridge, with a bullet on top, thr0ugh the reloading press.
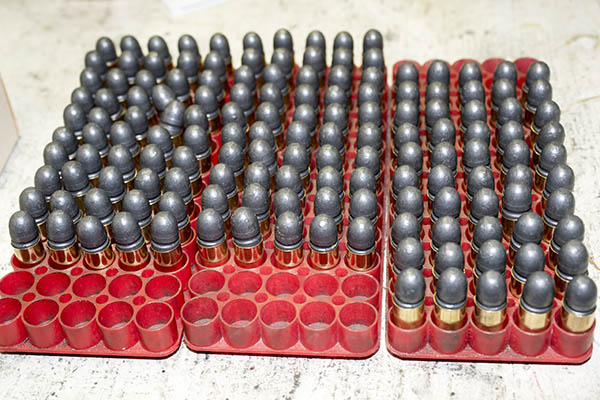
Charged cases topped with bullets, ready for the bullet seating operation.
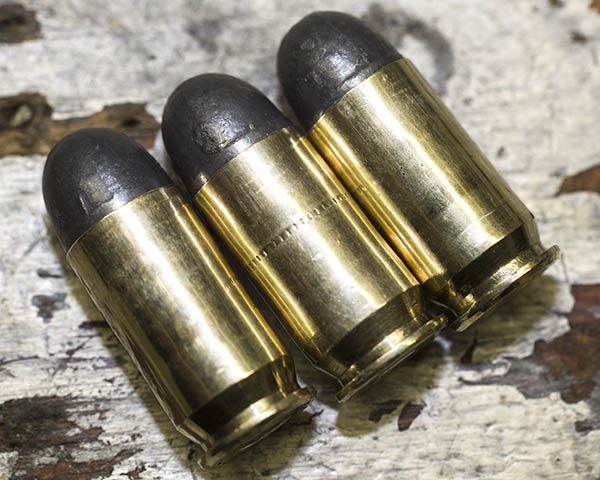
With each run up the press, I’ll create a reloaded cartridge. Here are three reloaded rounds…
Reloaded .45 ACP ammo. It’s good looking ammo, and I know it will provide superior accuracy and reliability in my 1911. It will perform way better than factory ammo, and that’s what this reloading game is all about.
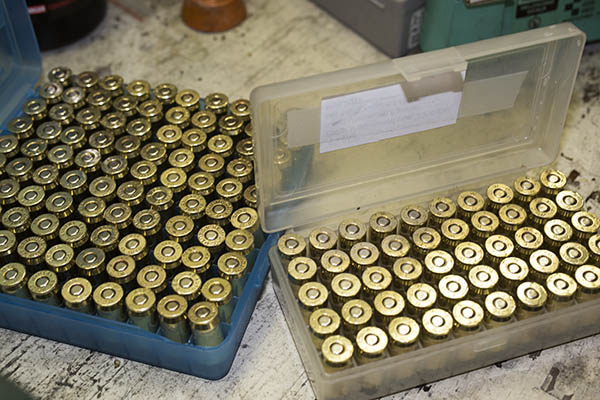
As I produce each round, I place it in one of the plastic boxes I use for my ammo.
Once the above steps are done, I then take the propellent remaining in the powder dispenser and return it to the propellant container (in this case, the Unique bottle). That’s one of the reasons it’s important to only have one bottle of propellant on the reloading bench. You don’t want to dump the leftover powder into the wrong propellant container. If that happens, you can’t use the container of propellant you just emptied the leftover powder into because now it contains a mix of two different propellants. The only thing you can do is throw it away. It’s just to risky to use it. And yeah, I’ve had to do that before.
Reloaded .45 ACP ammo, ready for the range. It looks good, doesn’t it?
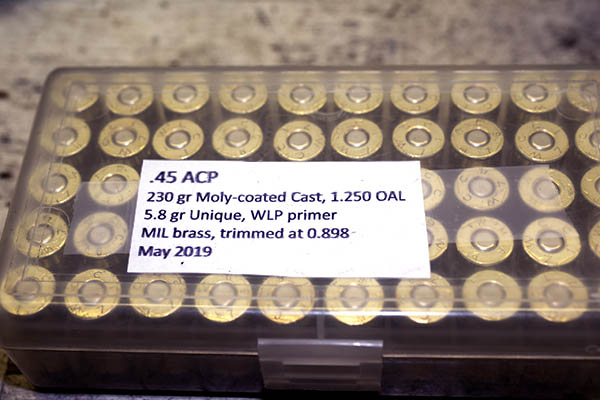
There’s one more step, and that’s labeling each box of reloaded ammo with cartridge, bullet weight and type, cartridge overall length, propellant type and charge, primer type, brass type, brass trim length, and the date I manufactured the ammo.
At this point, I’m good to go. It’s off to the range…
So there you have it. Reloaded .45 ACP ammo, as good as or better than what you can buy anywhere. I just returned from the range a few minutes ago, where I shot some of the ammo you see in the photo above, and yeah, it functioned flawlessly and hit the target every time.
If you enjoyed this post, let your friends know about us. Leave a comment if you’d like to add to or join the discussion. We love hearing from you. And if you never want to miss an ExhaustNotes blog, please sign up for our automatic email notifications!
Want to read more gun stuff? Check out our Tales of the Gun page!
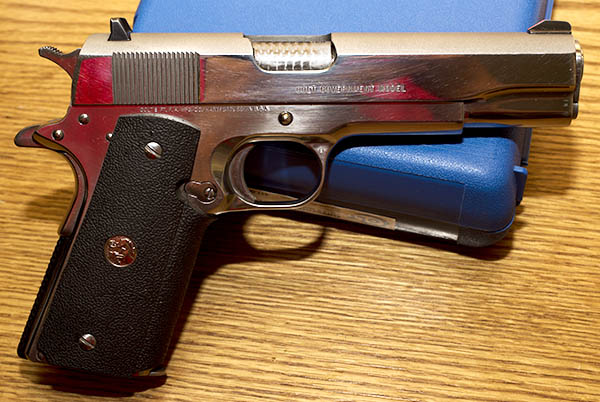
Good buddy Python Pete and I went to the range a few days ago to let loose with a pair of prancing ponies (that is to say, Colts), in both revolver and automatic flavors. The auto was my tried-and-true bright stainless Colt Government Model 1911; the wheelgun was Pete’s stunning 8-inch Colt Python. Both are stunningly beautiful and both are good shooting guns.
A custom bright stainless Colt, with Baer barrel, Millet sights, and a few other nice touches.
I bought the 1911 you see above at a pawn shop brand new back in the mid-1980s for just over $500. Colt no longer offers bright stainless steel guns, so I guess you could say mine is collectible, and when you see bright stainless Colt 1911s come up for sale (which doesn’t happen very often), prices start at $2,000 and go north from there. I guess you could say I made a good investment (except I won’t ever sell it).
A few years ago the front sight popped off my 1911, so I took it to a local gunsmith to have it restaked. That repair lasted all of 50 rounds, and I realized I needed to see an expert. That’s when I hooked up with TJ’s Custom Guns, and I had TJ revamp the Colt. It’s got a Les Baer match barrel, an extended one-piece guide rail, an engine turned chamber (I love that look), high profile/high visibility Millet fixed sights, and TJ’s exclusive high reliability tune. That last little bit means that my Colt 1911 will reliably feed any bullet configuration (semi-wadcutters, hollow points, etc.) and it will work no matter what. Folks, I’ve put tens of thousands of rounds through my 1911 since TJ massaged it, and it’s never had a failure of any kind (no failures to fire, no failures to feed, and no failures to eject…it just goes and goes and goes).
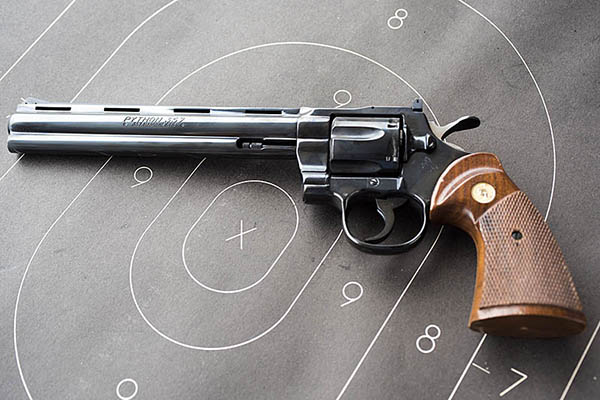
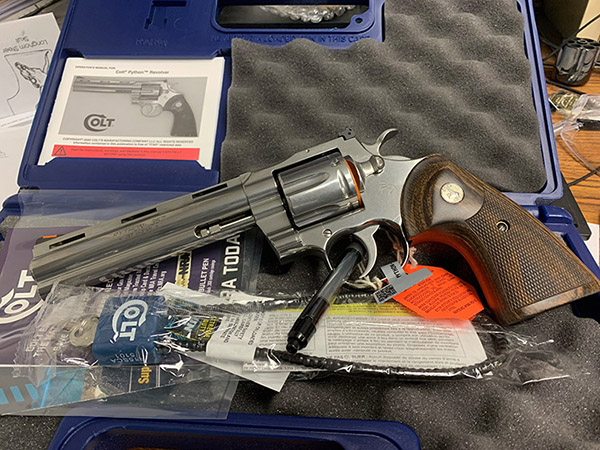
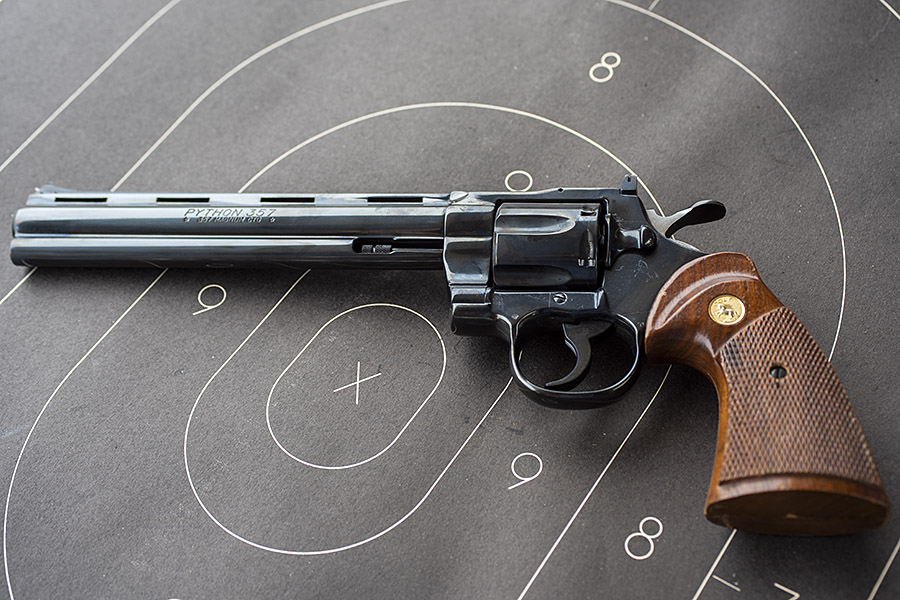
On to the Python. I’ve known good buddy Pete for more than 30 years (we sort of grew up together in the aerospace industry). Pete owns a Colt Python, a gun that is arguably the finest revolver ever made. His is the super-rare 8-inch model, too.
Revolver royalty…the stunning Colt Python. The Colt Python is perhaps the finest revolver ever made.
Colt no longer makes the Python, probably because they were too expensive to produce. The fit and finish are superior, and the feel of the thing is just sublime. It’s a .357 Magnum, one of the world’s all time greats, and a cartridge that dominated the police market before 9mm became all the rage. Colt revolvers were hand-fitted and involved lots of custom assembly, and I suppose it just didn’t in with the need for low cost manufacture in a market dominated by black plastic 9mm handguns. No, the Python is from another era characterized by highly polished blue steel and finely figured walnut, an age in which I felt more comfortable. Seeing a Python on the firing line again was a treat, and when Pete asked if I wanted to try the big Colt, he didn’t have to ask twice.
Pete and I had four handguns with us (the two mentioned above, plus a SIG 9mm and my Rock Island Compact 1911). I shot my two 1911s offhand for a while, and then I tried my luck with Pete’s SIG and the Python. It was fun.
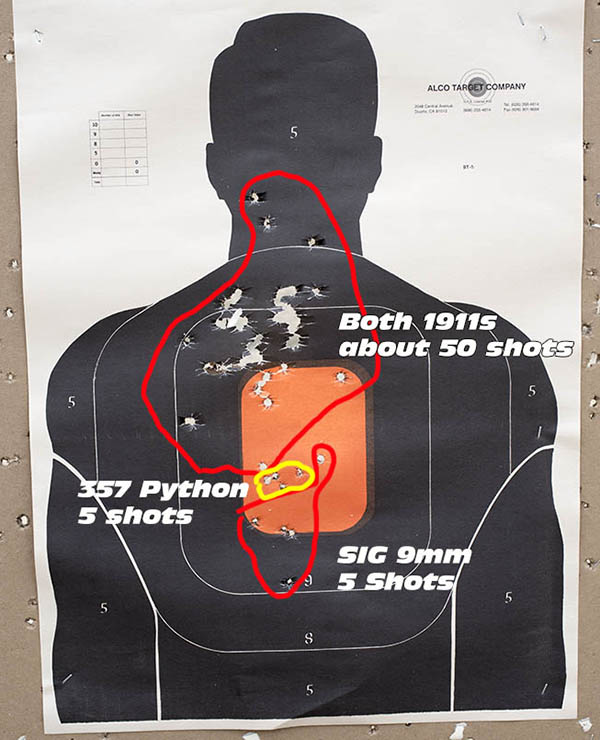
You can argue about a good automatic being as accurate as a high-end revolver, but you won’t convince me. The Python is a tack driver.
I fired 5 shots of “nothing fancy” factory ammo with the Python, and the accuracy was superb. The targets don’t lie, folks.
I’ve owned two Pythons in my life, and both were back in the 1970s. When I was in Korea, I found out I could order one though the Base Exchange at a substantial discount. I couldn’t believe what the nice lady was telling me at the Kunsan AFB Exchange, so I ordered a 6-inch blue steel Python for something like $150 (it sounded too good to be true). Incredibly, it came in the mail to me in Korea. Before I rotated home, I had to submit a form through the Army to get permission to import the revolver back to the US. I did that, and a few weeks later I had a letter signed by the Director of the Alcohol, Tobacco, and Firearms Bureau allowing me to bring my Python home. It went into my duffel bag, I produced the letter when I went through Customs in San Francisco, and that was that. Better times.
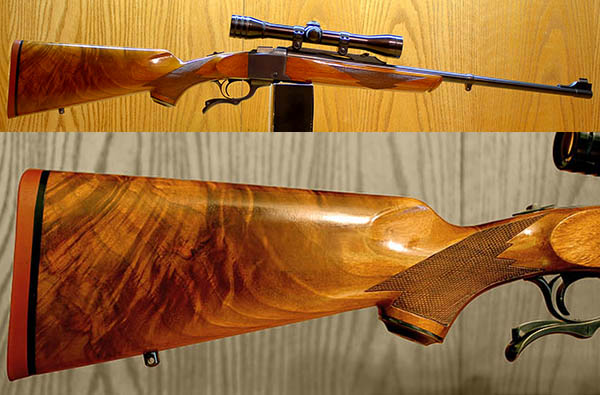
You know how it goes with these things. When I was back in Texas shortly after my stint in Korea, I saw a Ruger No. 1 single shot rifle in .30 06 I couldn’t live without, and I traded the Python for it (the guy at the store through in a couple of boxes of .30 06 ammo, too). Then I felt a void in my life because I no longer owned a Python, so I ordered another one (this time a 6-inch nickel-plated model) through the Fort Bliss Gun Club. It was under $200. Then I traded that for something else (I can’t remember what). Ah, the mistakes we make. But maybe they weren’t all mistakes. I’ve sent a lot of lead downrange with the Ruger No. 1 over the last 45 years, it’s one of the most accurate rifles I own, and it has stunning walnut.
The Ruger No. 1 in 30 06 I traded the Kunsan Python to get. It’s a 200th Year Ruger. I miss the Python, but I love my ’06 No. 1. Some day I’ll do a blog on this rifle.
Today, Colt Pythons typically sell for something in the $3,000 to $4,000 range. Pete’s would command even more, because it’s the 8-incher, which is a rare item. I’ve asked Pete if he wanted to sell his, but all I got in return was a smile. That’s probably just as well; I couldn’t afford it at today’s prices.
Reloaded .45 ACP ammunition. Bright, shiny, and far more accurate than factory ammunition in my Colt and Rock Island 1911 pistols. I’ve got the targets to prove it.
In our first post on this topic, we talked about the equipment and components needed for reloading the .45 ACP cartridge. In this blog, we talk about the reloading process. We won’t cover all of it here (we’ll get about halfway through), and we’ll cover the rest of the process in a subsequent blog or two. In our first blog, we discussed the basic equipment. In this blog, we’ll talk about a few more bits of equipment that I use, but they are not essential. You can get by without them.
If you want to catch up with the first blog on this topic, you can do so here.
Let’s say you’ve been to the range, you’ve made .45-caliber holes in your targets, and you’ve collected your spent brass. That’s the only part of the reloading process I don’t like…at my age, bending over and picking up all that brass is a pain-in-the-you-know-what. But I still do it. In fact, if I see somebody leaving brass on the ground, I’ll collect it. I grew up collecting brass to reload, and leaving brass at the range feels to me like a crime against nature.
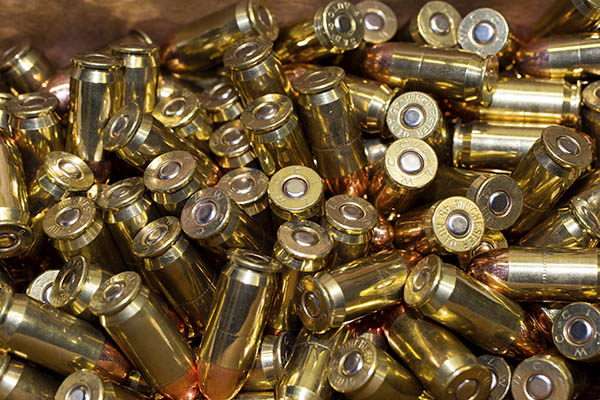
So we’re home, and you’ve got your fired brass…
Fired .45 ACP brass. I just can’t leave brass at the range. To me, it’s like leaving cash on the ground.
This next step I’m going to show you is an optional one, and that’s cleaning the brass. You don’t need to do this, and I reloaded .45 ammo for a lot of years without ever cleaning my brass. I always do it now, though, and I do it for two reasons: Cosmetics and accuracy
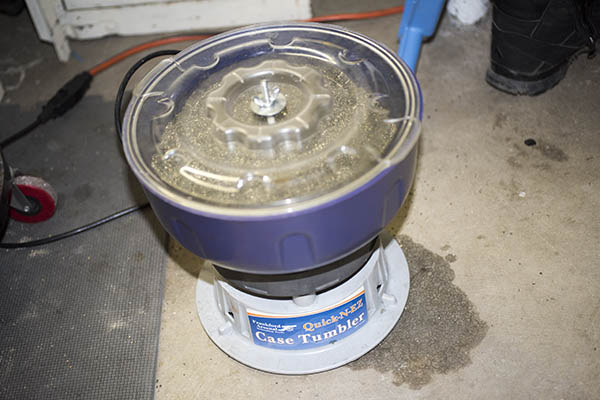
Here’s how I go about doing it. I dump the brass into my vibratory tumbler and let it rock for a couple of hours.
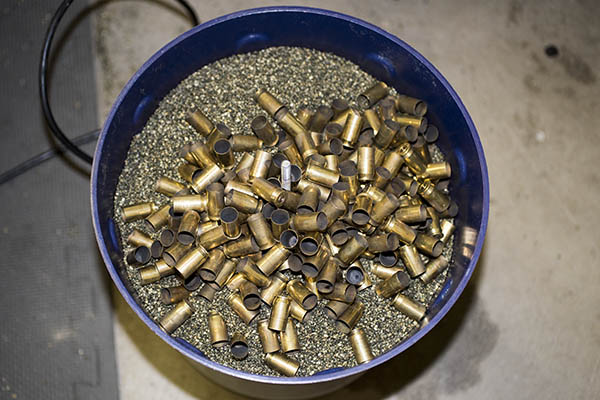
My Frankford Arsenal vibratory cleaner. I call it a tumbler. It has corn cob media. You unscrew the butterfly nut on top, remove the cover, and dump the fired brass into the media.Here’s the tumbler with the cover removed and the brass placed on the media. The cover goes back on and I let the thing vibrate for a couple of hours.
Like I said above, I tumble my brass. One of the reasons is that I like bright, shiny ammo (it just looks cool). But a far more important reason is that it makes the ammo more accurate. When you tumble the brass, you’re cleaning it on the inside and the outside. The outside is cosmetic. The inside affects the grip the brass case has on the bullet. We’re not interested in making it shiny on the inside; we’re interested in making that grip consistent. I’ve found over the years that a consistent inside case surface (where the case interfaces with the bullet) makes for a more accurate cartridge. It’s extremely significant in a rifle (I’ve seen 100-yard groups shrink from 3 inches to a quarter of an inch in my .30 06 Model 70 Winchester just by tumbling the brass). The accuracy improvement in a handgun is not that significant, but it’s still there. You don’t have to do this (you can reload the brass without tumbling it), but it’s something I do.
Here’s what the brass looks like after it’s been tumbled….
Squeaky clean and shiny. Fired, cleaned brass.
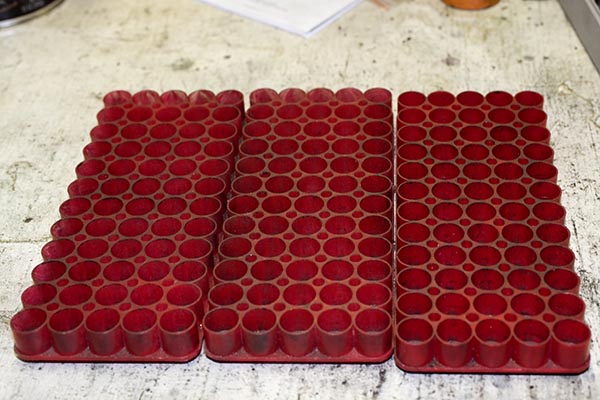
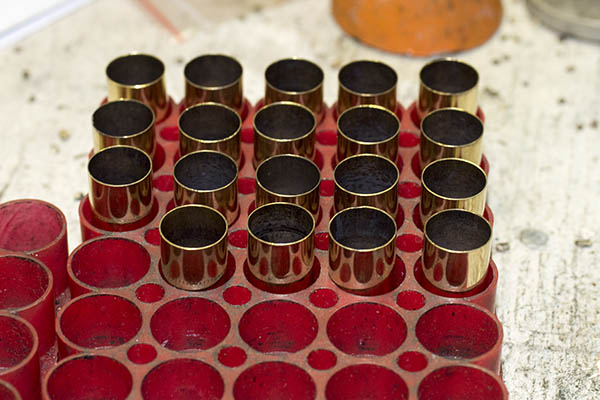
Now we’re ready to start the resizing operations. We’ll want to get our ammo trays ready…
Reloading trays. Each tray holds 60 rounds, but I only load 50 in each one.
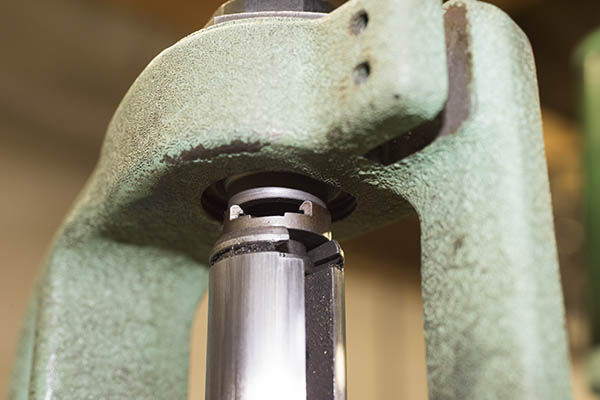
The next step is to install the first of our reloading dies (the resizing die) in the press. We’re going to use this die to squeeze the cartridge case back to its unfired case diameter and simultaneously knock out the fired primer.
The resizing die. Note the protruding pin; it’s what pushes the old primer out of the brass case.The resizing die, threaded into the reloading press. Note the large locknut at the base.With the shell holder installed on the press ram, we fully elevate the ram, thread the resizing die down to contact the shellholder, withdraw the ram slightly, turn the die in just a bit more, run the ram up, and then lock the die in place with its locknut. What we want is to feel a slight “knuckle over” when the ram is fully elevated.
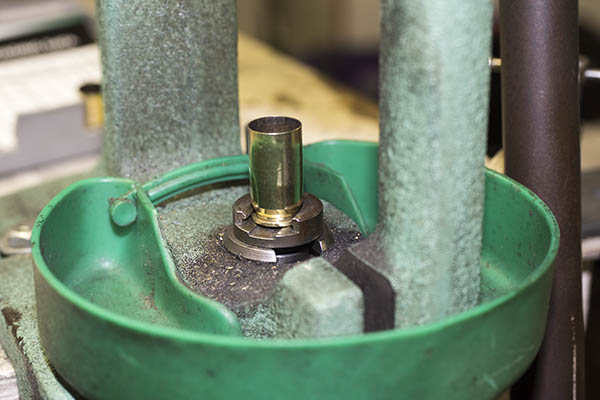
At this point, we’re ready to start resizing and depriming cases. Here’s what that looks like.
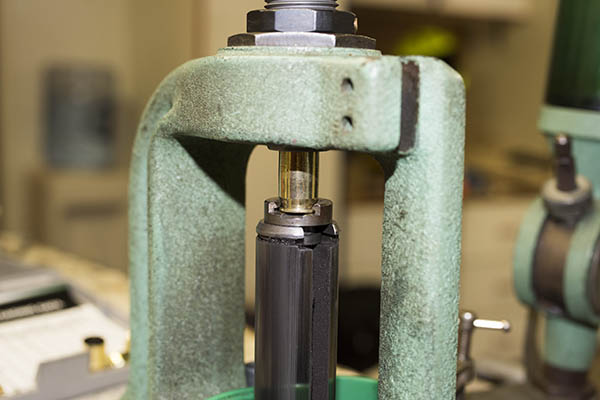
A case in the shellholder. When we raise the ram, it will be resized and the old primer will be pushed out.The ram is raised all the way to the top of its stroke. Here we see the case just starting to enter the resizing die. You don’t want to get your finger caught between the die and the fired case (don’t ask me how I know). The ram will go up until the shellholder contacts the bottom of the sizing die. As that occurs, the case is resized to its original diameter, and the primer is pushed out of the case.
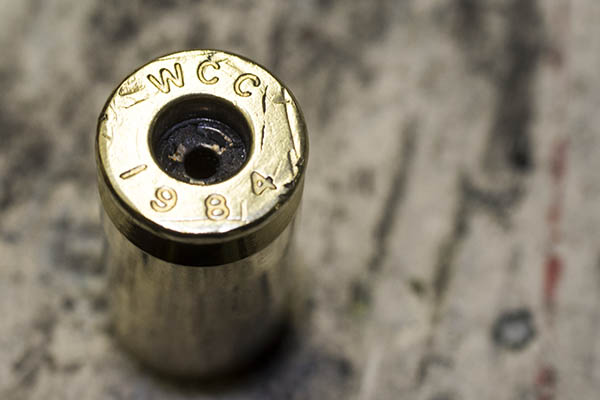
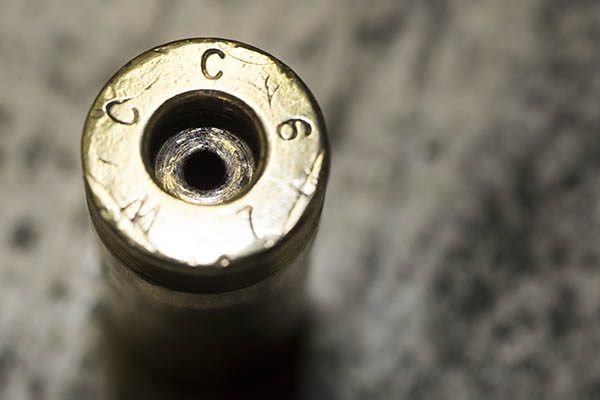
This is what the case looks like after it has been resized. Note that the primer is no longer in the case. Also, note how funky the primer pocket is. It’s gunked up with combustion residue.
A resized, deprimed case. Note the combustion reside remaining in the case’s primer pocket. And yes, I’ve been reloading this case since 1984. I’ve got some that are even older. .45 ACP brass lasts a long time.
As each case comes out, I’ll place it in the reloading tray, like you see below.
Resized and deprimed cases in the reloading tray.
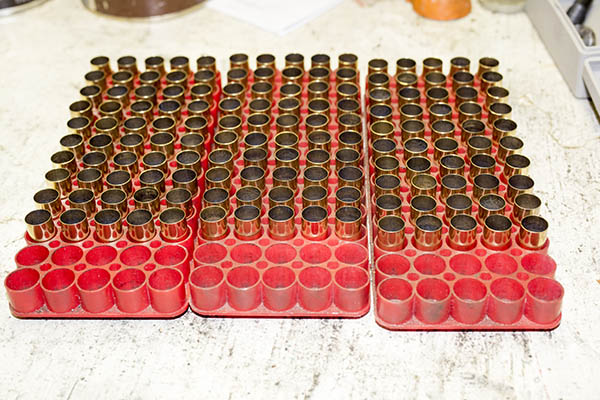
When I reload, I’ll generally do between 20 and 200 rounds in a batch. I reloaded 150 rounds in this batch.
150 resized and deprimed cases. Note that there are 10 empty spaces in each tray.
I use reloading trays that hold 60 rounds, and the reason I like these is that for a group of 50 cases I can track which case I’ve performed an operation on and which ones remain. Each time a case undergoes a reloading step, I move it over such that I always have 1o open spots between the cases that have undergone a reloading step and those that have yet to undergo the step.
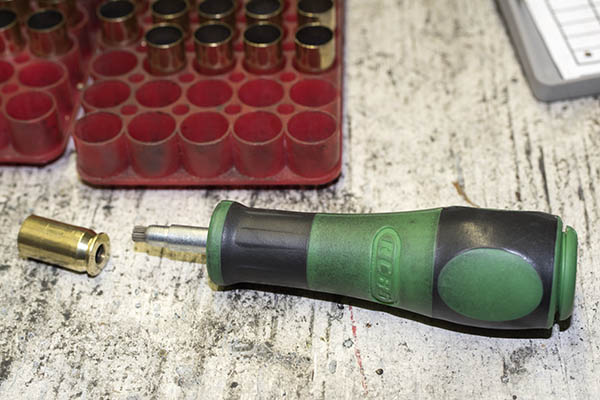
Ah, but those primer pockets. Remember how dirty they were after we pushed the primers out? Well, this is another optional step. I clean the primer pockets. I do each case manually, one at a time, using a primer pocket cleaning tool.
The primer pocket cleaning tool. It’s a primer-pocket-sized wire brush, and it removes the primer pocket combustion residue.A cleaned primer pocket. It doesn’t need to be bright and shiny; we just want to remove the clumps of combustion residue so the new primer can fully seat.
Like I said, primer pocket cleaning is optional. I reloaded for a lot of years and won more than a few matches without primer pocket cleaning, but these days I do it on every case. The reason we want the residue gone is that the residue can interfere with the new primer seating fully in the case (we’ll talk more about that in the next .45 ACP reloading blog). Having the primers all seated to the same depth will theoretically make for more accurate ammunition (less variability always equals more accuracy). It won’t effect functioning if the primers are at slightly different depths in a 1911, but if you’re reloading ammo for a revolver, a primer that is seated above flush (one that sticks out beyond the cartridge case base) can interfere with the cylinder turning.
At this point, we’ve got cleaned, resized, and deprimed cases. We’re ready to bellmouth the cases, install the primers, charge the cases with propellant, and seat the new bullets.
So that’s it for now. Stay tuned; this series will continue right here on the ExNotes blog!
The finished product: Reloaded .45 ACP ammunition. This handcrafted ammo is tailored for my 1911, and it is much more accurate than factory ammunition. Our blogs on reloading will cover the equipment and components needed, and the steps involved, in reloading ammo for the .45 Automatic.
I’ve had a few requests for a blog on reloading. You know, not just favored loads for different cartridges, but how to go about reloading. I know it can be a bit intimidating if you’ve never done it, but (trust me on this), learning how to reload adds an entirely new dimension to shooting, and many of us view reloading as being as much fun as shooting. In fact, one of my friends often jokes about shooting…he says it’s what we do so we get to reload ammo again.
A very cool guy named Roy Johnson taught me how to reload when I was in the Army. I was assigned to Fort Bliss, Texas, and Roy ran the Rod and Gun club there. Roy was a colorful El Paso fixture, and they named the road to the Rod and Gun club Roy Johnson Lane when he died. I was 22 years old when Roy taught me how to reload, and I’ve been reloading ever since.
I thought I would approach this topic in two or three parts, with the first blog focused on the equipment and components you’ll need to reload, and a subsequent blog or two on the actual reloading process. I had to pick a cartridge, so I thought I would start with the first one I learned to reload: The .45 ACP.
With that as a backdrop, here we go…
Reloading reverses the process of firing a bullet, and reversing that process requires several pieces of equipment.
One part of the equipment list is the dies that force the fired brass case back into shape (the brass expanded during firing) and knock the used primer out of the case.
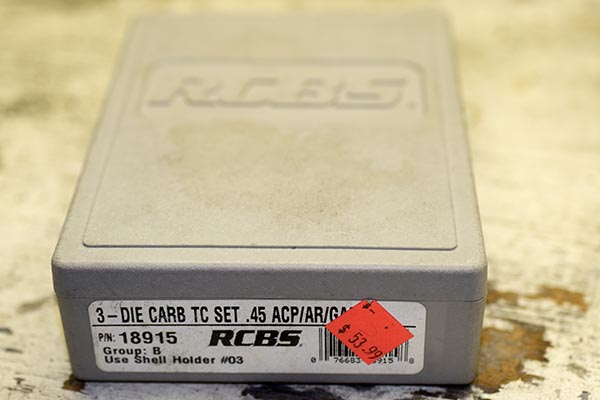
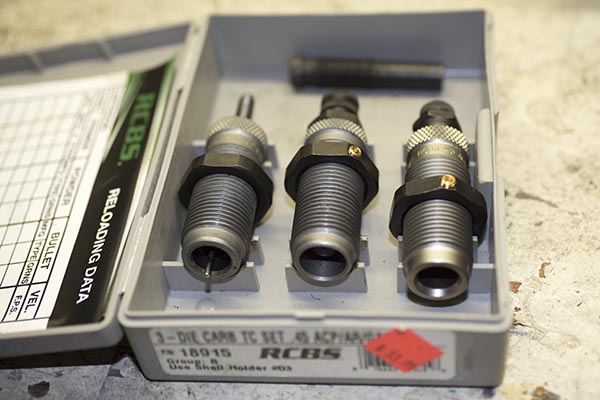
A set of RCBS carbide dies for the .45 ACP cartridge.A die set consists for a pistol cartridge typically includes three dies. From left to right, they are the resizing die (it sizes the brass case back to original dimensions and punches the primer out of the case), the expander die (it opens and flares the case mouth to accept the new bullet), and the seating die (it seats the new bullet in the case and removes the case mouth flare).
I stick with RCBS dies, as I’ve learned over the years they work best, but there are other manufacturers out there. I also use Lee dies for a few of the cartridges I reload (they are typically less expensive than RCBS dies, and they are as good). An added advantage of the Lee dies is that they include the shellholder with the die set, so you don’t have to buy a separate shellholder and pay extra for it. I don’t care for Hornady dies, but as they say, your mileage may vary. I’m the guy doing the writing here, so I’ll share my experiences and preferences, and I like RCBS and Lee. A new set of RCBS carbide dies are a little north of $50; Lee dies are typically $10 to $15 less than the RCBS dies (and like I said earlier, the Lee dies come with a shellholder).
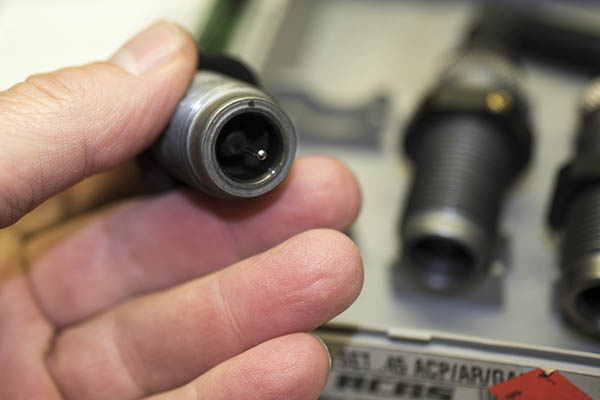
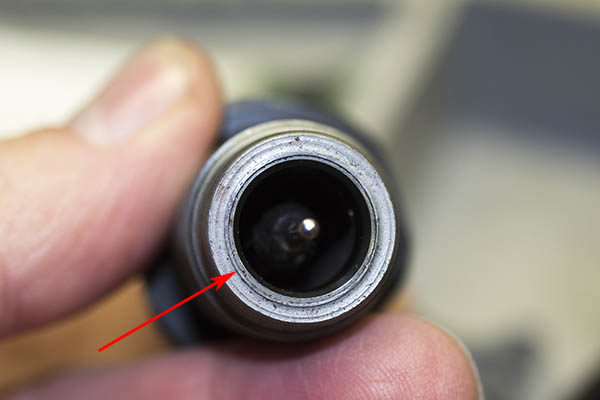
The business end of the carbide resizing die. The red arrow points to the carbide insert.
I use carbide dies for pistol cartridges. A carbide die has a super-hard carbide insert that interfaces with the brass case, and it allows you to squeeze the case back to its unfired configuration without having to lubricate the case first. The downside is that carbide dies are slightly more expensive than non-carbide dies. For straight-walled pistol cartridges, there are three dies in a set. We’ll discuss in more detail what each does in Part II of this series.
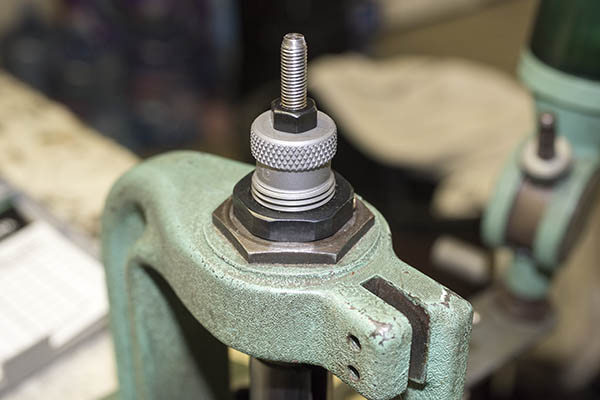
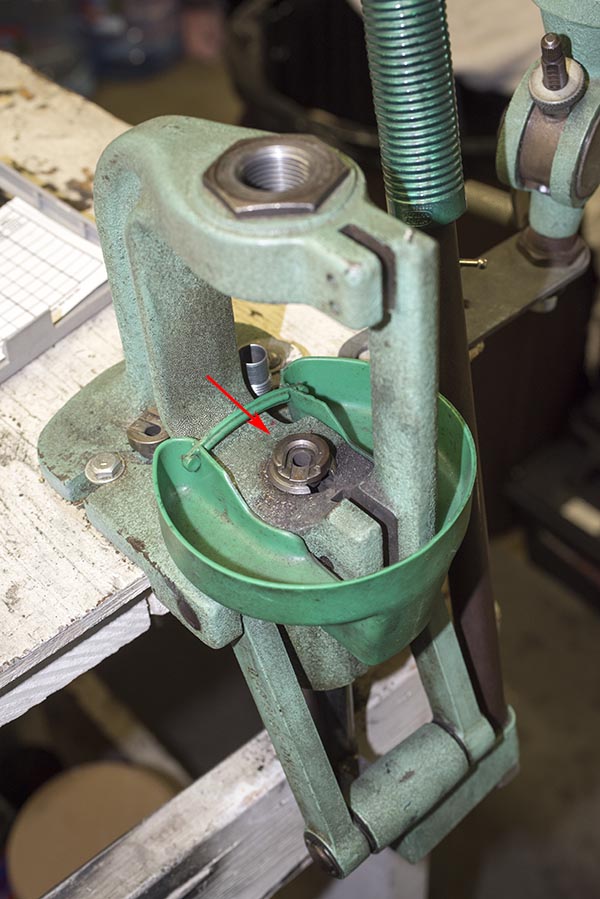
You will also need a reloading press and a shellholder for the brass cartridge case. I use an RCBS Rockchucker press I bought new nearly 50 years ago when Roy Johnson taught me how to reload. A good press lasts forever.
The RCBS Rockchucker reloading press. A good one lasts forever. The red arrow points to the shell holder. Different cartridges take different shell holders. We’ll see how all this stuff is used in Part II of our reloading series.
A scale is necessary for measuring propellant charges (also referred to as powder). Several companies offer scales specifically designed for reloading.
My RCBS reloading scale. Like the Rockchucker press shown above, I’ve been using this for a half century.
It’s a good idea to have reloading trays for the cartridges. These are relatively inexpensive, and they seem to last forever, too.
Reloading trays. These hold the brass cases we are going to reload, and allow for easy tracking and inspection of each reloading process step.
A powder dispenser allows you to dispense the correct amount of propellant in each cartridge case.
A powder dispenser, and the propellant I like to use for loading .45 ACP ammunition. I bought that dispenser back in the day, along with the scale and the press. My preferred propellant is Unique.
At this point, we’ve covered the equipment necessary; let’s now turn to the components. One is the propellant you see in the photo above. As seen in the photo below, for the .45 ACP cartridge, I prefer Unique.
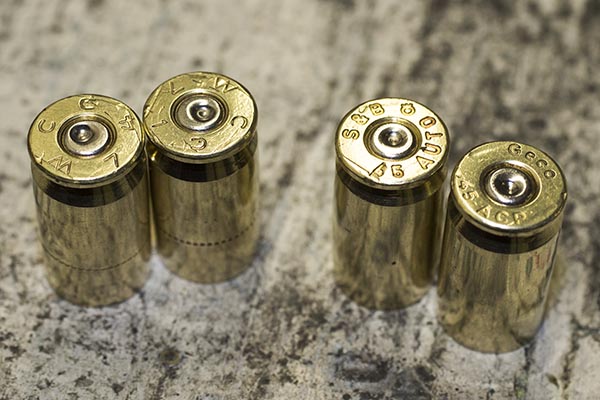
You’ll need previously-fired cartridge cases. You can also buy new brass that has never been loaded if you don’t have any, or you can buy factory ammo, shoot it, and save the brass. I don’t think I’ve ever purchased new brass for the .45 ACP, mostly I had plenty available from my days in the Army. The .45 ACP cartridge is a relatively low-pressure cartridge, and the brass seems to last forever. I’ve been reloading the brass you see here for a long time.
Fired .45 ACP brass. It’s dirty. I usually polish mine, but it’s not necessary that you do so. We’ll talk more about that in the next blog.Polished .45 ACP brass. It cleans up well and it seems to last forever (look at the stamps on the two cases on the left).
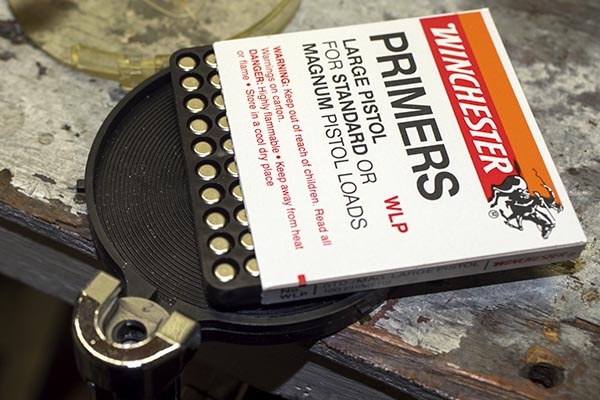
You’ll need primers. The primer is the little cap that the firing pin strikes when you pull the trigger. There are two or three companies making primers these days. I usually buy whatever the shop has in stock. I haven’t found that primers make a difference in accuracy or reliability for handgun shooting.
Winchester primers. We’ll talk about the tool you see below the primers, and how to install the primers, in the next blog.
And finally, you will need bullets. I’m using moly-coated 230-grain roundnose lead bullets these days, like you see in the photo below, mostly because I have a bunch of them in my reloading locker. Many other bullet configurations are available.
Bullets. I usually buy them in boxes of 500 because I do a lot of shooting. There are different kinds of bullets available, but that’s a discussion for another time, too. If you’re just starting out and you’re reloading .45 ACP ammo, my advice is to get a 230-grain roundnose bullet in either cast or jacketed flavors. It will feed reliability in nearly any 1911. We’ll talk more about this in the next blog, too.
There’s one other item I strongly recommend you purchase, and that’s a reloading manual. These manuals list different loads for different cartridges and different bullets and propellants. The whole idea here is to experiment with these combinations (within the parameters provided by the manuals) to find the recipe that produces the best accuracy and reliability in your gun. My preference is the Lyman manual, as it lists different bullet manufacturers and cast bullets, too. You can buy manuals from the bullet manufacturers, but the downside there is they only show data for their bullets.
You can buy all of the equipment separately (as I did a long time ago) or you can buy a complete kit that has everything you need to get started. RCBS has a kit that goes for about $350. Lee has a similar kit for a lot less (about $150), and it will get you into the reloading game. I have a friend who bought the Lee kit a few years ago, he uses it to reload .308 Winchester ammo for his Model 700 Remington, and the ammo he makes routinely delivers 1/2-inch groups at 100 yards. With either kit, you’ll need to buy the dies required for the cartridge you wish to reload, and the components as described above.
You might be wondering: Where do you buy this stuff? Most gun stores sell reloading equipment and components. Cabela’s and Bass Pro are two that come to mind. You can also buy components and equipment online from places like Amazon, Midway, Natchez Shooter’s Supply, Grafs, and other places. Buying the energetic components online gets a bit more complicated (propellants and primers), but the stores can fill you in on that. In most areas, there’s usually a shop that is known for being the best in your neck of the woods for reloading stuff, and you can find these places with a quick Google search or by asking around.
So there you have it. I’ve described the equipment and the dies you’ll need to reload the .45 ACP, but the procedures I’ll describe in subsequent blogs will be the same for nearly any handgun cartridge (.38 Special, .537 Magnum, .380, 9mm, .40 S&W, .44 Magnum, and .45 Colt). All you need will be different dies and shellholders, and of course, different types of bullets.
Our next reloading blog will cover the first steps of the reloading process. Stay tuned; it’s coming up!
Read our other Tales of the Gun stories for the loads we prefer. Disagree with anything above or want to toss your $0.02 into the discussion? Hey, there’s a comments section below and we’d love to hear from you.
One last thing…ever wonder what the “ACP” stands for in .45 ACP? Well, here you go…wonder no more.


 Good buddy Python Pete and I went to the range a few days ago to let loose with a pair of prancing ponies (that is to say, Colts), in both revolver and automatic flavors. The auto was my tried-and-true bright stainless Colt Government Model 1911; the wheelgun was Pete’s stunning 8-inch Colt Python. Both are stunningly beautiful and both are good shooting guns.