A Favorite 1911

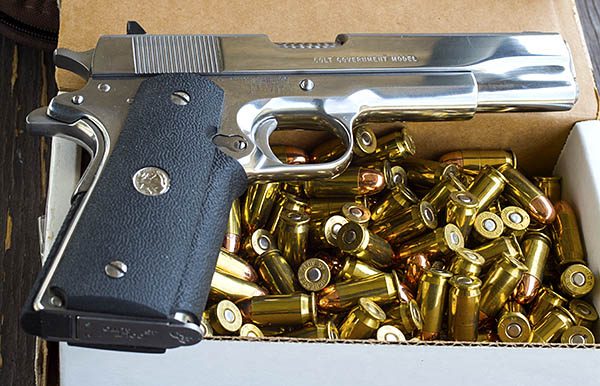
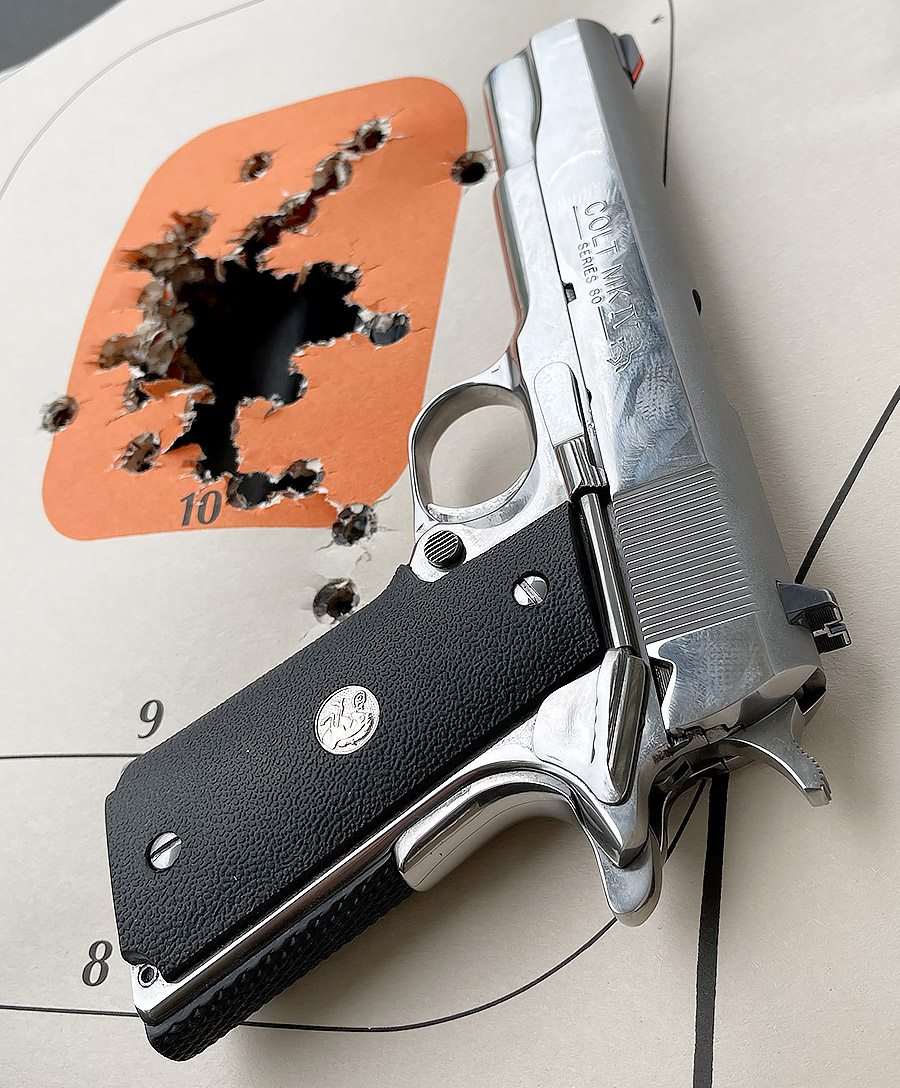
The 1911 is an all time favorite handgun for me (and a lot of other people, too).   I’ve owned several 1911s over the last few decades, I carried one in the Army, and I enjoy shooting them.  One of the best I’ve ever owned is a bright stainless steel Series 80 Government Model I bought new back in the mid-1980s.   Mine has been customized by good buddy TJ (of TJ’s Custom Gunworks) and it’s the one you see here.  I have no idea how many rounds I’ve sent downrange with this gun, but it’s been zillions.  Maybe even gazillions.

TJ’s Custom 1911 Touches

My bright stainless 1911 has had a number of TJ’s custom touches.  The fixed Millet sights are probably the most obvious.

Front and rear Millet sights on my 1911. You’re actually supposed to focus on the front sight and the rear should be blurred when shooting (just the opposite of what you see here). I’ll post more on that in a later blog.
The Millet red ramp front sight.

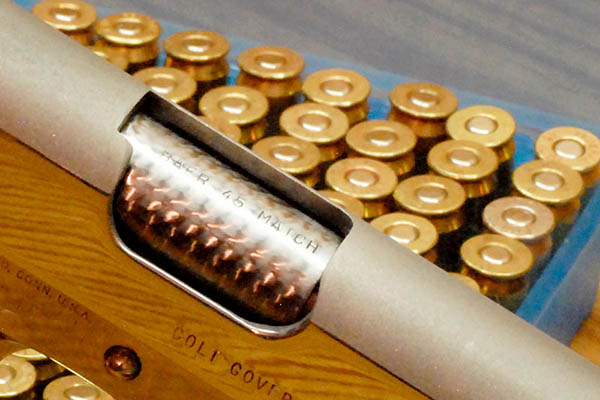
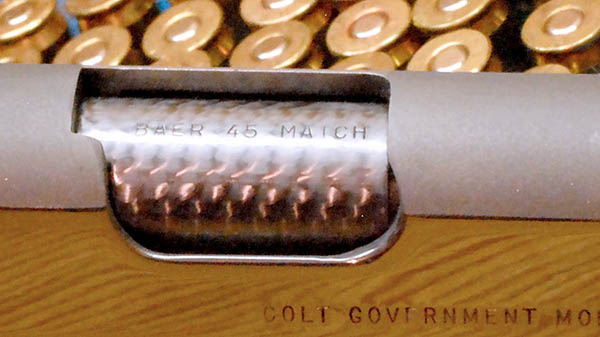
TJ polished and ramped the gun’s internals so it will feed anything, he added a Les Baer match grade barrel, and I had him engine turn the chamber (I love the look).

A Les Baer match barrel.
I like it so much I photographed it twice!

The original Colt front sight wouldn’t stay put on my 1911 (probably because of the number of rounds I was cycling through it), and after having the front sight restaked twice, I knew something more permanent was required.  The Millet red ramp from sight has two stakes, they are each larger than the single Colt front sight stake, and TJ JB-welded them from underneath after staking.  They are on there for the duration.  A lot of folks prefer a dovetailed front sight and that would have worked, too, but I’m partial to these no-longer-made Millets.  I just like the look.

The rear sight is a fixed Millet dovetail and it has a bright white outline that works well with the red ramp front. I’m not normally a fan of gimmicky sight doodads like red ramps and white outlines, but these just flat work.  They’re quick to acquire and they put the bullets where I want them to go.  Millet sights are no longer in production, but they are some of the best ever made and TJ keeps a stash in stock for his customers.  I imagine he spends a lot of time on Ebay hunting for these things.

One other thing TJ did on my 1911:  He fitted the extractor.  It was very rough as delivered from Colt and difficult to remove for cleaning.  Now (after TJ’s magic touches) it inserts and removes easily, and extraction is flawless.

1911 Accuracy

Close enough for government work, most folks would say, and maybe that’s so.  When I slow down and do my part, I can tear one ragged hole at 50 feet with my 1911, and that’s good enough.  If I’m shooting for fun with a bit of speed, it’s not problem to put an entire box of ammo through one big ragged hole with the odd flyer or five like you see up top.

The Millet sights print where I want them to, and I like the simplicity of fixed handgun sights.  It’s a good setup.

Getting a Grip

My 1911 didn’t need a trigger job, and TJ recommended not trying to improve the trigger after he felt it.  The gun came with the rubber Pachmayr-type wraparound grips from the Colt factory, and I added a Pachmayr rubberized rear grip housing.  Those two items (the rubber grips and rear grip housing) are, in my opinion, as good as it gets in the 1911 game.  I don’t think that rear grip housing is available any more.  I wish I had bought a few extra when Pachmayr was still making them.

Appearance Is Everything 

I’m not normally a shiny objects kind of guy, but when I first saw my bright stainless 1911 in that gun store 35 years ago, I knew I had to have it. The gun just looked cool and it’s a conversation starter.  It’s easy to pick up minor scratches that I can see before other folks do, but they come right out with a bit of Flitz (a superb stainless steel polish) and a little elbow grease.

My Three Favorite .45 ACP Loads

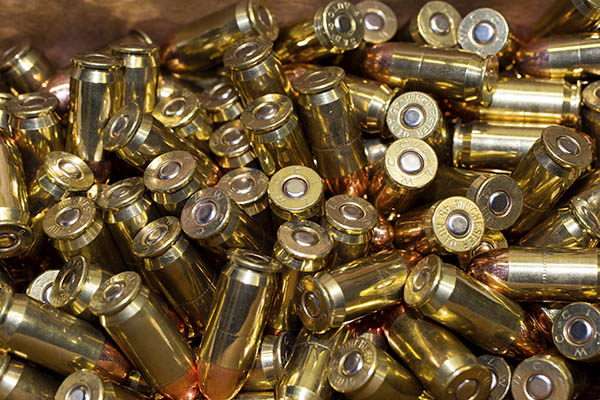
The target you see at the top of this blog?  That’s 50 rounds at 50 feet with one of my favorite loads for this and any other 1911 I’ve ever shot:  5.0 grains of Bullseye under a 185-grain cast semi-wadcutter bullet.  I’ve got a couple of other favorite loads, too.  One is the 230-grain cast roundnose over 5.6 grains of Unique (that load is 100% reliable in any 1911).   Another for target work is 4.2 grains of Bullseye and a 200-grain cast semi-wadcutter.  All three loads are as reliable as taxes going up under a Democrat, and they all work with the same recoil spring.  In my case, that’s the spring that came with my Colt 1911.

230 grains (in this case, bullets from Xtreme), 5.6 grains of Unique, and good times.

If you’re interested in learning how to reload .45 ammo, here you go:

Reloading Part I
Reloading Part II
Reloading Part III
Reloading Part IV


Sign up for free!


We have more good stuff on our Tales of the Gun page, and if you enjoyed this piece, you might take a look.


Enfield 650 Valve Adjustment

This blog explains how to adjust the valves on a Royal Enfield 650 Interceptor.   This was the first valve adjustment my motorcycle has had, and it occurred at the 500-mile mark.  The first valve adjustment is an important one, as decreases in the valve gap will typically be more severe as the engine is breaking in.  For the record, though, on my bike’s eight valves only one was slightly tight (and that was one of the intake valves).  The other seven were pretty much where they were supposed to be, but I loosened the adjusters and readjusted them just to see if any were difficult to access or if they would give me any problems.  Accessibility was superb and the adjustments were all easy to make.

Like most threaded adjuster valve adjustments, 90% of the job is just taking away or loosening the stuff you need to get at the valves (and then putting it all back on the bike).  On the Enfield, that’s the right side body panel, the seat, the fuel tank and its connections, an electrical subassembly between the upper frame rails, and the valve cover.  The actual valve adjustment only takes a few minutes.

You’ll need several tools for this job.  Here’s the list:

      • Feeler gage.
      • 17mm socket.
      • 8mm socket.
      • 10mm socket.
      • Sparkplug socket.
      • 14mm Allen drive.
      • 4mm Allen drive.
      • Ratchet with extensions.
      • 10mm wrench.
      • Flat blade screwdriver.

Because I’m an old fart and a pack rat, I had everything I needed except for the 14mm Allen drive (that was one I had to order on Amazon).  Odds are you already have most or all of this stuff already, too.  We tend to pick up oddball stuff over the years.  If you live on the Tinfiny Ranch, that includes stuff like lathes, concrete mixers, tillers, old MGs, and more.  But the only tools you’ll need for adjusting the Enfield 650’s valves are what I listed above.

The other thing we need to do is make sure the engine is completely cool.  You can’t ride the motorcycle, shut it off, and then adjust the valves.  The engine needs to be cold.

Adjusting the valves sounds way more intimidating than it is.  I took a couple of hours to adjust the valves on my Enfield and this was the first time I did it.  On subsequent valve adjustments I’m guessing I’ll need less than an hour now that I know my way around the bike.  Dealers charge up to $581 for this job, which is kind of a joke when you consider the amount of time it takes (that is, if you think getting ripped off by a dealer is funny).  The dealers are counting on you being intimidated.  You shouldn’t be.  This is not a hard thing to do.

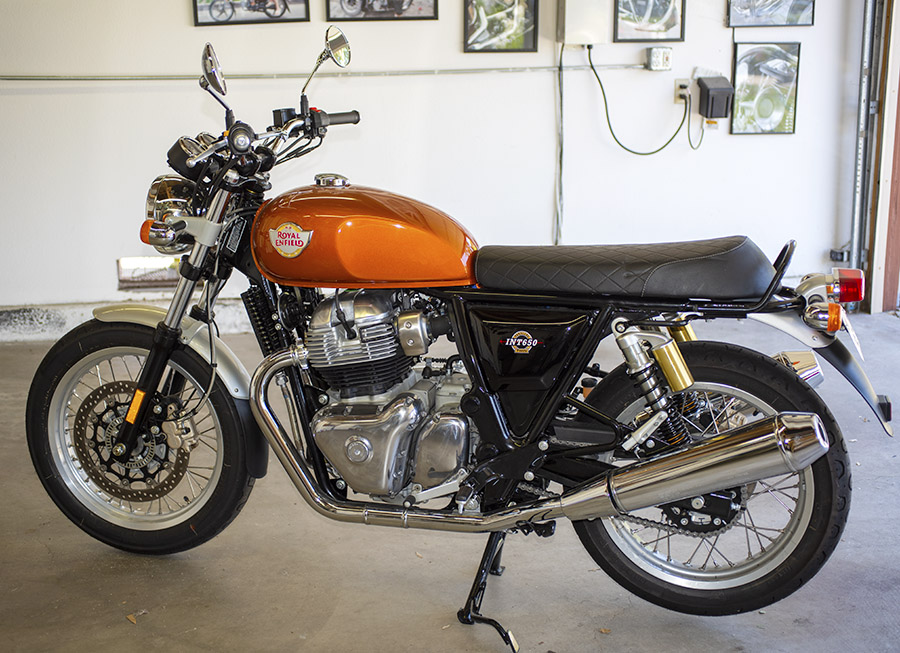
Start by putting your motorcycle on the center stand, as you see in the big photo at the top of this blog.   That makes getting to both the left side and the right side of the bike easier.

Use your ignition key to unlock the right side body panel.  It pivots out from the bottom and then pulls down, and that will take it off the bike.
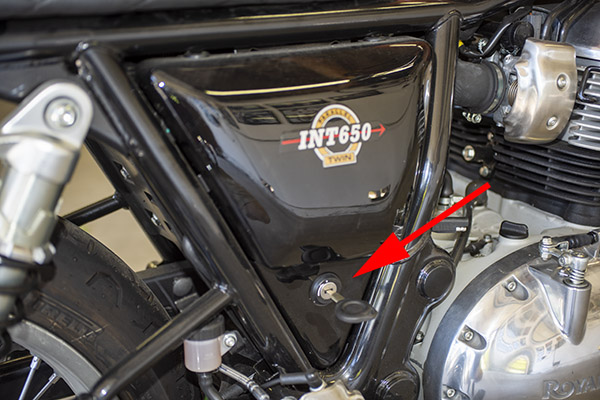
Once the right side body panel has been removed, you’ll have access to the seat release (shown by the red arrow).  Pull it out and remove the motorcycle seat by sliding the seat to the rear.
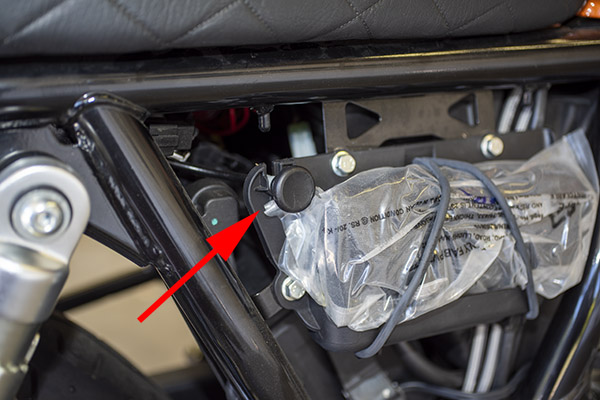
The next step is to remove the two 10mm bolts securing the fuel tank to the frame.  This job is a lot easier if you run the fuel level down (it makes the tank lighter and easier to handle when you disconnect the two electrical connections and the three hoses underneath the tank).  I had mine on E, but there was still a fair amount of fuel in the tank.
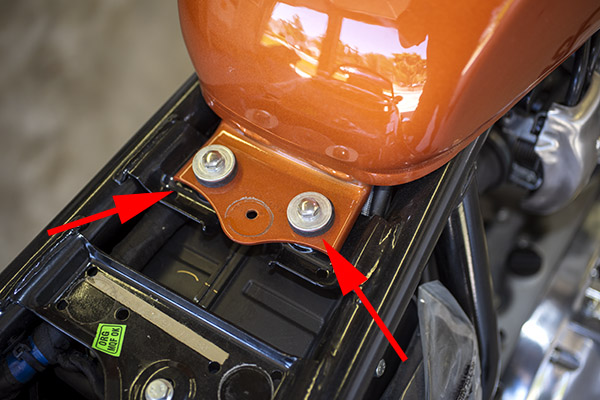
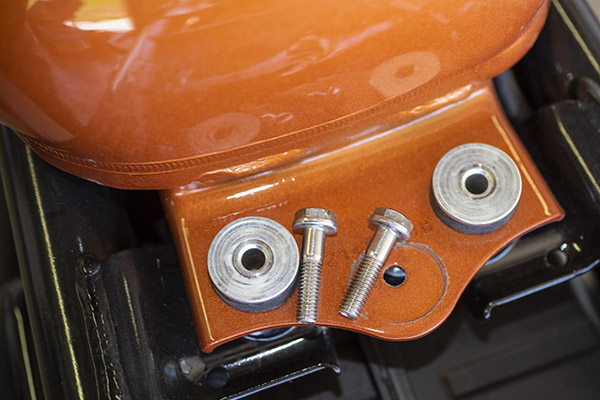
Once the two bolts are removed, set them aside (not like you see here; put them someplace where you won’t lose them).  The tank will then slide to the rear.  Put a shop rag on the frame behind the tank so you won’t scratch anything.
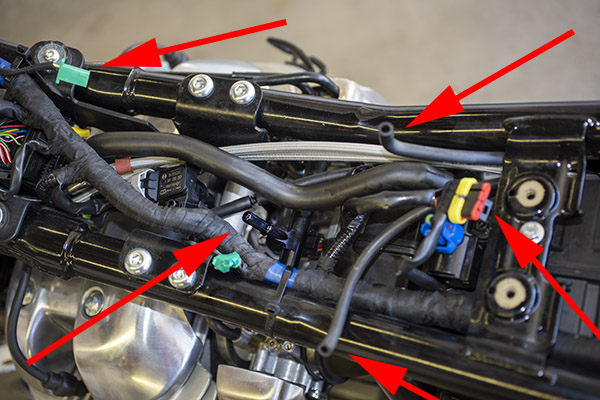
As mentioned above, there are five things that have to be disconnected underneath the fuel tank so that you can remove it from the motorcycle.  As seen in the photo below, going counterclockwise from the upper left corner of the photo, these five things are:

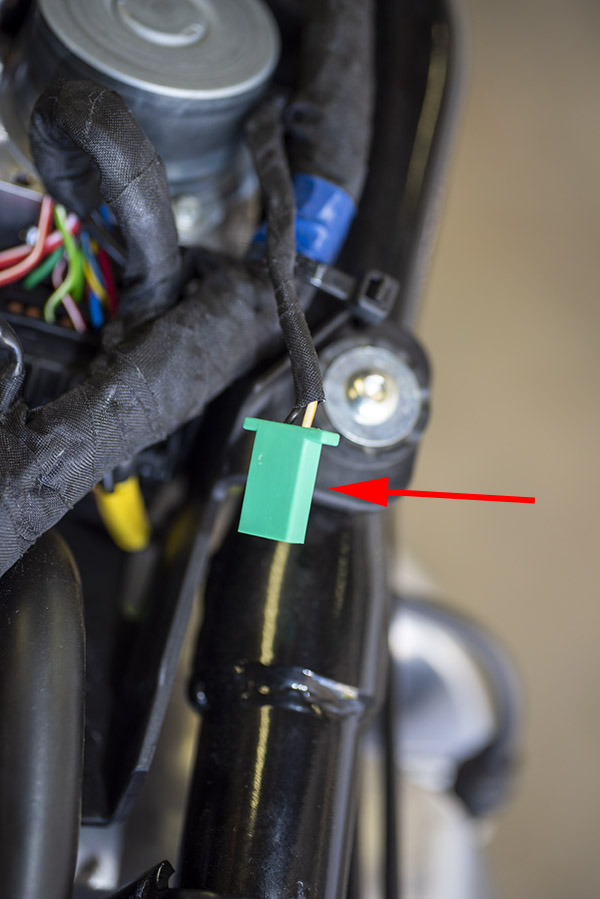
      • An electrical connector to the fuel gage (the green connector).
      • A fuel vent line.
      • The fuel pump electrical connector (the yellow, red, and black connector).
      • Another fuel tank vent line.
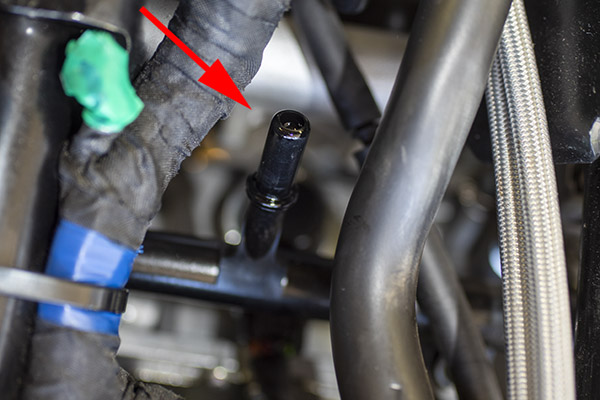
      • The fuel hose (this is mated with a quick-disconnect fitting that stays on the fuel tank; it has a button you press to allow pulling the fuel hose off).

I show this on the motorcycle side of the equation.  It would have been a little tough to get a photo of the bottom of the tank.
Here’s another shot of the fuel hose quick disconnect male end (it stays with the motorcycle).
This is another shot of the fuel level gage electrical connector.
And here’s a photo of one of the fuel vent lines and the fuel pump electrical connector.

After tilting the tank up and disconnecting all five of the connections described above, remove the tank and place it on a cloth to prevent scratching.

At this point, disconnect the sparkplug leads and remove both sparkplugs.  We are going to crank the engine by hand, and we don’t want to have to fight the engine’s compression as we do so.
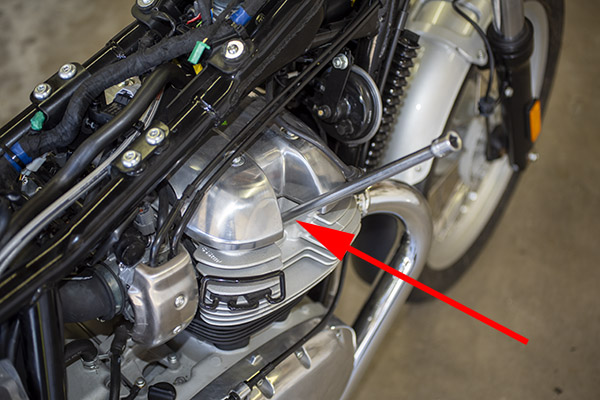
The next step is to remove the three Allen bolts that secure an electrical subassembly between the upper frame rails.  We don’t need to remove the subassembly; we just need it to be pushed up so that we can maneuver the valve cover out of the way (which, incidentally, I found to be the hardest part of the valve cover adjustment process).  Set the three Allen bolts aside in a secure location.

Next, remove the four 8mm bolts securing the valve cover.  Set them aside in a secure location.
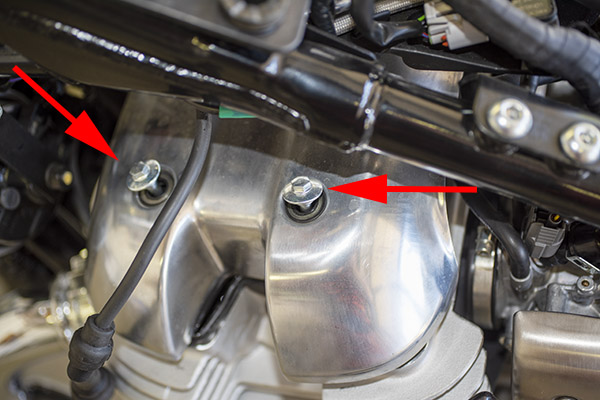
Once the four valve cover bolts are out, you can remove the valve cover.  It will slide out on the left side of the motorcycle.  You’ll probably invent a few cuss words when doing this.  The valve cover is a tight fit between the cylinder head and the motorcycle frame’s upper rails (it’s why we loosened that electrical subassembly described above).  There’s a complicated and reuseable rubber gasket that seals the valve cover to the cylinder head.  Be careful not to nick the gasket when you’re sweet-talking the valve cover off the engine.

Once the valve cover is off the engine, you’ll have access to the valve adjusters.  As this is an eight-valve engine, there are four adjusters for each cylinder (two intake and two exhaust valves).  The four valves on the right side of the engine are shown below.

And these are the four valves on the left side of the motorcycle.

Here’s where you’ll need that 14mm Allen drive mentioned above.  It was the only tool I didn’t already have.  It was something like $6 on Amazon, and I now have two of them.   Amazon sent me an email a couple of days after I ordered the tool because they felt like they lost one in shipment so they shipped it again, and then two arrived in separate packages on the same day.  Don’t tell Amazon.  I’m keeping both.  Bezos can afford it.
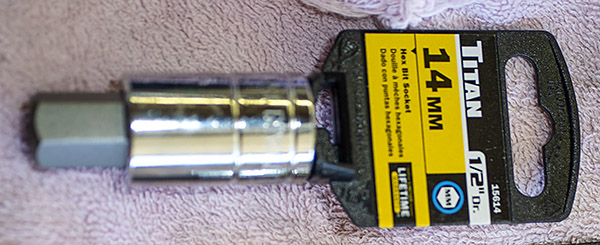
Here’s the access port cover on the left side of the engine.

Remove the access port cover on the left side of the engine with the 14mm Allen drive.
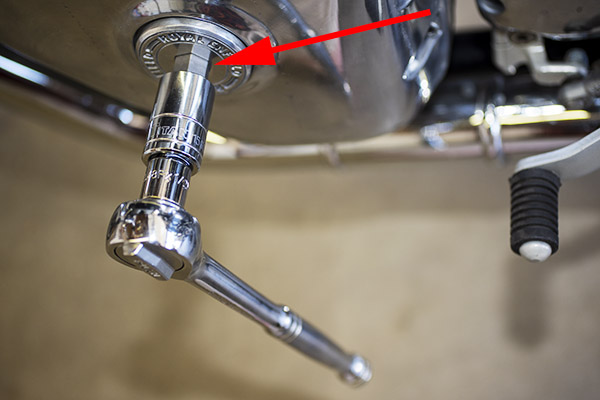
Note that the access port cover is sealed with a rubber o-ring.  Don’t lose this part.
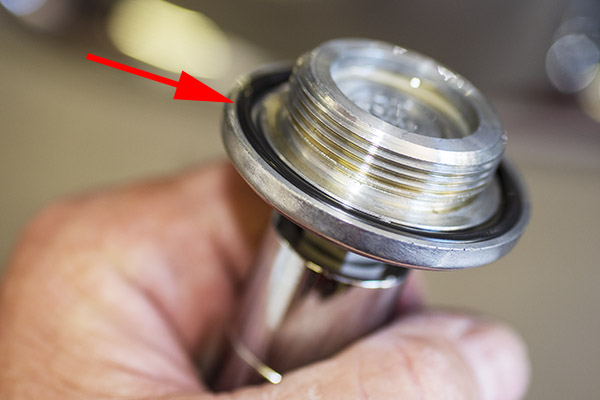
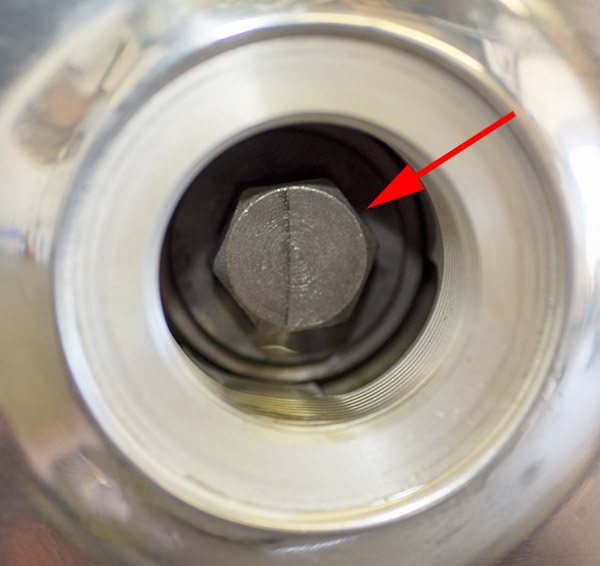
If you peek inside the access port, you’ll see a 17mm bolt head.  This is where the 17mm socket is used.  You can crank the engine by hand (always going counterclockwise, never clockwise) to bring the crank to a position where the valve being adjusted is not being lifted by the cam lobe.  This is known as getting the lifter on the cam’s base circle, and that’s what we want when we make the adjustment.
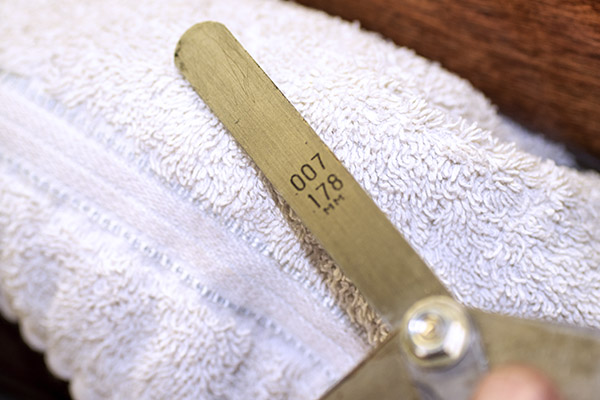
I had a feeler gage from way back tucked away in my tool cabinet.  If you don’t have one of these tools, they are available on Amazon.  We’ll need the 0.003 inch (or 0.076mm) feeler gage for the intake valve adjustment, and the 0.007 inch (or 0.178mm) feeler gage for the exhaust valve adjustment.  The intake valves are the ones on the rear of the engine (closest to the fuel injectors) and the exhaust valves are the ones on the front of the engine (closest to the exhaust headers).  I know.  Duh.

This valve adjusting business is done by feel with the use of the feeler gage.  I guess that’s why they call it a feeler gage.  You want to make the adjustment such that after you make it, there’s a slight drag on the gage as you move it back and forth between the valve stem and its actuator (you get the “feel” of this slight drag; hence the “feeler gage” name).
Enfield makes it easy to get the engine rotated to the right spot so that the lifter is on the cam’s base circle with a handy indicator located in the cylinder head.  It’s on the engine’s left side as shown in the photo below.  The indicator is marked with an L above a scribe line, and an R above a scribe line.
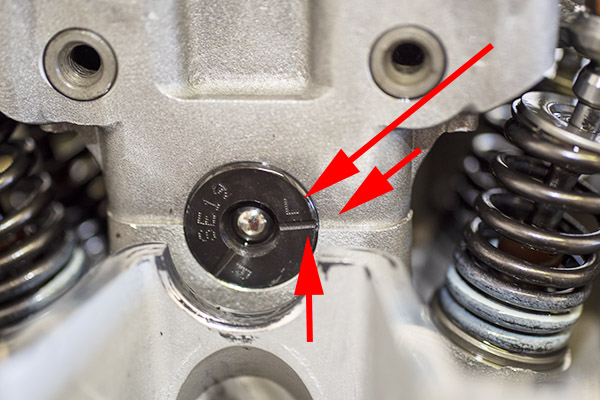
Turn the engine by hand with the 17mm socket (again, always counterclockwise, never clockwise) until the L and its scribe line are aligned with the line on the casting as shown below.   We want the L and its scribe line aligned with the corresponding line in the casting when we adjust the valves on the left side of the engine.  After we’ve adjusted the valves on the left side, we’ll want to do the same thing to get the R and its scribe line aligned with the line in the casting to adjust the valves on the right side of the engine.
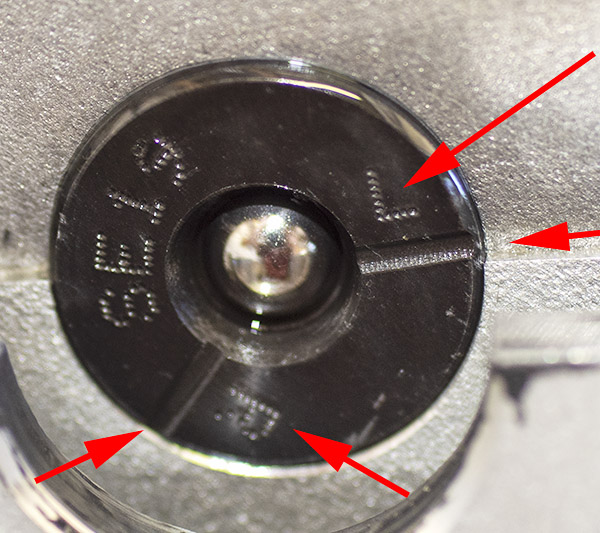
When the crank is appropriately positioned (for the left side of the engine, as shown above), we are now ready to adjust the valves.

The actual valve adjustment is accomplished by loosening the bronze-colored valve stem lock nut with a 10mm wrench, then making the adjustment with a flat bladed screwdriver in the adjuster screw slot, while positioning the appropriate feeler gage blade between the adjuster and the valve stem.  This is what controls the gap between the adjuster and the vavle stem.  When the gap is what it’s supposed to be, lock the adjuster in place with the locknut.  We do this for both intake valves with the 0.003-inch blade, and both exhaust valves with the .007-inch blade.

After we’ve done the left side of the engine, we similarly rotate the crank to align the R index mark and then we adjust the valves on the right side of the engine.  The R has to be on the right side of the index plate so it reads right side up.

At this point, I rotate the engine two complete turns by hand and use the feeler gage to check the valve gap again.  If it’s not good I redo the above adjustments.  This is just a check.  For me, it’s always been good.

So, about that valve cover and the complicated seal between it and the cylinder head.  Here’s what it looks like from underneath.

Note that the seal is orientation sensitive.  It’s got a little half moon in the seal on the left side.   As mentioned above, getting the valve cover off was a challenge.  Getting it back in place with the seal properly positioned was even more of a challenge.  But neither steps were really that bad.  The good news is that this was the toughest part of the job, and it wasn’t that tough.

After you finish adjusting the valves, assembly is the reverse of disassembly.  There are three cautionary notes:

      • Use a shop rag or two on the motorcycle frame so you don’t scratch the frame or the fuel tank when you reinstall the fuel tank.
      • When you remake the fuel line quick disconnect, make sure you feel it click into position.  It’s possible to not fully make the connection, which could result in pressurized fuel being pumped out over your hot engine.  That would not be a good thing.
      • When you reinstall the valve cover, make sure the seal between it and the cylinder head is correctly positioned.  If it is not, oil will leak from this interface.

So there you have it.  For me, that’s $581 (what the closest Enfield dealer charges for a valve adjustment) going in the Baja kitty.  Or maybe the reloading components fund.  Whatever.  It’s not going into the dealer’s pocket, and that’s the point.

Enfield did a nice job engineering these bikes, I think, and they made the valve adjustment process straightforward.  It would have really been cool if the valve cover was designed so that it could be removed without taking the body panel, seat, and fuel tank off (like on an old airhead BMW or a Moto Guzzi), but hey, it is what it is, and what it is is way less complicated than most other modern motorcycles.  There’s also an argument to be made for hydraulic valves (which never require adjustment), but hydraulic lifters weigh a little more and don’t work well at high rpm.


More on Enfields?   Hey, read our series on taking two Enfields (a 650 and a Bullet) through Baja.  It’s what prompted me to buy my Enfield!


This idea on online maintenance tutorials was something we started at CSC Motorcycles with the RX3 250cc adventure touring platform introduction.  The market received it well and we had a lot of fun assembling the tutorials.  CSC was well ahead of the curve on this sort of thing and it is one of the many reasons their bikes have done so well.
ExhaustNotes Product Review: Cooper 2 Lightweight Tent

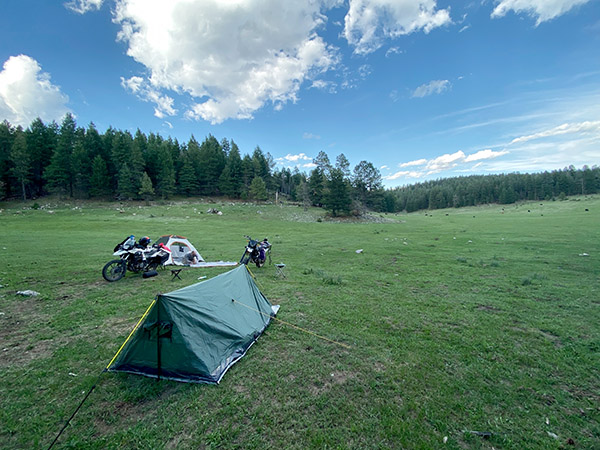
Camping on a motorcycle has never been near the top of my Fun Things To Do list. Like it or not, it seems I end up camping on a motorcycle more than is needed for strong bones and healthy fingernails. Street bike camping is tolerable because you can pile junk sky high but trail riding with a load of camping gear is a chore. Off-road, small lightweight equipment is the way to go. I’ll never admit it but it’s possible to go too small and too lightweight. My tent is an example of going overboard.

I’ve been using an old-style pup tent, like the Boy Scouts use, and when folded correctly the thing is admirably small. The pup tent reduces to the size of a bag of Batdorf & Bronson coffee and weighs next to nothing.
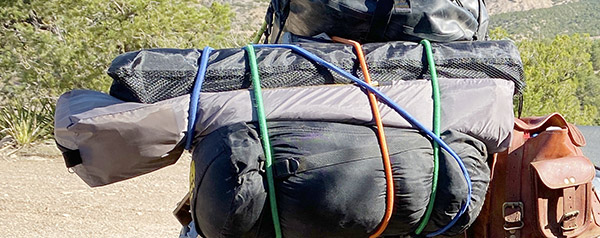
The problem with the pup is the ceiling height and the square footage. There’s no way to sit up in the thing, you have to crawl in and out. Once you’ve stored all your gear inside finding space for you body is a challenge. If you toss and turn throughout the night like I do your arms will be hitting the walls and roof. It’s a tight squeeze.

Unless you buy brand name equipment camping gear is really cheap, like me. I found a larger tent; the Cooper 2 (no relation to the road racing legend) for $28 on Amazon and shipping was included.

The Cooper 2 is easy to set up as it has only two fiberglass poles crossing in the middle. You fit the ends into the corners of the floor and bowing the poles raises the tent. Nearly 50-inches high at the center and with 49 square feet of floor space the Cooper 2 was huge. I could stuff all my gear inside and still have room for my sleeping bag. I could easily change into my Space Patrol pajamas with the privacy those pajamas demand. You know how it is.

The Cooper 2 is vented at the top, which kept condensation to a minimum. I didn’t get to test it in the rain but I suppose it will do as well as any other 28-dollar tent. I set up my sleeping bag towards the back of the tent and had plenty of room to throw elbows and kick out from under the covers. It was the best night’s sleep I’ve had in a tent. Which is to say I woke up cotton-mouthed, fingers bleeding and a dead raccoon next to me.

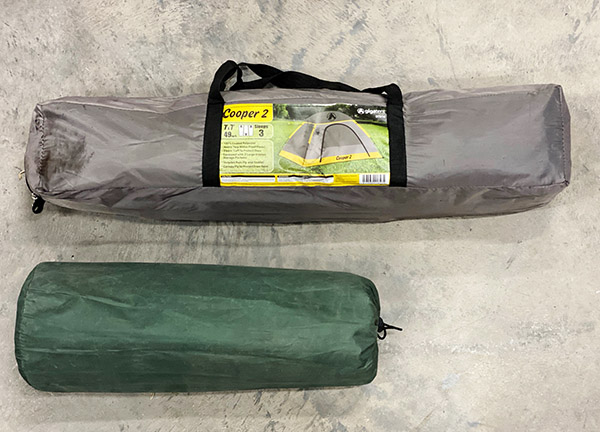
All that luxury comes at a price, however. Folded up, the Cooper 2 is nearly twice as large as the pup tent and weighs 4 pounds 9 ounces compared to the pup’s 3 pounds 4 ounces. Still, the extra tonnage is worth it to me. I’ll just have to get rid of some other gear to compensate for the Cooper 2 tent, like maybe the handlebars or the front wheel of the Husqvarna.


More ExNotes product reviews are here!

How about a 30mm big bore rifle?

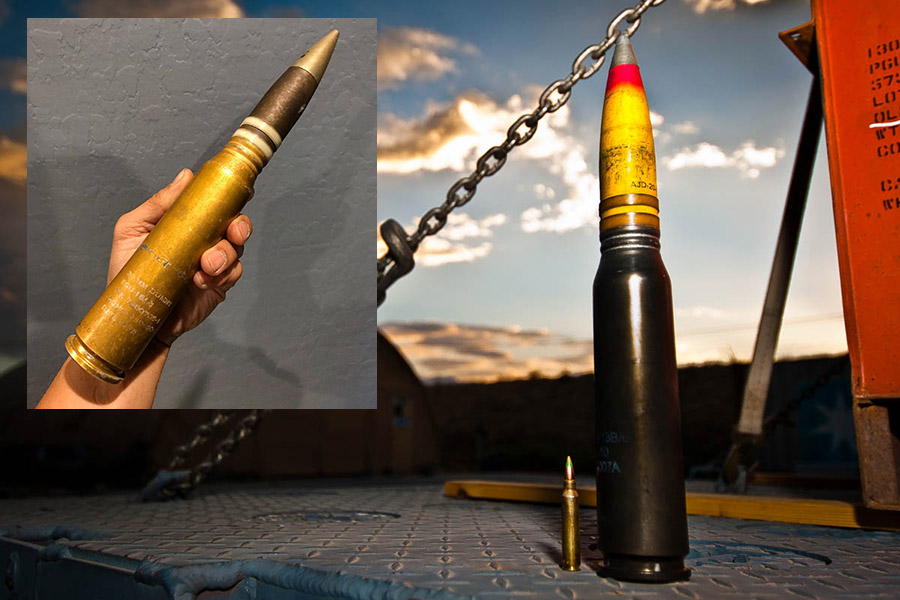
When I worked at Aerojet Ordnance, we made 30mm GAU-8/A ammo for the A-10 Warthog. The government originally planned to manufacture this ammunition in a government arsenal and the Army’s projected cost per round was $85 in mature production. The A-10 ammo had a warhead with a depleted uranium warhead and an aluminum sabot in one round (that was the armor piercing incendiary round), a high explosive incendiary in another (that was the “soft target” round), and a target practice tracer round.  It was all potent stuff.  Each had more muzzle energy than a World II 75mm Howitzer round.

Ed Elko

Our president (Ed Elko, a wonderful man and brilliant business leader) tried to convince the Army to buy its 30mm ammo from a commercial outfit (that would be us, Aerojet Ordnance), but Ed couldn’t get past the stale minds in the Army (the Army buys munitions for all of the services). So he bypassed the Army’s civil service dinosaurs and went to the US Congress.  Congress knew a good deal when they saw it and they directed the Army to buy the ammo from Aerojet.  The Army didn’t like that, but they did what they were told.  And that was a good thing.  The last year I was at Aerojet we were selling 30mm ammo to the Army for $6.30 per round and making a 30% profit.  This, on ammo the Army thought would cost $85 per round in mature production if it was made in a government load plant (your tax dollars at work).  I can’t make this stuff up, folks.  They really were (and their successors probably still are) that stupid.

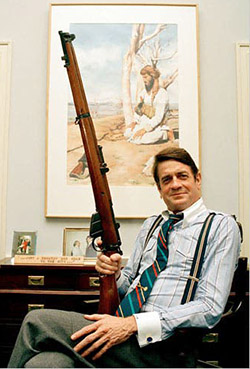
Charlie Wilson with a Lee Enfield rifle.

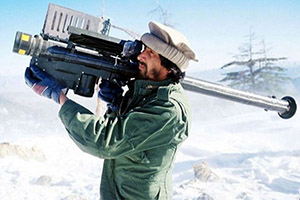
That 30mm cartridge, incidentally, was one that we sanitized for an Afghan project back in the 1980s.  “Sanitized” means it had no markings identifying it as being made in the US.  We were doing this for a charismatic Congressman named Charlie Wilson. Old Charlie was sponsoring a deal that involved a shoulder-fired rifle chambered for the GAU-8/A cartridge.  You backed the rifle up to a tree or a rock and got underneath the thing to fire it.  Charlie and his Mujahideen amigos wanted to use it to take out the Soviet Hind helicopters, and here’s where the plot thickens.  Our government didn’t want to sell the Afghan rebels Stinger anti-aircraft missiles because they had guys like Osama bin Laden in their ranks.  But we wanted the Afghans to be able to take out the Hind helicopters.  They needed something, and the thought was that maybe a 30mm elephant gun was the answer.  And wow, did that effort ever go south.

The guy who led the 30mm rifle development effort here in the US somehow managed to fire a cartridge in a Washington, DC, gas station.  Yes, folks, he had an accidental discharge of a 30mm rifle in a DC gas station.  That event lit up the gas station and injured four people.  It’s one of the first things I think of whenever I read comments about the inherent wisdom in carrying a concealed weapon with a round chambered.  But I digress.  To get back to the 30mm story, the GSI (that’s gubmint-speak for gas station incident) was hushed up by the folks in trench coats (you know, Boris and Natasha types), everyone recognized the innate and incredible dumbness of a shoulder-fired 30mm rifle, and a short while later President Reagan approved selling Stingers to the Afghans.  And within weeks of that decision and the Stinger’s Afghan debut, the Soviets decided maybe Afghanistan wasn’t such a good idea after all. The movie “Charlie Wilson’s War” is based on those events, but it left out the 30mm rifle and the DC gas station debacle.
I met Charlie Wilson a couple of times (that’s Congressman Wilson in the photo above). He was a hell of a man and I’ve written about him before here on the ExNotes blog. But back to the 30mm accidental discharge event…that story is here:

Ex-Pilot’s Quest for Better Weapon Goes Awry – The Washington Post

The Stinger

As usual, the Washington Post got the story wrong. The guy who had the rifle in his pickup truck  wasn’t “trying” to sell the rifle to the government; he was being paid to develop the weapon so it could be used by the Mujahideen, and he was doing quite well until the gas station incident. The thing about all of this that is interesting to me is that the real story never reached the public.  You won’t find any photos of that rifle floating around on the Internet, or of the gas station fire (believe me, I tried).  Imagine that.  A guess station catches fire in Washington, DC, and there are no photos.  My, my.


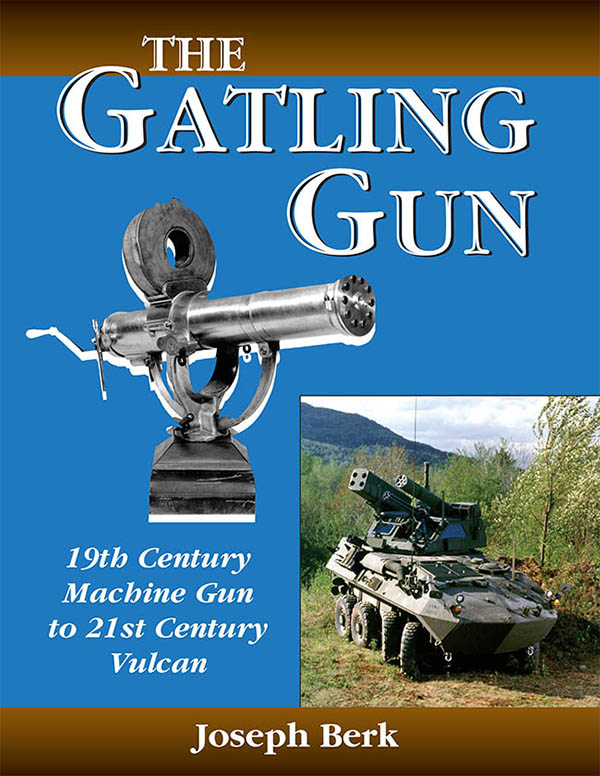
More about the A-10 and its 30mm Gatling gun?   Hey, it’s all right here:

Safe Queen, or Shooter?

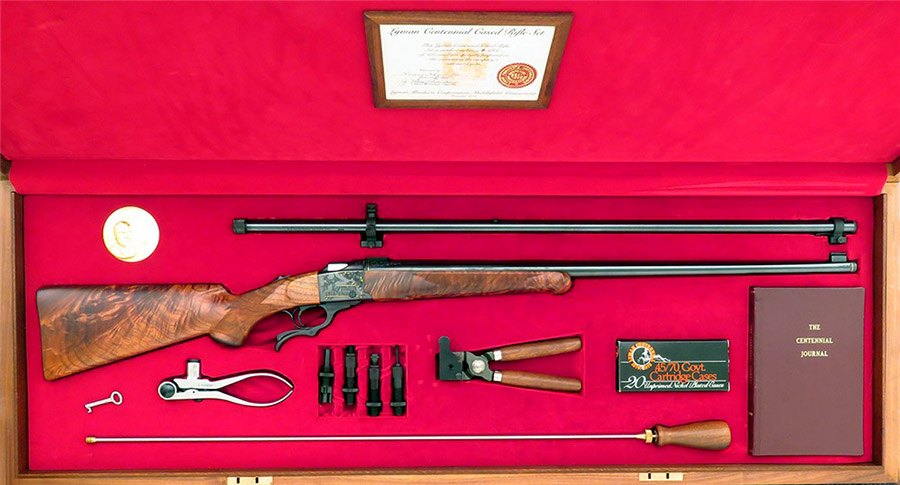
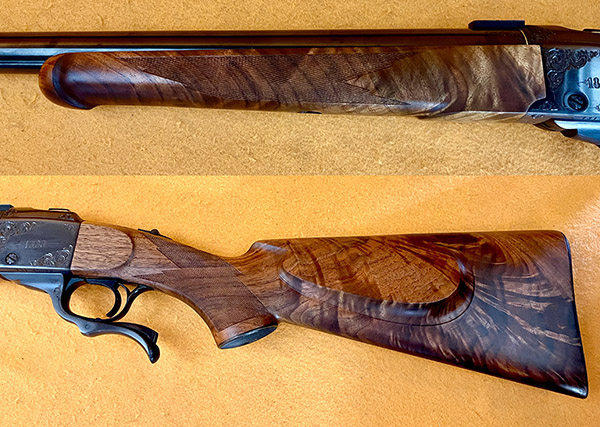
Some folks won’t shoot a commemorative or high end custom gun, and instead relegate the firearm to a life of being on display or taking up residence as a safe queen.  Other folks espouse a manly “I won’t have a gun I don’t shoot” attitude.  I’m a few days away from having to make that decision with the Lyman Ruger No. 1 you see in the photo above.  What’s your feeling, and why?

Let us know here in the comments section and don’t waste any energy posting on Facebook.  This is where the cool kids hang out and we want to know what you think.


More Tales of the Gun are right here!

How Much Milk Is Left?

A few weeks ago I read a Wall Street Journal opinion piece by Peter Funt (of the Candid Camera show).  His article was on the pandemic lockdowns and isolation inducing more folks to publish their memoirs, and Funt made the case that this was not such a good thing.  Most memoirs are God-awful boring.

That got me to thinking about the adventure touring genre.  You know, the books, blogs, videos, and endless Facebook posts and forums about adventure rides.

Adventure rides.

We used to call a motorcycle ride a motorcycle ride.  Now they are all “adventure” rides.  And we don’t tell a story or do a bike test.  Now, it’s a reveal.  Harley is going to introduce a new bike in few days.  But it’s not a new model announcement.  It’s a “reveal.”

Ten to twenty years ago, the place to go to read good riding stories was ADVRider.com and their Rides page (back then, the stories and photography were actually good) and HorizonsUnlimited.com.  Now it’s mostly videos, Facebook, and blogs.  There’s too much of this (and I say that as guy who writes a blog).  I seldom view any of it.  Which is not to say you should stop reading ExNotes.  We’re different, you know.  We’ve never had a “reveal” (other than that one unfortunate wardrobe accident in China) and we never will.

All of the above begs the question:  How much milk is left in the adventure riding cow?

Fads come in waves, and a surefire way to know that a wave is dissipating on shore is when a big company tries to surf in on the little bit of surf that’s left.  Witness the Pan America, Harley’s too much, too late entry into the ADV world.  Harley wants to compete with the BMW GS, KTM, and Ducati high end ADV bikes.

It’s hard for me to see how Harley is going to prevail.  For starters, my feeling is that most folks who ride big V-twin cruisers (folks who form the bulk of Harley’s current customer base) have little interest in adventure touring.   The premise is that Harley will attract a new crop of customers, presumably drawing the sheeple who would have bought BMWs, or KTMs, or Ducatis.  Color me skeptical, but I just don’t see it happening.

No, what’s happening is a sea change, not an opportunity to do a little surfing in a dying market.  The world moves in fads, with each fad having about a ten-to-twenty-year life, and we’re due for a new one.  I just don’t know what it is.  Consider this:

    • In the 1960s, it was British vertical twins.  Those were cool years and the Triumphs, BSAs, Nortons, and Enfields of the day were cool bikes.
    • In the 1970s and the 1980s, it was Japanese machines (the so-called UJMs).   Honda’s 750 Four had five gears, and that fifth one was for the paradigm shift that swallowed the British empire and made us wonder if maybe Japan won World War II after all.  Four cylinders across the frame, with differences between manufacturers that could only be described as trivial.  The UJMs were kind of cool, too, but not as cool as the Britbikes (at least to my way of thinking).  But the Britbikes were toast, destined to emerge two decades down the road as the darlings of a small but well published vintage motorcycle market niche (and in case you missed it, that was a plug for Motorcycle Classics magazine).
    • In the 1990s, it was Harleys and all that went with it.  You know, middle aged guys becoming pirates and bikes festooned with chrome, leather fringe, and conchos.  I was one of them for awhile and I had everything but the tattoos.  Bikes that people with more money than brains bought (often paying over MSRP) so they could don do-rags, denim, and non-DOT helmets, and look pretty much exactly like all the other beer-bellied rugged individualists.  I was one of them for a while, too.
    • Sportbikes had a good run somewhere in the middle of all this, too, with ergonomics that guaranteed significant incomes for chiropractors and physical therapists, who frequently used that money to pay well over list price for a Harley (see above).  Guilty again.  You got me.  I had a TL1000S, a Triumph Daytona, and a Speed Triple.
    • With the turn of the century, the trend migrated toward 650-pound, liter-plus bikes styled like dirt bikes and equipped with electronics rivaling Air Force One.   Denim and do-rags were replaced by Power Ranger clothing.  Everybody wanted to be Charlie and Ewen, but few could afford the chase trucks and mechanics, and even fewer could handle one of the bloated beasts off road.  Most adorned driveways and Starbuck’s parking lots.  I mean, the headlight lenses on some of these things cost $1800; no way anyone was taking those wunderbikes into the woods.  I’m sort of guilty here.  I had a Triumph Tiger.  I took it off road just once and it was terrifying.

I think we are fast approaching the last throes of the overweight off-road $25K-to-$30K wannabee adventure bikes and their thousand-dollar Aerostitch-wearing riders…you know, the guys who stand on the pegs even when riding on level asphalt.  (Sit down, guys…your “sell by” date flew by years ago and I’ll say what everyone else is thinking:  You look silly.)

So what’s next?

Electric motorcycles?  Nope, I don’t think that’s going to happen in any major way.  Alta is gone, Zero is struggling, and the Livewire may have already suffered electrocution as a consequence of Harley’s rewiring.  Electric bikes don’t sound like motorcycles, the range is not there (it’s not going to be any time soon), and I think a motorcycle without an internal combustion engine really isn’t a motorcycle at all.  So what will be the next big moto thing?

Self-driving motorcycles?  Nope.  Dead on arrival, I think.

Even more “mode complexity” on street bikes?  Probably not.  That sort of thing appeals to juvenile minds (ones susceptible to Jedi mind tricks).  I think even the easily-led characters mentioned above recognize this as too gimmicky.  I once had a pimply faced kid ask me at one of the IMS shows how many modes our imported-from-China 250cc ADV bike had, and I told him:  Two.  On, and off.  He nodded knowingly, as if I had let him in on a great secret, and wandered off toward the Ducati booth.

I think the ADV thing is going to dry up, even though we are still seeing sales upticks in the motorcycle market.  Sort of.  ADV-style bike trends have been up, but it always was a relatively small market segment and the current increase (most likely the result of the “more free stuff” crowd rocking Washington these days) appears to be big but actually is not.  Dirt bike sales are up, but that’s for off road dirt bikes only.  Street bike sales are down about 10%.  And that thing about motorcycle sales overall going up?  Yeah, it is, but it’s mostly ATVs (of the 4-wheel persuasion, which are included in the motorcycle sales figures).  One bit of actual data, and that is this:  CSC can’t keep bikes in stock.  They sell out as soon as they arrive.  But CSC delivers real value at a very reasonable price…I don’t know that I ever saw an RX-Anything with conchos and fringe.  And CSC motorcycles are definitely not $25K driveway bling.  Yeah, the big bike ADV thing is fast approaching its “sell by”date, I think.  The fat lady is singing, folks.  It’s almost over.

So, given that the ADV milk is drying up, the next big thing will be…

Hell, I don’t know.

What do you think?  You guys figure it out and let me know.  And if you think you know, leave a comment here.  Curious minds want to know.

45 Colt New Service (by Guy Miner)

Good buddy Guy Miner, former US Marine and retired law enforcement officer, enjoys following the ExhaustNotes blog and in particular, our gun stories.  Guy has a very cool 1909 Colt and he wrote a guest piece on it for us.


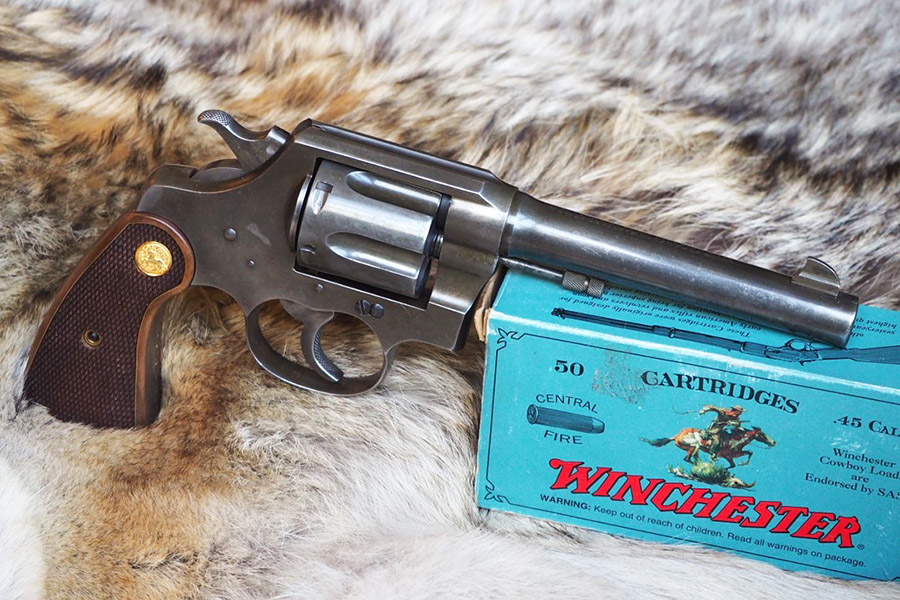
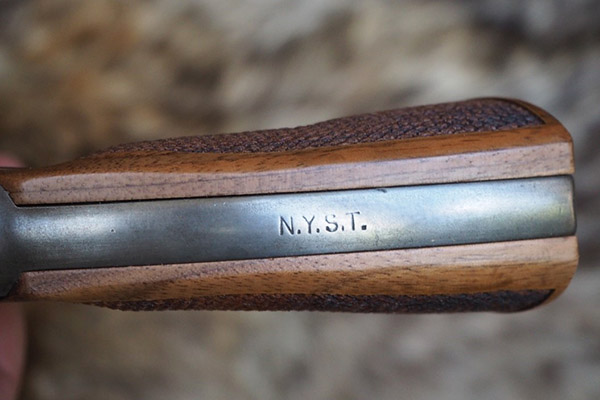
Pressed into service by the Army, Navy and Marines early in the twentieth century, the Colt New Service revolver also served in various police departments and of course as a sturdy handgun for many outdoorsmen. This particular revolver was my grandfather’s and I’ve been caring for it the past 35+ years. The old Colt is a big revolver, with a 5 ½” barrel and those gaping 45 caliber holes in the cylinder. Grandpa, a WWI veteran, got this Colt after it was sold as surplus by New York. The backstrap is marked NYST for New York State Troopers. He carried it as part of his WWII era security duties with the Home Guard.

When it became mine, I replaced the bulky custom grips that fit the frame poorly and my hand worse. A pair of recent manufacture, original looking grips better suit both the revolver and my hands. I wasn’t expecting much in the way of accuracy and was pleasantly surprised on my first trip to the range with it. The first ammo I used was Federal’s 225 grain LSWC hollow point which produced modest recoil and good accuracy.

All of the major ammunition makers support this wonderful old cartridge. It was originally a low pressure, big bore tossing a heavy lead bullet at modest velocity. For this revolver, that’s exactly how I load it. Typically I’ll use the soft swaged 250 grain Speer LSWC loaded with 8 grains of Unique and a CCI 300 primer for about 830 fps.

One caution when loading for these fine old revolvers – they’re not meant to handle the very stout 45 Colt loads intended for use in Ruger’s much newer and stronger revolvers. Stick with loads for the old 45 Colt, which approximate the power level of a 45 ACP.

I treat the old gun gently, shooting only a few boxes of ammo through it every year. Now and again I’ll shove it into a holster and haul it along with me on a camping or fishing trip, though I prefer a smaller revolver for those duties. Mostly it gets hauled along out of a sense of nostalgia. Handling it, I can’t help but think of my grandfather, of the trooper who carried it long ago, and of the history wrought by these grand big bore revolvers.


Guy, thanks very much for your guest blog.  I always enjoy reading about vintage revolvers.  Your Colt has an interesting provenance and a great family history, and the grips you put on it look great.  I always wanted a 1909, and your story makes me want one even more.  You write well, my friend.


Check out our other gun stories on Tales of the Gun!


Subscribe for free!