TriggerShims Bolt Shims

By Joe Berk

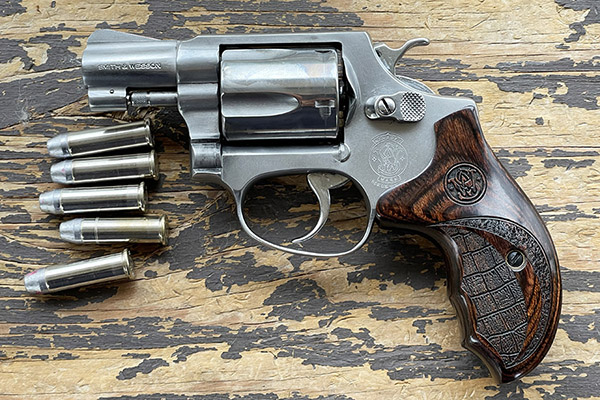
I should have known better.  Before I tried good buddy Lance’s bolt shims (at TriggerShims.com), I was a bit skeptical even though another of Lance’s products had worked (and is still working) very well for me.  I installed Lance’s cylinder shims on my Model 60 Smith and Wesson revolver a few years ago and they solved a lot of ills, including excess cylinder gap, difficulty in opening the cylinder, velocity loss, and double action misfires.  The Model 60 is completely reliable now (I’ll include a link to that story at the end of this blog).

The above notwithstanding, though, I was still skeptical about bolt shims. I didn’t understand the concept of rimfire rifle bolt shimming, and that fueled my cynicism.  I mean, on a bolt action rifle, what is there to shim?

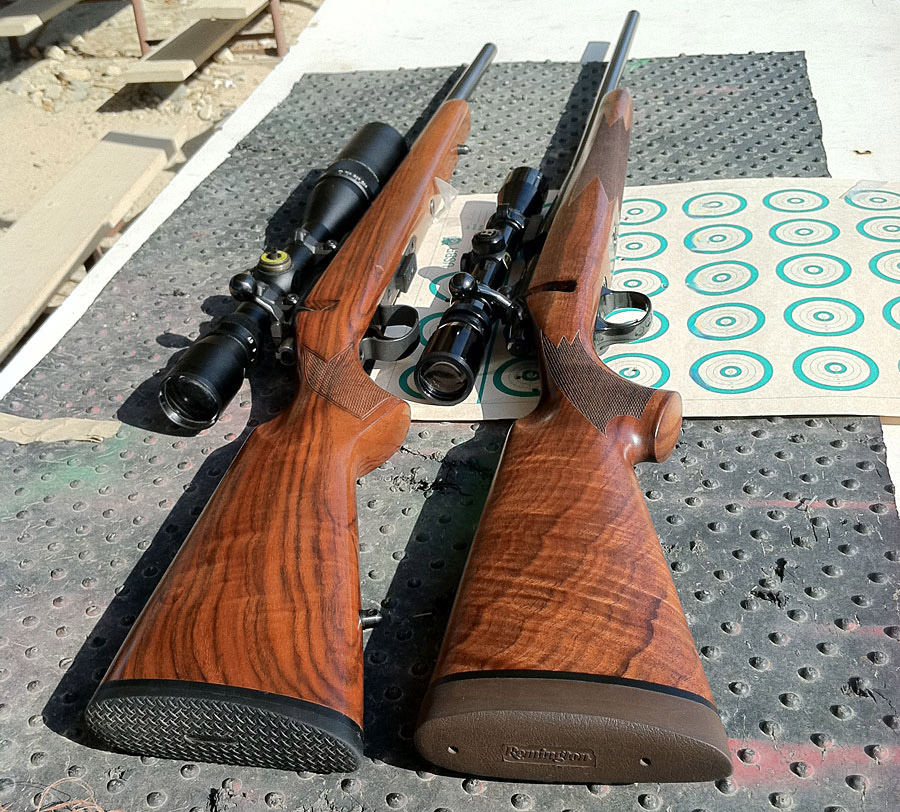
I called Lance at TriggerShims and spoke with him.  Lance said his customers tell him bolt shims work, but I wouldn’t know until I tried them.  I was up for it.  I had two rimfire rifles I felt should be more accurate:  A Remington Custom Shop Model 504 and a CZ 452 Varmint model.  The CZ would shoot moderately well off and on (it wasn’t consistent); the Remington was a major disappointment from the day I bought it.  It was expensive and for something coming from Remington’s Custom Shop, I expected a lot more.  The Custom Shop 504 rifle is beautiful, its walnut stock is fabulous, but its groups were poor.

The Concept

When you get a set of bolt shims from Lance, you get five in varying thicknesses. The shims are color coded so you don’t have to guess at what they are or measure them.  The package looks like you see below.

A pack of TriggerShims’ bolt shims. Note the color coding on the shims.  Five shims come in a package; the fifth one from the envelope you see above now resides in my Remington Model 504.

How Bolt Shims Work

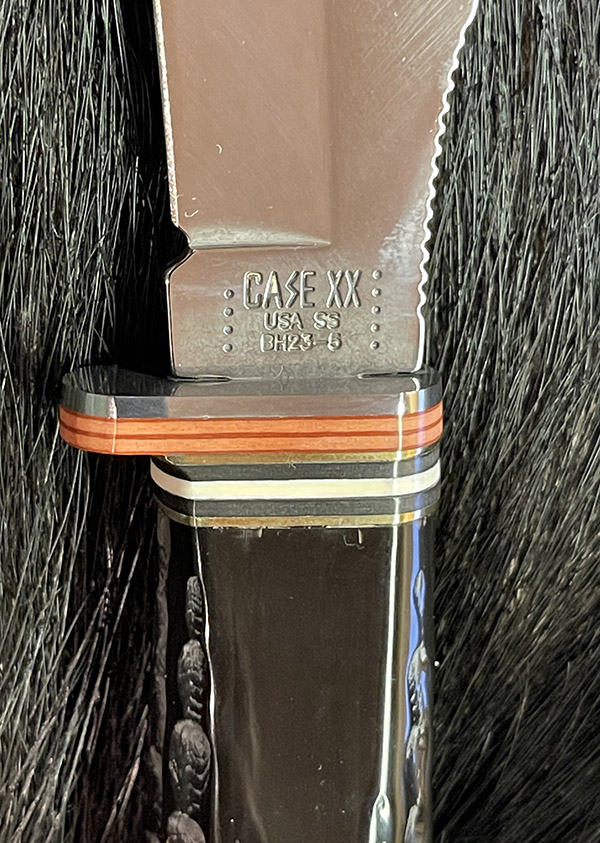
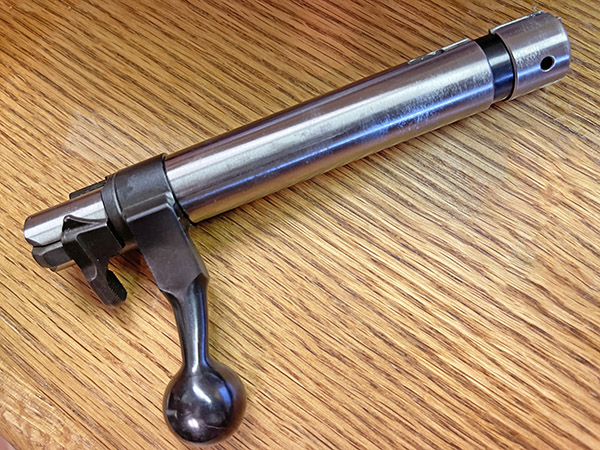
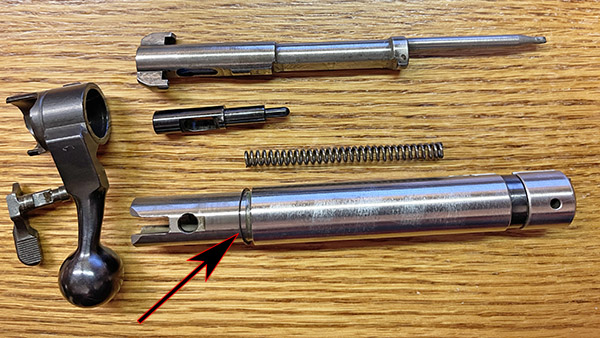
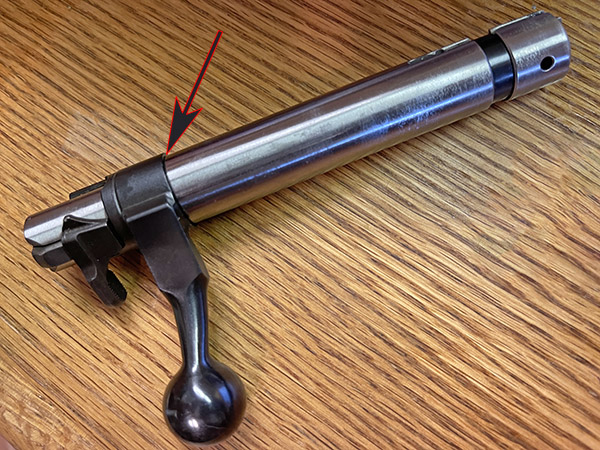
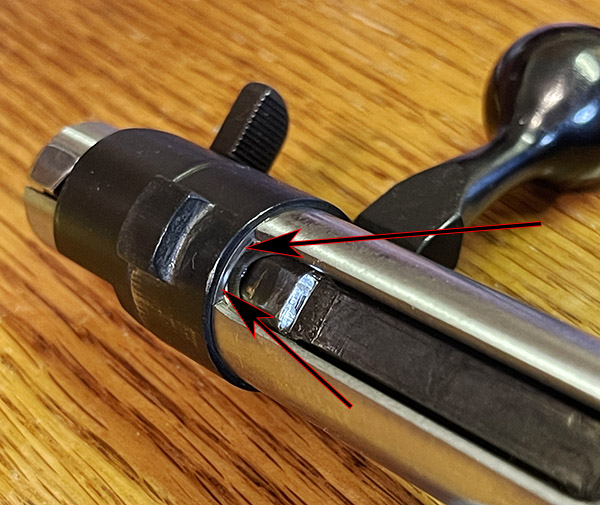
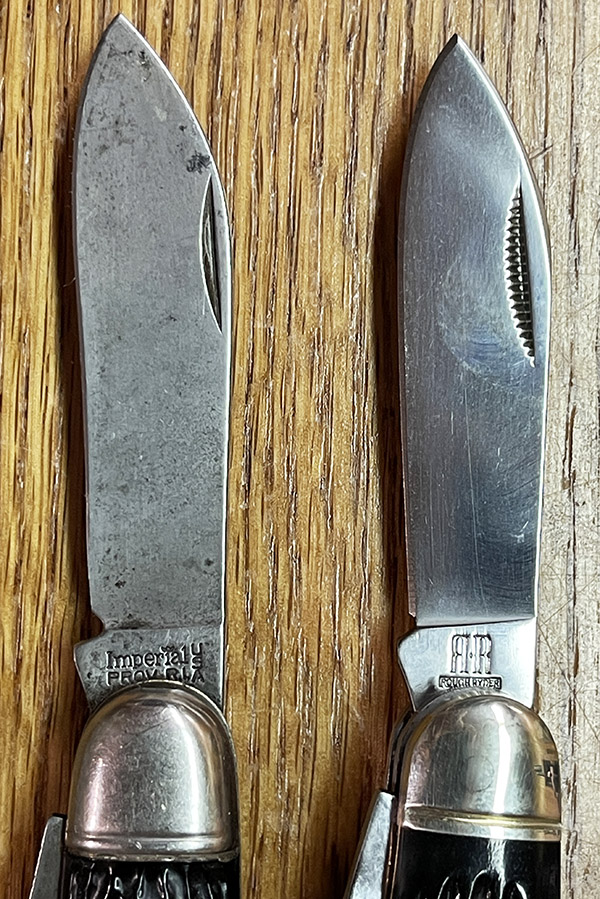
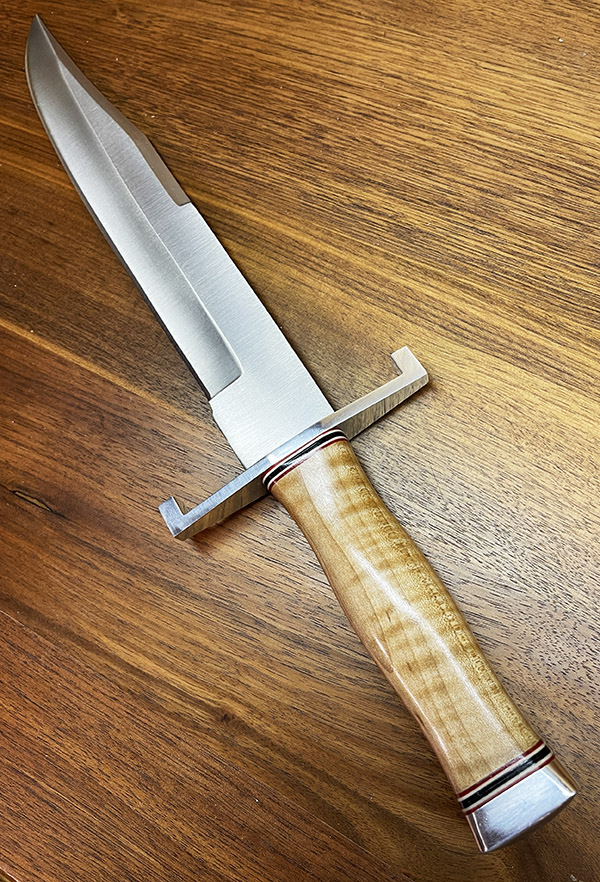
Most rimfire bolt action rifles’ bolts are different than centerfire bolts.  On a centerfire bolt, the bolt locks into the receiver at the front of the bolt.  On most rimfire bolt action rifles, the bolt locks into the receiver at the bolt handle, the forward portion of the bolt extends forward to meet the rifle’s breech, and the bolt’s locking lug is integral to the bolt handle.  Typically (as is the case on my CZ 452 and Remington 504), the forward portion of the bolt is actually two separate and concentric cylinders, with the forward part of the bolt able to move forward on the inner cylinder (i.e., closer to the chamber) if it is shimmed to do.  You can see it in my Model 452 CZ bolt in the photos below.

The CZ 452 bolt.
The CZ 452 bolt disassembled. The arrow points to the 0.002-inch TriggerShims shim placed on the bolt shank.

Now consider headspace, the amount of clearance between the cartridge base and the bolt face.  If there’s too much headspace, case separations can result when the brass case stretches during firing.  Not enough headspace, and you can’t close the bolt.   You might wonder:  Why not simply have line-to-line contact in the chamber between the cartridge and the chamber, with zero headspace when the bolt is closed?  That could work if you always shot with cartridge cases from the same manufacturer, there was no variation in the cartridge cases, there was no variability from rifle to rifle, you always fired your weapon at the same ambient temperature, and you always let it cool completely between shots.  These qualifiers are unrealistic, so rifle manufacturers add clearance (i.e., headspace) so that the bolt can always close on any rifle they manufacture when using any kind of ammo meeting the cartridge’s external dimensional specifications at any reasonable temperature.

On a centerfire bolt action rifle, we can use tricks like neck sizing the case (instead of full length resizing the case) so that if that case was previously fired in the same rifle, a reloaded cartridge will have much less clearance between the cartridge case, the bolt face, and the chamber walls.  This often works with a centerfire cartridge if, when reloading the cartridge, we only resize the case neck (that’s called neck sizing).  Sometimes it’s an easy way to shrink groups (i.e., to make your reloaded ammo more accurate).

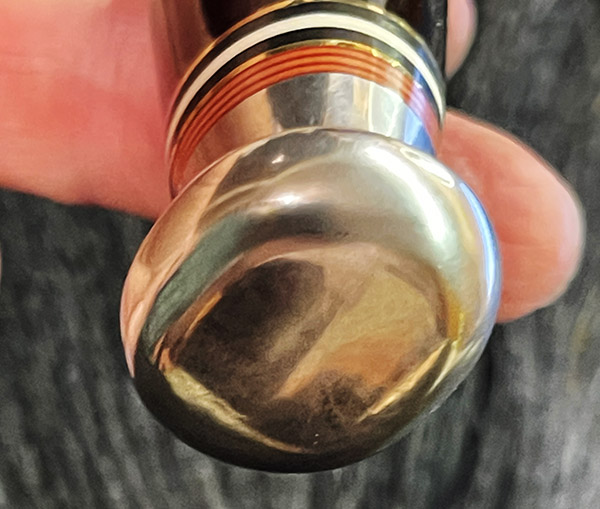
We don’t reload .22 ammo, though.  So what can we do to eliminate unnecessary headspace?  That’s where TriggerShims’ bolt shims enter the picture.  The idea is that instead of increasing the length of the brass case to eliminate unnecessary headspace, we push the bolt face forward (toward the rifles’ chamber) to shrink the headspace.  In the photo above, you can see where the TriggerShims bolt shim fits between the bolt handle and the bolt’s outer cylinder.  When the bolt is assembled with the bolt shim installed, it looks like this:

The arrow points to the bolt shim. It pushes the bolt face forward 0.002 inches.
The bolt shim is visible from the bolt underside. Because the bolt locks with a lug on the bolt handle casting, the forward portion of the bolt sits further forward when the bolt shim is installed.

The package from TriggerShims contains five shims of different thicknesses, color coded by thickness.  Lance doesn’t know how much shimming your bolt might need, and initially you don’t either.  One approach is to go at this question as you would when developing a load for a centerfire rifle; i.e., trying different powders, powder charges, etc., except the sole independent variable is shim thickness.  Here, the questions are how much excess headspace is there in your rifle, and how much should you remove to optimize accuracy?

The best approach to answering the above questions is to take the shims to the range, and with your preferred ammo, shoot groups with no shims, the 0.0015-inch shim, the 0.002-inch shim, the 0.003-inch shim, the 0.004-inch shim, and the 0.005-inch shim, and then select the shim that provides the greatest accuracy.  Theoretically, if you switched ammo brands, you could repeat the process and find the best shim for the new ammo.  It’s very clever.

Me?  I’m lazy.  I watched a bunch of YouTube videos describing the above and I decided I didn’t want to disassemble and then reassemble my bolt at the range, so I simply installed the 0.002-inch shim on both my CZ 452 Varmint and my Remington Custom Shop Model 504.  (The Model 504 bolt shim installation is very similar to how it’s done on the CZ.)

The Results

Does it work?  In a word, yes.  I wouldn’t have believed it without trying it myself.   I’m here to tell you the results are nothing short of amazing.

Remington Model 504

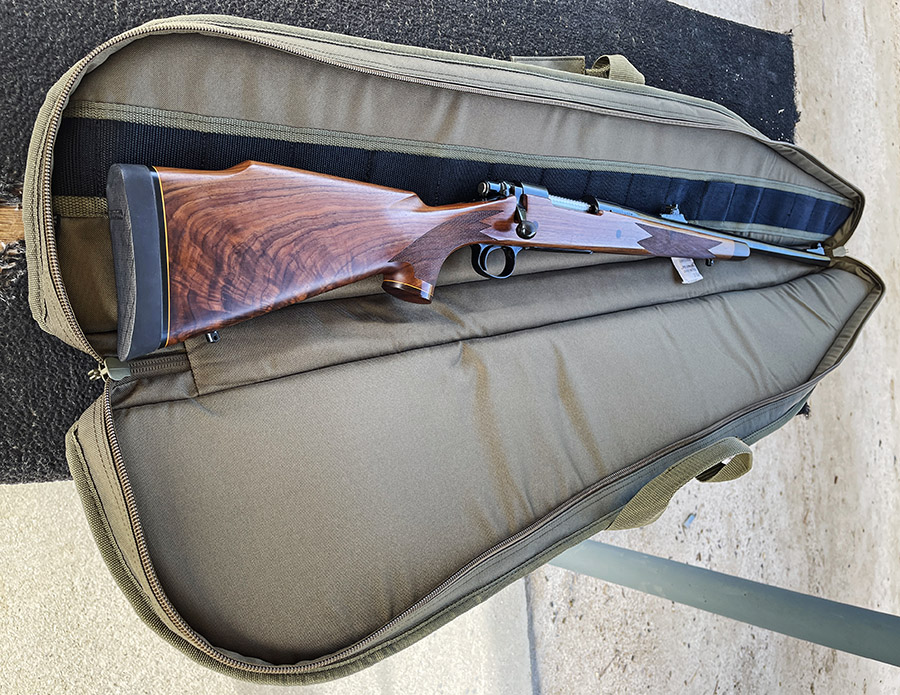
As I mentioned at the start of this blog, my Model 504 was a real disappointment.  Yeah, it’s beautiful, with deep, lustrous bluing and gorgeous walnut.

My Custom Shop Model 504. It sure is pretty.

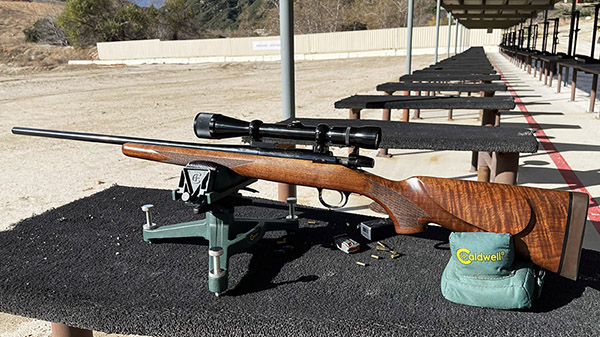
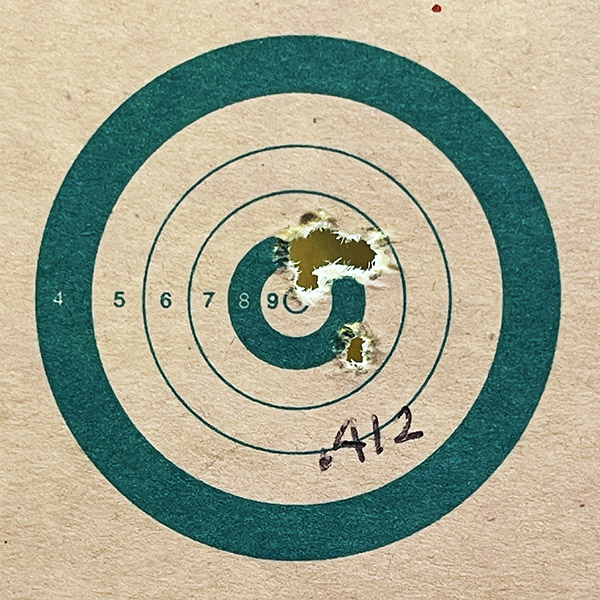
But the Model 504 didn’t group well with any ammo.  That was a surprise, partly because of the rifle’s price, partly because of the Remington Custom Shop’s reputation for stellar performance, and partly because the rifle was glass bedded from the Custom Shop.  I did my online research (ass backwards, as usual, after I bought the rifle) and I learned that Model 504s are known for lousy accuracy.  I tried screwing around with relieving the bedding where it interfered with the barrel attaching screw, I tried different action screw torques, and I tried different ammo.  Nothing worked.  I thought I had been stuck with a beautiful rifle that was essentially a paperweight.  Here are a couple of typical groups from the Model 504 at 50 yards with Eley Target ammo (which is good stuff) before I installed the bolt shim.

A Model 504 typical pre-bolt-shim-installation 5-shot group at 50 yards.
Another pre-bolt-installation group at 50 yards from the Model 504. Before installing the bolt shim, I would have considered this a good group from this rifle.

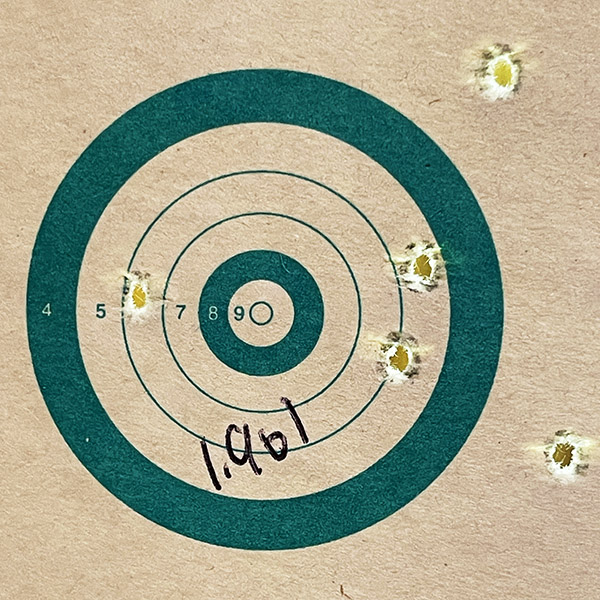
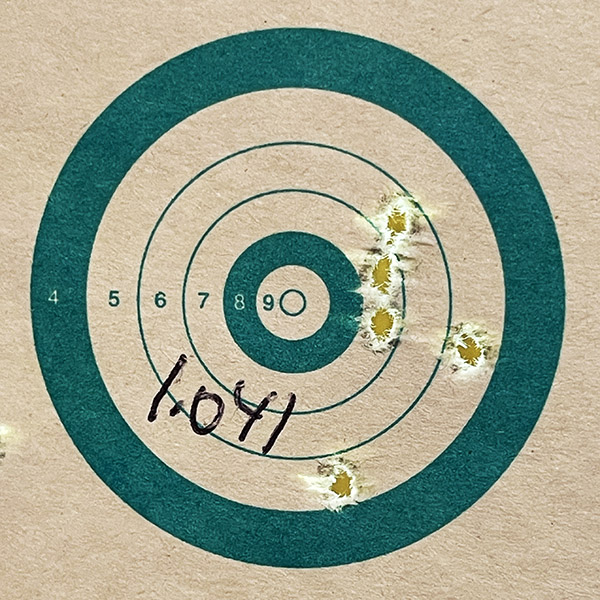
As you can see, they are what we in the engineering world would call lousy.  The groups would vary, seldom going as low as that 1.041-inch group you above.   Mostly they were awful.

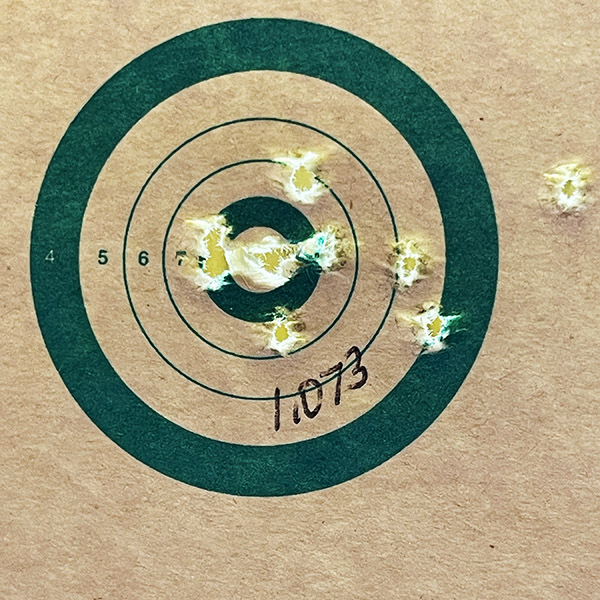
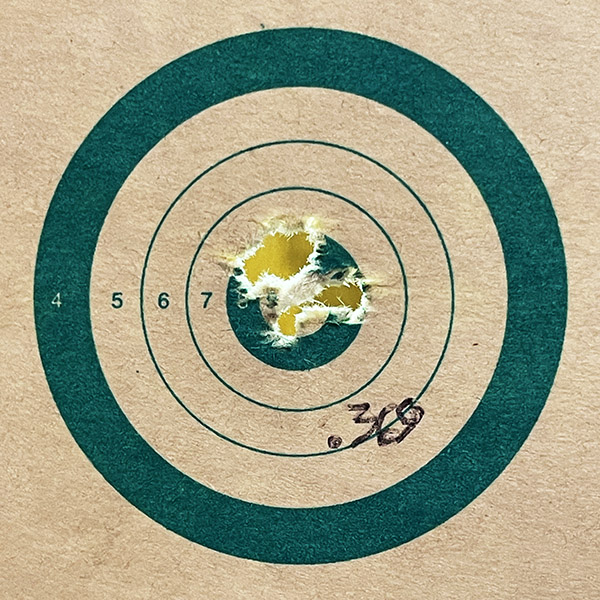
I then installed a 0.002-inch trigger shim on the Model 504 and I tried it again.  Wow! Look at this!

A dramatic and immediate improvement with the 0.002-inch bolt shim. This first group with the bolt shim installed was shocking. It got even better (see below).
The next group from the Model 504 with the bolt shim. I’m a believer.

When I saw those groups through the 12X Weaver scope on my Model 504, I couldn’t believe what I was seeing.  In my mind, I could hear Lance’s calm voice in our recent telephone conversation telling me there’s no guarantees, but folks say they work.   Indeed they do!

CZ452 Varmint

I was blown away by the Model 504’s improved accuracy with the addition of the 0.002-inch bolt shim, so I wanted to try it on the CZ.

Another pretty rifle: The CZ 452 Varmint.

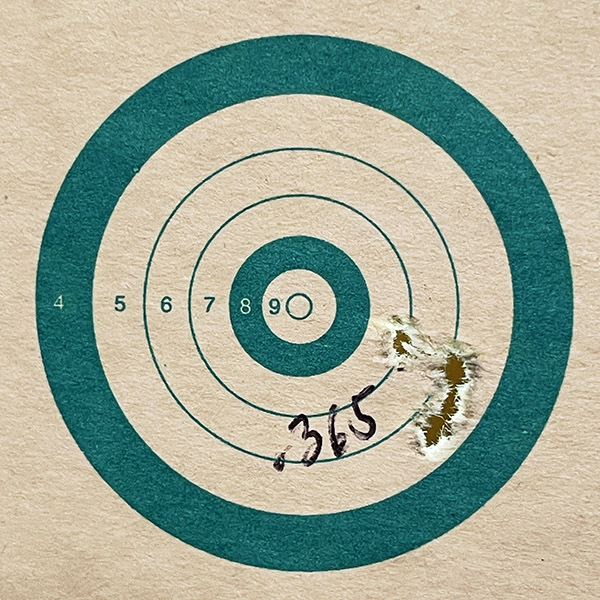
The CZ has always shot better than the Model 504.  Here’s a typical 10-shot group with the CZ452 before I installed the bolt shim:

I meant to shoot a 5-shot group before installing the bolt shim, but I shot 10 instead. It’s a typical group from the CZ before I installed the bolt shim.

What you see above is what the CZ would do at 50 yards with Eley Target ammo in my hands.  Sometimes it would do a little better.  Sometimes it would do a little worse.   I’m not that great a shot; other people could probably do better.  But it’s typical for me.  I wanted it to do better.

The TriggerShims 0.002-inch bolt shim went into the CZ and again, my response was:  Wow!

One little tiny 0.002-inch bolt shim and voila!
Someone once said only accurate rifles are interesting. These two rifles suddenly became much more interesting with the addition of TriggerShims bolt shims.

The Bottom Line

As the saying goes, your mileage may vary.  But I’m convinced:  Bolt shims work.  I might be able to improve my groups even more if I experimented a bit with different shim thicknesses, but I’m more than pleased with what I saw after trying my simple and unscientific “install the 0.002-inch shim and see what happens” approach.  This really is a great product. If you want to improve a bolt action .22  rifle’s accuracy, check out TriggerShims.  You can thank me later.


Pretty Wood

People sometimes ask how I find guns with exceptional wood.  It’s easy.  I can’t pass a gun shop without stopping, and I spend a lot of time on gun forums.  Every once in a while, I’ll see a rifle with walnut that speaks to me.  The Model 504 you see here came from First Stop Guns (they’re in Rapid City, South Dakota) when Susie and I were out there touring that part of the country.  I spotted the CZ 452 on a forum post and I sent a message to the owner asking if he would sell it to me.  The first answer was no, but a year later the owner contacted me and asked if I was still interested.  You know the answer to that one.

Pretty lumber indeed, and now they are both shooters. The CZ 452 is on the left; the Custom Shop Model 504 is on the right. You don’t often see .22 rifles with wood like this. For that matter, you don’t often see centerfire rifles with this kind of wood, either.

About that Model 60 cylinder shim story I mentioned…


Join our Facebook ExNotes page!


Never miss an ExNotes blog:


Help us keep the lights on:


Don’t forget: Visit our advertisers!


A Case XX Candy Stripe Whittler

By Joe Berk

In the pocketknife world, Case is an old school, respected, made in America marque that has been around for a long time.  I’ve written before about Case knives.  Case makes a very reasonably-priced, premier American product.  They are a first-class item.

You can imagine my surprise, then, when a Priority Mail item showed up in my mailbox (my real mailbox, not the Outlook one on my screen).   I saw that it was from good buddy TK halfway across the country, but I had no idea what it would be.  I knew TK from my CSC Motorcycles days, when we both worked at the company.  Those were good times and TK was a good guy.  We shared common interests in motorcycles, guns, knives, and other things.  TK and I rode the Death Valley rally on CSC Mustangs.  TK had previously worked at a knife shop, and it’s been said that his name was short for “Tommy Knives.”

When I opened the box from TK, it was Christmas Day here in California.  TK had sent a beautiful Case XX two-bladed folder, one that I had never seen or known about previously.

I took a photo and uploaded it to Google to learn what this new-to-me collectible was, and it was indeed a collectible item.  A Case XX Whittler, to be specific, with candy stripe scales, made in 2001.  Very, very cool.

You might be wondering what Case’s “XX” denotes, as did I.  Here’s what Google said:

The “XX” on Case knives…signifies that the blade has undergone a specific heat-treating process, specifically that it was tempered and tested twice for strength and durability.

Historically, the “XX” mark originated as a quality control system during the heat-treating process at W.R. Case & Sons Cutlery Co. When blades were initially hardened in the furnace, an “X” was marked on the pan. A second “X” was added when the blades returned to the oven for tempering, indicating they had been properly and fully treated. Today, the Case “XX” trademark serves as a distinction of the quality and craftsmanship inherent in each knife.

This is a very nice and much appreciated gift, TK.  Thanks very much!


A sad note to this story:  I wrote this blog a couple of weeks ago, and then I learned a couple of days ago that TK passed away after undergoing heart surgery (TK passed on 18 September).  Godspeed, TK.  Our thoughts are with you.  I enjoyed your friendship and you will be missed.


Join our Facebook ExNotes page!


Never miss an ExNotes blog:


Help us keep the lights on:


Don’t forget: Visit our advertisers!


A Rough Ridin’ Tater Skin Big Folder

By Joe Berk

You know I’m a knife nut.  The collecting craze came to me late in life, and I’ve been making up for lost time.  You also know that when you buy anything from any retailer, you’re deluged for life with an endless stream of emails pitching more products.  Those emails work (at least they do on me), and sometimes they light a match that can’t be extinguished.  That’s what happened here.  An email floated in from an online knife retailer touting a sale, with a photo of a knife that that caught my attention.

So I clicked and the ad brought me to the online retailer’s website, but the knife wasn’t there.  I spent a good half hour looking through hundreds of knives from that manufacturer (Rough Ryder) on the retailer’s site, and I couldn’t find the one in the ad above.  I emailed the retailer asking about it, and didn’t get a response.  I emailed the retailer again the next day and there still no response.  On Day 3, I called the retailer.  They apologized for not answering my emails and promised a response that day.  They kept their word, but I didn’t like the answer: The knife was out of stock and they had no plans to order more.  I also received an email from the man who owned the knife store.  He apologized for the ad.  That was a nice touch and it kept those guys on my “go to” list.  But I still wanted the knife and they didn’t have it.  Compounding the felony, the knife importer (Rough Ryder) didn’t have the knife shown above on their website, either.

I didn’t know anything about the knife, including its size or anything other than the fact that it was a folder and the scales were brown burlap Micarta.  I Googled those terms and found the knife on Amazon!  Woo hoo!   I knew I had promised Susie I was done buying knives for a while, but you know how that goes.  Add to cart, buy, etc.  It arrived the next day.

Man, this is a big knife.  Please, no jokes or questions about what I am compensating for.  I just like these things and they are so inexpensive, I’m indulging whatever underlying cranial miswiring is fueling this collecting affliction.  I sent a quick photo to Bowie-fabricating good buddy Paul, and he asked me how big it is.  That led to more iPhone photos and this blog.

I learned on Amazon the knife is the Rough Ryder Deer Slayer, and the Rough Ryder series with brown burlap Micarta scales is their Tater Skin line.  The Rough Ryder Deer Slayer isn’t offered any longer, but you can still find them on Amazon and one or two other retailers.  The Amazon price is $39.97, and for a knife this size, that’s pretty reasonable.

The Rough Ryder Deer Slayer is nicely packaged.  The box is fiberboard (cardboard, basically) and it probably won’t stand up to constant opening and closing, but it is nice.  The knife doesn’t come with a sheath (or a holster, like a Buck does), which would have been even nicer. But it’s still pretty cool.

The blade is 4 inches long, and the knife (with the blade out) is almost 10 inches.  This is a big knife.

The blade material is 440 stainless (it is razor sharp), and the brown burlap Micarta scales are aesthetically pleasing.  The blade is a slip joint, which means it opens and closes like a regular pocketknife.  The spring that holds it in either the open or closed position is strong, and I’m ultra-careful closing this one, making sure my fingers are out of the blade’s path as the knife is being closed.

The bottom line:  I like the Rough Ryder Deer Slayer.  I’ll probably never do anything with the Deer Slayer other than look at it (I’m certainly not going to slay Bambi with it).   But I like it.  If you want one, you should act fast as the knife is no longer being made.  Amazon has a few in stock, and then that’s it.


Join our Facebook ExNotes page!


Never miss an ExNotes blog:


Help us keep the lights on:


Don’t forget: Visit our advertisers!


ExNotes Review: Shenzhen 4000 Inverter Generator

By Joe Gresh

My nesting work here at the ranch is taking me further away from electrical power. A 100-foot extension cord isn’t cutting it anymore. The little Harbor Freight Tailgator has been a trooper, but 700-watts isn’t enough for the electric jackhammer or two concrete mixers at once, and besides that the urge to spend money is strong.

Lots of buttons and outlets on the 4000. A 12-volt cigarette lighter outlet is unusual for cheap stuff.
A cool little fuel gauge is fitted to the top of the tank.
Rated 3200 continuous and 4000 surge, the ‘Zhen seems to power most anything up to 26 amps. That’s  four times as much as the Tailgator.
The 30-amp, RV-type plug is great for welding.
But you’ll need an adaptor to plug your light duty flux core into the 4000.
This handy float bowl drain is a must-have for today’s crappy, alcohol laced fuel. Drain it after every use.
I’d like to see a little more weld on the frame. It would only take 30 seconds.
The inverter lives under the fuel tank. This is where the magic happens converting DC into AC.
Unlike a normal genset that hangs the AC portion off of the crankshaft opposite the pull start, the Shenzhen incorporates the power source inside the blower area and the rope start.
The generator came complete with a cute tool kit. You won’t get far with it but the thought counts.
The muffler isn’t super quiet like a Honda but it costs a lot less. The ShenZhen is around 63 decibels using my seat of the ear dyno.

I have more than the usual number of generators: in addition to the Tailgator, there’s a 10,000-watt Italian-Honda mash up and a 9,000-watt Predator (also from Harbor Freight), but both of those machines are heavy and hard to move on the steep and rocky New Mexico terrain we are currently beating into submission.

I wanted something light-ish that I could toss in a truck or carry downhill to a terracing job. It needed to have enough juice to run my equipment loads and if it could power the flux-core welder, that would be ideal.

At 60 pounds the Shenzhen 4000 seemed like the way to go. Amazon reviews on the generator were mostly good.

The ‘Zhen 4000 is an inverter-type generator. Unlike a standard AC generator which must run at a steady RPM to make 60 cycles per second, an inverter generator makes DC power (zero cycles or one endless cycle, depending on how you look at it).  That DC is then converted to AC by an inverter.

The advantages to inverter-type generators are several:

    1. The engine RPM can vary according to load making the unit more economical for powering lighter loads. At full load there probably isn’t much difference.
    2. The frequency can be tightly controlled, putting out 60 hz regardless of the load.
    3. The sine wave form can be cleaner with less noise. Small generators induce jagged wave forms due to the slight increase/decrease in crankshaft rotation speed through the engines power cycle.
    4. There’s less noise at lighter loads, because the engine speed can be slowed to meet demand.

The disadvantage to inverter-type generators is basically a more complicated generator with more parts to fail. There is a slight efficiency loss converting DC to AC voltage but it’s kind of a wash (see Item 1 above)

The Shenzhen I bought from Amazon was $299. Now that I’ve bought it, my ever-alert Facebook algorithm is sending fly-by-night offers for the same unit at $149. If you can get it for that price without being scammed, it’s a hell of a deal. $299 isn’t bad either.

The choke was labeled backwards which led to a lot of rope pulling. It might be ok in the southern hemisphere but around here we peel the sticker off and flip It over.

The unit started right up once I realized the choke was labeled backwards and seems to have plenty of power. It runs my little flux core welder better than a regular receptacle. I’m mobile!

Time will mention under its breath if the ‘Zhen holds up and I’ll be sure to let you know if it’s junk. For now, it’s the real deal.

The Shenzhen 4000 runs the flux core welder nicely. I can crank it all the way up, a setting that pops a 15-amp breaker after a minute.

Join our Facebook ExNotes page!


Never miss an ExNotes blog:


Help us keep the lights on:


Don’t forget: Visit our advertisers!


Two Kool Kamp Kings

By Joe Berk

Sue and I were in Reno last month to visit the National Automobile Museum.  Like most places, Reno isn’t what it used to be.  The downtown area is a bit sketchy and I didn’t feel comfortable at all walking around.  That said, we had a good time at the Auto Museum and a good time in Reno.  As is my habit, I checked online to see if there were any interesting gunstores in town, and the online info for one in particular caught my eye: Willey Brothers Firearms.  Unlike the others, Willey’s ad emphasized the kind of guns I’m interested in (blue steel and walnut, not the black plastic tactical junk one mostly sees in gun stores these days).  Willey Brothers lived up to its ad:  The firearms were interesting, including the used guns.

The old Imperial Kamp King knife I bought at a gun store in Reno, Nevada. It has a combination bottle opener/scredriver, an awl for punching holes and undoing knots, a can opener, and a main blade. This one is about 50 years old, and it is in great shape.

Nothing in the gun offerings was interesting enough, though, to make me want to go to the bother of shipping it to the Peoples Republik of Kalifornia, but I noticed the store had a few used pocketknives for sale.  One in particular caught my eye:  An old Imperial Kamp King that was in nice shape.  I was interested in it because it has the same four-bladed configuration as my old Cub Scout knife.   At $25, it looked like a good deal, so I paid the asking price and Sue and I were on our way.  When I got home, I cleaned it up with a bit of Kroil penetrating oil and 0000 steel wool. I think it was made in the 1950s or 1960s (that’s a guess on my part, although if I studied the video included below, I’d probably be able to narrow it down more).

The new Rough Rider Kamp King, with the same blades as the original. This is a very high-quality knife, and I can tell you that the main blade is razor sharp (don’t ask me how I found out).

That got me thinking.  There’s a company called Rough Rider (not the condom company) that makes a current version of the Kamp King.  I recalled seeing that knife when scrolling through the offerings from Chicago Knife Works (which is actually located in Marion, Virginia).  The CKW Kamp King was only $16.94, and the more I thought about it, the more I knew I had to have it (admittedly, the thought process did not take long).  Move to cart, buy now, and in went my credit card number.

Chicago Knife Works has great prices and terrible shipping.   It takes 10 to 12 days from the time I’ve placed orders with these guys until whatever I order actually ships.  I don’t mean until it gets here; I mean until it actually leaves the CKW facility.  I don’t know if that’s because CKW is just pokey, or if they don’t keep much in stock and they order their knives from China when I place an order.  I suspect it’s the former, as every time it’s taken an inordinate amount of time to ship and I send them an email to complain (I did that every time I’ve ordered anything from them).  Then I’ll get an automated response from Chicago Knife Works telling me they’re sorry (which I already knew) and they have so many orders they just can’t get to them all in a reasonable amount of time.  And every time when I wrote to complain about taking to long to ship, well, CKW ships my order the very next day.  I should get smart and complain about the shipping delay as soon as I place an order, I guess.

My new Rough Rider Kamp King arrived a few days ago and I’m impressed.  It is a really nice knife that dimensionally is pretty true to the older ones that were manufactured in America.  The quality on the new Chinese Kamp King is really good.  The fit and finish are superb, and it just doesn’t look or feel like a cheap knife.

The old Kamp King (top), and the newer one (bottom). The dimensions are the same. For $16.94, the new one is a great buy.

The other reason I ordered the new Kamp King is that I wanted to compare it to a Marbles Scout King I had purchased from Chicago Knife Works about six months ago.  I thought it might be the same knife as the Marbles, but it is not.  The Marbles knife is a bigger, heftier version of the Kamp King.  I suspect they are both manufactured by the same knife company in China, but I don’t know this.  The appearance of the two new knives (even though the dimensions and the scales are different) is so similar that I’d bet both come out of the same factory somewhere in the Peoples’ Republic (and I’m talking about China now, not Kalifornia).

The original Kamp King was manufactured by Imperial in Providence, Rhode Island. The new one is produced somewhere in China; most likely in Yangjiang City, China’s knife-making capital.

I Googled the topic and although I couldn’t find the specific Chinese company that makes these knives, I learned that China’s primary knife-manufacturing region is Yangjiang City in Guangdong Province.  It’s been China’s knife-making center for more than 1,400 years and is home to several knife companies.  I’d sure like to visit that area someday.  I’ve been to Providence, Rhode Island (where the original Kamp Kings were manufactured).  A visit to Yangjiang City would be interesting. I’d probably come home with a suitcase full of interesting and inexpensive knives.


Join our Facebook ExNotes page!


Never miss an ExNotes blog:


Help us keep the lights on:


Don’t forget: Visit our advertisers!


A Tale of Two Bowie Knives

By Joe Berk

Well, maybe it’s three.  A little while ago I wrote about a custom Bowie knife good buddy Paul crafted for me.  That knife was a surprise gift, I like it a lot, and it fit in nicely with the rest of my collection.

A surprise gift from good buddy Paul: A custom Bowie knife.

Paul then sent a photo of a curly maple Bowie he made for himself, and I liked it so much I offered to buy it.  Not so fast, Paul said.  He’s keeping that one, but he offered to make another one just like it for me.  One thing led to another, and I decided to go ahead with the curly maple Bowie.  And then I decided to get yet another Bowie, this time with a white Micarta handle.  Paul told me about a block of Micarta he’s had for 40 years, and he thought it would do nicely.  Over the years, the Micarta had taken on a beautiful yellow hue similar to real ivory.

Lifelong good buddy Paul with some of his Randalls and a few other toys. I’ve known Paul longer than any other person on the planet.

Paul is an experienced and serious knifemaker, and he is also a collector.  He has the nicest collection of Randall knives I’ve ever seen, as well as a bunch of other high-end knives.

Now, on this business of Bowie knives:  In the previous Bowie blog (to which I provided a link above), I wrote briefly about the history of Jim Bowie and the knife that bears his name.  And speaking about bears, some of you might be thinking about Davy Crockett, a Bowie knife, and the myth surrounding his encounter with a bear.  Congressman Crockett’s ursine encounter is but a story; it’s not historical fact.  It likely came about as the result of the song, “The Ballad of Davy Crockett.” As our President might say: It’s fake news. There’s no proof it actually occurred. But it’s fun to think about.

My two recent custom Bowie acquisitions are both massive knives.  The Micarta-handled bowie has a blade length of 9 3/4 inches and an overall length of 14 7/8 inches.  It’s a huge knife with a gorgeous brass guard.  It is simply stunning.

The Micarta Bowie. The handle, the brass guard and pommel, the blade, the brass pins, and the Micarta handle make for a beautiful custom knife.
A close up shot of the craftsmanship on the custom Bowie handle. It is an exquisite knife.
Big boys, big toys: Both of these knives are huge. The Micarta-handled knife has a good feel to it.  The ruler you see above is 15 inches long.

The curly maple custom Bowie knife is the one that got all this going.  When I saw the one Paul had crafted for himself, I had to have one.  I absolutely didn’t need it, but I wanted it.  I wanted one just like Paul’s, and he came through. It’s a beautiful knife.

Paul does beautiful custom work. You should see his black powder rifles; they are equally impressive. This knife just looks right.
The workmanship on both knives is superb. The guard and the pommel are beautiful bits of aluminum hand filed and finished by Paul. There are a lot of hours in these knives, and it shows.
Curly maple, custom everything: This is a beautiful Bowie knife.  The background for this photo and others in this blog is an Ossabaw hog skin.  I shot it on a hunt with Paul in Arizona about 10 years ago with a curly-maple-stocked Model 70.

The curly maple knife is even bigger than the Micarta knife (the blade length is 10 inches and the handle is 5 1/4 inches, for an overall length of 15 1/4 inches).  Although it’s bigger, the maple knife is noticeably lighter than the Micarta Bowie due to its more slender blade, the aluminum guard and pommel, and the curly maple handle.  Both are big, big knives.  Huge, actually.

Paul asked for my inputs during the design of both knives, and he kept me posted with photos as the knives came together.  It was fun, and I now own the two beautiful Bowies you see in this blog (three, if you count the first one).  They are stunning knives, they are built exactly as I wanted them, and they are a magnificent addition to my small collection.

You know, we have bears here in southern California. Lots of them, apparently.  One was in the backyard of a home just a half-mile from ours few days ago.  Bears, be forewarned.  Thanks to Paul, I’m ready.


Join our Facebook ExNotes page!


Never miss an ExNotes blog:


Help us keep the lights on:


Don’t forget: Visit our advertisers!


ExNotes Review: MidwayUSA Soft Rifle Case

By Joe Berk

I don’t usually buy things with features I don’t need, but I made an exception for MidwayUSA’s soft rifle case.  I needed a couple of soft rifle cases because some of mine had worn out (the zippers were tearing on a couple, the inner lining was snagging on the front sight on another, the handle broke on one, etc,).  Usually, I spend about $10 or $12 on a rifle case because the only thing I really use them for is bringing a rifle to or from the range.  In the past, I’ve purchased them when visiting Bass Pro or Turner’s.

I buy a lot of reloading components from MidwayUSA, so that’s where I went for the cases.  MidwayUSA usually ships either the day I order anything, and they have that $100 free shipping threshold.  At $26.24, their Heavy Duty Scoped Rifle Case was more than I wanted to spend, but hey, I would only need to order four of the things to get my free shipping.  I am a sucker for that free shipping deal.

The cases arrived quickly, and MidwayUSA packaged them well.  They arrived in a single large box with plenty of padding.  You could have shipped a body in the box (it was that big). Each case was in a separate plastic bag.  It’s funny when you think about it:  Carefully packing a case in a box to protect it from damage when the purpose of the case is to protect things from damage.

The rifle case itself is impressive.  It’s wider than usual and it has heavier padding on the sides.  The zippers are higher quality than what I usually see on rifle cases.  Inside, there are a couple of Velcro straps to secure a rifle (that’s a feature I don’t need, but it’s a nice touch).  The case has a carrying strap so you can carry it from the shoulder (yet another feature I don’t need, but some folks might).  There’s an exterior zippered pocket, presumably for carrying ammo.   I used it for the Velcro retainers and the shoulder strap, so I guess it came in handy.

I was worried about the case being big enough to accept get some of my longer barreled rifles, but there’s plenty of room.  I have a couple of long action bolt rifles with 26-inch barrels, and the MidwayUSA case swallowed those with ease.  You can see that in the photo at the top of this blog.

The cases can be had in olive green, desert, or black.   I bought the olive green version in a nod to my alma mater (the US Army).

Overall, I give the case 10.0 points (out of a total possible 10 points).  I knocked it down a half a point because it had things I didn’t need, but then I gave it a half point back for MidwayUSA’s free (and speedy) shipping.  If you are in the market for a rifle case, this is a good one.


Pro Tip:  Never store a firearm in a soft case (or a holster) for an extended period of time.  The case or the holster will hold moisture and lead to rusting.  Take the weapon out regularly and wipe it down with an oiled rag.


Join our Facebook ExNotes page!


Never miss an ExNotes blog:


Help us keep the lights on:


Don’t forget: Visit our advertisers!


Patagonia, Part 1: Southbound

By Bobbie Surber

Some trips are booked on a whim. Others are slow-brewing obsessions. For me, Patagonia was both myth and magnet—pulling at me for over a decade until, finally, I said yes.

From the rhythm of Santiago to the wild edge of Torres del Paine, onward to the granite spires of Fitz Roy, and finally to the end of the world in Ushuaia – this journey began long before the first step.

Some dreams grow slowly, quiet things that live inside you for years, waiting for the right season. In the spring of 2025, I finally answered Patagonia, a land that had lived in my imagination for over a decade.

This five-part series is a love letter to that journey: the W Trek in Torres del Paine, the trail to Fitz Roy, epic glaciers, the emotional and raw beauty of our stay in a turn-of-the-century estancia, and the weeks of awe, grit, and the stillness in between. But before it began, it started here—with four grounding, soul-resetting days in Santiago.

Santiago: A Soft Landing in the South

We arrived on a warm March evening, a little weary from 24 hours of travel. It was our first time traveling in the southern hemisphere together, and the city welcomed us with a gentle kind of grandeur – equal parts aged colonial elegance, unique barrios, and the Andes rising in the distance like a promise.

Santiago surprised me. I expected a pleasant stopover in a city I had yet to explore, but what we found was something deeper: a soulful pause. The city is a seamless blend of past and present – where the Metropolitan Cathedral anchors Plaza de Armas with 18th-century dignity, and just a few blocks away, the creative heartbeat of Barrio Lastarria pulses through cobbled streets lined with wine bars, coffee shops, pisco bars, bookstores, and tucked-away galleries.

We gave ourselves four full days to settle in, slow down, and breathe before the hard miles ahead. We wandered without a plan through Santiago’s romantic, tree-lined streets, lingered over café con leche, and sampled seafood so fresh it felt like the ocean hadn’t even noticed it was missing yet.

We ate slowly, laughed easily, and always – always – had room for a round (or two, or three) of Pisco Sours. There’s something about their sharp, citrusy kick and frothy top that made us pause mid-conversation just to savor. We debated in earnest the merits of Chilean vs. Argentine piscos – aged in sherry flasks vs. clear and youthful expressions. They became a little ritual we both looked forward to at the end of each day.

At night, Barrio Lastarria – our temporary home – transformed. Crowds gathered in the streets as fire dancers performed to the rhythm of drums, laughter, and clapping hands. It felt like a celebration – not just of the city, but of being alive, present, and open to whatever might come next.

One golden afternoon, after a locals’ lunch from the nearby green market, we climbed Cerro Santa Lucía, the small hill where Santiago was founded. From the top, the view stretched beyond colonial rooftops and high-rise towers to the distant edge of the Andes. The wind caught my hair, and I stood quietly, thinking: It’s all really happening.

Santiago didn’t rush us. She cradled us in her warmth and rhythm – and without even trying, helped me remember why we came. She held the silence between what I was leaving behind and the transformative journey ahead.

Packing, Repacking, and Trusting the Journey

When we weren’t exploring the city, I was sprawled across the Airbnb floor, turning our room into a staging ground for our gear. Santiago’s quiet charm and youthful energy balanced the task at hand: preparing for the wilderness ahead.

I repacked my backpack more times than I want to admit – agonizing over every ounce.

Do I really need a second base layer?
Will this hold up to Patagonia’s infamous wind?
Are we actually ready for what’s coming?

Eventually, I stopped trying to pack perfectly and started packing with intention – and trust. The truth is nothing can fully prepare you for Patagonia’s rawness. At some point, you just have to take a leap of faith and go.

Flying South: The Landscape Begins to Shift

From Santiago, we boarded a flight to Puerto Natales, Chile – the gateway to Torres del Paine National Park. As the plane sliced its way southward, the landscape shifted – flat plains giving way to jagged peaks, glacier-fed rivers, and a coastline shaped by wind and time.

Puerto Natales welcomed us with its signature mix of remoteness and warmth. It’s a small, rugged town perched along the edge of Seno Última Esperanza – the Last Hope Sound, a stunning fjord that reaches inland from the Pacific Ocean. With snow-dusted peaks in the distance and steel-gray water stretching out before us, it felt like we had reached the last outpost before stepping off the map.

Colorful corrugated metal buildings lined the streets, most weatherworn but vibrant, standing defiant against Patagonia’s legendary wind. The town is modest but full of charm – local cafés, gear shops, friendly bakeries, and hostels nestled between homes and small restaurants. Everything feels like it belongs here – resilient, practical, but with soft edges.

After a 30-minute shuttle journey from the airport, we checked into our hotel for the next two nights. Our room sat just a short walk from the water’s edge, where fishing boats rocked gently in the inlet and clouds drifted low across the mountains beyond. The cold air felt cleaner, sharper – like the world had been distilled to its purest elements: rock, wind, water, sky.

That evening, Tom and I bundled up and walked along the costanera, the long waterfront promenade that hugs the fjord. The sky was moody and low with clouds, the wind tugging at our jackets. Seabirds dipped low over the water. In the distance, the silhouette of the mountains we came for was just barely visible, blurred and waiting.

We didn’t speak much. We didn’t need to. We were here. The adventure was about to start.

What’s Next: Hiking the W Trek

In Part 2, I’ll take you inside our six-day trek through Torres del Paine: past hanging glaciers, through lenga forests, clomping up to the famous Towers – a dream I’ve held so long come true – ending along the windswept shores of Lago Grey. It was a hike that tested us, shaped us, and left us completely in awe.

If you’ve ever dreamed of Patagonia – or are planning your own trek – drop a comment or question below. I’d love to hear from you.

Patagonia Prep Tips

If Patagonia is on your list – or already on your calendar – here are a few tips from our experience that might help you prepare, both practically and mentally:

      1. Ease into it with Santiago.  Give yourself 2–3 days in Santiago to rest, adjust to the time zone, and mentally downshift. Patagonia can be physically demanding, so it’s worth arriving grounded. Plus, Santiago is a beautiful, underrated city full of soul, food, and architecture.
      2. Pack for all four seasons.  The weather in Patagonia is famously unpredictable – you can experience sun, sleet, hail, and 50mph winds all in a single day. Prioritize a quality waterproof shell (jacket and pants), a layering system (base layers, fleece, insulated puffy), windproof gloves and a beanie, and trail runners or hiking boots that are well broken-in.
      3. Repack with intention, not perfection. You will overthink your gear (everyone does). Don’t aim for flawless – aim for flexibility. Trust that you’ll adapt on the trail. Patagonia will shake loose whatever you didn’t need anyway.
      4. Download maps and offline essentials. Many areas in Patagonia have little to no cell service. Download maps on Maps.me or Gaia GPS, as well as offline translations (Spanish), weather apps, and your itinerary. Print any confirmations – especially for Refugio’s or border crossings.
      5. Carry both cash and cards.  While larger towns accept credit cards, many places in Patagonia – including transport, markets, and smaller cafés – prefer Chilean or Argentine pesos in cash. ATMs can be unreliable, so plan ahead.
      6. Train your body for multi-day hikes. If you’re doing the W Trek or Fitz Roy trails, it helps to prepare with at least a few local hikes beforehand, especially back-to-back days. Work on carrying a loaded pack for long distances.
      7. Prepare mentally for the elements.  Patagonia rewards patience, grit, and presence. Some days are full of awe. Others are full of wind and sore feet. You may not always get postcard views – but the rawness is part of what makes it unforgettable.
      8. Early Reservations.  For Torres Del Paine Park you will need to make early reservations  for your camping or lodging. You cannot enter the park without showing your lodging confirmation.

Join our Facebook ExNotes page!


Never miss an ExNotes blog:


Help us keep the lights on:


Don’t forget: Visit our advertisers!


Movie Reviews: The Titan Documentaries

By Joe Berk

I recently watched two movies on the Titan submersible implosion and both were excellent.  The first is Titan: The OceanGate Submersible Disaster, which is currently streaming on Netflix.  The second is Implosion: The Titanic Sub Disaster, and that one is currently streaming on Max.  The two movies offer different takes on how the events leading up to the disaster unfolded.  Both are chilling in their depictions of the technical arrogance and unwillingness of the key guy, Stockton Rush, to recognize that Titan was moving toward failure.

I’ve spent a lot of my working days investigating product failures of all sorts, including serving as an expert witness on several cases and teaching engineering ethics in Cal Poly Pomona’s engineering school.  Two factors are always present when fatalities occur:  Engineering arrogance, and putting other factors ahead of safety.

Engineering arrogance refers to a misguided belief that a failure won’t occur (even though ample indications existed before a fatal event occurs) because we’re omnipotent, we’re smarter than everyone else, we’ve never experienced a failure of this nature before, or…well, you get the idea.  On the space shuttle Challenger, NASA had experienced numerous o-ring failures prior to the one that killed the crew, but they ignored them because “we’re NASA and we’ve never lost a man in space” (that is an actual near-verbatim NASA management quote prior to the Challenger accident).   Everyone knows the Takata airbag story; those folks experienced explosions during engineering development and product acceptance testing, yet they continued to sell these dangerous devices because they thought they would be okay.  Takata airbags actually killed people in service and Takata continued to sell them.  It’s surprising how often this feeling is present in the engineers who designed products that kill people unintentionally.

Incidentally, one time when I was giving a deposition the attorney representing a company whose product killed someone hit me with something I wasn’t expecting and he caught me off guard.  He asked how I could criticize any one with my background in designing cluster bombs and other things that had, as their primary purpose, exactly that function:  To kill people.  I was floored and didn’t have a good answer.  As sometimes happens, I had the perfect answer a few hours after the deposition had ended.  My products, you see, had killing people as their purpose.   Your products did not.

The other factor that is always present is putting other things in front of safety.  Cost is a big one.  Everyone knows about the Pinto and its propensity to burst into flame when rear-ended.  Not everyone knows that the Ford Crown Victoria, Ford’s big sedan, had the same problem.  The police knew about it, though, and they finally told Ford they wouldn’t buy any more Crown Vics unless Ford addressed the problem.  Incredibly, Ford engineered a protective cage for the fuel tank and only sold it on the police automobiles.  It was cheaper to keep paying out wrongful death lawsuits with the recipients signing nondisclosure agreements.  There are lots of examples of this.

Both factors were present and both resulted in the Titan’s implosion. I’ll get off my safety soapbox now and leave you with a recommendation for watching both Titan: The OceanGate Submersible Disaster and Implosion: The Titanic Sub Disaster.  They are both excellent documentaries.


Join our Facebook ExNotes page!


Never miss an ExNotes blog:


Help us keep the lights on:


Don’t forget: Visit our advertisers!


Case Buffalo Horn Hunter

By Joe Berk

Case is a old-line American knife manufacturing company with roots that reach all the way back to 1889.  I knew them as a pocketknife manufacturing company, and without really knowing anything about them, one of the first knives I purchased when my interest in pocketknives was rekindled was a Case Stockman (you can read about that knife here).  I mentioned to good buddy and edged weapons rabbi Paul that I had purchased a Case, and he gave the company his seal of approval: “They’re an old line knife company, they’re made in America, and they’re good,” he told me.  I didn’t know any of that when I purchased the Stockman, but it felt good to know Paul thought I had made a good decision.

The Case at hand…sorry, couldn’t resist that.

Not long ago I received an email from the Chicago Knife Company (an online retailer) offering a Case Hunter.  The knife had my attention immediately for several reasons:  It was a fixed blade Bowie/hunting knife (I didn’t know Case made such an item), it had a jigged buffalo horn grip, it was mirror finished, and the price was right.  Buy now, a credit card number, free shipping, no sales tax, and it was on its way to me.

Made in America. Case has an American manufacturing history that goes back more than a century.

The Hunter arrived a few days ago, and it’s beautiful.  I’m glad I ordered this one.  For me, it’s a collectible.  I won’t be wearing it in the field and I have no intentions of skinning or field dressing anything with it (as I watched our guide Tom do on a recent pig hunt in Arizona).  I just enjoy looking at it.

To me, the knife feels a little small and a little bit light, although I’m not sure why it does.  It has an overall length of 10 inches, a blade length of 5 inches, and a handle length of 4 inches.

The polished buffalo horn grip from the left side.
A view of the buffalo horn grip and spacers from the right side.
As a potentially more usable grip, stacked leather is available.

The buffalo horn grip is highly polished.  Maybe too much so, as it feels a bit slippery.  That’s okay, I think, for something I intend to admire a lot and use little.  If I was buying this knife as a tool (and not as a bit of artwork), Case also offers it with a stacked leather handle.  That might be more practical.

Serrations on top of the bade. The 5-inch blade is relatively narrow compared to some of my other knives.

The blade has a serrated edge along the top.  Maybe that’s intended to be used for sawing.  Again, it doesn’t matter to me.  It’s decorative as far as I’m concerned.  The pommel is cool, too.  It’s polished aluminum and it looks great along with the knife’s red, yellow, white, black, and brass spacers.

The Case Hunter’s polished aluminum pommel.

On the Chicago Knife Works site, the blade material is identified as H-2.  Here’s what Google says about that steel:

H-2 steel has extreme corrosion resistance, especially in saltwater environments. Its composition uses nitrogen instead of carbon.  It is described as tough and capable of holding an impressive edge.  The strengthening process for H-2 steel involves intense rolling and cold-working, not traditional hardening and tempering.  H-2 is an evolution of H-1 steel, while retaining its desirable properties and being easier to manufacture. It can attain a Rockwell hardness in the high 60s while remaining resilient. In summary, H-2 steel is used in some knives and offers exceptional corrosion resistance, toughness, and good edge retention. 

The Case Hunter is not listed on the Case Knives website, but it is listed on the Chicago Knife Works site.   I called Case to confirm it is still available, and it is.  This is not a Chinese or Pakistani knife; it’s made in Bradford, Pennsylvania.  A black leather sheath is included with the buffalo horn Case Hunter.


Join our Facebook ExNotes page!


Never miss an ExNotes blog:


Help us keep the lights on:


Don’t forget: Visit our advertisers!