I finally made the leap. My solar system went online in 2018 and except for a few snow days has produced reliable power in all that time. We’ve had around 30 power outages at the grid-tied Carriage House (some 5 minutes, some 5 hours) during the same time span.
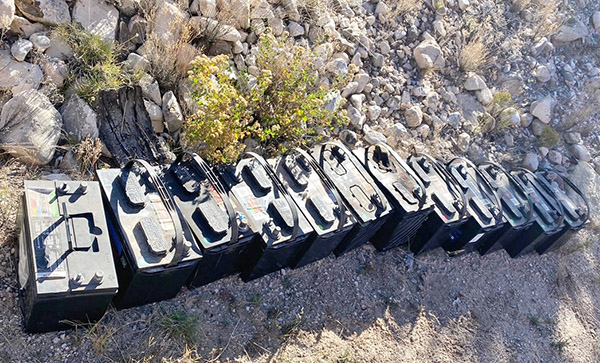
The old, lead-acid bank gave great service but it is time to step into the future. I’ll be keeping the best of the old ones for a power source in the green house.
Initially we went with plain old lead-acid batteries because they were a third the cost of lithium batteries. The lead-acids worked well and since they’ve been around hundreds of years it was easy to predict performance and longevity.
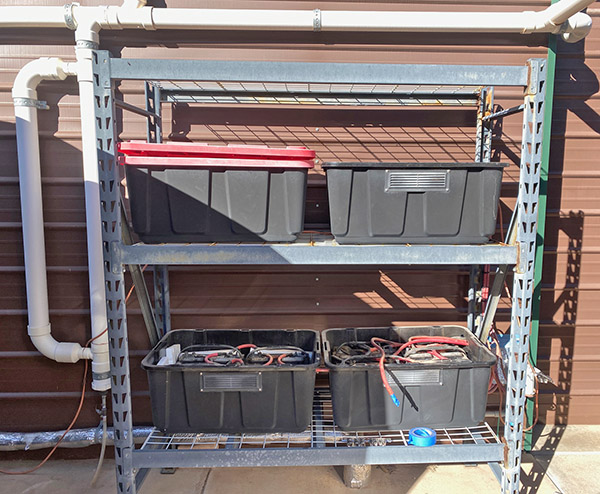
The jumper cables are messy but effective.The old bank was four boxes on two shelves. I never did get around to filling the last box.
The battery bank started small with just 4 batteries and grew with our budget to 12 total. There are two of the original 2018 batteries still functioning and I’ve replaced three batteries that failed. It’s easy to tell a bad lead-acid in a battery bank: it’s the hot one.
I haven’t been religious about topping up the electrolyte so some of the batteries might have failed due to misuse. Regardless, I’m happy with their performance and the lead-acids did me right.
Last year I noticed lithium batteries dropping in price. They ended up costing the same as the cheap Walmart lead-acids I was using. With new tariffs looming I decided to make the switch. I bought one batch in January and another batch in March, depending on whatever sale was on. My cost averaged around $119 per 12-volt, 100-ah battery. I wasn’t brand loyal, whatever was cheapest was fine by me.
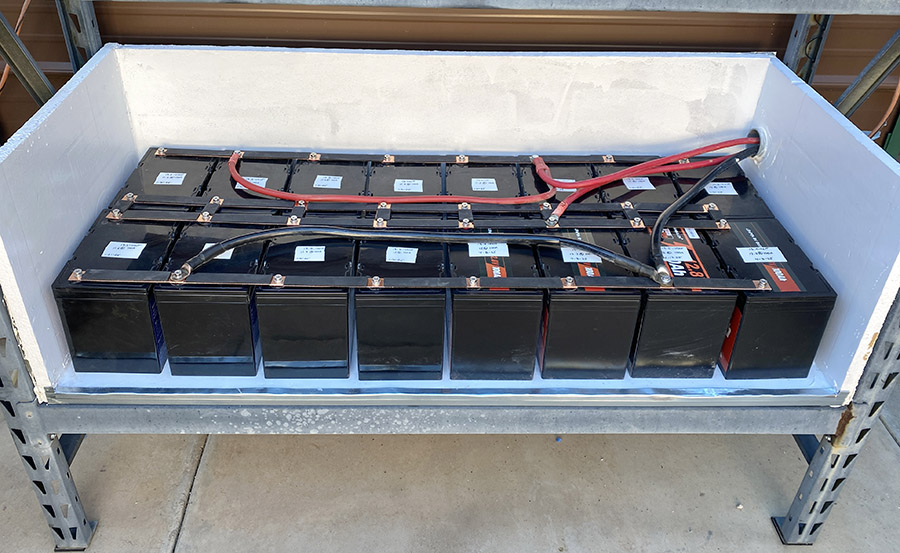
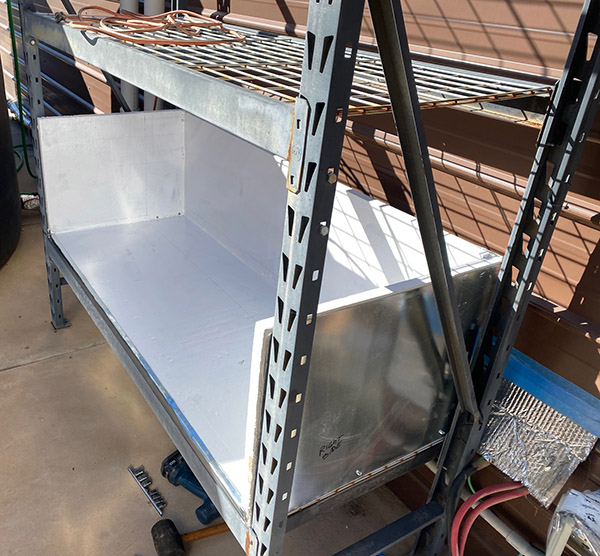
With winter approaching and long cold nights of pipe heaters draining storage I built an insulated box to hold the new batteries. Advantages with the lithium are 16 batteries fit on one shelf, weight is half of lead acid, and there’s no need for a sealed battery box as there’s no acid to leak.
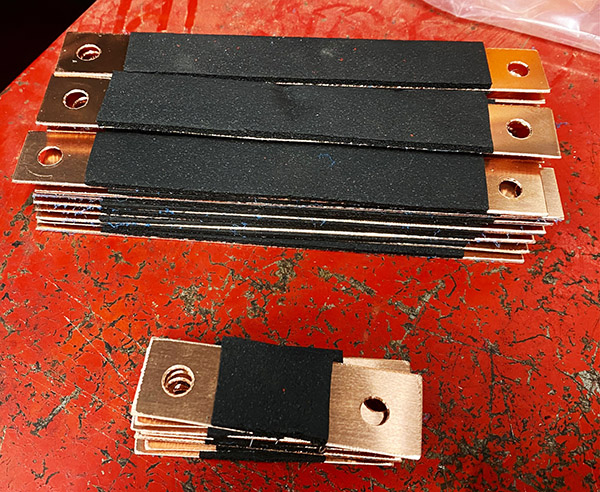
Most of this was replaced by copper bars.Lots of copper buss bars took a couple days to make. Foam on top to prevent shorts in case a chunk of metal lands on the bank.
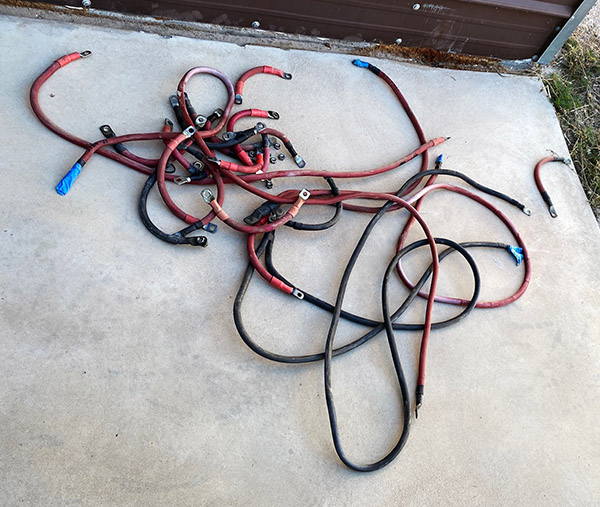
I also took the opportunity to clean up the installation, getting rid of messy-looking jumper cables and replacing them with solid copper buss bars. With everything on one shelf I eliminated several feet of cabling which can only be good.
Lithium batteries need a bit more charging voltage so I cranked up the solar regulator a 1/2 volt or so. I also reset the inverter charger setting to one more like lithium.
The batteries have sat on the shed floor for 6-8 months so when I connected them up to the solar they sucked a steady diet of 55 amps from the sun.
Theoretically I have 19,000 watts of storage now, more than double the 7200 watts of the old, lead-acid battery bank. In actuality it’s probably 80% of 19,000 watts because you don’t want to drain the batteries flat.
The new box is 1-inch foam skinned with sheet metal. Hopefully it will slow a fire.All the batteries on one shelf cuts down on cabling. Buss bars make a tidier installation. With no acid fumes connections should stay cleaner. What’s not to like?
Some disadvantages to lithium batteries are they are more affected by cold temperatures (hence the insulated battery box), they are limited to 100-amp output per battery (not a problem as my inverter draws 250-amp max), and I can’t really think of any others.
Time will tell if the lithium batteries last the 10-year claimed life span. I’ve pre-tested each battery’s load capacity and marked the results on top of the battery. I should be able to compare results in the future to see if individual battery performance degrades. All in, I’m happy with the new batteries. Hopefully I’ll have about a 3-day reserve for those snow days.
Oh, and those tariffs? They don’t seem to apply to lithium batteries as you can still get 12-v, 100-ah lithiums for $119 on Amazon.
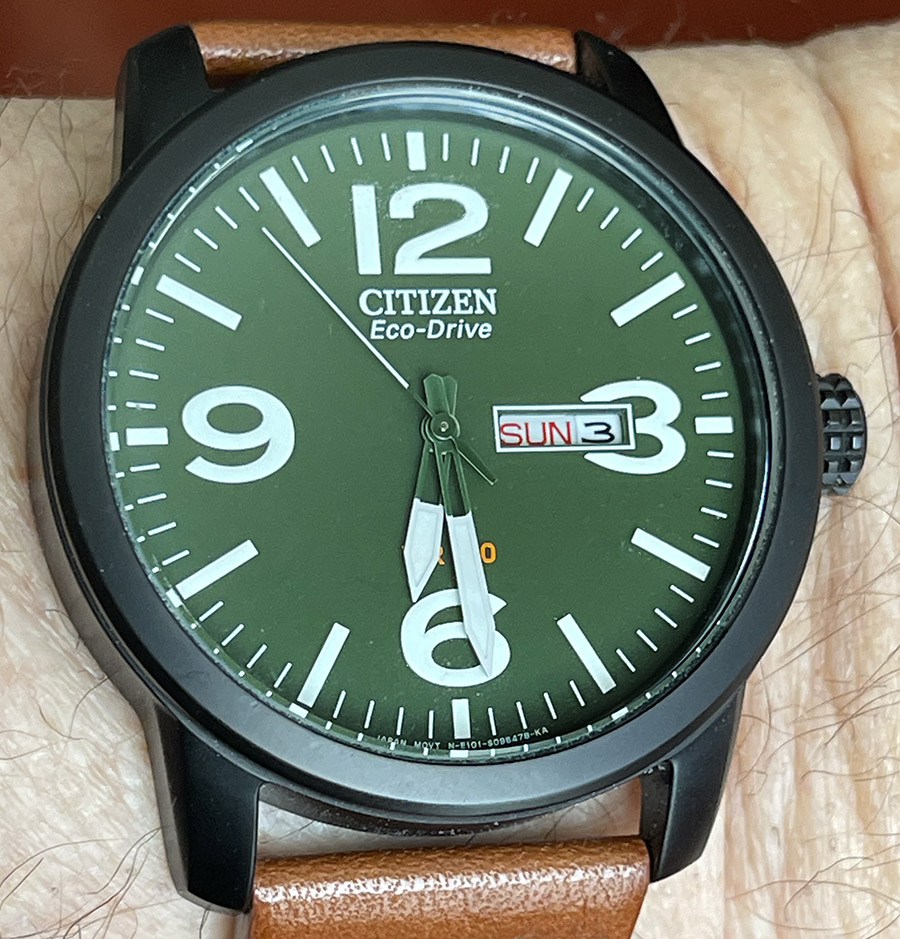
You’d think with my old-age eyesight and need for bigger letters and numbers I’d wear the Citizen watch you see above more often, but the fact is I don’t. I bought it years ago when I was a yuppie, and I wore it a little, but it just hasn’t had much wrist time in the last couple of decades. But it still works well, and it’s still got those big numbers. I need those now.
The Citizen uses their E101 solar-powered quartz movement and like all Citizens, Seikos, Casios, and Orients that use a quartz movement, it is phenomenally accurate. I’m talking in the range of seconds per month. I never thought I’d need a watch that accurate, and I probably don’t, but I enjoy having one. It’s one of the reasons I almost never wear an automatic (i.e., mechanical) watch anymore. They just don’t have the kind of accuracy I’ve become accustomed to.
Another feature on the watch you see here is the lume. It’s incredible. At night, the numbers and those big hands jump out at you. Other than having a backlit Casio or Timex, the lume on this watch makes it one of the easiest to read in darkness I’ve ever owned.
Once this watch is charged after being in the light, it keeps running for a long time. If I leave it on the shelf for months, it still keeps running. Evidently, room lighting is enough to keep it charged. When it does run down, it doesn’t take very long for it to come alive when it sees sunlight again.
What surprised me is that even though I’ve owned this watch for more than 20 years (it’s probably closer to 30 years), you can still buy this model at a relatively modest price. The exact colors you see here are no longer available, but the basic watch design is, and to me the new colors are just as attractive as the old. Here’s the same watch in a brushed stainless finish with a canvas strap. I like this look a lot.
I’m tempted to buy the watch you see above, but I already have plenty of watches. You can buy the above watch on Amazon for $184, or better yet, from Jomashop for a paltry $124. That’s a hell of a deal.
I haven’t done a knife story in awhile, but that doesn’t mean I haven’t been buying. Some of these online knife stores’ websites are addictive, and the Chicago Knife Works site certainly falls into that category. It’s fun just perusing their offerings. Sometimes, I’ll see something that piques my interest and then I’ll search on a feature that a particular knife has. That occurred recently when I saw a folder I likes with bone handles (or scales, to use knife aficionado terminology).
Bone as a scale material is intriguing to me, partly because I like the way it looks, partly because it looks like ivory, and partly because of a recent visit to the fabled Colt Custom Shop in West Hartford, Connecticut. When I saw an artist crafting custom grips on a Colt 1873 Single Action Army, I asked about the material (knowing that ivory was no longer available). The answer, as good friend and Colt factory guide Tim told me, was bone. Giraffe bone, to be specific. I would never have imagined.
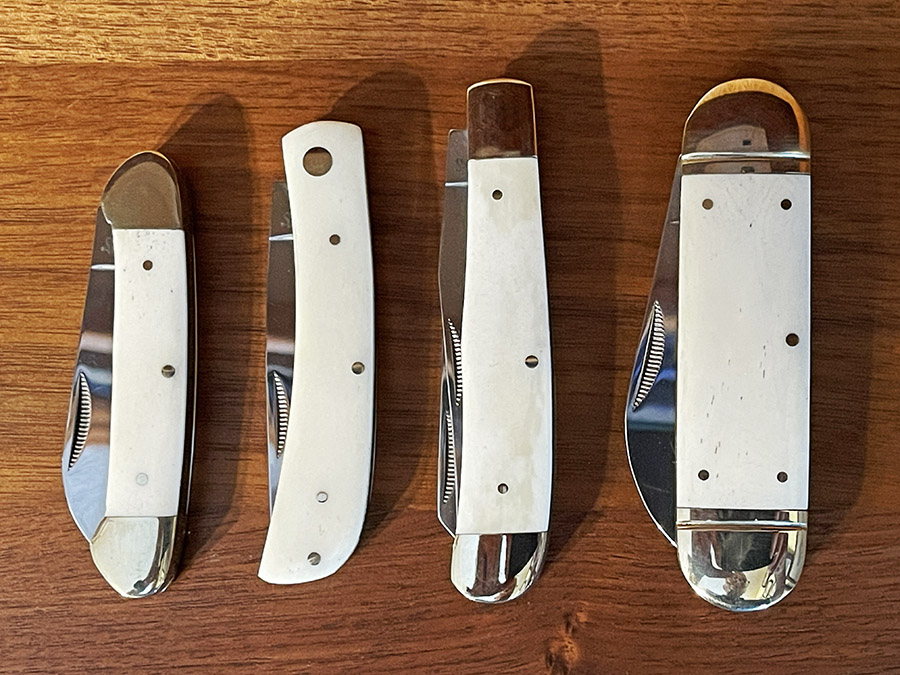
Anyway, to get back to the main attraction, I saw a Marbles folding knife with white bone scales on the Chicago Knife Works site and I liked it, so I searched on all Marbles folders with bone scales. What the site’s search returned was intriguing.
I liked every one of the knives I saw, and Chicago Knife Works‘ prices are so reasonable I pulled the trigger on all of them. Cheap fun, and they looked good on the Chicago Knife Works site. They arrived a few days later (all the above, with shipping, was only about $50), and I can tell you they look even better in person.
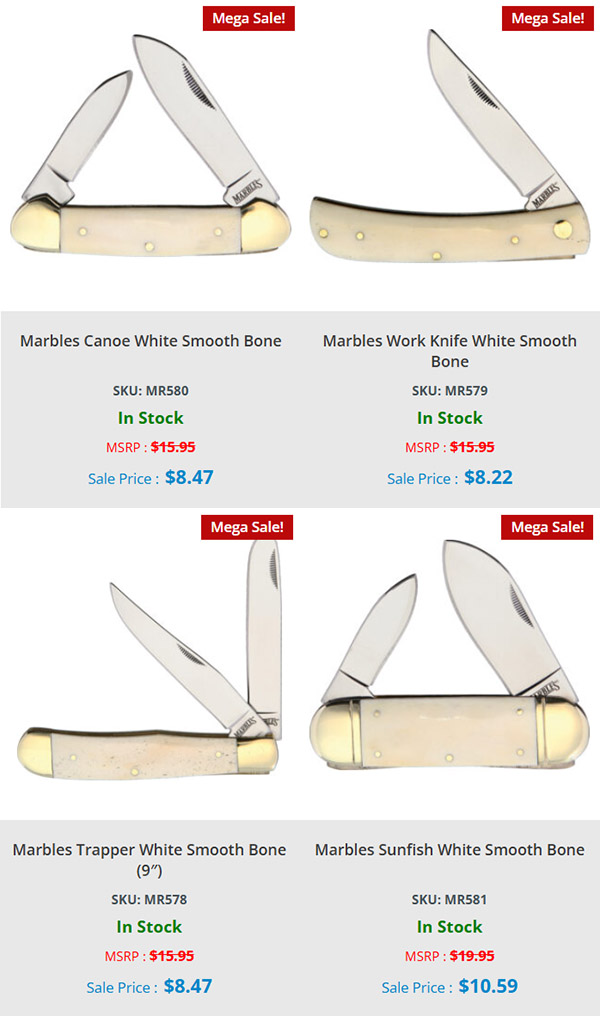
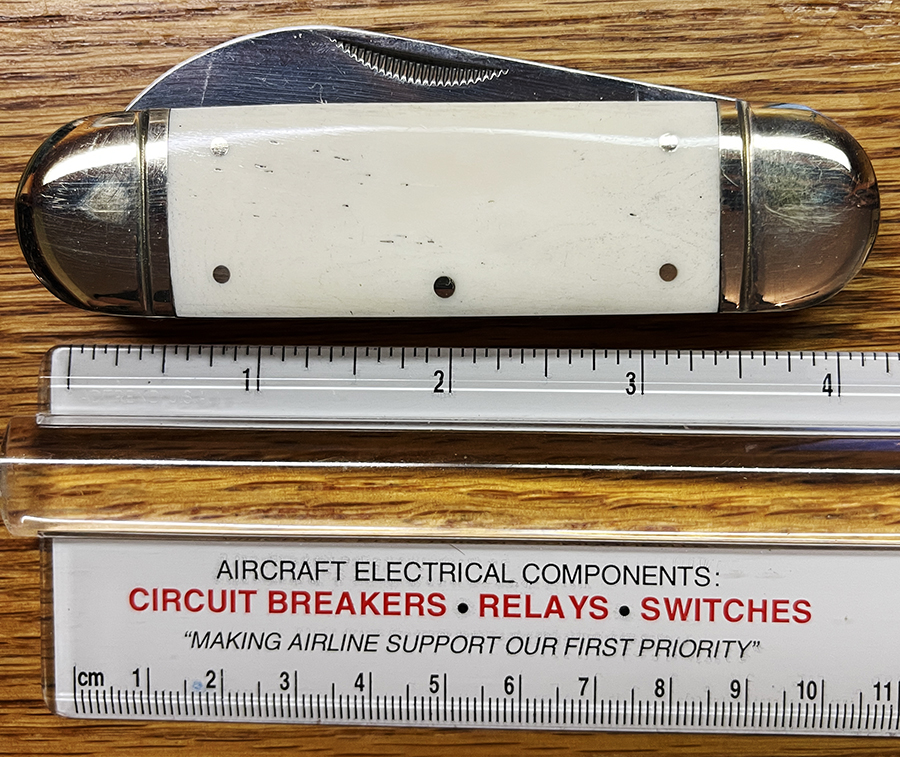
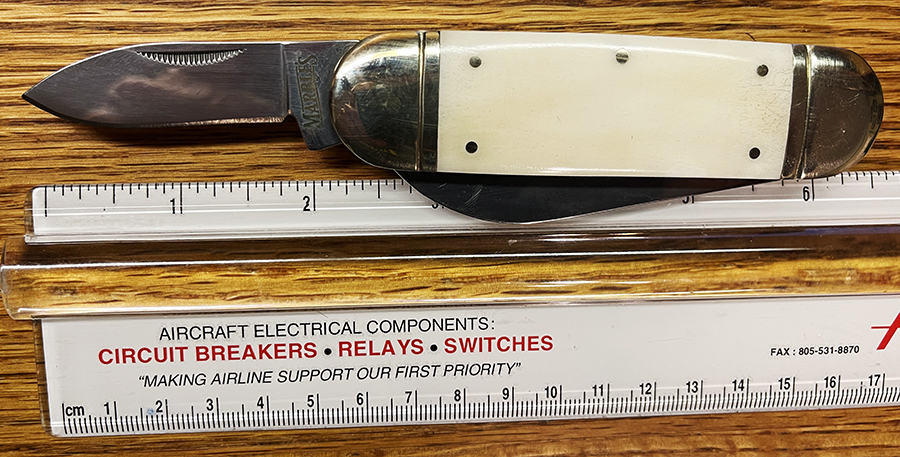
All the knives are appealing, and I like the white bone appearance. The canoe style is one I’ve written about before, and in my opinion, it is about the perfect-sized pocketknife for pocket carry. It has two blades and both are razor sharp. The work knife (also known as a sodbuster) is a single-bladed knife and its name comes from the fact that it is designed to be used by a working man (like a farmer). The trapper knife (as you might have guessed) is the design preferred by trappers. It has two blades: One with a clip point and the other with a spey blade (we’ve mentioned those before; my Case Stockman knife also has a spey blade). And finally, there’s that gorgeous two-bladed sunfish knife, which is a big knife. It gets its name from its sunfish-like shape.
The Sunfish is a physically big knife, as the following photos show:
I can’t say which of the above knives I like the best, so I’ll cut to the chase and tell you that I like them all. So much so, I continued the quest for knives with white bone scales.
Most recently, I purchased a large folder (the Rough Ryder Deer Slayer) from another knife supplier only because Chicago Knife Works didn’t have it in stock. I’ve written about it before.
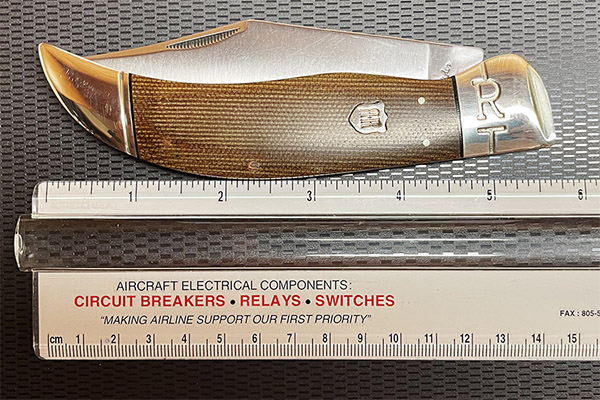
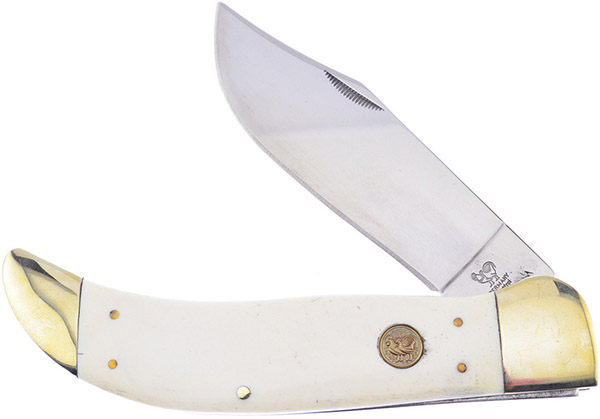
I like the look and size of the Deer Slayer so much that I started poking around to see if that knife was available with white bone scales. It was. The manufacturer this time is Hen and Rooster, and I was able to order it from Chicago Knife Works.
I guess I should say the importer, not the manufacturer, as I suspect the same manufacturer makes knives for several importers with slight differences to meet the importers’ marketing strategies. I don’t have the Hen and Rooster knife yet, but when I get it, I’ll post a few photos in a future blog.
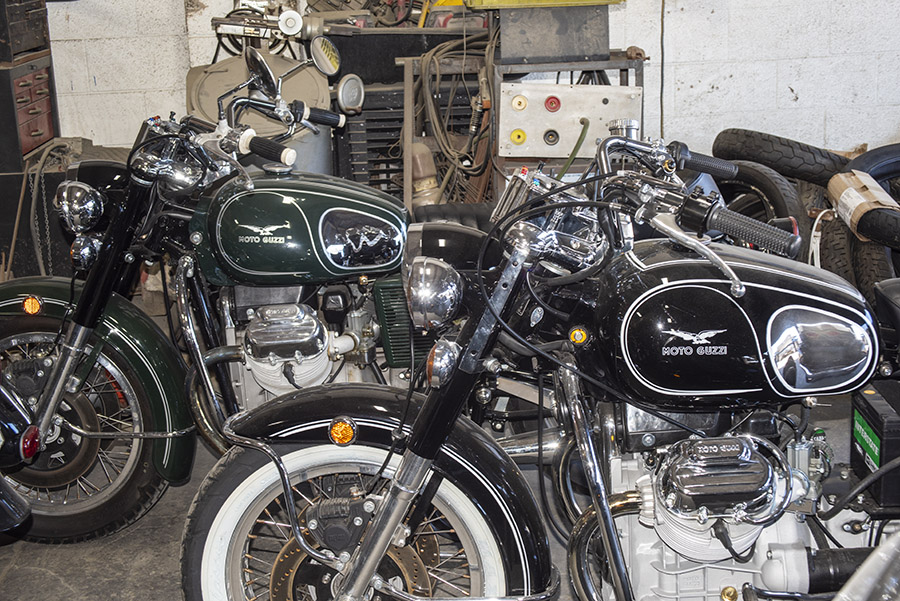
As the title implies, last week was quite a week, and a lot of it focused on Moto Guzzi stuff. The Roman gods are sending me a message, I think, but old age and big bucks will most likely keep my desire to own a vintage Guzzi suppressed. And there’s been some pocketknife stuff, too, leading into the age-old Chinese quality discussion. I’ll get to that in a minute.
The guts of a Guzzi in the Cycle Garden shop. This is a cool place in a hot locale (temperatures sometimes approach 120 degrees in Indio).
I spent Monday morning at Cycle Garden in Indio, California, getting tutored by good buddy Steve on the finer points of Guzzi fork rebuilding. It’s for a piece I’m doing on that topic, and the folks at Cycle Garden couldn’t have been more welcoming. These guys know their stuff, as well they should: They are the largest, busiest, and probably the best in the world at concours-level Guzzi restorations. I developed a bad case of the “I wants” for a restored Guzzi after seeing some of the bikes at the top of this blog, but it’s probably not in the cards.
Just forking around out in the desert…
After treating me to a cup of his famous home-roasted and ground coffee, Steve showed some of the bikes to me. There’s not a single part on a Cycle Gardens restoration Guzzi that isn’t touched during the restoration (both 0n the motorcycle and in the engine). How much? Somewhere in the neighborhood of $40,000 to $50,000. A look at any of the Cycle Garden bikes easily confirms the value is there. But my wallet is light enough already. Watch for more on the Cycle Garden shop; it’s amazing.
The man, the Moto Guzzi, and the legend: Chris Donaldson sitting across the table from yours truly. Buy the book on Amazon. Buy mine, too!
On Friday, I visited another Guzzi shop 130 miles to the west, this time to meet with and interview Chris Donaldson. Chris wrote Going the Wrong Way, the story of his ride around the world on a Moto Guzzi. He just flew into Los Angeles from Ireland to ride across the US. We had a nice meeting, and you’ll be hearing more about Chris in a subsequent blog.
One the pocketknife front, it’s been mostly good (and the good will be featured in upcoming blogs) with several new additions to the collection. But there’s been a couple of bad apples, and that’s increased my smarts about what to look for in a pocketknife.
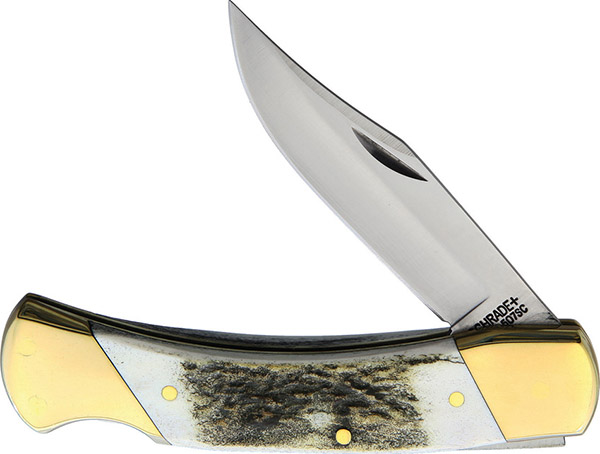
The Schrade stag-handled folding hunter. The blade wobbled in the knife body when closed. Back it went. I’m still waiting for a replacement. It’s made in China.
The first was a large Buck-110-style Schrade folding hunter with stunning stag grips. The knife arrived and I loved the look of it, but it had a defect. With the blade closed, it wobbled inside the knife body. In my opinion, it should have no side-to-side play, so back it went. I don’t want my money back; I just want a good knife. We’ll see what happens.
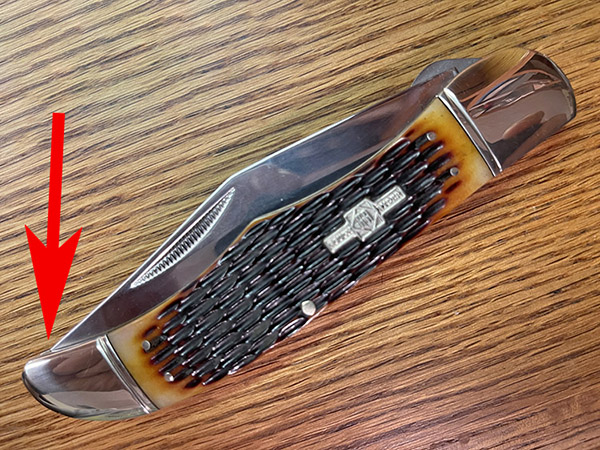
The Rough Rider Large Hunter. I love the design, but the knife is no good. The tip lies above the line of the knife body when the knife is closed. Muey malo, mi amigo. This is also a Chinese knife.
The next was another beautiful large hunter, this time from Rough Rider. It’s a beautiful knife, but it arrived with a different problem. On this one, when the knife is closed the tip of the blade sits slightly proud of the knife body, and that means you can catch your hand on it. Who would think to check for this? Apparently, not the folks who manufacture the knife, and not the folks who sell them, either. I bought one from Amazon, and I returned it the next day. I wanted the knife, though, so I ordered it again from Chicago Knife Works. Wouldn’t you know it? The replacement knife had the same problem. Size notwithstanding, it’s an inexpensive knife, but apparently they’re all bad (at least based on my sample of two).
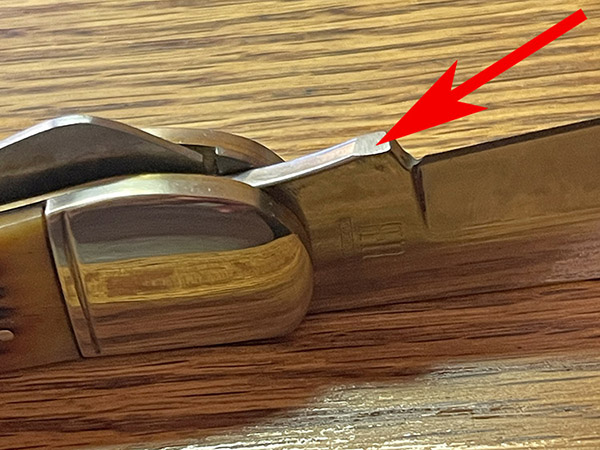
The Rough Rider’s kick. Grinding it down didn’t fix the problem.
I tried grinding down the Rough Rider’s kick (the part of the blade that controls how far it goes into the knife body when it closes), but that didn’t fix the problem. It’s an inexpensive knife (only about $15) and I’m not going to bother returning it. I’ll just look at it from time to time. It will remind me that I’m not as smart as I sometimes think I am.
Stay tuned, my friends. There’s more coming your way.
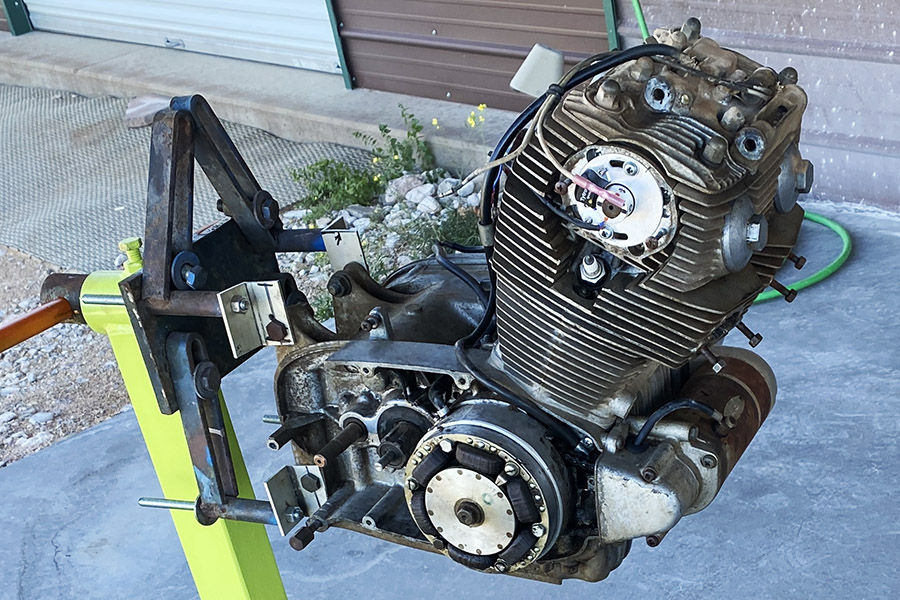
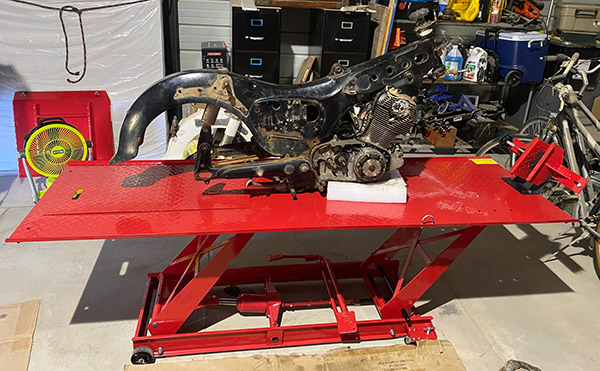
The Dream is perched on the new Harbor Freight lift and slowly coming apart. I’ve been busy with other projects so don’t freak out if it seems like progress is slow. It’s not me. It’s the environment I work in.
This installment involves a bit of inventory control. I need a decent front rim but all the ones online look just as bad as the rim I have. The parts bike front rim is bad too. They are sturdy and run true but lots of surface rust makes them look bad. I can get new rims on eBay, sold in pairs for around $200 delivered, but I only need one rim. Anyone want to form a syndicate and go halvies on some 305 Dream rims?
$20 kickstand. Sometimes I do it the easy way.
Both of the Dreams were missing their side stands and I debated making one from scratch. Just for kicks I went on eBay and some hero had a side stand for $20 so I bought it. It’s kind of like cheating but It would take me two days to make a stand.
Hopefully these seals will work, keeping the oil inside where it belongs.
I’ve also ordered a set of engine seals. I’ll have the engine side covers off to free up the clutch plates and clean the centrifugal oil filter can. Also I need to remove the alternator to gain access to the starter clutch as it’s hit and miss. I figure it’s a good time to replace the seals. The only one leaking at the moment is the shift-shaft seal but you know how it goes with old rubber. Twenty miles down the road another seal will start leaking. Then another.
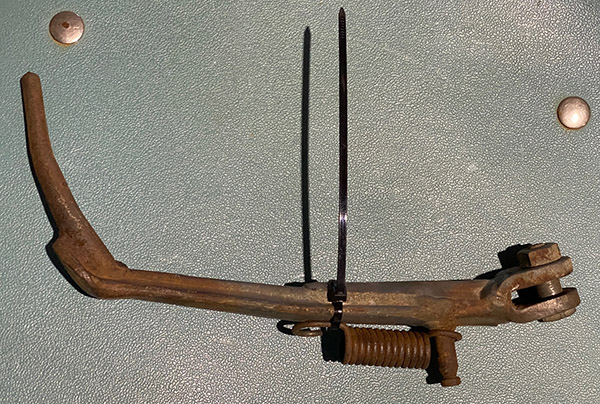
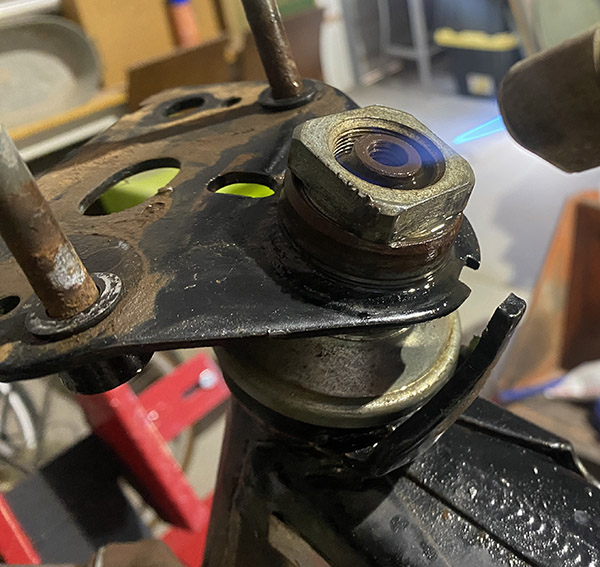
Deez Nuts were tight as hell. It took me two days to get them loose.
Getting the Dream’s steering stem apart was an Ossa. The top lock nut was knitted to the cone nut and the thing was tight as hell. Much hammering, heat and penetrating oil was used over the course of two days. The steering stem nuts finally unwed and spun off by hand. All the bearings and races look good with no divots or flat spots to cause erratic steering. There was even soft grease still inside! Impressive for a 63-year-old motorcycle.
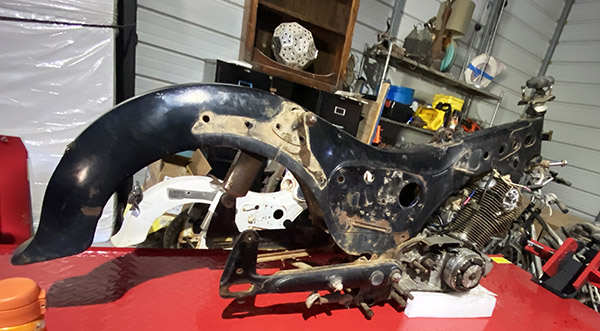
The Dream on the maiden lift.
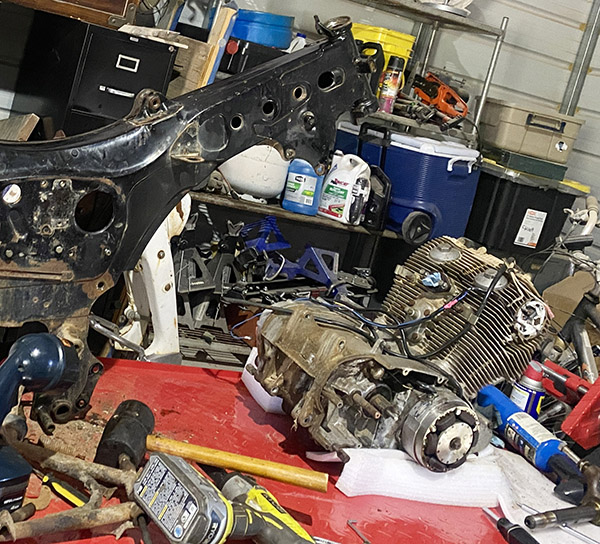
I’ve got the frame off the engine now. It’s a fairly lightweight sheet metal construction. Kind of like a monocoque Norton but with a separate fuel tank. Honda copied a lot of ideas from German and British sheet metal frame manufacturers.
The Dream frame is light. Easy to lift off the engine for an old man.
The frame has a few dings to fix and the Dream is made from pretty thick metal. The dents are hard to get behind to push out. I’ll try the painless/paintless dent remover but I don’t hold out much hope as the frame is twice as thick as gas tank metal. If that doesn’t work I’ll get a stud welder and pull the dents with a slide hammer.
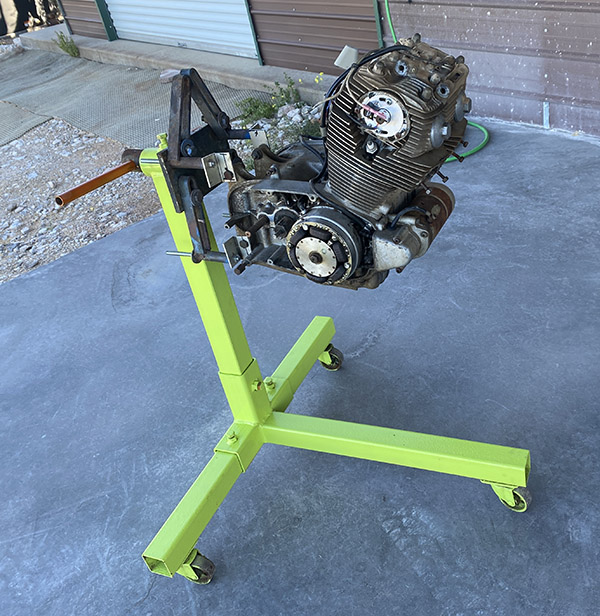
Kind of Kawasaki green for the new paint on the stand. Almost safety vest green. I had a can in stock.
Since I have a new, shiny lift I decided to clean up the old, rusty engine stand to match. I’ve had this stand since the late 1970’s and it’s had everything from a 4-Cylinder Volvo marine engine, many Chevy small blocks and a big, heavy, Ford 427-inch OMC inboard strapped to the thing. The big Ford was pretty bouncy. With the cast iron, water-cooled exhaust manifolds the thing probably exceeded the stand’s weight rating by 300 pounds. I used a 2×4 in the front to help stabilize the engine.
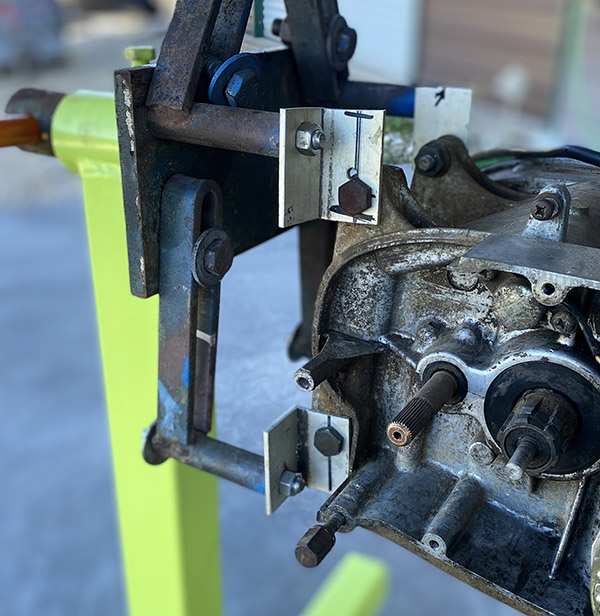
A few aluminum tabs and the Dream engine bolted right up. I’m going to do this method on the next MC engine I work on.
In all those years this will be the first motorcycle engine I’ve had on the stand. It makes everything easy with the mill at hip level. You can rotate the engine 360 degrees by spinning the T-handle. Which begs the question: why didn’t I think of this before?
I’m thinking heavy metallic with candy-copper followed by 2K clear. What are the odds it won’t bubble?
I hear you: not much progress but I’m a bit lame right now and taking it easy for a week or so. What about a 3-part metallic orange for a color? Too much? Atomic Green? Black, red or white is boring.
A few months ago Sue and I visited the Jameson Classic Motorcycle Museum in Monterey, California, for a Motorcycle Classics “Destinations” article. It was a marvelous museum in a marvelous locale, we had a wonderful time, Motorcycle Classics published the article, and I first learned of Emma Booton. Staci Jameson, heir to the Jameson museum collection, explained that several of the bikes on display had been lovingly restored by Emma Booton, whom Staci described as a “restoration goddess.”
I’m currently working on another Motorcycle Classics set of articles featuring how to do different motorcycle maintenance activities, which led me to seek Emma’s advice and, hopefully, to photograph her activities as she did some of the things I would be writing about. Well, I hit a home run there, too. Emma was very willing to support the activity, so Sue and I did another run up to the Monterey Peninsula to visit with Emma at her Moto Town shop.
Emma has a sense of humor, as this photo in her shop demonstrates. That’s Emma on the right.
Emma and I spent a great morning together as she worked through a series of activities on a vintage Honda dirt bike and I snapped away with my Nikon. Emma is a wonderful teacher with a delightful British accent and a very keen sense of humor. It was fun and I enjoyed every second of it.
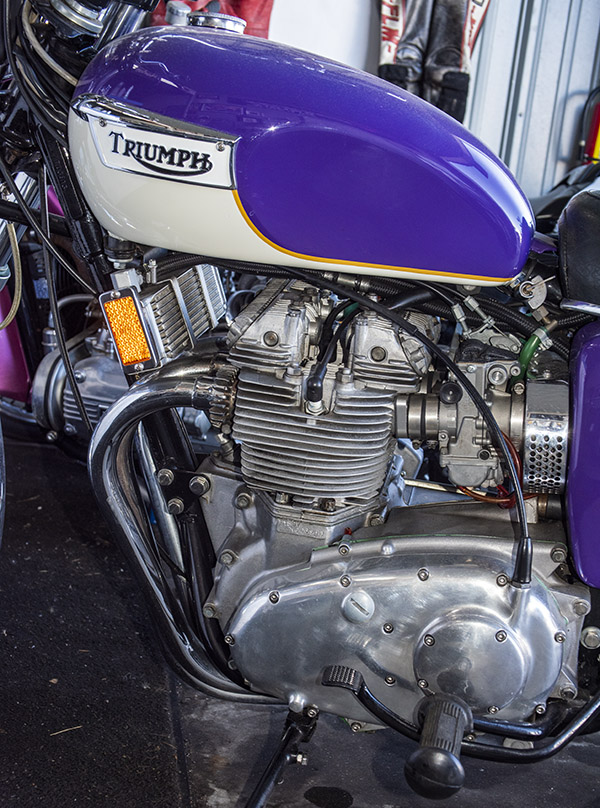
Emma Booton’s resto mod Triumph Trident. I want it.
While all this was going on, my eye wandered to the other bikes in the shop, and one in particular was visually arresting: A resto mod Triumph Trident. I asked Emma about it and learned it was one of her personal bikes. The bike has been poked out to 900cc, it has larger diameter forks and dual disk brakes, bigger carbs, transistorized ignition, a hotter cam, an oil cooler, and lots more.
I asked Emma if the colors were the stock Triumph purple that was available in those early 1970s Trident days. I remembered that Triumph had a purple, but Emma’s bike was much more vibrant than any Triumph I remembered. “No, dear,” came the answer in that vibrant British accent (aurally matching the Trident’s stunning purple paint). “I knew I wanted purple, but not the Triumph purple, which wasn’t very uplifting. I looked and looked and looked and couldn’t find exactly what I wanted, and then I saw it…the purple on a Roto Rooter truck! I call it Roto Rooter purple!”
Call Roto Rooter, that’s the way…
There weren’t any Roto Rooter trucks nearby, and on the long drive back down to So Cal, Sue and I diligently scanned the other cars and trucks we saw on the road, but we didn’t see any Roto Rooter vehicles. A quick look on Google Images struck paydirt, though, and we saw it. Emma was right. She nailed it: Rotor Rooter purple!
Emma and yours truly.
I would dearly love to own Emma’s Triumph. Not many motorcycles reach out and grab me like that, but the Trident you see here sure did. It’s a good feeling.
One of the many red lines crossed on the way to becoming moto-saturated is owning a motorcycle lift. If a rider finds that he needs a lift then things have gone too far and he needs to reevaluate what the hell is actually up.
I’ve wanted a lift for many years but haven’t been able to justify the expense or space requirements a lift brings to the table. (ha!, get it? Table?)
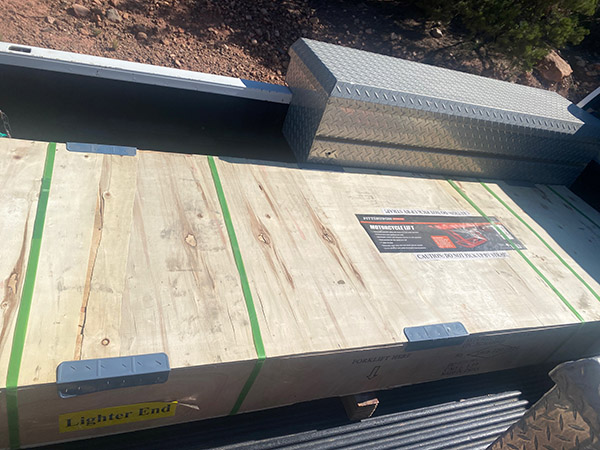
The lift comes securely packaged in a wooden crate. If you know the price of wood nowadays the lift is almost free!
This particular lift from Harbor Freight cost around $300 when it first appeared on my radar 30 years ago. At the time my shop was a 10×10 metal shed and there just wasn’t enough space to park the thing.
Turns out it was a good thing I didn’t take the plunge as my shed in Florida was flooded several times and the lift would have corroded away. (Ha! Get it? Plunge-flooded? I kill myself!)
My recent acquisition of a pair of Honda Dreams and subsequent crawling around on battered knees got me thinking about a lift again. I have the room now. Floods are unlikely where my shop is situated and the HF sale price of $399 defied quantitative easing, inflation-tracking and recent tariffs on China. In short, $399 seemed like a pretty good deal.
You definitely get your money’s worth in weight as the lift was a heavy bitch to load and unload. Plan on having a few strong backs to move the lift. The guys at Harbor Freight loaded it into the truck with a forklift but I don’t have any strong backs available at home. I had to slide the crate out of the truck and let it fall the last two feet from the tail gate. It wasn’t really a free fall, I had a floor jack mid-crate to act as a fulcrum when the crate cleared the tailgate. Think of it as a controlled crash landing. The crate took the fall in stride and its contents were undamaged by my rough handling. Plus the lift is a sturdy thing, it would take some doing to bend it.
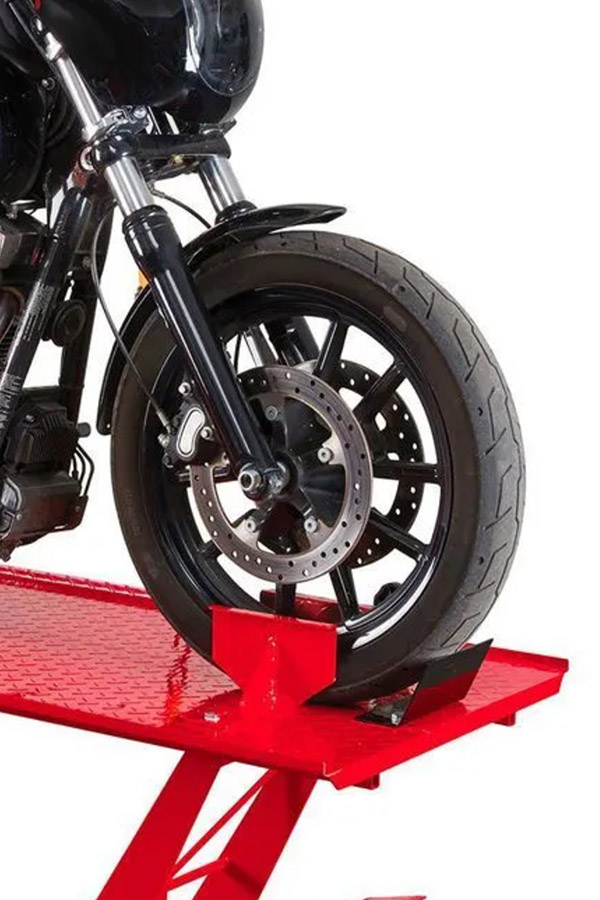
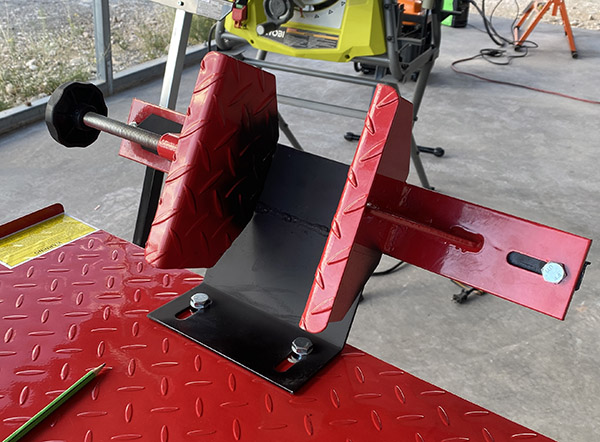
In this Harbor Freight photo you can see how the clamp won’t do much for holding the motorcycle upright.
The lift comes 99% assembled with only the wheels, tie down points and tire vise to bolt on. If you’re handy 1/2 hour should see the project through. There are a few niggling issues though.
Like most things from China Freight the lift needed a few modifications. It goes with the $399 price point.
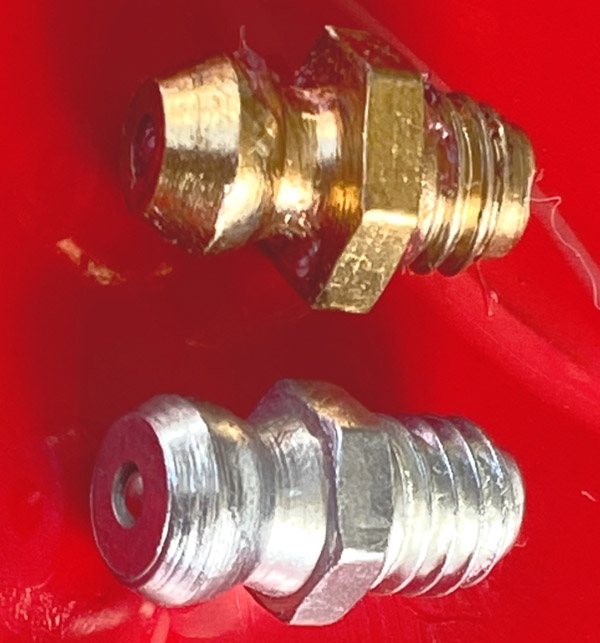
Slightly reduced nipples to go with the reduced price. If you want to grease your new lift you’ll need to replace the gold Chinese nipples with good old USA style, silver Chinese nipples.
China must have different size grease guns because all of the grease fitting were slightly undersized and didn’t fit a US style grease gun. Attempts to grease the various grease points just pumped gook all around the nipple. I replaced the China-sized nipples with US-sized nipples and the pressurized grease flowed to the desired locations with no ooze-out around the fitting.
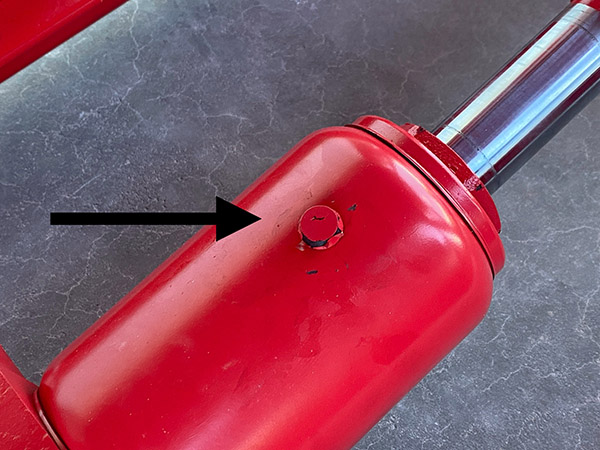
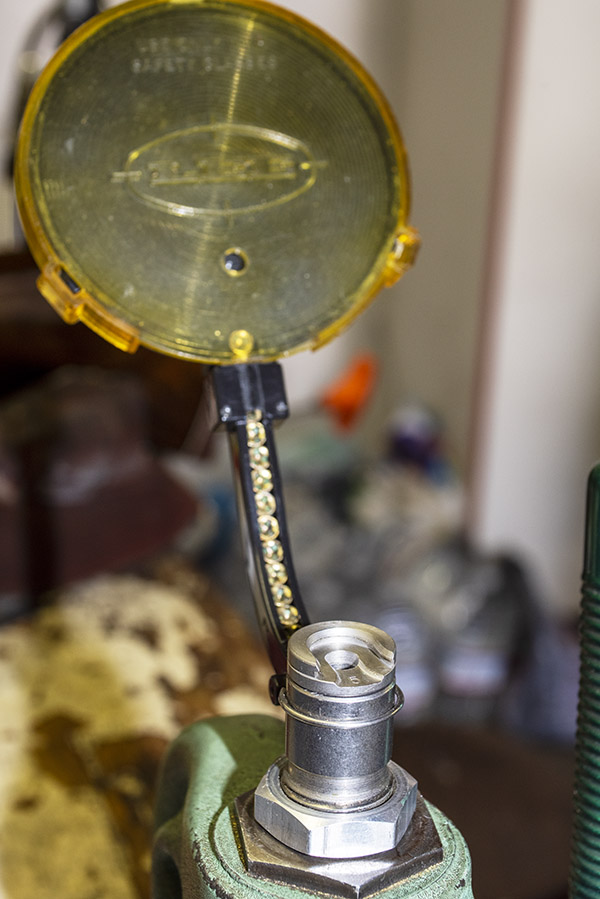
This rubber plug is where you add oil to the pump. Warning: it’s a bear (like Ossa!) to get back in the hole.
The owners manual that came with the lift recommended checking the hydraulic oil in the ram. It was slightly low so I put in a few ounces of fork oil. That was the easy part. Getting the little rubber plug back into the ram housing was a struggle with the lift in the lowered position. I finally gave up and raised the lift for access. It was still a PITA to get the plug back in.
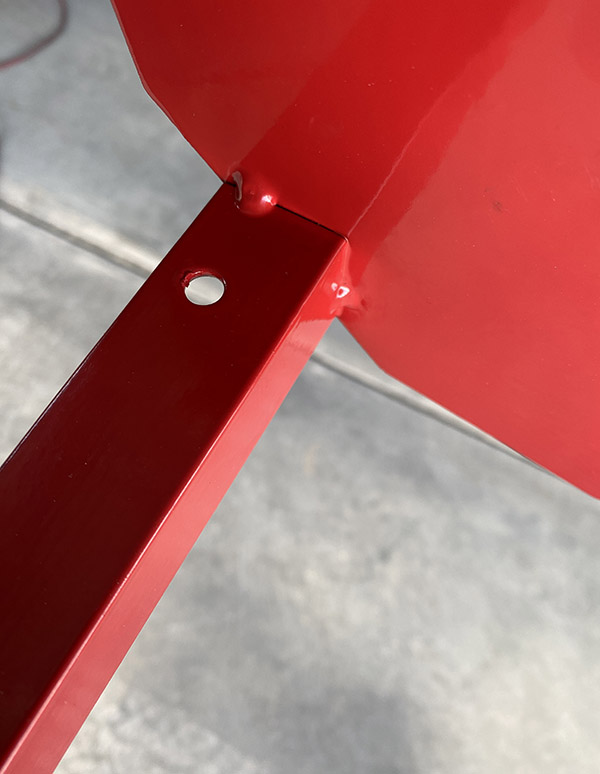
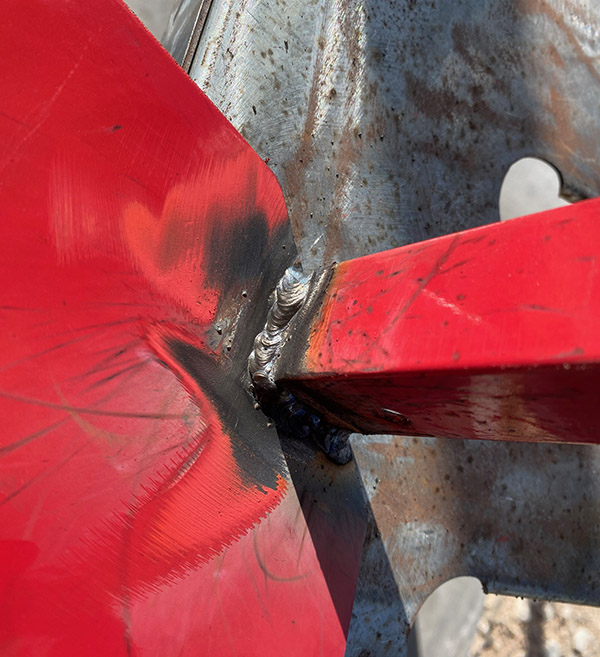
Not much weld on sliding part of the clamp.I stuck some more welding wire to help hold the slider togetherHere it is in action. I’ve yet to clamp the rest of a motorcycle to the table so it may fall apart on me.
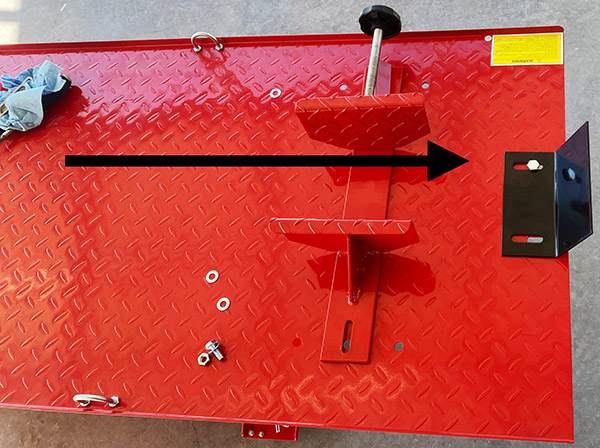
As delivered, the tire clamp installs in the wrong place. Down on the floor, it doesn’t provide much resistance to tipping leverage. There are many internet solutions for this issue but all of them required spending additional money. I figure at $400 you shouldn’t need to buy more stuff just to keep the bike from falling over.
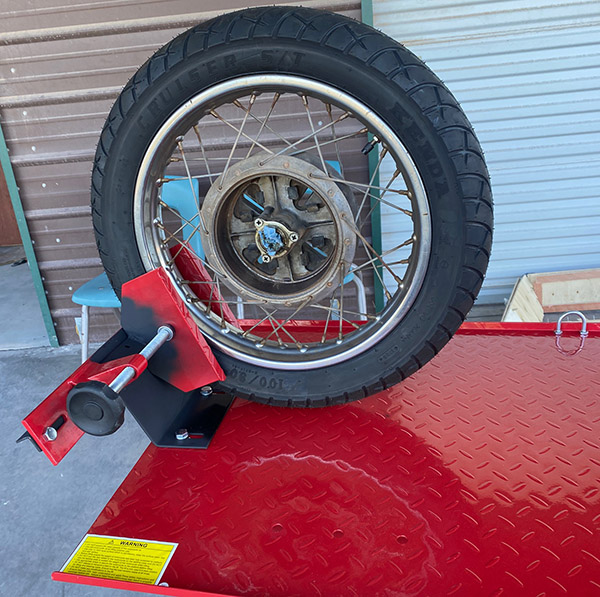
As delivered the tire clamp is too close to the fulcrum of tip-ology.If all you have is a hammer every problem is a nail. It’s the same when you get a welding machine. I added the tire clamp to the top of the tire stop to gain better leverage.The repositioned tire clamp gets a higher grip for less tip.
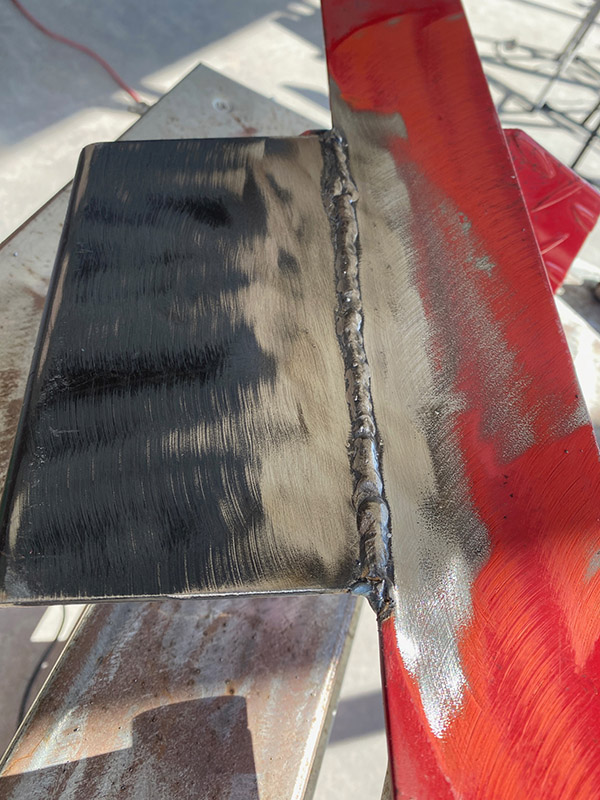
The thriftiest way to fix the tire clamp is to relocate the thing on top of the tire stop. This gave me a chance to practice poor welding on a mission critical part. The sliding part of the clamp was lightly welded so I slathered on a bit more metal.
Once the clamp was in place I added a piece of angle iron to prevent jaw-spread, a common occurrence among older motorcyclists. Drilling two extra holes in the angle iron gave me another, more forward attachment point for tie down straps.
This all sounds like a lot of work but it took maybe 2-3 hours and that number includes thinking about things. I’ve got the Dream on the lift for its maiden voyage and it seems to be stable. I give the lift 5 stars for value and 2 deep vein thrombosis’ for HF still not quite getting it right after all these years. If you need a motorcycle lift and don’t mind tinkering and welding a bit the HF lift on sale is hard to beat.
The ’62 Dream gets the honor of being the first to sit atop the HF lift.
Part 1 of this series took us through brass preparation, Part 2 took us through priming, and here we are at Part 3, which discusses powder charging, bullet seating, and case mouth flare removal.
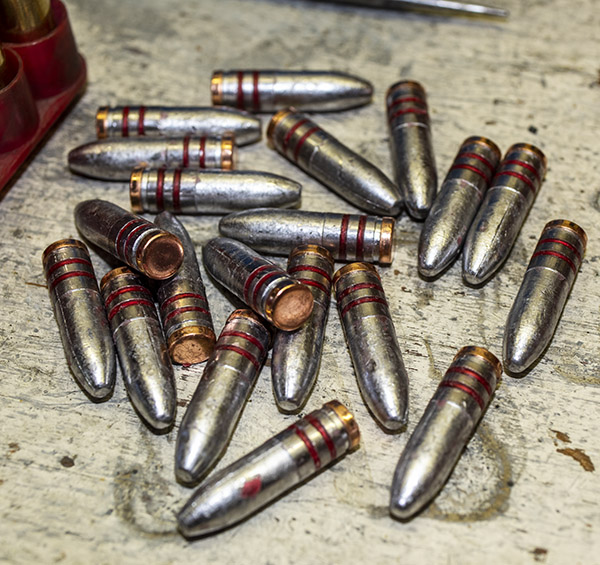
Cast 200-grain bullets, lubed, sized, and gas checked. These are from the Lyman 314299 mold.
I had previously mentioned that I shoot cast bullets in my military surplus rifles, and in particular, I like a gas-checked 200-grain cast bullet. Good buddy Roy Hursman cast these for me. Roy retired and sold his bullet casting gear. I hope I’m able to find somebody that does as good a job as Roy.
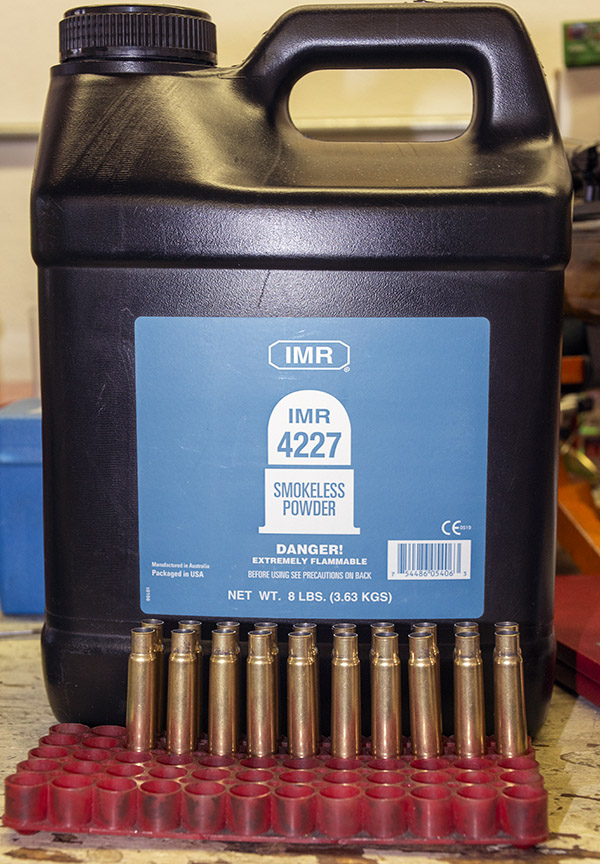
This 8-lb bottle of IMR 4227 propellant is good for nearly 2,700 rounds of .303 British ammo.
I use different powders in my rifle cast bullet loads. A good one is IMR 4227, which is what I used for this .303 British load. The secret sauce recipe is 21.0 grains of IMR 4227 with no fillers. I’d like to tell you that I developed this load after extensive testing, but I can’t. It was next to what the Lyman cast bullet manual said was the accuracy load with this bullet and IMR 4227 was in my ammo components locker, so it got the nod, and it worked. I felt no need to experiment any further; the load worked well and was very accurate. This 21.0-grain IMR 4227 load is near the lower end of the loads listed in the Lyman manual. The bullets exited the muzzle at about 1600 feet per second (as tested with my Garmin chronograph), and that’s good enough for me.
I use an RCBS powder dispenser, and once I had it set up to throw 21.0 grains of IMR 4227 propellant, there was no need to weigh the charge for each cartridge because the powder meters so well. I loaded the 20 rounds like it was pistol ammo, placing each empty brass case beneath the dispenser, charging the case, and moving on. After I had charged all 20 cases, I threw another charge into my scale’s powder cup and weighed it again to make sure the dispenser was still on the money. It was (the powder dispenser released exactly 21.0 grains).
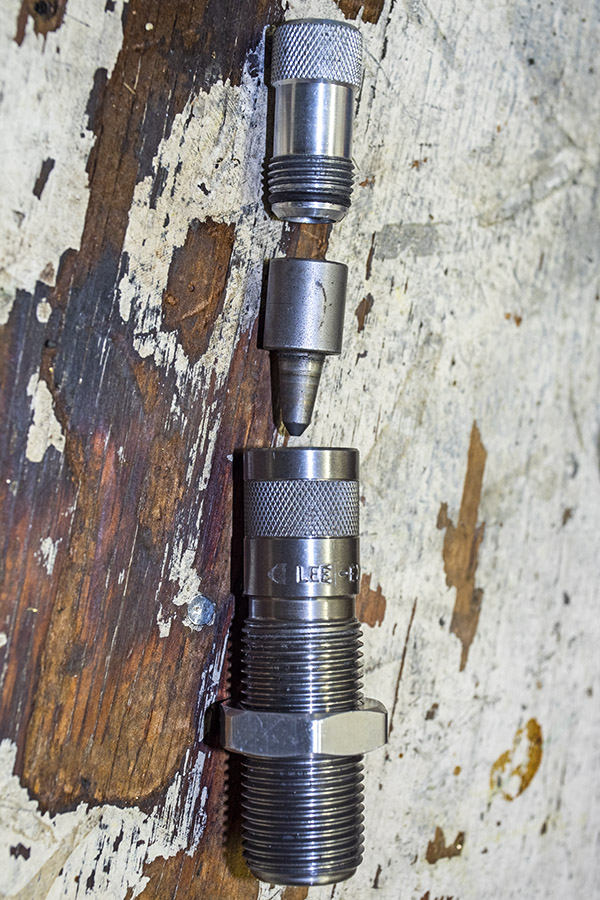
It was time to turn to the Lee Ultimate 4-Die set’s bulleting seating die. The first step was to install the bullet seating die in the press and screw it partially in.
The Lee .303 British bullet seating die. It includes a feature for a roll crimp if so desired. The knob on top adjusts the bullet seating depth.
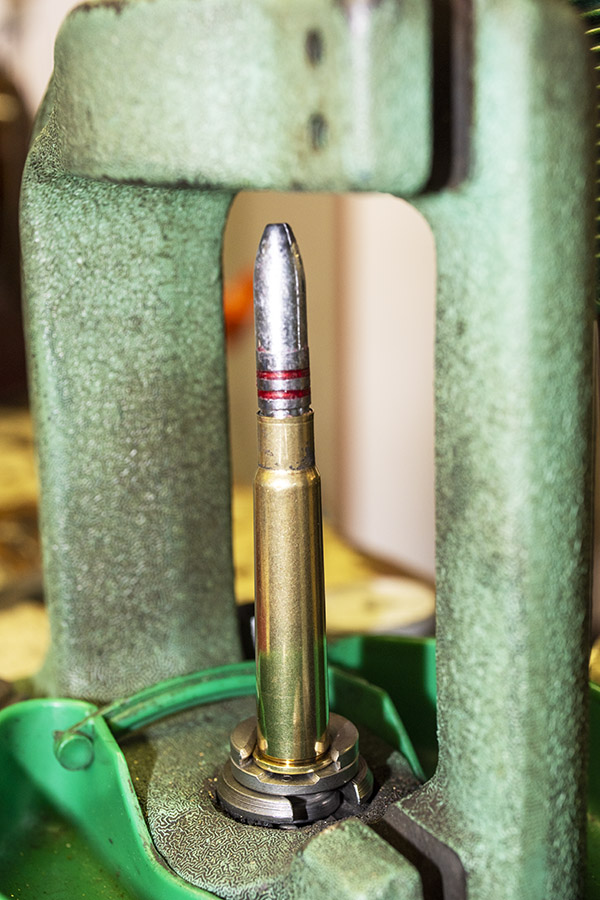
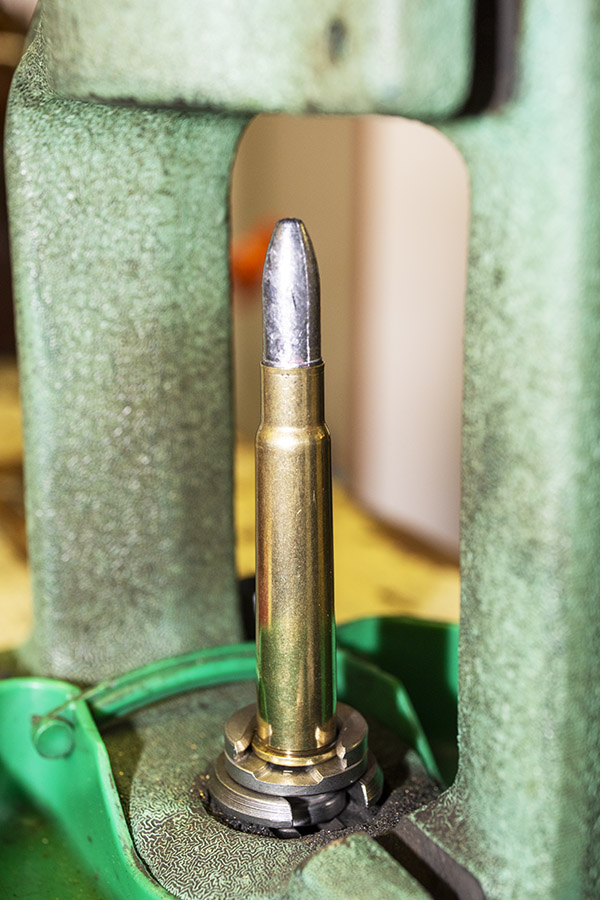
I placed the first bullet over a charged .303 British case (charged with IMR 4227, that is) and raised the ram in the press. Observing where the bullet went (i.e., how deeply it seated in the case), I lowered the die in the press a bit more, repeating the process until I attained the desired bullet seating depth. I wanted the bullets to be seated such that the cartridge mouth was just behind the bullet’s first driving band.
A cast bullet about to be seated in the cartridge case.A seated bullet, positioned exactly where I wanted it.
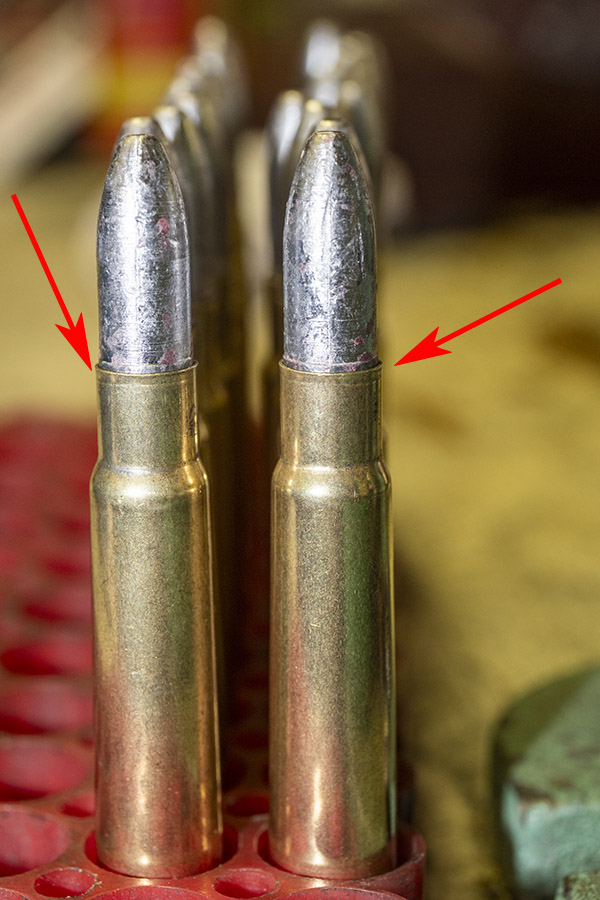
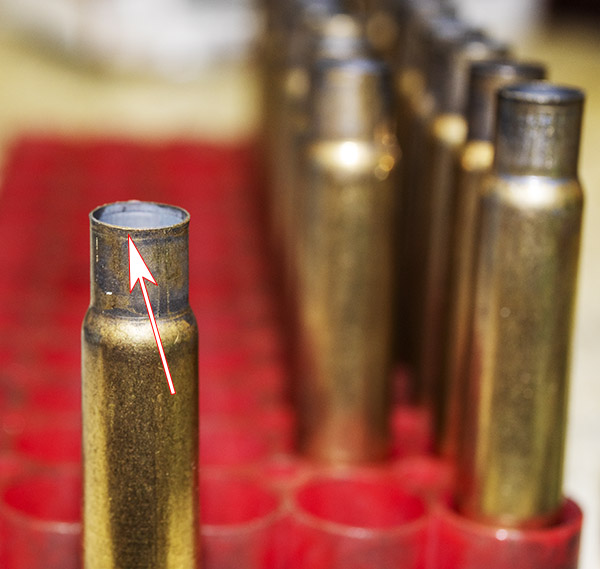
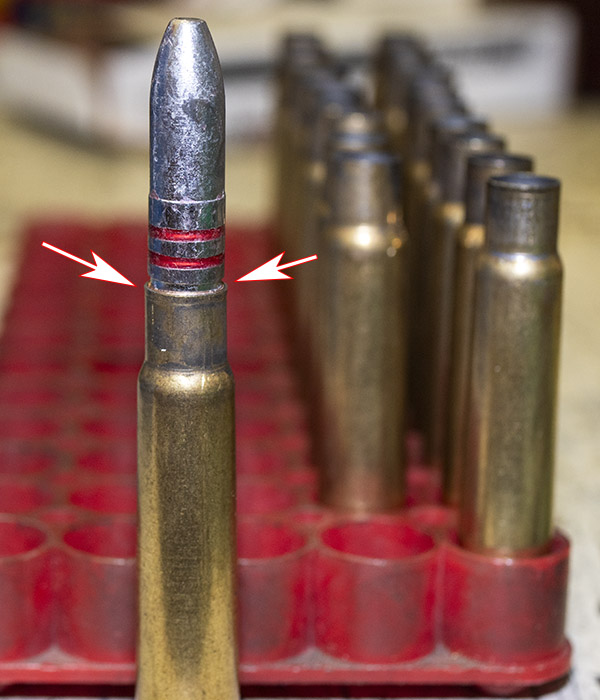
After seating all 20 bullets in the 20 charged .303 British cases, it was now time to remove the case mouth flare we induced in Part 1 of this series. I probably could have skipped doing so, because I did as I advised in Part 1 (I flared the case mouth just enough to allow the bullet to enter). Even without removing the flare, the cartridges would chamber because the flare was so small. But I like to go for the extra step of removing it just to make sure.
The red arrows point to the remaining flare after seating the bullets. This will be removed with the Lee factory crimp die in the next step.
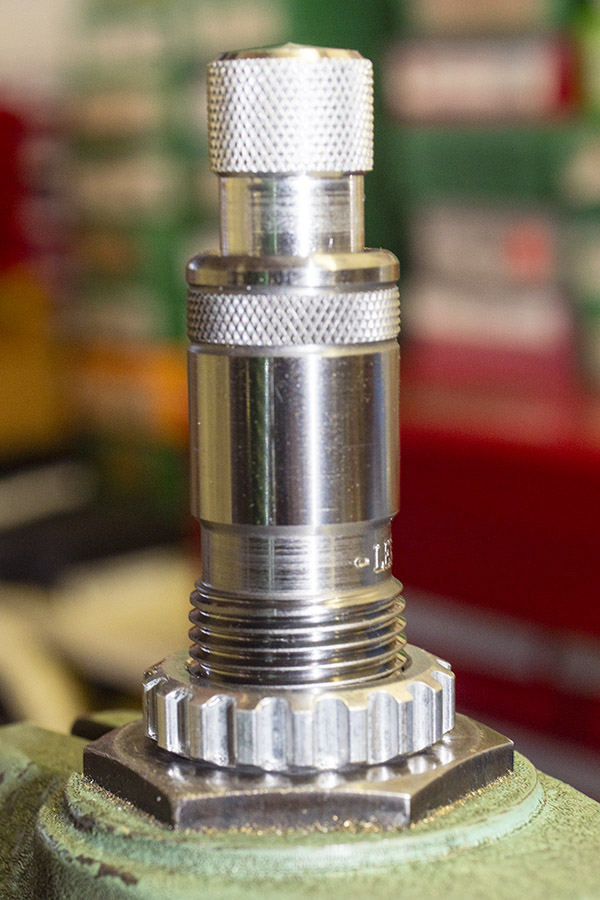
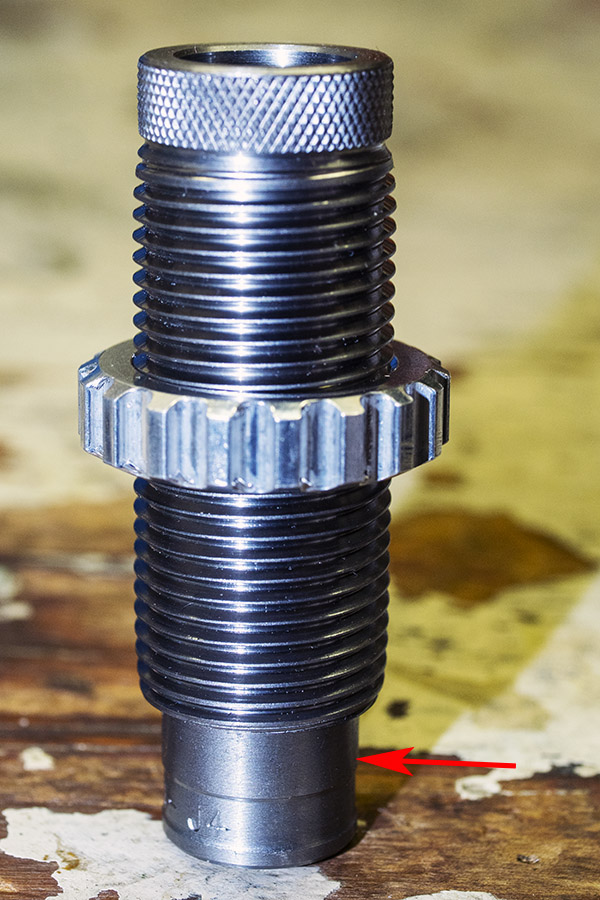
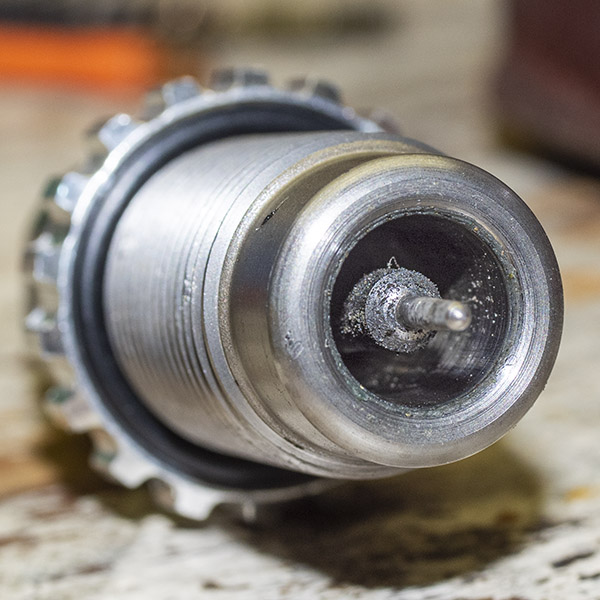
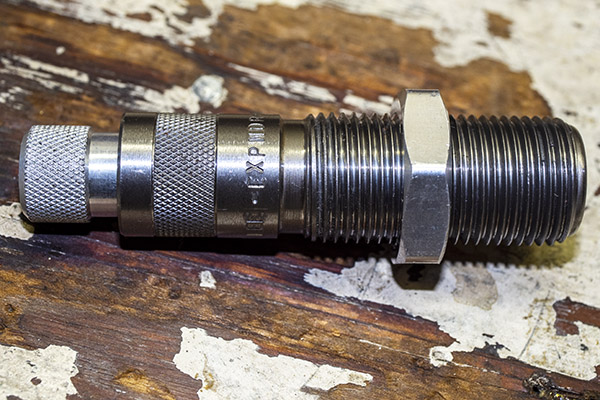
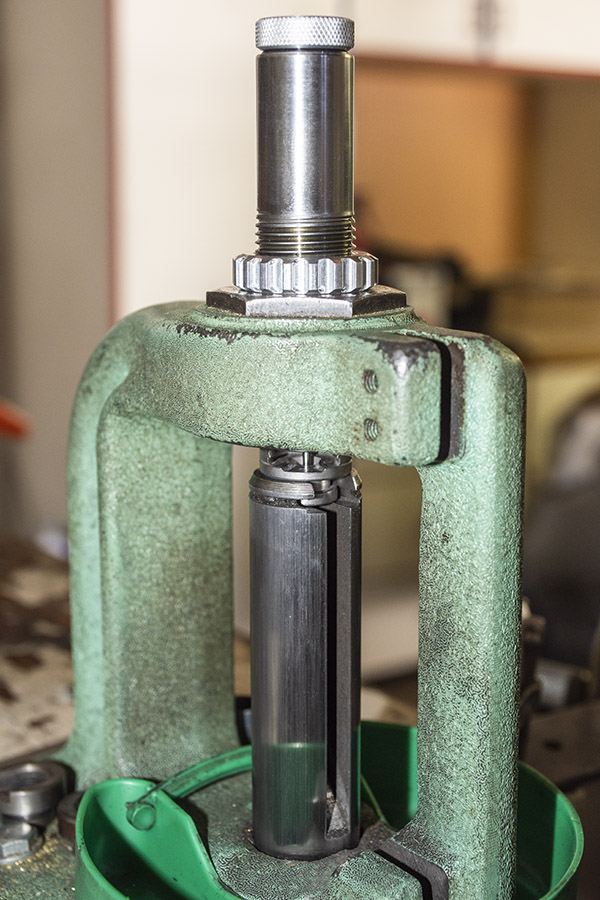
Lee’s factory crimp die (the fourth die provided in their Ultimate 4-Die set) is what I use for removing the flare. It can also be used (as the name implies) for crimping the case mouth on the bullet.
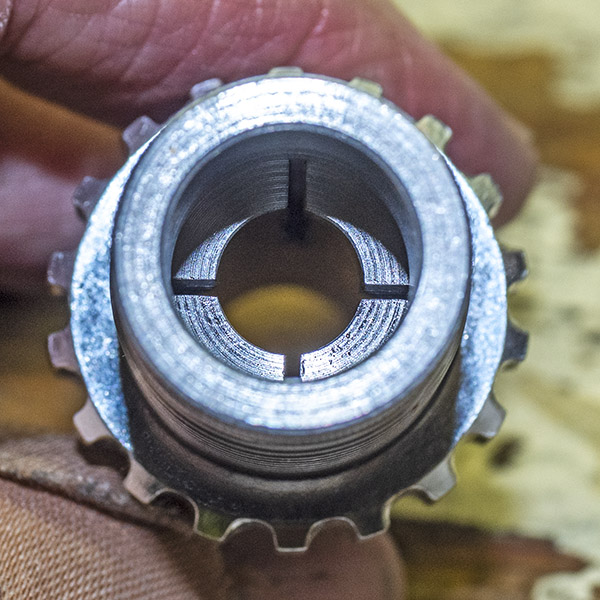
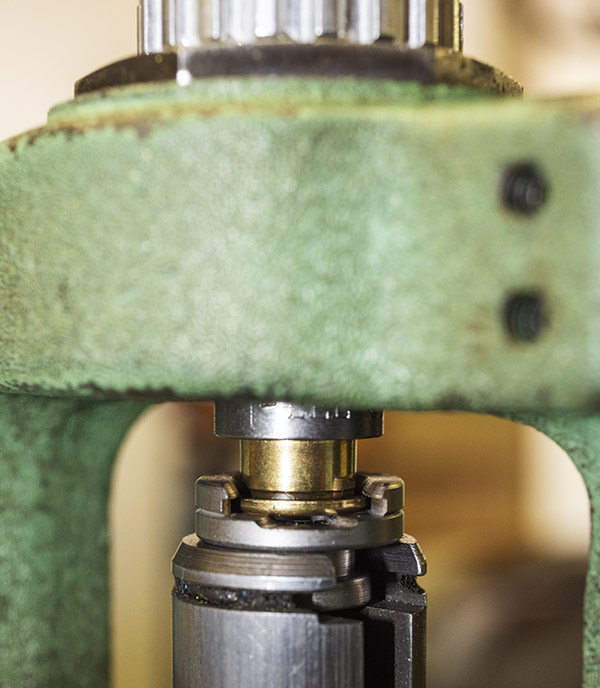
Lee’s factory crimp die. The arrow points to the cylinder that is pushed up into the die body by the shell holder when the press is fully raised. By adjusting how far the die body is screwed into the reloading press, you can adjust how much crimp is applied.The view from above the Lee factory crimp die. The cylinder shown in the photo above (see red arrow) cams into the four circumferential collets shown in this photo. These four collets apply force to the cartridge case. You can adjust the die to apply no force, just a small amount of force to remove case mouth flare (as I did to my .303 British cases), or to apply a crimp.
By adjusting how far the die is screwed into the press, you can control how much force is applied to the case mouth. You can screw it in just enough to remove the case mouth flare (as I did), or you can screw it further into the press to apply as firm a crimp as you want around the case mouth.
The Lee factory crimp die does not apply a roll crimp; it applies a concentric circular flat crimp around the case mouth periphery. Some folks think this makes the Lee factory crimp independent of case length. I don’t agree with that. On longer cases, the Lee factory crimp will press more case material radially inward than it would on a shorter case (theoretically, if the case were trimmed too short, the Lee factory crimp would apply no crimp). But it’s still more controllable than a roll crimp, and the amount of roll crimp applied is far more sensitive to case length than is the Lee factory crimp. And if you wish to apply a roll crimp instead of the Lee factory crimp, you can still do so with Lee bullet seating die. Just screw the die body in further (while backing off on the bullet seater on top of the die) until the reduced diameter step inside the die body contacts the case mouth enough to provide a roll crimp.
I ran all 20 cases through the Lee factory crimp die after adjusting the die. I adjusted the die to apply just enough radially-inward force to remove any remnants of flare from the case mouth.
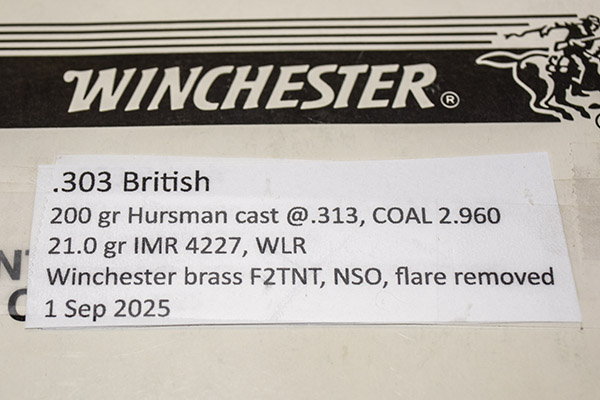
After completing all 20 .303 British neck-sized cartridges, I put them in a box and applied a label, as I do with all my reloaded cartridges.
Reloaded, boxed, and labeled. “F2TNT” is my code for fired two times, not trimmed. “NSO” means neck sized only.
How did this ammo shoot? It did well, as the target below shows. I can’t show that my neck-sized-only reloads are dramatically better than full-length resized ammo, but I know I have the other advantages offered by neck sizing (not having to lube the cases, a quicker reloading process, and longer brass life). I am quite pleased with my Lee .303 British die set.
A perfectly centered, tight, 3-shot group at 50 yards, with light recoil and good accuracy. The Lee Ultimate 4-Die set does what it is supposed to.
More reloading, hunting, and shooting stories are here!
In Part 1 of this three-part series on using Lee Precision dies to reload the .303 British cartridge, we covered resizing, decapping, full-length resizing, neck sizing, and flaring the case mouth. Part 2 continues the reloading process.
The next step for me (after the brass is resized and flared) is case cleaning. I use a Frankford Arsenal vibratory polisher. I’ll drop the brass in it and do other things for an hour or so as the brass is polished.
Resized cases in the Frankford Arsenal vibratory polisher. The media is made from corn cobs. I add Dillon’s polishing liquid to it prior to starting the polisher.Finished brass. I like it to be clean and well polished both for aesthetics and for accuracy. When the inside of the case neck is polished, it is free of any lubricant from the resizing operation, and case neck grip (or tension) will be consistent from round to round. Case neck tension variability will increase group size.
After the brass comes out of the polisher, I inspect each one to make sure there are not bits of the polishing media stuck in the primer hole. I’ve never tested to determine if this would interfere with the round firing or if it would cause a flyer, but it’s not the sort of thing that would help.
A primer hole with a bit of media stuck in it. Usually about 10% of the cases have media stuck in the primer hole after polishing. I push it out with a dental pick.A cartridge case with a clean primer hole (i.e., with no media stuck in the primer hole).
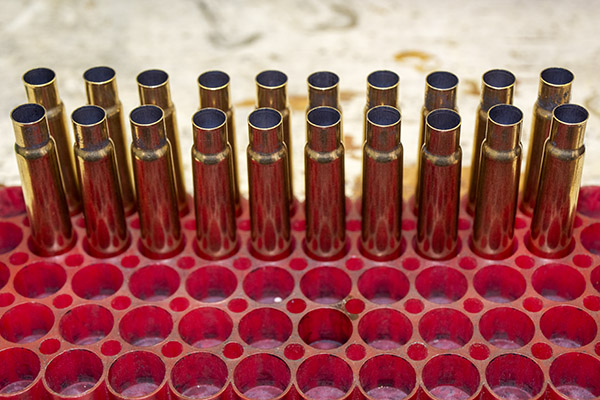
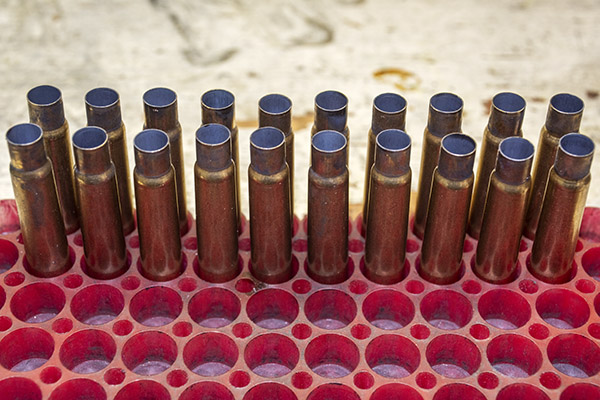
When all the cases are completely free of media and all the primer holes are clear, I’ll set them in a reloading tray, as you see below.
Twenty polished cases ready to be primed.
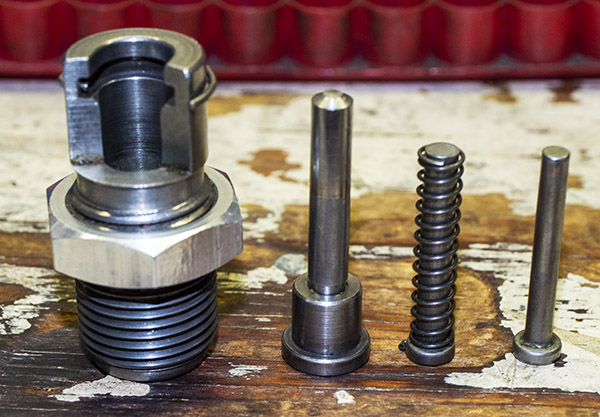
Next, I’ll prime the brass. There are a lot of tools available to do this. I use a Lee Auto Prime, an item that I bought a good 50 years ago. Remember that I mentioned that Lee gear is good? Lee no longer makes this item (I can’t tell you why) but they do have other priming devices available today. For me, this one just keeps on working, and I like how it works. It consists of three groups of parts: The primer tray and feed system, the case holder/primer seater assembly (it installs above the reloading press), and the ram that installs on the press ram.
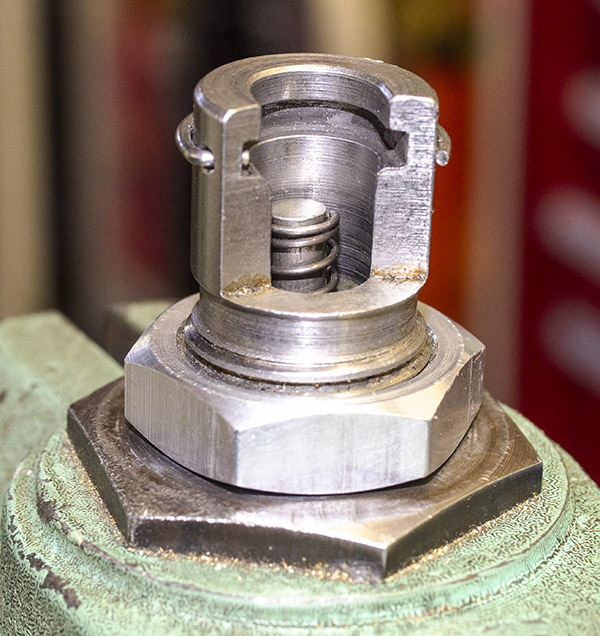
An old Lee Auto Prime, still in its original box. The two feed chutes on either side of the primer tray are used for either large or small primers. The primer seating assembly components are in the plastic container at the photo’s bottom.Lee Auto Prime components. From left to right: The die body, the priming ram, the two primer rods (one for small primers, the other for large primers), and the spring. The spring goes over priming rod selected for use (as shown here, the large primer rod). The priming ram is installed on the reloading press’s ram where the shell holder would normally be. One of the priming rods, with a spring over it, goes into the die body (see photo below).
I install the case holder/primer seater assembly on top of the ram, then I remove the shell holder on the reloading press ram and install the primer ram on top of the ram, and then I load the primer tray and feed chute.
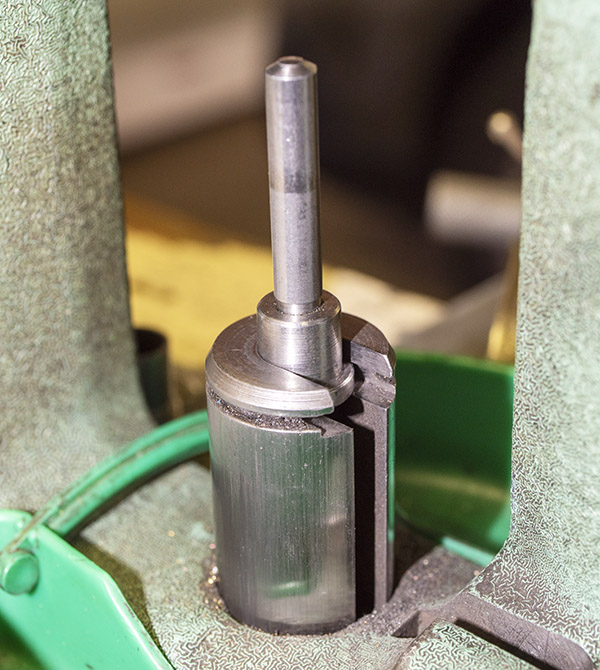
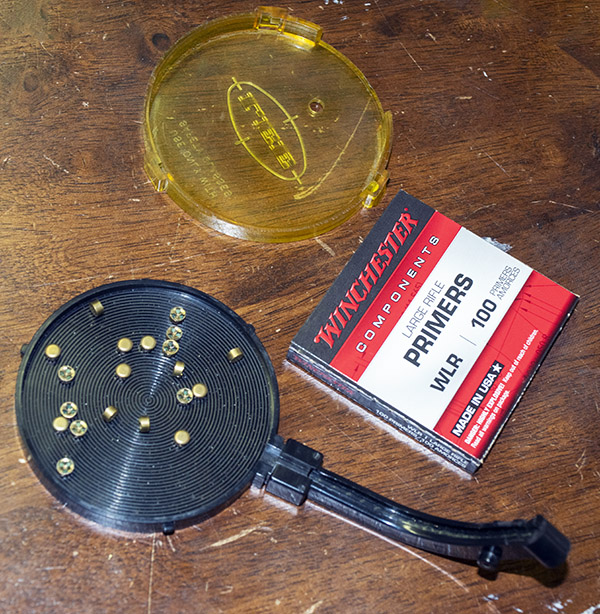
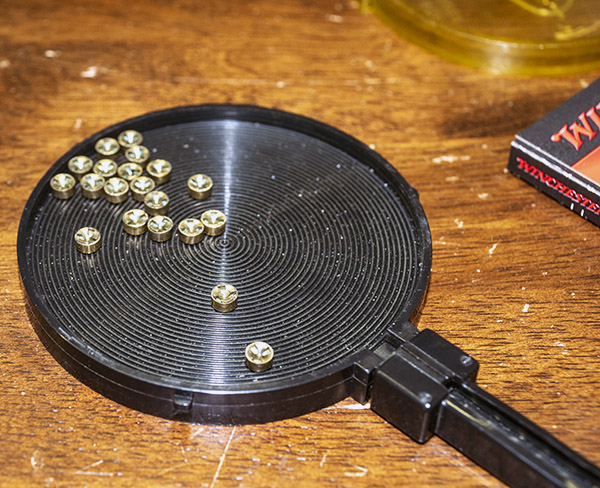
The Lee Auto Prime die body installed in the reloading press, with the priming rod and spring in place. The primer chute will go over the priming rod and spring, and the shell holder snaps into the die body over the priming rod and spring.The Auto Prime ram installed on the reloading press ram. It fits into the ram where the shell holder is normally installed.The primer chute installed on the primer tray, with 20 primers dropped onto the tray. Note that some primers are facing up, some are facing down, and some are on their sides.The tiny concentric ridges in the primer tray help to flip all primers such that they face up. By gently shaking the tray from side to side, all primers orient themselves to face up. If you shake too aggressively, you’ll drop some of the primers out of the tray. It sounds more complicated than it actually is, and after doing it once, you’ll get a feel for how much “shake” is needed.After getting all the primers into a face up orientation, I put the primer tray cover on the primer tray, and then use a toothpick or the previously-mentioned dental pick to obstruct the primer chute at the primer tray. Then, I’ll place the bottom end of the primer chute in the die body. Finally, I’ll slide the shell holder into the die body and remove the obstruction from the primer tray. The primers will slide down into the chute and the first primer will be in position over the priming rod.
Once the above is complete, I prime each case. I insert each case into the shell holder, and then gently run the press’s ram up. Doing so seats the primer. The beauty of this approach is you can feel each primer being seated, and the power of the ram makes sure each primer is fully seated. When the case is primed, I remove it and the primers in the chute slide down, forcing a new primer into position above the priming rod. I’ll repeat the process until all the cases have their primers seated.
Primed cases, ready to continue the reloading process.
After the above is complete, I’ll have a tray full of cases ready to be charged with propellant. We’ll cover that in Part 3.
One of my favorite rifles is the Enfield No. 4 Mark 2, a bolt action rifle just dripping with history and charisma. The No. 4 Mark 2 was the last in the Enfield rifle series, with a run of 59,000 produced by Britain’s Fazakerly armory for Ireland in the 1950s. It was the last Enfield in a long line of continuously improved rifle designs, and it includes a much-improved trigger design. Most of these Irish rifles were never issued and many were sold in their unfired, cosmoline-laden condition. Mine comes from that group. It’s the one in which I tested the reloaded ammo featured in this blog series.
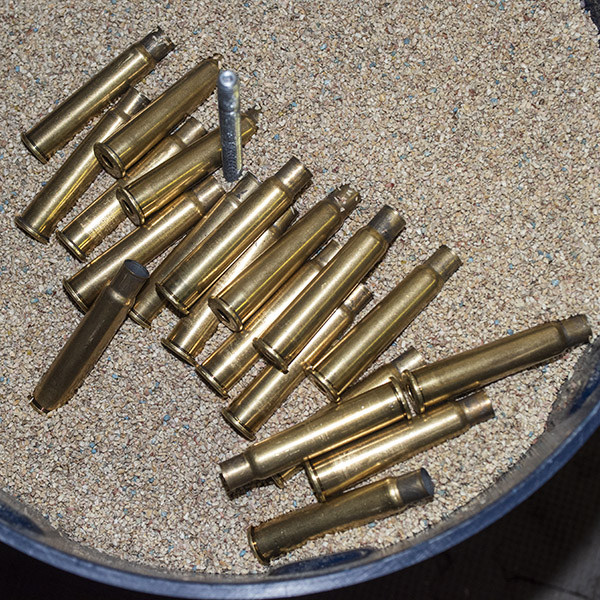
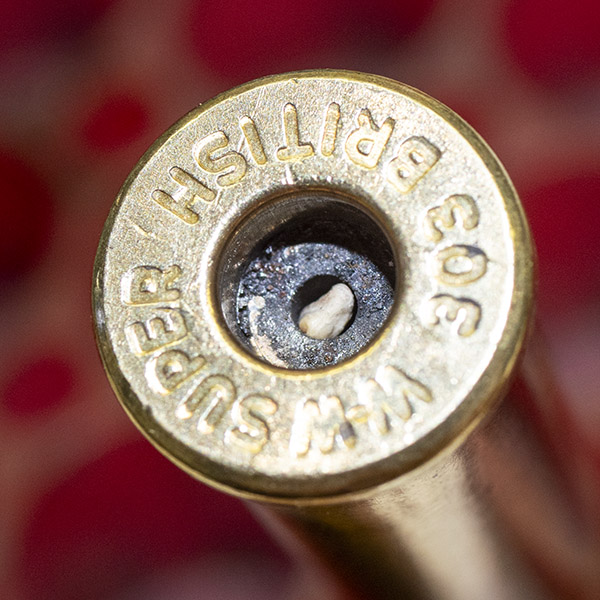
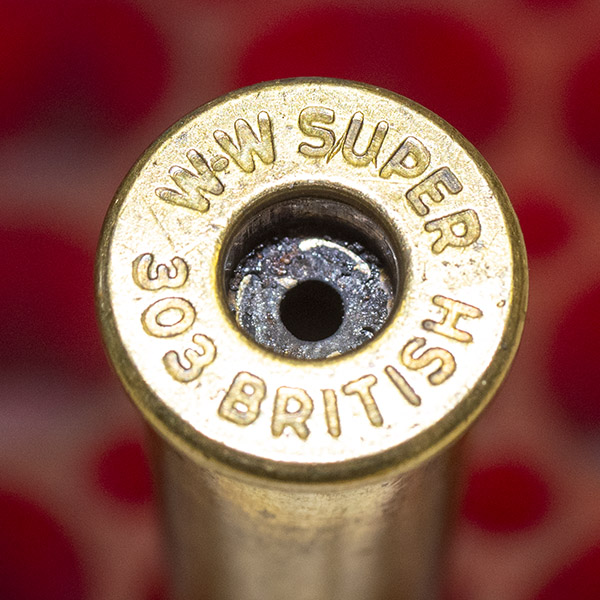
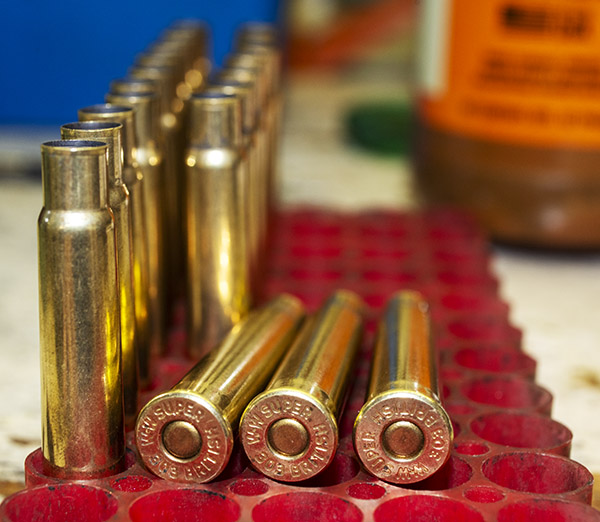
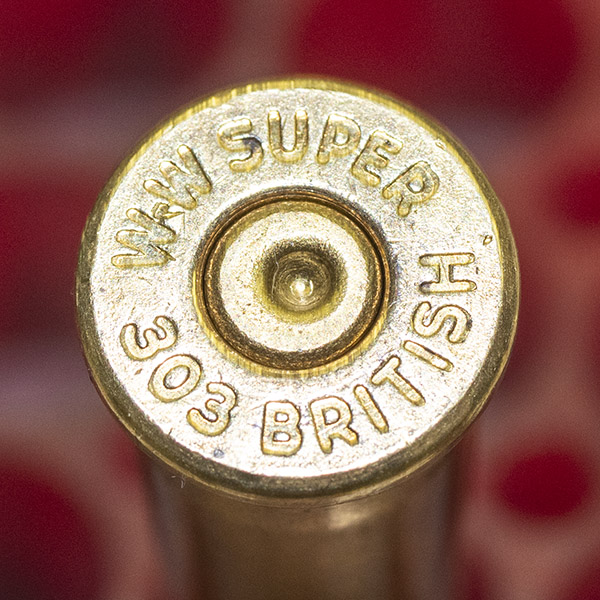
Once-fired .303 British cartridge cases. They almost look like scaled-down .375 H&H cases.A close-up view of the .303 British case after firing. These cartridge cases are ready for the reloading process.The headstamp. These are Winchester cases. Note the spent and indented primer, which will be removed in the case resizing process.
I have a stash of once-fired .303 British brass acquired from generous friends over the years. I will reload them with 200-grain cast bullets made by good buddy Roy Hursman, sized to 0.313 inches, which I also use in my Modelo 1909 Argentine Mauser and Mosin-Nagant rifle. I thought they might work well in the Enfield (and they did; I’ll tell you a bit about that here and provide much more detail in Part 3 of this series).
The cast lead bullets I load in my .303 British ammo. These weigh 200 grains. They have been lubed (the red grease in the lube grooves), gas checked (the copper cap on the base), and swaged down to 0.313 inches. They work great in the 7.65 Belgian Mauser, 7.62x54R Russian, and .303 British cartridges.
What I didn’t have in my shop was a set of dies in .303 British. I naturally turned to Lee Precision. I believe in Lee reloading equipment. I have their dies for the .22 Hornet, .22 250, .243 Winchester, 6.5 Creedmoor, .30 Carbine, .30 40 Krag, .300 H&H, .300 Weatherby, .38 Special/.357 Magnum, .44 Special/.44 Magnum, .45 ACP, .45 Colt, and probably a few others I can’t remember as I type this blog. I also use other Lee reloading equipment. I think their Classic Turret Press is the best reloading press of its type for loading handgun cartridges. The bottom line here is that I’ve never been disappointed with Lee products, and I say that as a guy who has been using Lee gear for 50 years.
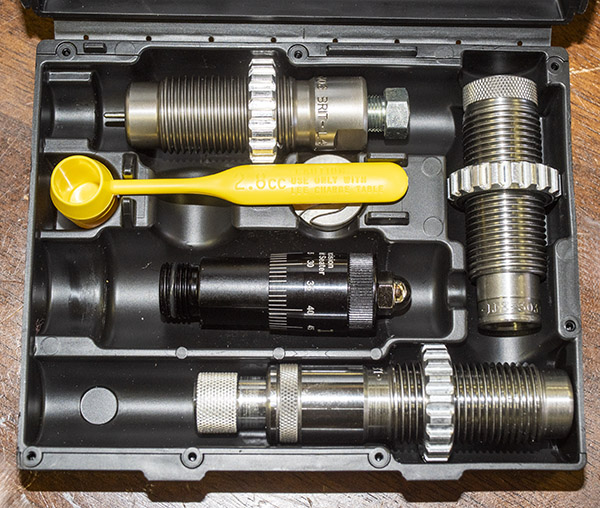
I ordered Lee’s Ultimate 4-die set, and what I received surprised me. I received the four dies (which I expected) and a micrometer bullet seating attachment (which I did not). Each Lee die set also includes a little packet of case lube for the resizing operation (it’s not shown in the photos below). It’s a nice touch; Lee basically gives you everything but the reloading press and the components (bullets, brass, primers, and powder) to load a specific cartridge with each of their die sets.
The Lee ULee Ultimate 4-Die set includes four dies normally included in a single box. My set included a micrometer bullet seating attachment not evaluated in this blog series (although I will evaluate it in a future blog). The fourth die (the collet die) was provided in a separate container (see below). In the photo above, we have the full-length resizing die (top), the bullet seating die (bottom), the factory crimp die (right), the micrometer bullet seating feature, the shell holder, and a measuring cup (not used by me). Lee also provides a small pack of case lube (not shown here).The Lee collet neck sizing die, used in lieu of the full-length resizing die to neck size the brass case.
I won’t get into the micrometer bullet seater in this three-part .303 British Lee die set review (that review will occur down the road a bit).
The Lee Ultimate 4-die set includes two resizing dies (a full-length resizing die, and a collet die for neck sizing only), a bullet seating die (that also includes a roll crimping feature), and a separate crimping die for applying what Lee calls a factory crimp. The die set also includes a shell holder (a nice touch, as other manufacturer’s die sets do not) and a powder scoop. I’ve never used the powder scoop; I use a more precise powder dispenser.
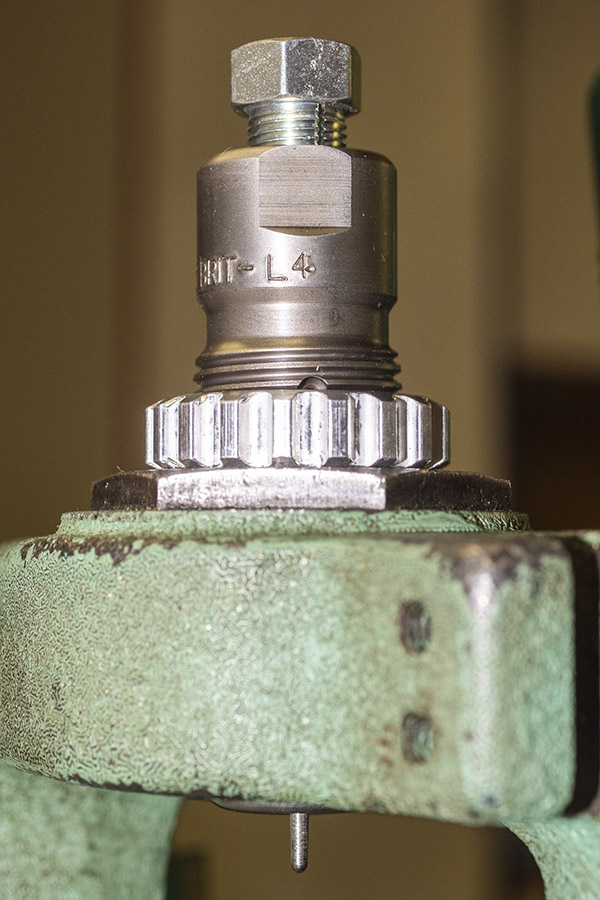
The once-fired brass I had on had was good stuff. It was in the original factory boxes and it was in good shape. Because the rifles it had been fired in previously were not my Enfield, I knew I would have to full length resize the brass first to return each case to factory dimensions. To do that, I mounted the Lee shellholder in my press, ran the press all the way up, and then installed the full-length resizing die, screwing it down in the press until it contacted the shell holder. I then retracted the press ram, turned the die another 1/8 of a turn into the press, and locked the die in place with its locking ring.
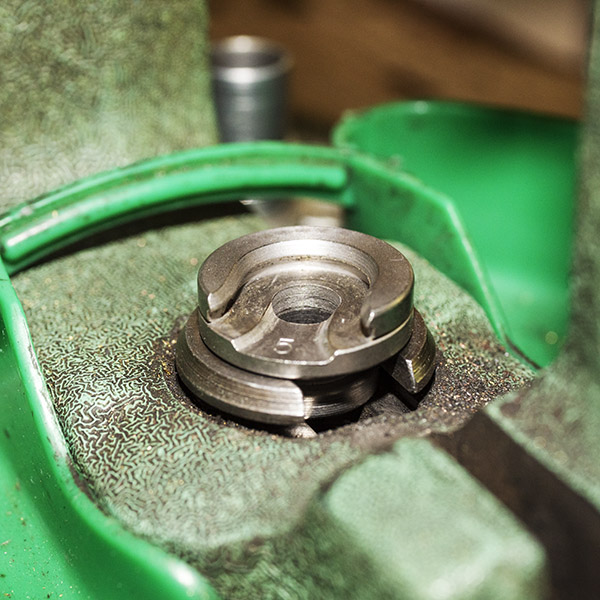
The Lee .303 British shell holder installed in my reloading press. It snaps into place. Dies and shell holders are typically interchangeable between reloading press and die manufacturers. I use a single-stage RCBS Rockchucker reloading press; Lee dies and shell holders fit it perfectly.Lee’s full-length resizing die installed in the press. This die simultaneously resizes a fired case to factory specification and punches out the spent primer. Note the locking ring on the die body.The business end of the Lee full-length resizing die after resizing a bunch of cases. This photo shows the decapping pin, which removes the old primer.
I lubed each case with the lube Lee provided and ran it through the full-length resizing die, which simultaneously brought the cases back to factory dimensions and removed each case’s spent primer. The full-length resizing dies does both steps in one operation.
I intended using cast bullets in the .303 Enfield, so for me the reloading process included an additional step: Flaring the case mouth. Case mouth flaring allows cast bullets to enter the cartridge case without the case shaving any lead from the bullet. To flare the case mouths, I use a Lee universal flaring tool I purchased decades ago. It’s a clever die set that uses a cone to impart a slight bellmouth to the case.
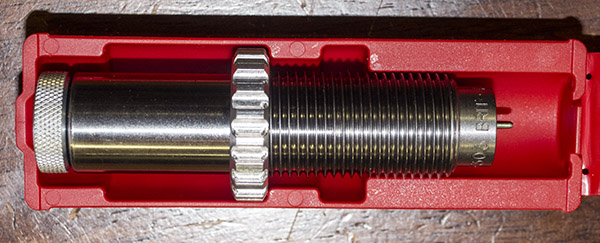
Lee’s Universal Case Mouth Expander. I bought this in the 1970s and I’m still using it.The Lee Universal Case Mouth Expander disassembled. The amount the case mouth is flared is determined by how far the die body is screwed into the reloading press, and by how far the adjuster (top item in this photo) is screwed into the die body. The cone (shown in the middle of this photo) is what flares the case mouth. Lee provides two cones; one of small-to-medium calibers (shown here), and one for larger calibers (not shown here).When empty cartridge cases are run into the Lee Universal Case Mouth Expander) it imparts a slight flare to the case mouth. If you do it right, you can barely see the flare (as is the case for the case shown here) and the bullet enters the case with no lead shaving.
The approach to case mouth flaring is to install the Lee Universal Case Mouth Expander in the press and adjust it to impart just enough flare to allow the bullet’s base to enter the case. You don’t need much flare (less is more here; too much will work harden the brass unnecessarily). I’ll jump ahead a bit and mention here that if you can find that happy spot where you flare the case mouth just enough to allow the bullet to enter the case, you won’t have to crimp the case mouth later to eliminate the flare.
A perfectly-flared case mouth, with just enough flare to allow a bullet to start into the case without shaving any lead.
After completing the above full-length resizing and flaring, I reloaded 20 rounds (like you see in the photo at the top of this blog). Then I did what I always do: I labeled the box of reloaded ammo. After that, I fired the reloaded ammo in my Enfield.
I’m not going to cover the rest of the reloading process in Part 1 of this series, but I will in Parts 2 and 3. I’m jumping ahead here by mentioning firing the full-length resized ammo because I wanted brass that had been fired in my rifle. Ammo fired in my rifle would be perfectly formed to my rifle’s chamber, which is minutely different than other rifles’ chambers. That’s because of rifle chamber dimensioning tolerances. The once-fired brass I had was fired in other rifles, so I needed to shoot it in my rifle so the cases conformed to my chamber.
How did the full-length resized .303 ammo shoot? Very well, thank you. Take a look.
This was the first time I had fired this ammo in my rifle, so I needed to dial it in. The first three rounds went low at 50 yards (the nice tight group at about 5:30 on the outer edge of the 6-ring), so I ran the Enfield’s ladder aperture sight up. Oops, too much, which resulted in the group high in the 6-ring. I went down half the distance on the rear aperture, and the next three rounds were just above the bullseye. Down a click or two more, and the rifle was on the money. In case you were wondering, I used 21.0 grains of IMR 4227 and a Winchester large primer (but more on the load in Part 2 of this series).
Having fired my full-length resized ammo in my Enfield, the fired brass could now be neck sized instead of full-length resized. The idea behind neck sizing is that the clearance between the chamber and the brass case is greatly reduced by neck sizing (as opposed to full-length resizing), and theoretically, neck sizing should result in increased accuracy because the case won’t be rattling around in the chamber. There are a couple of another advantages to neck sizing, too. One is that it works the brass less, so it should last longer. A third advantage is that you don’t have to lube and then clean the cases. They can be neck sized without using lubricant. I’ll say more on that in a moment. Not having to lube (and then cleaning the lube from the cases) greatly speeds up the reloading process.
Now that I had brass cases that had been fired in my rifle, I installed and adjusted the Lee collet die in my press. The collet die performs two operations. It has a decapping pin that punches out the spent primer, and it has a set of four collets that compress the case neck around a spindle to bring it back to new brass factory dimensions (that’s the neck sizing operation). You can adjust the die’s depth in the press to adjust the final inside diameter of the case neck, which is a very useful feature to have. Ideally, the resized case neck inside diameter should only be 0.001 to 0.002 inch smaller than the bullet diameter. That amount of case neck inside diameter undersizing will allow the case the grip the bullet firmly so that it won’t push into or pull out of the case. You could make it tighter and still seat the bullet, but doing so would expand the case mouth more with the bullet’s insertion, and that is not desirable. It would distort the case and possibly introduce non-concentricity or angular misalignment between the bullet and the case, and that would hurt accuracy.
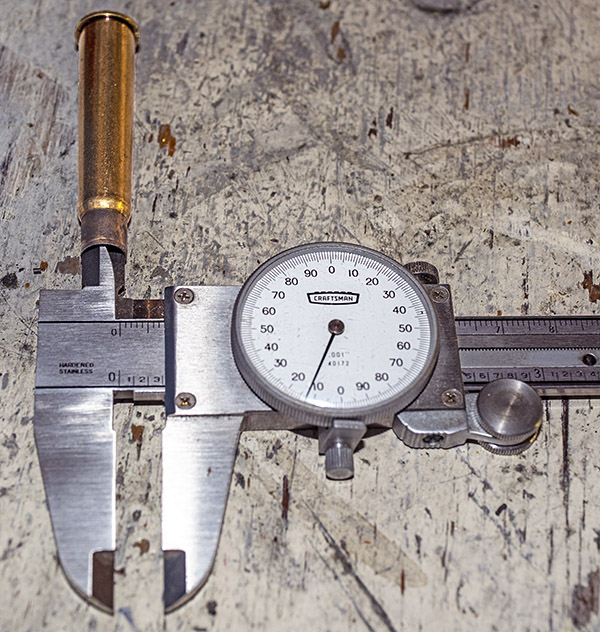
The Lee collet die installed in my RCBS Rockchucker press. This die will neck size the case instead of full-length resizing it.A .303 case entering the Lee Collet Die. By adjusting the depth to which the Collet Die is screwed into the press, you can control the neck-sized-only cases’ neck diameters. I adjusted the die to provide a 0.312 neck inside diameter, which gives 0.001-inch interference between the bullet and the case neck.
After completing the die seating depth adjustment, I had the case mouth diameter exactly where I wanted it: 0.312 inches. My cast bullets were at 0.313 inches, so I was good to go.
Not the world’s best photo (mea culpa). Parallax makes the inside diameter in this photo look like 0.313 inches; it was actually reading 0.312 inches. That’s what I wanted.
Next up will be our Part 2 of the Lee .303 British Ultimate 4-Die set review. Stay tuned.
So far, I am very impressed with this set of Lee dies. I’m not surprised, though. As I mentioned earlier, I’ve been using Lee equipment for decades, and it has always pegged the needle on my quality meter. These dies are good at any price. The fact that they cost less than any of the competitors’ products is a huge plus.


 I’m tempted to buy the watch you see above, but I already have plenty of watches. You can buy the above watch on Amazon for $184, or better yet, from