I’ve owned three Colt Pythons. Back in the ‘70s I had a blue 6-inch Colt Python and another 6-inch nickel-plated one (they were only about $250 back then, and I could buy them for even less through the Post Exchange). Both those Pythons went down the road, and yeah, I’m sorry I sold them. Who wouldn’t be?
Please click on the popup ads…it keeps us going!
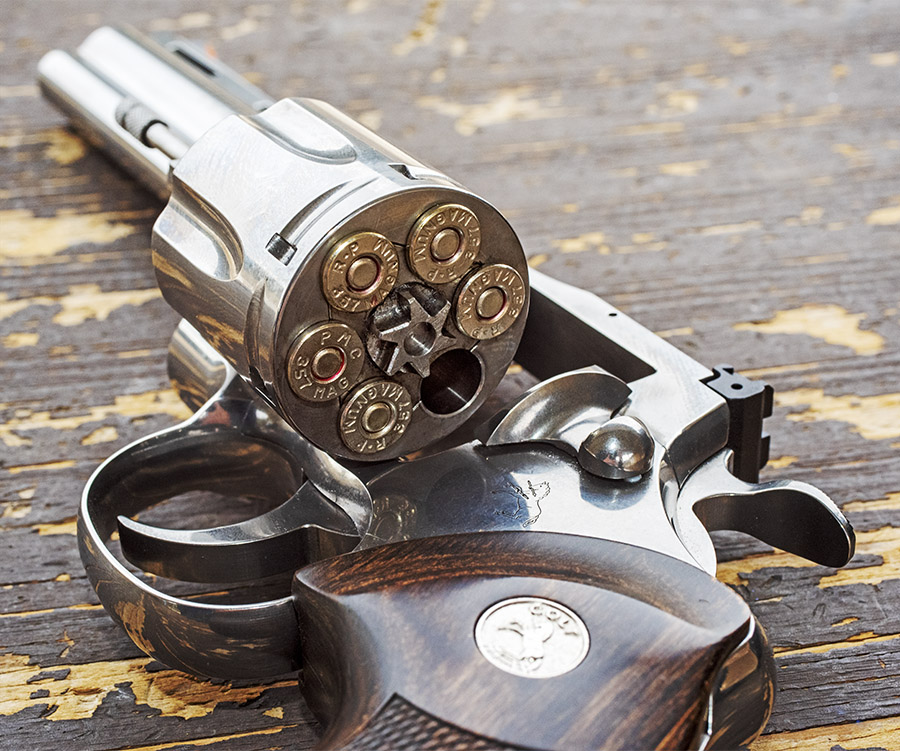
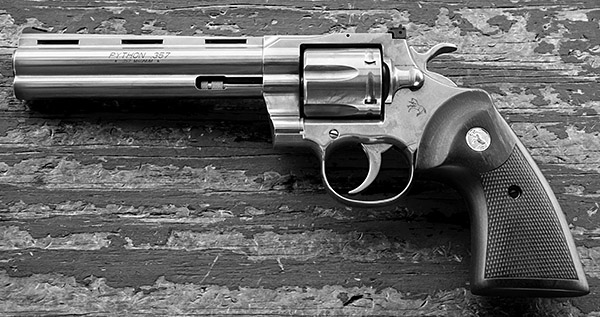
These days, I have a 6-inch bright stainless Colt Python, the new model, and I love it. It’s the one you see in the photo above. I’ve been to the Colt factory to see how they are made, and both the Python’s design and its production are impressive. I’ll let you in on a secret: The new Pythons are better guns. I shoot my Python a lot. In the last few months I’ve been hitting the range with it at least a couple of times every week. I’m old school, I guess: I prefer a revolver to a semi-auto, and I prefer .38 Special and .357 Magnum over 9mm. Your mileage may vary. I know what I like.
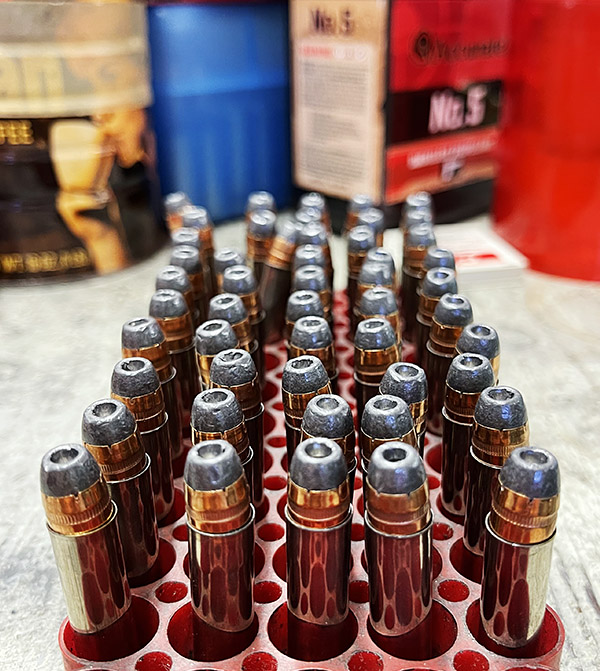
Winchster 110-grain jacketed hollow point bullets waiting to be seated and crimped.
I remembered that back in the day I found a 110-gr jacketed hollow point bullet with 10.0 grains of Unique (the max load in the Hornady manual in the 1970s) and it was extremely accurate in my blue steel Python. I mean, like one-hole accurate. Accurate enough to keep that load in my memory for five decades.
Fast forward 50 years and you’ll find me scrounging for reloading components on a fairly regular basis. On one of those scrounging expeditions Rick Phillips (of Phillips Wholesale) had Accurate No. 5 propellant in stock. It’s a handgun powder, and Rick told me that Accurate No. 5 has a burn rate about like Unique. Hmmm. Unique, huh? That stuck in my mind, mostly because I had some 110-grain .357 pistol bullets in my components stash: I had Winchester jacketed hollow points, and Hornady jacketed hollow points. I bought a bunch of the Winchester bullets during the Obama years when everything was scarce, and I was down to one unopened bag of 100. I had an unopened box of the Hornady 110-grain bullets, too.
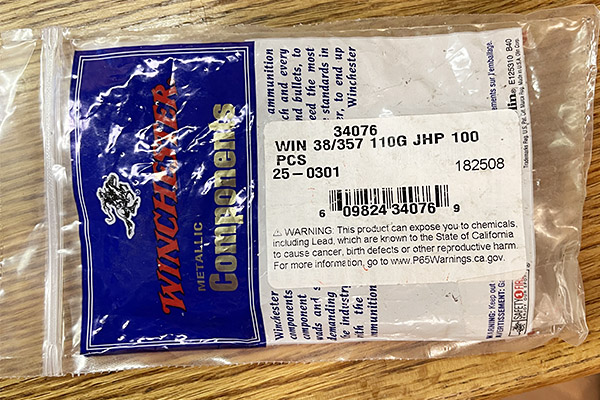
Winchester, if you’re paying attention, this bag was 15 bullets light.
I loaded the last of the Winchester bullets recently using some junk 357 brass. I have Unique, but I wanted to see if I could get good results with Accurate No. 5. Rick’s comment about Accurate No. 5 being about like Unique stuck in my mind. The max load on the Accurate site for 110 grain bullets is 11 grains, so I loaded some at 10.1 grains and some at 10.5 grains, both with magnum CCI primers.
Winchester shorted me on that last bag of 100 grain bullets. The last bag I had was unopened, but it had only 85 bullets in it. I wrote to Winchester customer support, and they responded with an answer that was left blank. I wrote to Winchester again after receiving the above non-answer for an answer, but I’m not holding my breath.
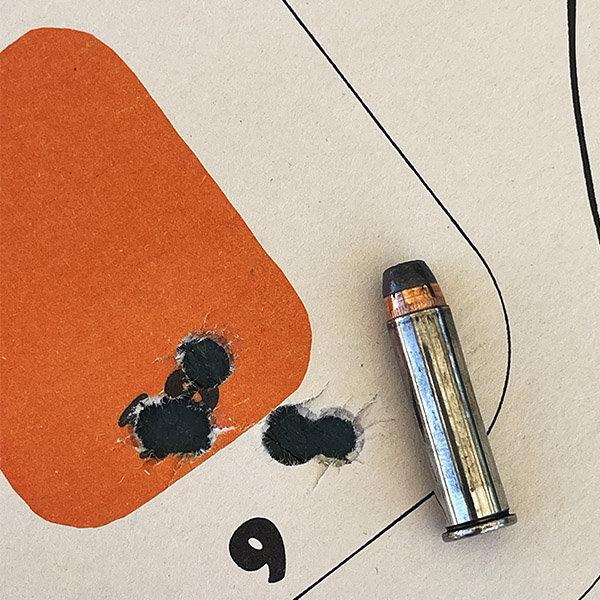
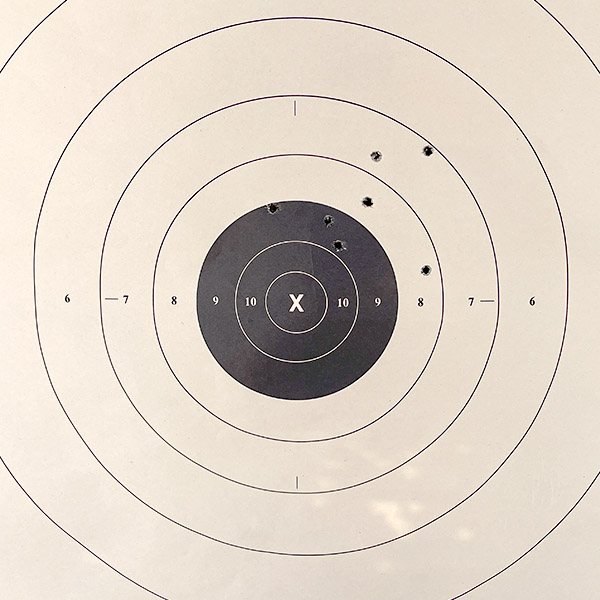
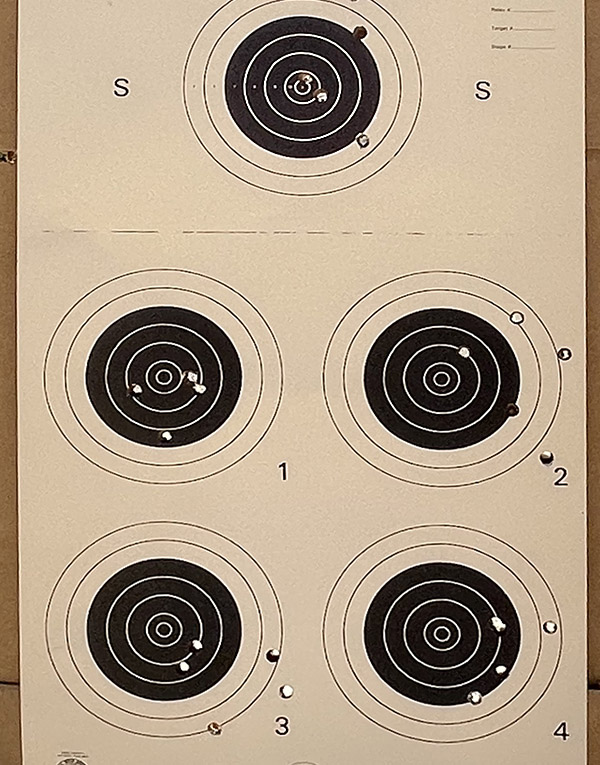
The results with both the Hornady and Winchester bullets were great. Here’s a 5-shot group at 50 feet with 10.1 grains of Accurate No. 5 and the Winchester bullets. This was the best group this morning, but they were all good.
That’s how we like to do it. I know the brass is dirty. This was a quick and dirty test. The laod was 10.1 grains of Accurate No. 5, a CCI 550 primer, and Winchester’s 110-grain jacketed hollowpoint bullet. The distance was 50 feet.
The 10.1 and the 10.5 grains of Accurate No. 5 loads shot about the same from an accuracy perspective, but the 10.5 grain loads made the primers flatter, so I’ll load the 10.1 grain load the next time I reload this ammo. No sense burning up more powder and stressing the gun and the brass if there’s no accuracy improvement. It’s already excellent at 10.1 grains.
Rugged, reliable, regal, and rewarding: Today’s Colt Python.
The Winchester bullets looked cruder than the Hornady bullets but I think they maybe had a slight accuracy edge. I went online to buy more, but I learned Winchester discontinued them. One of my buddies had two bags and he gave them to me, but the odds of me ever getting any more are slim. Hornady, Speer, and Sierra all make JHP 110-grain bullets, but nobody has any in stock. I have 85 left of the Hornady bullets (I used 15 of the Hornady bullets to make up for the ones Winchester shorted me) and now, an additional 200 Winchester bullets. You still owe me 15 bullets, Oliver.
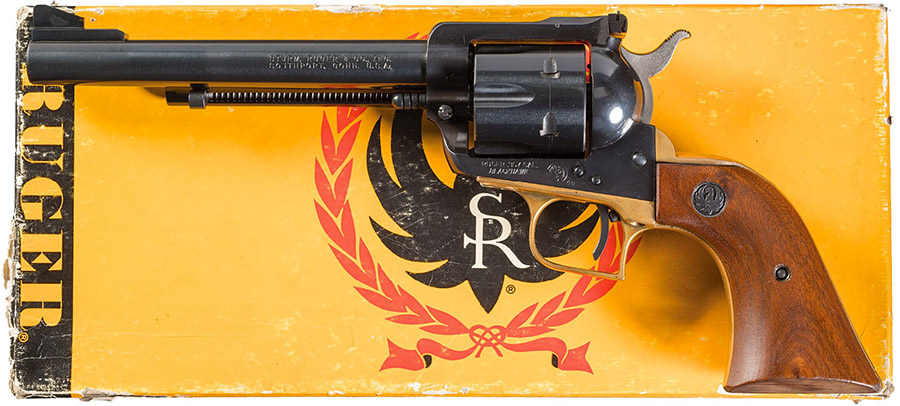
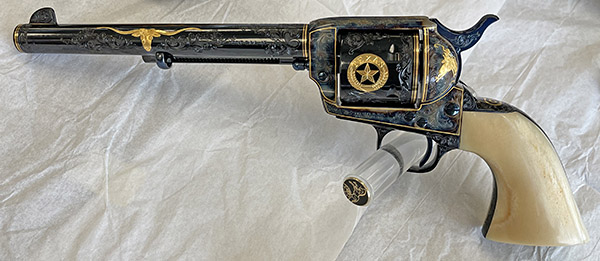
If I had to select one handgun above all others, my choice would be easy. It’s Ruger’s .357 Magnum Blackhawk. I don’t have one, but that’s something I aim to fix in the near term. I’m watching two .357 Blackhawks on the auction block right now. One is that drop dead gorgeous brass frame Old Model you see in the big photo above. That one is not just any Blackhawk, either. It was previously owned by Hank Williams, Junior.
The Hank Williams Blackhawk has a lot going for it. It’s the Old Model Blackhawk, which has a feel when cocked similar to a Colt Single Action Army. There’s the provenance (this one has a letter attesting to its prior ownership and its factory brass grip frame). And, there’s that rare (and highly desirable) brass grip frame. Ruger only made a few of those.
Winning the auction for the Hank Williams Blackhawk is a long shot. My backup is to buy a new Blackhawk, and I have my eye on the one shown in the photo below.
A new New Model Ruger .357 Blackhawk with a 6 1/2-inch barrel.
I guess I need to go tangential for a minute and explain this business about Old Model and New Model Blackhawks. The basic difference between the Old Model and the New Model is that the Old Model can fire if you drop it on a hard surface. The New Model incorporates a transfer bar to prevent that from happening. You should carry an Old Model with the hammer resting on an empty chamber; you can safely carry a New Model with all six chambers loaded. Naturally, geezers like me prefer the look and feel of the Old Model (and we tend not to drop our guns), but the new Model Model is every bit as good and every bit as accurate. Geezers just like old stuff.
I found a used 200th year stainless steel one on Gunbroker about a dozen years ago, I won the auction for it, and I ran the equivalent of a lead mine’s annual output down the bore (including some ultra-heavy 200-grain loads). I am the only guy I know who wore out a .357 Blackhawk. The loading latch wouldn’t stay open, and when I returned it for repair to Ruger, they were as amazed as I was that I wore it out. It was beyond repair, they told me, but as a good will gesture they paid me what I paid for it. Nobody, but nobody, has better customer service than Ruger.
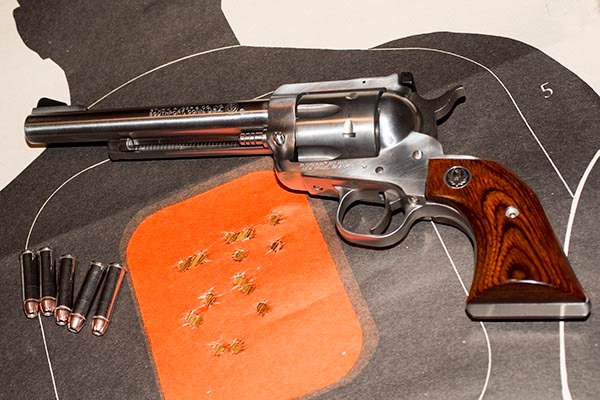
A 25-yard group with the .357 Blackhawk. The Blackhawk will do this all day long.
Part of the reason the .357 Blackhawk I describe above went south, I think, is that it was stainless steel. I have it in my mind that stainless steel is softer than blued carbon steel, and I think they just don’t hold up as well under a steady diet of heavy loads. That’s why my next .357 Blackhawk will be blue steel.
To me, the Blackhawk is a “do anything” .357 Magnum. It’s a good buy in today’s inflated world, it’s a solid defense round, you can hunt with it, and it is accurate. I like the longer barrel for the sight radius. You can believe this or not, but I can easily hit targets at 100 yards with a .357 Blackhawk and the right load.
Typical .357 Blackhawk groups.
It’s been at least a couple of years now that I’ve been without a .357 Blackhawk, and like I said, I aim to fix that problem. I’ll let you know which of the above two guns (a brand new blue steel Blackhawk, or the Hank Williams Old Model) I pick up. Most likely it won’t be the Hank Williams revolver (competition and bidding will be intense on that one and it will probably be too rich for my blood), but the New Model will make me just as happy. Good times lie ahead. Stay tuned.
Good buddy Paul is a black powder enthusiast. I am, too, except I’m completely inexperienced as a shooter in the blackpowder world. I owned an 1858 Remington reproduction (it was a Pietta, I think, and it was beautiful). Good buddy Duane wanted one and I sold mine, new in the box, to him without ever firing it. I’ve seen it fired, as Duane is a range regular and he’s had it out a few times. And I have a beautiful reproduction Colt Walker (made by Uberti; you can read that story here), but I haven’t fired that yet, either.
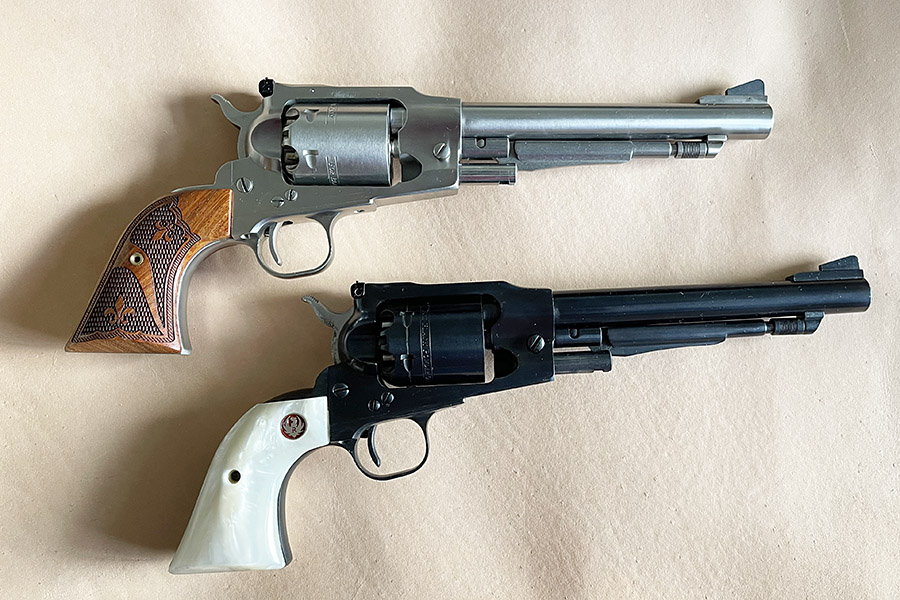
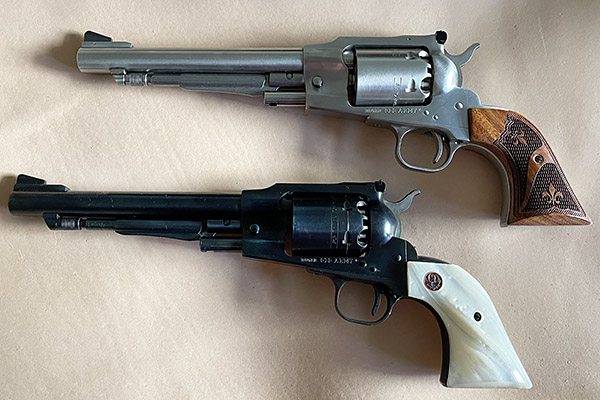
But I digress; this story is about the Ruger Old Army. Two of them, in fact. The name notwithstanding, the Ruger Old Army is a completely modern gun, with the exception of it’s being a cap and ball revolver. Ruger made a few variations of this fine weapon, with the variations being barrel length (the ones Paul owns are both 7 1/2-inch barreled guns; Ruger also made 5 1/2-inch barreled versions), blue steel or stainless steel construction (the ones you see here are samples of each), satin or highly-polished stainless steel, and fixed or adjustable sights. Ruger also offered a brass grip frame on the blue steel version (those are beautiful handguns). Ruger also offered the Old Army with simulated ivory grips for a while.
Paul added custom grips to his Old Army revolvers, and in both cases, the grips add considerably to the revolvers’ appearance.
Big bore percussion revolvers have simultaneously been called either .44 caliber or .45 caliber. They are not a .44, though. They are all .45s, and you can fire either a .457 lead ball, or a .454 conical lead bullet.
Ruger introduced the Old Army in 1972 and discontinued it in 2008 as sales slowed. From what I’ve read, Ruger Old Army revolvers can be extremely accurate. I can’t tell you that from personal experience, however. As I said above I have absolutely zero range time with the Old Army or any other black powder firearm. Caps are difficult-to-impossible to find these days with the pandemic-induced components shortages (I haven’t fired my Walker yet for that reason).
Paul’s two Old Army Rugers are beautiful. One of these days, when components are flowing freely again, we’ll have to get them and my yet-to-be fired Colt Walker on the range.
The city of Hartford in Connecticut is Mecca if you are a Colt fan (as in Colt firearms), and I sure am a Colt fan. I grew up seeing Colt .45 sixguns in western movies when I was a kid and I got my first Colt (a .45 ACP 1911 Government Model) when I finished college (and I’ve never not owned at least one Colt since then). I have no tattoos, but if I were going to get one it would be the Colt logo.
My Colt 1911 has been sending lead downrange for 50 years.
I made a friend in the Colt company when reviving the MacManus award. I had to be in Hartford recently for a symposium and I told my Colt buddy I’d buy him a beer. He suggested a tour of the Colt factory. That was an opportunity I could not let pass.
Popup ads…click on them and we’ll keep the lights on!
The original Colt plant (the one built by Sam Colt) is a National Historic Site. Time did not permit visiting it, but I could see the blue dome above the old plant from my hotel window.
The original Colt manufacturing facility on the banks of the Connecticut River. I didn’t get to it, but the next time I’m in Hartford I will.
The modern Colt factory is a few miles from downtown Hartford. It’s what you see in the big photo up top, and it’s where I had the plant tour described in this blog. The bad news is that photography is prohibited inside the plant (as a manufacturer of military rifles for the US and other countries, Colt can’t have photos of their production processes finding their way to the bad guys). The good news is that I entered the inner sanctum. I saw how the M4s, the M16s , the 1911s, the Single Action Armys, the Pythons, and all the other cool stuff are made. As a manufacturing guy and gun guy with a defense industry background, it was one of the best days of my life.
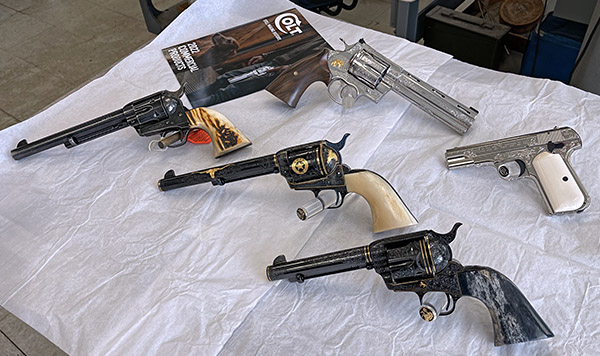
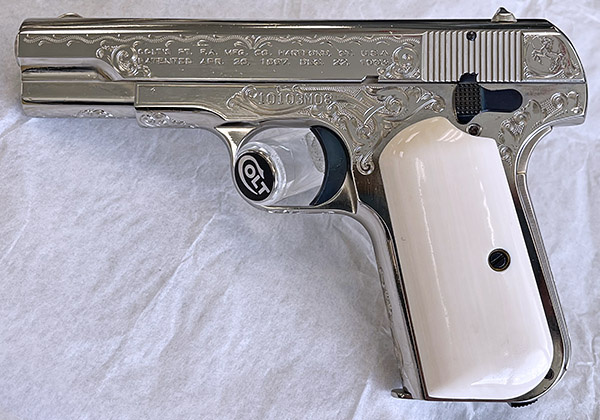
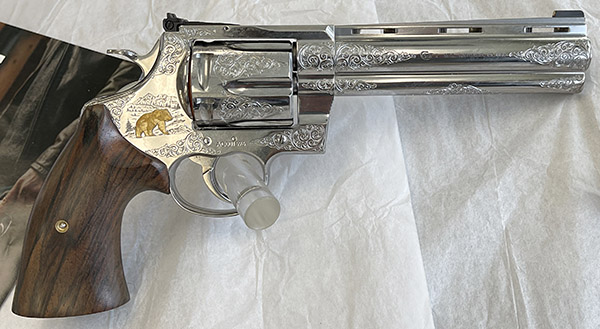
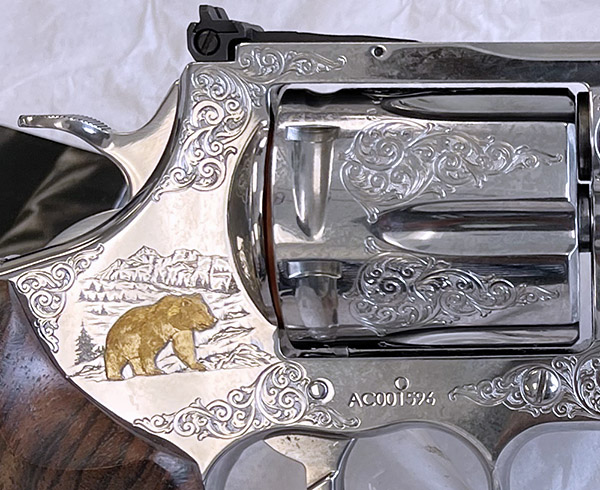
More good news is that I could take pictures inside the famed Colt Custom Shop. The Custom Shop is a small group of world class artists who assemble what are arguably the most desirable guns in the world. Think engraved, gold inlaid, extremely expensive works of the gunmaker’s art. Guns that are delivered to US presidents, wealthy collectors, and…well, you get the idea. There’s a two-year waiting list for a Custom Shop Colt firearm, and when delivered, the ticket can exceed the cost of a new car. On the secondary market, some have been known to exceed the cost of a new home.
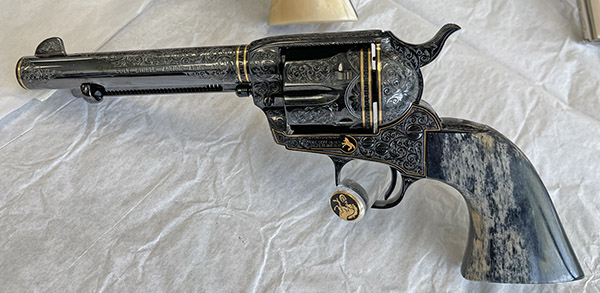
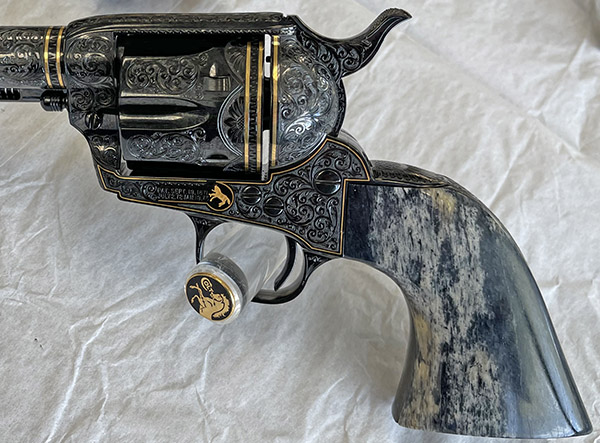
Colt Custom Shop handguns, the stuff of dreams.You can still purchase a brand new Colt 1903 through the Custom Shop. This one is exquisite. I owned one in the 1970s I bought it for $75 and sold for $200 a few months later, thinking I had done well. Ah, the mistakes we make.A Custom Shop Anaconda with an inlaid gold bear and extensive engraving.A closeup of the above Anaconda’s engraving and gold inlay. It’s all done by hand with small hammers and tiny chisels.An exquisite Single Action Army. The grips are giraffe bone.A closer look.Colt’s Custom Shop is producing a series of Single Action Army revolvers for the legendary Texas Rangers. The Texas Rangers are the oldest law enforcement organization in America.Colt has a process for making a new gun look aged. It’s been applied to this Custom Shop Single Action Army.
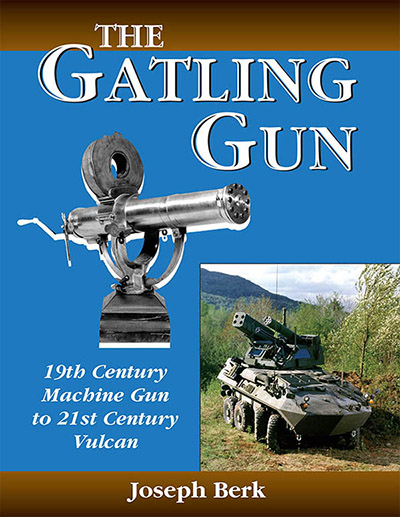
This was my second visit to Hartford. When I wrote The Gatling Gun nearly 30 years ago, I contacted Colt to ask if I could visit their archives (the original Gatling guns were built by Colt). Colt referred me to the Connecticut State Library and Museum. I went there and I was met by a Connecticut State Trooper who asked me a few questions, took my fingerprints, and ran a background check. Satisfied I wasn’t a terrorist or a KGB agent, he issued a laminated permit designating me an official Connecticut state historian. That gave me access to the archives in a secure area of the Museum. Poking around in there made for a fun day, and I used materials from those archives when I wrote The Gatling Gun.
My visit to the Colt archives three decades ago was impressive. I handled hand-written documents signed by Dr. Gatling and Samuel Colt. It was a great day and a lifelong memory. My recent visit to Colt factory and the Custom Shop (as described in this blog) made for an even better day. A Colt tattoo….maybe that’s not a bad idea.
Some days at the range I don’t feel like punishing myself with heavy recoil or trying to shoot the tightest possible groups with loads that have been tuned to perfection. Nope, shooting is fun, and sometimes blasting through a box of ammo is just what the doctor ordered.
A few years ago when we were organizing military surplus rifle fun matches, good buddy Paul showed up with a bunch of zombie targets. Paul called the zombie Boris and the hostage Betty, and the names stuck. We had targets left after the match, and yesterday I shot the very last one.
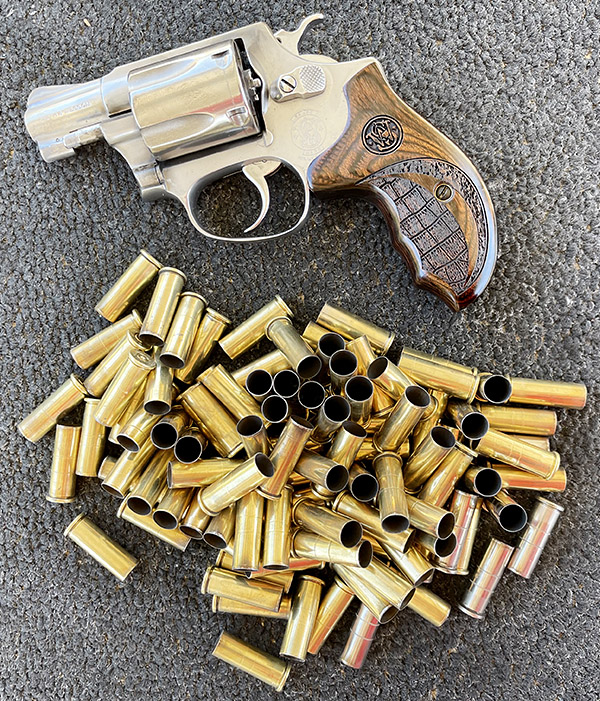
I had my trusty Model 60 Smith and Wesson and a box of 100 .38 Specials I had loaded on my Star progressive reloader. They were Gardner Cache powder-coated 148-grain wadcutters with 2.7 grains of Bullseye (the go to accuracy load in .38 Special). I set ol’ Boris and Betty up on the 7-yard line and proceeded to double-action my way through 20 cylinders’ worth of ammo (the cylinder in a Model 60 holds 5 rounds). There was not a single misfire in the entire 100 rounds, and more importantly, not a single one of them hit Betty. Boris…he didn’t fare so well.
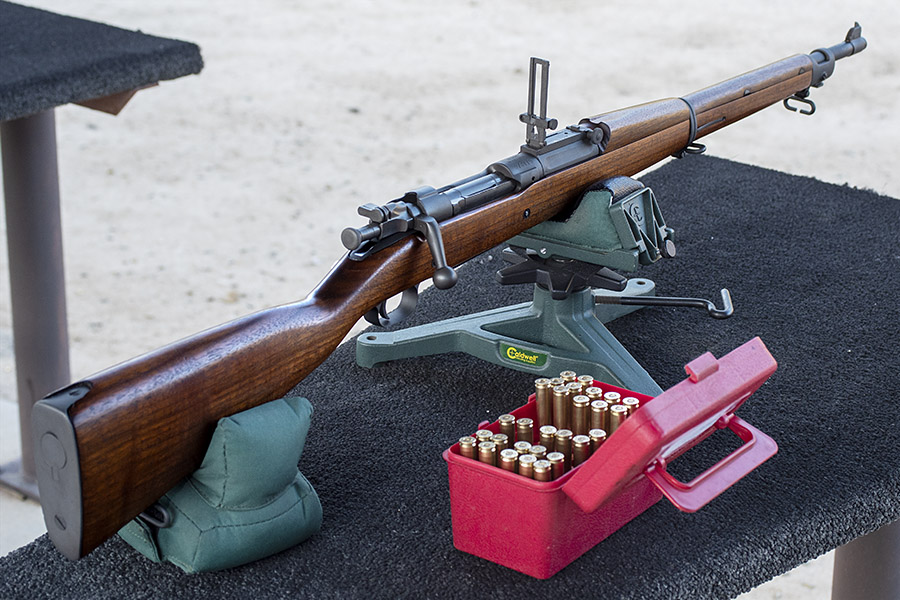
This is an update on my latest 1903 Springfield load development work.
I purchased this rifle about three years ago assuming the headspace was correct, but it wasn’t. That’s a risk associated with old military rifles. Rifle parts are often mixed through the years, and when doing so with the bolt and the barreled action, it’s easy to induce an excess headspace condition. That’s what I encountered on my rifle, so I had the Civilian Marksmanship Program (CMP) in Anniston, Alabama install a new 1903 barrel and rechamber the rifle. Live and learn, I guess. Always check the headspace when purchasing a milsurp rifle.
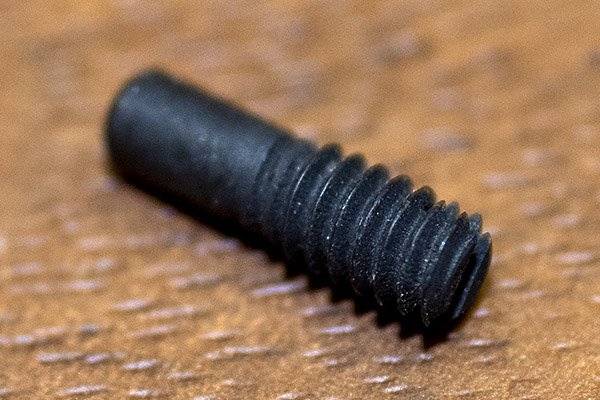
As it was returned to me from the CMP the rifle shot to the right and jacketed bullets shot way too high (at least I thought it shot way too high, but I was wrong…more on that in a bit). I noticed that the front sight was biased to the left (which made the rifle shoot to the right). I drifted the front sight in its base (it’s a dovetail fitting). The front sight takes a retaining screw that secures it to the barrel mount, and on my rifle that screw was missing. It might have shipped that way from the CMP or it might have fallen out.
When the Springfield was returned to me from the CMP, the front sight was biased to the left, as you see here. I didn’t notice it at first.A replacement front sight screw.
I wrote to the CMP regarding the missing front sight screw, but I haven’t heard from them and I found a replacement front sight screw on the Sarco website. I haven’t installed it yet (that will come later). I drifted the front sight in its dovetail to the right, and that brought the point of impact closer to the point of aim.
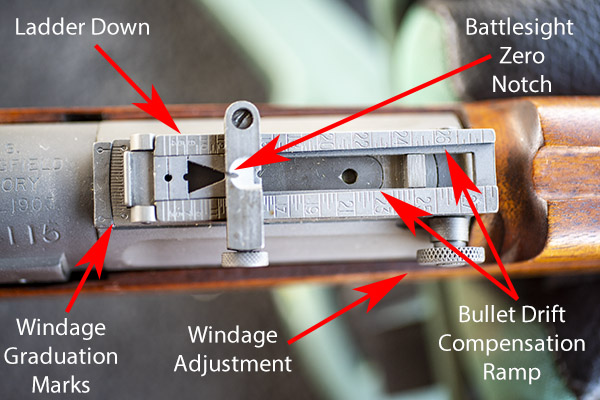
Before I get into the reloading specifics, I should explain a bit about the rear sight. The rear sight on the 1903 Springfield rifle is a complicated device. It’s called the M1905 rear sight, and it is designed and calibrated for standard military ball ammo (back in the day when the Army used .30 06 ball ammo). The sight is a ladder type rear sight and it has four aiming methods. One is the battlesight zero (it’s with the ladder down); the other three are with the ladder up which allows adjusting for various distances. In the big photo at the top of this blog, you see the rear sight with the ladder up. In the photo below, you see the rear sight with the ladder down.
The M1905 rear sight assembly on the 1903 Springfield rifle. The sight ladder is in the down, or battlesight zero position. Wow, there’s a lot going on there.
This first aiming method is through the battlesight zero notch with the ladder down. Battlesight zero means the bullet will coincide with the point of aim at 547 yards. The thought is that if you hold center of mass on a man-sized target at any distance up to 547 yards, you’ll hit the target. At 100 yards the rifle will shoot way high with the ladder down using the battlesight zero, which is what I experienced. I did not understand this was a normal occurrence when using the battlesight zero rear sight notch.
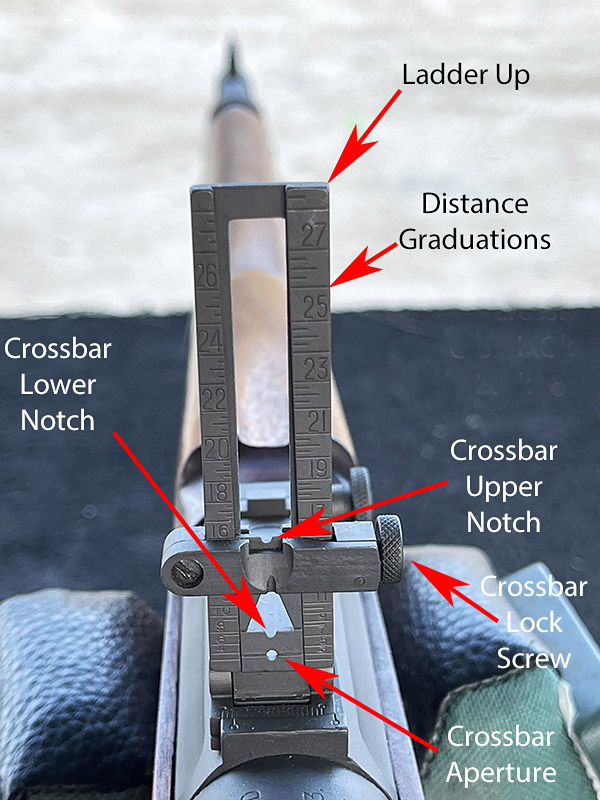
The 1903 Springfield’s rear sight in the raised position. Note that the sides of the rear sight force the crossbar to the left as distance to the target increases. That’s a built-in feature to compensate for bullet drift to the right at longer distances. Clever people, those Army engineers were. This rifle is over 100 years old.
The other three aiming methods all involve shooting with the ladder up (as you see in the above photo). You can adjust for various ranges from 100 yards out to 2800 yards (which is roughly a mile and a half) by loosening the crossbar lock screw and sliding the crossbar up or down to various indicated ranges on the ladder. One sighing method uses the crossbar upper notch. You simply slide the crossbar up or down so that the top of the notch aligns with the estimated distance to the target (in yards) on the ladder’s distance graduations. Another sighting method uses the crossbar lower notch. In this case, you slide the crossbar up or down so that the top of this lower notch aligns with the estimated distance to the target. The last sighting method involves using the crossbar aperture. There’s a horizonal scribe line across the plate containing this aperture, and when using the aperture, you align that scribe line with the estimated distance to the target. The aperture allows zeroing the rifle for ranges as close at 100 yards, which is where I do most of my shooting.
All the above is calibrated for standard military .30 06 ball ammo. If you’re shooting cast bullet ammo, or jacketed ammo with bullet weights or velocities other than standard ball ammo, you have to zero your rifle for your specific load.
There’s one other bit of coolness incorporated into the design of this rear sight. The sight ladder is designed so that as you raise the crossbar, the sighting notches and aperture move to the left. That’s to compensate for the bullet’s natural drift to the right as distances increase.
It’s all very clever, but in my opinion the Army made it too complicated. The rear sight was probably designed by an engineer who never had to carry or use a rifle in the field or train recruits to do so. I think most of the guys I served with in the Army would have a hard time remembering all this (I’m an engineer and I struggled to understand it). Apparently the Army agreed: They simplified the rear sight on the later 1903A3 rifle. The 1903A3 rear sight is much better for an infantry rifle.
That’s enough background on the 1903 Springfield sights. Let’s get to the reloading variables and which loads the Springfield likes. I prepped several, and I also grabbed some of the ammo I had previously loaded for the M1 Garand.
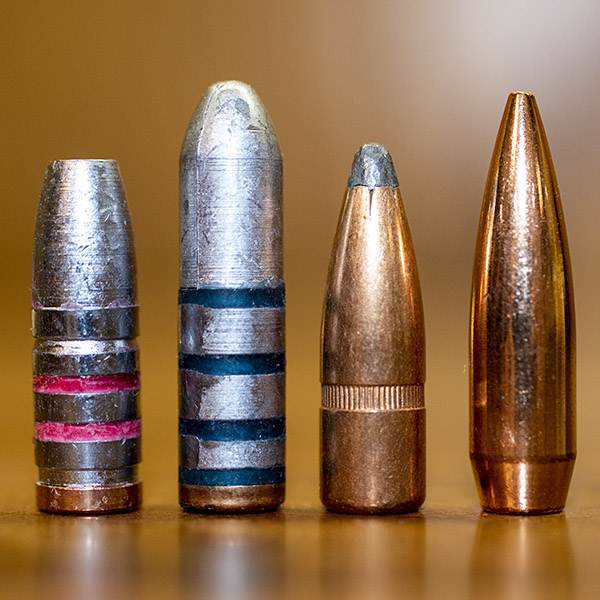
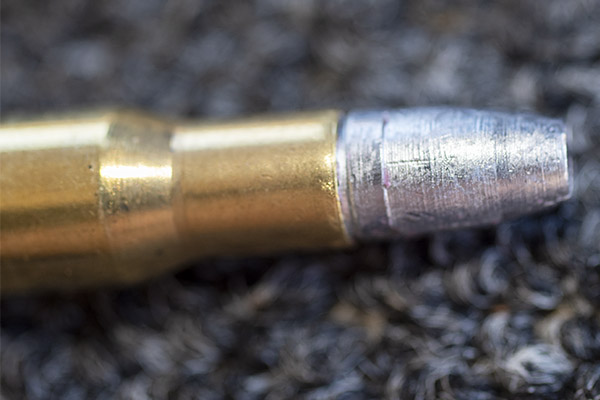
Four bullets used in this testing. From left to right: The Hursman 173-grain cast bullet, the Montana 210-grain cast bullet, the Winchester 150 grain jacketed soft point bullet, and the jacketed Speer 168-grain Match bullet.The Hursman cast bullet loaded in a .30 06 cartridge.
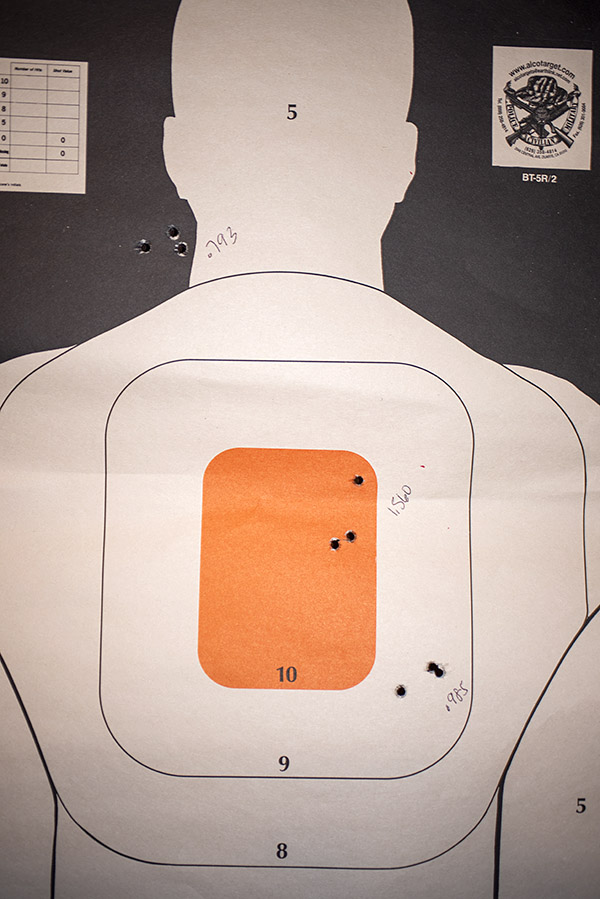
I first fired at a 5o-yard silhouette target to see where the bullets were hitting (there’s lots of real estate on that target). With the ladder down, the point of impact was to the right and low using the 17.0-grain Trail Boss and 173-grain Hursman bullet load. With the ladder up, it moved left a little and printed higher using the higher rear sight notch. For that 0.793 group up top, I used the bottom edge of the upper left box as the aimpoint. For the other two groups, it was the bottom of the orange bullseye.
An initial target shot with cast bullets and Trail Boss powder. There’s a lot of real estate on this target, so I could see where the rifle was shooting.
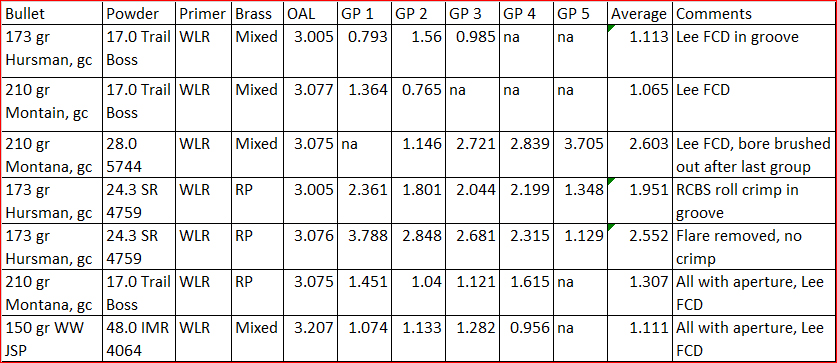
I shot groups at 50 yards with several different loads using combinations of the bullets shown above and SR 4759, Trail Boss, 5744, and IMR 4064 propellants, all at 50 yards, and all with neck-sized-only .30 06 brass. Then I returned a week later and fired groups with the 150-grain jacketed Winchester bullets (again at 50 yards).
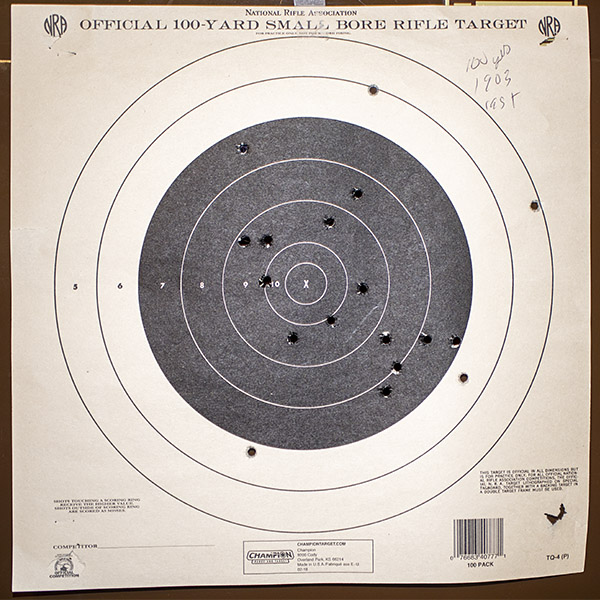
After shooting the above groups, I had 20 rounds left with the Trail Boss, Hursman bullet, and SR 4759 load. I shot two of them at a clump of dirt at about 80 yards and hit it (I think) both times. Then I put a 100-yard small bore rifle target up at 100 yards and shot at it with the 173-grain cast bullet SR 4759 load (8 rounds were crimped, and 10 rounds were not). To my surprise, all 18 rounds were on the paper and 14 of the 18 were in the black. It’s not that great a 100-yard group, but it shows potential. All this was with the ladder down using the battlesight zero sighting approach, so with cast bullets this rifle (at least with the SR 4759 load) is pretty much in the ballpark.
Cast bullets at 100 yards using the battlesight zero rear sight.
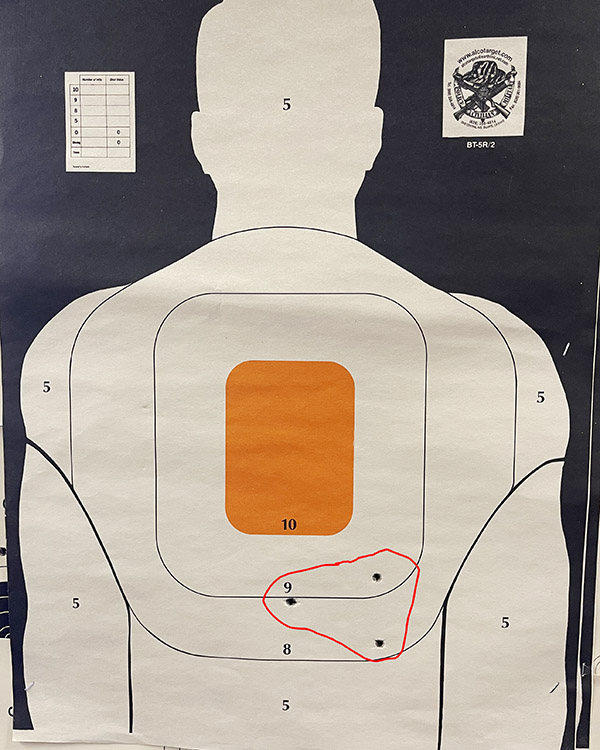
For the jacketed loads, I used the 150-grain Winchester jacketed soft point bullet (I bought a bunch of these a few years ago when somebody had them on sale) and 48.0 grains of IMR 4064. This is the accuracy load in the Lyman reloading manual with a 150-grain jacketed bullet, and I know from prior development work it is superbly accurate in my Model 70. It is also a minimum load, which is nice given the 1903’s steel buttplate. The 1903 did well at 50 yards with the Winchester bullets, so I posted another silhouette target at 100 yards. I fired three rounds and it was rough shooting at that target. Using the aperture, I literally could not see the orange bullseye at 100 yards when I focused on the front sight. The orange bullseye disappeared until I shifted my focus to the target. I’d acquire the bullseye, then rapidly shift my focus to the front sight and squeeze the trigger. I did that three times, literally firing blind, and managed to get a 3.050-inch 3-shot group.
The 150-grain jacketed Winchester bullet load at 100 yards. I couldn’t keep the orange bullseye visible using the aperture at 100 yards.
I figured it was time to quit while I was ahead. I didn’t have any more black bullseye targets with me. I knew I would be able to see those focusing on the 1903’s front post while sighting with the aperture. But with the orange bullseyes (like you see in the target above), I might as well have been shooting at night. I returned to the range a few days later and shot at 100 yards with the jacketed 150-grain Winchester bullets (with the 48.0-grain IMR 4064 load), the 210-grain cast Montana bullets (with the 17.0-grain Trail Boss load), and the 168-grain Speer match bullets (with a 48.0 grain IMR 4064 load).
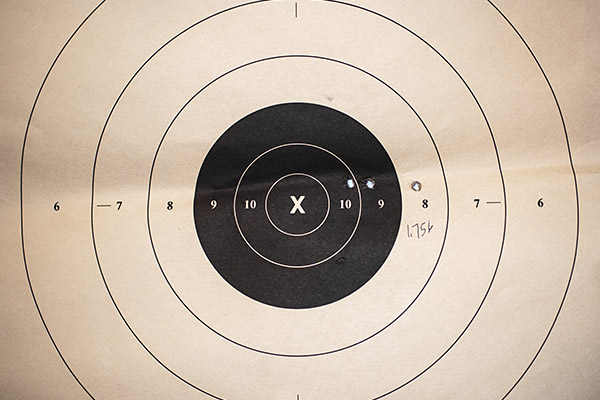
Using the rear sight aperture, I shot the target below at 100 yards with the 150-grain Winchester jacketed bullet and 48.0 grains of IMR 4064. I was pleased with the results and I quit after 3 shots (I didn’t want to screw up the group).
Three shots into an inch and three quarters at 100 yards. The load was 48.0 grains of IMR 4064 and the Winchester 150-grain jacketed soft point bullet. Old eyes and an even older rifle sometimes do great things. My rifle was manufactured in 1918; I was born in 1951.
I then shot at another 100-yard target with the 210-grain Montana cast bullet (these were loaded with 17.0 grains of Trail Boss). I used the rear sight’s lower notch for this target. Hmm, what do you know…the elevation was about perfect without moving anything on the rear sight.
Another 100 yard target, this time with the Montana 210-grain cast bullet and 17.0 grains of Trail Boss. I used the rear sight notch immediately above the aperture without making any adjustments. This is a real sweetheart load with minimal muzzle blast, almost no recoil, and no leading. The cast bullets are not as accurate at 100 yards as are the jacketed bullets, but they are still pretty good.
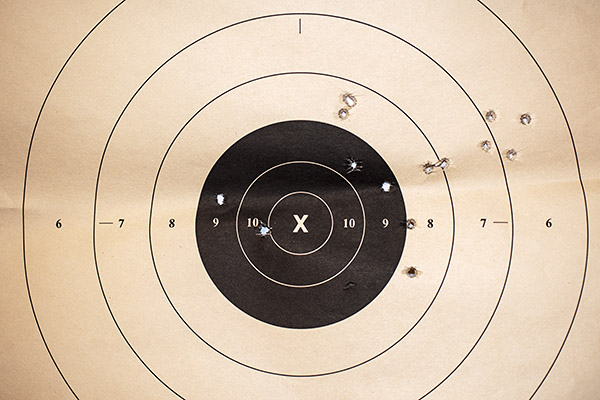
Finally, I fired eight rounds originally loaded for the Garand (I reload for the Garand in multiples of eight, as that’s what a clip holds), returning again to the rear sight aperture. This load used the 168-grain Speer jacketed boattail hollowpoint bullet and 48.0 grains of IMR 4064 propellant. The Speer bullets are almost identical to the Sierra match bullet, but the Speer’s ogive is slighly different and it has less bearing area in the barrel. I called the wizards at Speer about that and they recommended going to a heavier charge than would be used with the comparable Sierra bullet (they specifically recommended 48.0 grains of IMR 4064 for the Garand). That load was a little warm in the 1903 (the recoil was significantly more than the 150-grain Winchester bullet and the primers had slight flattening). But it was reasonably accurate.
Eight rounds of .30 06 ammo loaded for the Garand, using the 1903 rear sight aperture, at 100 yards. The astute blogophile will note there appears to be only seven holes; the hole just outside the 10-ring had two bullets pass through it.
My observations and conclusions from the above are:
The 1903 Springfield rear sight is needlessly complex for an infantry rifle. You may feel differently. Hey, go start your own blog.
With my cast bullet loads, there was no leading. My cast bullets had gas checks (the little copper cup on the bullet base), which helps to prevent leading.
The Lyman cast bullet book showed a minimal 5744 load to be the accuracy load for the 210-grain Montana cast bullet. I did not find that to be the case.
Both the Hursman 173-grain and the Montana 210-grain cast bullets were extremely accurate with 17.0 grains of Trail Boss, at least at 50 yards.
The Winchester 150-grain jacketed bullet accuracy load, per the Lyman manual, was with 48.0 grains of IMR 4064. I found this to be a very accurate load. I didn’t do a lot of work developing a jacketed bullet load. I’m going to stick with this one for this rifle.
Orange bullseyes and aperture rear sights don’t work with my old eyes at 100 yards. They are okay at 50 yards, but not 100 yards.
Both of the jacketed bullet loads I tried (the Speer Garand load and the Lyman 150-grain accuracy load) are accurate. Without adjusting the rear sight from the 150-grain jacketed bullet setting, the Garand load shoots a little high and to the right, but the group size would fit into the bullseye if the sights were adjusted.
The cast bullets are not as accurate as the jacketed bullets at 100 yards. The cast bullets are comparabily accurate to jacketed bullets at 50 yards, but not at 100.
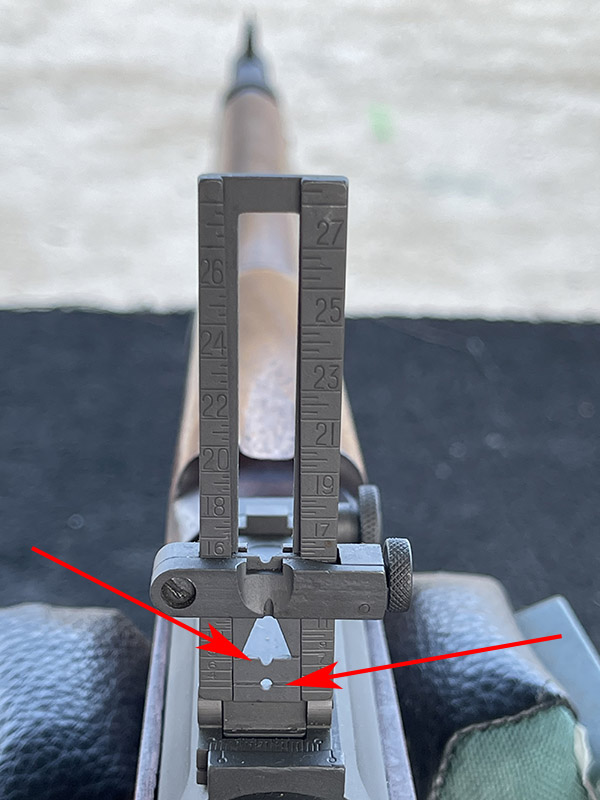
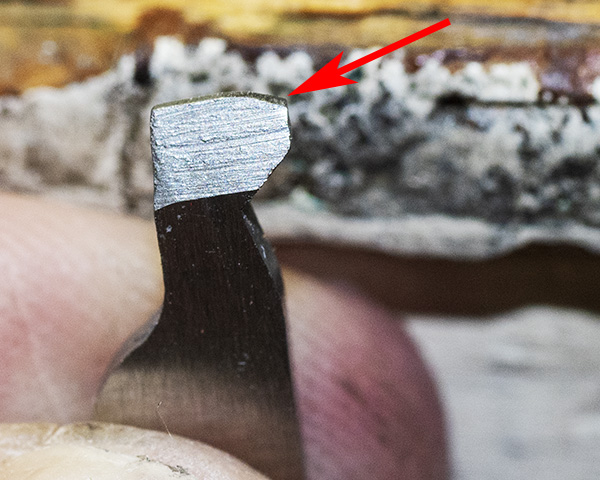
With regard to shooting both cast and jacketed bullets in the same rifle, I got lucky: As complicated as that 1903 Springfield rear sight is, I found that one rear sight position shoots to the same point of impact at 100 yards for both my cast bullet accuracy load and my jacketed bullet accuracy load. Yep, you read that right. With the rear sight crossbar secured as you see in the photo below, I can use the aperture (denoted by the right arrow) with the 150-grain jacketed bullet load. Or, I can use the lower crossbar notch (denoted by the left arrow) with the 210-grain cast bullet, 17.0 grains of Trail Boss load. Both will shoot to the same point of impact at 100 yards. A friend asked if I tuned the loads to do this. I wish I could say I had that kind of load development expertise. Nope, I just got lucky.
One size fits all (sort of). With the 1903’s rear sight in the raised position, I use the notch denoted by the arrow on the left for my cast bullet accuracy load at 100 yards. I use the aperature denoted by the arrow on the right for the 150-grain jacketed bullet load at 100 yards. I don’t need to move the rear sight cross bar up or down. Sometimes you just get lucky.
One final note that’s sure to set the Internet on fire: I know this is heresy. As much as I like my 1903, I think the 91/30 Mosin Nagant is a better rifle. My Mosin groups better at 1oo yards. But that’s a story for another blog.
Never miss an ExNotes blog:
Tales of the Gun: 1911s, revolvers, 9mm semi-autos, bolt action sporters, milsurps, reloading, big bore rifles, and more. It’s all right here!
Click on those popups, folks! It’s what pays the rent!
ExNotes features a bunch of things (motorcycles, guns, watches, reloading, and more). We get way more hits on the gun pieces than we do on anything else, but truth be told, we’re old and we’re not motivated by hits, likes, tweets, or any of the other silliness introduced by the so-called social media platforms. Gresh and I write because we like to write. It’s that simple. Don’t get me wrong: We love it when you click on the pop up ads that appear on the site and in our blogs because that puts money in our pockets.
On occasion, we’ll hear from some left wing asshole (sorry for the redundancy) with his shorts in a knot when we do a gun blog. Hey, we get it: Some folks hate guns. My advice and response has always been simple: If you don’t like guns, don’t buy one. If you don’t like a gun blog, don’t read it.
But even a lifelong, died-in-the-wool shooting enthusiast like yours truly feels sick, disgusted, and unspeakably sad at the rash of mass shootings that have become common in the last few years. I knew a guy who lost a daughter in the Virginia Tech shooting. The aftermath is gut-wrenching. I’ve wondered: Should these high capacity weapons be outlawed? Then I remembered…guns that hold large quantities of ammo have been around for over a hundred years, and when I was a kid, we didn’t have these mass shootings. So what’s changed?
A friend sent this YouTube video to me a few days ago. I can’t remember ever having agreed with Bill Maher on anything (not that he or anyone else needs me to), but I think old Maher nailed it. Take a look:
As I mentioned above, we like it when you click on the pop up ads. We like it even more when you leave comments. We’re eager to hear from you, and if ever one of our posts deserved comments, this is it.
It’s been a long haul correcting double action misfires on my snubnose Smith and Wesson revolver, but the magnificent Model 60 is where I want it to be now. Here’s how I went about it.
My Model 60 had too much end shake (the cylinder had a lot of back and forth play). Shimming the cylinder with TriggerShim’s excellent shims quickly corrected that problem. Shimming the cylinder keeps it closer to the firing pin and that permits more energy from the hammer’s fall transferring directly into the primer. You can read our blog about correcting cylinder end shake here.
My reloaded ammo’s primers were not completely seated. When that occurs, some of the hammer and firing pin’s energy goes into fully seating the primer rather than firing it. You want ammo reloaded for use in double action revolvers to have very slightly flattened primers after the primer seating operation, and that can be achieved with Lee’s excellent primer seating tool. You can read about that here.
If a revolver is out of time the firing pin will hit the primer off-center resulting in unreliable ignition. If you shoot enough your revolver will go out of time. Correcting revolver timing typically involves fitting a new hand and you can read about that here.
If your revolver’s hammer spring has weakened over the years or as a result of use you can easily install a new Wolff hammer spring. We wrote a blog about that you can read here.
If you’re having problems with misfires in a double action revolver, the above areas are where I would look first.
The .35 Whelen is an interesting cartridge. A wildcat formed by necking .30 06 brass up to .35 caliber, it’s been called the poor man’s .375 H&H, but the price of ammo would suggest it’s anything but a poor man’s cartridge. A box of 20 factory rounds when I checked just a few minutes ago ranged from a low of $50 to a high of $72. For 20 rounds? Gimme a break!
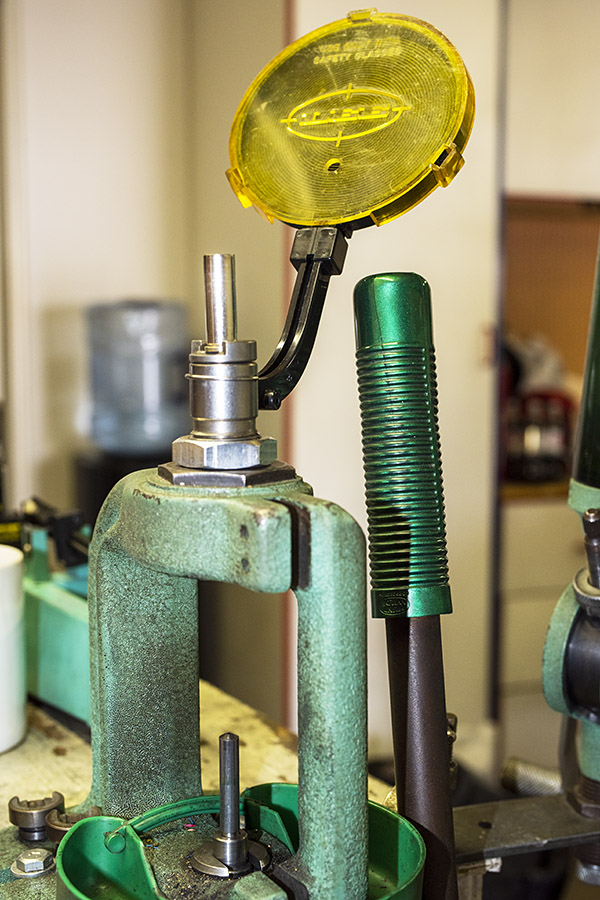
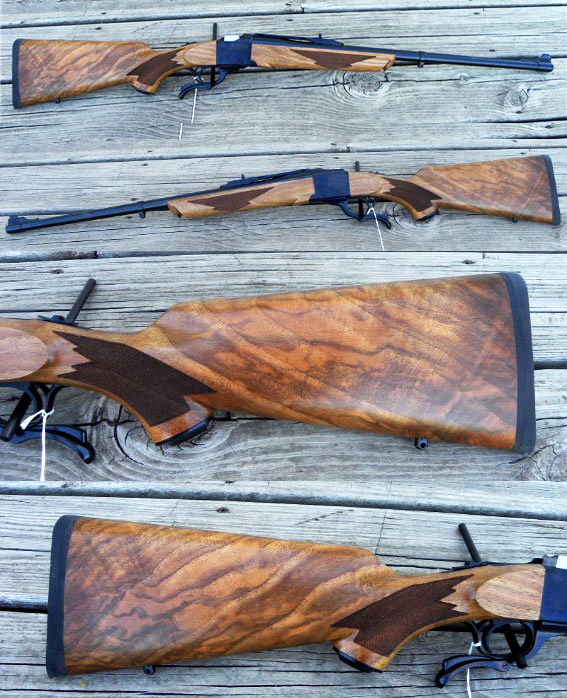
My .35 Whelen Ruger No. 1. They didn’t make too many of these and mine has exceptional Circassian walnut. It’s not for sale.
I like to shoot, but I’m a cheap SOB and truth be told, I don’t like beating my self up with factory .35 Whelen recoil. Roll that up with the good luck I’ve been having with good buddy Ralph’s Boudreau Bullets in several handguns and I wondered: Could I have Ralph make .35 caliber powder-coated pistol bullets sized to .359 inches? You see, cast pistol bullets for the .38 Special or .357 Mag are ordinarily sized to .358 inches (the sizing operation occurs after the bullets are cast when they are swaged down to the desired diameter). But .358-inch diameter bullets probably wouldn’t work in the Whelen. The .35 Whelen rifle has a bore of .359 and shooting bullets sized to .358 would allow the propellant gases to escape around the bullet as it traveled down the barrel. That would melt the sides of the bullet and create God-awful leading. A tighter fit (with .359 bullets) ought to work better, and powder-coated cast pistol bullets are inexpensive. Inexpensive is good. Did I mention I’m a cheap SOB?
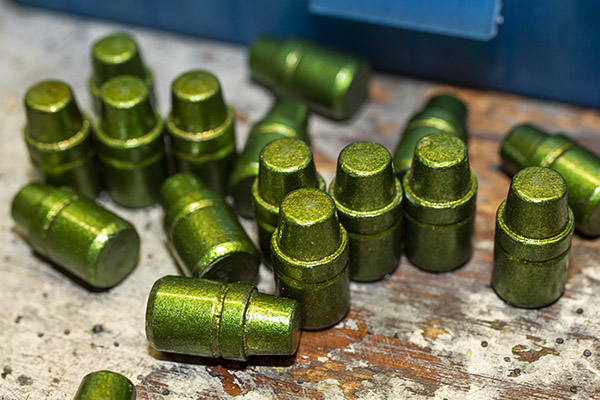
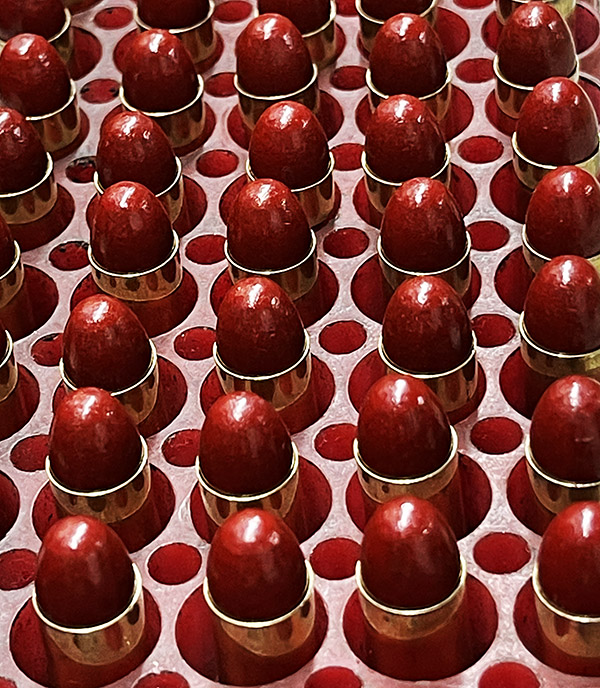
Boudreau 158-grain powder-coated pistol bullets with candy apple green powder coating. These are sized to .359.
I’ve loaded jacketed pistol bullets in the .35 Whelen before, I’ve loaded cast pistol bullets, and I’ve also loaded cast rifle bullets from Montana Bullet Works. The Montana bullets are great and the Whelen performed well with them. The jacketed pistol bullets worked well. The cast pistol bullets I tried before didn’t work well (you can read about that here). The premium cast Montana Bullet Works bullets are not cheap (nor should they be). I wanted something inexpensive so that I could play with the Whelen at recoil levels comparable to a .22. Maybe Ralph’s powder-coated pistol bullets would work.
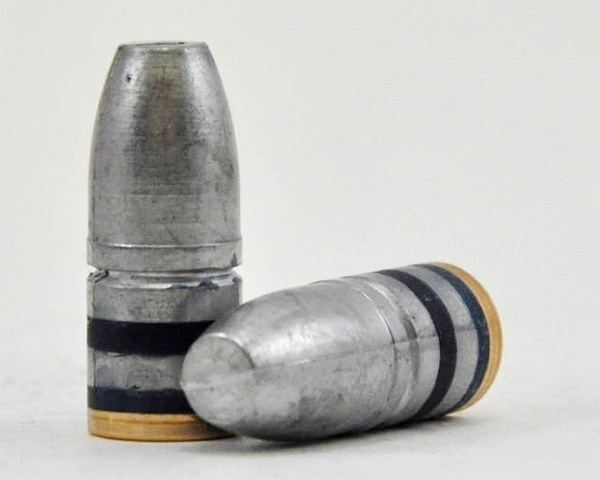
Montana Bullet Works cast rifle bullets. These are very accurate, but they cost as much as jacketed rifle bullets.
Ralph obliged, and when my .359 158-grain cast semi-wadcutters arrived, the fun began. I did my research on the Internet about what loads other folks had used with cast pistol bullets in the .35 Whelen, or at least I attempted to. Like everything else on the Internet, opinions were all over the map.
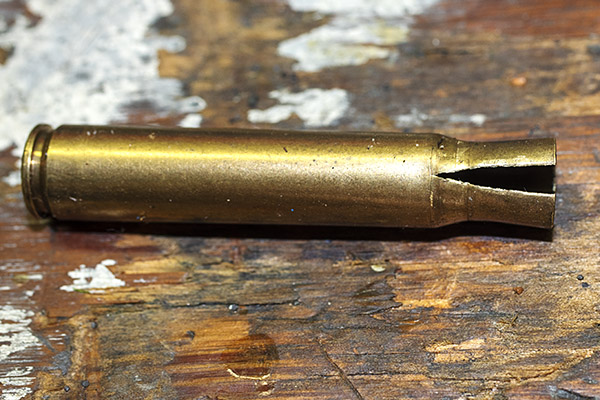
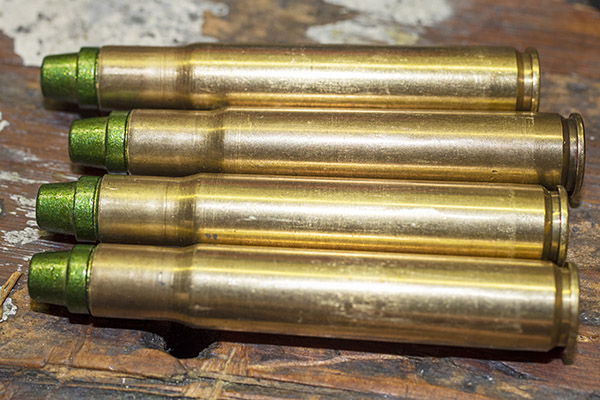
I make .35 Whelen brass from older .30 06 brass that I had already reloaded a few times by running the cases through a .35 Whelen full length resizer. Not every case survived the neck expanding operation.Loaded .35 Whelen ammunition with Boudreau’s 158-grain powder-coated bullets. Later loads seated the bullets out further for an overall cartridge length of 2.910 inches. I don’t use a crimp on these bullets and I neck size only.
I initially went with what one forum commenter fervently quoted: Low charges of Trail Boss were the way to go with 158-grain cast bullets. He was wrong, as least as far as my Ruger No. 1 is concerned. I tried 13.0 grains and the groups at 50 yards were (no kidding) about a foot in diameter. This might be okay for a shotgun, but not a rifle. The groups were lousy, but I noticed that the bore was clean. Ralph’s powder coating, which had worked well in keeping a handgun bore clean, worked well in the longer rifle barrel as well.
These groups were typical of all loads tried (except the last one).A nice clean bore with Trail Boss powder. There was no leading.
I next tried Unique propellant (first with 13.0 grains, and then with 15.0 grains), which had worked well for me in the past in a variety of cast rifle loads for other cartridges. Nope, both of these loads shot lousy groups, too, and they leaded the bore way more than Trail Boss. Trail Boss is actually a faster powder than Unique, so the slower-burning Unique was driving the bullets to higher velocities.
Bore leading with Unique. This stuff doesn’t dissolve with Hoppe’s or any other commonly-used bore solvent. You’ve got to scrub it out with a bore brush.
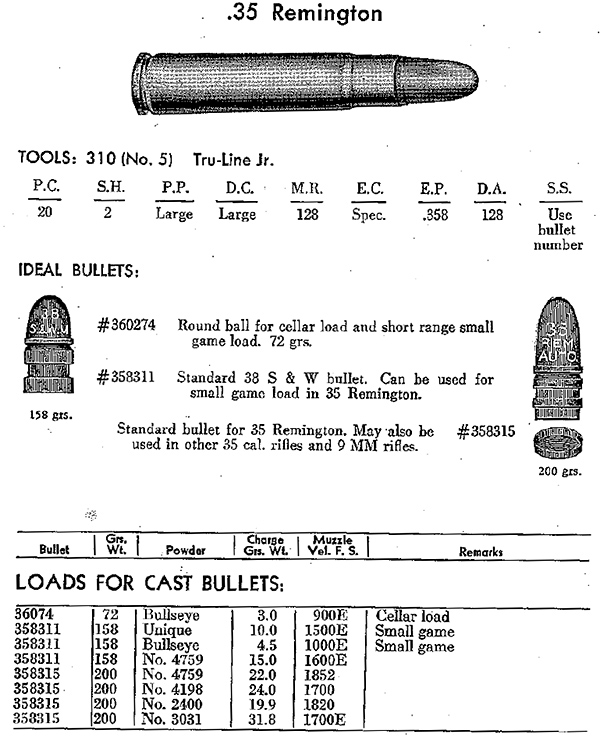
Then it was on to Bullseye. I found a few references to these loads in various forum comments, but Bullseye is a dicey powder and I wanted a better load data source than some yahoo on a gun forum. I hit paydirt when I found an old Ideal reloading manual and it had a Bullseye load for the .35 Remington (the .35 Whelen was still a wildcat cartridge when this manual was published and there was no load data for it). I figured with the .35 Whelen’s bullet weight and case volume, I wouldn’t get into trouble using the .35 Remington load. I tried it and I tried a few others with a bit more powder (there were no pressure signs), but nope, it was not to be. I still had terrible groups at 50 yards.
Loads from an old Ideal reloading manual. It was a place to start.Bullseye loads in the .35 Whelen produced no leading.
Hmmmm. Maybe it’s a powder position thing, I wondered. I called Ralph at Boudreau’s Bullets and chatted with him. Ralph explained that when the powder doesn’t fill the case, powder position makes a huge difference in accuracy even in a 9mm pistol cartridge. Okay, I can fix that, I thought. So after loading my brass again with the same light Bullseye loads, I inserted a cleaning patch in each cartridge to hold the powder up against the primer. Still no cigar, though: The groups remained stuck on atrocious. It was cool, however, seeing the cleaning patch threads dissipate downrange in the scope after each shot. One good thing that came out of the Bullseye loads was that they didn’t lead the bore. Well, maybe two good things: I didn’t blow myself up. Okay, three good things: None of the bullets stuck in the bore.
I was just about ready to give up trying to make the powder-coated .359 Boudreau bullets work in the Whelen when my mind returned to the powder position question. Okay, I thought, the cleaning patch wad trick (a noble thought) was a bust. But Trail Boss might still be the way to go, even though the lighter load wouldn’t group. Those earlier 13.0-grain Trail Boss loads left a lot of unoccupied space in the case. The beauty of Trail Boss is that you can load all the way up to the bullet base (thereby completely eliminating the powder position issue, as the case will be full) without overpressurizing the cartridge. So that’s what I did. I measured where the base of the bullet would be at a cartridge overall length of 2.910 inches and I filled a case to that level with Trail Boss. The magic number was 19.3 grains. I adjusted my powder dispenser and went to work.
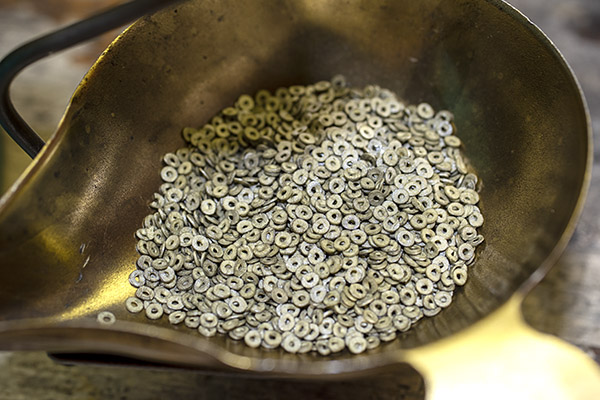
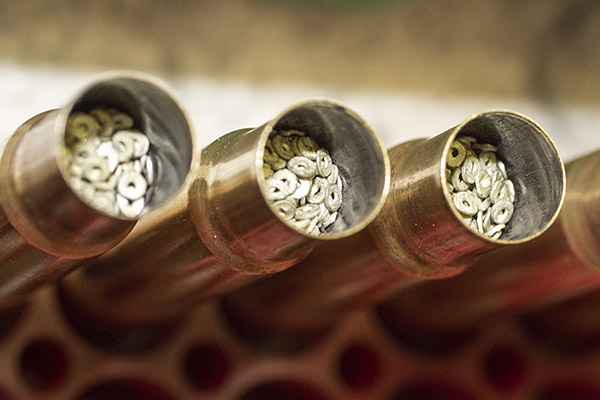
19.3 grains of Trail Boss powder in my RCBS powder scale. The powder flakes look like little Cheerios.19.3 grains of Trail Boss in the .35 Whelen cases. The powder stack just touches the bullet base. The propellant is held in place and it provides a nice, even, repeatable burn.
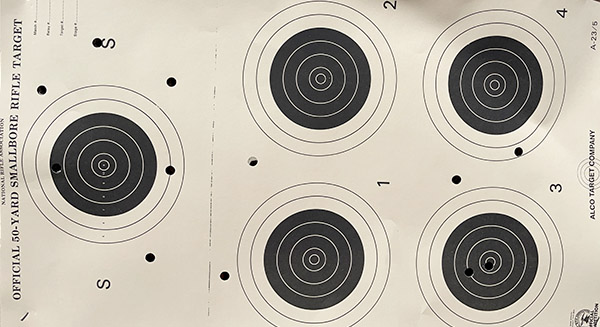
The next day I was on the range at the West End Gun Club. I’d been reading more forum posts about 158-grain semi-wadcutter bullets in .35 Whelen and the feel I got from them was that most people were shooting at 25 yards. You know, turning a grizzly bear rifle into a close-range gopher grabber. Okay, that’s an old reloaders trick: You want tighter groups, just move the target closer. So for the first six of my 19.3-grain Trail Boss loads, I shot at a 25-yard target and wowee: Finally, a group!
19.3 grains of Trail Boss and the 158-grain Boudreau powder-coated bullets at 25 yards.
It wasn’t a great group (I’ve shot tighter groups at 25 yards with a handgun), but it was a group. It was a clear indication I was on to something. So I next set up a target at 50 yards.
The same 19.3 grains of Trail Boss at 50 yards. I can’t explain that flyer off to the right. But the other five rounds were looking better. More work is necessary. I have a path forward.
That group was gratifying. I can’t explain the one flyer off to the right (the trigger broke cleanly on that shot and it felt like it should have grouped with the others…maybe it hit a fly on the way to the target). The other five shots went into a group about the size of the bullseye, but biased to the right. That’s one thing I noticed with all of these light loads: They shoot to the right.
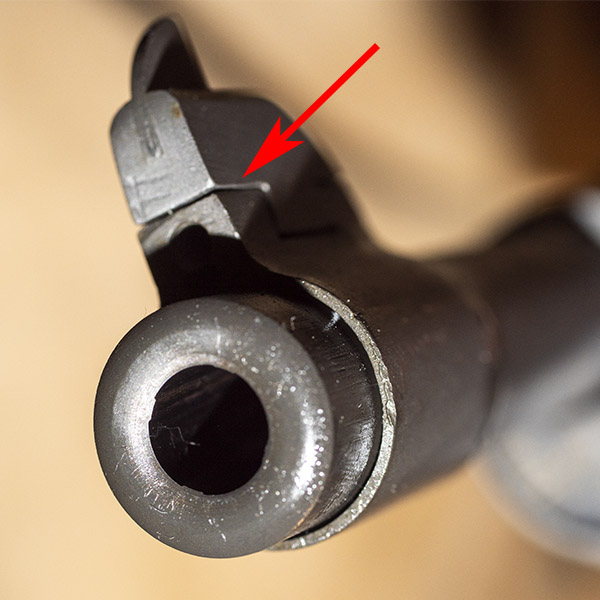
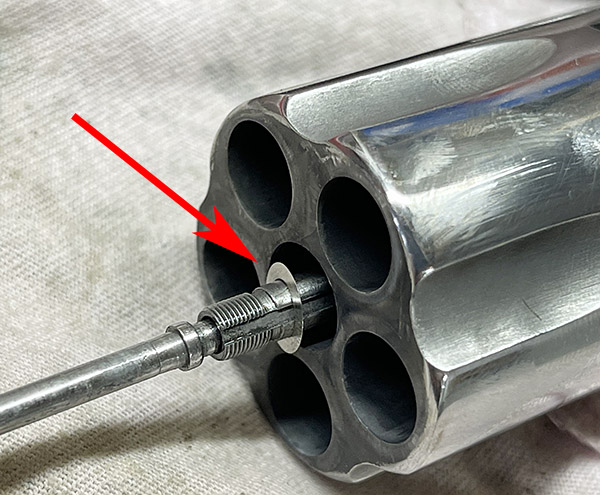
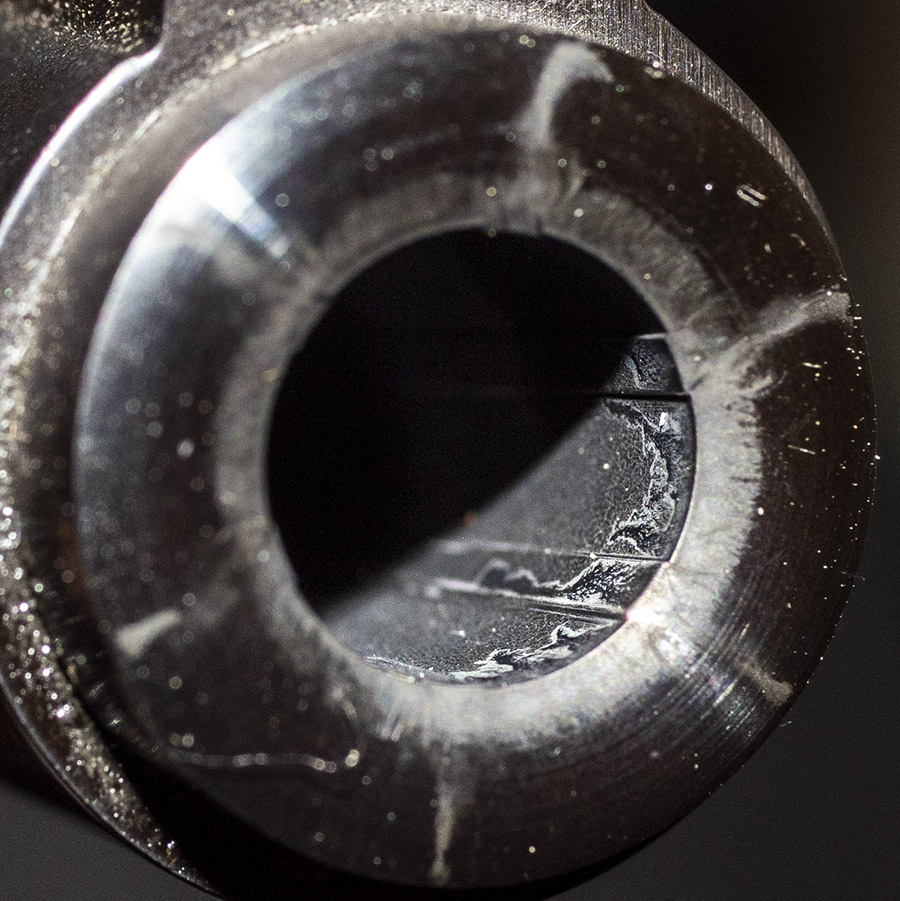
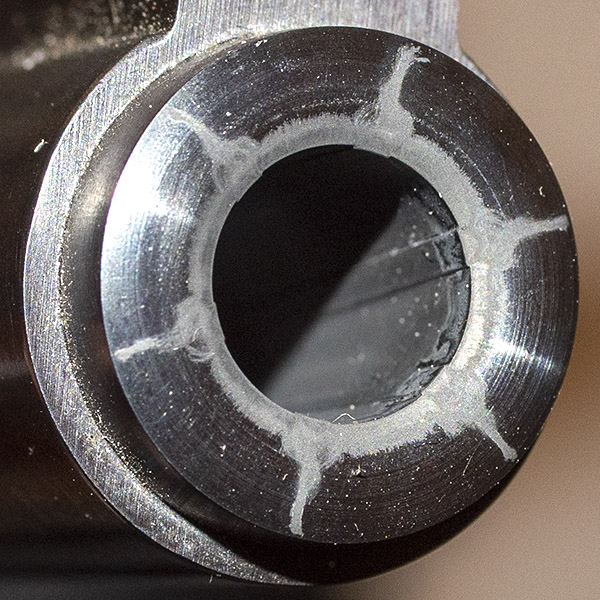
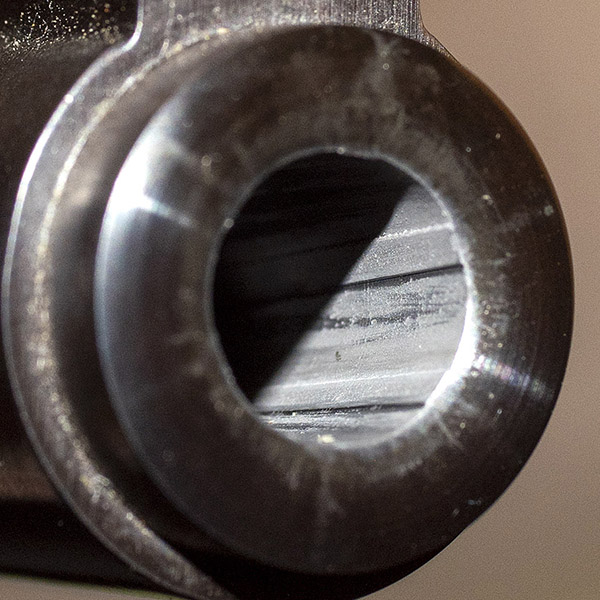
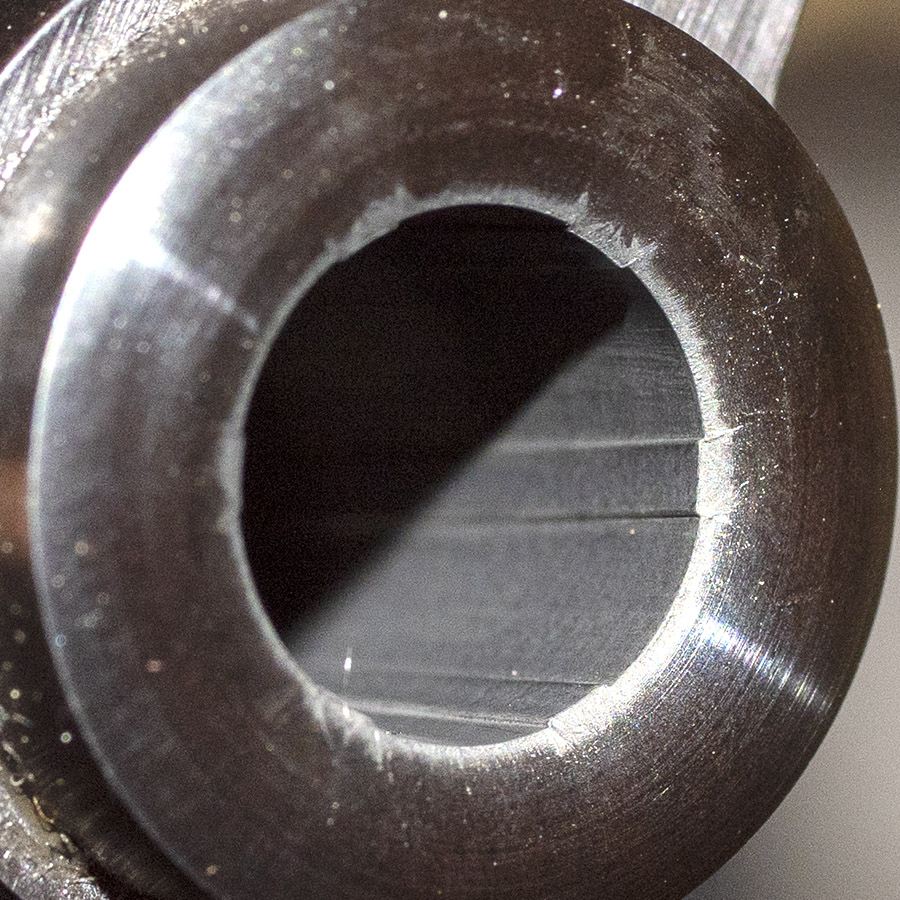
When I returned home, I photographed the muzzle. It’s the photo at the top of this blog. I was pleased to see how clean it was. It had the same appearance as occurred before with 13.0 grains of Trail Boss. There was a kind of swirly thing going on near the muzzle inside the bore; I think that is a combination of melted lead and powder-coating paint behind the bullet as it exits the bore. The rifling was clean, as in no lead.
There are a few more things I should mention: When you’re loading at these reduced levels, the brass doesn’t really expand or stretch. Neck sizing works just fine. Also, when you’re loading cast bullets, you have to flare the brass case’s mouth (I use a Lee tool for this) so that the bullet can get an easy start into the case. If you don’t flare the case, you’ll shave the powder coating and lead off the sides of the bullet, both of which will degrade accuracy. And one more note…you’ll see in these photos that I seat the bullets pretty far out for an overall cartridge length of 2.910 inches. The bullets are not contacting the rifling at that length, and there’s enough of the bullet in the case to keep it aligned. I’m not worried about setback (the bullets moving under recoil) because the Ruger No. 1 is a single-shot rifle.
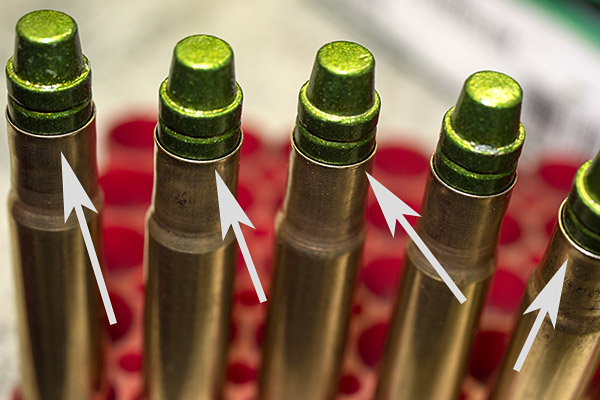
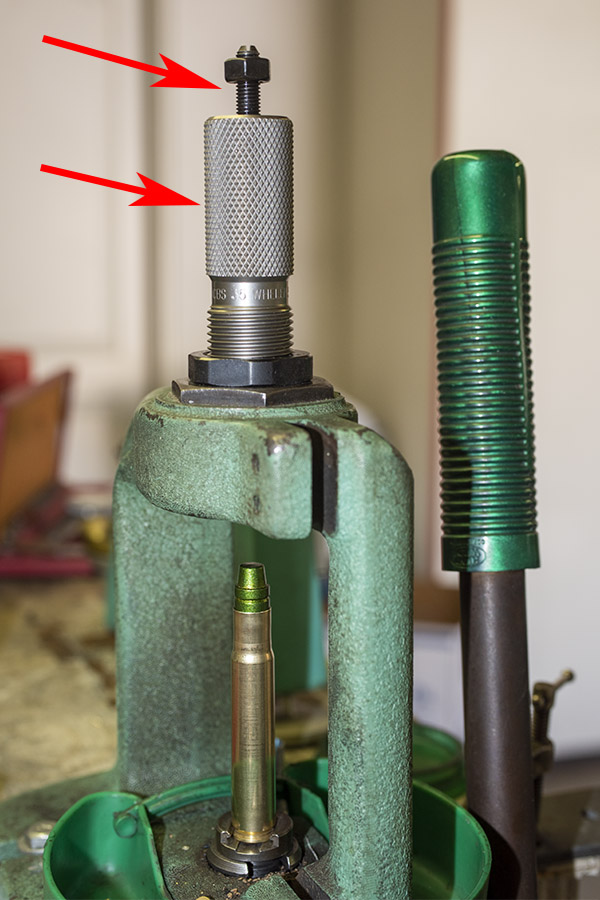
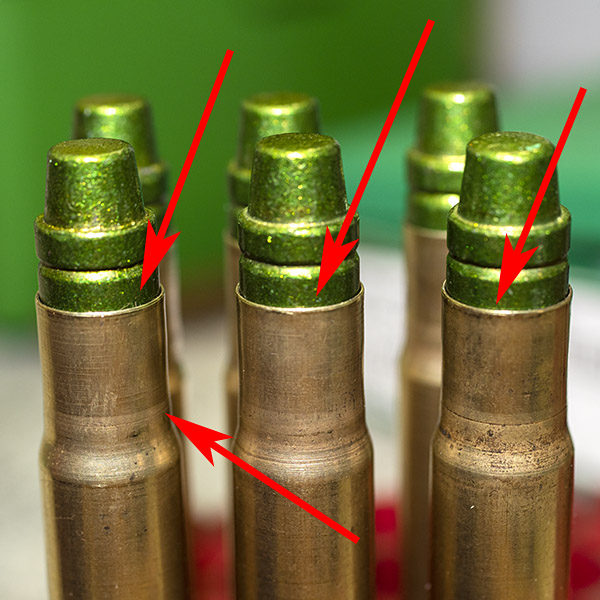
The gray arrows point to a very slight flare. You have to flare the cases before seating the bullets or the case will shave the bullet as it is inserted into the cartridge case.The bullet seating and crimping die in my RCBS Rockchucker press. Seating and crimping are performed in two separate steps.
After I seat all the bullets to the correct depth, I then back way off on the bullet seater (again, denoted by the upper arrow in the above photograph). I’ll next screw in the die body (denoted by the lower arrow) until the reduced crimping radius in the die body interior contacts the mouth of the cartridge. At that point, I’ll adjust the die by screwing it in just a little bit further. What I’m doing is adjusting the die so that it removes the flare, but does not crimp the case mouth. You can see the results (i.e., the case mouth flare removed) noted by the red arrows in the photo below.
The upper arrows show the case mouth after the crimping die has removed the case mouth flare. These are not crimped; I adjusted the die to just remove the flare. The lower red arrow indicates the depth to wihch I neck sized these cases.
Back to the cost issue: As you read at the start of this blog, a box of 20 rounds of .35 Whelen factory ammo goes for anywhere between $50 and $72. By my computations, the reloads you read about here cost under $6 for a box of 20 rounds.
So what’s next? Well, the brass is in the tumbler and I’m going to load more. Same load, which kicks about like a .22. Then I’ll try reducing the load slightly to see if that improves things. Stay tuned; you’ll be able to read all about it right here on the ExNotes blog.
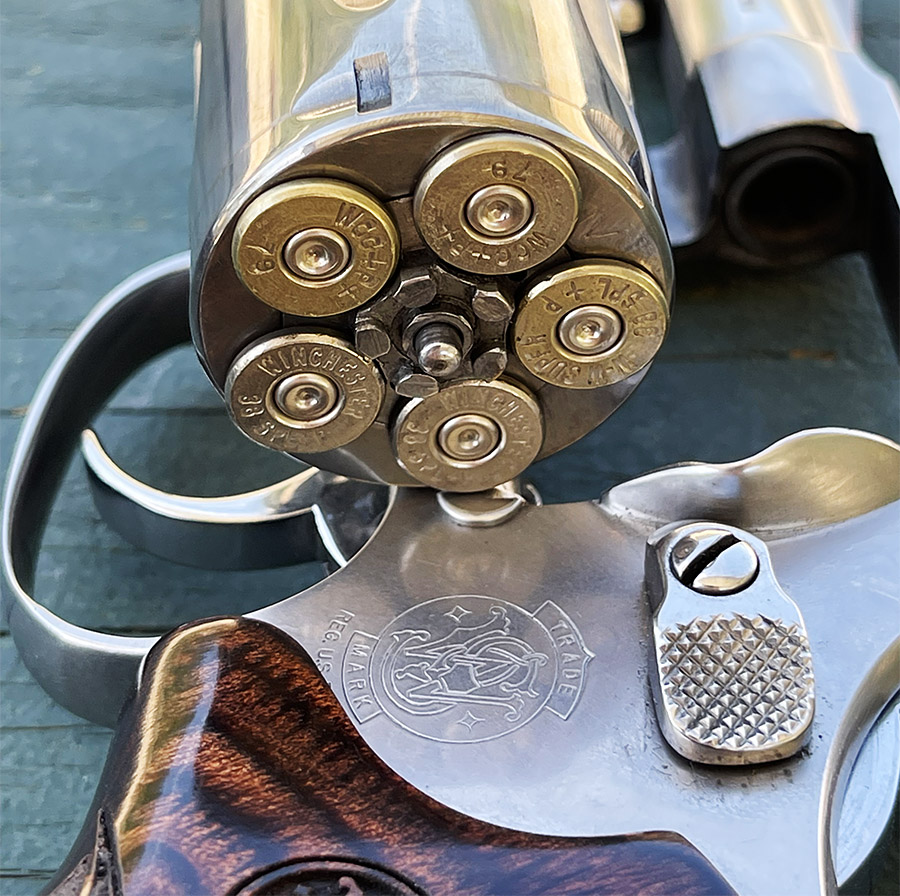
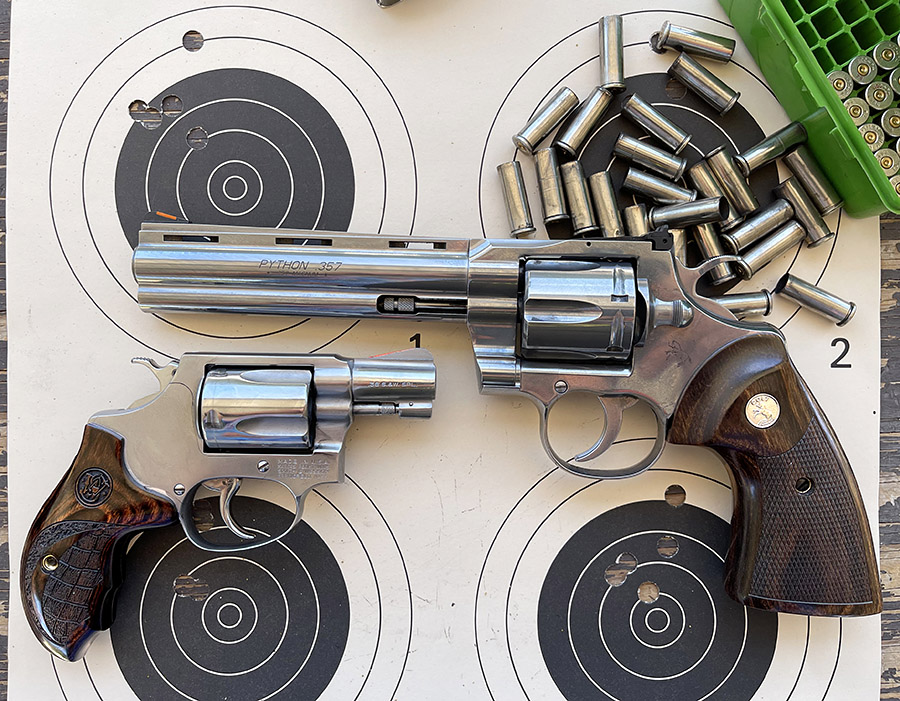
Another day on the range, and another set of test results. These are the first loads I’ve tried with Boudreau’s 158-grain powder-coated semi-wadcutter bullets. I loaded the Boudreau bullets into .38 Special cases for evaluation in a Colt Python and a Smith and Wesson Model 60. My first reloads were with Accurate No. 5 powder.
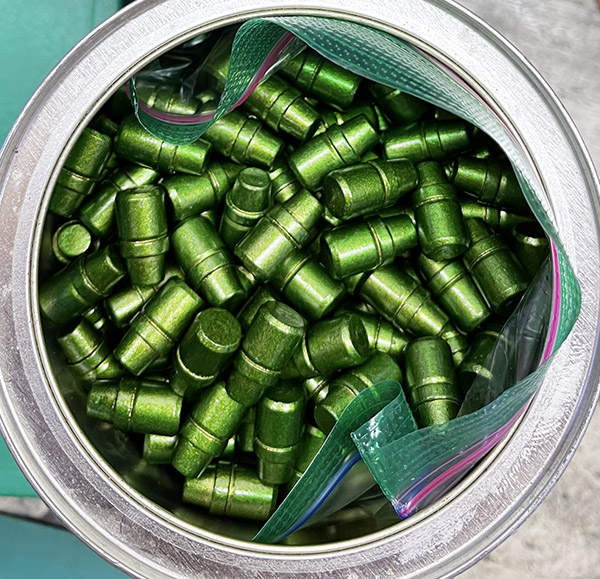
158-grain Boudreau bullets in candy green. Boudreau’s makes a good bullet.Fresh .38 Special reloads. The candy green color goes well with brass cases.
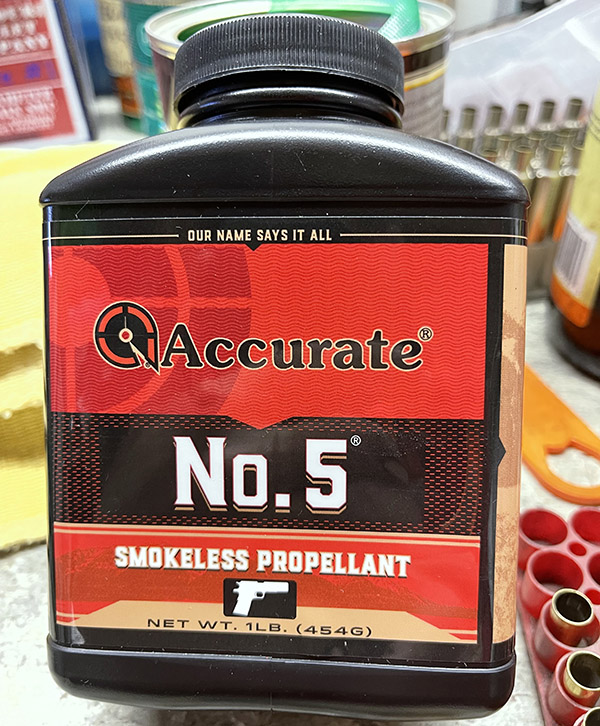
These days, you take what you can get when it comes to reloading components. I previously developed accurate .38 Special loads with Bullseye, Unique, Power Pistol, and WW 231 propellant (you can read about them on our Tales of the Gun page), but I haven’t previously loaded .38 Special with Accurate No 5. It was the only powder my reloading shop had in stock, so I bought a couple of bottles to try.
Classy-looking ammo.Accurate No. 5 propellant.
Finding data for powder-coated bullets is a bit dicey, and it’s even more difficult with Accurate No. 5. There’s load data on the Accurate website, and they recommended a load range of 5.3 to 5.9 grains for this powder with a 158-grain powder-coated bullet. I loaded at 5.4 grains (0.1 grain above the minimum) to try in both my Colt Python and my Model 60 Smith and Wesson (both of which have been massaged with custom triggers from good buddy TJ’s Custom Gunworks).
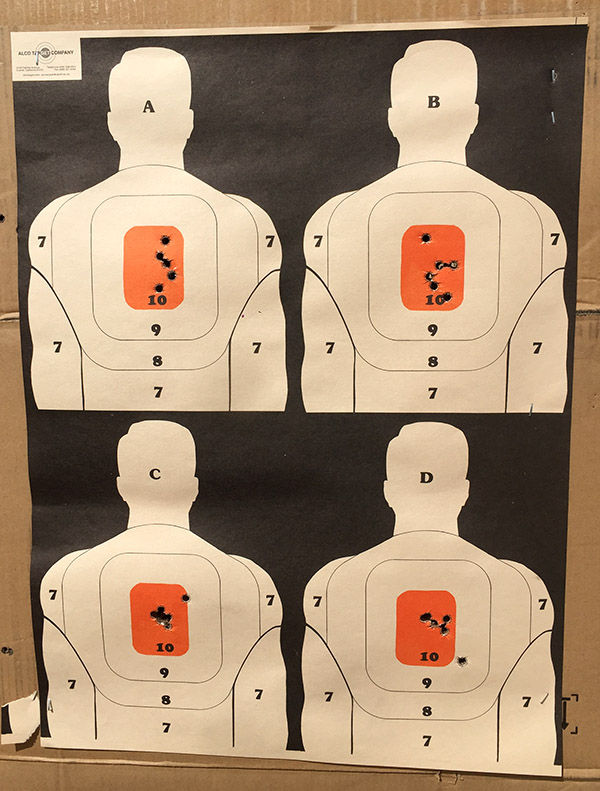
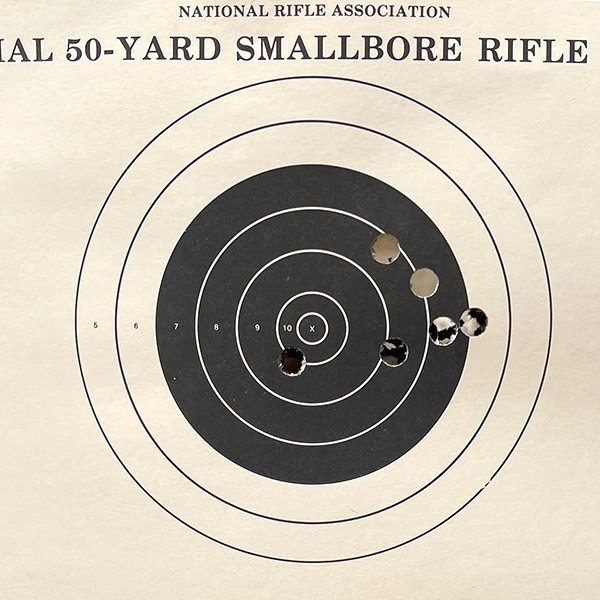
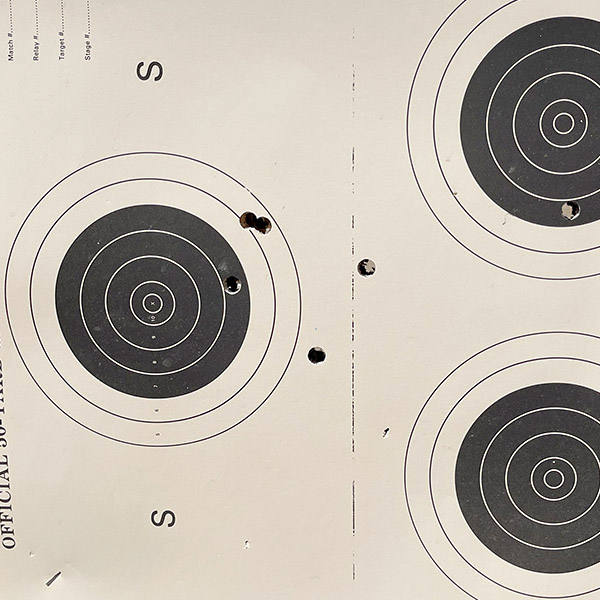
Colt Python results at 50 feet. Not bad for an initial load. Subscribe to the ExNotes blog for future load tests.Smith and Wesson Model 60 load results at 50 feet. This is not too shabby for a snubnose revolver.
I recently tried Boudreau’s 9mm 125-gr bullets and I was very pleased with the results (you can read about that here). I’m just getting started developing loads for the .38 Special with the Boudreau powder-coated bullets.
9mm ammo reloaded with Boudreau’s powder-coated bullets.
You may have noticed that Boudreau’s Bullets is now an advertiser on the ExNotes site. I like the product and we want to share the knowledge with you. You can call the number on their site; ask to talk to Ralph. He’s very knowledgeable and you will be in good hands.