I told you a bit about my 222 Savage 340 in an earlier blog, and I described removing the barreled action from the stock for a refinishing project. This is the second installment of that project, in which I remove the old finish and prep the stock for refinishing.
Stripping
At this point, all that’s left is the walnut stock, and that means it’s time to remove the old finish. The last time I did this I used an spray that took the finish off almost immediately, and it required only one application. This new stuff is supposed to be better for the environment, and the spray can said it might take a couple of applications to get all of the old finish off. The instructions also said to wait 3 hours after applying it. It did take three applications to get all of the old finish off. Somewhere a tree hugger is thankful, I guess, but it meant that with the wait times after each application this task was spread over 2 days. The way I used it was I sprayed the stuff on, I waited the three hours, and then I wiped the gooey finish remnants off with a towel. I wore disposable rubber gloves and wiped the stock down with an old terry cloth towel.
The stripper. I’m hoping the search engines see that term and we get lots of hits. You know. The stripper.
Oil Extraction
After that, I went to work with a heat gun on the stock. That sweated out the whatever oils were left in the wood, and then it was time to start the stock repairs and the sanding.
Undinging
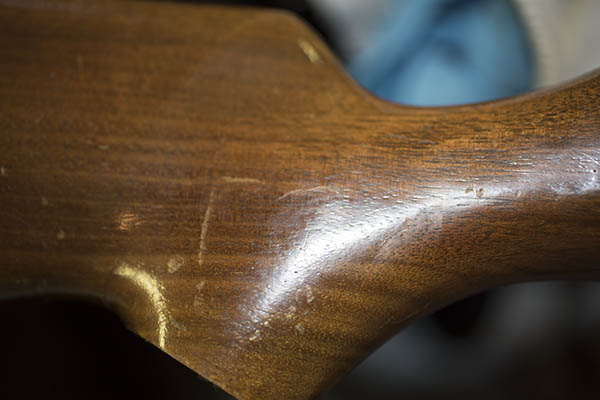
There were a couple of depressions in the stock (not chips, but slight depressions where the wood had been compressed). That called for the old wet washcloth and iron trick. The drill here is to lay a wet washcloth over the dings in the stock, and then apply the hot iron to the washcloth directly over the dings. The resulting steam is forced into the wood and it lifts the dents. It works well because the wood wants to return to its uncompressed state and the steam helps it do so.
Butt and Cap Alignment
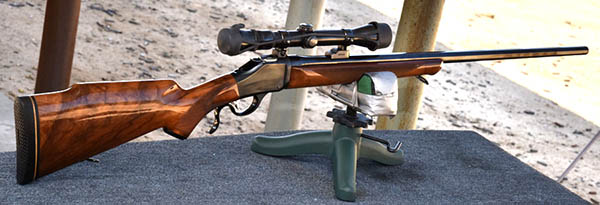
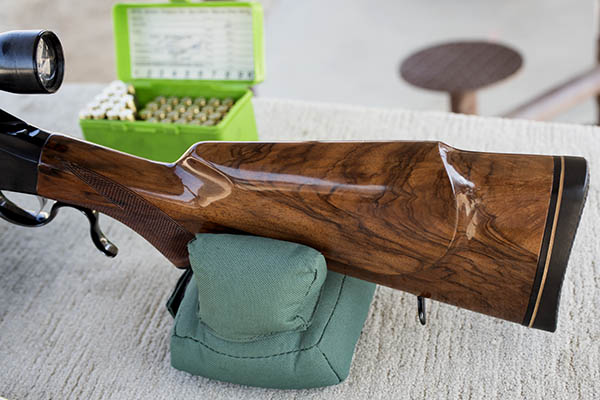
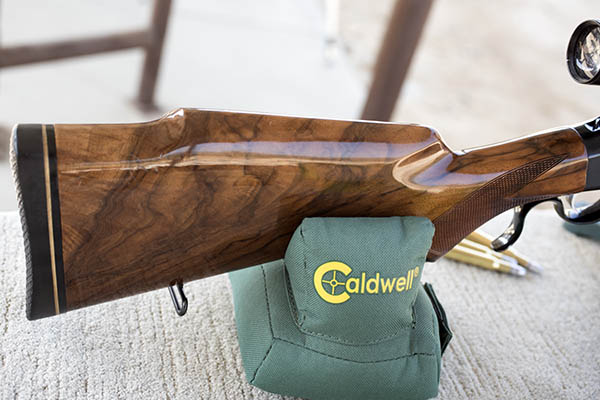
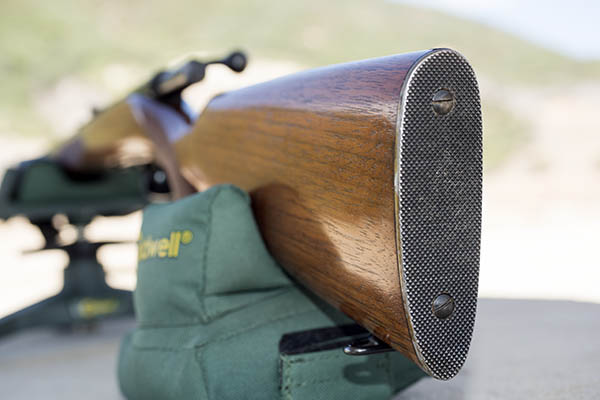
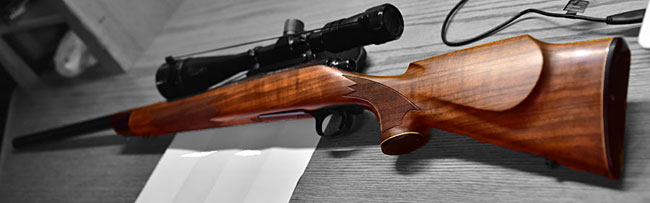
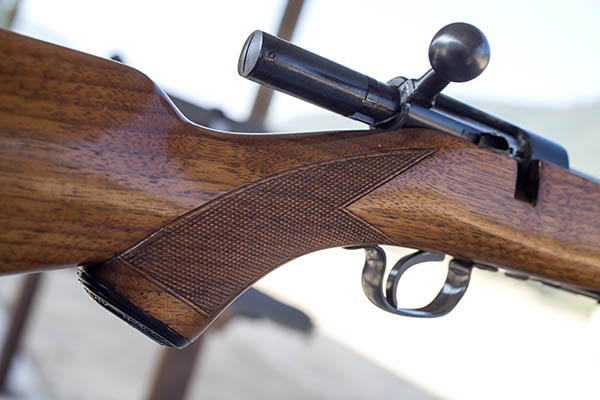
After that, I reinstalled the butt plate and the pistol grip cap, but without the white line spacers. The white line spacer thing was a popular look in the ‘50s and 60’s, but I don’t care for it. I like the look of a black buttplate and pistol grip cap directly against the walnut. There was a bit of mismatch between these plastic parts and the stock, but that’s okay, too. It will be addressed in the next step.
The old look: White line spacers. Ugh!The new look, pre-TruOIl and pre-final-sanding. It’s going the way I want it to.
Sanding
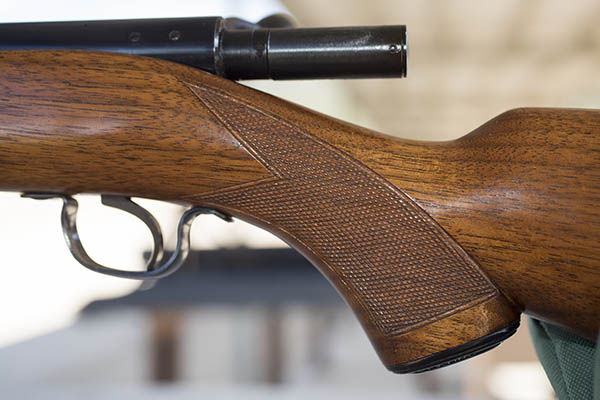
You might think the walnut would be smooth because it was already smooth before the original finish was applied several decades ago, but that’s usually not the case in a project like this. Stripping the finish raises the grain a bit, and truth be told, original finishes from the factory are usually not so good, anyway. And, as hinted at in the preceding paragraph, sanding will assure a perfect match between the walnut stock and the butt plate and pistol grip cap. I start with 220 grit sand paper, then 320 grit, then 400 grit, and finally, 600 grit. Again, patience is a friend here. I worked to get the match I wanted between the stock and the black plastic parts, and I wanted a smooth surface all over the stock. I always sand with a block to support the sandpaper, and I’m careful not to round any edges where crisp edges are desired (like along the top of fore end).
All of the above took a little more than 3 days, and at the end of this phase of the project, I had a pristine stock with a perfectly matched buttplate and pistol grip cap. It was ready for the next step, and that’s the start of the TruOil applications for a rich, subdued, and elegant oil finish. That’s coming up in the next blog on this project.
Read more of our Tales of the Gun stories here, and don’t forget to sign up for our automatic email blog notifications!
Did you miss the earlier blogs on this Savagely inexpensive, tack-driving Savage 340? You can see them here and here!
I recently purchased a copy of Field and Stream, a magazine I had not read in decades. I was traveling, the selection of good reading material at airport newsstands is limited, and it was the only thing that looked even remotely capable of occupying my interest on a 3-hour flight. In scanning the cover, I saw that the magazine included an article on long-distance shooting, so Field and Stream it was for that flight.
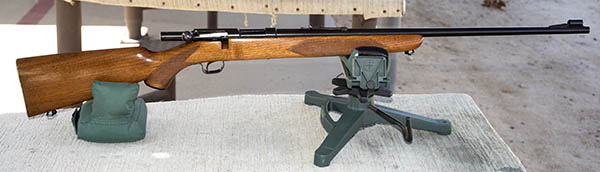
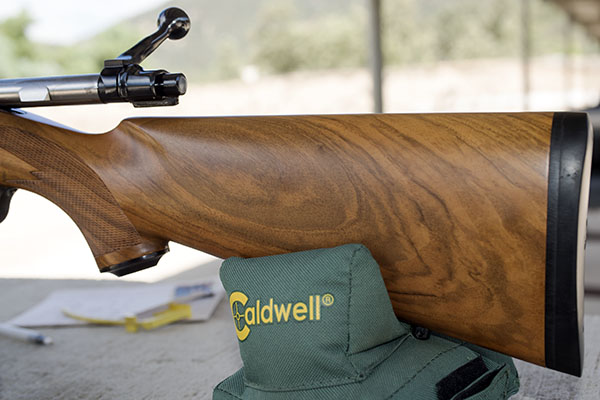
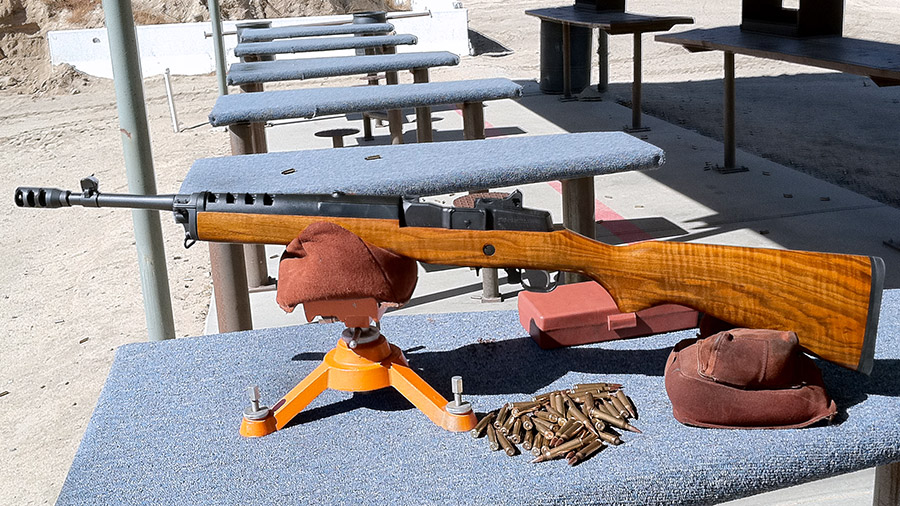
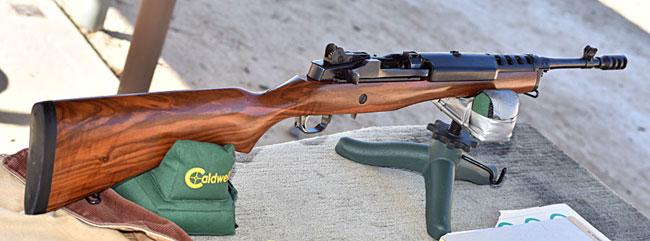
The Ruger Mini 14
Back on topic, the Ruger Mini 14 is a rifle not known for its accuracy, and I was frustrated with mine. It was (I thought) barely okay as far as accuracy goes. I like shooting it, but the Mini 14 wasn’t great in the accuracy department and great was what I wanted.
The Ruger Mini 14, a rifle not known for exceptional accuracy.
The Field and Stream piece on long-distance shooting was partly focused on hunting at extreme distances (something in which I have zero interest), and partly focused on rifle marksmanship (something in which I have a keen interest). There was nothing new in the article (I’d been exposed to all the topics it covered at one time or another), but seeing them all in one place was a good refresher that made me realize I was getting sloppy in my old age. As I read the article, I realized that I wasn’t doing a lot of the things that are important for shooting tiny groups and I had been relying too much on the rifle and the load to make it all happen. This somehow seemed particularly relevant to the Mini 14 and it made me want to get to the range with it and focus on the techniques mentioned in the story. I realized there was more to this accuracy business than just the gear and the ammo. The nut behind the trigger plays a significant role, and this particular nut had not been focused on the basics.
I resolved to concentrate on the fundamentals mentioned in the Field and Stream article (things I learned 50 years ago in the Army) during my next trip to the range. As soon as I returned to California, that’s exactly what I did. And you know what? I shot better. A lot better.
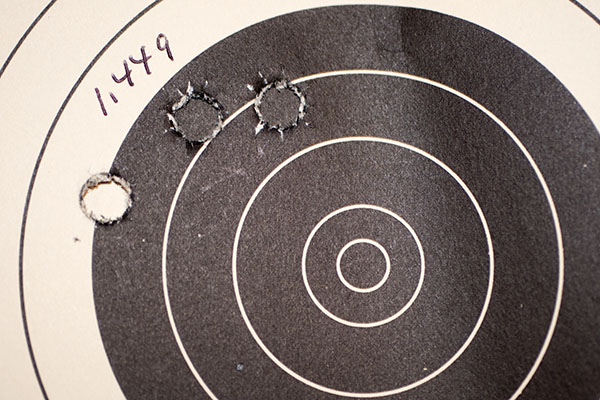
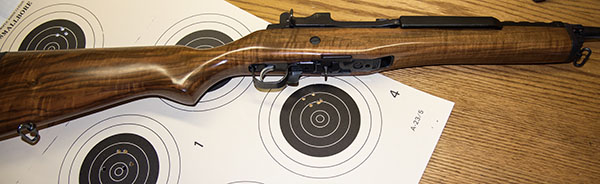
Back to basics, and the groups got smaller. My load was a 62-grain PRVI full metal jacket boat tail bullet over 23.2 grains of ARComp. Always start low on the powder charge and work up; this is a max load in my rifle. Your results may vary. These targets were shot at 50 yards.
The load (a 62-grain bullet over 23.2 grains of ARComp) is one I had previously found to be a decent one in my Mini 14, but it had never given me groups like I shot that morning. That morning my groups were consistently tight and significantly smaller than what I had seen in the past. It was extremely satisfying, and I proved to myself once again that it’s the fundamentals that make a difference. Bear with me; I’ll get to those in a moment.
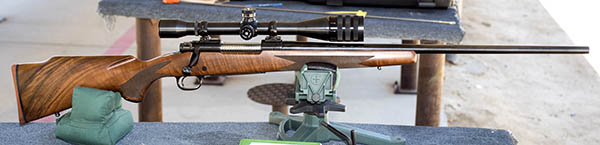
First, a comment or two on my Mini 14. Whenever I show a photo of it or take it to the range, folks ask about the stock. My rifle is a special run 580-series Mini 14 offered by Davidson’s (a Ruger distributor) about 10 years ago. It has a Circassian walnut stock (folks often ask if it’s a custom stock, but it’s not). I looked at a lot of Mini 14s online from that special run before I bought the one you see above. I wanted exceptional walnut and I think I found it in this rifle.
As configured from the factory, my Mini 14 didn’t meet the laws here in the Peoples Republik of Kalifornia. I had to remove the flash suppressor and replace it with a muzzle brake to bring it into the Golden State. I also replaced the Ruger rear aperture sight with one from Tech Sites (it’s a better design, in my opinion). Other than that, the rifle is completely original. I’ve put tens of thousands of rounds through my Mini 14, it’s my favorite rifle, and it’s absolutely reliable. But it’s never been terribly accurate (or so I thought) until I read that Field and Stream article and got back to the basics.
Marksmanship Fundamentals
You might be wondering about what the fundamentals of sound rifle marksmanship are. Or maybe you already know what they are, but you would like a few reminders. That’s kind of where I was. Here’s what I took away from that Field and Stream article.
1. The first fundamental is to get into a good position. I shoot from the bench, and most folks might think that the rest, the rifle, and the bench make everything work. There’s a lot more to it than that. You need to get square to the rifle and sit directly behind the stock, and you need to adjust your position to achieve a natural aim. What that means is that after you think you are in the right position, you sit up away from the rifle, close your eyes, and then position yourself behind the rifle again. Open your eyes, and when you look through the sights, the sights should naturally align on the target. If they are not on the target, you’re not there yet. Move around and try it again. Keep doing this until you can shut your eyes, get in position, look through the sights, and find the target right where you want it to be. Trust me on this: It makes a difference.
2. The next fundamental is to focus on the front sight only. The Field and Stream article was about a rifle with a telescopic sight, but it mentioned front sight focus for iron sights and I knew I had a hard time doing it right when shooting the Mini 14. I guess I needed to be reminded. This is a tough thing to do for most people. I do it superbly well with a handgun, but I have a tough time doing it when shooting a rifle equipped with a rear aperture sight. I find myself wanting to look at the target, wanting to get the front sight post perfectly aligned in the rear aperture, and generally not doing this the way it’s supposed to happen. Focusing on the front sight only is almost zen-like in the concentration it demands. When I do it right, though, I actually don’t see the rear sight or the target and that’s tough for me to accept mentally. When I do it right, the only thing I see is the front sight and the muzzle flash when the hammer drops. Seeing that flash outlining the front sight lets me know I’m in the zone and I’m doing it the way it should be done. It’s a weirdly satisfying feeling. When it happens, I know the bullet will go where I want it to go.
3. The third important factor is breath control. None of us can hold a rifle steady while breathing, so I had to find a natural point to hold my breath. According to the Field and Stream article (and my old drill instructors) we can only do that for a couple of seconds before the sight starts to blur. In the Army, we were taught to take a breath and let it half out. The Field and Stream article pointed out that the “let it half out” thing may not be the best approach. The article said to find your natural point for holding your breath, so I tried that and sure enough, I seem to have a spot about two-thirds of the way down that feels like a natural stopping point. The article also mentioned that if the front sight starts to blur, don’t try to force the shot. Take another breath and start over. Not doing all of these things, I realized, were bad habits I had picked up.
4. The fourth important factor is trigger squeeze. Easy, steady, straight back, using the tip of my finger only. I have a tendency to get my finger too far around the trigger. On this outing, I forced myself to use only my finger tip, and wow, it really worked.
5. The last thing the Field and Stream article mentioned was holding the rifle properly with your trigger hand. Some of this stuff I knew, and some of it I didn’t. Shooting from the bench involves barely touching the rifle. That part I knew, and I think I did okay there. What I do is to just barely have my cheek on the stock without bearing down on it (you can impart torque into the rifle if you hold it too securely, and that works against accuracy). The other thing was how to hold the rifle with your trigger hand. This was something I hadn’t been doing correctly. The correct technique is to use my lower three fingers to lightly pull the rifle straight back into my shoulder, use my trigger finger tip to squeeze straight back on the trigger, and position my thumb off the rifle above my other fingers (I had to relearn not to wrap my thumb around the stock). That last part felt unnatural to me, but boy oh boy, it sure worked. I could see the difference on the target.
So there you have it. I focused on the fundamentals described above, and what do you know, I shot my Mini 14 better than I ever did before. My Mini 14 is suddenly far more interesting and way more fun to shoot, and I have a new respect for it. And the group sizes show it. Back to the basics. Good times.
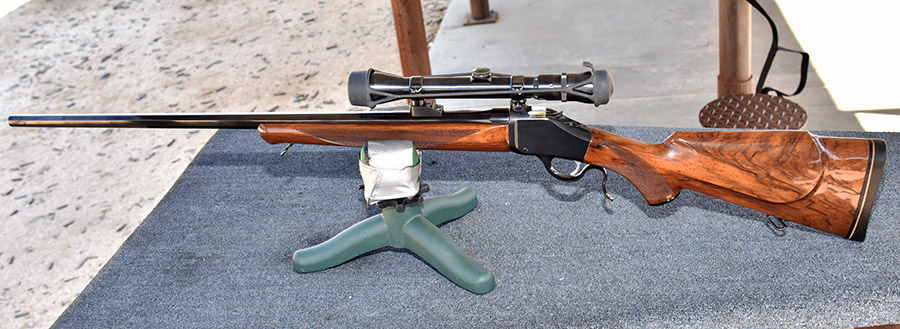
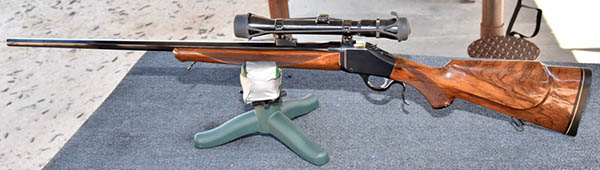
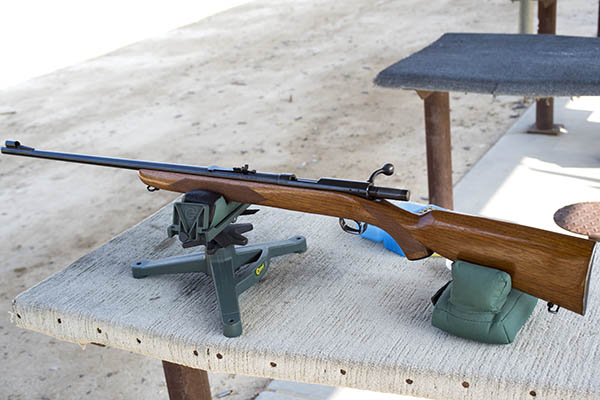
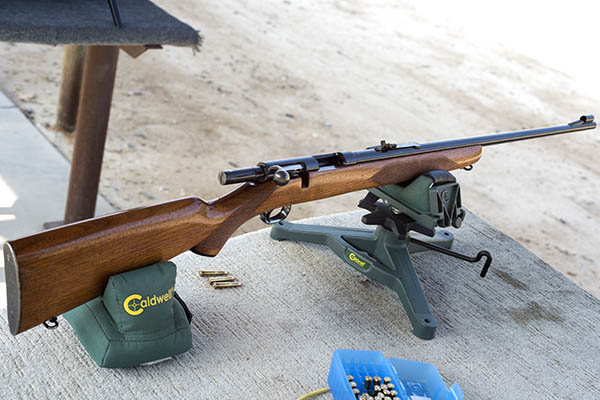
I’m refinishing the stock on my .222 Remington Savage 340 and as promised, here’s the beginning of the story on this project.
The Rifle: A Savage 340
This story goes back a few years when I spotted a Savage 340 on the used gun rack at a local gun store. Several thing about the rifle intrigued me…it was cheap (it was only $180), it was chambered for the 222 Remington (a very accurate cartridge), and the stock was scratched and worn (but the damage was superficial). I thought the little Savage would make for an interesting refinishing project. But I guess I’m like Gresh. Some things need to be put on simmer for a while.
The rifle shot well, I played around developing a load for it, and it was only after the thing sat around for a couple of years that I finally got on with my refinishing project. I’ve blogged about this rifle a couple of times before, and I’ll give you the links to those posts at the end of this blog.
The Original Finish
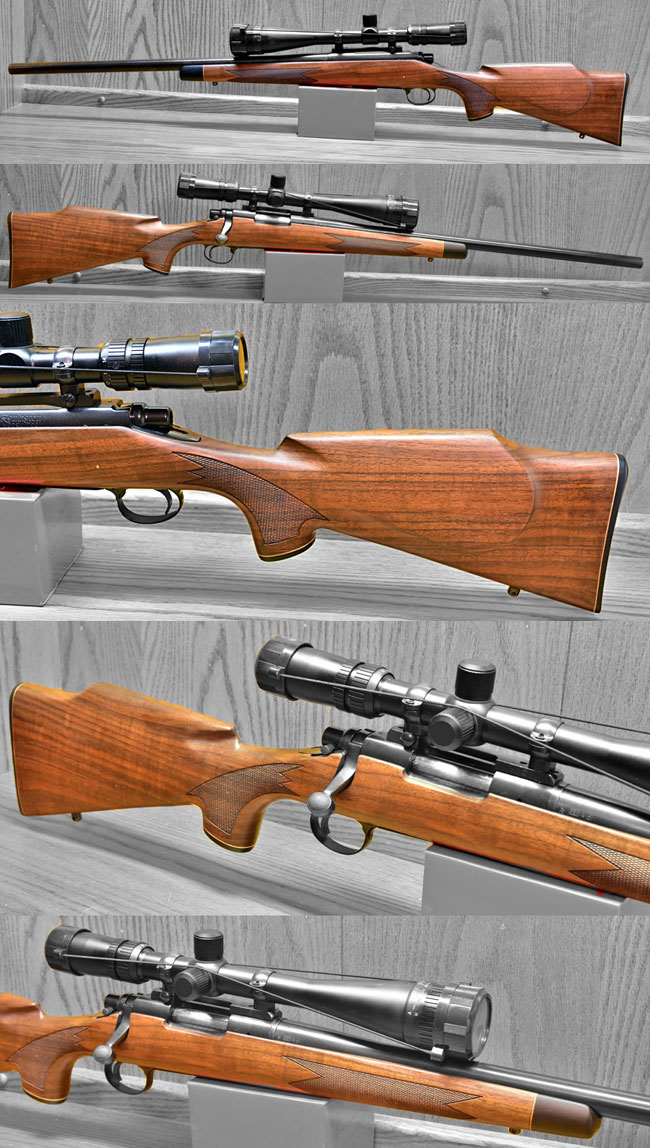
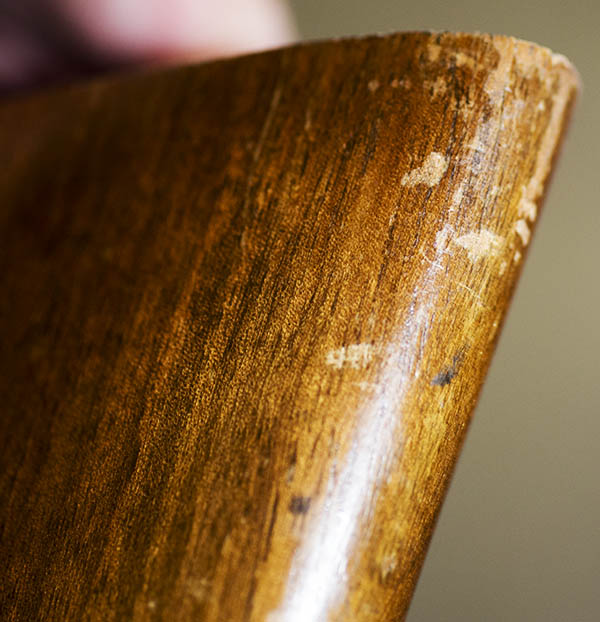
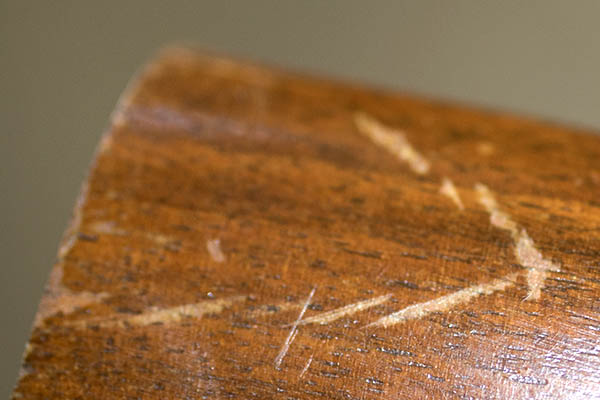
The Savage had some kind of a shellac or varnish finish that was flaking and scratched in a lot of places. The underlying wood was sound; there were just a lot of finish scratches all over.
Superficial flaking on the butt.More superficial surface finish damage.Other light scratches. Like I said, the underlying walnut was sound.
The rifle had a black butt plate with a thin white plastic spacer, and the pistol grip catch had the same deal. I knew I was going to delete the white spacers because I like the look better without it.
The white spacers had to go.
I’ll show you what the butt plate and pistol grip look like without the white line spacers in a subsequent blog. Trust me; it’s way more elegant.
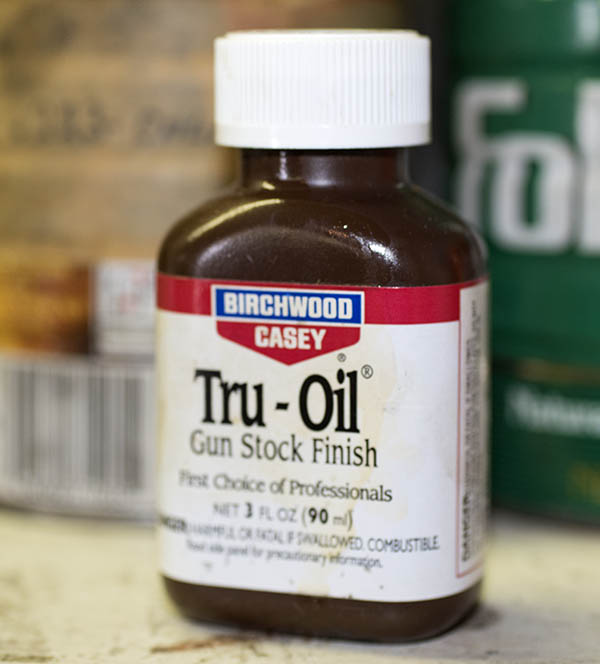
TruOil to the Rescue
Me? I’m a big fan of oil finishes, and my soup du jour is always TruOil for projects like this one. But I’m getting ahead of myself.
The best stuff ever invented, TruOil is.
Barreled Action Removal
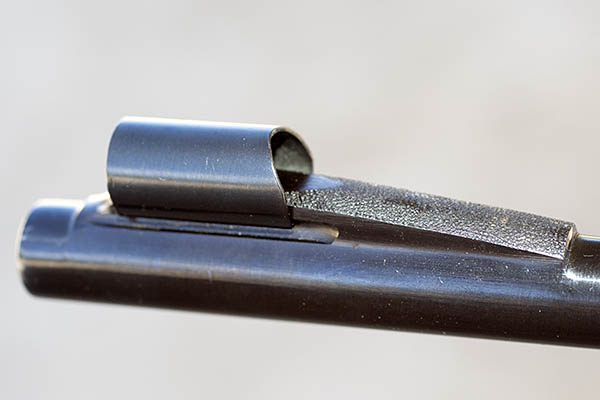
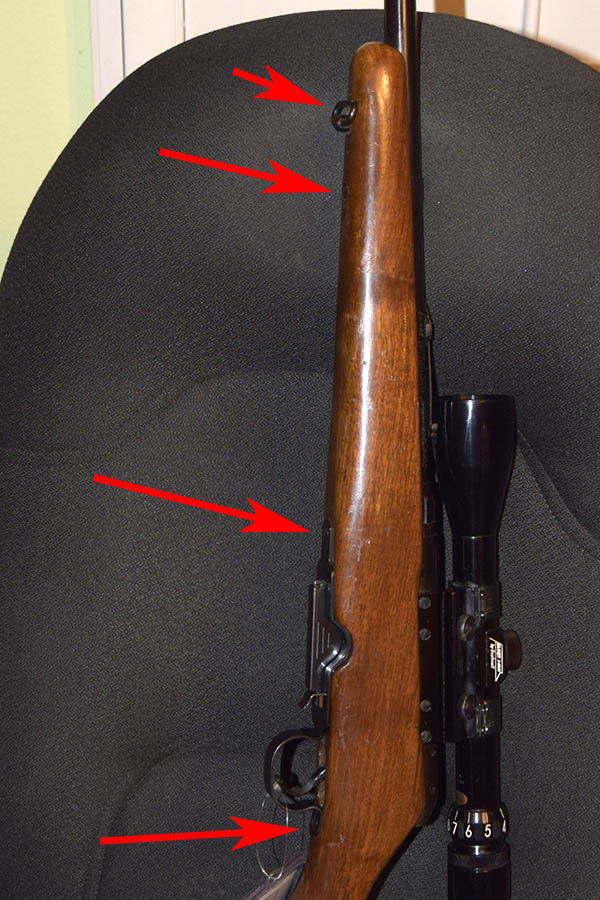
The first step in any gunsmithing project is to make sure the rifle is unloaded, which I did, and then I remove the barreled action from the stock. That was easy peasy…the Savage has three screws securing the metalwork in the stock. It’s the rear trigger guard first (and unlike most rifles, on these old Savages all that rear most screw does is hold the rear of the trigger guard in the stock; it does go all the way through to the receiver). Then it’s the screw up front, which taps into a barrel retainer. And then it’s the main action screw, immediately under the forward portion of the receiver. It’s an unusual setup. Most rifles are secured by bolts through the trigger guard/floorplate that secure the receiver to the stock. Having only one attach point to the receiver and another on the barrel is supposed to hurt accuracy. No one told that to my Savage, though. It shoots into an inch at 100 yards all day long. After that it was the sling swivels, which unscrew from the stock.
Three screws release the barreled action from the stock (the barrel mount, the forward action, and the rear trigger guard screws). The sling loops unscrew, too.The rear trigger guard screw and the action screw.
The next steps are to remove the butt plate and the stock’s pistol grip cap. Those are retained by Phillips head screws and they came off easily.
That’s it for now. The next steps will involve stripping the finish, and that’s a topic for the next blog in this series. Stay tuned. If you want to read the original blog we posted on the Savage 340, it’s here.
Want to get notified when we post subsequent blogs? Hey, just sign up here!
Good buddy Jason, a Ruger No. 1 in .338 Win Mag, and a 400-lb, 7-ft Alaskan black bear.
As the title of this blog implies and in this case, my good buddy Jason was literally loaded for bear. For several years I had owned a Ruger No. 1 single-shot rifle in .338 Win Mag. That’s a monster of a magnum. I had never fired the rifle and I sold it to Jason. He told me he was going on a bear hunt in Alaska (something I’ve always wanted to do), and I was happy to the see the rifle go to a good home. Most recently, Jason sent the photo you see above and a recap of his hunt to me to share here on the ExNotes blog. Here you go, folks!
It all started in 2016 when I purchased my first Ruger No. 1 in 338 Win Mag from Joe. I’ve always wanted a Ruger No. 1, but I already had a Winchester Model 70 in 338 Win Mag. I planned to go on a bear hunt in 2018, so what I did was sell my Winchester Model 70 to my best friend, who went on the bear hunt, too. I would be using my Ruger No. 1. So this is a story about me and my new rifle and our quest for a big Southeast Alaskan black bear. It was a guided hunt through Alaskan Coastal Outfitters.
Our base camp was on a boat and in the evening we would take a skiff and cruise around all the little islands and bays looking for the right bear. We saw lots of bears (a lot of sows with cubs). We also saw a lot of boars. On Day 4 of our hunt we saw a really nice bear. We got as close as we could without spooking him. My guide told me to get out of the boat and he held the boat still for me. Then, as I was pulling my leg over the side of the boat I got hooked on to the edge of the boat and I fell face down in 8 inches of water.
The bear ran off and my beautiful Ruger No.1 was laying in 8 inches of salt water, so we raced back to the boat, took the rifle apart, and cleaned it up so it was like new.
The next day we went out again and this time I was extra cautious not to fall in when we came across the bear you see in the picture. He was about 300 yards from the skiff when we spotted him. We got as close as we could without spooking him, which was about 140 yards, and my guide kept on asking me if I could make the shot. I always answered “yes, no problem.” I lay down and rested my rifle on my pack. Wouldn’t you know it, I had to lay down in a little creek so I got wet again. We lay there for what seemed to be an eternity. My guide made sure it was a boar and not a sow. Finally, he gave me the OK.
Just then, the bear turned so he had his back to me (so I couldn’t shoot). It gave me an opportunity to situate my follow-up shot. I decided the quickest way to get a follow-up shot (if I needed one) was to shoot with the next round in my hand.
The bear finally turned broadside and I dropped the hammer. I hit him just behind the shoulder and he dropped. My guide backed me up with a 375 H&H rifle, but he didn’t need to fire it. The bear went down, and when we reached him, we saw he was the monster he appeared to be from a distance. The bear measured 7 feet and weighed about 400 lbs.
Jason, that’s an awesome story and a magnificent photograph. I was sorry to see that rifle go, but it obviously went to a good home and you sure put it to good use. You know, it takes a real sportsman to do what you did…going after bear with a single-shot rifle. Congratulations on a successful hunt, and thanks much for sharing your adventure with us here on the ExhaustNotes blog!
Would you like to write a guest blog for ExNotes? It could be a gun story, a hunting story, a motorcycle story, or any other idea you think might work for our audience. If you have an idea, please let us know at info@exhaustnotes.us. If we publish your story, you’ll get a signed copy of Destinations with our compliments and gratitude!
The sport of metallic silhouette shooting came to us from Mexico, where it started roughly 80 years ago as a part of a culture of rural village celebrations. They used live animals in those days tethered to a stake, which made it a lot harder to hit them because after the first shot the animals tended to take evasive action. I guess it was considered politically correct in those earlier times because the match would be immediately followed by a rip-roaring barbeque (at which, of course, chicken, pig, turkey, and ram were on the menu).
I learned all of this from a world-class metallic silhouette shooter named Jose Porras in the 1970s. Jose used to drive up from Mexico to shoot with us at Fort Bliss when I first got into the metallic silhouette game. He was the guy to beat, and I never did. I didn’t care. I just liked hearing his stories about the old days and the origins of the sport.
Metallic Silhouette Targets and Distances
I had last shot in a metallic silhouette match about 45 years ago. By then, the sport had morphed into shooting at metallic silhouettes, like you see in the photo at the top of this blog. There were chickens at 50 meters, pigs at 100 meters, turkeys at 150 meters, and rams at 200 meters (this was for the handgun competition). All of the silhouettes were life-sized. For high power rifle (which we always shot with a scope back then) the targets were the same, but they were located at 200 meters (chickens), 300 meters (pigs), 385 meters (turkeys), and 500 meters (rams). Those are long distances, and all of the rifle shooting was offhand (no slings or shooting jackets). You could shoot from a sitting position in the handgun matches, but the rifle competition was all a stand up affair. It was challenging, and that’s what made it interesting. The winner usually connected with only about half the targets, and you either hit them or you didn’t.
Just hitting the targets didn’t count. You had to hit them with enough energy to knock them over. In the rifle competition, that alone ruled out the light cartridges. And you couldn’t use magnums, either, because those cartridges would damage the targets. Nope, in the rifle game, it was a Goldilocks affair. The energy had to be just right. 7mm Mauser, 7mm-08, .308, and .30 06 were the favorites back then.
In the handgun competition, everyone either used a magnum cartridge (.44 Magnum was popular), .45 Colt loaded to the max, or a custom wildcat (I’ll say more about that below). .45 ACP, .38 Special, and the standards of the day didn’t have enough energy to knock the targets over, and their rainbow-like trajectories meant there wasn’t enough adjustment in the sights. 9mm? Fuhgeddaboutit. The 9mm was woefully anemic for this game.
Metallic Silhouette Handguns
In the International Handgun Metallic Silhouette Association (IHMSA) national championships in 1976 in El Paso, I tied for 5th place and then lost a shootoff. I was out of the money in 6th, but I was still pretty pleased because I was using a bone-stock Smith and Wesson Model 27 .357 Magnum with my cast bullet reloads, while all of the guys who did better than me were shooting custom XP-100 Remingtons. The XP-100 was a single-shot pistol based on a rifle action, and in those days, guys would have them custom barreled in 30×223. The 30×223 was a wildcat based on the 5.56 NATO cartridge blown out to take a .30 caliber rifle bullet. It ultimately became known as the 300 Blackout cartridge. Jose used one of these 30×223 custom handguns for culling coyotes on his estate in Mexico during the week and for winning matches in El Paso on the weekends. He was really, really good. I imagine the coyotes hated him.
.22 Rifle Metallic Silhouette Shooting
Well, to make a long story slightly less long, I had been wanting to get back into metallic silhouette shooting for the last four and a half decades, and one day a year or so ago I did. I broke the suction between my butt and the seat in front of this computer and I shot in the .22-caliber metallic silhouette rifle match at the West End Gun Club. I shot my Browning .22 A-bolt (a relatively rare and semi-collectible rifle).
I didn’t know it when I went out there, but they shoot two classes: One with scopes, and the other with open sights. The open sight targets are roughly four times the size of the scope targets, and for whatever reason, on the rams the targets for the scoped guns are set back an additional 10 yards (for the other three animals, the distances are the same). At all distances, though, the targets for the scoped guns are really, really small. Take a look.
With apologies for the lack of focus, here’s a zoomed-in shot of the turkeys. The iron sight turkey targets are on the left; the scoped-rifle turkeys are on the right…
Like I said, the scoped-rifle targets are really tiny. You can see that in the photo above. They were maybe two inches tall. Shooting at these things offhand was a challenge, but I had a blast out there. There were four guys shooting scoped rifles (I was one of them) and 14 guys (and gals) shooting iron-sighted rifles (mostly lever guns; all with expensive aftermarket aperture sights). It was a good crowd…mostly older guys (my age and up) with a few folks in their 20s and 30s. Everybody was friendly.
I could have started this blog by telling you I came in fourth in the scoped class and let it go at that, but the fact is I had the lowest score in the scoped class. I only got 14 out of 60 silhouettes, the next guy got 18, another guy got 20, and the highest guy got 22. It’s a tough game. I’m pretty happy with what I did, though. I had only zeroed my rifle at 50 yards (where I got about half the chickens). I got about a third of the pigs I shot at (these were the 65-yard targets, and every shot at them when I connected was at the low edge of the target). I only got one each of the rams and the turkeys (the turkeys are always the toughest), but like I said, I wasn’t zeroed and those were just lucky hits. Next time I’ll do better (and there will be a next time). This was all shooting offhand at teeny, tiny targets. I’d like to try the open sight class next time, too, just because the targets were a lot bigger. It all was a lot of fun.
The club also has a centerfire lever gun silhouette match, and I’m thinking I’ll try that, too. Those distances go out to about 140 yards, it’s all open sights, and it’s all lever guns. They told me they mostly shoot .357 Magnum (a handgun cartridge) and .30 30 for the centerfire metallic silhouette competition. The bug has bitten and I am enjoying being back in the game.
Sometime in the late 1970s, when I was an engineer on the F-16 program at General Dynamics in Fort Worth, Texas, I visited a company called National Water Lift somewhere in the Great Lakes area. What we bought from NWL had nothing to do with water (they made the F-16’s hydraulic accumulators). It’s a lead into this story, which is about my Browning B78 rifle. You see, every time I had to visit one of these distant places on my business travels, it was an opportunity to check out the gun shops in the area. Which I did, and the one that stuck in my mind had a Browning B78.
The Browning B78 Rifle
The B78 was a competitor to Ruger’s No. 1 single-shot rifle, and the design was basically a resurrection of the old Winchester High Wall. Ruger did surprisingly well with the No. 1 back in the 1970s (the idea of a single-shot rifle was intriguing to me and many others), and I guess Browning wanted in on the action (pardon the pun).
Help us bring fresh content to you: Please click on the popup ads!
Rugers outsold Brownings probably 10 to 1 (or more) in those days because they were less expensive and Ruger’s marketing was better. But the Browning was (and still is) a very elegant rifle. I saw one at that store (I want to say it was in Kalamazoo, Michigan, but I can’t remember for sure), and it was nice. It was a 30 06 and it had an octagonal barrel, which was all very appealing. But the Browning was a good $100 more than the Ruger and in the 1970s, that kind of money was out of my reach.
Good Deals on Gunbroker
Fast forward 40 years, the Great Recession was upon us, and all kinds of exotic and collectible rifles were popping up on Gunbroker.com (a firearms auction site). I saw what appeared to be a nice B78 on Gunbroker, with an octagonal barrel, in God’s caliber (that would be .30 06), and I pounced. I paid too much, but we never say it that way. I bought too soon. Yeah, that works. I just bought too soon.
A earlier photo from one of my first range trips with the Browning B78. .30 06, one shot, great walnut, an octagonal barrel…this rifle is elegant.The B78 is sharp from either side. That’s a Weaver 2×7 scope, and it gets the job done.
After I bought the B78, I wanted to put a period-correct scope on it (you know, from the 1970s) and I found a nice Weaver 2×7 on another auction site. Weavers are good scopes and the ones from the 1970s were blued steel and made in America. It was just what the doctor ordered, and it looks right at home on my B78.
My B78 is used, and it’s got a few nicks and dings on it. But the metal work is perfect, and the walnut is (in my opinion) exhibition grade. Take a look, and you tell me.
Good wood. This is exhibition grade walnut……and it has fine figure on both sides.
Preferred B78 .30 06 Jacketed Loads
I’ve owned the B78 for about 10 years now, and it’s been a lot of fun. I’ve never seen another B78 on the rifle range, and I’ve certainly never seen one with an octagonal barrel. It’s just a cool firearm. But it is finicky. It likes heavier bullets and with the right load it’s accurate, but getting there took a lot of experimenting, a little bit of forearm re-bedding, and a lot of load development. I’ve got two loads that do very well in it…one is a heavy-duty jacketed load, and the other is a cast bullet light load. The heavy load is with a 180 grain Remington jacketed softpoint and a max load of 4064 (I’ve shot three-quarter-inch groups with this load at 100 yards). That load has big recoil, but it’s tolerable. I tried 180 grain Nosler bullets (that’s a premium bullet), but the rifle does way better with the less-expensive Remington bullets. That’s a good thing, because I found a good deal on 900 of those bullets and they have a home on my reloading bench now.
A Preferred B78 Cast Load
My cast bullet load is a short-range low power load, and it’s recoil is almost nonexistent compared to the jacketed load. It’s a 180 grain cast lead bullet (with a gas check) and 17.0 grains of Trail Boss power. After zeroing the Browning for the jacketed bullet load mentioned above at 100 yards, I had to crank the scope up a cool 85 clicks to bring the cast bullets back on paper at 50 yards (I was surprised there was that much adjustment in the scope). But wow, those cast bullets at 50 yards cloverleafed consistently. It was essentially putting them through the same ragged hole. At 100 yards, getting the cast bullet load back to point of aim involved another 25 clicks of elevation on the Weaver, and again, I was surprised there was that much in the scope. At 100 yards, the cast load groups opened up to about 2 ½ inches, and that’s still okay. What’s nice is I can shoot the cast bullet load all day long. The barrel doesn’t heat up and the recoil is trivial. As you might imagine with a load like this and the gas-checked bullets, there was virtually no leading.
When I go for deer later this year, it’s going to be with this rifle. One shot. I think that’s all I’ll need. We’ll see.
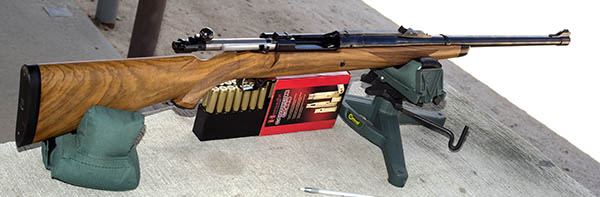
It was a day on the range with three classic and regal rifles: A .22 Hornet Winchester Model 43, a Winchester Model 70 chambered in .300 Weatherby Magnum, and a .416 Rigby Ruger Model 77 RSM Express. These are rifles that can handle everything from rabbits to rhinos, although my only intent was to punch holes in paper, preferably with the holes as close to each other as possible. It’s always fun doing so, and it’s even more fun when the rifles have an elegance rooted in fine walnut, hand-cut checkering, and deeply polished blue steel. To me, these things are art. Art you can take to the range and enjoy. I’m going to tell you more about the load data for each of these rifles in subsequent blogs; today, it’s a bit of history about the guns and their cartridges, and how I came to own each of these fine rifles.
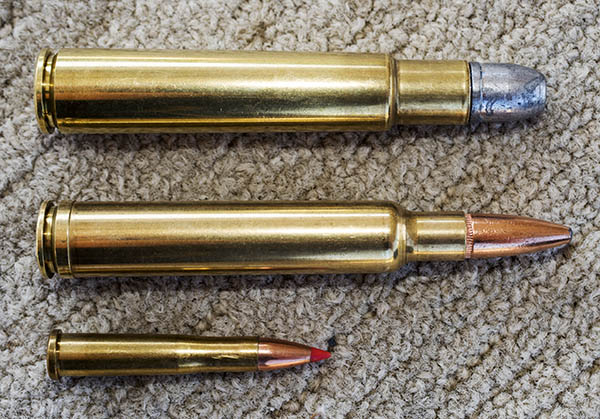
A study in extremes: From top to bottom, it’s the .416 Rigby, the .300 Weatherby Magnum, and the diminutive .22 Hornet. All three are reloaded cartridges.
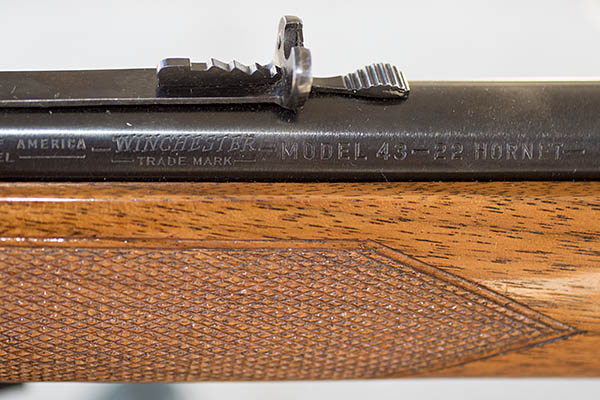
The rifles? I’ve mentioned at least two of these in ExNotes blogs before, but for those of you who haven’t read those posts, let me bring you up to speed. The first is a Winchester Model 43 Deluxe manufactured in 1949.
The Winchester Model 43 Deluxe, a .22 Hornet rifle that looks like it shipped from the factory last week.
The next is an early 1980s Winchester Model 70 XTR. It’s one of a very small number of rifles Winchester chambered in .300 Weatherby that year.
Another magnificent Winchester, this time a Model 70 chambered in .300 Weatherby Magnum. Check out the walnut!
And the last is a Ruger Model 77 RSM Express. It’s a monstrous rifle, chambered for a cartridge designed to slay monsters. Rhinos, elephants, and more. It’s a beautiful firearm.
The .416 Rigby Ruger RSM Express, a rifle so costly to produce Ruger had to stop making it.
As I wrote this blog, I realized that I purchased all three rifles from the same store: Turner’s in West Covina, California. Turner’s is the major hunting and fishing sporting goods chain here in California. I’m usually not a fan of big chain stores, but I’ve found some good deals at Turner’s and I’ll give credit where credit is due: Turner’s did good by me. All three of these rifles were fantastic deals.
People ask how I find guns with great wood. Part of it is I’m picky and I’m patient. Another factor is that today’s firearms market is dominated by folks who want black plastic rifles and pistols. That’s the market Turner’s serves and that’s good for me, because when collectible firearms with blue steel and walnut come into Turner’s they tend to sit for awhile. Most guys who focus on ARs tend to ignore what, to me, is the good stuff.
The Winchester Model 43 was on the consignment rack at Turner’s several years ago. It was the first Model 43 I had ever seen and I liked the look and feel. I like the cartridge, too. Turner’s had the rifle priced at $1000 and after doing my research, I thought that was fair. But I’m not interested in a fair deal. I want an exceptional deal. I visited that store every week or so for a good month and a half, and that little Model 43 had not moved. You see, in that neighborhood, there isn’t much of a market for a collectible Winchester. Like I said above, it’s just not what sells around here.
Winchester only made the Model 43 from May 1948 through 1953, and as mentioned above, mine was manufactured in 1949. When I bring my Model 43 to the range, folks who know what they’re seeing are all “ooohs” and “ahhhs,” as the crowd I run with consists mostly of guys who started driving when Eisenhower was in the White House. These guys get it.
Name one modern rifle that includes a checkered steel butt plate. You can’t. They don’t exist. You have to turn back the clock 50 years or more to fnd this.Hand checkering, too! Not laser cut, not pressed in, not machine cut, and not a rubber insert…but real hand-cut checkering. Somebody at the Winchester factory probably took the better part of a day 70 years ago to do this, and it was all done with hand tools. Checkering is one of the things that makes this Model 43 a Deluxe model.Nobody has better rollmarks than Winchester, and these say it all: America, Model 43, Winchester, and .22 Hornet!I pointed this out in an earlier blog, but it’s so cool I’ll mention it again. That front sight is not a separate part grafted on to the Model 43’s barrel; it and the barrel are machined from one piece of steel. Think lots of machine time and big production expense. Check out the stippling on the sight ramp (it cuts the sun’s glare). That would have all been done by hand.
So, back to my pining over the Model 43. I stopped in at Turner’s for maybe the sixth time to look at the Hornet again. I mean, the thing was on my mind. I was thinking about it at night when I went to sleep, it kept me up, and then when I finally dozed off, I was still thinking about it the next morning. To be a complete human being, I realized, I needed that Model 43. I suspect that if you’re reading this blog, you understand.
If the Hornet was still on the rack at Turner’s, I reasoned, the guy who had it on consignment might be willing to negotiate. I was going to offer $950. The rifle was easily worth the $1000 they were asking for it; $950 would be a killer deal. So I stopped in on the way home one day and asked to look at the Hornet again. I sensed that the guy behind the counter (the Turner’s gun department manager) was a little hesitant to show it to me, but he handed it over after opening the bolt.
I looked at the attached tag. The price had been reduced to $850.
I’ll take it, I said. The gunstore guy sighed. He told me he had wanted to buy the rifle (he was an older guy, like me), but that wasn’t my problem. I filled out all the paperwork, and 10 days later, I took my 1949 Hornet home. I was a complete human being. I could sleep now. All was well with the world.
I have no idea why Winchester stopped making these rifles, but I suspect it was because they were expensive to manufacture and the Winchester Model 70 was selling better. Whatever. And the cartridge itself? The .22 Hornet was first fielded in the early 1930s and when it hit the market, it was a sensation. It was a wildcat cartridge designed at the Springfield Arsenal and its focus was high speed (in those days, the 2400 fps Hornet was fast). The Hornet’s low recoil, relatively flat (for the day) trajectory, and accuracy made it the hot ticket for sending critters to the Great Beyond. I’ve been with Hornet-armed guys chasing jackrabbits and coyotes in west Texas; there is no better cartridge for this kind of hunting in the desert surrounding El Paso. There are more powerful .22 centerfires available today, but the Hornet is the one that started it all. It’s one of the world’s all-time great designs.
Winchester offered the Model 43 in two flavors – the Standard and the Deluxe. My 1951 Stoeger catalog shows that a new Deluxe sold for $66.95 that year; the Standard was $12 less expensive. Mine is a Deluxe, with checkering and a deep blue highly polished finish. And wow, it does its job well. It has iron sights, and I shot some amazing groups with it at 50 yards. I’ll share the load data with you in a subsequent blog.
50 yards, the right load, open sights, and a well-mannered Model 43 all came together on this fine day. Any time I can get under an inch at 50 yards with open sights, I’m calling it a good day.But wait, there’s more! This old Model 43 gets the job done!
I bought the Model 70 .300 Weatherby rifle in the 1980s. I was an aerospace engineer working at Honeywell in Covina (we did naval gunfire control systems for one of the first cannon-launched laser-guided munitions), I met my wife Sue when I worked at Honewell, and I hung out with my good buddy Ralph. Ralph, as it turns out, had the same affliction as me: He was a gun nut. Ralph told me about Turner’s. I was new to California, and I had never heard of Turner’s.
You can guess where this story is going. I went to Turner’s on my lunch break and I saw the Model 70. I knew enough back then to know that a factory Model 70 chambered for a Weatherby round was an unusual rifle, and I also had a taste for fancy walnut (my Dad made custom gunstocks, so I guess the walnut thing is genetic). The rifle was marked for something like $429 or $439 if I recall correctly (I might be off a little, but it was somewhere in the just-north-of-$400 range). I knew that it was tough to lose money on a gun (not that I had any plans to sell it), but it was the wood on that Model 70 that cinched the deal for me. I paid what they were asking because I wasn’t much of a negotiator back then. Today, I know that gun shops always put the rifles with the most beautiful wood on display. By definition, that’s the one I want and I’ll work hard to get it. But now I always ask for a discount no matter how stunning the stock is, because, you know, it’s the display model. Don’t laugh. It almost always works.
Sweet. The Model 70 in .300 Weatherby Magnum. The time to buy a gun like this is when you see it. They don’t come along too often, and I’ve never seen another one like it.
Winchester introduced the Model 70 in 1936. They value engineered the Model 70 in 1964 (that’s a nice way of saying they cheapened its looks and feel), and the pre-64s used to be far more desirable. But that’s all changed. I’ve owned pre-64s and modern Model 70 Winchesters, and I can tell you from personal experience the current production Model 70s are better guns. You can argue the point, but like I’ve said, I’ve owned both, and you won’t convince me. I’ve got the targets to prove it.
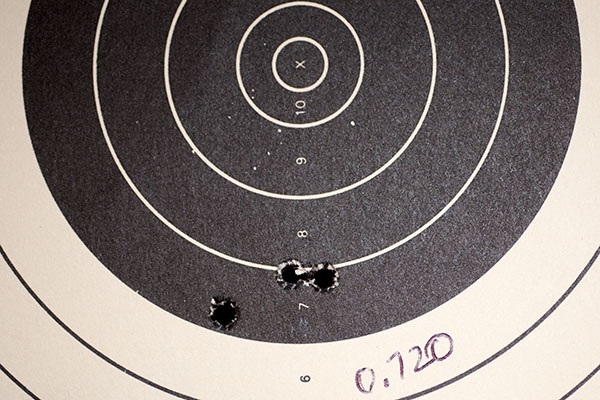
The funny thing about this particular Model 70 is that after I bought it, I didn’t shoot it but once or twice over the next 35 years. I was happy just knowing I owned it, and truth be told, I was a little intimidated by the .300 Weatherby cartridge. Yeah, I know, real men don’t flinch, but let me tell you, those .300 Weatherby rifles kick. I started getting serious about mastering this cartridge recently, though, and that’s what led to my Three 300s blog a couple of weeks ago. I guess I’m getting used to the recoil (a .300 Weatherby will rattle your fillings), because on this most recent range visit, the Model 70 graced me with a couple of 100-yard groups I found astonishing. I can’t do this with a .300 Weatherby all the time, but when I do, I’ll brag a bit. And I did. And I’m bragging a bit.
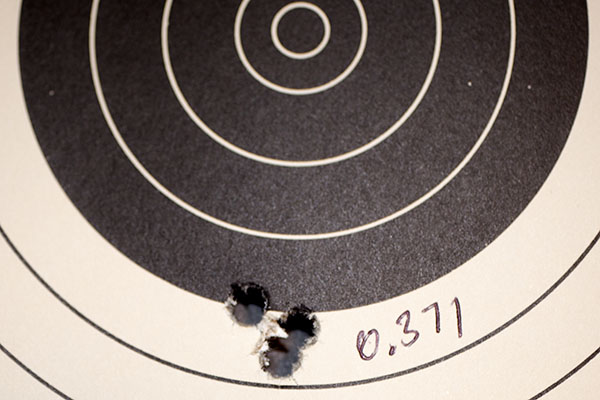
100 yards, a Weaver T-10 scope, and flinch-free trigger time all came together for a half-minute-of-angle 100-yard group. I shoot 3-shot groups when developing a hunting load. I’ve never been a fan of 5-shot groups, as I’ve found it’s very hard to get an animal to stand still for five shots.Maybe that 0.519-inch group isn’t good enough? Hey, the very next one measured 0.371. This is from a .300 Weatherby, mind you, at 100 yards. I’m good to go!
The Model 70 Winchester has been called the Rifleman’s Rifle, and for good reason. Model 70s have the right look and they are just flat accurate. I guess you could go wrong with a Model 70, but I never have, and I’ve owned a few over the years. And the .300 Weatherby cartridge? There’s no question: It’s a bruiser. Developed by Roy Weatherby in 1944, it’s still one of the fastest 30-caliber rounds ever and as you can see above, it can be very accurate.
All right, on to the last one, and that’s the .416 Rigby. Wow, what a cartridge that monster is. It was the third rifle I brought to the range with me. I was about five bays away from the rangemaster when I fired the first round. He immediately came over to ask what I was shooting. I thought he was intrigued by the thump (something that might have registered on a Richter scale somewhere), and I guess in a way he was. I proudly answered that it was a .416 Rigby. Then he asked me to move further away from his observation post. The further the better, he said.
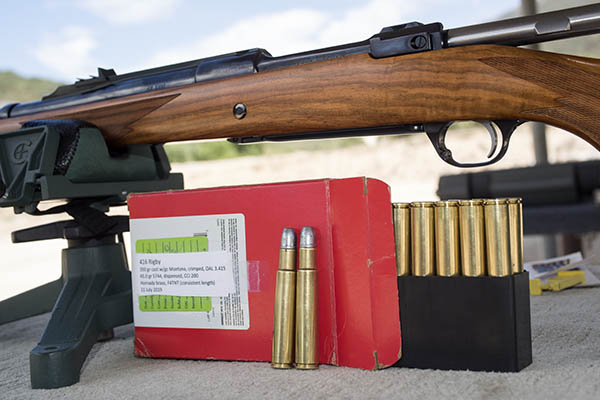
The rhino thumper. Big bullets, big bore, big rifle, big muzzle blast, and big recoil! One box of unprimed brass (that’s just 20 pieces) costs $43!It just looks cool, doesn’t it?
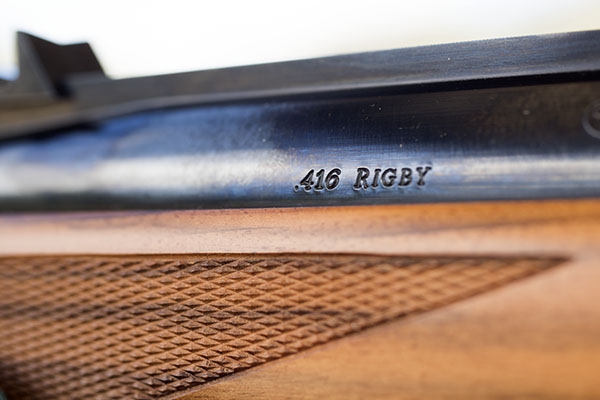
The .416 Rigby is a cartridge with an interesting pedigree. It was first developed in 1911 by John Rigby and Company, the folks in England who made safari rifles for folks who liked to throw money around. The cartridge was designed for dangerous game…big things that can bite you, stomp you, gore you, and maybe even eat you. Over the years, Rigby built approximately 500 rifles chambered for its mighty .416 cartridge, and then it fell out of favor after the .458 Winchester Magnum entered the market. The .416 Rigby probably would have died a graceful death had Ruger not stepped in with their .416 Rigby Model 77 RSM (the rifle you see here) nearly 30 years ago. All told, Ruger built about a thousand of these rifles from 1991 to 2001. Then, presumably because of the manufacturing expense and fewer guys going to Africa to chase the things that bite back, Ruger discontinued the rifle.
I bought the Ruger at Turner’s, and it was a repeat of the Hornet story. The Rigby was on consignment (at the very same Turner’s in West Covina), and it was marked $1400. That was not a bad price, and these Ruger Express Magnums are an investment (you see them now for numbers approaching $2000, sometimes even more). I keep telling my wife that (you know, the line about collectible guns being investments and all). She keeps asking me when I’m going to sell.
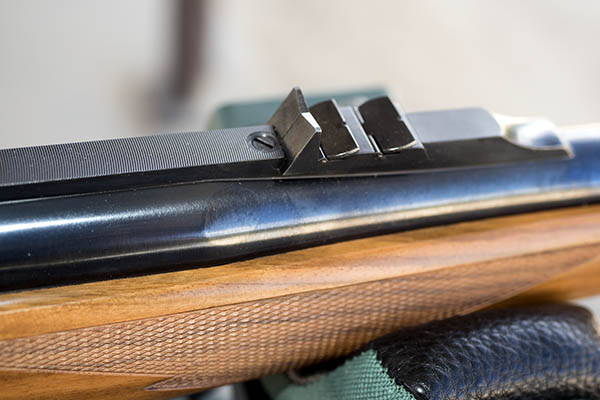
Like the Model 43, the barrel and sight are machined from one blank (it’s the rear sight on the Ruger rifle). That means Ruger had to hog the whole mess out of a single piece of steel. Think excessive machine time, and think high manufacturing cost.
The rear sight ramp is the same piece of steel as the barrel, similar to the approach Winchester used for the Model 43’s front sight ramp. The three leaves are for close, mid-range, and long-range game. This is an expensive way to go, but it makes for fast adjustments for someone pursuing dangerous game. It was a common approach on high-dollar safari rifles back in the day. It’s elegant.
This .416 Rigby Ruger had an exceptionally well-figured Circassian walnut stock. All of the Ruger RSM Express rifles had Circassian walnut, but I’ve only seen a few as fancy as this one, and when I saw this one, I knew I had to own it (it’s a disease, I know). And this is another rifle in as-new condition. I can guess what happened…somebody bought it dreaming of Africa, the trip never materialized, the prior owner found out what .416 Rigby ammo costs (north of $200 for 20 rounds of factory ammo), the guy fired one or two rounds and felt the wrath of Rigby recoil, and shortly thereafter the rifle found its way to the consignment rack. It happens more often than you might imagine.
Stunning Circassian Walnut. As supplied by Ruger, Circassian has an almost orange hue to it. This one is beautiful.
I offered the Turner’s dude $1200, and he said he couldn’t do that without talking to the person who had the rifle on consignment. I looked at him and he looked back at me for several seconds. I guess it was a standoff. Finally, I spoke: Give the guy a call, I said.
He did, and yep, 10 days later the big Ruger came home with me. It’s a monster. It weighs more than any rifle I own, and a big part of what drives the weight is that monstrous hogged out .416 barrel. But when you light one off, that weight is your friend. It soaks up the recoil, of which there is plenty.
The Ruger was not nearly as accurate as the other two rifles I had on the range that day, but it still wasn’t too bad. I was shooting at 50 yards initially, and this is the best group I could get…
.416-inch holes at 50 yards. This rifle will do better. I just didn’t have it in me that day.
After shooting five 3-shot groups at 50 yards, I had five rounds left in the box of 20. I wanted to see where the bullets would hit at 100 yards, and I used a pistol silhouette target to make that assessment.
Meh, I could do better. With other rifles, I have on occasion shot groups under an inch at 100 yards with open sights, but it wasn’t going to happen that day (for me or the .416 Rigby).
I held at 6:00 on the target’s orange center, and I used that larger target because I didn’t know where the rounds would land at that distance (I wanted lots of paper around the point of aim so I could see what was going on). I put all five shots on paper, but the group size was a disappointing 6.6 inches. Oddly enough, the rifle was printing very slightly to the left at 50 yards, but it clearly grouped to the right at 100 yards. I need to think about that a little bit. Maybe it was the way the sun was hitting the front sight (that can make a significant difference), as I shot the 100-yard group later in the day. I found the v-notch on the Rigby’s rear sight to be a bit difficult to use (I could not form a consistent sight picture). I guess it’s okay for a charging rhino, but it’s not conducive to the accuracy I sought. I’m not done with the Ruger Express rifle yet, and truth be told, I ‘m kind of glad the results weren’t stellar. Half the fun with these things is searching for the perfect load. Once you find it, for me at least, a lot of the excitement goes away. I figure there’s still plenty of excitement left in the Rigby.
Do you enjoy our gun stories and photos? Check out our other Tales of the Gun. And don’t be bashful about adding your name to our blog update list. You can do so here:
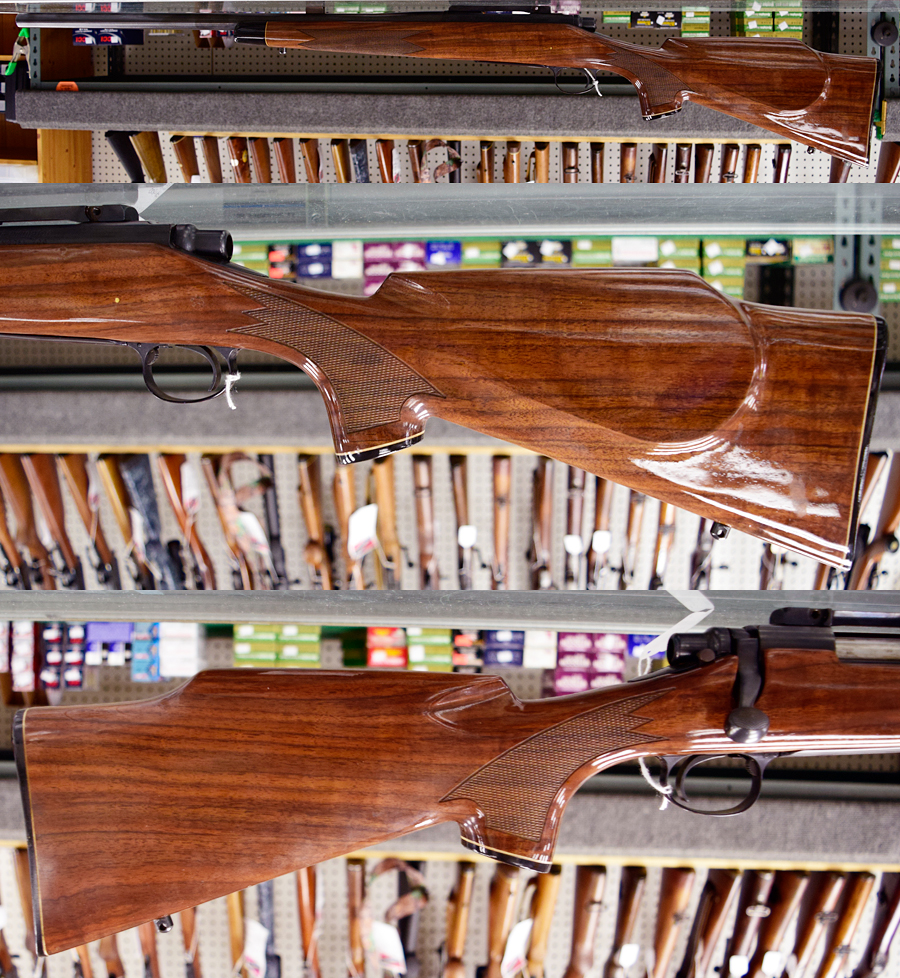
A Remington Model 700 BDL Varmint gun in .223. I spotted this at the Gunrunner in Duarte, and it followed me home.
There’s gun stores, and then there’s gun stores. I can’t pass a gun store without stopping in. The issue is that most gun shops today are soulless retail outlets with black plastic. Glocks, ARs, you get the idea. Guns with no soul and gun shop owners with even less. But there are exceptions. One that comes to mind is the Gunrunner in Duarte. It’s a favorite, partly because the team working there consists of older guys a lot like myself (crusty, maybe carrying a few pounds more than they should be, and a sense of humor). But it’s mostly because they get it. “It” being, of course, blue steel and walnut. And military surplus rifles. I can’t drive by Gunrunner’s without stopping in. You never know what they might have in stock, and even if I don’t buy anything, it’s always fun looking.
One day a few years ago on just such a stop, I noticed an older Remington Model 700. It was the varmint model and it had a price that was just too good to walk away from. And the photos don’t do it justice. It had a real contrasty bit of walnut with horizontal dark stripes that were unusually nice on a production gun. As the saying goes, I pulled the trigger. I bought the rifle for a scant $400, which I thought was a hell of a deal (I think new ones are about a thousand bucks now).
The Remington was pretty well gummed up with old oil (so much so the firing pin and trigger were stuck), and the standard M-700 BDL high gloss urethane finish was going south in a big way. I took the barreled action out of the stock and gave it a thorough cleaning. Then I spent hours on the stock with 0000 steel wool.
When I was finished, I was pleased with the results. The rifle looked way better than it did with the original high gloss finish (which never really appealed to me…it was too Hollywood for my tastes). The stock had a few nicks and scratches before; after the refinish, those completely disappeared. It became a thing of great beauty with a nice, subdued, European look. I grabbed a few shots, and then I played with them a bit in Photoshop to subdue the background and highlight the rifle. I like how the rifle and this photo in particular turned out…
The results of 0000 steel wool and a bit of work on my Model 700 Varmint rifle.
I mounted an inexpensive Tasco 6×24 scope on the Model 700. I wasn’t wild about the scope, as it didn’t seem to be able to focus the reticle and the target simultaneously (or maybe it was just my old eyes). A new Weaver or a Leupold might have been in order, but the results with this resurrected old warhorse were still outstanding. The rifle shot into an inch at 100 yards before I did any load development (which wasn’t too shabby) with what I regarded as junk .223 ammo.
More photos of the Model 700 after refinishing and with the new Tasco mounted.
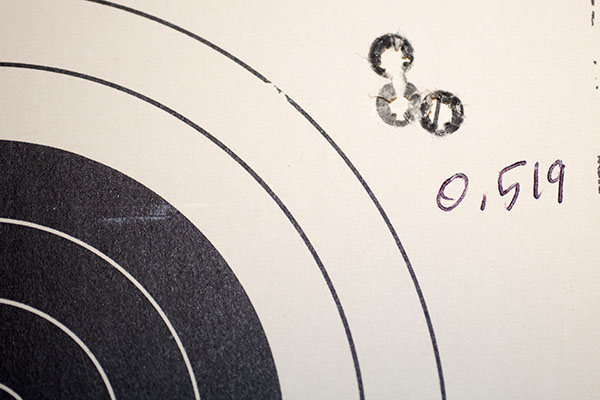
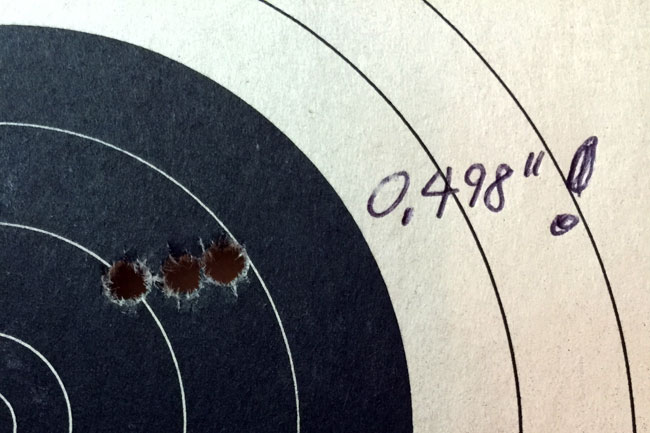
I went to work on developing a load to get the rifle to shoot into a half-inch, and I succeeded: I broke the half-minute-of-angle barrier with a 0.498-inch three-shot group almost immediately!
A half-minute of angle!
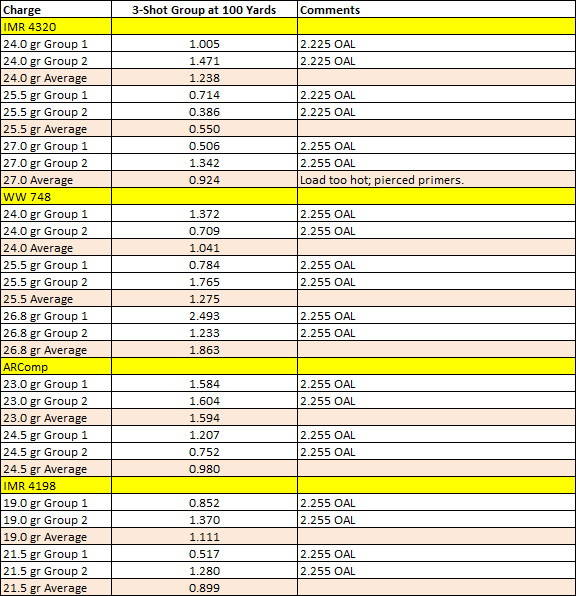
That was with IMR 4320 propellant, and it prompted me to try several different propellants and charge weights:
Load results for the Model 700 .223 Remington. All of the above loads used the Hornady VMax 55 grain bullet. You should always start at the low end of the charge range and work up; do not simply take my accuracy loads and try them in your rifle!
You might think that with the above results the rifle was a keeper. It was, but not for me. A couple of my shooting buddies wanted it, and I transferred it to a good friend for what I had into it.
I belong to a small circle of good buddies who, like me, are into shooting military surplus rifles and other cool old guns. We get together every two months or so for an informal match at the West End Gun Club. It’s a fun match, nothing terribly formal, and the winner has to buy lunch for everyone (and it’s usually me or Greg shelling out the cash for the fine Mexican lunches that follow our get-togethers). Those events are a lot of fun and you can read about them (and the milsurp rifles) on our ExhaustNotes Tales of the Gun page.
Lots of times, though, it’s just me and good buddy Greg out there on the rifle range, and this past Friday morning was one of those days. When that happens, we’ll usually send an email around to the other guys in our milsurp squad talking about what we shot, the loads we used, and how we did. We did that last week, and I thought I’d share the emails with you. First, my email to the boys…
Guys:
Every once in a while I get this feeling I need to sell a few guns, and that happened again earlier this week. I thought one of the ones I would sell was a pristine Model 43 Winchester Deluxe in .22 Hornet. This rifle is in as new condition with the original bluing. It was manufactured in 1949, 2 years before I was born. I took it out of the safe with the idea of taking a few photos for Gunbroker.com, and then I realized: What was I thinking? I don’t want to sell this rifle. Nope, a far better idea would be to load some .22 Hornet ammo and take it to the range.
The Model 43 Winchester, in .22 Hornet. This is the Deluxe version, with cut checkering and a deep blue finish. It’s hard to believe this rifle is 70 years old!An elegant rifle, to be sure.
I bought the Model 43 about 6 years ago and until this morning I had never fired it. It found it on the consignment rack at Turner’s in Covina. After seeing the rifle there, I stopped by every other week for a couple of months, and then on one visit I saw they had dropped the price. I thought it was fairly priced at the original number they had on the rifle, but I was initially hesitant. It’s a beautiful rifle, but it didn’t really fit in with the other stuff in my modest collection and I didn’t want to shell out big bucks for another toy that would just sit in the safe. When they dropped the price, though, I pounced. The gun department manager there was mildly annoyed because he wanted to buy it and it a weird sort of way that made me feel good. Hey, you snooze, you lose.
I knew I had waited too long to finally get around to shooting the old Winchester, but the Hornet’s day in the sun was today. The Model 43 and I found our way to the WEGC range this morning, and as you might imagine, it was a good day. Hell, any day on the rifle range is a good day.
22 Hornet ammo. It’s the original 22 centerfire cartridge, and in its day, it was the ultimate varmint round. Plus, it’s just cool.
About that .22 Hornet ammo: Good buddy Michael B sent some Hornet brass to me a few months ago. I loaded the brass Michael sent to me yesterday with a mild 4227 load (the powder came from Paul) and a box of 45 grain Sierra bullets that have been on my reloading bench since God was a roadguard. (Thanks, Michael…I put your brass to good use!) Good buddy Greg was there with me. He can verify that everything you read here is true, unless he takes the 5th.
[Note for our blog readers…you’ve heard me talk about good buddy Paul, who was my next door neighbor when we were kids. So was Michael. He’s Paul’s little brother.]
Here are a few more shots of the Model 43…it is a beautiful little rifle. Clean, rare, collectible, and in fantastic condition. I mean, do any of you think you are going to look this good when you are 70 years old?
The Model 43’s front sight. It and the barrel are machined from one piece of steel.
In examining the front sight and its ramp, I was surprised to see that it was a not a separate piece attached to the barrel. Nope, these barrels started as a giant hunk of steel, and were hogged down to shape. The front sight ramp is an integral part of the barrel. That had to be expensive to manufacture. Note the stippling on the ramp. Things were different in 1949.
I’m pretty sure that the bluing is original…the lettering and roll marks are all very crisp.
Note the checkering, a feature of the Deluxe version of the Model 43.The rear sight and the fore end. This thing looks like could be brand new.
The stock may have been refinished, or at least had a coat or two or TruOil added to spruce it up somewhere along its life’s journey. The checkering is sharp, though. It might be the original stock finish. Overall, the rifle is in excellent condition.
And finally, a photo of Michael’s brass reloaded by yours truly in the original Model 43 magazine…I can’t imagine what a replacement magazine (if you could even find one) would cost for this rifle…
Good-looking ammo in a good-looking (and original) magazine. It’s a magazine, not a clip.
The Model 43 shot well this morning. It had already been zeroed in by the previous owner and it shot roughly 1-inch above point of aim at 50 yards, which is about perfect for a rifle like this. Recoil was very moderate, as you might imagine with a 45-grain bullet at 2400 fps. The groups were about 1.5 to 2.0 inches, which is, as they say, close enough for government work. Not too shabby for a 70-year-old Winchester.
Joe
So that was my email, and it was quickly followed by a response from Greg. Here’s what old Greg had to say…
Every word Joe says is true, I swear. That gun looked like someone just took it out of the box. And that machined ramp at the front sight was very unexpected. Anyone familiar with manufacturing techniques will immediately recognize the difficulty of machining that final few inches of the barrel. Eh, times gone by. You won’t find that on any guns today I think.
Greg firing his 7mm Mag Ruger No. 1 on an earlier outing.
My story-of-the-day is the 7mm Remington Magnum Ruger No. 1 I took out. I had the normal power loads that did about as they usually do at 100 yards, roughly an inch and a half. But the surprise was a very low power load I jinned up with Trail boss. I had a 140 grain Sierra Game King sitting on top of 20 grains of Trail Boss (I know, it sounds weird). The Hodgdon site has a data sheet (attached) that has loads all the way up to a .416 Remington Magnum. But for the 140 grain bullet in a 7mm RemMag they list a load starting at 17.2 grains and going up to a max load of 24.5 grains, so my 20 grains was somewhere near the middle.
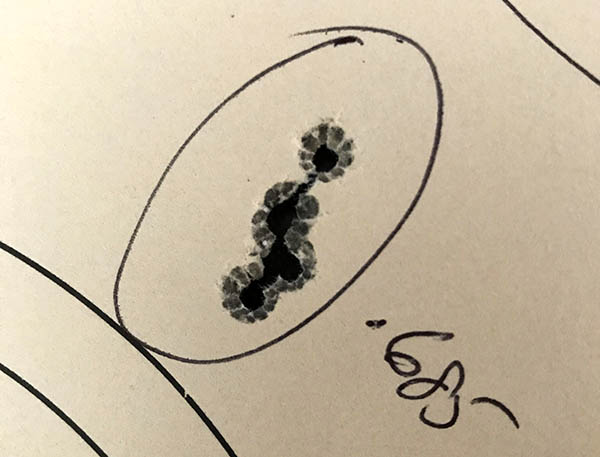
Anyway, I had just put away the Mini-14 and thought I’d start the Ruger No. 1 off with the low recoil Trail Boss loads. I was stunned to see the five shot group pictured below (at .685”). It was easily the best group of the day for the rifle, though it ended up on paper about 12” below, and 1” to the left, of the “normal” loads for that beast. Recoil was extremely mild as you would expect.
A reduced-velocity 7mm Mag load loaded with Trail Boss propellant. This is a 5-shot group at 100 yards. It’s a phenomenally accurate load in Greg’s Ruger No. 1.
My problem with this Trail Boss load is that the scope, as mounted, doesn’t have the adjustment range to accommodate the 12” drop at 100 yards, so I may end up shimming its mount to enable the use of Trail Boss. Time will tell…
Greg
And there you have it. More good times, good guns, good shooting, and good loads. Stay tuned…because we’ll keep the Tales of the Gun stories coming!
This post wraps up our tutorial on reloading .45 ACP ammunition, although from time to time we’ll be posting favored .45 loads as we continue to add Tales of the Gun blog posts featuring this fine old cartridge. If you’d like to catch up by reading the first three parts of this series, here they are:
We’re in the home stretch now, folks, with the last steps in creating our custom-crafted .45 ACP ammunition. The tools and components we’ll use in these remaining reloading steps are the propellant, the powder dispenser, our previously prepped-and-primed .45 ACP brass cases, bullets, the third reloading die, a reloading scale, a caliper to measure cartridge overall length, and boxes and labels to hold and identify the ammo we’ve created.
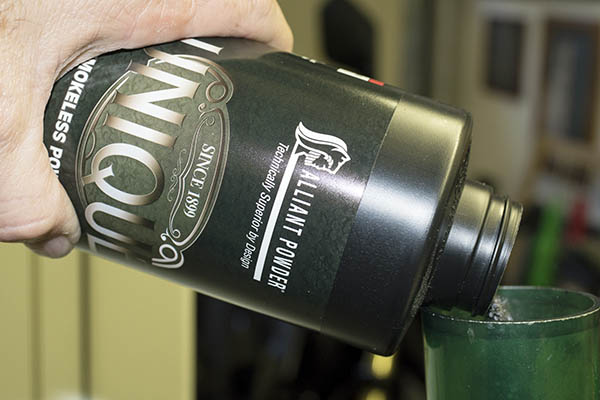
That’s the powder dispenser on the left, and Unique propellant on the right. I use an RCBS dispenser. Several reloading equipment companies offer these.
My preferred propellants for .45 ACP ammo are Unique or Bullseye, and of the two, I prefer Unique. Some folks prefer Bullseye. Others may use different propellants. One of the more enjoyable aspects of the reloading process is you can try different recommended propellants (and different charges of these propellants) to find the secret sauce that works best for you.
Help us bring more articles to you…please click on the popup ads!
What does that mean? For a revolver, it usually means the load that is the most accurate. For a semi-automatic handgun (like the 1911), accuracy is not the only requirement. You also need to have a load with enough energy to cycle the action. Usually, the loads shown in a reloading manual are powerful enough to cycle the action. You should never go above the maximum propellant charge listed in any reloading manual, and you should only approach that by testing loads at the lower end first, and then working up to a higher level if you feel a need to for accuracy or functionality reasons (but never go above the max load).
Adding Unique propellant to the powder dispenser.
Here’s another important point: Whichever powder you choose to use, never have any propellant other than the one you are using on your reloading bench. You don’t want to get the propellants mixed up, or mistake one for another.
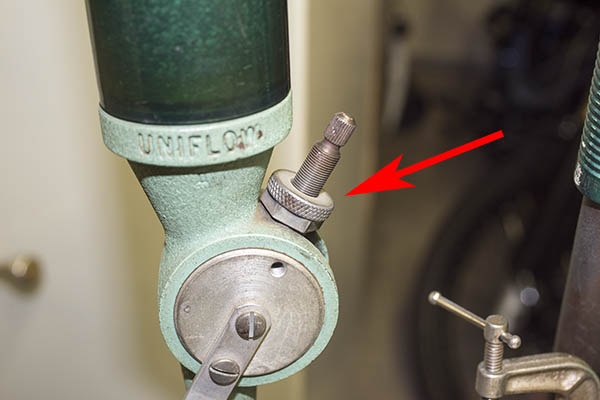
After you’ve added propellant to the powder dispenser, tap the dispensing handle against the lower stop several times to settle the powder. What we’re going to do next is to adjust the throw weight (the weight of powder dispensed) by adjusting the dispenser with the threaded adjustor shown in the photo below.
The dispenser’s adjustor. You can screw it in to dispense less powder, or out to dispense more powder. Once it dispenses the correct amount, lock it in place with the locknut.
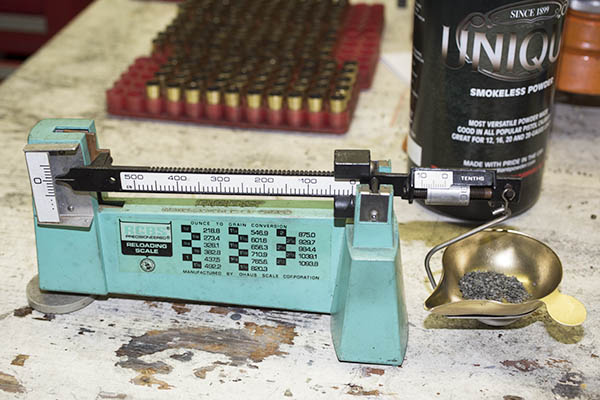
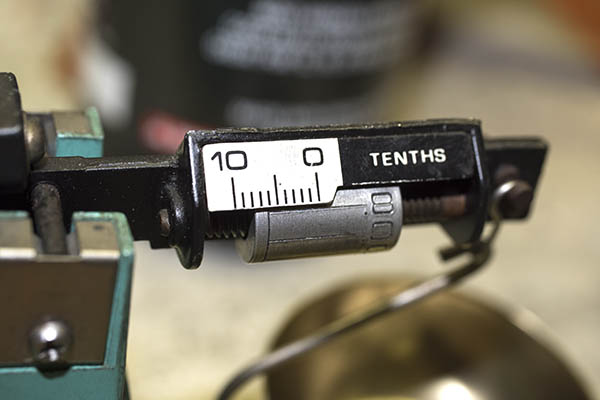
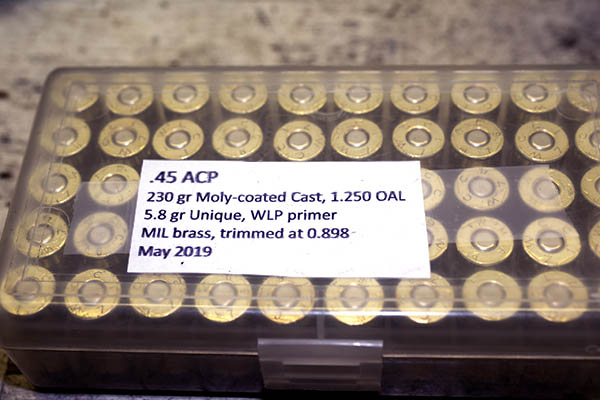
What we do at this point is get our reloading scale, set it to zero grains, and make sure the indicator (the balance arm) is in a neutral position (as indicated on the left side of the balance arm against the graduations on the scale markings on the left of the scale. Once the scale is zeroed, use the sliding and turning adjustors for the weight of propellant you wish to use. After years of accuracy testing and shooting, I’ve settled on 5.8 grains of Unique as the load I use with a 230-grain cast roundnose bullet.
My RCBS reloading scale set to 5.8 grains.
Note in the photo above that the sliding weight is at zero grains, and further note in the photo below that the rotating adjustor wheel is set to 5.8 grains. For anything under 10 grains, you leave the sliding weight at zero and set the weight with the rotating barrel as shown below. For most .45 ACP loads, we use the rotating barrel only.
The rotating barrel adjusting wheel is set to 5.8 grains.
After adjusting the powder dispenser’s adjustor and checking the weight with the scale, we now have the dispenser releasing 5.8 grains of Unique propellant every time the dispenser is actuated. I’ll throw several charges to make sure the dispenser is dispensing consistently, and once I’m satisfied it is, we’re now ready to dispense 5.8 grains of propellant in each of the prepped and primed cases we prepared in Part III of of our .45 ACP reloading series.
There are 5.8 grains of Unique in each primed case. Note that the propellant levels are approximately equal in all cases, and no cases have been missed.
When you dispense powder, it’s important to be consistent. I don’t like to stop until I’ve done the entire tray of prepped and primed cases, and I don’t like to be interrupted while I’m doing this. After you’ve dispensed the propellant in each cartridge case, visually inspect the tray to make sure every case is charged with propellant, and all propellant heights are approximately equal. We’re looking for missed cases here (if that happens, the primer will push the bullet into the barrel just a bit, which requires disassembling the firearm to hammer the bullet back out with a rod, and that’s basically the end of your shooting session that day). We’re also looking for any cases that are double-charged (i.e., cases that have two charges of powder in a single case). A double charge is real serious and dangerous business, as it will most likely blow up the gun, injure you, or worse. You have to pay attention to what you’re doing here. Like I just said, this is serious business.
So, after we’ve charged the cases with propellant, we now ready to move on to the next step, which is seating the bullets.
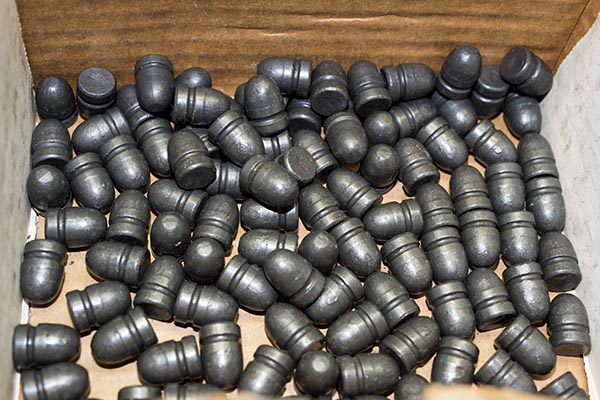
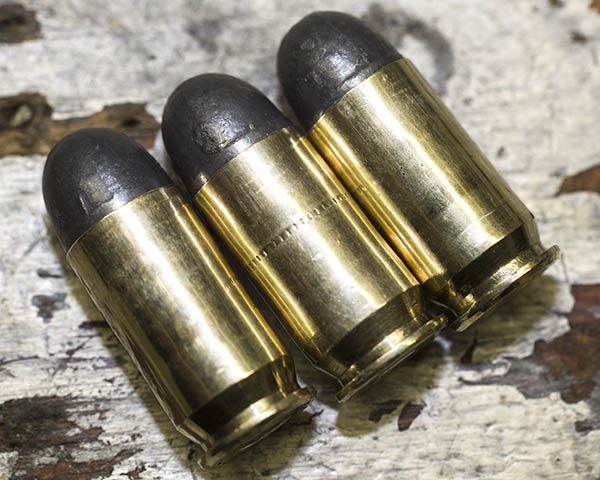
.45 ACP 230-grain cast roundnose bullets. I like this bullet design and weight. It’s accurate, and it feeds reliably in just about any .45 auto.
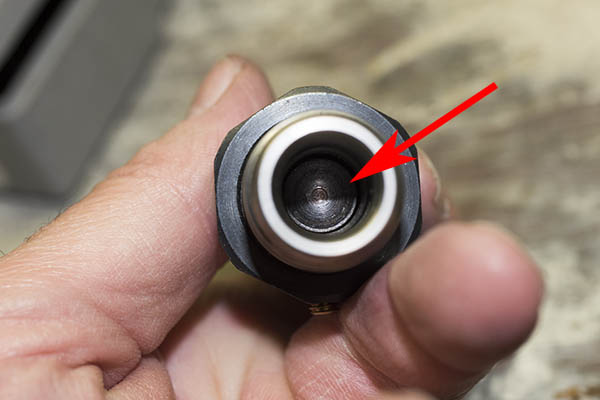
We’ll now use the seating die, the last of the three dies in our die set. This part of the operation requires a bit of adjusting and a bit of finessing on our part. We’re actually doing two things with this third and final die. We’re seating the bullet to the correct depth in the cartridge case (to meet the cartridge overall length requirement, which is found in your reloading manual), and we’re removing the cartridge case bellmouth that allowed the bullet to enter the case.
The business end of the seating die. The red arrow points to the part of the die that interfaces with and pushes the bullet into the case.
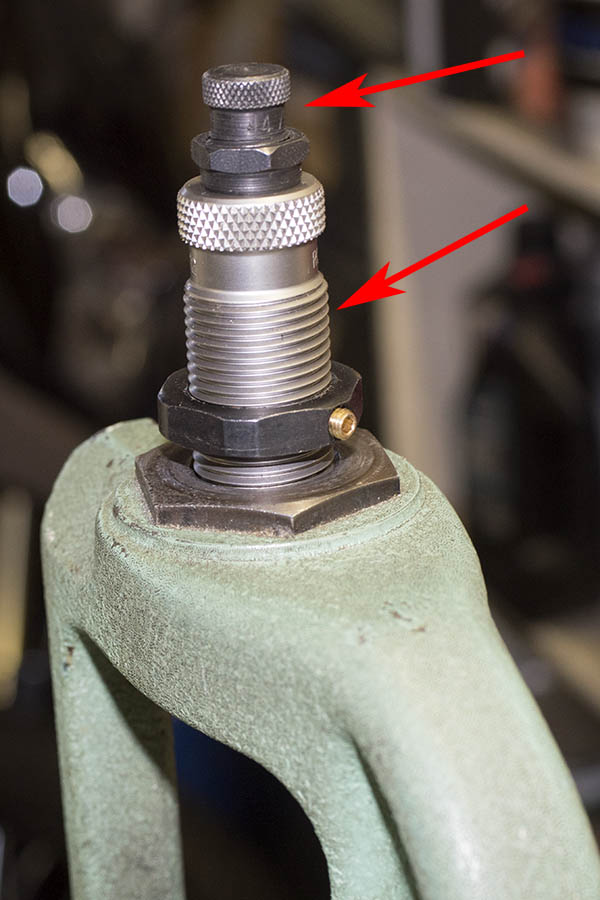
In order to make both adjustments, we’ll work with how far we thread the entire die into the reloading press (this affects both bullet seating depth and crimp), and we’ll also work with the bullet seating adjustor. These two parts of the die are shown by the red arrows in the photo below.
The bullet seating die in the reloading press. The upper threaded adjustor (denoted by the upper red arrow) adjusts bullet seating depth. The crimp or bellmouth removal adjustment is made by how far the entire die is threaded into the press (denoted by the lower red arrow), Once the crimp (or bellmouth removal for the .45 ACP cartridge) is set and the cartridge meets the desired overall length, lock both the die and the bullet seating adjustor in place with the two locknuts.
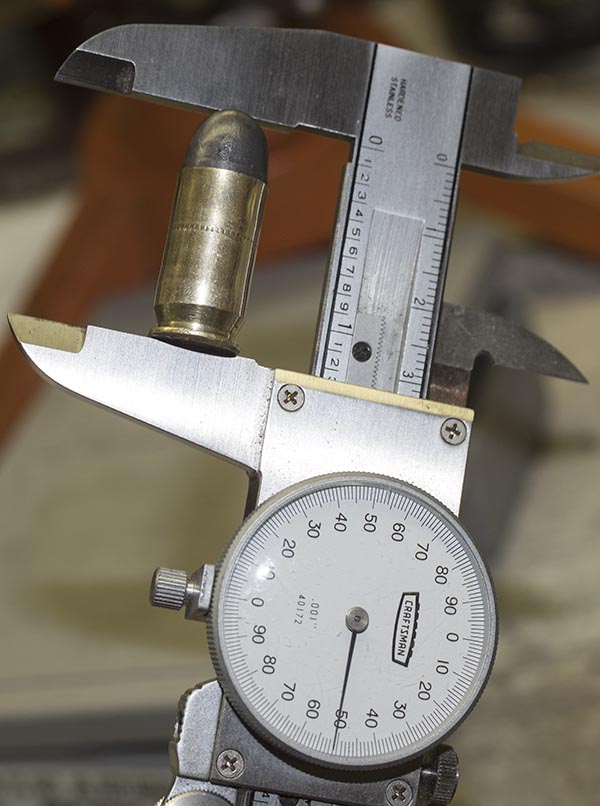
Here’s how I do this. I first screw the bullet seating adjustment all the way into the die, and then I’ll use this to seat the bullet to the right depth by threading the entire die into the reloading press, a little at a time. With each adjustment, I’ll run the charged case (with a bullet on top) into the die with the press. I keep doing this until the cartridge overall length is where I want it to be. For a 230-grain roundnose bullet, I adjust the seating depth such that the cartridge overall length is 1.250 inches, as specified by my reloading manual. That cartridge overall length is good, as it allows the cartridge to feed into the chamber, and it allows the cartridge to fit into the magazine.
Once I have the bullet seated to a depth that provides the correct cartridge overall length, I then back the bullet seating adjustor all the way out. Then I’ll start the crimping adjustment process by threading the entire die deeper into the press, a little bit at a time, running the cartridge into the press with each incremental downward die adjustment. The reason I ran the bullet seating adjust all the way out is that I don’t want it to push the bullet in any further while I adjust the crimp.
Here’s what going on here. Remember that I said the seating die does two things: It seats the bullet to the correct depth, and it crimps the cartridge. In the case of the .45 ACP, we’re not really crimping the bullet into the case. We just want to remove the brass case bellmouth that we previously added to allow the bullet to start into the case. The inside of the seating die has a reduced circumference step. Our purpose in making this adjustment is to thread the die into the press just enough to have the case make contact with the inner die step. That will remove the bellmouth. We’re not crimping here; we’re just removing the bellmouth so that the brass case becomes a straightwall case around the bullet.
Once I have adjusted the die body by screwing it into the press enough to remove the case bellmouth (and with the press ram raised to position the cartridge all the way up in the die), I then run the bullet seating adjustor all the way down, such that it contacts the top of the bullet. This will position the die such that it removes the case bellmouth, and simultaneously seat the bullet to the correct cartridge overall length. At this point, I can lock everything in position with the two locknuts (one for the die body in the press, the other for the bullet seating adjustor in the die) while the ram is in the raised position with a cartridge in the die. At this point, I’m ready to finish the rest of the cartridges.
A case with the bellmouth removed, and the bullet seated to the correct depth. The cartridge overall length is 1.250 inches. Life is good. I can hit a gnat in the ass at 25 meters with this cartridge.
At this point, what I do is put a bullet on each charged case, and then I start running each cartridge, with a bullet on top, thr0ugh the reloading press.
Charged cases topped with bullets, ready for the bullet seating operation.
With each run up the press, I’ll create a reloaded cartridge. Here are three reloaded rounds…
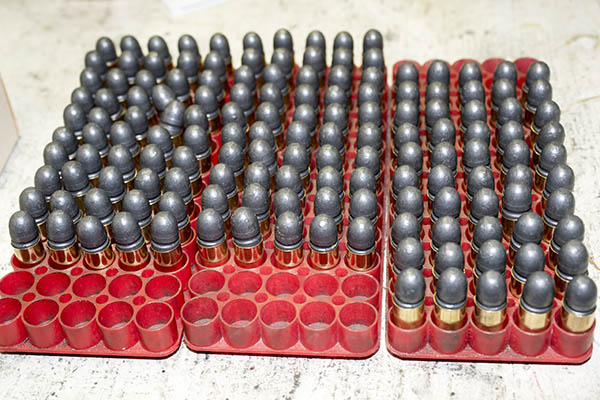
Reloaded .45 ACP ammo. It’s good looking ammo, and I know it will provide superior accuracy and reliability in my 1911. It will perform way better than factory ammo, and that’s what this reloading game is all about.
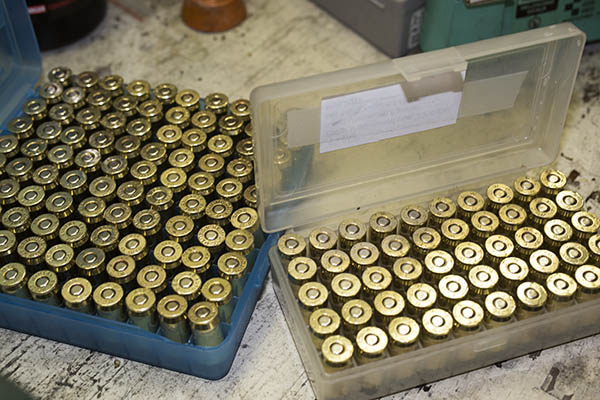
As I produce each round, I place it in one of the plastic boxes I use for my ammo.
Once the above steps are done, I then take the propellent remaining in the powder dispenser and return it to the propellant container (in this case, the Unique bottle). That’s one of the reasons it’s important to only have one bottle of propellant on the reloading bench. You don’t want to dump the leftover powder into the wrong propellant container. If that happens, you can’t use the container of propellant you just emptied the leftover powder into because now it contains a mix of two different propellants. The only thing you can do is throw it away. It’s just to risky to use it. And yeah, I’ve had to do that before.
Reloaded .45 ACP ammo, ready for the range. It looks good, doesn’t it?
There’s one more step, and that’s labeling each box of reloaded ammo with cartridge, bullet weight and type, cartridge overall length, propellant type and charge, primer type, brass type, brass trim length, and the date I manufactured the ammo.
At this point, I’m good to go. It’s off to the range…
So there you have it. Reloaded .45 ACP ammo, as good as or better than what you can buy anywhere. I just returned from the range a few minutes ago, where I shot some of the ammo you see in the photo above, and yeah, it functioned flawlessly and hit the target every time.
If you enjoyed this post, let your friends know about us. Leave a comment if you’d like to add to or join the discussion. We love hearing from you. And if you never want to miss an ExhaustNotes blog, please sign up for our automatic email notifications!
Want to read more gun stuff? Check out our Tales of the Gun page!


 I didn’t know it when I went out there, but they shoot two classes: One with scopes, and the other with open sights. The open sight targets are roughly four times the size of the scope targets, and for whatever reason, on the rams the targets for the scoped guns are set back an additional 10 yards (for the other three animals, the distances are the same). At all distances, though, the targets for the scoped guns are really, really small. Take a look.
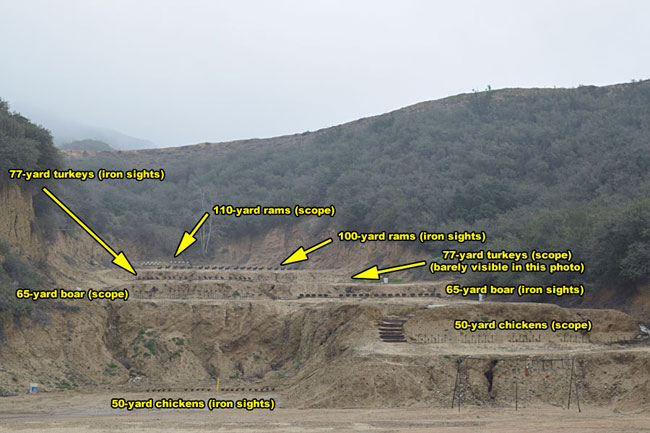 With apologies for the lack of focus, here’s a zoomed-in shot of the turkeys. The iron sight turkey targets are on the left; the scoped-rifle turkeys are on the right…
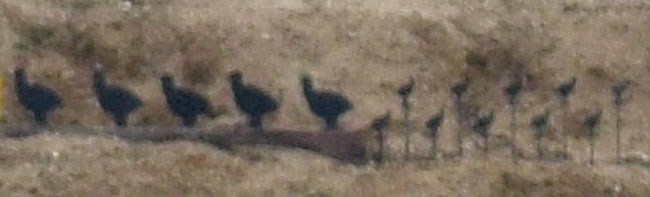 Like I said, the scoped-rifle targets are really tiny. You can see that in the photo above. They were maybe two inches tall. Shooting at these things offhand was a challenge, but I had a blast out there. There were four guys shooting scoped rifles (I was one of them) and 14 guys (and gals) shooting iron-sighted rifles (mostly lever guns; all with expensive aftermarket aperture sights). It was a good crowd…mostly older guys (my age and up) with a few folks in their 20s and 30s. Everybody was friendly.