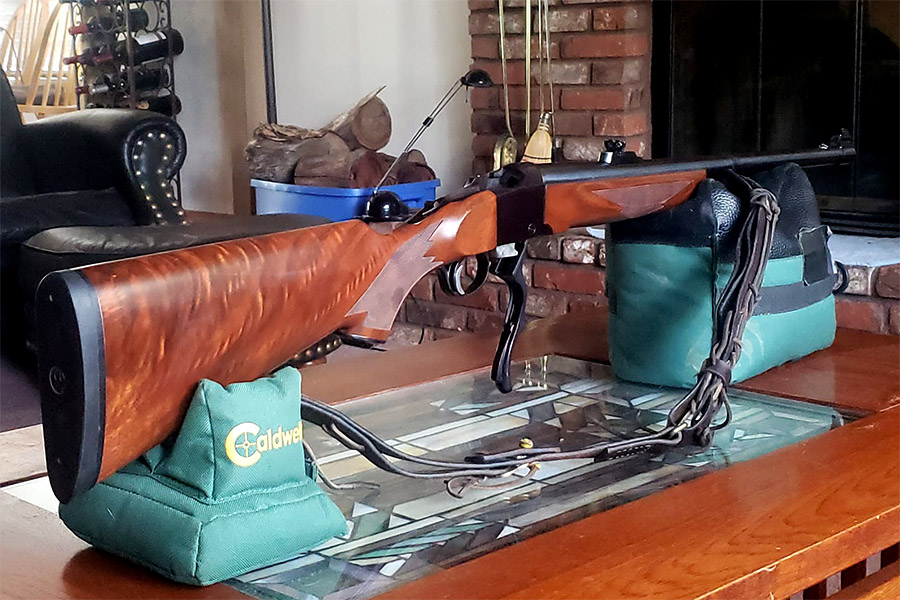
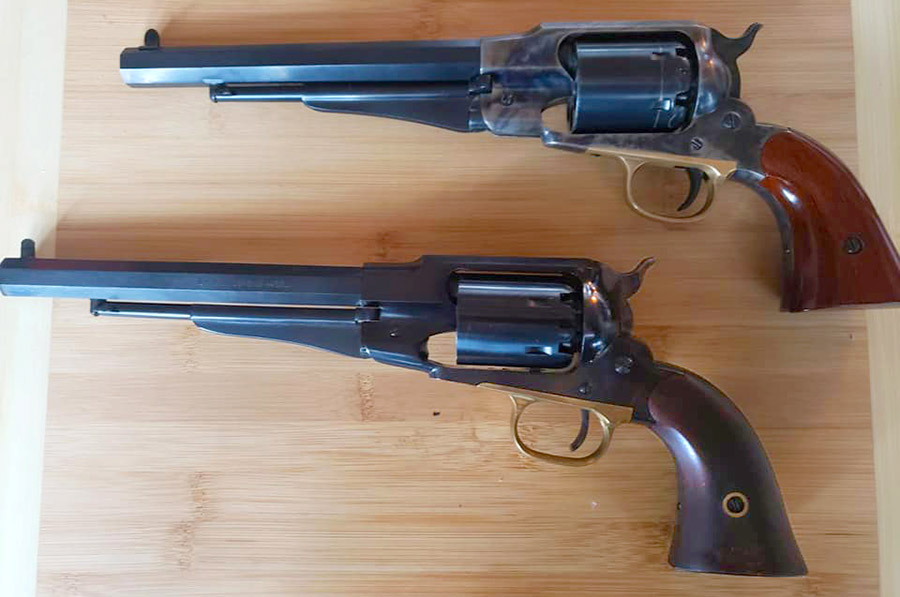
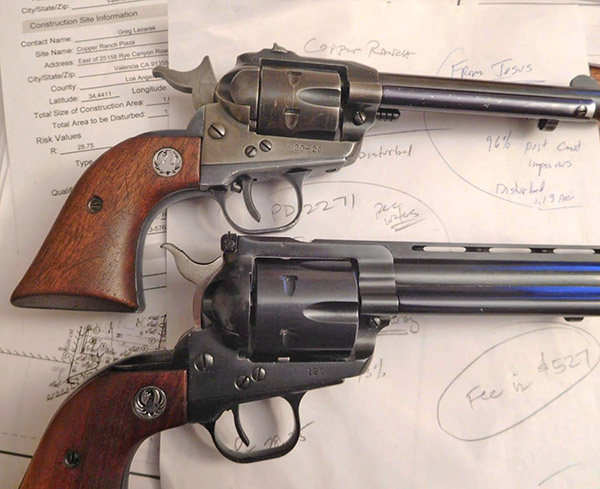
This blog compares two modern Italian reproductions of the famed .44 caliber 1858 Remington New Model Army revolver. One is manufactured by A. Uberti S.p.A. (it’s the one on top in the big photo above); the other is by F.LLI Pietta (the revolver on the bottom). Here’s another shot of the two:
The Uberti in on top right, the Pietta is on lower left.
The 1858 Remington New Model Army was a competitor to Colt’s blackpowder percussion sidearm. The Army went with both versions but primarily bought the Colt (it was 50 cents cheaper than the Remington). Then the Colt factory had a fire in 1864. At that point, the Army starting buying Remingtons in quantity. The Remington was considered to be the stronger revolver because it has a top strap over the cylinder (the Colt does not), and some folks feel the Remington is easier to aim because the rear sight is cut into the frame (instead of the hammer, as on the Colt). And there are other advantages to the Remington, which Jose covers. With that as a background, here’s Jose’s article on the modern Uberti and Pietta reproductions. All photos in this blog are by Jose.
Help us publish: Please click on the popup ads!
If you’ve never fired a percussion revolver you’re really missing out on huge part of firearms history. But maybe you didn’t know that even here in California you can order one of these fine blackpowder revolvers online or over the phone with a credit card and have it shipped to your doorstep without background check or going through an FFL. Your state rules may vary.
Cap and ball packpowder sidearms were a huge part of arms on both sides during the American Civil War. The Union Army had a contract for the Colt 1860 Army, but when Colt could not keep up with demand Remington Model 1858’s were ordered. Many troops preferred the Remington over the Colt for a number of reasons. The Remington has a top strap making it stronger, and the Colt was prone to having loose percussion caps jam the cylinder.
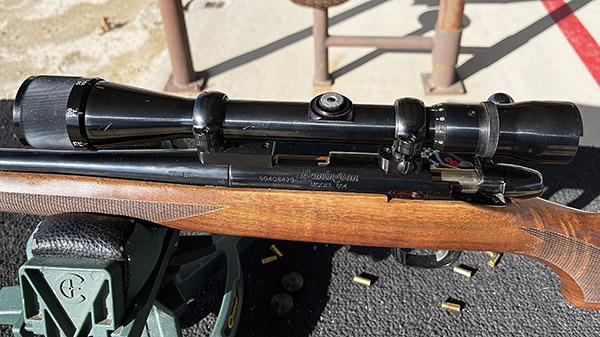
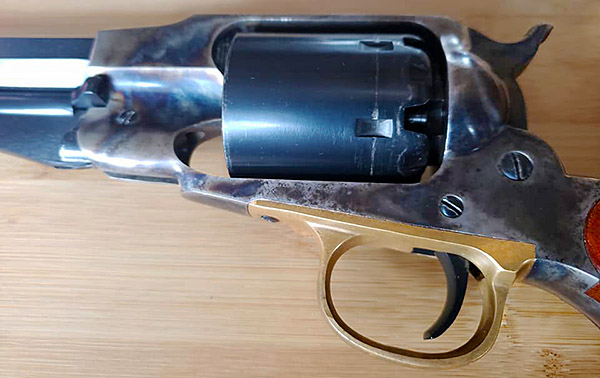
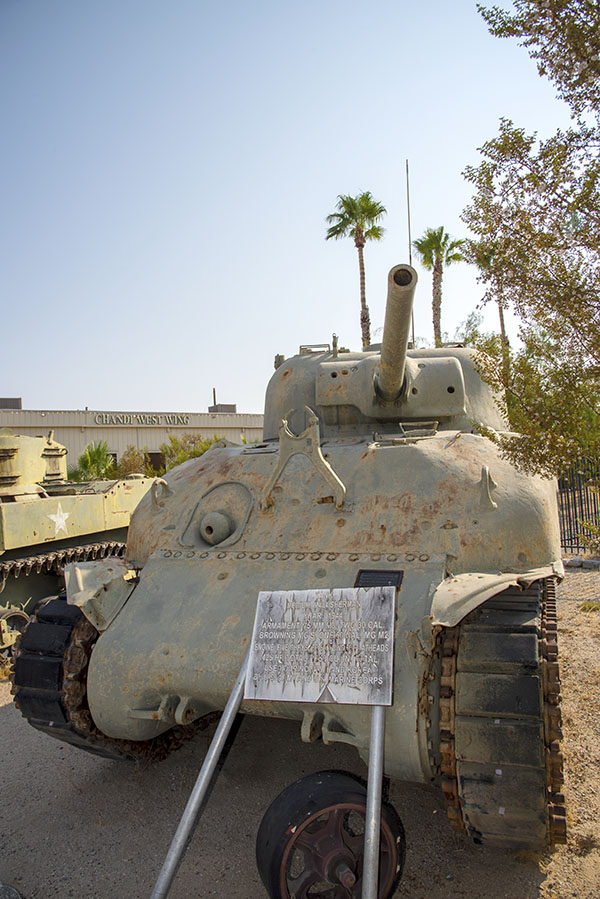
Uberti 1858 Remington Revolver
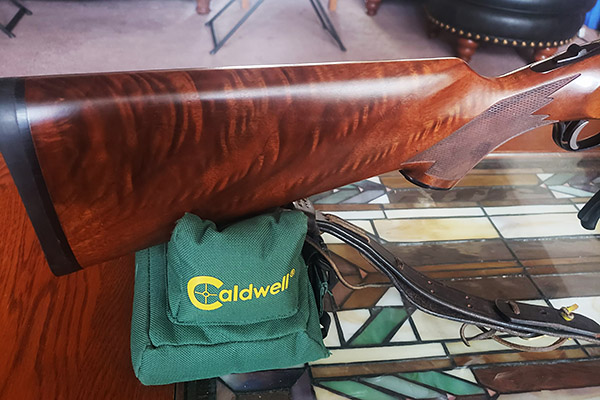
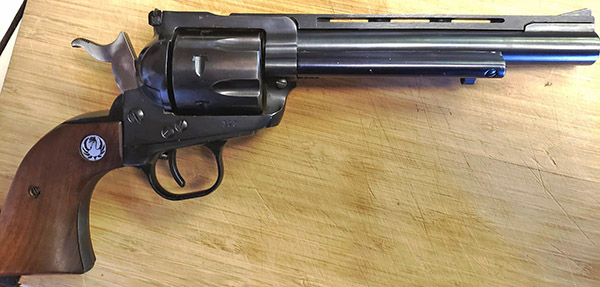
I’ve had the Uberti for about 10 years. It’s an awesome piece of fine craftsmanship. There is nothing cheap about this revolver, the fit and finish are supurb. The cylinder and barrel are a deep blue, the steel frame is color case hardened, and the trigger guard is polished brass, ans walnut stocks, giving it a very classy look. The gun is a six shot .44 cal, rifled 8-inch barrel with 1:18 LH twist, and weighs in at 2.7 pounds.
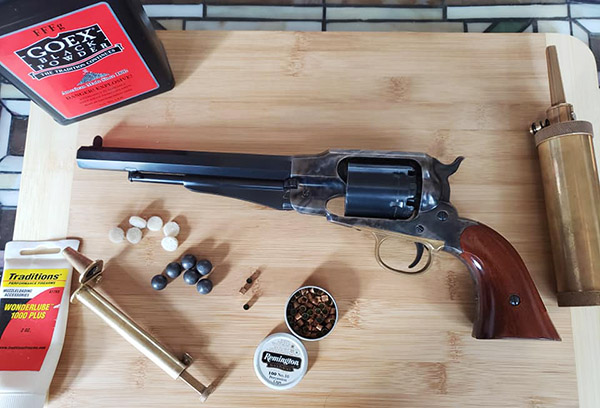
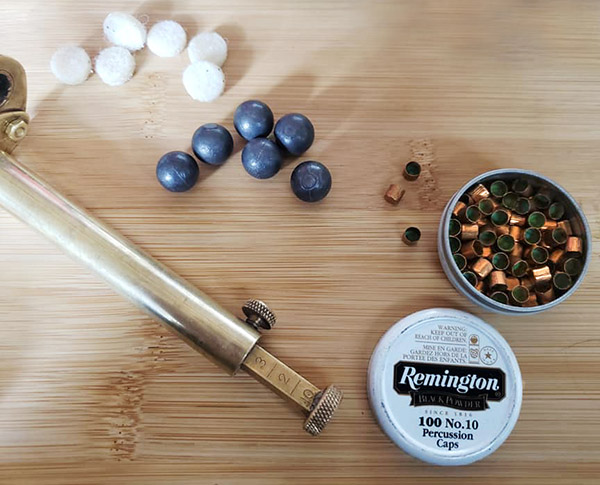
454 cal pure lead balls, Remington #10 percussion caps, waxed felt wads, and the Uberti 1858 New Army.Powder measure, balls, waxed felt wads, and caps.
I use .454-inch diameter balls cast from pure soft lead (stick on wheel weights or plumbers lead, BRN 7) weighing in at 143 grains. It fires best when loaded with 35 grains of FFF blackpowder (I don’t like substitute synthetics), a felt pad soaked in bore butter over the powder, and the ball over the top. The felt over the powder charge prevents a chain fire from jumping between cylinders, and also adds some lube to the barrel between rounds helping prevent a buildup of powder. Either Remington or CCI #10 percussion caps provide the spark.
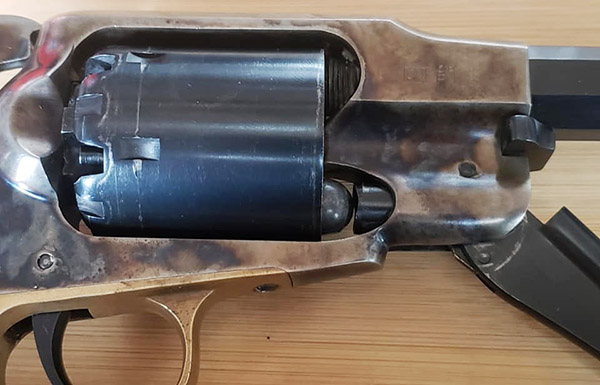
The color case hardened steel frame on this model Uberti is off set nicely by its polished brass trigger guard.The loading lever on the Remington 1858 is used to ram the ball into each cylinder, after loading powder and waxed wad. The percussion caps are placed on the cylinder nipples only after all cylinders have been loaded.The cylinder doesn’t require removal between loadings, only for cleaning.
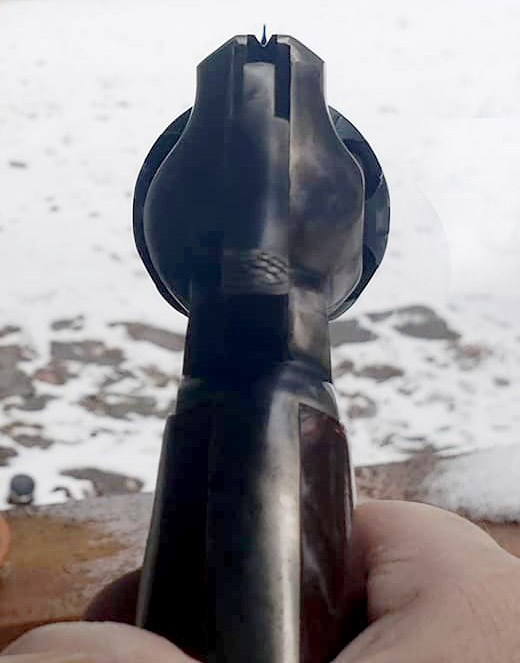
The Uberti is very well balanced and feels good in the hand. The cylinder locks up very tightly. There are noches between the cylinder nipples to rest the hammer on making it safe to carry with all six cylinders loaded. The rear sight is a V-notch on the top strap, unlike the Colt 1860 which has the notch on the hammer because the 1860 lacks a top strap. It’s no exaggeration that out to 40 yards my the Uberti 1858 holds about as tight a group as my Ruger Super Blackhawk .44 mag!
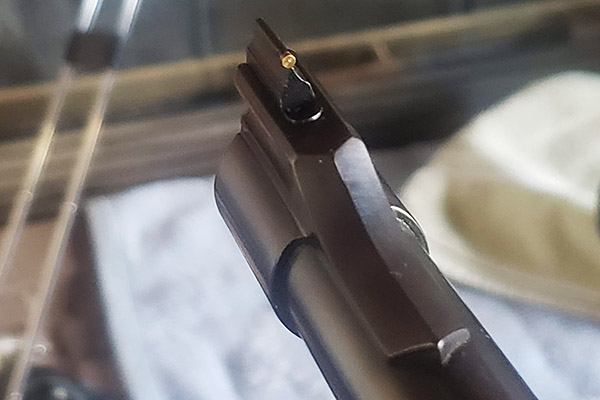
The Remington 1858 has a top strap over the cylinder making it stronger than the Colt 1860 and older firearms. It also allows for placement of a stable V-notch rear sight as opposed to the Colt’s rear site which is a simple notch filed on the back of the hammer.Nice sight picture. This Uberti has a 1:18 barrel groove twist and holds groups as tight as my Ruger Super Blackhawk out to about 40 yards.
Properly cleaning and blackpowder revolver after a day in the field is a good exercise in gunsmithing. The revolver should be entirely disassembled, down to the Springs, removing hammer from the frame, cylinder pin, loading lever, trigger, mainspring, nipples from the cylinder – everything except for removing the barrel from the frame and front sight.
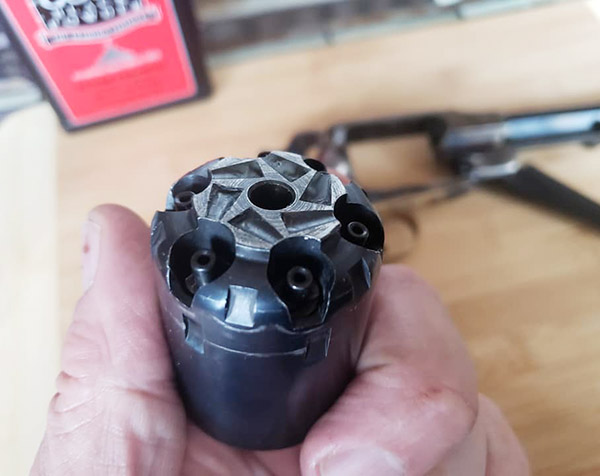
The notchs between the nipples are for the hammer to rest, allowing the six-gun to be safely carried with all cylinders loaded.
A good set of gunsmithing drivers and properly fittjng nipple wrench are mandatory to keep from damaging the screws. Owning a blackpowder revolver will help anyone gain confidence to start Barking simple dunsmithing repairs and parts replacements on other types of firearms. If you don’t already have a blackpowder gun order one today! They are a blast.
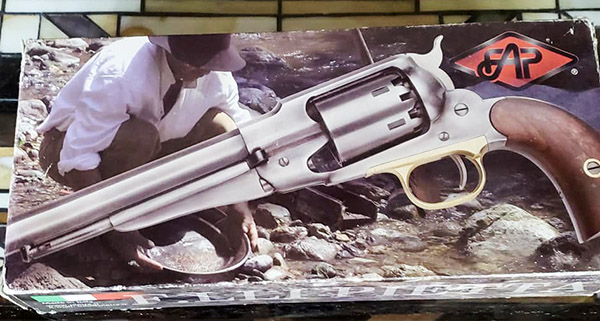
Pietta 1858 Remington Revolver
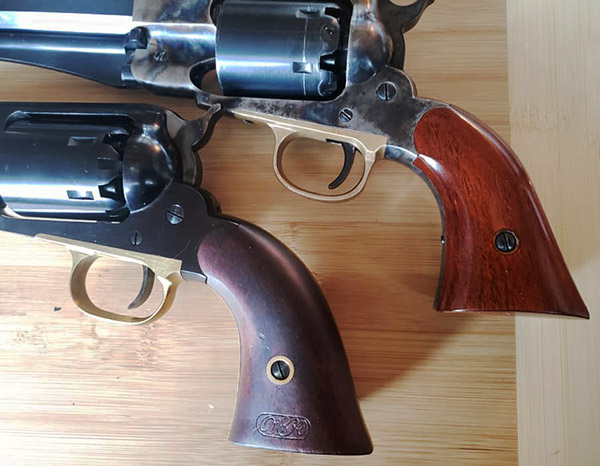
This one was recently purchased because the price was right. It looks like it has never been fired, and I’ve not fired it yet, either. The specs are essentially the same as the Uberti; however, the claimed weight of the Pietta is only 2.4 pounds compared to Uberti’s 2.7 pounds. For whatever reason the Uberti feels much lighter and more well balanced. The Pietta is noticeably front heavy. The Pietta has a little play at cylinder lockup. The hammer pull and trigger feel smooth and crisp, similar to the Uberti.
The Pietta, another quality Italian replica in a slightly lower price range.
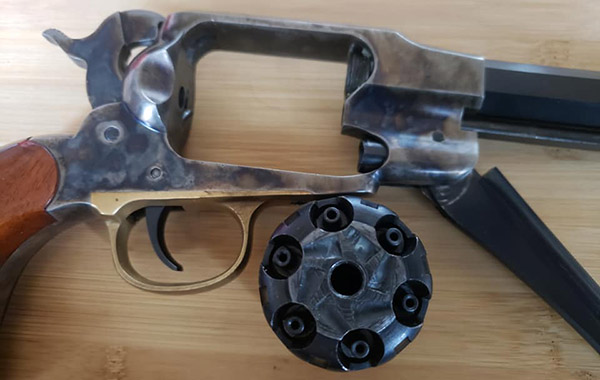
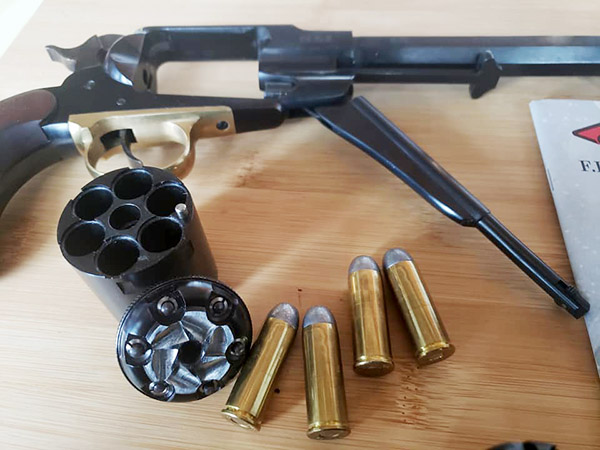
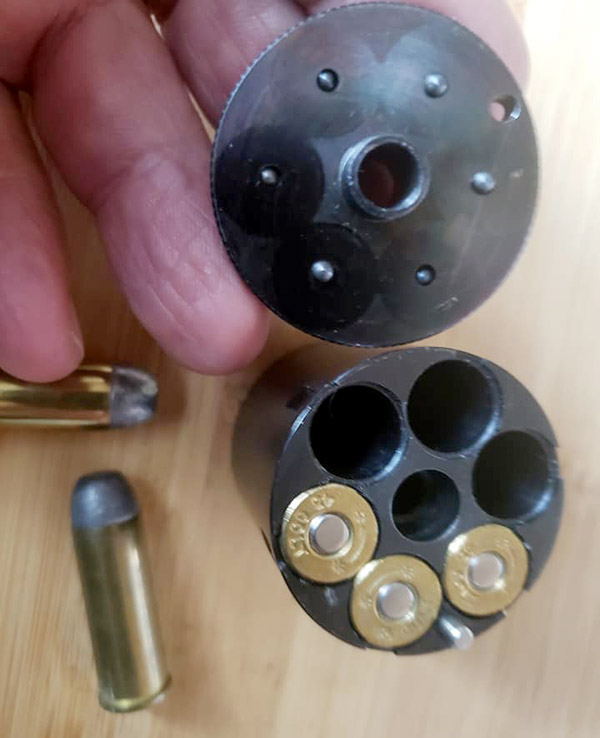
The really nice thing about the Pietta is that it came with an optional .45 Colt conversion cylinder. I’ve always wanted to get a conversion cylinder for my Uberti but they are very expensive, about 2/3 what I paid for the gun, and they always seem to be out of stock.
This Pietta came with a .45 Colt conversion cylinder.The conversion cylinder has an upper plate that holds a separate firing pin for each cylinder.
The conversion cylinder for the Pietta fits very nice, locks up tightly, and came with a box and a half of .45 Colt ammo which I have no intentions of using. Remington first started converting Model 1858 revolvers to .46 cal rimfire metallc cartridges in 1868. These were still blackpowder cartridges as smokless powder hadn’t yet been developed. So I will hand load .45 cartridges for the Pietta using blackpowder to stay traditional.
I’m looking forward to shooting these two together on a side-by-side comparison soon. For now, I hope you enjoy the photos.
This is my tale about restoring a very ugly and broken vintage 1968 Ruger Blackhawk that had the safety conversion done by the Ruger factory. I think Skeeter Skelton would have approved! (Skeeter Skelton was an American lawman and prolific gunwriter well known to firearm enthusiasts.)
First, a little background on the single action revolver, or “sixgun” as they are called. In 1872 the US government was looking for a new service revolver to replace its older Colt and Remington cap-and-ball revolvers used in the Civil War. Colt developed a sixgun that utilized the then new technology metallic cartridge. Colt was the successful contractor and their cartridge gun was adopted by the government in 1873 as the 1873 Colt Single Action Army. The 1873 Colt SAA was shortly thereafter offered to the civilian market and became very popular with ranchers, lawmen, cowboys and bad guys alike. The “Peacemaker” (as Colt’s SAA became known) was priced around $15, which was most of a drover’s wages for a month.
After WWII a new-fangled gizmo called television started to become affordable. In 1948 about 1% of American households owned a television, and by 1955, 75% of American households owned at least one television set (black and white with “rabbit ears” antenna, of course). The TV set became the center of the living room, and the entire family would gather around the “set” after dinner. Hollywood’s golden age of TV westerns from the mid-1950’s through the 1960’s produced an astounding number of instant hits with shows like Have Gun Will Travel, Rawhide, Wanted Dead or Alive, and The Rifleman. All of them featured the Colt SAA and Winchester repeating rifles, or the “lever gun.” Every red-blooded American boy and his father and his uncles and even some moms wanted to own and shoot their very own Peacemaker. But there was a problem: The Colt sixguns were expensive and often not available.
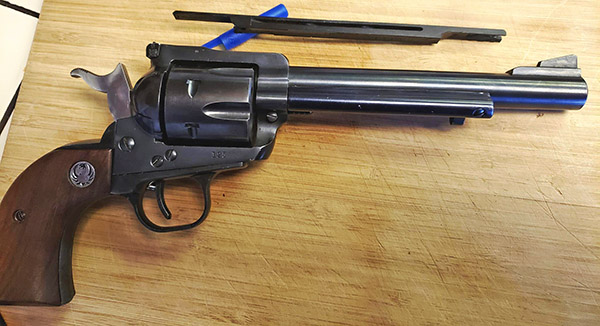
My beautiful all original 1969 Ruger Single Six (top), the ugly vent ribbed 1968 Ruger Blackhawk “parts gun” (bottom). The Single Six is Ruger’s .22 Long Rifle sixgun; the Blackhawk is the larger centerfire cartridge sixgun. Note the three screws on both sixguns and the square-faced, non-notched hammer on the Single Six in the half-cocked position. This Single Six was my first handgun given to me by Mom & Dad brand new for Christmas as a young man 13 years of age. It has a fair amount of holster wear from hunting, backpacking, camping, etc. over many years of honest use. I own up to evey scratch and ding on this well-used sixgun, and I’d never want to refinish or change a thing. When Ruger’s free retrofit advertising campaign first appeared in 1975 issues of Guns & Ammo magazine, I was tempted to send mine in to make it like the New Model but didn’t want to part with the gun for a few weeks. In hindsight, I’m sure glad that I didn’t fall for it.
That’s when Bill Ruger decided to give the public what they wanted. In 1953 Ruger introduced the Single Six revolver chambered in .22 Long Rifle. It was a sixgun for every boy! Two years later in 1955 Ruger introduced its Blackhawk in .357 Magnum. This was a sixgun for every man! They were and still are wildly popular. About 700,000 of the pre-1973 Ruger Single Six .22 revolvers were made, and well over a million New Model Single Six .22 revolvers were made after 1973. I’ll defer the exact number manufactured to the Ruger historians.
Ruger’s Single Six and the original Blackhawk single action revolvers were patterned after Colt’s SAA. The Ruger has a similar shape, size, look and feel as the Colt on the outside. But on the inside Ruger made some improvements. Ruger’s guns used modern high-strength carbon steel. Colt’s action ran on leaf springs prone to breakage. Ruger replaced the brittle leaf springs with much tougher coil springs made from piano wire. The Ruger guns are much tougher than the Colt.
One of the infamous traits both Ruger’s initial guns and the Colts share is the first small hammer cock position called the “safety” is not safe. A gun with all six cylinders loaded, if accidently dropped, is prone to the safety failing (resulting in a negligent discharge). Therefore both the Colt and pre-1973 Rugers should only be carried with five rounds loaded and the hammer down over an empty chamber. These pre-1973 Ruger sixguns are known as the “three-screw” Rugers, as identified by the three plainly visible screws on the left side of the frame, just as the Colts have three screws. The original Rugers are also called Old Models, for reasons that become clear in a minute.
As the story goes, someone who didn’t follow what is clearly stated in Ruger’s owner manual to carry only with the hammer over an empty chamber, dropped their Old Model Ruger, fully loaded with six rounds, and shot himself in the leg. Apparently, there were other negligent discharges and expensive lawsuits. This prompted Ruger’s engineers to develop a safer design Ruger sixgun. This newer design is called the New Model Blackhawk. New Model Rugers can safely be carried with all six chambers loaded. Beginning in 1973 all the New Model Rugers have what’s called the “transfer bar safety.” It basically works by making a mill cut in the front (or face) of the hammer so that in the down position the hammer face can’t possibly touch the frame-mounted firing pin. When cocked back in the shooting position, a steel bar (the transfer bar) attached to the trigger mechanism is raised. When the trigger is depressed, the transfer bar fills the gap between the milled cutout on the hammer face and the firing pin, effectively “transferring” the hammer’s impact to the firing pin.
The 1973 and later New Model Rugers are easily identified because they do not have the three screws. They have instead two pins. Another difference is that there is no “half cock” position for loading the gun. The cylinder freely rotates for loading simply by opening the loading gate. The New Model Rugers work well enough but do not have the distinctive feel and clicking sound while cocking the hammer as do the Colts and old three screw Rugers. The New Model trigger is not quite as smooth as the older designs because of increased drag and the friction of the transfer bar as it moves into position. Some shooters claim they don’t notice the differences between the two, but I own both and I can feel the difference.
In 1975, Ruger engineers devised a method of retrofitting all of the “unsafe” pre-1973 sixguns with a makeshift transfer bar. They ran a campaign in the gun periodicals that prompted owners to ship their old guns to Ruger and they would “upgrade” the older guns to make them safe to carry with all six chambers loaded.
It remains unknown how many owners sent their guns back to Ruger, but apparently there were thousands because we see many of these retrofitted guns on the used gun market today. They are three screw guns that function similar to the New Model two pin guns, but unfortunately the trigger pull on the converted guns is absolutely terrible. The retrofit-style transfer bar scrapes up along the back side of the frame causing an awful, gritty, jerky feel. To make matters worse, the retrofit cylinder base pin is fitted with a small spring-loaded pin that also drags against the transfer bar to push it out and over the firing pin on its upward travel. If the retracting pin gets stuck, the transfer bar pushes into the firing pin, locking up the gun. The retrofitted three screw Rugers are pretty bad, taking all the smoothness from the action.
Ruger reportedly returned the retrofitted guns back to their owners with the original parts sealed a small plastic bag. Many of these plastic parts bags have been separated from the converted guns (they were either lost or thrown away). Ruger doesn’t offer any of these old parts for sale to the public, as they consider them unsafe. If an old unconverted three screw is sent in Ruger for any type of repair, they will return it to its owner with the transfer bar conversion installed, whether the owner asks for it or not. In fact, Ruger will not work on an unconverted old model gun without doing the conversion.
Unconverted three screw models (i.e., unaltered Old Model Rugers) today command premium prices among collectors. Even with the parts bag, the converted Old Models will never realize their true collector value because Ruger has permanently marked the converted guns with an “R” on the frame. The stamp is concealed underneath the grip frame to prove that the factory had done the conversion even if an owner wished to restore it back to its unaltered condition. Ruger will install the Old Model conversions but only if the owner sends the gun to them for installation, and Ruger will stamp the frame showing that they did the conversion.
Converted Old Model Rugers having the afterthought safety conversion are generally not very good shooters. However, restored back to original, these guns make very nice non-collectible shooters for those able to locate the original parts. The Old Model unconverted guns handle much better than the New Model guns, provided a most important safety rule is strictly adhered to. That rule is to never carry the restored-to-original Old Model Ruger with the hammer over a loaded cylinder. This brings us to the point of this story.
Six years ago I stumbled upon an Old Model 1968 three-screw Blackhawk being sold as a parts gun at the Ventura Crossroads gun show. The cylinder was totally locked up due to the transfer bar conversion (as described above). However, the asking price was so low that I won’t tell you the cost because you wouldn’t believe me. Besides being broken it had a ventilated rib that I had never seen before on any Blackhawk. It was truly an ugly duckling Ruger Old Model Blackhawk! But it had a great finish and the original factory grips, so I went for it without haggling over the price. Man, I’m not kidding. This gun’s price was so low it was almost free.
The Poly Choke fake ventilated rib glued onto a Blackhawk barrel is just about the ugliest thing somebody could do to a Ruger. Trying to make it look like a Colt Python? Well, you failed!Close up of the Poly Choke fake rib. It does absolutely NOTHING to improve the gun
After the 10-day cooling off period, I brought the ugly little Old Model sixgun home, along with a brand-new, high-quality gunsmith screwdriver set. After disassembling the Ruger, I found that the cylinder was frozen because of the factory safety conversion. After cleaning it up and freeing the cylinder, the gun had the absolute worst sandy, gritty, heavy sticky trigger I’ve ever experienced. It now worked but it had a terrible action, and it was still the ugliest Blackhawk I had ever seen.
After more research I found that Ruger never made a Blackhawk with a ventilated rib. This gun had a phony aftermarket glued-on rib made by the Poly Choke company. I guess the owner wanted something that looked like a Colt Python and decided to dress up the Ruger for Halloween. I managed to pull the fake ventilated rib off without causing any damage to the barrel, but it wasn’t easy. The Poly Choke adhesive was pretty tough. After pulling the rib off, the remaining glue was removed using brake cleaner spray. By now the gun was looking pretty good again, but the action still sucked.
With the Poly Choke rib removed, the “parts gun” is beginning to look like a Blackhawk again. Note the flat hammer face. This photo was taken after the transfer bar conversion had been removed and factory original parts installed.
To smooth up the action, I removed the transfer bar conversion and replaced it with factory original parts to restore it to the original, classic “5-shooter” configuration. Unfortunately, the gun didn’t come with the old parts bag but I was determined to restore it. Now before any of the do-gooder Ralph Nader safety types out there proclaim “how irresponsible of you,” allow me to ask if you’ve ever seen an original Colt SAA with a safety conversion? Well, no, you have not because Colt had the good sense to not ruin their guns with an ill-designed stopgap transfer bar safety.
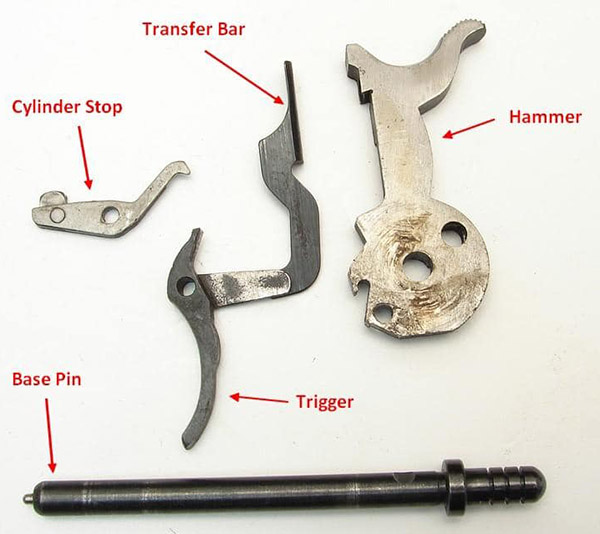
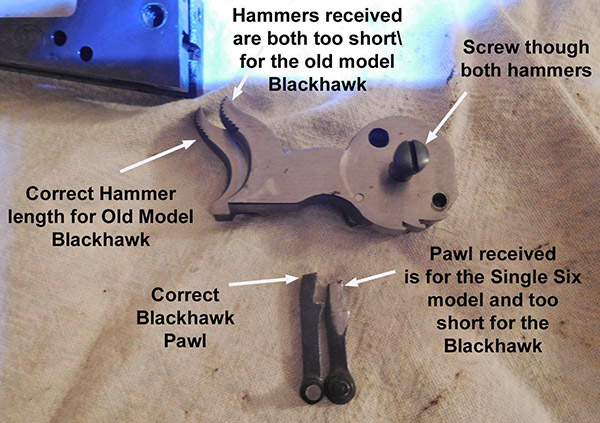
Finding the original parts for an Old Model Ruger is very difficult. Each part had to be purchased separately. It took several months to find all the parts and there were some hiccups along the way. Upon receiving some parts advertised as original Blackhawk parts, such as the hammer, I found that they were original parts for a Single Six model and were not compatible with the Blackhawk. Eventually all the original parts were acquired. The parts included a new hammer, trigger, base pin, cylinder stop, spring, screw, and pawl. The photos and captions tell the story about what it takes to restore converted guns and illustrates the differences between the original and retrofit parts.
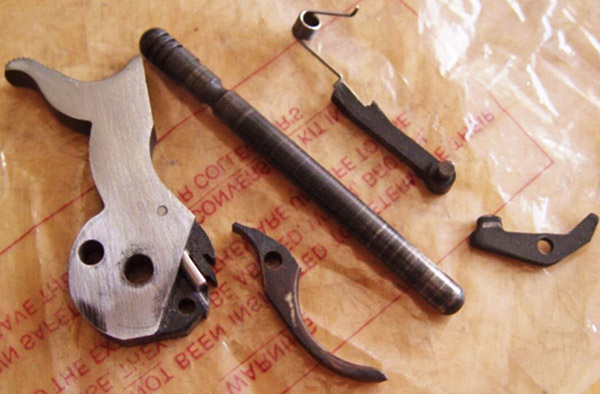
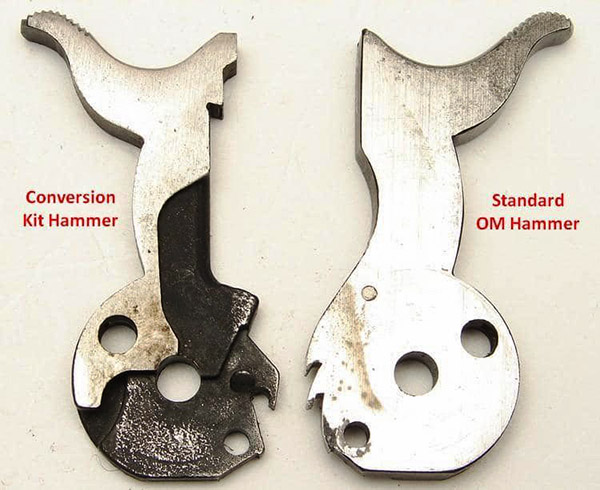
Factory transfer bar safety conversion parts. Note that this is not the same parts set as the transfer bar parts that come installed with New Model Blackhawks. These transfer bar safety conversion parts were specially designed to fit on the old three screw models and are not interchangeable with the two pin new models. In this photo the transfer bar appears to be connected to the trigger, but that’s not the case. The transfer bar has a hole that aligns with the trigger pivot bolt.Original Old Model unconverted parts. This is an image that shows the contents of a returned parts bag that was offered for sale on the internet many years ago. Unfortunately, it was not available when I restored by Blackhawk and I had to locate the parts individually.Comparison of the original flat-faced hammer (right) and the conversion hammer (left). Note that the conversion hammer has been milled on the face to create a space between the frame-mounted firing pin and hammer while the hammer is down and the transfer bar retracted. The side of the conversion hammer is also recessed for clearance of the long arm of the transfer bar. The transfer bar has friction along this part of the hammer. The front face of the transfer bar also rubs against the back of the frame. All of this creates unwanted friction that gives the converted gun a gritty feel. Also note the three notches on the original hammer for the safe, half-cock, and full-cock trigger positions. The conversion hammer lacks the three clicks that give the Old Model Ruger and Colt SAA their classic feel and sound.When mixing and matching parts as you can find them, the trigger is not likely to be the same as the one that came with the hammer as a matched set and will likely need minor honing of the sear and hammer notches for proper fit. This is an opportunity to make the trigger pull better.One of the pitfalls of buying used gun parts on the internet is that the seller doesn’t always know what he is selling. The Ruger Single Six and Blackhawk trigger groups are not the same. Here’s an example of some of the Single Six parts that were sold to me as Blackhawk parts. The Single Six’s hammer and pawl are both shorter than those of the Blackhawk.
To make a long story short, all the original parts cost more than what I paid for the gun. But it was worth it. This is the smoothest Blackhawk trigger ever, and the accuracy is awesome. Only hand loaded, home cast Elmer Keith style bullets have been fired through it since acquired by me.
This Old Model Ruger has become one of my favorite .357 Magnum sixguns and I think that Skeeter would have approved of how this “parts gun” was salvaged.
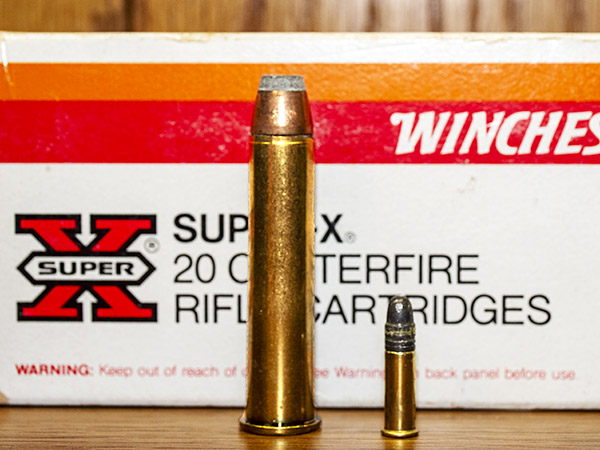
The .45-70 Government cartridge was destined for obsolescence in the middle of the last century and then a curious thing happened: Ruger chambered their No. 1 single shot rifle for it and Marlin did the same with an adaptation of their lever action rifle a short while later.
300-grain .45 70 Winchester and .22 LR Federal cartridges.
When Marlin and Ruger came on board with their .45 70 rifles, there was suddenly significant interest in the cartridge. I fell in love with the .45 70 when I bought a Ruger No. 1 in 1976 (a rifle I still have), and I’ve been reloading the cartridge ever since. I’ve owned several No. 1 Rugers, a few Ruger No. 3 rifles, a bunch of Marlin .45 70s, and a replica 1886 Winchester (by Chiappa, with wood that is way nicer than anything from Winchester).
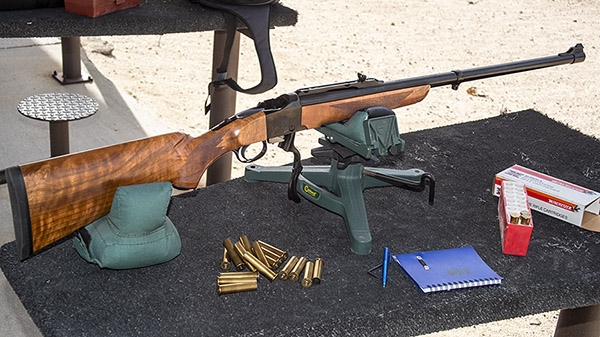
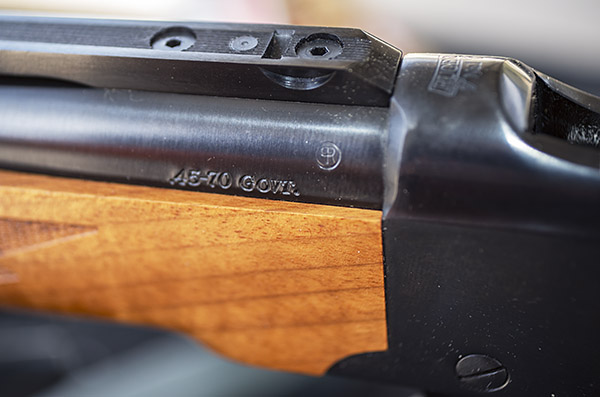
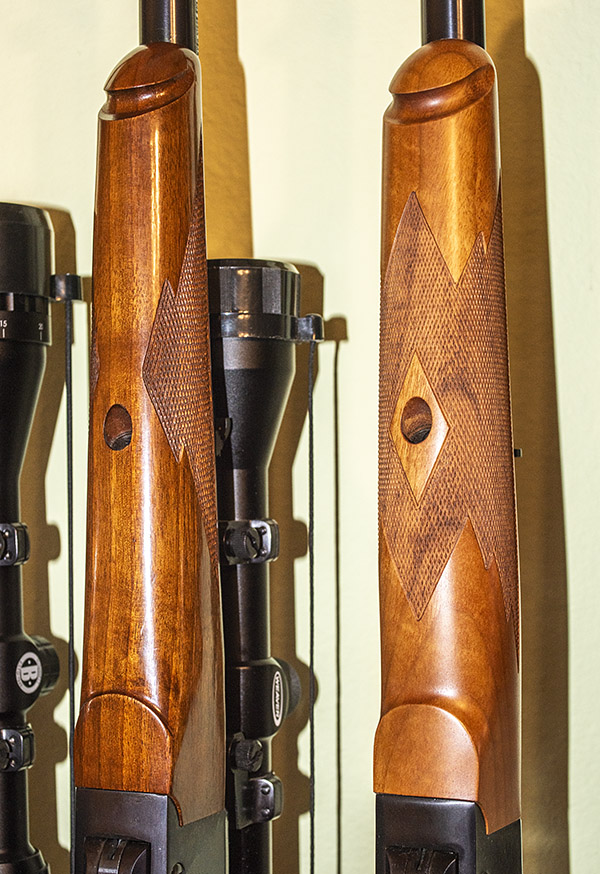
Starboard side of the Ruger Circassian .45 70 No. 1 rifle with 26-inch barrel.Yep. The .45 70 was adopted as the official US Army cartridge in 1873, hence the “Gov’t” designation sometimes seen with the cartridge name.In addition to its Circassian walnut and 26-inch barrel, these rifles included wrap-around checkering on the forearm. The standard checkering pattern for a Ruger No. 1 is shown on the rifle to the left.
All these manufacturers have offered special editions of their .45 70 rifles. One of the more recent offerings from Ruger was a 26-inch barreled No. 1 with a Circassian walnut stock. When it was first offered about 7 years ago by Lipsey’s (a Ruger distributor), it was a limited run of only 250 rifles. They sold out immediately and folks still wanted these, so Lipsey’s and Ruger offered a second run of 250 rifles. I wanted one with fancy wood, but none of the Circassian Rugers I saw online had wood nice enough to be interesting. Even though the rifles had Circassian walnut, all the ones I saw were plain and straight grained. Then one day I wandered into a local gun shop and I saw the rifle you see here. It caught my eye immediately and at first I couldn’t believe what I was seeing. These rifles were next to impossible to find and here was one right in front of me. It was pricey, but I Presbyterianed the guy down to $1050 (you fellow Members of the Tribe will get it) and I pulled the trigger (figuratively speaking).
Ruger’s more recent .45 70 No. 1 rifles have a short leade (the distance between the forward edge of the cartridge case and where the rifling starts). Mine won’t chamber cartridges with 400-grain and above bullets. In fact, I had some ammo I had loaded with an old batch of Hornady’s 300-grain jacketed hollow points, and this ammo wouldn’t chamber, either. I examined the profile of my old 300-grain Hornady bullets and compared it to pictures of the current Hornady 300-grain bullets, and it was obvious the older bullets had a more gradual ogive (the curved portion of the bullet’s profile). I ordered a box of the current Hornady 300-grain slugs, I loaded them, and the ammo chambered in this rifle easily. In researching this issue on the Internet, the issue of recent Ruger .45 70 rifles’ shorter leades is a complaint that’s popped up more than once. One guy even sent his rifle to Ruger, but he said Ruger measured the chamber and returned it to him with no work done (according to him, Ruger said the rifle met SAAMI chamber spec requirements). It’s not really an issue to me; if I want to shooter the heavier bullets I’ll use a different .45 70 rifle.
I had some Winchester factory .45 70 cartridges in my ammo locker, including the Winchester load with 300-grain hollow point bullets. I thought I would shoot those to see how they did in the Circassian No. 1.
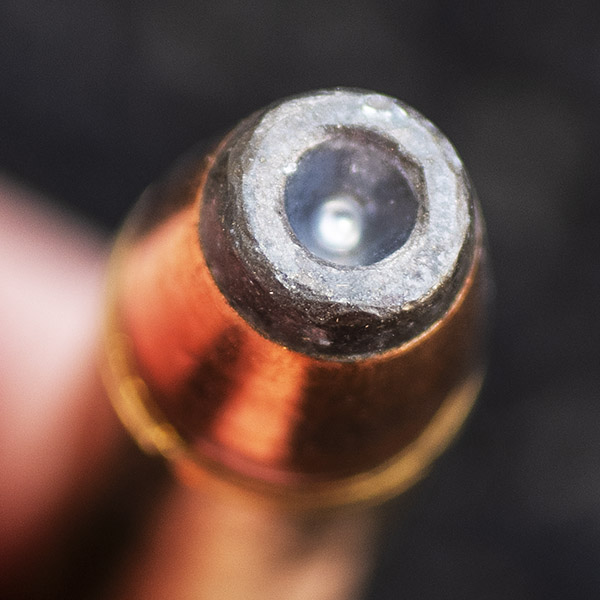
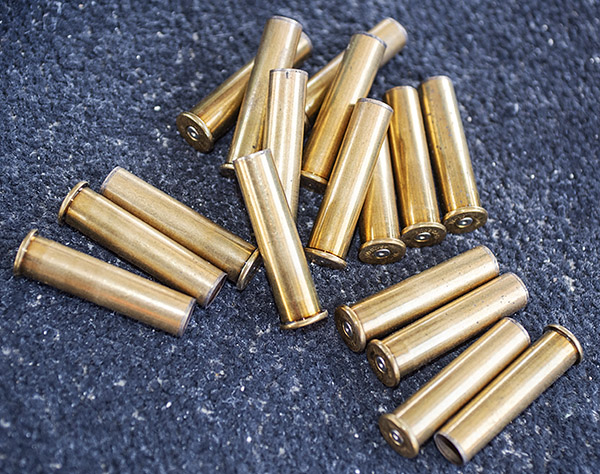
A big ol’ .45 70 hollow point cartridge.Spent cases destined for reloading. This is one of my favorite cartridges to reload.
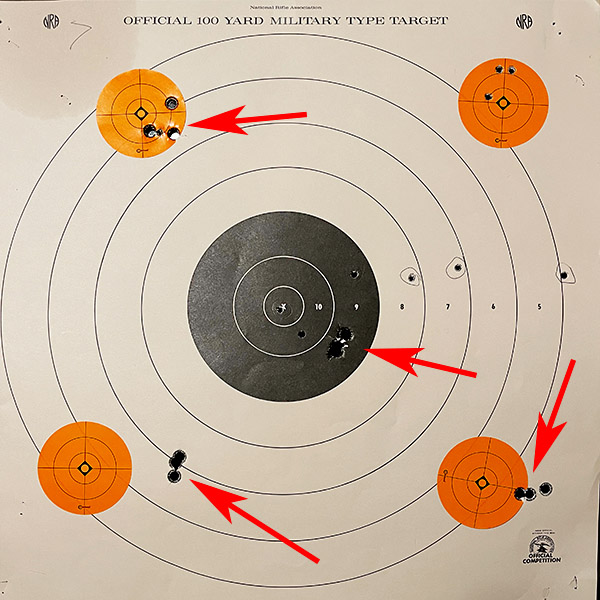
My first shots were at 50 yards, and the Ruger grouped nicely. The shots were biased very slightly to the right. That’s okay, because the Ruger rear sight is adjustable for both windage and elevation. I didn’t bother making the adjustments on the range, as it was a fairly windy day. I’ll make the adjustments, if necessary, on the next trip.
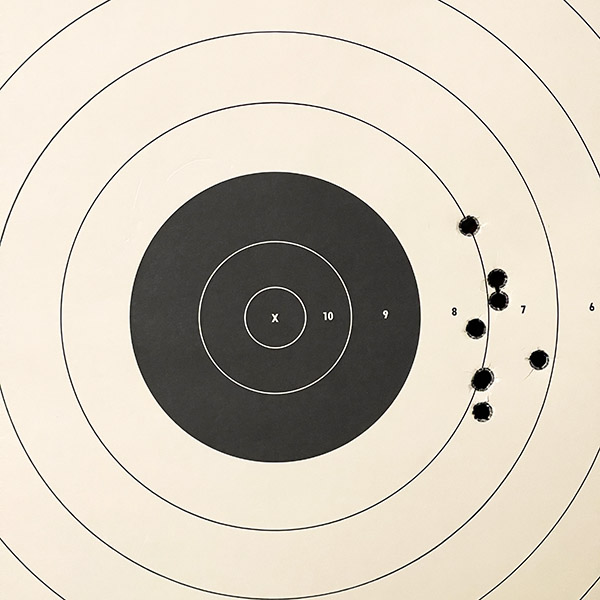
50-yard groups with the Circassian No. 1. The groups are biased to the right, some more than others (a function of how I held the rifle for each group). Ignore the upper right target and the circled holes to the right of the bullseye; those were from a .243 I had out on the same day.
I then set up a standard 100-yard target (at 100 yards). There were 20 rounds in the box of Winchester .45 70 ammo and I had already shot four 3-shot groups at 50 yards. That left eight rounds to play with at 100 yards, and play around I did.
Eight shots at 100 yards. I need to move the rear sight a bit to the left. The vertical stringing is most likely a function of not allowing the barrel to cool between shots.
The results surprised me. I was holding on the bullseye at 6:00, and those big 300-grain hollowpoints hit at about the right elevation. As was the case with the 50-yard targets, the point of impact was biased to the right. The first three made a tight group and then the shots climbed as I progressed through the eight. The vertically strung group was only about an inch in width. The stringing is almost certainly due to barrel heating and the barrel being deflected up by the forearm (it’s not free floated). I was pleased with the results. It told me that I could leave the elevation adjusted for 50 yards and it would still be spot on at 100. On my next range outing with this ammo, I’ll adjust the rear sight to the left a scosh and take my time between shots to preclude the stringing. Even with the stringing you see in the above target, it’s not too shabby for a 100-yard group with open sights.
More blogs on this and other .45 70 rifles? You bet!
The thought came to me easily: The Patton Museum. We’d been housebound for weeks, sheltered in place against the virus, and like many others we were suffering from an advanced case of cabin fever. Where can we go that won’t require flying, is reasonably close, and won’t put us in contact with too many people? Hey, I write travel articles for the best motorcycle magazine on the planet (that’s Motorcycle Classics) and I know all the good destinations around here. The Patton Museum. That’s the ticket.
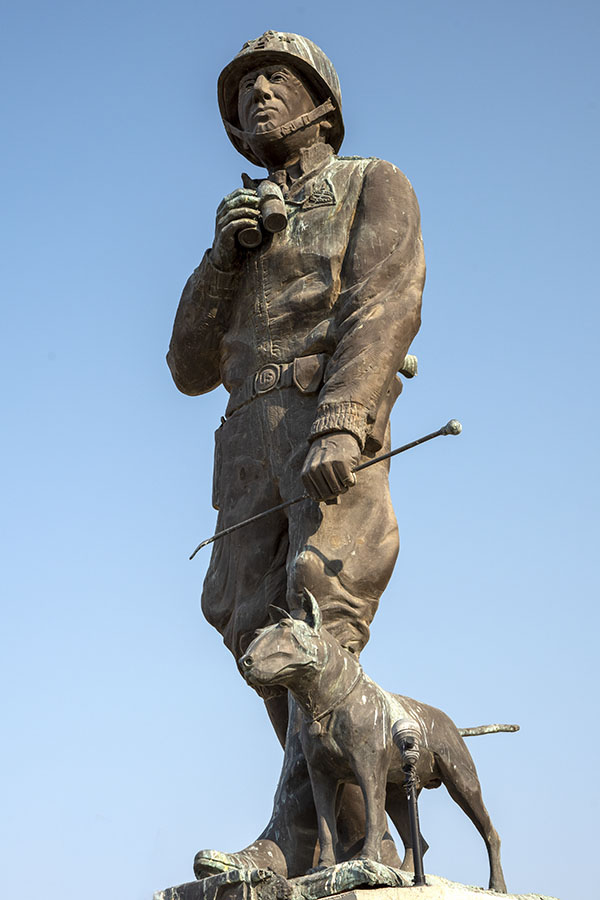
General George S. Patton, Jr., and his faithful companion, Willie, at the General Patton Memorial Museum in Chiriaco Summit, California.
I called the Patton Museum and they were closed. An answering machine. The Pandemic. Please leave a message. So I did. And a day later I had a response from a pleasant-sounding woman. She would let me know when they opened again and she hoped we would visit. So I called and left another message. Big time motojournalist here. We’d like to do a piece on the Museum. You know the drill. The Press. Throwing the weight of the not-so-mainstream media around. Gresh and I do it all the time.
Margit and I finally connected after playing telephone tag. Yes, the Patton Museum was closed, but I could drive out to Chiriaco Summit to get a few photos (it’s on I-10 a cool 120 miles from where I live, and 70 miles from the Arizona border). Margit gave me her email address, and Chiriaco was part of it (you pronounce it “shuhRAYco”).
Wait a second, I thought, and I asked the question: “Is your name Chiriaco, as in Chiriaco Summit, where the Museum is located?”
“Yes, Joe Chiriaco was my father.”
This was going to be good, I instantly knew. And it was.
The story goes like this: Dial back the calendar nearly a century. In the late 1920s, the path across the Colorado, Sonoran, and Mojave Deserts from Arizona through California was just a little dirt road. It’s hard to imagine, but our mighty Interstate 10 was once a dirt road. A young Joe Chiriaco used it when he and a friend hitchhiked from Alabama to see a football game in California’s Rose Bowl in 1927.
Chiriaco stayed in California and joined a team in the late 1920s surveying a route for the aqueduct that would carry precious agua from the mighty Colorado River to Los Angeles. Chiriaco surveyed, he found natural springs in addition to a path for the aqueduct, and he recognized opportunity. That dirt road (Highways 60 and 70 in those early days) would soon be carrying more people from points east to the promised land (the Los Angeles basin). Shaver Summit (the high point along the road in the area he was surveying, now known as Chiriaco Summit) would be a good place to sell gasoline and food. He and his soon-to-be wife Ruth bought land, started a business and a family, and did well. It was a classic case of the right people, the right time, the right place, and the right work ethic. Read on, my friends. This gets even better.
Fast forward a decade into the late 1930s, and we were a nation preparing for war. A visionary US Army leader, General George S. Patton, Jr., knew from his World War I combat experience that armored vehicle warfare would define the future. It would start in North Africa, General Patton needed a place to train his newly-formed tank units, and the desert regions Chiriaco had surveyed were just what the doctor ordered.
Picture this: Two men who could see the future clearly. Joe Chiriaco and George S. Patton. Chiriaco was at the counter eating his lunch when someone tapped his shoulder to ask where he could find a guy named Joe Chiriaco. Imagine a response along the lines of “Who wants to know?” and when Chiriaco turned around to find out, there stood General Patton. Two legends, one local and one national, eyeball to eyeball, meeting for the first time.
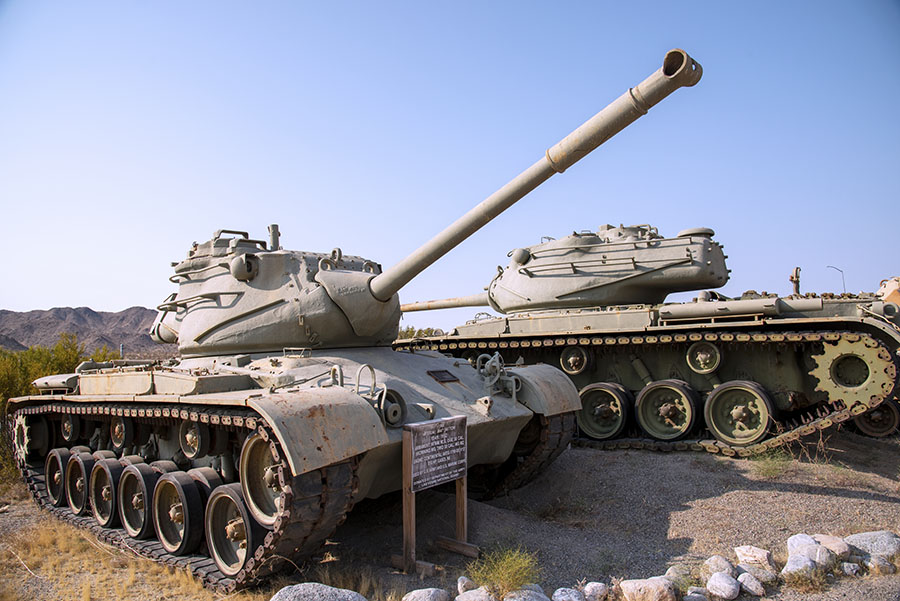
A Sherman tank, the one Patton’s men would go to war with in North Africa and Europe, on display at the General Patton Memorial Museum.
Patton knew that Chiriaco knew the desert and he needed his help. The result? Camp Young (where Chiriaco Summit stands today), and the 18,000-square-mile Desert Training Center – California Arizona Maneuver Area (DTC-CAMA, where over one million men would learn armored warfare). It formed the foundation for Patton defeating Rommel in North Africa, our winning World War II, and more. It would be where thousands of Italian prisoners of war spent most of their time during the war. It would become the largest military area in America.
General Patton and Joe Chiriaco became friends and they enjoyed a mutually-beneficial relationship: Patton needed Chiriaco’s help and Chiriaco’s business provided a welcome respite for Patton’s troops. Patton kept Chiriaco’s gas station and lunch counter accessible to the troops, Chiriaco sold beer with Patton’s blessing, and as you can guess….well, you don’t have to guess: We won World War II.
World War II ended, the Desert Training Center closed, and then, during the Eisenhower administration, Interstate 10 followed the path of Highways 60 and 70. Patton’s troops and the POWs were gone and I-10 became the major east/west freeway across the US. We had become a nation on wheels and Chiriaco’s business continued to thrive as Americans took to the road with our newfound postwar prosperity.
Fast forward yet again: In the 1980s Margit (Joe and Ruth Chiriaco’s daughter) and Leslie Cone (the Bureau of Land Management director who oversaw the lands that had been Patton’s desert training area) had an idea: Create a museum honoring General Patton and the region’s contributions to World War II. Ronald Reagan heard about it and donated an M-47 Patton tank (the one you see in the large photo at the top of this blog), and things took off from there.
I first rode my motorcycle to the General Patton Memorial Museum in 2003 with my good buddy Marty. It was a small museum then, but it has grown substantially. When Sue and I visited a couple of weeks ago, I was shocked and surprised by what I saw. I can only partly convey some of it through the photos and narrative you see in this blog. We had a wonderful visit with Margit, who told us a bit about her family, the Museum, and Chiriaco Summit. On that topic of family, it was Joe and Ruth Chiriaco, Margit and her three siblings, their children, and their grandchildren. If you are keeping track, that’s four generations of Chiriacos.
The Chiriaco Summit story is an amazing one and learning about it can be reasonably compared to peeling an onion. There are many layers, and discovering each might bring a tear or two. Life hasn’t always been easy for the Chiriaco family out there in the desert, but they always saw the hard times as opportunities and they instinctively knew how to use each opportunity to add to their success. We can’t tell the entire story here, but we’ll give you a link to a book you might consider purchasing at the end of this blog. Our focus is on the General Patton Memorial Museum, and having said that, let’s get to the photos.
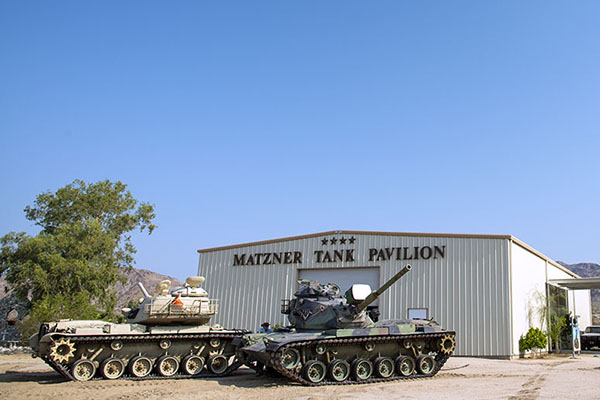
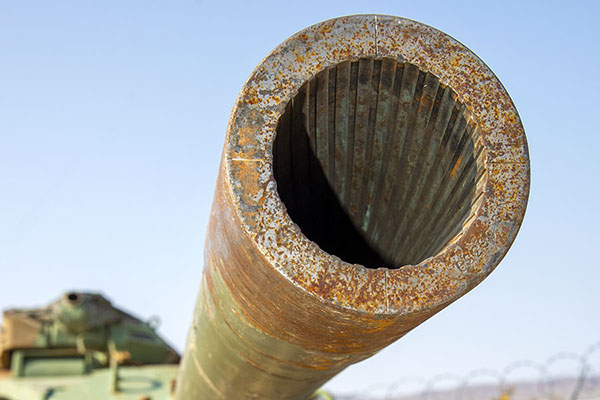
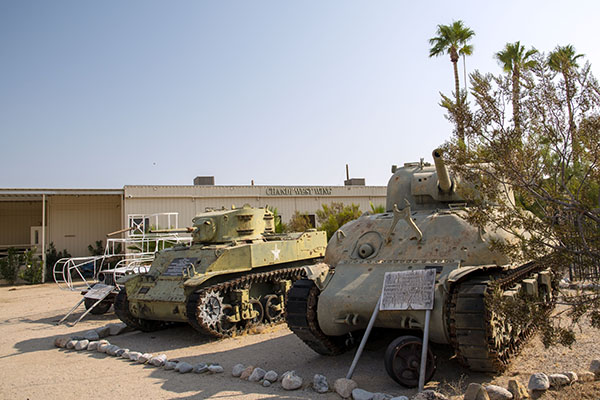
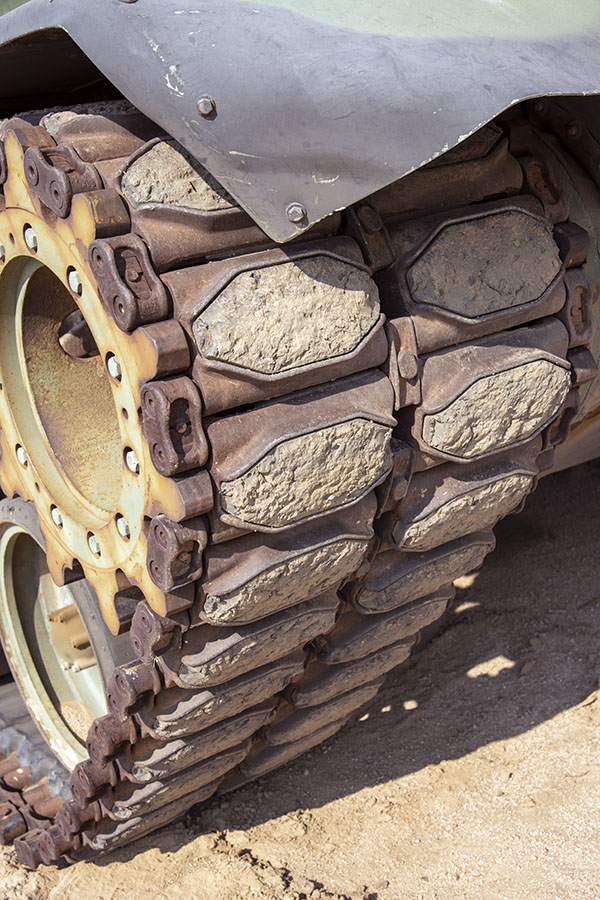
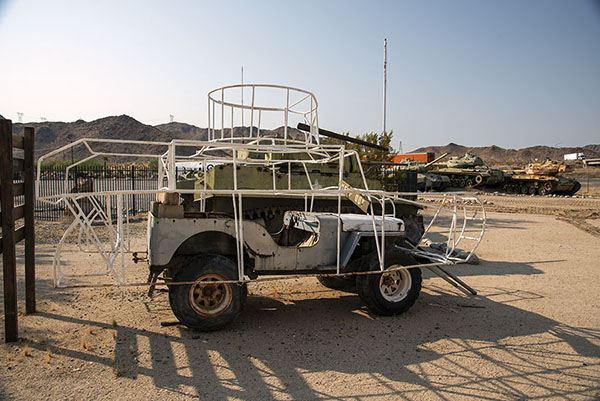
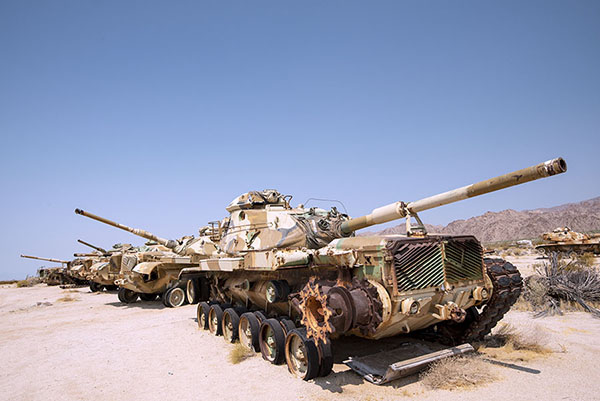
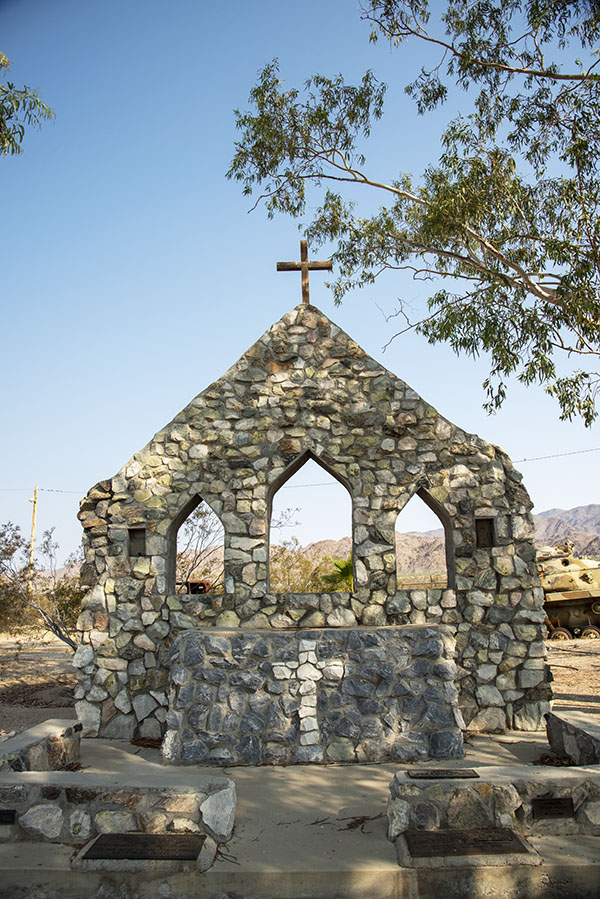
The Patton Museum’s new Matzner Tank Pavilion. When we were there, one of the two M60 tanks you see in front was running. If you think a motorcycle engine at idle makes music, you will love listening to an M60’s air-cooled, horizontally-opposed, 1790-cubic-inch, 12-cylinder diesel engine. I drove an M60 once when I was in the Army. Yeah, I still want one.The business end of an M60’s 105mm main gun. This one has been out of service for a long time; hence the rust. Firing one of these settles disagreements quickly.The M4 Sherman, our main battle tank in World War II, on the right, with an M5 Stuart tank on the left.Don’t tread on me, or so the saying goes. Everything on a tank is big. You don’t realize how big until you stand next to one.When Patton’s men trained at the DTC-CAMA, they used mockup aggressor vehicles (jeeps fitted with frames and canvas) to simulate the bad guys.M60 main battle tanks parked behind the Museum. This was a shot I could not resist. If Joe Gresh was into tanks, this is what Tinfiny Ranch would undoubtedly look like. The Patton name was attached to the M47, M48, and M60 tank series. I asked Margit about these tanks, and she told me that when the Museum raises enough money, they’ll be made operational and put on display. For now, Margit said, “they stand as silent ghosts with General Patton at the helm.” I like that.The General Patton Memorial Museum outdoor chapel. The chapel was built using desert rocks. If someone is looking for a unique wedding venue, this is it.
When I first visited the Patton Museum nearly 20 years ago, there were only three or four tanks on display. As you can see from the above photos, the armored vehicle display has grown dramatically.
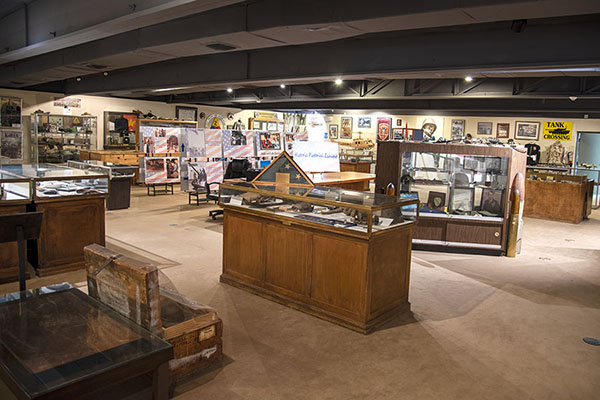
Like the armored vehicle exhibits, the Museum interior has also expanded, and it has done so on a grand scale. In addition to the recently-built Matzner Tank Pavilion shown above, the exhibits inside are far more extensive than when I first visited. Sue and I had the run of the Museum, and I was able to get some great photos. The indoor exhibits are stunning, starting with the nearly 100-year-old topo map that dominates the entrance.
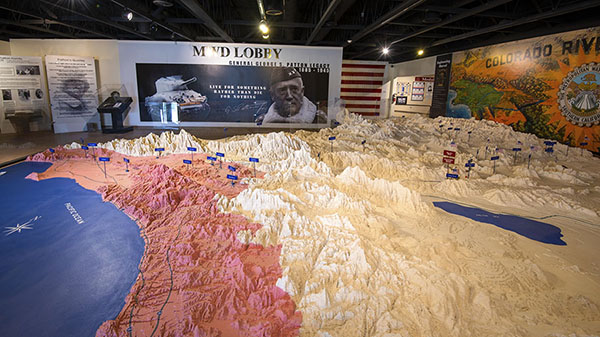
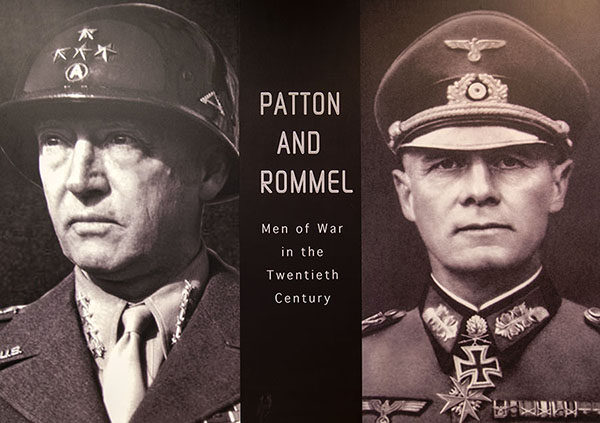
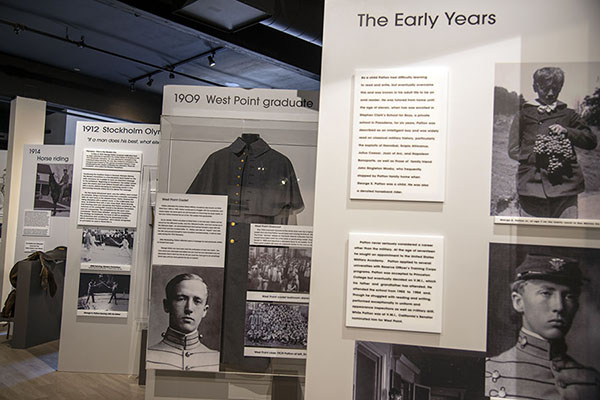
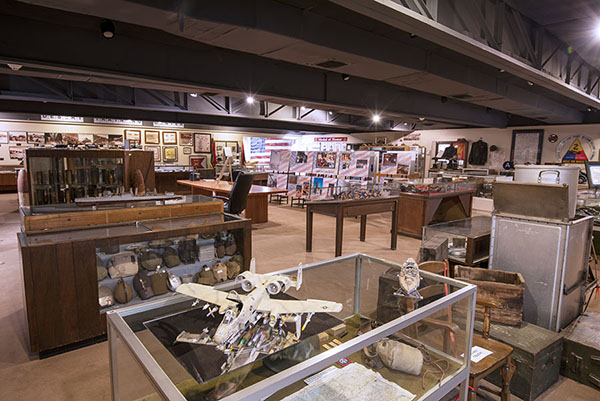
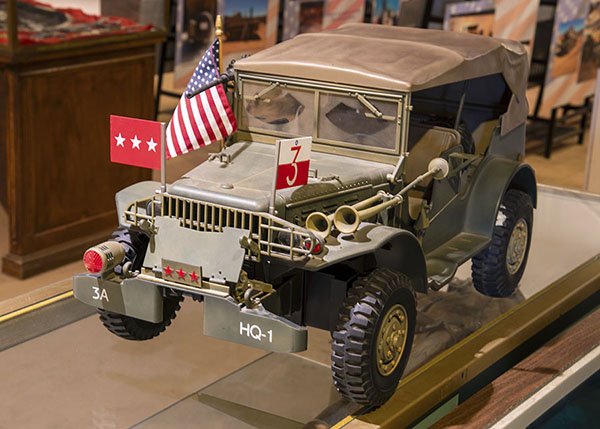
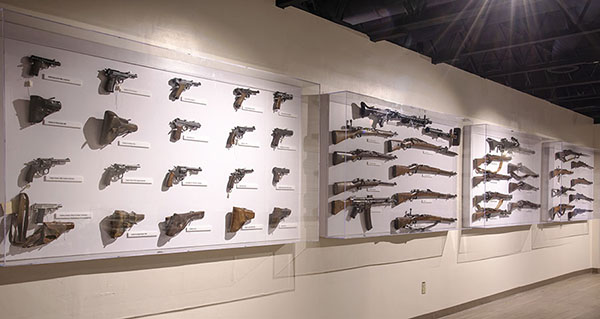
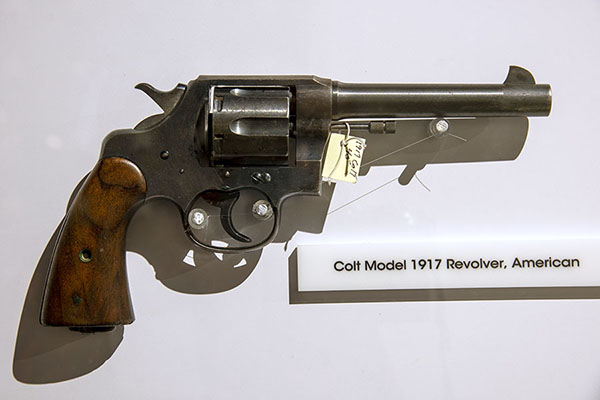
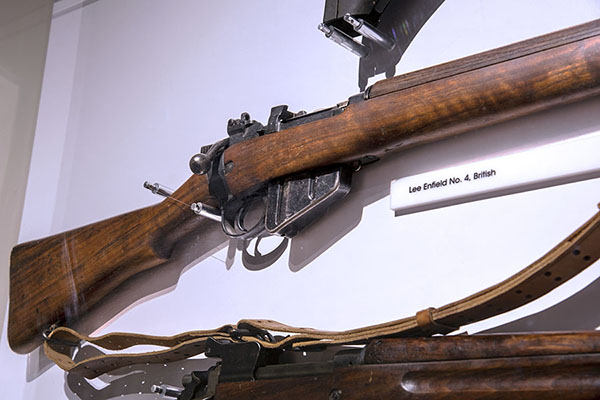
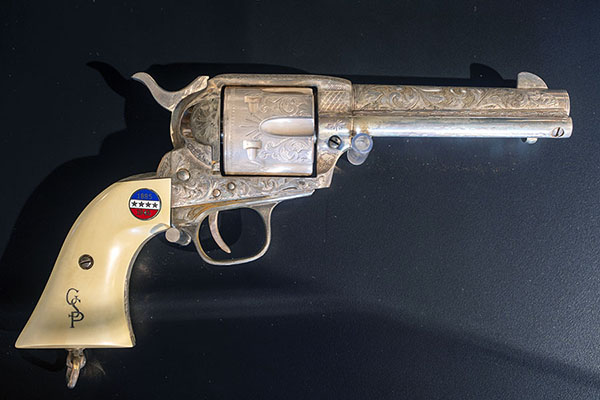
The Metropolitan Water District’s scale map of southern California, Arizona, and Nevada. MWD brought this model to the US Congress in 1927 to secure funding for the California Aqueduct, then they stored and forgot about it for decades. An MWD executive overhead Margit talking about the planned Patton Museum in the Chiriaco Summit coffee shop one day, he remembered the map, and one thing led to another. MWD donated the map to the Patton Museum in 1988. The Big Map (as it is known) covers the area used by Patton’s Desert Training Center and the California Arizona Maneuver Area. It’s a visually-arresting display that is truly something special.Generals Patton and Rommel, the two key players in North Africa. If you’ve never seen the movie, Patton, you need to fix that oversight. It is a great movie.George S. Patton: The early years. Patton attended the Virginia Military Institute and the United States Military Academy at West Point. His family was from San Marino, California. Patton was born into wealth and could have done whatever he wanted. He chose a career in the US Army.One of the display rooms inside the Patton Museum. I could have spent the entire day in just this room. That’s an A-10 Warthog model in the foreground. It’s the airplane we used to take out Iraq’s Republican Guard tanks in Operation Desert Storm. I worked for the company that manufactured the A-10’s 30mm Gatling Gun ammo and Combined Effects Munitions cluster bombs that did most of the heavy lifting in that war.Another view inside the Patton Museum. A tripod, a Nikon, a wide angle lens, and having the room to myself. It was a grand day.A model of Patton’s command vehicle. Patton lived in a trailer and moved with his troops during most of World War II, unlike other US generals who mostly stayed in hotels. Patton was an RVer before there were RVs.The Patton Museum has an extensive World War II small arms display. I could have spent half a day just viewing this part of the Museum. I’ll be back.The Patton Museum’s small arms display included this beautiful Model 1917 Colt .45 ACP revolver. Most of the surviving specimens you see today (when you see them at all; they are not very common) have a Parkerized finish. This one has the original blued finish. I own a Colt 1917; mine has the original finish, too. There’s quite a story behind these revolvers.A beautiful British Infantry Lee Enfield No. 4 rifle. I grabbed a photo of this one because it had an unusually attractive stock, something you don’t often see on infantry rifles.A replica of General Patton’s ivory-handled Colt Single Action Army revolver. Patton carried different sidearms during World War II, including this Colt SAA and a Smith and Wesson .357 Magnum (also equipped with ivory grips). Patton’s Colt SAA had two notches carved in the left grip. Then Lieutenant Patton was part of the Pershing expedition that chased Pancho Villa in Mexico from Fort Bliss (my old stomping grounds). Patton personally killed two men in a gunfight during that action. There’s no doubt about it: Patton was the real deal, a genuine warrior.
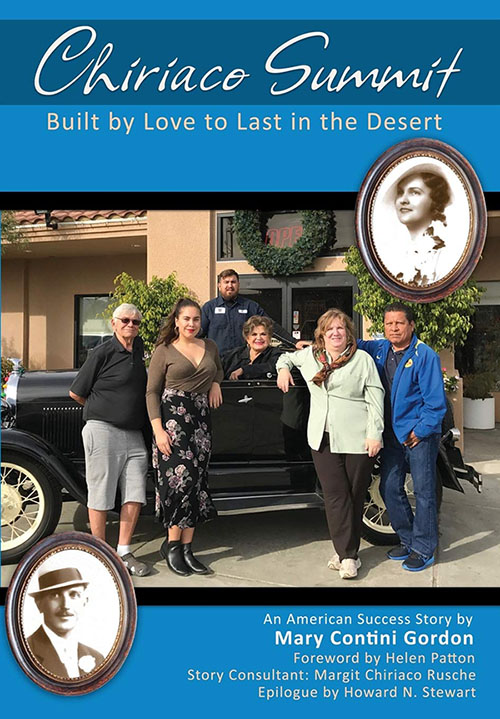
In addition to the General Patton Memorial Museum, there are several businesses the Chiriaco family operates at Chiriaco Summit, and the reach of this impressive family is four generations deep. As we mentioned earlier, it’s a story that can’t be told in a single article, but Margit was kind enough to give us a copy of Chiriaco Summit, a book that tells it better than I ever could. You should buy a copy. It’s a great read about a great family and a great place.
I enjoyed Chiriaco Summit immensely. That’s Joe Chiriaco in the lower left photo, and Ruth Chiriaco in the upper right inset. Margit Chiriaco Rusche, their daughter, is seated in the 1928 Model A. Fourth-generation Victor (whom we met) runs a vintage car header company at Chiriaco Summit. Victor is the young man standing behind Margit.
So there you have it: The General Patton Memorial Museum and Chiriaco Summit. It’s three hours east of Los Angeles on Interstate 10 and it’s a marvelous destination. Keep an eye on the Patton Museum website, and when the pandemic is finally in our rear view mirrors, you’ll want to visit this magnificent California desert jewel.
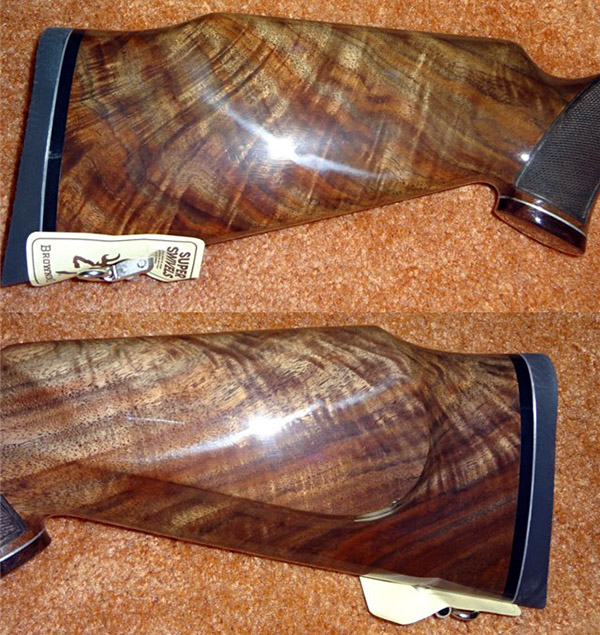
This is the fourth (and at least for now, the last) in a series of blogs on Browning bolt action rifles (the other three articles were on a .223 A-Bolt Micro Medallion, a maple-stocked 6.5 Creedmoor X-Bolt), and a .22 Long Rifle A-Bolt I used in metallic silhouette competition). The .223 A-Bolt and the 6.5 Creedmoor X-Bolt are very accurate. The .22 Long Rifle A-Bolt was pretty, but its accuracy was less than I thought it should be so after trying several different brands of .22 ammo I sold it.
This .308 Browning A-Bolt caught my eye for several reasons:
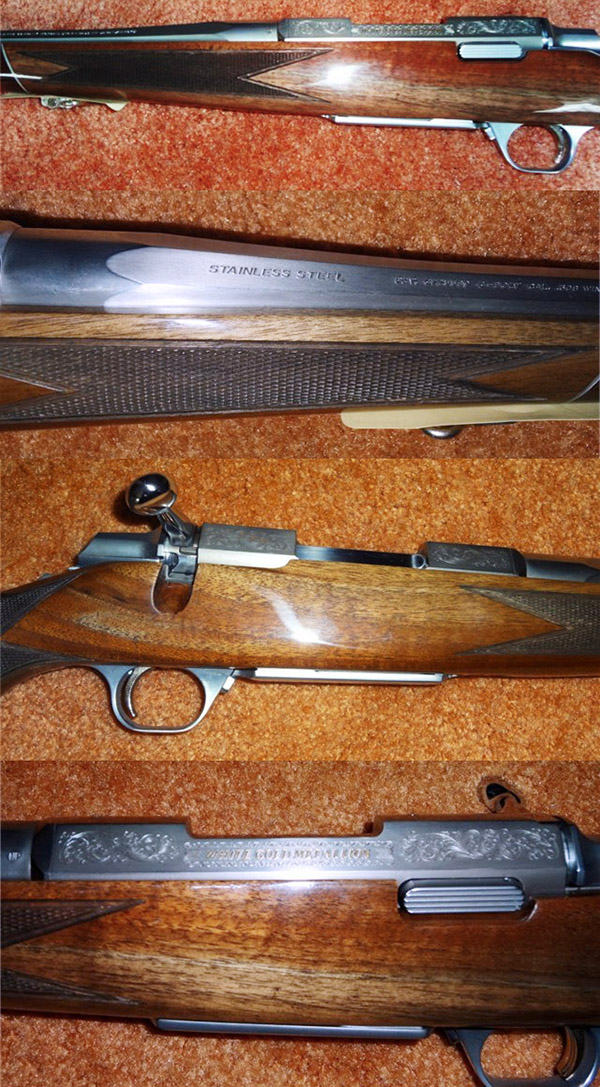
It is a stainless steel Gold Medallion A-Bolt in .308 Winchester with an octagonal barrel. At the time, stainless steel rifles were popular, and I always thought octagonal barrels were cool.
I like the .308 cartridge. It’s one of those cartridges that are inherently accurate, and I never owned a .308 that didn’t shoot well. I already had the dies and plenty of brass.
I like the Browning centerfire bolt action rifles. I knew from my experience with the .223 Micro Medallion that they are accurate.
My buddy Baja John and I spent a day at the range with his stainless steel octagonal .25 06 Browning. I liked it and I knew I wanted one.
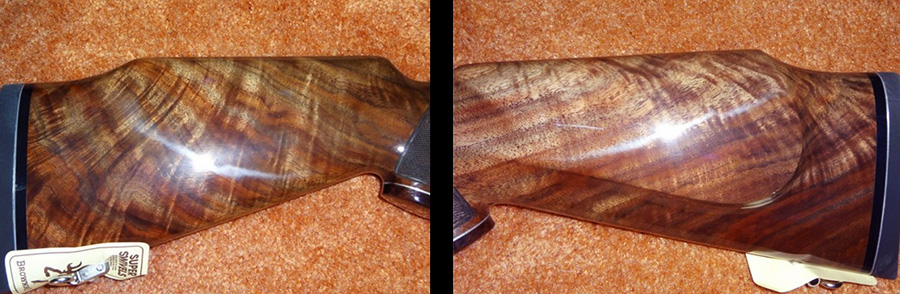
The walnut is exceptional. The photos speak for themselves. I’m a sucker for pretty walnut.
The photos below are the ones that appeared in the Gunbroker.com ad.
As an aside, Browning rifles and shotguns are manufactured in Japan by Miroku. Miroku is an interesting firearms manufacturer for several reasons, one of which is that they did not make guns for the Japanese military during World War II (at least not that I could find any reference to). The other modern Japanese gun manufacturer is Howa; that company made rifles for the Japanese during the war (the Arisaka rifle). I own several modern Howas; they are excellent rifles (as are the Brownings made by Miroku). Miroku got its start making hunting guns in 1893, and then in 1934, they started manufacturing whaling harpoon guns. Today, Miroku manufactures rifles and shotguns under their own name and for other companies (including Winchester). Based on my experience and observation, the Miroku Brownings are high quality firearms.
I know, I’m getting off track with the above info on Miroku and Howa. Back to the Browning .308, the topic of this blog. Here’s the description of my .308 as it appeared in the Gunbroker.com auction:
You are bidding on a brand new Browning White Gold Octagon Medallion in 308 Winchester, this is absolutely New In The Box. These rifles were shot show specials from several years back. They feature octagon barrels, gold accents on the receiver, stunning wood and highly polished bolt handles. These are very stunning rifles and very rare. * I am thinning the herd, selling those items I just never get around to shooting. As I am again beginning to sell a lot of items I will take them to my gunsmith 1x per week for shipment, usually Saturday morning. My gunsmith is a farmer so it may then take a day or 2 to process and ship them. All guns are shipped to an FFL dealer only. It is your responsibility to send your funds and a copy of your dealer’s FFL (e-mailed legible copy is ok). I will NOT call, fax or spend time chasing down your dealer’s FFL. I will hold shipment until you send an FFL. If sending an FFL is a problem for your dealer either find another dealer or please don’t bid. * Any damage in shipping will be the responsibility of the shipping company. All products are shipped fully insured and will ship by FEDEX. Items paid for by Postal MO will ship right away. Those who pay with a bank check or personal check will wait up to 10 days to clear. I only ship to FFL dealers. I do not end auctions early so please don’t ask. I will also not take less than the minimum bid price!! * I am looking for one rifle for which I would consider working out a trade, it is a SAKO Mannlicher in .375 H&H. Otherwise I do not have an interest in trading. * All auctions need to be paid within 7 days of the end of the auction to avoid negative feedback. Once the firearm is received I would appreciate your feedback. I will always leave feedback for those who do the same. Thank you for looking at my auction, good luck!
[Information added 5/9/2012 6:59:47 AM] I want to comment on a couple pictures; First, there is NO scratch in the stock it is just the flash creating that impression. Secondly, there is a slight reddish cast in the finish but the flash distorts the look in the one picture. The gun looks like the more brownish pictures in real life. It is a very highly figured stock.
Based on the above, it appeared the seller was firm on his price (he used two exclamation points in his admonition regarding lower offers). I would have paid the $1399, but I come from a long line of people who believe you should never pay the asking price, at least not immediately. Disregarding his warning, I wrote to ask if he would consider a lower price, and the answer came back in seconds: No. Well, that was quick, I thought, impressed with his resolve. I was getting ready to respond with an “okay, I’ll pay the $1399” when a minute or two later another email floated in. He would take $1275. Done, I typed, and I hit the send button.
You might be wondering how this rifle shoots. That would be something you and I have in common. I’ve never fired it. I’m considering doing so, however, and that would require adding a scope, rings, and mounts. I may get around to doing that sometime in the near future.
What do you think? Should I mount a scope and shoot this beauty?
Never miss an ExNotes blog:
Please click on the popup ads and visit the folks who advertise with us.
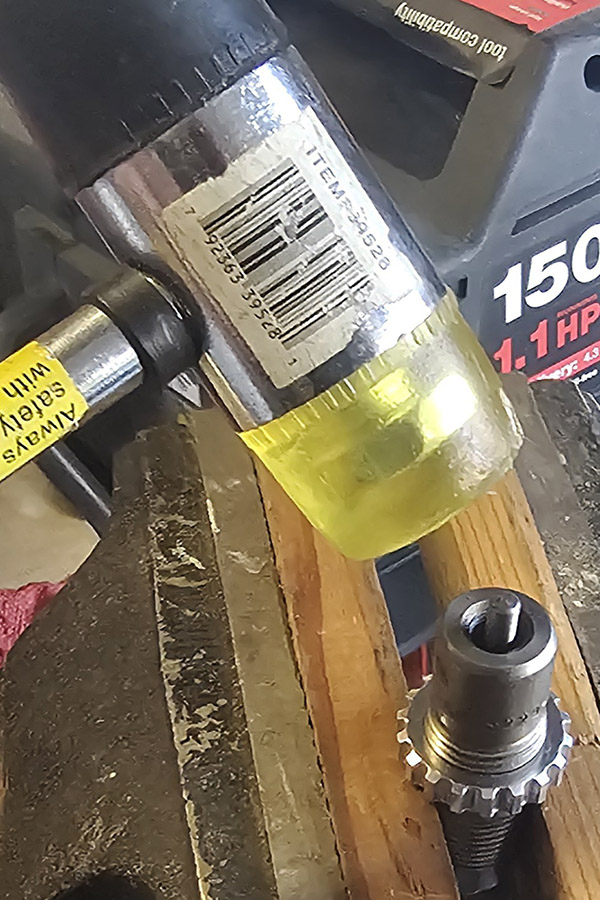
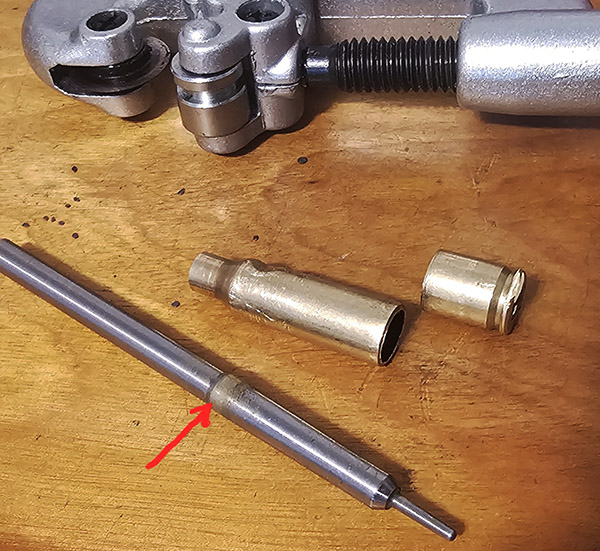
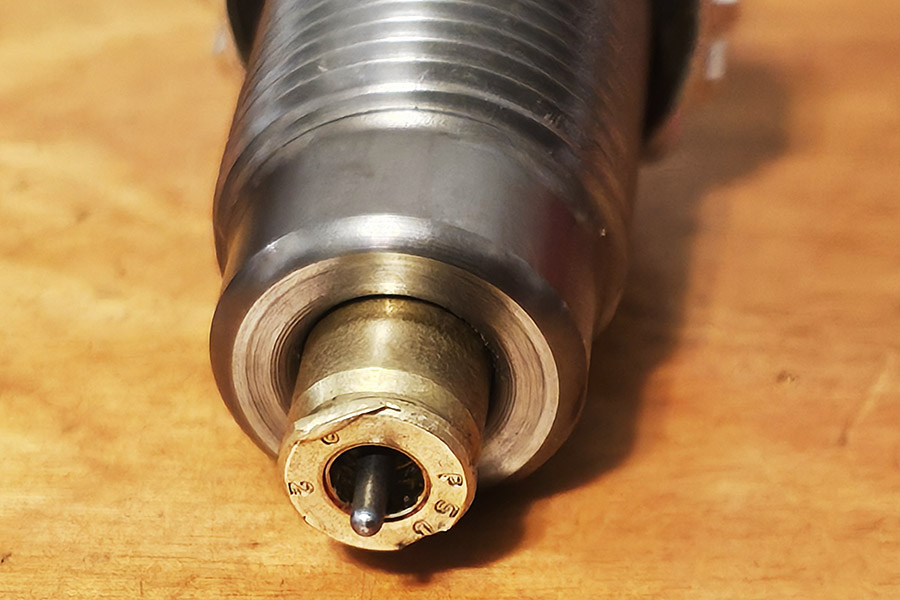
A problem that sometimes occurs when we reload is that a case gets stuck in the decapper/expander die (also known as the resizing die). This can result from not adequately lubricating the case prior to running it into die, or not cleaning a new die prior to use. The case gets stuck in the die, and when you attempt to extract it on the reloading press down stroke, the shell holder deforms the case’s rim and it pulls free of the shellholder. Getting the stuck case out can be problematic.
A friend just bought a new set of Lee .223 dies and forgot to clean out the decapper/expander die. The result was a stuck case (as you can see in the photo above). Here’s the easy way to remove stuck cases using tools that can all be bought at your local hardware store.
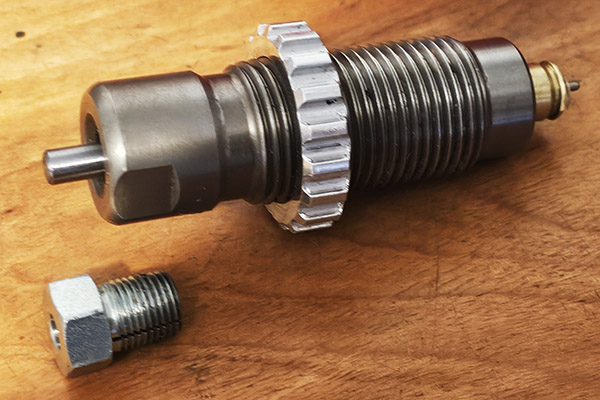
1. Remove the die and take off the pin retainer using the proper 1/2″ box and 3/4″ open wrenches. No crescent wrenches, pliers or vice grips!
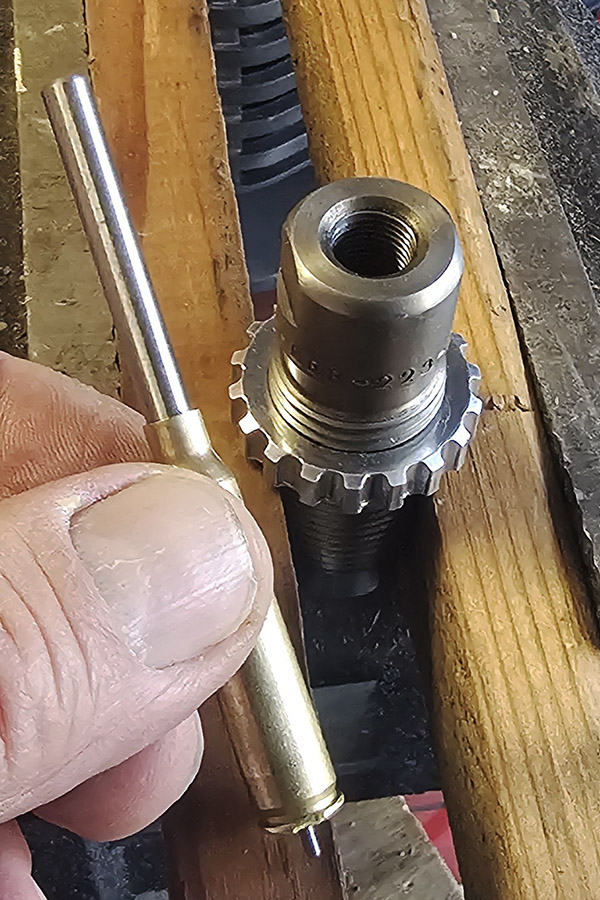
2. Put the die in a well-padded vise and knock the pin down with a brass or hard plastic mallet. The brass mallet or brass punch works best.
3. The expander pin will remain in the case. It will be loose and rattle around a bit, but still trapped inside the case.
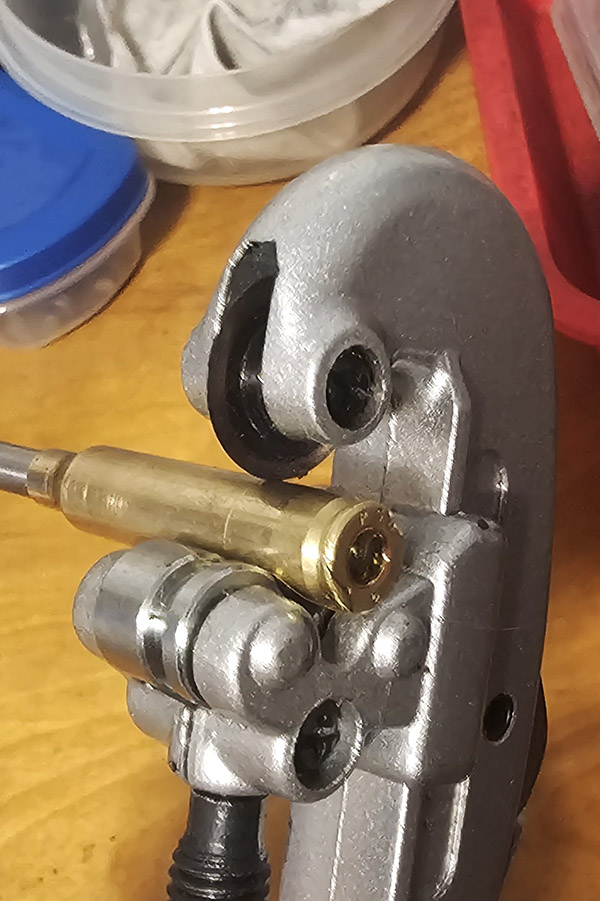
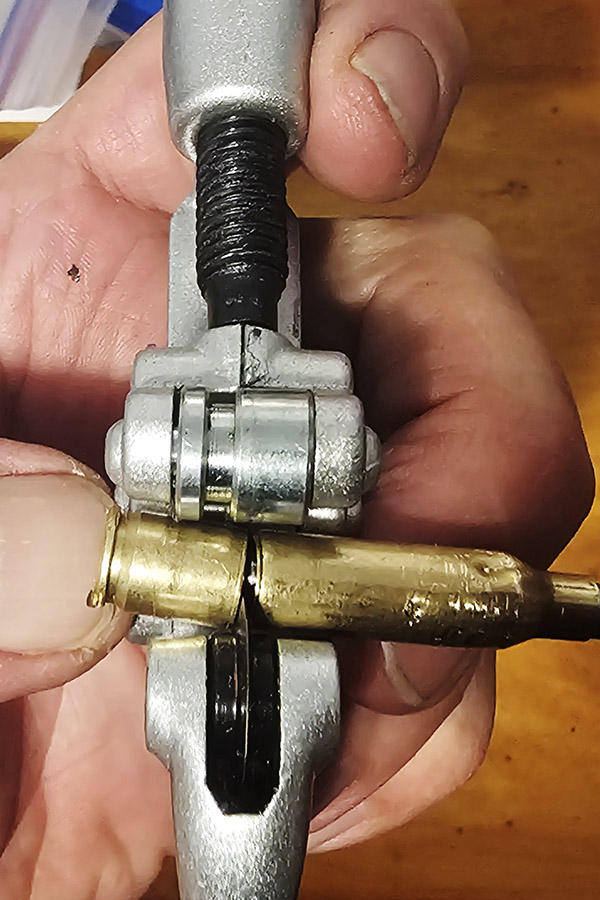
4. Use a small tubing cutter to remove the base of the case.
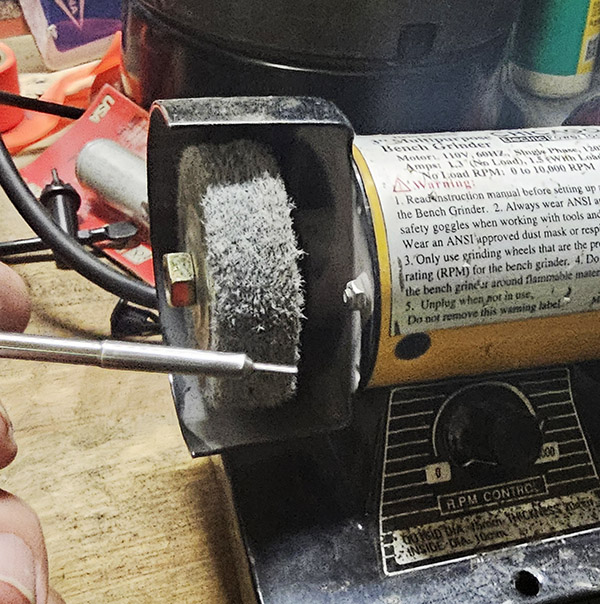
5. Clean up and polish the expander pin using a non-abrasive wheel or a Scotch Brite pad with soap and water. Get all that factory gunk out of the sizing die body too. I use brake cleaner, but WD 40 will also loosen the factory crud.
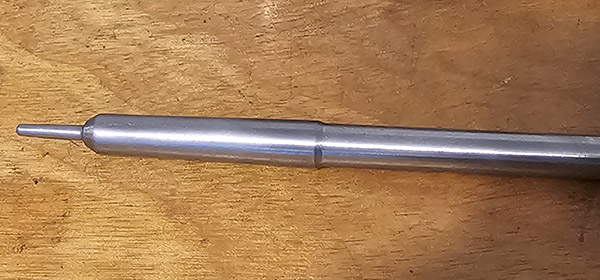
6. Reassemble everything with the pin lining up with the top of the retaining nut. Secure VERY tightly again using the proper wrenches.
Your die will now be better than new because the factory gunk is gone and the expander pin has been polished.
Make sure to use a good case lube on all bottle necked rifle calibers. I’m not a huge fan of the white Lee water soluble case lube but it works. I prefer to use spray lubes such as Lyman or Hornady One Shot.
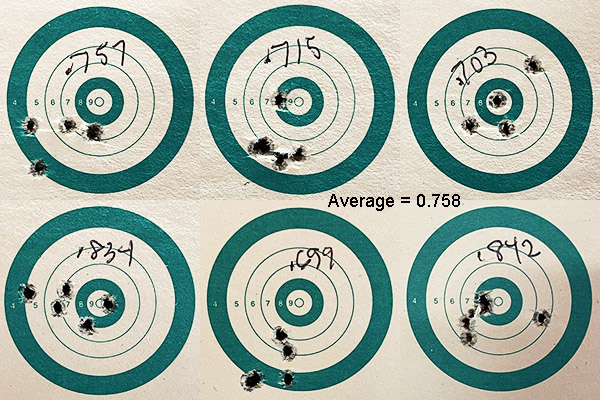
The good news is when I was recently on the range with my Remington Custom Shop Model 504 the air was dead still and I had the range to myself. The bad news is the 5-shot 50-yard groups were just so-so, and I didn’t have anything to blame that on but myself. Well, maybe. I only tried two kinds of ammo (an old box of Remington Target 22 and a new box of CCI standard velocity ammo). You have to play around trying different makes (just like you would experiment with different reloads) to find ammo that a rimfire rifle really responds to. I’m not there yet. But I’m having fun along the way.
Representative 5-shot, 50-yards groups from the Custom Shop Model 504. I’m expecting to see groups in the .250-.300 range from this rifle (I’m not done yet).
Sue and I were in Rapid City, South Dakota, several years ago exploring Mt. Rushmore and the Black Hills. We took a lot out of that trip…we saw Mt. Rushmore during the day and in the evening, we saw bunch of stuff in the Black Hills area, we went out to a little-known Minuteman Missile National Park, we saw the Badlands, we stopped in Wahl Drug, we went to Devil’s Tower, and of course, I had to check out what I now know to be one of the best gunshops in the country: Rapid City’s First Stop Gun and Coin. I could have spent the entire day there, but we had other things to see and do. After our visit, I started checking out what First Stop had listed on Gunbroker.com, and it wasn’t too long after that that I saw a Remington Custom Shop Model 504.
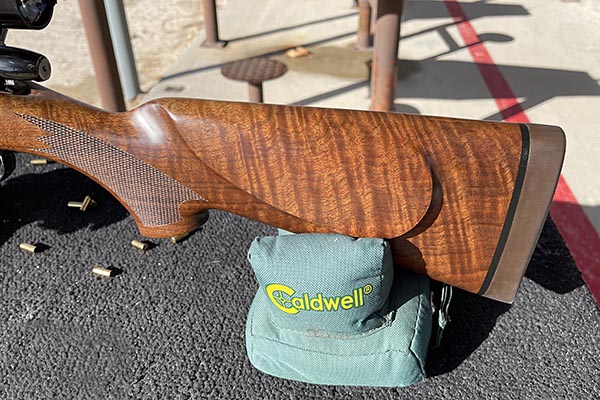
High end walnut, as is appropriate on a Custom Shop Remington rifle. The recoil pad might be more appropriate on a .416 Rigby, but it looks great on this rifle.
I didn’t even know what a Model 504 was, I’d never handled or shot one, but I knew what the Remington Custom shop was all about. The rifle had my interest. It was not cheap, but that was maybe a dozen years ago and when you see a Custom Shop Model 504 come up for sale today (which hardly ever happens), the ask is about three times what I paid. I’ve never seen another Custom Shop 504 in person; I’ve only seen them on the rare occasions one appears on Gunbroker and in a couple of Internet reviews.
Remington wanted a high end .22 bolt rifle in the early 2000s to compete with the offerings from Kimber, Browning, Ruger, CZ, and others, and the Model 504 was the result. Remington had three versions: A Sporter model, a heavy barreled Varmint version, and the Custom Shop 504 you see here. Remington built the 504 from 2004 to 2007. The Custom Shop Model 504 was the flagship and it had it all: A machined steel receiver, a highly polished deep blue finish, a free-floated barrel and glass-bedded action, highly figured walnut, a subtle forearm tip, a super smooth action, cut checkering, a recoil pad that might be more at home on a .300 Weatherby, and a barrel from the super-exotic Remington Model 40 target rifle. I didn’t know any of this at the time I hit the “buy now” button, but I knew any Remington Custom Shop rifle is a collectible item.
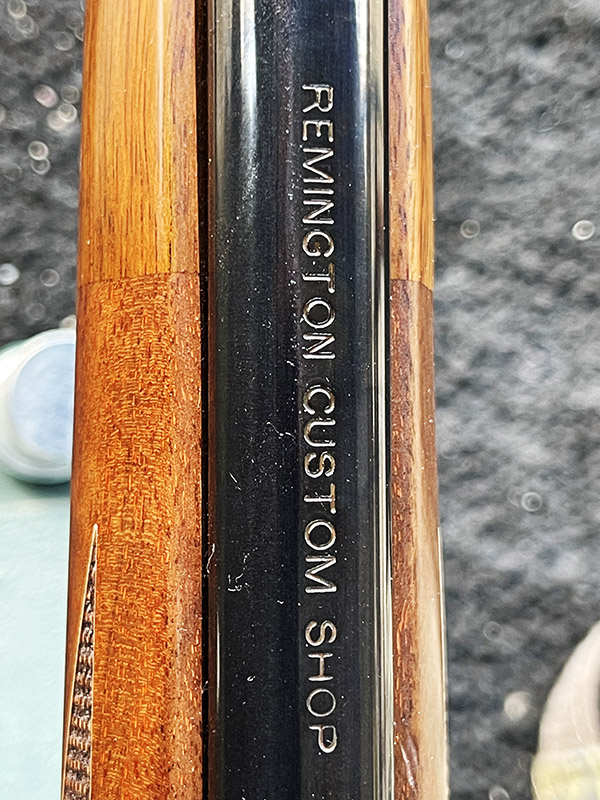
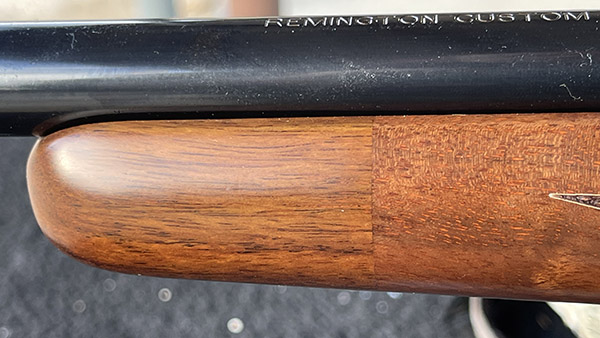
The Model 504 receiver is glass bedded.The Custom Shop markings on the 504 barrel.A very subtle forearm tip.
My rifle came with the rings of unknown origin and Bausch and Lomb mounts. I first mounted Bushnell scope, a scope set up to be parallax free at 100 yards. But I typically shoot a .22 at 50 yards. I next put an old Weaver 4×12 variable scope (adjustable for parallax) on the rifle, and when I adjusted for 50 yards it had no parallax. I don’t know how repeatable that old scope is (and as you’ll notice from the photo above, the groups seem to move around a bit), so one thing I’m going to do in the future is put another scope on the rifle, mostly likely Mueller’s 4×12. I have a Mueller scope on another rimfire rifle and I know it is good. I like the looks of the old Weaver the 504 is wearing now, but when I tried adjusting it, there didn’t seem to be much correlation between the adjustments I was making and where the bullets were going.
The Weaver scope mounted on the Model 504.
Something that had me scratching my head are the plastic inserts on the scope rings between the scope body and the rings. I’ve never seen this on any other rifle, but from what I’ve read on the internet, they work well for other shooters (even on heavily recoiling rifles, which a .22 is not). The scope appears to be secure.
The plastic scope ring inserts. I had never encountered this before.
The Model 504 magazine is apparently scarcer than an honest politician. Only one magazine was included with my rifle. Now that I am shooting it more (it’s no longer a safe queen), I thought it might be a good idea to pick up a couple of spare mags until I saw their price. When you can find one on Ebay or Gunbroker, they go for around $200. I think I’ll be careful with my one magazine and keep looking; maybe I’ll get lucky and find one in a gunstore’s discounted junkbox (most old line gunshops have these).
The difficult to find and very expensive Model 504 magazine.High end walnut, starboard side.High end walnut, port side.
It may be that the Model 504 is just not that accurate. My findings are consistent with what other 504 reviewers have published (in fact, my gun is turning in tighter groups than what others have previously published). Recognizing that the Custom Shop model used the same barrel blanks Remington used for the Model 40 .22 rifle, I would have expected more. Maybe it’s there and I just haven’t found it yet. At least that’s my hope.
Good buddy Paul sent this very recently released video from Lipsey’s to me last night:
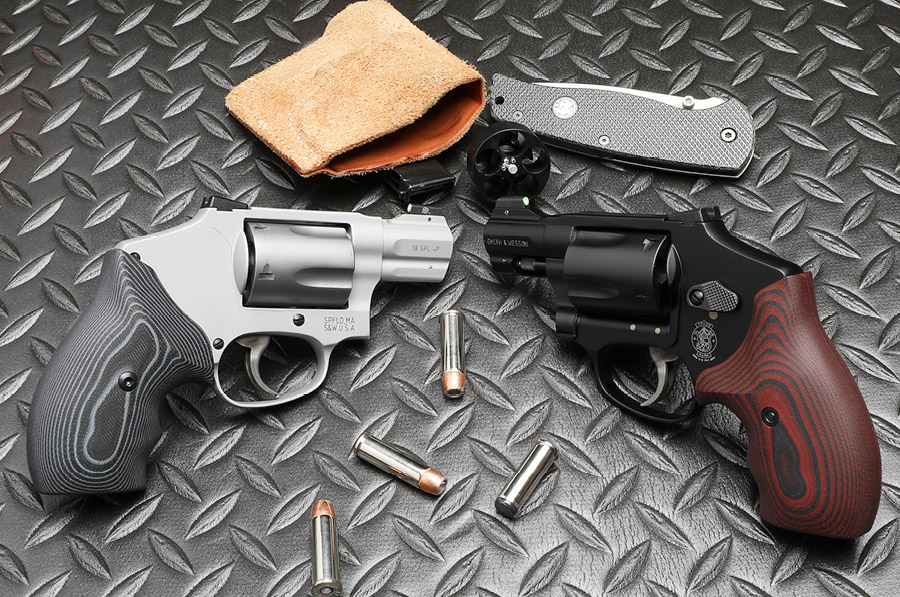
The video is just under 10 minutes long and it’s worth watching. To me, this new J-frame Smith addresses most of the shortcomings I’ve noticed with my concealed carry J-frame revolver. Here are my thoughts:
I like it.
The ideal of a .30 caliber 6-shot is intriguing (in addition to the 5-shot .38 Special version Lipsey’s is also offering). I know most concealed carry handgun encounters are settled in less than two shots, but having an extra round (one over the standard 5 shots) makes sense to me.
I notice the grips don’t go below the bottom of the grip frame, which would be a problem for me. Getting my little finger caught under the grip frame is what makes shooting a J-frame revolver uncomfortable (in fact, it’s downright painful after a shot or two). I do like the G10 material grips, though. I have those on my Sig Scorpion 226 and it is the best grip material ever, in my opinion. I would like a set of G10 grips that extend lower than the bottom of the grip frame, like the Altamont grips I put on my J-frame. These would be very comfortable.
The sights are a much-needed upgrade. The stock Model 60 and other J-frame sights are a joke.
The aluminum frame means light weight, which I guess is good for carrying the gun all day, but those little J-frames can have fierce recoil. My stainless steel Model 60 packs a punch; the aluminum version recoil will be worse. I suppose the assumption for most is that the gun will be carried more than it is shot, and that makes sense. But, still, that’s going to be a lot of recoil.
The J-frame endurance package is sorely needed. I shot the hell out of my Model 60 doing rapid fire at 7 yards and it quickly went seriously out of time. That was an expensive fix. Mine also had excessive headshake. I was able to address it with a shim kit, but it should not have been necessary.
It will be interesting to see what this new Lipsey’s/Smith and Wesson J-frame revolver costs and if it gets approved in California. My prediction is that Lipsey’s will later release a .357 Magnum version (not that anyone would need it, but it would probably sell well). I also predict a 9mm version. 9mm is the most popular centerfire handgun cartridge in the world, and I believe a 9mm version would sell well, too.
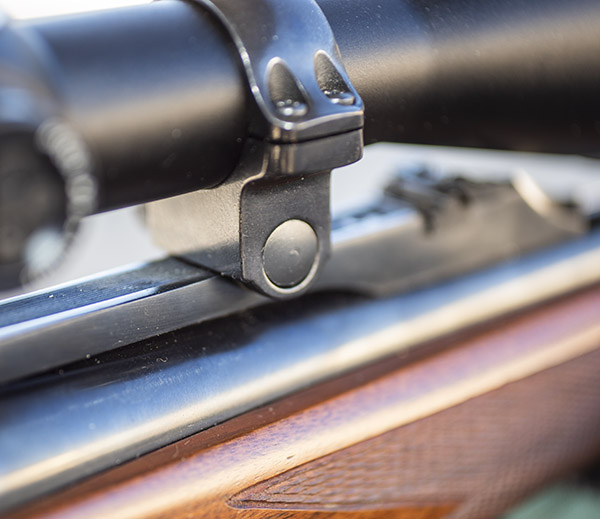
Bushnell scopes have been around forever and they are kind of a generic scope…just as effective as the name brand medication but at a fraction of the cost. I’ve had several that came with rifles I bought, but I never bought a new one until recently. I’m glad I did. I bought the Bushnell Banner 4×12 and it’s a great scope.
The 4×12 Bushnell Banner scope. It’s a surprisingly good scope for well under $100.
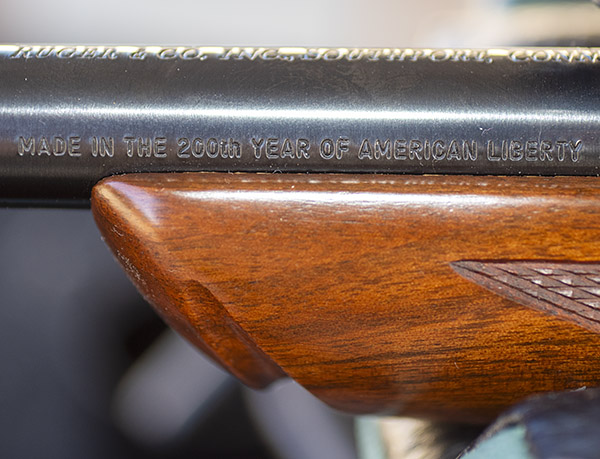
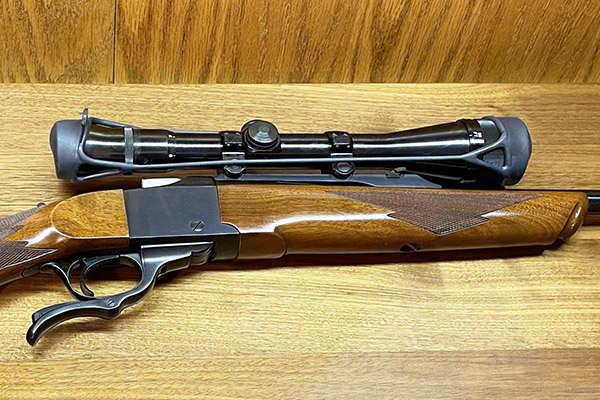
The story goes like this: I won a Ruger No. 1 in 243 Winchester in an online auction about 15 years ago. The rifle was a 200th year Liberty model, it looked good, and I stashed it in the safe. I shot it for the first time a month ago, and that’s when I learned I had an accuracy issue. The Ruger came with a period-correct 4×12 Weaver (long since discontinued), which provided plenty of magnification but my groups were embarrassing.
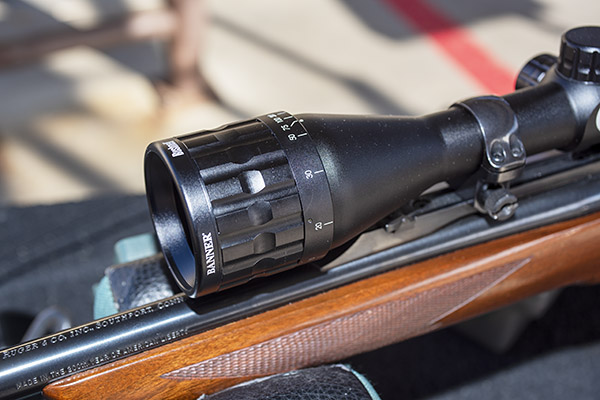
The .243 Ruger No. 1 on the range. The rifle is wearing the new Bushnell Banner 4×12 scope in this photo.
Let’s go tangential for a second or two: The “4×12” I use above refers to the scope’s variable magnification, which ranges from 4 times actual size to 12 times actual size. With a good scope (one offering optical clarity), you can see the bullet holes in the target at 100 yards when the scope is zoomed up to 12 times actual size.
The Ruger American Bicentennial inscription. It’s on all Rugers made in 1976.
For hunting, I always prefer a straight 4-power scope (i.e., a nonvariable) because of its wider field of view and the fact that I can still hold a pretty tight group with a 4-power scope. Magnifying the target four times is good enough for hunting. That’s especially true on a deer-sized target, but it’s good enough even on rabbits. I’ve sent a lot of Texas jacks to the promised land with a simple 4-power Redfield on my .30 06 Ruger No. 1.
The scope companies pretty much all say that you should keep a variable scope at low magnification to acquire the target, and then zoom it up for a more precise aim. But I’ll tell you that’s just marketing hype, it’s laughable, and it’s a lot of baloney. When I’m hunting and I see a game animal, the adrenal glands go into overdrive. It’s all I can do to remember to take the safety off, and I can remember a few times when I forgot to do that. The thought of seeing a target, acquiring it in the scope at low magnification, taking the safety off, lowering the rifle, increasing the zoom, raising the rifle again, reacquiring the target, and then squeezing the trigger is ludicrous. Nope, for hunting purposes, a straight 4-power scope is the way to go for me. On the other hand, when I’m on the range, I just leave the variable scopes at their highest magnification. In short, I don’t need a zoomable scope. But the marketing guys know better, I guess, and that means they weather vane to variable scopes. That’s pretty much all you see these days.
But I digress. Let’s get back to the main attraction, and that’s the new Bushnell Banner 4×12 scope on my .243 No. 1 rifle. This all started when I loaded some brass good buddy Johnnie G sent my way. The rifle would not consistently hold a zero, and even when it did, it shot grapefruit-sized groups. My thought was that the old 4×12 Weaver scope that came with the rifle had conked out, so I replaced it with another inexpensive scope I had laying around (an older Bushnell Banner 3×9 scope that is probably 50 years old). While mounting the older 3×9 Bushnell, I checked both Ruger rings (front and rear) to make sure they were secure. They seemed to be, but they were not (more on that below). I took the No. 1 (now wearing the older model Bushnell Banner) to the range. The accuracy situation did not improve.
The 4-12X Weaver scope that came with the 200th year .243 Ruger No. 1. That scope may still be good; I’ll have to mount it on another rifle to confirm that.
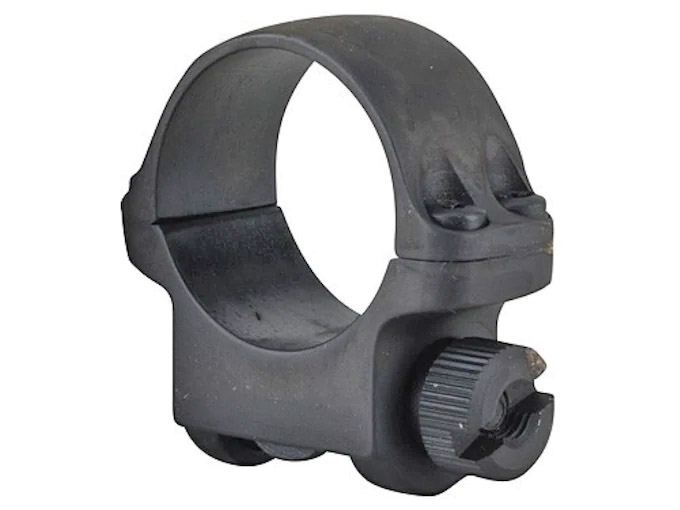
So I removed the older 3×9 Bushnell and the Ruger rings. That’s when I discovered that the front ring was not secure. It had felt like it was, but it fooled me (which is not too hard to do). Ruger provides rings with their centerfire rifles and they are good, but the rings on this rifle were muey screwed up. The clamp (the bolt with the angled head) on the front ring was mangled, and both the nut and the clamp were gunked up with some sort of adhesive (probably Loctite, but who knows). I think what had happened was the clamp could be tightened on the mangled part of the clamp’s angled surface. The buggered-up clamp was not properly positioned in the mounting surface and the caked-on adhesive compounded the felony. Under recoil, the forward ring was moving around.
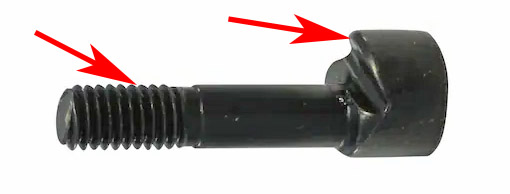
A Ruger scope ring. Ruger provides two of these with each of their centerfire rifles.The Ruger scope ring clamp. It’s a bolt with an angled surface (denoted by the right arrow) that clamps onto a machined crescent on the rifle’s scope mounting surface. The threads on mine were caked with an adhesive.The Ruger scope ring nut. It’s what threads on to the clamp shaft in the photo above.
The Ruger No. 1’s forward scope ring. This was not firmly mounted because the clamp had been damaged by Bubba gunsmithing. God must love Bubbas; He sure made a lot of them.
I recut the clamp ‘s angled surface with a file to eliminate the mangled portion and reblued the clamp using Birchwood Casey Cold Blue, and I wire-brushed as much of the adhesive as I could from the clamp’s threaded shaft with a bore brush. I then worked the clamp into the nut until I cleaned out the remaining adhesive on the nut. I reinstalled the ring and satisfied myself that this time it was secure.
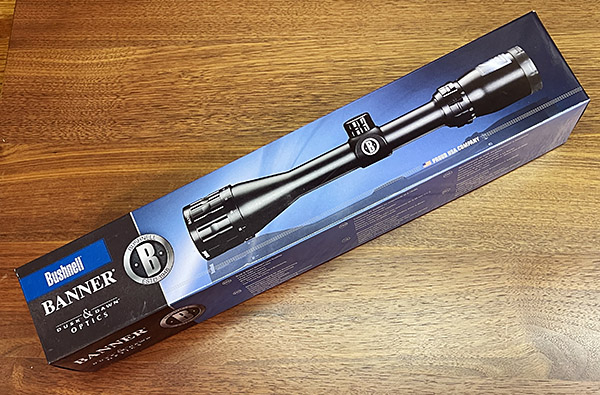
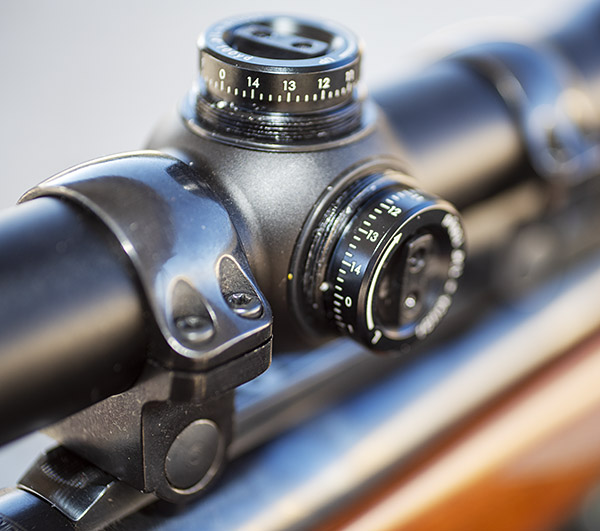
The Bushnell Banner box. The scope was nicely packaged.The Bushnell Banner’s parallax adjustment ring. These really work.The Bushnell Banner’s quick adjust focusing rear ring. It’s a nice feature.The Bushnell Banner’s adjustment knobs after their covers had been removed. These have a nice feel, with a distinct tactile click for each 1/4-inch adjustment. You don’t need any tools to make these adjustments. It’s first class.
When my new 4×12 Bushnell Banner scope arrived a few days after I ordered it on Amazon, I was impressed with its appearance. I even liked the box. I looked through the scope and was impressed with its optical clarity. These inexpensive Banner scopes have continued to improve over the years, and this one looks great.
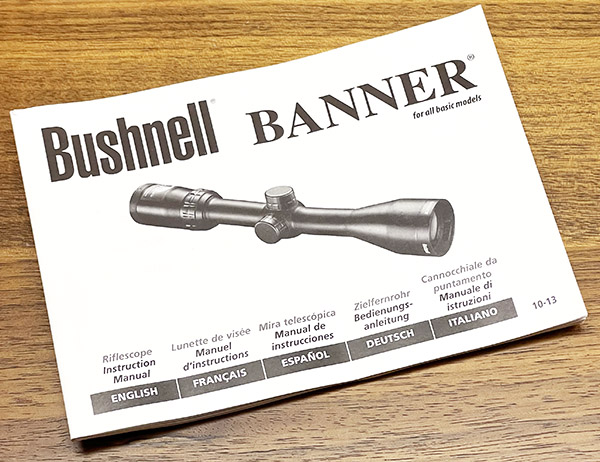
The Bushnell Banner’s operator’s manual. It contains basic information about mounting and boresighting the scope.
The Bushnell scope has a lifetime warranty and it came with what I thought was an impressively thick operating manual. The manual is printed in five languages (English, French, German, Italian, and Spanish), so it was only one fifth as thick as it first appeared to be. But it was still a good manual. The scope also came with lens covers, which is a nice touch.
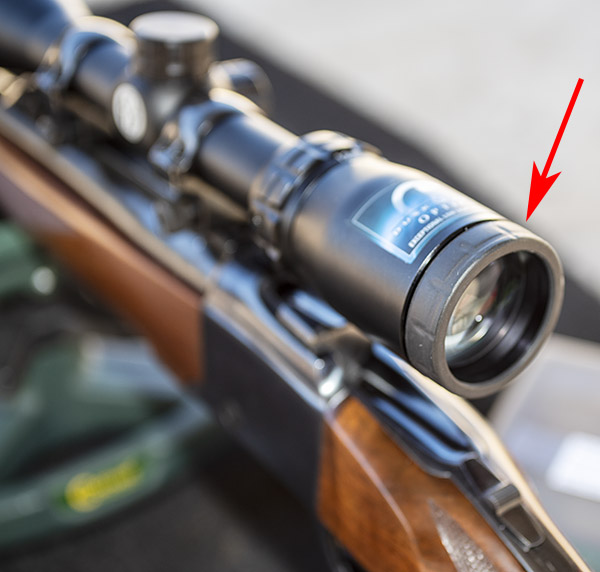
The Bushnell has other features that are important to me. It has a quick focus ring at the rear to focus the reticle, and it has a parallax adjustment feature on the objective end (the front of the scope). Parallax adjustment has become increasingly important to me; it minimizes the scope’s susceptibility to slightly different eye positions. You adjust for parallax by moving your eye around and making sure the reticle stays centered on the target.
The Bushnell has removable windage and elevation adjustment dial covers, and windage and elevation adjustment can be made by hand (no special tools are required). Each click represents 1/4-inch of movement on a 100-yard target, which is pretty much the standard on scopes.
The Bushnell has a 40mm objective lens, which I think is about right. It looks right and still allows the scope to be mounted low on the rifle. Some scopes go bigger with 50mm objectives, but I think they look silly. These bugeye scopes have to sit higher on the rifle (which makes sighting through them difficult). Nope, for me a 40mm objective is as big as I care or need to go.
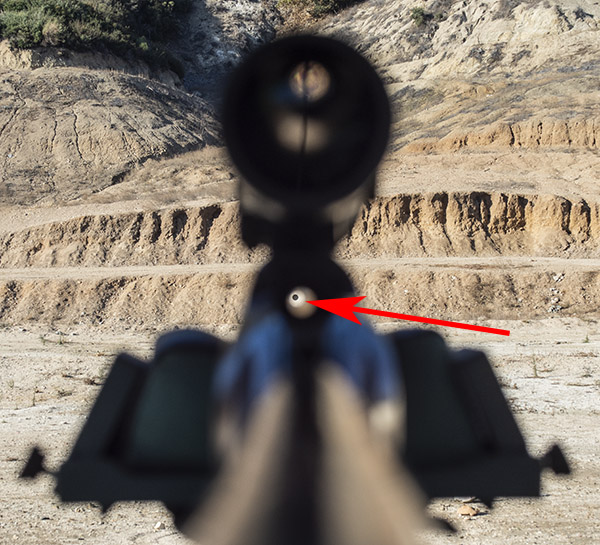
Although I own a boresigting device that mounts on the barrel, I prefer not to use it. The thought of potentially damaging a rifle’s crown, which a boresighting device can do, is not something I want to entertain. I boresight the old-fashioned way: I’ll set the rifle up in a rest, look through the bore (from the breech end) and move the rifle around until a 50-yard target is centered in the bore. Then, without moving the rifle, I’ll adjust the scope’s windage and elevation until the reticle is approximately centered on the target. Once I’ve done that, I’ll fire one shot and see where it hits. I’ve actually done this and had the impact be on the target with that first shot, but it took four shots this time. After each shot, I adjusted the windage and elevation to get the next shot two inches below my point of aim at 50 yards, and then switch to a target at 100 yards to finalize the adjustment.
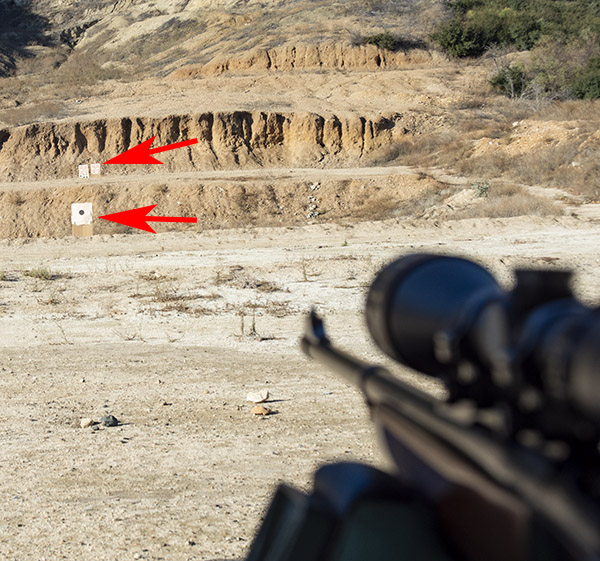
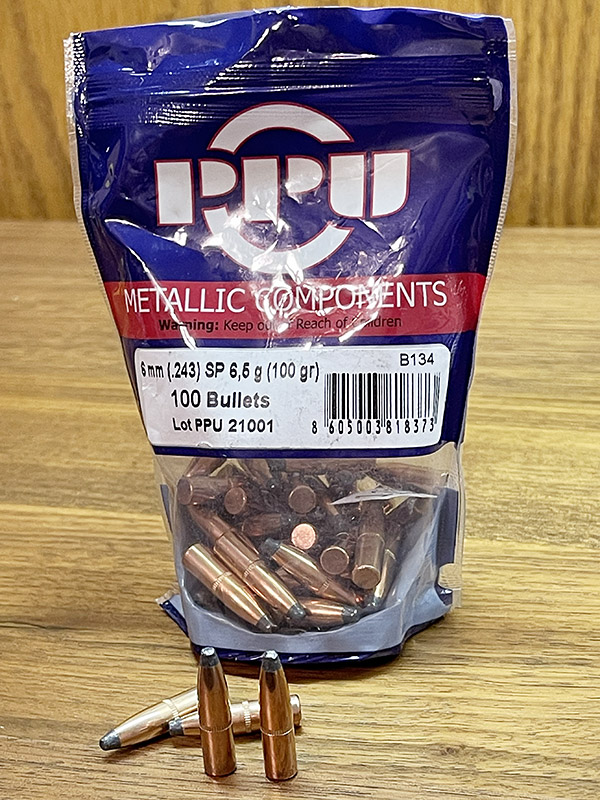
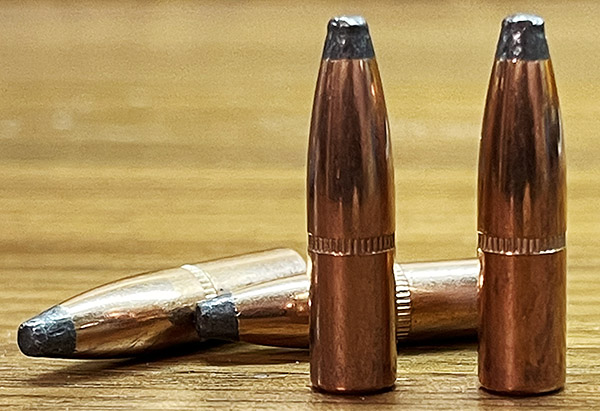
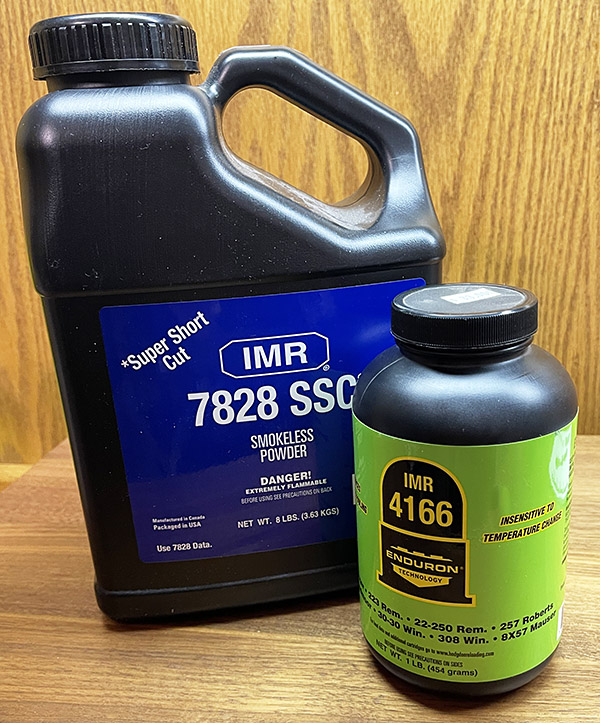
On the range at the West End Gun Club. The first target is at 50 yards; the second set of targets is at 100 yards. I used the first target for boresighting and initial scope adjustment.To boresight the scope, you look for the target through the rifle’s bore. It appears to be a little offset in this photo because it was difficult to get the camera aligned with the bore, but you get the idea. You want the target centered when looking through the barrel.I used PPU (PRVI Partizan) 100-grain jacketed soft point bullets for this round of load development. The Ruger has a 1 twist in 10 inches rate. A 100-grain bullet is right at the edge of stability with this twist rate; lighter bullets should be more accurate.Another shot of the PPU 100-grain bullets. There’s a long bearing area on that bullet.I used two propellants for this test series: IMR 7828 and IMR 4166. The IMR 4166 performed better than the IMR 7828 load and it reduced the copper fouling in the bore.
For this outing, I had loaded two groups of .243 ammo, both using PRVI Partizan 100-grain jacketed soft point bullets. One load had 43.0 grains of IMR 7828 propellant; the other group had 34.5 grains of IMR 4166 propellant. I used the IMR 4166 ammo last. IMR 4166 was one of those new powders that is supposed to not leave copper deposited in the rifling (I’ll explain why I used the past tense in a second). I wanted to use it to minimize the cleaning after shooting the rifle.
So how did it all work? The IMR 7828 load didn’t perform well as the IMR 4166 load. The IMR 7828 load was shooting 2 1/2 to 4-inch groups. Part of that was due to the Ruger’s twist rate (1 in 10), which is marginal for a heavy (for the .243) 100-grain bullet. But I was surprised with the last group of the day, which was with IMR 4166 powder.
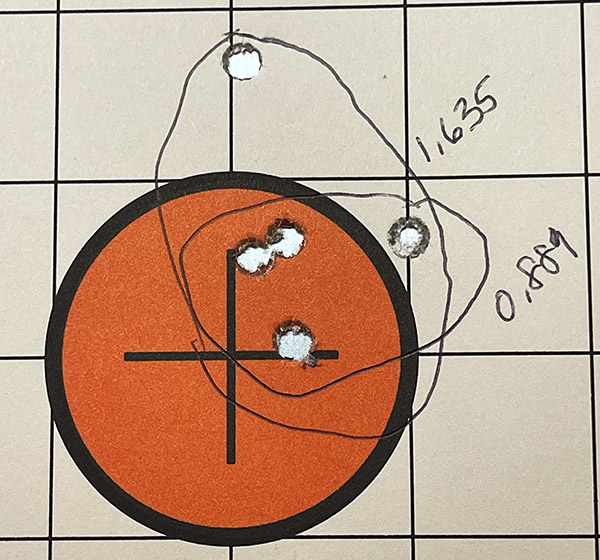
The last shots of the day, and the last of the loads with IMR 4166 propellant.
Four of the five shots went into 0.889 inch; the fifth shot opened the group up to 1.635 inches. That fact that the IMR 4166 grouped much better might be due to the fact the propellant may have removed some of the copper fouling (it appeared to have a lot less copper fouling when I cleaned the rifle later), it might be due to the fact that IMR 4166 is a faster powder compared to IMR 7828, it might have been me, or it might be a statistical fluke. You might think this would push me to develop a load with IMR 4166, but unfortunately the powder has been discontinued (I’m on my last bottle). Future load development work for this rifle will be with lighter bullets and other powders with burn rates similar to IMR 4166. Varget comes to mind. I’ll keep you posted.
I know, I’m digressing again. I started out with the intent to do a product review on the Bushnell Banner 4×12 scope, which I think I did, but I morphed into a bit of load development work for the .243 Ruger No. 1. On my intended topic: The Bushnell Banner is a great scope, and it performs way beyond what it’s sub-$100 price would indicate (I paid $72 for mine on Amazon). If you’re looking for a good low-priced scope, the Bushnell is hard to beat. I like it so much I’m going to by another one for another Ruger, but that’s a story for another time.
I’ve never had any desire to hunt African game and I probably never will. But I’ve enjoyed reading about the African plains rifles since I was a kid in junior high school. Bringing a copy of Guns & Ammo magazine to school would probably get you a quick trip to the principal’s office these days…but I digress.
Exquisite walnut is often found on the older Ruger No. 1 rifles.
Quite a few years ago I saw an old Ruger No.1 Tropical in the consignment rack of a small gun shop that is now long gone. The owner said, “just pick it up and feel the heft.” And of course, I did and the next thing you know we were talking price, knowing I would never pay $2,000 for a collectible Ruger No. 1. Shaun confided in me that the rifle’s owner couldn’t find the obsolete 405 ammo for it anywhere and he wasn’t a handloader, so he wanted to sell the rifle. Another problem with the rifle was that a previous owner had cut down the front sight, probably because he had been shooting handloads with .41 caliber pistol bullets. So we settled on $500 and I became the owner of my first “unobtainable” Ruger No. 1!
In the gun shop years ago eyeing the Ruger No. 1. Salesman Shaun said, “hand me your phone and let me take a photo of you so you can see how good you look with that rifle!” Shaun passed away a couple of years ago, but I know he smiled down from Heaven yesterday as I fired the Ruger No. 1H Tropical for the first time. And he was right, this gun was meant for me!
It took me a lot of searching over the past few years, but I finally located a set of 405 Win reloading dies, the shell holder, and all the components to bring this rifle back to life.
Hornady had made a run of new 405 Winchester brass and I was lucky enough to find a new old stock box of 50 shells. I also located some new Barnes .412, 300-grain TSX bullets.
The first step in restoring the old 1H Tropical was to contact Ruger and purchase a new gold bead front sight. That was a simple install as the blade is held in place by a small detent spring.
New Ruger NOS gold bead front sight blade installed.
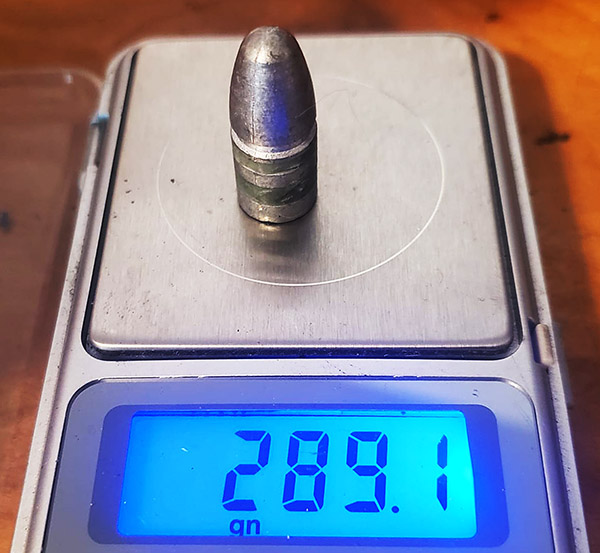
Not wanting to use the expensive Barnes TSX bullets quite yet, lead bullets were cast from lead wheel weights with a bit of tin added using a Lyman 412263 plain base mold to cast 288 grain bullets. These were sized to 0.413 inch and lubed with Alox. Lyman has since discontinued this fine old bullet mold.
A Lyman 412263 bullet, lubed and sized.
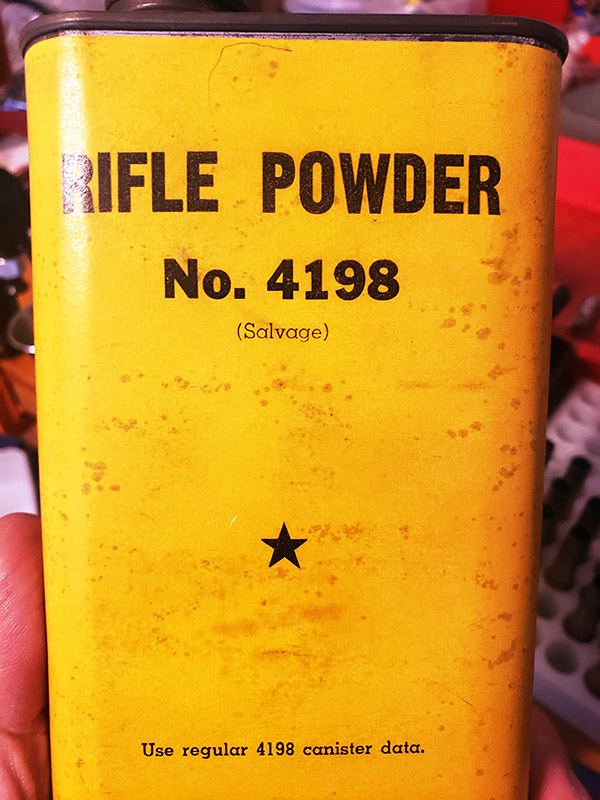
Finally, yesterday morning I decided it was time to resurrect this old rifle! Besides, the project would give me the opportunity to test some old “salvage” Hodgdon 4198 powder I’ve had sitting on the shelf for nearly two decades. The powder is probably from the 1950s or early 1960s. I also had some ancient CCI 200 large rifle primers on hand.
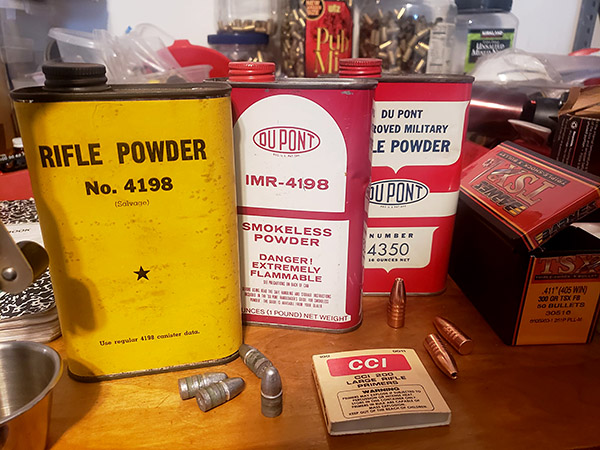
Hodgdon “salvage” 4198 smokeless powder. The powder is probably WW II US Military surplus powder that Hogdon bought in bulk and repackaged in the late 1950s or early 1960s.Vintage components for a vintage cartridge.
I loaded 20 rounds of 405 Winchester ammo using the cast lead bullets and a starting load of 38.5 grains of 4198 and headed down the hill with good friend Yvon to an informal shooting range on BLM land.
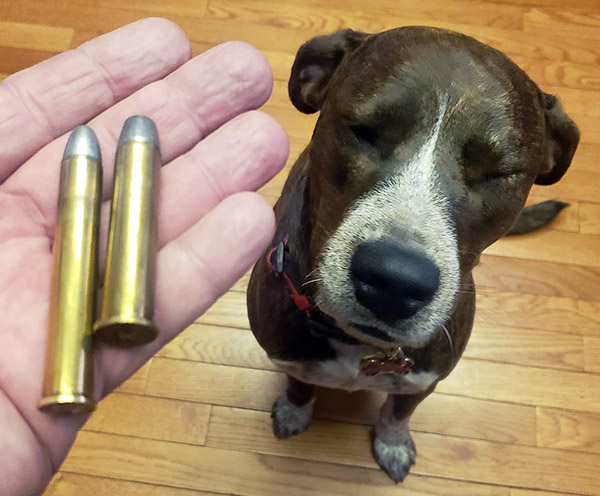
The obsolete 405 Winchester cartridge (left) and the popular 45-70 Government cartridge (right) used by 1880s plains buffalo hunters of the American west. I don’t shoot buffalo and never will. But I enjoy reviving and firing old guns!
Let me say that this Ruger No. 1H Tropical in 405 Winchester lives again. It shoots incredibly tight groups with the cast bullets and gold bead open sights.
My next project will be to develop a non-lead hunting load using the 300 grain Barnes TSX bullets.
Bringing life back into old obsolete rifles can be tons of fun.


 2. Put the die in a well-padded vise and knock the pin down with a brass or hard plastic mallet. The brass mallet or brass punch works best.