Back in the day when Steve Seidner and CSC Motorcycles were running full tilt on building replica Mustangs, the custom bikes were rolling off the production line fast and furious. Most buyers were in love with the little repliStangs, and most accessorized their bikes heavily. The bike’s list price was something like $3,995 or $4,995 (I forget which), but it wasn’t unusual for buyers to run the price up to $10,000 with accessories, extra chrome, and more. The typical buyer was 70- or 80-year-old person who had wanted a Mustang as a teenager back in the ’50s but Dad said no. It was time to get even with Dad, and get even they did.
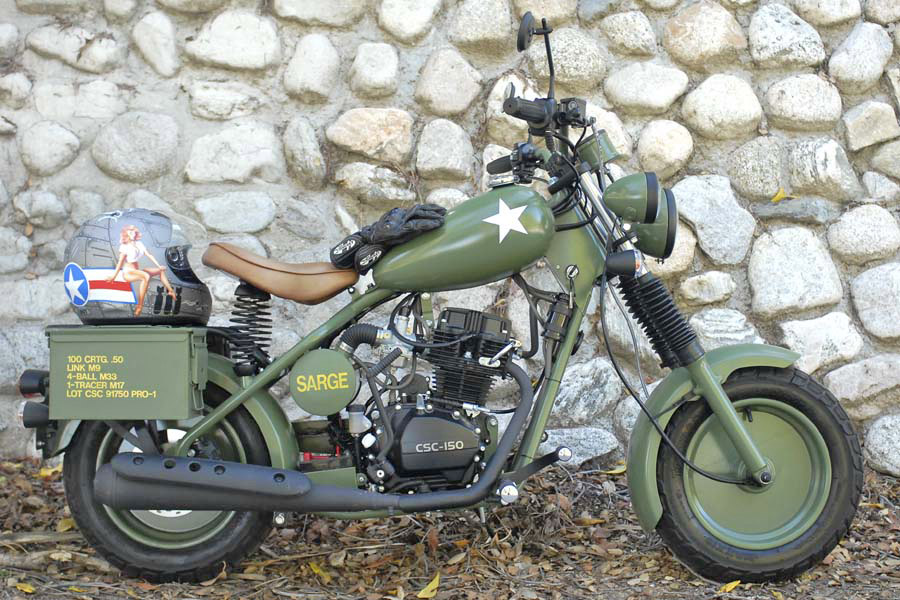
We also did a few custom bikes on spec and it was great for me. I wrote the CSC blog back in the days, and with the constant stream of customs there was always plenty to photograph and blog about. One of my favorites, and one of my favorite photos, is a bike Steve built for himself. He christened it “The Sarge” for obvious reasons.
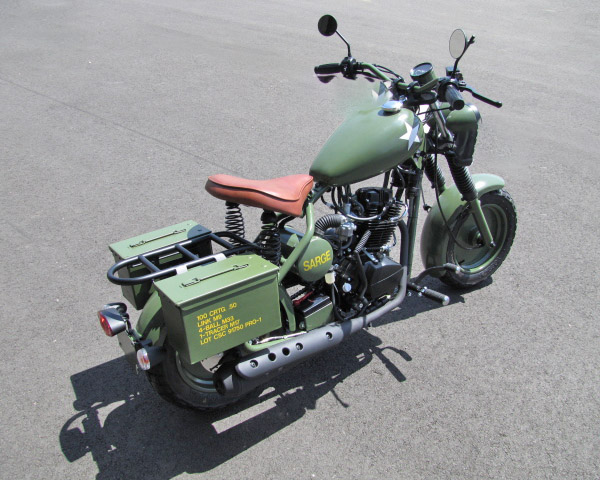
The Sarge had a lot of custom touches, including .50-cal ammo cans as saddlebags, a near complete dechroming, lovely OD green paint, brown leather seat, and more. It was a stunning motorcycle. My El Cheapo Bell helmet and its Army Air Corps livery completed the package. I found a stone wall somewhere in the hills above the CSC plant when the plant was at the La Verne airport, and that made for a nice backdrop. The Sarge photo at the top of this blog has always been one of my favorites.
Would you like to know more about CSC’s early days, the evolution of the Mustang replicas, and what it was like importing the Chinese RX3 to America? Read 5000 Miles At 8000 RPM!
Earlier Phavorite Photos? You bet! Click on each to get their story.
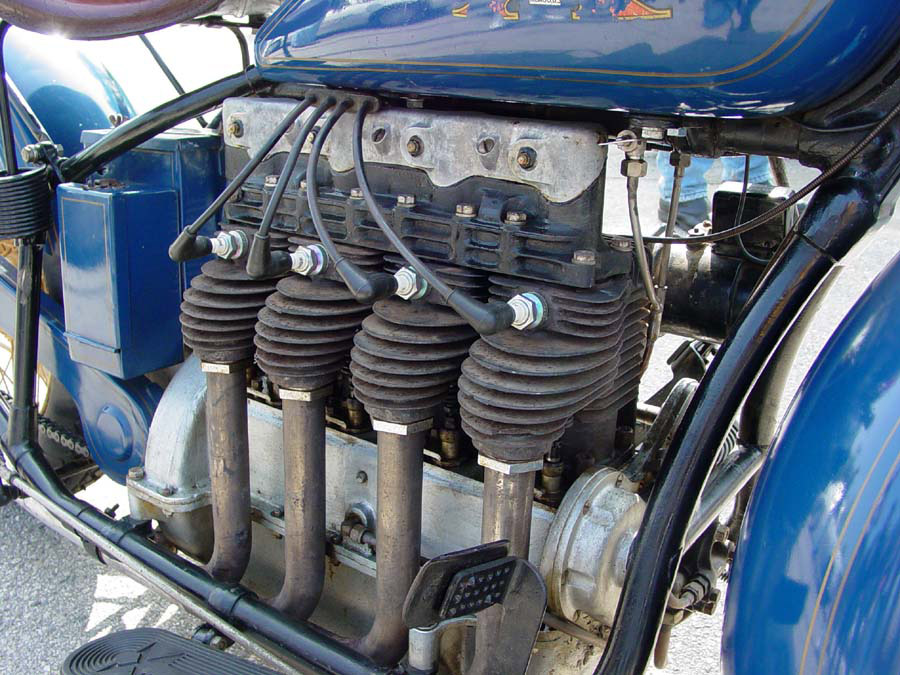
Imagine my surprise: I thought there would be but one 10-cylinder motorcycle. I thought this would be a quick blog. There’s the Dodge Viper-powered Tomahawk that was newsworthy maybe 10 years ago. But wait, there’s more (as my hero Billy Mays used to say). I found two more poking around on the Internet.
Two Dodge V10 Motorcycles
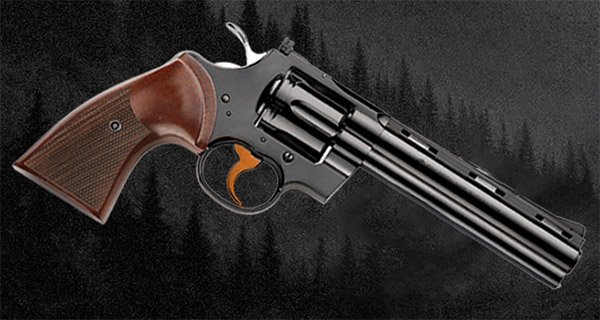
You may remember a Dodge Viper powered V-10 motorcycle a couple of decades ago. It was a weird one with two wheels upfront and two wheels in back. Between that feature and the weight, the handling must have been atrocious.
I thought Dodge had just built one as a showpiece, but according to online references they actually built and sold nine of the things (at a price of $550,000). The Dodge boys called it the Tomahawk. It has a theoretical top speed of 450 mph. Take a look:
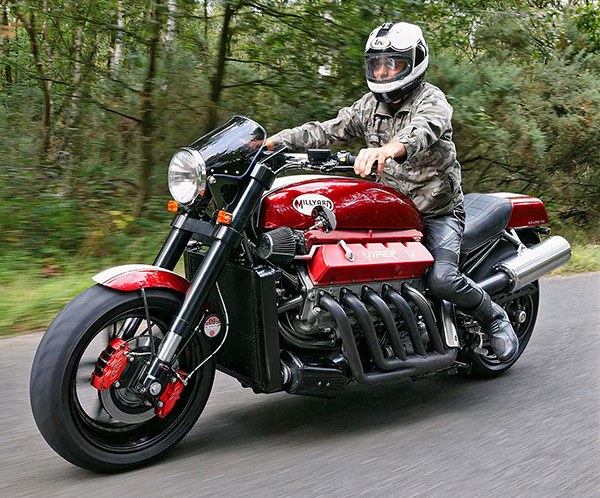
Allen Millyard, a builder who created a number of mega-cylinder motorcycles and who has been featured in a few of our previous ¿Quantos Pistones? blogs, also built a Dodge V-10 motorcycle. It is more conventional (if a 10-cylinder can be called conventional) wheel layout, with one at the front and one at the rear.
Here’s a YouTube about the Millyard V-10. It’s cool, as it shows a 172-mph, two-up run.
The Bistella
The Bistella is an unusual 10-cylinder, 500cc, supercharged two-stroke , Jawa-based motorcycle designed by Czech engineer Marek Foltis. It’s a weird one, and I guess Foltis is living proof that if you have the talent, nothing is impossible. The bike used the cylinders and pistons from ten 50cc Jawas. Wow. Just wow. Take a listen:
You might be wondering: Is there more to come in our ¿Quantos Pistones? series? Yep, there is. Stay tuned.
Missed any of the earlier ¿Quantos Pistones? blogs?
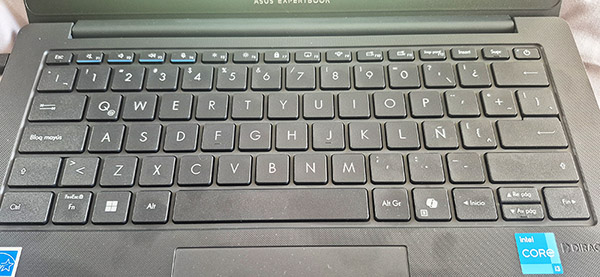
Even though I was an IT (information technology) Project Manager for 12 years, a weak point of mine happens to be IT. Yes, IT.
As an IT team leader one of my greatest strengths is not only placing others in positions where they can excel, but ensuring I do the same for myself. Living in Colombia I happened upon a new challenge. One morning my laptop refused to connect to the Wi-Fi. The laptop I had been using the past two or three years was gifted to me by a friend. This laptop had sort of “fallen off a truck,” or was “found in the alley.”
My guess is the problem I was now faced with was due to the organization it “belonged to” running an audit. I am certain the audit didn’t dig the Colombian IP address, so the laptop was terminated. I now had to purchase a new laptop here in Medellin, Colombia. Shouldn’t be a big deal, right?
Not the case, of course.
Finding a mall in Medellin wasn’t difficult. It was a huge modern three-story mall with nothing but IT and telecom stores. It was a bit overwhelming. I Googled reviews as I walked through the mall and it didn’t take long to settle on a store. I found a representative that spoke decent English to bridge the gap with my never-ending Spanish stumbling. He recommended a few basic machines. I began more research on reviews and picked out a basic laptop that would suffice (mainly for writing ExNotes pieces).
After installing Windows and basic MS apps, I returned to my apartment and noticed something was off. The keyboard was in a different format. It was a Spanish QWERTY layout. OK, not a huge deal: I could learn a new keyboard. What really confused me is they loaded the software for a standard American keyboard. This meant the keys did not match many of the symbols. I learned this on my own, but not before walking the streets of Medellin with my laptop asking locals to assist me. No one else could figure it out, either. This was becoming frustrating, but some relief that it wasn’t my incompetence that caused it.
Returning to my apartment, and after a bit more Google research, I learned to toggle the keyboard to the QWERTY format to match the keyboard, which is where it will stay. Yes, I am sure I could exchange the laptop and hunt down one with a normal keyboard, but what fun would that be?
I will be in South America for quite some time (more on that in another blog), so I thought I would just embrace the change. Also, it is now easier for me to do “¡” and “¿” symbols to impress the locals.
We need your support! Do what you can to help ExNotes stay in the black!
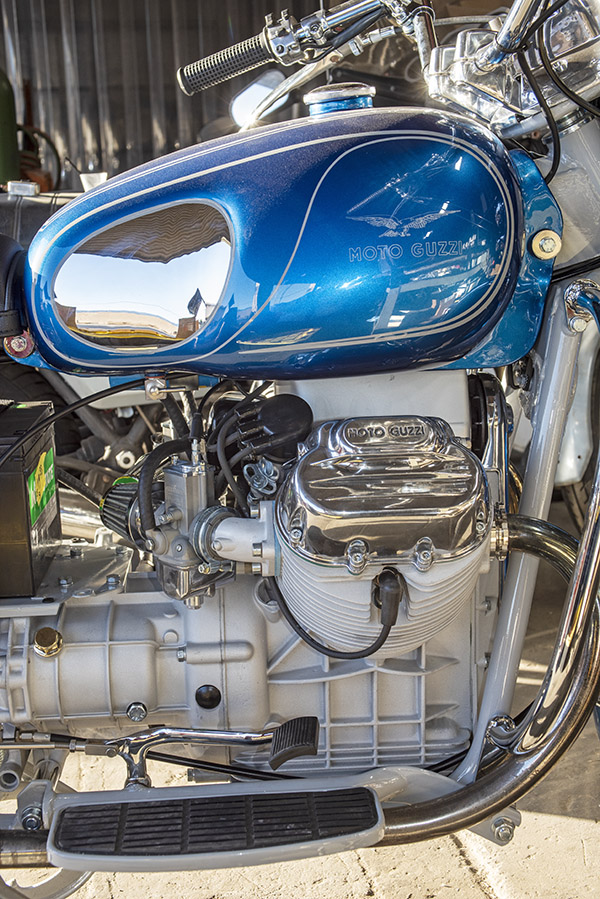
Coming up…more on Cycle Garden and their impressive work on Moto Guzzi and other Italian motorcycles!
This is really cool: Pietta is coming out with a reproduction of the original Colt Python, and rumor has it that it will sell for about half what a new Python costs. That puts the pre-tariff price at $750. Pietta plans to call it the Blacktooth. I don’t know about that name, but I don’t make thousands of guns like Pietta does. I’m thinking something like Copperhead would be a good name for this handgun. Copperhead would make an obvious connection with Python and Colt’s serpent-themed sixguns, and it sort of ties in with copper-jacketed bullets. Maybe put a touch of copper plating on the gun, too, to complete the copper connection (the trigger or the hammer, the grip medallions, or maybe the screws). Maybe even offer a tuned version with an action job, and call it the Competition Copperhead? Eh, what do I know?
A Pietta Copperhead?
The Python story goes like this: Colt originally produced the Python in 1955 as a premium double action revolver, and then it was discontinued in 1999. The original Pythons had hand-fitted components, and it just got too expensive to make. I’ve heard it said that they went out of time quickly, and the frames tended to stretch with full bore .357 Mag loads. I owned a couple of these original Pythons, and they were beautiful guns, but they both went down the road when in my youthful ignorance I decided I needed something else more. Colt reintroduced the new Python with redesigned internals and frames in 2020, and I quickly snapped up one. It’s a beautiful handgun, and I’ve written about it a lot on these pages (I’ll provide links at the end of this blog).
How is it that Pietta, an Italian gunmaker known for producing copies of Old West sixguns, is able to copy the original Colt Python? Well, Partner, I don’t know, but I’m guessing Colt’s patent on the original Python expired and Pietta picked it up. That’s what happened on the Colt 1911 (the .45 Auto) and why so many companies are now producing the 1911.
I’m guessing that the Pietta Python won’t be available in California (at least initially) for a while (or maybe ever) due to our nutty gun laws, but who knows…maybe Pietta will succeed in getting the thing California approved. I sure hope so. Or maybe I’ll buy a house and live part time in a state that respects the U.S. Constitution so I can have access to the guns California prohibits. Texas or Tennessee come to mind.
More Python? You bet. Here are our earlier Python related posts:
I’m thinking of doing another book on guns. It would be a two-volume series. What I have in mind is a compendium of expanded articles based on our firearms-related blogs, with a working title of Tales of a Gun Collector. Volume 1 would be rifles; Volume II would be handguns. What do you think? Let us know by leaving a comment below, and thanks in advance for your inputs.
Speaking of Colt…did you know that the original Gatling guns were manufactured by Colt in Hartford, Connecticut? All that and more is in The Gatling Gun.
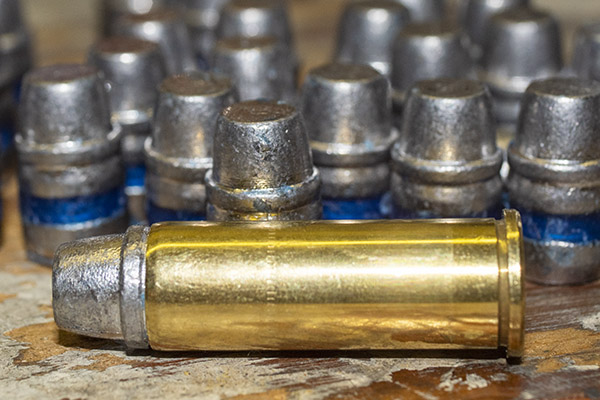
In the early days of the COVID pandemic, I bought a box of 500 240-grain cast lead .44 bullets from a reputable bullet supplier.
A reloaded .44 Magnum cartridge. This is one of my favorite cartridges to reload and shoot. Dirty Harry made me a believer.
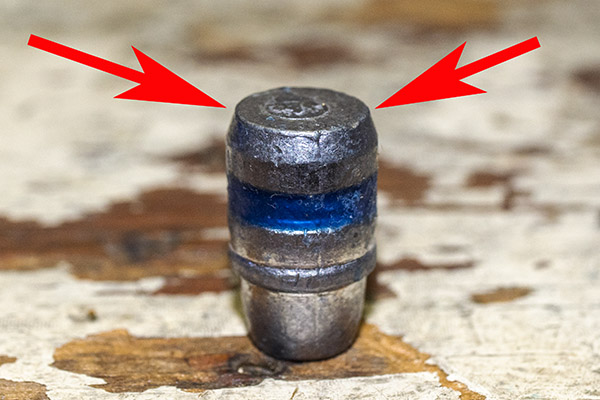
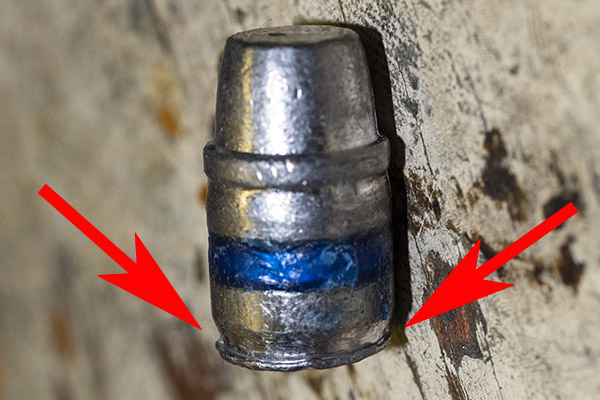
When I opened the box to start loading these bullets, I was dismayed to see that the bullet bases were not clean. Most were plagued by excess lead that had flowed beyond the bullet’s beveled base. The conventional wisdom has always been that any deformations to a bullet’s base will degrade accuracy, so I was disappointed when I saw these.
A relatively good cast bullet, with no excess lead around the bullet skirt. This bullet is shown upside down.A defective cast .44 Magnum bullet. Excess molten lead flowed around the base of the bullet. This occurs when the lead has not solidified when the bullet is dropped from the mold, or if the slider above the mold is loose. The theory is that an imperfect base will cause the propellant gases to deflect the bullet as it leaves the barrel.
I contacted the manufacturer (whose bullets I had been using for many years) by email and asked if such bullets met their quality requirements. I included a picture of one of the deformed bullets. The manufacturer’s response was immediate: No, those bullets were not acceptable. They do not meet our quality requirements.
The manufacturer then went on to say they had previously been aware of this lot escaping, they had traced it to a particular inspector, and he was no longer with the company. I probably would have jacked up the inspector a bit, and I would have seriously jacked up the operator instead. After all, it was the operator who made the bad product. The manufacturer also promised to send me a new box of bullets, and shortly thereafter, they arrived.
I put the box of defective bullets on a shelf under my reloading bench and forgot about them for the next several years. Recently, while poking around under the bench, I came across them again. It’s always exciting to find forgotten stuff down there, and I half expect to come across Jimmy Hoffa someday hiding behind a coffee can full of .45 ACP brass. As I looked at the box of bullets, I wondered: Are they really defective? Would they shoot well enough for my purposes?
You can guess where this story is going. I decided to test good versus bad bullets. While I was at it, I decided to also test the effects of powder position within the cartridge case on velocity and accuracy (more about this a bit further down).
Deformed Bullet Base Accuracy and Velocity Testing
The first step involved sorting good bullets from bad. Most of the 500 bullets had deformed bases, but I was able to find 20 bullets with relatively clean (i.e., no excess lead flow) bases. I then selected the worst of the deformed bullets. I loaded 40 cartridges with 5.9 grains of Alliant’s Red Dot propellant (it was what I found to be a good load for the .45 Colt, it was in the range of propellant weight my manuals suggested for Red Dot in the .44 magnum, and I already had the powder dispenser adjusted to drop 5.9 grain from a batch of .45 Colt I had just finished loading). This would allow for firing four groups of five shots each with the deformed bullets, and another four groups of five shots each with the good bullets. It was a large enough sample size to allow making a quantified comparison of good versus bad bullets’ effects on accuracy.
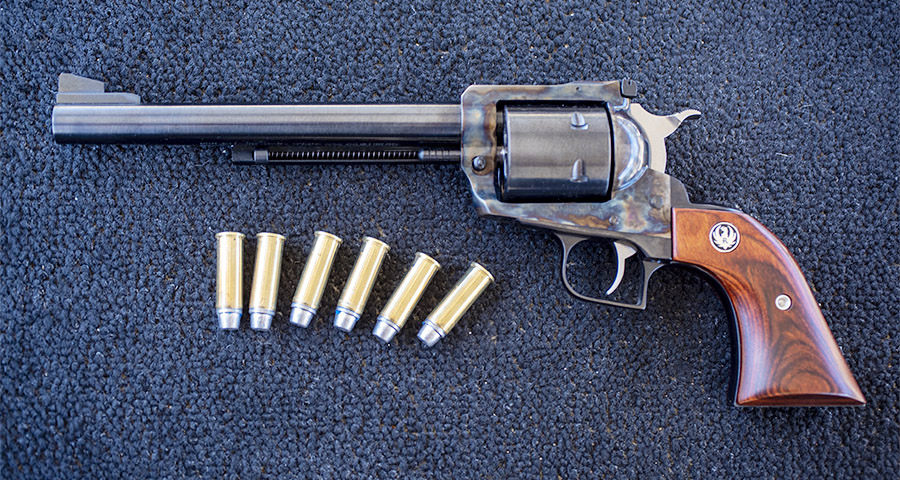
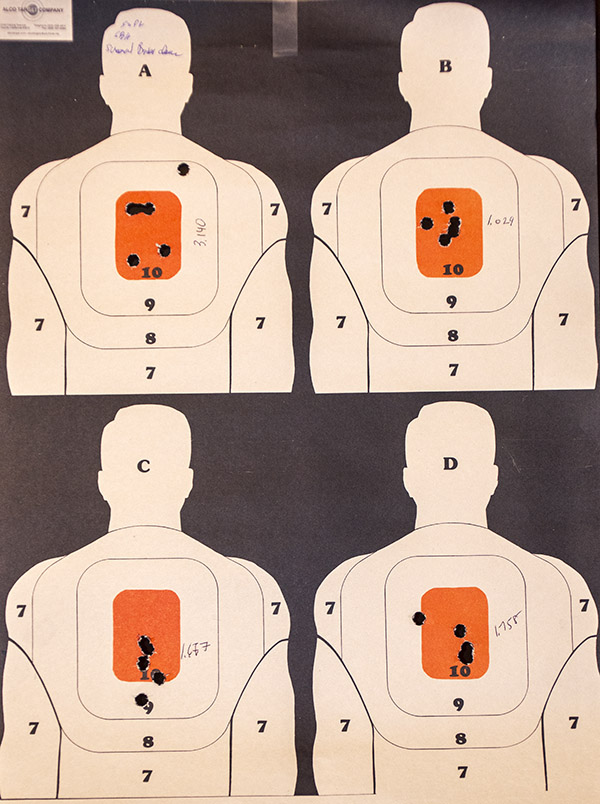
For this testing, I used mini-silhouette Alco targets at distance of 50 feet (you’ve seen me use these targets for other handgun accuracy testing). I shot my Turnbull Super Blackhawk, a superb and elegant .44 Magnum revolver (it’s the handgun you see at the top of this blog). I captured velocity information with my Garmin chronograph. All loads used once-fired Remington brass and the CCI 300 primer, and all were loading using Lee’s superb Classic Turret Press and Lee dies.
Here’s a typical target:
Alco’s target with four mini-silhouettes.
So what were the results? Here’s what I found assessing the bullets with defective bases versus those with relatively clean bases:
Based on the average group size comparison between the good bullets versus the defective base bullets, the good ones group better than the bad ones (even at the short test distance of 50 feet). The good bullets grouped, on average, 1.901 inches; the ones with defective bases had an average group size of 2.432 inches. That’s a 28% accuracy degradation for the bullets with defective bases.
The muzzle velocity difference between the two groups of bullets is not very significant, with an average velocity in the 970 feet per second range and a relatively small standard deviation of only around 19 feet per second. This is a good load.
Powder Position Accuracy and Velocity Test
There’s a concern that powder position within the case will affect both accuracy and velocity. The conventional wisdom holds that if the powder is close to the bullet (instead of the primer), the cartridge will behave differently than if the powder is close to the primer (or so the theory goes). It is thought this affects both accuracy and velocity. I tested this parameter, too.
I had another 40 rounds to do the same kind of testing as described above for the bullet base testing. I did not sort the bullets this time. For the first 20 rounds, I pointed the muzzle down (to position the powder more near the bullet) prior to firing. For the second 20 rounds, I pointed the muzzle up (to position the powder more near the primer) prior to firing. I did this to assess both accuracy and velocity.
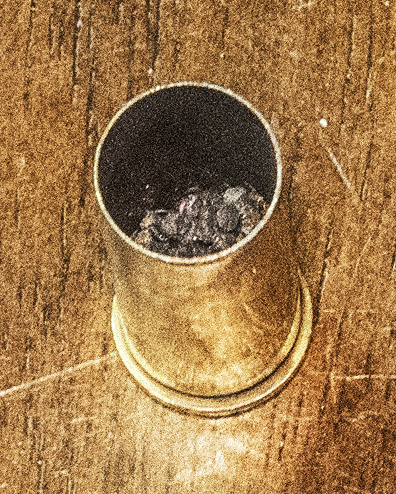
5.9 grains of Red Dot does not fill a .44 magnum case; it instead occupies about 70% of the case volume. When the bullet is seated in the case, that 5.9 grains fills even more of the available case volume because the bullet occupies a portion of the case above the powder.
It’s tough to get a photo like this. This is 5.9 grains of Red Dot in a .44 Magnum case. When the bullet is seated, most of that case volume is taken up.
There is a little space available (5.9 grains is not a compressed load), and the powder in the case can be biased toward the bullet or toward the primer. Would this make a difference in either accuracy or velocity? The test results here show positioning doesn’t make much of a difference:
As you can see from examining the above data, the group size difference between the two approaches is not very large, and can probably be accounted for by variability in my shooting. There is a small difference in average velocities, but it’s probably insignificant.
I think what’s going on is that because Red Dot is a somewhat fluffy powder, it occupies enough of the case volume that it doesn’t make any difference which way the powder is situation in the case when it fires. It might make more sense to repeat this experiment with a denser powder like Bullseye, which occupies much less of the case volume. I may get around to that one of these days. What this test says to me is that 5.9 grains of Red Dot behind a 240-grain cast semi-wadcutter bullet is a good load in the .44 Magnum. It’s even better when the bullet bases are not deformed.
More gun stuff? You bet. Buy yourself (or a friend) a copy of The Gatling Gun.
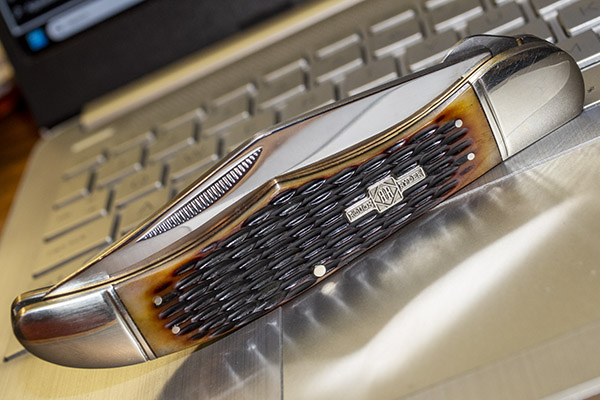
The knife du jour is the Rough Ryder 854, which is a gigondo folder that looked like something I couldn’t live without when I saw it on the Chicago Knife Works site. I’m hooked on the large folders, and at a price of $14, this thing seemed too good to ignore.
The Rough Ryder 854. No one has these in stock anymore. It’s a lot of knife at any price.Yessiree…a real pig sticker!
The problem, however, was that the design was defective, or the quality was terrible, or maybe it was both. It was a subtle defect, one that most folks wouldn’t notice until they stabbed themselves with the tip.
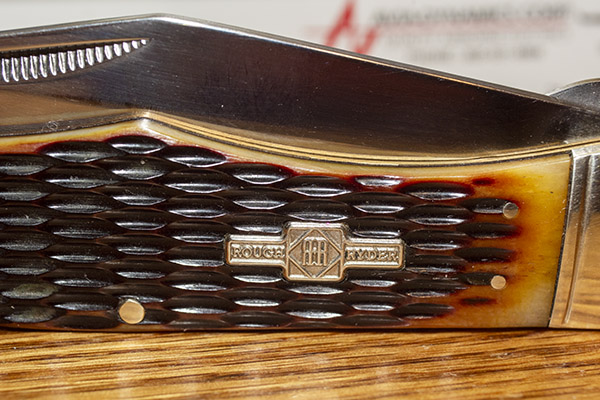
The Rough Ryder logo. I like it.
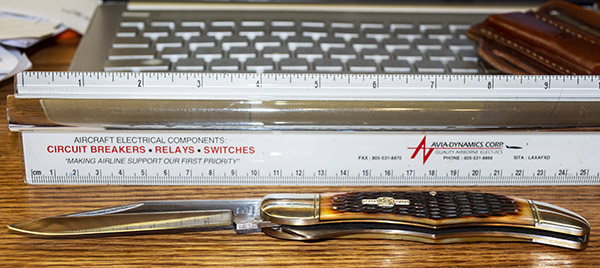
I first saw the knife online somewhere, and then I looked for it on Amazon. I hit paydirt and I used my Prime membership to skirt the shipping costs. Two days later it was at my front door. It looked beautiful, but the blade stopped a little bit short of the knife being fully closed. That’s not good, I realized. I tried squirting WD 40 and then adding oil to the knife’s pivot point, but the blade still stopped a bit short of being fully closed. Back it went to Amazon.
But I like the knife. It looked good and it felt good. So I called Chicago Knife Works and ordered the same knife from them. I called first, and asked if they would examine the knife before it shipped for the problem the first one had. Sure, they said. No problem. Chicago Knife Works is always slow in shipping, though, so I waited the obligatory four or five weeks before it arrived. But finally it did, and I was like a kid at Christmas time when it landed in my mailbox.
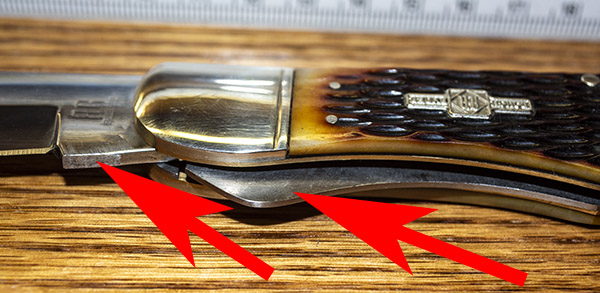
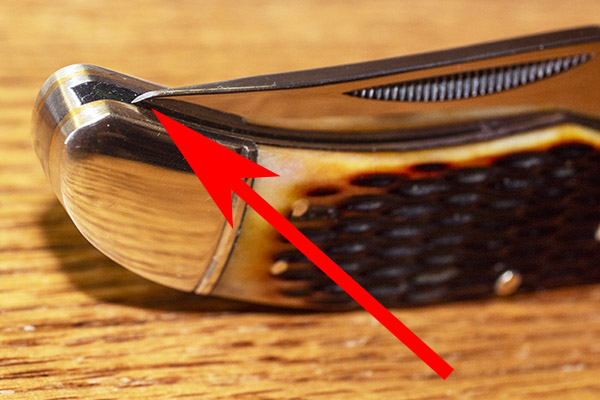
You can guess where this story is going. The new Rough Ryder had the same disease. It wasn’t as bad as the first knife, but the blade didn’t fully close. If I ran my finger along the knife handle’s edge, the blade tip still ran proud, and I still saw it could stab me if I wasn’t careful.
The red arrow on the left shows the area I relieved, thinking it would allow the blade to go further into the knife when folded. I was wrong. The red arrow on the right shows the knife’s liner lock, which prevents the blade from inadvertently closing after it has been opened.
The engineer in me took over. I examined the open blade profile and saw a bump stop. If I ground that down, I thought, the blade would more fully close. So I started grinding with my Dremel. That didn’t work. I ground some more of the blade stop off, and things didn’t improve. I examined the blade’s profile and the knife again, and I realized there was another stop of the blade (on the other side of its pivot point) that also controlled where the blade came to rest when the knife closed. But I couldn’t get to that one. Hmmm. Time for Plan B.
What’s weird (and what’s an ingrained character flaw) is that I was really stressing out over this $14 knife. I’ll do that sometimes, and this was one of those times. I’ve been a lot less annoyed at things that are a lot more expensive and aren’t perfect. I should have just returned the Rough Ryder. But I was fixated on fixing the thing. In the Diagnostic and Statistical Manual of Mental Disorders reference manual, it’s identified as Gresh’s Disease.
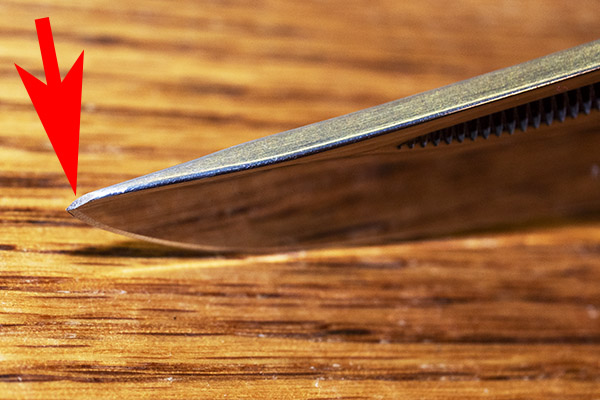
When thinking about potential fixes, I realized if I couldn’t get the blade to close any further, I could reprofile the blade to get rid of the tip, or, to be more accurate, to lower the blade’s profile so that the new tip would be below the knife’s scales when closed. So that’s what I did. The stone came out, I went to work, stroking the blade tip and checking how the blade closed every few strokes. Voilà, problem solved.
The blade tip lay above the scales when the knife was closed. I ground it down in the area indicated by the red arrow. Problem solved.A band aid fix, to be sure, but sometimes band aids work.
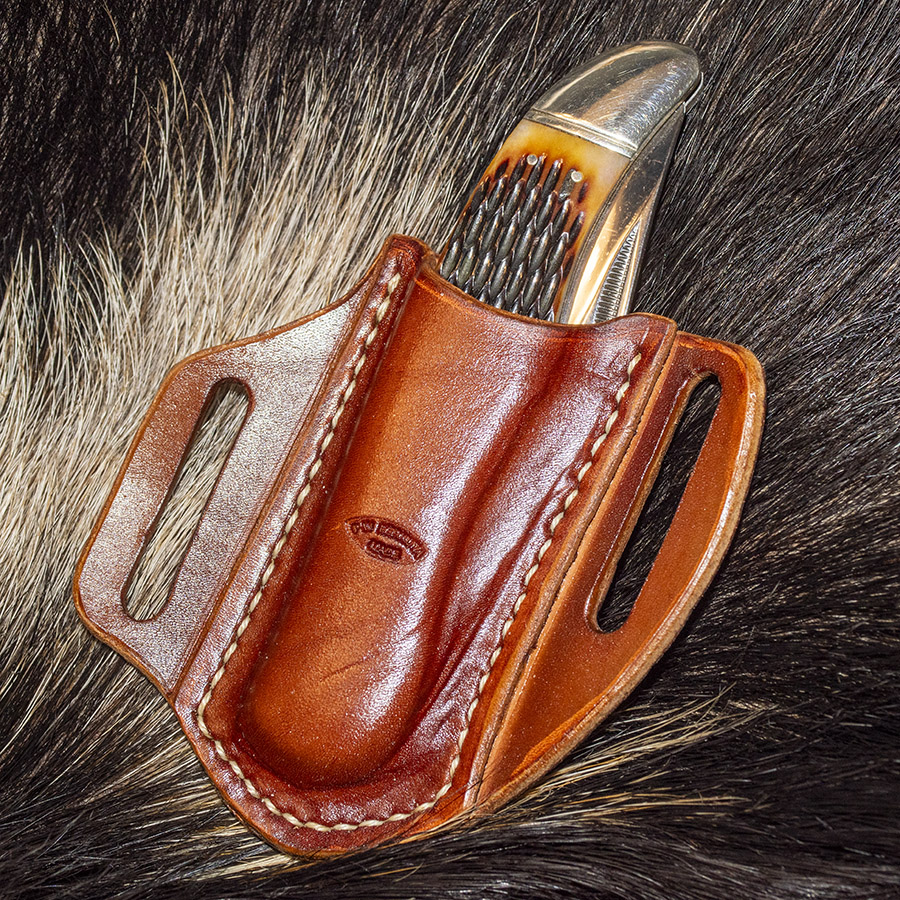
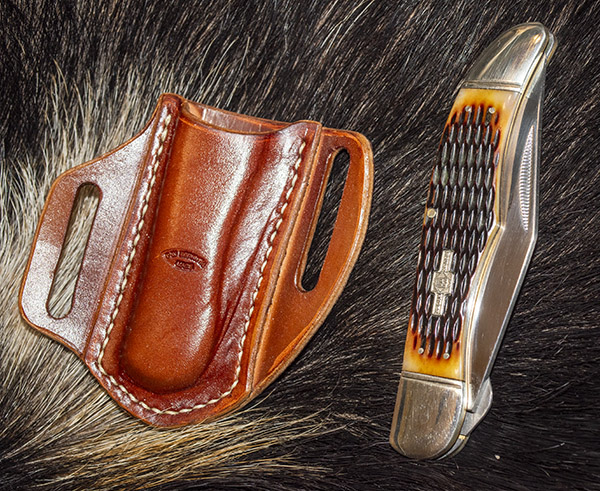
In the meantime, good buddy and craftsman extraordinaire Pauly bought the same knife. The guy is lucky; his Rough Ryder 854 closed the way God intended it to, and it did not have the same problem mine had. But he didn’t stop there. What the knives needed (both his and mine) was a holster.
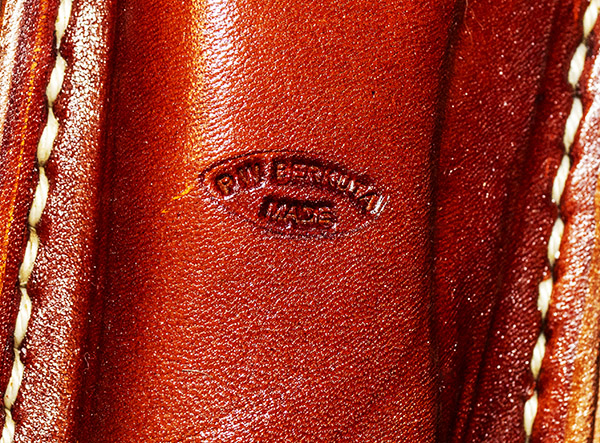
The Rough Ryder and the holster Paul made for me.P.W. Berkuta Made. It’s a cool stamp.
I’ve known Paul longer than I’ve known any living person on the planet. Literally. We were next door neighbors back in New Jersey when I was born. Paul has always been good at creating things, and it turns out that leatherworking is among his many talents. Paul created custom holsters for these knives, and they look and work as good as anything I’ve ever seen. What’s really cool is the holster takes advantage of the knife’s curves. The holster is formed to the knife’s coke bottle profile, which secures the large folder when it is in the holster. It’s a hell of a nice gift.
We need your support! Do what you can to help ExNotes stay in the black!
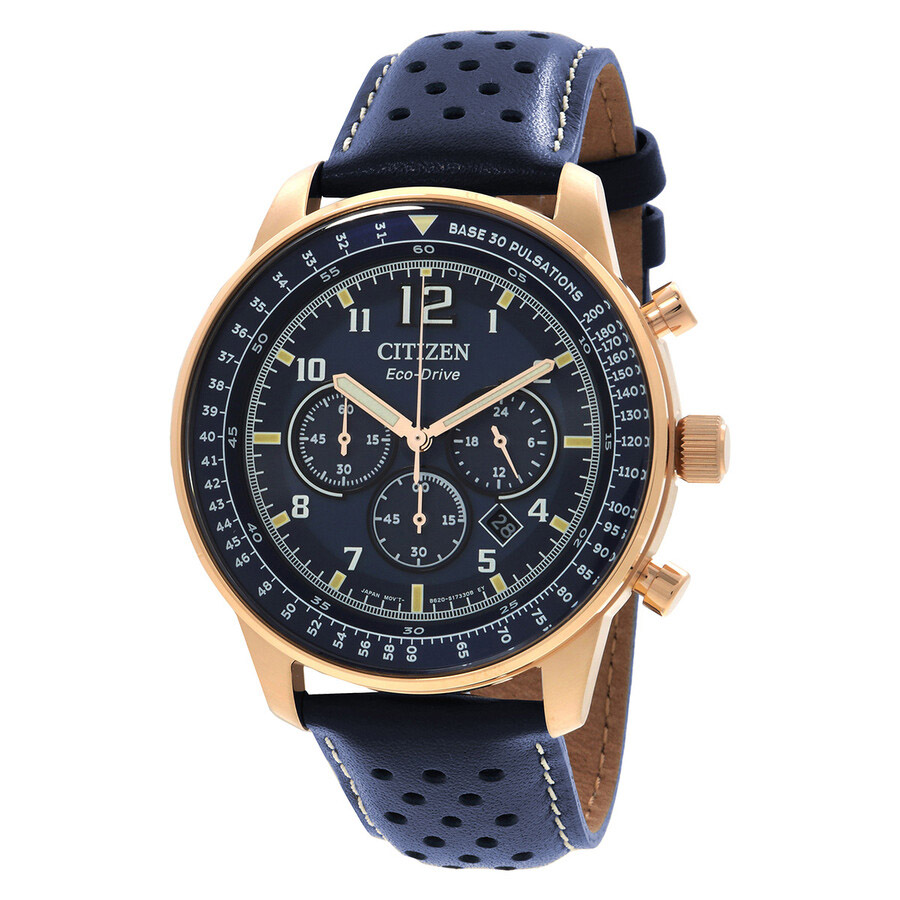
It was an impulse buy, the kind of purchase that folks who send out marketing emails hope to induce, and it my case, it worked spectacularly well. My new Citizen chronograph is rose gold (something I’m a sucker for), with a leather band (something else I’m a sucker for), and both the leather band and the watch face are Navy blue (something I’m…well, you know where this is going). As it was over $100, there was free shipping (something that always gets my attention). And finally, there was the sale price: $144, down from $395. I am a soft touch for great deals on wristwear, weapons, and other assorted toys that find their way into the ExNotes blog.
All that was cool, but after I clicked buy now and typed in my credit card info, I studied the chronograph bezel markings. I was intrigued by the notation “Base 30 Pulsations.” You can see it on the outer bezel between the 12:00 and 2:00 positions. As much as I like watches in general and chronometers in particular, I had never heard of such a thing before I bought the watch you see above.
It was off to Googleville, and like always, Google came through.
The Base 30 Pulsation system came about in the early days of watchdom as a tool for doctors to quickly measure a person’s pulse rate. The way it works is that you start the stopwatch (the chronometer) and count 30 heartbeats for whoever’s pulse you’re taking. When you hit 30 beats, you stop the chronometer. The chronometer’s second hand will point to the patient’s pulse rate. If the pulse rate is the normal 60 beats per minute, the second hand will point to 60 on the outer bezel, which makes sense because if you had 30 beats in 30 seconds, well, your pulse rate would be 6o beats per minute. This is cool stuff.
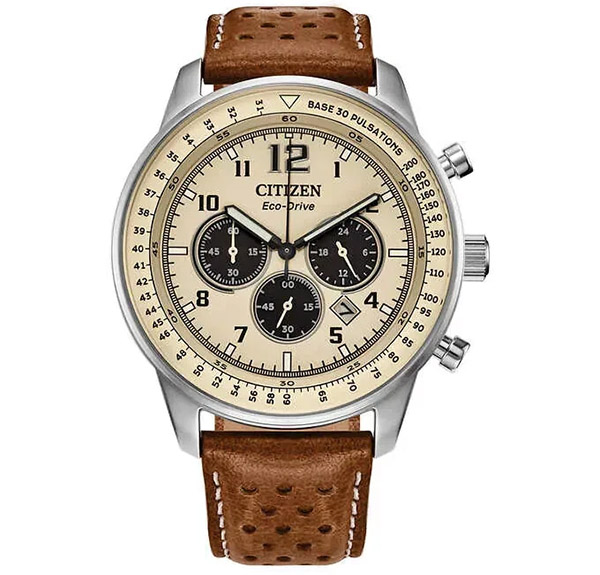
That got me to thinking: Are there other chronometers out there with bezels marked in the 30 Base system? Yep, and some are even by Citizen. They have an identical model to the one you see above in stainless steel with a brown leather band and an ivory face:
I’d seen the above watch (the ivory-faced one) in the display case at my local Costco, but I can’t remember what they were asking for it and I couldn’t find it on the Costco website. I’m pretty sure it’s still in the store. If you can’t find one at your local Costco, there are a bunch of retailers selling them on Ebay.
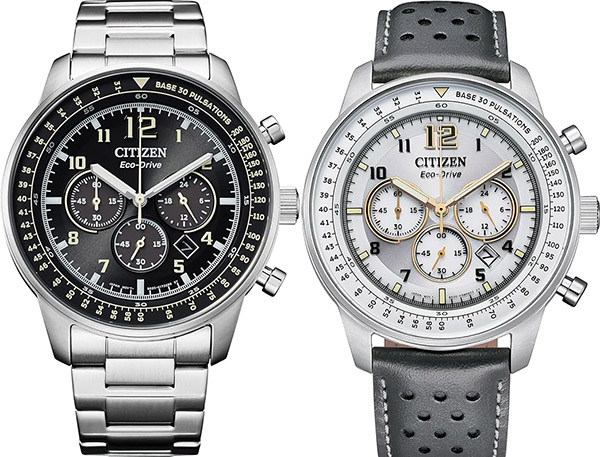
I also found a couple more stainless steel Base 30 versions of the Citizen in different colors on Amazon:
Amazon’s prices were in the $250 to $275 range for the above watches. Those might be decent prices, but Jomas (www.Jomashop.com) has them all beat at $144 (which is what I paid for mine).
A man with a watch knows what time it is. A man with two watches is never sure.
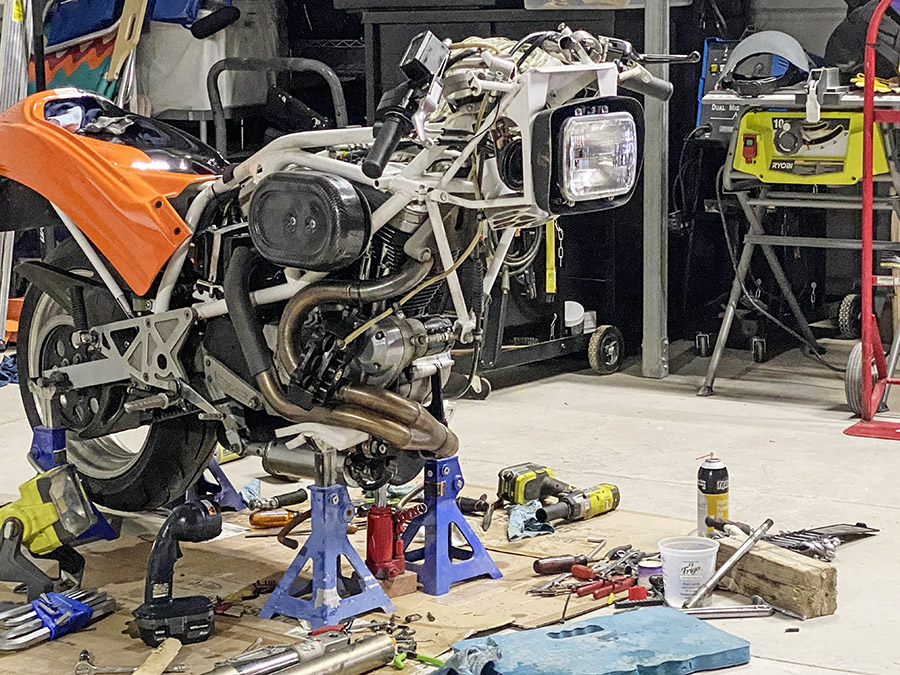
I have two motorcycles with upside down forks. Both of these motorcycles have leaking fork seals. Coincidence? I think not. I have no love for USD forks and one of the reasons I wanted a Buell Cyclone was the conventional forks those bikes came with.
I don’t care for upside down forks. They seem to leak more than conventional forks.
Alas, I ended up with a Thunderstorm, which is mostly the same as a Cyclone except for the forks. Mine were leaking, which is not unexpected for a 30-year-old motorcycle.
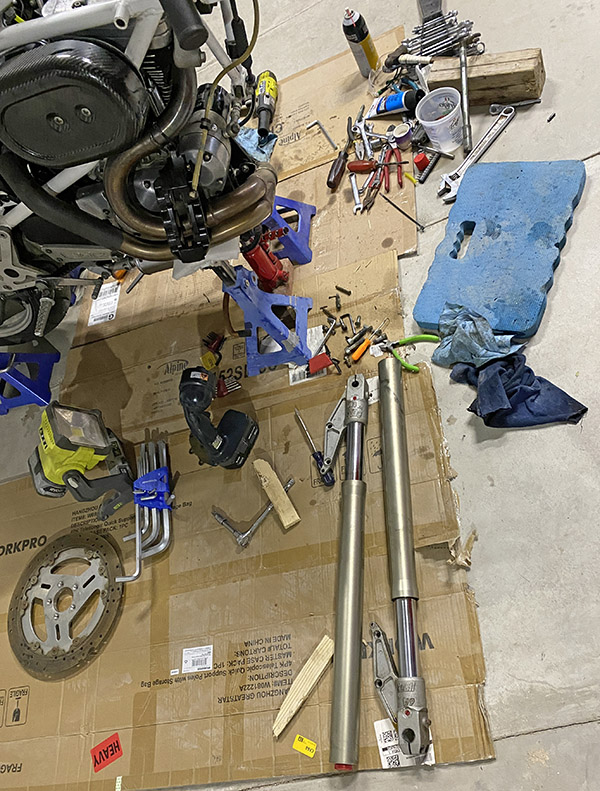
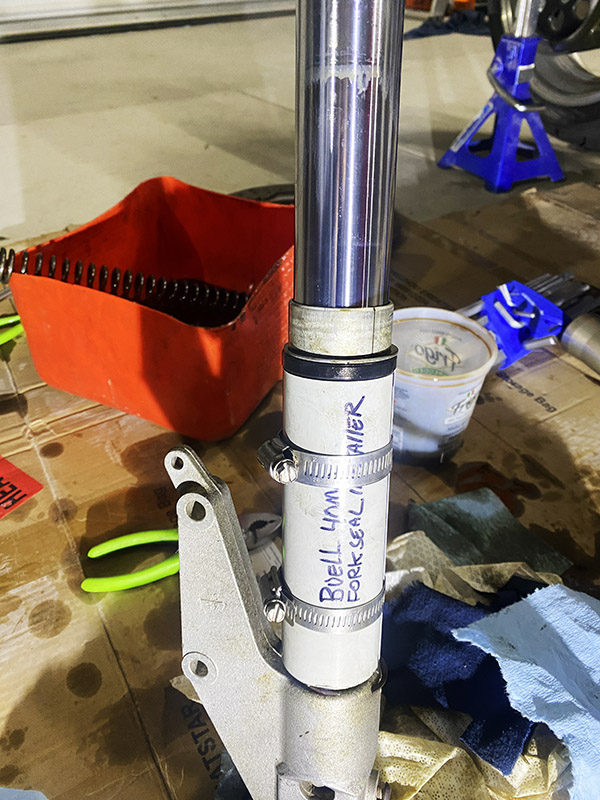
I try to lay out the parts in the order they are removed. Until I kick the cardboard and the bits scatter. This is the fork cap-retainer-plastic spacer-metal washer top of the tube parts.
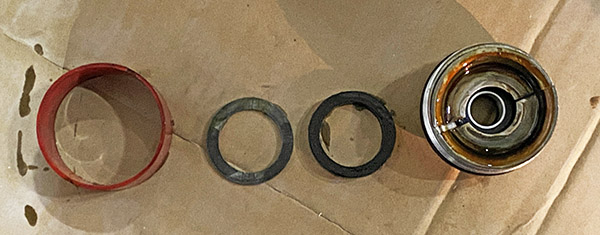
New fork seals were kind of hard to find. I tried contacting the OEM manufacturer, White Power (that name didn’t age well), but I got no response. Through the wonder of the internet, I found a company in England that had the seals.
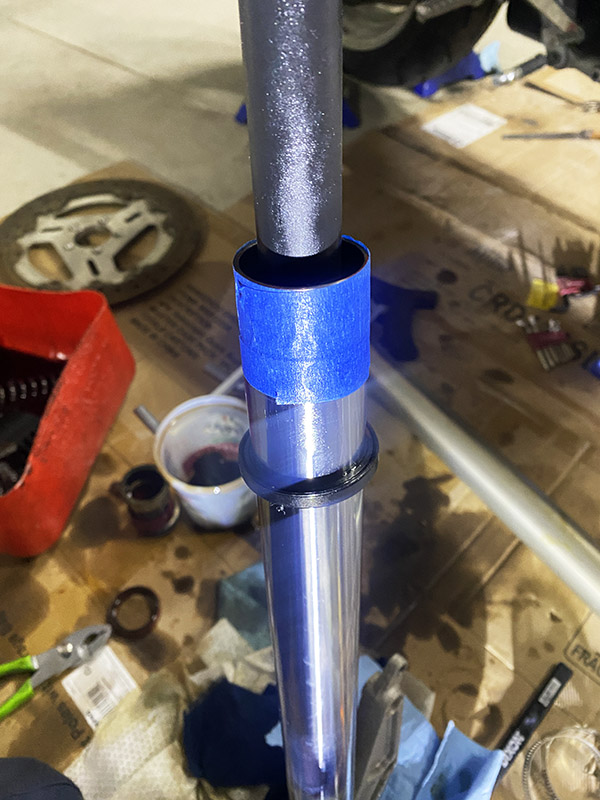
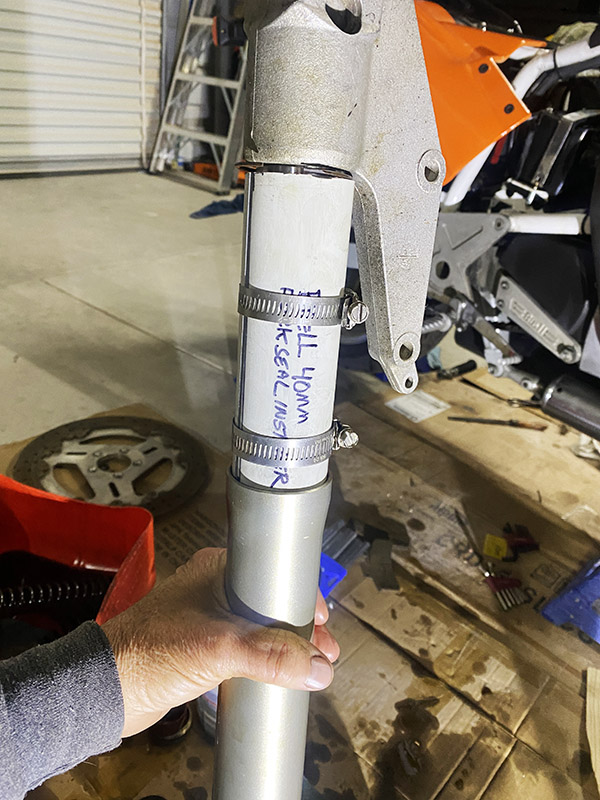
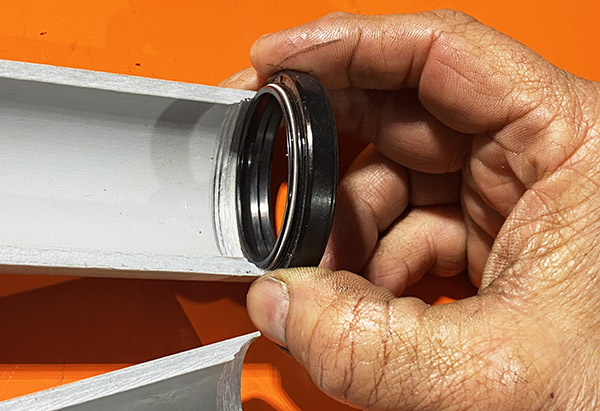
Always tape over ridges so the seal doesn’t get cut or damaged when sliding it into the tube.The seal installer in action. Sliding the fork tube presses in the fork bushing, a spacer and the seal in one motion.After pressing the two halves are removed. Next is the seal retaining clip (which is all that holds the forks together).
The seals were reasonably priced at $14 per set, but the shipping was expensive. I bought three sets since the shipping was the same. Now I have enough Buell S2 fork seals for the rest of my life. On a side note: a week after the seals were delivered FedEx sent me a $20 invoice for “fees.” I haven’t paid the fee yet; I’m not sure, it may be a scam. The fees may be re-named tariffs.
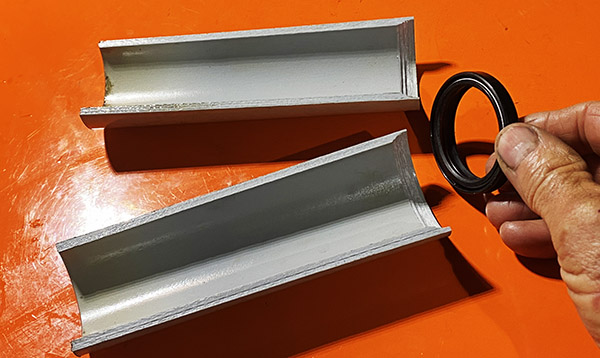
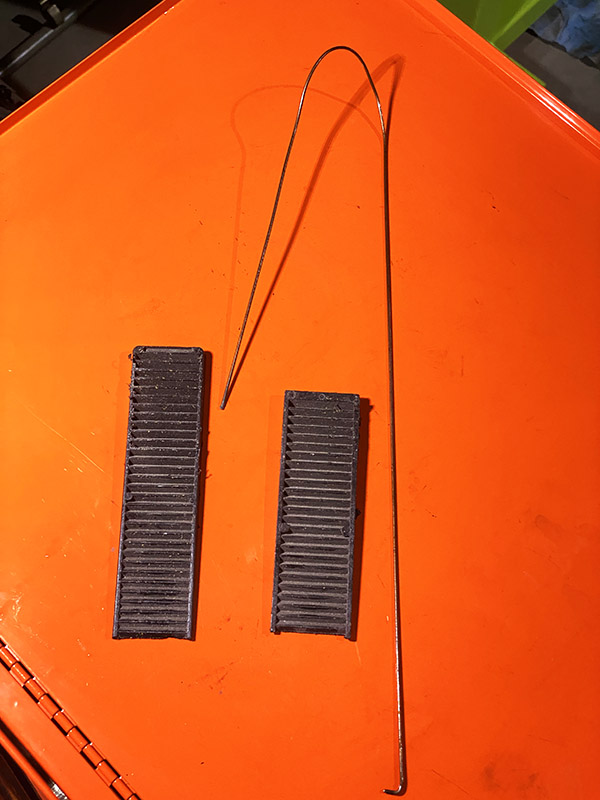
Without this relief cut the seal installer would smash the seal lip.Buell seal installer. PVC tube machined to fit seal lip then cut in half.
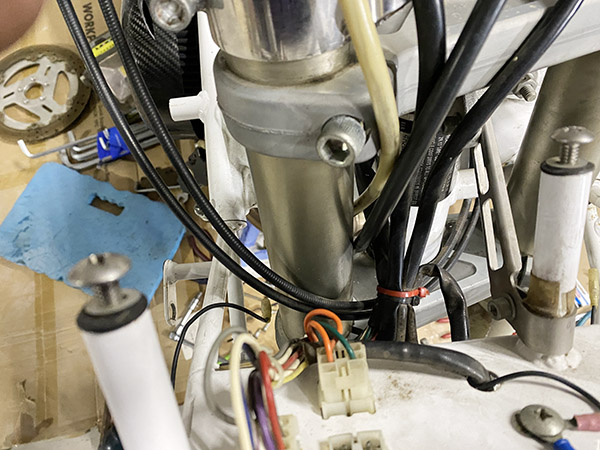
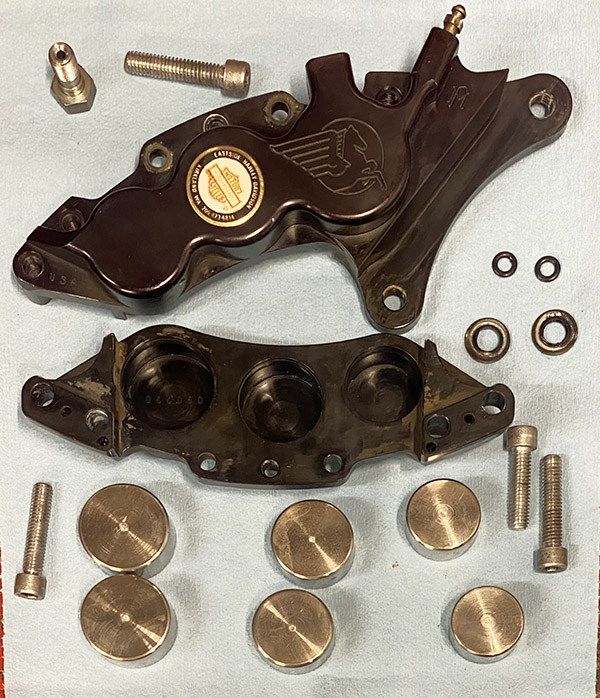
The Buell has a large front disc. To remove the wheel, you have to remove the brake caliper. To remove the brake caliper, you have to remove the brake pads and then retract all six of the caliper pistons back inside their respective bores.
The old Performance Machine brake caliper pistons were pretty crusty, and I didn’t want to push all that mess across the bore seals into the caliper. Removing the brake disc from the wheel allowed enough wiggle room to get things apart.
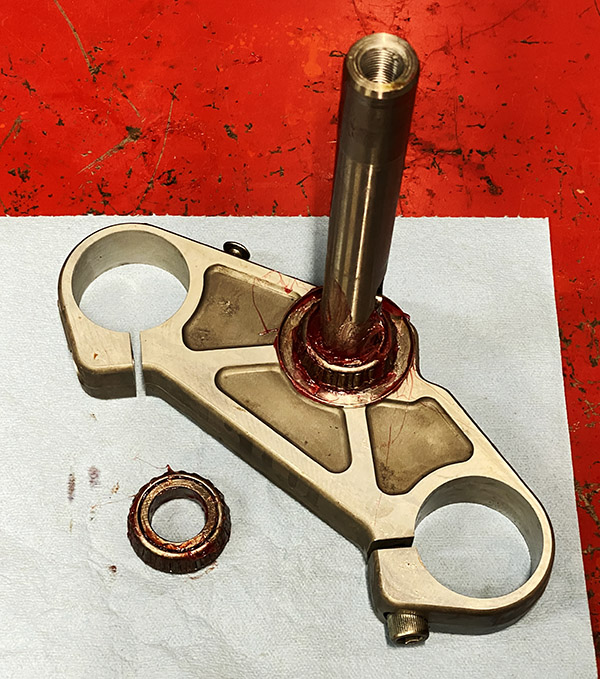
The WP forks were super tight in the triple clamps. I used a wedge to expand the fork tube bores and still it was a struggle to slide the forks out. Once out, disassembly was fairly straightforward (although oily) experience.
These triple clamps really grip the fork tubes. You almost don’t need pinch bolts.
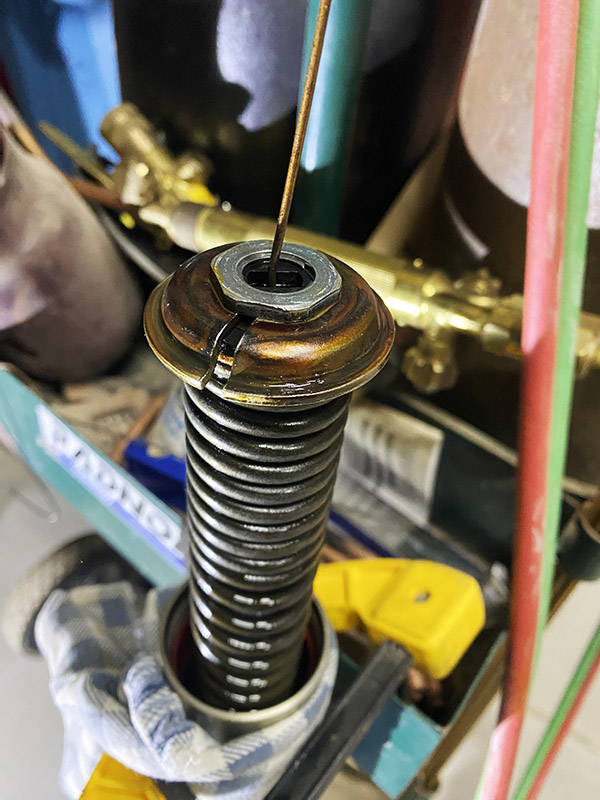
You’ll need to make a seal installer to press the new seals into the forks. I made mine from PVC tubing in the hope of avoiding scratching the sliders. The new seals fit well, and the hardest part was compressing the fork spring while holding the damper rod up with a bent wire and using a third hand fitting the damper rod spring keepers. My Buell shop manual describes this process as a two-man job. And it really is.
It took a couple days to figure out how to one-man a two-man job. I ended up employing an oxy-acetylene welding cart as a prop to hold the fork. The T-handle on the cart was in a convenient location and height to loop the damper-rod holding wire over and I still had two hands free to compress the spring and slip in the keepers.
After the seals are in place the fork spring retainer goes on. Note the wire holding the damper rod and the welding cart holding the fork. This setup leaves both hands free to compress the fork spring and fit the retainers.More Buell specialty tools. Wire to hold damper rod, wedges to spread triple clamps.
The Buell manual called for 7-1/2 weight fork oil. I should have ordered fork oil online, but I didn’t, so I called around and the local Honda shop had some. It’s a 20-mile drive to the Honda shop. The Honda fork oil bottles are confusingly labeled. What looks like 7 weight ended up being 5 weight, but I wanted to get the front end put back together. So I poured a pint of 5 weight into each fork leg. Stay tuned for a follow up report if I can feel any difference between 5 and 7 weight fork oil.
While the forks were off, I re-greased the steering head bearings. They still had a little grease remaining but thinly applied. I walked out the old stuff and smooshed in fresh grease. That left just the front caliper to clean up.
Re -greased steering head bearings. I don’t like the design of the cup under the bottom bearing. It seems like it would hold water. I might bend a drain channel into the low side.
The caliper came apart easily, but the pistons did not. I used to have a big pair of reverse pliers (the jaws expand rather than close when the handles are squeezed). I would use these pliers to grab inside the hollow pistons and pull them out of the caliper. I would, that is, if I could find them. I spent a few hours looking for the pliers and finally gave up.
A snap ring Oliver was pressed into service and I managed to get all six pistons out. Performance Machine uses chromed steel pistons and the bit of piston that was exposed to the elements had corroded. Finding new pistons would be an impossible task and a new caliper would cost $600, so I polished the corroded pistons on the buffing wheel.
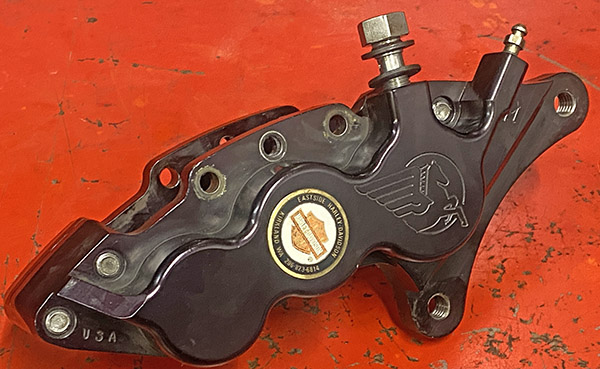
Except for the chromed pistons, the PM caliper is a nice looking unit. Note the piston diameter change to apply evenly distributed wear.Performance Machine caliper back together and waiting on brake pads
I’ve had good luck piston polishing. Yes, they re-corrode, but the section of piston covered with brake fluid doesn’t corrode. I look at it as an ongoing maintenance item rather than a bad part. You’ll have to wait for new brake pads to arrive to see if the caliper leaks in Buell Fever Part 7.
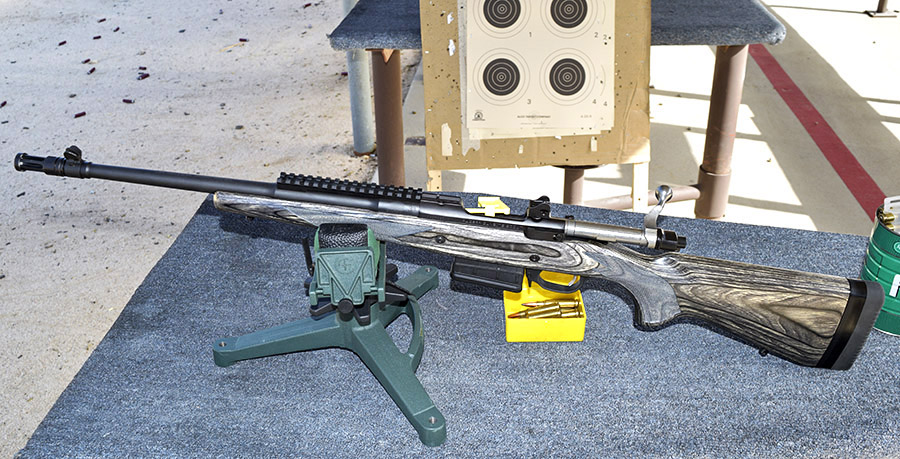
One of my favorite rifles (and one that is a lot of fun to shoot) is my Ruger GSR. I bought one when they first came out; my late buddy Jim Wile did the same. That was 14 years ago. Man, the years are flying by. It seems like it was just a few months ago.
The marketplace is the ultimate authority on what stays in production and what does not, and I guess the market has spoken. My GSR cost about $800 14 years ago, and even though I thought that was a bit pricey at the time, I felt it was still a good deal. I love shooting .308 and I especially love shooting the GSR with its open sights. It is accurate. With certain loads, it can keep five shots in an inch. It fits me like a glove. That was a over decade ago, though, when I was steadier and my eyes were better.
Nothing in this world stands still, however. The price of the GSR climbed to nearly $1500, and Ruger came out with lower cost alternatives on different rifle platforms with the black plastic furniture that’s so in vogue today with shooters who think they know everything (file under: there’s no accounting for some peoples’ tastes).
As one of the world’s largest and most successful firearms manufacturers, Ruger knows what it is doing. But that doesn’t change my feelings. I wish the GSR was still in production.
I’ve posted a number of stories on the GSR. Here are the links:
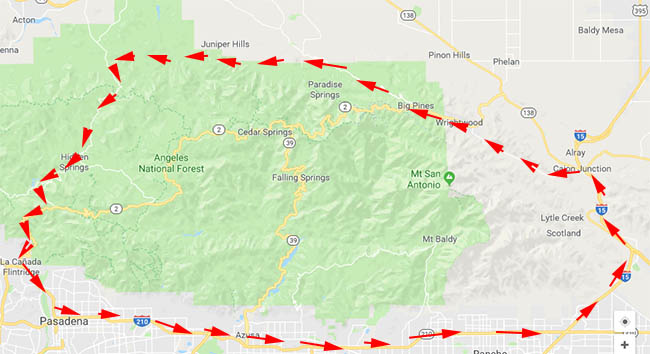
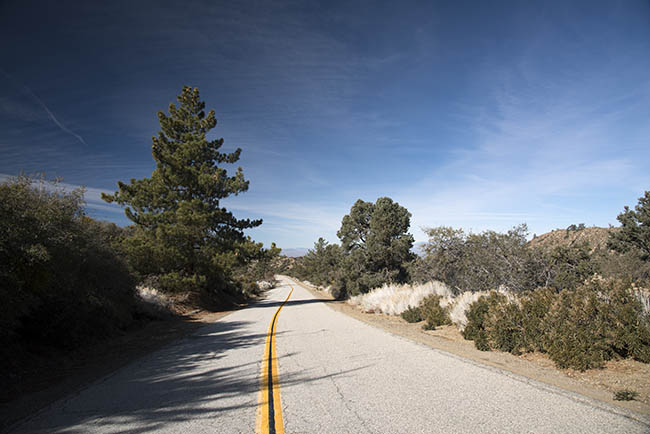
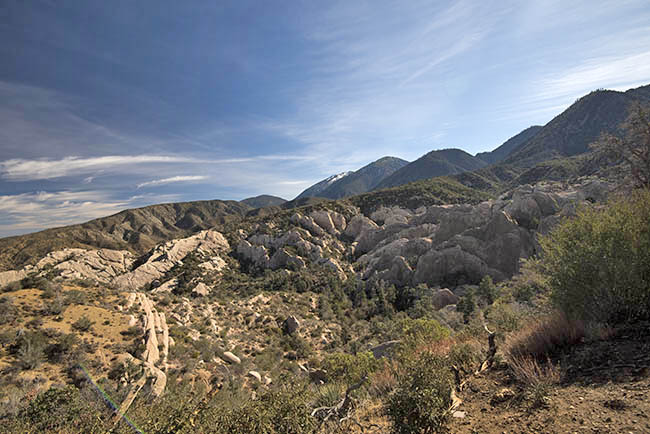
The photo above is another one of my all-time favorites from one of my all-time favorite local motorcycle rides here in southern California. It’s a circumnavigation of the San Gabriel Mountains, and it takes you right over the San Andreas Fault.
The route. This is a beautiful ride. It takes 4 or 5 hours to complete.
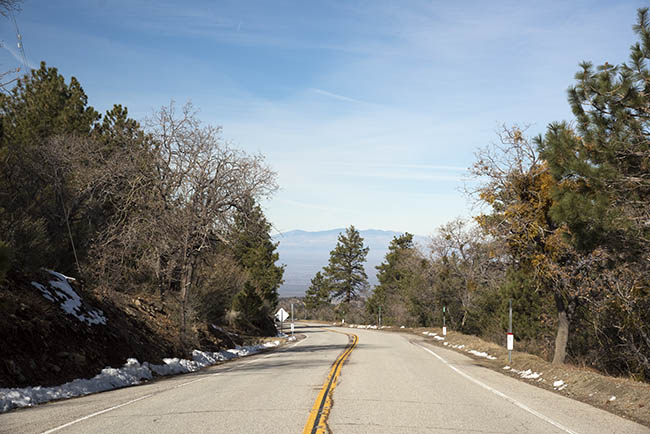
The ride is beautiful, especially on the northern side of the mountains along the southern edge of what we call the High Desert.
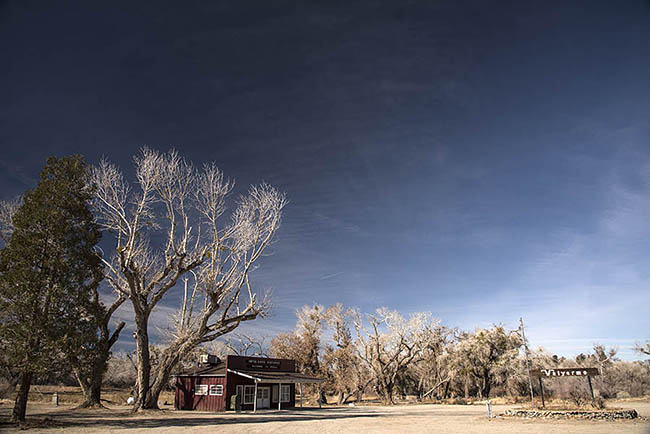
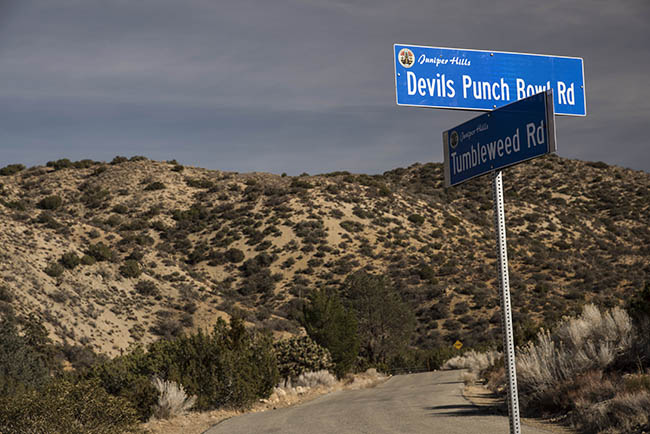
Valyermo, a nice spot to stop for a photo.Scenes on the north side of the San Gabriels. Note the snow still on the sides of the road.Descending toward the High Desert.The intersection of Devil’s Punch Bowl Road and Tumbleweed. Turn left and it will take you to the Devil’s Punch Bowl on the San Gabriel’s northern slope.The Devil’s Punch Bowl.
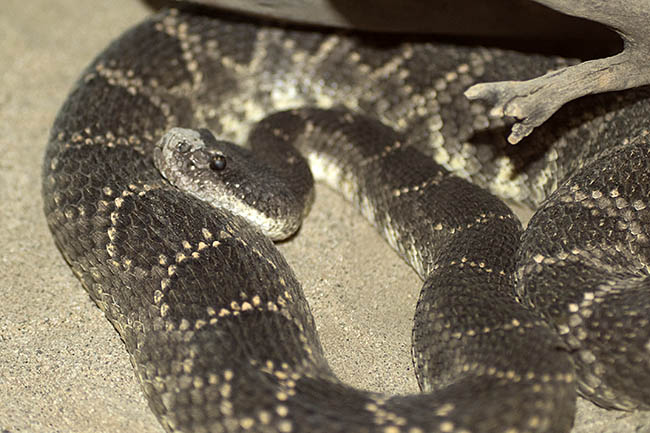
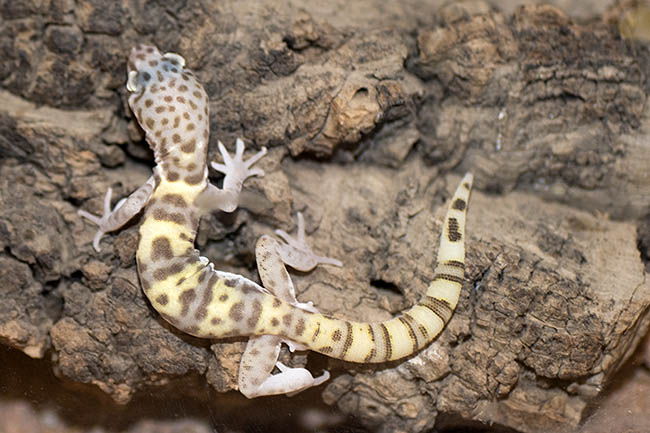
If you’re taking this ride, there’s a cool ranger station at the Devil’s Punch Bowl County Park. The park has several exhibits, including Squinty, an owl with an injured eye park personnel rescued.
Squinty says hello.Yes, indeed. A Western Diamondback in a cage. There are many, many more in the hills and in the desert.A Western Banded Gecko at the Devil’s Punch Bowl County Park. These are very beautiful.
We have a bunch of other phavorite photos here on the ExNotes site. The Phavorite Photo series came about as a result of a suggestion from good buddy Peter. Peter, thanks much!
Earlier Phavorite Photos? You bet! Click on each to get their story.