Facebook and Meta were slammed in court yesterday, with a mega-million-dollar award going to a plaintiff claiming harm from Fecebook’s intentionally-addictive interface. I can see both sides of that argument, and I’m saying that as a guy who is hopelessly addicted. I can spend hours scrolling mindlessly through all the stupid stuff I see on Facebook (especially, for reasons that would take team a team of psychiatrists to unearth) videos of baby gorillas.
There’s a Facebook feature showing friends who are currently online, which I never paid much attention to. There’s another feature that allows you to call (through your computer and the Facebook interface) friends who are currently online. You can probably guess where this is going. I saw that Mike Huber was online yesterday morning, and I decided to give the Facebook telephone option a try.
A few rings later and Mike and I were conversing, clear as a bell, about a variety of topics. Mike is in Colombia for a few more days, and we had a great time talking about that wildly-beautiful country. Oddly enough, Mike ran into Buffalo Bonker down there in Colombia. I first met Mike on one of the CSC Baja rides when we were filling our gasolina tanks in Cataviña. Buffalo was also on that ride 8 years ago. It’s interesting how these motorcycle-based chance encounters can become lifelong friendships.
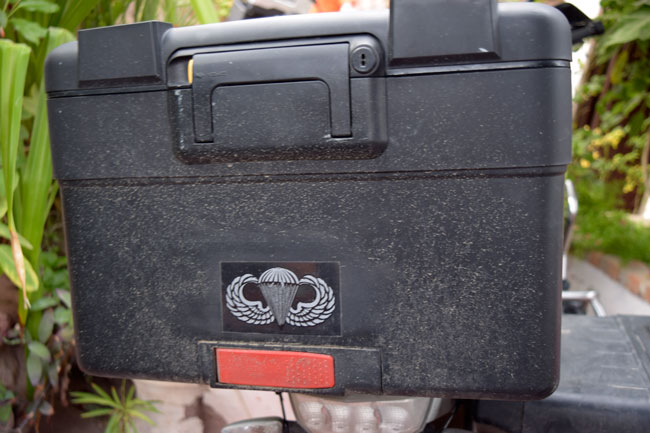
Lunch with Mike Huber at Las Casitas in Bell, California. It was as good as it looked!Mike Huber’s top case and jump wings. It led to a conversation that led to a great friendship.A Buffalo self-portrait in Baja.
That had me thinking about my trips to Colombia. I love the place. I did a lot of blogging while I was there. If you don’t see any friends you can call on Facebook, if you’re tired of listening to warped news shows pretending to be objective, or if you just want to see a bunch of cool photos and a few videos of my Colombian adventures, today is your lucky day…
Greenwich Mean Time. In case you were wondering, that’s what GMT means, and I thought I would introduce this blog with a simple definition of what Greenwich Mean Time actually means, only it’s not that simple. Here’s the first part of a long explanation from Wikipedia:
Greenwich Mean Time (GMT) is the local mean time at the Royal Observatory in Greenwich, London, counted from midnight. At different times in the past, it has been calculated in different ways, including being calculated from noon; as a consequence, it cannot be used to specify a particular time unless a context is given. The term “GMT” is also used as one of the names for the time zone UTC+00:00 and, in UK law, is the basis for civil time in the United Kingdom.
It gets more complicated from there, with considerations given for the historical differences between the day starting at noon (versus midnight), variations in the time at which the sun crosses directly over London’s Greenwich Observatory (it can vary by 16 minutes either way), and other factors I’m not going to go into here. After reading through the Wikipedia definition, I’m going to settle on GMT standing for Greenwich Mean Time and leave it at that.
In my watch-centric context, GMT means a watch that can be used for showing the time in two time zones simultaneously. There’s a lot of ways to do this and the watchmaking world has numerous different approaches. It’s perhaps easiest with a digital watch that can switch between cities (Casio has a number of watches that can do this and we’ve blogged about them before). Within the analog world, there are also different approaches, and we’ve also written about those before (see our blogs on the Citizen Blue Angels and the Citizen Night Hawk).
The more conventional GMT approach in the analog watch world is to add a fourth hand and a separate 24-hour set of markings, with the fourth GMT hand or the hour hand used to designate the second time zone. Last year, I bought a two-tone Seiko GMT watch because I thought it was cool and it compared favorably to my Rolex GMT Master II (and that blog is here).
So where’s this story going?
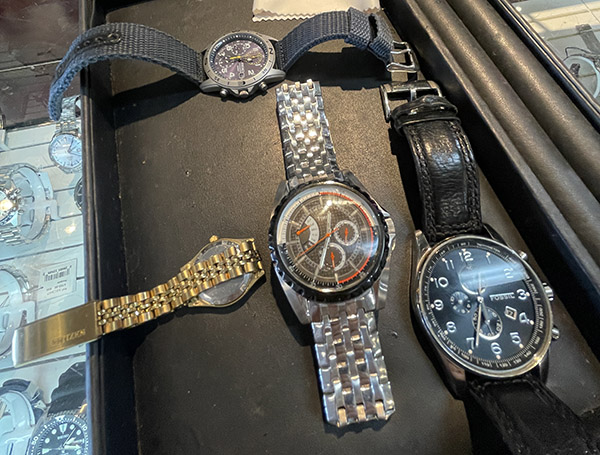
Several watches needed new batteries. The one at the top is a Seiko military-styled chrono in blue. The one at lower left is Sue’s Citizen. The one in the middle is a Timex flyback day-date I bought several years ago. I hardly ever wear that one, but I like it. The one in the lower right is a Fossil I admired when moto-buddy Joseph Lee wore it one day. To my surprise, he took it off and gave it to me.
A few days ago, I noticed several of my quartz watches had stopped running. One of Sue’s quartz watches had, too. Dead batteries. It happens on an irregular basis. But that’s okay, because it gives me an excuse to swing by my favorite watch shop, Golden Times Jewelry, in nearby Pomona. They’re nice people and they only charge $3.25 to install a new battery. And while I’m waiting, I can peruse their selection of new Citizen and Seiko watches.
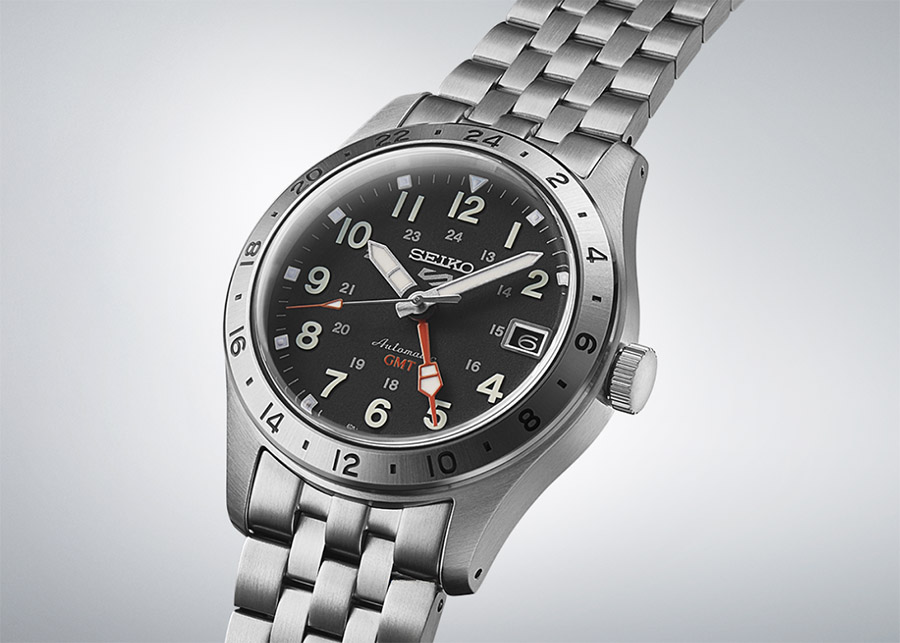
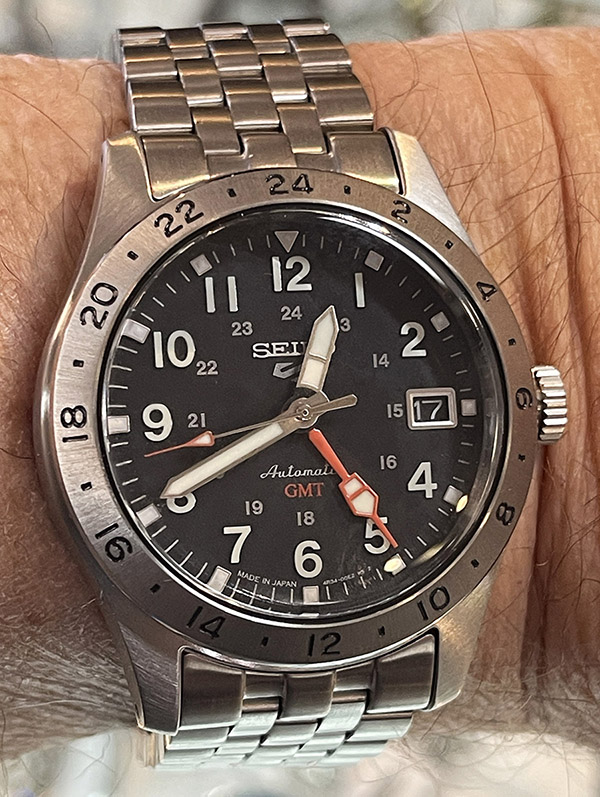
My new Seiko Field Series 5 GMT. This is a good-looking and accurate watch.
I was doing that when I noticed a Seiko I had not seen previously. It was the Seiko 5 Field Series GMT. It had all the features that appealed to me, including big numbers (my eyes aren’t what they used to be), a black face, strong contrast between the hands and the face, a stainless steel case and bracelet, it was not hideously huge (why do watchmakers make watches so unnecessarily big these days?), and an overall appearance that, to me, looked good. I asked to see it, and Stephanie (the nice lady who manages the shop) lopped 35% off Seiko’s suggested list price. That was a superb deal.
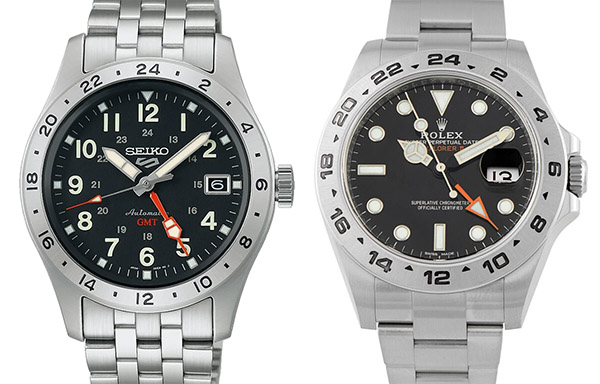
The Seiko 5 Field Series GMT and the Rolex Explorer II. The Rolex’s street price is around $11,000. The Seiko’s MSRP is about $450, but you can get it for less. I think the Seiko is better looking than the Rolex.
The new Seiko reminds me of Rolex’s Explorer II GMT. I tried it on and asked Stephanie if it made me look fat. She smiled. I pulled the trigger and I’m glad I did.
When I got home, I navigated to the official US time site (www.time.gov) and set the new Seiko to the exact time on it. I’ve been wearing the new Seiko for several days now and the watch is tracking to the official government time exactly. That’s awesome from a mechanical automatic (i.e., self-winding) watch. A new Rolex (or one that’s been appropriately serviced) is accurate to about 5 seconds per day. The Seiko is keeping better time.
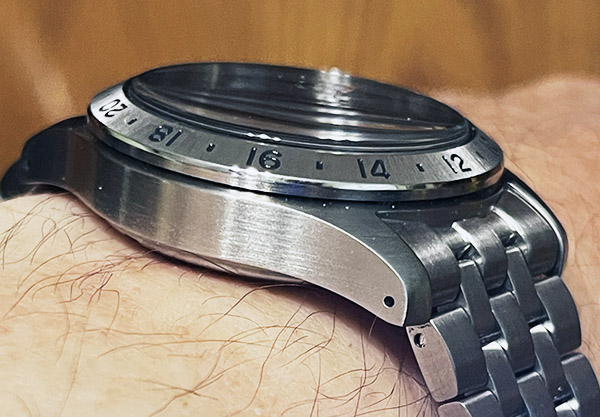
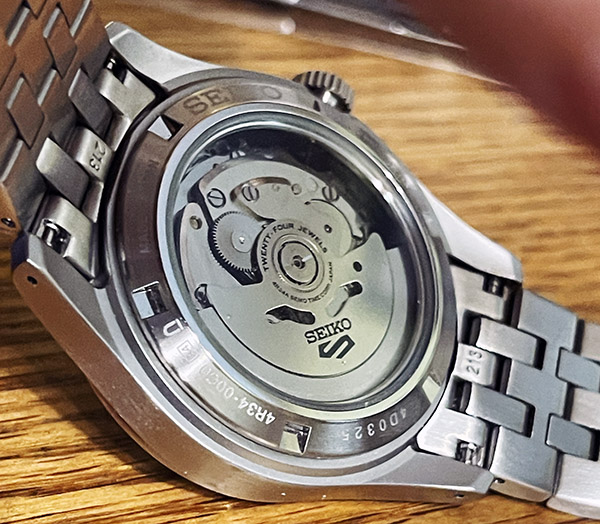
The new Seiko sits lower on the wrist than my other Seiko Series 5 watches.The Seiko 5 Field Series GMT window. I like it.
There are several things I like about this new Seiko. It sits lower on my wrist than most of my watches. That’s good. Like the other Seiko 5 watches, the watch has a window that allows you to see the movement and the self-winder. That’s a feature I like. The Seiko has a 41-hour reserve (if you take it off when it is fully wound, it will keep running for another 41 hours). That’s less than a Rolex’s 70-hour reserve, but in the real world, it’s kind of a pointless advantage (in my opinion). If I take the watch off, it’s only going to be for an hour or so. If I’m going to wear a different watch, it will usually be for a week or more (so neither a 41-hour reserve or a 70-hour reserve will keep it going).
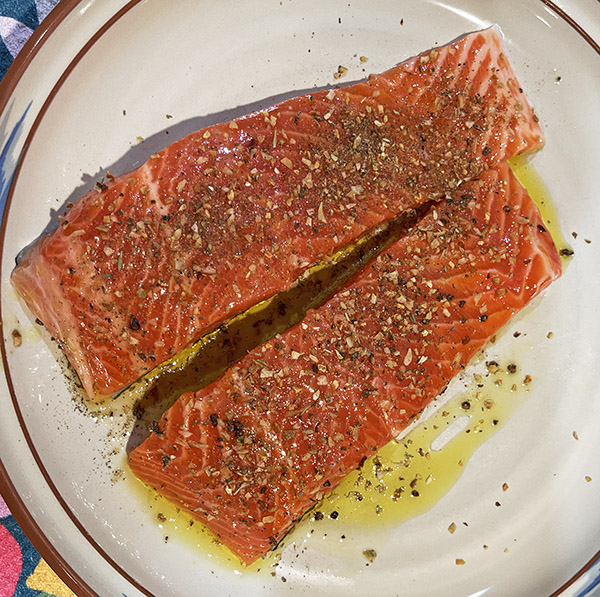
Few dinners are as easy to make and ritzy as barbequed salmon. It’s one of my favorites, and it came about as a result of dinner several decades ago at the now-defunct California Lawry’s restaurant out near Griffith Park. Lawry’s is a company that makes spices, one of which is their 17 Seasonings. I’m not sure why I ordered salmon that night (it might have been a first for me), but it was delicious. So much so, in fact, that I asked our waiter how it was prepared. He smiled. That was the whole point of Lawry’s having a restaurant: To get you to like their meals and buy their spices.
“It’s easy,” he said. “Drizzle a little olive oil on the fish, put some of our Lawry’s 17 Seasonings on top of it, throw it on the grill, and you’re there.”
The guy was right, and I’ve been making my barbequed salmon that way ever since. It’s a favorite if it’s just Sue and I having dinner, and it’s a favorite when we’re having folks over for company.
With that as an intro, let’s get into it.
Ingredients
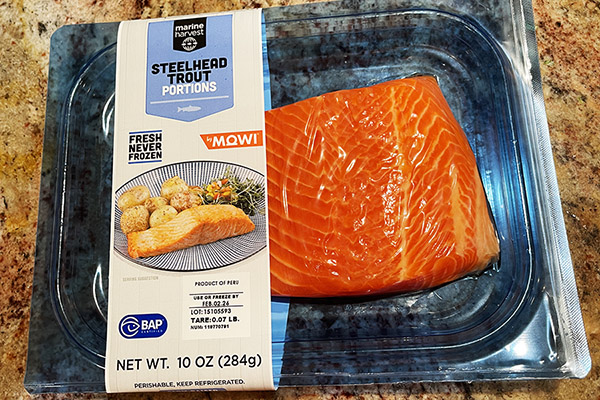
Salmon. Duh. Yep. You can get a big container at Costco (although lately their salmon hasn’t been that good), or you can buy a couple of cutlets packaged like you see below. When you open the salmon, if it smells fishy or it has an ammonia aroma, bring it back to the store. It’s been on the shelf too long. Good fish will have no smell.
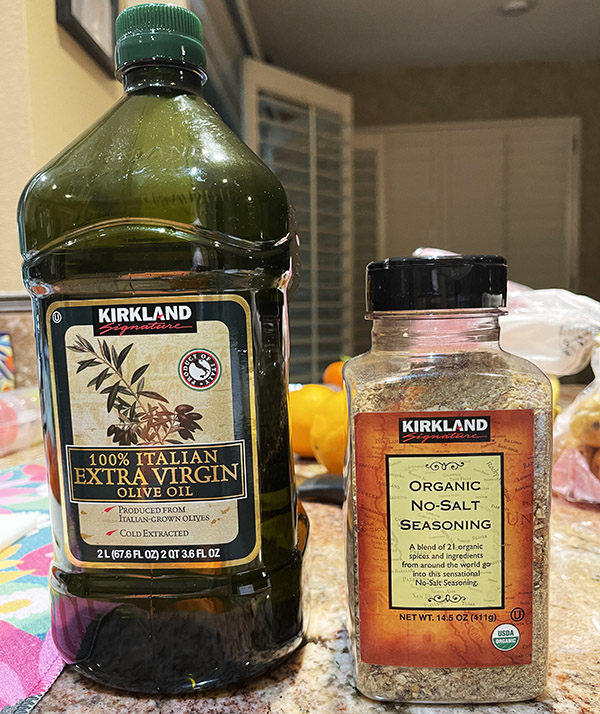
Seasonings. I think you can still get Lawry’s 17 Seasonings. These days, we just buy Costco’s bigger bottle of seasoning, which they call their organic no salt seasoning. A bottle of that lasts us a year or two. It’s just as good as the Lawry’s, but way less expensive.
Olive Oil. Get the extra virgin stuff. If you see anything labeled extra extra virgin, steer around it. It only goes up to extra virgin. I know people in the olive oil business. Trust me on this.
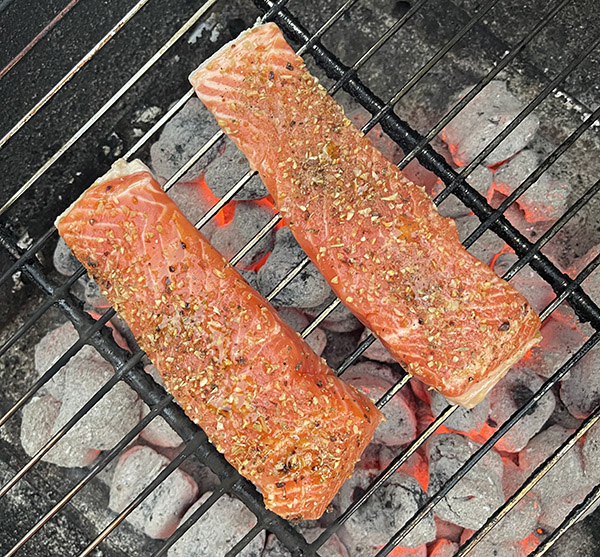
Charcoal Briquets. I like to barbeque the old-fashioned way, with a barbeque and charcoal.
A Charcoal Grill. Nothing fancy here. I use the cheapest charcoal grill I can find at Walmart. Every decade or so I’ll need to replace it. I like the taste of charcoal grilled stuff better than a gas grill.
Once you have everything, you’d good to go. This takes about 45 minutes to prepare, with a good half hour being necessary just to get the charcoal going.
Get the charcoal grill started and put the wire grill on top of the glowing briquets. Scrub the grill clean after it’s hot and spray the grill with a nonstick spray.
Steelhead, Atlantic salmon, Coho salmon…it’s all good. We prefer steelhead trout. Salmon is in the trout family, hence the name.
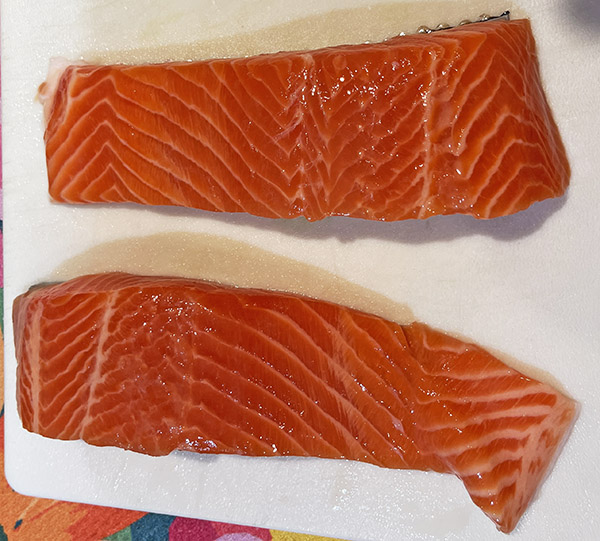
While the grill is heating, open the salmon container, rinse the cutlets (or the filets with tap water).
Rinsed and ready for the oil and the seasonings.We do a lot of shopping at Costco. Their Organic No-Salt Seasoning is just like Lawry’s 17 Seasonings.
Drizzle a little oil over the top of the cutlets, and then sprinkle the seasonings on top of the oil.
Drizzled, sprinkled, and ready to grill.
Place the salmon skin side down on the grill for 14 minutes. After 14 minutes, flip the cutlets and grill for an additional 3 to 4 minutes.
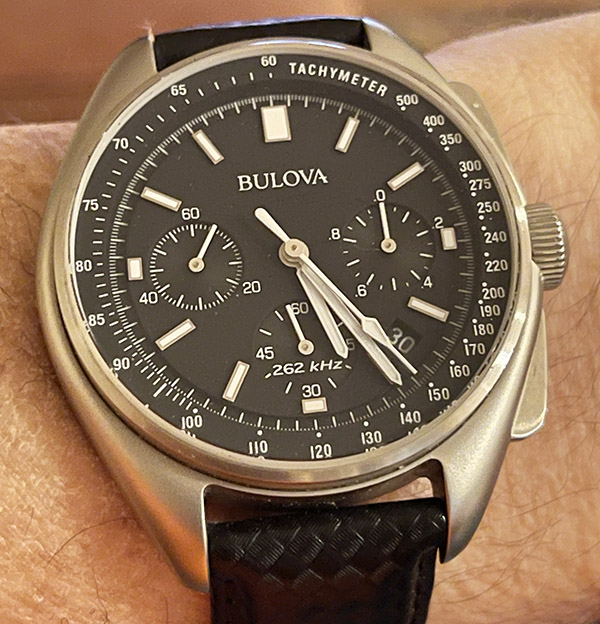
Having a decent chronograph helps here (my preferred watch is either a Casio G-Shock or my Bulova Lunar Pilot). Any watch will do. But I’m not going to let a chance to show a watch slip by. If want to read our watch reviews (and other equipment reviews, too), they are right here.
There’s a hell of a story behind this Bulova.
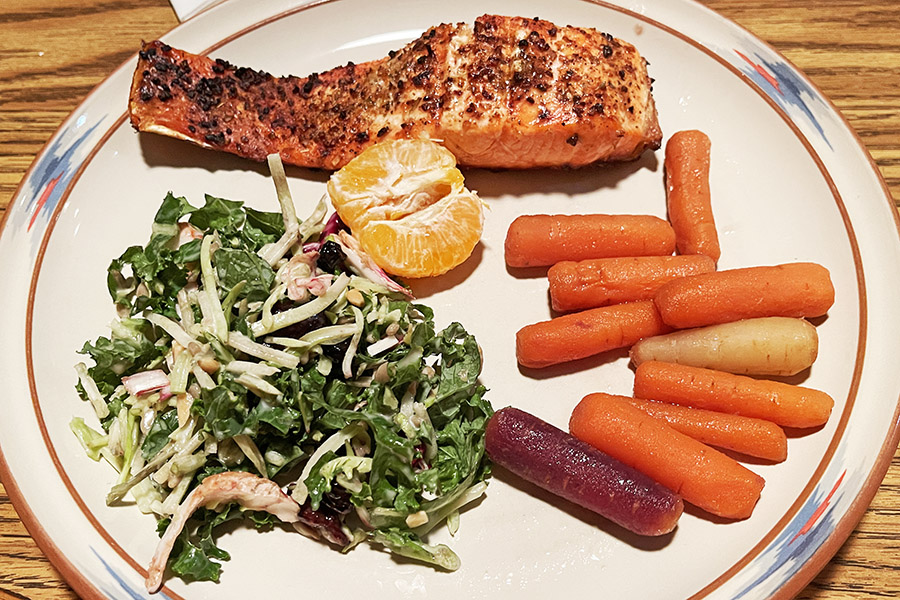
Remove the salmon from the grill; it’s ready to serve. Just about any veggie goes well with salmon. We like steamed carrots, asparagus, a salad, maybe some citrus as sides (as you see in the photo at the top of this blog), and others.
Good to go, and great to eat.
So there you have it. Barbequed salmon, à la ExhaustNotes. Don’t thank us now; just click on those pop-up ads or maybe click and leave a donation to support your favorite blog writers.
Subscribe to ExNotes for free!
We need your support! Do what you can to help ExNotes stay in the black!
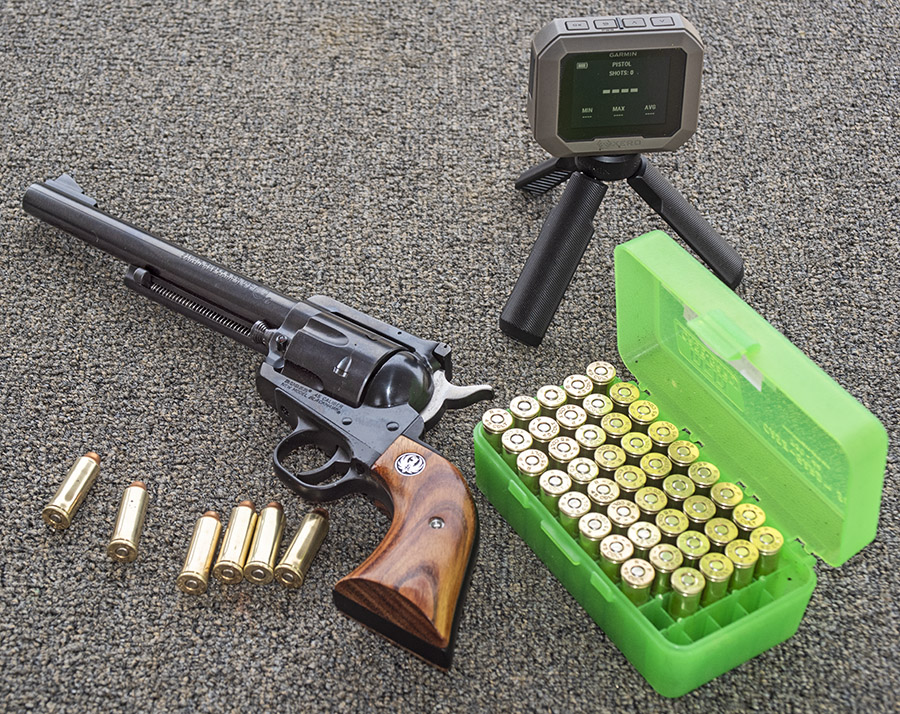
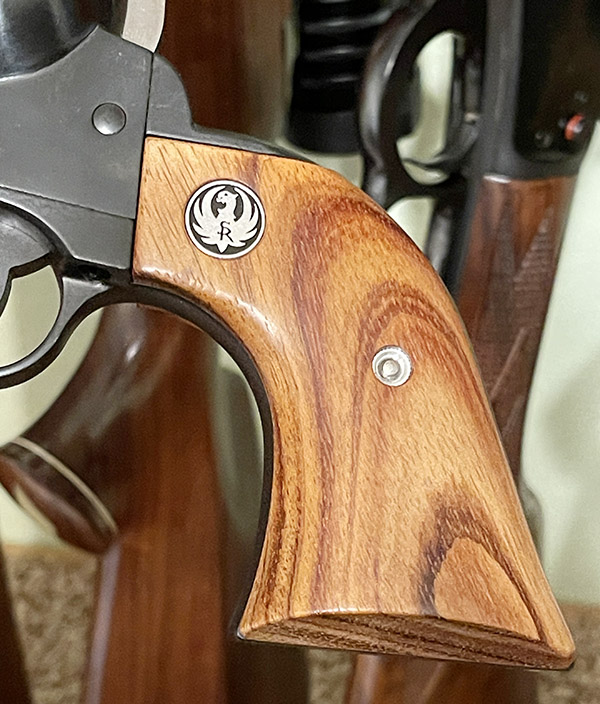
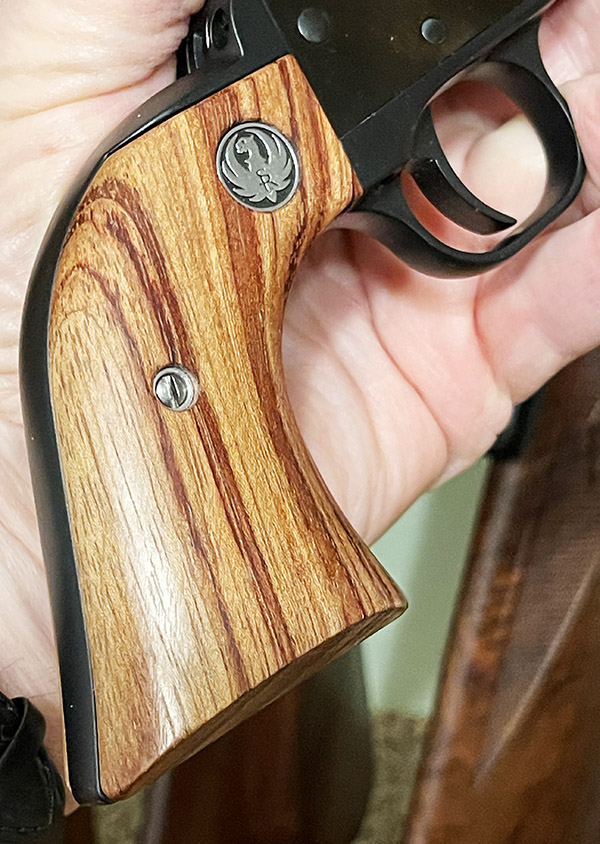
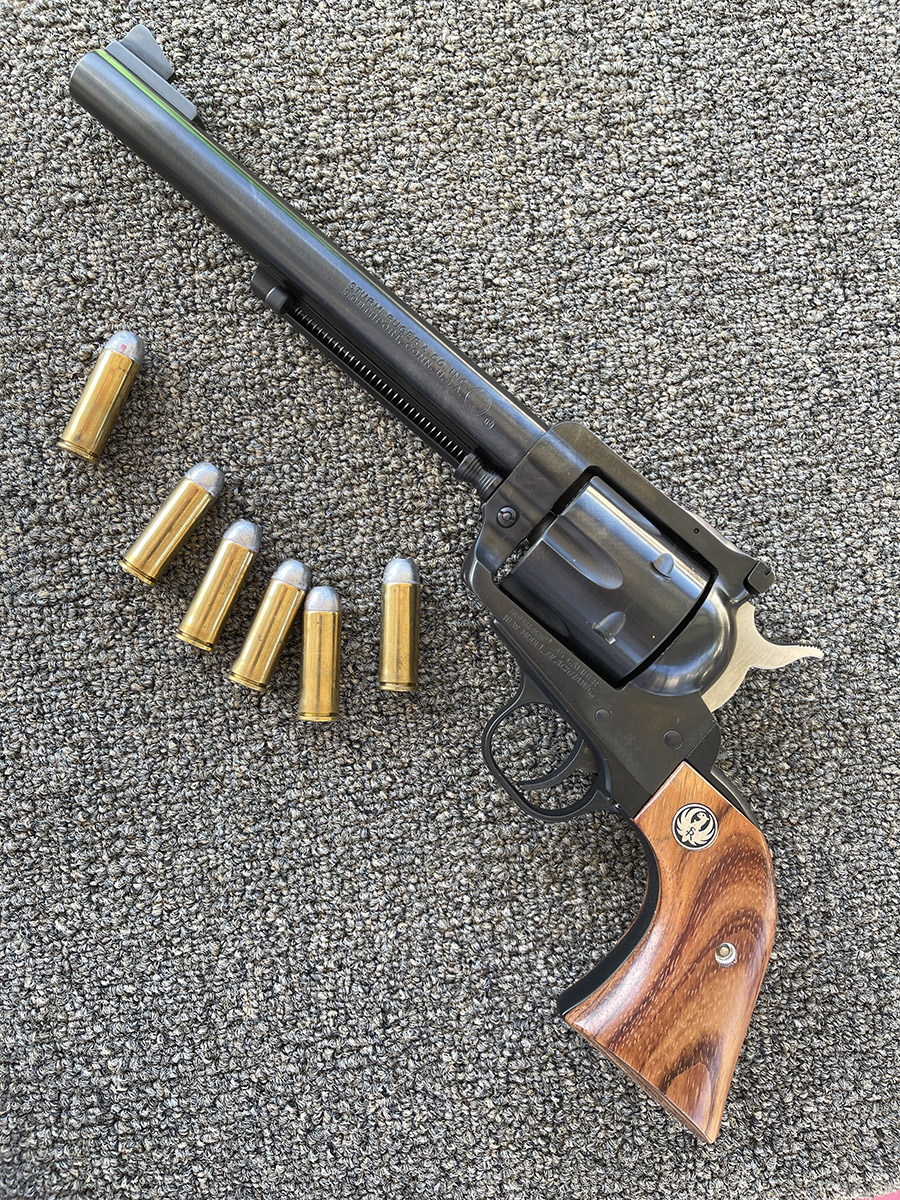
I saw the Ruger Blackhawk you see above in a forum post several years ago and wrote to ask if the owner if he would sell it. The answer was yes, and after navigating all the California hurdles, the revolver found a home in my gun safe. Several things attracted me to it. It is a 200th Year Ruger, it is in as new condition, the cylinder throats had already been reamed to their correct dimensions (several .45 Colt Blackhawks left the factory in 1976 with undersized throats), and the grips are nice (much nicer than normally seen on a Ruger Blackhawk). The grips have great figure and the wood-to-metal fit is superb (something rarely seen on a new Blackhawk these days).
Fancy wood. I’m guessing this is Gonçalo Alves wood. The wood-to-metal fit is way better on this 50-year-old revolver than it is on current production Rugers.The right grip is just as pretty as the left. Ruger used to get it right.
You saw my previous post 0n fitting the Power Custom base pin to this revolver, and another in which I compared this handgun to two other .45 Colt handguns (a 4 5/8-inch stainless Blackhawk and a tuned Taylor Uberti Single Action Army replica). I had not really done any load development for the Blackhawk you see in this blog, and I wanted to start doing so this week. I grabbed some ammo and headed to the range.
Getting out to the West End Gun Club has been a bit dicey over the last month or so. With our heavy rains, Lytle Creek has been running high. My Subie came through, though, like it almost always does.
I say “almost” because a couple of years ago under similar circumstances, I almost became a U-boat commander. You may have read that blog before.
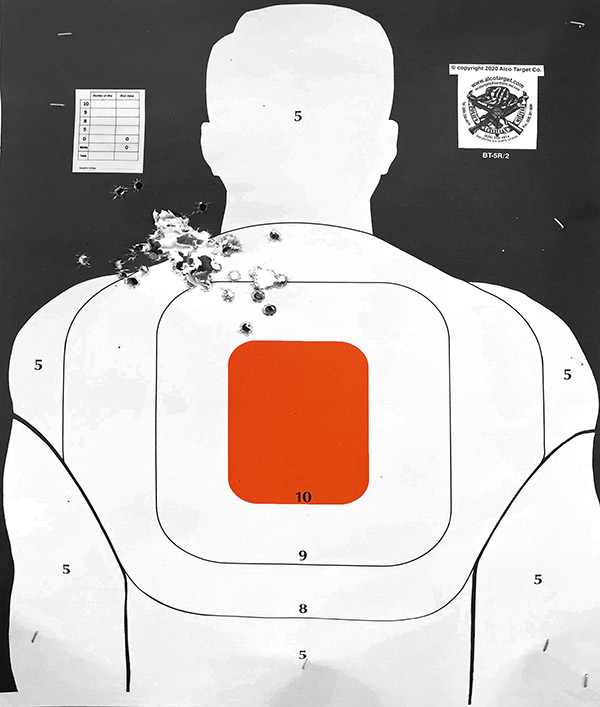
My first target at 25 yards with the 5.9-grain Red Dot load I had previously evaluated at 10 yards was mediocre. The group was high and big. Ordinarily (and with an accurate revolver), I can put a box of ammo into a 25-yard group you could cover with a silver dollar. That wasn’t happening with this load.
Meh. I’ve done better.
When my buddy Kevin saw the above target, he asked if I was using a shotgun. I understood his point. So I set up another target, again at 25 yards and with the same load, figuring I’d do better the next time. The results were the same.
Another group with the 5.9-grain, 200-gr truncated roundnose cast bullet. Just like the group above. High left, and too damn big.
Must be the load, I thought. I switched to the last box of .45 Colt loaded with Trail Boss powder (it was 6.4 grains of Trail Boss under the same 200-grain roundnose, flatpoint, cast bullet used above). That’s a load that’s done well in other guns chambered for this cartridge. The results were almost identical to the Red Dot load.
Same bullet, but with 6.4 grains of Trail Boss. Maybe the group was a little tighter. Maybe not.
So far, the .45 Blackhawk results with Red Dot were disappointing. The groups were too big and too high. My Blackhawk’s rear sight is all the way down, so it I knew it was time to try something different. I had some 230-grain roundnose Missouri bullets hiding somewhere under the reloading bench, along with another box of 200-grain Speer swaged bullets, but I didn’t think either of those would be the answer here. A heavier bullet (like the 230-grain cast roundnose bullet) would shoot higher. That’s what heavier handgun bullets do because they generate more recoil and have a slower muzzle velocity (and that causes the bullet to spend more time in the barrel as it rises), giving a higher point of impact. I also had some 185-grain full metal jacket bullets (a little lighter than the ones I shot here), so I tried them. Maybe they would be the answer. I went home and loaded some of those to try the next time I visited the range.
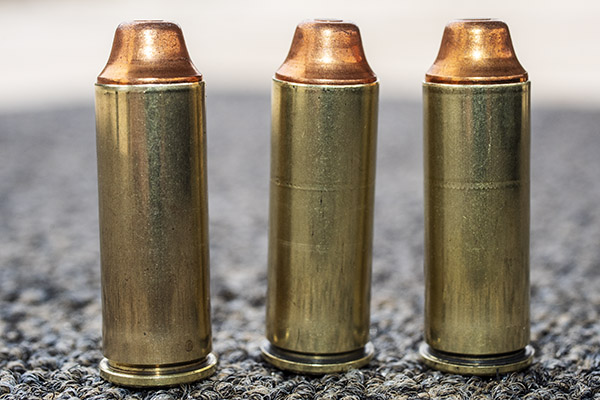
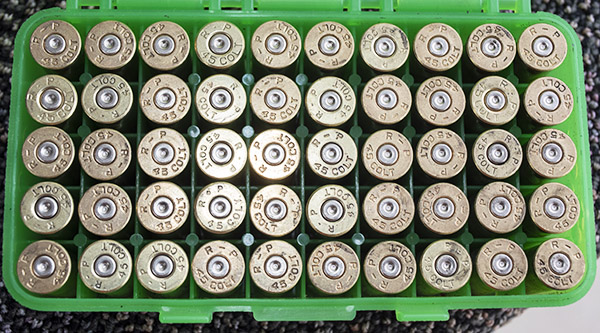
An unusual appearance cartridge: The .45 Colt with 185-grain Winchester jacketed semi-wadcutter bullets.
I prepared 20 .45 Colt reloaded rounds with the 185-grain Winchester jacketed semi-wadcutters with the same Red Dot propellant charge as previously used (5.9 grains), and then I reloaded another 20 rounds with that Winchester bullets and a heavier charge (6.7 grains of Red Dot).
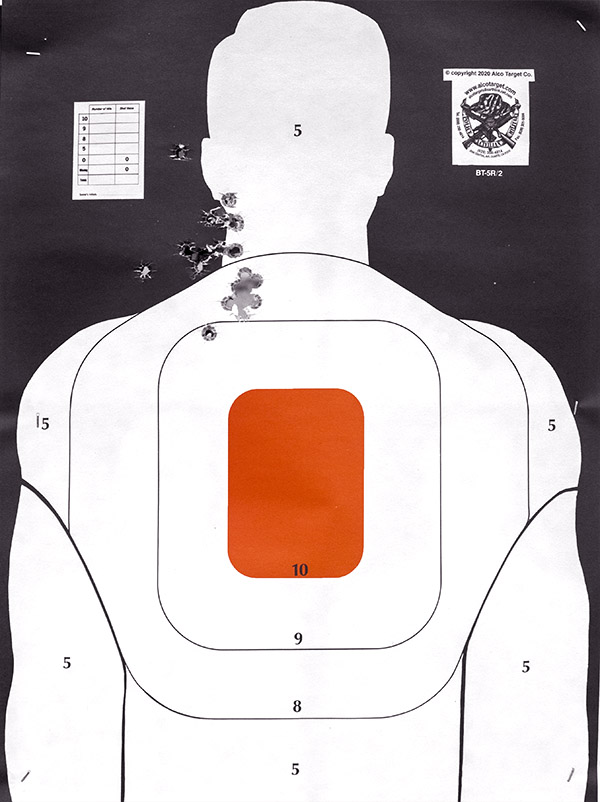
The first group (loaded with 5.9 grains of Red Dot and the 185-grain Winchesters) printed high and to the left. The group was a little tighter, at least with respect to lateral dispersion.
Way high, a little left, and a few flyers. The rear sight was already in its lowest setting. It was pretty windy that day.
I next shot a group with a higher Red Dot charge (6.7 grains). It moved the group down substantially (a hoped-for result) and the group was tighter. Ah, progress. It comes in many forms.
With a higher Red Dot charge (6.7 grains here), the group moved a little right and a little lower. That one flyer on the left? Who knows?
A quick check of the fired cartridges confirmed what I was experiencing when extracting the above rounds. There were no pressure signs, and extraction was easy.
No primer flattening, and easy extraction. These loads showed no signs of high pressure.
I went home and reloaded more .45 Colt cartridges, this time with even higher charges. The recipes this time were the same 185-grain Winchester jacketed semi-wadcutters, but with 7.0 grains and 7.3 grains of Red Dot.
While all this was going on, I continued to cruise the Internet, looking for more information on Red Dot and its reloading peculiarities. A found a few places where folks mentioned that the powder didn’t meter well. Usually, my Lee powder dispenser has a consistent drop, so I thought I would weigh a few after I had the dispenser adjuster. Wow. Those guys were right. I was seeing variation of as much as 0.5-grain from charge to charge. Hmmm. I was experimenting with charge weight differences as small as 0.3 grains, while the dispenser was throwing in variability of 0.5 grains. That’s not good. I filled the powder dispenser, rapped it a few times to settle the Red Dot, and I managed to get the variability down to not more than 0.2 grains. It was 0.0 grains, which is what I had experienced with other powders, but it was better than the 0.5 grains I first encountered. Like Donald Rumsfeld used to say, you go to war with the Army you have. My Army had 0.2 grains powder-drop-to-powder-drop variability, and that’s what I was going to war with.
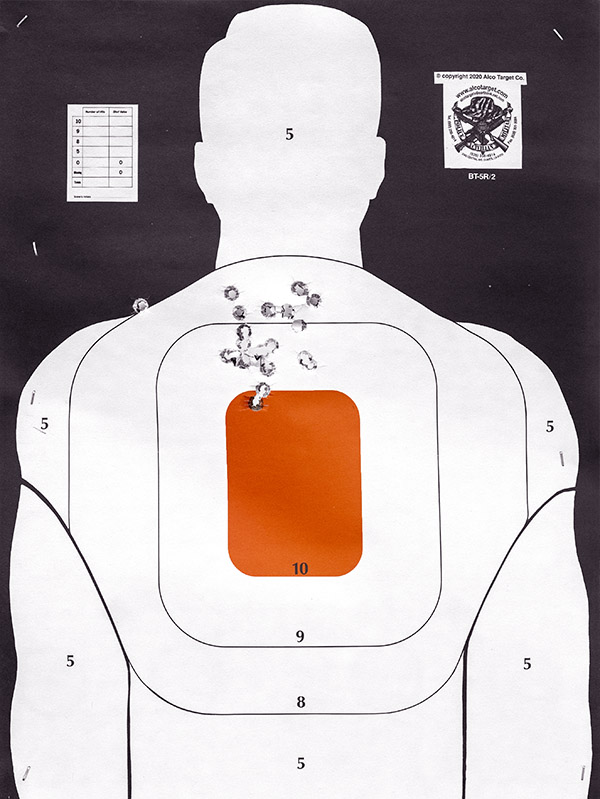
The next day at the range, I fired 20 rounds at a 25-yard target using a my 7.0-grains-of-Red-Dot load. It shot a little bit better group, and it had a little bit lower point of impact. More progress.
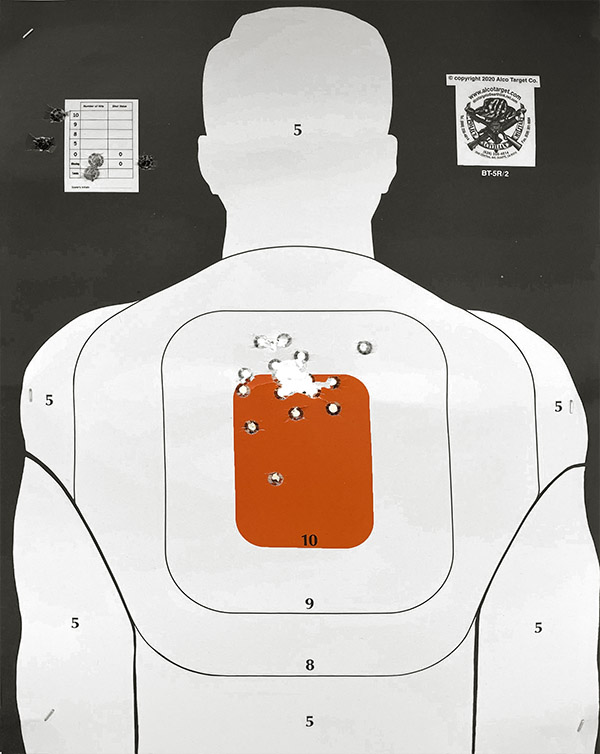
Ever wonder why a head shot is only worth 5 points, while a center of mass shot is worth 10? These things sometimes keep me up at night. The point of impact was getting lower with higher charges.
Then I tried the last group I had loaded, this time with 7.3 grains of Red Dot. I had a few stray shots, but I also had the makings of a better group, and it was lower yet on the target.
A better group. Still too high, but getting better. Those stray shots: Were they the result of shot-to-shot powder charge weight variability, or were they due to pilot error?
At that point, I decided to call it a day with this test series and with this revolver. Here’s what I concluded from the above:
Red Dot is not the best propellant for the .45 Colt cartridge, which is probably why you almost never see it listed in any of today’s reloading manuals. The above notwithstanding, Red Dot can work for .45 Colt cartridges, as this test series found.
Higher charge weights are better, probably because they occupy more of the case volume (the .45 Colt is a big handgun cartridge). My tests showed that the average velocity, the extreme spread, and the standard deviation all improved with higher Red Dot charge weights.
With my 7.3-grain Red Dot load, the average velocity is 980.0 feet per second, the extreme spread is 76.5 feet per second, and the standard deviation is 21.1 feet per second. These are not the best numbers I’ve ever seen in a handgun, but they are not the worst, either, and a 185-grain, .45 caliber bullet smoking along at nearly 1000 feet per second is nothing to sneeze at. Other powders would do better in this cartridge (IMR 4227 comes to mind), and future efforts will focus on that.
Regarding my .45 Colt Blackhawk shooting high at 25 yards, I don’t know if it’s the load or the gun. I have another Ruger Blackhawk that shoots high at 25 yards (my .357 Blackhawk). I have a lower rear sight blade from Ruger laying around here somewhere. I will try to find it and, after confirming it is lower than the blade currently in the gun, I’ll see how much that helps.
So there you have it: Red Dot propellant reloads in a Ruger .45 Colt Blackhawk. If you have a comment, we’d love to hear it.
More gun stories? You bet! There’s good stuff on our Guns page on the three Rs (Rugers, revolvers, and rel0ading)!
You know, you’d think the folks who produce James Bond movies would have their act (pardon the pun) together, but evidently that’s not so. I’ve already written about the iconic early James Bond movie flyer that shows Sean Connery standing provocatively with what appears to be a very menacing handgun. It wasn’t. It turns out that what old Bond, James Bond posed with was a .177-caliber pellet pistol (a BB gun, to use a looser term), and that was because they forgot to bring the real gun for the photo shoot. The photographer, a target shooter, just happened to have his BB gun in the trunk of his car. I wrote about my identical pellet pistol a few years ago.
But all’s fair in love, war, and spy movies, and when I get a chance to watch a Bond movie (no matter how many times I’ve seen it), I’m in. That’s what happened the other day when I was channel surfing and Goldfinger popped up. I started the movie and in the opening scenes I noticed something I had previously missed. When Bond is doing his Navy Seal routine, getting ready to blow up a waterfront drug lab disguised as an oil tank, I caught a glimpse of his watch.
A poor image, taken from my TV screen with my iPhone.
I stopped the movie and went back a bit to get a better look at the watch. Wow, it was a Rolex dive watch (another topic we’ve covered here on ExNotes), and wow again, it had a military style band. The image quality you see above is awful, partly due to it being an evening scene and partly due to the above image being a cell phone capture of my television screen. It’s too bluish, I know. But that watch strap…wow! Was it a coincidence? I had just received an email from a company called BluShark offering an identical watch strap!
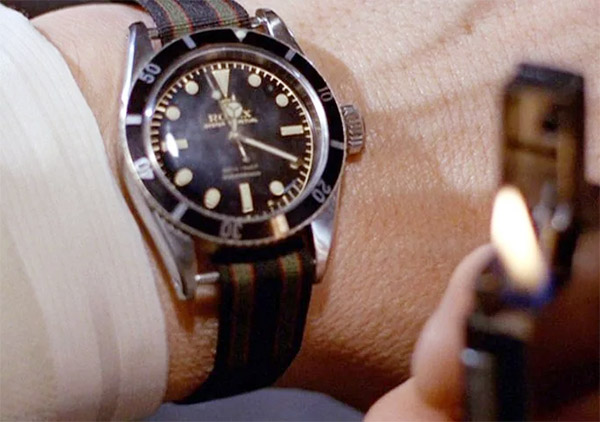
I went to Google and searched for a better image of the Goldfinger scene. Sure enough, I found it:
Note the watch strap’s colors (or should I say colours?) and poor fit on the Rolex Submariner.
Several thoughts emerged:
I’m not and never have been a military watch strap fan.
The above notwithstanding, I liked the colors in the Bond strap.
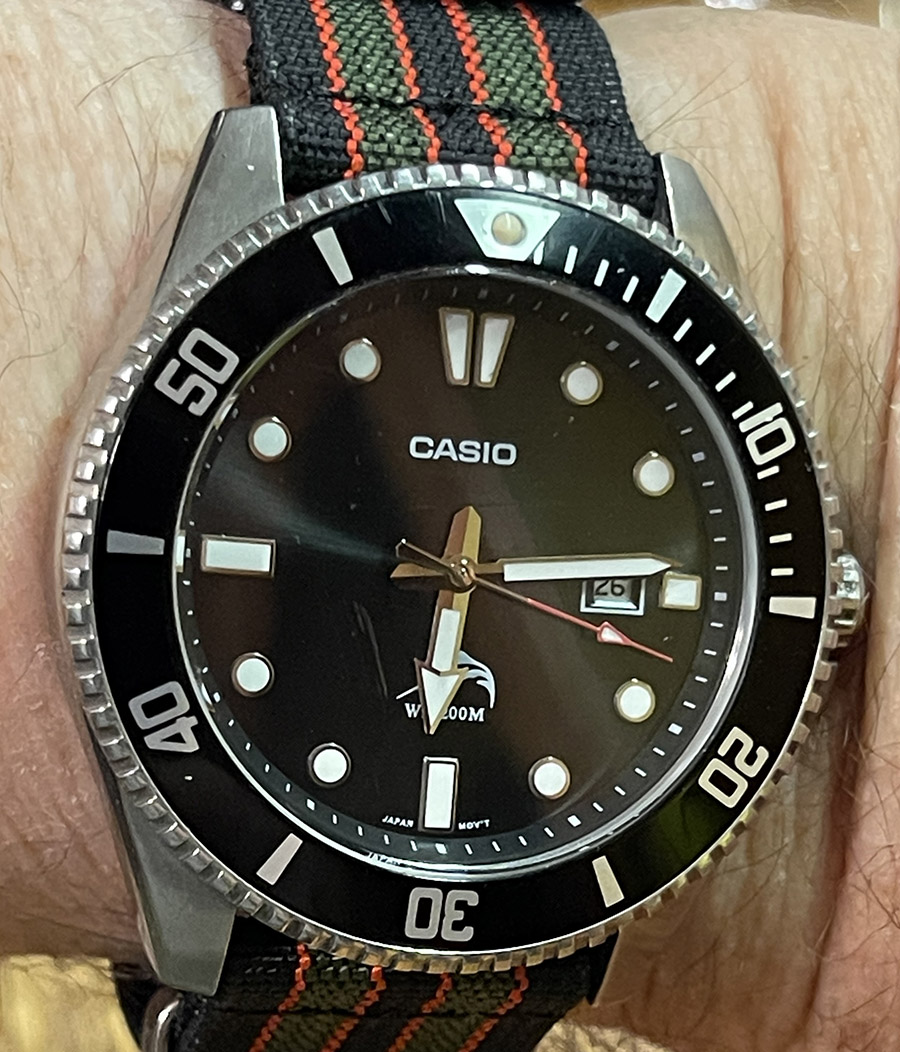
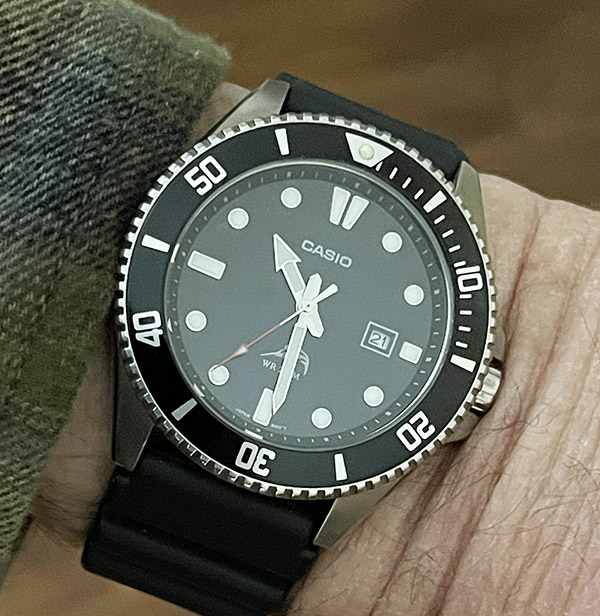
I have a Casio Marlin, which is kind of a poor man’s Rolex, and those Bond watch strap colors looked good against a black dive watch.
The watch strap in the Goldfinger scene didn’t fit the watch at all. It was a couple of sizes too narrow compared the Rolex’s lug width.
My Casio Marlin and its original watch strap. I’ve owned this watch for close to 20 years. It’s the best watch buy on the planet.
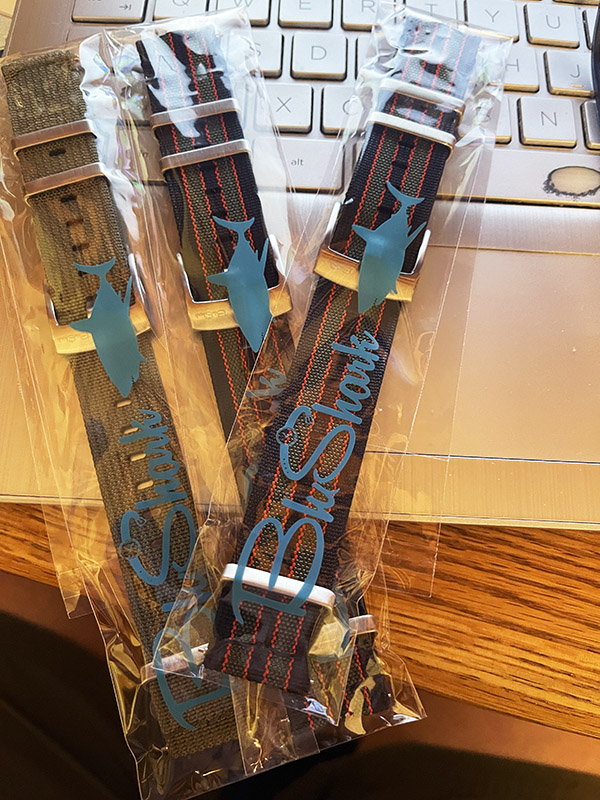
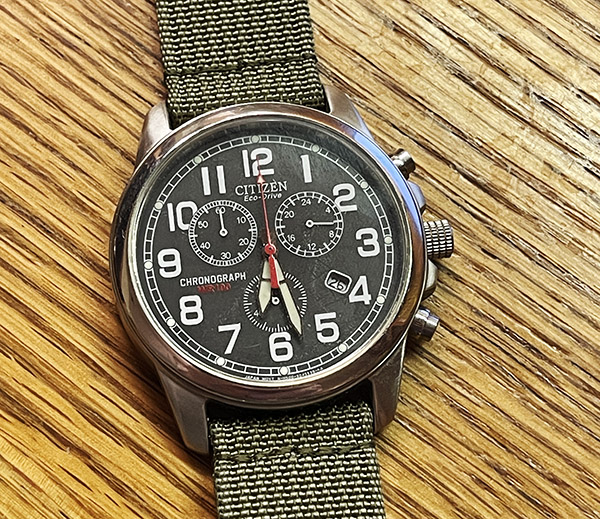
So I went back to the BluShark email. Buy two and get one free. They sent me a code for another 10% off my first order. Free shipping. How could I say no? I knew what I would order, too. I wanted two of the Bond watch straps in the appropriate size, one for my Casio and another identical one for good buddy Paul’s new Casio (he bought a Marlin, too; he’s always giving me free stuff, and it was time for me to reciprocate). And I wanted another military style strap in OD green for my Citizen Eco-Drive chronograph, a watch I’ve owned and enjoyed wearing for 30 years. The Citizen originally came with an OD green cloth strap, and a similar military strap for it would be perfect.
The BluShark watch straps.
A few days later the BluShark bands arrived. Wow. It took only minutes to fit my two to their respective watches, and as you can see from the photo atop this blog, the Casio looks great.
That had me wondering: What is the significance of the colors on the Bond watch strap, and in Goldfinger, why did the strap fit his Rolex so poorly?
As to the fit (and as much as you can trust anything you read on the Internet), Sean Connery didn’t own a Rolex. Albert Broccoli, the producer, did, and he leant his watch to Connery. But it didn’t fit Connery’s wrist. A crew member had the watch strap you see in Goldfinger, so it was quickly swapped onto Bond’s watch, and voilà, the Bond watch strap was born. Like I said near the beginning of this blog, you’d think a Bond movie prop department would be better organized, but there you have it.
As to the colors, well, that story is all over the map, too. The one I like is that the colors in the Bond strap are the British military intelligence regimental colors (red, green, and black). That leads to the next logical question: Do spies wear colors to advertise their spy backgrounds? I think the answer is probably no, but it makes for an interesting explanation and an intriguing story. I found more on this poking around a bit, including a blazer patch for members of the British Intelligence Corps (you know, just in case Boris and Natasha needed to confirm their suspicions).
Spy swag. Why hide it?
This is all interesting stuff and it makes for interesting conversation. If you’d like to see more about BluShark and their straps, you can do so here.
That Citizen Eco-Drive I mentioned above? I’m wearing it now and I love it. Here’s what it looks like:
The Citizen Eco-Drive watch mentioned above. It’s another favorite.
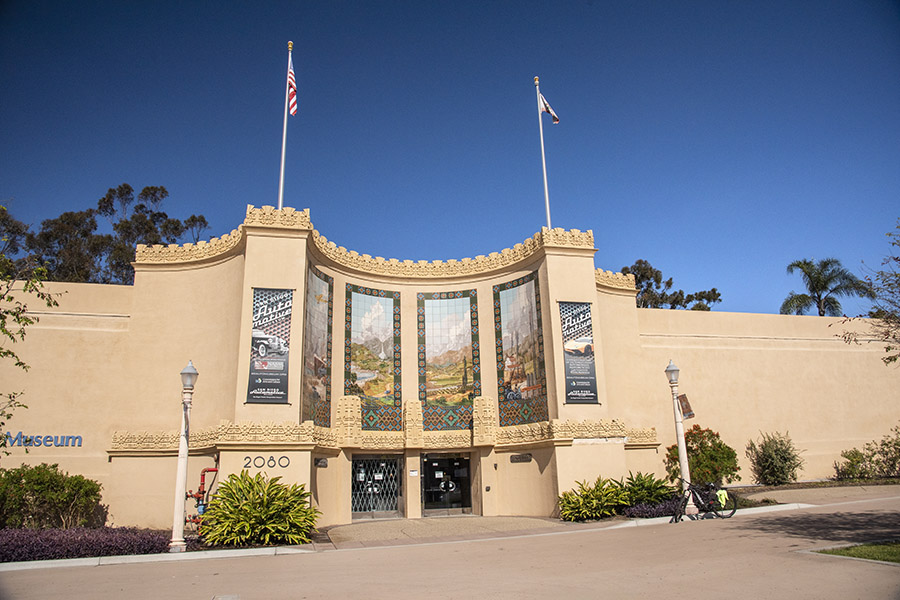
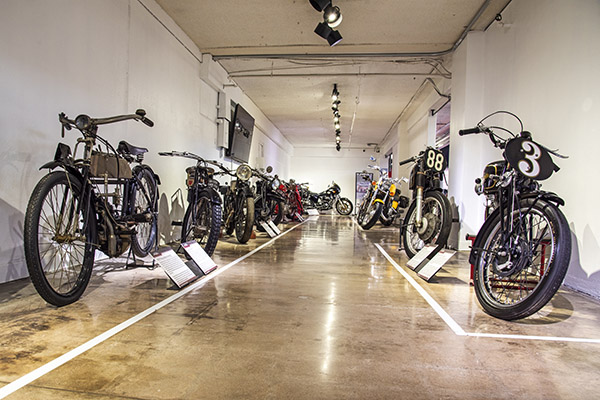
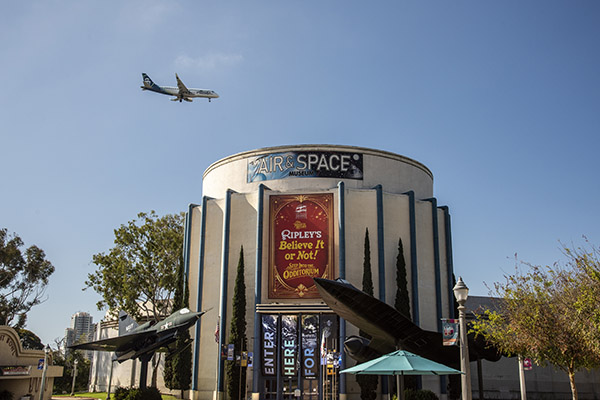
The building you see above is the San Diego Automotive Museum. Take a good look at it…the sculpted trim, the mosaic panels, and its architectural splendor. We’ll touch on those topics again at the end of this post.
Our travels this year have focused mainly on motorcycle museums. Why, then, you might ask, an automotive museum? The name (i.e., an automotive museum) suggests four-wheeled transport. But the San Diego Automotive Museum popped up when I Googled motorcycle museums, and when subsequently searching the definition of “automotive,” I learned that the word can be used to describe anything related to or concerned with motor vehicles, including motorcycles. In the case of the San Diego Automotive Museum, it does indeed relate to motorcycles. In fact, much to my surprise there are as many motorcycles in the San Diego Automotive Museum as there are cars.
The main motorcycle display area in the San Diego Automotive Museum. In addition to the dozen or so motorcycles in this hall, the Museum has other motorcycles displayed in other locations.
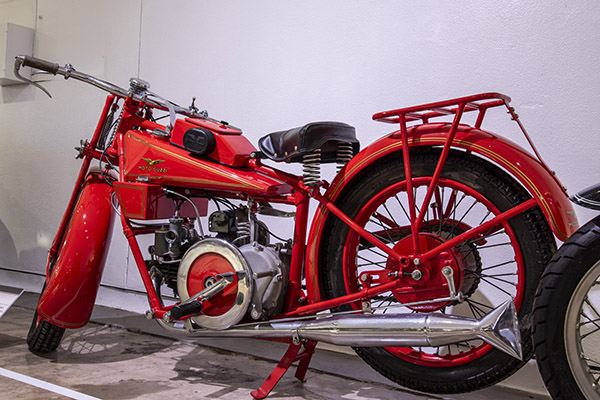
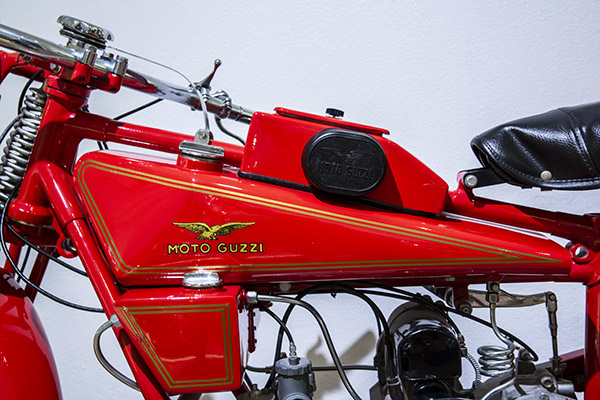
Some of the motorcycles in the display hall were ones I had never heard of, and as a guy who’s been fascinated with motorcycles since the early 1960s, that’s saying something. I’ve been doing some great things with Cycle Garden in Indio, California recently for Motorcycle Classics magazine, and I’ve always been interested in the V-twins from Mandello del Lario, so any day I see anything associated with that marque is a good day. Ever hear of the Dondolino? Yeah, me neither. It almost sounds like an Italian restaurant’s signature dish.
The Moto Guzzi Dondolino, and to be specific, this is a 1951 model. It means a small swing, as one would have for a child. The Dondolino…I like that. Check out the bologna slicer flywheel.Another shot of the Dondolino, this time a close of the fuel tank.
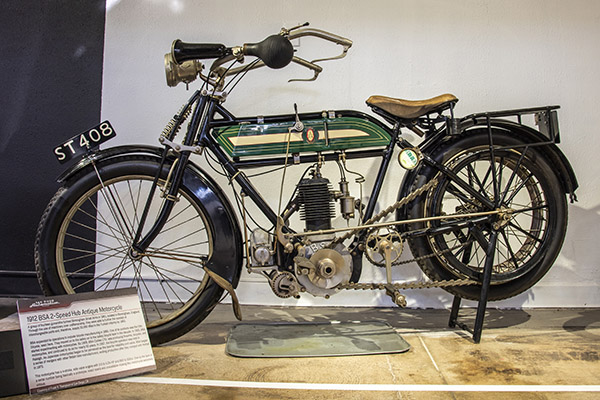
Another one that was fascinating for several reasons, not the least of which was its paint treatment, was a 1912 BSA single. Surprisingly, the Museum operations manager told me flash photography was okay (in most museums it is not). It was hard getting decent photos in the display hall, even though I shoot raw photos (not jpegs), as the raw photo format preserves all photo data (jpegs compress the data). The display hall was lit with tungsten lighting, which always make getting good color balance difficult. Even though the the raw photos allow for color temperature adjustments in Photoshop, it was tough getting these right.
The 1912 BSA single. Check out the bulb horn.
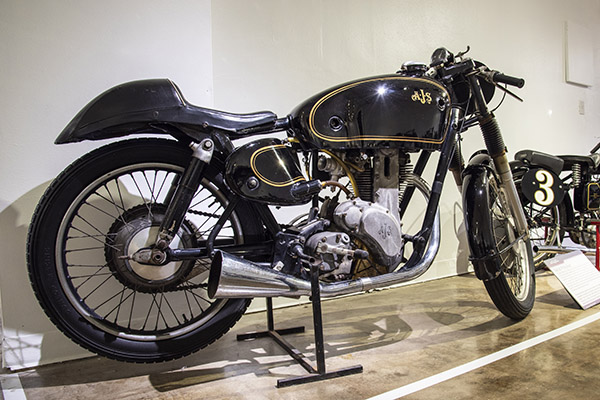
The Museum has a beautiful AJS motorcycle on display. Some of you older folks and more serious students of the motorcycle may know of the original A.J. Stevens and Company of Great Britain, which manufactured motorcycles from 1909 to 1931. AJS sold to Norton, and ultimately became part of Norton Villiers in 1966. That company went belly up a few years ago. Several organizations picked up the Norton name and tried to make a go of it; to my kn0wledge, none succeeded (although I haven’t checked in the last month or so, so maybe yet another Norton-named manufacturer snuck in). The AJS name has been revived as a small bike manufacturer, or rather, a name attached to 125cc motorcycles made in China by Jianshe.
A 1948 AJS 7R “Boy Racer.” The colors are classic. Note the megaphone exhaust.
You know, AJS is indirectly (and partly) responsible for the CSC name. When founded in 2010, today’s CSC was initially known as the California Scooter Company. The California Scooter Company manufactured Mustang replicas (the Mustang was a small American motorcycle made in the 1950s). The name, California Scooter Company, caused us no end of grief because people would look at the little Mustangs and ask, “is it a motorcycle or a scooter?” We always explained how “scooter” was a slang term for a motorcycle. I wanted to tell people they were too stupid to ride if they didn’t know the difference (but in an unusual display of politeness I never did). Ultimately, we shortened “California Scooter Company” to “CSC” based on the industry’s history of three-letter acronyms for company names. You know: BMW, BSA, KTM, AJS, etc. Then the questions changed to “What does CSC stand for?” I couldn’t resist that one and my answer was immediate: Chop Suey Cycles.
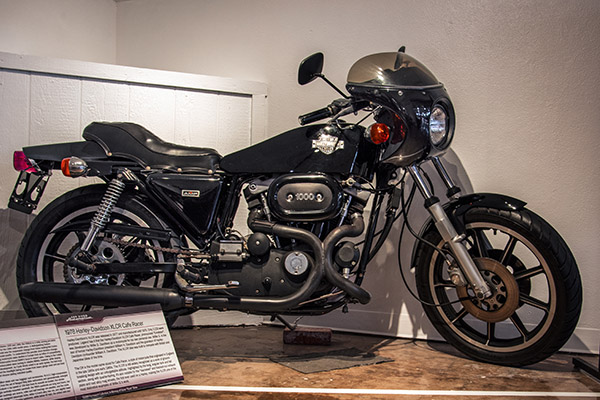
To get back to the main attraction (the San Diego Automotive Museum), both ends of the main motorcycle display hall are anchored by big American V-twins. One is a 1978 XLCR Harley Cafe Racer, which I think is one of the most beautiful motorcycles Harley ever made. The other end of the display hall has a garish chopper, one from a company appropriately named Big Dog. In an act of photographic mercy, I didn’t get a photo of it.
The Harley Cafe Racer. Always wanted one, never bought one. They were a shade over $3,000 in 1978 when new. I came close to buying one back then, but I didn’t pull the trigger.
Moving outside the motorcycle exhibit hall and into the rest of the Museum, as mentioned earlier there are motorcycles displayed throughout the other displays. One of the first is a Dan Gurney Eagle. Dan Gurney was a famous automobile racer who formed a company that mounted Honda engines in a frame in a manner that positioned the rider low in the bike. The seating arrangement was said to improve handling. Maybe it does. To me, it just weird, and rider visibility has to be terrible. I think I would look weird (or weirder than usual) when stopped with my legs splayed out to the sides.
A Dan Gurney Eagle. Weird, huh? The concept never caught on.
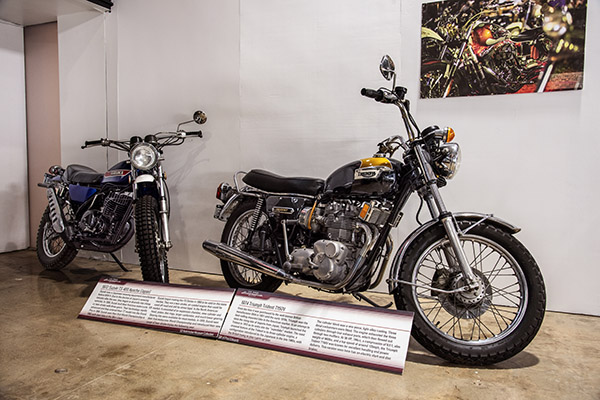
As soon as you enter the Museum, there’s a 1974 Triumph 750 T150V Triple on display (along with a two-stroke Suzuki 400cc dual sport). The Triumph Trident was supposed to be Triumph’s answer to the Honda 750 Four, but it was too little, too late. The Honda was far ahead of its competition. Triumph ultimately went out of business a few years later.
A 1972 Suzuki Apache and the Triumph Trident 750.
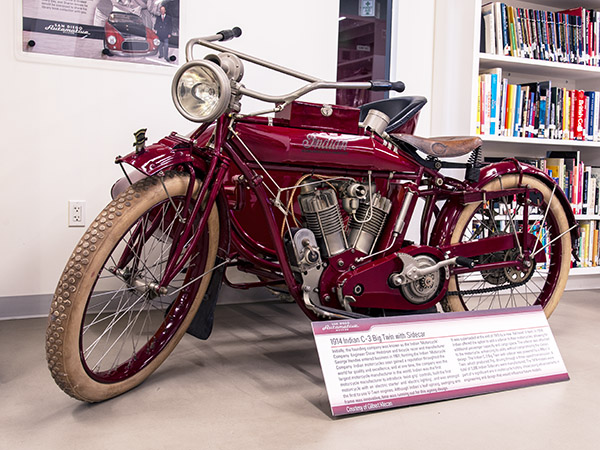
The San Diego Automotive Museum has a library, and our host explained to us that they are often visited by elementary school classes. Students use the library for homework assignments related to automotive topics. There are a couple of interesting motorcycles in the library. One is a Scott two-stroke (another motorcycle I had never seen before); the other is a 1914 Indian V-twin with a sidecar.
A 1927 Scott Flying Squirrel.A 1914 Indian C-3 with Sidecar.
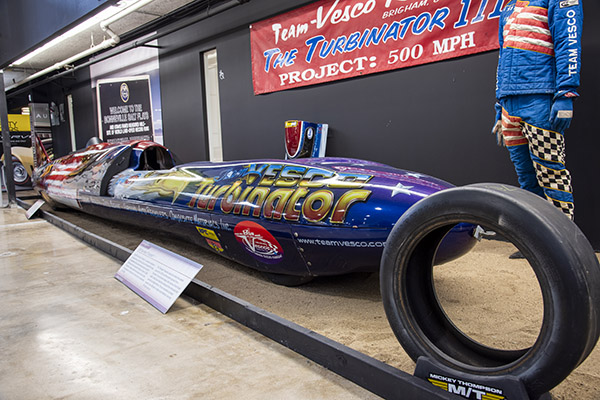
In the Museum’s main display area, there’s a land speed record streamliner that at first I thought was a motorcycle. You know, kind of like the land speed record Triumph that hit 247 mph back in the 1960s (Triumph included a “world’s fastest motorcycle” decal on every bike). But this vehicle wasn’t a motorcycle; it actually had four wheels beneath its narrow body work. The Vesco Turbinator is powered by a helicopter engine, and it set a world speed record for wheel-driven (as opposed to jet propelled) vehicles.
The Vesco Turbinator. It set a world speed record for wheel-driven vehicles, cracking the 500-mph barrier.
I poked around a bit on the Internet and found this very cool YouTube of the Turbinator’s Bonneville speed run:
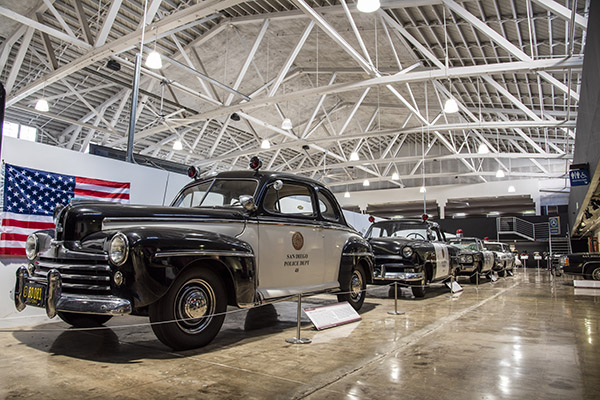
There were several kinds of cars on display, including an interesting collection showing the evolution of police cruisers.
The San Diego Automotive Museum has an impressive display of police cruisers.
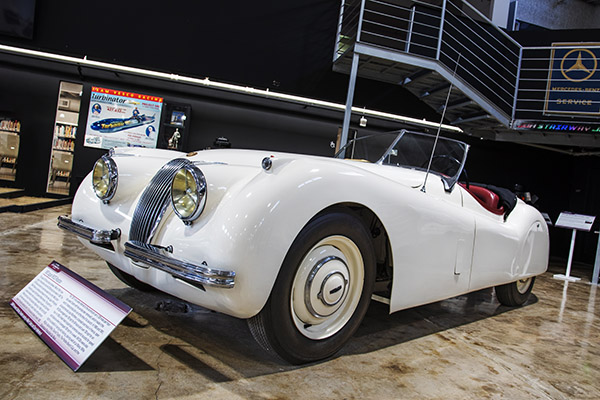
One of my dream cars has always been the XK-120 Jaguar, and the San Diego Automotive Museum had one on display.
This sure is a beautiful automobile.
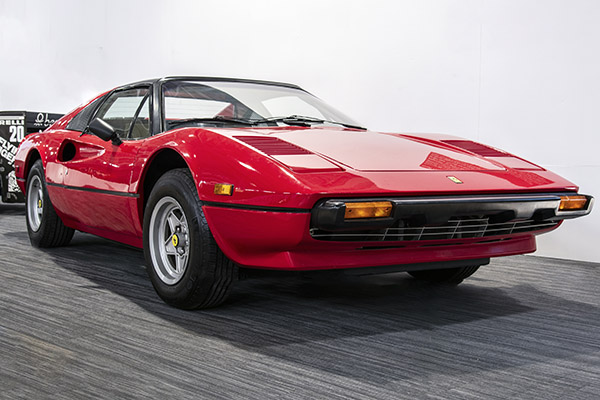
Do you remember Tom Selleck’s first television series, Magnum P.I.? The Museum’s displays include the Ferrari 308 from that show.
Thomas Magnum’s Ferrari. It was beautiful then and it’s beautiful now. I was surprised at its small size.
When I first moved to southern California nearly 50 years ago, we had traffic, but not like we do today. We read a lot of stories about billionaires leaving California, but as far as I can tell, it feels like a lot more people are here now. I think our population is increasing. High density housing and traffic are out of control. Back in the 1970s, it was no big deal to hop on my Electra Glide, head south, and arrive in San Diego two hours later. Today, that same trip is at least three hours, and that certainly was the case when Sue and I visited the Automotive Museum a few days ago. We have more freeways than we did 50 years ago, but the traffic is horrendous and it still takes longer to get anywhere. That said, our ride the other day was an easy hundred-mile stint south on Interstate 15 to California State Route 163, and then a right turn into Balboa State Park.
Although the drive down to San Diego was long, I didn’t mind. It had been at least 30 years since I’ve been to Balboa Park. It’s a national treasure. The Park covers 1200 acres, and it is one of the oldest parks in the U.S. The land was originally reserved in 1835. Balboa Park contains 17 museums and 18 botanical gardens. It also has theaters, restaurants, and the world-famous San Diego Zoo. The whole affair is managed by the San Diego Parks and Recreation Department.
As we chatted with our new friends in front of the San Diego Automotive Museum, they told us about the Air and Space Museum facility originally being built by the Ford Motor Company. It is directly under the flight path in to San Diego’s Airport. From the air, the Air and Space Museum looks like a Ford V-8.
After visiting the Automotive Museum, Sue and I wandered outside and shot a few photos of the building (including the one at the top of this blog). It was a glorious day, the kind that makes living in southern California a treat: 70 degrees, essentially no humidity, and not a cloud in the sky. As I wrestled with the big Nikon 810 and its 24-120 lens, we noticed two older gentlemen sitting at a table in front of the Museum. They watched me taking photos, and that led to a 45-minute conversation about life in general, getting old, being retired, enjoying days like the one we were enjoying, and Balboa Park. The two were both nearly 80 years old. One had been the architect for the Automotive Museum’s remodeling a few decades ago; the other had designed and built the ornate trim you see around the top of the Museum. They regaled us with stories about the Automotive Museum building, the Museum’s donors, and more. It was a pleasant morning, made all the more interesting with this conversation.
The way to take in Balboa Park (if you haven’t been here before) is not to do it the way we did (i.e., driving down for a half-day visit to the San Diego Automotive Museum). A better way to enjoy Balboa Park is to spend several days in San Diego. San Diego is one of the world’s great cities, and Balboa Park is its crown jewel.
You could spend a week just in Balboa Park, but there are many other fun things to do in and around San Diego, many of which we’ve written about before. The San Diego Zoo is one of the world’s great zoos, and it’s good for a full day (or two). There’s the USS Midway Museum, which can only be described as magnificent. The Deer Park Winery and Auto Museum is just a few miles up Interstate 15, with its magnificent collection of convertibles and wines. Mexico is just a few miles south, with Tijuana on the other side of the border, Tecate and its culinary delights an hour or so to the east, and all of Baja starting as soon as you cross the border. Baja is magnificent; it offers some of the best riding in the world. The restaurant scene in San Diego can only be described as spectacular, but don’t get waste time or money in the high-priced tourist eateries in San Diego’s Embarcadero area. If you want authentic Italian cuisine, navigate your way to Volare’s (it’s one of San Diego’s best kept secrets).
So there you have it: The San Diego Automotive Museum and a few other San Diego attractions. If you haven’t been to this magnificent city, San Diego is a destination that should be on your bucket list.
One of the very few areas in which the Ruger Blackhawk design can be improved is cylinder shaft retention. I experienced this problem many decades ago on a Ruger .357 Blackhawk, and back in those days, the easiest thing to do with a problematic firearm was to sell it (that’s not so easy these days). I don’t want to sell any of my guns, especially my 200th Year Ruger .45 Colt Blackhawk. It’s the one you see in the photos above and below.
Before I go too much further, let’s address terminology. The Blackhawk cylinder rotates around a shaft that Ruger identifies as a base pin assembly. That’s okay, I guess; Ruger makes a lot of guns and they can call their parts whatever they want. I tend to use more precise and descriptive terminology. I call the part the cylinder rotates around the cylinder shaft, and that’s what I’ll refer to it as in this blog.
To get the point of this blog, I had a problem the last time I had the Blackhawk on the range (which was only the second I had fired the gun). I shot my 850 fps, 5.9 grains of Red Dot, and 200-grain cast bullet loads (which is a mild load), and suddenly, the gun would not cock. On closer examination, I found that the cylinder shaft had jumped forward. It was the return of a condition I had experienced on another Ruger Blackhawk back in the 1970s and then had completely forgotten about.
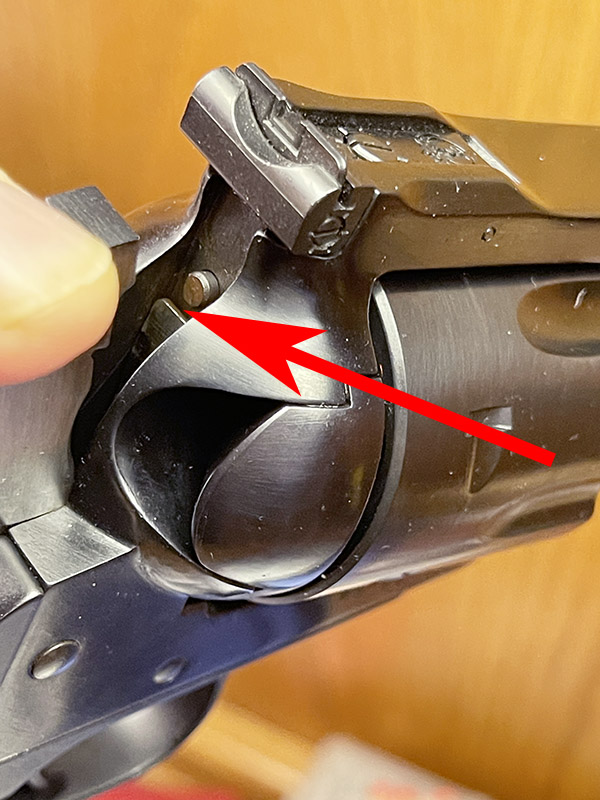
The cylinder revolves around a shaft that is held in place by a spring-loaded, frame-mounted lock. Under heavy recoil, the cylinder shaft wants to stay where it is due to inertia as the gun recoils. The spring-loaded lock engages a notch in the cylinder shaft, and it’s supposed to prevent that from happening. Sometimes, though, the recoil is too much. The spring-loaded lock is cammed out of place by the cylinder shaft inertia, and the cylinder shaft slides forward in the frame.
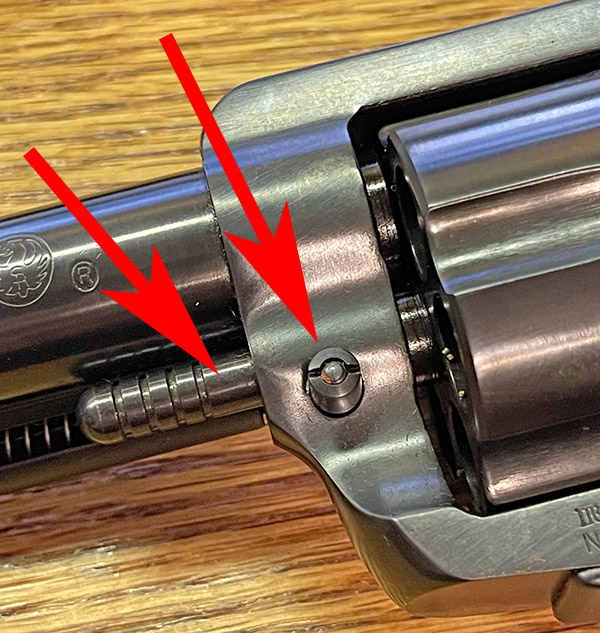
The left arrow points to the cylinder shaft. The right arrow points to the spring-loaded cylinder shaft retention pin. To remove the cylinder, push the retention pin to the gun’s right, and the cylinder shaft can be pulled forward. This allows removal of the cylinder for cleaning.Under recoil, the cylinder shaft’s inertia can cause it to displace the cylinder shaft retention pin, and that allows the cylinder shaft to slide forward in the revolver frame (as you see here). When that occurs, the revolver hammer cannot be pulled all the way to the rear to cock the gun.
When the cylinder shaft slides forward in the frame, the spring-loaded pin at the other end of the cylinder shaft moves forward, too. It shifts to a position that interferes with upward motion of the revolver’s transfer bar when attempting to cock the gun. You can see the area of interference in the photo below.
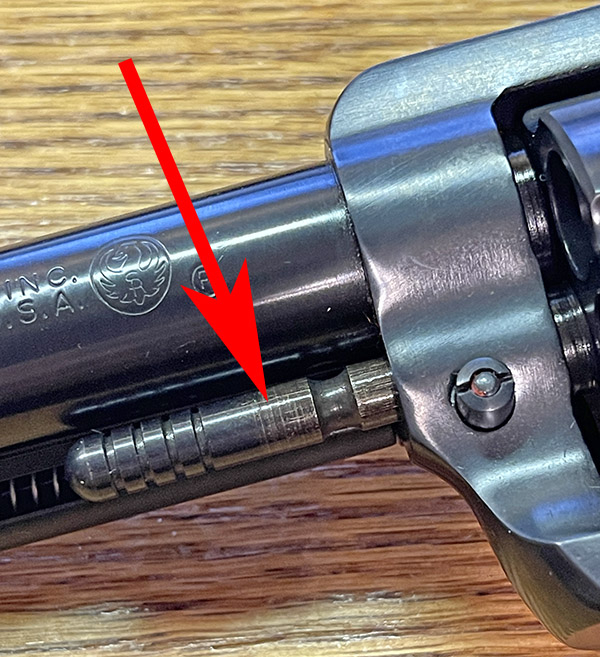
When the cylinder shaft slides forward in the revolver frame, a spring-loaded pin on the end of the cylinder shaft moves with it. When that occurs, the cylinder shaft’s aft end pin no longer pushes on the transfer bar (indicated by the red arrow). The result is that the transfer bar is no longer held to the rear. When attempting to cock the gun, the transfer bar’s upward motion is blocked by the firing pin.
The transfer bar is designed to prevent the hammer from contacting the firing pin if the trigger is not pulled. This feature prevents an unintended discharge is the gun is dropped. The transfer bar is normally pushed to the rear by a spring-loaded pin in the back of the cylinder shaft, but when the cylinder shaft slides forward, that no longer occurs. The result is that the transfer bar (no long held to the rear) catches on the firing pin, and the gun will not cock.
The Fix: The Power Custom Base Pin
So what’s the fix to the cylinder shaft moving forward in the revolver when it recoils? That would be a product called the Power Custom replacement base pin (note that Power Custom uses Ruger’s terminology for the cylinder shaft). I bought one and this blog focuses on the good, the bad, and the ugly (and which, with a nod to Clint Eastwood, somehow seems fitting for a blog on a part that goes into a Western-styled six shooter).
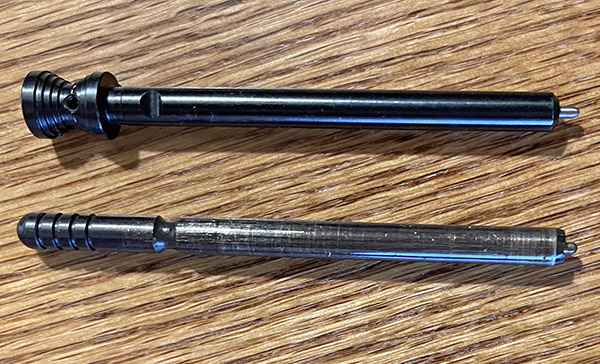
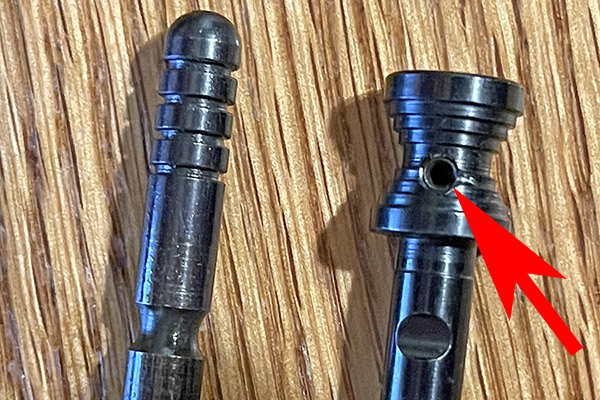
The Power Custom replacement base pin (upper component) and the stock Ruger cylinder shaft. The little pin on the right end of each is what pushes the transfer bar to the rear, preventing interference with the firing pin when the revolver is cocked. Note the Power Custom’s larger grip on the left.
Installation
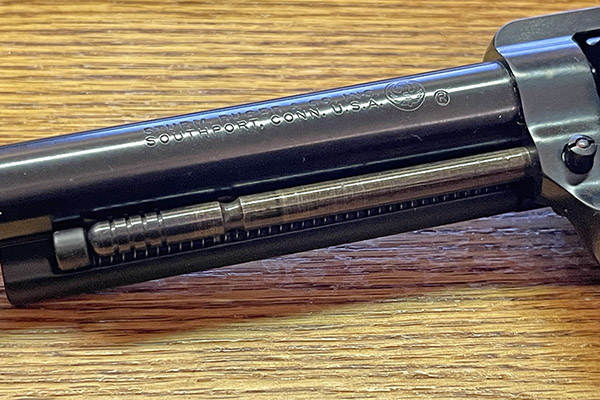
When I started to remove the Ruger’s cylinder shaft so I could install the Power Custom part, I discovered something I had forgotten. The ejector rod subassembly has to come off to allow cylinder shaft removal. Without doing so, the cylinder shaft cannot move far enough forward for removal.
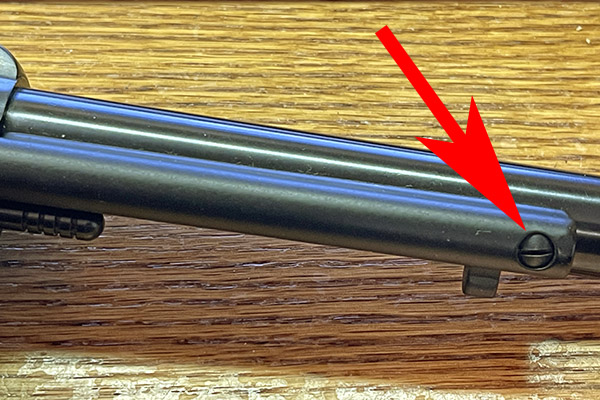
A fully-extended cylinder shaft. The ejector rod and its housing had to be removed to remove the cylinder shaft.The screw that allows removing the ejector rod housing.
Removing the ejector rod subassembly was easy enough to do, and after doing so, I pulled the original Ruger cylinder shaft and replaced it with the Power Custom part.
The Good
The Power Custom replacement base pin (which replaces the original cylinder shaft) has a tighter fit in the revolver frame and the cylinder. The Power Custom part has a diameter of 0.2492 inches; the stock Ruger cylinder shaft has a diameter of 2.480 inches. I could feel the decreased cylinder wobble as soon as I installed the Power Custom part. Theoretically, this should translate into improved accuracy.
The Power Custom replacement has a different, larger-diameter, stepped grip. There’s more to grab onto when you want to slide the cylinder shaft forward to cylinder removal.
The Power Custom grip contains a set screw that can be tightened against the revolver barrel (which I did not use). The idea is the tighter fit and the set screw act to prevent the cylinder shaft from being inertially driven forward under recoil. Power Custom recommends using a drill bit through the set screw hole to spot face the barrel, which would give the set screw a better place to seat. I didn’t like that idea, and I didn’t tighten the set screw on my gun.
A set screw on the Power Custom base pin assembly. I opted not to use the set screw. Note the slot in the Power Custom part for the cylinder shaft release, and note that it is unmarred.
Finally, although the Power Custom base pin has a larger grip, the overall part is shorter in length than the stock Ruger part. This allows greater ejector rod travel, which is better for case ejection. Sometimes with the stock Ruger cylinder shaft, the cases aren’t fully ejected due to carbon fouling in the cylinder, and spent cases have to be pulled manually from the cylinder after they are partially ejected. This shorter overall length is a good idea, I think.
The Bad
I already mentioned the set screw business above, and Power Custom’s barrel spotfacing recommendation. I didn’t like the idea of having to use a set screw.
Power Custom provides a tiny Allen wrench for use in tightening the set screw. With the stock Ruger cylinder shaft, the cylinder shaft can be moved into the cylinder removal position with no tools, and should the need arise, the cylinder can be removed in the field. With the Power Custom part, an Allen wrench is needed. I don’t want to carry around a tiny Allen wrench. Is this a real concern? Maybe. In the last 50+ years, I have had to remove Blackhawk cylinders a time or two while wandering around in the boonies. To me, this is a disadvantage.
This brings us to the principal bad, and it’s my fault (for reasons I’ll explain momentarily): The Power Custom base pin did not reliably stay in place under recoil in my Blackhawk. Note my comment above: I did not tighten the set screw in the Power Custom base pin. If I had, it probably would have stayed put. And on the plus side, it doesn’t jump out of position nearly as often as the Ruger cylinder shaft does.
The Ugly
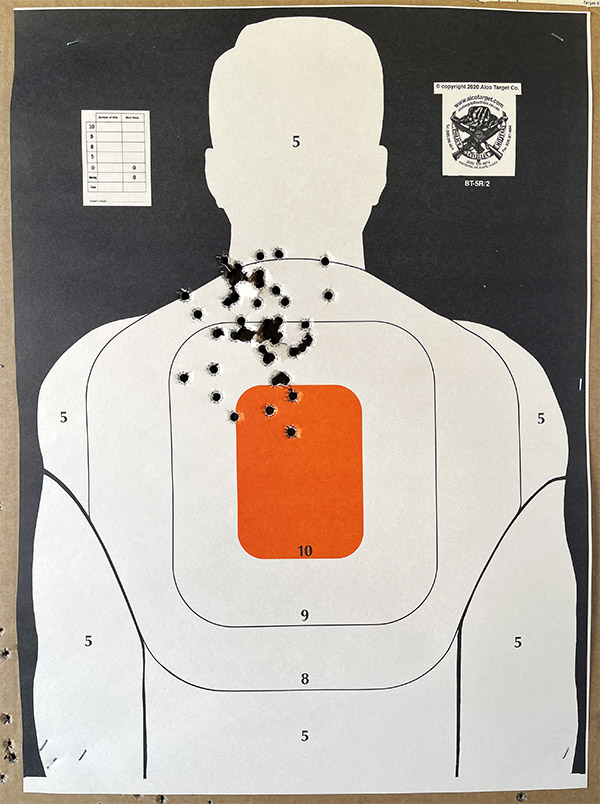
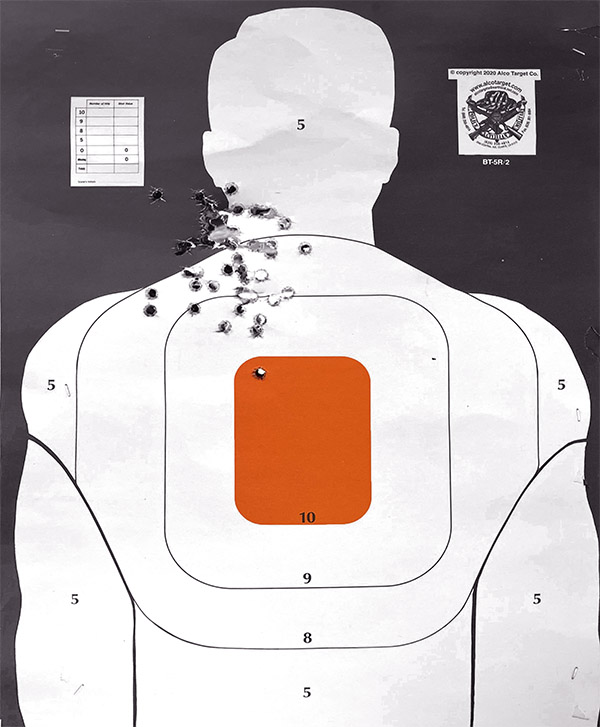
Once the new Power Custom cylinder shaft was installed, I grabbed some ammo and headed to my local indoor range. How did the Blackhawk shoot with its new cylinder shaft? From an accuracy perspective, I could not tell the difference. This is a 10-yard target, depleting a box of my reloaded .45 Colt ammo in the process.
Thanks again, Command Sergeant Major Hickman! My point of aim was at 6:00 on the orange bullseye. At 30 feet, the revolver was shooting high, and the rear sight was all the way down.
During my indoor session on three different targets (using up a couple of boxes of the 5.9-grain Red Dot reloads), the new Power Custom cylinder shaft jumped over the retainer twice. If I had tightened the set screw against the barrel, that probably would not have happened, but to mention it one more time, I don’t like the idea of having to rely on a set screw to hold the cylinder shaft in place.
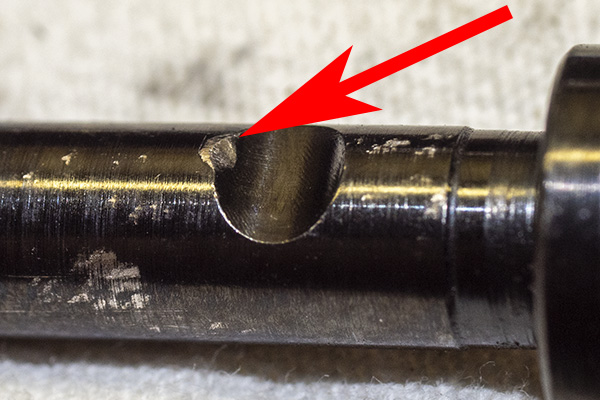
When I returned home, I pulled the Power Custom base pin. I could see that it had deformed slightly in the groove that engages the mating retention feature in the revolver frame. I then pulled the extractor subassembly to get a better photo.
A gouge on the new Power Custom cylinder shaft. It wasn’t there when new (see earlier photo of the new part). I believe the Power Custom base pin steel should be heat treated to a higher hardness. The part’s softness and not using the set screw is what allowed this to occur.
My conclusion is that the Power Custom base pin should be heat treated to a higher hardness. If it had been, it would not have deformed when forced against the revolver’s cylinder shaft retention feature. But that may be irrelevant. The Power Custom base pin’s principal locking feature is the set screw, and I didn’t use it. And as I mentioned above, while it did shift forward a couple of times, it doesn’t exhibit this behavior nearly as often as the stock Ruger component does.
I emailed Power Custom about the deformation I noted in their cylinder shaft, and to the company’s great credit, they put a replacement base pin in the mail to me the next day. That’s great customer service.
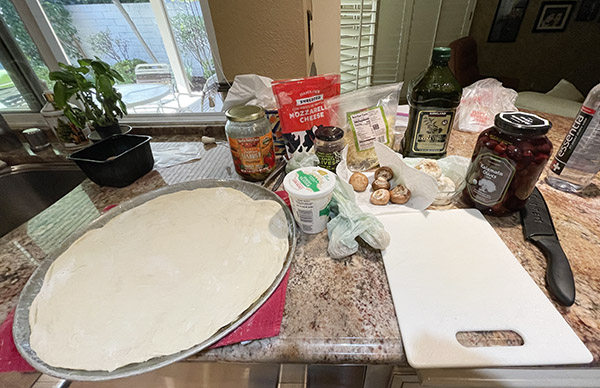
I love pizza. It’s not healthy, but the way Sue and I make it it’s probably healthier than the stuff you get in a restaurant, and it’s definitely way better (and way healthier) than any frozen pizza. Any recipe should start with the ingredients list, so here goes:
Pizza dough. We buy ours from a local Italian deli, Claros, and it makes the best pizzas. If you don’t have an Italian deli in your area, Trader Joe’s has good pizza dough. And if you don’t have a Trader Joe’s nearby, you’re on your own. Don’t give up; pizza dough is not always easy to find. But look around for it. Don’t go with prepared pizza crusts; your pizza won’t be nearly as good.
Olive oil. Don’t cheap out here. Get the extra virgin stuff. Costco has good olive oil.
Garlic. Get fresh garlic and squeeze it with a garlic squeezer. Don’t use the pre-diced garlic. Squeeze it fresh.
Shredded mozzarella cheese.
Shredded parmesan cheese.
Ricotta cheese.
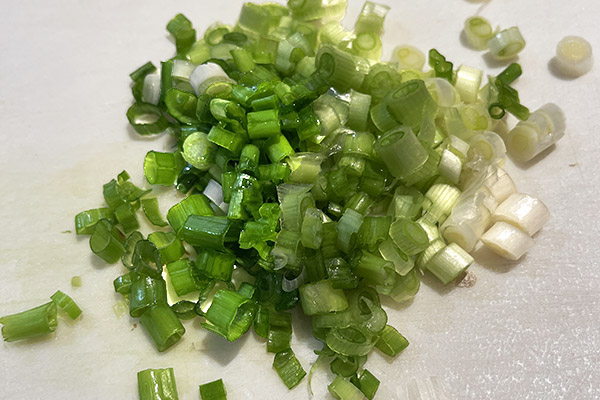
Green onions (also known as scallions).
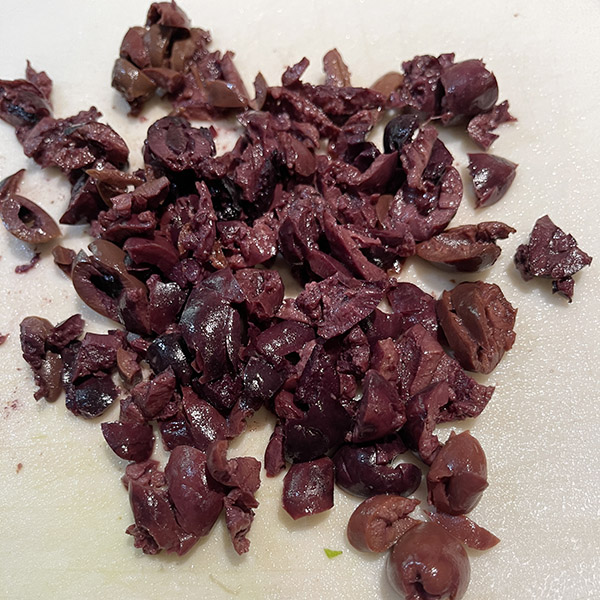
Kalamata olives. Some people like to use black olives instead of Kalamata olives. There’s no accounting for some people’s tastes, I guess.
Large mushrooms (I use 6 or 8, depending on the size of the mushrooms).
Sun-dried tomatoes. Get the kind that are bottled in oil; don’t get the dried kind. We prefer the sun-dried sold by Costco, but our local Costco doesn’t always have them.
Corn flour.
Preheat oven to 475 degrees.
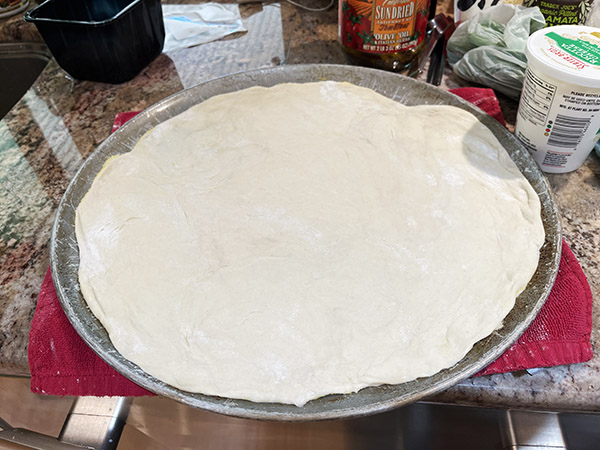
Spread the corn flour on the pizza pan (the idea here is to prevent the pizza from sticking to the pan).
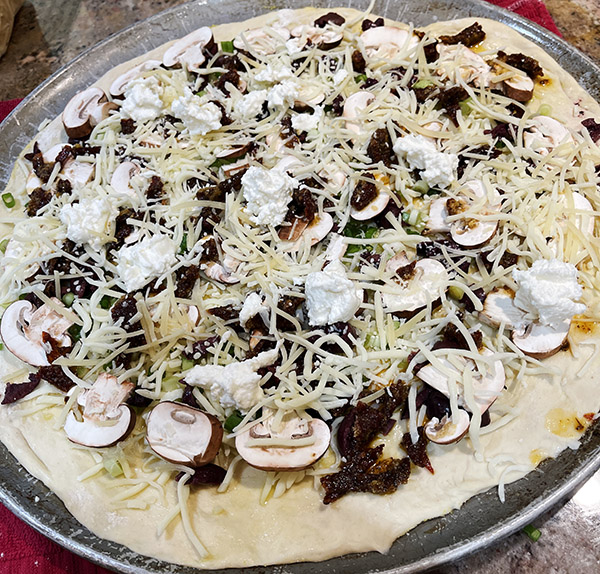
Flatten and spread the pizza dough on a large pizza pan. I like a thin crust, so we make it as thin as we can. It’s probably about 1/8-inch after we do this.
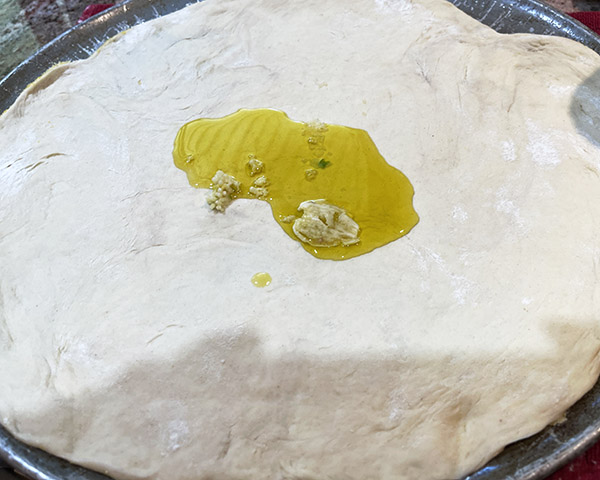
Pour a puddle of olive oil onto the pizza dough so that it forms about a 4-inch circle.
Separate one large garlic clove and use the garlic mincer to mince it over the olive oil. Spread the olive oil and the minced garlic over the entire top of the crust.
Spinkle a handful of shredded mozzarella cheese over the pizza. Don’t get carried away here; less is more. You want the cheese to come close to the outer diameter of the crust.
Dice three or found green scallions and sprinkle on top or the mozzarella cheese.
Chop up 15 or 20 Kalamata olives and sprinkle on top of the mozzarella cheese.
Slice the mushrooms into thin pieces and arrange these on top of the mozzarella cheese.
Sprinkle about 15 or 20 pieces of sun-dried tomatoes on the pizza.
Sprinkle another handful of shredded mozzarella cheese on top of the pizza. Again, less is more. Don’t try to cover the entire pizza with cheese.
Sprinkle about a half a handful of shredded parmesan cheese over the top of the pizza.
Dab about 20 quarter-to-half teaspoonfulls of Ricotta cheese on top of the pizza.
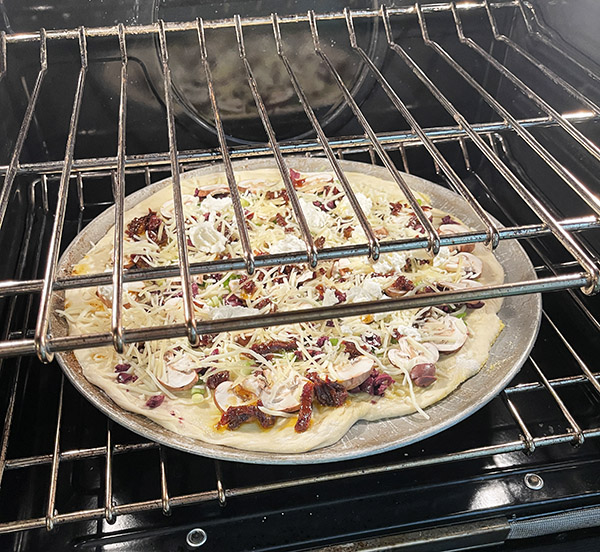
Place the pizza in the preheated oven. In our oven, it seems to heat more evenly with the pizza on the bottom rack.
We bake our pizza for 14 to 15 minutes. This cooks everything through and lightly toasts the cheese.
Remove the pizza from the oven and allow it to cool for a few minutes. Slice it with a pizza slicer and serve.
It seems like a lot of work, but making a pizza like the one you see above only takes about 30 minutes, and the pizza is outstanding. It goes good with a salad, a glass or red one, or maybe a Peroni. Try it. You can thank me later.
Other ExNotes Recipes
Yep, we’ve got a few, and we’ll have a few more in coming weeks.
We have several recipes planned, too. These include grilled salmon, Italian stuffed shells, bacon-wrapped filet mignon, chile relleno, fish tacos, stuffed orange roughy, and more.
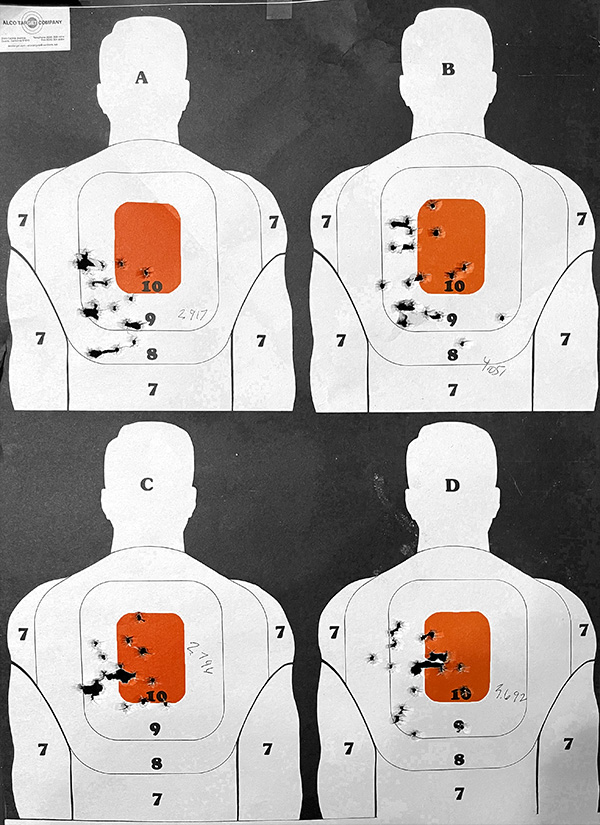
Here’s the bottom line upfront: Don’t expect stunning accuracy from DKC’s 9mm bullets.
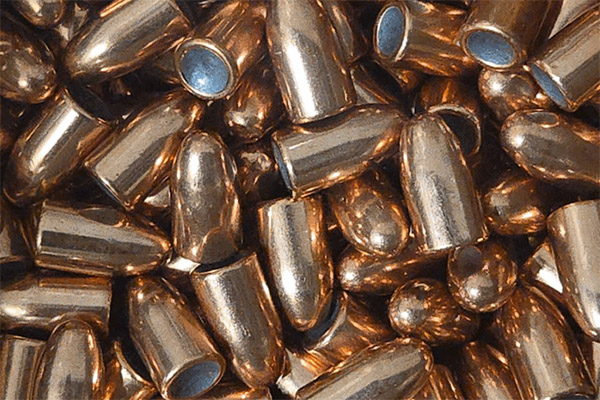
I bought 1000 of them from Raven Rocks after watching a YouTube video about FBI handguns and ammunition, in which an FBI ballistics expert explained why the FBI uses 147-grain bullets in their 9mm Glocks. The YouTube fellow didn’t specify which 147-grain bullet the FBI uses, although a friend later told me it’s the Speer Gold Dot. The DKC bullets I bought were cheap at $98 per 1000, and my testing showed why. You get what you pay for. Sometimes.
Full metal jacket, 147-grain, 9mm DKC bullets.
DKC is relatively young Turkish ammunition and reloading components manufacturer. One of their importers is Raven Rocks here in the US. I’ve ordered components from Raven Rocks before (in particular, their composite 9mm and .45 bullets) and I’ve been pleased with the results. I was hoping the same thing would happen with these 9mm full metal jacket bullets, but it was not to be. Win some, lose some.
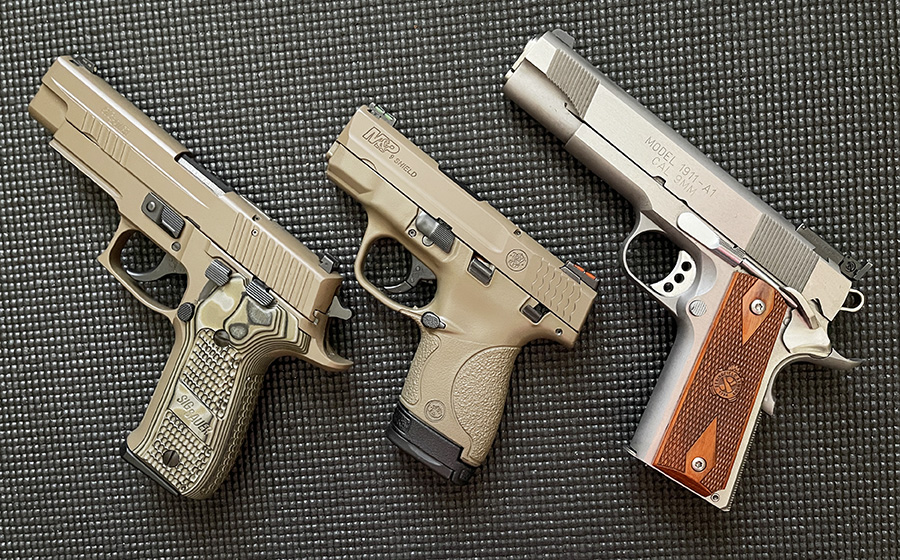
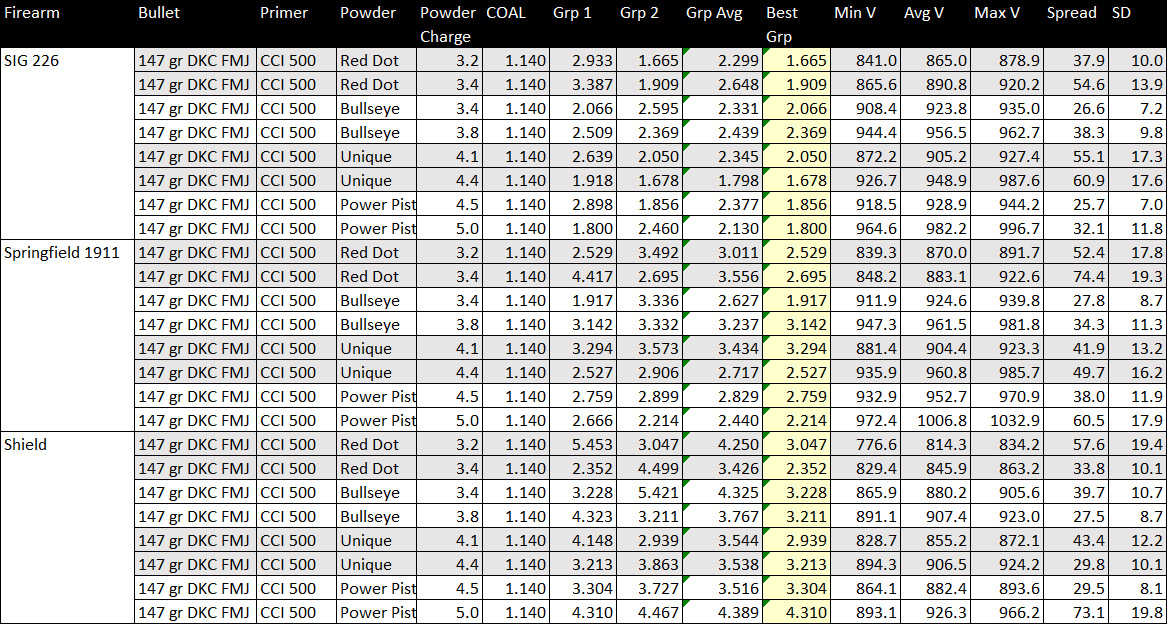
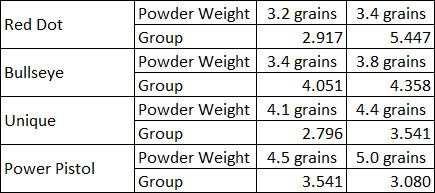
I fired my 9mm DKC bullet handloads at the West End Gun Club using the 147-grain full metal jacket bullets. I tested the bullets in three different handguns (a Springfield 1911, a SIG P226, and a S&W Shield), with a light load and a heavier load for each of four different propellants (Red Dot, Bullseye, Unique, and Power Pistol). For the initial accuracy testing, I shot two 5-shot groups at 50 feet for each configuration.
How did the new bullets do? All the 50-foot groups were disappointing from an accuracy perspective. A few of the groups dipped below 2 inches, but most were above (and some well above), and at 50 feet, that’s not the kind of accuracy I’m used to. Here’s how it shook out:
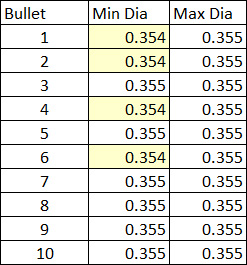
The results. I fired 400 shots in total for this blog’s test series. I used my Garmin Xero to chronograph the velocities. Click on the table to make it bigger.
The above table is data intensive and correspondingly small (ah, if only my groups were the same). If you click on the table, it will open in a new window and be a little easier to read.
You can see from the above that the group sizes generally were mediocre to poor. As a point of reference, what I consider good is a group of an inch or less from a 9mm at that distance. None of the loads I tested met that threshold.
I added a column to show the best of the two groups fired for each load in each pistol (this is highlighted in yellow), thinking that maybe it was my shooting that returned the mediocre groups and this might give a better feel for what worked best. None of the groups met my 1-inch threshold. I had been h0ped that a few of them would, as had occurred when testing previous 9mm loads (see, for example, A Tale of Two Nines, A 9mm Comparo: Cast Bullets, and A 9mm Comparo: Jacketed Bullets). On the plus side, all the loads functioned all three handguns reliably. There were no failures to feed and no failures to extract. I guess that’s something.
Surprisingly (especially when considered in light of the mediocre accuracy), the velocity standard deviations were all relatively low, and in some combinations, surprisingly low. Bullseye was generally the winner from a standard deviation perspective, although its low standard deviation did not translate into superior accuracy.
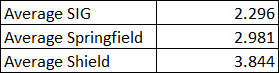
I averaged all groups for each handgun (both high and low loads and the different propellant loads). Predictably, the SIG returned the best groups overall, and the short-barreled Shield was the worst. The SIG has always been a stellar performer.
Average group sizes for all loads in each pistol.
I then considered the results across the three pistols to try to select a powder that I could use for all three handguns. To do this, I averaged the three pistol’s performance with the light Red Dot load, the average performance with the heavy Red Dot load, etc. Nothing emerged as a significantly better accuracy load, as you can see below.
Average group size for different loads across all three handguns.
By this time, the data were confusing me. I was also feeling my age a bit, thinking maybe my old eyes just aren’t what they used to be.
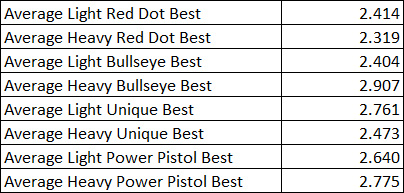
At the end of the session, I had 20 rounds left in each load combination. I fired the heavy loads (for each powder) into each of four targets at 50 feet using the SIG only. By this measure, the heavy Power Pistol load had maybe the best group. I didn’t do the same for the other two handguns. The Power Pistol load had perceptibly heavier recoil, and it averaged over 1000 fps (a lot, I think, in a 9mm 147-grain load). I don’t know if I want to subject an aluminum-framed handgun to a steady diet of this load (see my blog on the Smith and Wesson Model 59).
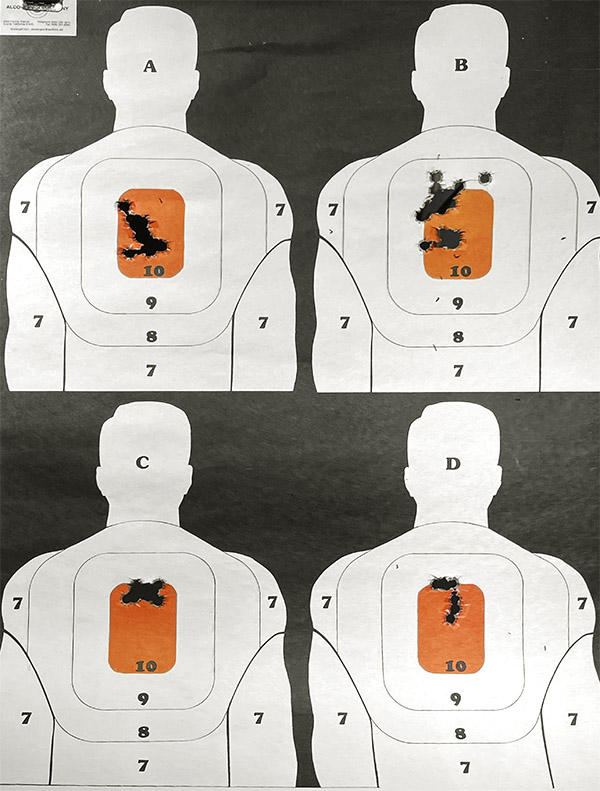
The targets you see above are (clockwise from top left), the heavier Red Dot load, the heavier Bullseye load, the heavier Unique load, and the heavier Power Pistol load. If you eliminate the one or two flyers in each group, there’s not a lot of difference between any of the heavier loads.
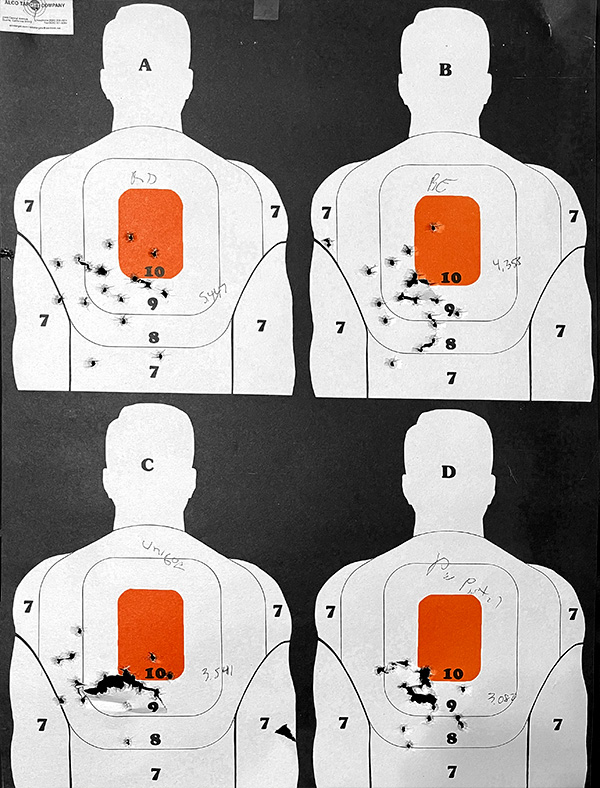
I also had 20 rounds left for each of the four loads at the lower end of the propellant charges. I took these 80 rounds and one of the Alco mini-4 silhouette targets to my indoor range. I again fired all rounds through the SIG, shooting the groups you see below at 10 yards. Here’s what that target looked like:
These are targets shot at 30 feet with 20 rounds each of the lighter loads. Clockwise from top left, these were shot with the lighter Red Dot load, the lighter Bullseye load, the lighter Unique load, and the lighter Power Pistol load.
The experimental design for the lower and higher load comparisons with the SIG you see above would probably earn a failing grade from a competent statistics professor. The sample size is too small, I shot at different distances for the higher-level loads versus the lower-level loads, and I probably broke one or two other statistics rules. That notwithstanding, here’s a summary of what the group size data looks like:
Data from the above two targets summarized in tabular form.
Where’s all this going? The bottom line is none of the results were anything to write home about. Why, I wondered? Other 9mm loads had done significantly better.
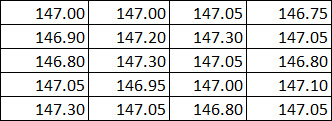
To further assess why my results were as mediocre as they were (and recognizing but not fully accepting that 100% of the mediocrity could have been due to me, the shooter), I next evaluated the bullets themselves. The first parameter I measured was bullet weight. In a random weight sample of 20 DKC 147-grain 9mm bullets, here are the weights I recorded (all weights are in grains):
Weights for 20 of the DKC 147-grain 9mm bullets.
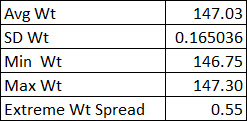
That first bullet was right on the money at 147.0 grains, so I thought these would prove to be good bullets from a weight variability perspective. But I was wrong, as the remaining measurements above showed. Here are the particulars on weight variability:
Bullet weight variability parameters.
I think that half a grain weight variability (0.55 grain, to be exact) is a lot for a jacketed pistol bullet. I would have expected the weight to be within ±0.1 grain, so an extreme spread of 0.55-grain is not good. It’s also not likely that the weight variability is symmetric to the bullets’ axes, which further aggravates the problem. As the bullet spins, any weight asymmetry will induce larger group sizes.
That had me wondering about bullet diameter. After zeroing my calipers, I measured the diameter of 10 bullets. Note that these are stated by the supplier to be 0.355 inches, which is what I would expect on a 9mm jacketed bullet. Here’s what I found:
0.355 inches in diameter? Guess again, Bullet Boy!
Damn! Four of the ten bullets I measured were out-of-round by 0.001 inch (these are Bullets 1, 2, 4, and 6), and where this occurs, they are undersized. Small wonder the group sizes were not that good. The undersized bullets would have rattled down the bore, with perhaps some propellant gas sneaking around their periphery. I think the reason the hotter Power Pistol loads did a little better is the higher chamber pressure probably deformed the bullet to fill the bore better.
Here’s the bottom line from an old ordnance engineer: These bullets are (ah, what’s that ordnance technical term again…oh yeah, I remember): MAB (or mediocre, at best). They are cheap at $98/1000, but in retrospect, they are at best plinkers, nothing more. Maybe I’m expecting too much. Maybe a 9mm handgun just won’t group that well with a 147-grain bullet. I don’t think that’s it, though. I’ve done better with other 9mm 147-grain bullets.
I relayed the above results to a few of my buddies and one of them asked me if he could have some of the DKC bullets because, as he put it, he is more of a plinker than a wannabe ballistics engineer (like yours truly). Done and done, I immediately answered. Then the question becomes: How should I load the rest of these bullets? I still have several hundred left.
I realized this would not be a decision based on accuracy, as none of the different recipes I tried resulted in impressive accuracy. I don’t need big time penetration and I don’t need high velocity, as I’m not an FBI agent preparing for a rerun of the Miami gunfight. I decided I would go with a load that offered:
A low velocity standard deviation (which held at least a promise of better accuracy).
Reliable performance.
Lower recoil.
A load that was adequate (if not stellar) across all three 9mm handguns.
Any of the loads I tested with the 147-grain DKC bullets meet the above criteria, so the choice came down to which powder I had the most of on hand. That made it easy. I’m going with the lower Red Dot load of 3.2 grains. That will give me just under 900 feet per second from the 1911 and the 226, and just over 800 feet per second in the Shield. That’s as good as or better than a .38 Special with a comparable weight bullet, and the .38 Special is a great cartridge. I’ll be flush with these 9mm handloads for a while, and then I won’t buy any more of the 147-grain DKC bullets.
I like to read, and when I hear about a good book, odds are I’ll pull up Amazon and order a copy. The Wall Street Journal had a positive review on Operation Wrath of God, and that was enough for me. The WSJ is the only paper we take any more, having given up on the LA Times, the NY Times, and local Daily Bulletin rag. The other papers were just too biased in their reporting (and people wonder why print is dead).
Operation Wrath of God is about secret ties that have existed for decades between the Israeli Mossad, the European intelligence services, and our intelligence community. The premise is that although the Europeans were outwardly incensed when the Israelis struck back at the terrorists for the Munich massacre (and continued for years to do so on European soil), they (and we) continued to share current intel on their whereabouts. On the Munich massacre, you may recall that was when the bad guys murdered Israeli Olympians.
Even though European governments and their press had their noses bent out of shape at the retaliatory Israeli actions, these same European governments continued to provide the Israelis detailed information about where the terrorists were located. Basically, the Europeans made things a lot easier for the Israelis to strike back, even though European governments publicly condemned the Israelis for doing so. The author makes the case that the Israeli Mossad provided such good intelligence on nearly everything going on in the world, it made sense to keep the lines of communication flowing both ways.
The book covered essentially all the major Israeli intelligence operations related to the Israeli payback, and parts of it read almost like a novel. That’s the good news in this book review. The bad news is that a lot of the book is painfully redundant. I found myself annoyed at reading essentially the same stories two or three times. The text comprises 255 pages (with another almost 90 pages of acknowledgements, citations, and index materials). I think the same information could have been presented much more concisely.
That said, Operation Wrath of God was a good read and I’d recommend it to anyone interested in these topics. I’m glad I bought it.