ExNotes Review: Motorcycle Camping Stoves

In 1975 Greg Smith and I went on a long motorcycle ride. Greg had one of the first Goldwings, a pretty metallic blue motorcycle with a Windjammer faring. I had a BMW R75/5 also with a Windjammer faring and Samsonite bags. The ones with the soda machine, round key lock to hold the bags into the frames. We visited 41 US states and were on the road 3 months: Florida to California to Canada to Maine and most of the states between the coasts. In all that time I think we stayed in a motel three times; the rest was camping. Mostly we stayed at state parks for a dollar or commercial campgrounds with showers and toilets at the cost of around 2 dollars a night. If it was late or we were lost we would pull off the road and find an out of the way place to set up our tents. If it was really late or we were tired we would toss our sleeping bags on the ground and sleep just about anywhere.

Modern campgrounds are more like mini subdivisions now and the huge RV’s jammed cheek to jowl cost way more than houses did in 1975. But when we were discovering America on the Goldwing and BMW, tents were still popular. People camped out of their cars. KOA campgrounds were a luxury stay with plenty of hot water and clean bathrooms. We were on a strict 10 dollar-a-day budget back then, so eating at a restaurant was off limits except for cheap fast food places. We cooked all of our breakfasts and dinners. It was fun.

The very first motorcycle camp stove I bought was a Peak 1. Greg had one too.

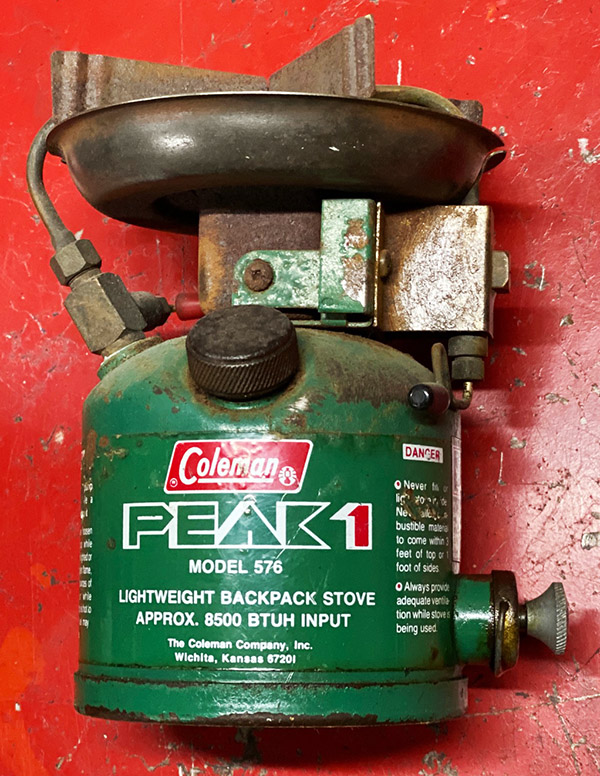
New, the Peak 1 cost like 20 dollars, which was a huge amount of money back in 1975. I had bought many motorcycles for less money. The Peak was worth it, though, and has proven to be indestructible. It still works fine some 47 years later. Starting the Peak 1 has never been a simple process. You pump up the tank pressure and fiddle with the two fuel levers (instructions are printed on the side) and then a big yellow flame erupts from the stove. After a minute or so it settles down and you flip the small lever to normal operation. To adjust the flame use the long lever.

My Peak could use a new pump diaphragm but with determined pumping you can build enough pressure to light the thing off. After the cross tube gets hot the stove makes its own pressure. The colder it is the harder the stove is to start but it has never failed to start. The Peak 1 burns Coleman stove fuel or some stuff called white gas. White gas was available at many gas stations in the 1970’s so it was easy to fill the little tanks on our stoves for a few cents. A full tank would last a week of meals and coffee.

The Peak 1 is sort of big and heavy; I wouldn’t want to backpack with the thing. I don’t think gas stations sell white gas any more so you need the Coleman fuel. Any Wal-Mart has Coleman fuel. I used the Peak for many years until motorcycle camping became less likely to happen and I shoved the old warhorse onto a shelf.

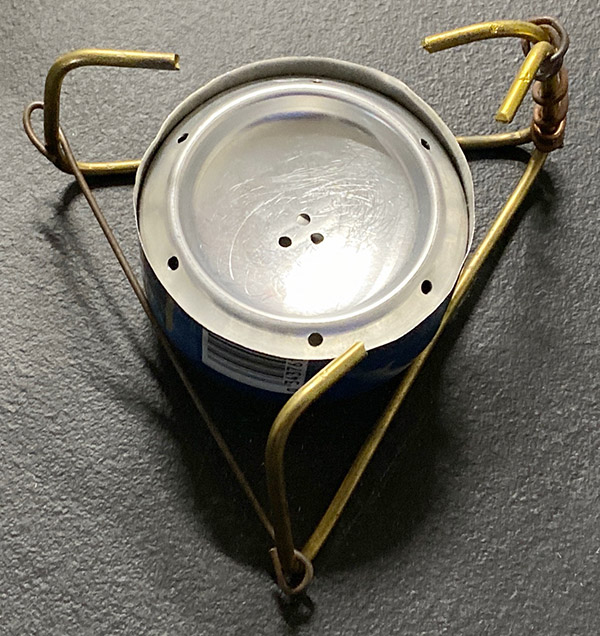
For economy, nothing beats a penny, beer-can stove. They cost nothing. These little alcohol-burning stoves are super lightweight, probably the lightest you can get. You can’t buy a beer can stove, you’ll have to make one and YouTube has probably 1000 videos on how to build your own. The Cliff’s Notes version is you cut two beer cans and fit the two bottom bits together. Then you punch some holes for the flames to shoot out and a hole for filling the contraption. The penny serves to slightly pressurize the stove for a nice long flame. You’ll need some rocks or a wire frame to hold whatever you’re cooking. I used a bit of bent brazing rod.

Fuel for the stove is available everywhere. Drug stores, liquor stores (Everclear), auto stores (Heet) alcohol is ubiquitous in our country. The way it works is you fill the stove with a few ounces of alcohol, put the penny in the middle and light it up. The one I made lights easily.  Some builders complain about hard starting. One fill up will boil a quart of water and burns for 12 minutes or so. The beer-can stove has its drawbacks. Once the thing is lit you don’t want to move it or tip it over. It’s all too easy to set your arm on fire. Don’t try to conserve fuel, let the stove run until it’s out of alcohol. Lastly, the stove is fragile and easy to crush: pack accordingly.

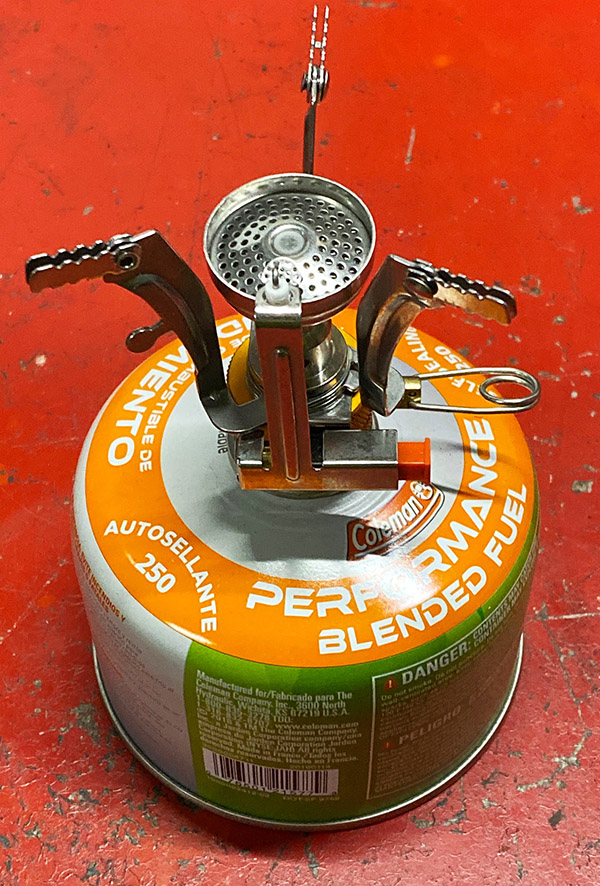
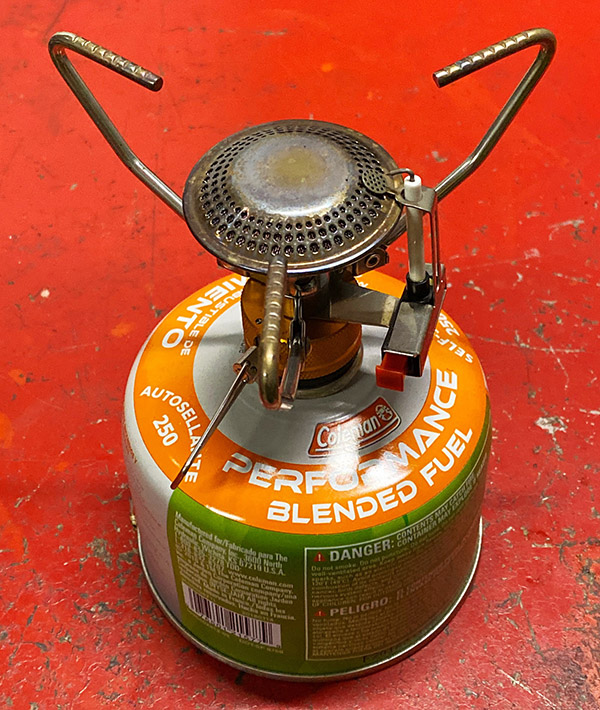
Now we come to my favorite stoves: these little butane stoves cost between $10 and $15 on Amazon. They are extremely compact, like beer can stove size but not as light weight. They use slightly hard to get butane canisters (Walmart again) but they start easily and boil water fast. I have two sizes. The larger one was the first type I bought and it’s now my go-to motorcycle camping stove. My buddy, Mike, bought the smaller burner so I had to get one, too.  They’re cheap. The small one will fit anywhere.  Folded up it’s about the size of your thumb after you smashed your thumb with a hammer. The larger one actually works better because the flame is spread over a larger area. Water seems to heat faster with the big one but I haven’t timed it.

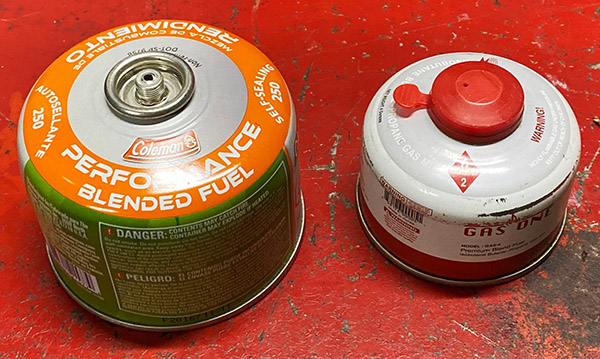
You can get butane fuel in several sizes. For a short, 2-3 day camping trip the small canister will do. Oddly, the large canister of butane costs less than the small one and it’s good for a week of camping. When I pack for a motorcycle camping trip I try to save space everywhere. It kills me to pay more for less fuel.

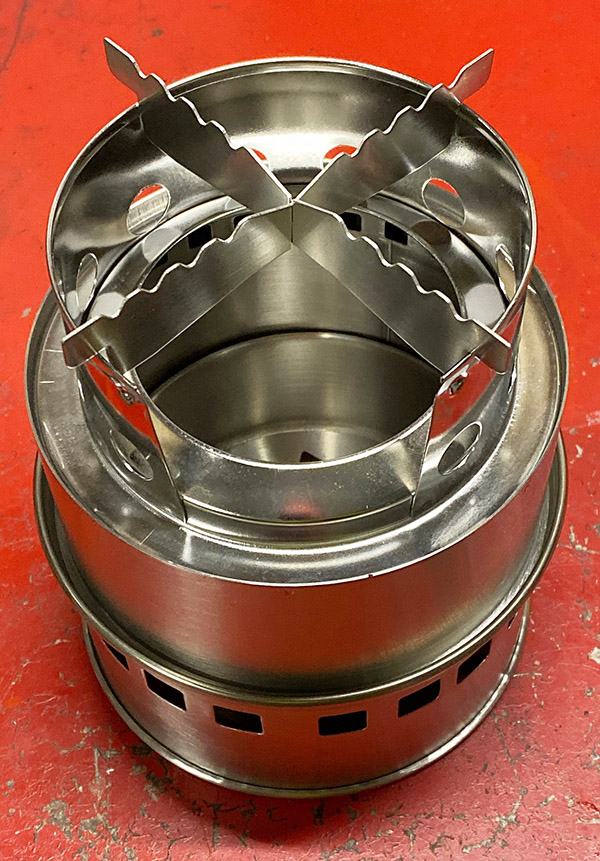
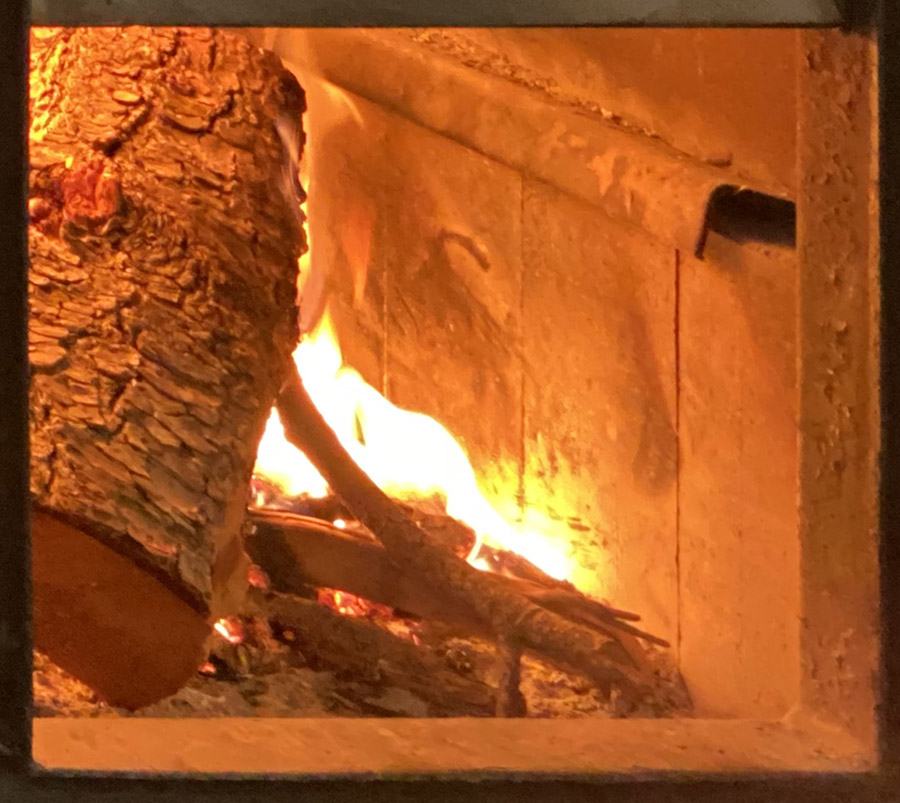
My newest stove is this wood burner. It’s so new I haven’t even used it yet. It’s bulky but not so heavy. The photo shows the stove fully assembled and ready for use, it breaks down to about 1/3 the size for packing. The big idea behind this stove is you don’t need any fuel to run the thing. Wood twigs, leaves, bits of brush, anything that will fit in the stove and burn are fair game. The stove is designed with side-draft vents to help cut down smoking. I got it because I like the idea of free fuel in an unlimited supply. I’ve yet to camp where there wasn’t enough stuff on the ground to make a pot of coffee. The top is cut away so you can feed a steady supply of soiled baby diapers, 12-pack Budweiser cardboard cartons and discarded Covid facemasks into the beast. Cook your dinner and clean up the environment at the same time! Drawbacks are you have to use the stove outside. No brewing a nice cup of Batdorf & Bronson coffee in the motel room.

There are many other types of small camp stoves. Everyone is trying to design a better, smaller, lighter stove. Some stoves cost hundreds of dollars. That’s not my bag, man. I guess I am into motorcycle camping stoves like Berk is into armaments: a stove for every pot, as it were.

Resurrections, KLR250 Part 5: Two Steps Back

In Part 4 of the KLR Chronicles I managed to damage the water pump oil seal. Never one to stand pat, in Part 5 I damaged the new water pump ceramic seal. It wasn’t easy and I’m still not sure how it happened.

After cleaning off the old gasket material stuck to the clutch cover I managed to get the new oil seal installed without drama. Next I used a suitable sized socket to pound the new ceramic seal into the water pump housing. This all went well and as such was probably where I broke the seal.

The clutch cover has two locating dowels but the gasket was sort of floppy and would slip out of place when I tried to install the cover. I ran down to NAPA and picked up a can of spray gasket High Tack goo and used that to hold the gasket while I messed with the cover.

Reassembling the mess was easy from then on and I filled the radiator with new coolant expecting success. I took the bike for a short ride and dammed if the water pump wasn’t leaking worse than when I started. Resigned to never getting the bike going I removed the water pump cover and water pump impeller. I thought maybe the impeller o-ring was the culprit so dismantled the cover and replaced the o-ring and tried again. It still leaked. Dismantling the pump for third time was when I found the crack.

The ceramic seal is a multi part extravaganza consisting of a flat seal area, a spring, a rubber bellows and the metal ring part that fits into the housing. I tried pulling the ceramic part off but it just crumbled. It took a bit of tugging to remove the bellows and spring from the metal. And then I remembered that when I removed the old seal the spring, bellows and seal fell out into my hand. This made me think that the old seal wasn’t leaking at the ceramic interface and, in fact, was leaking between the bellows and the metal ring part.

If you’ve followed my mechanical exploits you can guess what happens next. I cleaned the metal ring (still stuck in the housing) and the old seal bellows. Then I blobbed black RTV silicone on the ring and glued the old seal/spring/bellows into the new ring.

And it worked! The water pump no longer leaked. This kind of repair is not the sort of thing you want to rely on 50 miles out into the desert so I’ll have to order yet another water pump seal. This time I’ve got an idea and will try something different to remove the metal ring. I hope to not pull the clutch cover again. We will see.


More Resurrections are here!

ExhaustNotes Travel: The North Rim

Berk recently did a story on the Grand Canyon and I have visited the park many times. I’ve never made it to the North Rim however, and a trip to Las Vegas, Nevada was a wonderful opportunity to check out the other side of that great big hole in the ground as it was practically on the way. If you plan on going know that the North Rim closes around the end of November. When we arrived a few days before Thanksgiving the ranger station, restaurant, gift shop and lodge were all closed. The park was still open but the place was deserted. Only us and a few other cars were at the park that day.

National Park fees are getting kind of pricey.  35 dollars was the day pass fee except there was no one to collect the money. There was an electronic-pay box near the Ranger Station. Several of the other visitors were poking and prodding at the box but no one was having any success actually paying. Payees would stab their card in and look to the waiting customers as if to say, “What do I do now?” Someone else would try to help the lost soul but we were getting nowhere. I never got a chance at the box because we decided it must be out of service and besides we were just taking a drive through.

The North Rim is quite a bit different than the South Rim. For one, it’s about 1000 feet higher in elevation. The slope is different also: rain water on the North Rim flows into the canyon while rain water flows away from the canyon on the South Rim. What this means is that the South Rim is relatively straight along the edge with many places to pull over and gaze at the canyon, The North Rim has fjord-like canyons that intersect the Colorado River gorge at right angles so getting to view points means longer drives and some backtracking to get to the next one. There are fewer car-accessible spots on the North Rim and in fact most of it is hiking material. I don’t hike.

There are supposed to be bison running around but except for chipmunks we saw very little wildlife mostly due to the onset of winter. The critters were probably settling in snug somewhere we couldn’t see. The view points may be fewer but the views are still spectacular at the North Rim. My cell phone camera was dwarfed by the immensity of the scene and the photos you see in this story reflect that tiny little sensor.

The North Rim is kind of far from anywhere; the closest lodging we could find was at the Jacob Lake Lodge. The Jacob Lake Lodge is an all-in-one resort with rooms, a gift shop, a nice place to eat and a gas station. The staff was made up of bright young college students who work several-month shifts then go back to school. There are staff accommodations on site. CT and I were amazed at how smart, kind and genuinely good people these kids were. The entire place was run by 20 year-olds, not an adult in sight.

Jacob Lake Lodge is open year around and is worth a visit even if the North Rim is closed. There is a big fireplace and comfy seats to sit in as you pen manifestos or just check your email. The logs are 3 feet long and the fire is tended to by the 20-somethings. The drive up on 89A takes you from mostly desert to pine forests in a few miles. I’ll be going back again because I missed Jacob Lake’s famous pie due to eating so much food. You should go, too.


Here’s a link to our earlier Grand Canyon story, and here’s a link to our Reviews page (it has other National Parks).

ExhaustNotes 2021 Motorcycle Rider Gift Guide

Long after the last word has been typed, when the world lays in waste and all that remains is a ground-hugging sulfuric cloud of swirling brown gas fed on by fantastic single-celled creatures all named Bob, there will be Christmas gift giving guides. This is because gift-giving guides are really just listicles masquerading as useful information. Listicles are the lowest form of writing and like the single-celled Bobs, can survive anything. Of course that depressing scenario doesn’t stop ExhaustNotes from jumping on the bandwagon. At least we waited until after Thanksgiving.

The motorcycling community is many-fractured; to the outsider we may seem to require only one description: motorcyclists, but that is far from the reality. ExhaustNote’s gift guide recognizes both the Yin and the Fro of the motorcycling public and is helpfully broken into rider type to better match motorcycle-gift to motorcycle-giftee.

This beautiful gold-tone trophy is an excellent gift for the Canyon Racer. Canyon Racers are easy to identify because they just passed you on the inside of a blind corner…in a school zone. Canyon Racers ply their trade on public roads because those guys on the racetrack are going way too fast for Canyon Racer to get past; unlike that Chrysler mini van they out-braked and stuffed mightily in the Arby’s drive up window. Canyon Racers have colorful motorcycles that mimic the appearance of race bikes in the same way Canyon Racers mimic actual racers. They dress in expensive leather suits and spend most of their time sanding down the edges of their tires to mask a common malady named Chicken Strips. Have no fear of duplicate gifts with the above trophy, the one you give your Canyon Racer will be the only one he ever sees.

Morbid and practical describes both the finely crafted casket above and the riders in our next group: The Cruisers. Consisting of mostly dead men, the Cruiser rider segment is so old they can remember the time before the Internet was invented. As the Cruiser rider’s body withers away to leather and buckles the bikes he rides become ever larger, slower and more expensive. Often mistaken for a briefcase, the Cruiser rider blows all his money chasing chrome and noise-making devices leaving his next-of-kin no money to pay for his funeral. The casket above will subtly tell the Worst Generation, best known for their ability to close the door behind themselves, that the one thing belonging to future generations that the Cruisers can’t mortgage is time.

One of the handiest gifts you can give an Adventure Bike rider is this inflatable cast. The tall, heavy motorcycles Adventure Riders prefer are sized exactly right for breaking an ankle when they fall over. And fall over they do. A normal person would look at an Adventure motorcycle and never in a million years guess that you are supposed to take the machine off road. Everything about the bike, its weight, size, width and ground clearance screams ridiculous. The Adventure Rider only screams when the bike falls on him. Other suitable gifts for an Adventure Rider would be a first aid kit, health insurance, a girl friend or a gift card to a nationwide chain of coffee brewers.

These rose-colored glasses are perfect for the Vintage motorcycle enthusiast. Even older than the Cruiser Rider, Vintage Riders are way more stubborn. They can be found at home because their bikes are never actually ridden. Simply looking at a motorcycle is all the excitement their weak and failing hearts can take. (This means no girl friends!) If you get the optional, rose-colored magnifying glasses your Vintage Rider will be able to identify the date codes on the many, many parts he has stored in boxes. Knowing the date code won’t really change anything but he will sleep better having the useless data points. The Vintage Rider will never sell his parts because he knows what they are worth, preferring instead to leave it to his nephew to toss the boxes of greasy bits into a dumpster when he is summoned to settle the Vintage Rider’s estate.

This gift will delete…I mean delight Scooter Riders. Properly used, the castration tool will provide welcome clearance for the odd, two-feet-together seating position most scooters employ. In addition to the improved comfort, dramatic personality changes can be expected that will make your favorite Scooter Rider more pleasant to be around. He’ll fight much less and smell better to boot! If your Scooter Rider has designs on a singing career get him one sooner rather than later.

All these gifts are available online at Amazon or other local-shop destroying, mega corporation websites. Merry Christmas!


Free!  Free!  Free!  Get your free subscription here!

Ferrari versus…Jeep?

You’ve probably seen the movie Ferrari versus Ford a few years ago about Enzo Ferrari, Henry Ford II, Carrol Shelby, and the 24 hours of Le Mans.  As flicks go, it was decent show.   Ford GTs are cool and so are Ferraris, made even more so by their stint in the police show a few years ago where a Ferrari Testarossa shared top billing with the two actors who played the good guys.  That show had one of the greatest intro scenes ever:

I didn’t know why that show and the Miami Vice sound track was playing in my mind repeatedly for the last day or so, and then it hit me:  Joe Gresh posted an old passport photo on Facebook.  Take a look and tell me what you think:

Gresh is a Jeep man, though, through and through.  Like me, I think he’d have a hard time even getting into a Ferrari.  Hence the title of this blog.

A bit about the Ferraris on Miami Vice.  It’s shades of Long Way Around all over again, you know, when those two dilettantes who call themselves adventure riders wanted to borrow a couple of KTMs and do a show about going around the world on motorcycles.  KTM wouldn’t cough up the bikes, so BMW stepped in with their GS ADV bikes, and Starbuck’s parking lots haven’t been the same since.

Something similar happened on Miami Vice.  Its producer asked Ferrari to give them two Testarossas and the answer was no.  So they had two kit cars made up using Corvettes as the base car and Enzo went nuts.  He sued the kit car company, but in the end,  he coughed up the two real Ferraris so Don Johnson could be authentic.  Not as authentic as Joe Gresh in a Jeep, but more than he would have been otherwise.

One more thing about Miami Vice:  A lot of big name actors got their start on that show.   Take a look:


Never miss an ExNotes story…we’ve got a zillion of them!

Yamaha RD350 No. 9: Shocks, It Was Nothing

The RD350’s rear suspension seemed kind of springy to me, like there was no damping or the shock oil had leaked out. In corners the bike would hit a bump and bounce. Nothing frightening or dangerous but in combination with the front forks needing a rebuild anything less than smooth pavement was a ragged, unsophisticated ride. The RD still wore its original shock absorbers from 1974 so I figured it was time for a replacement set.

I found many options online, prices ranged from $500 to $50. I think we all know what option I took. Look, it’s not that I don’t want a really nice set of shocks it’s just that I’ve had some bad luck with expensive shock absorbers. In a nutshell they didn’t last very long. I mean it’s not like a dirt bike where you need good suspension. I’m using the RD350 on the street, an environment where you hardly need rear suspension at all. I found a set of shocks on ebay that looked similar to the original Yamaha shocks. For $47 shipping included I was willing to take a chance. The shocks arrived in about 3 days.

Out of the box the eBay shocks looked really well made. The chrome was beautiful, the top-mounting boss was cast aluminum and the things even have a plastic sleeve between the shock body and the spring to eliminate squeaking. The original shocks did not have this feature and squeaked a lot. They sounded like an old, rusty gate swinging in the wind when you hit a bump.

Fitment was straightforward except that the original Yamaha shocks had no bushings: the rubber inside the mounts fit directly over the shock studs. I had to press out the steel bushings on the new shock, which was fairly easy using a bench vice and a couple appropriately sized sockets. Instead of black rubber like the originals the new shocks used a material that resembled urethane and may in fact be urethane. It is translucent yellow and looks cool.

With the bushing removed the new shocks fit a bit loose on the mounting studs but not loose enough to fit a bushing. I thought about cutting a strip from an aluminum beer can and wrapping it around the stud to take up the slack but instead decided to hope that the now-bushingless urethane would relax a bit over time and swell to suit its environs. I often hope for mechanical things to fix themselves and frequently they do. The washers on either side of the stud sandwich the urethane a bit when the shock bolts are tightened so maybe they will smoosch the fit tighter.

After fitting the shocks I found the first spring preload position was too soft so I stuck a pin punch inside the nifty preload adjuster hole and cranked it up to the second position. That seemed about right. I wheeled the Yamaha out into the daylight and fired up the sweet-running two-stroke twin. It’s a sound that never gets old.

The first thing I noticed while riding was no squeaking, the eBay shocks were quiet. The roads around my place are sort of rough and there was a noticeable improvement in the bounciness department. It seemed like with the rear shocks working better the blown out front forks felt worse or maybe I just paid more attention. Corners were steadier and the rear tire rubbed the fender less than it did before. Still, it wasn’t the dramatic improvement I was shooting for. That might be down to the $47 price point.

Curious about the original shocks I compressed the spring with a long bar clamp and removed the spring collar along with the spring. Now I could test the shocks for damping action. Surprisingly both shocks still had oil in them and offered firm resistance to rebound. The compression action was much less as you would expect. It’s really hard to tell but I think the two Yamaha shocks offer slightly different hydraulic action. Certainly nothing I could feel on the road. I’ll go out on a limb here and say that there was probably nothing wrong with the original shocks. They work like they work I guess.

I’ll clean up the Yamaha shocks and pack them away to rot. In the meantime I’ll be running the eBay shocks to see if they hold up for 47 years like the originals. The new rear suspension has moved fixing the forks to the front burner. The RD350 handles well with clapped out suspension, I can’t wait to get both ends sorted and sample some of that legendary road-racer for the street performance RDs are known for.


More of the Gresh Resurrections!

Yamaha RD350 Part 8: I’m Gonna Ride My Horse Till I Can’t No More

One of my many personality flaws is that I’m overly fond of television talent shows. It’s pretty embarrassing how many of these type of programs I watch by dribs and drabs on YouTube. I’d like to break free from the habit but it seems like there is always another undiscovered talent that needs my attention. One of my favorite talent show singers is a chick named Hadwin.

Hadwin has a very distinctive voice like Amy Winehouse or Janis Joplin had distinctive voices except she’s not like them at all. When she was very young, Hadwin’s strange body movements bordered on uncomfortable-to-watch but now that she is older she seems to have calmed down a little. Her voice ranges from a squeak to a low, hollow echo and it’s not so much the quality of her voice that makes her great, it’s the way she rips apart songs with abandon. I wouldn’t call her voice sweet but you’ll be able to tell it is her singing as soon as she opens her mouth. It doesn’t hurt that she looks a little bit like Emma Peel from the 1960’s British TV show The Avengers.

Which is an off-kilter intro for my first big ride on the 1974 RD350. The bike still needs some work but I really wanted to put some miles on the thing to see how it would fare on a longish ride. I started with a run up highway 54 into Carrizozo. 54 is a long, straight road that averages about 4500 feet elevation. As it’s located down in the Tularosa Valley, 54 is usually a bit warmer than the mountain roads to the east. Most of the time traffic on 54 is going about 70 mph and on this day the RD350 was keeping up easily, spinning between 55 hundred rpm and 6 thousand. Unfortunately the RD’s speedometer was showing 85 miles per hour and no way was I going that fast unless a RD350 tops out at 130. I calculated my fuel mileage at the first gas stop as 41 miles per gallon. I thought that was pretty good fuel mileage for a thirsty two stroke. Must be that Torque Induction?

On the way up 54 I noticed the RD350 had a narrow blubbery spot around 5000 rpm and as I turned onto Nogul canyon road and climbed in altitude the blubbery spot grew wider. Nogul canyon road takes you by many curves to the base of the Ruidoso/Alto area. It’s a fun road to let the RD350 wail a little and the road tops out at a little over 7000 feet. I couldn’t wail too much because the RD’s oversized rear tire rubs the fender in hard corners. I have new, correct size tires ordered. By managing my engine speed, a process made easier by the Yamaha’s smooth-shifting 6-speed gearbox, I could get past the rich spot on the fuel delivery and from 5500 up the bike ran fine. You could feel the power loss the higher you went. Gavalin Canyon Road skirts Ruidoso to the east; it’s a twisty road but has a lot of local traffic trying to avoid the zillions of Texans who visit Ruidoso. Many times there are more Texans in Ruidoso than Ruidosoans.

On my way downhill on 70 to Tularosa I took the old road to The Old Road Café on the Mescalero Indian Reservation. The Old Road Café is a multi level place that looks like some sections are real adobe. The back porch area has a decided slant, I wouldn’t be surprised if it toppled over one day. The Old Road Café has the best tacos around. They are oily corn tacos with shredded beef, homemade salsa and I love the things. I loaded up on tacos, rice, beans and iced tea before taking the final plunge into Tularosa and the Tuliefreeze ice cream shop for a little reward.

All in, the RD350 tootled through the mountains and the valley for 150 miles. It was a blast listening to the little twin sing that old song and I was surprised by the RD’s ability to keep up with modern, yet rural traffic. If you had to you could run 80 miles per hour as long as you wanted to hold on. From faded memories I thought the RD would be more of an around town bike but after I get it sorted I see no reason the bike wouldn’t do well on long trips. The only limiting factor is the 3-gallon gas tank, which means you need to find a gas station every hundred or so miles. That’s not always easy to do in New Mexico.


Never miss an ExNotes blog!

Grand Canyon National Park

Arizona’s Grand Canyon National Park is another bucket list destination.  As As was the case described in our recent blog on Devils Tower, a movie inspired my first visit.  A contemporay review of the 1991 Grand Canyon movie said it was about “random events affecting a diverse group of people exploring the race- and class-imposed chasms which separate members of the same community.”  That’s an artsy-fartsy tinsel-town mouthful.  Grand Canyon was pretty good and it had some big name actors in it.  But we’re not here to talk about the movie.

On to Grand Canyon National Park. The name sounds majestic, and the Grand Canyon surely is.  I’ve been to the Grand Canyon many times (it’s only a day’s ride from home) and I would not pass on an opportunity to see it again.  It’s a great ride in a car or on a motorcycle. I’ve done full-family car trips and I’ve done a number of motorcycle trips. Interestingly, some of the best rides were on the 250cc CSC RX3 motorcycles with guys from China, Colombia, and the US (you can read more about the RX3 trip in 5000 Miles At 8000 RPM).

A Grand Canyon photo from the 5000-mile Western America Adventure Ride.

There are two places to see the Grand Canyon National Park, the North Rim and the South Rim. The South Rim is by far the most heavily visited area and offers the best views, but the North Rim is a better ride, especially the last 50 miles or so along Arizona Route 67 (also known as the North Rim Parkway). Getting to the South Rim involves riding through a spectacular desert to get to Grand Canyon National Park, at which point you enter a beautiful pine forest. And when you visit the South Rim, you can continue on in the direction you were traveling when you leave — you don’t have to backtrack. The North Rim is different: There’s one way in, and one way out. It takes longer to get to the North Rim along heavily-forested Route 67 (and that road shuts down when it snows), but wow, what a ride!

My first Grand Canyon visit brought me and a riding buddy to the North Rim on a couple of Harleys nearly 30 years ago. It rained all the way in, we were thoroughly soaked and chilled, and I still remember how much fun I had. The Grand Canyon Lodge is the pot of gold at the end of the rainbow. It’s a magnificent place to stay or you can just have lunch there.  The view is awesome, but I think the views from the South Rim are even better (and there are more vantage points).

Ah, the South Rim. That’s where I took the big photo at the top of this blog and it shows none other than world-famous concrete consultant and moto-journalist Joe Gresh.  It almost looks fake, like I had a cutout of Gresh and pasted it into the photo, but it’s not.  He’s just a very photogenic guy.

You can approach the South Rim from either the east or the west via state Route 64 running along the canyon’s southern edge. On my last trip, we came in from the eastern end, paid our fees to enter the park, and a helpful Ranger explained that there were a series of viewpoints along the way. We hit every one and each was beyond stunning. It’s hard to believe what you see when viewing this magnificent region, and it’s easy to understand why the early Spanish explorers concluded it was impossible to reach the Colorado River a mile below. You can see all the way to the North Rim (10 miles away as the hawk flies, but a full day on a motorcycle).  On a clear day you can see 100 miles.

The Tower at the eastern edge of the South Rim.

There’s an ancient tower of sorts on the easternmost viewing spot along the South Rim and we had an interesting experience there on the CSC Destinations Deal tour.  Our good buddy Orlando left his gloves on this new RX3 while we were taking in the view, and when we returned, we caught a thief red-handed trying to steal them.   Or rather, I should say red-beaked.  It was a big old crow (a bird, not the whiskey) and he was trying to make off with one of Orlando’s gloves.  We all started screaming at that big old blackbird, and it dropped the glove and flew away.  That was a good thing.  It was super cold that morning and Orlando would have had a tough time continuing the ride without both gloves.

Good buddy Rob giving a Grand Canyon elk a drink on the CSC Destinations Deal ride.  Don’t try this at home, kids.

The earliest known Grand Canyon habitation occurred during the Paleo-Indian period nearly 12,000 years ago, but the emphasis here is on “known.” Archeologists are still discovering ancient stuff down there. Geologically, the Grand Canyon started about 20 million years ago.  The Colorado River, flooding, ice, wind and seismic shifts worked their magic to create the 277-mile-long, 15-mile-wide, and mile-deep Grand Canyon.

Fine dining in Williams’ Red Raven restaurant, right on Old Route 66.  That’s me and good buddy Paul after a wild boar hunt.

Hey, here’s one more thought:  If you’re doing the South Rim, it’s something that you can take in in a day.  Most folks stay in Grand Canyon Junction just outside the entrance to the South Rim, but that’s a real touristy area and if you don’t like McDonald’s or pizza, your dining choices are limited.  My advice is to stay in Williams, about one hour south.  It’s just off I-40.  Williams is a bit touristy, too, but the hotels and restaurants are a cut above what’s in Grand Canyon Junction.  It’s a nice ride north to the South Rim early the next morning.   Trust me on this; you can thank me later.


Never miss an ExNotes blog.  Sign up here:


More epic motorcycle adventures are waiting for you here!

KLR250 Reflash: Part 4

I know what you’re thinking. You’re thinking I’ve been working on the KLR250 for forever. It seems that way to me also. Since the last KLR blog 325 years ago we have sold The Love Shack in Astor, Florida and the Widowmaker 250 no longer has a purpose in my life. I’m not one to store a good motorcycle and the KLR250 will make some newbie rider (or older experienced motorcyclist) a fine machine to learn the dark art of dirt riding.

It’s time for the KLR to go. I can’t keep all these bikes registered and insured, much less in operating condition. But before I let a new owner crash about on the KLR there are a few more things I need to fix.

Equipped with a worn out 21” front tire, a very popular size, I blew a few bucks on a new Dunlop semi-dirt tire and a new tube. These skinny 21” wheels are super easy to change tires on, it took like 20 minutes.

The Widowmaker’s fork seals were dribbling a decent flow of oil; in fact one tube only had a few ounces left inside. One fork leg came apart easily: Impact wrench on the bottom bolt and zing-zing it was apart. The other leg was more trouble. The recessed allen bolt just spun when I hit it with the impact.

I needed something to stop the inner damper rod from spinning the fork spring, which wasn’t offering enough resistance. Looking through my nut and bolt bins was futile. I found a spark plug was the closest to fitting the damper. I cut down the plug and removed the ceramic, then welded a length of all thread to the plug. With my new eye I could just make out the puddle. It was great, before I saw nothing but glare.

The damper rod retaining tool worked excellent and I was able to dismantle the other fork leg. After cleaning assembly was straightforward. A length of PVC pipe was used to press the new seals into the sliders. I didn’t have enough fork oil in one viscosity so I mixed 10 weight and 15 weight together. I figure I’m running 12.5 weight in the forks now.

I reassembled the front forks and all seemed done at the front. Next I installed a new battery just for the KLR250, no more sharing with the Husky and Z1. The battery has been sitting around a year or so but still had juice. I popped it into the KLR250, lowered the bike off the motorcycle jack and the thing started in about 7 kicks. These KLRs are tough cookies.

Thinking I was pretty much done, I took the bike on a road test. The carb might be a little clogged up as it’s either idling at 3000 RPM or dying. Once up to speed the bike ran as good as it ever has. Parking the bike on the brand new shed floor it was easy to notice coolant dripping from that small hole in the water pump housing. Rats, this is what I mean when I say I can’t keep them all running.

I ordered a new water pump seal and when it arrived I drained the Widowmaker’s coolant and removed the water pump cover and impeller. The seal is a spring-loaded ceramic type of deal and the spring part pulled off with little effort. That left the steel part still stuck in the engine.

If you’re lucky, sometimes you can thread a deck screw into the thin metal seal and pull the thing out with no problem. I wasn’t lucky and the seal kept looking worse the more I tried to remove it.

Finally I gave up and removed the right side engine cover to gain access to the seal from the other side. Removing the cover meant I had to remove the rear brake lever, foot peg and clutch cable. With the engine cover off it was a piece of cake to poke the seal out from the inside with a ¼” punch.

As you can see, I pretty much mangled the seal trying to save taking the engine cover off. For good measure I also destroyed the pump shaft oil seal in the process. I guess it needed changing also. Now I’ve got to look up a pump oil seal and a cover gasket for the Widowmaker. I think I’m going to clean the carburetor and see if I can’t make it run better low speed. Since I have to take the tank of to clean the carb I may as well adjust the valves. It’s super easy on the KLR250. And then it will be ready to sell.


More on the KLR and other Resurrections!


Never miss an ExNotes update…get your free subscription here.

The 2021 Rubber Chicken Ride

If you had asked me a week ago what the Rubber Chicken Ride is about I would have replied, “I have no clue, Bubba.” Held annually in Truth or Consequences, New Mexico the 2021 Rubber Chicken Ride resisted any defining characteristics and after three days participating I still have no clue what it was about.

There’s an entry fee, $50, that goes to the New Mexico Off Highway Vehicle Association, (NMOHVA). I guess it’s a like a fundraiser except a motorcycle ride breaks out while passing the collection plate.

I met up with the near legendary dirt-riding group, The Carrizozo Mud Chuckers at the Truth or Consequences Travel Lodge motel. The Travel Lodge is one of the few remaining old school types where the room doors open out directly onto the parking lot. I like this layout as you can hang out as a group tinkering with the bikes. It fosters community spirit and you can lock your bike to the uprights supporting the overhang. At the motel we met six other Rubber Chicken Riders none of who had any idea what was going on and all pushing 70 years old. That’s like 3 years older than the Chuckers.

This year’s Chicken was stripped to the bare bones due to Covid. No group dinners, no Show Us Your Scars competition, no organizing at all: just show up and ride. Part of the confusion was due to my not bothering to download the GPX files from the Rubber Chicken thread on ADVrider, which I knew nothing about until I was at the event. I probably couldn’t have figured out how to migrate the files to my GPS anyway. It annoys me that those old codgers can download files into their displays and I’m still using paper maps. I think of my GPS is kind of a last resort deal; I use it when I’m not sure how to get home.

That first day we tried to find the Rubber Chicken sign up area at Healing Waters Plaza, a place no one in Truth or Consequences seems to have heard of. Everyone we asked sent us to a different Healing Waters but they were hot springs, not the sign up staging area. The town was named Hot Springs in the past and has quite a few still around. Luckily, my Garmin knew about the palm-lined plaza and after riding past it several times we were able to find the pocket park along with a couple other Rubber Chicken Riders. Oddly, there was no water in sight.

The other riders we met at Healing Waters were as clueless as we were so we sat around and talked bikes for a while then the Chuckers and I decided to ride out to nearby Elephant Butte Dam to check out the scenery. After the dam tour we hit up the local Denny’s. You know how they say landing and take off are the most dangerous parts of flying, that’s how it is for me getting on or off the tall Husky 510. The Husky’s kickstand is so designed that once you’re on the bike you can’t tip it over far enough to retract the stand. This means I have to get on or off the bike with the kickstand up. Not a problem on a normal motorcycle, with the Husky it takes Baryshnikov-level flexibility to toss a leg over the high seat and rear luggage stores. I’m no Baryshnikov.

I got half way off the bike but my boot hung for a life-altering moment, still on one leg the bike started to topple over the far side. I pulled the bike back towards me but pulled a little too much. With my stubby, grounded-leg near the centerline of the wheel track the bike toppled over onto the near side taking me out in the process. In the Denny’s parking lot. In front of everyone.

Back at the Travel Lodge we grilled the other riders.  They resisted at first but stopped struggling as soon as they were evenly browned on both sides. The way it was supposed to work is you download route files and load them in your GPS before arriving, then at the plaza meet up with like-minded riders and off you go, a merry band of riders. It’s a great way to meet new riding buddies. There’s no NMOHVA sanctioned rides. This is the loosest possible group ride you can imagine. One of the riders had an old, Rubber Chicken event T-shirt. In a testimony to how damaged things have become since Covid all we got this year was a tiny NMOHVA sticker with a rubber chicken on it.

The second day there was a sign up table at the Healing Waters Plaza. Maybe 15 riders had gathered and we had a good gabfest with the boys and one girl. By now we pretty much had the event figured out so the Chuckers and I headed out to Chloride, an occupied-ghost town for one of the routes: the Chloride canyon loop. We didn’t have GPX files but the Chuckers had paper maps.

At the end of the road in Chloride the road turns hard left and becomes unpaved. It’s sort of rough and rocky being a dry streambed at the bottom of a steep canyon. After about a mile of this abuse we stopped to reassess our riding skills and time left in the day. For a route that 6 guys on dirt bikes had done just a day before there were no tire tracks except the ones we were making. I dreaded turning on the Garmin because I’ve never read the owner’s manual, it always leads to a bunch of button pushing and frustration instead of riding. The Garmin said the road went for 5.6 more miles then dead-ended.

We started doubting our direction. Maybe we are on the wrong route, those 70 year-old guys couldn’t have gone this way. None of us liked the idea of riding this rocky trail 5 miles and then turning around and riding it back. We chose an alternate route. Seeing as there were no official routes anyway we felt we could take liberties with the Rubber Chicken.

Our alternate route was a long, 60-mile stretch of fairly easy dirt bookended between 80 miles of pavement on either side. The route seemed to go on forever. We went over the continental divide twice, once on paved Highway 59, once on Dirt Road 150. The later it got the faster we went. Highway 152 was a marvelous twisty road that we could use as much of the side-tread of our knobbies as we dared. We arrived back at the Travel Lodge at 7 pm; 9 hours of riding over widely varying terrain made for excellent sleeping.

On the third day of the Rubber Chicken Ride, a Sunday, the other riders at the Travel Lodge had loaded up their bikes and gone home. The Mud Chuckers and I decided to leave the Rio Grande Valley and work our way one valley east to Tularosa Valley, our home turf. In retrospect, we didn’t get much for our $50 but it got us away from our usual dirt-riding spots and it supported the NMOHVA so it was money well spent. While I was telling this story to my wife, CT, it must have sounded like I was complaining. Maybe I did bitch a little. She said that volunteer organizations always need help and that maybe next year we should print a few maps, plan a Rubber Chicken route and set up a ride instead of waiting for others to do the hard work for us. That sounded an awful lot like a gauntlet being thrown down to me.


Subscribe to ExNotes!