ExNotes Event Review: AHRMA Motofest, Monterey, California

By Joe Gresh

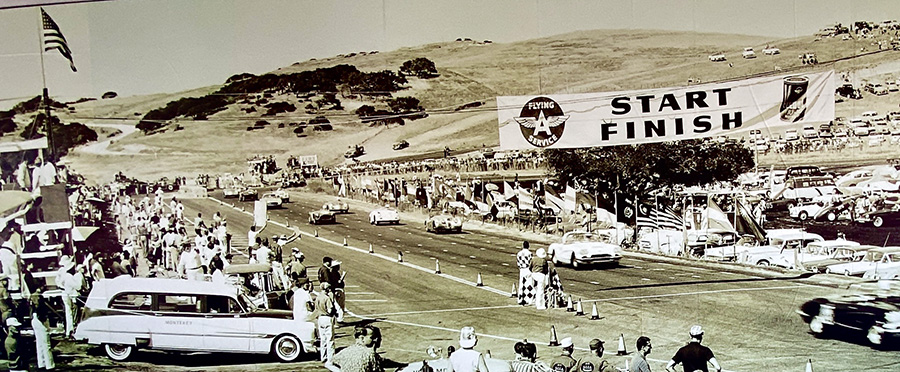
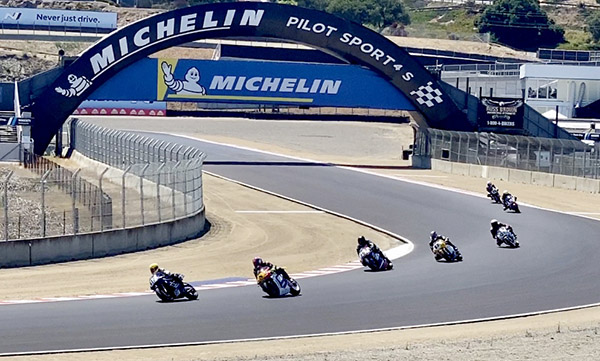
After riding through the stifling heat of Utah, Nevada and central California the cold, foggy mists of the Monterey Peninsula penetrated my mesh jacket and I shivered. It was wonderful to be cold and it was wonderful to be at Laguna Seca’s Weather Tech Raceway. This wasn’t my first visit to Laguna Seca but it was my first time inside the track. Years ago I rode up from San Diego back when Laguna Seca was a date on the world championship calendar. Today, Austin’s COTA circuit has usurped that role in America but Laguna Seca is still way prettier.

Two strokes ruled Moto GP racing in that era and when I pulled up to the entrance gate the $50 ticket price almost gave me a stroke.  I was earning $3.50 an hour working on boats and $50 was a ton of money. I figured the hell with it and went to the Monterey Bay Aquarium instead. Oddly enough, the entry fee for AHRMA’s Motofest vintage racing was still 50 dollars some 40 years on. This time I paid for a ticket because riding from La Luz, New Mexico is a long way to go for nothing.

Motels around Monterey are sort of expensive. Your best deal is the 4-day camping pass at the track. I bought a reserved campsite because I wasn’t sure how things worked inside. Turns out there were plenty of campsites available for this event. I had site 110A, which gave me a view of turn 5 in one direction and a view of the bikes going up Rahal hill to the Corkscrew in the other direction.

Site A-110: it’s a good place to spend the weekend.

Plenty of portable toilets were sprinkled around the venue and hot showers were available in the more substantial structures. All the faucets were marked non-potable so bring plenty of water. I had to buy those little bottled waters in the paddock at $3 a bottle. The ground at my site was pretty hard so I never got my flimsy aluminum tent pegs to penetrate. Luckily my site had an old steel spike that someone left behind. I drove the spike into the hard ground on the windward side, tied the tent to the spike and used my gear to hold the other three corners down. The hydraulic jack came in handy as a hammer.

I say the ground was hard but apparently the hundreds of ground squirrels had no problem burrowing holes every 15 feet. The squirrels are all over the place at Weather Tech. I’m surprised that an aged vintage motorcycle racer hasn’t fallen in a squirrel hole and broken a leg. I’ve heard that when they get up in years it’s best to shoot them rather than let them suffer.

Me and Milich, he’s tall with a lot of drag but still wins.  You can visit Milich’s websites at http://guzzipower.com/ and https://www.ducpower.com/.
Thad Wolf’s Suzuki. I never did find Wolff, he must have known I was looking for him.

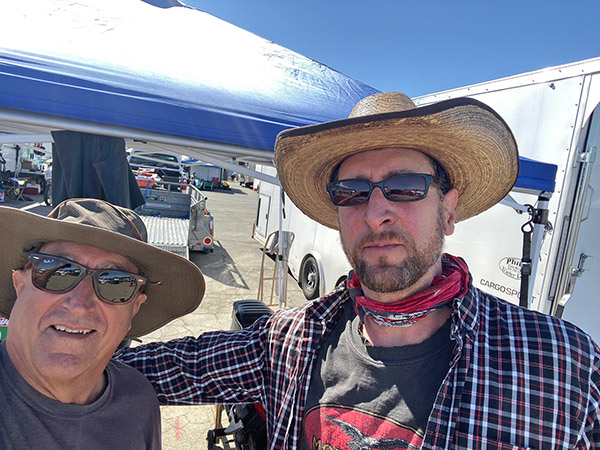
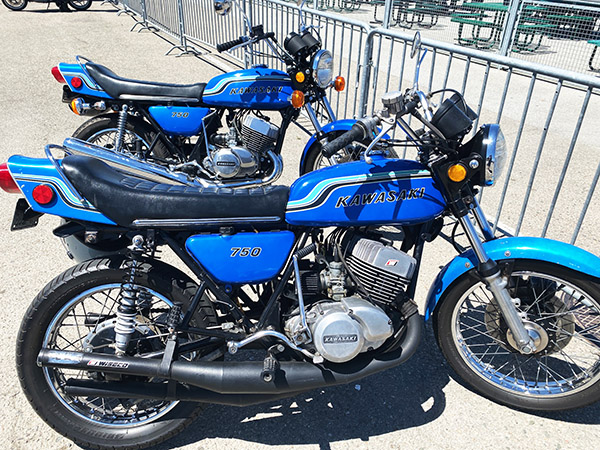
Thursday was practice all day. The bikes were sent out in groups with staggered starts. There are a lot of classes in AHRMA, like dozens, to keep track of but I mostly just listened for two-strokes. AHRMA’s Motofest had a sort of mini Motorcyclist magazine reunion vibe. The Kevin Hipp racing family was there along with Thad Wolff and Ed Milich. Go-Go Gulbransen, whose name the announcer never tired of uttering was there also. Go-Go was the guy who tested the upper limits of new sport bikes for Motorcyclist magazine. All these guys live and breathe motorcycles and it’s the passion you can’t fake that made them such good journalists.

This might be a real S2 Kawasaki production racer. Very few were built. You had to know somebody.

Vintage racing today looks a bit different from when the motorcycles were current models. Hondas seem to dominate. The 160cc slopers, 175 twins and 350 twins were much faster than I remember them. In fact, I don’t remember them racing at all. I assume it’s due to better oils and electronic ignition systems, because in the old days the small bore grids were mostly Yamahas with a few Suzukis and Kawasakis. If there was a Honda racing it was usually sputtering at the tail end of the pack and the rider was wearing construction boots and welding leathers. Of course, things were different at the GP/factory level where Honda did all right for itself considering the handicap it was working under. It helps to have Mike Hailwood and Freddie Spenser on your team.

A brace of H2s these sounded good when they pulled in.
Jewel-like T500cc twin Suzuki. This was a revolutionary bike when it came out. Some people thought you couldn’t go this big without heating problems. Another bike I want to own one day.
Zoomie RD 350 with DG sunburst heads. Going for that squish band action.
A pile of Ossas. These are Stilettos; I want a Pioneer.
Thames van. I imagine it’s British.
Stretched Honda Mini Trail with custom Grom-based block. 350cc, tops out around 100 miles per hour. I asked the kid if it was dangerous. He said he lived in Oakland, so it was the least dangerous thing he did.

After setting up camp I walked all over Laguna Seca: I needed the exercise after sitting on the ZRX1100 for five long days. To get to Monterey I took the long way around, up through Colorado to Grand Junction then across Utah and Nevada to California. I tried to ride Highway 120 through Yosemite Park but the road was closed. I detoured north from Lee Vining to Highway 108 and was rewarded with one of the world’s great motorcycle roads. Anyway, from my campsite to the paddock was only a 15-minute walk. Less if you didn’t tangle with a ground squirrel.

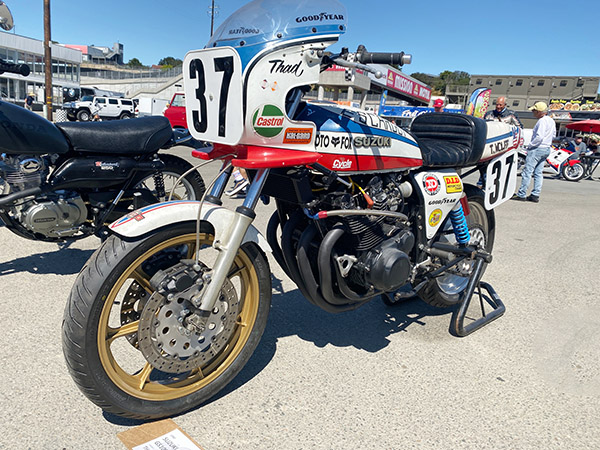
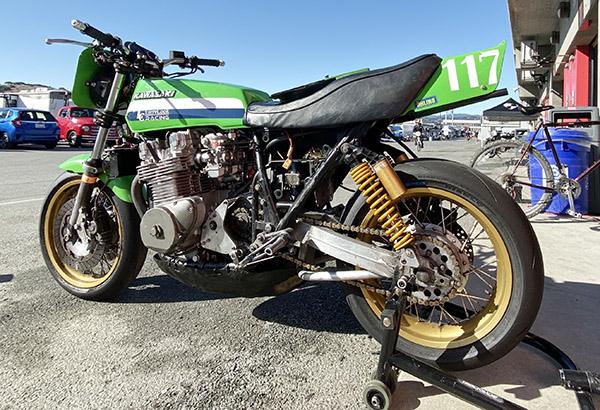
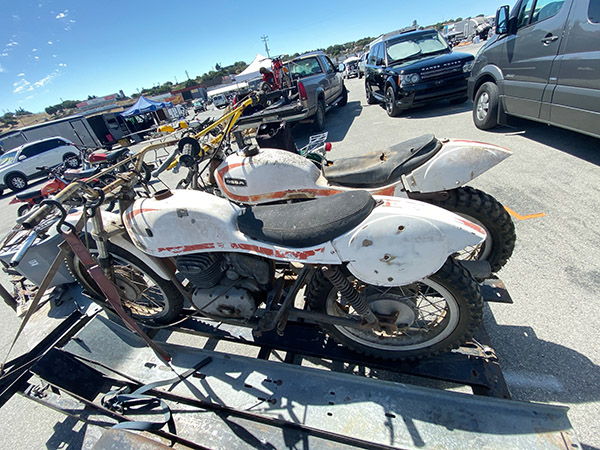
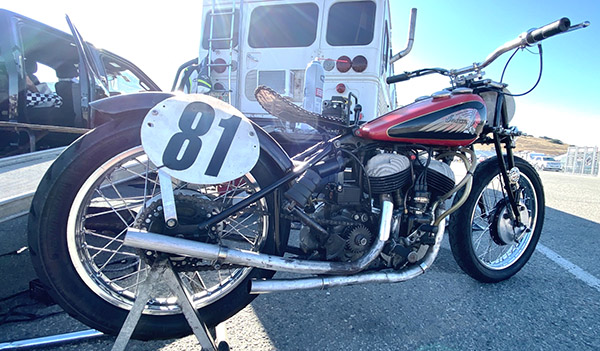
Vintage racing is all about the paddock. The racing, while serious, is almost secondary to checking out the old race bikes. The paddock is where the food is, where the beer is and where the old motorcycles are. Most of the spectators hang out in the paddock area. I wandered around for hours looking at motorcycles. I ate a turkey sandwich and drank a beer that was like 28 dollars but we need to support the moneymaking aspect of Laguna Seca or it’ll become luxury housing.

Turn 4 action.
Yamaha RD400 scooting right along.

Saturday and Sunday were race days. I hung out with Motorcyclist Magazine alumni Ed Milich for a bit. Ed has an admirable cost per win philosophy in that he expends just enough effort to get first place and no more. His bikes look like hell but they run great. Paint don’t win races, says Ed. On the track he never seems to be trying hard, the gap between him and second place grew larger as if by magic. Ed won every race he entered (four) I did some math and determined that Ed spends around $4.37 per win. Hipp won his races also. Hipp’s bikes are those fast Honda 350s and they look like show bikes. Hipp’s wins probably cost more than Milich’s, but they still count.

Montessssa on the trials course.

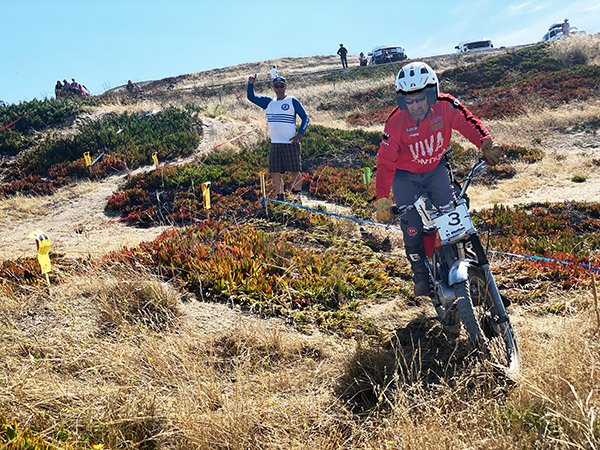
Sunday morning I went over to the trials section. Set in gullies and on the sides of hills, trials riding never looks too hard until you try it. Trials events at the level Laguna Seca puts on have the advantage of being relatively safe as the speeds are very low and you can’t fall very far. This isn’t the crazy stadium trials you watch on YouTube but it suits the old motorcycles participating. I might try the trials on Godzilla next time I go to Laguna.

The legend Dave Roper. I think he’s still the only American to win at the Isle of Man races.
Walt Fulton fetteling his XR750.

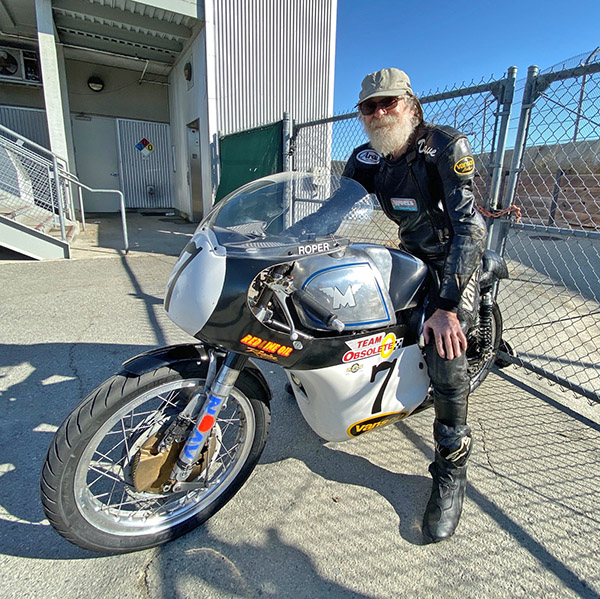
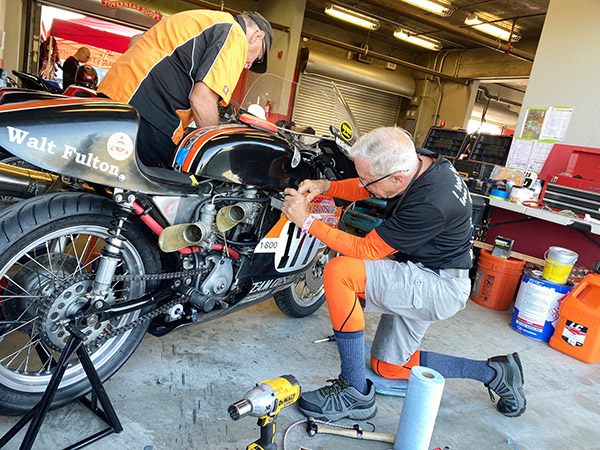
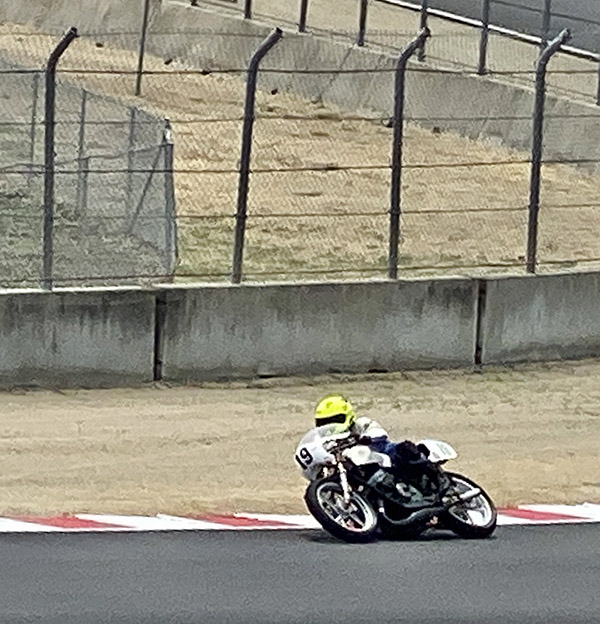
With such wildly different motorcycles it’s hard to compare rider skill. Except when it comes to Dave Roper: Roper, who resembles a stick of beef jerky with a cotton ball stuck on one end, was smooth and fast on any bike he rode. Roper and Walt Fulton, with a combined 300 years of racing experience, put on quite a show with their matching H-D branded, Aermacchi Sprints. There was a vintage motocross at Laguna Seca but it ran concurrent with some other races so I missed it. You really need to be two people to see all the action at AHRMA’s Vintage Motofest.

Nice, tank shift flattie. This bike sounded good on the track, very low rpm drone.

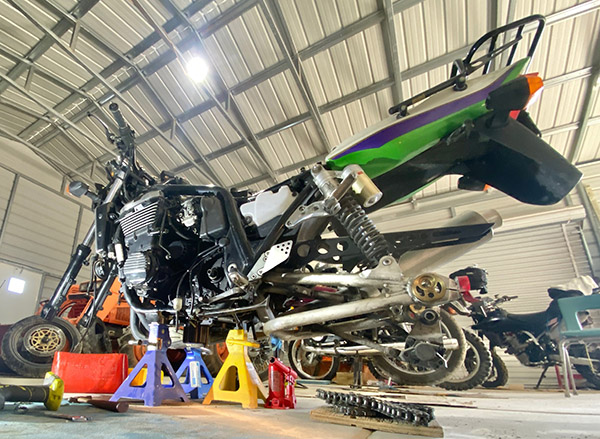
It was nice to have the campsite for Sunday night; I didn’t have to rush to pack and head out into the unforgiving freeways of California in the late afternoon. Wherever I ride the ZRX1100 it attracts attention. I’ve had people take selfie photographs standing next to the bike, I get asked what year it is almost every ride. The thing is bone stock. Laguna Seca was no different, the bike garnered a steady stream of complements from my camp neighbors. I must look hard up because the guy camping across from me handed me 40 dollars and said I had dropped it. I think he was trying to be nice to a vagabond. Normally I would have taken it but I’m trying to become a better person and told the guy it wasn’t mine.

Californians and Ex-Californians like to bitch about their state, but the damn place is beautiful. California has it all from the beaches to the mountains to the desert and all types of terrain in between. With straight roads crowded by farm equipment, the central valley (also known as The Breadbasket of America) was like the Tail of the Dragon for my nose. Sweet manure, grassy hay, dust and soil, the smells kept swapping back and forth giving my nasal passages whiplash.  If it wasn’t so expensive, I’d live in California again but my total running costs at Tinfiny Ranch are less than the annual taxes on any house I could afford there. The Californians I met were universally friendly and interesting to talk to, we would start up a conversation like we had known each other for years and had just spoken last Thursday.

I’ll go to AHRMA’s Monterey bash again. It’s closer than Daytona for me and with the camping, about the same cost. I give the event high marks for value. You really get your 50 dollars worth with AHRMA.


Never miss an ExNotes blog:


Want the story on the ZRX resurrextion?  It’s right here.

An SR 500 On The Block

By Joe Berk

When Joe Gresh posted his article yesterday about downsizing his project list and knowing his limitations, we received an interesting comment from one of our readers:

Now that your flush with cash, how about a SR500, Its on my chopping block. With my recent dive in to the Ducati end of the pool I’m gonna keep the 1974 Suzuki Titan and the 99 Suzuki Bandit 1200s and the Ducati Monster S2R 1000… Thinking I have finally done it…. then boom, Hey come look at a 1965 BSA C15… Free. Dammit

Well, that comment sure had my attention.  I’ve always wanted an SR500 Yamaha.  So I wrote to Dragonknee about it, and here’s what he told me:

I do have photos and I’m asking 1850.00 for it. I do have extras but with those I’m into it about 2300 bucks. I have a spare motor and a bunch of period correct extras. Supertrapp and Lockhart oil cooler along with the parts to do a dual disc set up and just tons of other things.

In addition to the photo at the top of this blog, here are three more.

Dragonknee is up in the Pacific Northwest, and that’s a bit far for me.  The bike seems like a hell of a deal.  If you’re interested, leave a comment with your email address.


Never miss an ExNotes blog:


A Man’s Got To Know His Limitations

By Joe Gresh

The famous line was from a Clint Eastwood movie, I think, but regardless it rings true for me as I ease into my salad years. Or is that my pabulum years? Recently I did a few simple mathematical equations and then ran the results through my life expectancy chart. The results were not encouraging. I would need to live another 124 years, 7 months to complete all the projects I’ve started. That’s if I didn’t gain any additional projects in the ensuing 124 years. Unfortunately, the projects still drift in by ones and twos. It’s time I got to know my limitations.

I was building the driveway retaining wall at The Ranch when the epiphany came. I looked around at the tools spread around the front yard, the stack of lumber and the pallets of concrete and decided that there was just no way to do it all and that I needed to shed a few projects. At least get them off my books. The low hanging fruit was first to go.

The 1974 MGB-GT was a candidate because I haven’t spent much money on it yet and it’s a huge, time consuming proposition. It needs many, many manhours and truthfully I never really wanted a MGB-GT anyway. It was just on the land when we bought the place and I thought it was a cool looking car. I bandied about about selling it but the prospect of wading through all the Internet scammers and tire kickers didn’t appeal to me. My buddy Mike from the Carrizozo Mud Chuckers expressed an interest in the car so I made him a deal he couldn’t refuse: I gave it to him.

Before you get all wound up and start telling me how you would have given me $500 for the car I have this to say: “No, you wouldn’t.” Just like you wouldn’t buy a Janus if it had an American made V-twin engine or an electric car if it went 100 miles further on a charge. Mike has a trailer that fit the MBG perfectly and we loaded it up using two come-alongs in series. With 3 flat tires it took about a half-hour to move the car 20 feet. Inches add up to miles and the blue, MGB is now residing 69 miles away at Mud Chuckers central. Seeing the car roll off the property gave me a real lift. It’s like I bought an extra year of my life.

The next thing to go was the KLR250. When I had the Love Shack in Florida the KLR was the bike I left in the shed. Whenever we were in residence the KLR faithfully dragged me around central Florida. It wasn’t fast but I could hold 70mph on the highway if there wasn’t a headwind. The KLR sat as we moved junk across the country and then sat in the shed here at The Ranch for a few years. You know how that goes. The carb gummed up and it wouldn’t start.

I decided to sell the bike but first I had to fix the front brake, fork seals and replace the front tire. After accomplishing those chores I wandered off to construction projects and the KLR languished. The final straw was when I skipped over the KLR250 to get the ZRX1100 running. I realized that the liquid-cooled 6-speed enduro bike had fallen completely off the to-do list.

Mike came to the rescue again and picked up the KLR250 for a cool 1000 dollars and dragged it back to his place. He has since replaced the stock constant velocity carb with a Mikuni clone off of Amazon and the bike starts and moves under its own power again. The new carb is jetted too rich so there’s a bit more fettling to be done but I won’t be doing it.

Having those two projects out of the way emboldened me to get rid of more junk. The Bomber is on the chopping block. I originally bought the Bomber for its running gear. I planned to put the Bomber’s small block Chevy and ½ ton running gear into Brumby (the Jeep). But the Bomber was so handy for hauling concrete the Jeep swap never took place. CT signed me up for a Lowes card and with the card Lowes will deliver anything to The Ranch for $20. This means no more concrete hauling and no need for the Bomber along with the Bomber’s tags and insurance.

I’ve got a few things to fix on the Bomber but I think I can get $1500 or so for the beast and that will be another project off my books and another year of my life back.

The trend line is clear to see: Stuff not getting used is going away. The 1975 Kawasaki 900 isn’t even safe now that the ZRX1100 is running. It has become too valuable and selling it would enable me to finish a few other projects, like my Honda 50 with a 140cc Lifan motor. Zed mostly sits because the purple Yamaha RD350 has taken over top spot in the vintage street bike category. I can only ride so many motorcycles at once.

You may say I’m getting lazy or maybe just old but I say I’m being realistic. There are still a few old motorcycles I’d like to own and clearing the decks is a time-honored tradition for normal people. Anyone need a Huffy beach cruiser with a 60cc two-stroke motor attached? It’s too fast downhill and too slow uphill. The thing is going to kill me if I don’t get rid of it.


More on the Gresh Resurrections!


Never miss an ExNotes blog:

Triumph’s New 400cc Motorcycles

By Joe Berk

Well, what do you know?  Triumph is the latest moto manufacturer to jump on the small bike band wagon with the announcement of their new 400cc  single-cylinder motorcycles.  Not to be too snarky, but better late than never, I suppose.  Harley did the same thing a year or so ago with their 350cc  and 500cc motorcycles, but the Harleys were supposed to be manufactured and only available in Asia.  More’s the pity, although I get it:  A small bike wouldn’t go well with the typical Harley crowd.

Back to today’s topic:  The new 400cc Triumphs:  I like them.

Triumph announced two models:  A Speed 400, and a Scrambler 400.  They look like Triumphs, which is to say they look fabulous.  I like the colors (each will available in three different color themes) and I like the looks.

The Triumph Speed 400.
The Triumph Scrambler 400.

With a published 40 horsepower, the bikes will probably be good for 100 mph, and that ought to be enough for any sane rider.   I’m guessing the bikes will get something around 70 miles per gallon, and that should be good, too.  Triumph turned to Bajaj (in India).  There’s nothing wrong with that.  Triumph’s Bonneville line is manufactured in Thailand.  My Enfield 650 (which I’ve been riding for three years) is manufactured in India, and its quality is magnificent.  Prices on the new Triumphs haven’t been announced yet.  If the Mothership can keep the dealers from pulling their normal freight and setup chicanery, these bikes should be a good deal (but expecting dealers to abandon their larcenous freight and setup games is, I realize, probably wishful thinking).

On that Harley thing I mentioned above:  QianJiang (also known QJ Motor) bought Benelli (an Italian motorcycle company) in 2005.  QJ took the name and started offering bikes made in China but labeled as Benellis (I saw them at the Canton Fair a few years ago).  The QJ/Benelli bikes are not bad looking, but I’ve never ridden one and I have no idea how good (or bad) they are.  It’s that very same Benelli (i.e., the Chinese one) that Harley announced would be making 350cc and 500cc small Harleys.  The Harley plan was that their smaller models would only be sold overseas (i.e., not in America).  Harley makes and sells more motorcycles than I ever will, so I suppose they know what they are doing.  But I think they are making a mistake not bringing their small bikes to America.

Look! Up in the sky! It’s a QJ Motor! No, it’s a Benelli! No, it’s Super Harley!

Let’s not forget the new BSA Gold Star, another made-in-India Britbike reported here on the ExNotes blog about a year ago.  That one is still in the works, I guess.  For a delivery date, the new BSA website still says “available to order soon,” which is to say we have no idea when the new BSA Goldie will be here.

The revivified Beezer Gold Star. I think it is a better-looking bike than either the new Triumph or the small Chinese Harley.

While all this is going on, my friends in Zongshen (they make the RX3, the RX4, the Zongshen 400cc twins, the TT 250, the San Gabriel, and now the RX6 650cc twin that CSC imports to the US) tell me that the craze in China has gone full tilt toward bigger bikes.  That’s why they introduced the RX6.  I was the first journalist/blogger/all around good guy in America to ride and report on the RX6.  It’s a good bike, but I’m not a fan of the movement toward ever larger motorcycles.  I’m convinced that my RX3 was the best all around motorcycle I ever owned (especially for riding in Baja), and I’ve written extensively on that.

I’m looking forward to seeing the new Triumphs.  Hell, I’d look forward to seeing the new small Harleys and the BSA, too, but maybe that’s not in the cards.  Why the fascination and appreciation for small bikes?  Take a read here.


Never miss an ExNotes blog:

ZRX RX: An ExNotes Resurrextion, Part 6

By Joe Gresh

I probably shouldn’t badmouth them because they seem to have the business model sewn up and are industry giants, but Partzilla sucks. I’ve ordered quite a few ZRX parts from them and several things they do annoy me.  First, I get CT to order everything because it just works out better. Next, many parts you take the time to look up on their parts diagrams are not priced unless you go through the hassle of signing in to their website. Comparison shopping is difficult. The worst is when the page shows the part as available and in reality they don’t have it. This happened to me with the reed valve gaskets. The site said available (which is not the same thing as in stock) but I’ve been waiting about 3 weeks. CT emailed Partzilla about the situation and got a semi-snarky email in return. Is it better to lose a sale or lose a customer?

I get my Kawasaki parts from Southwest Suzuki Kawasaki in Alamogordo now. It’s actually faster than Partzilla and they give me a little discount if the part is outrageous (like those float needles). I go see Dave or Taylor at Southwest with part numbers I get off the Internet and the stuff is there within a week. Maybe the massive vertical integration of the ‘Zilla monster has reached an evolutionary dead end. I’m done with them, no matter that they’ve bought the first three pages of results on Google.

Rant over.

My Chinese petcock showed up and it looks exactly like the original Kawasaki petcock and fit perfectly. Unfortunately, when I tried to connect the old fuel line it had a pinhole leak right where the line expands from 5/16-inch to 3/8-inch.  I don’t know why Kawasaki went with the oddball molded fuel line. A 5/16-inch line will provide plenty of fuel to the 1100cc Kawasaki engine.

This is horrible but there are reasons why it is horrible. First, the OEM Kawasaki fuel line would need to be ordered and I don’t want to wait for it. Second, The original line connects to a plastic T-fitting between the No. 2 and No. 3 carburetors. Knowing my luck with old plastic fittings, I feared that replacing the hose entirely would lead to a broken T-fitting, which would mean pulling those damn carbs again. Then there’s the wait for a new T-fitting. I decided to let sleeping T-fittings lie and added a 3/8-inch to 5/16-inch hose barb adaptor complete with an ugly pipe connection between the two. Then I ran a new 3/8-inch line to the petcock. I mean to fix this mess later on but it works and doesn’t leak.

I gave up on getting the gaskets for the reed valves and made two block-off plates to seal the air intake to the exhaust ports. Then I spun up a little aluminum plug to seal the hole in the airbox where the reeds connected. I didn’t take photos of this part because I was in a hurry to hear the bike run.

I installed the rest of the radiator plumbing and started to fill the Kawasaki radiator with coolant and found the slippery green stuff running out the bottom as fast as I put it in. The front log manifold was pissing coolant, which was odd because I had replaced the four O-rings with new Kawasaki parts. This log manifold is behind the header pipes and not easy to access. Off came the pipe and the O-rings looked like they were deformed a bit.

My mistake was lubing the O-rings on the pipe manifold. This made them too slippery and when the pipe was pushed into position the rings slid out of the pipe O-ring grooves. I gave the rings a through examination and decided to clean all traces of lube from the pipe and O-rings. I shoved the thing back together, reconnected the hoses and it leaked as much as it did last time.

I pulled the log manifold for the third time and cussing up a storm. I tossed the new Kawasaki O-rings and dug some Harbor Freight O-rings out of an assorted kit I bought years ago. I was so frustrated I managed to cross thread one of the bolts that hold the manifold onto the engine block. Back off comes the manifold. For the fourth time. Remember, I’m doing all this behind the header pipes and I can barely get my fingers between the pipes.

I managed to get a tap started into the cross-threaded hole and using the tip of a finger to hold the tap and needle nose pliers to turn it, I ran the tap into the hole and straightened out the cross-threaded bit. Amazingly, the hole holds tension and I got the manifold back in place and the hoses connected. The manifold didn’t leak.

With the radiator full of coolant I started the bike.  It smoked quite a bit but after a few minutes the smoke eased off. I had set the idle screws at 1-1/2 turns out but the bike seemed rich. The idle mixture screws are accessible with the carbs on the bike but you need a special, shorty screwdriver to turn them. I made one out of bits and pieces. Make sure you have some sort of identifier so you can count the turns by feel. I used a small screw as my tactile-pointer and reset the screws to 1 turn out.

I tossed the seat on the bike and went for celebratory tacos at the Alomar Diner in Tularosa. The bike ran fair if a little rich. After I ate the tacos the bike wouldn’t start. What with everything having been messed with in the preceding weeks I wasn’t sure where to begin. So I kept cranking. And Cranking. And cranking.

Then I started smelling gas so I held the throttle wide open and cranked some more. The bike started making sounds like it wanted to start. I kept cranking. The Kawasaki sputtered to life stinking of fuel. I rode the bike home and it was running rich. I calculated my fuel mileage as 36 miles to a gallon. The ZRX1100 fuel tank vent was whistling like a teapot on boil and gave a gush of pressure when I opened the gas cap. This led me to believe there was a problem with venting.

Inside the ZRX gas cap is some sort of check valve assembly. It consists of two little red rubber valves and I couldn’t figure out how tank pressure was supposed to vent out. The ZRX has a vacuum operated petcock and with only a little pressure the shutoff diaphragm can be overridden. It’s a fine line. Naturally, removing the source of the problem is easier than making it work as intended so I removed the check valves and the bike whistled no more.

The bike was running much better and if anything was now lean-ish off idle. I did a 200-mile test loop through the mountains and the old ZRX1100 returned 53 miles to a gallon.

The Rex is running pretty well right now. I hate to do it but I’m going to buy four more Kawasaki O-rings for that coolant manifold and try again. Even though they aren’t leaking I don’t trust the Harbor Freight O-rings for longevity. I’ll order a new OEM fuel hose and I might take a stab at installing it. I also want a new fan switch O-ring for the radiator. I’m also going to set the idle mixture screws to 1-1/4 turns to see if it helps the off-idle lean spot, The ZRX stumbles a bit off the start. Once all this is sorted, watch for a ride report on the ZRX1100 in a future ExNotes blog.


See the earlier ZRX stories (and other Resurrection stories) here.

ZRX RX: An ExNotes Resurrextion, Part 5

By Joe Gresh

 The pressure of getting the ZRX1100 finished by July has eased off a bit. The Carrizozo Mud Chuckers may not be able to make July’s Laguna Seca races. I may have to go alone, which isn’t a bad thing, or skip the modern bikes and go to the vintage races held a week after. I’m leaning towards the vintage races as I really don’t have much interest in motorcycle road racing and the vintage bikes hold my attention just by existing. That doesn’t mean I’m backing off the ZRX1100 resurrexion project. I’m full speed ahead and will stay on the job until I am able to ride Rex again.

One of the things that worried me on the ZRX was the 24-year-old radiator. Kawasaki makes a quality motorcycle but how long can a radiator last? I found an aftermarket radiator on eBay for only $80 dollars with free shipping. You know how I like a deal. The radiator arrived securely packed and undamaged. It was welded aluminum and the workmanship looks excellent.

Unfortunately, there are a few problems with the fit of the aftermarket radiator. The top mounting ears are slightly too wide apart. When fitted with the original rubber isolator grommet the ears squeeze in as you tighten the bolts. It will need a thicker rubber isolator and that will require a longer spacer and bolt in order to avoid squeezing the rubber flat.

The next issue is the top tabs that hook into the expanded metal radiator bug screen are slightly too low. When the bottom screw holes are lined up the screen misses the top tabs completely; they hook into thin air. I slotted the screw holes to lower the screen on the radiator and it seemed to work although it looked like hell.

After those problems I found the blind holes in the side of the radiator that secure the radiator side covers were not centered correctly. You could get one bolt started or the other, but not both at once. This was fairly critical as the side covers also incorporate the bottom radiator mount and horn mounting bolts. To fix this I will need to fabricate new radiator side supports along with horn mounts. I decided to punt and cleaned up the original radiator and installed it. The aftermarket radiator might see future use but I’m not in the mood to do the fabrication right now.

The new Kawasaki water pump fit perfectly and I was able to install the hard plumbing pipes and hoses. This included the log manifolds located on the front and back of the cylinder block. I ordered a set of silicone hoses that fit fairly well except one hose was missing. Fortunately, it’s the easiest one to get to and it is straight, so I reused the old hose. I can fix it later if it springs a leak.

When I bought the ZRX used all those years ago the previous owner had dropped the bike moving it around. There is a small scuff on the headlight faring and the front brake lever was bent out at an awkward angle. I rode the bike like this for years. I decided that since I had the brakes apart I may as well straighten the lever. A little heat from a propane torch is all you need. Don’t go hog wild or you’ll melt the aluminum.

After closer examination I could see why the old float needles were leaking. There was a ridge worn into one and another had the rubber tip flaking apart. I ordered a new set of four needles for $28 (shipping included) from China but could not get an accurate delivery date. I was getting nervous about our trip so I went down to the local Kawasaki dealer. The dealer had Kawasaki-OEM needles for only $39 each. It killed me but I dropped $156 and bought the four needles.

With new needles in hand I checked the float levels. The range given in my book was 18.5mm ± 2mm from the float bowl flange to the bottom of the float. Mine were all sitting a bit high at 18mm. I readjusted them to 20mm anticipating needle wear and seating. After the carbs were back together I checked the floats on the bench and no fuel leaked out. I hope this status holds. Two days later my needles from China showed up. They look identical to the Kawasaki needles and even came with the tiny wire bail that fits over the float to pull the needle down when the float drops. My $156 needles required reusing the wire bail from the old needles.

I can see why so many ZRX riders convert the original air box to pod-type filters. It’s a challenge getting the carbs back into position. You have to mount both throttle cables and the choke cable, then feed the cables through the frame as you battle to slide the carb assembly between the manifolds and the  air box rubbers. It took at least an hour fighting to get the things in.  Then, once you feel like you have succeeded, there’s the not-small matter of fitting the springs onto the air box rubber groove. None of this would be difficult if there were access. The two inside boots were out of reach and too crowded for my fingers. I managed to get the springs in place using a couple of screwdrivers and a lot of bad language.

While waiting on parts I tackled the fuel tank. Amazingly the inside of the gas tank was not rusted. It had stinky old yellow muck inside but was otherwise in good condition. This might be due to my diligent addition of fuel stabilizer several times over the course of the ZRX’s long slumber. I rinsed the tank using fresh gas and after 4 flushes the inside was pretty clean.

The fuel filter on the petcock was brittle with age (or fuel stabilizer) and crumbled to the touch.  The filter is not sold as a separate part so I bought an entire petcock for less than a few Kawasaki gaskets. Again, from China. I didn’t pay attention to the delivery date and the petcock was promised between June 7th and July 15th. This was a huge window, so I bought a rebuild kit and it didn’t show up, either. Panicking, I went to the local dealer and ordered the inner packing and the gas tank O-ring figuring I could at least make something work. As you can see, I’m using a shotgun approach to parts as time grows short.

The petcock rebuild kit showed up a day before the Kawasaki stuff did and I managed to get a petcock assembled. My main issue with this plan is that since there is no interior fuel filter I’ll have to fit an inline filter. This is not as easy as it sounds because the Kawasaki uses a large 3/8” fuel barb and the 3/8” inline filters I’ve found are too large to fit under the carbs or below the petcock. Maybe my new petcock will show up soon and solve the problem for me.

The big holdup now is the gaskets for the reed-valve pollution plumbing located on the valve cover. The law of unintended consequences says that I should have left the reed valves alone when I painted the valve cover. But I didn’t. They tore when I removed the reeds to paint. I ordered the gaskets weeks ago and they have not arrived.

The reed valves allow fresh air to be drawn into the exhaust ports when there is a vacuum pulse at the exhaust port. Kind of like a smog pump without the pump. The reeds connect to a carb-vacuum-actuated valve that is supplied via the air box. I’m guessing this is some sort of backfire control. I can eliminate all this junk and I might do just that but I will need to make a blank plate to replace the reeds and a blob of high heat silicone to replace the gaskets.  Then I’ll need to plug the hole in the air box. It would be faster to bolt the junk back on as the bike ran fine with it.

I also installed the new battery and tested the electrical system. I tested the lights and horn and they seemed to work then I bumped the engine over to see if the electric starter still functioned. Maybe in Part 6 this motorcycle will start.


Like what you see?  Please thank us by clicking on a few of the popup ads.


Never miss an ExNotes blog:


More Resurrections are here.

ZRX RX: An ExNotes Resurrextion, Part 4

By Joe Gresh

I’m starting to worry about the timeline on this Kawasaki project. It’s already almost June and we will be leaving for Laguna Seca the beginning of July. Parts are trickling in slowly now and I’ve found things to keep me busy. I don’t want to ride the Yamaha RD350 all the way to California but I will if it comes down to it.

After assembling the rebuilt front calipers onto the 1999 ZRX1100’s forks I tried to flush out the brake lines with a can of spray brake cleaner stuff. No go as all three of the hoses were clogged so badly I couldn’t get a drop of liquid out of them. I guess old brake fluid turns into a solid after many years. A piece of stainless wire, sort of stiff, was worked back and forth into each line pausing occasionally to give the line a squirt. It was slow going but my thrifty ways were rewarded when I managed to force the wire all the way through the hose. Now I could really give the inside of the line a good, high pressure blast with the brake cleaner and air compressor.

I had the same problem with the rear brake hose and solved it the same way. Bleeding so many pistons takes patience and I don’t rush to do the thing in one day. The tiny bubbles take a long time to percolate to high points and I’ve got rear pedal pressure fairly good now. The front calipers are taking a bit longer. I have solid line pressure but I think there might be a bubble or two occupying space that should be DOT 4 fluid.

The Kawasaki ZRX has a lot of black painted parts. I love this even though most of the black paint was rusty and flaking off. There’s nothing easier than applying black paint. It’s a popular color and if it’s a shade or two off no one will notice. I gave the handlebars and water pipes a shot of Rust-Oleum engine paint.

This brand of paint seemed to mix well with the original Kawasaki paint. I tried another brand but it lifted the old paint at the margins where old paint meets bare metal.

The clutch slave cylinder leaked onto the sprocket cover area eating the paint so I wire brushed the cover, along with the slave cylinder cover and shot them with the same black paint.

Removing the four carburetors out of a ZRX is no easy feat. The book says to pull them from the air intake side first, and then slide them out of the manifolds on the cylinder head side. Well, I’m here to tell you that method doesn’t work. It was a battle but I had to slide the carbs out of the manifold first then work the air cleaner boots back with a screwdriver. I’m dreading putting the carbs back in. I think I’ll use a thin flat piece of steel on the air cleaner side to push the boots back without snagging the carbs.

The carbs were gummed up with old gooey gasoline but they weren’t the worse I’ve seen. Luckily all the vacuum diaphragms were intact and flexible. I had to remove the factory, no-tamper idle screw plugs to clean out the idle passage. Oddly, one idle screw was set to 1-3/4 turns out while the rest were +1-ish turn out. I’m going to split the baby and make them all 1-1/4 turns out to start. Located on the bottom of the carbs, these idle screws are somewhat accessible while the carbs are still on the bike so I can adjust them later if needed.

After cleaning all four carbs and reassembling them I wanted to bench test for leaks before facing the gauntlet of those rubber boots. I set the carbs in the vise and rigged a funnel to pour gas in. The gas ran out #4 carb as fast as I put it in. Taking the #4 float bowl off and inspecting the needle and seat revealed nothing so I cleaned the seat and rubber tipped needle again and ran another test. No change; the gas flowed like wine. I have ordered four new float needles so we will have to revisit the carb issue later.

After 25,000 miles I felt it was time to do the Kawasaki-recommended 12,000-mile valve clearance check. As expected, they were all at the minimum gap specified or too tight. With 16 valves it’s easy to get mixed up with your adjustments so I made a chart to keep track of which valve needed what shim.

Kawasaki made the valve setting process easier by using cam follower type rockers. These rockers are mounted on a long shaft that runs through the cylinder head. The rockers are held in place over the valve stem by springs on the rocker shaft. This means you can slide the rocker over on the shaft and lower it so that the valve spring keeps the rocker from returning to its original position. No more having to swap in a shim just to rotate the cams to the next valve that needed setting. I was able to measure all the valves and determine what size shims I needed in two rotations of the crankshaft. After swapping the shims I could, I ended up needing seven shims in total. The local Kawasaki shop had them for $4 each.

I was going to use a new valve cover gasket but the thing costs like $80. That’s too much for a big rubber ring. My plan is to dollar cost average and get one more use out of the old gasket. I’ll splurge on a new gasket at 50,000 miles…maybe. The cover looked pretty bad so I cleaned it up and shot it black with the same paint as I used on the coolant pipes. The gaskets on the crankcase breather reed valves tore when I removed the plates for painting so I ordered the four total gaskets at $30. This motorcycle repair business sure is expensive.

In Rex Rx Part 5 I hope to start getting closer to starting the beast. I’m waiting on bits and pieces so it might be time to do a few days of concrete work.


Help us help you:  Please click on the popup ads!


Miss the first four installments?  Hey, check them out here:

ZRX Rx 1
ZRX Rx 2
ZRX Rx 3


More Resurrections?  You bet!


Never miss an ExNotes blog:

ZRX RX: An ExNotes Resurrextion, Part 3

By Joe Gresh

Labor rates at motorcycle shops are well over $100 an hour and that fact got me thinking about the value of old motorcycles. Take my 1999 ZRX1100: The basic bike is sound but there are many minor issues that add up to a lot more money than the motorcycle is worth. If you took the bike to a shop, that is.

Fixing a bike yourself means you can take more risks. You can reuse iffy parts that a dealer mechanic cannot. The brake system on the Rex was in sad shape. All the calipers were stuck and the master cylinders were stuck, too. If I worked for a shop as a motorcycle mechanic I’d tell the customer they need all new parts. I couldn’t take the risk of my rebuilt caliper failing or coming back for a leak.

The bores in a brake caliper are not super critical as the sealing is done mostly on the piston walls. Unfortunately, my caliper pistons were not in great shape. I polished them as much as I could and cleaned up the bores. New o-rings and dust seals will hopefully keep them from leaking.

The master cylinder bore is much more critical because it forms the sealing surface for the piston and seals. Luckily the bores on the clutch and both brake caliper master cylinders were in good shape.

The rubber bits for the front and rear master cylinders looked ok-ish to me so I reused those parts. I’m to the point that I prefer old OEM bits to new aftermarket bits if I can get away with them.

The levers have a pressed in dust seal and I didn’t have a tube the correct size for the job so I turned out a short piece of PVC tubing to push the dust boot into place.

I ordered a new clutch master seal kit as I tore the original dust boot dismantling the thing. I also bought a clutch slave kit but the bore was so bad by the time I had it remotely smooth the piston was loose in the bore. I have ordered a new clutch slave cylinder.

All in, there were 18 hydraulic pistons in the ZRX that needed service. A shop mechanic would never re-use the stuff I did. It may come back to haunt me later.

I bought two new, made in Malaysia Continental tires for the Rex as the ones on the bike were made in 2009. The old tire sidewalls had small weather checking. I would have run the old tires if I was just bopping around town but I have a few long trips planned so at $200 for the pair I figured I’d better bite. The Harbor Freight tire changer made the job tolerably easy. Still not as easy as having a shop do it.

The fork seals were leaking so I popped in a new set of fork seals and replaced the fork oil and while I had the front end apart I dropped the lower triple clamp and pumped in some much needed grease to the steering head bearings.

I also bought a new front sprocket and new X-ring chain for the Rex. The chain had a new style master link that worked by pressing the side plate on using small nuts then breaking off the studs that stick out. If it works it will be a good idea, if not I’ll probably break my engine cases when the chain lets go.

If I had taken the ZRX1100 to a shop by this point I would have already exceeded the value of the motorcycle. A shop would need to put in all new brake components to cover their butt. I’m willing to risk my life on shoddy equipment to save money and I’m nowhere near done with the bike or spending money, as you’ll see in future blogs.


Keep the hits coming:  Please click on the popup ads!


More Resurrections are here!

The Wayback Machine: Zed’s Not Dead

Our latest Resurrection story about Joe Gresh’s ZRX is not our first big Kawi resurrection story.  Going back a few years, we previously ran a 20-blog series on a Z1 Kawasaki.  This Wayback Machine piece was the culmination of that story, with a link at the end that will take you to the entire series.  Those big Kawis are cool, and the Z1 is unquestionably the coolest of them all.


By Joe Gresh

You may recall from Zed 19 I had to re-soak Zed’s gas tank as 10 days were not enough to dissolve the rust. I drained, dried and reloaded the tank with apple cider vinegar and let it sit for 4 more days. This is what it looked like originally:

The second session really knocked most of the rust out. After rinsing I dumped a large box of baking soda into the tank and added clean rainwater sloshing it as I filled to mix thoroughly. I don’t know the chemical reaction that takes place but the baking soda neutralizes the acid, turning the metal a dull grey, almost white color. This treated metal does not flash rust and I’ve been going 3-4 years on another tank I cleaned like this without rust reappearing. It’s like the metal turns passive and stops reacting to oxygen.

If I wasn’t so hell-bent on riding this bike I think I would flush and cider the tank one more time but it looks good enough and I’ve got to ride! I connected a small hose to my shop vac and played it all over inside the tank. I can hear nothing when I shake the tank so at least there are no big chunks loose inside.

Proving that even the simplest life forms can learn I bought an entire new petcock for $23 rather than the rebuild kit for $8. This is real growth on my part. Usually I buy the kit, mess with it for hours then put it on only to have it leak. Only then will I buy the new one. Kawasaki uses a turnbuckle-type left-hand/right-hand thread on the Z1 petcock. It took about 145 tries to get it to tighten up facing the correct direction.

The new petcock has screens inside the tank and a bowl filter but with 40% of Zed’s tank out of my view-field I can only assume the entire tank is as clean as the places I can see. Inline fuel filters, one for each set of two carbs will hopefully catch any debris still in Zed’s tank.

An update on the Z1 Enterprises regulator/rectifier: It works. The battery charges @ 14.8 volts which is still a tad high but much better than the 17 volts Kawasaki’s setup was doing.

From the top Zed looks pretty well sorted. I took it for a ride and it ran really well for off the bench carb settings. It might be a little rich at idle or it might just be our 6000-foot elevation. I’m not going to tinker with it for now. I’d rather get some miles on the bike.

I don’t know what this bracket is for. Located on the right side down tube near the tach drive, it’d too light for a steering damper mount. Anyway, there’s enough stuff on the bike as is so I’m not going to worry about it.

I took Zed to my secret proving grounds and she ran through all 5 gears smoothly. The bike hit 90 MPH without even trying. I’ll need a better front tire to do any high-speed work. The brakes work ok. When you ride a SMR 510 Husqvarna all other motorcycle brakes seem like crap. After 33 miles there are small oil leaks at the tach drive and countershaft area. Maybe the clutch pushrod seal or sprocket seal is the culprit. That stuff is easy to fix.

The patina on Zed is excessive, bordering on shabby. The bike sat outside for years and paint wise there’s nothing left to polish or wax. The finish is just not there. The pin striping is cracked and missing sections. I’m not sure what to do about that. On the one hand a ratty bike may be less attractive to thieves and old Z1’s are getting fairly expensive. On the other hand it does look pretty bad. I’ve seen my Enduro buddy Mr. French do some amazing work with rattle cans. Maybe I’ll give it a go. The paint can’t look any worse.


That’s it: from Dead to Zed in 20 easy sessions. Don’t worry, this won’t be the last you’ll hear of Zed. I’ll be doing some long trips on this bike, maybe Mexico, maybe ride to a few flat track races. I’ll update the blog if I do any more major work on the bike. The story of Zed’s resurrection may be ending but the story of Zed is just beginning.


And there you have it.  If you’d like to run through the gears (i.e., the previous 19 installments of Zed’s Not Dead), you can do so here!


Help us continue the content:  Please click on the popup ads!

ZRX RX: An ExNotes Resurrextion, Part 2

By Joe Gresh

This ZRX1100 resurrextion started out kind of leisurely. We don’t like stress at ExhaustNotes.us because we are at peace with our surroundings. ExhaustNotes staff have a firm grasp of our place in the universe and see all matter as insignificant much like we see ourselves. There was no big rush, you know? However, things change in life and the ZRX resurrextion timeline has sped up due to the Mud Chuckers wanting to attend the road races July 7-9 at Laguna Seca in California, now known as Polident Speedway. From my house to Laguna Seca is 1150 miles the fast way and we never take the fast way. We might end up doing 2500 or more miles round trip. Thus, the urgency to get the road burner running as none of my other motorcycles are exactly suited to the job.

The first thing I did to the ZRX was to remove as much bodywork as possible to prevent the odd dropped wrench or spilled brake fluid from damaging Rex’s somewhat pristine original paintwork.

Kawasaki ZRX1100 bits and pieces have been trickling into the shed at Tinfiny Ranch and we will soon see some progress on the abandoned, neglected motorcycle.

Starting with the coolant leak from under the engine, I have determined the water pump or the O-rings on the pipes connecting to the pump were the culprit. Seeing as the pump is 24 years old I sprung for a new pump on eBay. I imagine I could buy just the mechanical seal and rebuild the water pump but I’m getting lazy.

The coolant pipes are slightly rusty so I’ll have to clean them up and give them a shot of paint. The paint on the front down tubes is chipped from road debris so I’ll touch up those areas also.

I also bought some new silicone hoses for the pipes. These hoses live directly behind the exhaust headers and while they seemed flexible and in good condition, they are also 24 years old. A lot of stuff on the Rex is 24 years old, because the bike is 24 years old. Funny, it seems like a new model to me. I can remember buying it only a few years old not a long time ago. Is this how aging works? Does time compress making distant events seem close?

The ZRX1100 comes standard with a ground skimming, low-slung exhaust system. The header pipe collector joins under the engine making my motorcycle lift too tall to fit between the pipe and the ground. Even if the jack fit under the bike you’d have to make some spacer blocks to prevent the pipe from hitting the lift. I went with jack stands on both front frame rails and one stand on a cross pipe behind the engine. With this tripod set up the bike feels pretty stable.

Once jacked up I could remove both wheels for new tires. I also removed the clutch slave cylinder that is leaking and then could access the leaking water pump.

The calipers on the front brakes are stuck.  My caliper rebuild kits came in the mail so I’ll have plenty of piston swapping to keep me busy. This is one of the chores I dread.

The chain is pretty much worn out. The rollers are loose on the pins and the thing has 25,000 miles on it.  Kawasaki used an endless type chain so I cut it off with a 4-inch abrasive cutting wheel. The rear sprocket looks unworn, which I find amazing, and the front sprocket has just the slightest bit of hooking. Most aftermarket junk won’t last as long as an old, used Kawasaki sprocket. I’ll get a new front sprocket and chain for the bike.

My initial goal with the Kawasaki is to fix the brakes, fork seals and tires. That will upgrade the ZRX to roller status, then I’ll be able to push it outside the shed for a much-needed bath. There is a long way to go to undo the damage 9 years of storage has done to this motorcycle so don’t get ants in your pants. Part 3 to follow, unless I skip to Part 5.


Help us keep the content coming:  Please click on the popup ads!


Here’s Part 1 of the ZRX Resurrection!


Never miss an ExNotes blog:


More Resurrections here!