Last year I wrote about the MacManus Award, a program I helped revive with the Rutgers University Reserve Officer Training Corps. Captain Colin D. MacManus was a US Army Infantry officer and an Airborne Ranger who graduated from Rutgers in 1963. Captain MacManus was killed in action in Vietnam in February 1967 and posthumously awarded the Silver Star for gallantry in action.
US Army Captain Colin D. MacManus, Rutgers University ’63.
To commemorate Captain MacManus’ life, each year the MacManus family awarded a .45 Auto to the graduating senior who held his Rutgers Corps of Cadets assignment, and in 1973, that was me. The award was a very big deal to me in 1973, and it’s still a big deal to me today. I still shoot my MacManus .45 regularly.
My first handgun: The Colin D. MacManus 1911 and a couple of 5-shot, 25-yard hand held groups I fired with it. I had it accurized in the 1970s, and it is still a tack driver.
The MacManus award fell away a few years after I graduated, but we were successful in restarting it in 2020. The young man who won the MacManus award last year communicates with me regularly. He’s now a US Army Infantry lieutenant going through the Ranger School at Fort Benning Georgia. Good people, these are.
My good buddy at Rutgers, Colonel Javier Cortez, selected the top cadet at Rutgers for the 2021 graduating class, and I’m happy to report that this year’s honoree will receive his 1911 from the Colt company (last year’s award was a Springfield Armory 1911, another fine handgun). This year’s Colt is the Classic Government Model just like you see in the photo at the top of this blog, and Colt is putting some special touches on it through their Custom Shop. That’s the same Colt model I was awarded in 1973, I’ve put a few tons of lead through it since then (230 grains at a time), and my Colt is still going strong.
Because of the pandemic, there was no award ceremony last year. We’re doing the award ceremony via Zoom this year, and I’m looking forward to it. If you would like to read more about MacManus award and its revival last year, you can get to it via this link:
This is good stuff, folks, and I am delighted to be associated with the effort. These are fine young men we are honoring. I’m proud of them, and I know you are, too.
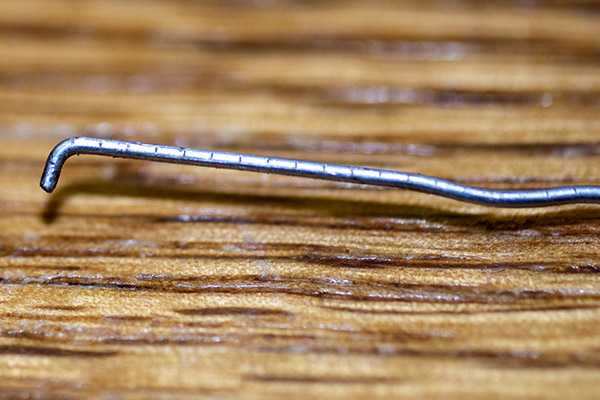
Necessity is the mother of invention, or something like that. When I heard that IMR 4320 was discontinued (on top of the ammo and components shortage), I was not a happy camper. IMR 4320 was my go to powder for several cartridges, and now what I have left is all there is (and it’s almost gone). But it really doesn’t matter, because we can’t hardly find propellants of any flavor. That notwithstanding, I made the trek to my local components supplier a couple of weeks ago, and he had only three propellants left: IMR 4166, 8208, and BLC2. I’ve never used any of these, although I had heard of Ballsy 2. The 4166 seemed interesting…it matched my motorcycle jacket, but none of my reloading manuals had any data for it (it’s that new). I bought all three.
I went online and found data published by the manufacturer, so I worked with that for my 30 06. IMR 4166 is an extruded stick powder. It will flow through a dispenser, but the dispenser throw variability was about 0.2 grain, and that’s enough when loading for rifle accuracy that I’ll weigh every charge with my scale and trickle it in with my RCBS powder trickler.N Would 0.2 grains make an accuracy difference? I don’t know (and someday I’ll test to find out). I suspect not, but weighing every charge only takes a few seconds more, and it seems like the right thing to do.
IMR 4166 is a stick powder that looks like any other stick powder. It’s in a powder trickler in this photo. Yeah, I weigh the powder for every cartridge.
On the IMR website, it said that Enduron IMR 4166 is one of a new class of propellant that offers four adventages:
Copper fouling reduction. These powders contain an additive that drastically reduces copper fouling in the gun barrel. Copper fouling should be minimal, allowing shooters to spend more time shooting and less time cleaning a rifle to retain accuracy. Hmm, that might be interesting. We’ll see how it does, I thought to myself as I read this.
Temperature change stability. The Enduron line is insensitive to temperature changes. Whether a rifle is sighted in during the heat of summer, hunted in a November snowstorm or hunting multiple locations with drastic temperature swings, point of impact with ammunition loaded with Enduron technology will be very consistent. In the old days, I might have dismissed this as a solution looking for a problem, but I’ve experienced what can happen in a temperature sensitive powder. I had a max load for my 7mm Weatherby that was fairly accurate that I took out to the range one day when it was 107 degreees. I fired one shot and had great difficulty getting the bolt open. It’s a real issue if you develop a load at one temperature and then shoot it at an elevated temperature. If IMR 4166 is free from that characteristic, that’s a good thing.
Optimal load density. Enduron powders provide optimal load density, assisting in maintaining low standard deviations in velocity and pressure, a key feature for top accuracy. Eh, we’ll see how it does on paper. I have some loads that are low density (i.e., they occupy well under 100% of the case volume) and they shoot superbly well. I’m interested in how the load groups. The target doesn’t give extra credit if an inaccurate load has a low standard deviation.
Environmentally friendly. Enduron technology is environmentally friendly, crafted using raw materials that are not harmful to the environment. Okay, Al Gore. Gotcha. Now go back to inventing the Internet.
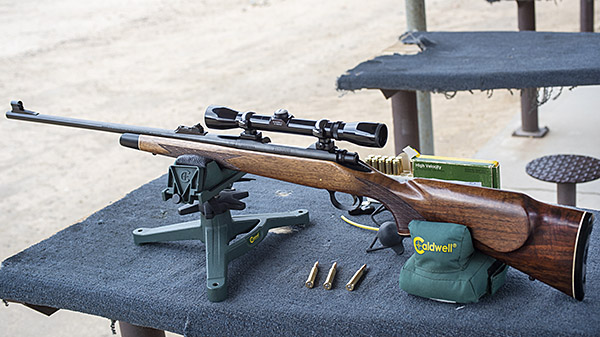
My test bed for the new powder would be a Model 700 Euro in 30 06, a 27-year-old rifle I bought new about 10 years ago. I had just refinished it with TruOil and glass bedded the action (a story a future blog, to be sure), and I hung a cheapie straight 4X Bushnell scope just to get a feel for how everything might perform.
The Model 700 Euro had a tung oil finish. The rifle was only offered in 1993 and 1994. The tung finish didn’t do it for me, so I did my usual TruOil finish. That’s an old Bushnell 4X economy scope up top.
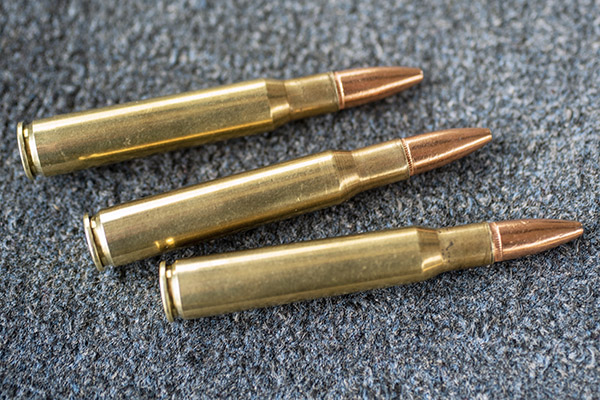
My load was to be a 180-grain Remington Core-Lokt jacketed soft point bullet and 47 grains of the IMR 4166, all lit off by a CCI 200 primer. If you’re interested, I was using Remington brass, too. The cartridges were not crimped.
Loaded 30 06 ammo with the Remington 180-grain jacketed soft point bullet.
Wow, those 180-grain bullets pack a punch. Recoil was fierce, and I probably felt it more because the Model 700 doesn’t have a recoil pad.
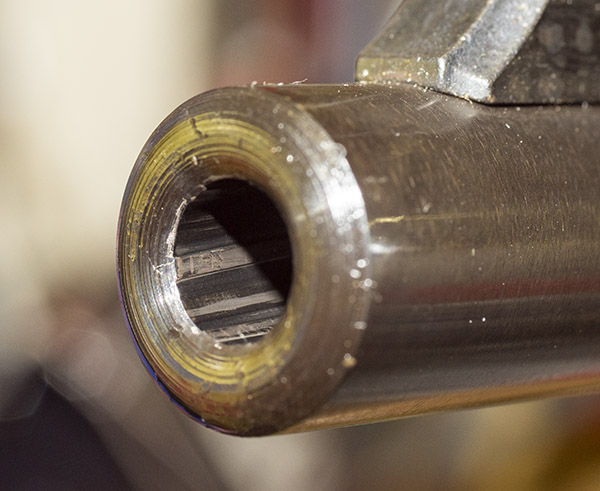
Okay, that’s enough about my heroics. Let’s take a quick look at how the propellant performed. With regard to the reduction in copper fouling claim, I’d have to say that’s an accurate claim. After 20 rounds (the very first through this rifle), I ran a single patch with Hoppes No. 9 though the bore, followed by a clean patch, just to remove the powder fouling. There was a very modest amount of copper fouling, way less than I would have seen with any other propellant. Ordinarily, at this point in the cleaning process (i.e., removing the soot) I would normally see a bright copper accent on top of each land. With 4166, there was only a minimal amount of copper present (as you can see below). After a second patch with Hoppes No. 9, the copper was gone. I guess this copper fouling eliminator business is the real deal.
This is a brand new rifle even though it’s nearly 30 years old. Check out the machinings inside the bore. Remington, for shame!
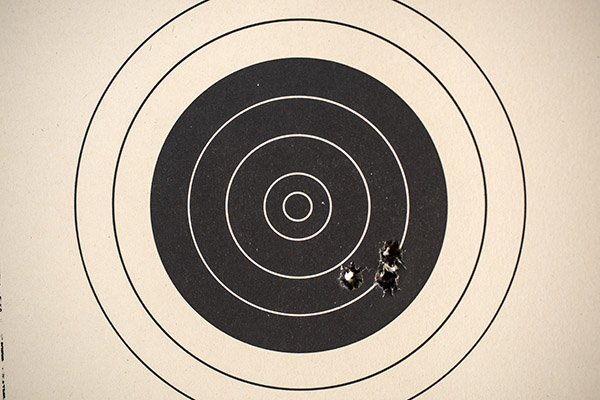
With regard to accuracy, 4166 has potential. I shot five targets that afternoon, and this was the best. It’s a 0.590-inch group at 100 yards, and that ain’t too shabby.
Sometimes you just get lucky. Other times you rely on careful load development, glass bedding, and a steady trigger squeeze.
The bottom line for me is that IMR 4166 is a viable powder. Now, like everyone else, I need to find more. That’s going to be a challenge. But at least I know that my IMR 4320 has a decent replacement.
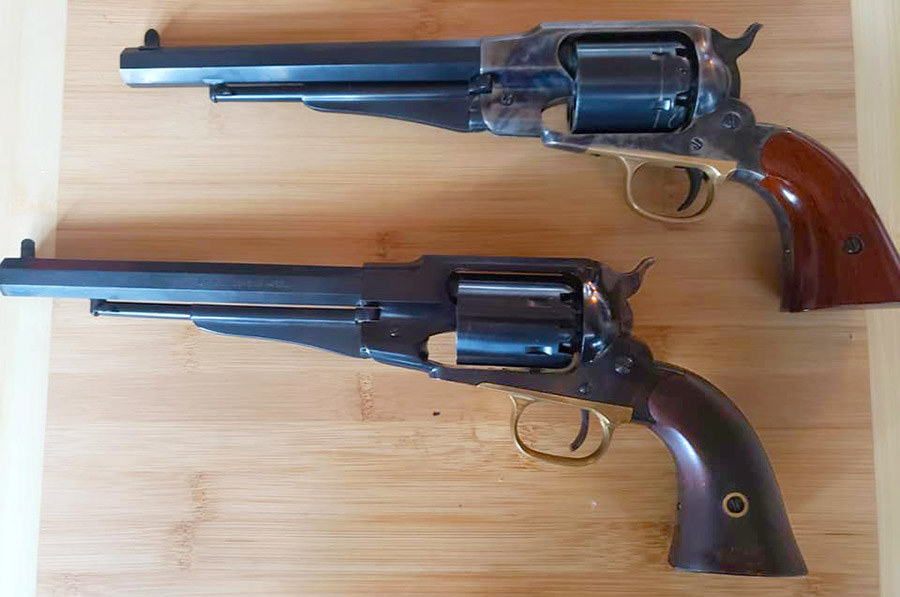
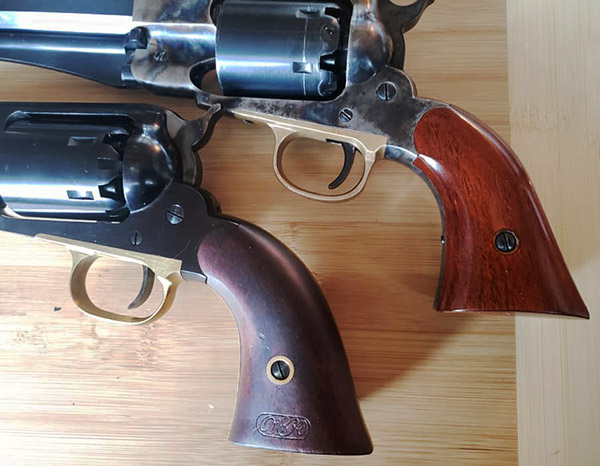
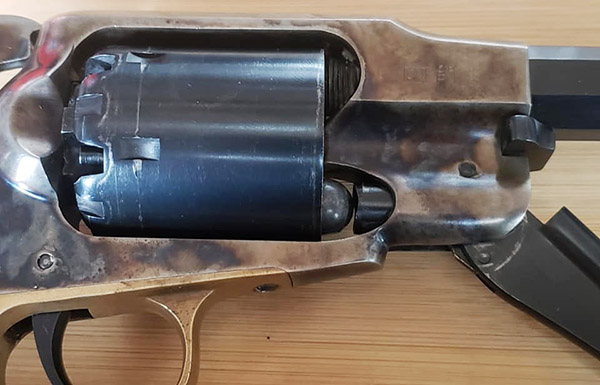
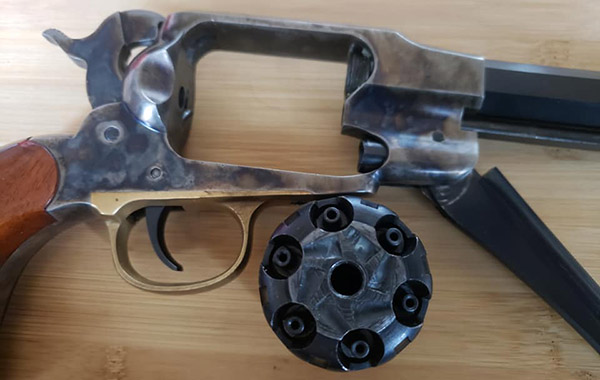
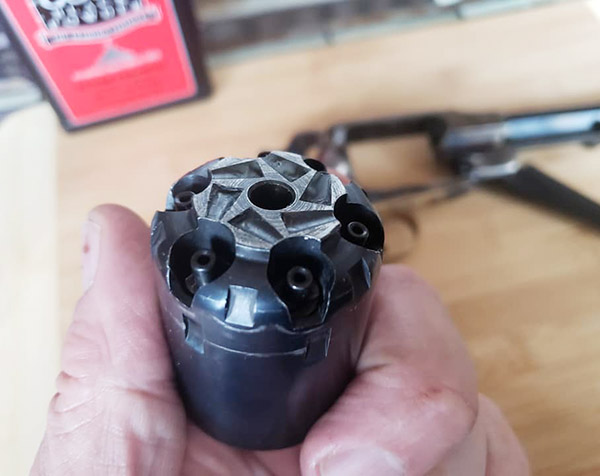
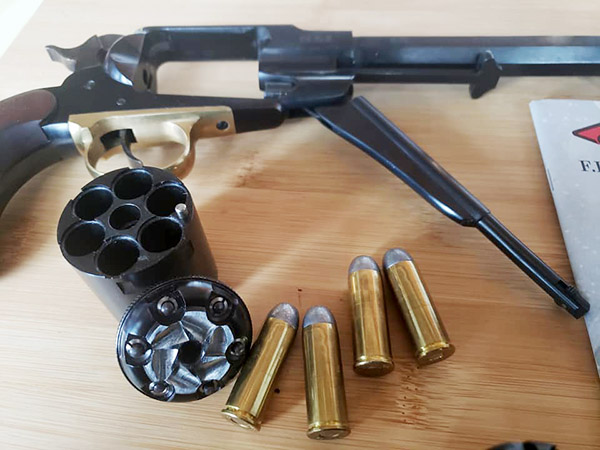
This is a guest blog by good buddy Jose, and it compares two modern Italian reproductions of the famed .44 caliber 1858 Remington New Model Army revolver. One is manufactured by A. Uberti S.p.A. (it’s the one on top in the big photo above); the other is by F.LLI Pietta (the revolver on the bottom). Here’s another shot of the two:
The Uberti in on top right, the Pietta is on lower left.
The 1858 Remington New Model Army was a competitor to Colt’s blackpowder percussion sidearm. The Army went with both versions but primarily bought the Colt (it was 50 cents cheaper than the Remington). Then the Colt factory had a fire in 1864. At that point, the Army starting buying Remingtons in quantity. The Remington was considered to be the stronger revolver because it has a top strap over the cylinder (the Colt does not), and some folks feel the Remington is easier to aim because the rear sight is cut into the frame (instead of the hammer, as on the Colt). And there are other advantages to the Remington, which Jose covers. With that as a background, here’s Jose’s article on the modern Uberti and Pietta reproductions. All photos in this blog are by Jose.
Help us publish: Please click on the popup ads!
If you’ve never fired a percussion revolver you’re really missing out on huge part of firearms history. But maybe you didn’t know that even here in California you can order one of these fine blackpowder revolvers online or over the phone with a credit card and have it shipped to your doorstep without background check or going through an FFL. Your state rules may vary.
Cap and ball packpowder sidearms were a huge part of arms on both sides during the American Civil War. The Union Army had a contract for the Colt 1860 Army, but when Colt could not keep up with demand Remington Model 1858’s were ordered. Many troops preferred the Remington over the Colt for a number of reasons. The Remington has a top strap making it stronger, and the Colt was prone to having loose percussion caps jam the cylinder.
Uberti 1858 Remington Revolver
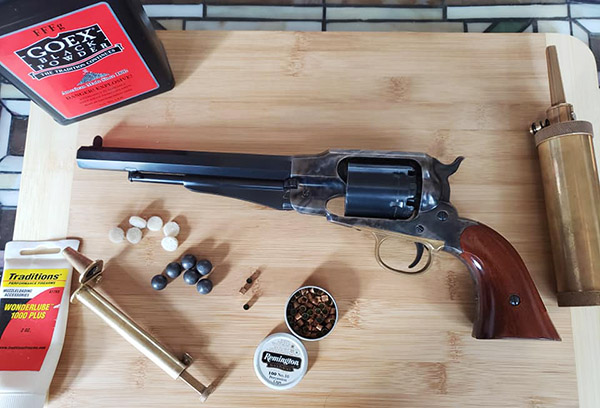
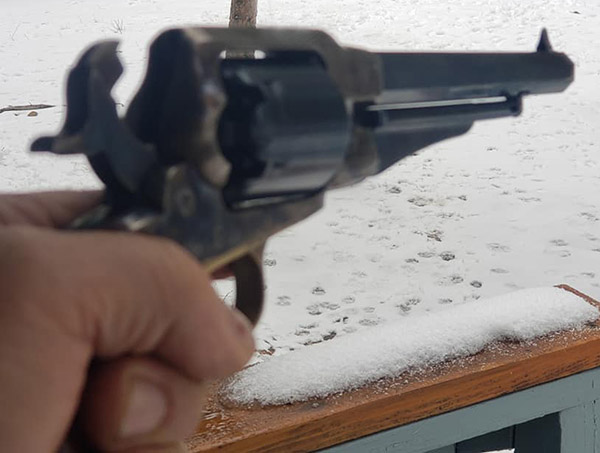
I’ve had the Uberti for about 10 years. It’s an awesome piece of fine craftsmanship. There is nothing cheap about this revolver, the fit and finish are supurb. The cylinder and barrel are a deep blue, the steel frame is color case hardened, and the trigger guard is polished brass, ans walnut stocks, giving it a very classy look. The gun is a six shot .44 cal, rifled 8-inch barrel with 1:18 LH twist, and weighs in at 2.7 pounds.
454 cal pure lead balls, Remington #10 percussion caps, waxed felt wads, and the Uberti 1858 New Army.Powder measure, balls, waxed felt wads, and caps.
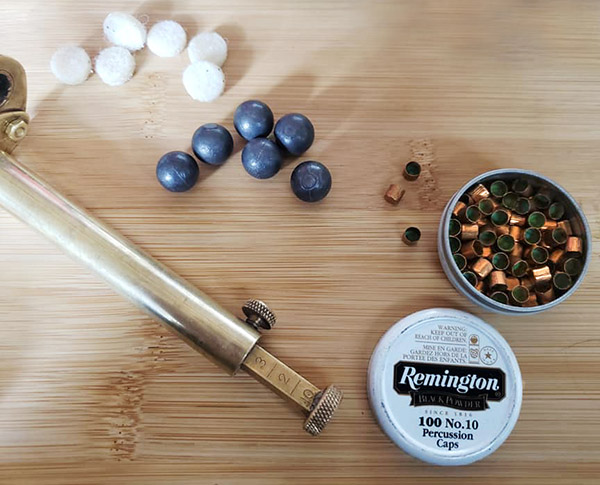
I use .454-inch diameter balls cast from pure soft lead (stick on wheel weights or plumbers lead, BRN 7) weighing in at 143 grains. It fires best when loaded with 35 grains of FFF blackpowder (I don’t like substitute synthetics), a felt pad soaked in bore butter over the powder, and the ball over the top. The felt over the powder charge prevents a chain fire from jumping between cylinders, and also adds some lube to the barrel between rounds helping prevent a buildup of powder. Either Remington or CCI #10 percussion caps provide the spark.
The color case hardened steel frame on this model Uberti is off set nicely by its polished brass trigger guard.The loading lever on the Remington 1858 is used to ram the ball into each cylinder, after loading powder and waxed wad. The percussion caps are placed on the cylinder nipples only after all cylinders have been loaded.The cylinder doesn’t require removal between loadings, only for cleaning.
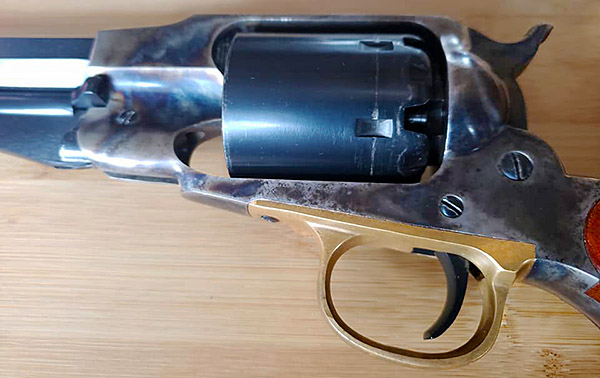
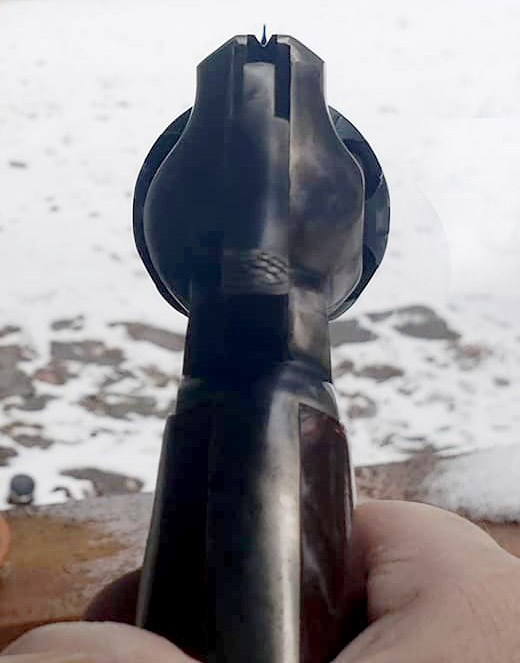
The Uberti is very well balanced and feels good in the hand. The cylinder locks up very tightly. There are noches between the cylinder nipples to rest the hammer on making it safe to carry with all six cylinders loaded. The rear sight is a V-notch on the top strap, unlike the Colt 1860 which has the notch on the hammer because the 1860 lacks a top strap. It’s no exaggeration that out to 40 yards my the Uberti 1858 holds about as tight a group as my Ruger Super Blackhawk .44 mag!
The Remington 1858 has a top strap over the cylinder making it stronger than the Colt 1860 and older firearms. It also allows for placement of a stable V-notch rear sight as opposed to the Colt’s rear site which is a simple notch filed on the back of the hammer.Nice sight picture. This Uberti has a 1:18 barrel groove twist and holds groups as tight as my Ruger Super Blackhawk out to about 40 yards.
Properly cleaning and blackpowder revolver after a day in the field is a good exercise in gunsmithing. The revolver should be entirely disassembled, down to the Springs, removing hammer from the frame, cylinder pin, loading lever, trigger, mainspring, nipples from the cylinder – everything except for removing the barrel from the frame and front sight.
The notchs between the nipples are for the hammer to rest, allowing the six-gun to be safely carried with all cylinders loaded.
A good set of gunsmithing drivers and properly fittjng nipple wrench are mandatory to keep from damaging the screws. Owning a blackpowder revolver will help anyone gain confidence to start Barking simple dunsmithing repairs and parts replacements on other types of firearms. If you don’t already have a blackpowder gun order one today! They are a blast.
Pietta 1858 Remington Revolver
This one was recently purchased because the price was right. It looks like it has never been fired, and I’ve not fired it yet, either. The specs are essentially the same as the Uberti; however, the claimed weight of the Pietta is only 2.4 pounds compared to Uberti’s 2.7 pounds. For whatever reason the Uberti feels much lighter and more well balanced. The Pietta is noticeably front heavy. The Pietta has a little play at cylinder lockup. The hammer pull and trigger feel smooth and crisp, similar to the Uberti.
The Pietta, another quality Italian replica in a slightly lower price range.
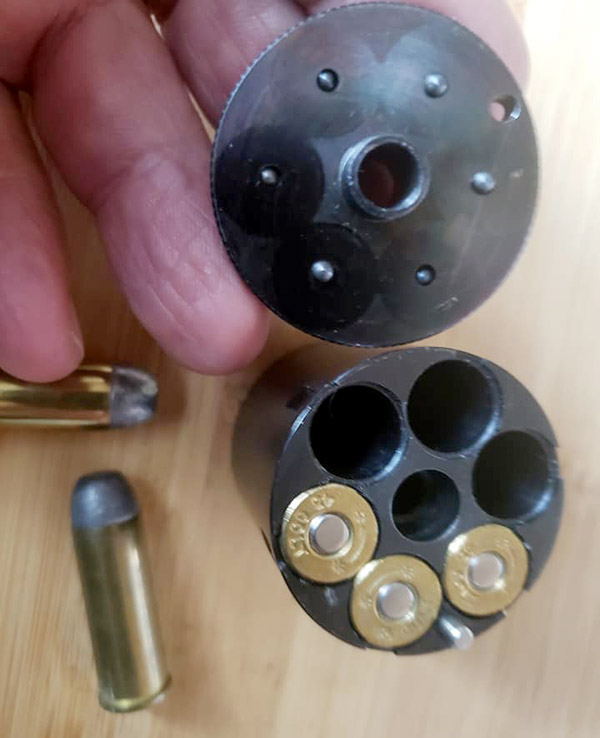
The really nice thing about the Pietta is that it came with an optional .45 Colt conversion cylinder. I’ve always wanted to get a conversion cylinder for my Uberti but they are very expensive, about 2/3 what I paid for the gun, and they always seem to be out of stock.
This Pietta came with a .45 Colt conversion cylinder.The conversion cylinder has an upper plate that holds a separate firing pin for each cylinder.
The conversion cylinder for the Pietta fits very nice, locks up tightly, and came with a box and a half of .45 Colt ammo which I have no intentions of using. Remington first started converting Model 1858 revolvers to .46 cal rimfire metallc cartridges in 1868. These were still blackpowder cartridges as smokless powder hadn’t yet been developed. So I will hand load .45 cartridges for the Pietta using blackpowder to stay traditional.
I’m looking forward to shooting these two together on a side-by-side comparison soon. For now, I hope you enjoy the photos.
That’s an awesome article, Jose. Thanks very much for sharing it with us here on the ExNotes blog.
I asked Jose to tell us a bit about himself, and he did. Jose is a geologist, an offroad racer, a fly fisherman, an upland game hunter, a handloader, and he likes to teach outdoor sports to young people. He lives on the banks of the Henry’s Fork River in Idaho in the spring and summer months and he spends the winter months in Big Bear Lake, California. Most of Jose’s offroad racing adventures are in Baja. Jose’s other hobbies include taekwando, and cumbia and bachata dancing. An interesting man, to be sure!
Never miss an ExNotes blog. Subscribe here for free!
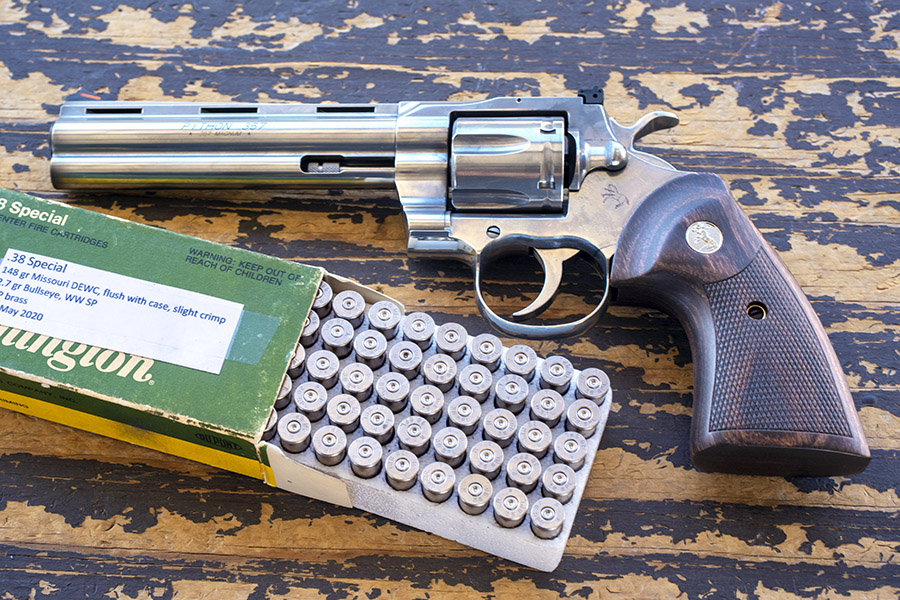
The Colt Python is an iconic handgun that stands out as the pinnacle of the gunmaker’s art. They were originally offered by Colt as their premier .357 Magnum revolver in a run that spanned decades and offered several variants: Blue steel, nickel-plated steel, brushed stainless steel, bright stainless steel, and barrel lengths of 2 1/2, 4, 6, and 8 inches. For a brief period, they even offered one chambered in .38 Special only. That all ended a few years ago when the revolver market subsided and black plastic, semi-auto 9mm gangbanger guns held sideways took over the silver screen (there’s absolutely no accounting for some folks’ taste, I guess). Then, in a surprise move, Colt introduced a re-engineered Python last year, in stainless steel only, with either a 4 1/4-inch or 6-inch barrel. I had to have one, and about a month ago, I scratched that itch.
The new Python carries a hefty $1499 price tag and they are just about impossible to find. And when you do see one, it is always substantially above MSRP. I don’t see the prices coming down on these guns, either. The original Pythons sell for $3K or more (mostly more), and with guns in high demand now and for the forseeable future, I think you’ll always always be able to get your money out of a Python if you ever wanted to sell it. I don’t see the prices going anywhere but up, and like I said, it is near-impossible to find a new Colt Python. But I know people in high places, I got a hell of a deal on my Python, and I am enjoying it enormously. Just looking at it is fun.
I went to my gun club a few days ago to shoot the new Python for the first time, and in a word, it was spectacular. I’ll get to that in a second.
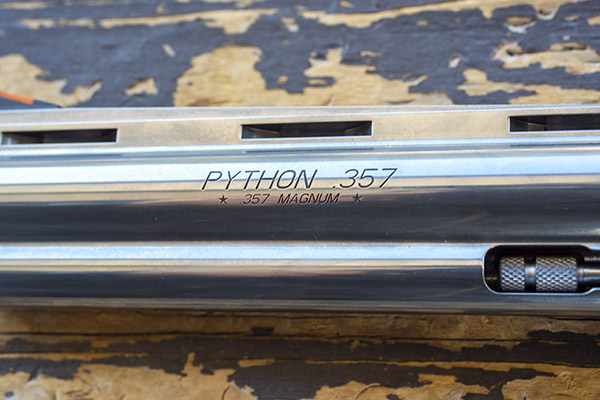
My Python has a 6-inch ventilated rib barrel. The revolver is polished stainless steel and it looks great. The roll marks on the new Python are very similar to the original Pythons. Very classy, in my opinion.
One of the reasons Colt stopped making the original Pythons a few years ago is they were too expensive to manufacture, as they required too much hand fitting of the revolver’s internal components. Colt’s re-engineering effort made all but one internal part capable of being CNC-machined to final dimensions, and in the modern Python hand-fitting is required for only one component. What that did was dramatically improve the double action trigger pull, and somewhat degrade the single action trigger pull. The double action trigger is short and sweet, and the hammer travel is only about half what it used to be. The single action trigger pull is, well, different. Read on, my friends.
Help us keep the content coming: Please click on the popup ads!
Single action, by design on the new Python, has a some take-up and you can actually see the hammer move a little further to the rear when you squeeze the trigger shooting single action. Think of it as a single action trigger that adds a little bit of double action to the dance before it releases the hammer.
I thought there was something wrong with the revolver, but my contact at Colt told me the new Pythons were designed that way to meet the California and Massachusetts drop test requirements. It is definitely not a “breaking glass” single action trigger; it’s closer to pulling the trigger on a Glock (that’s not intended to be a compliment). Double action, though, is absolutely outstanding. It’s a shorter pull than any other double action revolver I’ve ever fired and I like it. I suppose some people might think it’s a good thing that the gun meets the drop test requirements of left-leaning governments. Me? I’d go with Door No. 1 and refrain from dropping my loaded $1499 revolver.
Anyway, the single-action trigger threw me for a loop, but I adjusted to it quickly during a dry firing session. I don’t notice it anymore, and as you’ll see below, it sure hasn’t hurt accuracy.
Fit and finish on the new Python are top notch. You can see that in the photos on this blog, which I shot during and after an extended range session. I probably should have taken pictures before I fired the new Python (when the gun was factory immaculate), but hey, it is what it is.
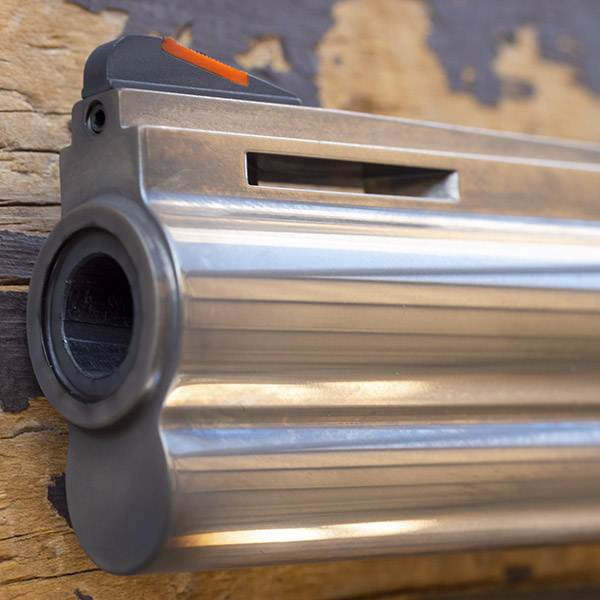
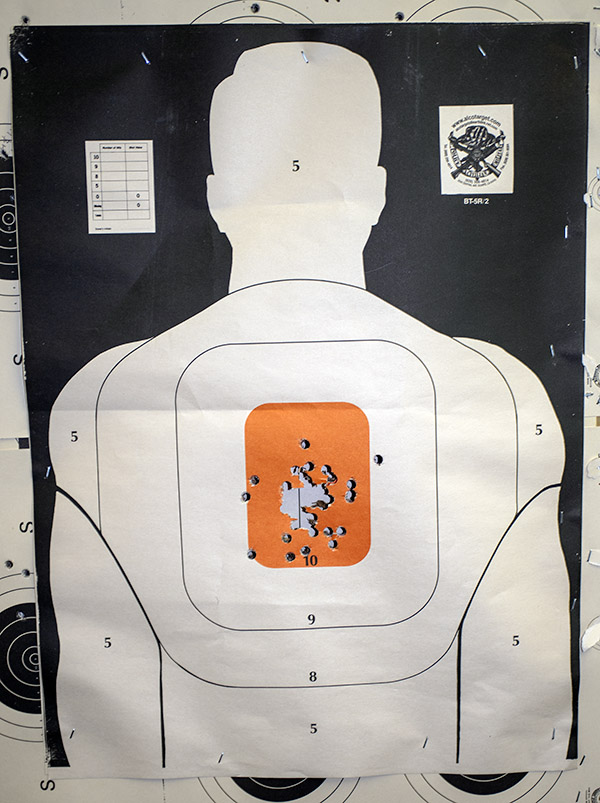
The new Python has a red ramp front sight, which I like. There is no white outline rear sight (it’s plain black). The combination works well, as the targets you see here show. The Python also has a recessed crown, unlike the original one, which was flush. The recessed crown better protects the bore.
My first shots were 50 rounds I put through the gun using my standard .38 Special target load (2.7 grains of Bullseye and a 148 gr wadcutter, loaded on my Star reloader), all fired single action. I shot from the 50-foot line and it was windy as hell. I had to stop a few times to walk downrange and add more staples to the target because it was starting to come loose, and the target stand was swaying toward and away from me as the wind rocked it. I was shooting, literally, at a moving target.
A complete box of .38 Special wadcutter ammo…50 rounds fired at 50 feet firing single action. All those extra staples were needed to keep the wind from tearing the target off the stand.
I was surprised (and pleased) at how stunningly accurate the new Python is. I hadn’t touched the sights, and it was punching holes right where I wanted right out of the box. It put an entire box of ammo into the bullseye with a standard 6:00 hold and the sights left as they came from the factory. That’s a first for me, and I’ve been doing this a long time. The bottom line: The new Python is accurate.
.38 Special ammo loaded with 148-grain wadcutter bullets. The bullet’s “wadcutter” nose profile cuts a clean hole in the target. I used mixed brass shooting the new Python for the first time.
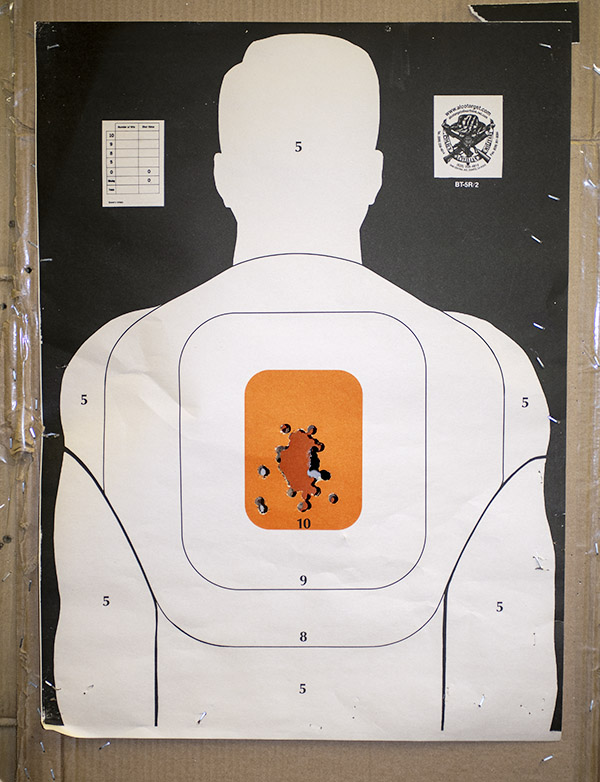
Then I shot another box of 50 cartridges (using the same .38 Special target load I used for the target above), but this time shooting double action. Let me make the point again: These two boxes were the first time I ever fired the new Python. Here’s my second 50 rounds on the target, fired double action.
Another 50 rounds at 50 feet, this time shooting double action. Not too shabby, if I do say so myself. The new Python’s double action trigger is superb.
Eh, one shot went out of the bullseye (it’s that one in the 9-ring, just outside the 10-ring, on the right). Like I said, it was windy out there. But still, for me, this was phenomenal double action shooting. It’s the best I’ve ever done shooting double action, actually.
Then I thought I’d try two 5-shot groups on the 50 foot standard pistol target with .357 ammo (all targets shown here were shot at 50 feet). As you know, a .357 Magnum handgun can shoot either .357 Mag ammo or .38 Special ammo. I brought along some of my standard 357 Magnum reloads (15.7 grains of Winchester 296 powder and a 158 grain Hornady jacketed hollow point bullet). This is a load I’ve been using since my Army days and it does well in any .357 Magnum revolver I’ve ever owned. It came from the pamphlet Winchester published in the 1970s for their powders. It performed superbly well in the new Python.
.357 Magnum shots at 50-foot targets. Point of aim was 6:00 for all shots. Bring it on…fire and brimstone…the new Python handles full power .357 Magnum loads well.
It’s easy to forget how powerful the .357 Magnum cartridge is unless you fire it back-to-back with the .38 Special. The .38 Special is a very manageable cartridge with moderate recoil, especially in a big, heavy, 6-inch handgun like the new Python. When I shot the .357 Magnum loads, I was instantly reminded that the .357 is a real barn burner. Think big recoil and lots of muzzle flash and blast. It was cool, and the big Python handled full power magnum loads well.
As I already mentioned, it was very windy and gusty on the range (two tractor trailers were on their side on I-15 when I drove out to the club). I was the only guy out there (I’m probably the first guy to visit our range with the new Python, too). On a calm day, I’m sure I could do better than the targets you see above.
I finished up another box of .38 Specials shooting 158 gr cast flatpoint Hursman bullets (also loaded with 2.7 gr of Bullseye), shooting at one of those green star target things you throw on the ground (my daughter bought it for me a few years ago and I think the thing is going to last forever). I walked it out to 50 yards with repeated hits, and I’ll bet I didn’t miss but two or three times out of 40 or so rounds.
There were no malfunctions of any kind in the approximately 150 rounds I fired through the new Python. No light strikes, no misfires, and no jams. And like I’ve been saying, accuracy was stellar. It’s almost like the new Python is laser guided.
A prancing pony…the rampant Colt logo that has adorned Colt firearms for more than a century and a half. Long may it live!
You know, there’s an old saying: You get what you pay for. To that, I would add the qualifier: Sometimes. In the case of the new Colt Python, this is one of those times. I love the new Python. It’s an iconic firearm and if you are thinking about getting one, my advice is this: Do so. You won’t be disappointed.
Colt has a custom shop, Remington has a custom shop, Winchester had a custom shop, Savage has a custom shop, Springfield Armory has a custom shop, CZ has a custom shop, and Smith and Wesson has a custom shop. It seemed Ruger was the only one of the big players that didn’t have a custom shop.
That’s changed. Ruger recently announced that they, too, now have a custom shop, except they do things differently. Rather than taking orders for custom features on their regular line of firearms, Ruger’s approach is to produce limited numbers of highly-customized guns. Stated differently, Ruger picks the features they want to add to their custom guns; your choice is to purchase it (or not). It’s not a bad way to go.
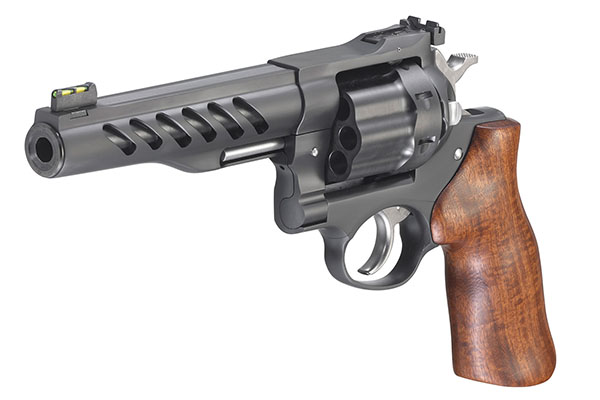
Note the new Super GP100’s dark PVD finish, the green fiber optic sight, the slotted barrel shroud, and other custom touches.
Ruger’s two most recent custom shop models are revolvers they call the Super GP100; one chambered in 9mm and the other chambered in .357 Magnum. These revolvers have a number of custom features, including a shrouded and vented barrel, 8-shot capacity and the ability to use star clips for speedy reloads, radically-fluted cylinder (I like the look), PVD (that’s physical vapor deposition) finish, polished and slicked up trigger and internal componentry, oversized Hogue hardwood grip, an 11-degree barrel crown (that’s supposed to enhance accuracy), and a fiber-optic front sight (never had one of those before; I’m eager to see if it really does anything for me).
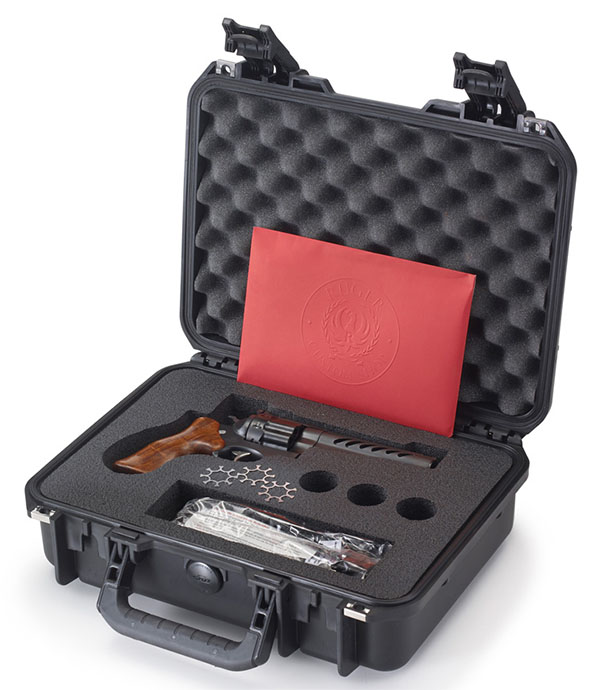
Befitting its custom status, the Ruger Super GP100 comes with a higher-quality carrying case.
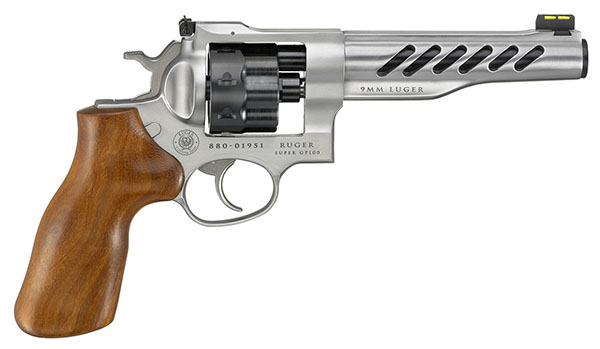
The Super GP is offered in two chamberings: .357 Magnum and 9mm Parabellum. The 9mm version is not approved here in the Peoples Republik of Kalifornia. That’s probably okay, as I would go for the .357 if given the choice. But that’s not a choice that’s going to be offered any time soon. Read on, and you’ll see what I mean.
The 9mm version of Ruger’s new Super GP100 revolver. It looks good. Note the shorter cylinder.
I like the way Ruger handled the 9mm Super GP100. The cylinder is shorter to match the 9mm cartridge, and the barrel extends back into the frame. This means the 9mm bullet has less of a jump to the rifling in the barrel, which should improve accuracy. It’s the same thing Smith and Wesson does on its .45 ACP revolvers.
Ruger doesn’t stock these guns. True to the custom shop concept, Ruger builds them as orders are taken. But it wouldn’t do any good to order one now, unless you just want to get a place in line. Due to the press of handgun orders induced by the election, the pandemic, and the recent civil rioting in major US cities, Ruger has its workforce focused elsewhere on meeting the unprecedented demand for its standard guns. As an aside, it’s tough to buy ammo right now, too, for the same reasons. That’s not bothering me, as I reload on my RCBS reloading gear and I’m well stocked.
I’m in the market for a .357 Mag revolver, but I’ll probably go with a more traditional handgun. Maybe a .357 Blackhawk or a S&W Model 27. I’ll keep you posted.
Revolvers, rifles, reloading, and more…check out our Tales of the Gun page!
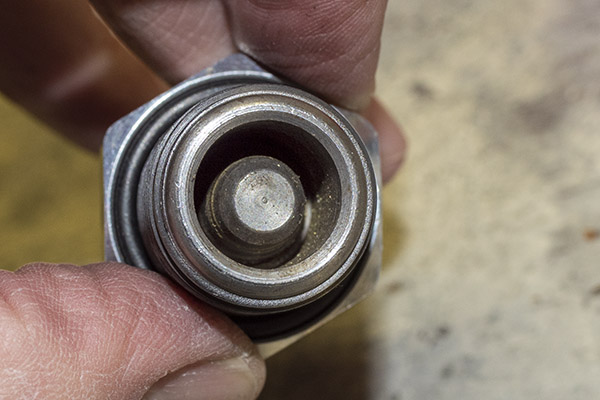
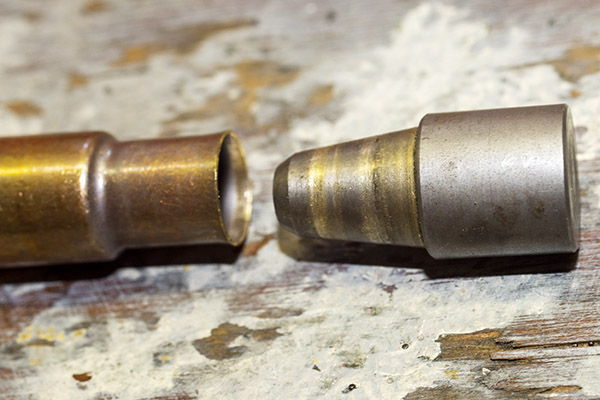
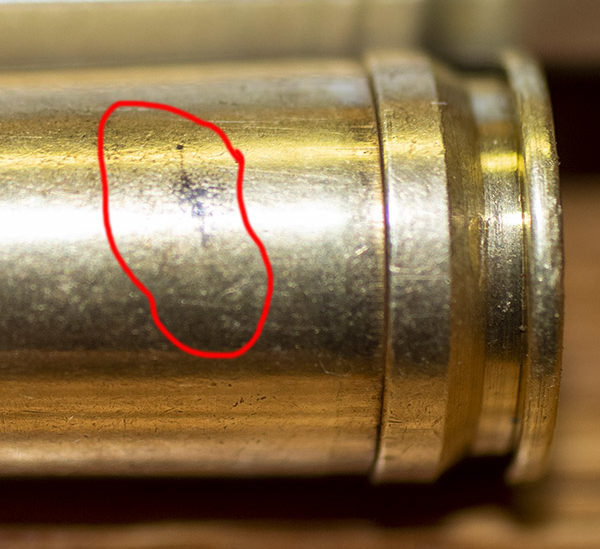
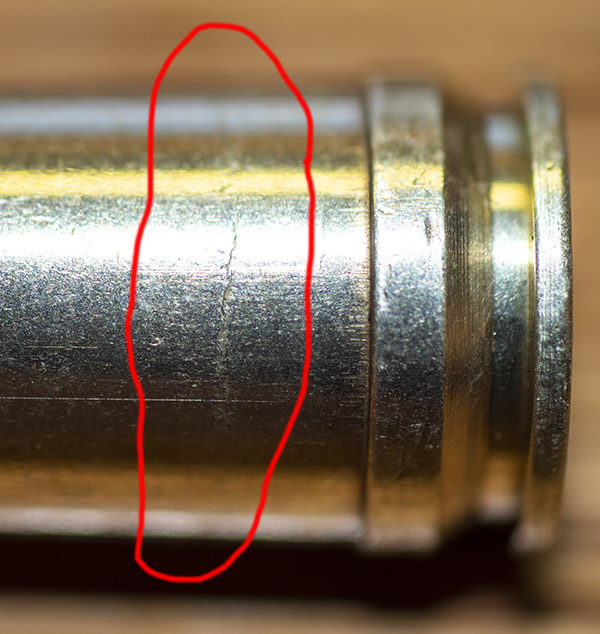
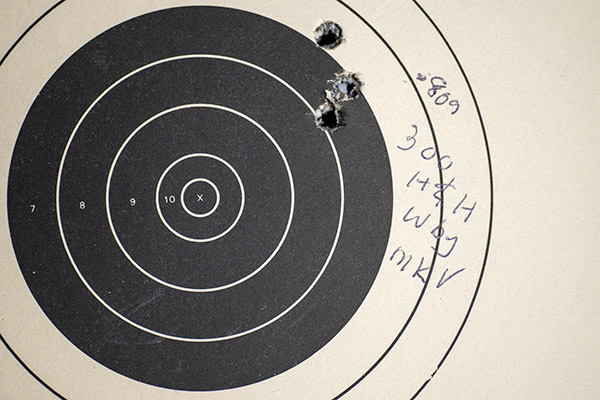
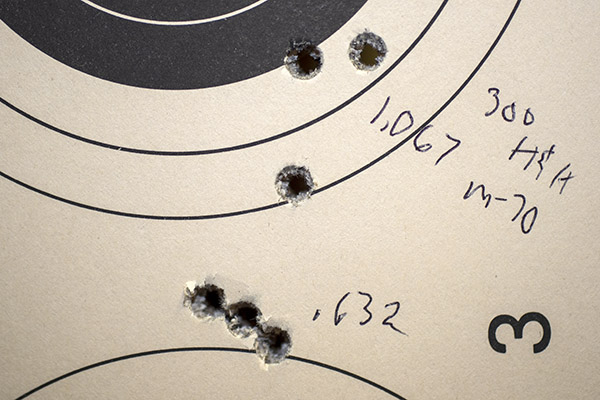
I had the 300 H&H Mags out last week, and when reloading the brass from that range session, I noticed a bright ring around some of them about a quarter inch above the belt. I did the inside-the-case check with a bent paper clip and sure enough, I could feel the sharp step of the brass thinning. Uh oh. Impending case separations. I had reloaded this brass once too often.
Case separations are caused by case stretching, which progresses each time you reload a cartridge. You can check for impending separations by examining the cases closely (you’ll see a bright ring, maybe evidence of gas escaping, or maybe even the beginnings of a crack above the case head). You can also make a tool from a paper clip to feel for a circumferential notch inside the case. That’s what I do, and I could feel the notch on these cases. They were at the end of their useful life.
I don’t know how many times I had reloaded these cases (maybe something like 3 to 5 times?), but rather than risk an impending case separation, I tossed the brass (all 50 pieces). It felt like a crime against nature, but it was necessary. I had two more boxes of 300 H&H brass (100 rounds) tucked away, so that will be the next lot that I load. I had tumbled the old brass for several hours, and maybe that was a good thing because it let me see the warning signs and the faint beginnings of circumferential cracks. Time to move on and start with fresh brass.
Evidence of a escaping gas on a fired 300 H&H Magnum case. The “belt” is the larger diameter just above the case base.A classic impending case separation. You can see that the case has already started to crack. This would separate if I loaded and fired it again.
When I started this blog, I didn’t intend for it to be another reloading tutorial, but here we are anyway. Let’s get back on the two 300 H&H Magnums. I guess to start, allow me to tell you a bit about the magnificent and classic 300 H&H cartridge. It goes back to shortly after World War I, when the venerable English firm of Holland and Holland introduced it as an African plains game cartridge. I know, I’m coming across as snooty, and to tell the truth, I’m not entirely certain what “venerable” means. But it sounds like it fits.
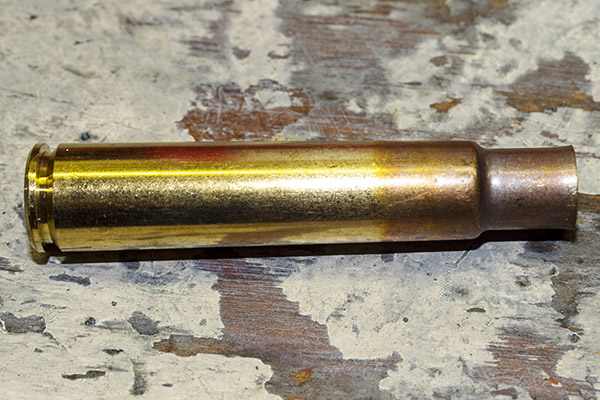
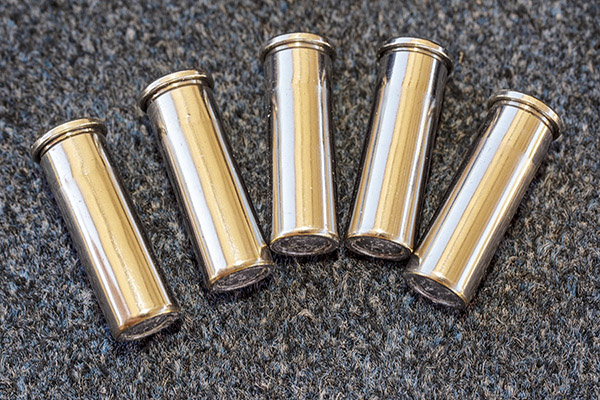
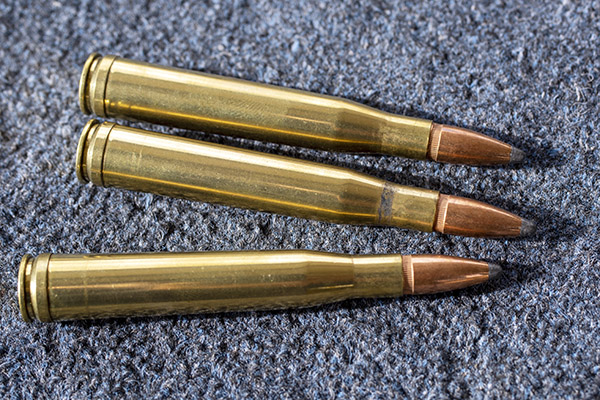
300 H&H reloads. I use 150 gr Winchester bullets I bought about 6 years ago. I got a good deal on those bullets and I bought about 700 or so. I should have bought more, as I can’t find them anywhere online. I think I have about 200 or 300 left. You can see a bright circumferential ring above the case base on the lower cartridge, warning that this brass was past its useful life.
The 300 H&H was the absolute hottest .30 caliber cartridge in those days, and the belted 300 H&H cartridge just looks cool. It became the basis for nearly every magnum round that followed, including nearly all the Weatherby chamberings, the 7mm Remington Magnum, and a bunch more. The 300 H&H round won the Wimbledon 1000 yard match in 1935, and in 1937 Winchester offered it as a factory chambering in their Model 70 (assuring it’s survivability well into the future). Did I mention it just looks cool, too?
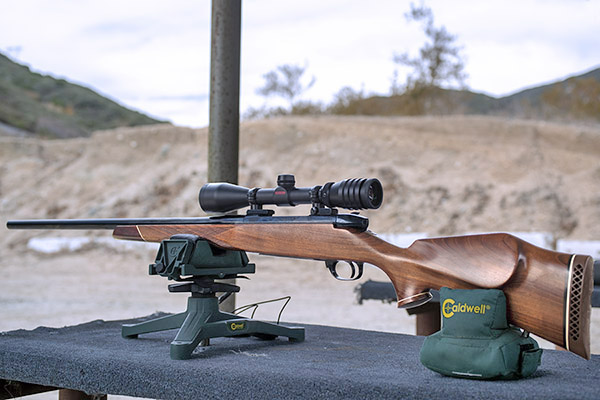
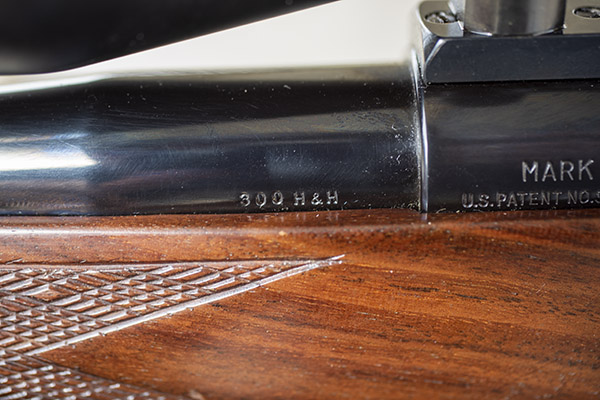
So to continue the story, I had to have a 300 H&H, and because I had a Weatherby 7mm Mag that I couldn’t get to group well no matter what I tried, to me the solution was obvious: Rebarrel it in 300 H&H. Which I did. 35 years ago. I’ve been shooting it ever since. It’s the one you see in the big photo at the top of this page, and if you don’t feel like scrolling up, here’s a view from the port side:
A custom 300 H&H Weatherby Mark V. This is a magnificent rifle.The cartridge stamp on my custom barrel.
The 300 H&H Weatherby is a fabulous rifle. It has a Timney trigger my Dad put in it while I was overseas, and it breaks like glass. I enjoy owning it, reloading for it, and shooting it.
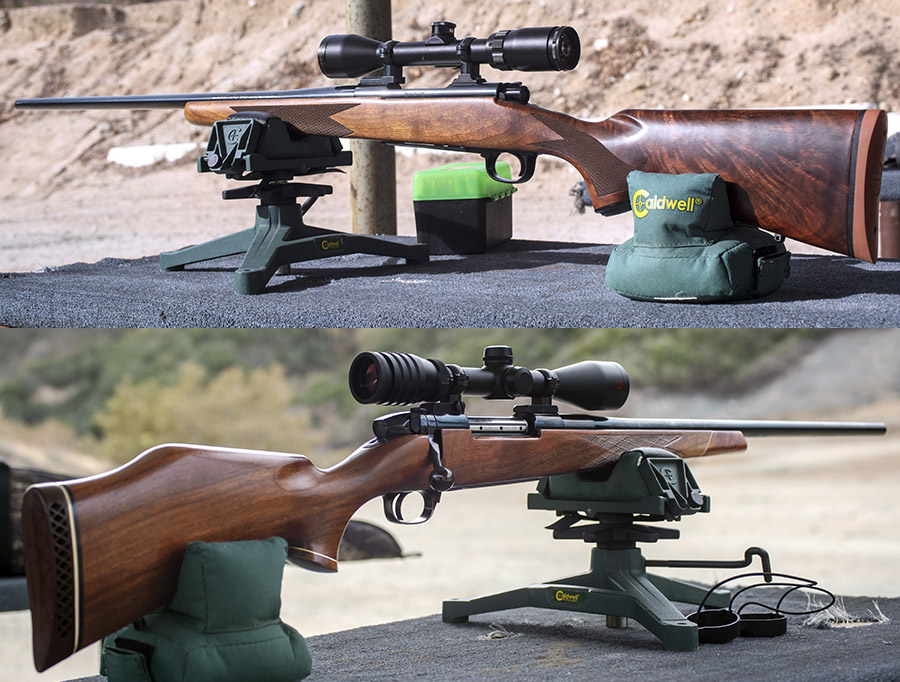
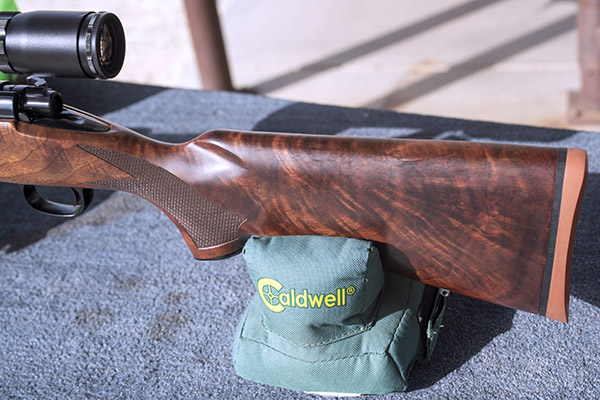
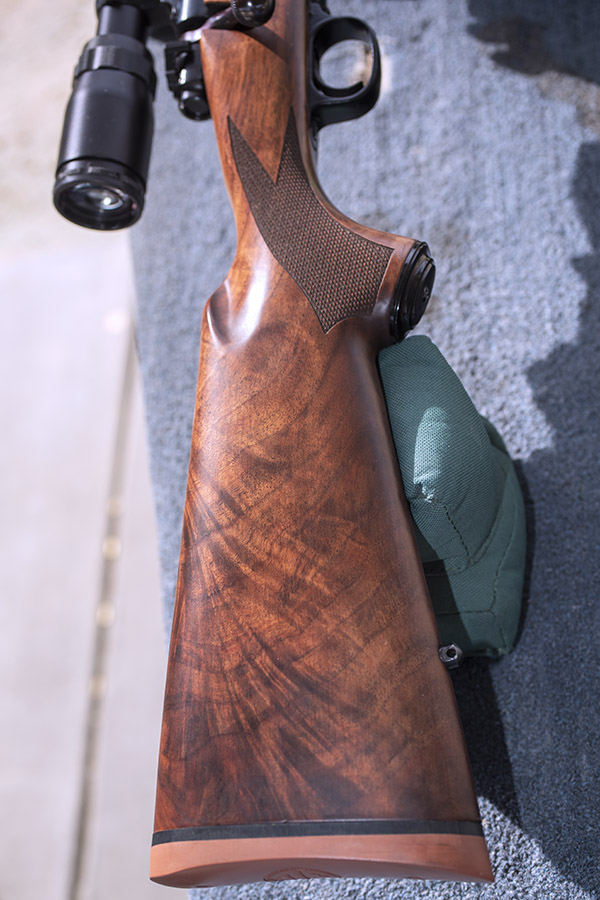
Then I picked up another 300 H&H rifle maybe 7 years ago: A Model 70 Winchester. The Model 70 in 300 H&H is not a commonly-encountered rifle, and I searched a while to find this one on Gunbroker with the fancy walnut I wanted. Trust me on this: It looks even better in person. And this one is a shooter. It deserves a better scope, but it’s still a beautiful rifle.
Sometimes people ask why I always find rifles with the nicest wood. It’s because I look for them!The Model 70 stock from the right side of the rifle. It’s unusual to see this kind of walnut on a production rifle. I recognized that when I saw the rifle on Gunbroker, and I pulled the trigger.
Anyway, one day last week was one of those days when I woke up and knew I needed to get out and shoot some 300 H&H Magnum. So I did. These are some photos from that range session. I think it was a Monday. It was cold and windy as hell with gusts up to 60 mph (that’s the bad news), but because of that I had the range to myself (that’s the good news).
I shot my standard 300 H&H load. It’s one that has done well for me in the Weatherby, and it does equally well in the Winchester. The load is 60 grains of IMR 4320, a CCI-250 large rifle magnum primer, the 150-grain Winchester jacketed soft point bullet I mentioned above, and an overall cartridge length of 3.600 inches. You won’t find this load in any of the newer reloading manuals, but I still have the manuals I used years ago, before all the latest and greatest gee-whiz propellants came out. That’s where I found this one. And wow, does it work! Check out the 100-yard groups on the targets below, and remember it was a cold and windy day when I shot these.
The inexpensive Bushnell on the Model 70 was at the end of its elevation adjustment range and the rifle still shot a little high at 100 yards. I shimmed the front of the scope up .010 inch, which should get me a foot lower on the target at 100 yards (if you do the math, each 0.005 gets you 6 inches at 100 yards). I should be in the scope’s adjustment range after shimming, but I haven’t fired it again to make sure. I’ll check it the next time I’m out there. Longer term, though, the Model 70 will get the scope it deserves (and that will be a Leupold).
Edit: I learned that the manufacturer has discontinued IMR 4320 propellant, so the bad news is that when I deplete the little bit of this wonderful powder I have left, I need to develop a new load (and I guess that’s also the good news, as it means I get to play around with developing a new accuracy load). I’ll probably start with IMR 4350, as my research indicates it’s the go to powder for .300 H&H. Nobody has 4350 in stock right now; hopefully, that will change soon.
One more update…on a subsequent trip to the range, the shims did the trick for the Model 70; the Bushnell scope can now be adjusted to put the shots right where I want them.
More fancy walnut: Check!
More accuracy loads: Check!
More gun stories: Check!
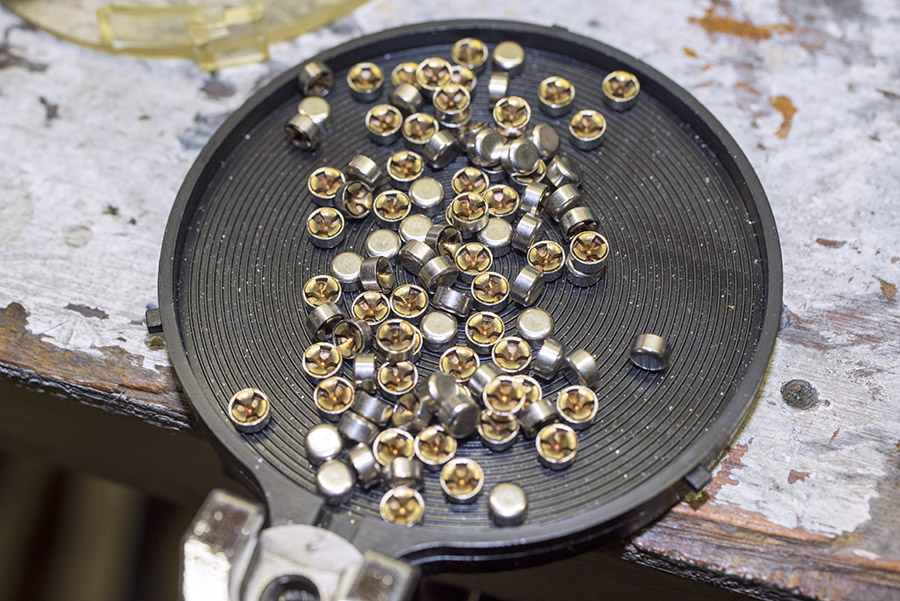
Gougers. People who overcharge simply because they can when supplies are low. Someone who takes advantage of a bad situation. There’s a lot of that going on in the ammo and reloading components business today. What’s driving it is extreme demand induced by the pandemic, the breakdown in law and order in some urban areas, a change of administrations, and the resulting ammunition and components shortages. People are buying guns and ammo in unprecedented numbers because they are afraid. It’s being fueled by uninformed and malicious folks on the Internet.
Me? I’m not worried. We’ve been through this before. The pendulum swings both ways, and it always returns to center. It may take a while, but common sense always prevails.
Before all this shortage business began, primers sold for about $34 or $35 per thousand. Gougers have kicked that up to around $100 per thousand, and even at that price, they are difficult to find. Thanks, but I’ll take a pass. I’ll wait it out. It’s that pendulum thing I mentioned above.
I imagine it’s tough being in the ammo business these days. For the most part, the folks who make ammo are the same folks who make reloading components, and with the unprecedented demand for ammo, their components are necessarily being consumed by their own factories. I get that, too.
This video from the CEO of an ammo and components company popped up in my feed yesterday, and I think it’s a good one. You might want to watch it.
I get it, Mr. Vanderbrink. The trolls who start rumors, spread rumors, and post stupid stuff on the Internet are as despicable as the gougers, and I give Vanderbrink a lot of credit for calling it like it is. I’d call the trolls morons, but that would be an insult to morons everywhere. You folks in the ammo business keep doing what you’re doing. We’ll be here as loyal customers when the shortages end, as they always do.
Guns, ammo, reloading, motorcycles, product reviews, trip reports, and more! Never miss an ExNotes blog:
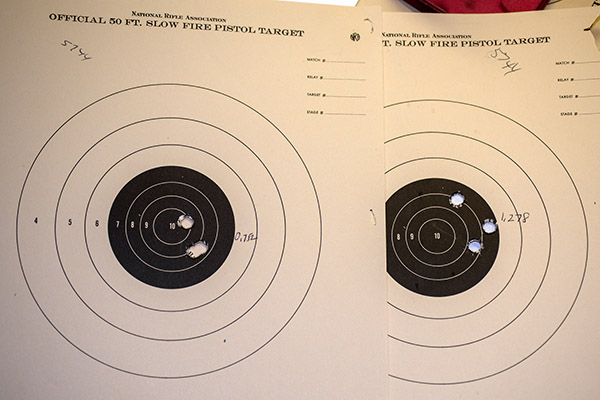
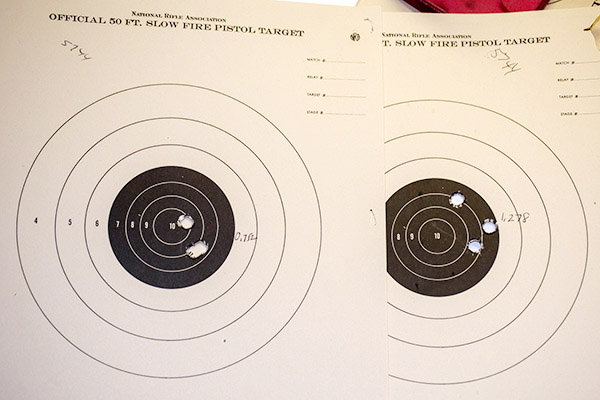
You’ll recall a recent blog where I waxed eloquent about Eleanor, my Ruger RSM .416 Rigby rifle. In that blog, I talked about reduced loads using 350-grain cast Montana bullets and 5744 and Trail Boss propellant. It was fun…the Trail Boss loads had milder recoil and “good enough” (but not stellar) accuracy. Take a look at these 50-yard targets:
The above target on the left was with 30.0 grains of Trail Boss; the one on the right was with 34.0 grains of Trail Boss. I could feel a tiny bit more recoil with the 34.0-grain load, but both were light loads with modest recoil. Weirdly, the point of impact shifted sharply to the right with the lighter load, but it moved back to the center with the 34.0-grain load (and it was slightly higher). The Trail Boss loads shot okay, but they weren’t running in the same league as the load I had shot the prior week with 5744 propellant and the same Montana Bullet Works 350-grain bullet, as you can see from the 50-yard targets below.
I could see what I was getting with the Trail Boss and I could see that it wasn’t grouping nearly as well as the 5744 loads at 50 yards, so that stopped my testing with Trail Boss (that, and the fact that I had used up all my Trail Boss cartridges).
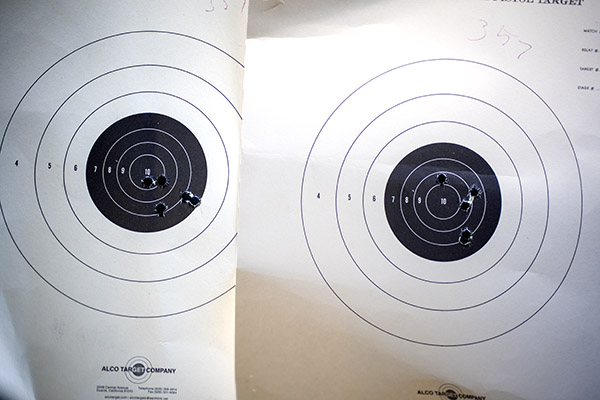
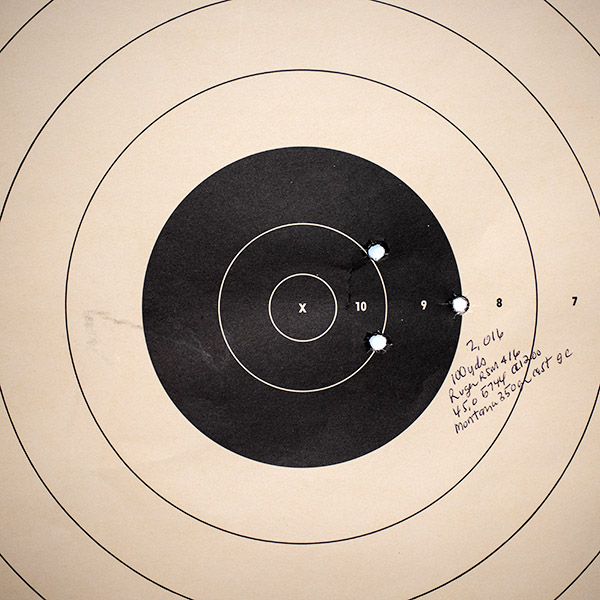
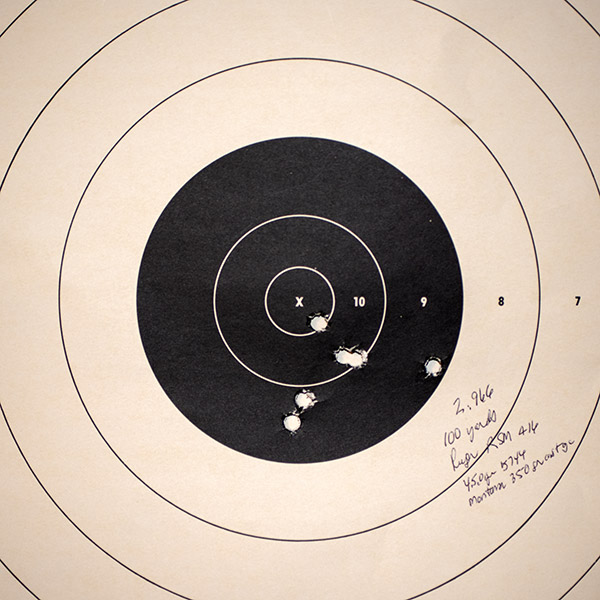
I was curious: How would Eleanor do at 100 yards? I still had some of the 5744 loads left, so I posted a couple of 100-yard targets and let Eleanor have her way. I first fired a 3-shot group and after looking through my spotting scope, I was surprised to see how well they grouped.
I thought maybe that target was a random success, and I didn’t want to ruin it by throwing more shots at it. So I fired another 3-shot group at the second target, and then another three at that same target. That’s the one you see below.
Before all you keyboard commandos start telling me that these results are nothing special, allow me to point out that these are 100-yard groups using open sights on an elephant rifle. I’m calling it good to go. Like I said earlier, when the elephants become an invasive species here in So Cal, I’m ready. The load is 45.0 grains of 5744 (it’s the load the Lyman Cast Bullet Handbook specified as the accuracy load, and they were right), the 350-grain Montana Bullet Works .416 bullet sized to .417 and crimped in the cannelure, Hornady brass, and a CCI-200 primer. I didn’t weigh each charge; I just adjusted my RCBS powder dispenser and cranked them out. If you were wondering, I use Lyman dies for this cartridge.
A bit more about Eleanor: The rifle is a Ruger 77 that the good folks from New Hampshire call an Express or RSM model (I think RSM stood for Ruger Safari Magnum). They made them in 375 H&H, 416 Rigby, and 458 Lott (kind of a magnum .458 Magnum). Ruger also made a similar one in a few of the standard calibers (7mm Mag, 30 06, and 300 Win Mag, and maybe one or two others). These rifles were a bit pricey when Ruger sold them in the late 1990s/early 2000s, but evidently not pricey enough. They were too expensive to manufacture, so Ruger stopped making them. When you see these rifles come up for sale today (which doesn’t happen very often), they command a premium. I wish I had bought one in 30 06 when they were first offered; to me, that would be the perfect rifle.
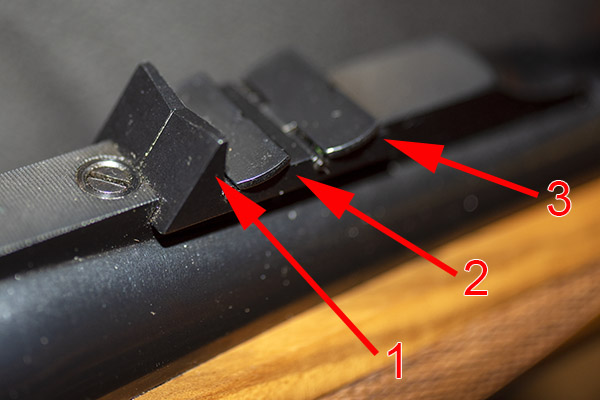
The rear sight on a Ruger RSM rifle is of the African “Express” style. The elevation adjustment consists of a fixed and two flip-up blades, and they all have a very shallow V. I guess the idea of that shallow V is that it lets you see more in case an elephant is charging. The sight has two flip up blades behind the fixed blade; as range increases, you flip up the second blade, and if it is an even longer shot, you go for the third blade. I got lucky, for me, the fixed rear sight blade is perfect with this load. I made a minor adjustment for windage, and the elevation is spot on with a 6:00 hold at both 50 yards and 100 yards.
Incidentally, that rib the rear sight sits on? It’s not a separate piece. It and the barrel were turned and milled from one solid piece of steel. It’s one of the reasons these rifles were too expensive to manufacture.
The front sight is the typical brass bead (you can sort of see it in the featured photo at the top of this blog), which I usually don’t like, but with these results I can’t complain. I’ve shot better groups with two or three other open sight rifles using jacketed bullets at 100 yards; this is the best any cast bullet has ever done for me.
Want to see the first installment of the Eleanor story? It’s right here.
Tough to get to a gunstore to buy targets? Range fees for targets too high? Do what I do and order them online. They’re delivered right to your door and they’re less expensive, too.
Need a calipers for measuring your group size? This is a great place to find great calipers at a great price.
Want to check out Montana Bullets? Here’s a link to their website. Tell them Joe sent you. Trust me on this: These are best cast bullets I’ve ever used.
You’ve thought about reloading, you’ve read stuff from us and others about the benefits of reloading, and you want to do it. But how?
Hey, I was born into it. My Dad was a reloader and I had a pretty good idea what to do when I wanted to start, but the urge to do so didn’t hit until I was a young guy in the Army at Fort Bliss. I was lucky. The guy who ran the Fort Bliss Gun Club (Roy Johnson) had a room set up for just that purpose and he walked me through the process some 50 years ago. But Roy has gone on to his reward, you’re probably not stationed at Fort Bliss, and you want to get into the game. That’s what this blog focuses on, and in particular, the equipment you’ll need to get started.
Inside the Fort Bliss Gun Club. This is a fabulous place where I spent a lot of time as a young Army dude. Next time I’m in El Paso you can bet I’ll stop in again.
Reloading Advantages
There are three advantages to reloading: Cost, accuracy, and availability.
Generally, reloaded ammo costs less than factory ammo, and in some cases (especially for more exotic rifle ammunition), the savings are huge. For example, factory .416 Rigby ammo costs $170 for a box of 20 rounds; I can reload .416 Rigby ammo for well under a buck a round.
From an accuracy perspective, reloading is the only way to go. You can tailor a load to a particular firearm by varying bullet type, bullet seating depth, crimp, powder type, powder charge, brass, and primers to arrive at a combination that delivers superior accuracy (and it’s fun doing this). I have rifles that shoot 3-inch groups at 100 yards with factory ammo; with my custom reloads, I can get half-inch groups.
Today, if you reload and you’ve laid in a good stock of components, you can reload your way through any ammo shortages. Nobody has .45 ACP, 9mm, or .223 ammo in stock right now; I have enough components on hand to reload thousands of rounds. I’m on the range two or three times a week enjoying my shooting hobby while other folks are online whining about not being able to buy ammo.
What You Will Need
The things you will need to start reloading fall into two categories: The reloading equipment, and the reloading components. The reloading components are the things that combine to bring an empty brass cartridge case back to life (that includes the bullets, the propellant, and the primers). The reloading equipment includes the gear you need to take the components and turn them into a ready-to-fire cartridge.
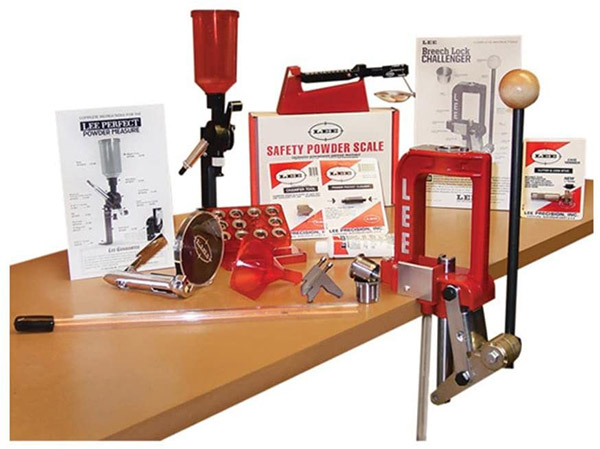
If you want to get into the reloading game, I believe the best way to do so is to buy a complete equipment reloading package from one of the suppliers like RCBS or Lee. That’s the RCBS kit shown in the big photo above. I’ll talk about it, the Lee kit, and a couple of others further down in this blog. First, let’s review each bit of gear.
The Reloading Press
That’s the lever-operated press that accepts the dies (more on that in a second) for reloading your ammo, and sometimes the press includes a mechanism for seating primers in the cartridge case after the old primer has been removed. In other cases, a separate priming tool is used. Presses are offered by RCBS, Lee, Lyman, Hornady, and other companies.
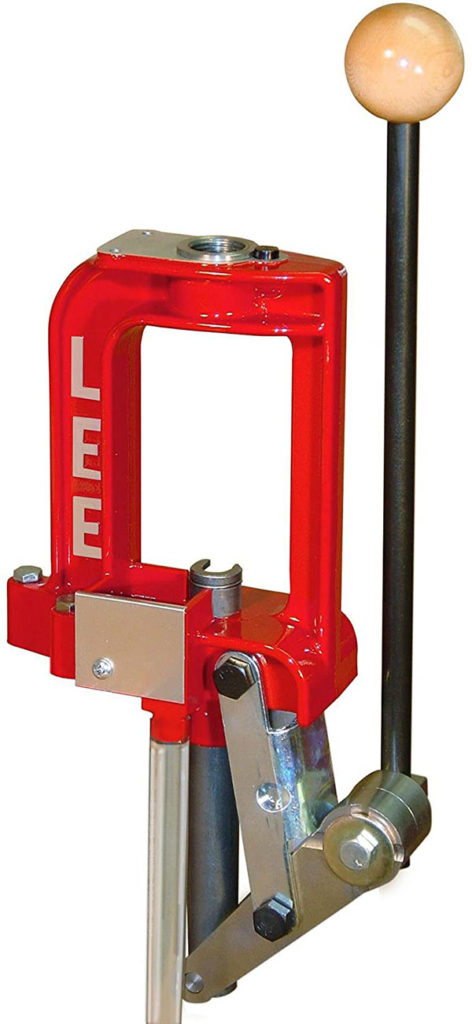
The Lee Challenger press. It’s a decent unit at a decent price, and an ideal way to get started in reloading.
Dies
The dies are cartridge specific. For handgun cartridges, the die set usually includes three dies; for rifle cartridges, the die set usually includes two dies. The good news is that die threads are pretty much standardized, and every company’s dies will fit every company’s reloading press. In other words, if you buy Lee dies, they’ll work on an RCBS press. If you buy RCBS dies, they’ll work on a Lee press. Dies are offered by several companies, with the most popular brands being Lee and RCBS.
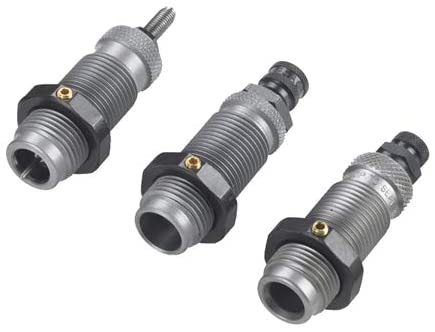
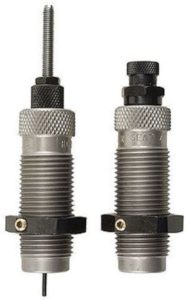
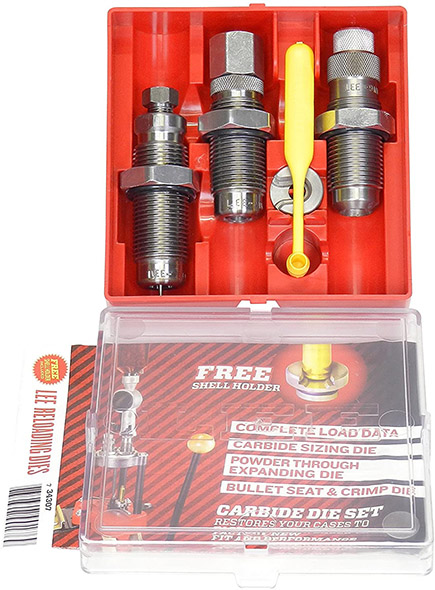
A three-die pistol set from RCBS. The first die knocks out the old primer and resizes the fired case. The second die flares the case mouth to accept a new bullet. The third die seats the new bullet and, if you want, crimps the bullet in place.An RCBS two-die rifle set. The first die knocks out the fired primer and returns the case to its original dimensions. The second die seats the bullet and, if desired, crimps it in place.A three-die pistol cartridge set from Lee Precision. Lee includes the shell holder with their die sets.
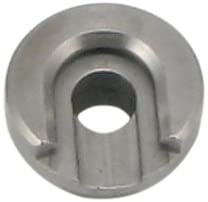
Shell Holder
You will need a shell holder for the cartridges you wish to reload. That’s the piece that holds the cartridge case in place so the press can push it up into the die and then extract it from the die. RCBS does not include the shell holder with their die sets (so you’ll need to buy RCBS shell holders separately); just about all other die makers do (when you buy their dies, the die set includes a shell holder for that cartridge).
A shell holder. You need to buy these separately if you buy RCBS dies.
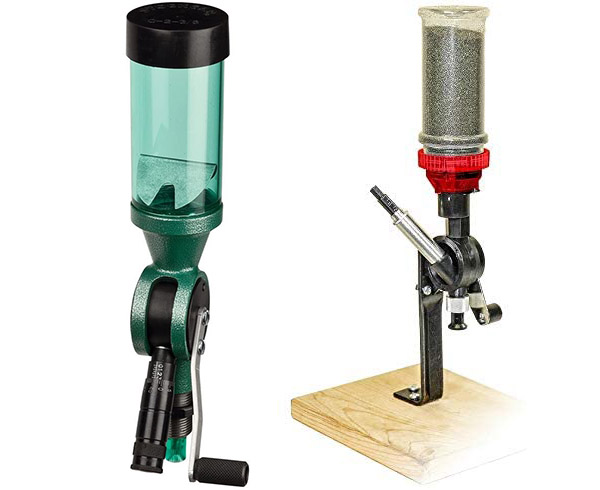
A Powder Dispenser
This is a device for dropping a precisely-metered powder charge into each cartridge case. There are fancy (read: expensive) electronic powder dispensers, but you don’t need those to get started and a lot of folks (myself included) don’t like them. A simple mechanical dispenser will work fine (as mine has been doing for 50 years). Both RCBS and Lee offer good powder dispensers; the Lee is substantially less expensive.
An RCBS powder dispenser on the left, the Lee powder dispenser on the right.
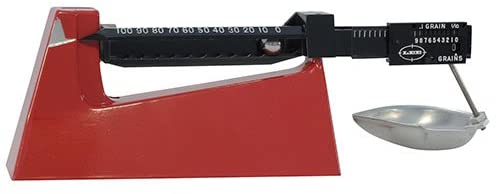
A Powder Scale
This is a simple balance beam scale to allow you to measure the weight of the propellant charge and adjust the powder dispenser to throw that charge. There are electronic scales, too, but they add complexity and considerable expense where none is required. Again, the dominant brands are Lee and RCBS.
A simple Lee balance beam reloading scale. These scales can measure to a tenth of a grain.
Cartridge Trays
When we reload, we use a cartridge tray (to hold the cartridges as we work through the process of reloading). A variety of manufacturers offer these.
An RCBS cartridge tray. These are available from several manufacturers. I’ve been using mine for nearly 50 years.
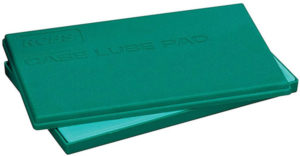
A Case Lube Pad
This is a simple foam pad. You put case lube on the pad and roll the brass cases on it to lubricate the exterior prior to running them through the resizing die (the first die used in the reloading process). If you have a straight wall pistol cartridge, you can buy tungsten carbide dies that don’t require lubing the cartridge cases. If you’re going to reload 9mm, .38 Special/.357 Magnum, .45 Auto, or .45 Colt, my advice is to spend the few extra bucks and get the carbide dies.
An RCBS case lube pad. You put a bit of case lube on the pad and roll the brass on it to lube the cases prior to running them through the resizing die.
Case Lube
This is the lube used as described above. To mention it again, if you’re going to reload straight wall pistol cartridges and you buy tungsten carbide dies, you won’t need case lube (or the case lube pad).
RCBS case lube.
Alternatively, you can buy spray-on case lubes, which eliminate the need for the case lube pad. I’ve tried spray-on case lubes and I prefer using the pad and case lube instead. Other reloaders like the spray-on approach better.
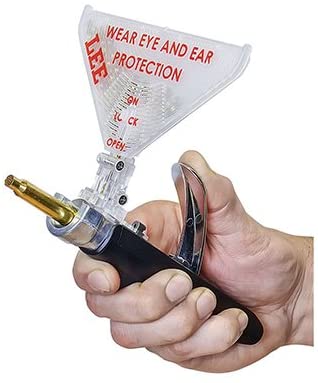
A Primer Seating Tool
Some reloading equipment companies incorporate a primer seating tool in their press; others offer separate primer seating tools. I have an RCBS press that came with the primer seating tool, but I like using a manual hand priming tool instead. Several manufacturers offer these; I use one from Lee.
The Lee hand priming tool. These work well. You can feel each primer seating and better control seating depth with these hand priming tools.
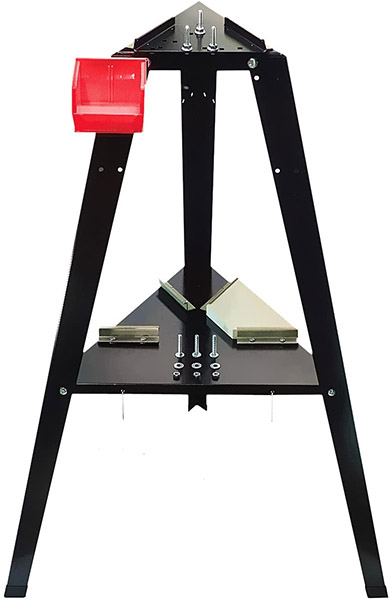
A Bench
You may already have a sturdy workbench where you can mount the reloading press; if not, there are reloading-specific benches available.
A Lee reloading bench. These work well if you don’t have a workbench for mounting your press.
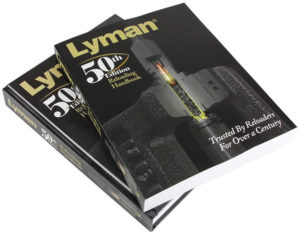
A Reloading Manual
There are several available, including the excellent offerings from Sierra, Speer, Hornady, and Lyman. Don’t think you can skip this; a good reloading manual is a must-have item for any reloader. They all explain the reloading process at the beginning, and they include safe recommended load levels for nearly all cartridges. I’ve acquired several reloading manuals over the years and they are all good; my favorites are the ones from Lyman. Others are published by bullet manufacturers (these include the manuals from Hornady, Speer, and Sierra) and those manuals include loads only for their bullets. The Lyman manual is more generic. But like I said, they’re all good.
I have reloading manuals going back 50 years. The Lyman manuals are probably the best.
That’s the reloading equipment. In addition to that, you’re going to need the ingredients for the cartridges you want to reload. That includes the brass cases, the bullets, the powder, and the primers.
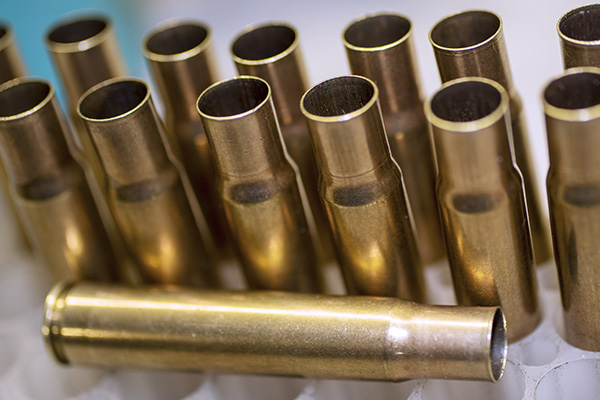
Brass Cartridge Cases
You can buy virgin brass online, you can buy once-fired brass at the range or at most gunstores, or you can do like most of us have done: Save your brass when you shoot factory ammo and reload it.
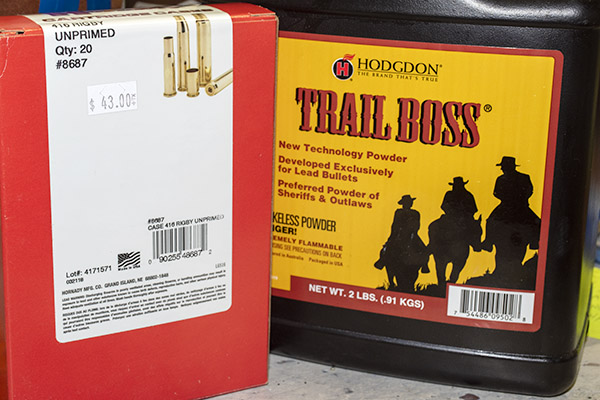
.35 Whelen brass waiting to be charged with propellant. This ammo costs $43 for a box of 20 factory rounds (and you can’t find anybody who has it in stock right now); I can reload it for under 50 cents a round.
Bullets
You’ll need bullets to reload your ammo. There are lots of options here, and they basically break down into either cast or jacketed bullets. I’m a big fan of cast bullets for handgun and reduced velocity rifle reloads, and I use jacketed bullets for full-bore factory level (high velocity) rifle loads. Most folks these days order bullets online from reloading suppliers like MidwayUSA, Graf’s, MidSouth, Powder Valley, Natchez Shooting Supplies, and others. Smaller gun stores are disappearing, and you usually don’t find decent prices at the big chain stores.
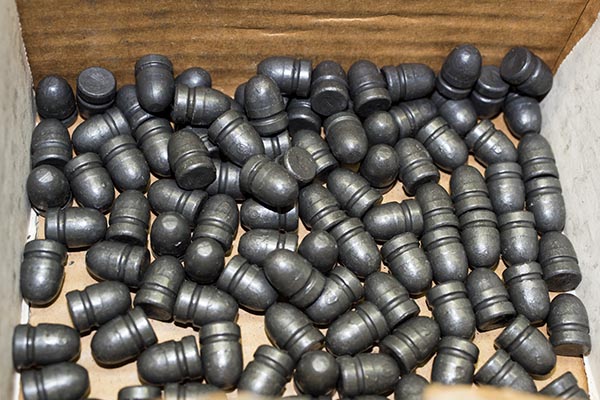
Cast bullets waiting to be loaded into .45 ACP cases.
Propellant
For lack of a better term, we usually call propellants “powder,” and there are a wide variety of powders available. The reloading manuals show which powders work best for the cartridge you wish to reload.
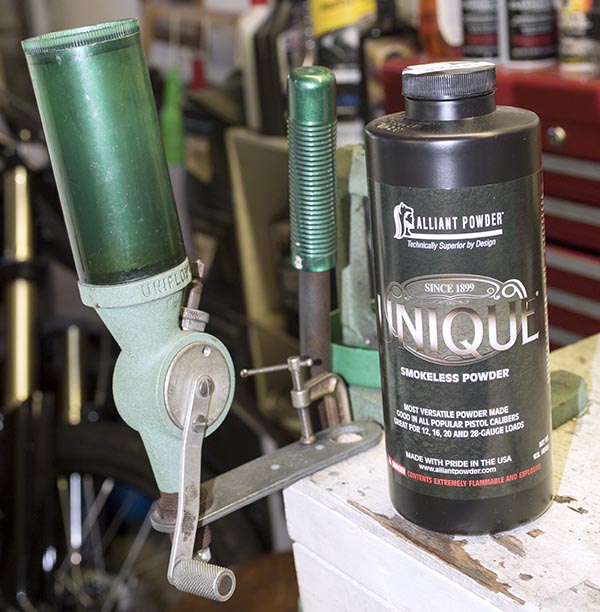
Unique propellant and my RCBS powder dispenser. The reloading manuals will help you select the powder you need. Unique is a good general purpose propellant I’ve used for a variety of handgun cartridges and a few cast bullet rifle loads.
Primers
The primer is the component that lights the candle when you pull the trigger. There are several primer suppliers. The trick today is finding them, as there has been a run on primers since the pandemic began. If you can find primers in a local shop, buy them. The same suppliers listed above for bullets also sell primers (they are all out of stock now, but that will change as supply catches up with demand).
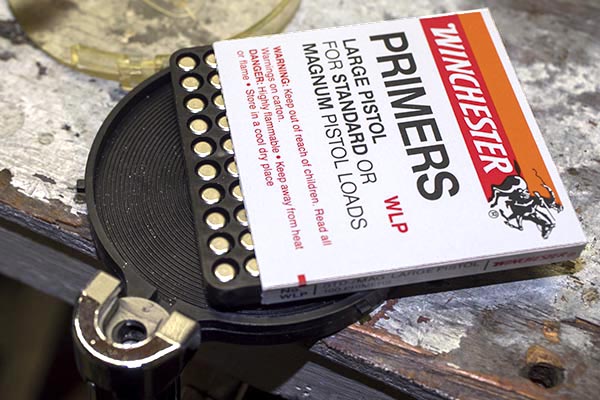
Winchester primers being loaded into my Lee hand priming tool. Other primer makes include Remington, CCI, Federal, and a few more.
The Best Equipment Approach: A Complete Kit
As I mentioned at the start of this blog, I believe the best way to get into the game is to buy a complete equipment reloading package from one of the reloading equipment suppliers. My advice if you are a new reloader is to go with the Lee package. It’s the least expensive and if you decide that reloading is not for you, you’ve minimized your cash outlay. I should add, however, that I don’t know anybody who ever tried reloading who didn’t get hooked on it. It is a marvelous hobby, and I believe it is as much fun as shooting.
I’ve used reloading equipment over the years from all the manufacturers. My personal setup is centered around an RCBS Rockchucker, but equipment from any of the suppliers is good. Basically, you can’t go wrong in this game from an equipment perspective. With that said, let’s take a look at what’s out there.
The Lee Challenger reloading kit. These were sold out on Amazon (and everywhere else) when this blog was published. Keep an eye on the Amazon site; it’s a good place to order the kit.
There’s only one problem with the Lee Challenger reloading kit: It’s such a good deal (well under $200 for the entire kit) that literally everyone is out of stock right now. As you know, we’re going through unprecedented times in the shooting world (guns, ammo, and reloading components are sold out due to the civil insurrection in many large cities, a new anti-gun administration on the horizon, and the global pandemic). That will change, but at this instant, no one I could find has the Lee kit in stock.
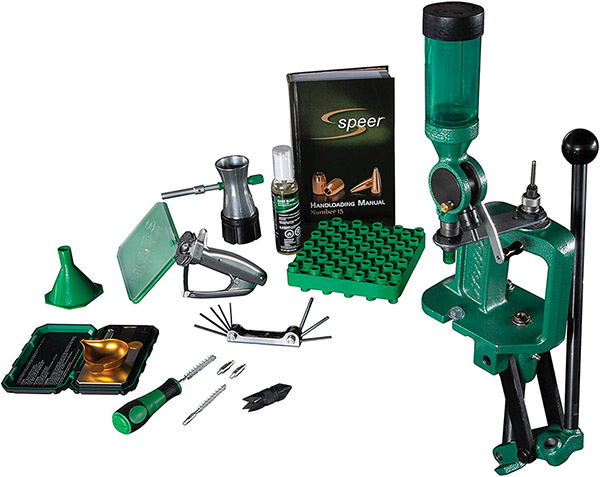
The RCBS reloading kit. RCBS makes high quality equipment that will last a lifetime. It costs more, but it’s worth it.
I’ve been using RCBS equipment for the last 50 years, and I believe it to be the best. It is built to last. If I couldn’t get the Lee package as a newbie, or if your budget will allow it, I’d go with RCBS equipment. At about $400, it’s just over twice the price of the Lee kit, but it’s still a great deal compared to buying all the different equipment items separately. The RCBS package shown above includes an electronic scale instead of a beam scale, a powder trickler (it allows you to finesse adding individual powder kernels to attain a precise charge weight), and a couple of case preparation tools that the Lee kit doesn’t include.
Lyman is another outfit offering a complete reloading kit:
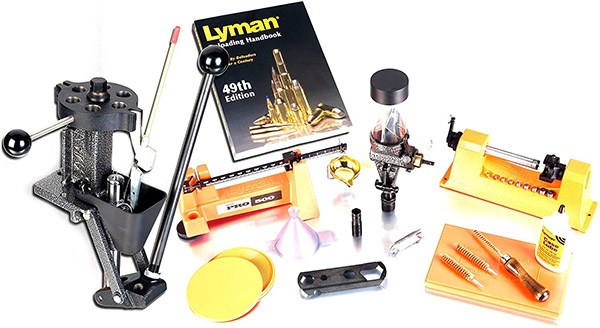
Lyman’s reloading equipment package.
What’s a bit different about the Lyman kit is that it comes with a turret press, which allows you to mount all the dies in the press head and rotate them as you progress through the various reloading steps. I’m not a big fan of this approach; other folks are. The Lyman kit is just under $1000; the turret press and the inclusion of a case trimmer are what drive the price to that level.
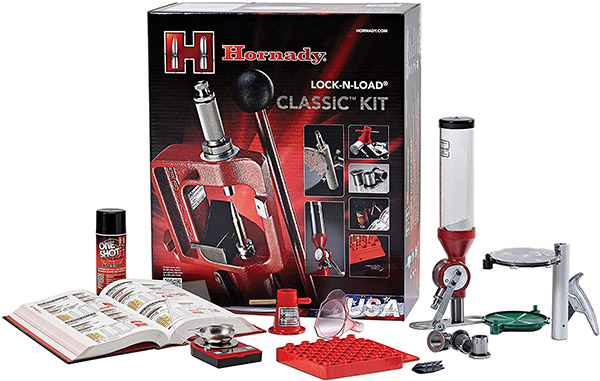
Hornady’s reloading package. I have the least experience with Hornady reloading gear, and I’m not wild about their dies. Hornady bullets are fantastic.
The Hornady kit is about $550. That’s substantially less than the Lyman kit, but more than either the Lee or the RCBS kits.
So there you have it. Remember that no matter which reloading kit you buy, you’ll still need dies and a shellholder specific to your cartridge. You’ll probably want to purchase more equipment as your reloading interest develops, including more dies (so you can reload more calibers), case cleaning and polishing accessories, a micrometer, and more. But what we’ve outlined here will get you started and keep you in the game for years.
In this blog we’ve covered the equipment you’ll need to get into reloading. If you would like to read about how to use this equipment, we have you covered there, too. We have a bunch of information on reloading various cartridges on our Tales of the Gun page, and a complete series on reloading handgun ammo that you can review here:
I don’t name my guns. Except for one. That’s Eleanor in the photo above.
I have a thing for big bore rifles, and chambered for the mighty .416 Rigby, Eleanor certainly qualifies. We don’t have too many elephants, rhinos, or cape buffalo in southern California. But if any ever become an invasive species here in the Peoples Republik, I’m ready. I’ve read all the African hunting stories, living vicariously through the adventures of folks like Theodore Roosevelt, Peter Hathaway Capstick, and others. It’s what prompted my path toward rifles like Eleanor.
But I digress. Back to the topic du jour. Sometimes you just wake up and think to yourself: I have to to load me some .416 Rigby today.
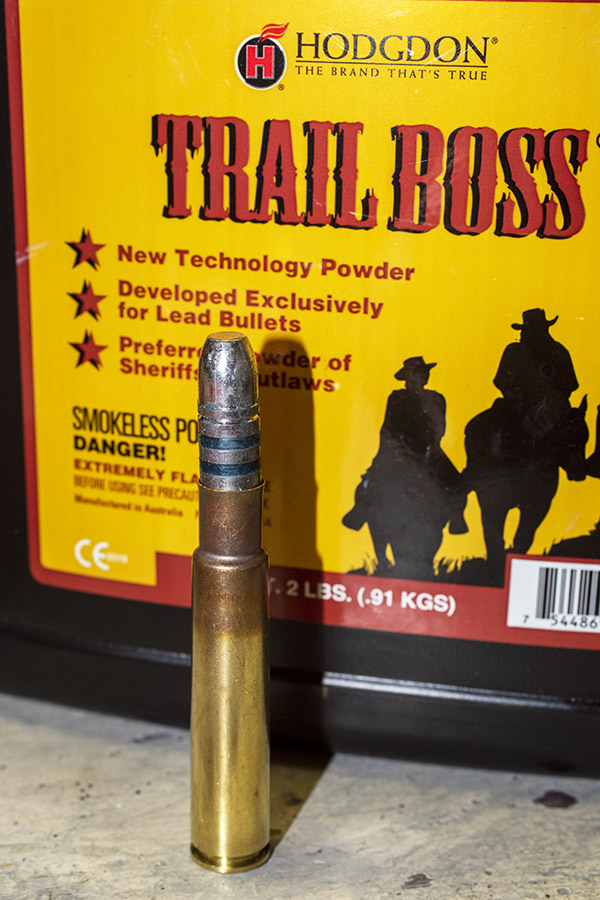
That’s what happened to me recently. I won’t get to shoot Eleanor for a few more days, but I thought I would share a few photos of the sausage-packing process involved in prepping .416 Rigby ammo. The drill on that fine day was for a couple of reduced-velocity loads using cast bullets and Trail Boss propellant. It’s going to be a fun day at the range when I light the candle on these puppies.
Reloading is sort of like cooking. You start with a recipe and the right ingredients. In this case, that includes .416 Rigby brass (something you don’t find laying around at the range) and Trail Boss propellant (which, like most reloading components, is pure unobtanium these days).
I’m well stocked with unfired, virgin Hornady brass and I used Montana Bullet Works cast 350-grain gas check projectiles. Because I’m loading cast bullets, the first step involved flaring the case mouth. I use the Lee universal flaring tool for this. You can see its business end in the photo below.
Here’s the Lee’s flaring die and a flared case mouth.
This is what the cartridge case looks like after it has been flared. You can see the diameter opens up slightly at the case mouth. This prevents shaving lead off the bullet base as it is seated in the brass cartridge case.
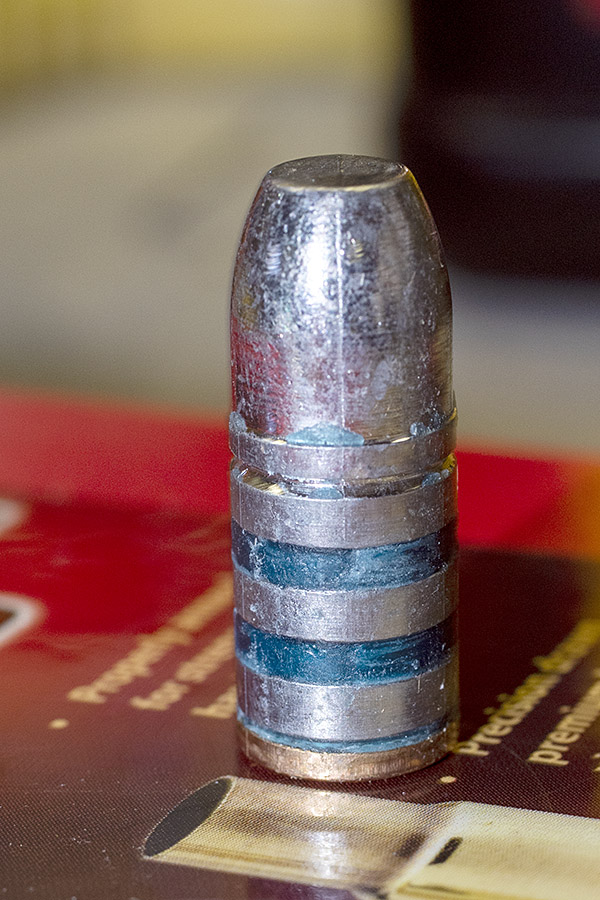
The Montana Bullet Works bullets are impressive. Actually, they are beyond impressive. I think they are perfect. They look more like machined parts rather than cast parts. I loaded their 350-grain flatnose cast bullets (they are 22 Brinell hardness linotype bullets) with a gas check base (take a peek at the next photo). The blue stuff is lubricant.
I’ve fired the Montana bullets before with 5744 propellant in Eleanor and they work well, as you can see on the targets below (I order my targets from Amazon). Those were 3-shot groups at 50 yards using the same Montana 350-grain cast bullets and 45.0 grains of 5744 propellant. Eleanor is an elephant rifle with iron sights, and I’m getting groups that would work well with prairie dogs.
There’s no leading with the Montana bullets. The Lyman cast bullet reloading manual (which I believe to be the best) lists 5744 and the 350-grain cast bullet as the most accurate load in this chambering (I like the Lyman manuals better than any of the others).
The photo below shows a bullet just starting into the cartridge case. I had already seated CCI 200 primers into the cases.
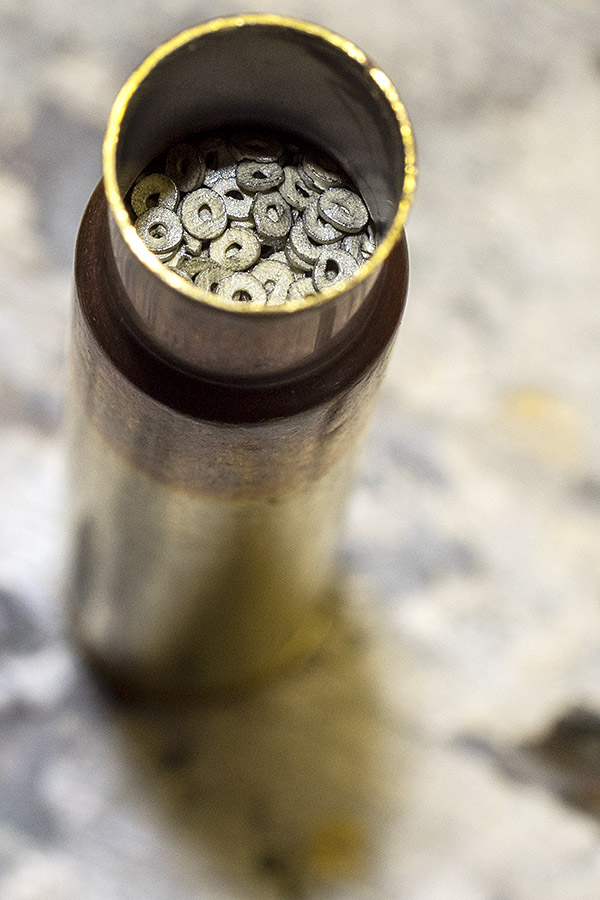
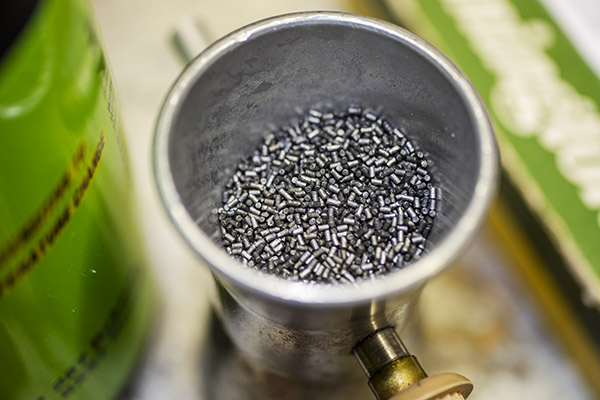
Trail Boss is a reduced velocity propellant that is designed to occupy most or all of a cartridge case’s interior. It’s a light powder. The shape is unusual. The grains look like little washers.
Trail Boss is so big and fluffy my RCBS powder dispenser couldn’t throw a big enough charge with a single throw. I wanted to load these at 30 grains and 34 grains (suggested min and max with this propellant), so I set the powder dispenser to 15 grains (that’s what you see in the powder tray above) and threw two charges for each case, and then I did the same at 17 grains (again, throwing two charges for each case). According to the folks who make Trail Boss, the max load should not exceed the base of the bullet, and the minimum charge is 70% of the max charge. Here’s what a charged case with the max charge looks like.
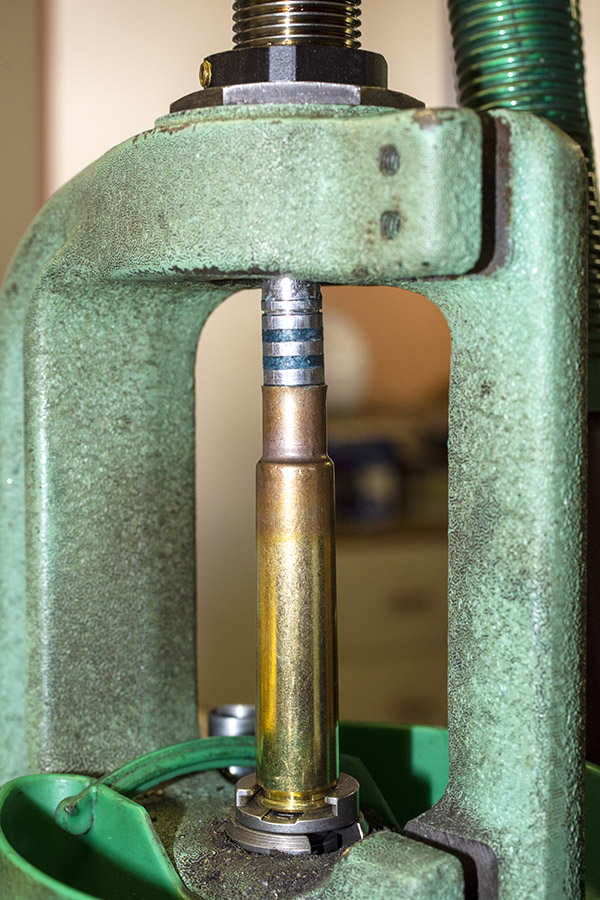
I next seated the bullets. These cartridges are so long that you have to put the charged brass case into the shell holder, and then angle the bullet up into the die and set it back down on the case before you run the ram up. I do bullet seating and crimping in two operations. I’ll seat all the bullets to the required overall length without a crimp, and then I’ll adjust the die and run each round through again to get a good crimp. I use an old RCBS Rockchucker single-stage press I bought new in 1974. I’ve been using it ever since.
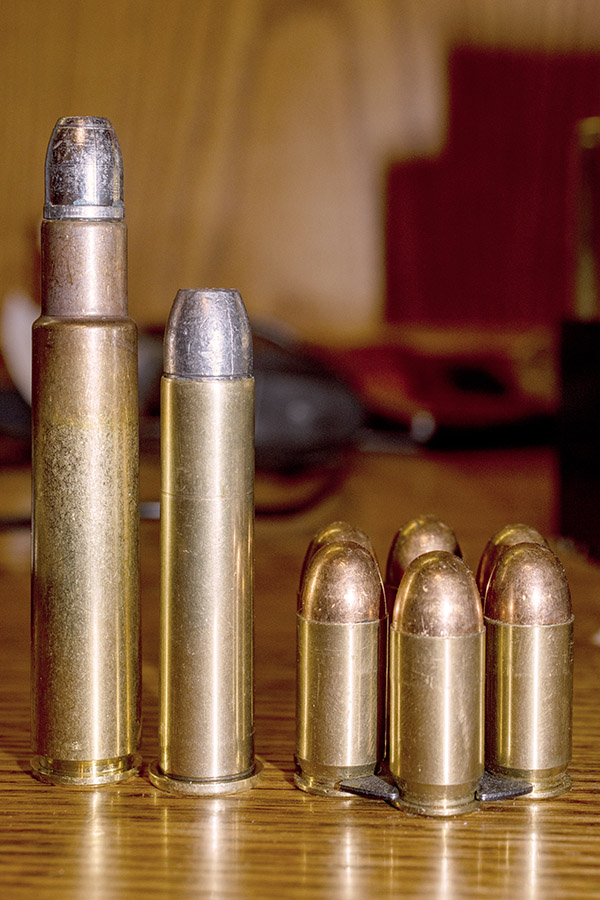
And here’s one last photo just to convey a sense of scale. From right to left, what you see below is a six-pack of .45 ACP cartridges in a moon clip ready for my 1917 revolver, a .45 70 round (I loaded some of those earlier today, too), and the .416 Rigby.
So how do these Rigby rounds shoot? I’m going to find out soon, folks, and I’ll let you know. Eleanor and I have a date at the West End Gun Club (don’t tell Sue). Stay tuned. It’s going to be fun.


 Challenger reloading kit. These were sold out on Amazon (and everywhere else) when this blog was published. Keep an eye on the Amazon site; it’s a good place to order the kit.