Antoni Gaudí

By Joe Berk

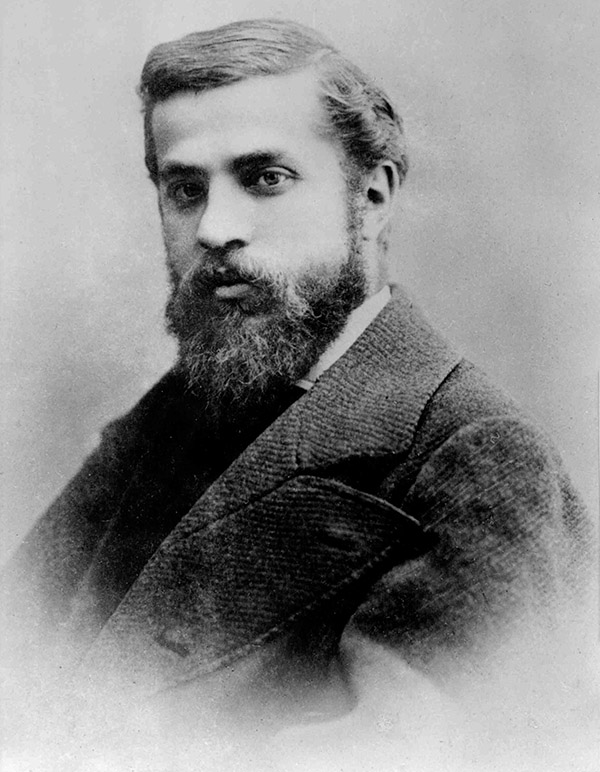
About two years ago Sue and I visited Spain and Portugal.  I posted more than a few blogs during that trip, but not enough on Antoni Gaudí.  Gaudí was a Spanish architect who lived from 1852 to 1926.  He was clearly a genius.  I wish I had known more about him before we sent to Barcelona; I would have appreciated what I was seeing more.  Better late than never, and after our trip I started reading and studying his life.  This was an amazing man.

We visited three of Gaudí’s works in Barcelona:  The Park Güell, the Casa Milà apartment building, and the Sagrada Familia.
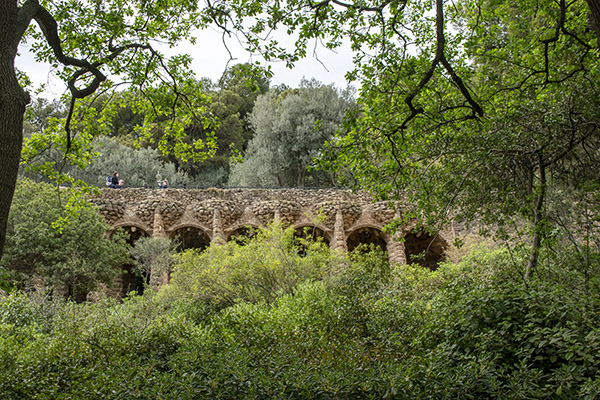
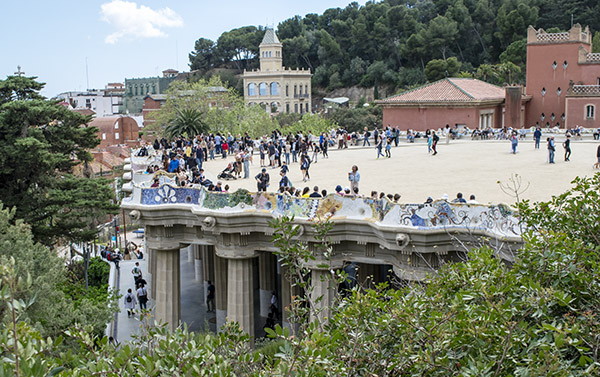
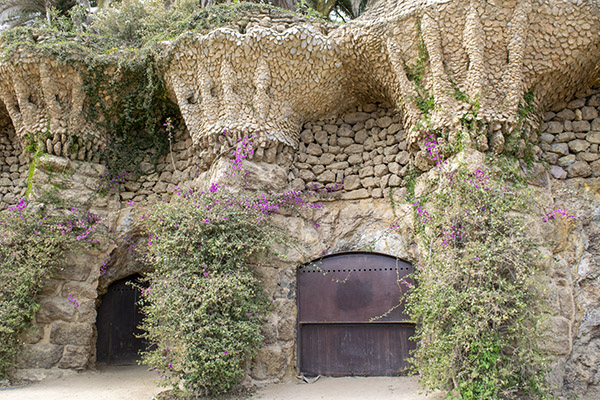
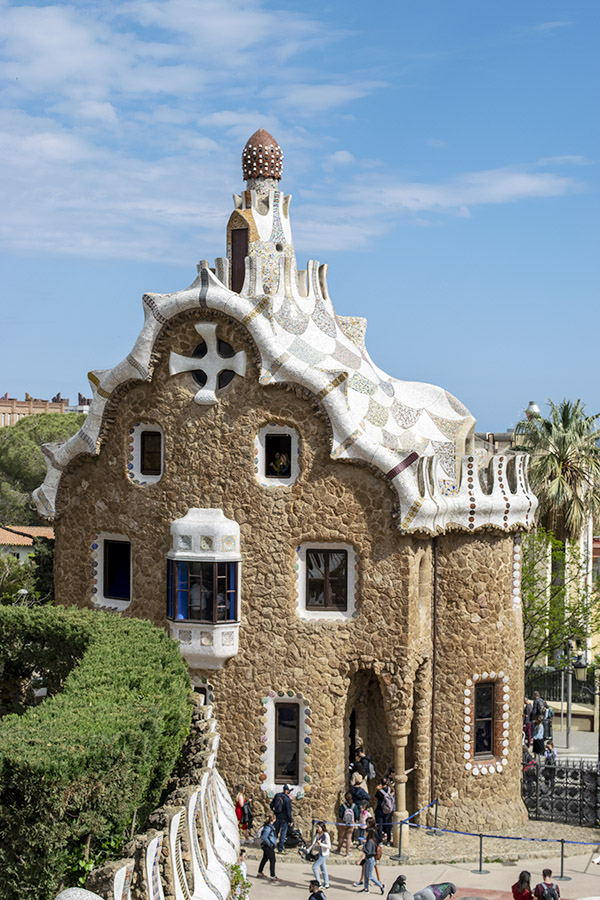
Park Güell

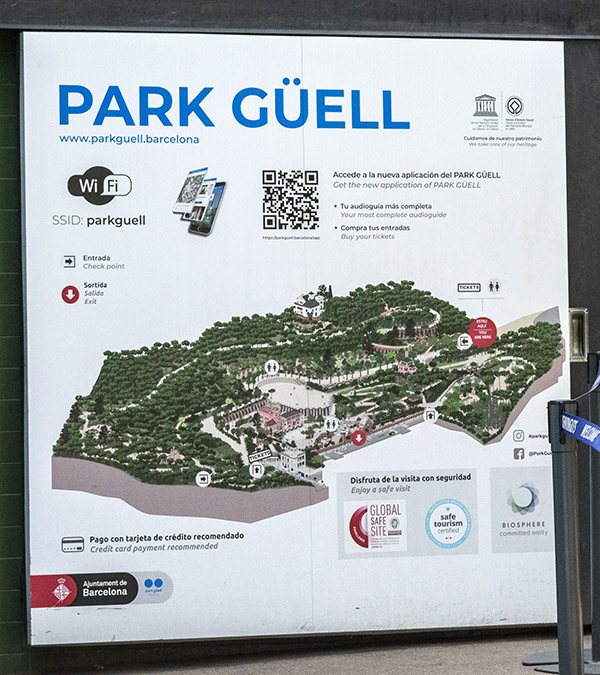
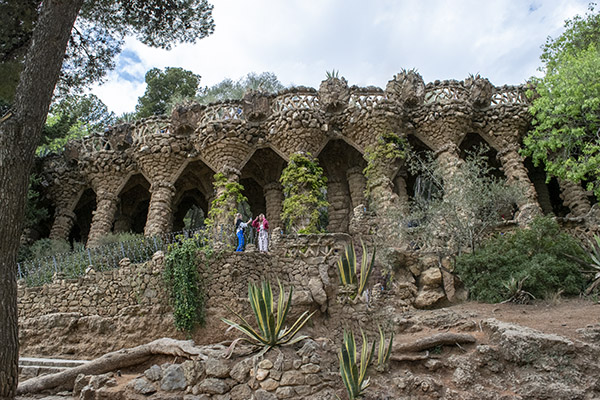
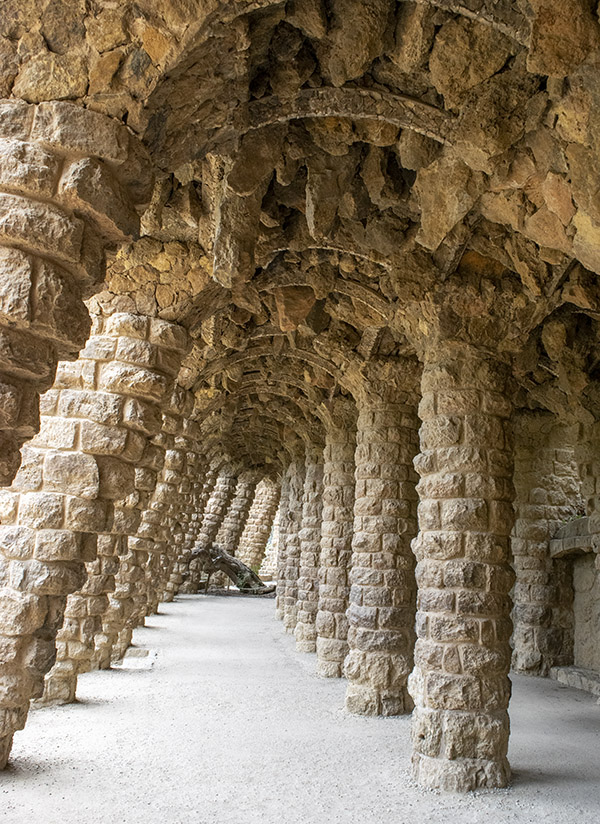
One of our first stops in Barcelona was the Park Güell.  Park Güell was commissioned by Eusebi Güell in 1900, a Catalonian businessman, when he enlisted Gaudí to incorporate several properties he already owned into the park.  The photo ops were everywhere we turned, from the sculped tunnels to the paths to the buildings and the sculptures.

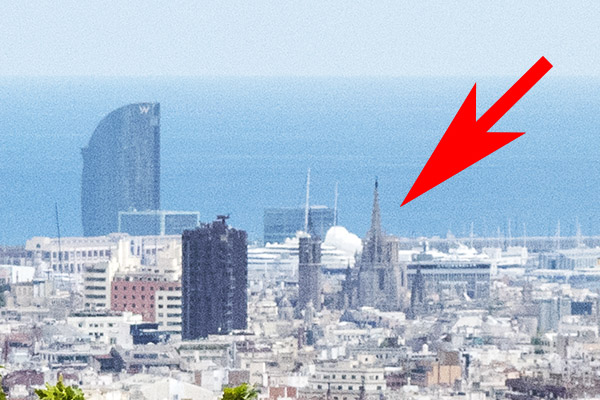
When wandering Park Güell, I noticed that we could overlook the city of Barcelona and see all the way to the Mediterranean.  I snapped a photo or two, without realizing that my photo included the Sagrada Familia (it’s in a photo below, identified by a large red arrow).  I’ll talk about that more in the next part of this blog.

If you look closely, you can see the Sagrada Familia from Park Güell.
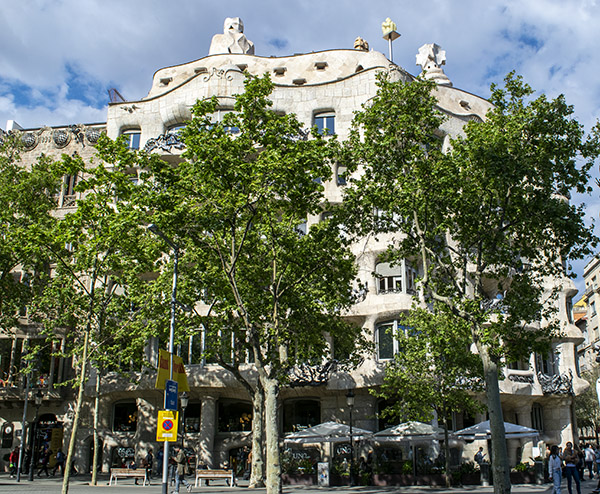
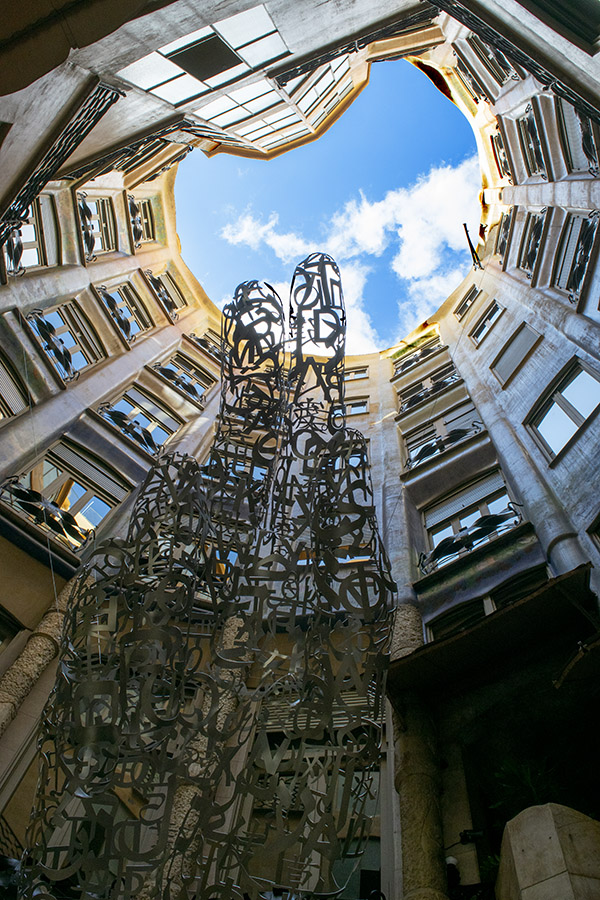
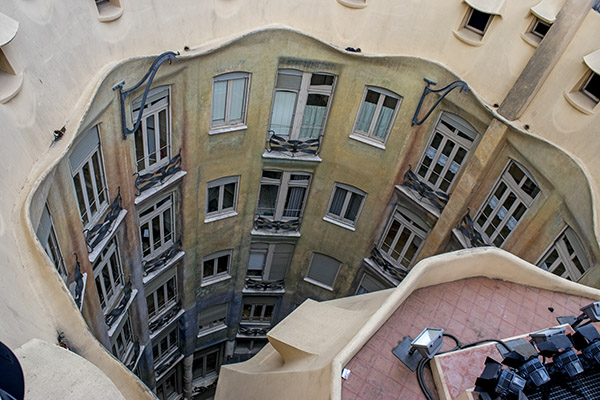
Casa Milà

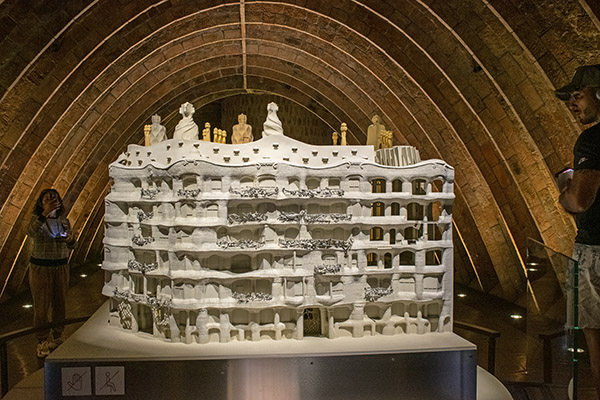
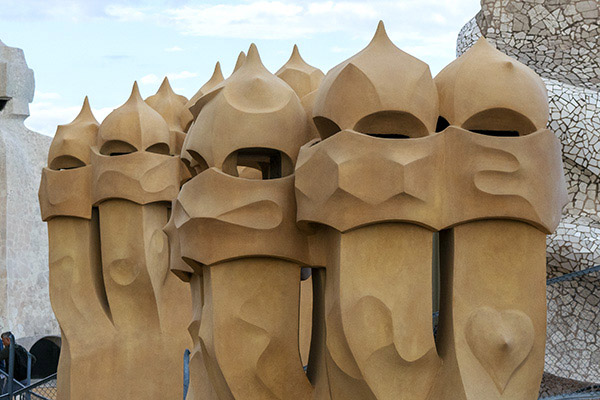
Casa Milà is another famous Gaudi work.  Completed in 1912, it was initially an apartment building.  Today it is a UNESCO World Heritage site.  Like Park Güell, Casa Milà suggests a Dr. Suess-like whimsiness in its design.  The structure is a giant  loop, with an opening surrounding by the apartments.  The roof contains many sculptures, with some that double as chimneys.  When we visited Casa Milà, our  guide asked if one reminded us of anything.  It did.  You’ll see it one of the photos below.  George Lucas saw it, and it became the inspiration for Star Wars’ storm troopers.  Another one of the photos below shows a model.  Gaudi preferred to design with models, and use these as the basis for the larger work.

The Sagrada Familia

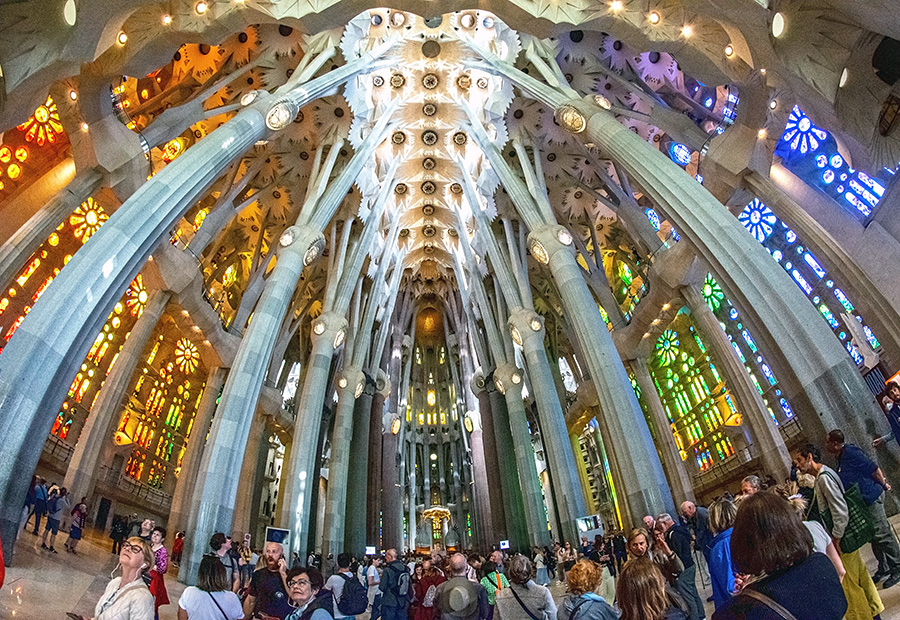
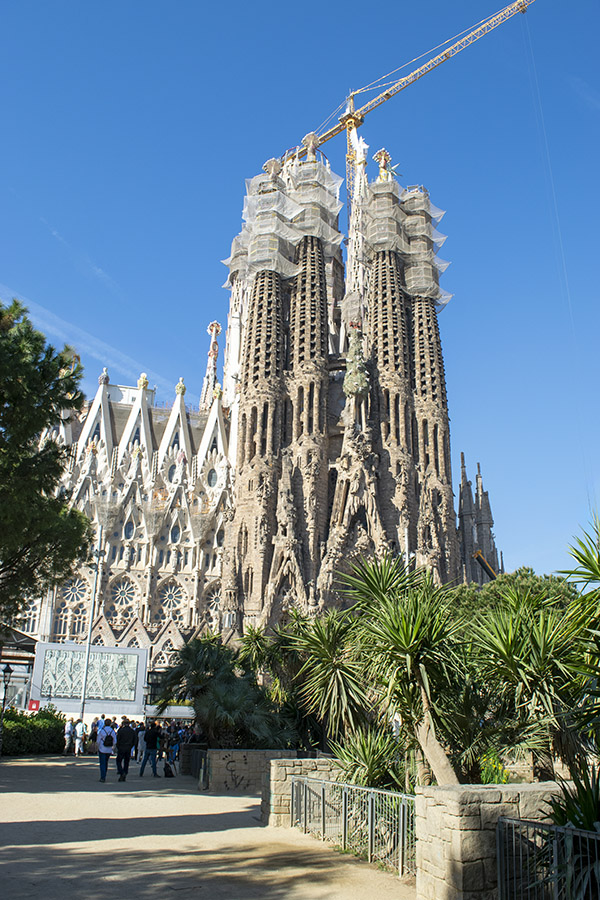
Talk about a long-running construction project:  Barcelona’s Sagrada Familia temple has been under construction for 140 years, and it’s not finished yet.  We heard that it would be finished in another 15 years, but who really knows?

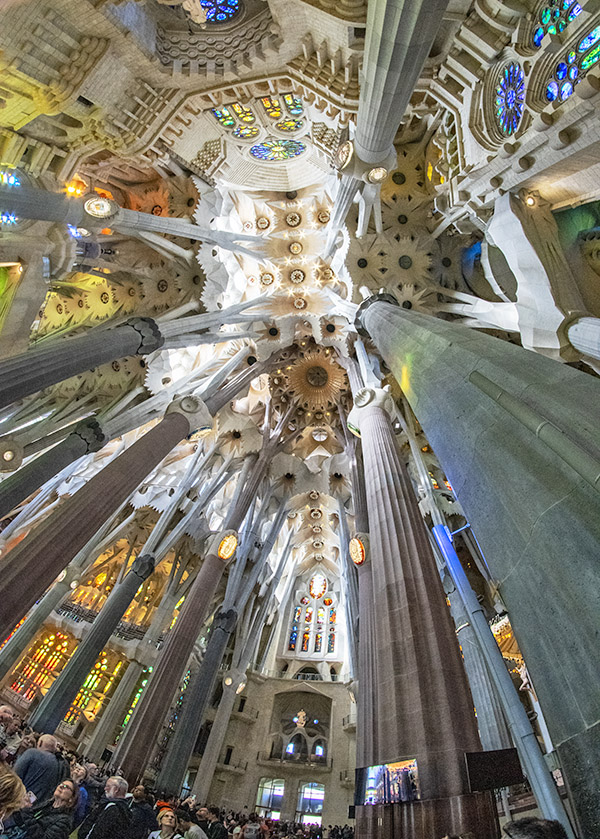
The construction schedule notwithstanding, the Sagrada Familia is an active church, and if entering it does not make you a believer, nothing ever will.  To say it’s impressive would be a massive understatement.  You really have to see the Sagrada Familia to understand the excitement, the grandeur, and the genius of its design.  The exterior has that same Dr. Suess/Harry Potter mystique.  Once you are inside, the feeling is not one of being in a building.  It’s more like being in a well-illuminated and immense living creature.  The illumination comes from the buildin’s stunning stained glass, designed with colors tuned to the light from Barcelona’s sunrise and sunset.

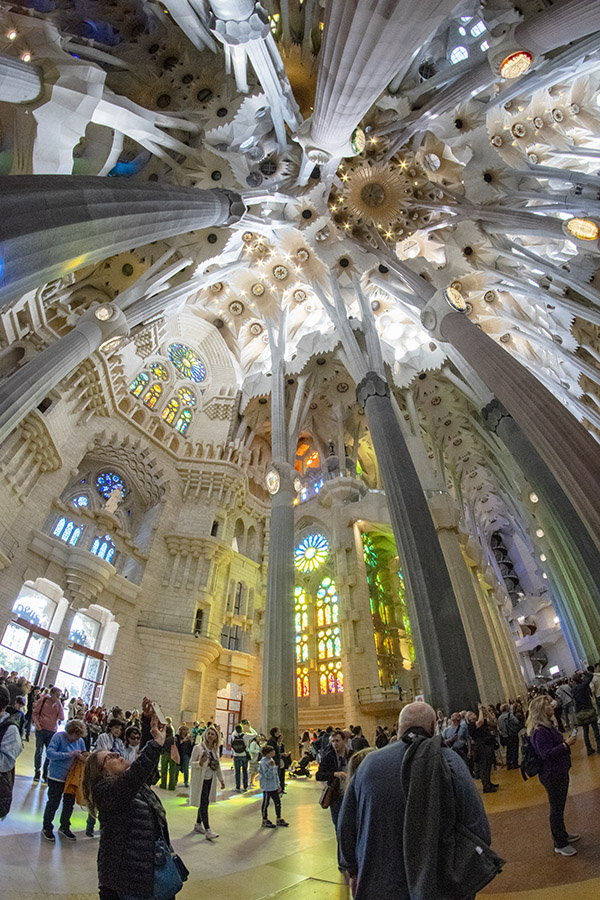
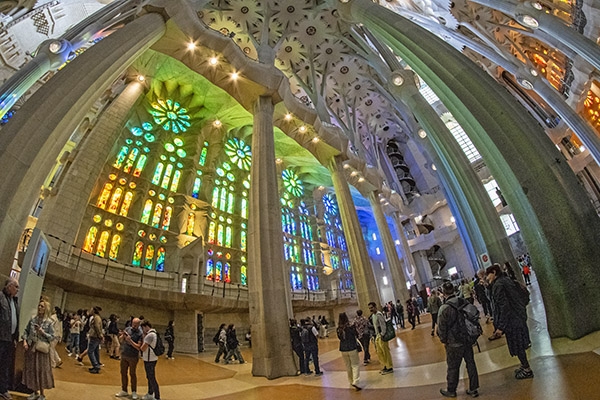
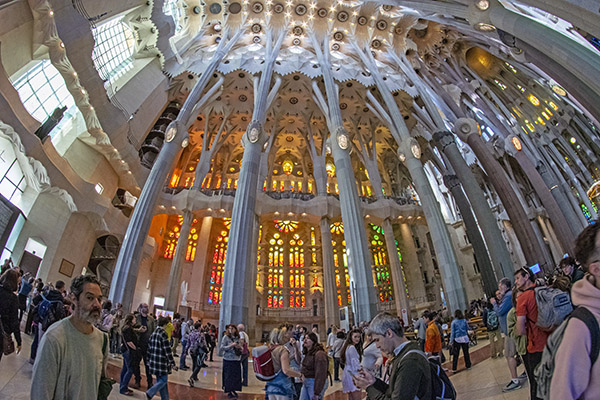
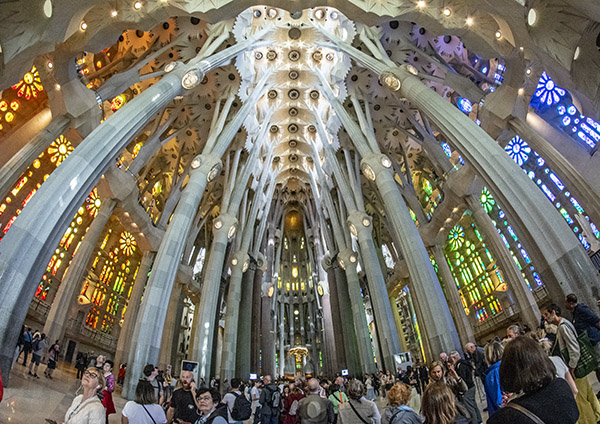
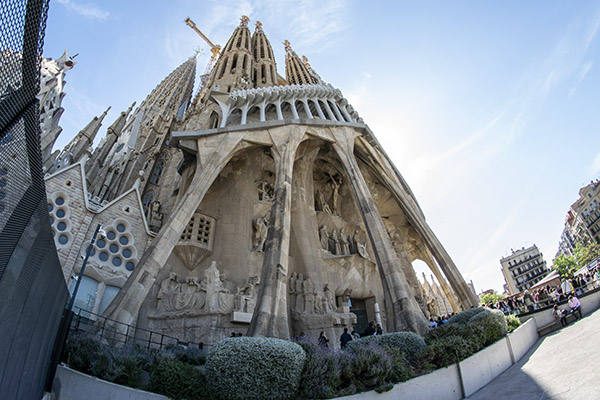
Mere words don’t do justice to the Sagrada Familia.  It is a place that has to be personally experienced to get a feel for its magnificence.  I’ll return to Barcelona someday, and you can bet that I’ll visit the Sagrada Familia again.


Antoni Gaudí was a bit of a dandy in his younger days.  In his later years, he stopped taking care of himself and basically dressed like a homeless person.  He died as a result of being struck by a Barcelona streetcar, and when he was injured, people did not realize who he was (they thought he was a vagrant).  Antoni Gaudí’s remains are entombed in the Sagrada Familia, perhaps his greatest and certainly his most widely-known work.  The Park Güell, the Casa Milà apartment building, and the Sagrada Familia are not the only projects Antoni Gaudí created.  I’d like to search for and visit more of Gaudí’s works when I return.


When Sue and I visited Spain and Portugal, I didn’t take my Nikon D810 and  it’s 24-120mm lens (as I usually do).  The weight of that camera and lens has become too much for me to carry around.  I won’t bore you with the specifics of my age-related infirmities; I’ll simply share that I’m not what I used to be.  But I’m still kicking and trying, and for this trip, it was my much smaller and lighter D3300 and its correspondingly-smaller 18-55mm lens.  I also had a lightweight, non-zoom, non-metering Rokinon 8mm fisheye lens, which I used more than I expected to (it proved to be a very capable lens).   The D3300 and these two lenses (along with a bit of post-production PhotoShop tweaking) are what I used to create the photos above.  The interior photos were all shot at high ISO (in the range of 800 to 3200), which accounts for the graininess in a few of the photos.  Mea culpa.


Join our Facebook ExNotes page!


Help us keep the lights on:

Ball Watch Trainmaster

By Joe Berk

A disclaimer up front:  I don’t own the Ball Watch Trainmaster GMT you see above, and I don’t actually have one to review.  In fact, I’ve never seen one in person.  But I sure want one.  Sometimes it’s fun to think about buying something for a while without actually pulling the trigger.  One such item for me is the Ball Trainmaster GMT watch, as seen in the photo above.  Part of the desire is the watch’s design, and part of it is the Ball Watch heritage.

I like the Trainmaster’s bold face and big numbers.  Some have criticized the watch’s wonky font, but I like it.  If you look closely at the numeral 7, you’ll see the Ball designers did a cool thing there.  The sharp contrast between the blue hands and the white face works well, and the GMT red hand stands out, too.  It’s just a cool face; one I know I wouldn’t get tired of checking.

The appeal of a GMT is real for me.  I used to need one when working for CSC and when I was in the defense industry.  I’ve had projects in Chongqing, Kayseri, Tel Aviv, Haifa, Athens, Mexico, Glasgow, and Medellin, and knowing the local times instantly with a simple glance at my watch was a good thing.  It kept me from waking people up in the middle of their night and it let me know when they should be at their workstations.  These days I don’t have any overseas activities, but I still like the idea of a good GMT watch.  They’re just cool.

About that name:  The Trainmaster.  Ball has a history rooted in the railroad industry.  You’ll see it on every Ball watch with the letters RR (which stand for railroad).  It started 135 years ago with Webb C. Ball and a deadly railroad disaster.

Back in the day, trains used to coordinate their travel such that one would pull off onto a siding (a parallel track) so another (going in the opposite direction) could pass.  You can guess where this story was going.  In the Great Tipton Train Wreck (as it came to be known), one of the conductor’s watches lost four minutes and it didn’t coordinate correctly with the train going in the opposite direction.  Webb Ball, a Cleveland jeweler, investigated the two watches used by the conductors on the two trains and found a 4-minute discrepancy.  After that, Ball became the go-to guy for all railroad time-keeping issues   He started a watch company and Ball watches became the standard for all US rail activities.  It’s where the expression “on the ball” comes from.  If you were running on schedule, you were “on the Ball” (meaning you were on time).

Today’s Ball watches (including the Trainmaster) have a unique feature:  Their illuminated hands and time indicators.  The conventional luminosity approach other watches use is to incorporate photoluminescent pigments on the watch hands and numbers (or markers near the numbers).  The luminescent pigments absorb photons from exterior light sources like the sun or other strong lights.   The problem with this conventional lume approach is that it loses luminescence relatively quickly, and the lume doesn’t glow as brightly as the watch ages.

Ball’s approach is different.  Instead of using conventional watch lume materials, Ball incorporates what they refer to as micro gas tubes that stay bright.  These are tiny phosphor-coated glass tubes located in the watch hands and the numbers (or watch face markers) that contain tritium gas.  The micro gas tubes stay bright with no intensity diminishment.  They’re said to be good for 25 years.  Different Ball watches place the micro gas tubes in different locations.  On the Trainmaster, they are in the 
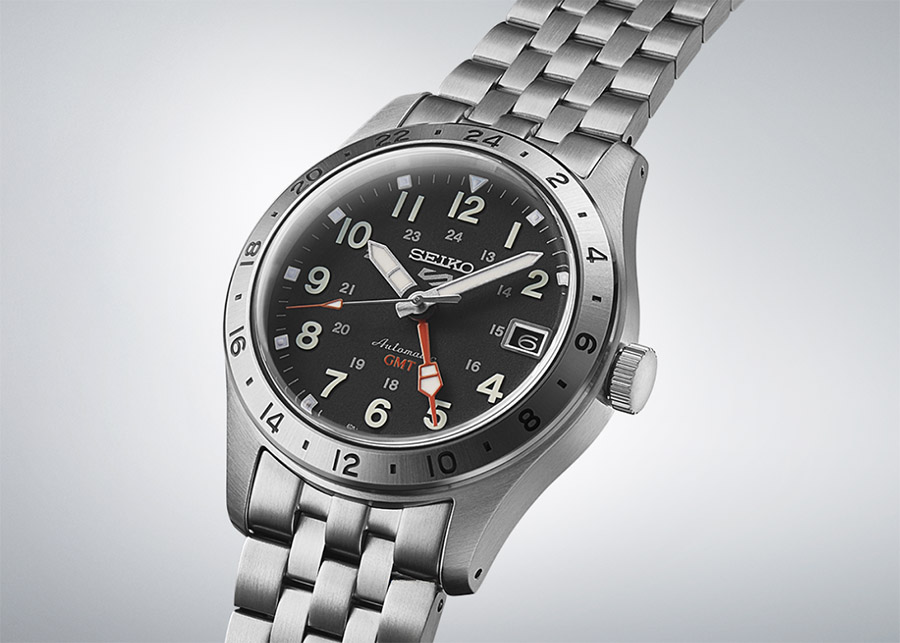
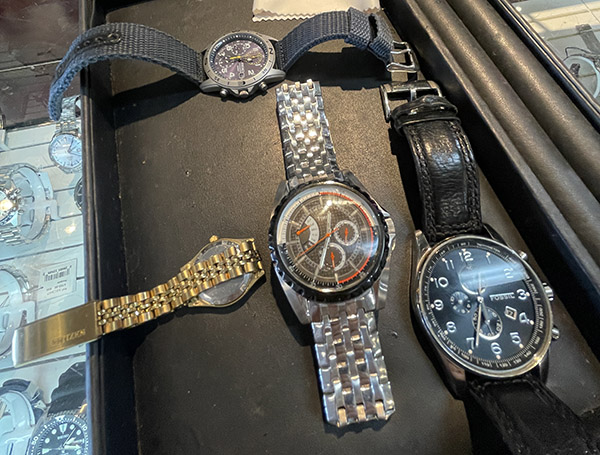
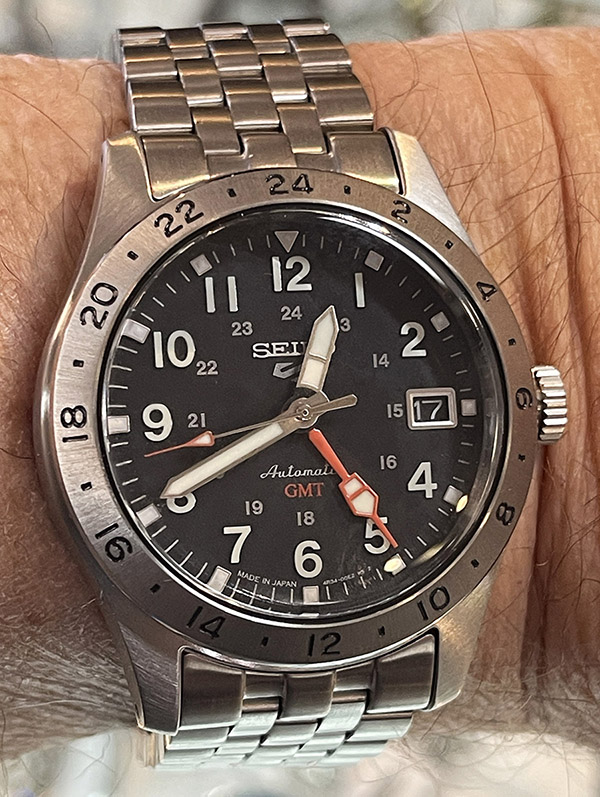
hour, minute, and second hands, and in markers by each number on the face.  There’s no marker in the GMT hand (I guess Ball thinks you don’t need to know the time elsewhere in the world at night).

Ball offers a couple of relatively unique options on this watch.  They will engrave your name for free.  You can also select your own serial number that goes on the watch face (if someone else hasn’t already selected it).  When Ball first announced these, I checked, and 007 was available.  Today, though, it’s not. I guess James Bond already ordered his.

As I said at the start of this blog, I’d like to own a Trainmaster, but not badly enough to actually shell out the cash owning one would require.  The Trainmaster retails for something north of $3,000.  Poking around a bit on the Internet, I found places that sell the Trainmaster in the $2500 to $2600 range, but that’s still pretty rarefied air for a watch I don’t need.


More gun stuff? You bet!


Join our Facebook ExNotes page!


Help us keep the lights on:

Marbles Randall Wannabees…

By Joe Berk

My buddy Paul is a serious Randall knife aficionado.  Randalls are way out of my pay grade, but I admire them greatly.  About a year ago, Paul sent a link to me for a YouTube video about a Marbles knife that approaches the look and quality of a Randall.  The YouTube video may be lacking in quality, but it more than makes up for it in content.  It sure grabbed my attention.

The price for (and the wait to get) a Randall knife make them a nonstarter for me, but the thought of a high-quality Bowie knife had my attention (as you probably already know from following the ExNotes blog).  The Marbles MR 723 sure seemed appealing, and for a measly $55, I thought I would take a chance.  It was money well spent.  The knife is beautiful, it is substantial, and it has the look and feel of a high-quality item.

A week or two after I received the Marbles Bowie, I learned that they are also available with a green Micarta (instead of black Micarta) handle.  At first, I was disappointed.  I would have preferred the green Micarta version.  Then I thought about it a minute.   For another few dollars, I could have both, and that’s what I did.

The specifications for these Marbles knives are impressive.  The knife has a blade length of 7 1/2 inches.  The blade is D2 tool steel, which I’ve read is a good knife steel (it’s kind of a moot point for me, as I don’t intend to do anything with the Marbles Bowies other than look at them).   The blade is substantive (it’s almost a quarter of an inch thick where it emerges from the guard), and it has a satin finish.  It’s very sharp.  I can’t tell you how long the edge will last, nor can I tell you how difficult it will be to sharpen it.  The guard and pommel are polished brass.  The handle material is, as mentioned above, Micarta, and it is available in either green or black (and both look good).  The sheath is first class, being nicely finished leather with a sharpening stone included.  Overall, these are very nice knives.  I know some folks who read this will dismiss me as a knife neophyte who won’t really use these knives the way other folks might use a Randall, and hey, they’d be right.  I’m not Davy Crockett, and I’m not going to try to kill a bear with either of these.

These Marbles are great looking knives, and they look good sitting amongst the other knives I’ve accumulated over the last year or two.  I’m pleased with the purchase.


More gun stuff? You bet!


Join our Facebook ExNotes page!


Help us keep the lights on:

A Telecon with Mike Huber

By Joe Berk

Facebook and Meta were slammed in court yesterday, with a mega-million-dollar award going to a plaintiff claiming harm from Fecebook’s intentionally-addictive interface.  I can see both sides of that argument, and I’m saying that as a guy who is hopelessly addicted.  I can spend hours scrolling mindlessly through all the stupid stuff I see on Facebook (especially, for reasons that would take team a team of psychiatrists to unearth) videos of baby gorillas.

There’s a Facebook feature showing friends who are currently online, which I never paid much attention to.  There’s another feature that allows you to call (through your computer and the Facebook interface) friends who are currently online.  You can probably guess where this is going.  I saw that Mike Huber was online yesterday morning, and I decided to give the Facebook telephone option a try.

A few rings later and Mike and I were conversing, clear as a bell, about a variety of topics.  Mike is in Colombia for a few more days, and we had a great time talking about that wildly-beautiful country.  Oddly enough, Mike ran into Buffalo Bonker down there in Colombia.  I first met Mike on one of the CSC Baja rides when we were filling our gasolina tanks in Cataviña.  Buffalo was also on that ride 8 years ago.  It’s interesting how these motorcycle-based chance encounters can become lifelong friendships.

Lunch with Mike Huber at Las Casitas in Bell, California. It was as good as it looked!
Mike Huber’s top case and jump wings. It led to a conversation that led to a great friendship.
A Buffalo self-portrait in Baja.

That had me thinking about my trips to Colombia.  I love the place.  I did a lot of blogging while I was there.   If you don’t see any friends you can call on Facebook, if you’re tired of listening to warped news shows pretending to be objective, or if you just want to see a bunch of cool photos and a few videos of my Colombian adventures, today is your lucky day…

Colombia’s Mighty Magdalena
Medellin!
Riding the Andes!
Mompos!
More on Mompos
Riding the Andes Part II
La Playa de Belem
Barichara!
Villa de Leyva
Merry Christmas!
Honda
Volcan Nevado del Ruiz
Volcan Nevado del Ruiz: Part I
Volcan Nevado del Ruiz: Part II
Day 8: Sweet Home La Ceja!
AKT Motos in Colombia
Colombia’s Economic Approach
Telenova Review: Bolivar

There you have it.  And if you would like a more in-depth, hand-held, old-fashioned paper-based approach, there’s always Moto Colombia!


More gun stuff? You bet!


We need your support! Do what you can to help ExNotes stay in the black!


More Huber? Check out A Trip Into The Moment.


More Gresh and Berk? You bet! Check out A Cup O’ Joes!


Join our Facebook ExNotes page!


Help us keep the lights on:

Seiko 5 Field Series GMT

By Joe Berk

Greenwich Mean Time.  In case you were wondering, that’s what GMT means, and I thought I would introduce this blog with a simple definition of what Greenwich Mean Time actually means, only it’s not that simple.  Here’s the first part of a long explanation from Wikipedia:

Greenwich Mean Time (GMT) is the local mean time at the Royal Observatory in Greenwich, London, counted from midnight. At different times in the past, it has been calculated in different ways, including being calculated from noon; as a consequence, it cannot be used to specify a particular time unless a context is given. The term “GMT” is also used as one of the names for the time zone UTC+00:00 and, in UK law, is the basis for civil time in the United Kingdom.

It gets more complicated from there, with considerations given for the historical differences between the day starting at noon (versus midnight), variations in the time at which the sun crosses directly over London’s Greenwich Observatory (it can vary by 16 minutes either way), and other factors I’m not going to go into here.  After reading through the Wikipedia definition, I’m going to settle on GMT standing for Greenwich Mean Time and leave it at that.

In my watch-centric context, GMT means a watch that can be used for showing the time in two time zones simultaneously.  There’s a lot of ways to do this and the watchmaking world has numerous different approaches.  It’s perhaps easiest with a digital watch that can switch between cities (Casio has a number of watches that can do this and we’ve blogged about them before).  Within the analog world, there are also different approaches, and we’ve also written about those before (see our blogs on the Citizen Blue Angels and the Citizen Night Hawk).

The more conventional GMT approach in the analog watch world is to add a fourth hand and a separate 24-hour set of markings, with the fourth GMT hand or the hour hand used to designate the second time zone.   Last year, I bought a two-tone Seiko GMT watch because I thought it was cool and it compared favorably to my Rolex GMT Master II (and that blog is here).

So where’s this story going?

Several watches needed new batteries. The one at the top is a Seiko military-styled chrono in blue. The one at lower left is Sue’s Citizen. The one in the middle is a Timex flyback day-date I bought several years ago. I hardly ever wear that one, but I like it. The one in the lower right is a Fossil I admired when moto-buddy Joseph Lee wore it one day. To my surprise, he took it off and gave it to me.

A few days ago, I noticed several of my quartz watches had stopped running.  One of Sue’s quartz watches had, too.  Dead batteries.  It happens on an irregular basis.  But that’s okay, because it gives me an excuse to swing by my favorite watch shop, Golden Times Jewelry, in nearby Pomona.  They’re nice people and they only charge $3.25 to install a new battery.  And while I’m waiting, I can peruse their selection of new Citizen and Seiko watches.

My new Seiko Field Series 5 GMT. This is a good-looking and accurate watch.

I was doing that when I noticed a Seiko I had not seen previously.  It was the Seiko 5 Field Series GMT.  It had all the features that appealed to me, including big numbers (my eyes aren’t what they used to be), a black face, strong contrast between the hands and the face, a stainless steel case and bracelet, it was not hideously huge (why do watchmakers make watches so unnecessarily big these days?), and an overall appearance that, to me, looked good.  I asked to see it, and Stephanie (the nice lady who manages the shop) lopped 35% off Seiko’s suggested list price.  That was a superb deal.

The Seiko 5 Field Series GMT and the Rolex Explorer II. The Rolex’s street price is around $11,000. The Seiko’s MSRP is about $450, but you can get it for less. I think the Seiko is better looking than the Rolex.

The new Seiko reminds me of Rolex’s Explorer II GMT.  I tried it on and asked Stephanie if it made me look fat.  She smiled.  I pulled the trigger and I’m glad I did.

When I got home, I navigated to the official US time site (www.time.gov) and set the new Seiko to the exact time on it.  I’ve been wearing the new Seiko for several days now and the watch is tracking to the official government time exactly.  That’s awesome from a mechanical automatic (i.e., self-winding) watch.  A new Rolex (or one that’s been appropriately serviced) is accurate to about 5 seconds per day.  The Seiko is keeping better time.

The new Seiko sits lower on the wrist than my other Seiko Series 5 watches.
The Seiko 5 Field Series GMT window. I like it.

There are several things I like about this new Seiko.  It sits lower on my wrist than most of my watches.  That’s good.  Like the other Seiko 5 watches, the watch has a window that allows you to see the movement and the self-winder.  That’s a feature I like.  The Seiko has a 41-hour reserve (if you take it off when it is fully wound, it will keep running for another 41 hours).  That’s less than a Rolex’s 70-hour reserve, but in the real world, it’s kind of a pointless advantage (in my opinion).  If I take the watch off, it’s only going to be for an hour or so.  If I’m going to wear a different watch, it will usually be for a week or more (so neither a 41-hour reserve or a 70-hour reserve will keep it going).

The Seiko 5 Field Series GMT is an awesome watch.  I like it a lot.


More watch reviews?  They’re right here.


More gun stuff? You bet!


Join our Facebook ExNotes page!


Help us keep the lights on:

Barbequed Salmon

By Joe Berk

Few dinners are as easy to make and ritzy as barbequed salmon.  It’s one of my favorites, and it came about as a result of dinner several decades ago at the now-defunct California Lawry’s restaurant out near Griffith Park.  Lawry’s is a company that makes spices, one of which is their 17 Seasonings.  I’m not sure why I ordered salmon that night (it might have been a first for me), but it was delicious. So much so, in fact, that I asked our waiter how it was prepared.  He smiled.  That was the whole point of Lawry’s having a restaurant:  To get you to like their meals and buy their spices.

“It’s easy,” he said.  “Drizzle a little olive oil on the fish, put some of our Lawry’s 17 Seasonings on top of it, throw it on the grill, and you’re there.”

The guy was right, and I’ve been making my barbequed salmon that way ever since.  It’s a favorite if it’s just Sue and I having dinner, and it’s a favorite when we’re having folks over for company.

With that as an intro, let’s get into it.

Ingredients

      • Salmon.  Duh.  Yep.  You can get a big container at Costco (although lately their salmon hasn’t been that good), or you can buy a couple of cutlets packaged like you see below.  When you open the salmon, if it smells fishy or it has an ammonia aroma, bring it back to the store.  It’s been on the shelf too long.  Good fish will have no smell.
      • Seasonings.  I think you can still get Lawry’s 17 Seasonings.  These days, we just buy Costco’s bigger bottle of seasoning, which they call their organic no salt seasoning.  A bottle of that lasts us a year or two.  It’s just as good as the Lawry’s, but way less expensive.
      • Olive Oil.  Get the extra virgin stuff.  If you see anything labeled extra extra virgin, steer around it.  It only goes up to extra virgin.  I know people in the olive oil business.  Trust me on this.
      • Charcoal Briquets.  I like to barbeque the old-fashioned way, with a barbeque and charcoal.
      • A Charcoal Grill.  Nothing fancy here.  I use the cheapest charcoal grill I can find at Walmart.  Every decade or so I’ll need to replace it.  I like the taste of charcoal grilled stuff better than a gas grill.

Once you have everything, you’d good to go.  This takes about 45 minutes to prepare, with a good half hour being necessary just to get the charcoal going.

Get the charcoal grill started and put the wire grill on top of the glowing briquets.  Scrub the grill clean after it’s hot and spray the grill with a nonstick spray.

Steelhead, Atlantic salmon, Coho salmon…it’s all good. We prefer steelhead trout. Salmon is in the trout family, hence the name.

While the grill is heating, open the salmon container, rinse the cutlets (or the filets with tap water).

Rinsed and ready for the oil and the seasonings.
We do a lot of shopping at Costco.  Their Organic No-Salt Seasoning is just like Lawry’s 17 Seasonings.

Drizzle a little oil over the top of the cutlets, and then sprinkle the seasonings on top of the oil.

Drizzled, sprinkled, and ready to grill.

Place the salmon skin side down on the grill for 14 minutes.  After 14 minutes, flip the cutlets and grill for an additional 3 to 4 minutes.

Having a decent chronograph helps here (my preferred watch is either a Casio G-Shock or my Bulova Lunar Pilot).   Any watch will do.  But I’m not going to let a chance to show a watch slip by.  If want to read our watch reviews (and other equipment reviews, too), they are right here.

There’s a hell of a story behind this Bulova.

Remove the salmon from the grill; it’s ready to serve.  Just about any veggie goes well with salmon.  We like steamed carrots, asparagus, a salad, maybe some citrus as sides (as you see in the photo at the top of this blog), and others.

Good to go, and great to eat.

So there you have it.  Barbequed salmon, à la ExhaustNotes.  Don’t thank us now; just click on those pop-up ads or maybe click and leave a donation to support your favorite blog writers.


Subscribe to ExNotes for free!


We need your support!  Do what you can to help ExNotes stay in the black!


More Huber? Check out A Trip Into The Moment.

More Gresh and Berk?  You bet!  Check out A Cup O’ Joes!


Join our Facebook ExNotes page!


Help us keep the lights on:


Buell Fever Part 7: Lean On Me

By Joe Gresh

Tidying up where we left off in Part 6, the new front brake pads arrived and everything wheel-wise went together. Bleeding the front caliper was uneventful and the brake stopped the wheel which is all you can ask in today’s crazy world.

Stoppage by PM.

It was time to tackle the Buell’s kickstand issue. If you’re keeping count, that’s three motorcycles I have had to modify the kickstand on.

Kickstand things are precarious and resulted in a crash.

The Buell’s kick stand was an odd duck. It had the typical Harley locking style but where Harley used heavy, hard-wearing steel the Buell used soft, easy to consume aluminum.

The material change is important because with only 13,000 miles my Buell kickstand locking groove was completely worn out. The notch the kickstand flopped into was gone and with the poor angles involved the bike was ready to fall over any minute. And it did.

The notch area, eaten away in the pursuit of light weight.

I was going to take a stab at welding a notch in place but I couldn’t get the TIG torch in the narrow kickstand mounting boss. This was a job better left to the pros at Roy’s Welding. I took the aluminum side plate down to Roy’s and dropped it off.

Access is limited, so I gave up and took the kickstand plate to a welder.

A few days later I called Roy’s to see how things were going and I guess they couldn’t get their torch in between the kickstand mount either. Back I went to retrieve the still-boogered kickstand mount. I searched online for a few days but a left-side mounting plate was not available when I needed it.

Left with no option I tried some of Harbor Freight’s ersatz aluminum welding rod. This material is kind of an aluminum solder. To weld with it you use an Oxy-acetylene torch and it kind of works.

A nice flood of ersatz aluminum filled the void.

You’ll need to clean the aluminum well and then using the torch to heat the work you sort of rub the rod into the metal. Take care not to overheat the work. It’s an easy process that you can stop anytime by removing the heat source.

I welded (if you can call it that) the original pivot holes closed then filled the worn spot inside the kickstand mount. It worked ok and I managed to get the filler pretty level inside the mount.

The original pivot holes stopped the stand at a 90-degree angle. This was fine and dandy when the stand had a notch to fall into. My new plan was to make the kickstand more like every other kickstand in the world instead of Harley style.

The relocated pivot hole allowed more stand arc.

I re-redrilled the holes and a position that allowed the stand to swing forward and over center the return spring. This set up is pretty normal even in later Buells. I ground the stand a bit thinner to make room for a steel washer in the hope of protecting the soft aluminum filler material.

It looks much worse than it is

To allow movement for the old stand design the hole in the kickstand was oval shaped. This made for quite a bit of lean when deployed. My new design didn’t need the oval hole so I drilled it out and fitted a steel bushing. Now things were snug.

Steel bushing to fill the wongo-wongo, pivoting angle.

With the relocated pivot holes the end of the kickstand hit the swing arm in the up position. I used a piece of Starboard (plastic used in boat building) to make a new stop for the stand.

New stops keep the kickstand from hitting the swing arm.

It all worked. The Buell stand is still in an odd, dirt-bike like location but it operates normally and the bike doesn’t fall over. So that’s a good thing.

No more rolling off the stand and hitting the ground for me.

More Gresh Buellishness!

Buell 1:  More Cowbell
Buell 2:  The Reckoning
Buell 3:  An Own Goal
Buell 4:  Striking Oil
Buell 5:  Carb Blues
Buell 6:  Oingo-Boingo


More gun stuff? You bet!


We need your support! Do what you can to help ExNotes stay in the black!


More Huber? Check out A Trip Into The Moment.


More Gresh and Berk? You bet! Check out A Cup O’ Joes!


Join our Facebook ExNotes page!


Help us keep the lights on:

Ruger’s .45 Blackhawk and Red Dot Accuracy

By Joe Berk

I saw the Ruger Blackhawk you see above in a forum post several years ago and wrote to ask if the owner if he would sell it.  The answer was yes, and after navigating all the California hurdles, the revolver found a home in my gun safe.  Several things attracted me to it. It is a 200th Year Ruger, it is in as new condition, the cylinder throats had already been reamed to their correct dimensions (several .45 Colt Blackhawks left the factory in 1976 with undersized throats), and the grips are nice (much nicer than normally seen on a Ruger Blackhawk).  The grips have great figure and the wood-to-metal fit is superb (something rarely seen on a new Blackhawk these days).

Fancy wood. I’m guessing this is Gonçalo Alves wood. The wood-to-metal fit is way better on this 50-year-old revolver than it is on current production Rugers.
The right grip is just as pretty as the left. Ruger used to get it right.

You saw my previous post 0n fitting the Power Custom base pin to this revolver, and another in which I compared this handgun to two other .45 Colt handguns (a 4 5/8-inch stainless Blackhawk and a tuned Taylor Uberti Single Action Army replica).  I had not really done any load development for the Blackhawk you see in this blog, and I wanted to start doing so this week.  I grabbed some ammo and headed to the range.

Getting out to the West End Gun Club has been a bit dicey over the last month or so.  With our heavy rains, Lytle Creek has been running high.  My Subie came through, though, like it almost always does.

I say “almost” because a couple of years ago under similar circumstances, I almost became a U-boat commander.  You may have read that blog before.

My first target at 25 yards with the 5.9-grain Red Dot load I had previously evaluated at 10 yards was mediocre.  The group was high and big.  Ordinarily (and with an accurate revolver), I can put a box of ammo into a 25-yard group you could cover with a silver dollar.  That wasn’t happening with this load.

Meh. I’ve done better.

When my buddy Kevin saw the above target, he asked if I was using a shotgun.  I understood his point. So I set up another target, again at 25 yards and with the same load, figuring I’d do better the next time.  The results were the same.

Another group with the 5.9-grain, 200-gr truncated roundnose cast bullet. Just like the group above. High left, and too damn big.

Must be the load, I thought.  I switched to the last box of .45 Colt loaded with Trail Boss powder (it was 6.4 grains of Trail Boss under the same 200-grain roundnose, flatpoint, cast bullet used above).  That’s a load that’s done well in other guns chambered for this cartridge.  The results were almost identical to the Red Dot load.

Same bullet, but with 6.4 grains of Trail Boss.   Maybe the group was a little tighter.  Maybe not.

So far, the .45 Blackhawk results with Red Dot were disappointing.  The groups were too big and too high.  My Blackhawk’s rear sight is all the way down, so it I knew it was time to try something different.  I had some 230-grain roundnose Missouri bullets hiding somewhere under the reloading bench, along with another box of 200-grain Speer swaged bullets, but I didn’t think either of those would be the answer here.   A heavier bullet (like the 230-grain cast roundnose bullet) would shoot higher.  That’s what heavier handgun bullets do because they generate more recoil and have a slower muzzle velocity (and that causes the bullet to spend more time in the barrel as it rises), giving a higher point of impact.   I also had some 185-grain full metal jacket bullets (a little lighter than the ones I shot here), so I tried them.  Maybe they would be the answer.  I went home and loaded some of those to try the next time I visited the range.

An unusual appearance cartridge: The .45 Colt with 185-grain Winchester jacketed semi-wadcutter bullets.

I prepared 20 .45 Colt reloaded rounds with the 185-grain Winchester jacketed semi-wadcutters with the same Red Dot propellant charge as previously used (5.9 grains), and then I reloaded another 20 rounds with that Winchester bullets and a heavier charge (6.7 grains of Red Dot).

The first group (loaded with 5.9 grains of Red Dot and the 185-grain Winchesters) printed high and to the left.  The group was a little tighter, at least with respect to lateral dispersion.

Way high, a little left, and a few flyers. The rear sight was already in its lowest setting. It was pretty windy that day.

I next shot a group with a higher Red Dot charge (6.7 grains).  It moved the group down substantially (a hoped-for result) and the group was tighter.  Ah, progress.  It comes in many forms.

With a higher Red Dot charge (6.7 grains here), the group moved a little right and a little lower. That one flyer on the left? Who knows?

A quick check of the fired cartridges confirmed what I was experiencing when extracting the above rounds.  There were no pressure signs, and extraction was easy.

No primer flattening, and easy extraction. These loads showed no signs of high pressure.

I went home and reloaded more .45 Colt cartridges, this time with even higher charges.  The recipes this time were the same 185-grain Winchester jacketed semi-wadcutters, but with 7.0 grains and 7.3 grains of Red Dot.

While all this was going on, I continued to cruise the Internet, looking for more information on Red Dot and its reloading peculiarities.  A found a few places where folks mentioned that the powder didn’t meter well.  Usually, my Lee powder dispenser has a consistent drop, so I thought I would weigh a few after I had the dispenser adjuster.  Wow.  Those guys were right.  I was seeing variation of as much as 0.5-grain from charge to charge.   Hmmm.  I was experimenting with charge weight differences as small as 0.3 grains, while the dispenser was throwing in variability of 0.5 grains.  That’s not good.  I filled the powder dispenser, rapped it a few times to settle the Red Dot, and I managed to get the variability down to not more than 0.2 grains.  It was 0.0 grains, which is what I had experienced with other powders, but it was better than the 0.5 grains I first encountered.  Like Donald Rumsfeld used to say, you go to war with the Army you have.  My Army had 0.2 grains powder-drop-to-powder-drop variability, and that’s what I was going to war with.

The next day at the range, I fired 20 rounds at a 25-yard target using a my 7.0-grains-of-Red-Dot load.  It shot a little bit better group, and it had a little bit lower point of impact.  More progress.

Ever wonder why a head shot is only worth 5 points, while a center of mass shot is worth 10? These things sometimes keep me up at night. The point of impact was getting lower with higher charges.

Then I tried the last group I had loaded, this time with 7.3 grains of Red Dot.  I had a few stray shots, but I also had the makings of a better group, and it was lower yet on the target.

A better group. Still too high, but getting better. Those stray shots: Were they the result of shot-to-shot powder charge weight variability, or were they due to pilot error?

At that point, I decided to call it a day with this test series and with this revolver.  Here’s what I concluded from the above:

      • Red Dot is not the best propellant for the .45 Colt cartridge, which is probably why you almost never see it listed in any of today’s reloading manuals.  The above notwithstanding, Red Dot can work for .45 Colt cartridges, as this test series found.
      • Higher charge weights are better, probably because they occupy more of the case volume (the .45 Colt is a big handgun cartridge).  My tests showed that the average velocity, the extreme spread, and the standard deviation all improved with higher Red Dot charge weights.
      • With my 7.3-grain Red Dot load, the average velocity is 980.0 feet per second, the extreme spread is 76.5 feet per second, and the standard deviation is 21.1 feet per second.  These are not the best numbers I’ve ever seen in a handgun, but they are not the worst, either, and a 185-grain, .45 caliber bullet smoking along at nearly 1000 feet per second is nothing to sneeze at.  Other powders would do better in this cartridge (IMR 4227 comes to mind), and future efforts will focus on that.
      • Regarding my .45 Colt Blackhawk shooting high at 25 yards, I don’t know if it’s the load or the gun.  I have another Ruger Blackhawk that shoots high at 25 yards (my .357 Blackhawk).  I have a lower rear sight blade from Ruger laying around here somewhere.   I will try to find it and, after confirming it is lower than the blade currently in the gun, I’ll see how much that helps.

So there you have it:  Red Dot propellant reloads in a Ruger .45 Colt Blackhawk.  If you have a comment, we’d love to hear it.


More gun stories?  You bet!   There’s good stuff on our Guns page on the three Rs (Rugers, revolvers, and rel0ading)!

Tales of the Gun


Buy one for yourself (or for a friend):  Get The Gatling Gun!


Join our Facebook ExNotes page!


Never miss an ExNotes blog:


Help us keep the lights on:

Tokyo Road: Part 2

By Mike Huber

I still had two days to kill prior to picking up my motorcycle to begin exploring Japan. I found a great pod hotel next to a major hub and subway route, which made getting around Tokyo very easy.

A pod hotel is just that. It was a giant room filled with about 50 or so small containers like sleeping pods that are stacked two high. It is absolutely like sleeping in something you’d see in an 1980s sci-fi movie. This particular pod hotel had three floors of pods, and then on the top floor, an onsen (Japanese hot springs), a cold bath, showers, sauna, and a large dayroom for hanging out. For the price (approximately 40 USD) it was perfect for my 4-day stay in Tokyo.

The following night I listened to my friend’s advice and took the train three stops to Akihabara Electric Town. Akihabara Electric Town is a neighborhood in Tokyo that is pretty much a futuristic sensory overload chamber. It was just becoming dusk as I left the train and entered into this neighborhood of Tokyo. It didn’t take me long to feel overwhelmed by the sights and sounds which now fully engulfed me. Quite honestly, out of every country and location I’d have ever visited this was by far the most culture shock I think I have ever felt. It was like I had just been blasted into the future mixed with an anime theme. After a few minutes regaining my composure, I decided I needed a short break for a drink. Within a few blocks, I found one of the recommended experiences. The name of this place was The Maid Café.

The Maid Café is difficult to describe. I think the best description I can come up with is to take Hooters and put it in a blender with a futuristic anime environment. In order to request a menu or a beer you have to do this happy dance thing with your waitress and it involves all these intricate hand signals and gestures, which they sorta teach you. Sorta. The Maid Café along with the entire night was quite an overwhelming experience. I am sure that if one had consumed any type of mind-altering substance the evening would have been insanely colorful. Insanely colorful and I am sure you would end up at some arcade fishing a Monchichi out of a machine. That is if you had you consumed anything.

The remainder of the evening was spent in and out of uniquely themed bars and arcades. In one particular arcade I ended up losing all my subway money attempting to pull a Monchichi from one of those claw machines. My love of the Monchichi (they are such a peaceful, loving people) made it well worth the time and money to finally win one, which is now attached to my backpack as a reminder of my evening exploring Tokyo’s colorful nightlife.


We need your support!  Do what you can to help ExNotes stay in the black!


More Huber? Check out A Trip Into The Moment.

More Gresh and Berk?  You bet!  Check out A Cup O’ Joes!


Join our Facebook ExNotes page!


Help us keep the lights on:

Tokyo Road: Part 1

By Mike Huber

I believe I am skipping ahead a couple countries I experienced in 2025, but I really wanted to write about one of my favorite ones (that being Japan). This country opened me up to its unique culture and really welcomed me. As with previous places I visited, I did minimal to no planning ahead, outside of my arrival in Tokyo. This is the best way to travel, with no schedule or time constraint pressures.

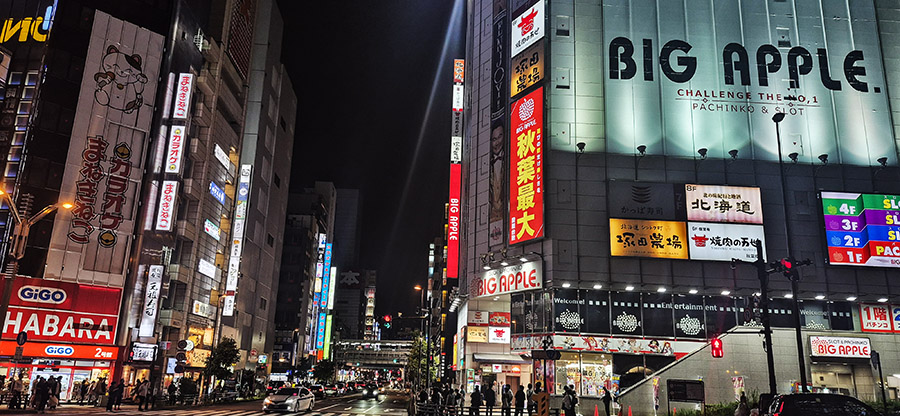
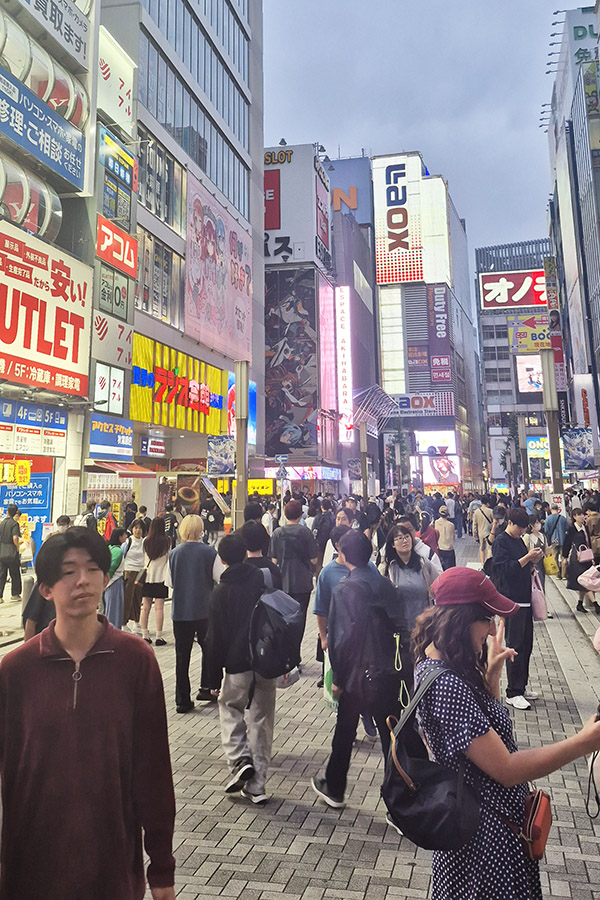
I am usually comfortable with no planning, but before arriving in Tokyo (one of the largest cities on earth), I was feeling overwhelmed. Within 30 minutes of landing I learned there was no need for those feelings, though. Tokyo is one of the most organized, safest, cleanest, and well laid out cities I have ever visited. As I traveled through Japan for the next five weeks, I learned the people are some of the most beautiful in the world, and that is coming from someone who has seen quite a bit of the world.

Being overly social and making friends everywhere, I happened to have a friend in Tokyo. I met Maico when I was traveling through Peru in 2012 and we kept in touch over the years. She owns a cute little coffee shop called Ami Cono (AmiCono) just two train stops outside Shibuya Crossing (a popular tourist destination).

I met Maico at her gelato shop and as we were reconnecting, she offered to take me out to dinner. Of course, I wanted sushi and she knew just the place! The restaurant was called Hiro Ishizaka, it was Michelin rated and much more than I expected. We spent the better part of three hours there as the owners (a husband and wife team) kept an endless train of sushi and saki coming at us until we couldn’t eat anymore. I feel fortunate Maico was able to get us a reservation, as they only served six people per evening.

As the evening came to a close, the other two couples left and Maico and I stayed to chat with the owners. It turned out the husband was a motorcyclist and being that I was about to rent a motorcycle that Monday for a week (or so), he and I had a deep conversation (mostly through Google Translate) on different roads to ride.

It was a great welcome to a new country. I was now armed with the knowledge of some great motorcycle roads and a few other highlights to add to my ever-growing list. I was ready to ride Japan!


We need your support!  Do what you can to help ExNotes stay in the black!


More Huber? Check out A Trip Into The Moment.

More Gresh and Berk?  You bet!  Check out A Cup O’ Joes!


Join our Facebook ExNotes page!