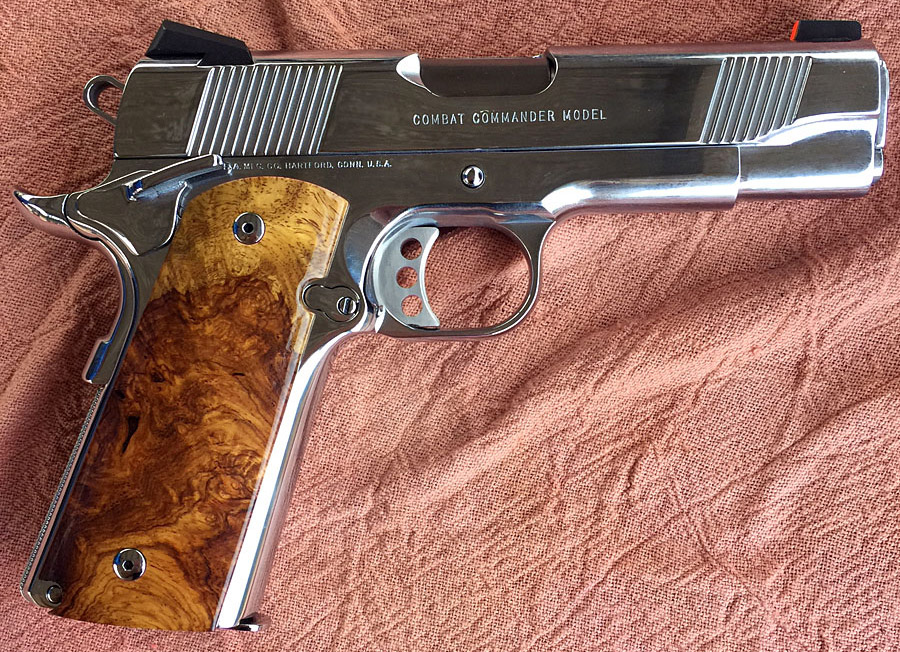
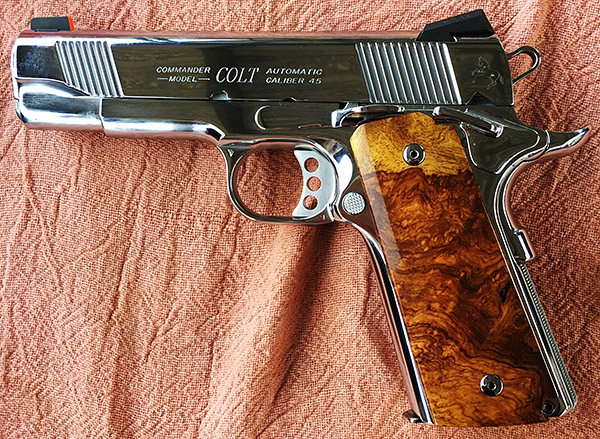
We’ve featured TJ’s Custom Gunworks a few times here on the ExNotes blog. I’ll take credit for influencing another good buddy who had TJ work his magic on a Colt Combat Commander, and this one is a honey. Colt’s Combat Commander is a 4.25-inch barreled version of the 1911. This TJ custom auto is hard chromed and it is a stunning example of TJ’s workmanship. You can see it in the photos and you can see the results on the range.
The Combat Commander shown here has had the following modifications:
Polished hard chrome finish over stainless steel.
Throated and polished barrel and frame.
Fitted and polished extractor.
New match trigger and action job.
New match hammer.
Smoothed breech face.
Polished full length guide rod.
Satin polish on barrel hood and chamber.
Extended slide catch.
New and rounded steel mainspring housing.
Trigger pull set to 3.0 lbs.
Melted sharp edges.
Reduced strength and smoothed magazine release button.
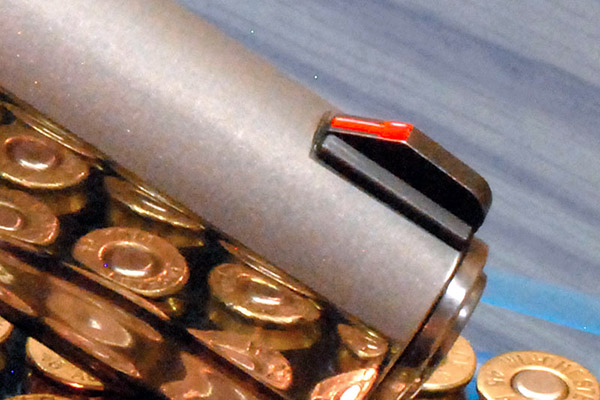
DayGlo red front sight.
Honduran rosewood burl grips.
I’ve seen this gun in action on the range and it is a thing of beauty. I’ve had a few guns customized by TJ, and I’ve steered a few friends there. I’ve had six handguns and a rifle customized by TJ, and every one of them is a stellar example of his craftsmanship. These include a Model 59, a bright stainless Colt 1911, the MacManus Colt 1911, the Rock Island Compact, a Model 60 Smith and Wesson snubbie, a Ruger Mini 14, and a new Colt Python. TJ’s emphasis is on reliability and perfection and on all of my guns he met those objectives in every case. When it comes to custom firearms, it doesn’t get any better than TJ’s Custom Gunworks.
You can read more firearms features on the Tales of the Gun page.
Enjoying the ExNotes site? Want to help support us?
Never miss an ExNotes blog. Sign up here for free!
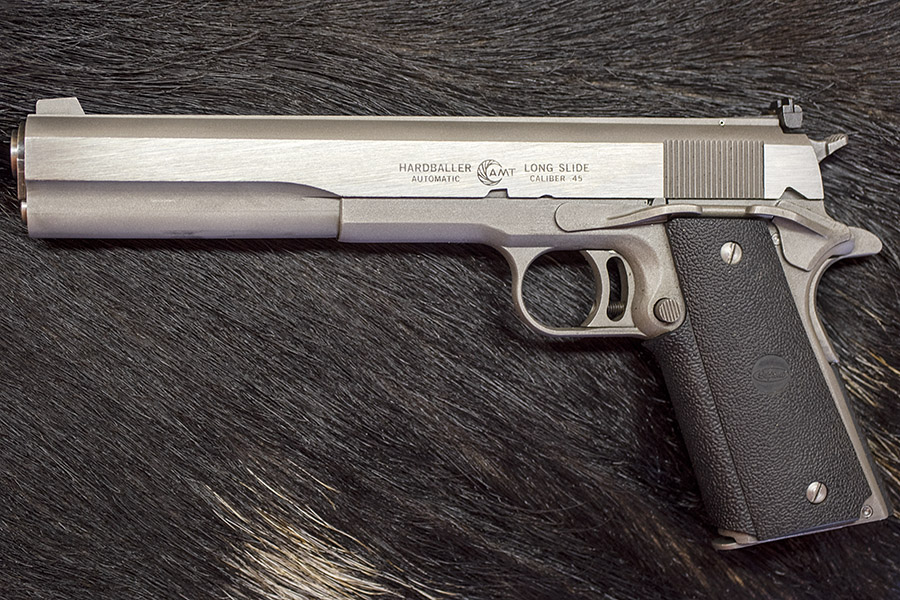
“I’ll be Bach,” of course, is the written Austrian-accent impersonation of the Governator (i.e., Arnold) in what has to be one of the best sci-fi movies ever, Terminator. One of the several guns that received top billing in that movie was an AMT Long Slide Hardballer equipped with a laser sight.
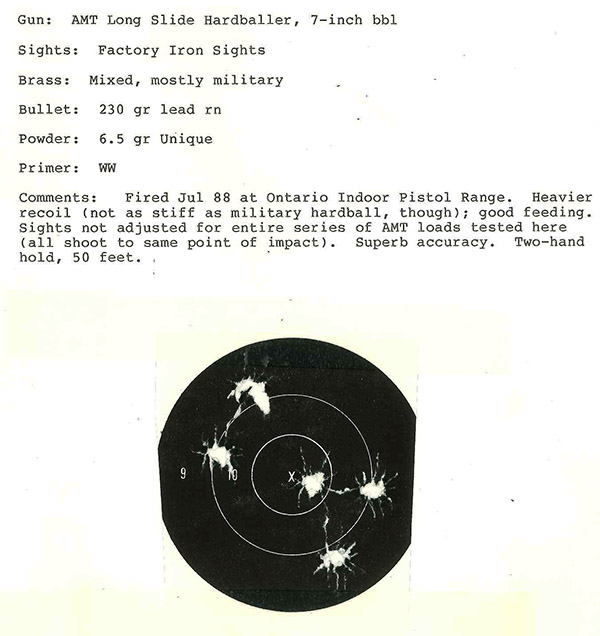
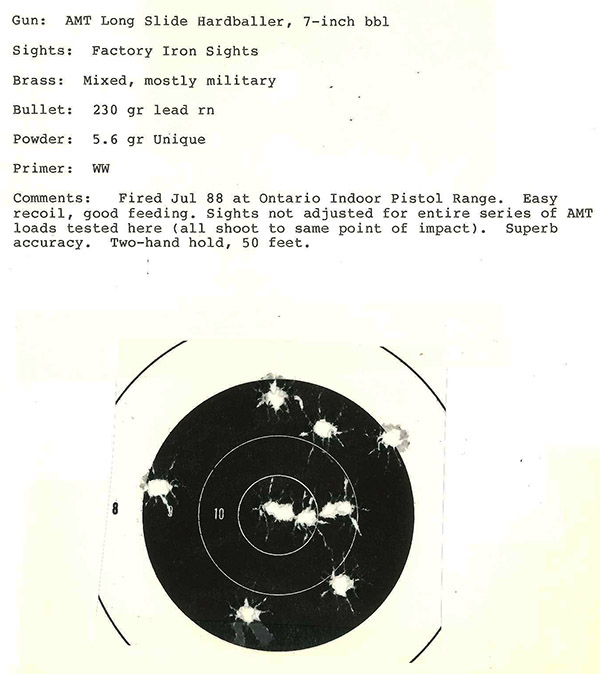
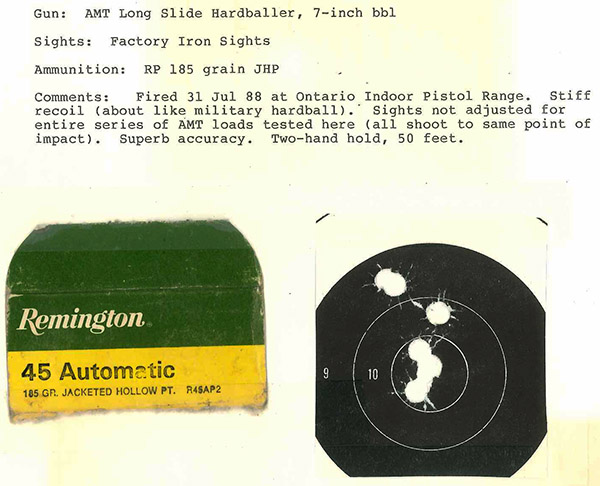
There are a lot of cool things to know about the Terminator movie and its armament, not the least of which is that laser target designators were not yet available for handguns when the movie was released in 1985. Ahnold’s (misspelled intentionally) AMT Hardballer had a custom 10,000-volt laser, and the wiring for all that power was hidden in the future governor’s jacket sleeve. I liked the movie, but I especially liked seeing the Long Slide Hardballer 1911 in it. You see, I own one. It cost just $365 back in the day and it was manufactured by Arcadia Machine and Tool (hence the AMT moniker) just up the road from me in Monrovia, California. It is a stainless steel 1911, it has a 7-inch long slide and barrel, and it is accurate. That’s my gun you see in the phot0 at the top of this blog. One of these guns recently sold for close to $2,000 complete with box and papers. I have the box and papers that came with mine. And no, it’s not for sale.
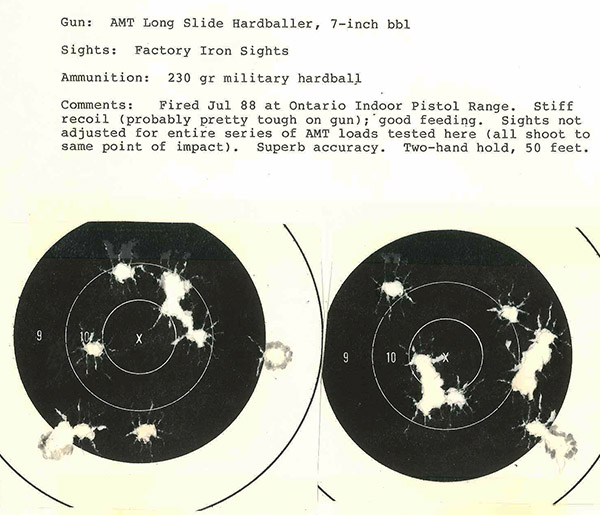
The Hardballer is surprisingly accurate. The 2-inch longer sight radius really works. Mine has not been tightened up, accurized, or modified in any way. The trigger pull is a bit higher than I would like, but it’s crisp (one of these days, I may get around to having TJ of TJ’s Custom Gunworks do a trigger job on it). I found the targets you see below in an old reloading notebook; they were all fired by yours truly, standing, at 50 feet. I guess that old saying is true: The older I get, the better I was.
I’ve owned my Hardballer for close to 40 years now. The AMT company is no more, so there won’t be any more of them. It’s a classic, and I need to get out and shoot it more often. Maybe I’ll do that today.
Keep us afloat: Click on those popup ads!
Never miss an ExNotes blog…sign up here for a free subscription:
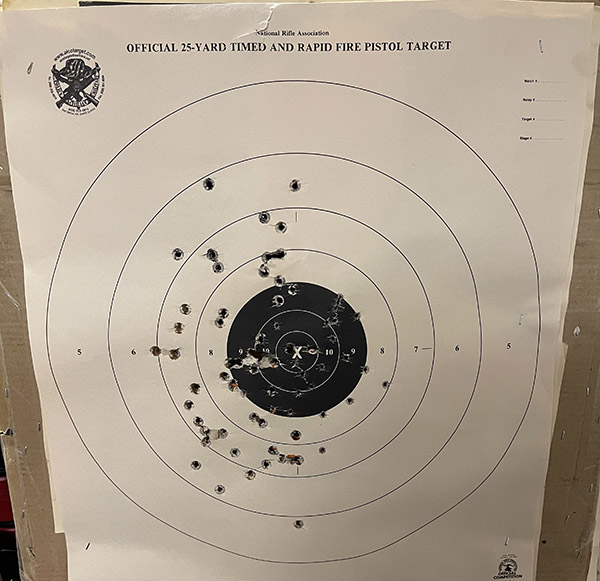
The last time I had the Compact 1911 on the range, I shot worse than usual. At 25 yards (with me resting my arms on the bench), I can typically keep my shots in the black with the Rock Compact. This is how I shot last week:
Maybe adequate for defense purposes and probably close enough for government work, but terrible shooting.
That’s pitiful (there’s a few 9mm holes on that target above; ignore those). Then I noticed the slide was not going fully back into battery, which was something new to me. It wasn’t jammed, it just needed a slight nudge to finish the trip home.
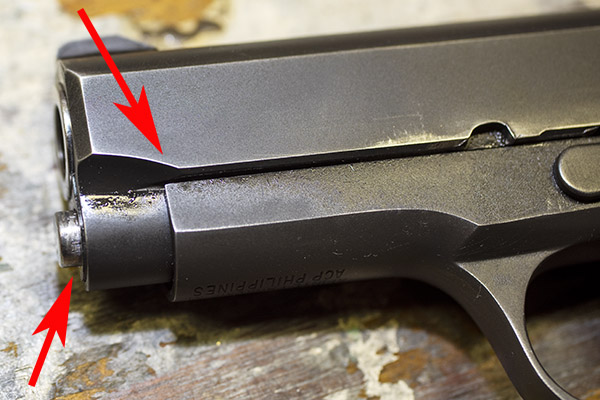
The slide sitting about a tenth of an inch from returning to battery.
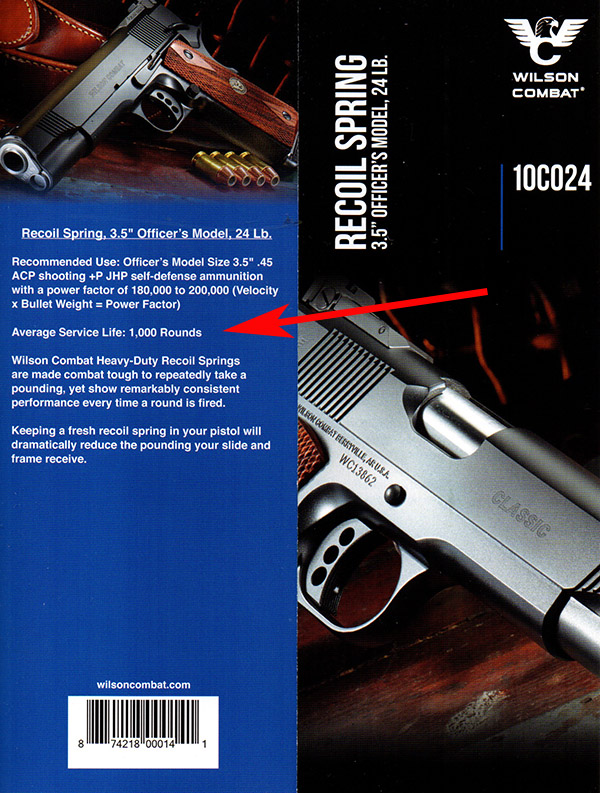
Another view of the slide not returning to battery. “Battery” means fully forward, ready to fire the next round.I knew that Compact 1911 recoil springs fatigue earlier than the springs in full-sized 1911s, but this one snuck up on me. Armscor (the Rock Island Armory folks who manufactured my Compact 1911) were out of stock, so I ordered a new spring from Wilson Combat. Wilson Combat is a recognized “go to” shop in the 1911 world. I received my new recoil spring a few days later.
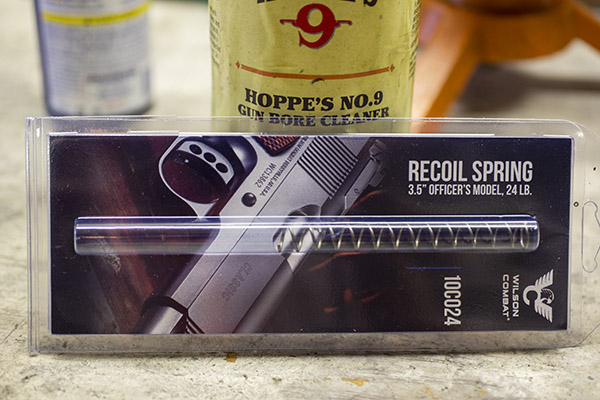
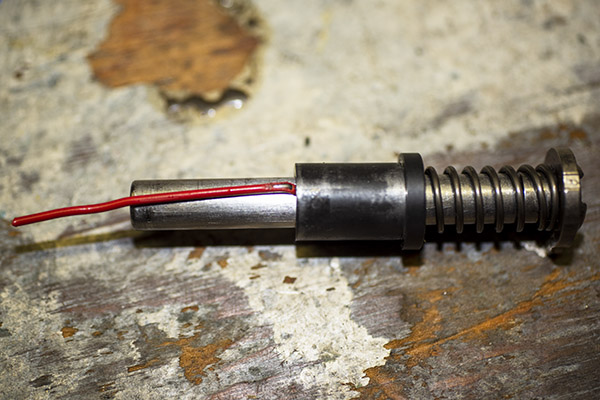
A brand-new Wilson Combat 24-pound recoil spring.
Online research said the life of these springs in a Compact 1911 is only about 2000 rounds, tops. That surprised me. The literature from Wilson surprised me even more:
The Wildon Combat bubble-pack literature.
1000 rounds. That’s 10 boxes of ammo. Wow. I probably had several times that many rounds through my Rock. Small wonder the slide wasn’t returning to battery.
When the spring arrived, I was eager to put it in my 1911. I dropped the magazine and cleared the weapon:
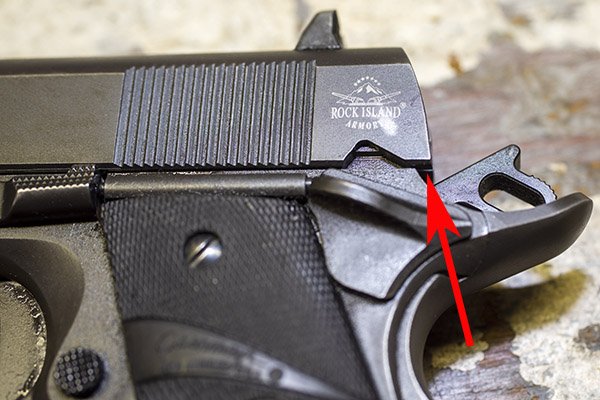
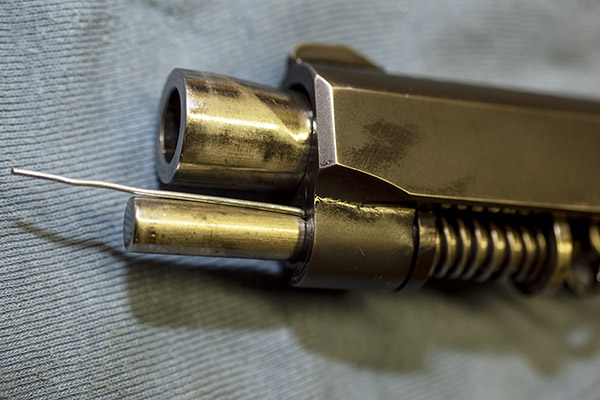
The TJ-customized and polished feed ramp and chamber entrance on the Rock Island Armory Compact 1911. Yep, it’s empty.
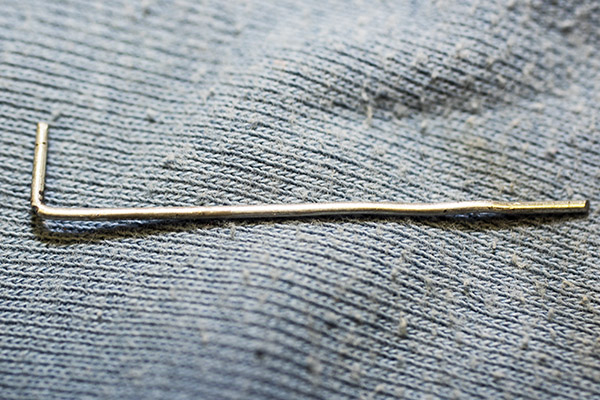
Then it was time to turn to my custom, German tool steel, carefully configured to exacting tolerances, Rock Island Armory Compact 1911 disassembly tool. It’s a bent paper clip:
A bent paper clip 1911 disassembly aid.
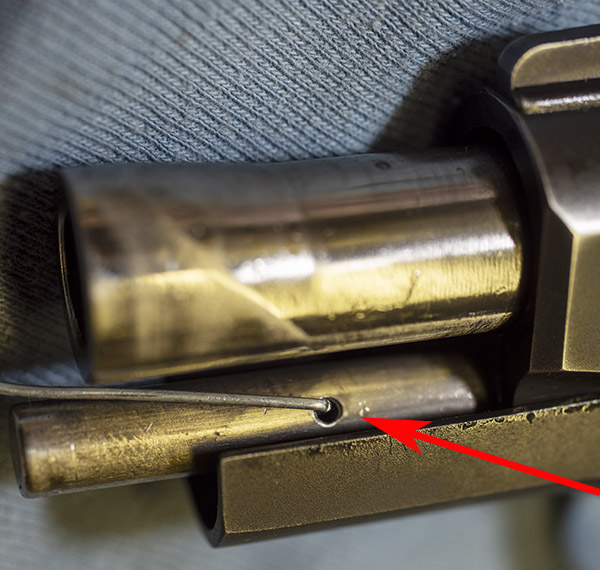
The drill is to lock the slide back, put the paper clip in the guide rod hole, and ease the slide gently forward to engage the paper clip.
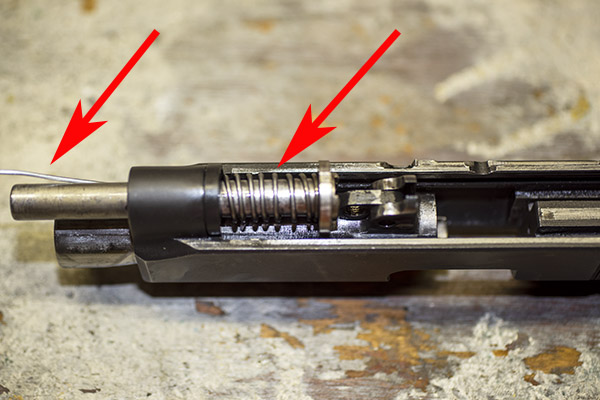
The 1911 guide rod hole that accepts the paper clip disassembly aid.With the slide forward on the guide rod, held in place by the paper clip You bend the paper clip so that the guide rod, recoil plug, and recoil spring can be pushed rearward in the slide to remove these three components as a subassembly).
Once I had the slide forward, with the paper clip disassembly aid in place like you see above, I withdrew the slide release from the left side of the pistol. At that point, the entire slide assembly can slide forward off the receiver.
Another view from underneath the slide.
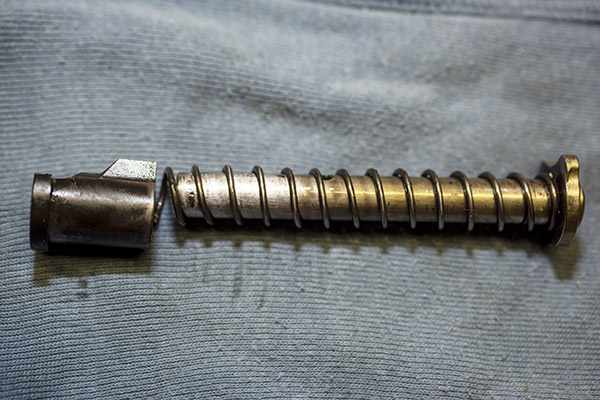
The next step was to extract the recoil spring, the guide rod, and the recoil plug out of the slide. It’s best to leave the paper clip in the guide rod (i.e., with the recoil spring still compressed), and then slide the entire recoil plug/recoil spring/guide rod rearward as a unit out of the slide. After that, I pushed down on the recoil plug, withdrew the paper clip from the guide rod, and released the compression on the spring. I was careful when I did this; parts could go flying if I just let them go. Don’t ask me how I know this.
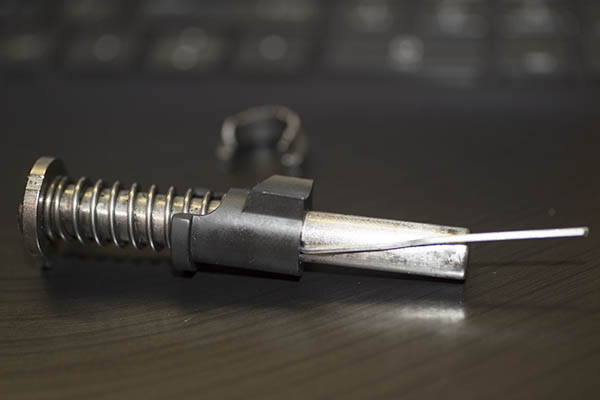
The recoil plug, the guide rod, and the recoil spring removed from the slide with the paper clip removed.
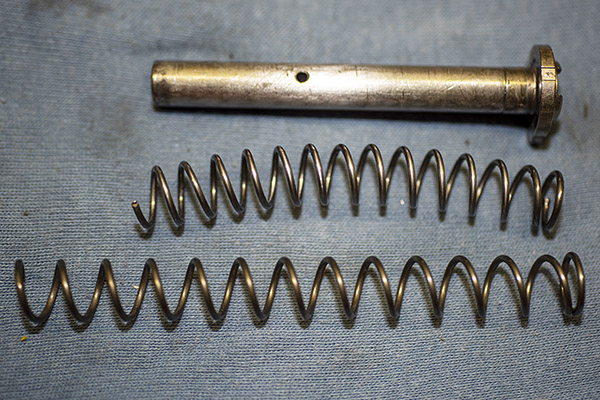
Here’s what the guide rod, the original recoil spring, and the new Wilson Combat recoil spring look like. The new spring is on the bottom:
Quite a difference, huh? In case you were wondering, both springs have 14 coils.
I think the new spring wire diameter is larger than the original spring wire diameter. I didn’t think to measure it before I installed it; I will do so the next time I have the gun apart. And there’s a huge difference in free length, as you can see in the above photo.
Installing the new spring on the guide rod with its recoil plug was a challenge. I had make to a tool to compress the spring and the recoil plug enough to get a paper clip on the guide rod to hold everything together so I could install it in the slide. Again, I was super careful. I didn’t want to release these parts, and I always wear eye protection when I do this sort of thing. A lot of people get hurt by being careless with springs.
The reassembled recoil plug, recoil spring, and guide rod, ready for insertion in the slide.
At this point, I reinstalled the subassembly in the slide, I slid the slide onto the receiver, and then I reinstalled the slide stop.
Once the gun was back together, the first time I tried to rack the slide I was shocked. I couldn’t pull the slide all the way back. I muscled it and then did so several times, and it seems to be okay now, but wow, it is stiff. The 24-pound recoil spring is way stronger than what the Compact 1911 had in it. That’s the bad news. The good news is that the problem with the slide not returning to battery is gone.
The Compact with the slide in battery.
You know, I was playing around with the Compact 45 when I was cleaning it before the above spring replacement and I noticed that because the slide only went limply into battery there was a lot more play between the receiver and the slide. I thought maybe it was me, but I noticed the accuracy was really falling off the last couple of times I shot it. I’ll bet when the recoil spring holds the slide firmly in battery keeps the slide in the same spot each time. With a weak spring, it stands to reason that the slide would swim around a bit more and accuracy would suffer. I shook the gun in my hand with the old spring in it, and it rattled just like the 1911s I carried in the Army. I’ll bet they all had worn recoil springs, too.
When testing a recoil spring to see if it’s the right one, the drill is to load one round in the magazine, fire it, and if the slide locks back after that round (as it is supposed to do), the spring is good. I tried that with seven rounds of factory hardball and the new Wilson Combat 24-pound recoil spring, and it worked each time. Then I tried my 230-grain cast hardball load with 5.6 grains of Unique (my reloads are less potent but way more accurate than factory ammo), and it worked great. Then I tried my 185-grain cast semi-wadcutter load (with 5.0 grains of Bullseye; my Compact 1911 accuracy load), and it worked great. It’s a little easier to rack the slide now, but it’s still way stiffer than it was before.
Like 1911 stories? Or maybe other handgun stories? Or good reloading info? Hey, it’s all available on Tales of the Gun!
Help us keep the content coming: Please click on the popup ads!
More stories on the Rock Island Armory Compact? Yes, indeed!
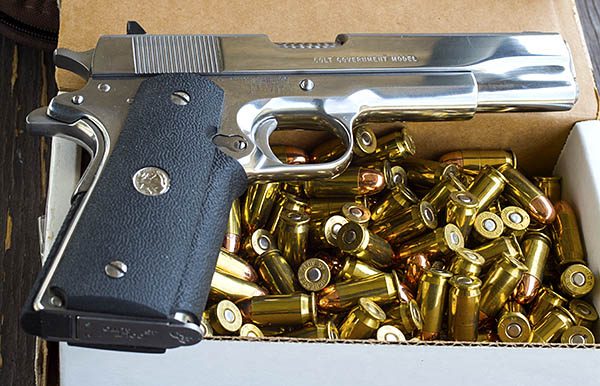
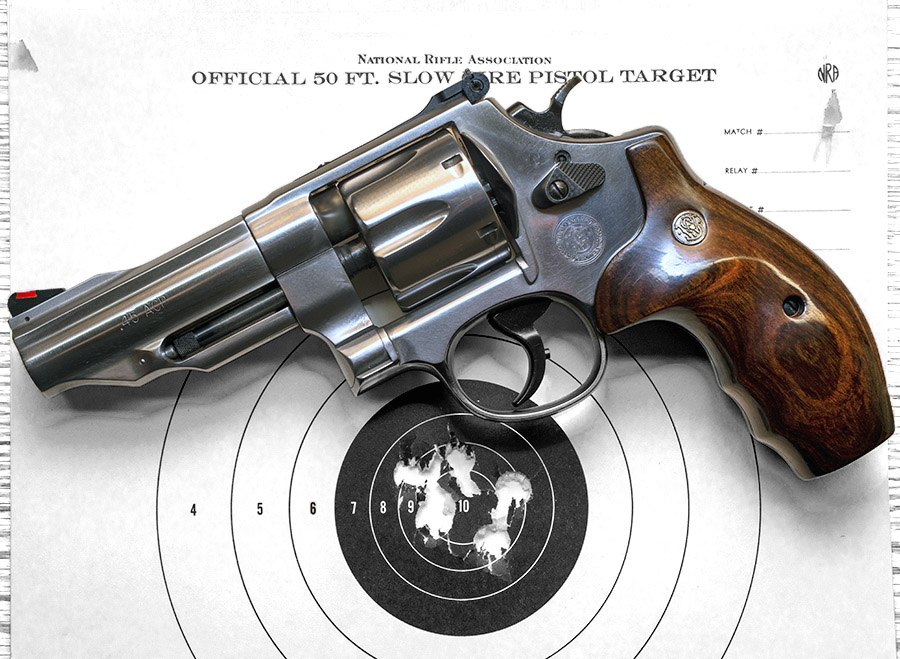
The 1911 is an all time favorite handgun for me (and a lot of other people, too). I’ve owned several 1911s over the last few decades, I carried one in the Army, and I enjoy shooting them. One of the best I’ve ever owned is a bright stainless steel Series 80 Government Model I bought new back in the mid-1980s. Mine has been customized by good buddy TJ (of TJ’s Custom Gunworks) and it’s the one you see here. I have no idea how many rounds I’ve sent downrange with this gun, but it’s been zillions. Maybe even gazillions.
TJ’s Custom 1911 Touches
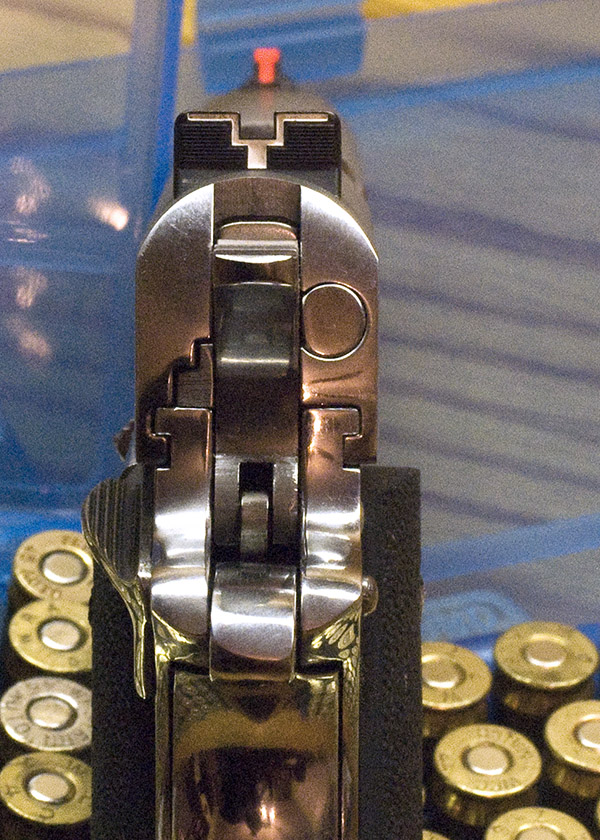
My bright stainless 1911 has had a number of TJ’s custom touches. The fixed Millet sights are probably the most obvious.
Front and rear Millet sights on my 1911. You’re actually supposed to focus on the front sight and the rear should be blurred when shooting (just the opposite of what you see here). I’ll post more on that in a later blog.The Millet red ramp front sight.
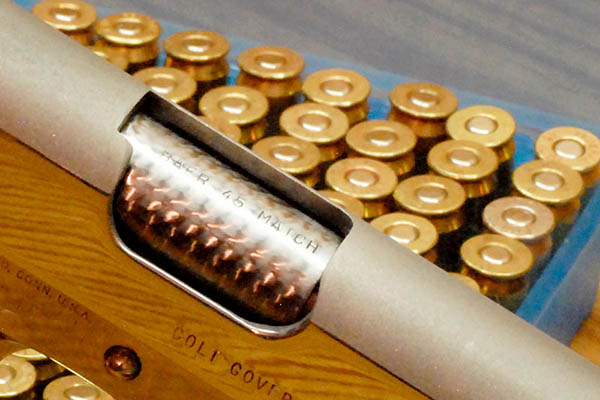
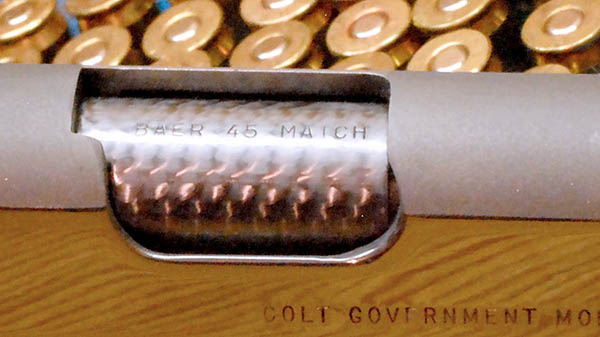
TJ polished and ramped the gun’s internals so it will feed anything, he added a Les Baer match grade barrel, and I had him engine turn the chamber (I love the look).
A Les Baer match barrel.I like it so much I photographed it twice!
The original Colt front sight wouldn’t stay put on my 1911 (probably because of the number of rounds I was cycling through it), and after having the front sight restaked twice, I knew something more permanent was required. The Millet red ramp from sight has two stakes, they are each larger than the single Colt front sight stake, and TJ JB-welded them from underneath after staking. They are on there for the duration. A lot of folks prefer a dovetailed front sight and that would have worked, too, but I’m partial to these no-longer-made Millets. I just like the look.
The rear sight is a fixed Millet dovetail and it has a bright white outline that works well with the red ramp front. I’m not normally a fan of gimmicky sight doodads like red ramps and white outlines, but these just flat work. They’re quick to acquire and they put the bullets where I want them to go. Millet sights are no longer in production, but they are some of the best ever made and TJ keeps a stash in stock for his customers. I imagine he spends a lot of time on Ebay hunting for these things.
One other thing TJ did on my 1911: He fitted the extractor. It was very rough as delivered from Colt and difficult to remove for cleaning. Now (after TJ’s magic touches) it inserts and removes easily, and extraction is flawless.
1911 Accuracy
Close enough for government work, most folks would say, and maybe that’s so. When I slow down and do my part, I can tear one ragged hole at 50 feet with my 1911, and that’s good enough. If I’m shooting for fun with a bit of speed, it’s not problem to put an entire box of ammo through one big ragged hole with the odd flyer or five like you see up top.
The Millet sights print where I want them to, and I like the simplicity of fixed handgun sights. It’s a good setup.
Getting a Grip
My 1911 didn’t need a trigger job, and TJ recommended not trying to improve the trigger after he felt it. The gun came with the rubber Pachmayr-type wraparound grips from the Colt factory, and I added a Pachmayr rubberized rear grip housing. Those two items (the rubber grips and rear grip housing) are, in my opinion, as good as it gets in the 1911 game. I don’t think that rear grip housing is available any more. I wish I had bought a few extra when Pachmayr was still making them.
Appearance Is Everything
I’m not normally a shiny objects kind of guy, but when I first saw my bright stainless 1911 in that gun store 35 years ago, I knew I had to have it. The gun just looked cool and it’s a conversation starter. It’s easy to pick up minor scratches that I can see before other folks do, but they come right out with a bit of Flitz (a superb stainless steel polish) and a little elbow grease.
My Three Favorite .45 ACP Loads
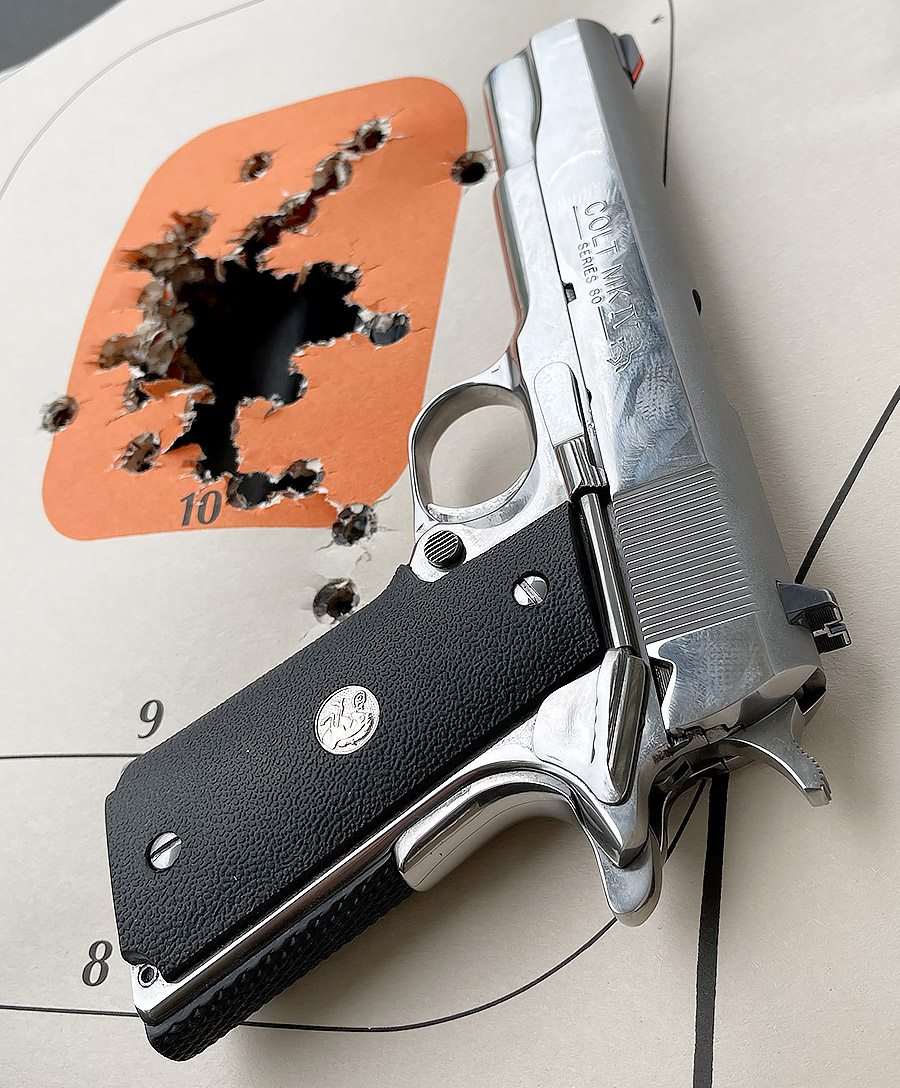
The target you see at the top of this blog? That’s 50 rounds at 50 feet with one of my favorite loads for this and any other 1911 I’ve ever shot: 5.0 grains of Bullseye under a 185-grain cast semi-wadcutter bullet. I’ve got a couple of other favorite loads, too. One is the 230-grain cast roundnose over 5.6 grains of Unique (that load is 100% reliable in any 1911). Another for target work is 4.2 grains of Bullseye and a 200-grain cast semi-wadcutter. All three loads are as reliable as taxes going up under a Democrat, and they all work with the same recoil spring. In my case, that’s the spring that came with my Colt 1911.
230 grains (in this case, bullets from Xtreme), 5.6 grains of Unique, and good times.
If you’re interested in learning how to reload .45 ammo, here you go:
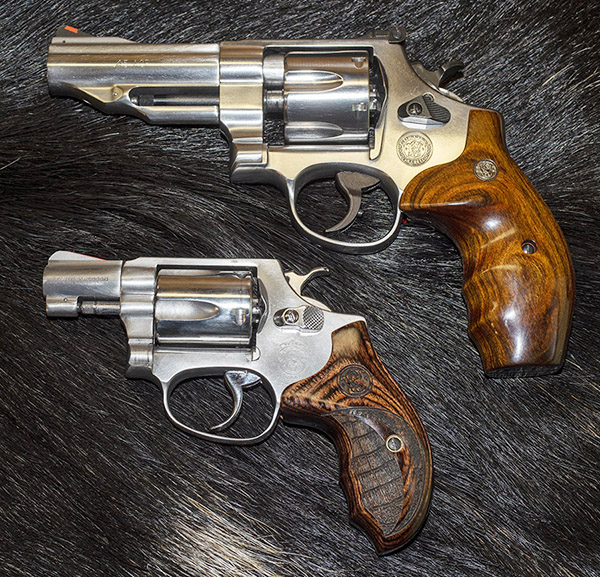
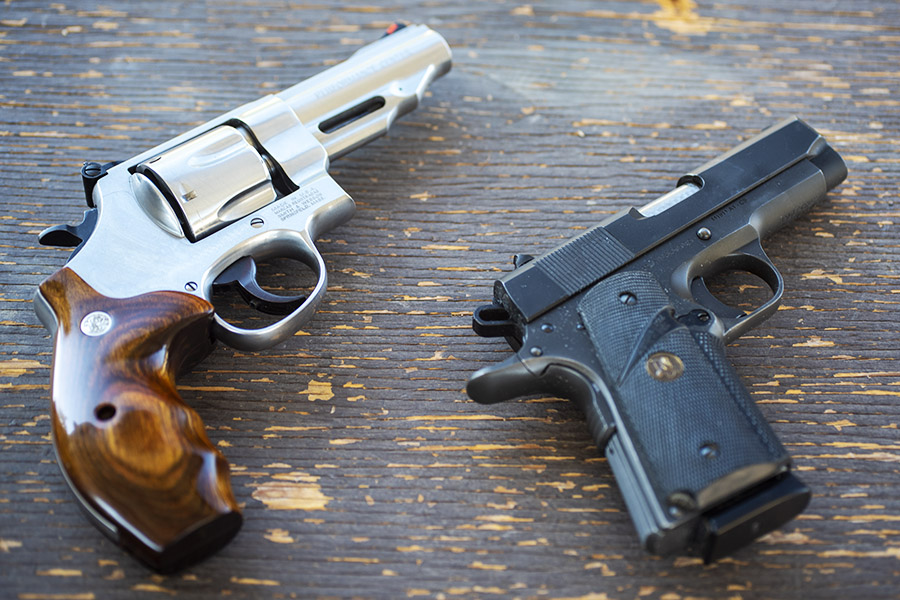
When I first posted about the Model 60 load development plan and the Altamont grips I bought from good buddy Paul, the cover photo showed my recently-acquired Model 60 snubbie and a Smith and Wesson Performance Center Model 625 I’ve owned for years.
The Model 625 and the Model 60.
I like that photo because the two stainless steel Smiths look great on the wild boar skin. That skin is from a pig hunt Paul and I did in Arizona a few years ago.
The earlier blog was about finding an accuracy load for the Model 60, but a few people wrote to ask if I had a favorite load for the Model 625. I do: My usual accuracy load for the 625 is a cast 200-grain cast semiwadcutter bullet (sized to .452 inches) over 4.2 grains of Bullseye.
When I went to the range to run a few rounds through the 625 I picked a box of ammo I had reloaded in 2014. It was different than my usual accuracy load. I used the same bullet (a 200-grain cast semi-wadcutter), but instead of Bullseye I had loaded these over 6.0 grains of Unique. And instead of .45 ACP brass in star clips, I used AutoRim brass. This is the load I fired that 6-shot group you see in the cover photo above for this blog, and it’s a honey. The group, that is…not the photo (it’s hard to get true colors when using an iPhone in the shade). I shot at 50 feet while standing…there’s no rest for the Model 625 or the weary.
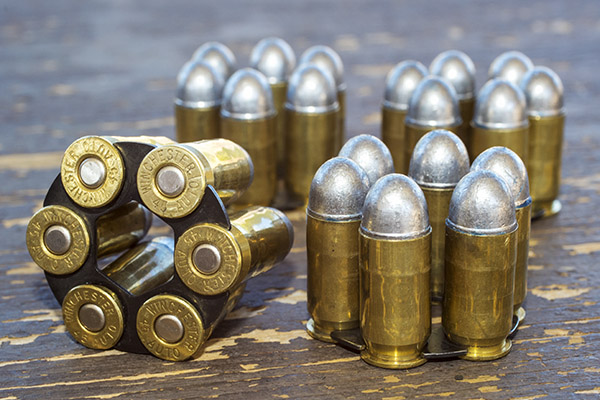
.45 ACP cartridges in star clips for the Model 625. These are loaded with 230-grain cast roundnose Missouri bullets.The .45 ACP cartridge (left) and the .45 AutoRim cartridge (right). The AutoRim cartridge is designed for use in the Model 625 without star clips. The ACP cartridge has a 230-grain roundnose Xtreme bullet; the AutoRim cartridge has Missouri’s 200-grain semi-wadcutter.
The AutoRim brass is in the tumbler as I write this and when I reload it I’m going to go with the same load: The 200-grain cast semi-wadcutter over 6.0 grains of Unique. It seems to be working for me.
Help keep us afloat: Please click on the popup ads!
Never miss an ExNotes blog: Sign up here for free!
Last year I wrote about the MacManus Award, a program I helped revive with the Rutgers University Reserve Officer Training Corps. Captain Colin D. MacManus was a US Army Infantry officer and an Airborne Ranger who graduated from Rutgers in 1963. Captain MacManus was killed in action in Vietnam in February 1967 and posthumously awarded the Silver Star for gallantry in action.
US Army Captain Colin D. MacManus, Rutgers University ’63.
To commemorate Captain MacManus’ life, each year the MacManus family awarded a .45 Auto to the graduating senior who held his Rutgers Corps of Cadets assignment, and in 1973, that was me. The award was a very big deal to me in 1973, and it’s still a big deal to me today. I still shoot my MacManus .45 regularly.
My first handgun: The Colin D. MacManus 1911 and a couple of 5-shot, 25-yard hand held groups I fired with it. I had it accurized in the 1970s, and it is still a tack driver.
The MacManus award fell away a few years after I graduated, but we were successful in restarting it in 2020. The young man who won the MacManus award last year communicates with me regularly. He’s now a US Army Infantry lieutenant going through the Ranger School at Fort Benning Georgia. Good people, these are.
My good buddy at Rutgers, Colonel Javier Cortez, selected the top cadet at Rutgers for the 2021 graduating class, and I’m happy to report that this year’s honoree will receive his 1911 from the Colt company (last year’s award was a Springfield Armory 1911, another fine handgun). This year’s Colt is the Classic Government Model just like you see in the photo at the top of this blog, and Colt is putting some special touches on it through their Custom Shop. That’s the same Colt model I was awarded in 1973, I’ve put a few tons of lead through it since then (230 grains at a time), and my Colt is still going strong.
Because of the pandemic, there was no award ceremony last year. We’re doing the award ceremony via Zoom this year, and I’m looking forward to it. If you would like to read more about MacManus award and its revival last year, you can get to it via this link:
This is good stuff, folks, and I am delighted to be associated with the effort. These are fine young men we are honoring. I’m proud of them, and I know you are, too.
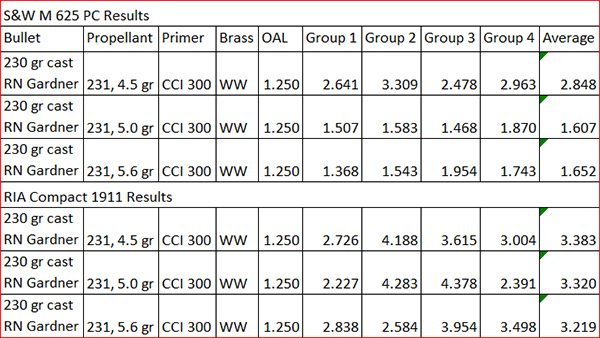
A couple of weeks ago I tested three .45 ACP loads in a Model 625 Smith and Wesson and my Rock Island Armory Compact 1911 using Winchester’s 231 powder and Jim Gardner’s 230-grain cast roundnose bullets. We’ve done a bunch of accuracy testing in both .45 ACP revolvers and autos with other loads (and you can find those stories here). This blog focuses specifically on Jim’s 230-grain roundnose bullets with Winchester 231 propellant.
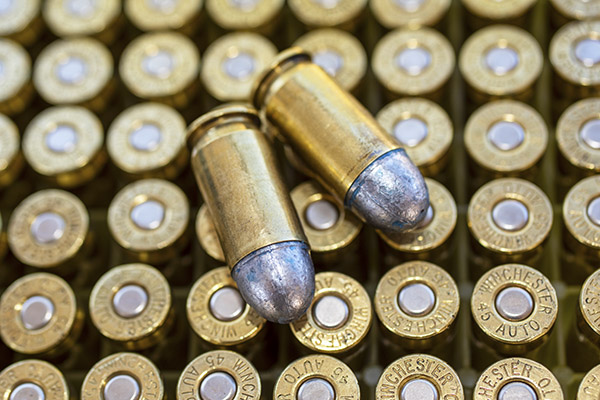
Reloaded .45 ACP ammo with Gardner 230-grain cast roundnose bullets. The 230 cast roundnose bullets replicate GI hardball ammo and this bullet feeds in just about any .45 auto.
To get to the point quickly, the Gardner 230-grain cast roundnose bullets did well (as you’ll see below). My testing consisted of three .45 loads with 4.5, 5.0, and 5.6 grains of WW 231 powder:
I was checking for accuracy and functionality in both guns. Here’s what I found:
The Compact 1911 likes 5.0 grains of 231, and that load functioned best with this powder in the automatic. The slide locked back after the last round the way it is supposed to; it would not do so with 5.6 grains of 231. Getting a short-barreled 1911 to function well is a bit tougher than a full-sized 1911. With 5.0 grains of 231 and the 230-grain cast bullets, my Compact 1911 functions reliably. Your mileage may vary.
4.5 grains of 231 functioned okay in the 1911, too, but it is the least accurate load in both the 1911 and the Model 625 (of the three loads that I tested).
The Model 625 likes both 5.0 and 5.6 grains of 231, with a slight accuracy edge going to the 5.0-grain load (although what you see here is probably more a result of my skills than anything else). The 625 is not as accurate with the lighter 4.5-grain 231 load.
Lyman’s reloading manual has 5.8 grains of 231 as the accuracy load with this bullet, but I didn’t go that high (it was a max load). Like I said, it doesn’t function reliably in the Compact 1911, and my testing showed 5.0 grains to be the Model 625’s sweet spot from an accuracy perspective.
All shots were at 50 feet, and all loads used the Lee factory crimp die (which assures easy chambering in 1917-style revolvers). The loads would do better from a machine rest or a steadier shooter. It was hot out on the range the morning I fired these targets and that probably adversely affected accuracy, too.
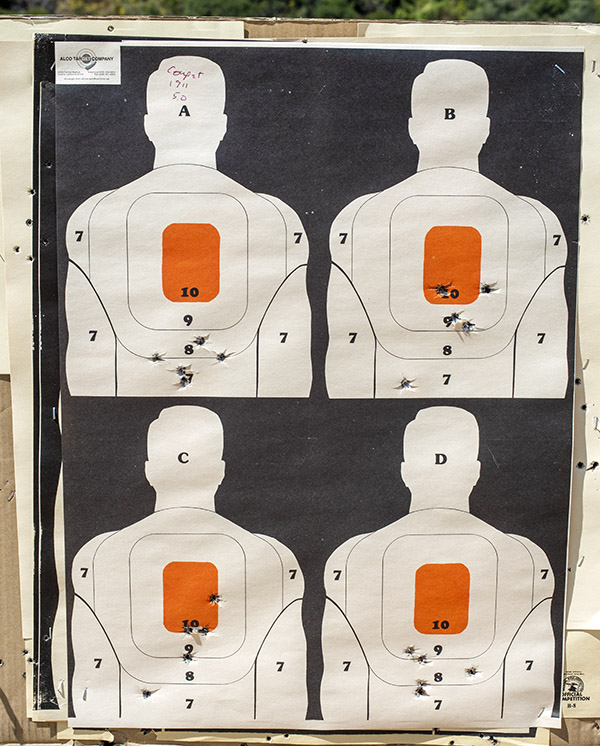
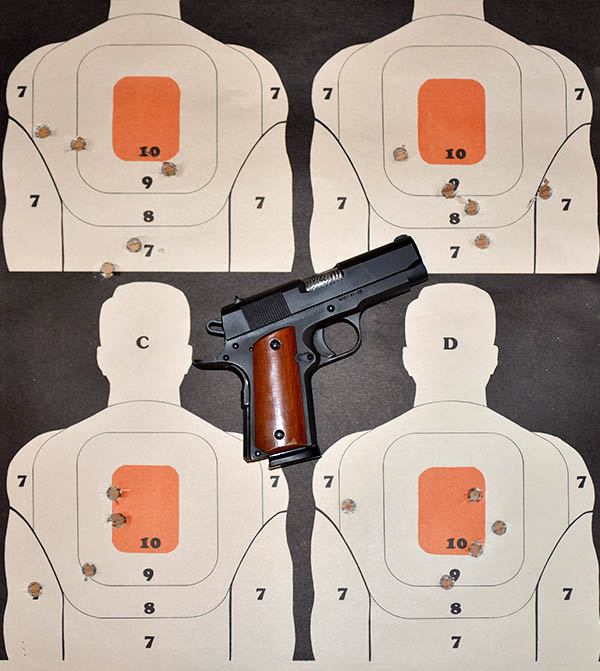
Here are the Compact 1911 targets that I shot using the 5.0-grain 231 load:
Compact 1911 results: Close enough for government work. I use Alco targets for this kind of testing; these have four silhouettes per sheet.
The Compact 1911 is not a target gun, but it is accurate enough for its intended purpose. The Rock Compact 1911 is very concealable and it’s the handgun I carry most often. They are surprisingly inexpensive and surprisingly accurate with the right loads.
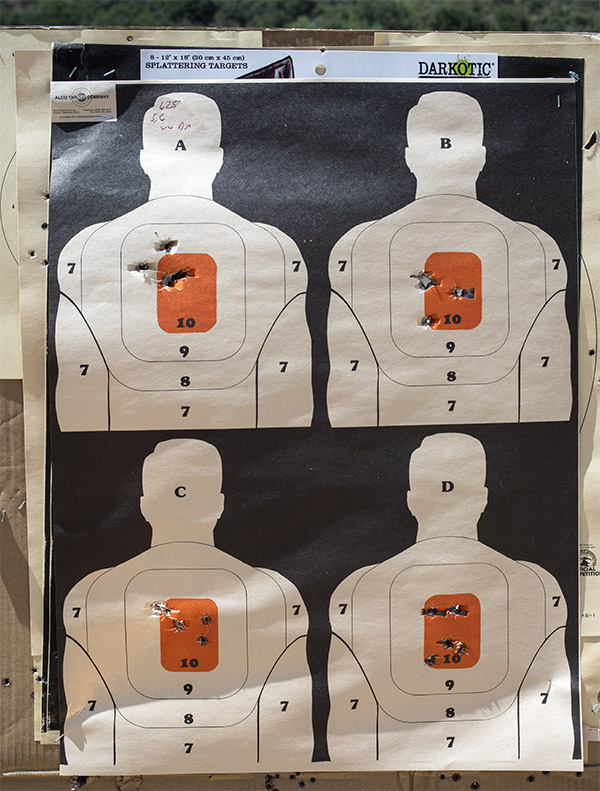
These are the targets with the Model 625 and 5.6 grains of 231:
The big Smith and Wesson Model 625 worked well with 231 and Jim’s 230-grain roundnose bullets. This is the 5.6-grain target; 5.0 grains of 231 were even more accurate for me.
The Model 625 Smith and Wesson is more accurate than the Compact 1911 (hey, no surprises there). They are both fun guns to shoot.
I usually load .45 ACP ammo with either Unique or Bullseye powder, but I thought I would try 231 just because I had some on hand and I wanted to see how it would do. I have an accuracy load for the Compact 1911 with Bullseye and a 185-grain bullet that we wrote about earlier. Other guys tell me 231 is their preferred .45 ACP propellant and I still had a can of it that I had purchased for the 9mm cast bullet comparo some time ago, so I thought I would give it a try in the two guns featured here. With the sketchy availability of reloading components during these uncertain times, it’s good to know that this powder works well in .45 ACP. But after this test, I’m going to stick with the other two propellants (Unique and Bullseye), assuming I can get them. What I didn’t like about 231 is that it is a sooty powder…I found it to be significantly worse in that regard than Unique.
WW 231 propellant is accurate, but it sure is a dirty powder. My left hand was covered in powder soot after just a few rounds.
I’ve been real happy with Gardner’s bullets. They are less expensive than other cast bullets, the accuracy is good, and I observed no leading in either handgun. I’ll be purchasing Gardner bullets again. If you haven’t tried Jim’s bullets, you might give them a try.
More Tales of the Gun, 1911, 1917, bolt action sporter, milsurp, load data, and other good shooting and reloading posts are here!
I’ve done a few blogs on the 1911 handgun and, in particular, on a Rock Island Armory Compact I bought a couple of years ago. I love the Compact, it’s accurate enough, and it carries well. But I’ve had several issues with this handgun and because I’ve written about it before, I feel like I owe you an update.
Quick offhand shots with the Rock Island Compact 1911 at 50 feet. The load was a 185-grain wadcutter with a stiff charge of Bullseye propellant. It’s accurate enough for its intended purpose, and every shot was on the target. My 230-grain hardball loads are more accurate.
I’m going to share my experiences with you, but I want to make this point early on: I love my Rock Island Compact, and I would buy one again in a heartbeat. Yeah, it’s had problems, but let me make my point again: I’d buy another one in a heartbeat. I thought long and hard about doing a blog focused on the Compact’s failures, mostly because I’ve used the gun longer and harder than most. I’ve put several thousand rounds through the Compact, and nearly all have been full-power, hardball equivalent loads. Having said that, let’s get into it.
Firing Pin Stop Release
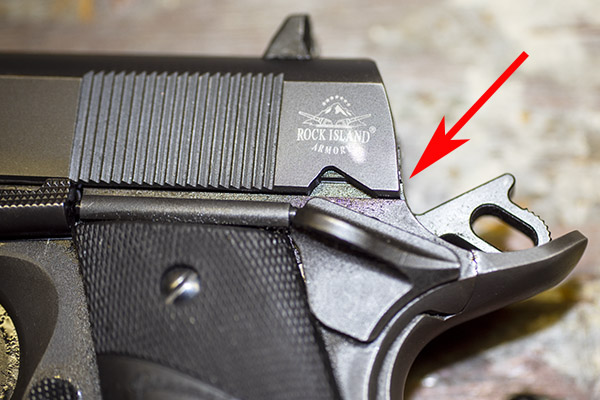
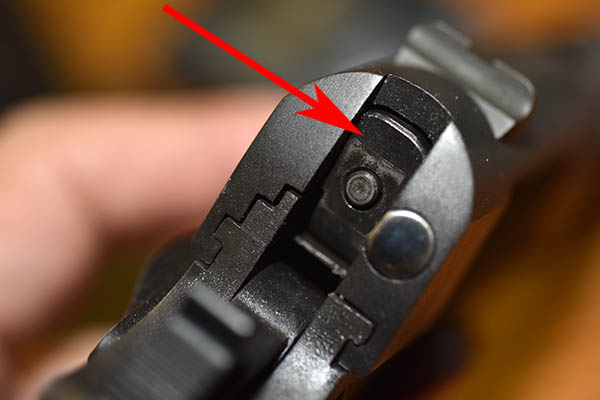
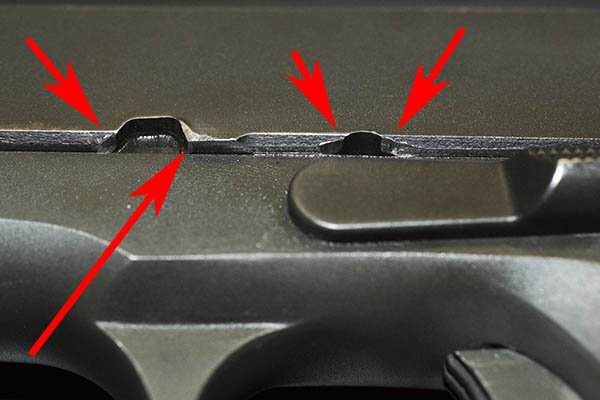
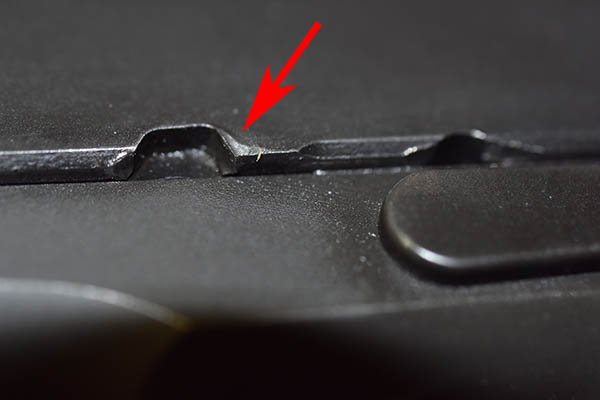
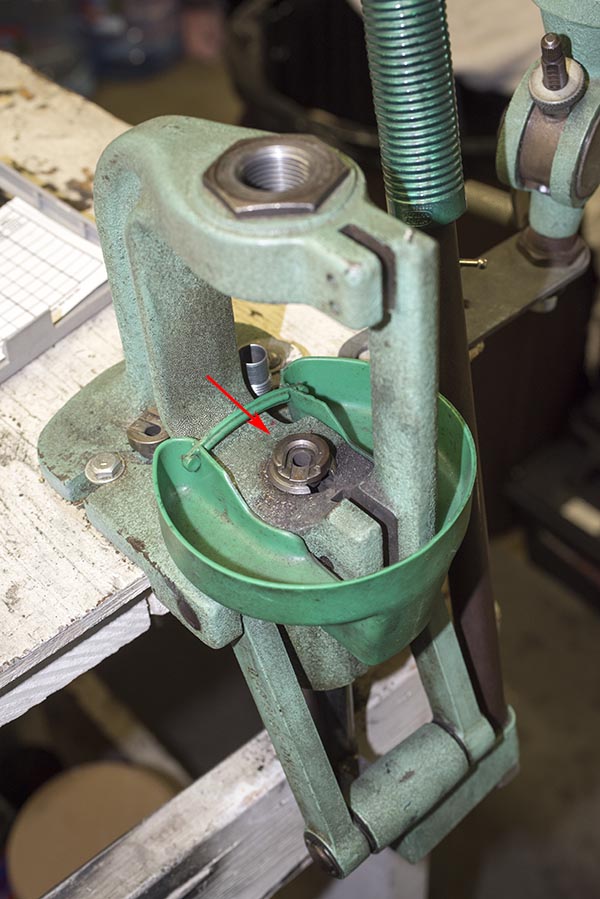
The first time I had the Compact on the range, it locked up a couple of times. The culprit? It was a weird one, something I had never encountered on a 1911 before. The firing pin stop was sliding off the firing pin.
The red arrow points to the firing pin stop. It is held in place by the firing pin (shown in the center of the firing pin stop) during recoil, but the firing pin has to be pushed back by its spring to do so.
This fix for this one was easy. After removing the slide from the frame, I depressed the firing pin, pulled the firing pin stop, and then I pulled the firing pin and its spring from the slide. I stretched the firing pin spring just a bit, figuring it needed a little more oomph to push the firing pin back to hold the firing pin stop in place. After that, this failure never recurred.
Staked Front Sight Failure
The Rock Island Compact front sight. It loosened within the first thousand rounds through the gun.
The front sight on my Compact came loose very quickly. That’s common enough on 1911s for staked sights (I’ve had it happen on a Colt 1911 and I’ve seen it happen on a couple of Springfield Armory 1911s, so it’s not a problem unique to the Rock Island handgun). If I was running Engineering at Rock Island, I’d specify a dovetailed front sight. The Compact replicates the look of the original Army 1911 (and I love that about the gun), but I think most purists like me would be willing to give up a tiny bit of the original GI look for a dovetailed front sight. Staked front sights on a 1911 (especially a Compact, which really gets knocked around by hardball-level recoil) are not a formula for long term reliability.
Rock Island made good on the front sight failure with their lifetime warranty. I sent the gun back and they fixed it, and the front sight is staying put.
Extraction and Ejection Failures
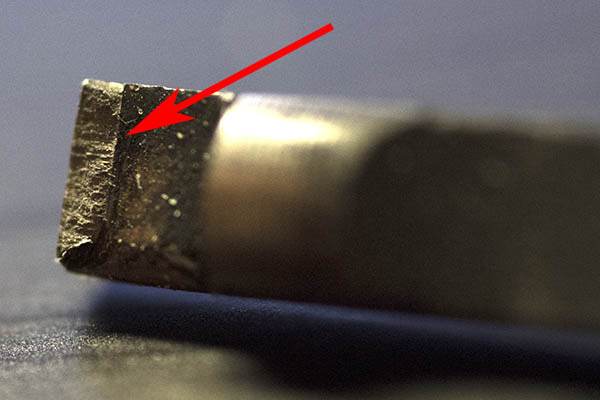
I had a ton of extraction and ejection issues. I sent the Compact back to Rock Island on the warranty and they fooled around with the extractor, but it still had extraction problems (at a lower frequency, but they still occurred). After the gun came back and I fired maybe another thousand rounds through it, the extractor broke so I replaced it with an aftermarket extractor (at my expense, because I didn’t want to send it back to Rock Island again). The nature of the failure indicated the extractor steel was too brittle.
The fracture surface of the Rock Island extractor. The surface fractography indicates the material was too brittle (perhaps a consequence of an inadequately-controlled heat treat process).
Ejection was flaky, too, and the gun frequently failed to eject the last round fired. It would stovepipe the brass as the slide went forward, and that brings me to another problem: The slide frequently would not lock to the rear after firing the last round. I mentioned that when I sent the gun back to Rock Island for the extraction issues, but they didn’t completely solve this problem, either. It got better, but it still occurred.
I then took the gun to a real gunsmith (good buddy TJ, about whom I’ve written before). TJ looked at the ejector and immediately recognized it was cut at the wrong angle. He recut it and the gun now ejects flawlessly. To state the obvious, you shouldn’t have to do this on a new gun.
Magazine Issues
Regarding the slide not locking back after firing the last shot in the magazine, that problem required a couple of fixes. One issue was the relationship between the magazine follower and the slide release. I bought two extra mags from Rock Island thinking (and hoping) that maybe I just had a bad magazine, but all three mags had the same problem. The magazine follower is supposed to push the slide release up after the last round is fired with enough force to lock the slide to the rear, but on my gun it wasn’t doing this reliably. I believe it was because one of the magazine follower bends is in the wrong place.
The magazine follower. The arrow on the right points to the follower bend I believe positions the flat portion of the follower (denoted by the other arrow) too low to effectively engage the slide release. I think that bend needs to be about 0.030 or 0.040 inches higher.
TJ addressed the magazine follower issue by welding a bead on the bottom of the slide release where it engages the magazine follower. That made sure the magazine exerted positive upward pressure on the slide release after the last shot, and that made a significant improvement. I think what Rock Island needs to do is modify the design of the follower bend, or better control the manufacturing process to make sure the follower bend is in the right place (it might be that the engineering drawing for the follower places the bend at the wrong location, or it might just be the magazine follower doesn’t meet the Rock Island drawing).
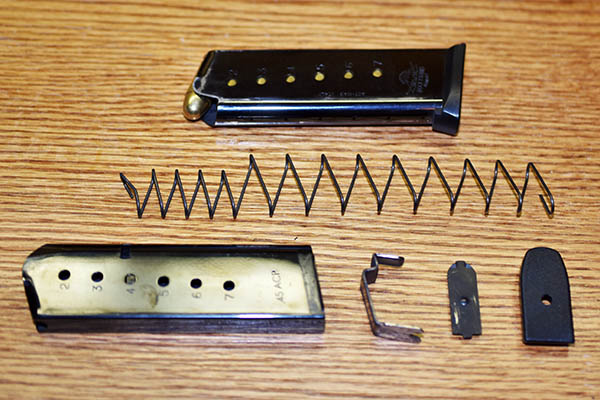
A fully assembled loaded magazine, and a disassembled magazine. One of the magazine issues is a weak magazine spring. The fix was simple enough: I elongated it and that fixed the slide not staying back after the last round.
The other issue is that the magazine springs were wimpy. I pulled the springs and stretched them, reinstalled them in the magazines, and the problem disappeared. The slide now stays back after firing the last round every time.
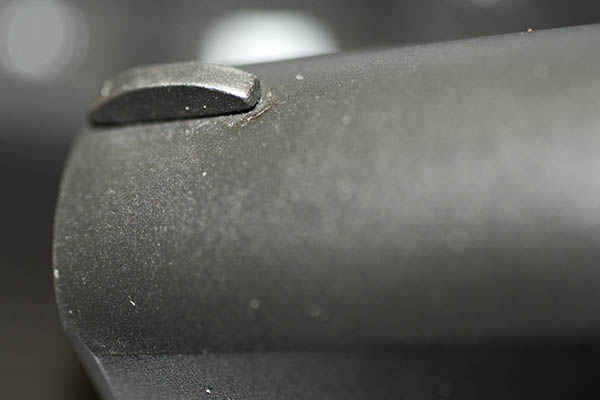
Slide Deformation
I believe the slide material is too soft. This resulted in a big burr on the slide at the rear of the machined cutout for the slide release, which I ground off because it was scarring the inside of my leather holster and it just looked ugly. You can see the deformation in the photos below.
Metal deformation on the Compact 1911’s slide. A small amount of this is to be expected, but this is excessive.Deformation in the slide’s release slot.
To some extent, a modest amount of slide material deformation is to be expected, and the problem is somewhat self-correcting. As metal deforms, it work hardens, and this natural work hardening tends to prevent further deformation. I’ve seen this occur on other 1911s I’ve owned (including one manufactured by Colt). I just saw way more of it than I expected on the Rock Island 1911.
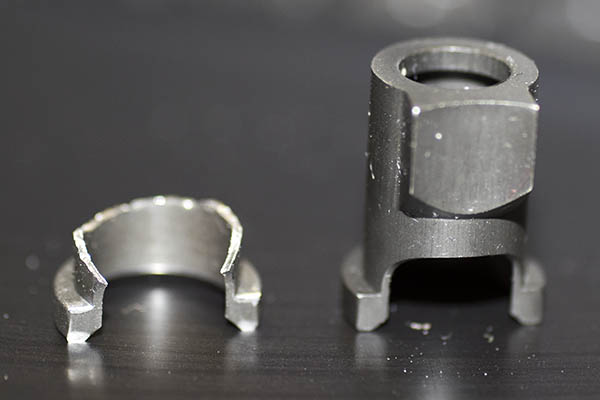
Guide Rod Plug Failure
My most recent failure involved the guide rod reverse plug (I call it a bushing). I think this part failed because it was too hard (the fracture surface indicates a brittle failure); I’m guessing the heat treat made it too brittle. This part needs to be more ductile. I also think it is too thin in the area in which the failure occurred.
Rock Island calls this part a plug; I call it a guide rod bushing. The plug fractured and Rock Island shipped a replacement part to me at no cost.The new plug installed on the guide rod. The paper clip is holding the plug in position while the 1911 is being reassembled.The guide rod, recoil spring, and replacement plug installed in the slide.The guide rod plug, viewed from the business end. My barrel and the guide rod have been polished; the stock parts have a Parkerized finish.
Poor Heat Treating Suspected
With the exception of the guide rod plug (which I think is a weak design) and the magazine follower, the issues described above are not faults in the basic design. I think they are being caused by inadequate heat treating process control. Heat treating was always a challenge in the defense plants I managed. To heat treat properly, you have to pull a partial vacuum to prevent hydrogen embrittlement, and it’s difficult (but not impossible) to get accurate temp readings in a partial vacuum. You think it’s one temperature, but actually it’s different temperatures at different locations in the heat treat oven. The result? You get parts harder or softer than specified on their respective drawings, which makes them more brittle or more ductile than they’re supposed to be. This issue of parts being too hard or too soft could be a contributor to the slide deformation issue, the front sight failure, the guide rod reverse plug failure, the extractor fracture, and the magazine and firing pin springs being too weak.
RIA Compact 1911: The Bottom Line
Yeah, I am putting more rounds through my Compact than most folks, who might get to the range once a month or more likely a couple of times a year. But the gun ought to be able to handle it. And yeah, the Compact has a lifetime warranty and the folks at Rock Island have been good about honoring it. I just wish I didn’t have to use it as often.
Having said the above, though, I’ll also tell you that new gun issues are not unique to Rock Island Armory. I’ve had to send three Rugers back for warranty service, my very expensive Smith and Wesson Performance Center revolver went back to Smith for repeated failures to fire (they took what I considered to be an inordinate amount of time to fix it), and my Springfield Armory M1A went back to Springfield for ejection issues (those guys took a long time, too). Two of my friends have Springfield Armory 1911s, and they both had to go back to Springfield for front sight failures (one of them had to go back twice because Springfield screwed up the repair). All of this has been in just the last few years. It’s unfortunate, but quality issues abound in the gun industry, and it seems like things are getting worse. When folks say they don’t make them like they used to, I can tell you from a lifetime of playing with things that go bang that’s true.
Help us keep the content coming: Please click on the popup ads!
I should also tell you that one of my good buddies tried my Compact, liked it, and he bought one. He hasn’t had any issues with his. None. Zip. Nada. So I can’t say my experience is representative of what you might expect. I’m only telling you what I experienced.
All the above notwithstanding, I’m happy with my Rock Island Armory Compact 1911 and like I said above, I love the gun. I’ve fixed the thing so many times that the Rock and I have what you might call an intimate relationship. We know each other. Like Gresh said about his relationship with the Royal Enfield Bullet, my Rock Island 1911 needs me.
You might wonder: Why not just buy a compact 1911 from a higher-end supplier, like Springfield, Kimber, Sig, or one of the custom builders like Les Baer or Wilson? Well, in a word, price. These other compacts start at roughly twice what the Rock costs (and go up sharply from there), and there’s no certainty they wouldn’t have problems, too. You could argue that you get what you pay for, and my response to that would be: Sometimes.
You can buy Rock Island 1911s for $499 all day long, and I’ve seen them on sale for as little as $429. That’s a great deal on a new 1911. I’ve had to work my way through the issues outlined above, but my Rock Compact is extremely reliable now and it’s a constant companion. Someday I may wear it out completely and if that ever happens, I’d just buy another one. If something goes wrong, odds are I’ll know how to fix it.
It was one of the ones that got away, that Colt 1917 was, and I regretted it for years. I like to describe some of the firearms I’ve let get away as ones I’ve stupidly sold but I don’t like being redundant, so let’s just say I sold it. It was stupid to sell any of them, and having been on a quest for a decade or so to replace the ones I’ve stupidly sold (oops, there I go again), I can tell you that I’m not selling any of my guns. You might be wondering where I’m going with this story, but wonder no more. It’s all about a magnificent score, in this case, a US Army Colt Model 1917 .45 ACP revolver. To jump ahead for just a second, this is the one that is on its way to being mine…
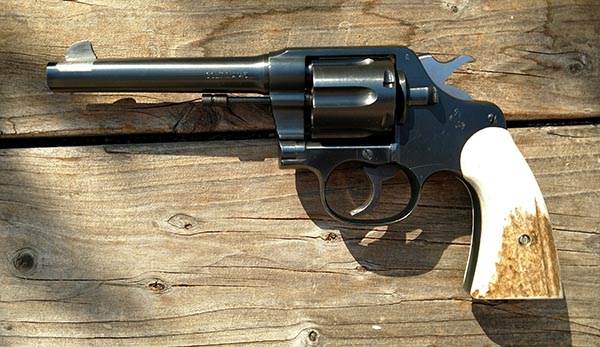
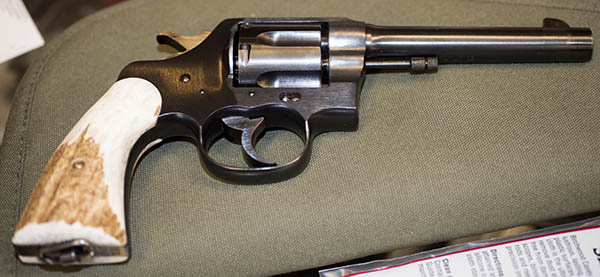
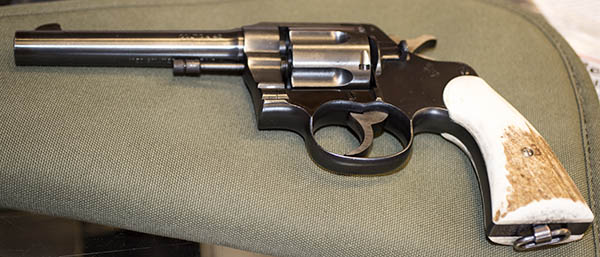
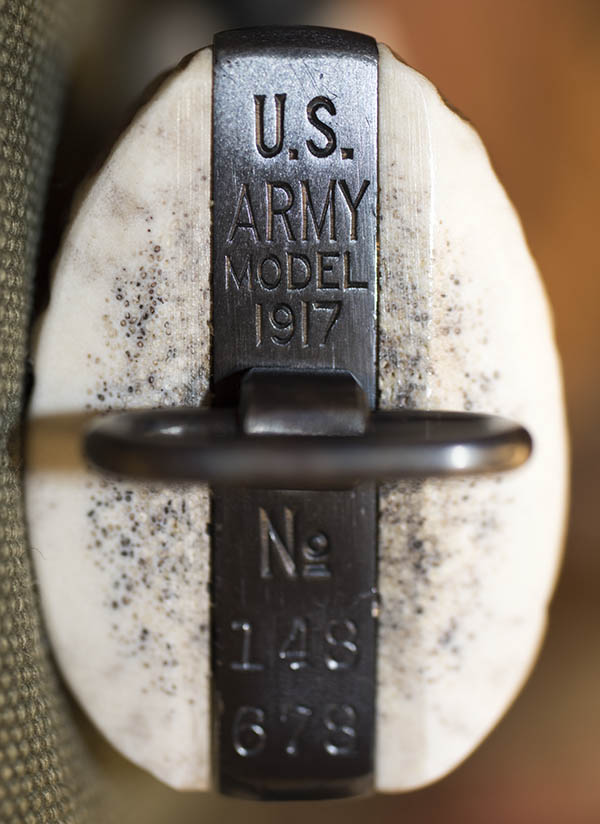
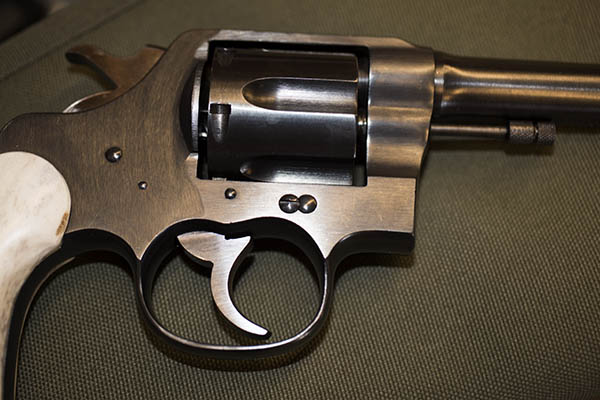
A magnificent original finish Model 1917 Colt revolver. Those are genuine elk antler grips. What appears to be an unblued area near the front sight is not…read on for more information.
The 1917s are interesting handguns, and yeah, that’s plural. There were two of them: A Colt, and a Smith and Wesson. In a very real sense, they are handguns that were never meant to be. The 1911 Automatic came on the scene in 1911, and the plan was to ultimately incorporate it throughout our Armed Forces. But life is what happens when you’re making plans, and the US Government generally moves slowly. When we entered World War I in 1917, there weren’t enough 1911s to go around, so the US Army turned on Smith and Colt to make their large frame revolvers in .45 ACP, and that’s how the 1917s came to be. It was an emergency measure to make up for what we didn’t have yet, and that was enough 1911s to go around.
Major General James E. Rudder, who carried a Colt 1917 when ascending Normandy’s Pointe du Hoc cliffs on D-Day.
When World War II happened, the US military had plenty of 1911s, but there was at least one soldier who preferred the 1917. Interestingly, I recently read an account in American Rifleman magazine (yeah, I’m a strong NRA supporter and I watch Fox News, too) about 34-year-old Lieutenant Colonel James E. Rudder, who led the U.S. Army Rangers when they scaled the cliffs at Pointe du Hoc in Normandy on D-Day. Colonel Rudder carried a 1917 Colt instead of a 1911 auto (presumably, a 1917 that had been through the arsenal refurb and wore a Parkerized finish). Rudder was an interesting man. He held numerous awards for valor, he retired from the Army as a Major General, and he then went on to become president of Texas A&M University. The American Rifleman article was about Rudder’s 1917 Colt, which he preferred to the 1911 auto because of its greater reliability. Ah, if these guns could talk…
Help us keep the lights on…please click on the popup ads!
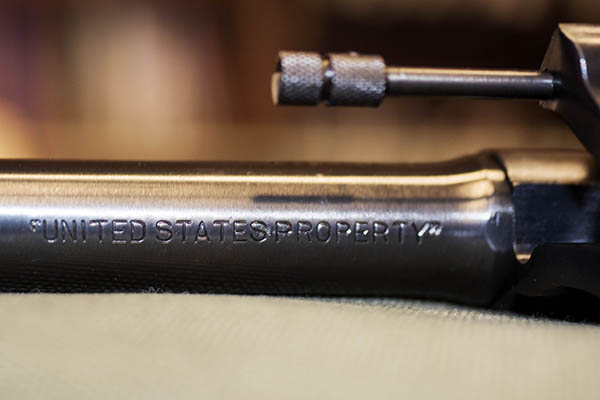
In the 1970s, when I was in the US Army stationed at Fort Bliss, Texas, I bought a 1917 Colt revolver at the El Paso gun show. I didn’t know too much about these guns then, except that they were large frame revolvers and they didn’t cost too much. I think I paid something like $125 for mine. It was cool. Big, heavy, Parkerized, and it shot the .45 ACP cartridge, a round I had already recognized as the ultimate handgun chambering. I had a .45 auto (a Government Model 1911), and having a revolver chambered for the same round felt like it was the right thing to do. My 1917 had interesting markings…it said US Army, United States Property, and all kinds of cool stuff. I liked it. I shot that revolver for a while, I had fun with it, and then I sold it to someone who wanted it more than I did. I think I got $200 for it, and in those days I fancied myself a Texas wheeler dealer gun guy.
But that 1917 danced around in my head for decades. I liked it and I missed it, and I wished I had kept it. Finally, a few years ago I started hunting for a replacement. The problem is, living here in the Peoples Republik of Kalifornia, I couldn’t look outside the left-leaning anti-gun liberal looney bin we call home, as the Model 1917 isn’t on our roster of handguns approved for sale here. If I was to find one, it would have to be one already here in LeftyLand, and that cut my options considerably. I kept an eye on the local gun shops (it’s okay if the gun is already in California, but the way the law is written I couldn’t bring in a 1917 from out of state). I checked Gunbroker.com (the premier site for gun sales) every few weeks. And I watched a California-specific site, Calguns.net. I kept looking, but none of the 1917s I saw looked nice enough for my tastes, or they were out ot state, or they were priced in the stratosphere.
Then I hit paydirt. Big time. I saw the 1917 you see in the photo above in a post on the Calguns.net site a couple of weeks ago. It looked to me like it had been reblued (because my earlier 1917 had been Parkerized and I’d never seen one that wasn’t) and the genuine stag grips were appealing (the 1917s originally wore uncheckered walnut grips). Those genuine stag grips all by themselves are a big ticket item and to me they look like they belong on a 1917. Unoriginal, yeah, but they sure looked good. The reblue (I thought) and the elk grips took away from the gun’s authenticity, but I liked the look. In fact, I liked it a lot.
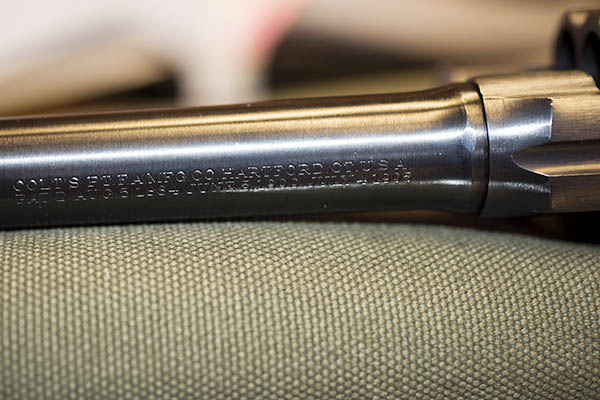
I sent a message to the advertiser (who became my new good buddy Jim), and I learned that the gun had not been reblued. It wore its original brushed blue finish, and the direction of the brushing was an indication of its originality. The 1917s went through an arsenal refinish between the wars, Jim explained, and that’s when they were Parkerized. The original finish is the one you see in the photos here. I researched what Jim told me, and yup, he had it right. That made the gun even more appealing. (That brushed blue original finish and the brushing direction is what made the area on either side of the front sight look unblued when the camera’s flash hit it, but it is, in fact, blued). This particular 1917 is unfired other than proof rounds at the Colt factory, and this particular handgun was manufactured in Hartford, Connecticut, in 1918. Yep, it is 101 years old. And it’s essentially a new gun.
All right, I decided, I’d most likely never get an opportunity like this again. Jim and I met at Imbert and Smithers in Redwood City to legally transfer ownership, and I was blown away when I saw the revolver in person. It is stunning. The guy behind the counter, a dude about my age, was similarly impressed. “I’ve never seen one in this condition,” he said, and he called the gunsmith over to look at it. I’ll admit it: I like having a gun that’s the center of attention in a circle of folks who know guns. It’s a cool feeling.
Okay, enough bragging with words. Let me do so with a few photos I shot yesterday at the start of my 10-day cooling off period…
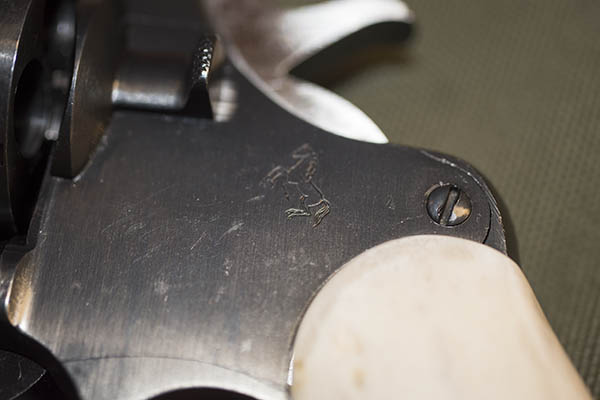
The 1917 Colt, chambered in .45 ACP, wearing the factory original finish.The view from the left. The elk antler grips work. It’s an elegant handgun.The Prancing Pony. Colt more properly calls its logo the “Rampant Colt.” Prancing Pony works for me. It’s one of the world iconic logos.The proof mark, showing that the revolver had been fired with a proof pressure test round at the factory.Yep. US Army Model 1917. Lanyard ring. I love the look of this thing.Good buddy Jim explained the brush blued finish on these guns to me. They have a unique pattern, and you can see some of it on the right side of the 1917’s frame. It’s beautiful.The Colt roll marks on top of the 1917’s 5.5-inch barrel.United States Property, the rollmarked lettering on the barrel’s underside.
You might be wondering: Am I actually going to shoot this revolver?
You bet. And you’ll read about it here when I do. Just 9 more days, and I’ll be fully cooled off. And then this puppy is mine.
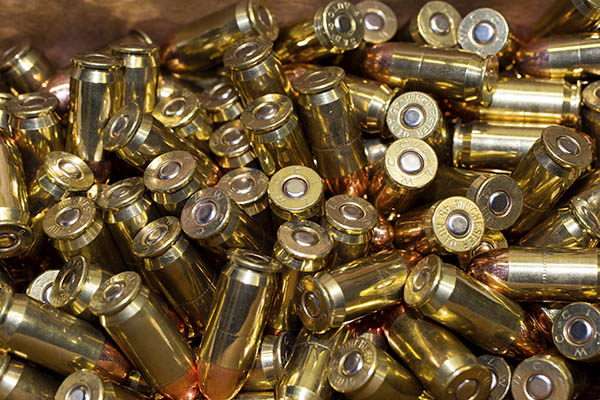
The finished product: Reloaded .45 ACP ammunition. This handcrafted ammo is tailored for my 1911, and it is much more accurate than factory ammunition. Our blogs on reloading will cover the equipment and components needed, and the steps involved, in reloading ammo for the .45 Automatic.
I’ve had a few requests for a blog on reloading. You know, not just favored loads for different cartridges, but how to go about reloading. I know it can be a bit intimidating if you’ve never done it, but (trust me on this), learning how to reload adds an entirely new dimension to shooting, and many of us view reloading as being as much fun as shooting. In fact, one of my friends often jokes about shooting…he says it’s what we do so we get to reload ammo again.
A very cool guy named Roy Johnson taught me how to reload when I was in the Army. I was assigned to Fort Bliss, Texas, and Roy ran the Rod and Gun club there. Roy was a colorful El Paso fixture, and they named the road to the Rod and Gun club Roy Johnson Lane when he died. I was 22 years old when Roy taught me how to reload, and I’ve been reloading ever since.
I thought I would approach this topic in two or three parts, with the first blog focused on the equipment and components you’ll need to reload, and a subsequent blog or two on the actual reloading process. I had to pick a cartridge, so I thought I would start with the first one I learned to reload: The .45 ACP.
With that as a backdrop, here we go…
Reloading reverses the process of firing a bullet, and reversing that process requires several pieces of equipment.
One part of the equipment list is the dies that force the fired brass case back into shape (the brass expanded during firing) and knock the used primer out of the case.
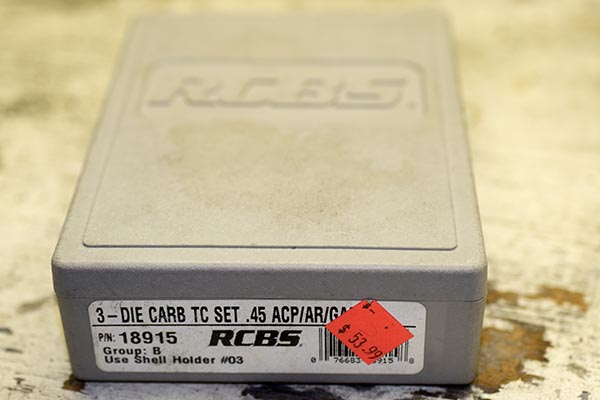
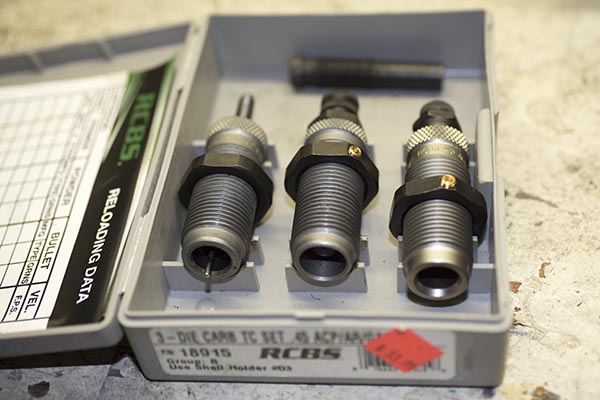
A set of RCBS carbide dies for the .45 ACP cartridge.A die set consists for a pistol cartridge typically includes three dies. From left to right, they are the resizing die (it sizes the brass case back to original dimensions and punches the primer out of the case), the expander die (it opens and flares the case mouth to accept the new bullet), and the seating die (it seats the new bullet in the case and removes the case mouth flare).
I stick with RCBS dies, as I’ve learned over the years they work best, but there are other manufacturers out there. I also use Lee dies for a few of the cartridges I reload (they are typically less expensive than RCBS dies, and they are as good). An added advantage of the Lee dies is that they include the shellholder with the die set, so you don’t have to buy a separate shellholder and pay extra for it. I don’t care for Hornady dies, but as they say, your mileage may vary. I’m the guy doing the writing here, so I’ll share my experiences and preferences, and I like RCBS and Lee. A new set of RCBS carbide dies are a little north of $50; Lee dies are typically $10 to $15 less than the RCBS dies (and like I said earlier, the Lee dies come with a shellholder).
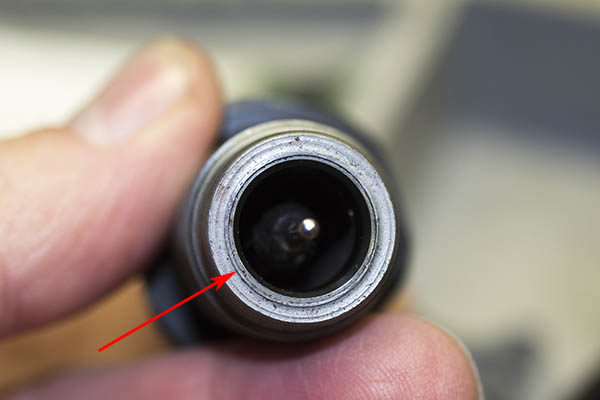
The business end of the carbide resizing die. The red arrow points to the carbide insert.
I use carbide dies for pistol cartridges. A carbide die has a super-hard carbide insert that interfaces with the brass case, and it allows you to squeeze the case back to its unfired configuration without having to lubricate the case first. The downside is that carbide dies are slightly more expensive than non-carbide dies. For straight-walled pistol cartridges, there are three dies in a set. We’ll discuss in more detail what each does in Part II of this series.
You will also need a reloading press and a shellholder for the brass cartridge case. I use an RCBS Rockchucker press I bought new nearly 50 years ago when Roy Johnson taught me how to reload. A good press lasts forever.
The RCBS Rockchucker reloading press. A good one lasts forever. The red arrow points to the shell holder. Different cartridges take different shell holders. We’ll see how all this stuff is used in Part II of our reloading series.
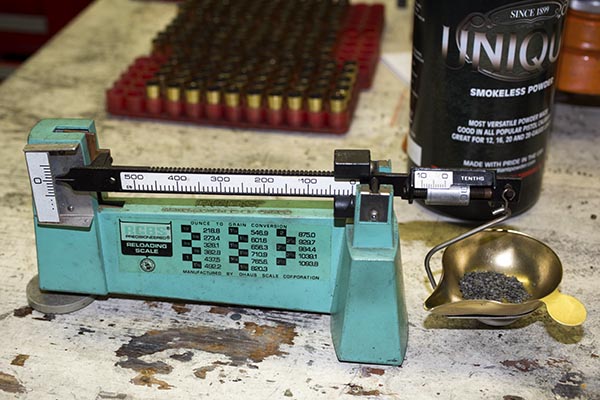
A scale is necessary for measuring propellant charges (also referred to as powder). Several companies offer scales specifically designed for reloading.
My RCBS reloading scale. Like the Rockchucker press shown above, I’ve been using this for a half century.
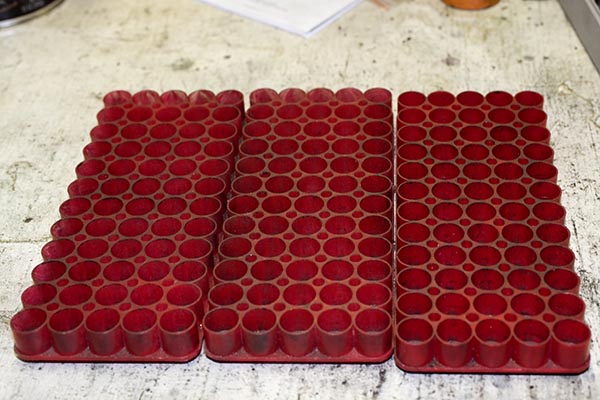
It’s a good idea to have reloading trays for the cartridges. These are relatively inexpensive, and they seem to last forever, too.
Reloading trays. These hold the brass cases we are going to reload, and allow for easy tracking and inspection of each reloading process step.
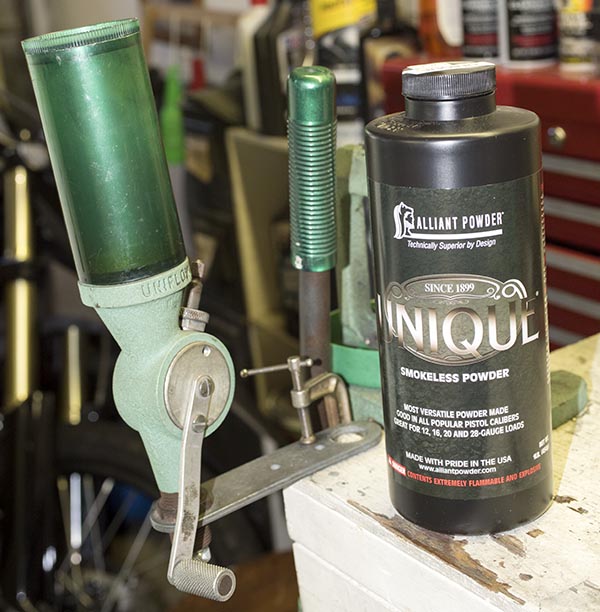
A powder dispenser allows you to dispense the correct amount of propellant in each cartridge case.
A powder dispenser, and the propellant I like to use for loading .45 ACP ammunition. I bought that dispenser back in the day, along with the scale and the press. My preferred propellant is Unique.
At this point, we’ve covered the equipment necessary; let’s now turn to the components. One is the propellant you see in the photo above. As seen in the photo below, for the .45 ACP cartridge, I prefer Unique.
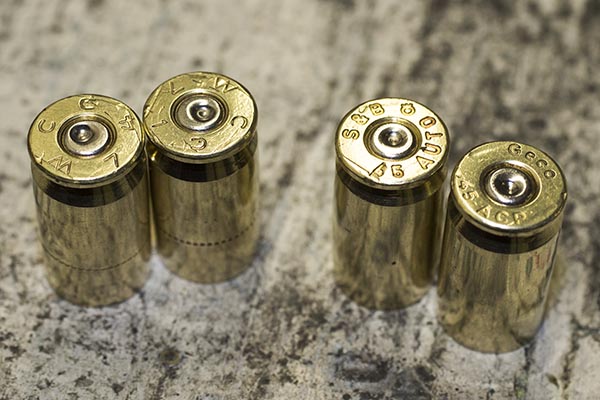
You’ll need previously-fired cartridge cases. You can also buy new brass that has never been loaded if you don’t have any, or you can buy factory ammo, shoot it, and save the brass. I don’t think I’ve ever purchased new brass for the .45 ACP, mostly I had plenty available from my days in the Army. The .45 ACP cartridge is a relatively low-pressure cartridge, and the brass seems to last forever. I’ve been reloading the brass you see here for a long time.
Fired .45 ACP brass. It’s dirty. I usually polish mine, but it’s not necessary that you do so. We’ll talk more about that in the next blog.Polished .45 ACP brass. It cleans up well and it seems to last forever (look at the stamps on the two cases on the left).
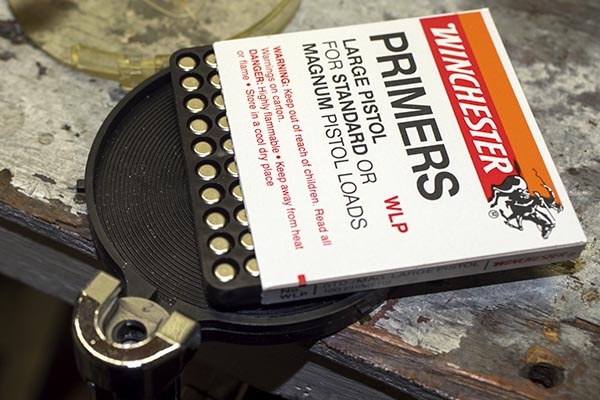
You’ll need primers. The primer is the little cap that the firing pin strikes when you pull the trigger. There are two or three companies making primers these days. I usually buy whatever the shop has in stock. I haven’t found that primers make a difference in accuracy or reliability for handgun shooting.
Winchester primers. We’ll talk about the tool you see below the primers, and how to install the primers, in the next blog.
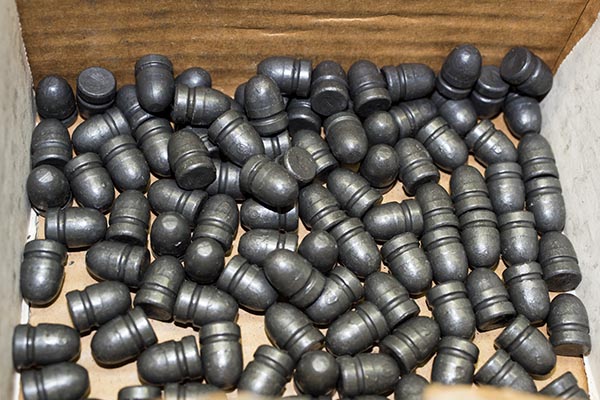
And finally, you will need bullets. I’m using moly-coated 230-grain roundnose lead bullets these days, like you see in the photo below, mostly because I have a bunch of them in my reloading locker. Many other bullet configurations are available.
Bullets. I usually buy them in boxes of 500 because I do a lot of shooting. There are different kinds of bullets available, but that’s a discussion for another time, too. If you’re just starting out and you’re reloading .45 ACP ammo, my advice is to get a 230-grain roundnose bullet in either cast or jacketed flavors. It will feed reliability in nearly any 1911. We’ll talk more about this in the next blog, too.
There’s one other item I strongly recommend you purchase, and that’s a reloading manual. These manuals list different loads for different cartridges and different bullets and propellants. The whole idea here is to experiment with these combinations (within the parameters provided by the manuals) to find the recipe that produces the best accuracy and reliability in your gun. My preference is the Lyman manual, as it lists different bullet manufacturers and cast bullets, too. You can buy manuals from the bullet manufacturers, but the downside there is they only show data for their bullets.
You can buy all of the equipment separately (as I did a long time ago) or you can buy a complete kit that has everything you need to get started. RCBS has a kit that goes for about $350. Lee has a similar kit for a lot less (about $150), and it will get you into the reloading game. I have a friend who bought the Lee kit a few years ago, he uses it to reload .308 Winchester ammo for his Model 700 Remington, and the ammo he makes routinely delivers 1/2-inch groups at 100 yards. With either kit, you’ll need to buy the dies required for the cartridge you wish to reload, and the components as described above.
You might be wondering: Where do you buy this stuff? Most gun stores sell reloading equipment and components. Cabela’s and Bass Pro are two that come to mind. You can also buy components and equipment online from places like Amazon, Midway, Natchez Shooter’s Supply, Grafs, and other places. Buying the energetic components online gets a bit more complicated (propellants and primers), but the stores can fill you in on that. In most areas, there’s usually a shop that is known for being the best in your neck of the woods for reloading stuff, and you can find these places with a quick Google search or by asking around.
So there you have it. I’ve described the equipment and the dies you’ll need to reload the .45 ACP, but the procedures I’ll describe in subsequent blogs will be the same for nearly any handgun cartridge (.38 Special, .537 Magnum, .380, 9mm, .40 S&W, .44 Magnum, and .45 Colt). All you need will be different dies and shellholders, and of course, different types of bullets.
Our next reloading blog will cover the first steps of the reloading process. Stay tuned; it’s coming up!
Read our other Tales of the Gun stories for the loads we prefer. Disagree with anything above or want to toss your $0.02 into the discussion? Hey, there’s a comments section below and we’d love to hear from you.
One last thing…ever wonder what the “ACP” stands for in .45 ACP? Well, here you go…wonder no more.