One of the many red lines crossed on the way to becoming moto-saturated is owning a motorcycle lift. If a rider finds that he needs a lift then things have gone too far and he needs to reevaluate what the hell is actually up.
I’ve wanted a lift for many years but haven’t been able to justify the expense or space requirements a lift brings to the table. (ha!, get it? Table?)
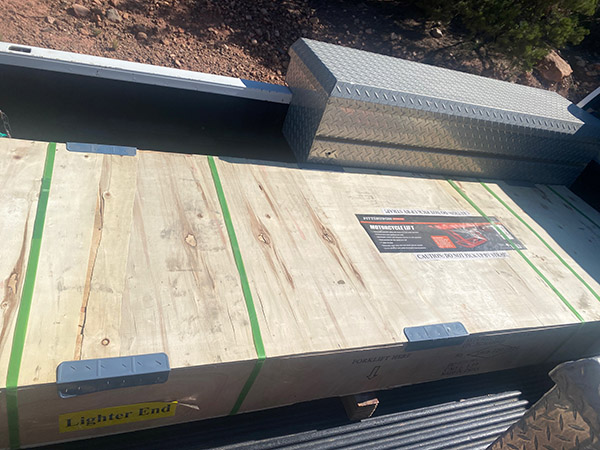
The lift comes securely packaged in a wooden crate. If you know the price of wood nowadays the lift is almost free!
This particular lift from Harbor Freight cost around $300 when it first appeared on my radar 30 years ago. At the time my shop was a 10×10 metal shed and there just wasn’t enough space to park the thing.
Turns out it was a good thing I didn’t take the plunge as my shed in Florida was flooded several times and the lift would have corroded away. (Ha! Get it? Plunge-flooded? I kill myself!)
My recent acquisition of a pair of Honda Dreams and subsequent crawling around on battered knees got me thinking about a lift again. I have the room now. Floods are unlikely where my shop is situated and the HF sale price of $399 defied quantitative easing, inflation-tracking and recent tariffs on China. In short, $399 seemed like a pretty good deal.
You definitely get your money’s worth in weight as the lift was a heavy bitch to load and unload. Plan on having a few strong backs to move the lift. The guys at Harbor Freight loaded it into the truck with a forklift but I don’t have any strong backs available at home. I had to slide the crate out of the truck and let it fall the last two feet from the tail gate. It wasn’t really a free fall, I had a floor jack mid-crate to act as a fulcrum when the crate cleared the tailgate. Think of it as a controlled crash landing. The crate took the fall in stride and its contents were undamaged by my rough handling. Plus the lift is a sturdy thing, it would take some doing to bend it.
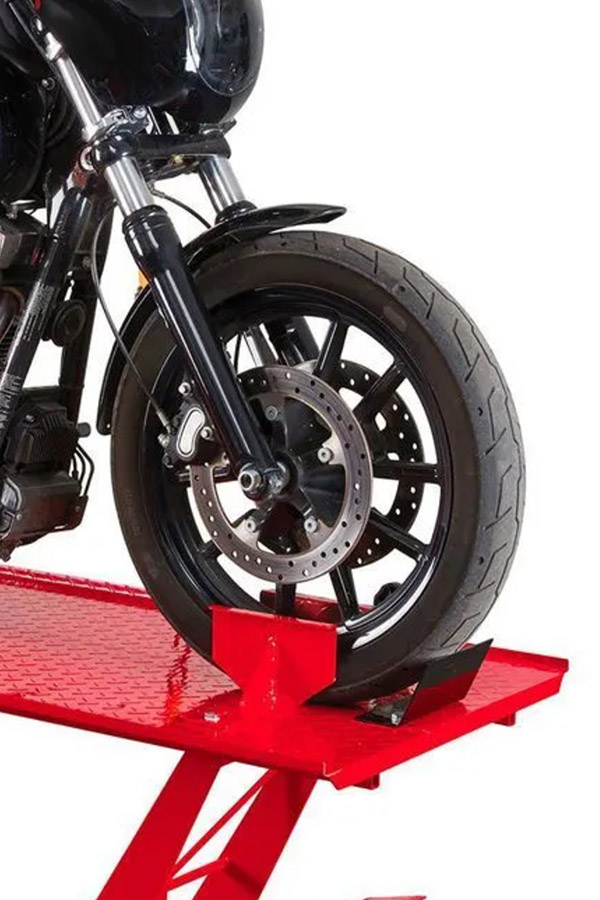
In this Harbor Freight photo you can see how the clamp won’t do much for holding the motorcycle upright.
The lift comes 99% assembled with only the wheels, tie down points and tire vise to bolt on. If you’re handy 1/2 hour should see the project through. There are a few niggling issues though.
Like most things from China Freight the lift needed a few modifications. It goes with the $399 price point.
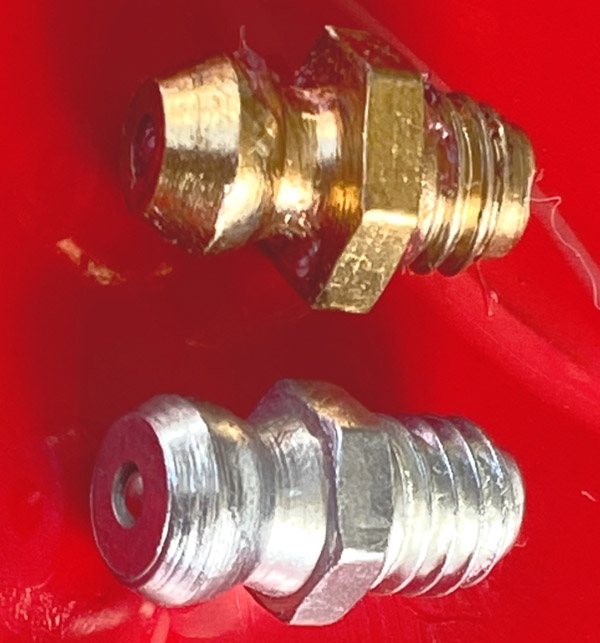
Slightly reduced nipples to go with the reduced price. If you want to grease your new lift you’ll need to replace the gold Chinese nipples with good old USA style, silver Chinese nipples.
China must have different size grease guns because all of the grease fitting were slightly undersized and didn’t fit a US style grease gun. Attempts to grease the various grease points just pumped gook all around the nipple. I replaced the China-sized nipples with US-sized nipples and the pressurized grease flowed to the desired locations with no ooze-out around the fitting.
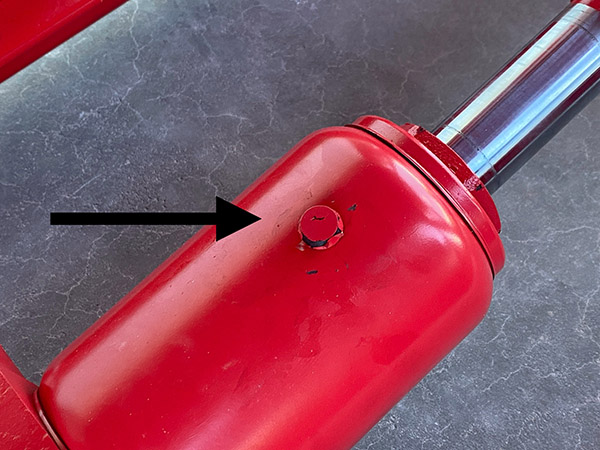
This rubber plug is where you add oil to the pump. Warning: it’s a bear (like Ossa!) to get back in the hole.
The owners manual that came with the lift recommended checking the hydraulic oil in the ram. It was slightly low so I put in a few ounces of fork oil. That was the easy part. Getting the little rubber plug back into the ram housing was a struggle with the lift in the lowered position. I finally gave up and raised the lift for access. It was still a PITA to get the plug back in.
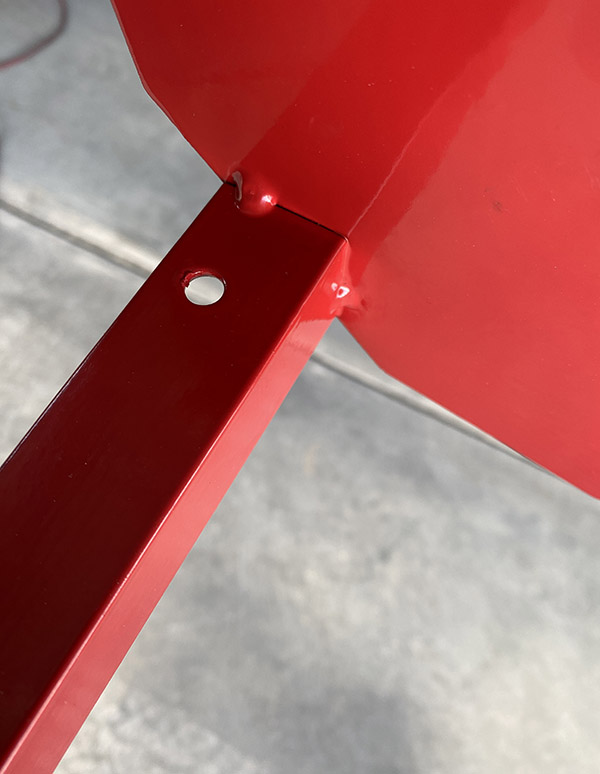
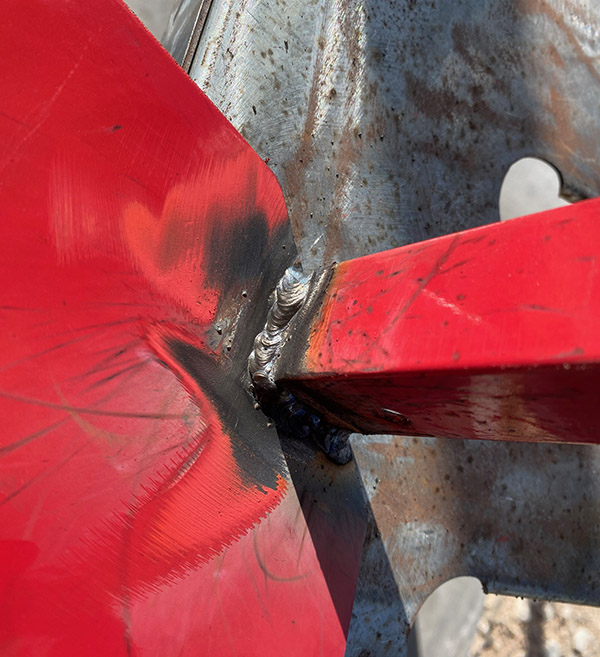
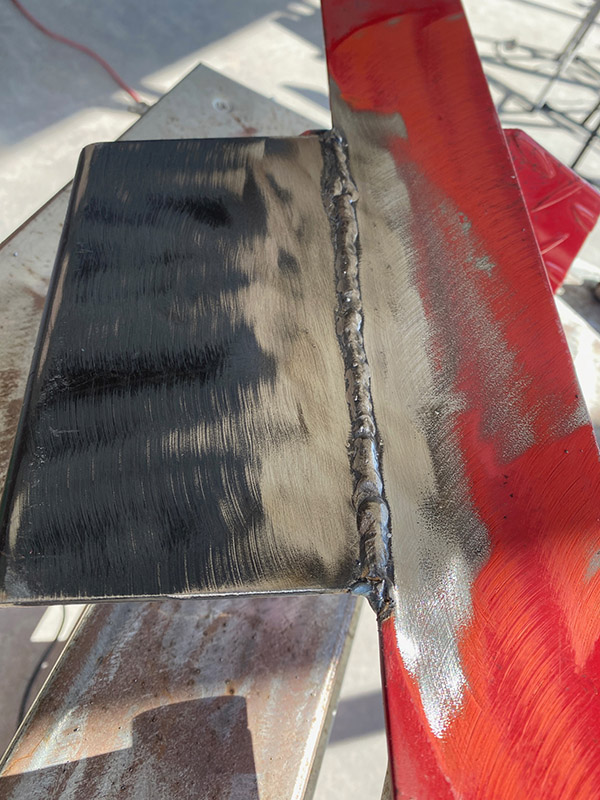
Not much weld on sliding part of the clamp.I stuck some more welding wire to help hold the slider togetherHere it is in action. I’ve yet to clamp the rest of a motorcycle to the table so it may fall apart on me.
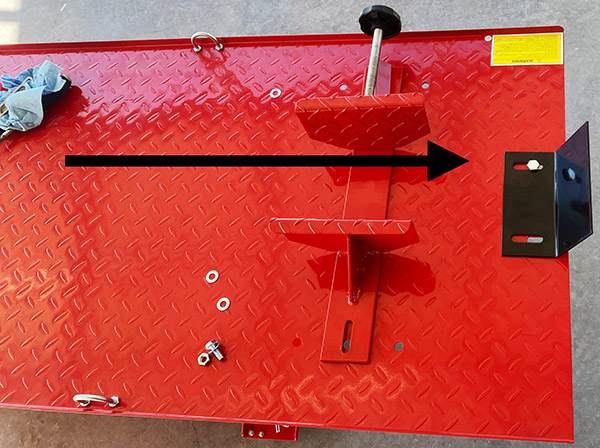
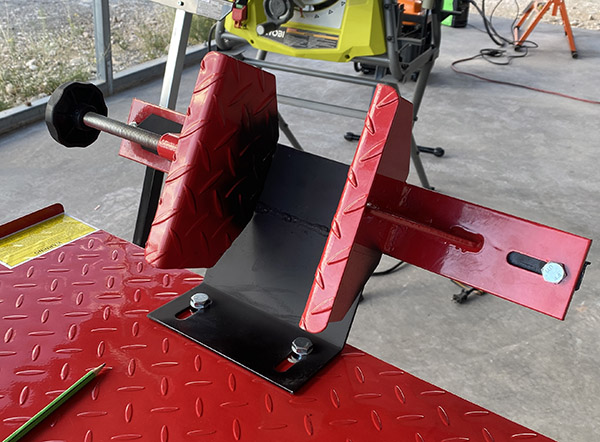
As delivered, the tire clamp installs in the wrong place. Down on the floor, it doesn’t provide much resistance to tipping leverage. There are many internet solutions for this issue but all of them required spending additional money. I figure at $400 you shouldn’t need to buy more stuff just to keep the bike from falling over.
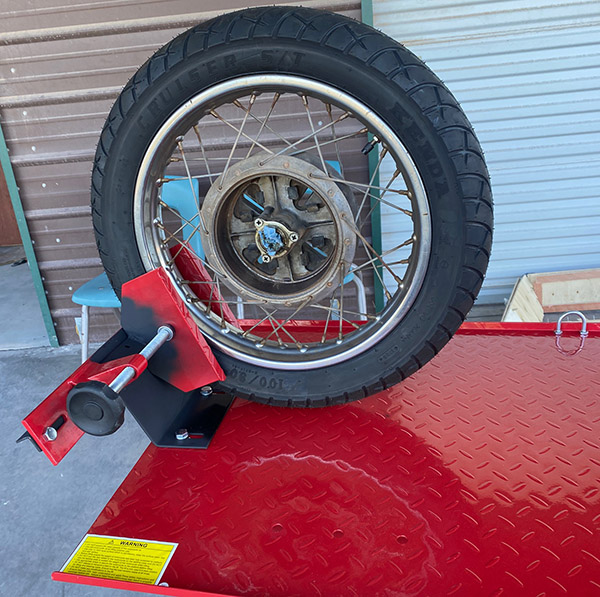
As delivered the tire clamp is too close to the fulcrum of tip-ology.If all you have is a hammer every problem is a nail. It’s the same when you get a welding machine. I added the tire clamp to the top of the tire stop to gain better leverage.The repositioned tire clamp gets a higher grip for less tip.
The thriftiest way to fix the tire clamp is to relocate the thing on top of the tire stop. This gave me a chance to practice poor welding on a mission critical part. The sliding part of the clamp was lightly welded so I slathered on a bit more metal.
Once the clamp was in place I added a piece of angle iron to prevent jaw-spread, a common occurrence among older motorcyclists. Drilling two extra holes in the angle iron gave me another, more forward attachment point for tie down straps.
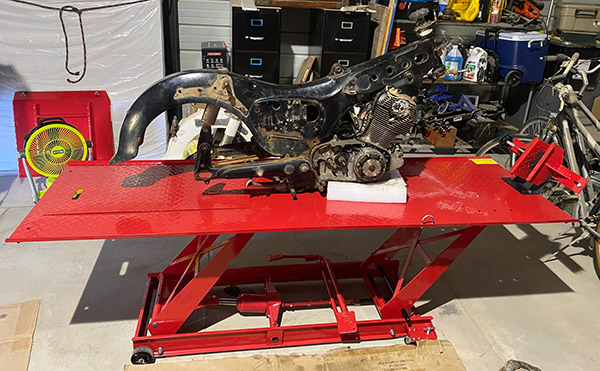
This all sounds like a lot of work but it took maybe 2-3 hours and that number includes thinking about things. I’ve got the Dream on the lift for its maiden voyage and it seems to be stable. I give the lift 5 stars for value and 2 deep vein thrombosis’ for HF still not quite getting it right after all these years. If you need a motorcycle lift and don’t mind tinkering and welding a bit the HF lift on sale is hard to beat.
The ’62 Dream gets the honor of being the first to sit atop the HF lift.
Fours? I’ve owned a few, and Lord knows I’ve sure seen a bunch of them. For starters, there’s the 1931 Excelsior-Henderson at the top of this blog (a photo that graces every one of our ¿Quantos Pistones? blogs). It’s not mine and I didn’t ride it. I was so interested in photographing that motorcycle, I didn’t realize I was standing next to Jay Leno until he took his helmet off. I’ve written about that encounter before.
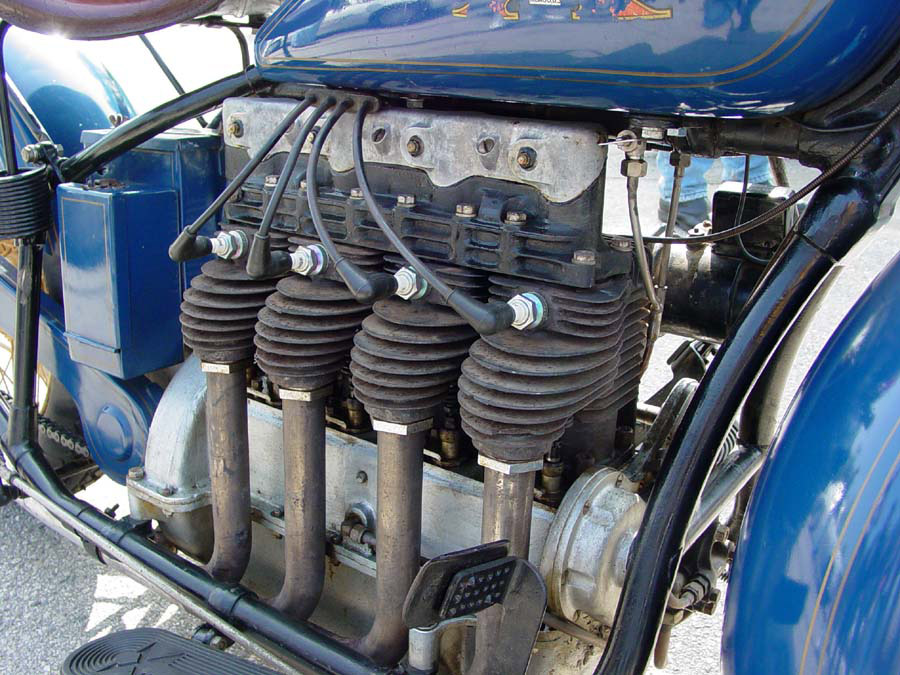
Honda CB 750
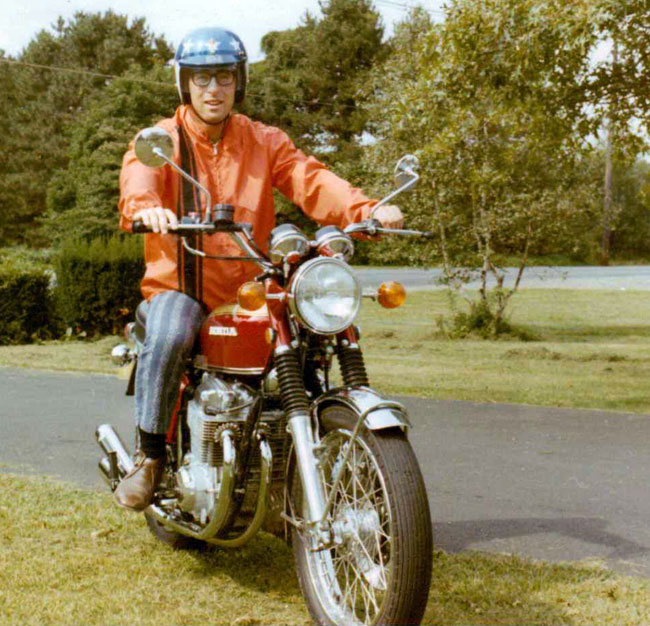
When the Honda CB 750 Four came on the scene in 1969, it turned the motorcycle world upside down. I thought the bike was interesting before I saw one, but I also thought I was a 650 twin kind of guy (you know, Triumphs and BSAs). The first 750 Four I ever saw accelerated past my house when I was way younger. It was a gloriously visceral and symphonic four. To a guy used to lopey Harleys and throaty Triumphs, the CB 750 sounded like an Indy Offenhauser. When I heard that high performance four-cylinder yowl, it was like walking through the jungle on a moonless night and having an unseen leopard suddenly scream a short distance away. It reached deep, took hold, and shook me mightily. I remember it like it happened yesterday. At that instant, I knew I would own a 750 Four someday soon. And I did.
Yours truly in the 1970s. Hard to believe it was more than 50 years ago. I loved that motorcycle.
Our family bought our motorcycles from Cooper’s Cycle Ranch in Hamilton, New Jersey. The CB 750 was $1539 out the door (I can’t remember what I had for lunch earlier today, but I remember that number), and my 750 was the color I wanted. Honda offered the 750 Four in four colors in 1971 (brown, green, gold, and candy apple red). I wanted a red one, and Sherm Cooper made it happen. It was a glorious bike. I rode it to Canada with a fellow Rutgers student (Keith Hediger, who had a white Kawasaki 500cc triple). That was my first international motorcycle trip. I rode it a lot of other places, too. It was a wonderful motorcycle. I wish I still had it.
Honda CB 500
I owned two Honda CB 500 Fours. I bought one from good buddy John who was a high school and college classmate. I only put a few miles on before putting it on my front lawn with a for sale sign. It sold quickly. I liked the bike (it was very smooth), but I needed the cash for something else (I can’t remember what).
Good buddy John and the CB 500 I bought from him.
A similar opportunity popped up decades later when a guy at work had a metalflake orange CB500 for sale at Sargent Fletcher (an aerospace plant I ran in the 1990s). Metalflake orange was a factory color on the CB 500 Honda. At $500, I figured I could take a chance. I bought it, rode it a little bit, never registered the bike, and sold it with a Cycle Trade ad a couple of weeks later.
Suzuki Katana
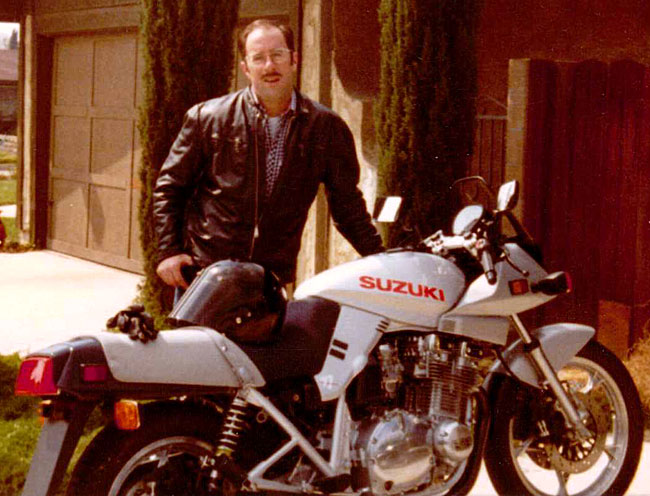
This was a bike way ahead of its time. Wow, was it ever fast. In 1982, the performance was incredible. It would probably be tame by today’s hyperbikes, but back in the early ’80s, it was something else.
Me and my Katana. I still had some hair in the 1980s. Not much, but some.
Take a good look at that photo. The ’82 Katana you see above is the only vehicle (car or motorcycle) for which I ever paid over list price. When it first came out, it was pure unobtanium. Suzuki only made 500 initially. I think mine was No. 241. I paid $5500 for it, which was way over list price in 1982, and I had to go all the way to Victorville to find one.
I thought I had something special, but that only lasted a month or two. After the initial limited release, Suzuki made another 500, bringing the total number to 1,000. I found that troubling, and I felt cheated. Those sold quickly, too, so Suzuki went ahead and produced yet another 500. Those last 500 didn’t sell well at all (Suzuki had reached all the fools like me by then and the market for a bike like the Katana had been saturated). Suzuki had to discount the remaining bikes heavily to move them. That really pissed me off. It would be another 15 years before I would buy another Suzuki (that was my ’97 TL1000S). The way I was buying and selling bikes in those days, that was a long time.
The Katana was my first ever superbike. It was scary fast in 1982, and it would probably still be scary fast today. Thanks to Joan Claybrook and Jiminy Carter (remember those two?), the speedo maxed out at 85 mph (as if that would somehow slow anyone down).
The pipes were one of the coolest things on the Katana. They were what Suzuki called black chrome and they looked great. The instrument pod was cool, too. The tach and speedo needles moved in opposite directions, which made it seemed like the two needles were unwinding as you rowed through the gears. This was my first ever bike with low bars. I didn’t like them, but the rest of the bike was very, very cool. I sold the Katana when my first daughter was born. A fat lady knocked it over in a shopping mall pulling her car out of its parking space. I took that as an omen. Time to step away from riding for a bit. I wish I still had that motorcycle.
Suzuki went on to use the Katana name (a Katana is a Japanese Samurai sword) on other models, but they were never the same at that first 1982 Katana.
Triumph 1200 Daytona
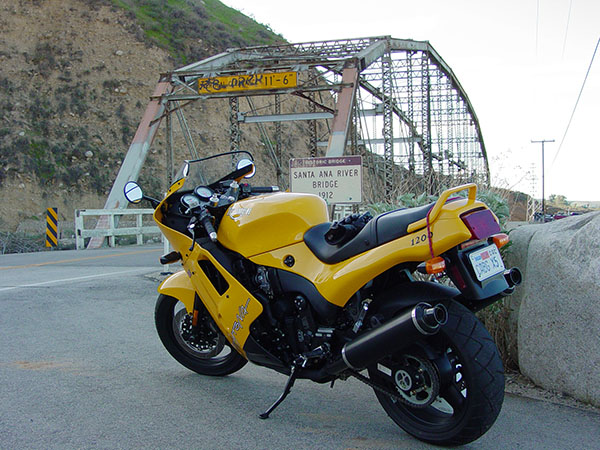
This was a fun machine. I bought when it was still brand new (but already 7 years old) on Ebay, thanks to an alert from my buddy Marty. It was $7,000. As soon as I won the auction, the next highest bidder contacted me and offered to buy it, but I turned it down.
The Locomotive. This was one of the best motorcycles I ever owned.
I’ve written about the Daytona before, and rather than reinvent the wheel, I invite you to read the more complete Daytona story here.
Honda Gold Wing
Back in the day, the initial Honda Gold Wing was a four, as they continued to be for several years. I thought I wanted one when the Gold Wing was first introduced (I was in Korea at the time and I saw the new Gold Wing in a Cycle World magazine). But I never acted on the urge to buy one and that was a good thing. I rode a friend’s a few years later and the bike had no soul whatsoever. It was boring beyond belief; I would not have thought any motorcycle could be that boring. But it was and it made me glad I never bought one.
Somewhere in Arizona on a road trip in the ’90s. That’s my CBX (to be covered in a later ¿Quantos Pistones? blog), my buddy Louis V (who went into the witness protection program), and Louis’s Honda Gold Wing (the most boring motorcycle I ever rode). All the gear, all the time was definitely not Lou’s motto.
Guys who have Gold Wings seem to love them. Emilio Scotto rode one around the world and wrote a great book about it. Today, of course, Gold Wings are sixes. I’ve read that the handling on the new ones is great for a big bike. But they’re not my cup of tea. You may feel different about Wings, and that’s okay.
So there you go: My experiences with four-cylinder motorcycles. The configuration makes sense from a lot of perspectives. They can be powerful and they are an almost universal configuration on Japanese motorcycles. But they’ve grown too big for my liking. I know there have been smaller fours out there (the Honda CB350 Four comes to mind), but as I’ve matured (read: become a geezer), I like smaller bikes better. As always, your mileage may vary.
Missed our earlier ¿Quantos Pistones? stories on the Singles, the Twins, and the Triples? Hey, no problemo! Here they are:
Part 1 of this series took us through brass preparation, Part 2 took us through priming, and here we are at Part 3, which discusses powder charging, bullet seating, and case mouth flare removal.
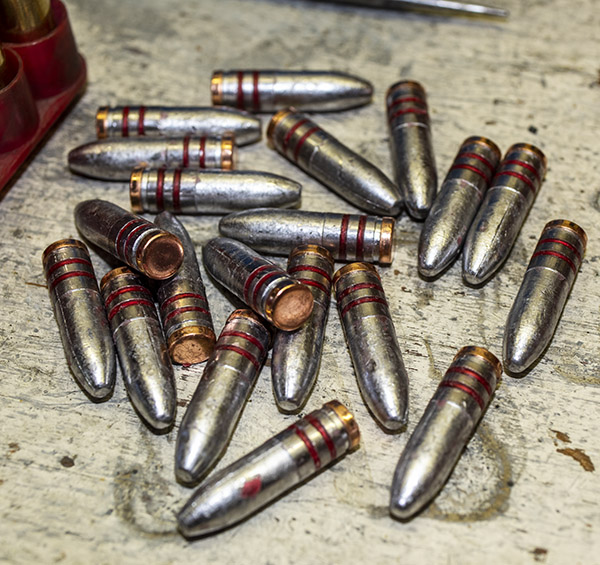
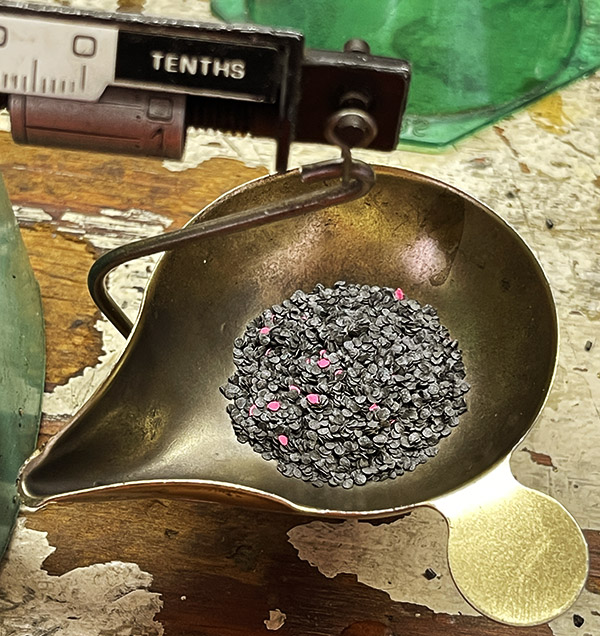
Cast 200-grain bullets, lubed, sized, and gas checked. These are from the Lyman 314299 mold.
I had previously mentioned that I shoot cast bullets in my military surplus rifles, and in particular, I like a gas-checked 200-grain cast bullet. Good buddy Roy Hursman cast these for me. Roy retired and sold his bullet casting gear. I hope I’m able to find somebody that does as good a job as Roy.
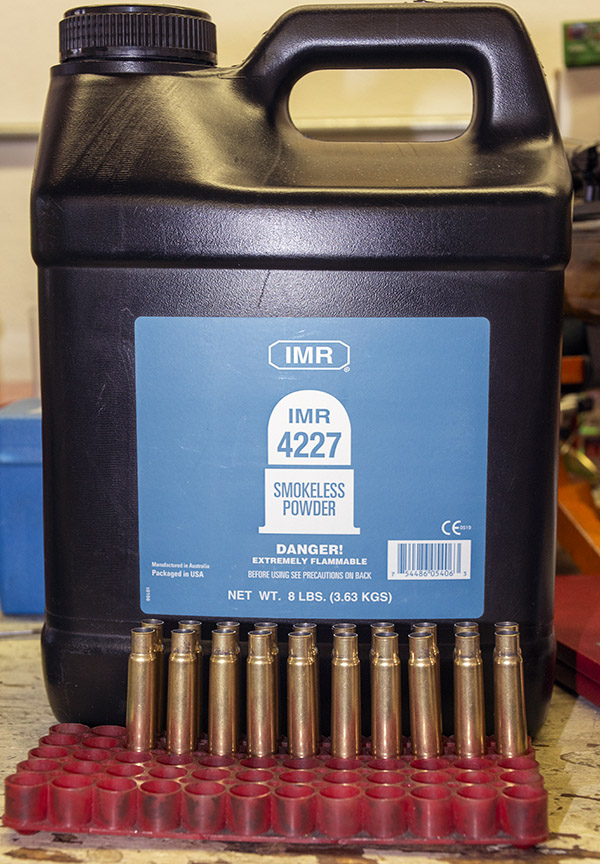
This 8-lb bottle of IMR 4227 propellant is good for nearly 2,700 rounds of .303 British ammo.
I use different powders in my rifle cast bullet loads. A good one is IMR 4227, which is what I used for this .303 British load. The secret sauce recipe is 21.0 grains of IMR 4227 with no fillers. I’d like to tell you that I developed this load after extensive testing, but I can’t. It was next to what the Lyman cast bullet manual said was the accuracy load with this bullet and IMR 4227 was in my ammo components locker, so it got the nod, and it worked. I felt no need to experiment any further; the load worked well and was very accurate. This 21.0-grain IMR 4227 load is near the lower end of the loads listed in the Lyman manual. The bullets exited the muzzle at about 1600 feet per second (as tested with my Garmin chronograph), and that’s good enough for me.
I use an RCBS powder dispenser, and once I had it set up to throw 21.0 grains of IMR 4227 propellant, there was no need to weigh the charge for each cartridge because the powder meters so well. I loaded the 20 rounds like it was pistol ammo, placing each empty brass case beneath the dispenser, charging the case, and moving on. After I had charged all 20 cases, I threw another charge into my scale’s powder cup and weighed it again to make sure the dispenser was still on the money. It was (the powder dispenser released exactly 21.0 grains).
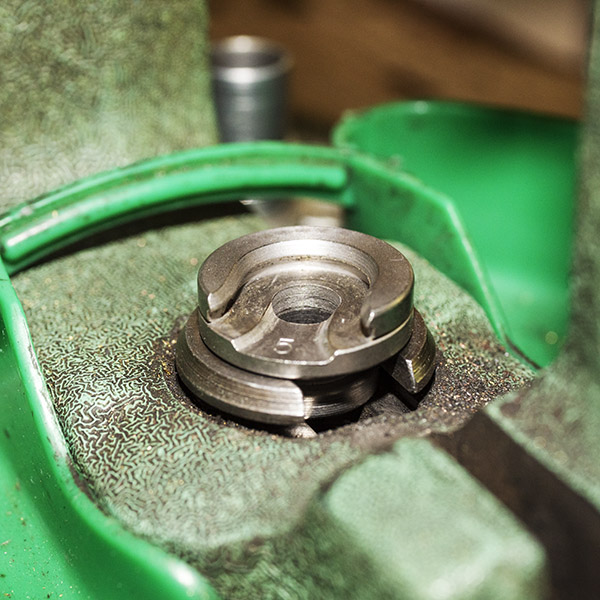
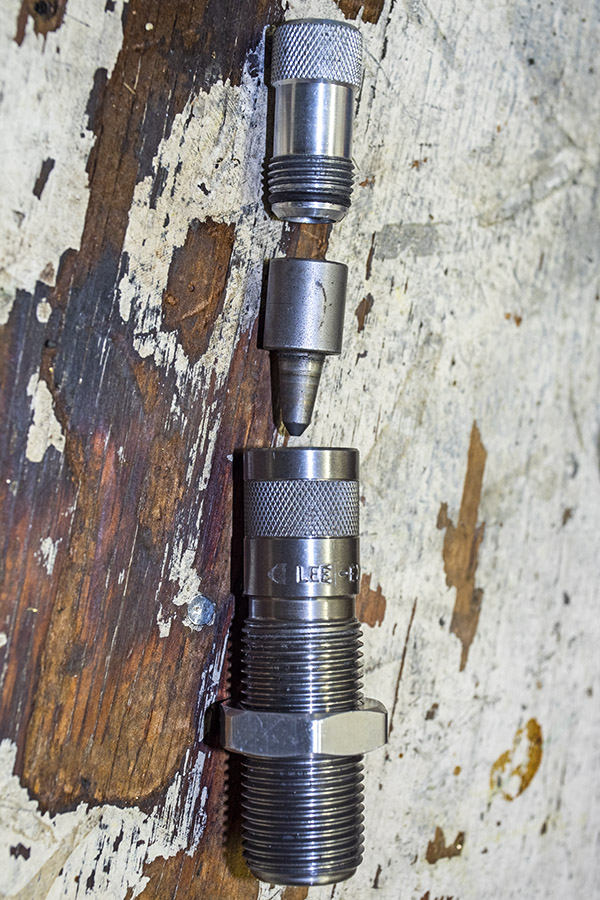
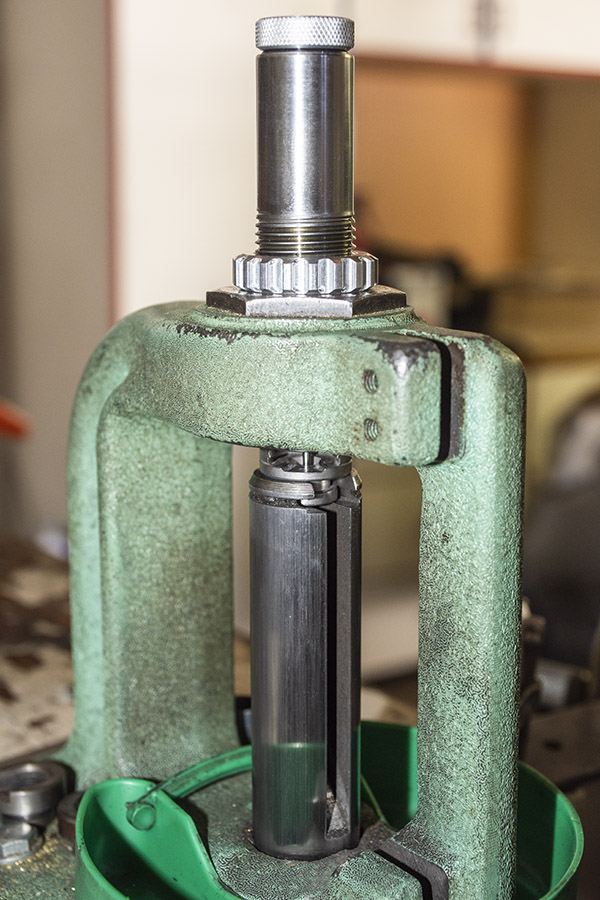
It was time to turn to the Lee Ultimate 4-Die set’s bulleting seating die. The first step was to install the bullet seating die in the press and screw it partially in.
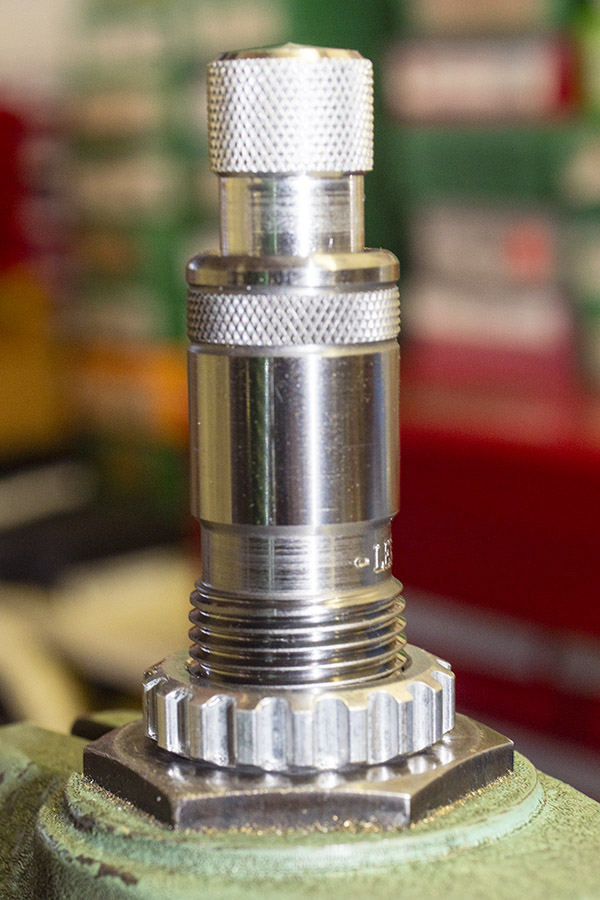
The Lee .303 British bullet seating die. It includes a feature for a roll crimp if so desired. The knob on top adjusts the bullet seating depth.
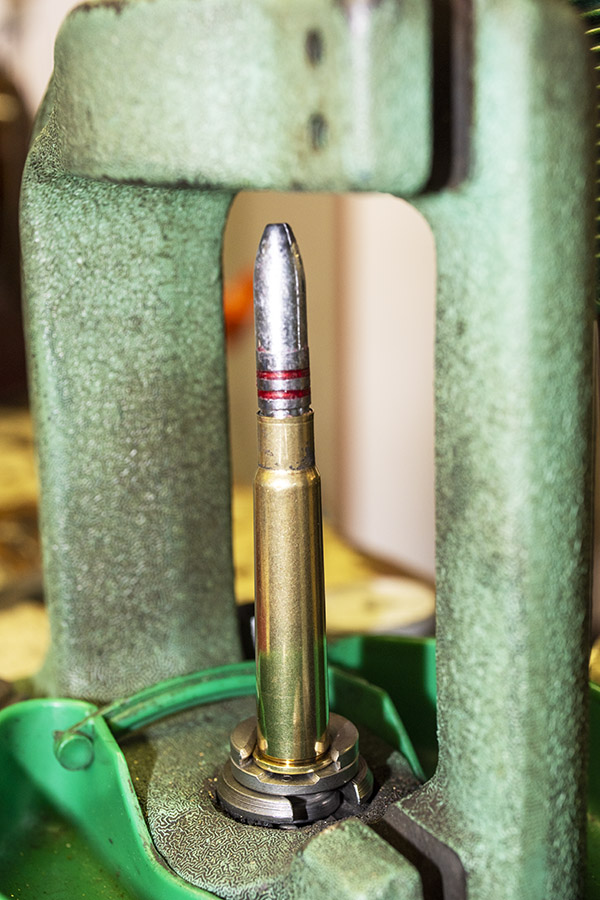
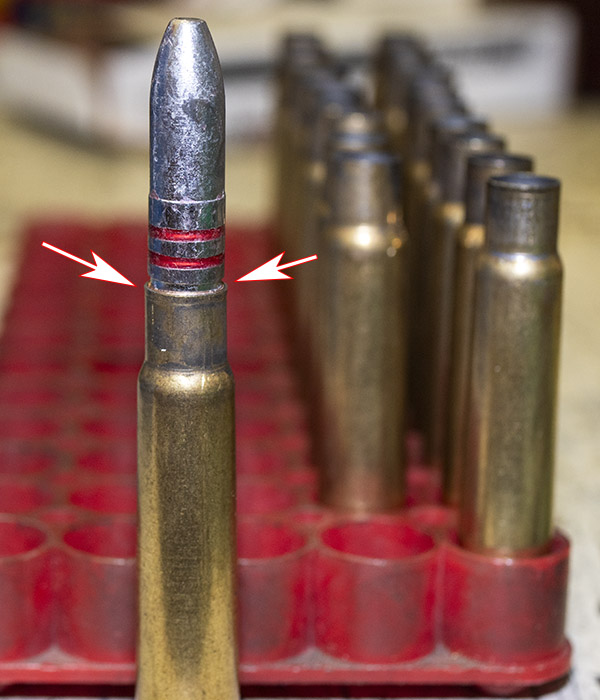
I placed the first bullet over a charged .303 British case (charged with IMR 4227, that is) and raised the ram in the press. Observing where the bullet went (i.e., how deeply it seated in the case), I lowered the die in the press a bit more, repeating the process until I attained the desired bullet seating depth. I wanted the bullets to be seated such that the cartridge mouth was just behind the bullet’s first driving band.
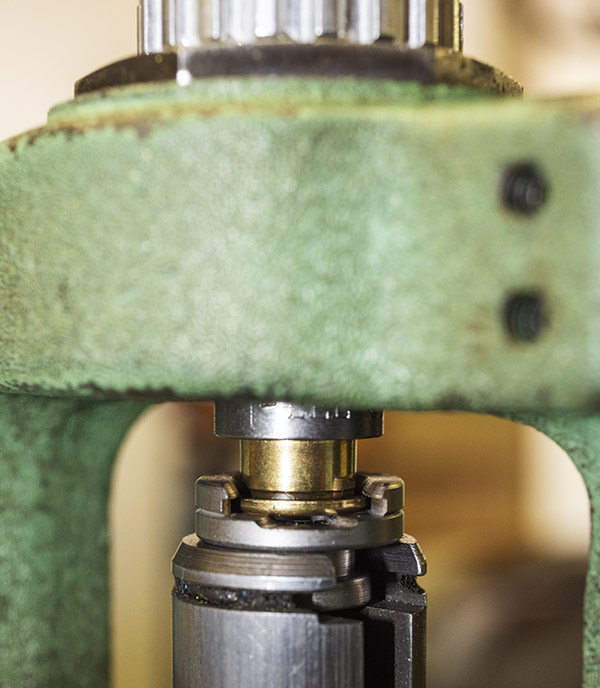
A cast bullet about to be seated in the cartridge case.A seated bullet, positioned exactly where I wanted it.
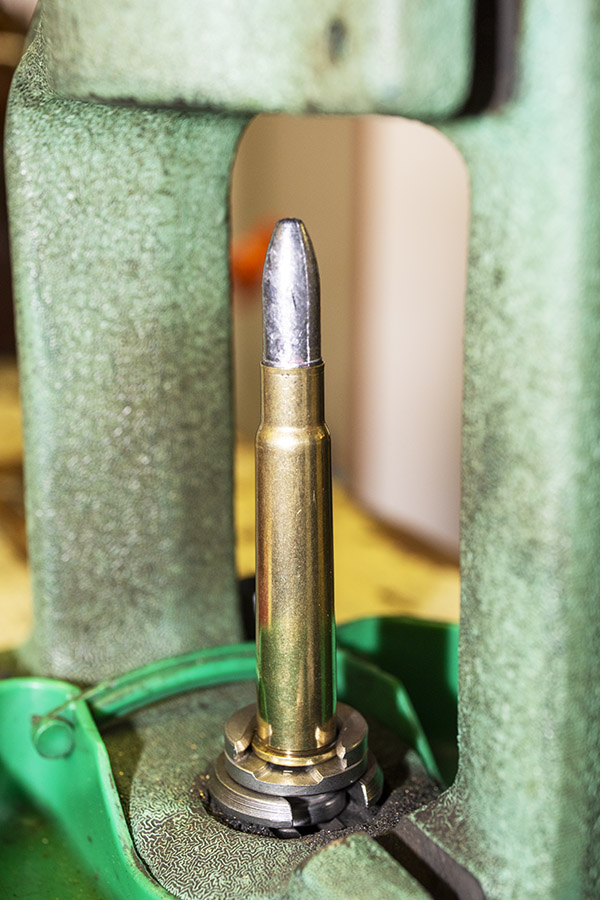
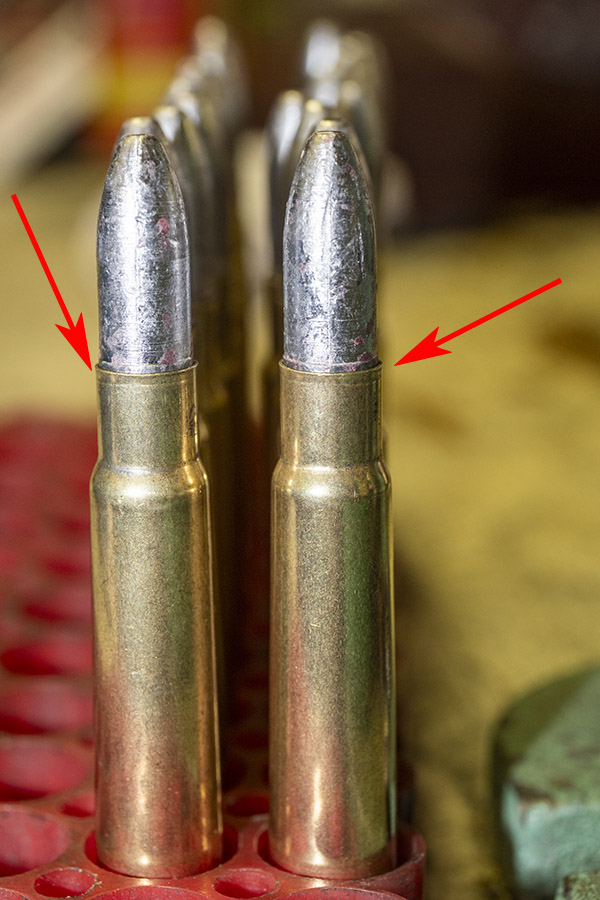
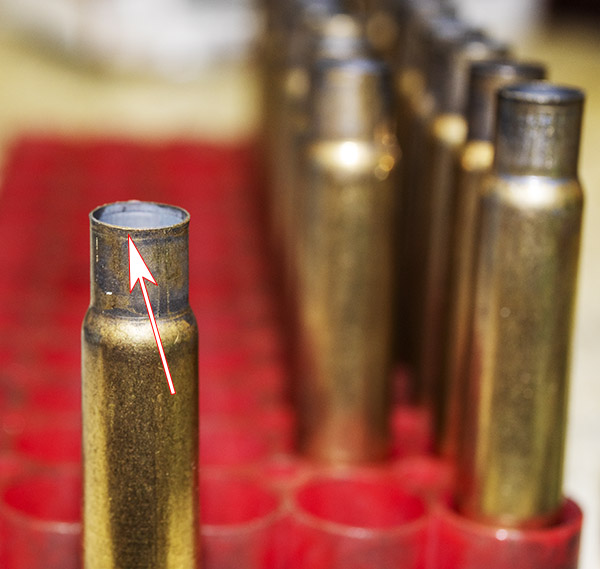
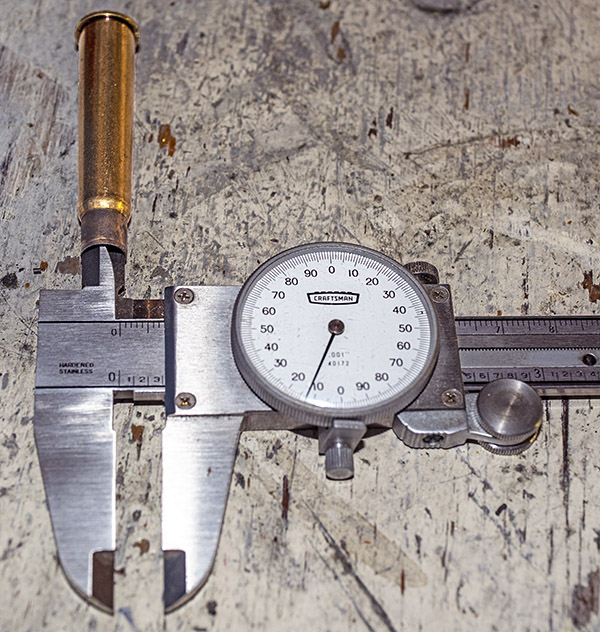
After seating all 20 bullets in the 20 charged .303 British cases, it was now time to remove the case mouth flare we induced in Part 1 of this series. I probably could have skipped doing so, because I did as I advised in Part 1 (I flared the case mouth just enough to allow the bullet to enter). Even without removing the flare, the cartridges would chamber because the flare was so small. But I like to go for the extra step of removing it just to make sure.
The red arrows point to the remaining flare after seating the bullets. This will be removed with the Lee factory crimp die in the next step.
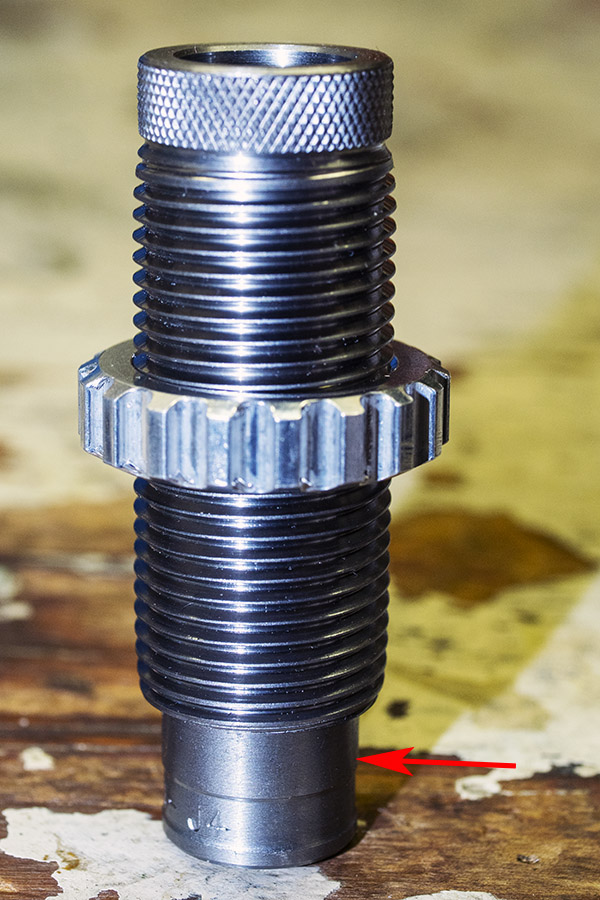
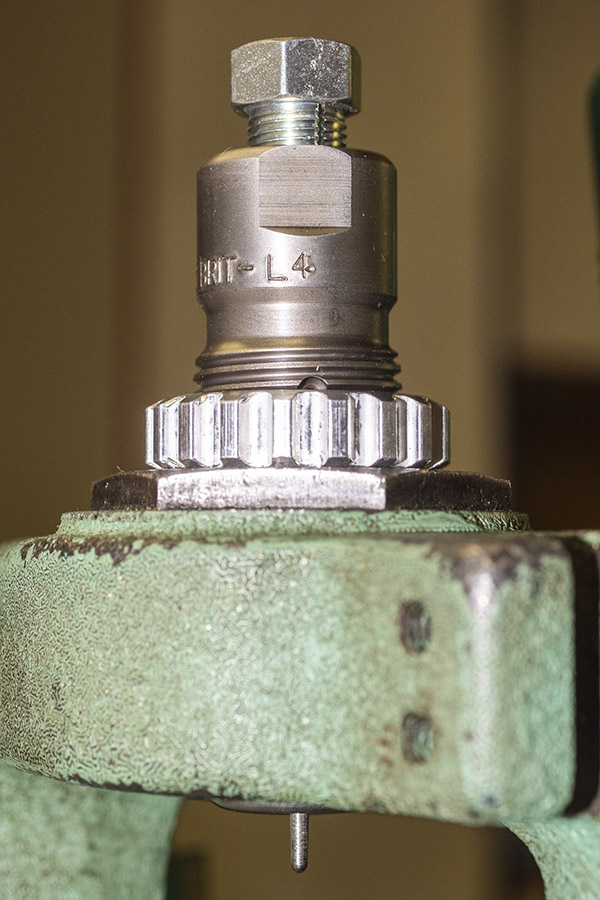
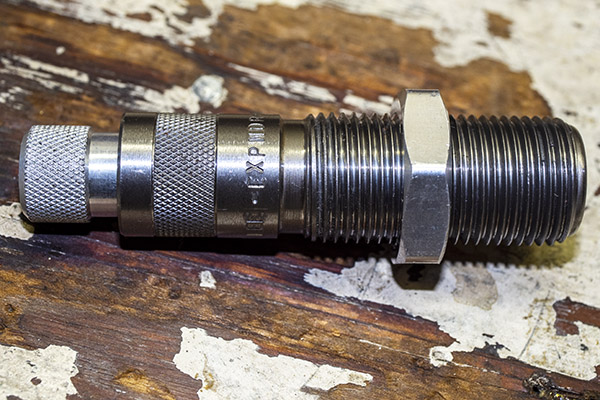
Lee’s factory crimp die (the fourth die provided in their Ultimate 4-Die set) is what I use for removing the flare. It can also be used (as the name implies) for crimping the case mouth on the bullet.
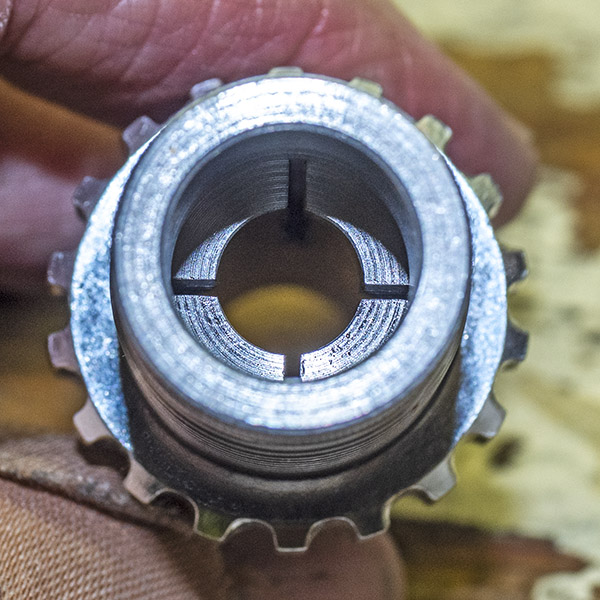
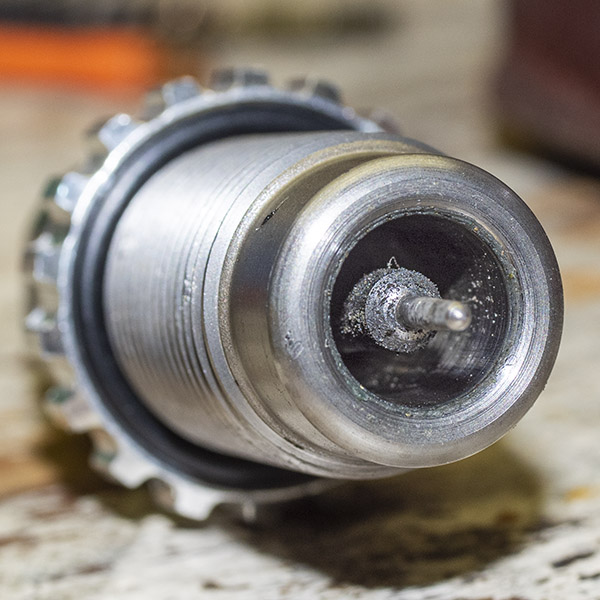
Lee’s factory crimp die. The arrow points to the cylinder that is pushed up into the die body by the shell holder when the press is fully raised. By adjusting how far the die body is screwed into the reloading press, you can adjust how much crimp is applied.The view from above the Lee factory crimp die. The cylinder shown in the photo above (see red arrow) cams into the four circumferential collets shown in this photo. These four collets apply force to the cartridge case. You can adjust the die to apply no force, just a small amount of force to remove case mouth flare (as I did to my .303 British cases), or to apply a crimp.
By adjusting how far the die is screwed into the press, you can control how much force is applied to the case mouth. You can screw it in just enough to remove the case mouth flare (as I did), or you can screw it further into the press to apply as firm a crimp as you want around the case mouth.
The Lee factory crimp die does not apply a roll crimp; it applies a concentric circular flat crimp around the case mouth periphery. Some folks think this makes the Lee factory crimp independent of case length. I don’t agree with that. On longer cases, the Lee factory crimp will press more case material radially inward than it would on a shorter case (theoretically, if the case were trimmed too short, the Lee factory crimp would apply no crimp). But it’s still more controllable than a roll crimp, and the amount of roll crimp applied is far more sensitive to case length than is the Lee factory crimp. And if you wish to apply a roll crimp instead of the Lee factory crimp, you can still do so with Lee bullet seating die. Just screw the die body in further (while backing off on the bullet seater on top of the die) until the reduced diameter step inside the die body contacts the case mouth enough to provide a roll crimp.
I ran all 20 cases through the Lee factory crimp die after adjusting the die. I adjusted the die to apply just enough radially-inward force to remove any remnants of flare from the case mouth.
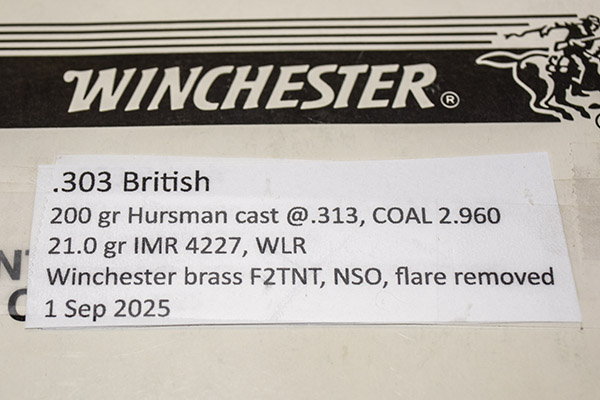
After completing all 20 .303 British neck-sized cartridges, I put them in a box and applied a label, as I do with all my reloaded cartridges.
Reloaded, boxed, and labeled. “F2TNT” is my code for fired two times, not trimmed. “NSO” means neck sized only.
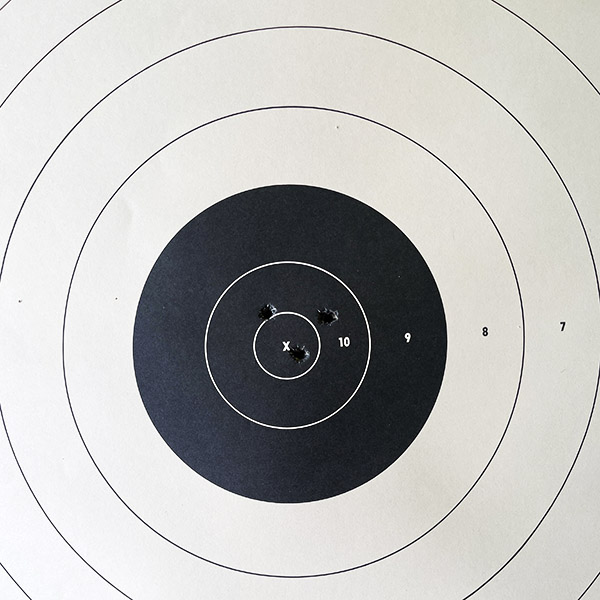
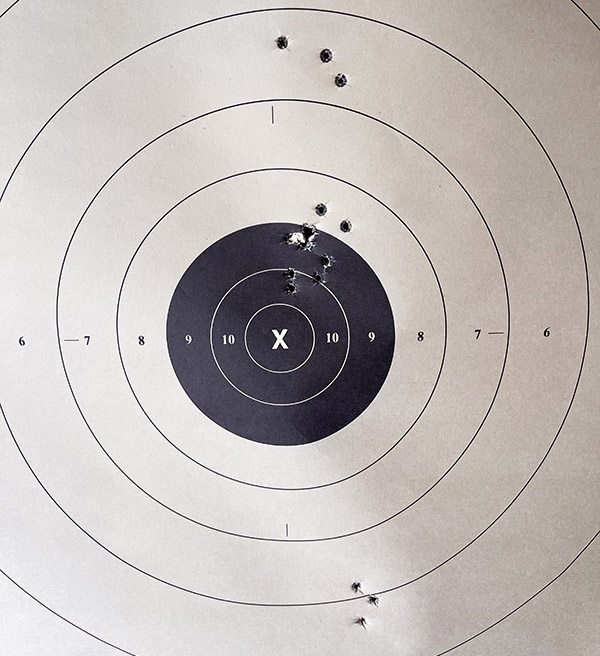
How did this ammo shoot? It did well, as the target below shows. I can’t show that my neck-sized-only reloads are dramatically better than full-length resized ammo, but I know I have the other advantages offered by neck sizing (not having to lube the cases, a quicker reloading process, and longer brass life). I am quite pleased with my Lee .303 British die set.
A perfectly centered, tight, 3-shot group at 50 yards, with light recoil and good accuracy. The Lee Ultimate 4-Die set does what it is supposed to.
More reloading, hunting, and shooting stories are here!
In Part 1 of this three-part series on using Lee Precision dies to reload the .303 British cartridge, we covered resizing, decapping, full-length resizing, neck sizing, and flaring the case mouth. Part 2 continues the reloading process.
The next step for me (after the brass is resized and flared) is case cleaning. I use a Frankford Arsenal vibratory polisher. I’ll drop the brass in it and do other things for an hour or so as the brass is polished.
Resized cases in the Frankford Arsenal vibratory polisher. The media is made from corn cobs. I add Dillon’s polishing liquid to it prior to starting the polisher.Finished brass. I like it to be clean and well polished both for aesthetics and for accuracy. When the inside of the case neck is polished, it is free of any lubricant from the resizing operation, and case neck grip (or tension) will be consistent from round to round. Case neck tension variability will increase group size.
After the brass comes out of the polisher, I inspect each one to make sure there are not bits of the polishing media stuck in the primer hole. I’ve never tested to determine if this would interfere with the round firing or if it would cause a flyer, but it’s not the sort of thing that would help.
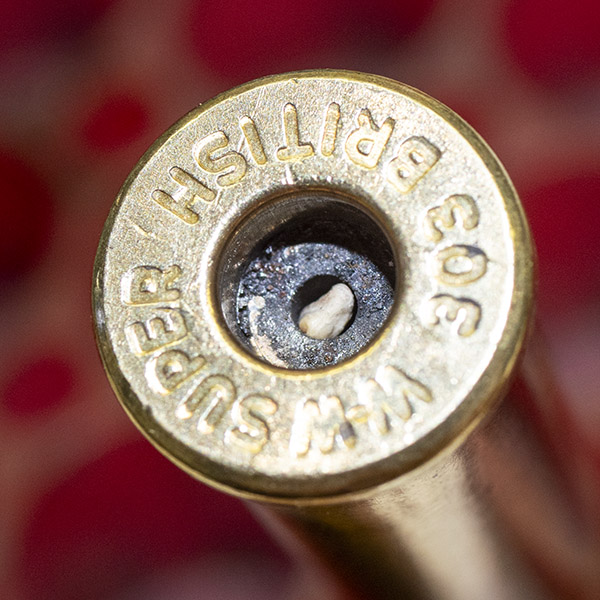
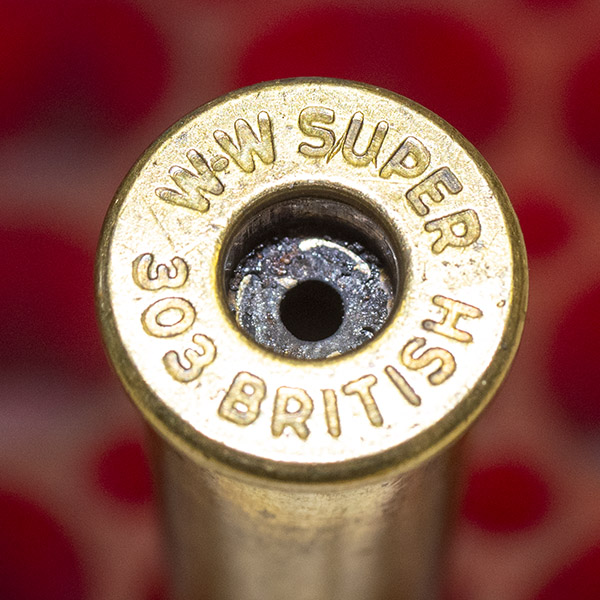
A primer hole with a bit of media stuck in it. Usually about 10% of the cases have media stuck in the primer hole after polishing. I push it out with a dental pick.A cartridge case with a clean primer hole (i.e., with no media stuck in the primer hole).
When all the cases are completely free of media and all the primer holes are clear, I’ll set them in a reloading tray, as you see below.
Twenty polished cases ready to be primed.
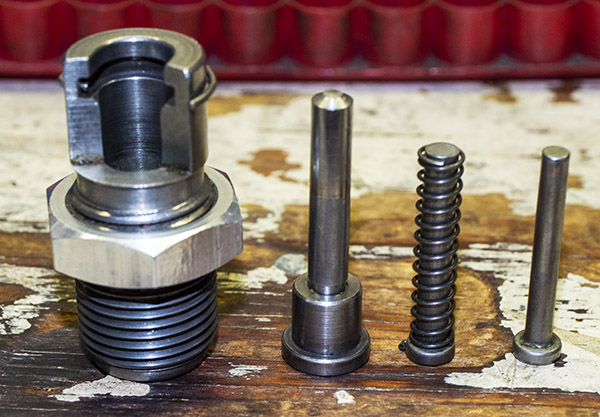
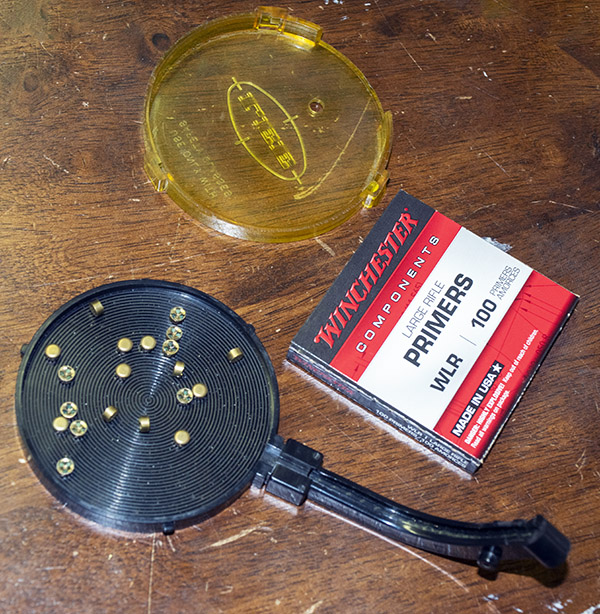
Next, I’ll prime the brass. There are a lot of tools available to do this. I use a Lee Auto Prime, an item that I bought a good 50 years ago. Remember that I mentioned that Lee gear is good? Lee no longer makes this item (I can’t tell you why) but they do have other priming devices available today. For me, this one just keeps on working, and I like how it works. It consists of three groups of parts: The primer tray and feed system, the case holder/primer seater assembly (it installs above the reloading press), and the ram that installs on the press ram.
An old Lee Auto Prime, still in its original box. The two feed chutes on either side of the primer tray are used for either large or small primers. The primer seating assembly components are in the plastic container at the photo’s bottom.Lee Auto Prime components. From left to right: The die body, the priming ram, the two primer rods (one for small primers, the other for large primers), and the spring. The spring goes over priming rod selected for use (as shown here, the large primer rod). The priming ram is installed on the reloading press’s ram where the shell holder would normally be. One of the priming rods, with a spring over it, goes into the die body (see photo below).
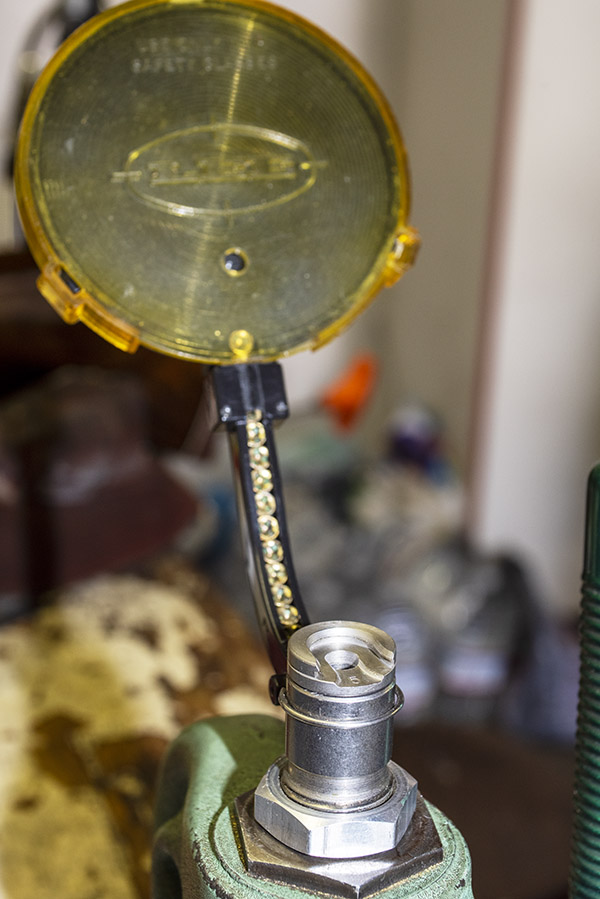
I install the case holder/primer seater assembly on top of the ram, then I remove the shell holder on the reloading press ram and install the primer ram on top of the ram, and then I load the primer tray and feed chute.
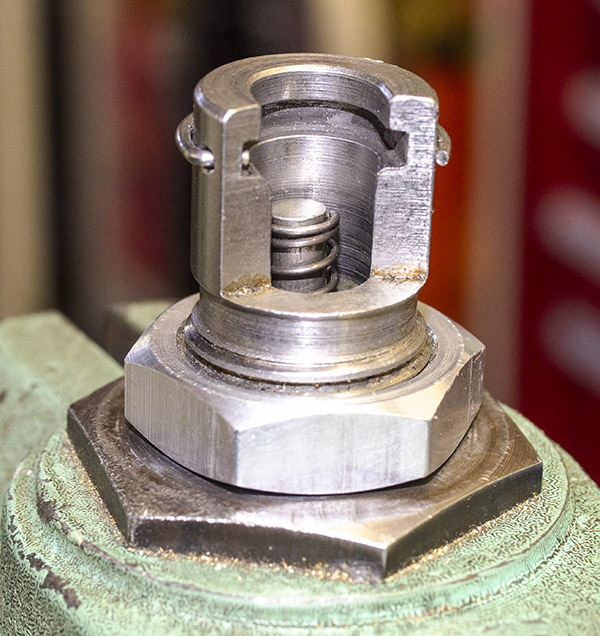
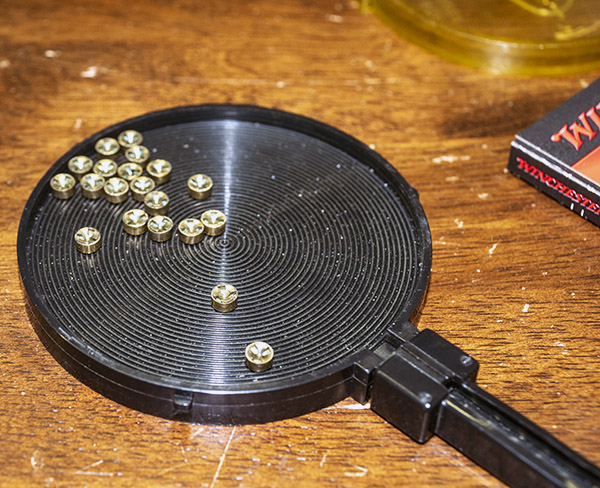
The Lee Auto Prime die body installed in the reloading press, with the priming rod and spring in place. The primer chute will go over the priming rod and spring, and the shell holder snaps into the die body over the priming rod and spring.The Auto Prime ram installed on the reloading press ram. It fits into the ram where the shell holder is normally installed.The primer chute installed on the primer tray, with 20 primers dropped onto the tray. Note that some primers are facing up, some are facing down, and some are on their sides.The tiny concentric ridges in the primer tray help to flip all primers such that they face up. By gently shaking the tray from side to side, all primers orient themselves to face up. If you shake too aggressively, you’ll drop some of the primers out of the tray. It sounds more complicated than it actually is, and after doing it once, you’ll get a feel for how much “shake” is needed.After getting all the primers into a face up orientation, I put the primer tray cover on the primer tray, and then use a toothpick or the previously-mentioned dental pick to obstruct the primer chute at the primer tray. Then, I’ll place the bottom end of the primer chute in the die body. Finally, I’ll slide the shell holder into the die body and remove the obstruction from the primer tray. The primers will slide down into the chute and the first primer will be in position over the priming rod.
Once the above is complete, I prime each case. I insert each case into the shell holder, and then gently run the press’s ram up. Doing so seats the primer. The beauty of this approach is you can feel each primer being seated, and the power of the ram makes sure each primer is fully seated. When the case is primed, I remove it and the primers in the chute slide down, forcing a new primer into position above the priming rod. I’ll repeat the process until all the cases have their primers seated.
Primed cases, ready to continue the reloading process.
After the above is complete, I’ll have a tray full of cases ready to be charged with propellant. We’ll cover that in Part 3.
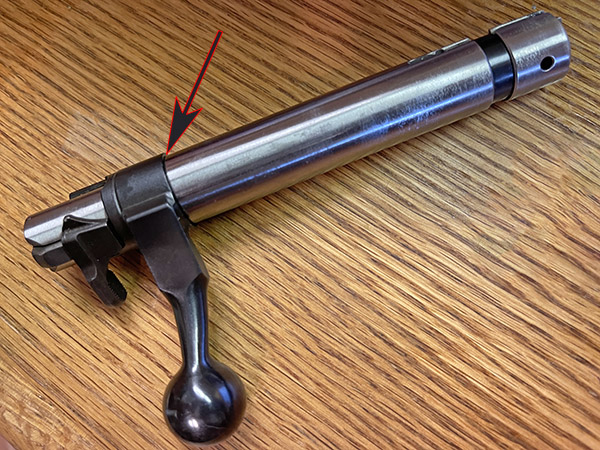
One of my favorite rifles is the Enfield No. 4 Mark 2, a bolt action rifle just dripping with history and charisma. The No. 4 Mark 2 was the last in the Enfield rifle series, with a run of 59,000 produced by Britain’s Fazakerly armory for Ireland in the 1950s. It was the last Enfield in a long line of continuously improved rifle designs, and it includes a much-improved trigger design. Most of these Irish rifles were never issued and many were sold in their unfired, cosmoline-laden condition. Mine comes from that group. It’s the one in which I tested the reloaded ammo featured in this blog series.
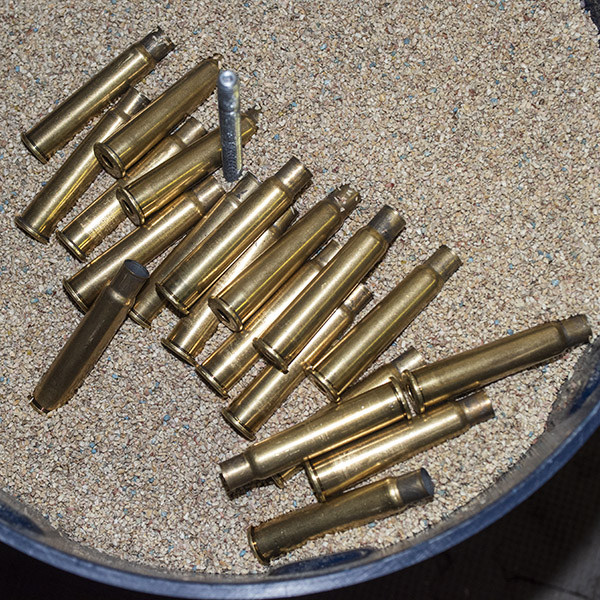
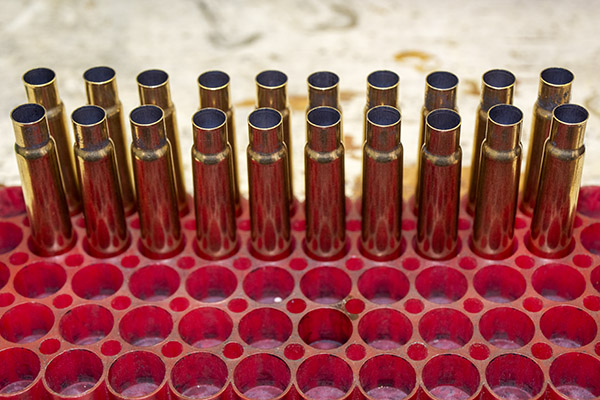
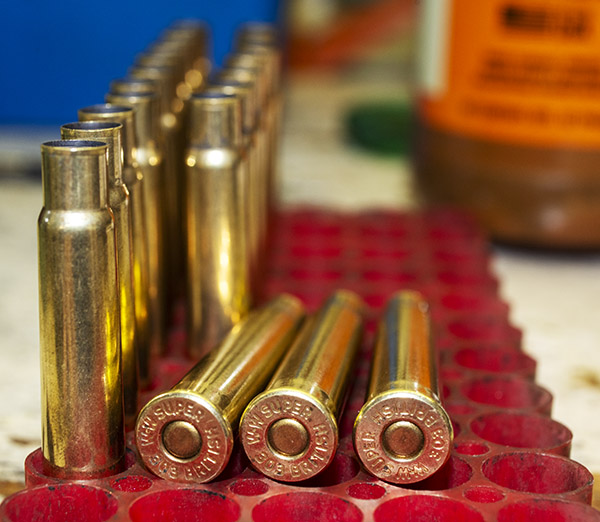
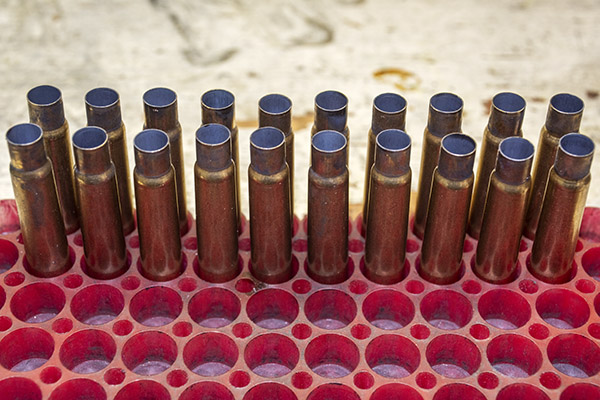
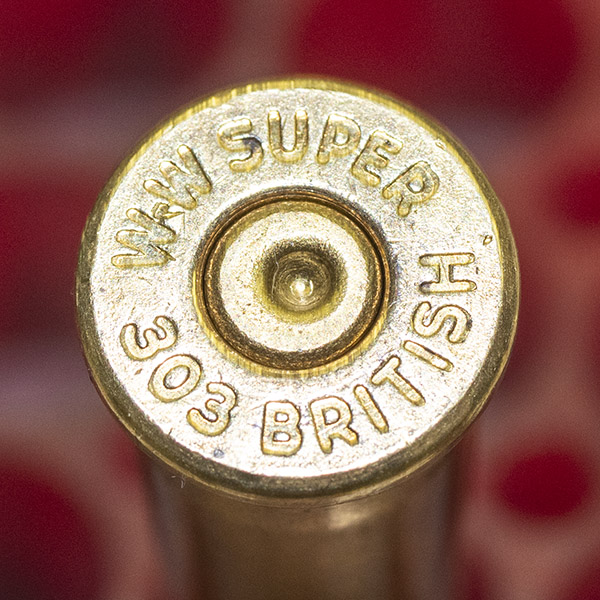
Once-fired .303 British cartridge cases. They almost look like scaled-down .375 H&H cases.A close-up view of the .303 British case after firing. These cartridge cases are ready for the reloading process.The headstamp. These are Winchester cases. Note the spent and indented primer, which will be removed in the case resizing process.
I have a stash of once-fired .303 British brass acquired from generous friends over the years. I will reload them with 200-grain cast bullets made by good buddy Roy Hursman, sized to 0.313 inches, which I also use in my Modelo 1909 Argentine Mauser and Mosin-Nagant rifle. I thought they might work well in the Enfield (and they did; I’ll tell you a bit about that here and provide much more detail in Part 3 of this series).
The cast lead bullets I load in my .303 British ammo. These weigh 200 grains. They have been lubed (the red grease in the lube grooves), gas checked (the copper cap on the base), and swaged down to 0.313 inches. They work great in the 7.65 Belgian Mauser, 7.62x54R Russian, and .303 British cartridges.
What I didn’t have in my shop was a set of dies in .303 British. I naturally turned to Lee Precision. I believe in Lee reloading equipment. I have their dies for the .22 Hornet, .22 250, .243 Winchester, 6.5 Creedmoor, .30 Carbine, .30 40 Krag, .300 H&H, .300 Weatherby, .38 Special/.357 Magnum, .44 Special/.44 Magnum, .45 ACP, .45 Colt, and probably a few others I can’t remember as I type this blog. I also use other Lee reloading equipment. I think their Classic Turret Press is the best reloading press of its type for loading handgun cartridges. The bottom line here is that I’ve never been disappointed with Lee products, and I say that as a guy who has been using Lee gear for 50 years.
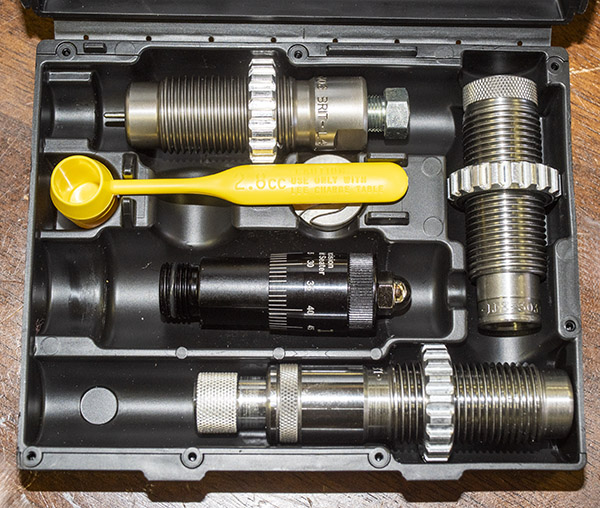
I ordered Lee’s Ultimate 4-die set, and what I received surprised me. I received the four dies (which I expected) and a micrometer bullet seating attachment (which I did not). Each Lee die set also includes a little packet of case lube for the resizing operation (it’s not shown in the photos below). It’s a nice touch; Lee basically gives you everything but the reloading press and the components (bullets, brass, primers, and powder) to load a specific cartridge with each of their die sets.
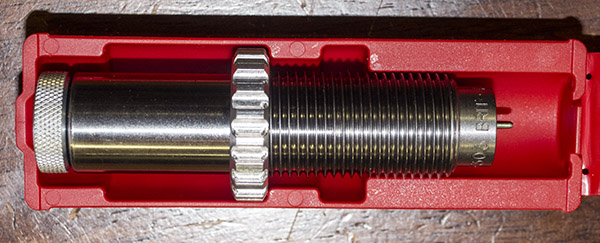
The Lee ULee Ultimate 4-Die set includes four dies normally included in a single box. My set included a micrometer bullet seating attachment not evaluated in this blog series (although I will evaluate it in a future blog). The fourth die (the collet die) was provided in a separate container (see below). In the photo above, we have the full-length resizing die (top), the bullet seating die (bottom), the factory crimp die (right), the micrometer bullet seating feature, the shell holder, and a measuring cup (not used by me). Lee also provides a small pack of case lube (not shown here).The Lee collet neck sizing die, used in lieu of the full-length resizing die to neck size the brass case.
I won’t get into the micrometer bullet seater in this three-part .303 British Lee die set review (that review will occur down the road a bit).
The Lee Ultimate 4-die set includes two resizing dies (a full-length resizing die, and a collet die for neck sizing only), a bullet seating die (that also includes a roll crimping feature), and a separate crimping die for applying what Lee calls a factory crimp. The die set also includes a shell holder (a nice touch, as other manufacturer’s die sets do not) and a powder scoop. I’ve never used the powder scoop; I use a more precise powder dispenser.
The once-fired brass I had on had was good stuff. It was in the original factory boxes and it was in good shape. Because the rifles it had been fired in previously were not my Enfield, I knew I would have to full length resize the brass first to return each case to factory dimensions. To do that, I mounted the Lee shellholder in my press, ran the press all the way up, and then installed the full-length resizing die, screwing it down in the press until it contacted the shell holder. I then retracted the press ram, turned the die another 1/8 of a turn into the press, and locked the die in place with its locking ring.
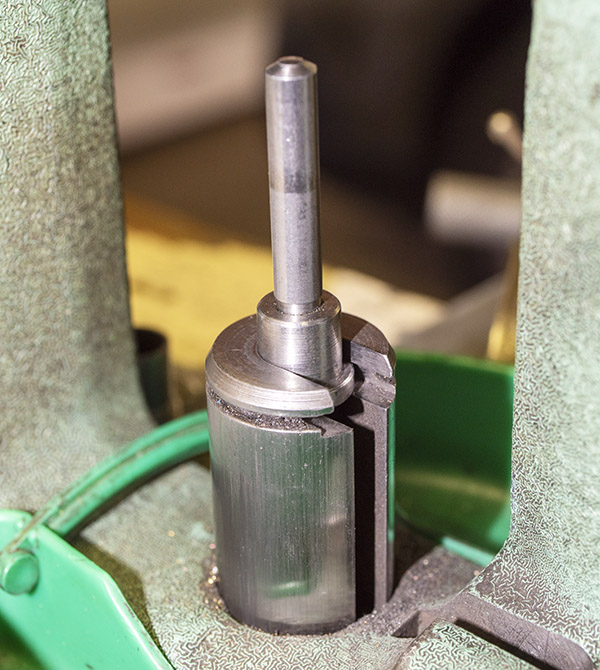
The Lee .303 British shell holder installed in my reloading press. It snaps into place. Dies and shell holders are typically interchangeable between reloading press and die manufacturers. I use a single-stage RCBS Rockchucker reloading press; Lee dies and shell holders fit it perfectly.Lee’s full-length resizing die installed in the press. This die simultaneously resizes a fired case to factory specification and punches out the spent primer. Note the locking ring on the die body.The business end of the Lee full-length resizing die after resizing a bunch of cases. This photo shows the decapping pin, which removes the old primer.
I lubed each case with the lube Lee provided and ran it through the full-length resizing die, which simultaneously brought the cases back to factory dimensions and removed each case’s spent primer. The full-length resizing dies does both steps in one operation.
I intended using cast bullets in the .303 Enfield, so for me the reloading process included an additional step: Flaring the case mouth. Case mouth flaring allows cast bullets to enter the cartridge case without the case shaving any lead from the bullet. To flare the case mouths, I use a Lee universal flaring tool I purchased decades ago. It’s a clever die set that uses a cone to impart a slight bellmouth to the case.
Lee’s Universal Case Mouth Expander. I bought this in the 1970s and I’m still using it.The Lee Universal Case Mouth Expander disassembled. The amount the case mouth is flared is determined by how far the die body is screwed into the reloading press, and by how far the adjuster (top item in this photo) is screwed into the die body. The cone (shown in the middle of this photo) is what flares the case mouth. Lee provides two cones; one of small-to-medium calibers (shown here), and one for larger calibers (not shown here).When empty cartridge cases are run into the Lee Universal Case Mouth Expander) it imparts a slight flare to the case mouth. If you do it right, you can barely see the flare (as is the case for the case shown here) and the bullet enters the case with no lead shaving.
The approach to case mouth flaring is to install the Lee Universal Case Mouth Expander in the press and adjust it to impart just enough flare to allow the bullet’s base to enter the case. You don’t need much flare (less is more here; too much will work harden the brass unnecessarily). I’ll jump ahead a bit and mention here that if you can find that happy spot where you flare the case mouth just enough to allow the bullet to enter the case, you won’t have to crimp the case mouth later to eliminate the flare.
A perfectly-flared case mouth, with just enough flare to allow a bullet to start into the case without shaving any lead.
After completing the above full-length resizing and flaring, I reloaded 20 rounds (like you see in the photo at the top of this blog). Then I did what I always do: I labeled the box of reloaded ammo. After that, I fired the reloaded ammo in my Enfield.
I’m not going to cover the rest of the reloading process in Part 1 of this series, but I will in Parts 2 and 3. I’m jumping ahead here by mentioning firing the full-length resized ammo because I wanted brass that had been fired in my rifle. Ammo fired in my rifle would be perfectly formed to my rifle’s chamber, which is minutely different than other rifles’ chambers. That’s because of rifle chamber dimensioning tolerances. The once-fired brass I had was fired in other rifles, so I needed to shoot it in my rifle so the cases conformed to my chamber.
How did the full-length resized .303 ammo shoot? Very well, thank you. Take a look.
This was the first time I had fired this ammo in my rifle, so I needed to dial it in. The first three rounds went low at 50 yards (the nice tight group at about 5:30 on the outer edge of the 6-ring), so I ran the Enfield’s ladder aperture sight up. Oops, too much, which resulted in the group high in the 6-ring. I went down half the distance on the rear aperture, and the next three rounds were just above the bullseye. Down a click or two more, and the rifle was on the money. In case you were wondering, I used 21.0 grains of IMR 4227 and a Winchester large primer (but more on the load in Part 2 of this series).
Having fired my full-length resized ammo in my Enfield, the fired brass could now be neck sized instead of full-length resized. The idea behind neck sizing is that the clearance between the chamber and the brass case is greatly reduced by neck sizing (as opposed to full-length resizing), and theoretically, neck sizing should result in increased accuracy because the case won’t be rattling around in the chamber. There are a couple of another advantages to neck sizing, too. One is that it works the brass less, so it should last longer. A third advantage is that you don’t have to lube and then clean the cases. They can be neck sized without using lubricant. I’ll say more on that in a moment. Not having to lube (and then cleaning the lube from the cases) greatly speeds up the reloading process.
Now that I had brass cases that had been fired in my rifle, I installed and adjusted the Lee collet die in my press. The collet die performs two operations. It has a decapping pin that punches out the spent primer, and it has a set of four collets that compress the case neck around a spindle to bring it back to new brass factory dimensions (that’s the neck sizing operation). You can adjust the die’s depth in the press to adjust the final inside diameter of the case neck, which is a very useful feature to have. Ideally, the resized case neck inside diameter should only be 0.001 to 0.002 inch smaller than the bullet diameter. That amount of case neck inside diameter undersizing will allow the case the grip the bullet firmly so that it won’t push into or pull out of the case. You could make it tighter and still seat the bullet, but doing so would expand the case mouth more with the bullet’s insertion, and that is not desirable. It would distort the case and possibly introduce non-concentricity or angular misalignment between the bullet and the case, and that would hurt accuracy.
The Lee collet die installed in my RCBS Rockchucker press. This die will neck size the case instead of full-length resizing it.A .303 case entering the Lee Collet Die. By adjusting the depth to which the Collet Die is screwed into the press, you can control the neck-sized-only cases’ neck diameters. I adjusted the die to provide a 0.312 neck inside diameter, which gives 0.001-inch interference between the bullet and the case neck.
After completing the die seating depth adjustment, I had the case mouth diameter exactly where I wanted it: 0.312 inches. My cast bullets were at 0.313 inches, so I was good to go.
Not the world’s best photo (mea culpa). Parallax makes the inside diameter in this photo look like 0.313 inches; it was actually reading 0.312 inches. That’s what I wanted.
Next up will be our Part 2 of the Lee .303 British Ultimate 4-Die set review. Stay tuned.
So far, I am very impressed with this set of Lee dies. I’m not surprised, though. As I mentioned earlier, I’ve been using Lee equipment for decades, and it has always pegged the needle on my quality meter. These dies are good at any price. The fact that they cost less than any of the competitors’ products is a huge plus.
People reload ammunition for different reasons. It used to be you could save money by reloading, and I suppose for the more exotic cartridges (any Weatherby ammo, the big elephant rounds like .458 Win Mag, the .416 Rigby, etc.) that’s still the case. It’s not the case for the more common rounds like 9mm, .45 ACP, and .223 Remington; bulk ammo for those is so inexpensive you’d be hard pressed to reload for as little as that ammo costs. Sometimes people reload because factory ammo is no longer available or it’s very tough to find. But most of us reload for accuracy. We can experiment with different combinations of components and tailor a combo to a particular firearm to find the sweet spot…that combination of components that provides the tightest groups. I’m in that category; it’s why I reload.
When I’m testing for accuracy and I get a tight group, I always wonder: Is it because of the combination of components, or is it just a random event? Usually, if the group size is repeatable, we conclude that it is the component combination, and not just a random good group that results from all the planets coming into alignment. But is there a better way? You know, one that shows with more certainty that it’s the component combination, and not just a fluke?
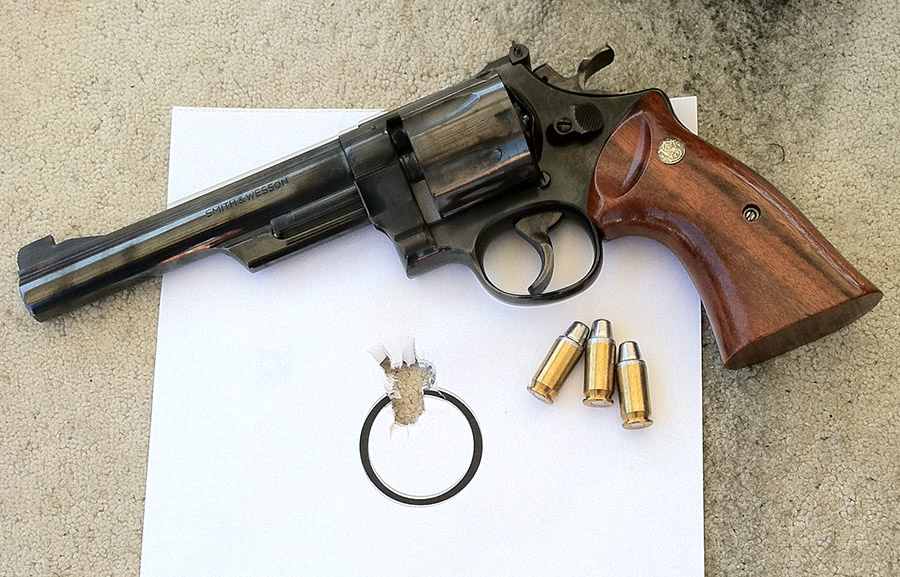
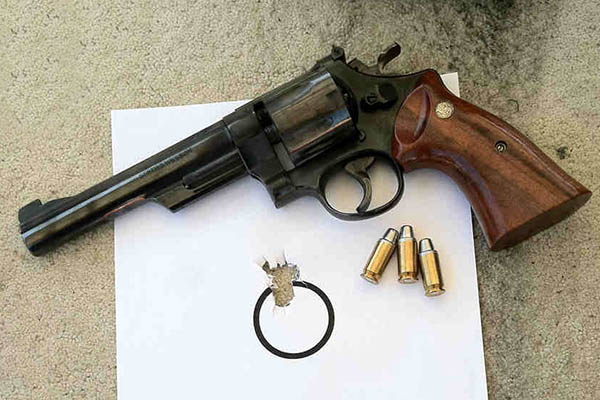
This article is a bit different. It’s not just a story about a gun or about reloading ammunition. It includes those things, but it’s more. This story is about applying the Taguchi design of experiments technique to .45 ACP load development for ammo to be used in a Smith and Wesson Model 25 revolver (the one you see in the photo above).
I’m guessing you probably never heard of Taguchi. That’s okay; most folks have not. Taguchi testing is a statistical design of experiments approach that allows evaluating the impact of several variables simultaneously while minimizing sample size. The technique is often used in engineering development activities, and I used it regularly when I was in the aerospace world. The technique was pioneered by Genichi Taguchi in Japan after World War II, and made its way to the US in the mid-1980s. I used the Taguchi technique when I ran engineering and manufacturing groups in Aerojet Ordnance (a munitions developer and manufacturer) and Sargent Fletcher Company (a fuel tank and aerial refueling company).
Taguchi testing is a powerful technique because it allows identifying which variables are significant and which are not. Engineers are interested in both. It lets you know which variables you need to control tightly during production (that is, which tolerances have to be tight), and it identifies the others that are not so critical. Both are good things to know. If we know which variables are significant and where they need to be, we can change nominal values, tighten tolerances, and maybe do other things to achieve a desired output. If we know which variables are not significant, it means they require less control. We can loosen tolerances on these variables, and most of the time, that means costs go down.
Like I said above, I used Taguchi testing in an engineering and manufacturing environment with great success. The Taguchi approach did great things for us. When I worked in the cluster bomb business, it allowed us to get the reliability of our munitions close to 100%. When I worked in a company that designed and manufactured aerial refueling equipment (think the refueling scene in the movie, Top Gun), it helped us to identify and control factors influencing filament-wound F-18 drop tanks. In that same company, it helped us fix a 20-year-old reliability problem on a guillotine system designed to cut and clamp aerial refueling hoses if failures elsewhere in the refueling system prevented rewinding the hose. You don’t want to land in an airplane trailing a hose filled with JP4 jet fuel. Good stuff, Taguchi testing is.
As you know from reading our other Tales of the Gun stories, the idea in reloading is to find the secret sauce…the perfect recipe of bullet weight, propellant, brass case manufacturer, and more, to find the best accuracy for a given firearm. Hey, I thought…I could apply the Taguchi technique to this challenge.
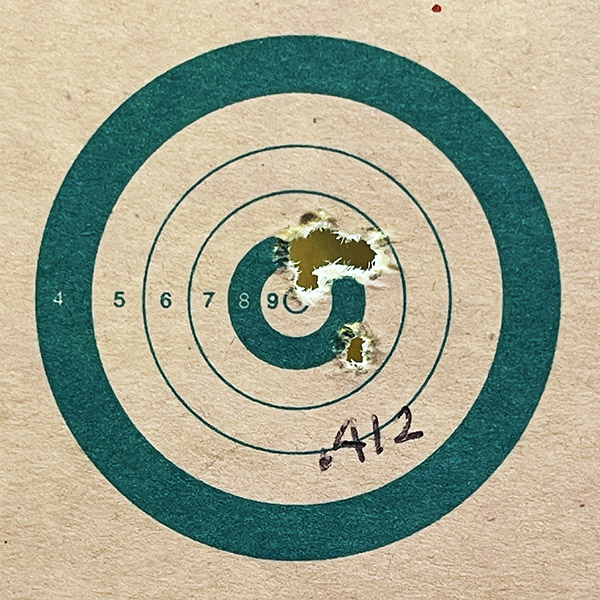
When you do a Taguchi experiment, you need to define a quantifiable output variable, and you need to identify the factors that might influence it. The output variable here is obvious: It’s group size on the target. The input variables are obvious, too. They would include propellant type, propellant charge, primer type, bullet weight, brass type, bullet seating depth, and bullet crimp. We’re trying to find which of these factors provides the best accuracy. I wanted to turn my Model 25 Smith and Wesson into a hand-held tack driver.
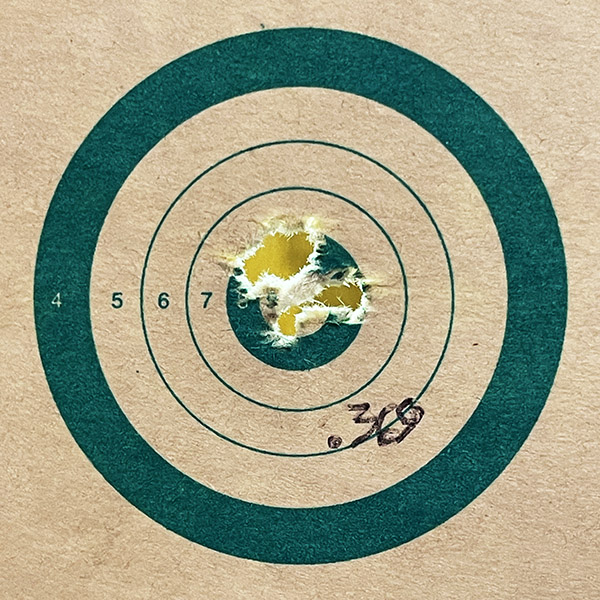
The Model 25 is an N-frame Smith and Wesson revolver chambered for the .45 ACP pistol cartridge. It is a superbly accurate handgun, as attested to by the target above.
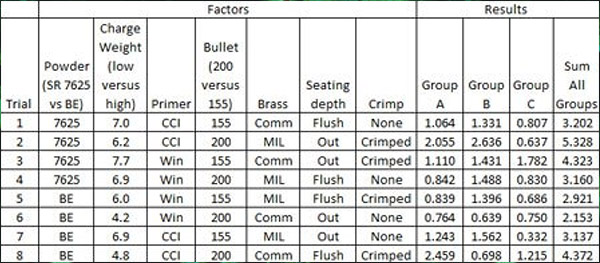
When Taguchi developed his testing approach, he made it simple for his followers. One of the things he did was define a simple test matrix, which he called an L8 orthogonal array. It sounds complicated, but it’s not. It just means you can evaluate up to seven different input variables with each at two different levels. That’s a bit complicated, but understanding it is a little easier if you see an example. Here’s what the standard Taguchi L8 orthogonal array (along with the results) looked like for my Model 25 load development testing:
As the above table shows, three sets of data were collected. I tested each load configuration three times (Groups A, B, and C), and I measured the group size of each 3-shot group. Those group sizes became the output variables.
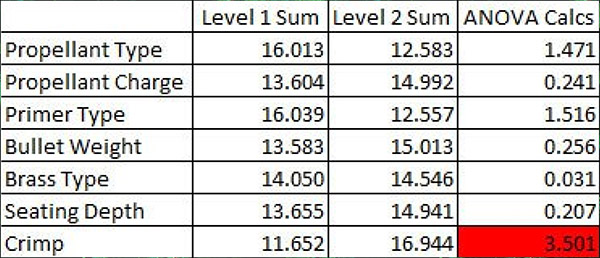
The next step involved taking the above data and doing a standard Taguchi ANOVA (that’s an acronym for analysis of variance). ANOVA is the statistical method used for evaluating the output data (in our case, the group sizes) to assess which of the above input variables most influenced accuracy. That’s a complex set of calcs greatly simplified by using Excel. The idea here is to find the factor with the largest ANOVA result. You see, any time you measure a set of results, there’s going to be variation in the results. Where it gets complicated is the variation can be due to randomness (the variation in the results that would occur if you left all of the inputs the same). Or, the variation can be due to something we changed. We want to know if the differences are due to something we did (like changing or adjusting a component) or if they are due to randomness alone. I cranked through the ANOVA calcs with Excel, and here’s what I obtained…
The above results suggest that crimping (squeezing the bullet by slightly deforming the case mouth inward) has the greatest effect on accuracy (it had the largest ANOVA calculated result). The results suggest that cartridges with no crimp are more accurate than rounds with the bullet crimped. But it’s a suggestion only; it doesn’t mean it’s true. The next step is to evaluate if the differences are statistically significant, and doing that requires the next step in the ANOVA process. This gets really complicated (hey, I’m an engineer), but the bottom line is that we’re going to calculate a number called the f-ratio, and then compare our calculated f-ratio to a reference f-ratio. If the calculated f-ratio (the one based on the test results above) exceeds the reference f-ratio, it means that crimping versus no crimping makes a statistically significant difference in accuracy. If it not not exceed the reference f-ratio, it means the difference is due to randomness. Using Excel’s data analysis feature (the f-test for two samples, for you engineers out there) on the crimp-vs-no-crimp results shows the following:
Since the calculated f-ratio (3.817) does not exceed the critical f-ratio (5.391), I could not conclude that the findings are statistically significant. What that means is that the difference in accuracy for the crimped versus uncrimped rounds is due to randomness alone.
Whew! So what does all the above mean?
All right, here we go. This particular revolver shot all of the loads extremely well. Many of the groups (all fired at a range of 50 feet) were well under an inch. Operator error (i.e., inaccuracies resulting from my unsteadiness) overpowered any of the factors evaluated in this experiment. In other words, my unsteadiness was making a far bigger difference than any change in the reloading recipe.
Although the test shows that accuracy results were not significantly different, this is good information to know. What it means is that all of the test loads (the different reloading recipes) are reasonably accurate. If I had used a machine rest, I might have seen a statistically significant difference. Stated differently, the test told me that I needed to use a machine rest with this gun to see which load parameters were really playing a role in accuracy. Without it, my flaky shooting skills (or as the statisticians like to say, my randomness) overpowered any accuracy gains to be realized by playing with component factors.
That said, though, I like that 4.2 grains of Bullseye load with the 200 grain semi-wadcutter bullet, and it’s what I load for my Model 25. But I now know…the gun shoots any of these loads well, and crimping versus no crimping doesn’t really make a difference.
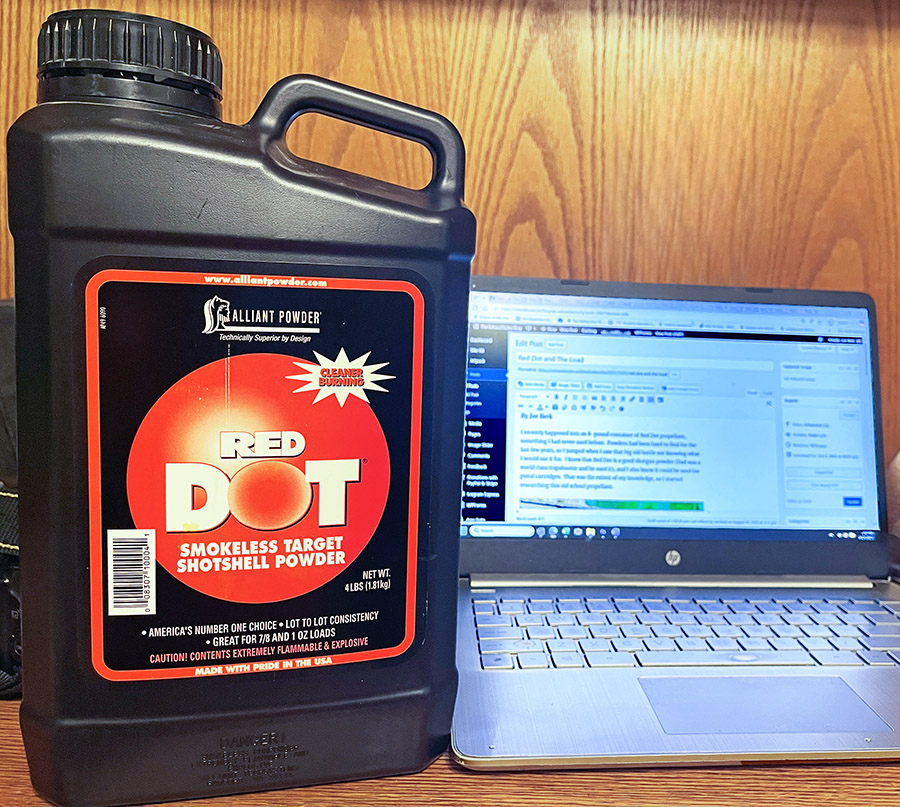
I recently happened into an 8-pound container of Red Dot propellant, something I had never used before. Powders had been hard to find for the last few years, so I jumped when I saw the Red Dot (not knowing what I would use it for). I knew that Red Dot is a good shotgun powder (Dad was a world class trapshooter and he used it), and I also knew it could be used for pistol cartridges. That was the extent of my knowledge, so I started researching this old school propellant.
Red Dot propellant. My cell phone camera and fluorescent lighting would have you thinking this powder should be named “Purple Dot,” but trust me, the flakes that appear to be purple in the above photo are really bright red.
What I learned about Red Dot was interesting. The Hercules powder company first released Red Dot in 1932, and it was primarily intended to be a shotshell powder for trap and skeet shooters. It’s a flake powder and it’s distinguishable by the red-dyed flakes mixed in with the black ones. It’s been updated at least a couple of times (one of the updates was to make it burn cleaner), but its kept its place as a relatively fast powder with a burn rate just slightly slower than Bullseye. For that reason, it also makes a great pistol powder, and most load manuals include recipes for practically everything from .25 ACP up to .45 Colt. I’m going to try it in .38 Special and .45 ACP, and maybe .44 Special. I think I can use it my old Star reloader, which is set up to throw 2.7 grains of Bullseye. I’ll check that out at some point in the future.
It turns out that among rifle cast bullet shooters (a space I inhabit), Red Dot is a preferred powder, so much so that 13.0 grains of it is informally (and apparently widely) known simply as “The Load.” The conventional wisdom is that 13.0 grains of Red Dot behind any cast bullet in any .30 caliber rifle (.308, .30 06, 7.62×54 Russian, 7.65 Belgian, .303 British, and more), the .375 H&H, and the .45 70 is a reliable and accurate load. With my 8-pound bottle of Red Dot and “The Load” (i..e, 13.0 grains of Red Dot), I should be good for something north of 4,307 rounds. That should keep me busy for a while. I’ll be playing with cast loads using “The Load” in a Mosin-Nagant, a Springfield 1903, a Modelo 1909 Argentinean Mauser, and probably the .45 70. When I do, I’ll share the results here.
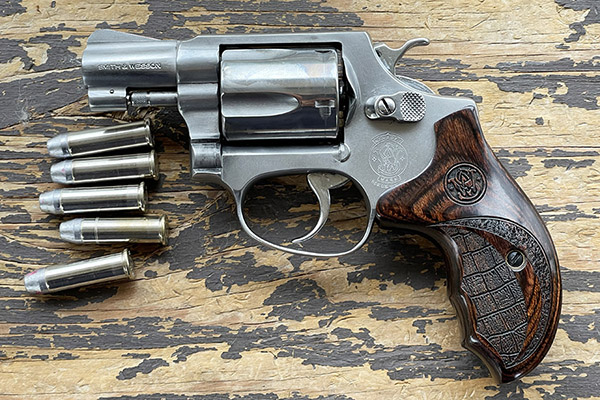
I should have known better. Before I tried good buddy Lance’s bolt shims (at TriggerShims.com), I was a bit skeptical even though another of Lance’s products had worked (and is still working) very well for me. I installed Lance’s cylinder shims on my Model 60 Smith and Wesson revolver a few years ago and they solved a lot of ills, including excess cylinder gap, difficulty in opening the cylinder, velocity loss, and double action misfires. The Model 60 is completely reliable now (I’ll include a link to that story at the end of this blog).
The above notwithstanding, though, I was still skeptical about bolt shims. I didn’t understand the concept of rimfire rifle bolt shimming, and that fueled my cynicism. I mean, on a bolt action rifle, what is there to shim?
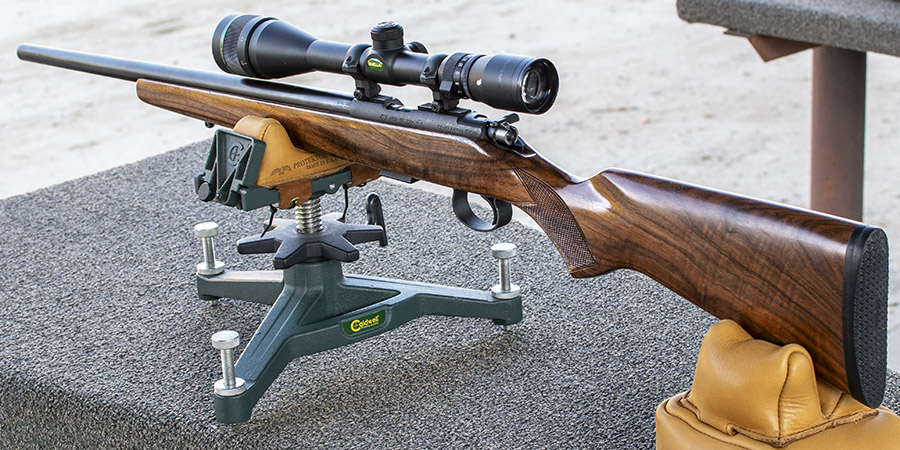
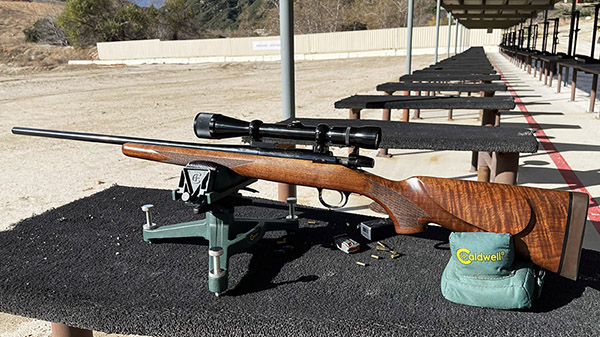
I called Lance at TriggerShims and spoke with him. Lance said his customers tell him bolt shims work, but I wouldn’t know until I tried them. I was up for it. I had two rimfire rifles I felt should be more accurate: A Remington Custom Shop Model 504 and a CZ 452 Varmint model. The CZ would shoot moderately well off and on (it wasn’t consistent); the Remington was a major disappointment from the day I bought it. It was expensive and for something coming from Remington’s Custom Shop, I expected a lot more. The Custom Shop 504 rifle is beautiful, its walnut stock is fabulous, but its groups were poor.
The Concept
When you get a set of bolt shims from Lance, you get five in varying thicknesses. The shims are color coded so you don’t have to guess at what they are or measure them. The package looks like you see below.
A pack of TriggerShims’ bolt shims. Note the color coding on the shims. Five shims come in a package; the fifth one from the envelope you see above now resides in my Remington Model 504.
How Bolt Shims Work
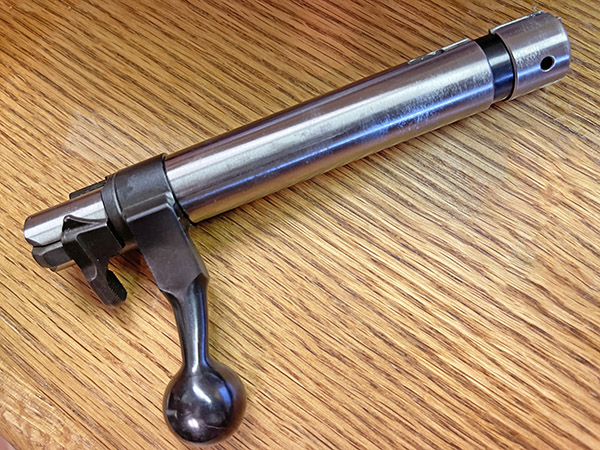
Most rimfire bolt action rifles’ bolts are different than centerfire bolts. On a centerfire bolt, the bolt locks into the receiver at the front of the bolt. On most rimfire bolt action rifles, the bolt locks into the receiver at the bolt handle, the forward portion of the bolt extends forward to meet the rifle’s breech, and the bolt’s locking lug is integral to the bolt handle. Typically (as is the case on my CZ 452 and Remington 504), the forward portion of the bolt is actually two separate and concentric cylinders, with the forward part of the bolt able to move forward on the inner cylinder (i.e., closer to the chamber) if it is shimmed to do. You can see it in my Model 452 CZ bolt in the photos below.
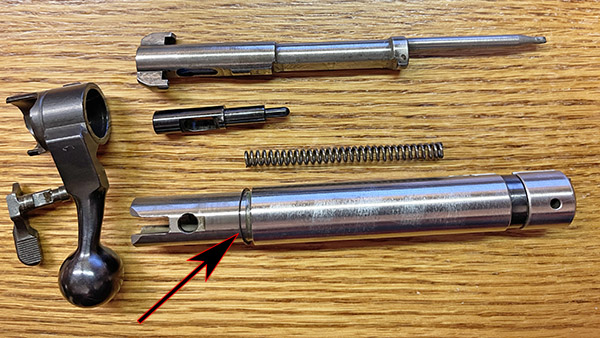
The CZ 452 bolt.The CZ 452 bolt disassembled. The arrow points to the 0.002-inch TriggerShims shim placed on the bolt shank.
Now consider headspace, the amount of clearance between the cartridge base and the bolt face. If there’s too much headspace, case separations can result when the brass case stretches during firing. Not enough headspace, and you can’t close the bolt. You might wonder: Why not simply have line-to-line contact in the chamber between the cartridge and the chamber, with zero headspace when the bolt is closed? That could work if you always shot with cartridge cases from the same manufacturer, there was no variation in the cartridge cases, there was no variability from rifle to rifle, you always fired your weapon at the same ambient temperature, and you always let it cool completely between shots. These qualifiers are unrealistic, so rifle manufacturers add clearance (i.e., headspace) so that the bolt can always close on any rifle they manufacture when using any kind of ammo meeting the cartridge’s external dimensional specifications at any reasonable temperature.
On a centerfire bolt action rifle, we can use tricks like neck sizing the case (instead of full length resizing the case) so that if that case was previously fired in the same rifle, a reloaded cartridge will have much less clearance between the cartridge case, the bolt face, and the chamber walls. This often works with a centerfire cartridge if, when reloading the cartridge, we only resize the case neck (that’s called neck sizing). Sometimes it’s an easy way to shrink groups (i.e., to make your reloaded ammo more accurate).
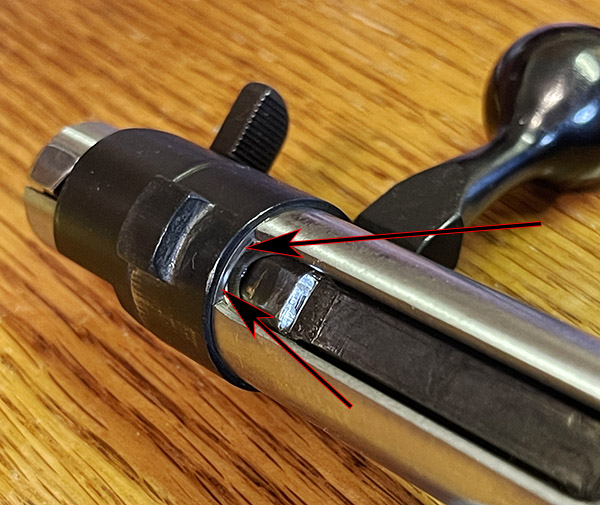
We don’t reload .22 ammo, though. So what can we do to eliminate unnecessary headspace? That’s where TriggerShims’ bolt shims enter the picture. The idea is that instead of increasing the length of the brass case to eliminate unnecessary headspace, we push the bolt face forward (toward the rifles’ chamber) to shrink the headspace. In the photo above, you can see where the TriggerShims bolt shim fits between the bolt handle and the bolt’s outer cylinder. When the bolt is assembled with the bolt shim installed, it looks like this:
The arrow points to the bolt shim. It pushes the bolt face forward 0.002 inches.The bolt shim is visible from the bolt underside. Because the bolt locks with a lug on the bolt handle casting, the forward portion of the bolt sits further forward when the bolt shim is installed.
The package from TriggerShims contains five shims of different thicknesses, color coded by thickness. Lance doesn’t know how much shimming your bolt might need, and initially you don’t either. One approach is to go at this question as you would when developing a load for a centerfire rifle; i.e., trying different powders, powder charges, etc., except the sole independent variable is shim thickness. Here, the questions are how much excess headspace is there in your rifle, and how much should you remove to optimize accuracy?
The best approach to answering the above questions is to take the shims to the range, and with your preferred ammo, shoot groups with no shims, the 0.0015-inch shim, the 0.002-inch shim, the 0.003-inch shim, the 0.004-inch shim, and the 0.005-inch shim, and then select the shim that provides the greatest accuracy. Theoretically, if you switched ammo brands, you could repeat the process and find the best shim for the new ammo. It’s very clever.
Me? I’m lazy. I watched a bunch of YouTube videos describing the above and I decided I didn’t want to disassemble and then reassemble my bolt at the range, so I simply installed the 0.002-inch shim on both my CZ 452 Varmint and my Remington Custom Shop Model 504. (The Model 504 bolt shim installation is very similar to how it’s done on the CZ.)
The Results
Does it work? In a word, yes. I wouldn’t have believed it without trying it myself. I’m here to tell you the results are nothing short of amazing.
Remington Model 504
As I mentioned at the start of this blog, my Model 504 was a real disappointment. Yeah, it’s beautiful, with deep, lustrous bluing and gorgeous walnut.
My Custom Shop Model 504. It sure is pretty.
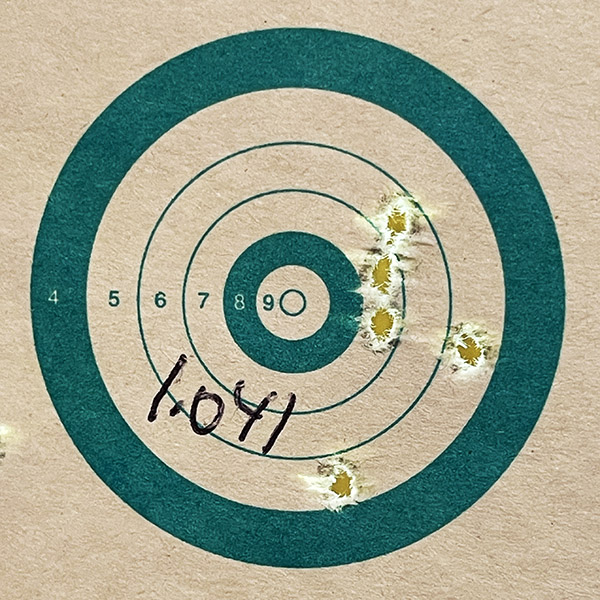
But the Model 504 didn’t group well with any ammo. That was a surprise, partly because of the rifle’s price, partly because of the Remington Custom Shop’s reputation for stellar performance, and partly because the rifle was glass bedded from the Custom Shop. I did my online research (ass backwards, as usual, after I bought the rifle) and I learned that Model 504s are known for lousy accuracy. I tried screwing around with relieving the bedding where it interfered with the barrel attaching screw, I tried different action screw torques, and I tried different ammo. Nothing worked. I thought I had been stuck with a beautiful rifle that was essentially a paperweight. Here are a couple of typical groups from the Model 504 at 50 yards with Eley Target ammo (which is good stuff) before I installed the bolt shim.
A Model 504 typical pre-bolt-shim-installation 5-shot group at 50 yards.Another pre-bolt-installation group at 50 yards from the Model 504. Before installing the bolt shim, I would have considered this a good group from this rifle.
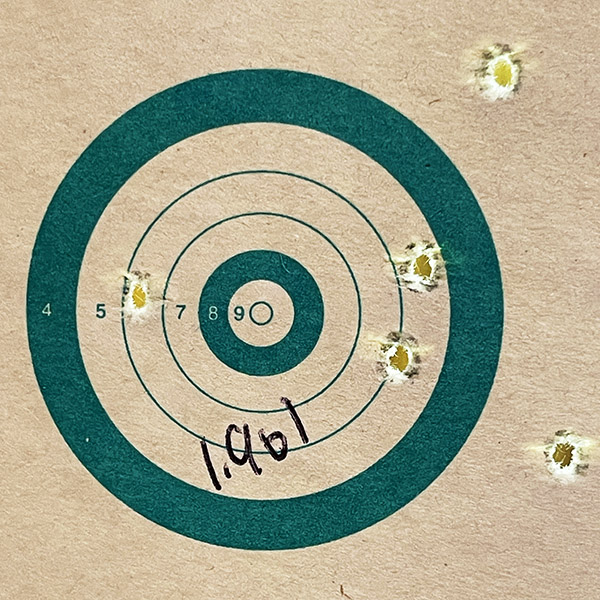
As you can see, they are what we in the engineering world would call lousy. The groups would vary, seldom going as low as that 1.041-inch group you above. Mostly they were awful.
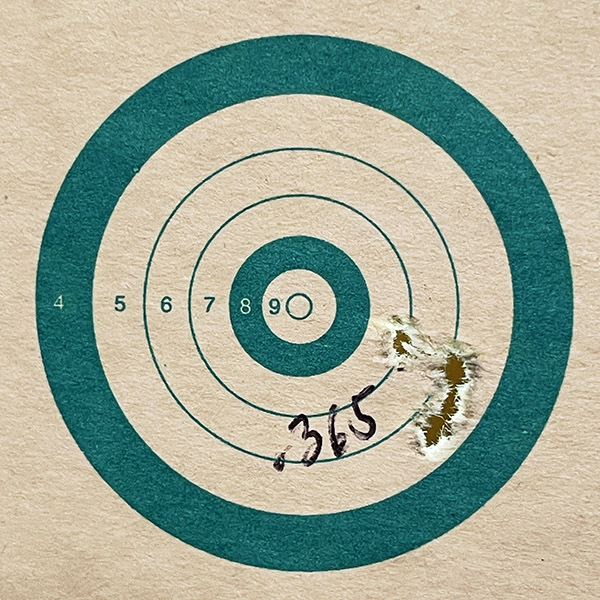
I then installed a 0.002-inch trigger shim on the Model 504 and I tried it again. Wow! Look at this!
A dramatic and immediate improvement with the 0.002-inch bolt shim. This first group with the bolt shim installed was shocking. It got even better (see below).The next group from the Model 504 with the bolt shim. I’m a believer.
When I saw those groups through the 12X Weaver scope on my Model 504, I couldn’t believe what I was seeing. In my mind, I could hear Lance’s calm voice in our recent telephone conversation telling me there’s no guarantees, but folks say they work. Indeed they do!
CZ452 Varmint
I was blown away by the Model 504’s improved accuracy with the addition of the 0.002-inch bolt shim, so I wanted to try it on the CZ.
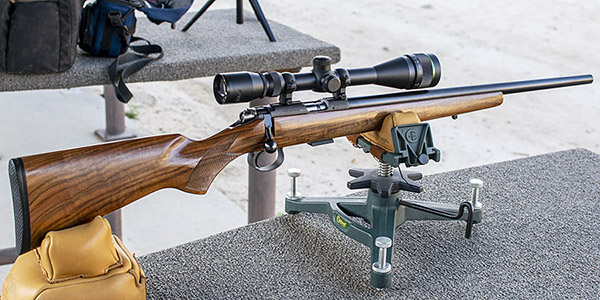
Another pretty rifle: The CZ 452 Varmint.
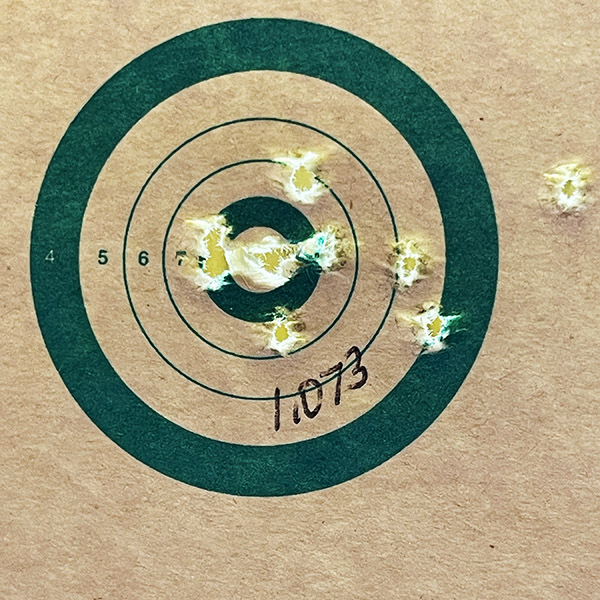
The CZ has always shot better than the Model 504. Here’s a typical 10-shot group with the CZ452 before I installed the bolt shim:
I meant to shoot a 5-shot group before installing the bolt shim, but I shot 10 instead. It’s a typical group from the CZ before I installed the bolt shim.
What you see above is what the CZ would do at 50 yards with Eley Target ammo in my hands. Sometimes it would do a little better. Sometimes it would do a little worse. I’m not that great a shot; other people could probably do better. But it’s typical for me. I wanted it to do better.
The TriggerShims 0.002-inch bolt shim went into the CZ and again, my response was: Wow!
One little tiny 0.002-inch bolt shim and voila!Someone once said only accurate rifles are interesting. These two rifles suddenly became much more interesting with the addition of TriggerShims bolt shims.
The Bottom Line
As the saying goes, your mileage may vary. But I’m convinced: Bolt shims work. I might be able to improve my groups even more if I experimented a bit with different shim thicknesses, but I’m more than pleased with what I saw after trying my simple and unscientific “install the 0.002-inch shim and see what happens” approach. This really is a great product. If you want to improve a bolt action .22 rifle’s accuracy, check out TriggerShims. You can thank me later.
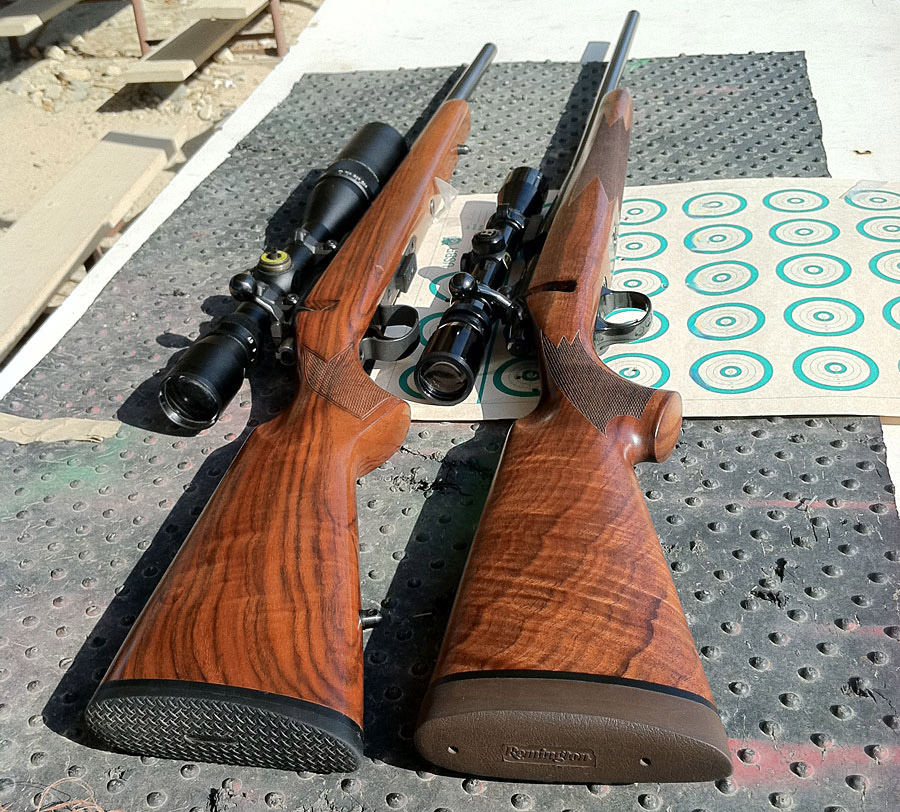
Pretty Wood
People sometimes ask how I find guns with exceptional wood. It’s easy. I can’t pass a gun shop without stopping, and I spend a lot of time on gun forums. Every once in a while, I’ll see a rifle with walnut that speaks to me. The Model 504 you see here came from First Stop Guns (they’re in Rapid City, South Dakota) when Susie and I were out there touring that part of the country. I spotted the CZ 452 on a forum post and I sent a message to the owner asking if he would sell it to me. The first answer was no, but a year later the owner contacted me and asked if I was still interested. You know the answer to that one.
Pretty lumber indeed, and now they are both shooters. The CZ 452 is on the left; the Custom Shop Model 504 is on the right. You don’t often see .22 rifles with wood like this. For that matter, you don’t often see centerfire rifles with this kind of wood, either.
At this point in my life, I realize it’s an itch I’ll probably never get to scratch: The need to own a Moto Guzzi. It started back in the early 1970s, when I was exploring rural northern New Jersey on my ’71 CB 750 Honda (yes, there were and still are rural parts of New Jersey). I had stopped for gas at a sort of combination general store and gas station when a pair of full dress Moto Guzzis rumbled by. I heard them first, before I saw them, and from the sound I thought it would be a couple of Harleys. Moto Guzzis sound a lot like Harley-Davidsons. Moto Guzzis were new in America, and these were the first I had ever seen. They burbled on by, leaving a lasting image and their captivating ExhaustNotes in my mind.
Ewan and Charlie, at it again. The Long Way Home is a good show. It somehow felt much more real watching these guys on older bikes battling the weather and old bike breakdowns. I enjoyed this one much more than the other McGregor and Boorman series.
So, about this sign from God business: A few days ago while channel surfing on Apple TV+, I saw another “Long Way” series from Ewan McGregor and Charlie Boorman. I had seen the other series from Ewan and Charlie and thought they were silly, almost an affront to real adventurers, guys like Dave Barr who had ridden around the world. You know, two dilletantes with more money than talent cashing in on the adventure motorcycle craze, versus Dave Barr, the real deal, a guy who rode around the world on his own dime on a trashed-out old Super Glide, one of the most unreliable motorcycles ever. Not finding anything more interesting as I brainlessly surfed through Apple’s offerings, The Long Way Home got a click from me. This time, the boys were on old bikes, an old BMW boxer and an old Moto Guzzi. It was the Guzzi that got my attention. I’m watching (and enjoying) the series. I’ll have a review of it posted here on ExNotes in the near future.
There can be no doubt about this shop’s focus on Moto Guzzis.
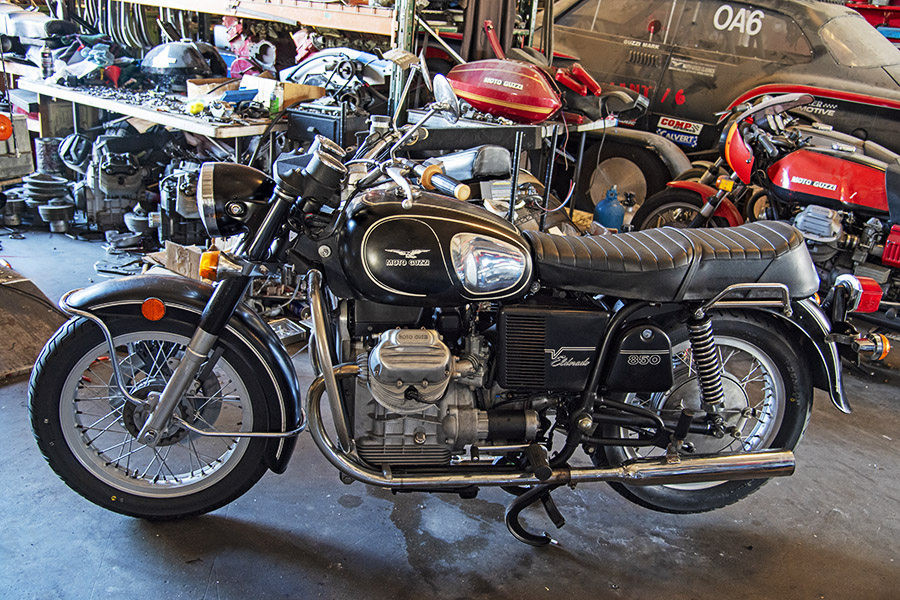
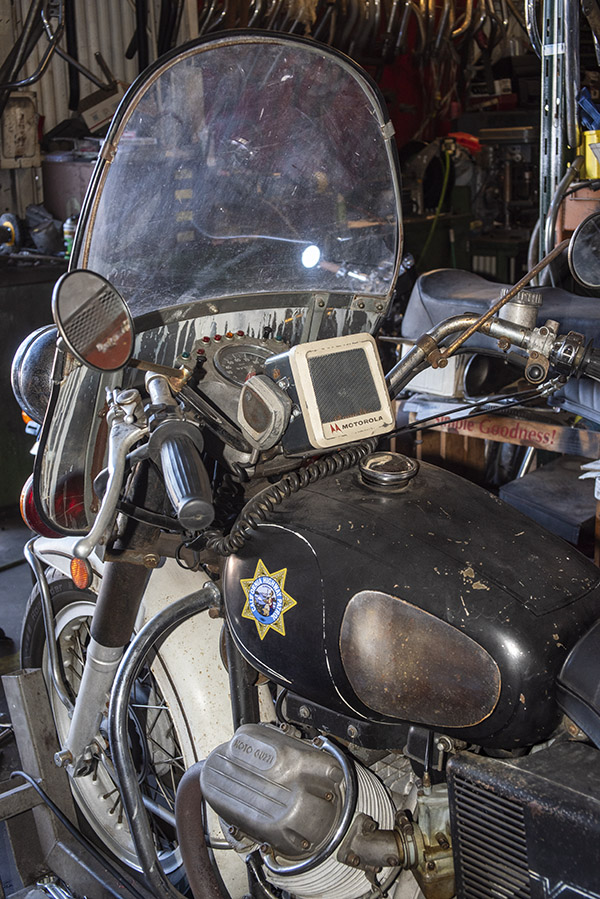
Then another thing happened. I visited Moto Guzzi Classics in Signal Hill and found myself in a sea of old Guzzis, like the stunning El Dorado you see at the top of this blog. Several of the old Guzzis were former police bikes, and I’ve always had a fascination for police motorcycles (I wrote a book about police bikes a few years ago).
Indeed they are.
Mark, the proprietor, specializes in bringing old Guzzis back to life. Mark doesn’t usually do 100-point restorations; Moto Guzzi Classics’ forte is in resurrections. You know, finding old bikes and getting them running again, kind of like Joe Gresh has done on his Zed and is currently doing on his Honda Dreams.
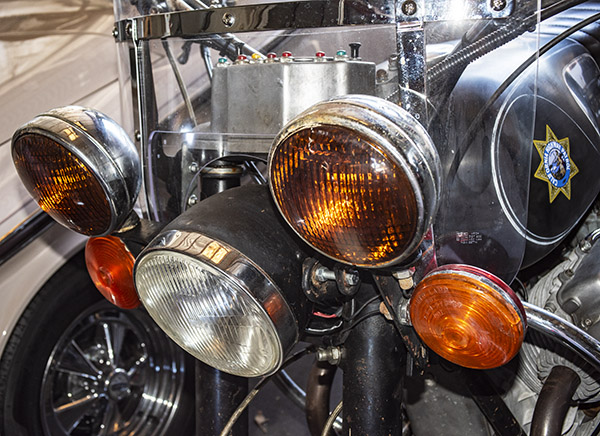
Mark let me snap a few photos of the 850 El Dorado and a former CHP police bike in his shop when I visited recently. It sure was fun.
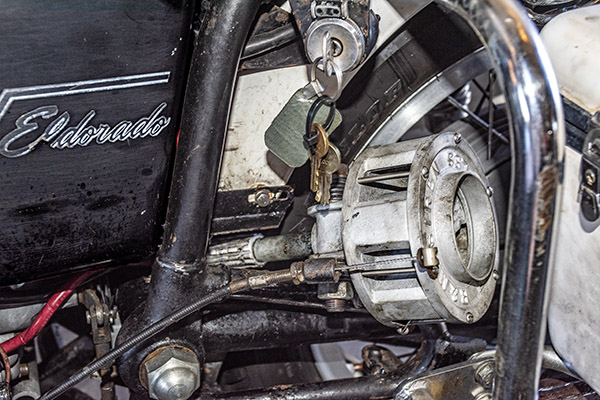
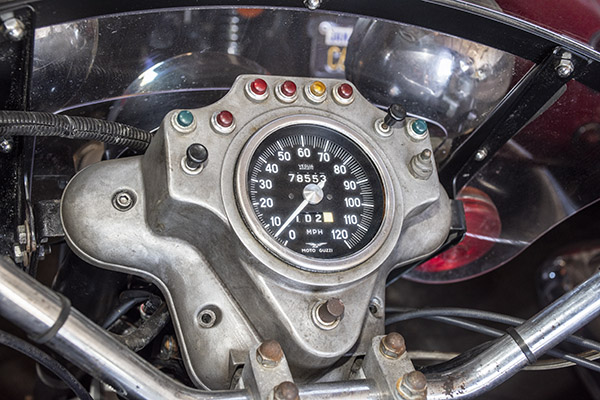
Patina to an exponent. Mike Wolf and Joe Gresh would love this place.This is a good portrait-oriented moto photo. I like getting pictures framed this way, capturing both the engine and the gas tank.Another photo of the CHP Moto Guzzi. It’s strange, realizing that that guys who rode these bikes are all retired now.An old-school siren. It was powered by the rear tire. When the officer actuated the cable, the siren’s drive rotated into the rear tire. I used to have bicycle siren on my Schwinn when I was a kid that worked the same way (at least until the neighbors told me to knock it off).The El Dorado’s certified speedometer. These were calibrated at regular intervals in case an offender challenged the ticketing officer’s accuracy in court.The amber spotlights shown here were red when this bike was on active duty. Mere civilians can’t run police lights on their bikes.
So, about this sign from God business: I had to think that with all the Guzzi inputs occurring lately (The Long Way Home and the visit to Moto Guzzi Classics in Signal Hill), maybe it was a sign. Maybe there’s a Guzzi in my future? I thought so, until I realized there just aren’t any dealers around me to work on them. I think there’s one in Glendale, but Gresh and I had a bad experience with the Enfield provided by that dealer for our Baja adventure a few years ago. I think the next closest one is 120 miles away in San Diego. That was enough to sour me on the idea of a new Guzzi. But maybe a used one? Hey, who knows?
I think the lucky amongst us are born with a lust for nature and a deep-seated bug to get to as many National Parks as possible. Out of 63 National Parks, I’ve been to 41 so I’ve still got some work to do. I’m not helping with this road trip as it is a return to some of my favorites.
In Part I, we visited Mesa Verde National Park then made our way to Ouray, Colorado. That’s where I will pick up my story.
Tom is a late riser; I’m up before sunrise whether I’ve gone to bed with the sunset or stayed up past midnight. This morning was no different, and yet it was. Right before dawn, I awoke to a single gunshot, adrenaline pumping, I waited for another shot or noise from the distant camper. Drifting back to sleep I wondered what had warranted the single shot? Mystery solved, a camper nearby forgot and left out his cooler, along comes mama bear with two cubs in tow. Let me tell you, once a bear is in your cooler they are not leaving until they have finished with everything you got! Well, a good story for the camper and a reminder that a bear that interacts with humans is often a dead bear so keep your campsite tight!
Finally crawling out of the tent just as the sky started to lighten, I brewed a cup of coffee with my AeroPress and built my last fire in Colorado. Taking some time to watch the sun start to light up the tips of the peaks above our steep and narrow valley floor, thinking about the day to come.
Coffee consumed and the fire dying down I got to work packing up the camp, leaving only the tent with a lightly snoring man to complete the breakdown. Tom eventually made it out of the tent with the promise of hot coffee and cold juice to get his day rolling.
While a bit sad to leave the alpine world of Ouray, we had the promise of a hotel room to wash off the stench of five nights camping and hiking to keep us motivated to knock out this day of driving to Utah. We drove out of Ouray on the last of the Million Dollar Highway, Route 550 towards Ridgway picking, up Route 50 through Fruita and on to Route 139 to our destination of Vernal, Utah.
A shower along with another fine dinner of enchiladas and the most powerful margarita I’ve ever had, made for a great evening in this little town. If you ever find yourself in Vernal, well I assume you are lost or really like dinosaur tracks but hey, if you do stay there the nicest staff is at the Wyndham Micro Hotel and if you love authentic Mexican food, then I highly recommend a visit to Plaza Mexicana on Main Street. Don’t forget to take your picture with the giant pink dinosaur before leaving town!
After a restful night and a full stomach, we continued north toward Pinedale, Wyoming, planning to camp before hitting the Tetons. This would set us up for an early arrival to Grand Tetons the next morning, allowing an extra few hours in the day to explore the park.
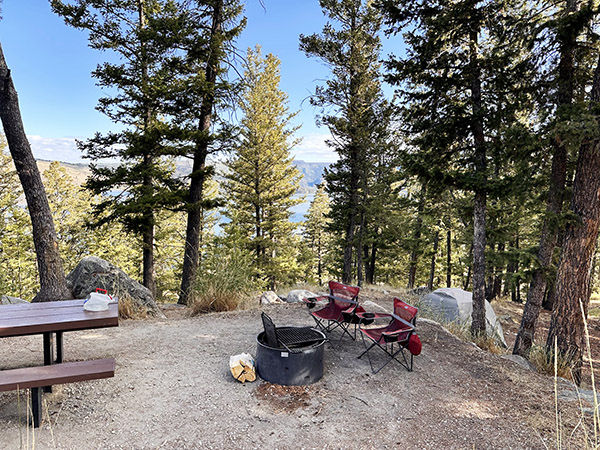
We pulled into Pinedale, stopping to restock our wine supply and invest in a decent bottle of single malt Scotch with the good luck of having a ranger station next door. The first ranger, an older woman, said no way will we find a campsite, but a younger gal told us to ride up the road to Lake Fremont Campground.
Score! This place has earned a spot on my list to return to. Perched in a shaded camp spot overlooking the lake we had a lazy afternoon watching the clouds move across the foothills, threatening a rain that never came.
With the Tetons looming ahead and Yellowstone just a drive away, we settled in for the night—excited for what the next day would reveal. More on that in Part III.